 UPDF
UPDF
 UPDF for Windows
 UPDF for Mac
 UPDF for iPhone/iPad
 UPDF for Android
 Nomostar
 UPDF AI Online
 UPDF Sign
 IvyCraft
 Edit PDF
 Annotate PDF
 Create PDF
 PDF Form
 Edit links
 Convert PDF
 OCR
OCR PDF to Word
 PDF to Image
 PDF to Excel
 Organize PDF
 Merge PDF
 Split PDF
 Crop PDF
 Rotate PDF
 Protect PDF
 Sign PDF
 Redact PDF
 Sanitize PDF
 Remove Security
 Read PDF
 UPDF Cloud
 Compress PDF
 Print PDF
 Batch Process
 About UPDF AI
 UPDF AI Solutions
 AI User Guide
 FAQ about UPDF AI
 Summarize PDF
 Translate PDF
 Chat with PDF
 Chat with AI
 Chat with image
 PDF to Mind Map
 Explain PDF
 PDF AI Tools
 Image AI Tools
 AI Chat Tools
 AI Writing Tools
 AI Study Tools
 AI Working Tools
 Other AI Tools
 AI Bookmark Generation
 AI Bookmark Summary
 AI Watermark Generation
 AI Background Generation
 AI Sticker Generation
 AI Stamp Generation
 AI Editing Suite
 UPDF Copilot
 AI Page Management
 AI Semantic Search
 PDF to Word
 PDF to Excel
 PDF to PowerPoint
 Enterprise Solution
 Enterprise Sign
 Enterprise AI
 Enterprise Plan
 Enterprise User Guide
 Enterprise Webinar
 IT
IT Education
 Construction
 Financial Service
 Healthcare
 Insurance
 Legal
Legal Manufacturing
 Government
 Researchers & PhDs
 Solopreneurs & Freelancers
 Lawyers & Legal Professionals
 Real Estate Agents & Brokers
 Education Solution
 Customer Stories
 User Guide
 UPDF Tricks
 FAQs
FAQs UPDF Reviews
 Download Center
 Blog
Blog Newsroom
 Tech Spec
 Updates
 UPDF vs. Adobe Acrobat
 UPDF vs. Foxit
 UPDF vs. PDF Expert

Quick Answer:
Jupyter Notebook is a web-based notebook application for someone working in data science. You can have a complete record of all your sessions including- codes, narrative texts, equations, and output. Sometimes, you have taken all the records, but you want to save or share them as a PDF for convenience. Here, we will discuss three ways to convert notes in Jupyter Notebook to PDF.
Part 1. How to Print a Jupyter Notebook as a PDF?
Browser printing is the fastest method when the notebook already renders correctly. It does not require TeX, Pandoc, or a command-line conversion.
Best for:
- quickly creating a visual PDF from the notebook currently open in Jupyter Notebook or JupyterLab.
Not for:
- a wide notebook that is already cut off in print preview; the browser will not automatically redesign long code lines or horizontally scrolling tables.
Step 1. Print Notebook
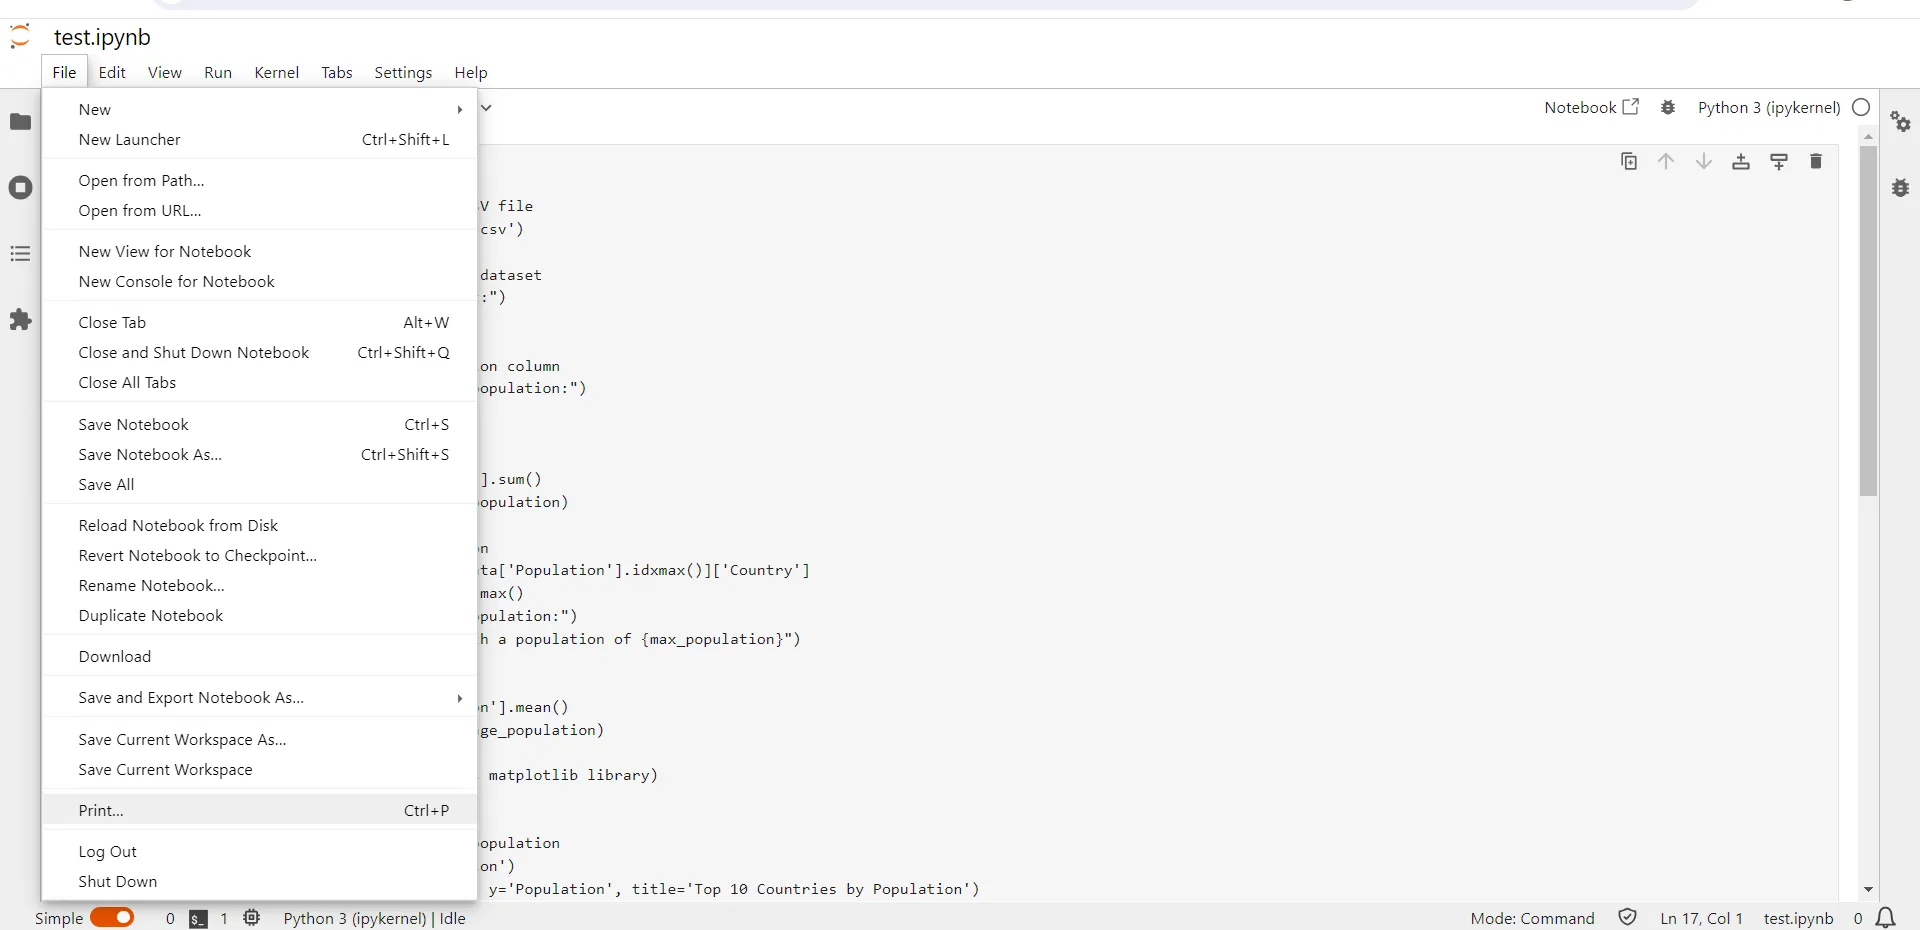
Go to the "File" menu and hit the "Save" option. Once saved, again in the "File" menu, select choose the "Print" option.
Step 2. Save Print as PDF
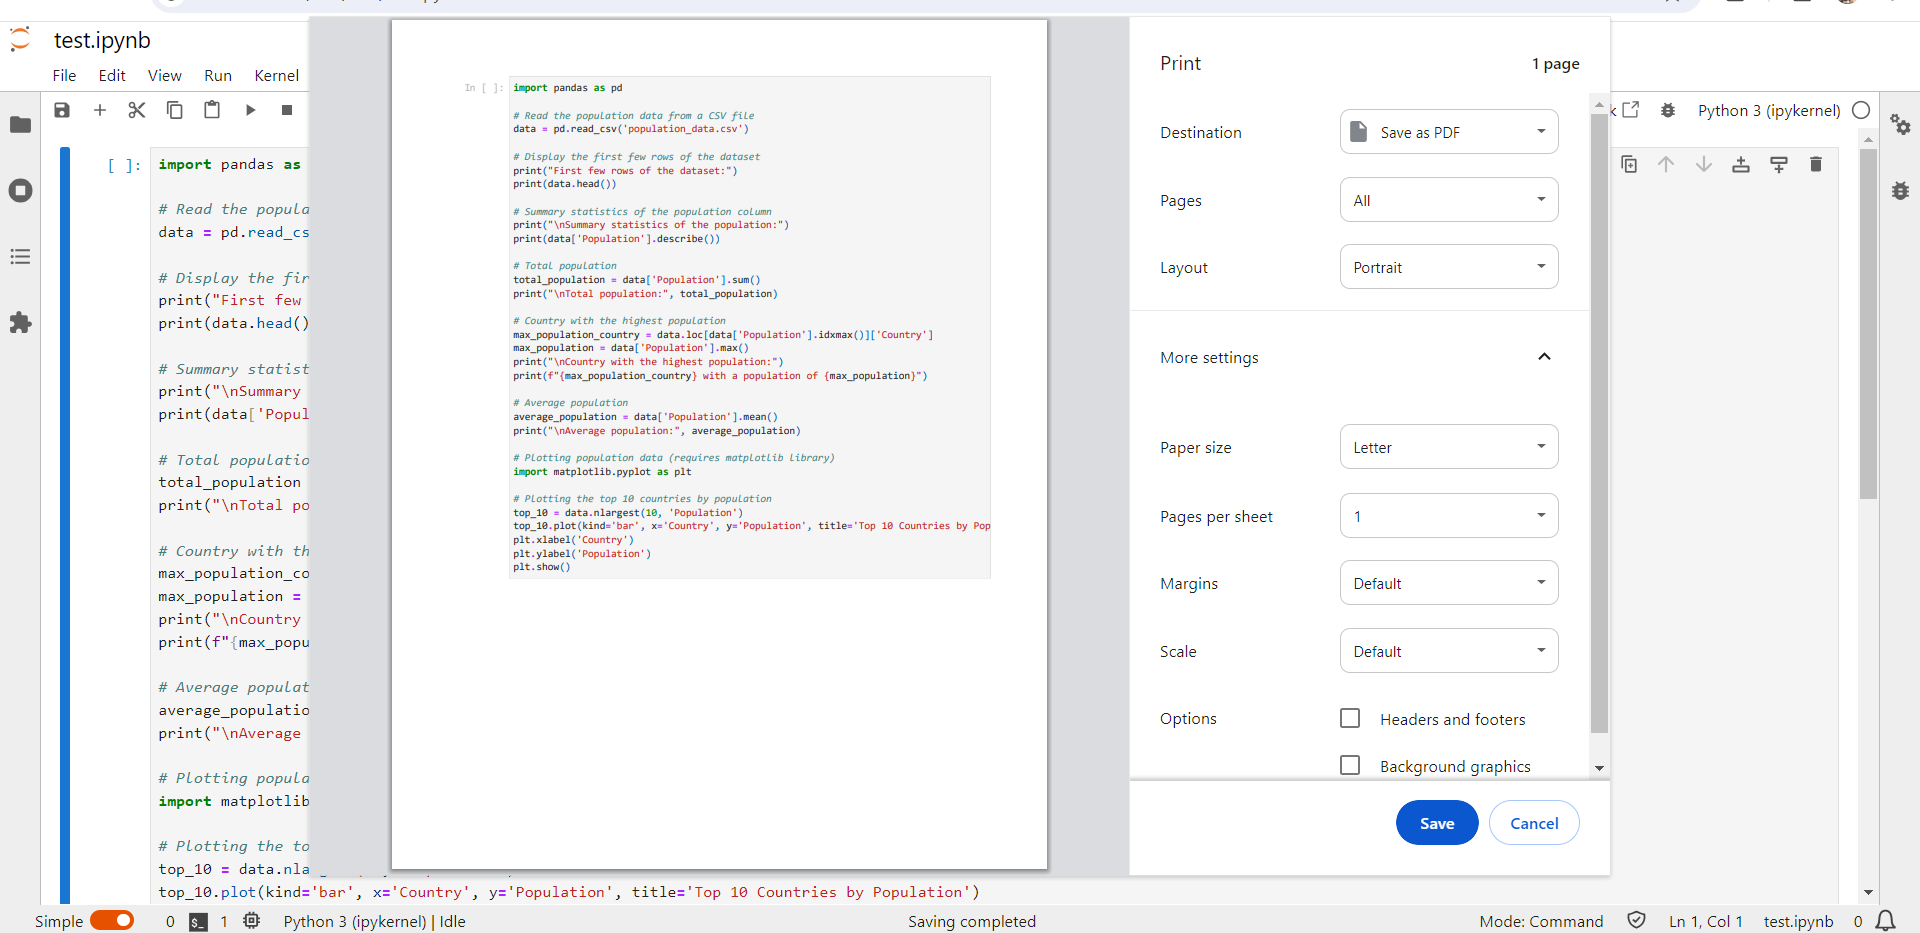
From the "Destination" dropdown menu in the print window, select "Save as PDF". Depending on your requirements, pick the layout, page size, pages per sheet, margins, scale, etc. Click on the "Save" button and you can choose the file name and the destination folder to save the PDF file.
Part 2. How to Convert Jupyter Notebook to PDF Via Screenshot?
Use screenshots only as a fallback when the notebook cannot be exported normally, the Jupyter server is locked down, or the original .ipynb file is no longer available.
Best for:
- assembling PNG or JPG captures into one readable PDF.
Not for:
- preserving selectable code, notebook metadata, runnable cells, or an accessible text layer. A screenshot-based PDF is primarily visual.
Step 1. Take the Screenshot and Save it
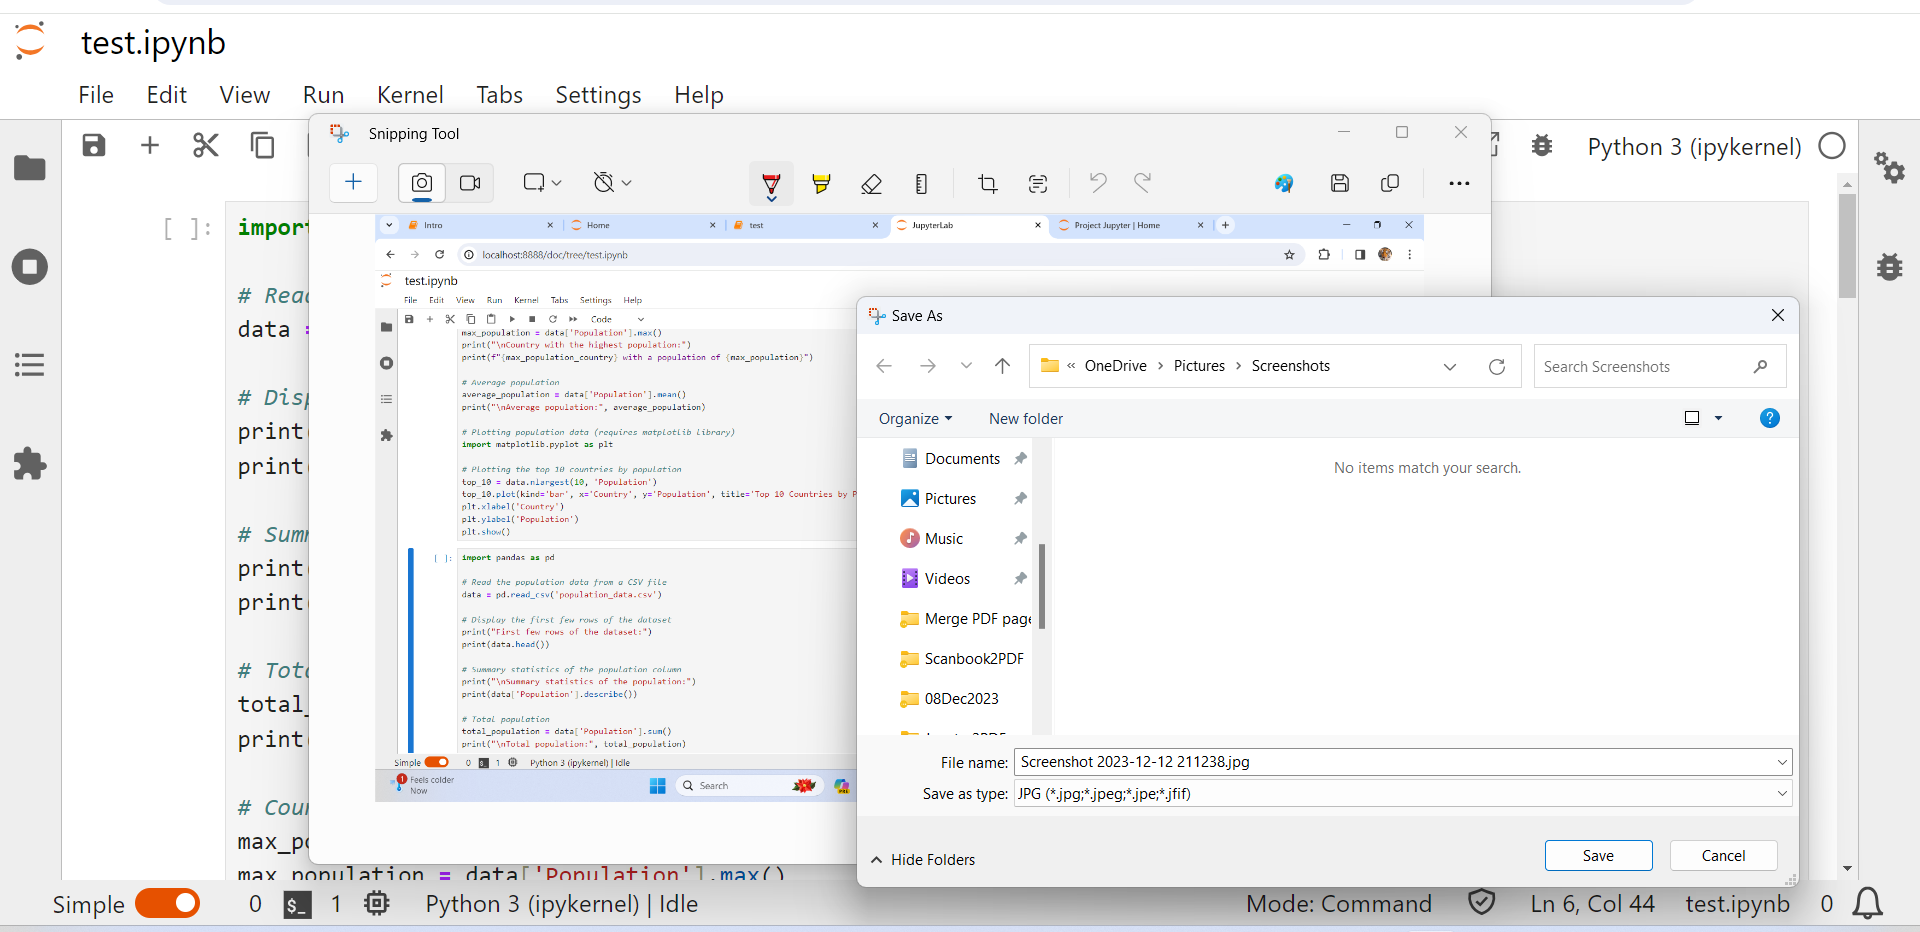
Take the screenshot by pressing the "prtsc" key on your keyboard. A screenshot will be taken. Recent versions of windows will automatically paste and save the screenshot. However, if you are using an older version of the Windows, you can paste the screenshot into any "Paint and Snip" or "Paint brush" app on your computer and save it as an image.
Step 2. Convert screenshots to PDF using UPDF
One of the easiest ways to convert an image to PDF is by using UPDF. It is a PDF reader and editor and is one of the cheap and the best option. Download UPDF by clicking here and open. From the "File" menu, select "Create > PDF from image". The UPDF will convert the image file and open it as PDF. Save the generated PDF in your folder of choice.
Windows • macOS • iOS • Android 100% secure
Part 3. How to Save Jupyter Notebook as PDF Via Download As Button
JupyterLab includes notebook export options in the File menu. PDF availability depends on the nbconvert configuration and dependencies installed on the local computer or Jupyter server.
Best for:
- users who want a menu-based export and already have the required PDF exporter configured.
Not for:
- a managed server where PDF export is missing or returns an error because TeX, Pandoc, Playwright, or Chromium is unavailable.
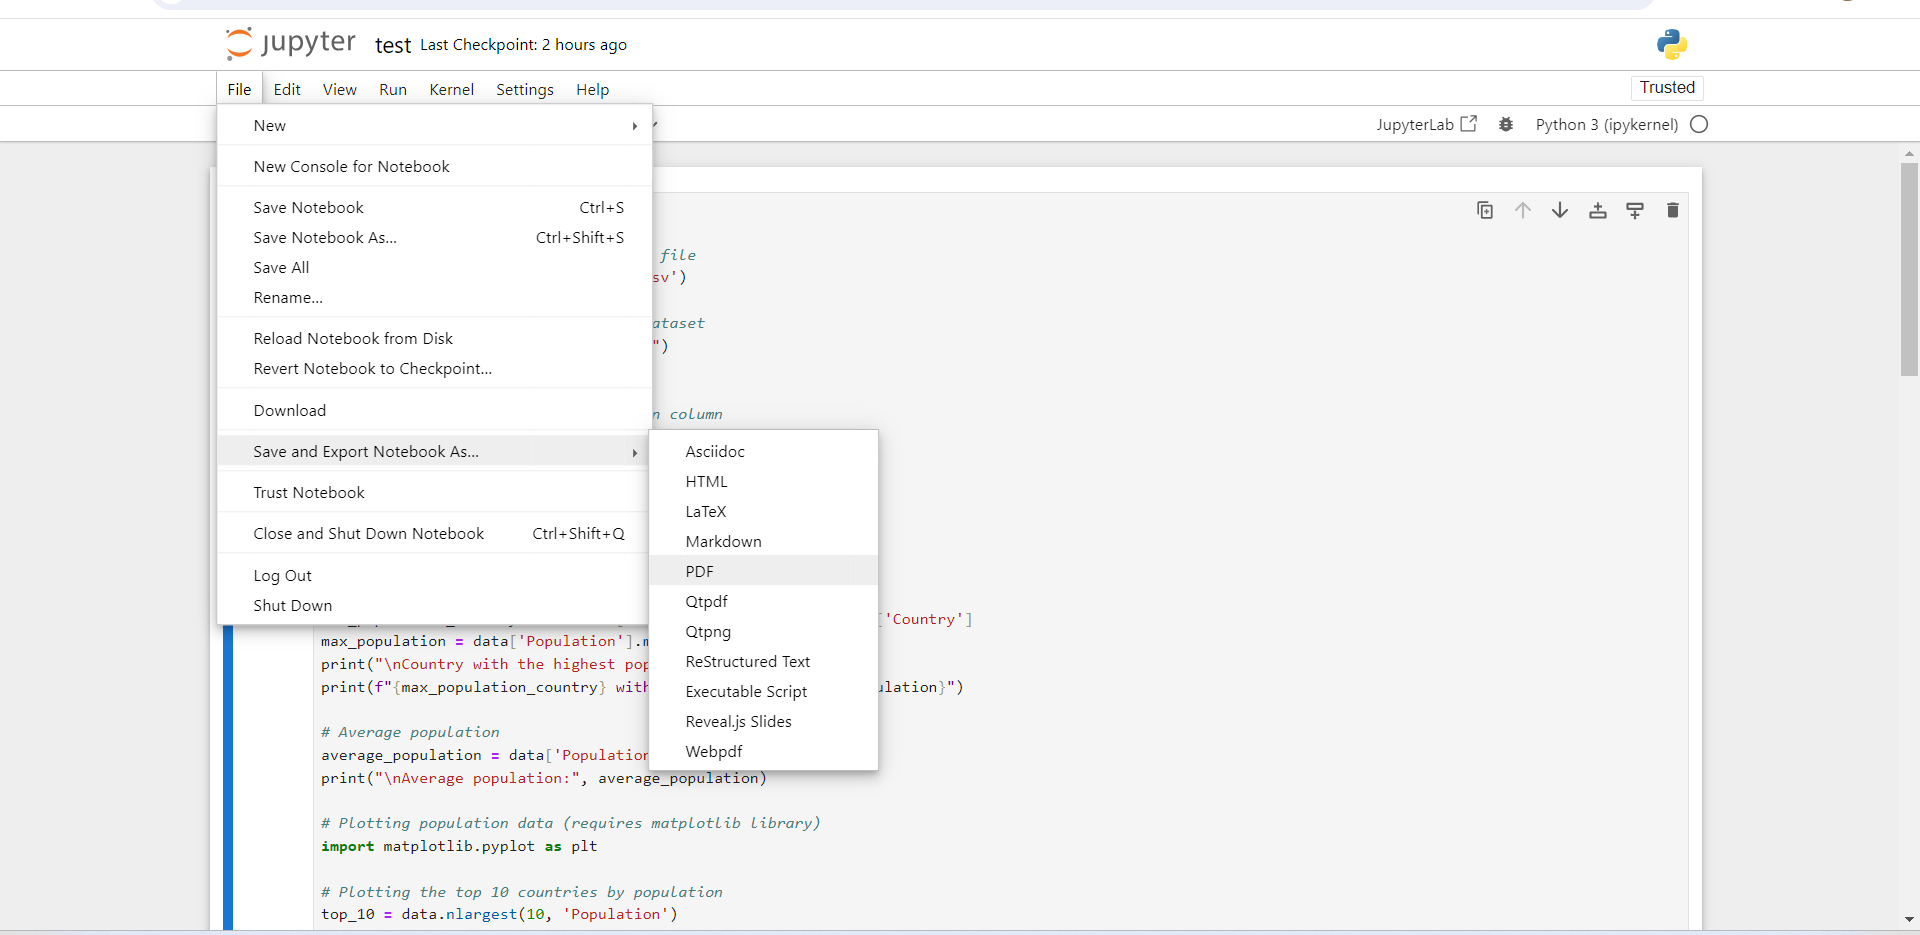
The Guide: From the "File" menu, select "Save and Export Notebook as > PDF". It will start the export and download the PDF file, which you can find in your "Download" folder. You can then copy the file and paste it to your folder of choice.
Part 4. How to Edit and Share the PDF Converted from Jupyter Notebook?
You may want to edit/annotate the PDF you just converted from Jupyter Notebook and want to share it too. If so, UPDF offers great tools to edit PDF generated directly from a text file, an image or a scanned file. You can edit text or images in your PDF file. You can also share the PDF link using UPDF. You can download UPDF now and use all the editing features.
Windows • macOS • iOS • Android 100% secure
So now, you want to know how to edit the PDF created from Jupyter Notebook? Here is the guide for you.
Step1. Open you PDF you just converted
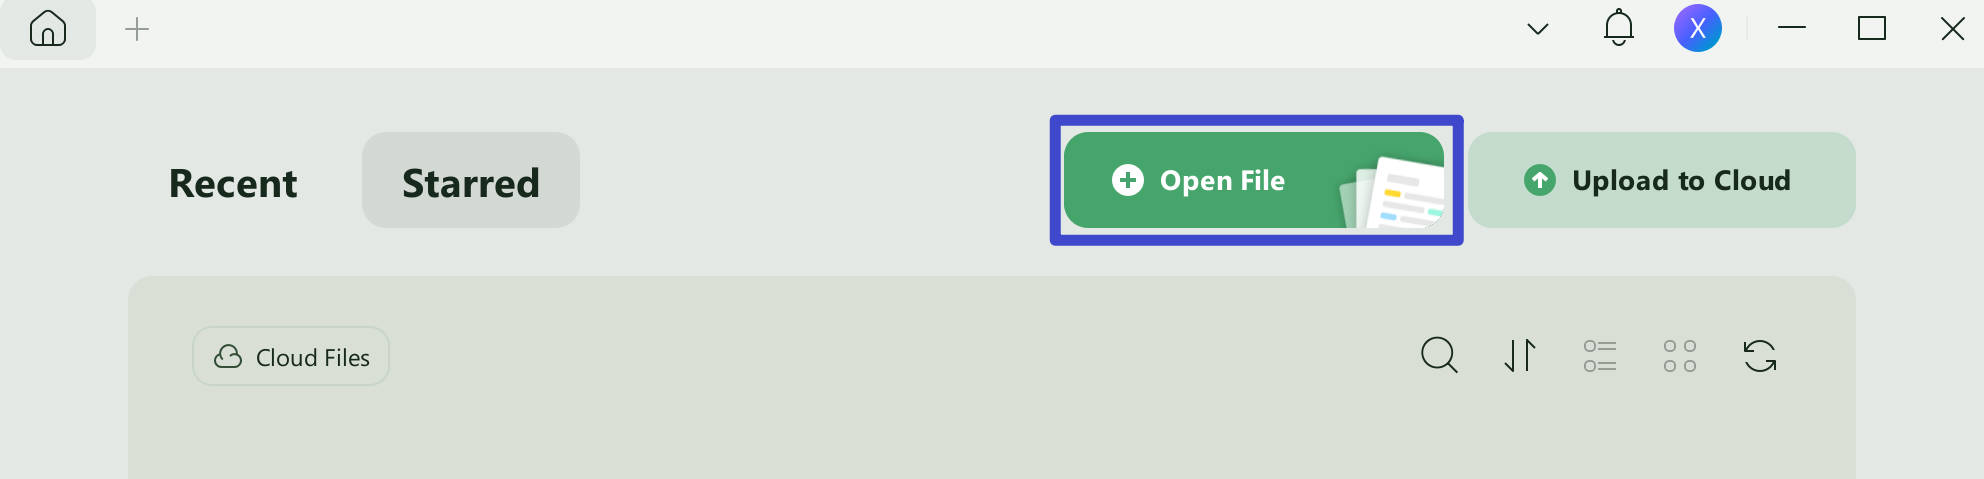
Start by opening the UPDF app and use "Open File" menu to open the PDF file.
Step 2. Edit PDF File
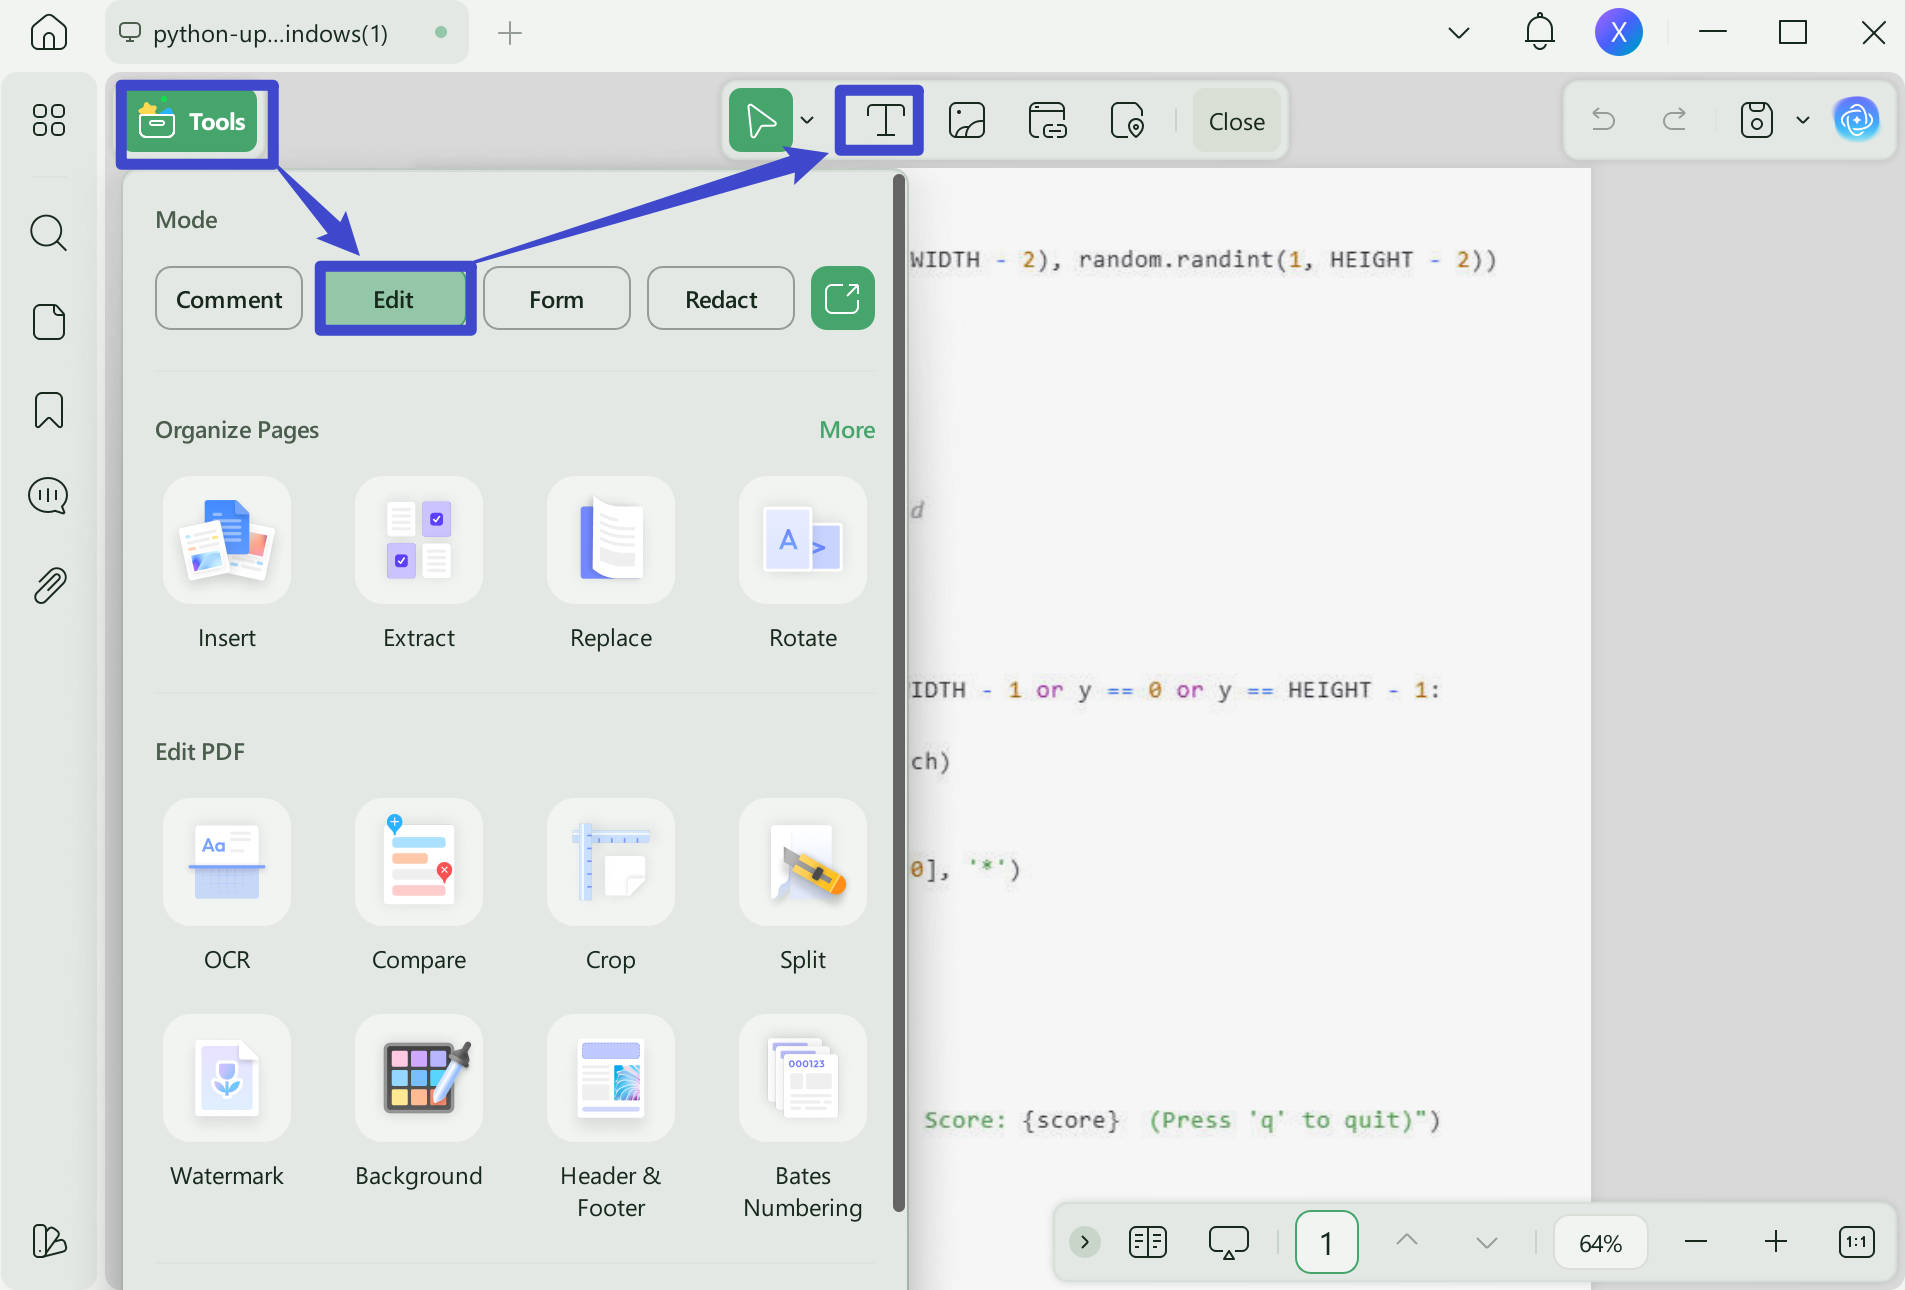
Once the PDF file is open, you will see a panel of options on the left, click on the "Edit" in "Tools" to open a banner of edit options. From here, you can click on the text or image to edit them directly. Or if you need to add new text, images, or links, you can click the icon on the top menu.
Step 3. Share Your PDF File
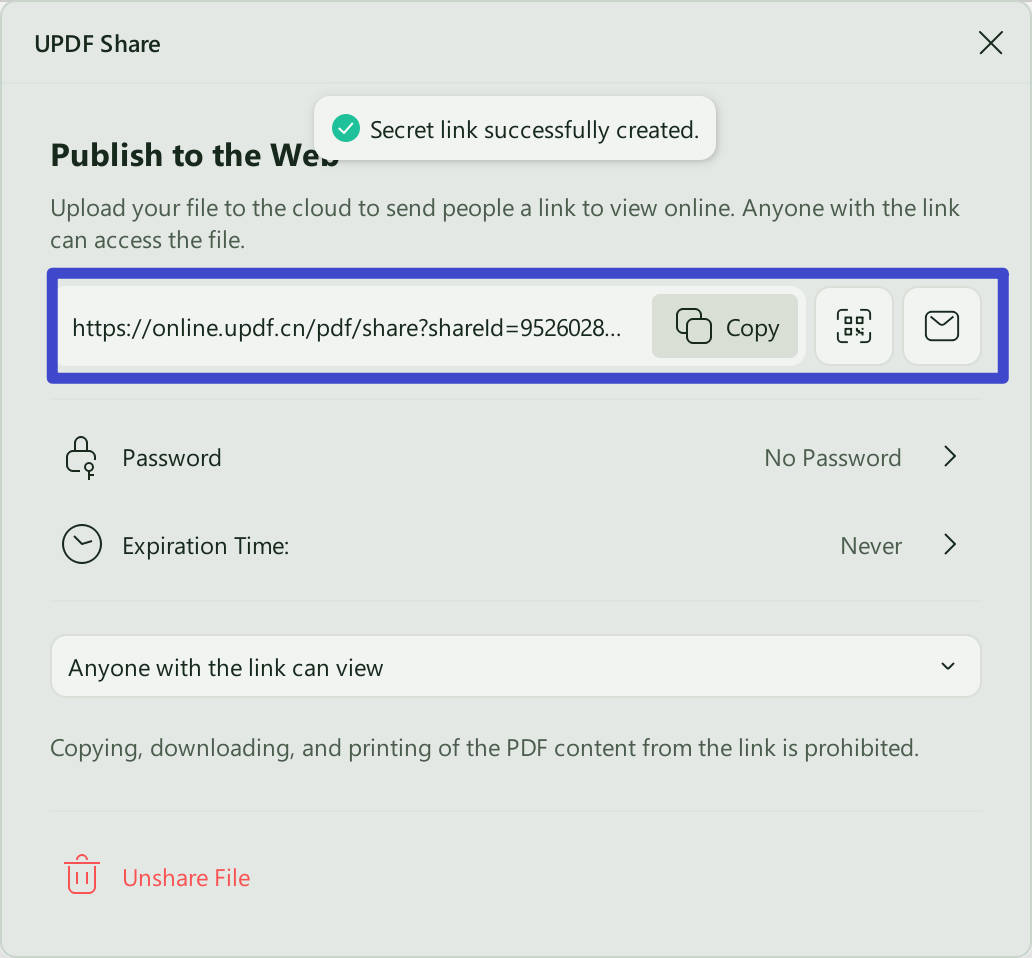
To share your file with someone, click on the "UPDF Share" icon, you can find towards the right of the screen. After creating a link, you can Copy a link to share with others or click the "Email" to share by email. Also, you can download a QR code and send the image to someone to use.
Besides PDF reading, editing, and sharing, UPDF has a range of tools like:
- Annotate PDF using pencil and eraser tool, add stickers, stamps, add attachment and comments
- Add bookmark, watermark, background, header and footer to PDF
- Organize, crop, combine pages, create and fill PDF forms
- Compress and Flatten PDF
- Protect PDF
- Print PDF
- Most importantly, UPDF has integrated AI, which can help you summarize, explain, translate, write and rewrite text
UPDF is available on Windows, macOS, iOS, and Android, with one license covering up to two desktop and two mobile devices. UPDF Pro costs US$49.99 per year, while the lifetime plan is available for a one-time payment of US$79.99. You can also use the free version before upgrading; it supports PDF editing and exporting with certain limits, including a trial watermark on saved files, two conversions per day, and five OCR uses. Check the official UPDF pricing page for the latest plan details.
FAQs
Q1: How to Convert Jupyter Notebook to PDF Without Code?
You can export Jupyter Notebook to PDF without code. Towards the right of the toolbar, there is a dropdown menu, select "Raw" from the menu. Now if you try to convert the file to PDF, it will not show the code.
Q2: How to Export Jupyter Notebook to PDF with Images?
In the "File" menu, choose "Save and Export Notebook as > PDF". The whole notebook with images will be downloaded as PDF automatically. Alternatively, you can print the notebook and then save it as PDF. The "Print" option can be found at the end of the "File" menu. Also, you can take a screenshot image and then convert it to PDF using UPDF.
Q3: How to Export Jupyter Notebook to PDF in Vscode?
Open your Jupyter Notebook files in Vscode. In the Vscode command palette write "Export" in the search bar and choose the "Jupyter: Export to PDF" option from the list. This will convert the notebook file to PDF and save it in the same folder.
Conclusion
Print the notebook from a browser when you need a fast PDF without TeX. Use JupyterLab's export menu when the server is correctly configured, and use WebPDF or the LaTeX command when you need a diagnosable, repeatable conversion. Treat screenshots as a recovery method because they sacrifice selectable text and notebook structure.
Once the exported content is complete, use UPDF for the final PDF rather than for notebook execution or conversion logic. Download UPDF for free to try preparing the Jupyter Notebook PDF for review or delivery — installation is free, and Pro removes the trial watermark from exported files.
Windows • macOS • iOS • Android 100% secure





 Enola Miller
 Grace Curry
 Enola Davis