 UPDF for Windows
 UPDF for Mac
 UPDF for iPhone/iPad
 UPDF for Android
 Nomostar
 UPDF AI Online
 UPDF Sign
 IvyCraft
 Edit PDF
 Annotate PDF
 Create PDF
 PDF Form
 Edit links
 Convert PDF
 OCR
OCR PDF to Word
 PDF to Image
 PDF to Excel
 Organize PDF
 Merge PDF
 Split PDF
 Crop PDF
 Rotate PDF
 Protect PDF
 Sign PDF
 Redact PDF
 Sanitize PDF
 Remove Security
 Read PDF
 UPDF Cloud
 Compress PDF
 Print PDF
 Batch Process
 About UPDF AI
 UPDF AI Solutions
 AI User Guide
 FAQ about UPDF AI
 Summarize PDF
 Translate PDF
 Chat with PDF
 Chat with AI
 Chat with image
 PDF to Mind Map
 Explain PDF
 PDF AI Tools
 Image AI Tools
 AI Chat Tools
 AI Writing Tools
 AI Study Tools
 AI Working Tools
 Other AI Tools
 AI Bookmark Generation
 AI Bookmark Summary
 AI Watermark Generation
 AI Background Generation
 AI Sticker Generation
 AI Stamp Generation
 AI Editing Suite
 UPDF Copilot
 AI Page Management
 AI Semantic Search
 PDF to Word
 PDF to Excel
 PDF to PowerPoint
 User Guide
 UPDF Tricks
 FAQs
FAQs UPDF Reviews
 Download Center
 Blog
Blog Newsroom
 Tech Spec
 Updates
 UPDF vs. Adobe Acrobat
 UPDF vs. Foxit
 UPDF vs. PDF Expert
UPDF is an all-in-one PDF editor with almost all the PDF features. You can use UPDF to edit, annotate, convert, compress, summarize, translate, etc.
To provide a better experience for you, we also have many hidden features. If you do not find out them, you can check out this article.
Let's get started by downloading UPDF.
Windows • macOS • iOS • Android 100% secure
1. 7 Hidden Hot Keys to Save Time
UPDF offers many hotkeys to use. And many can be found after the function names. So we will only show the ones that cannot be found directly but are important to you.
Hotkey 1. Pan PDF Page with "Space" Hot Key
By holding the "Space" key while using UPDF, the cursor turns to a hand for dragging up, down, left, and right on the PDF page to check some parts that cannot be seen on the screen or for better checking. This is exceptionally helpful while annotating or editing a PDF file.

Alternatively, you can click on the "Pan" icon at the top menu to use the pan feature.
Bonus
Hotkey 2. Zoom in and Out Quickly by Using "CTRL/Command" Hot Key or Trackpad
Hold the CTRL or Command key and "+", "-", or mouse scroll wheel, or use two fingers on the trackpad for zooming in and out of a PDF document.
At times, the text is too small to read or edit and needs to be zoomed in. Rather than wasting time switching to reader mode to find the zoom-in and out buttons, you can use the hotkeys directly.
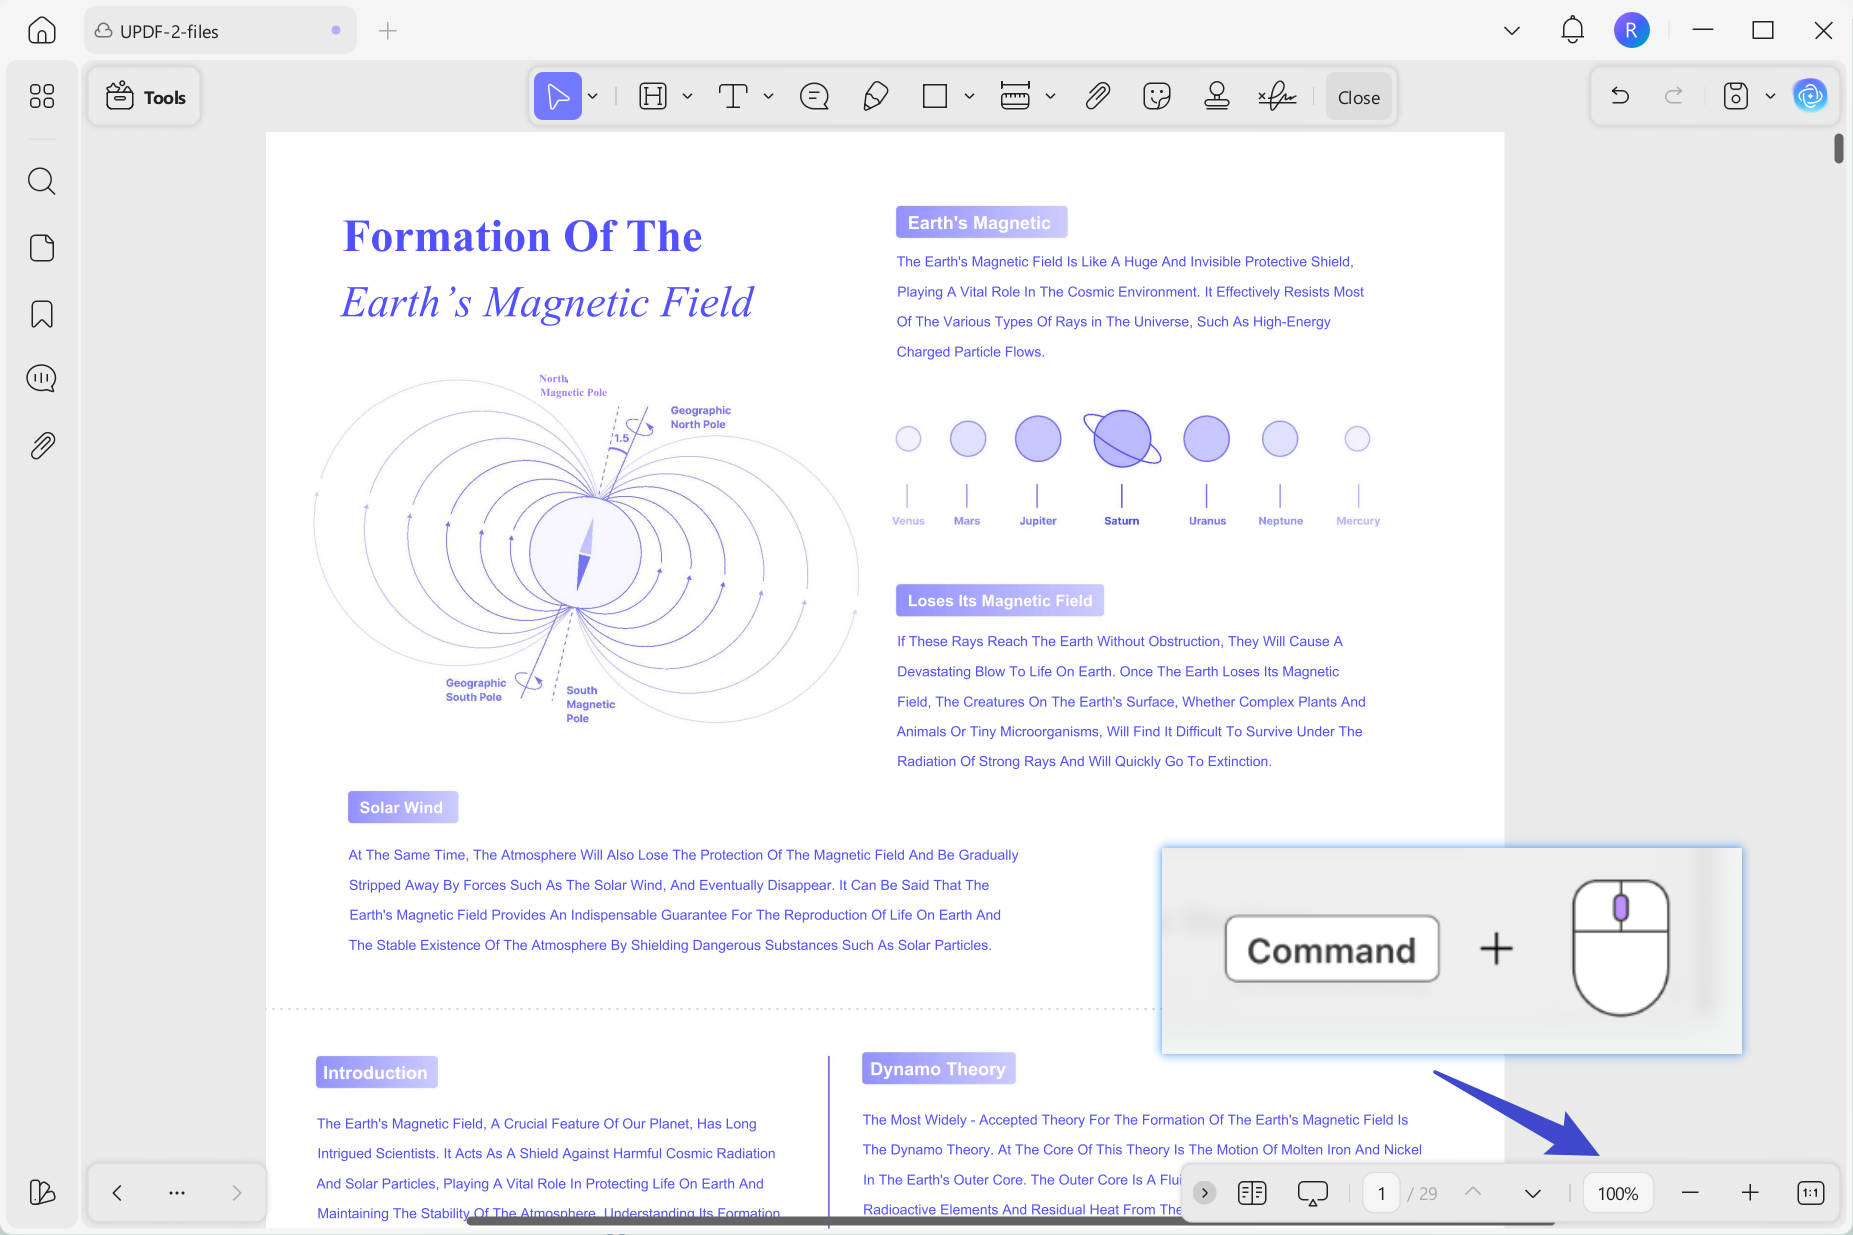
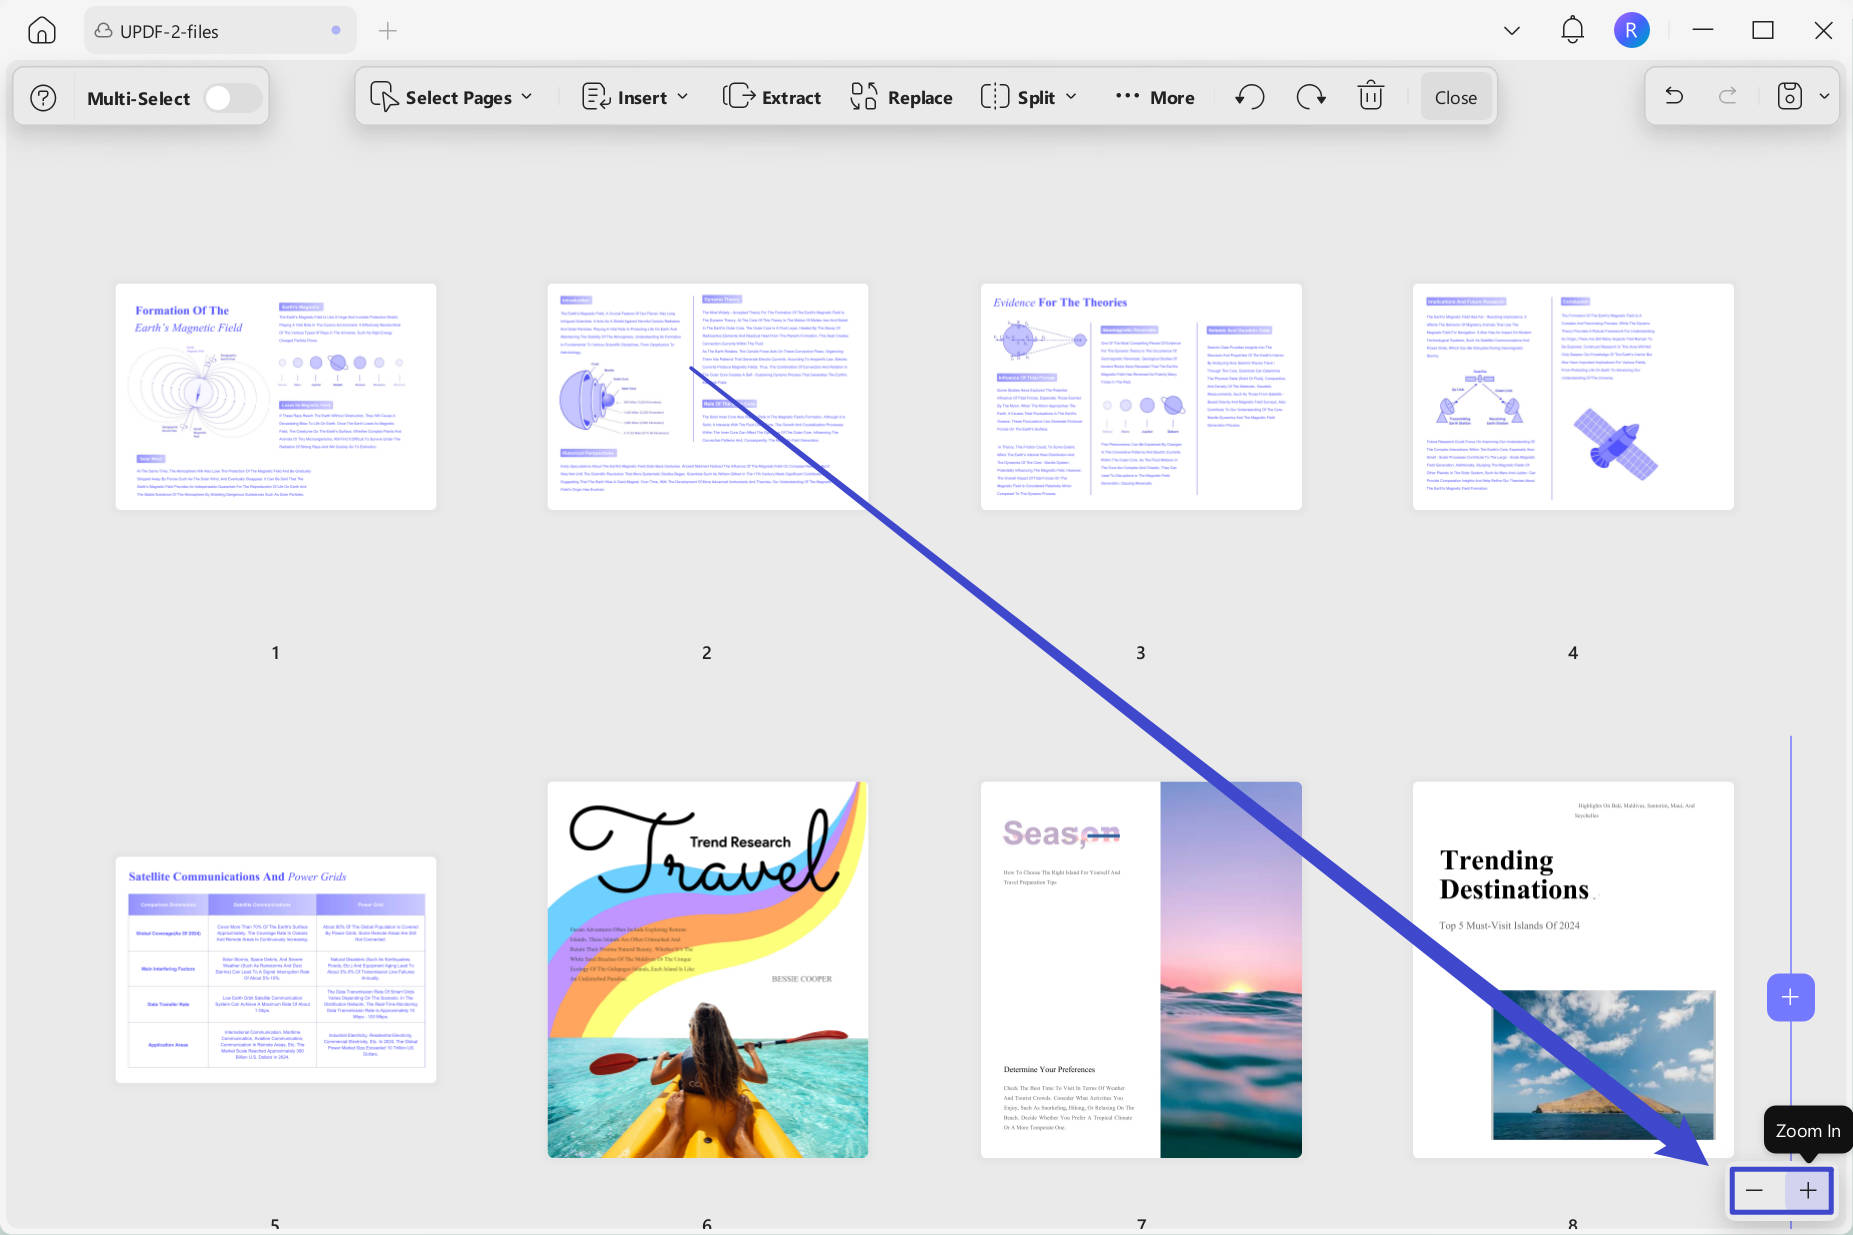
This hotkey can also be applied to zoom in and out the page thumbnails in the "Organize Pages" or you can click on the "Zoom in" or "Zoom out" at the right top side.
Hotkey 3. Double-click the Left Side of the Mouse to Add Text Comment (Mac Only)
You can double-click on the left of your mouse when you are in reader and comment mode to add new text comments to the PDF.
It is helpful when you need to add text comments to a PDF quickly when you are reading the PDF, add other elements to the PDF.
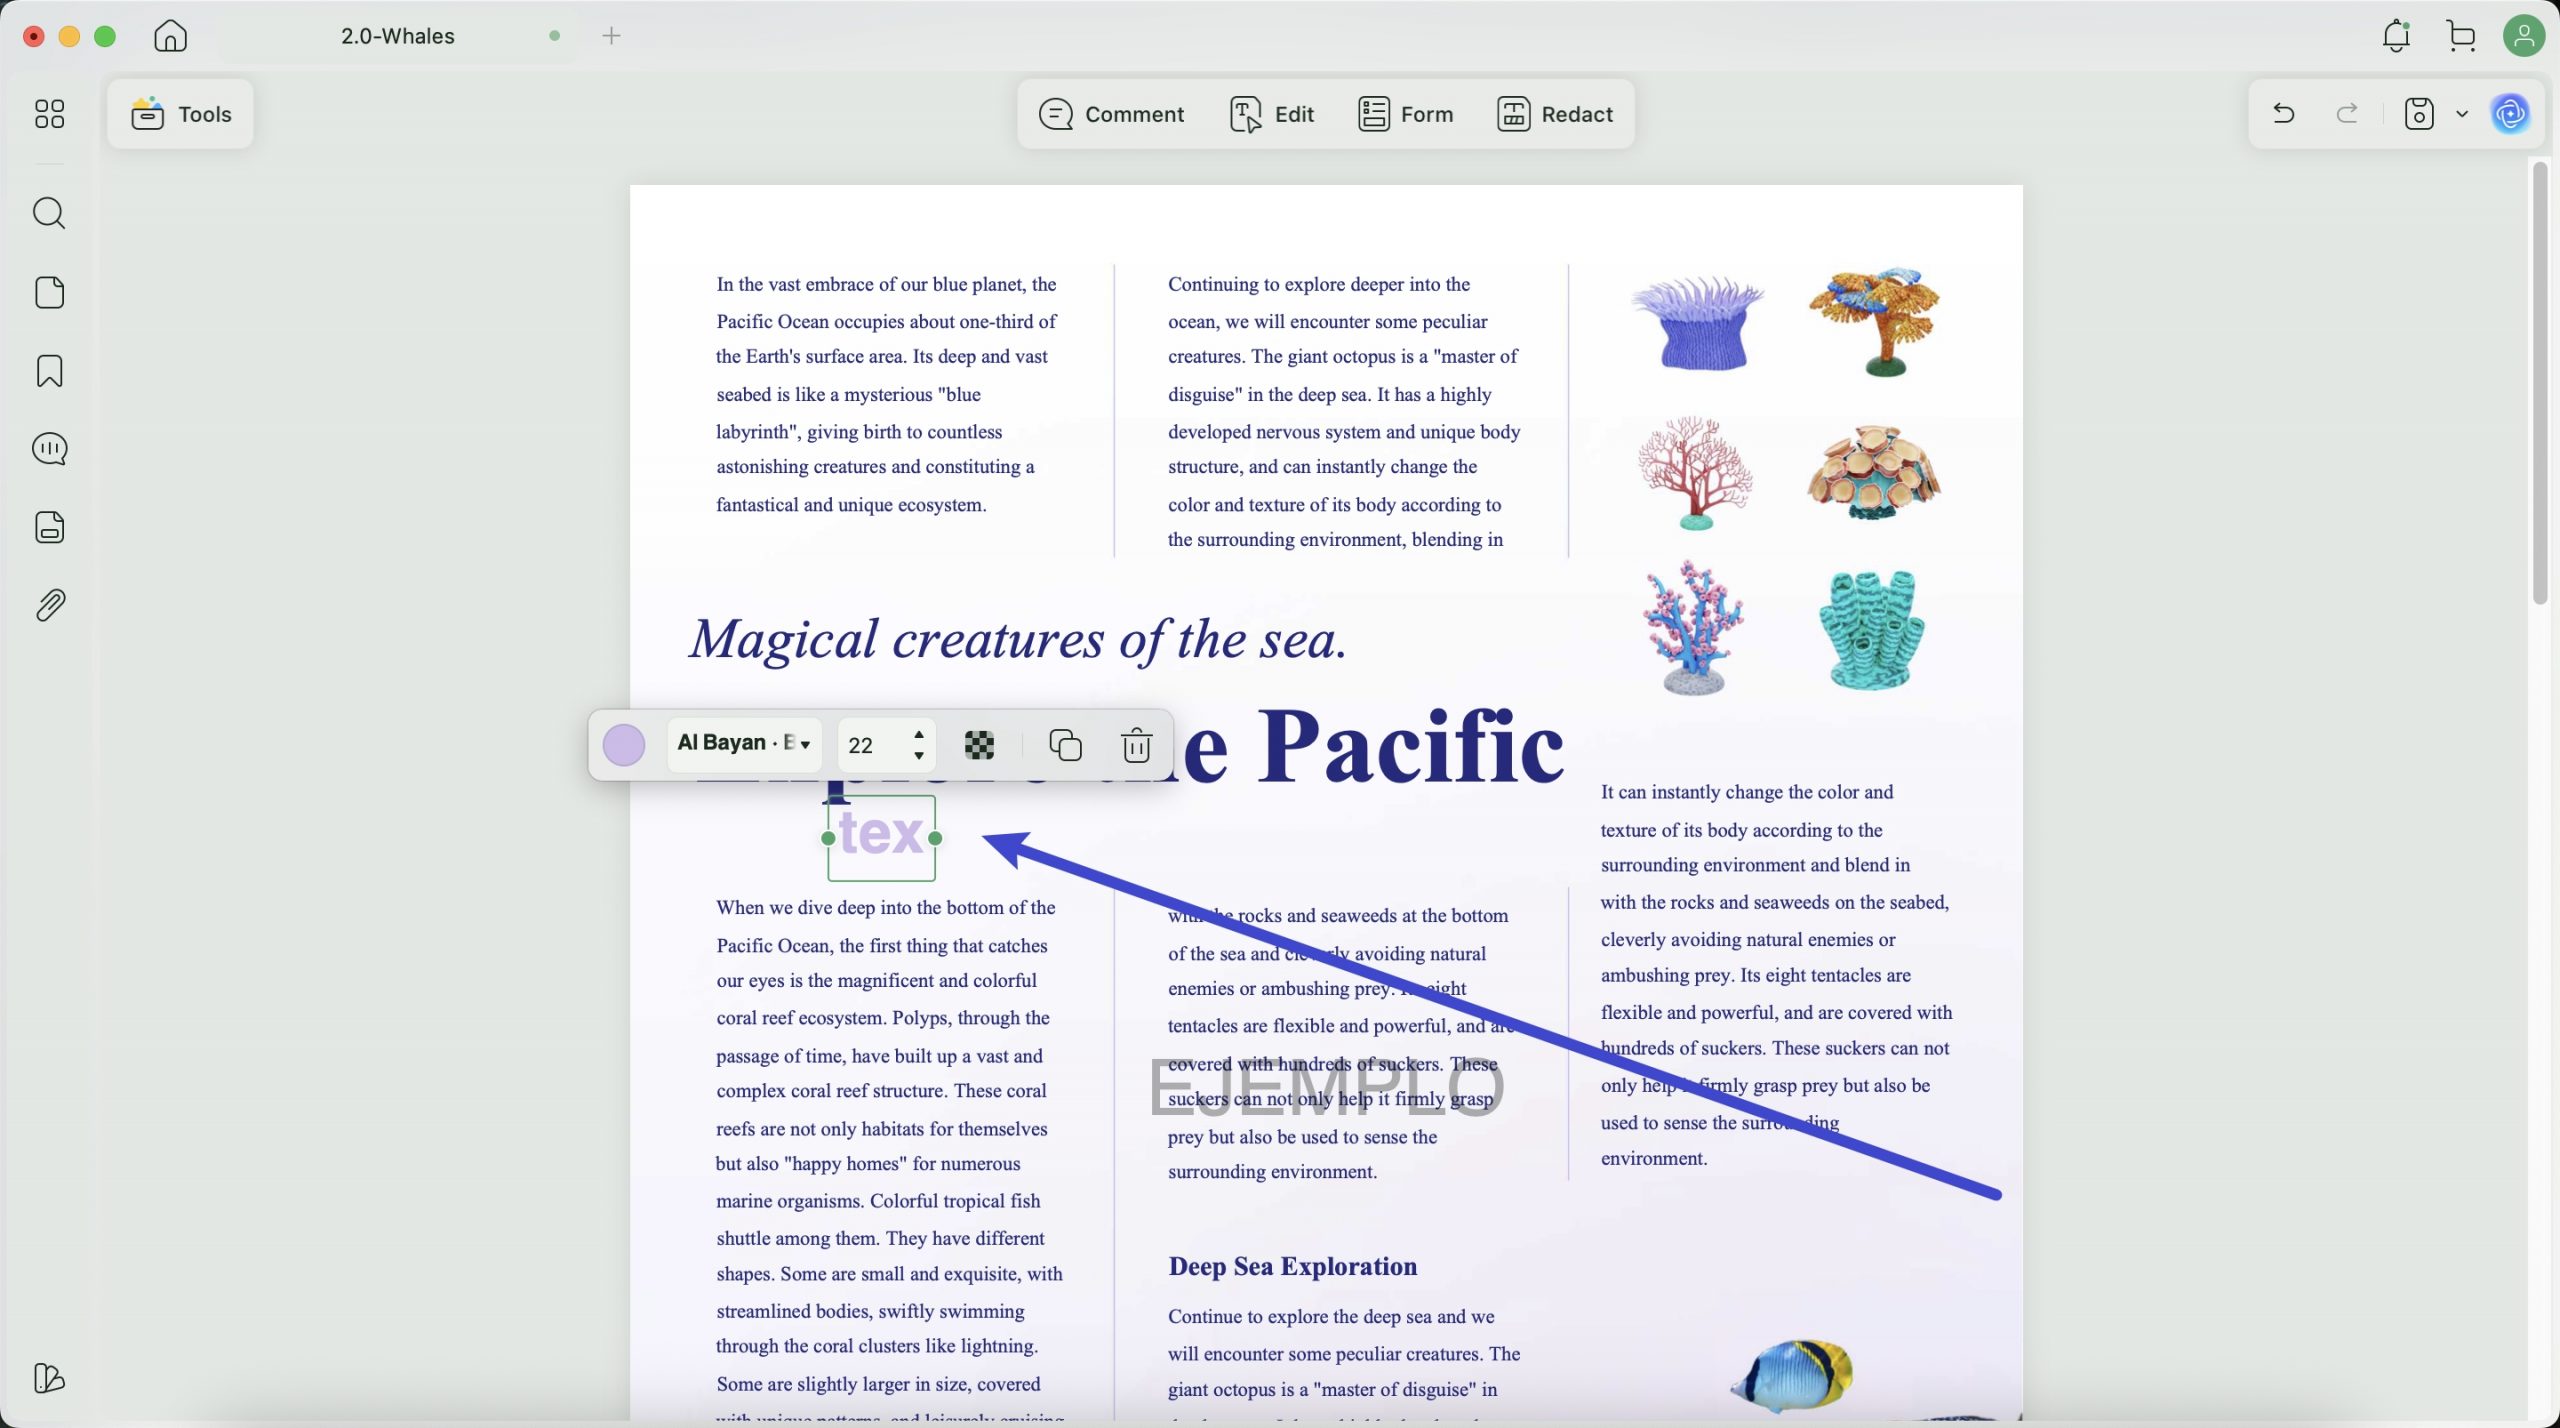
Hotkey 4. Double-Click on the Icon to Add Comments Continuously
Double-click on the comment tools icon to turn on the continuous mode of adding comments and markups on the PDF document.
How to Add Comments Continuously
- Step 1: Launch UPDF and open the document that you wish to add comments on.
- Step 2: In the window that opens, proceed to the "Comment" tab on the left panel. Proceed to select any markup tool and click to customize its properties. When it is done, you can double-click on it, it will be turned into continuous mode, after which you can add the markup continuously.

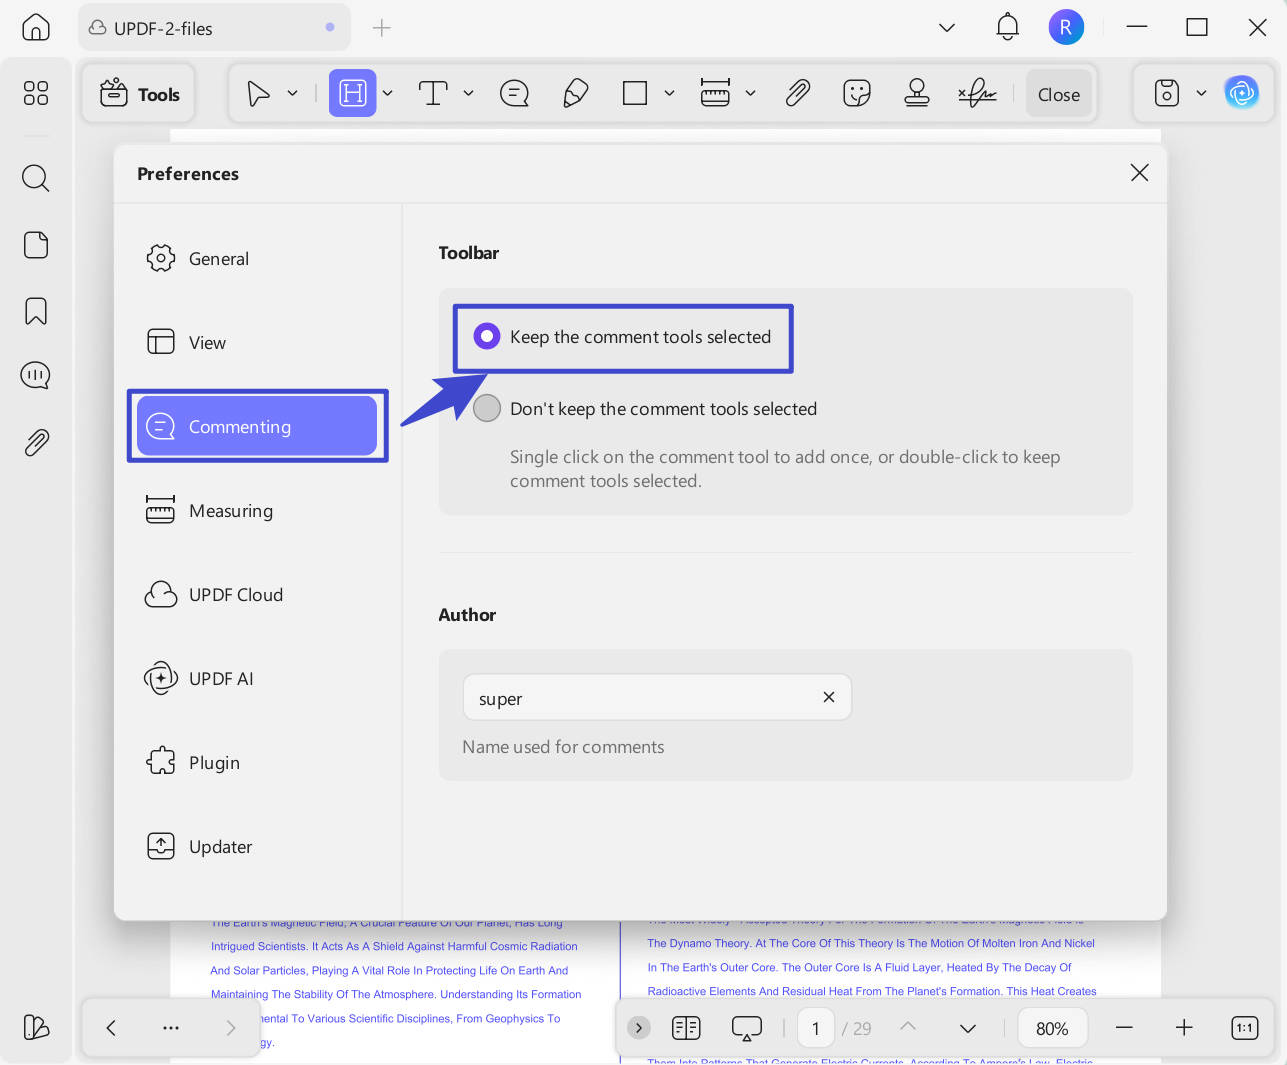
And if you need to add comments continuously frequently, you can also go to "Profile" > "Settings" > "Commenting" > check "Keep the comment tools selected". So whenever you click to select the option in the comment part, you can use the features continuously.
This quick operation allows the user to add comments to PDF without wasting time going through menus again and again. The feature turns out quite helpful in situations where you have to add multiple comments in no time.
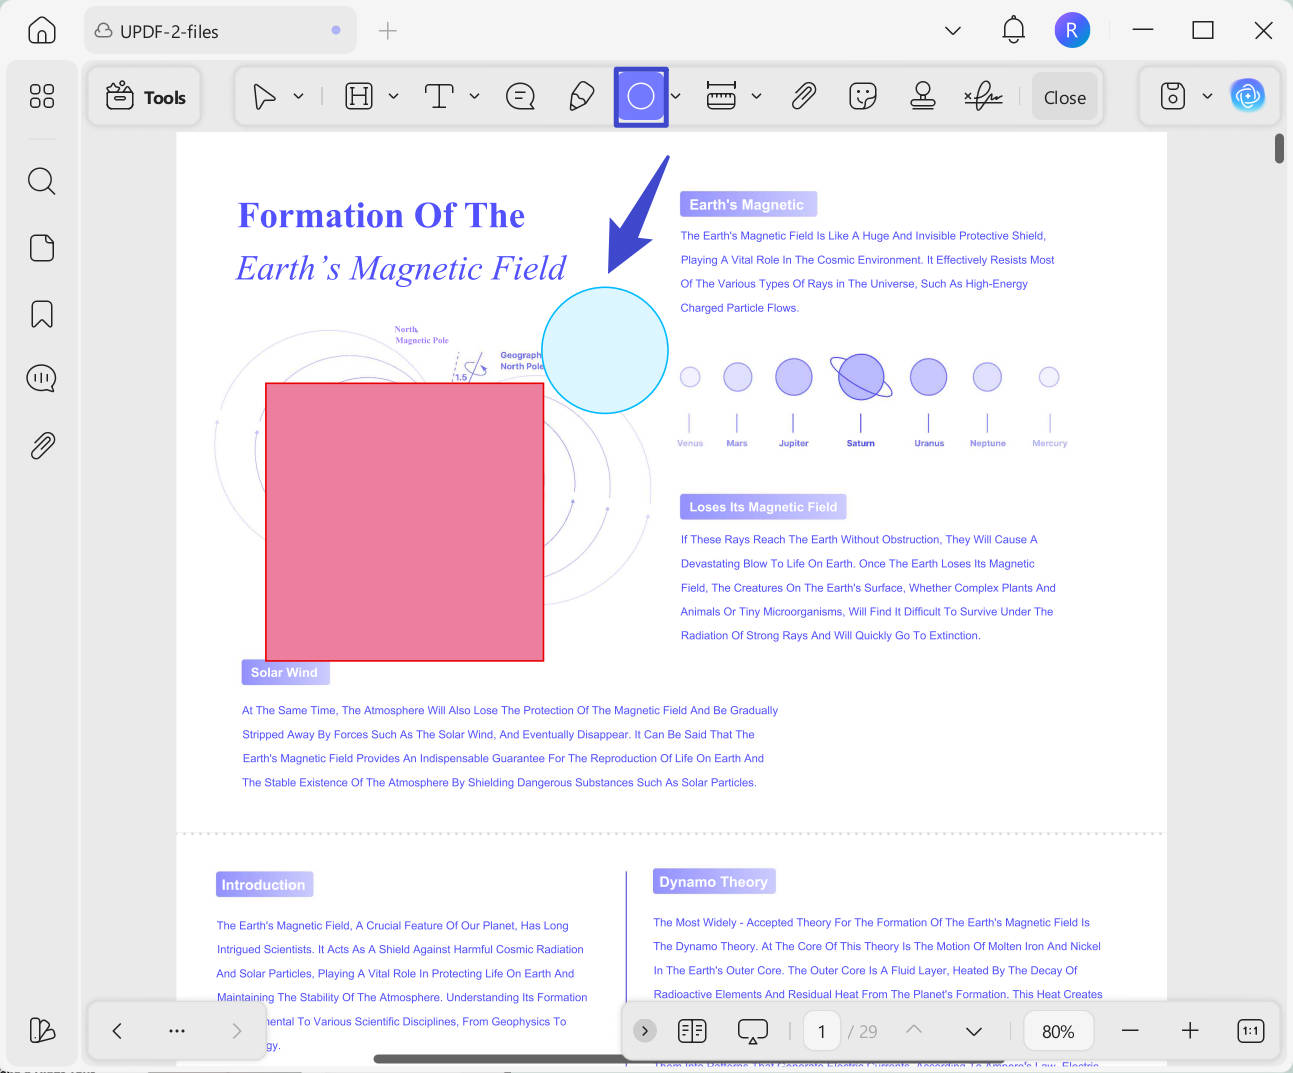
Hotkey 5. Draw the Perfect Square and Circle by Holding on the "Shift" Hot Key
When adding shapes, you can select the rectangle and circle shapes, hold on to the "Shift" and draw the perfect square and circle.

How to Use the "Shift" Hotkey for Drawing Shapes
- Step 1: Lead to the "Tools" > "Comment" tab on the left and select the "Shapes" option from the top bar. Set the appropriate shape and its properties from the menu that appears.
- Step 2: As you try to draw a shape on the PDF, hold the "Shift" key while drawing it. This will draw a proportional shape on your PDF document.
Why not download UPDF to your computer and try these hot keys on your own?
Windows • macOS • iOS • Android 100% secure
Hotkey 6. Highlight Area in PDF by Holding on "Shift" (Mac Only)
To highlight the area in PDF, you can go to "Comment" > "Highlight", now, hold on to "Shift" and draw to highlight are you need. Please note this feature is only available on Mac now.
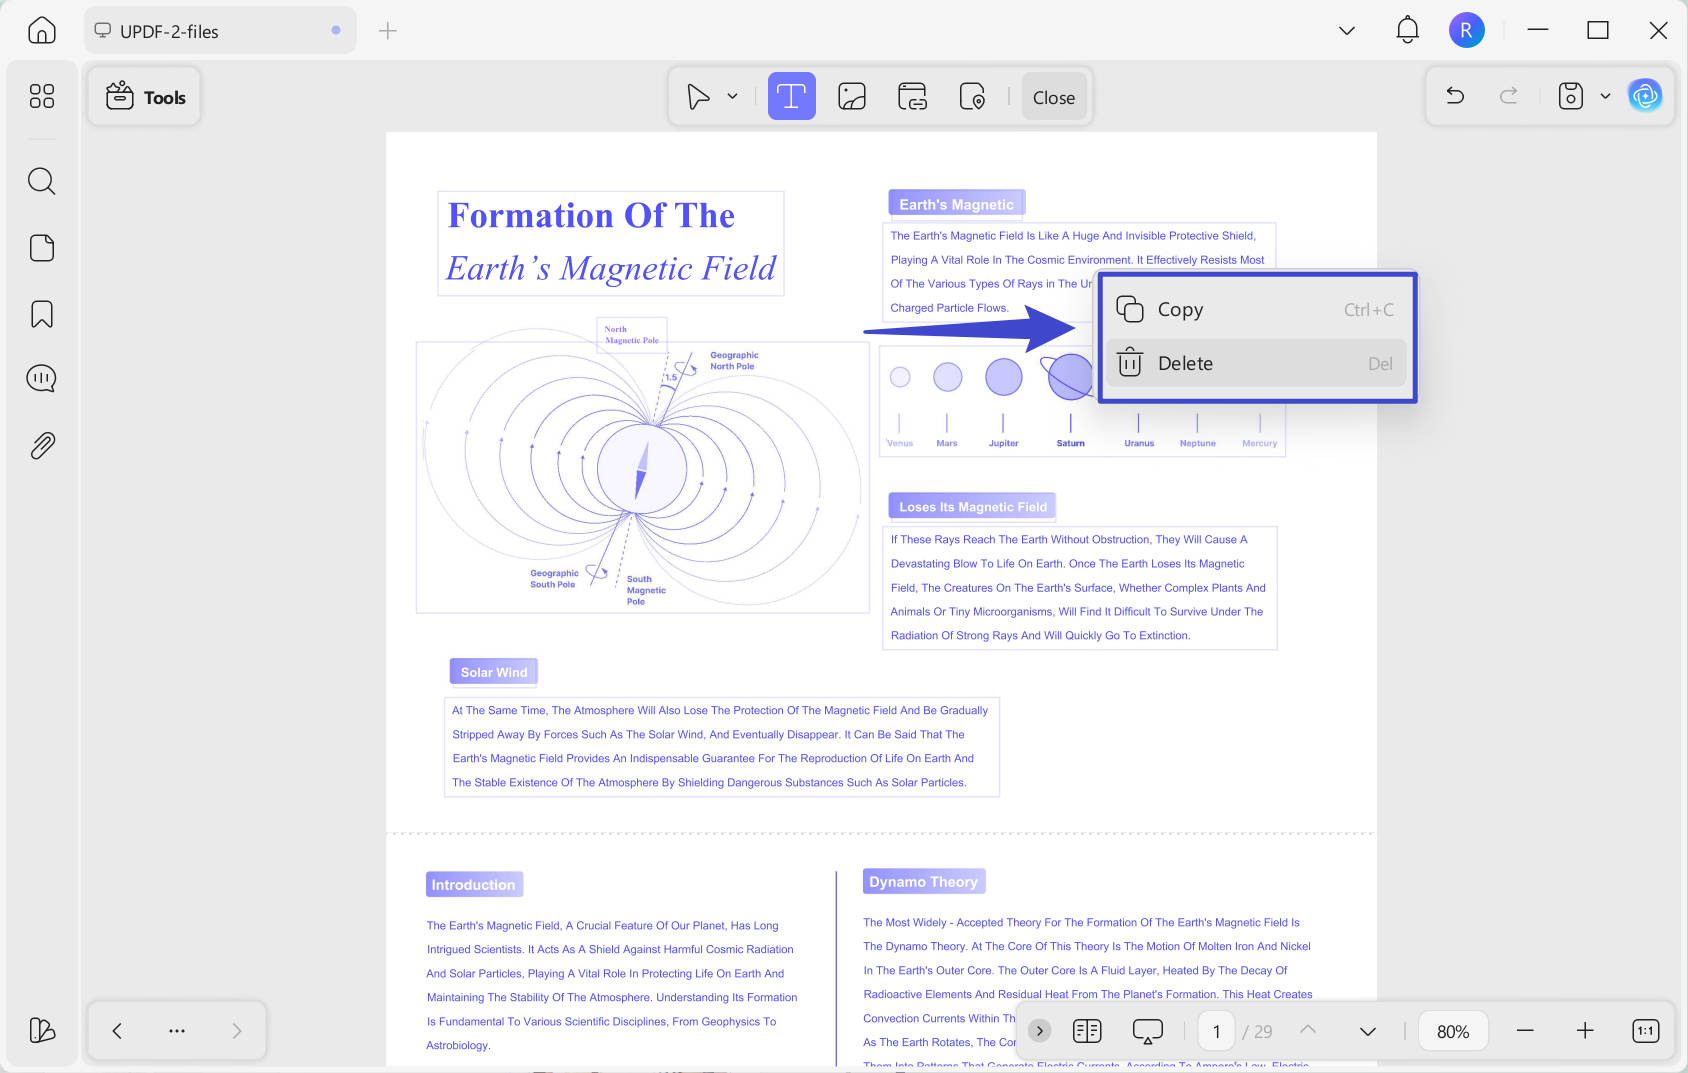
Hotkey 7. Select All by Using "Ctrl/CMD + A" in Editing Mode
If you want to have bulk editing for the elements in one page of the PDF files like "Copying", "Deleting", and "Moving", you can use "Ctrl+A" or "CMD +A" to select all the elements. Please note this feature can only work when you enter the "Edit PDF" mode.
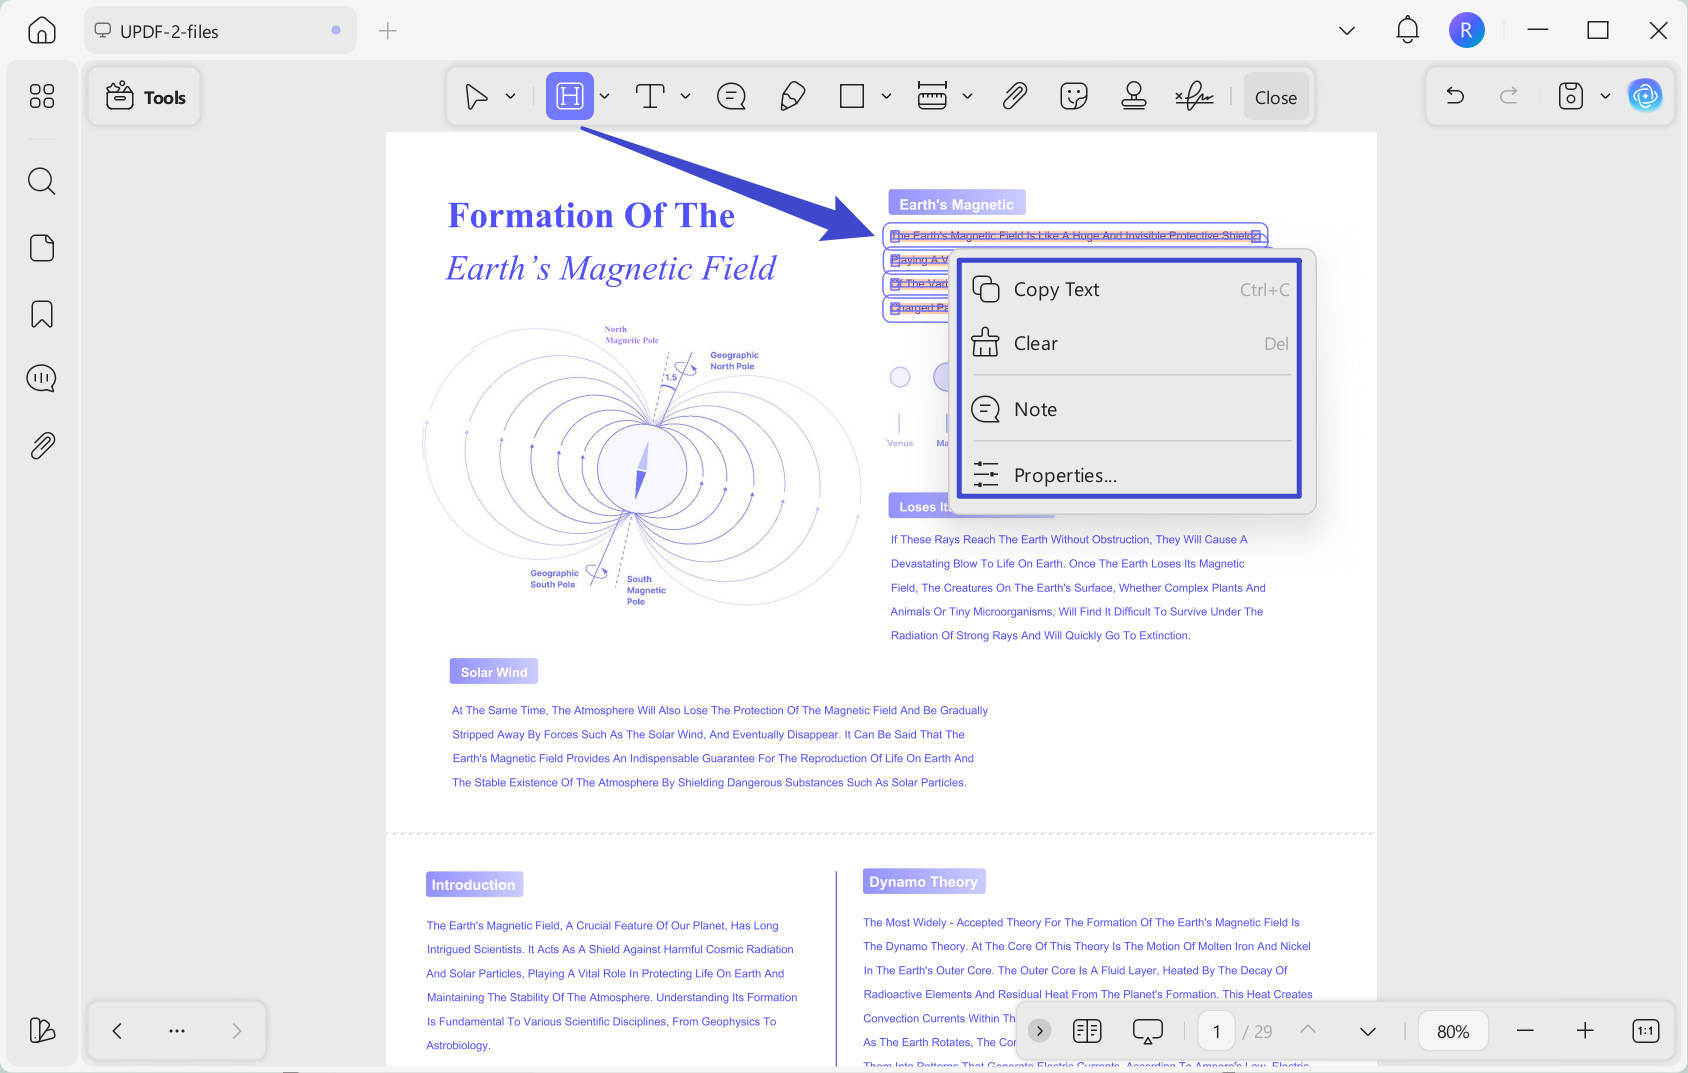
2. Find Options with Right-Click
You can get a lot of options by right-clicking on the file or the elements.
When you right-click on the page, you can find many options to manage the pages like rotate, change the page display, fit width, etc.
In different modes, you can get different options after right-clicking.
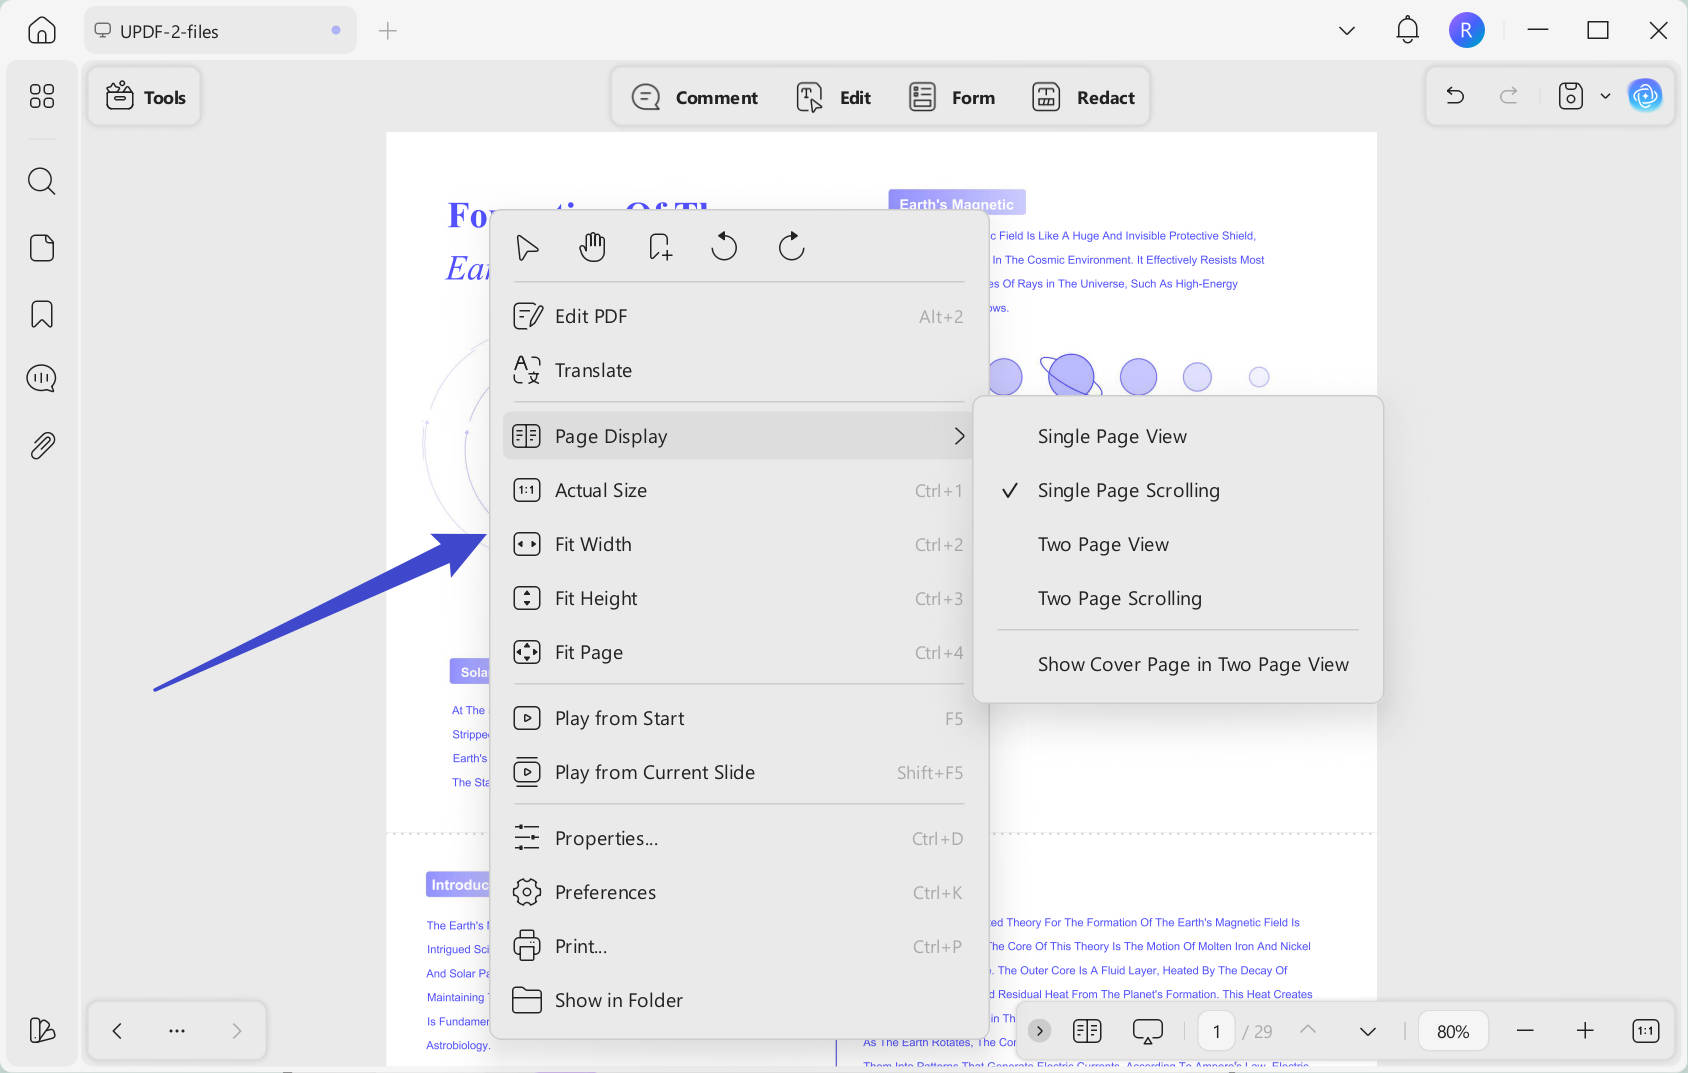
If you right-click on the element, you can get the option to edit the element. For instance, you can right-click on the highlighted parts to get the "Copy Text", "Clear", "Note", and "Properties" options.
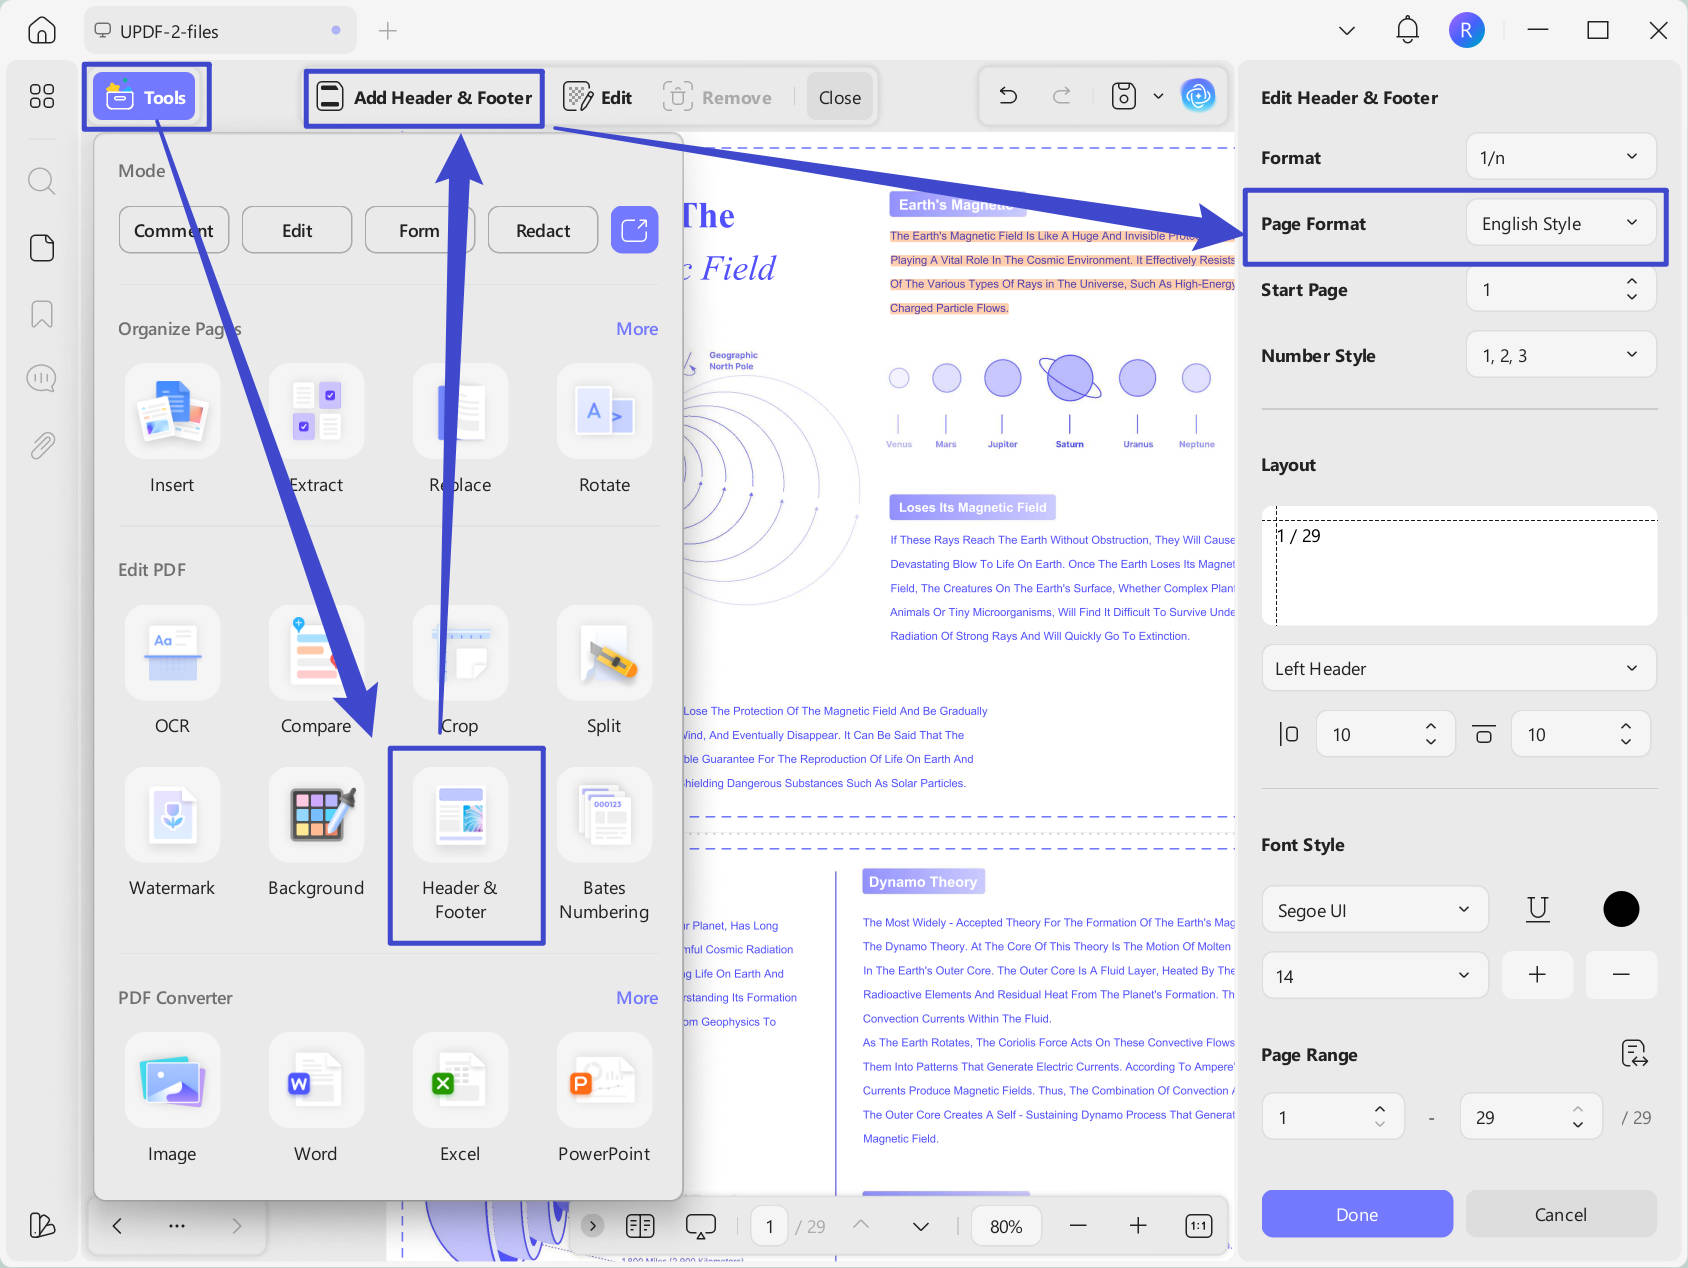
3. Adding Header & Footer per Selected Language Style
You can set different formats of page numbers along with the language you need in the header and footer.
How to Use Multi-language Header & Footer on UPDF
- Step 1: To add a header and footer on UPDF, open the PDF document and continue to the "Tools" tab on the left. Select "Header & Footer" from the top to continue with adding the particular element.
- Step 2: Proceed to the "Add Header and Footer" button on the bottom right. Select the Page Number preset you need.
- Step 3: Find the settings panel on the right panel to select your respective option according to the language you are dealing with. This section gives 11 different options of languages to select from in the drop-down menu. Click the "Done" button to proceed with saving the header & footer template for your PDF.
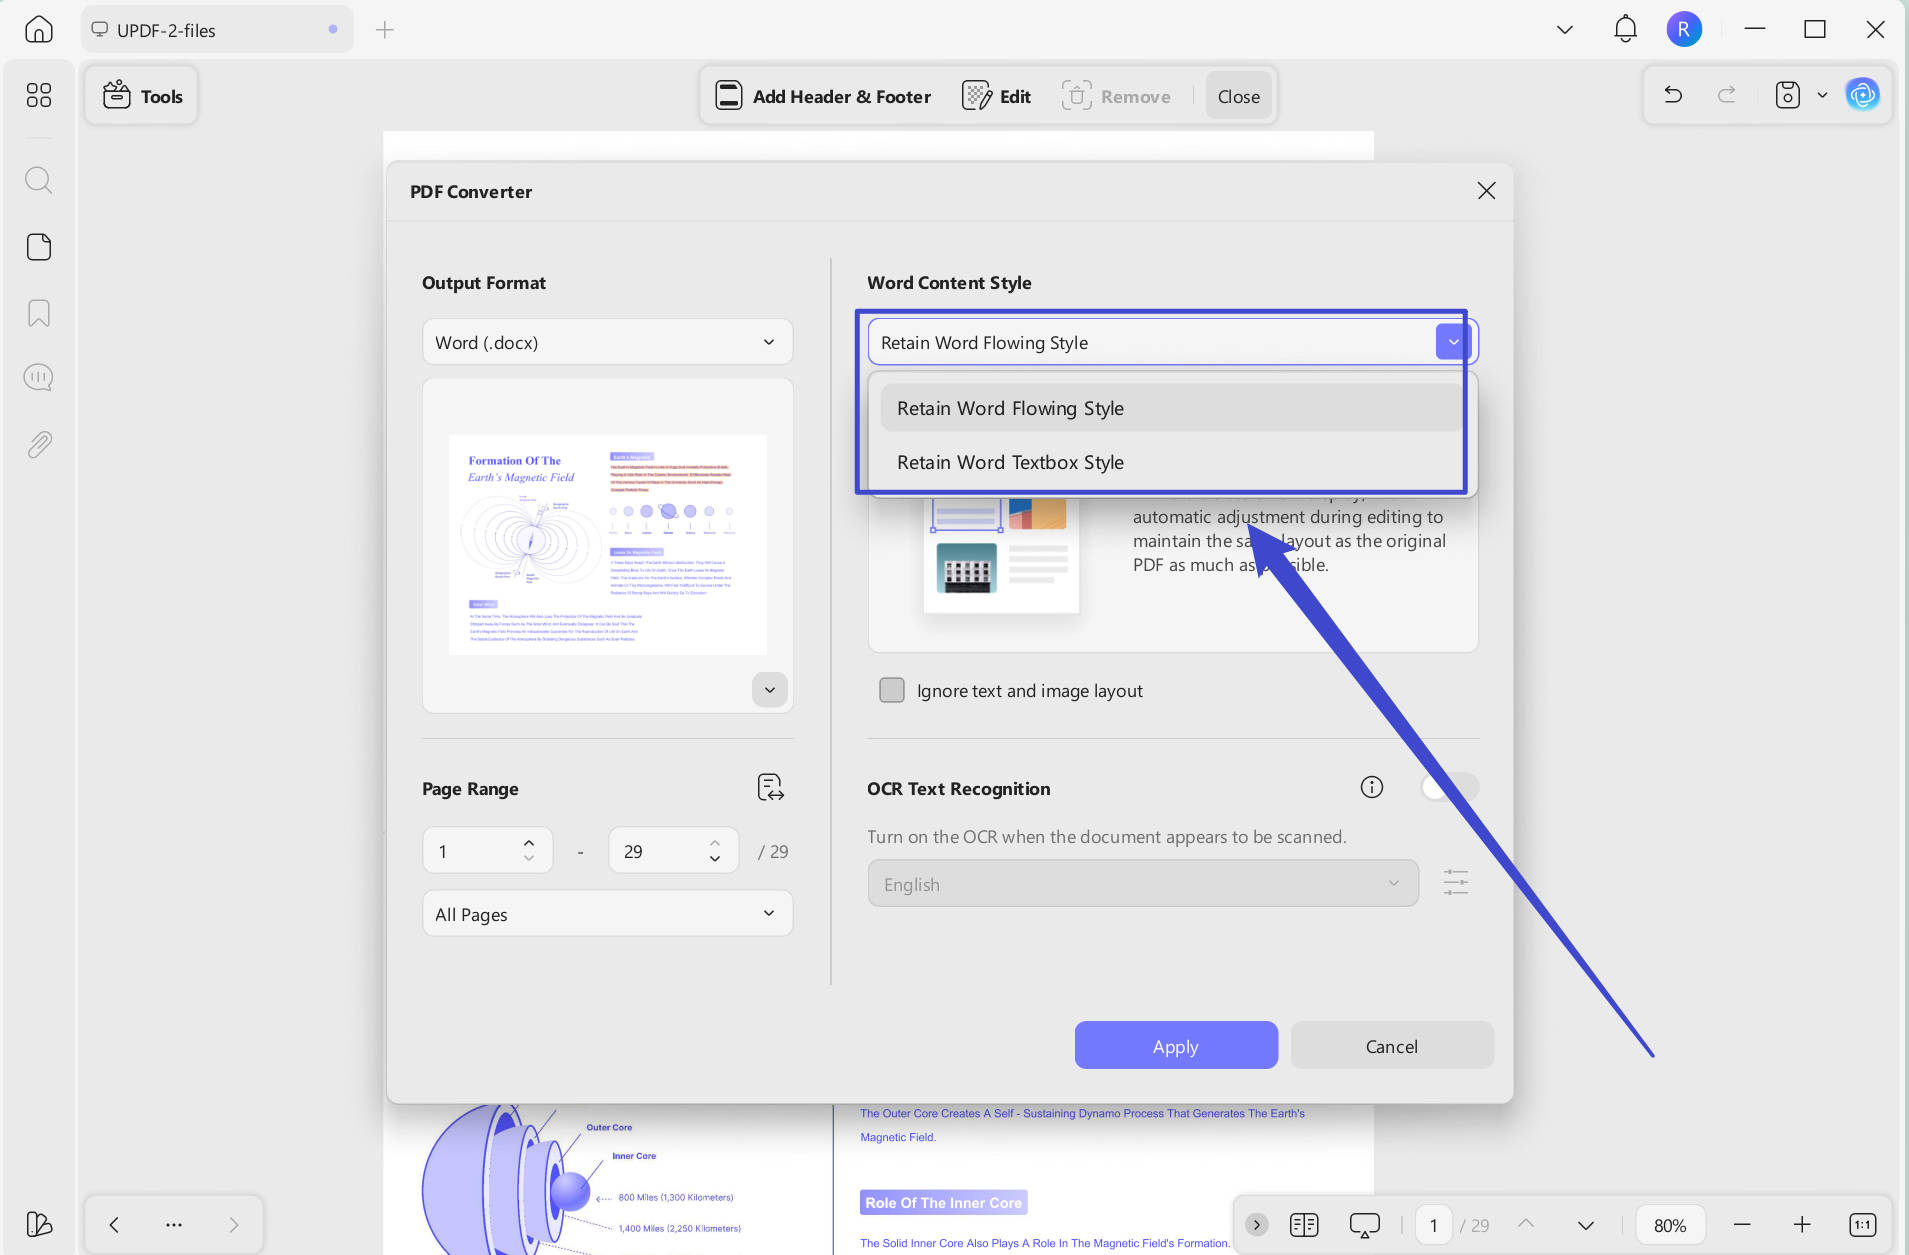
4. Control the Conversion Result with Layout Options
UPDF features two layout options while converting documents to Word for its users:
- Retain Word Flowing Format: The converted content uses Word’s classic flow, auto-adjusting during editing to closely match the original PDF layout.
- Retain Word Textbox Style: The converted content appears in text boxes without auto-adjusting layout, preserving the original PDF's formatting.
Rather than losing the quality and formatting of the PDF file, such options can help you preserve them in a few clicks.
How to Set Conversion Layouts While Converting PDFs
- Step 1: Open a PDF that is to be converted and select the "Tools" button on the right. Select "a format "Word" in the "PDF Converter" section and let a window open on the screen.
- Step 2: With the window opened, click to find the option for Word Content Style. You can select one you need.
- Step 3: Continue with the other options and tap the "Apply" option to convert the document into the required file format successfully.
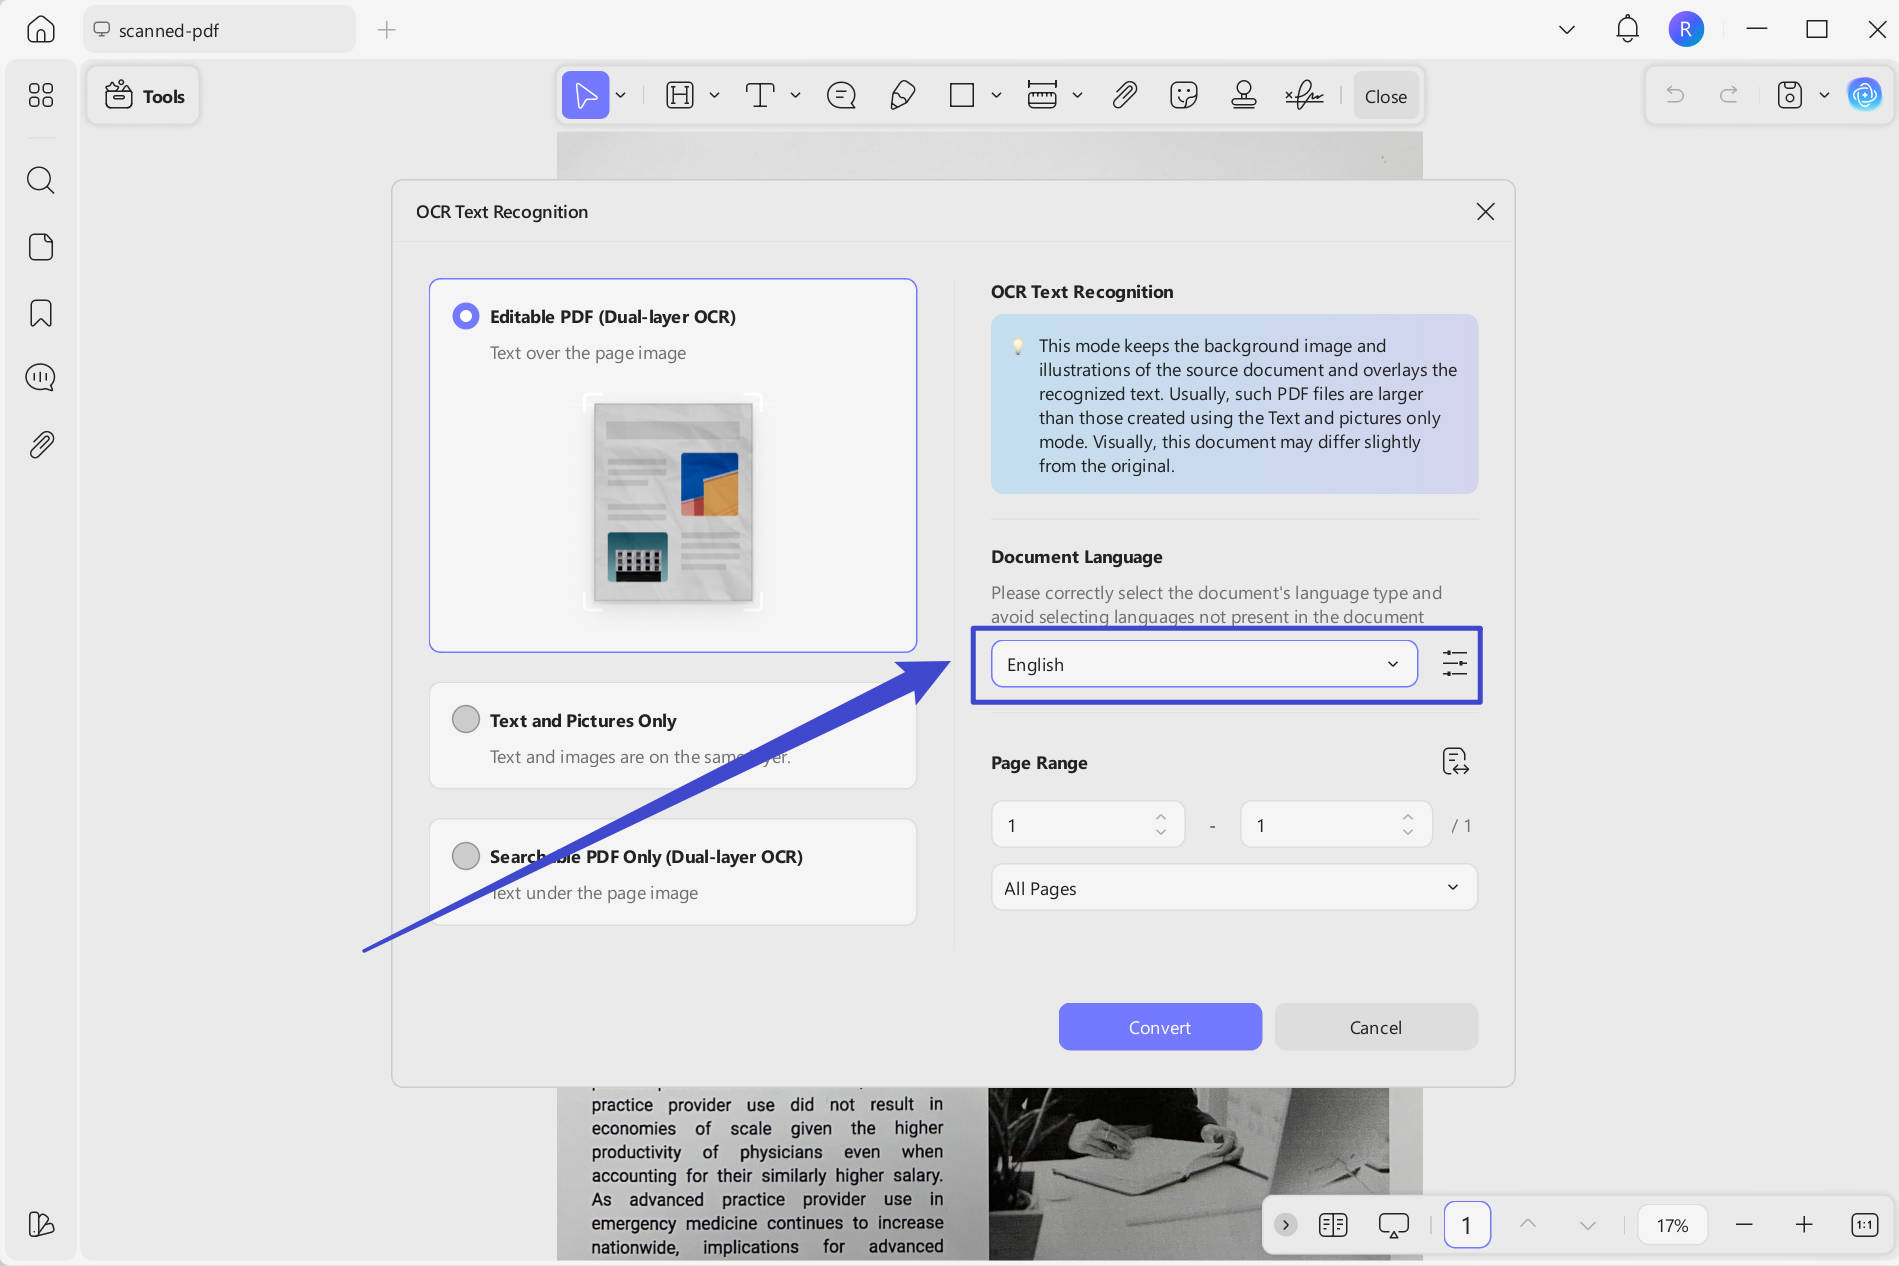
5. Control Document Editing Capabilities with OCR Layouts Settings
UPDF features three hidden layout options while performing the OCR function on a scanned PDF document. Look into these three layout options to understand more about them:
- Editable PDF: This mode preserves the background images and illustrations from the original document and places the recognized text on top. As a result, the file size is usually larger than those created with the “Text and Pictures Only” mode. Visually, the output may look slightly different from the original.
- Text and pictures only: This mode saves the recognized text and images, resulting in a smaller PDF file. However, the appearance may differ slightly from the original document.
- Searchable PDF Only: In this mode, the page image is preserved, and the recognized text is added in an invisible layer beneath it. This keeps the document visually almost identical to the original.
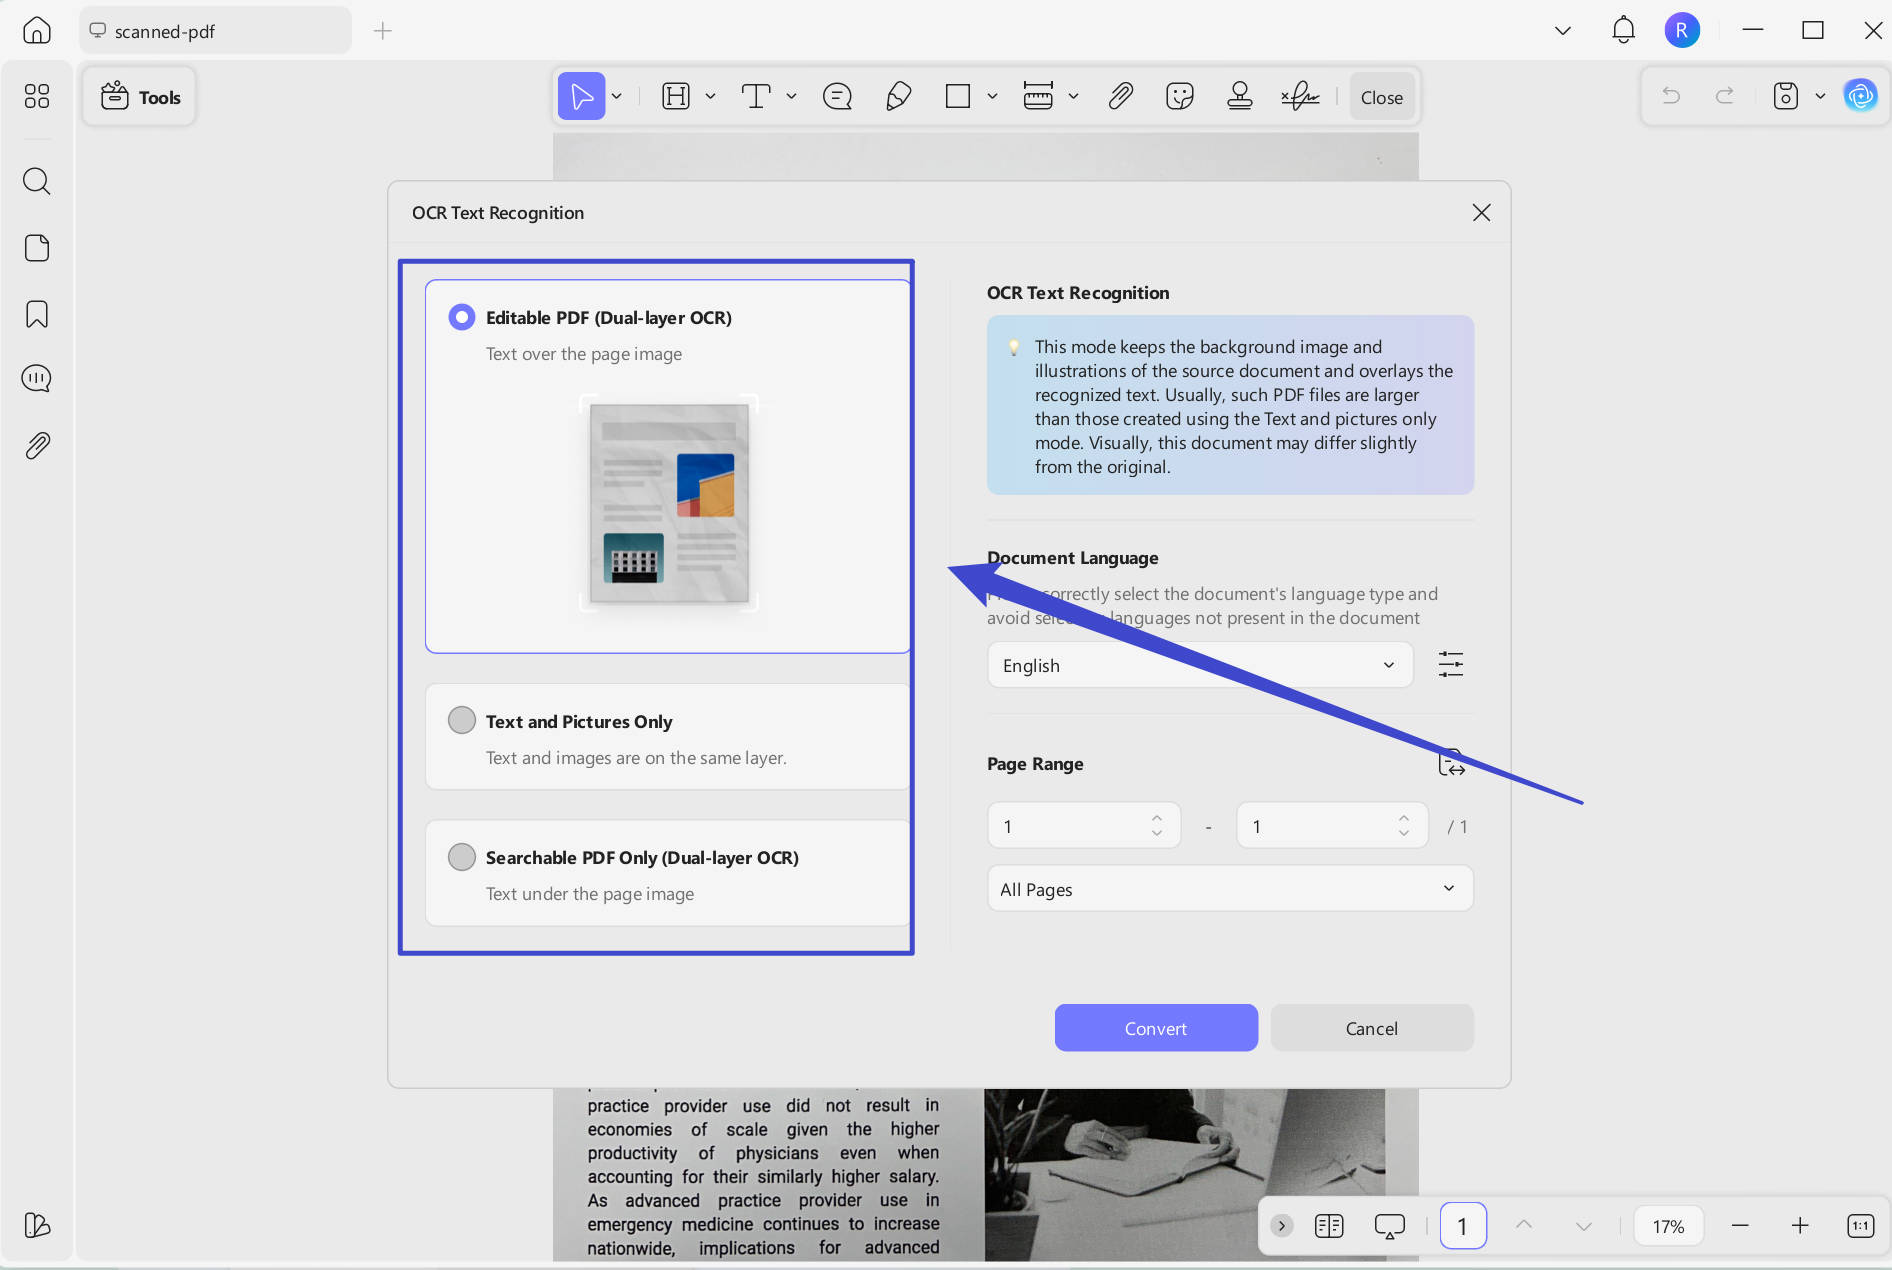
How to Use OCR Layouts for Converting Scanned PDFs to Editable and Searchable Files
- Step 1: Launch UPDF and open the respective PDF file with the "Open File" option. Click on the "Tools" > "OCR".
- Step 2: As it opens, ensure to select "Editable PDF" if you want to convert the scanned PDF to an editable one.
- Step 3: Make sure that you choose the document language. For example, here, my document is in English; I need to select "English" here. Choose page ranges. Click the "Convert" button.
Ready to streamline your document workflow? Download UPDF now! To learn more about UPDF's OCR features, you can watch the video below.
Windows • macOS • iOS • Android 100% secure
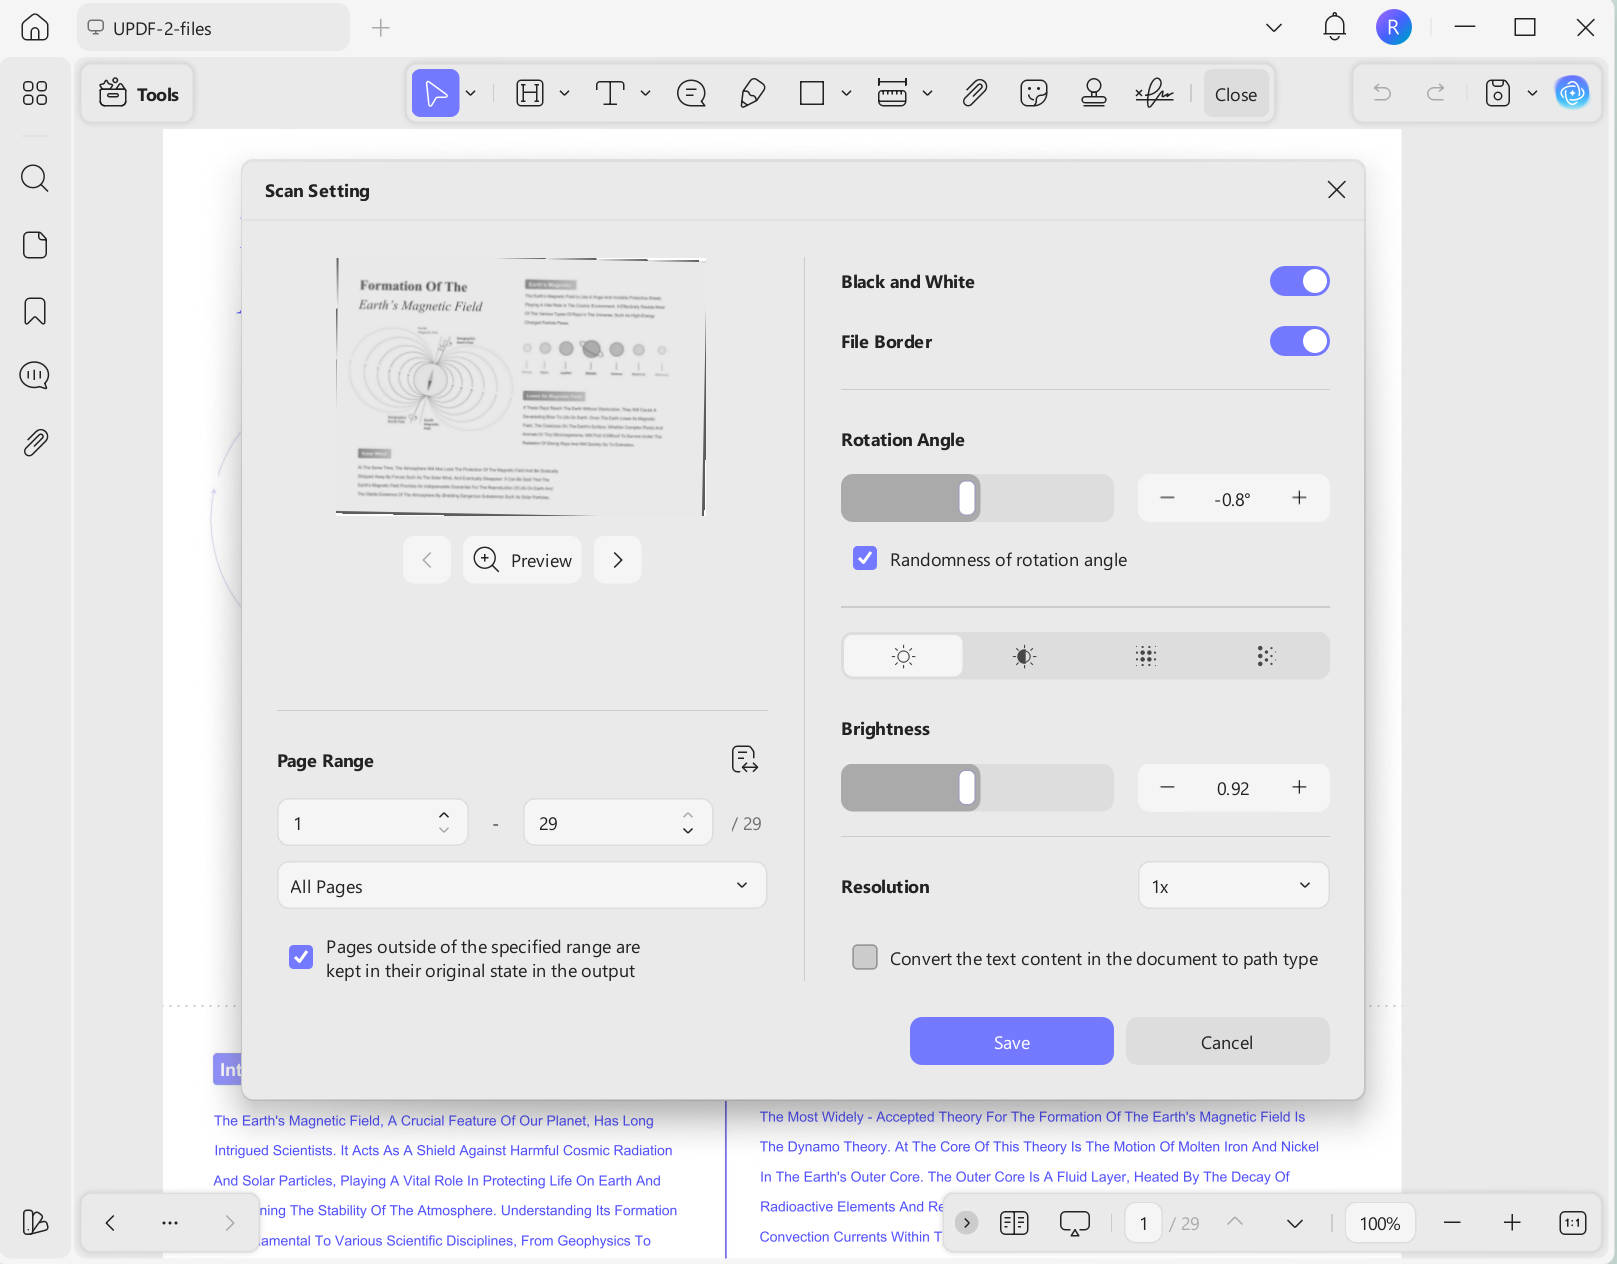
6. Turn PDFs to Image-Only To Avoid Unnecessary Edits
By turning PDFs to Image-Only PDF, you can change editable PDF documents to image-only PDF files. You can have their text and images secured from unauthorized access with the help of this feature.
How to Turn PDFs into Image-Only PDFs
- Step 1: For this process, you will have to access the "Image PDF" option after clicking on the "Arrow Down" icon near the "Save" button.
- Step 2: In the pop-up window, you can enable "Black and White", "File Border", change the Rotation Angle, and Brightness.
- Step 3: Click on the "Save" to convert PDF into image only PDF.
7. Quick Translating to Desired Language
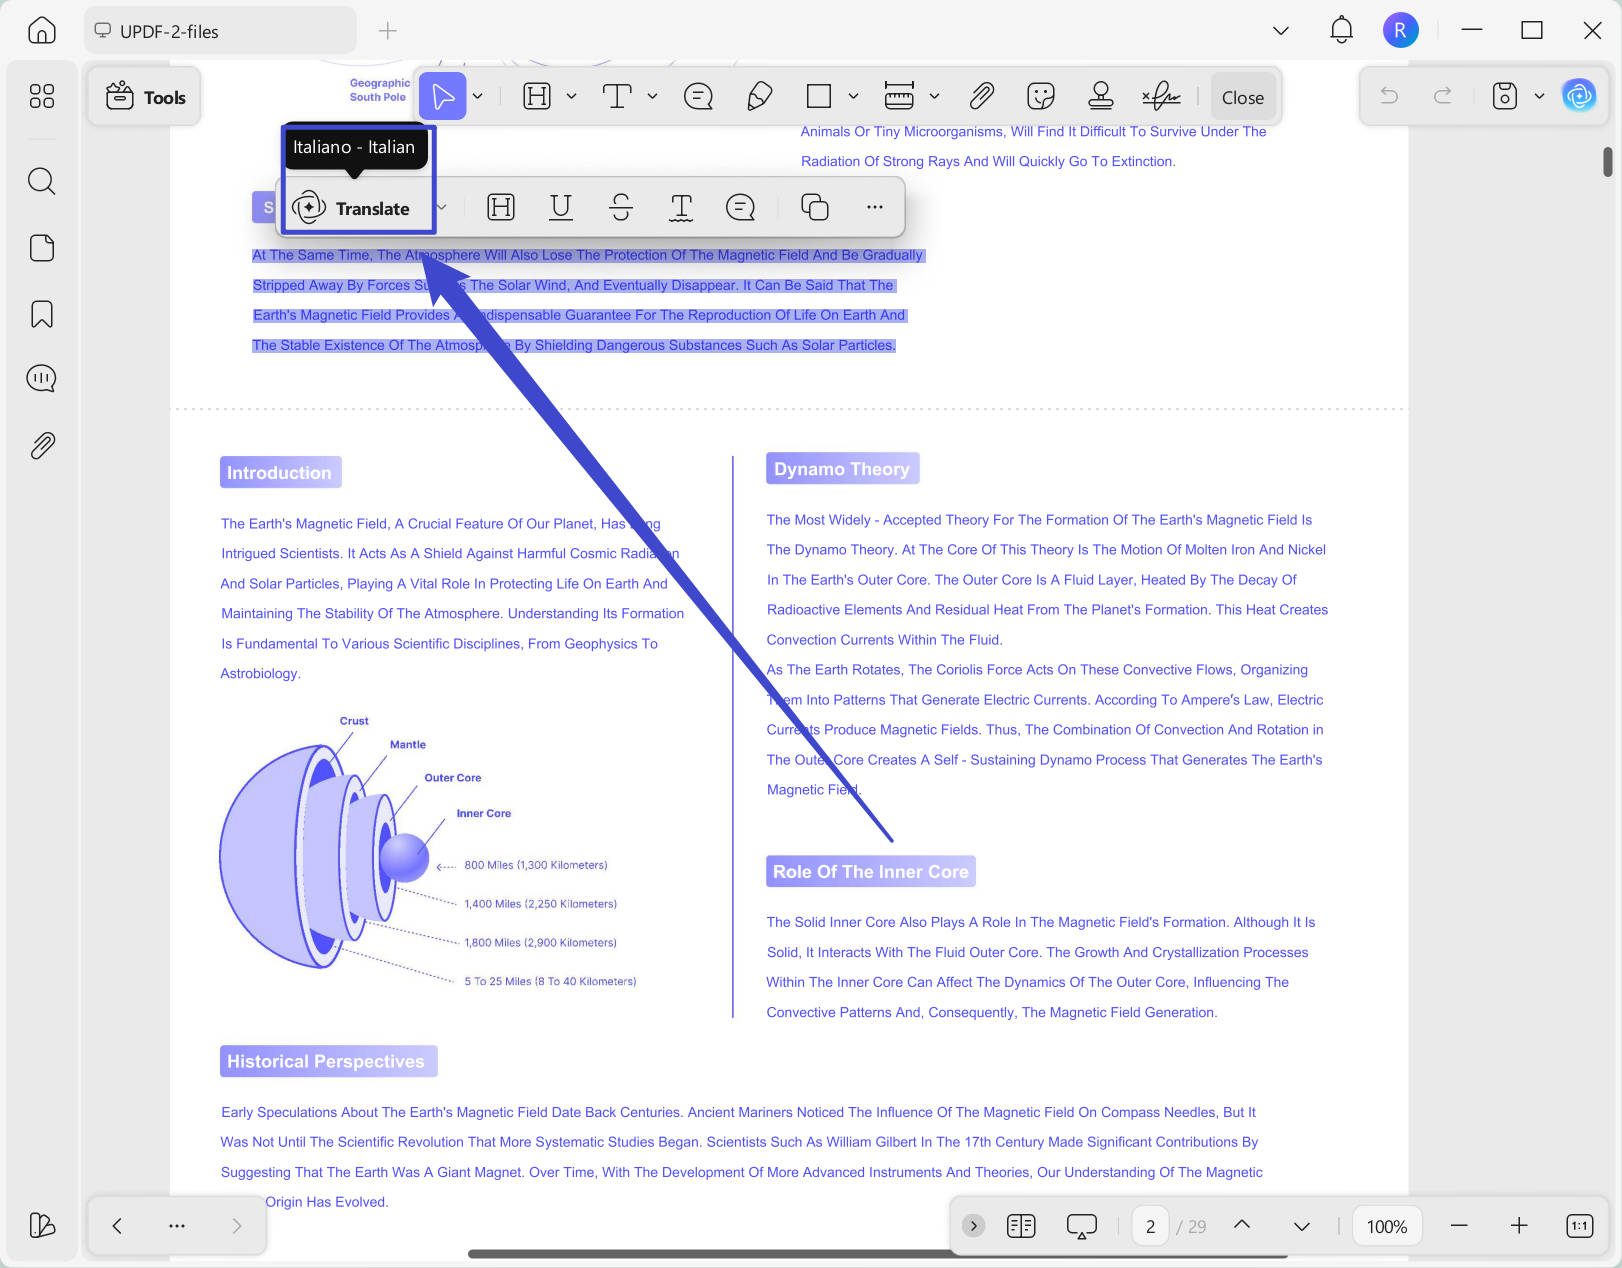
If you need to translate to one language frequently when reading a PDF, you can let UPDF remember the language you selected. So that you do not need to select a language at any time. You can follow the below steps.
Step 1. Open the PDF, select the content that you want to translate, click on the "Down Arrow" icon, choose "Translate", and select your desired language. For instance, here, I select "Italian". Now, the AI will start translating your selected content. And now, UPDF AI will set "Italian" as the default language to translate.
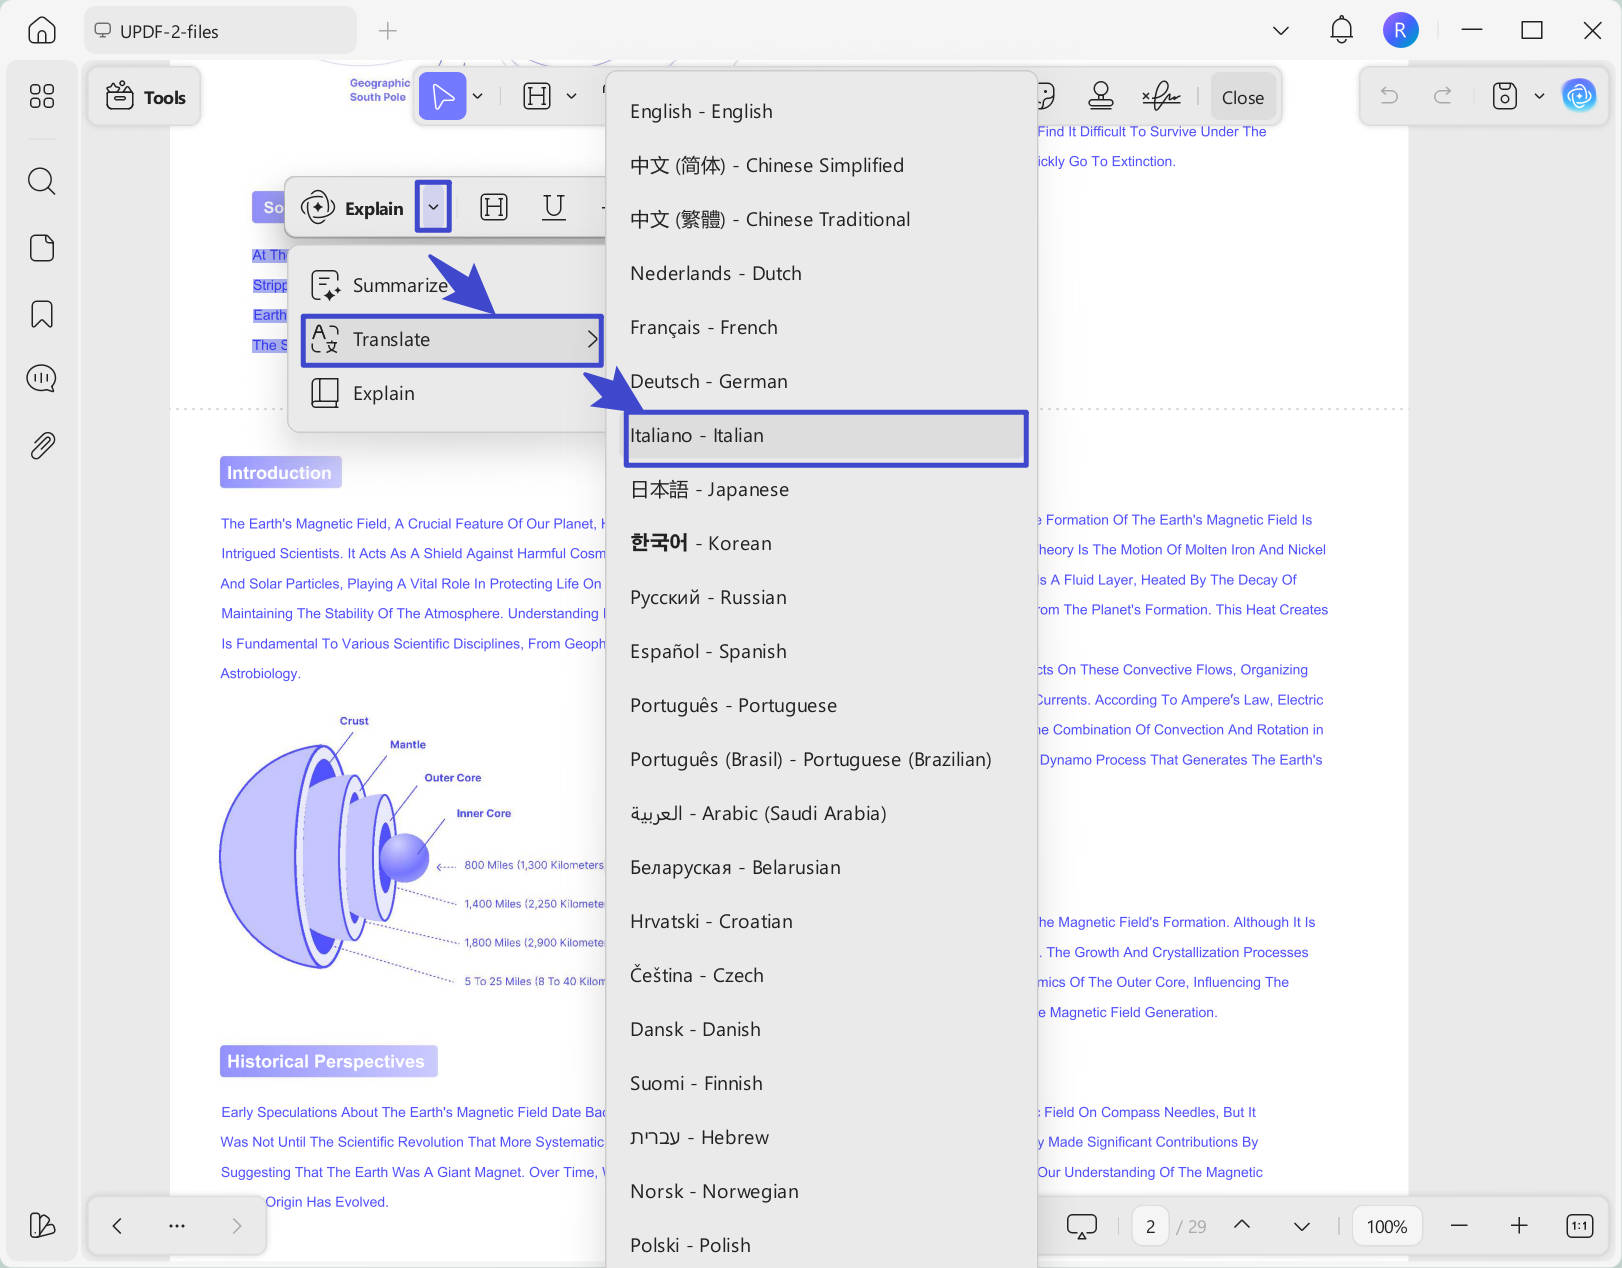
Step 2. Now, you can select any content, and click on the "Translate" icon. It will translate to "Italian" at any time.
8. Preview PDF with UPDF in File Explorer (Windows Only)
UPDF on Windows has one PDF preview plugin that allows you to preview the PDF on the file explorer with zoom in and out, and jump to pages without opening them in UPDF. Here is how to use it.
Step 1. Go to "Profile" > "Settings".
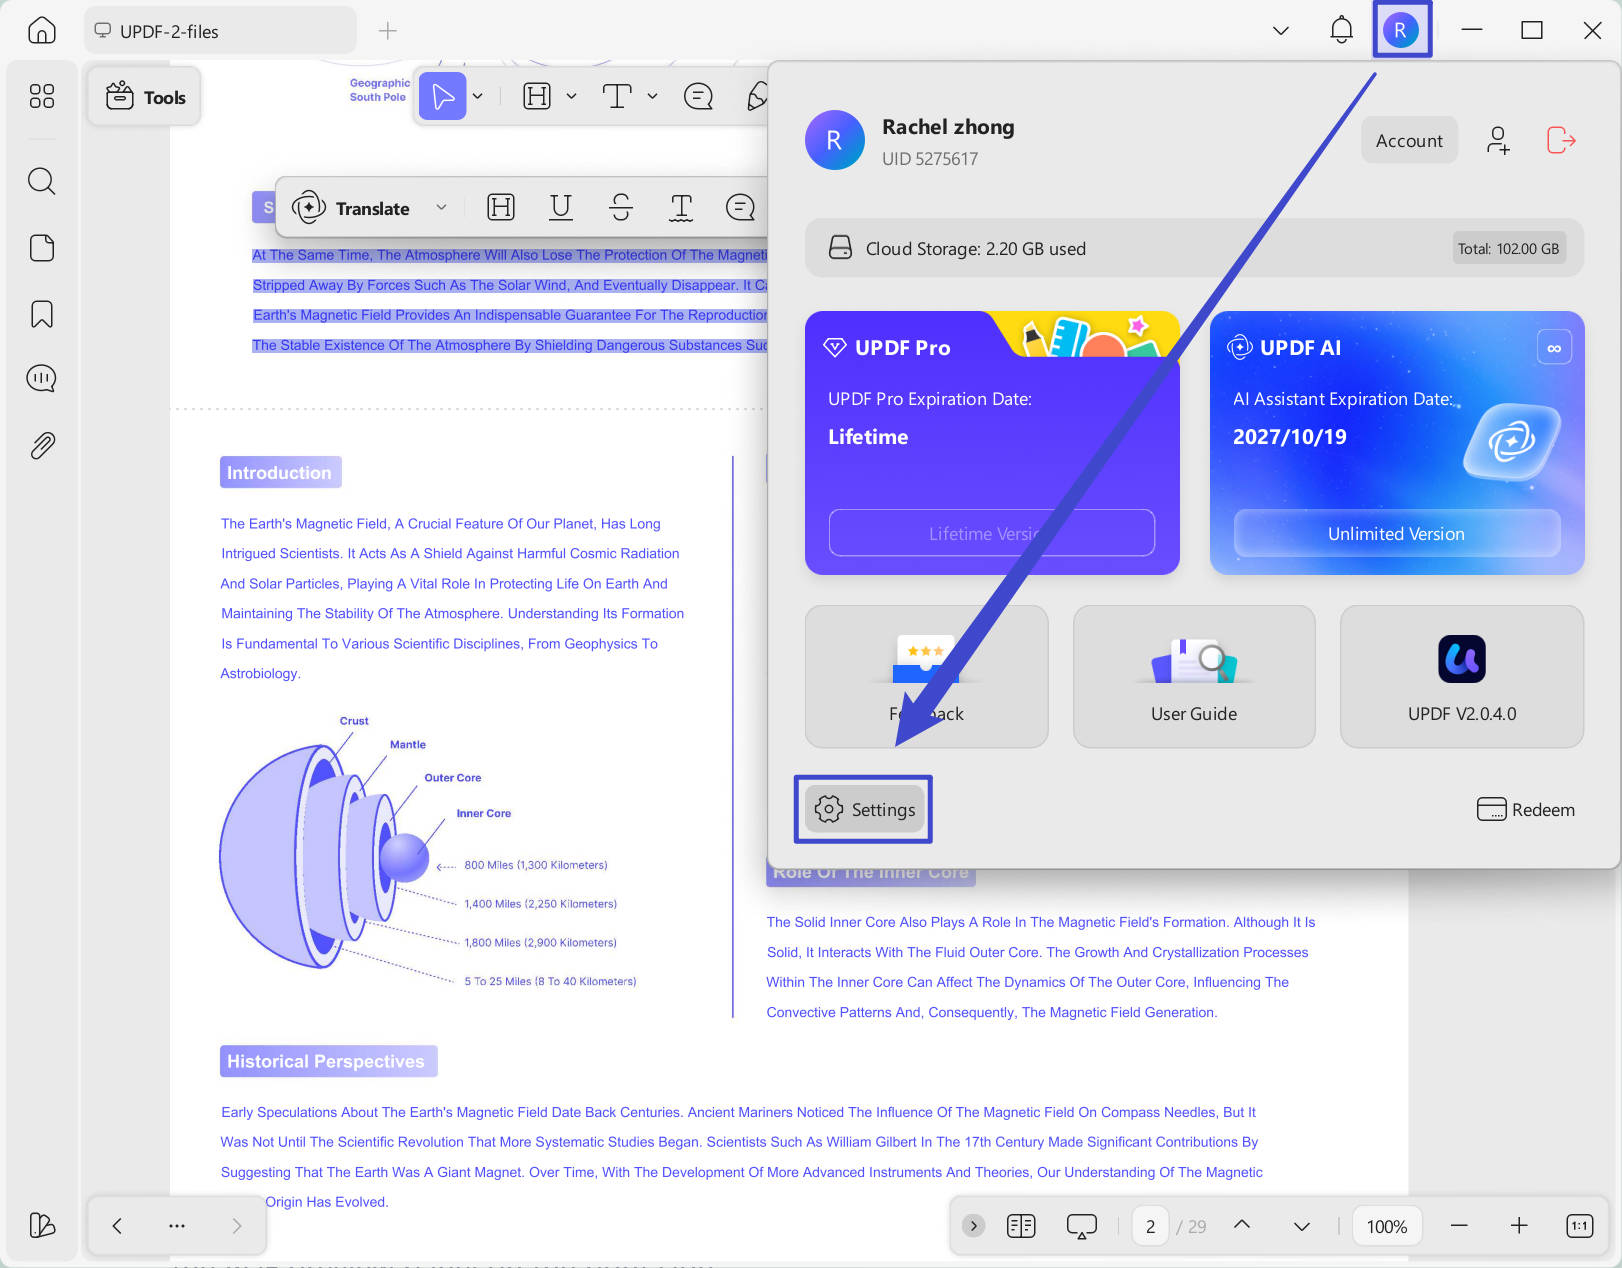
Step 2. Scroll down in the General section, and check "UPDF is the default preview tool for PDFs in the system resources manager."
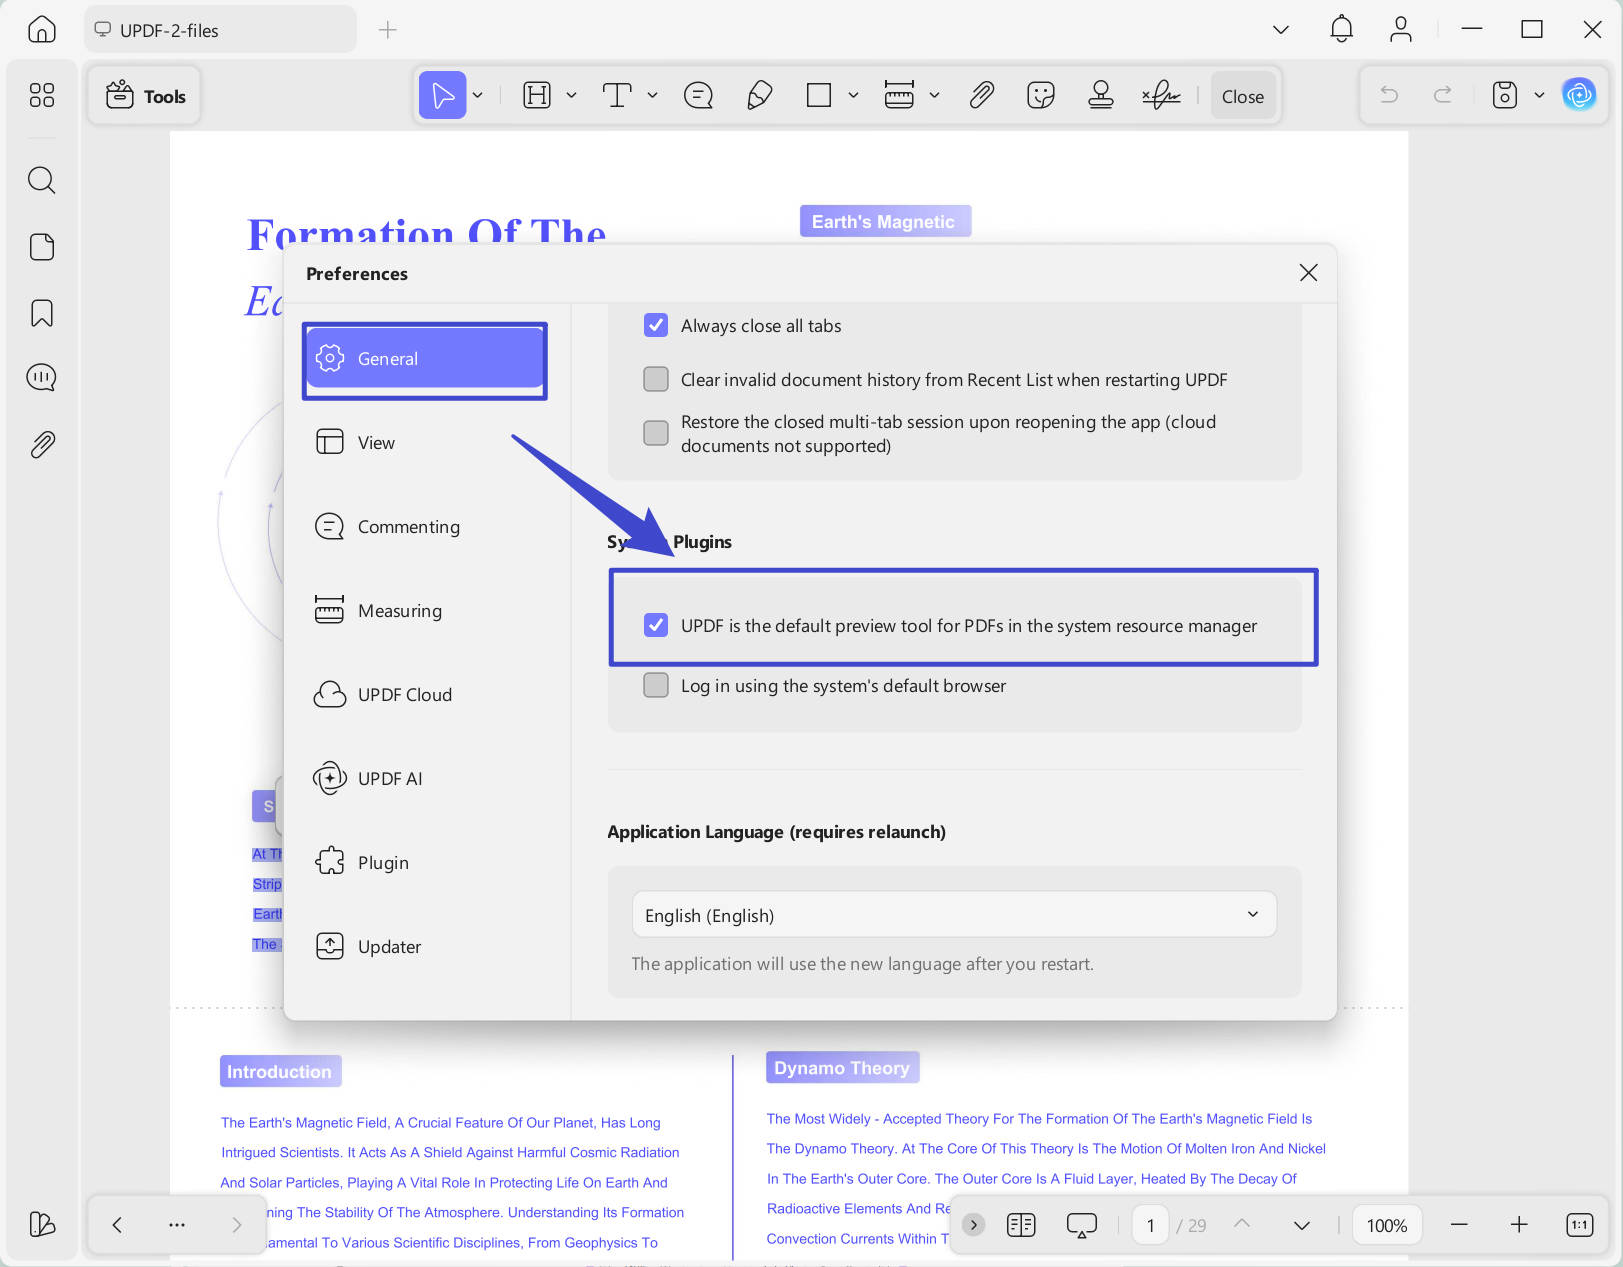
Step 3. Go to any file folder, click to select the PDF, and you can find the PDF preview panel on the right side.
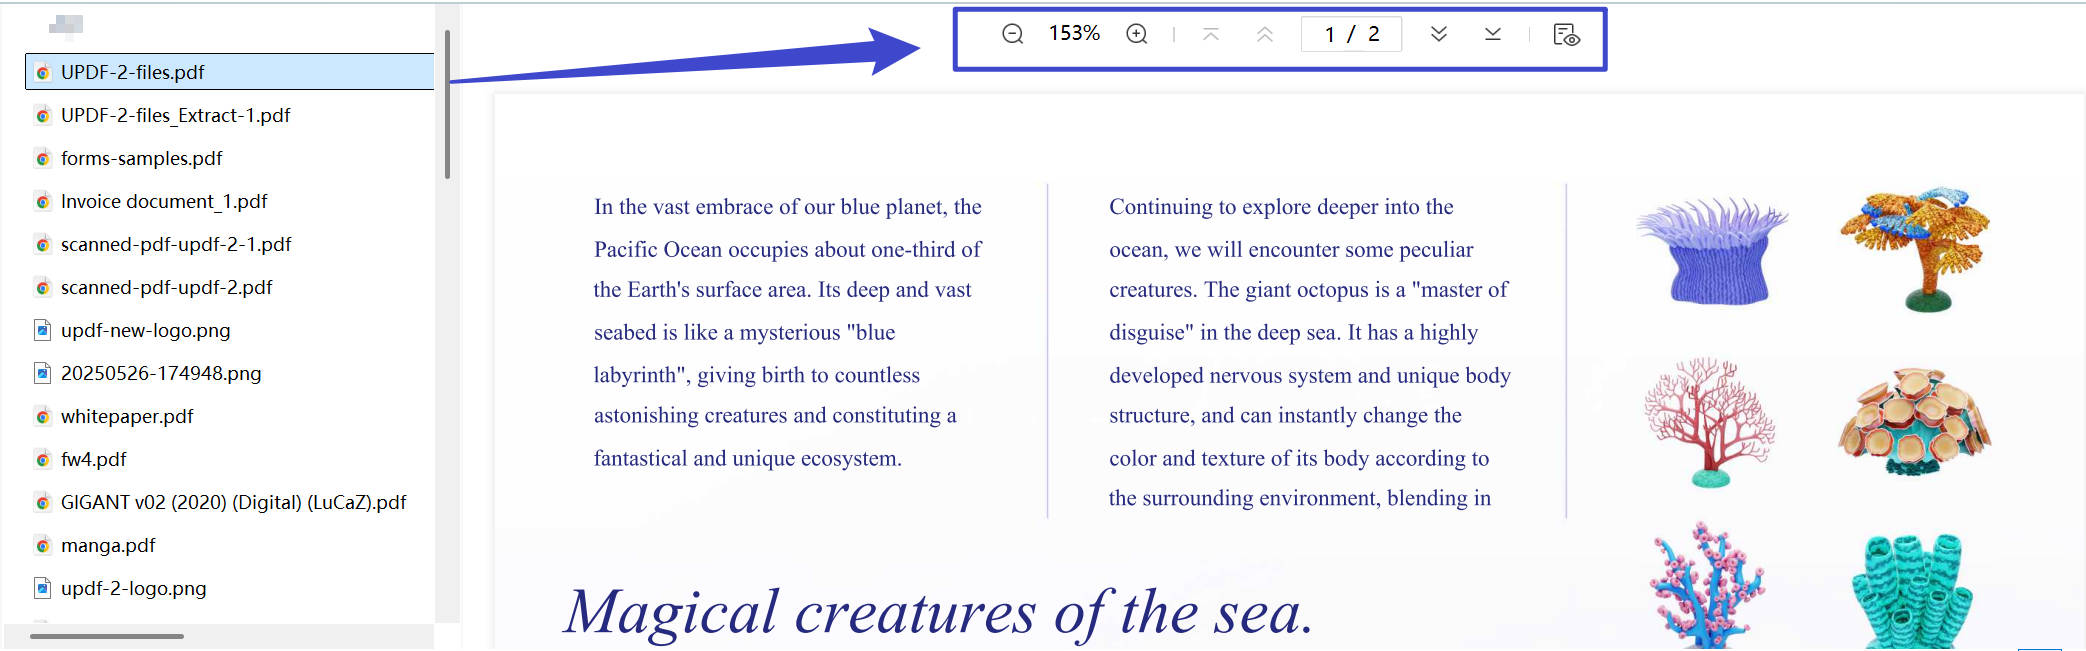
9. Extract Selected Pages by Dragging and Dropping (Mac Only)
To extract pages to one PDF quickly, you can select the page in the thumbnail or the pages in Organize Pages, then drag and drop them to the desktop.
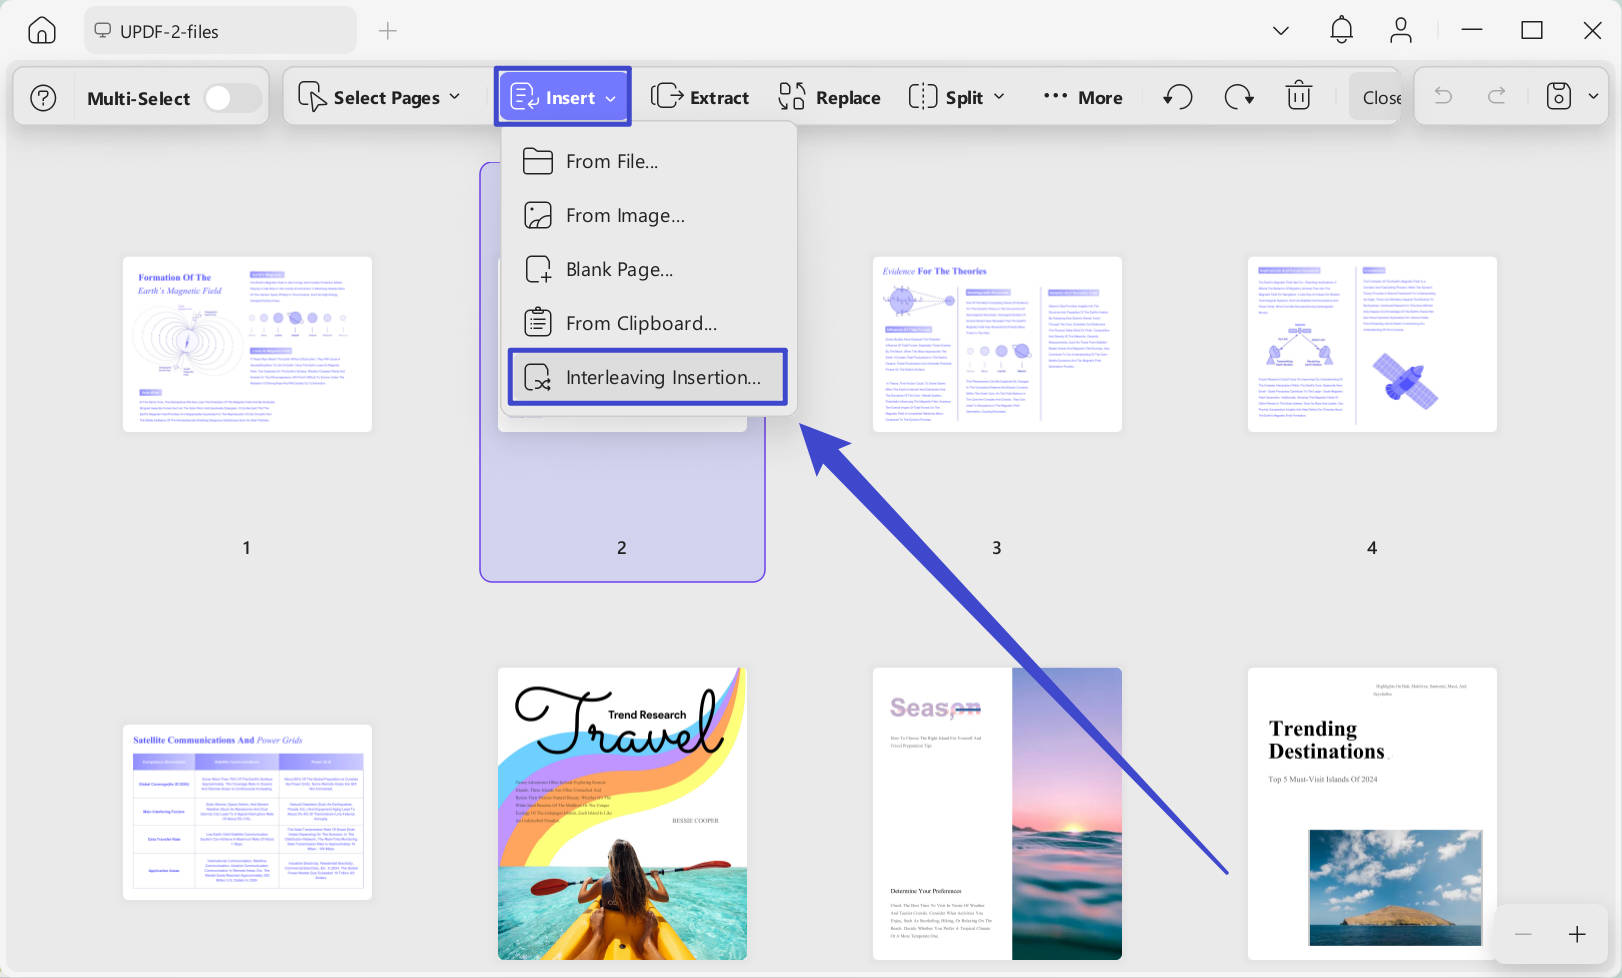
10. Interleaving Insertion
Interleaving insertion is very useful when you scan one file like a book in two files: One with all odd pages and the other with all even pages. You can download UPDF, open one PDF, go to "Organize Pages" > "Insert" > "Interleaving Insertion", select the other file and combine them into one PDF with correct order.
Windows • macOS • iOS • Android 100% secure
11. Add Grid Watermarks to PDF
In many cases, you may want to add grid watermarks to protect your PDF. Many PDF tools do not have this feature, but it is added in UPDF. Just open the PDF with UPDF, go to "Tools" > "Watermark" > "Add Watermark". Select the watermark style, choose the "Grid" option, and click on "Done" to add the grid watermarks to PDF

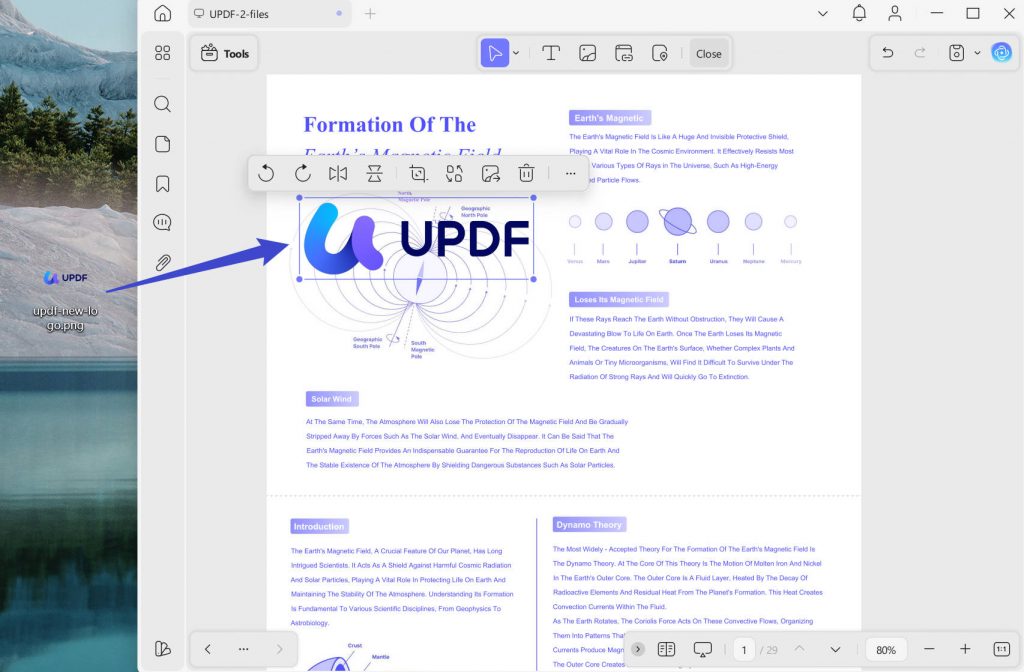
12. Add Images to PDF by Dragging and Dropping
You can also drag the images to PDF to add them quickly to PDF. Here is how. Open the PDF with UPDF, click on "Edit" in the "Tools" list, now, click to select the image on your computer, and drag it to the PDF opened in UPDF. Now, you add the image to the PDF successfully.
13. Add Rich Text to PDF by Dragging and Dropping (Mac Only)
You are allowed to select rich text like texts with links, then drag them into PDF to add them. You only need to go to "Edit" mode, open the file with rich texts, select all the rich texts, and drag them to PDF.
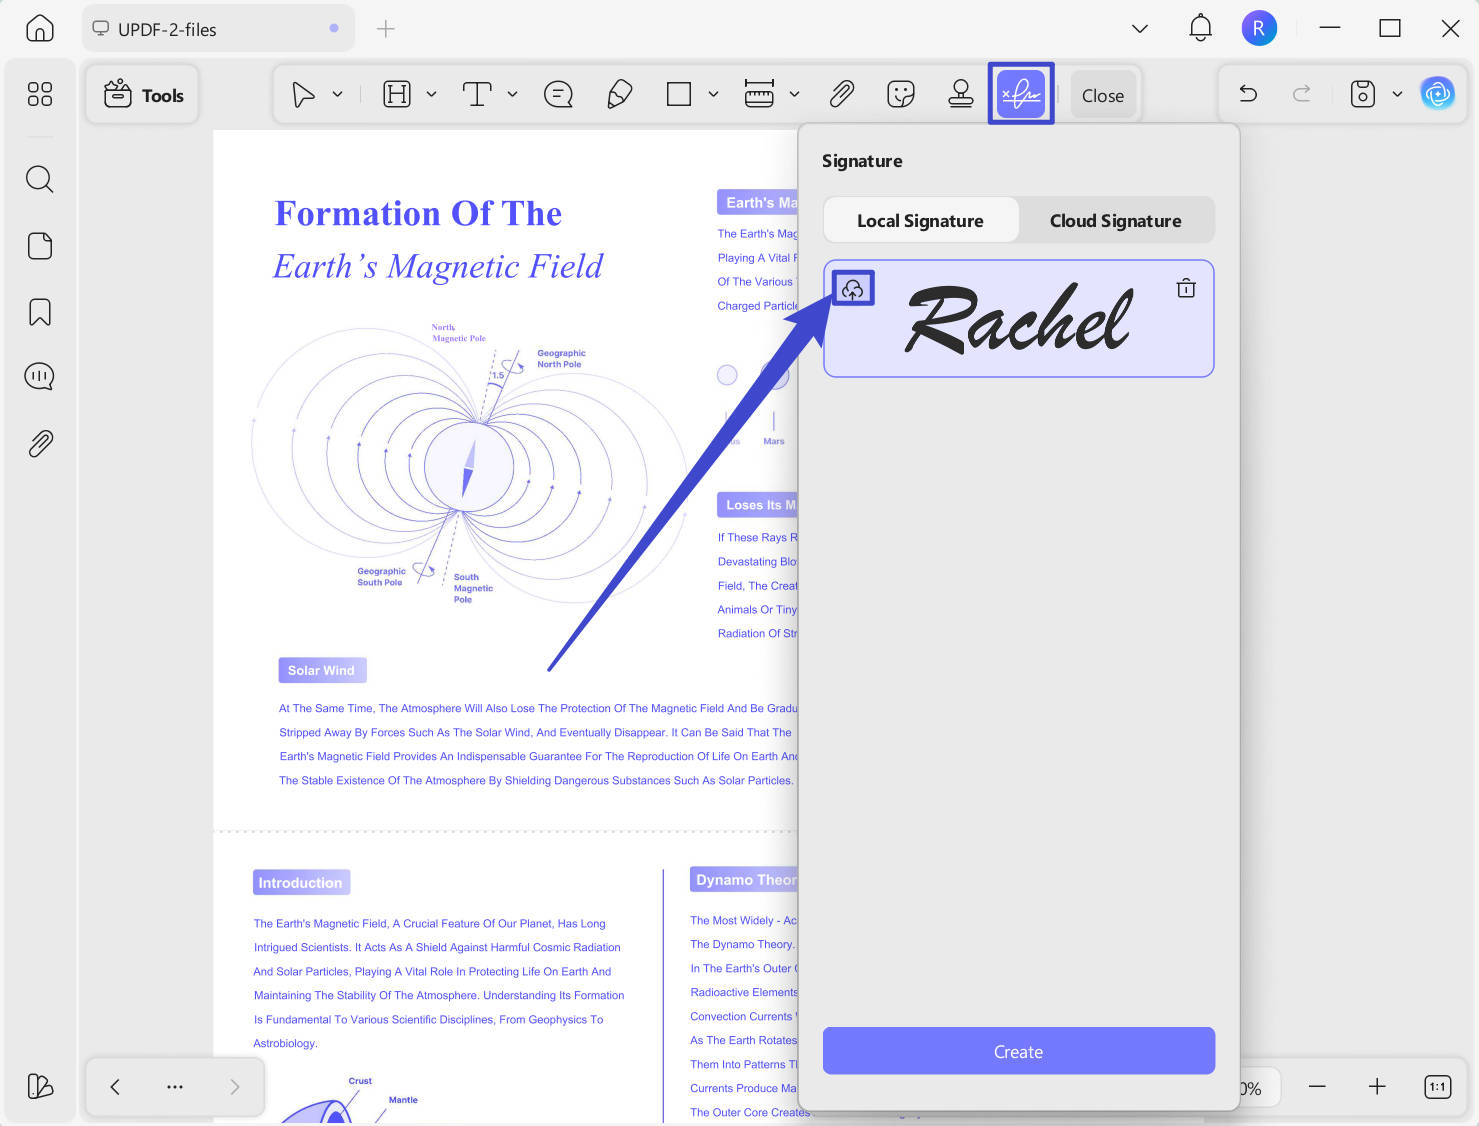
14. Sync Signatures Across Devices
With UPDF, you can create signatures and upload them to the cloud, then access and use them anytime and anywhere. Here is the guide for you.
Step 1. Open the PDF with UPDF. Go to "Comment" > "Signature" > "Create", and select the options to create the signatures you need.
Step 2. Click on the "Signature" again, and click on the "Cloud" icon to upload it to the Cloud. Then, you can open UPDF on any device and log in with the same account. Now, you can find and use this signature.
15. Extract Text from Scanned PDF or Image with AI
If you find that your scanned PDF or image file contains languages that are not supported by UPDF OCR and you only want to extract text, you can use UPDF AI to extract the text from the scanned PDF to image. Here are the steps.
Step 1. Drag the scanned PDF or image to UPDF, click on the "UPDF AI", go to "Chat" mode, select "Screenshot", and draw to screenshot.
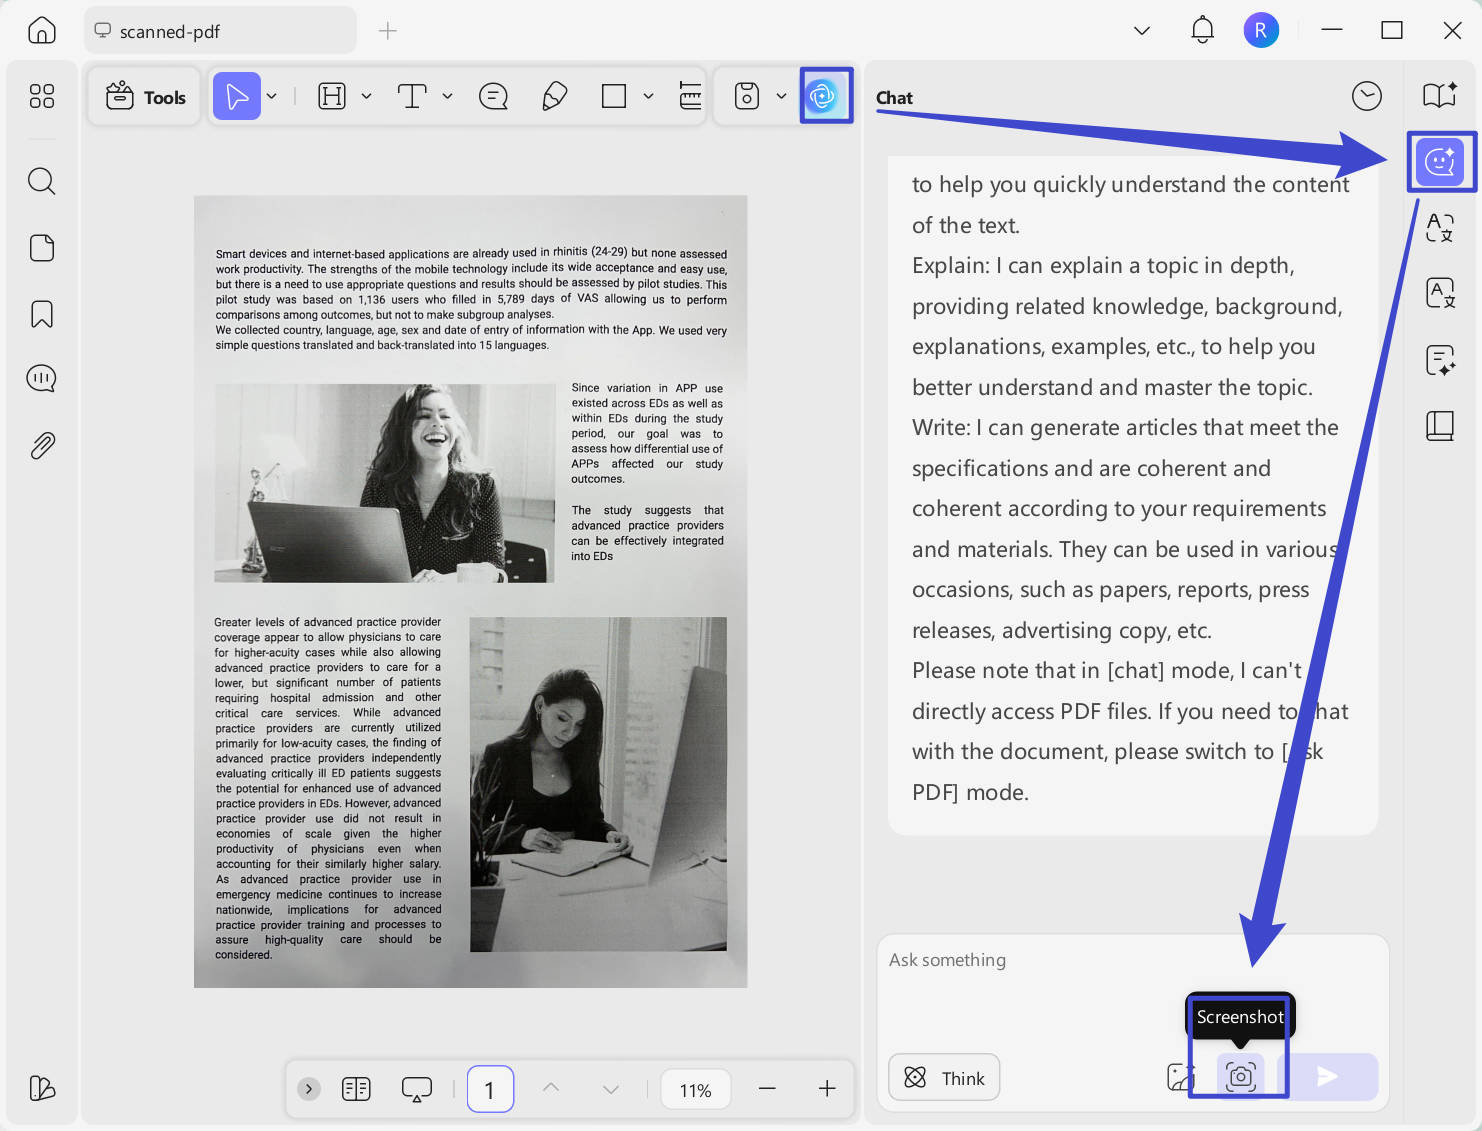
Alternatively, you can click on the "Export PDF" > "Image" to convert all scanned PDF to image files, then, go to "UPDF AI" > "Chat" > "Add Image" to import it to UPDF AI.
Step 2. Enter the prompt "Extract text from this image" and click on "Send". Now UPDF AI will extract them all and you can copy the content to any place.
16. 4 Other Tips
The tips mentioned above are valuable and helpful, but there are 4 more that would be great for you to know as well.
1. Set File Names As Bookmarks When Merging
When you merge PDF files, your file names will be set as bookmarks automatically. It is helpful when you need to navigate to some parts quickly.
Just go to "Tools" > "Merge", and add files to combine. Then, open the merged PDF, click on the "Bookmarks," and you will find all the file names are bookmarks in the merged PDF.
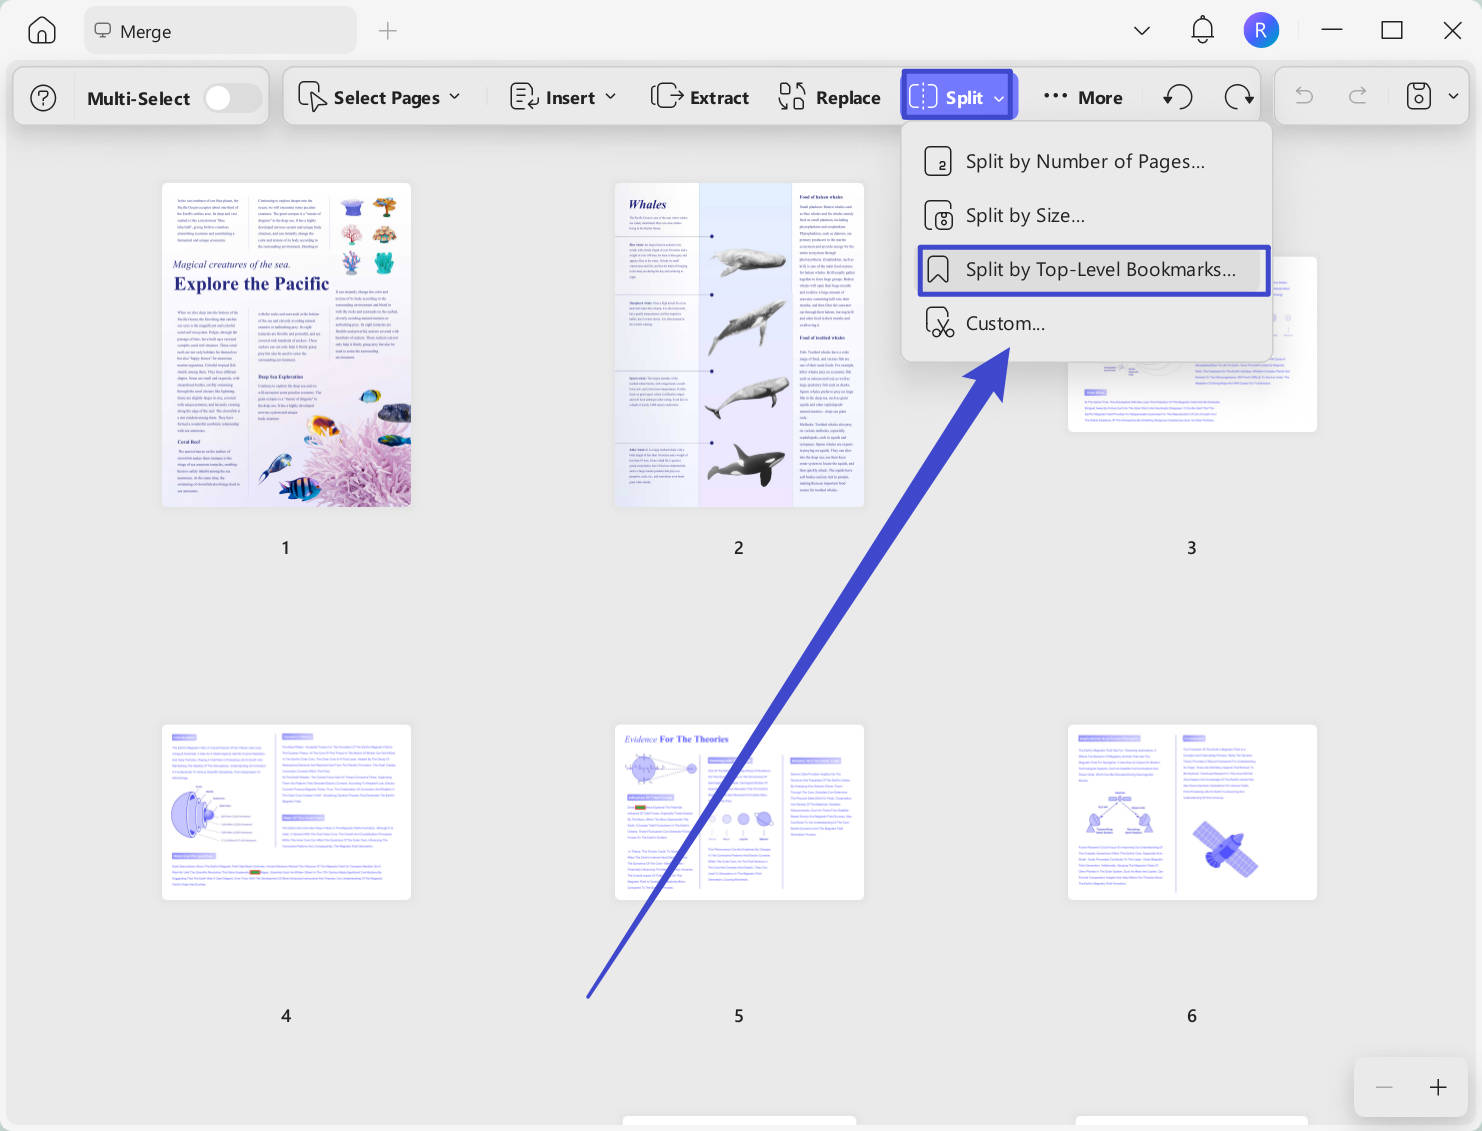
2. Set Bookmarks as File Names When Splitting
If you are using the split by Top Level Bookmarks, your bookmarks will automatically be set as your file names.
Just go to "Organize Pages" > "Split" > "Split by Top Level Bookmarks". You will find all the bookmarks become file names after the split.
3. Sync Editing in UPDF Cloud:
If you store the PDF files in the UPDF Cloud, you can open the PDF directly in the UPDF Cloud, then make changes to the PDF. UPDF Cloud will sync the changes across devices. Here are the steps for you:
Step 1. Click on the "Cloud" and click to open one PDF.
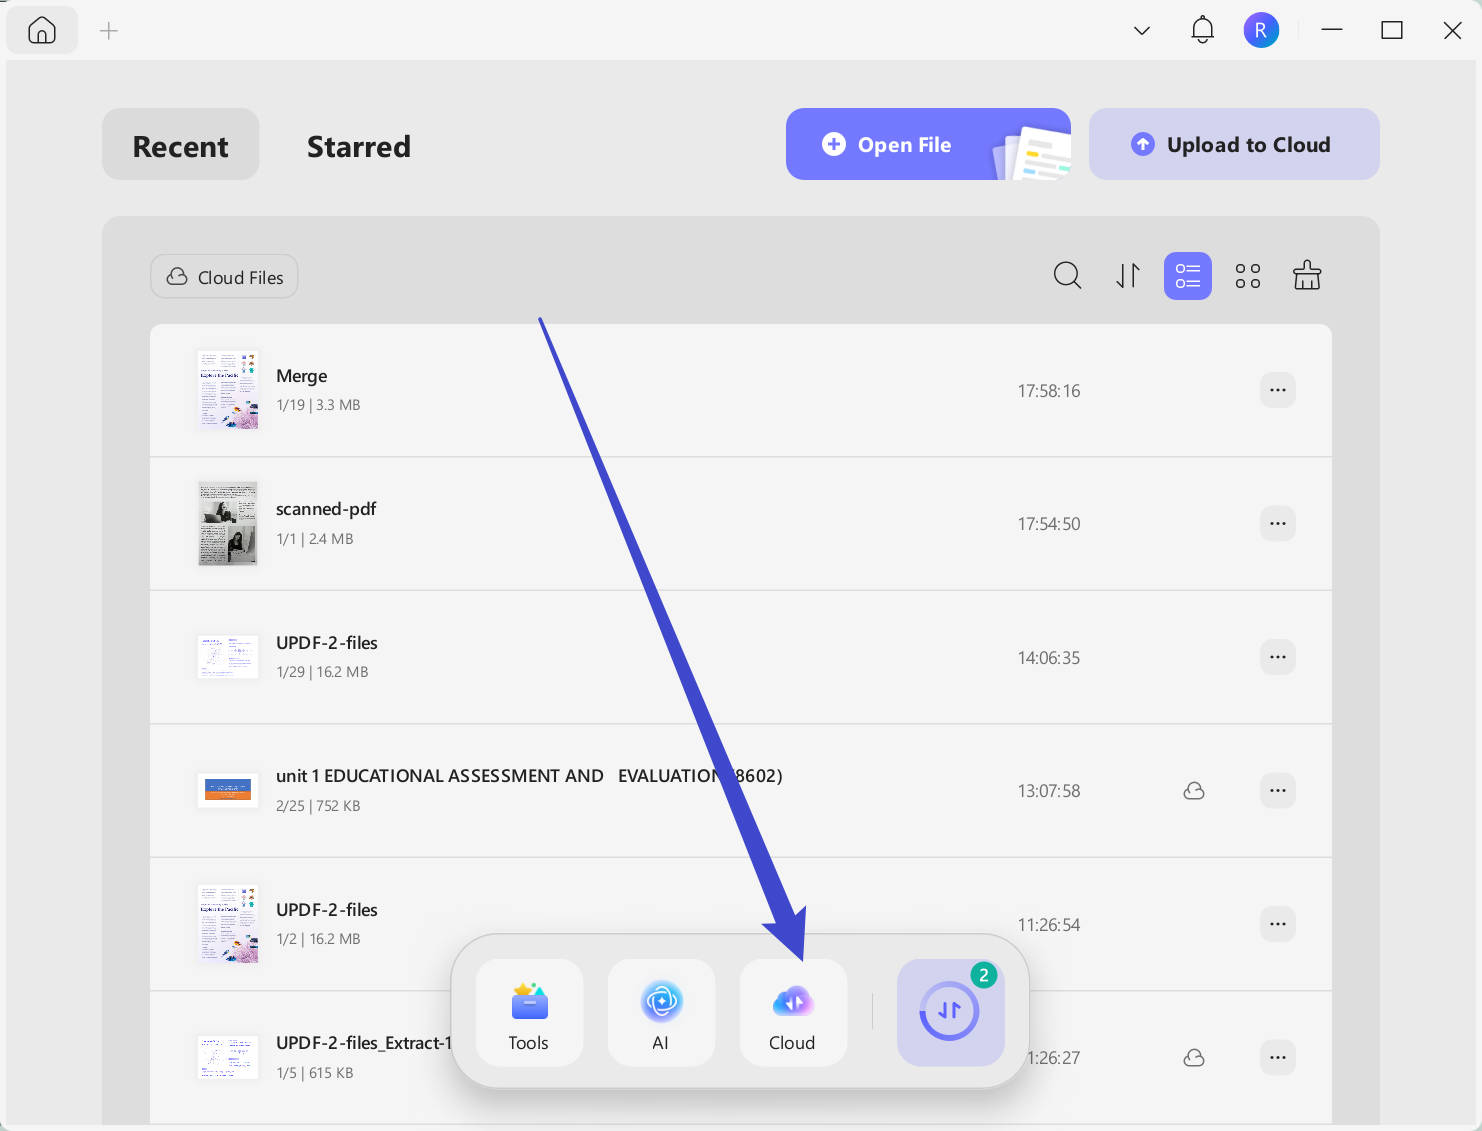
Step 2. Now, you can edit the PDF per your requirements. Hole on the "Ctrl+S" to save the changes. Then, you can go to another device and open the edited PDF in UPDF Cloud. You will find the changes that are synced.
4. Ignore Text Attributes and Spaces to Compare PDFs
When you try to compare PDF files, you can select to ignore text attributes and spaces.
Just click on "Tools" > "Compare PDFs". Select the two PDF files, and check on the two options: "When comparing texts, focus only on content changes and ignore text attributes such as font size and font color" and "Ignore spaces when comparing". Now, you can get accurate results by comparing texts, images, etc.

Conclusion
With all these hidden features, you can master PDF file handling easily. UPDF is also highly rated by renowned media websites, including AppleInsider The extensive range of features sets UPDF apart in the realm of PDF editors. Why not download UPDF via the button below and upgrade to the pro version if you like it?
Windows • macOS • iOS • Android 100% secure


 Enola Davis

 Enrica Taylor
 Enola Miller