Jupyter Notebook is a web-based notebook application for someone working in data science. You can have a complete record of all your sessions including- codes, narrative texts, equations, and output. Sometimes, you have taken all the records, but you want to save or share them as a PDF for convenience. Here, we will discuss three ways to convert notes in Jupyter Notebook to PDF.
Part 1. How to Print Jupyter Notebook As PDF?
Now imagine you have most of your codes and notes taken in the Jupyter Notebook but you want to save it as PDF to use them later. The most straightforward method to convert Jupyter Notebook notes to PDF is by using the "Print" option. Here are the steps:
Step-1. Print Notebook
Go to the "File" menu and hit the "Save" option. Once saved, again in the "File" menu, select choose the "Print" option.
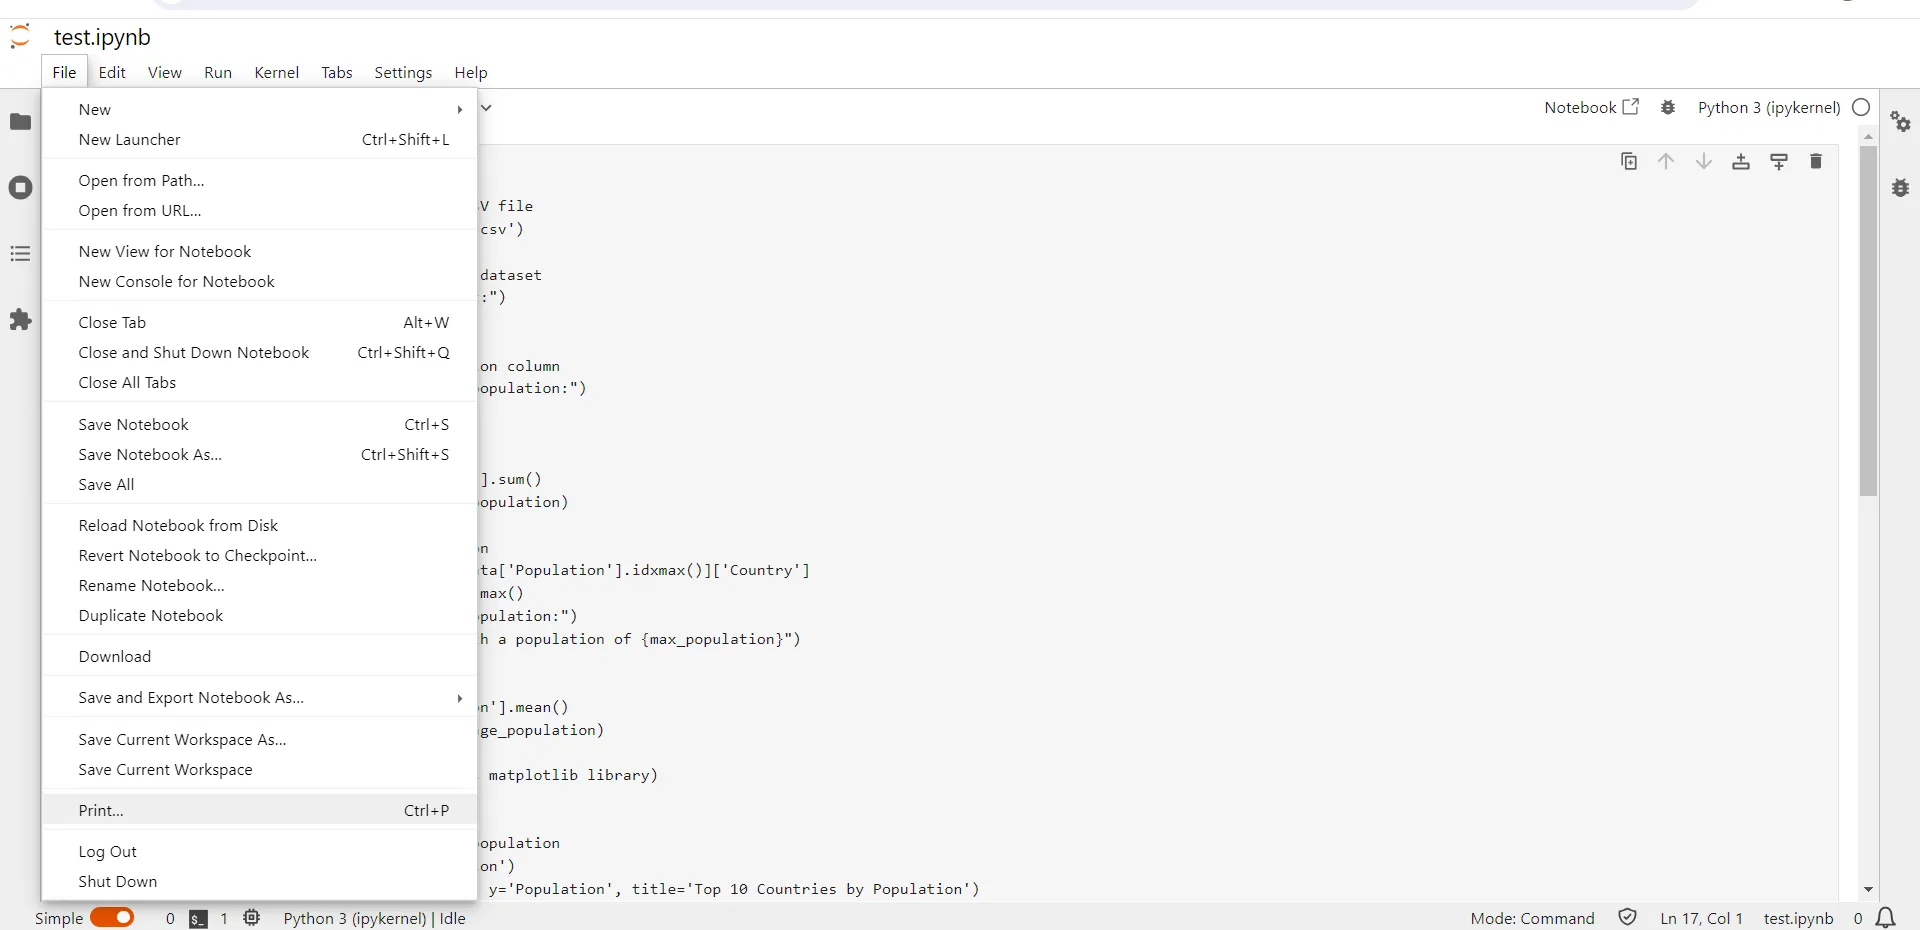
Step-2. Save Print as PDF
From the "Destination" dropdown menu in the print window, select "Save as PDF". Depending on your requirements, pick the layout, page size, pages per sheet, margins, scale, etc. Click on the "Save" button and you can choose the file name and the destination folder to save the PDF file.
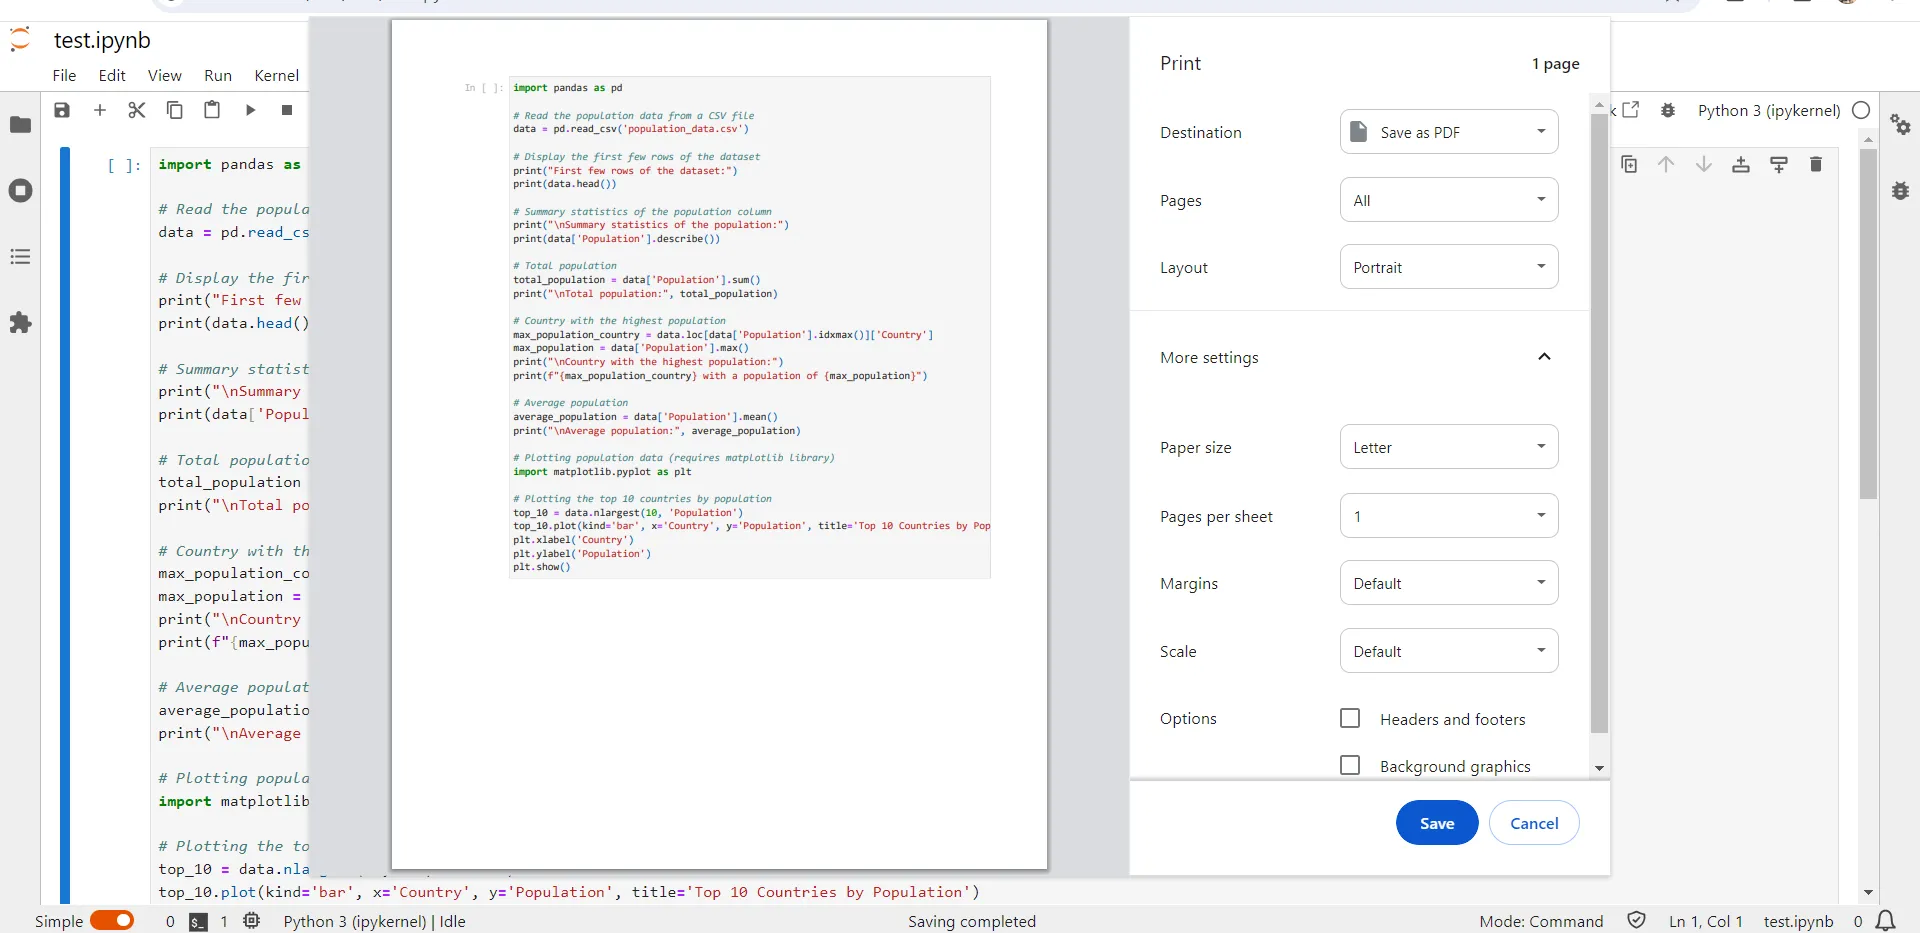
Part 2. How to Convert Jupyter Notebook to PDF Via Screenshot?
If you use an older version of the Jupyter Notebook, you may not see the "Print" option in the "File" menu. It may also happen if you have a technical glitch in the program. However, you can still convert the Jupyter Notebook to PDF by taking the screenshot and then converting it to PDF. Here is a step-by-step guide:
Step-1. Take the Screenshot and Save it
Take the screenshot by pressing the "prtsc" key on your keyboard. A screenshot will be taken. Recent versions of windows will automatically paste and save the screenshot. However, if you are using an older version of the Windows, you can paste the screenshot into any "Paint and Snip" or "Paint brush" app on your computer and save it as an image.
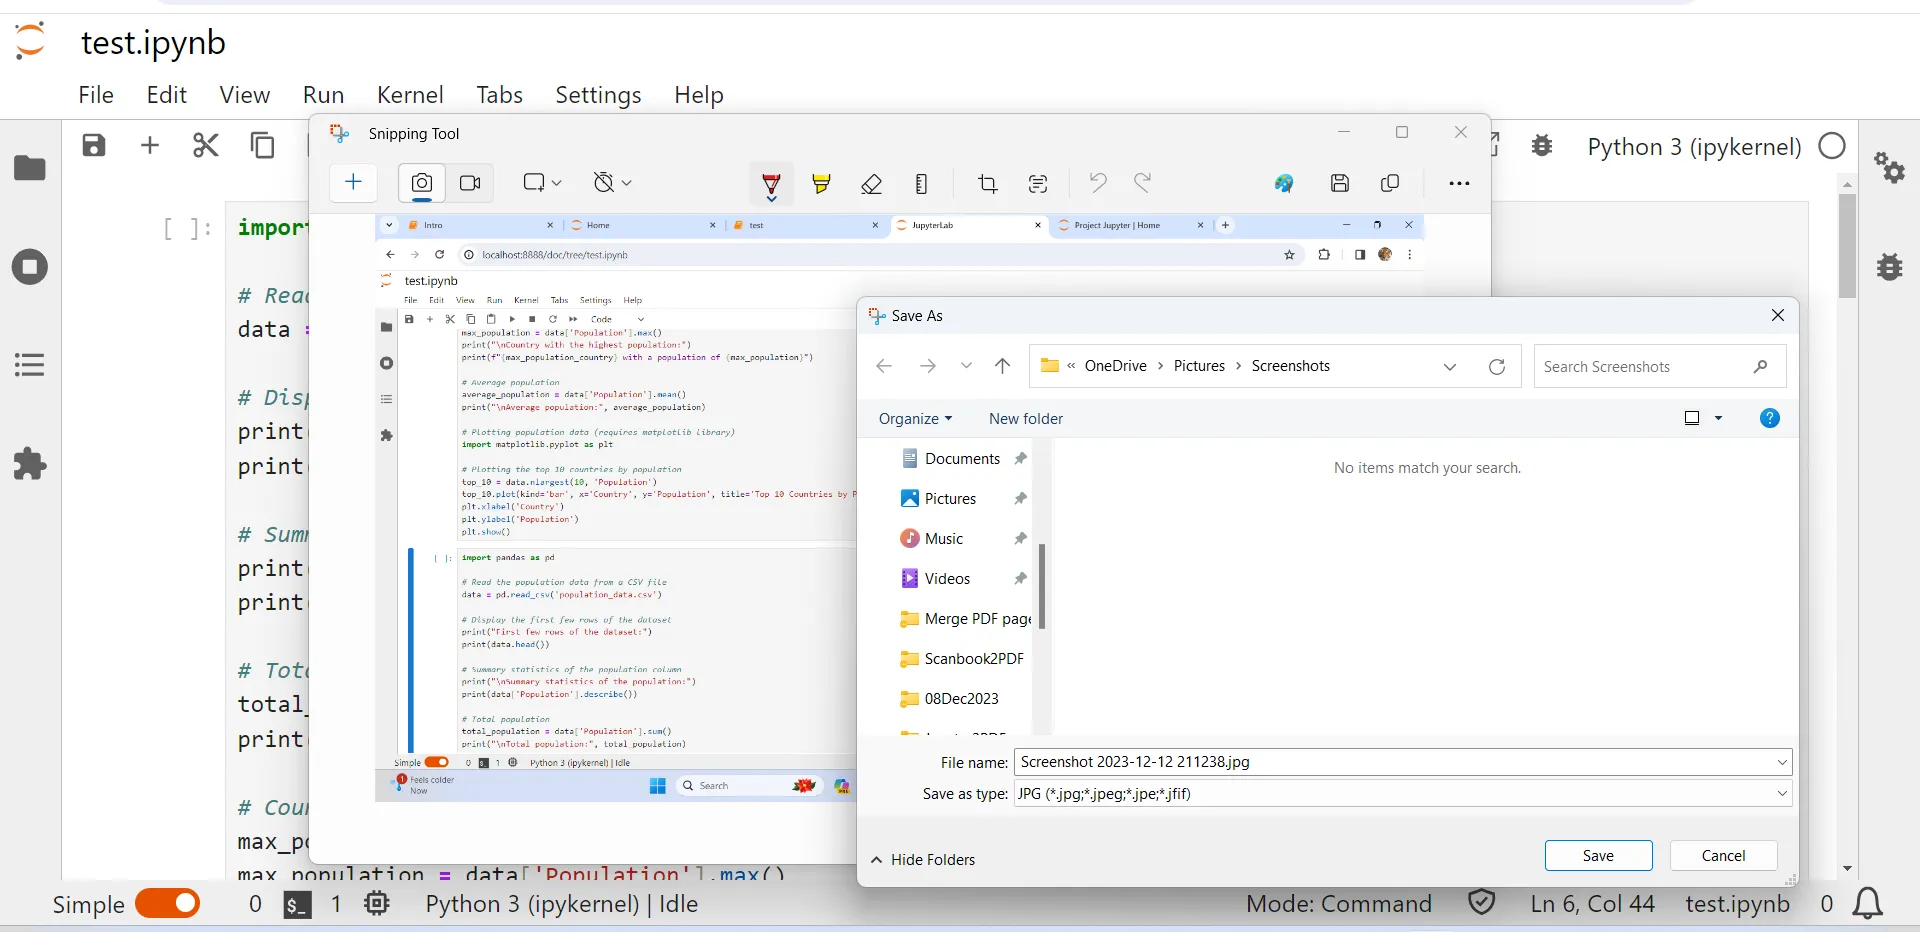
Step-2. Convert screenshots to PDF using UPDF
One of the easiest ways to convert an image to PDF is by using UPDF. It is a PDF reader and editor and is one of the cheap and the best option. Download UPDF by clicking here and open. From the "File" menu, select "Create > PDF from image". The UPDF will convert the image file and open it as PDF. Save the generated PDF in your folder of choice.
Windows • macOS • iOS • Android 100% secure
Part 3. How to Save Jupyter Notebook as PDF Via Download As Button
Another easy way to save Jupyter Notebook as a PDF is by using the "Download" option. It is also a direct method, so you don't have to beat about the bush. Here are the steps:
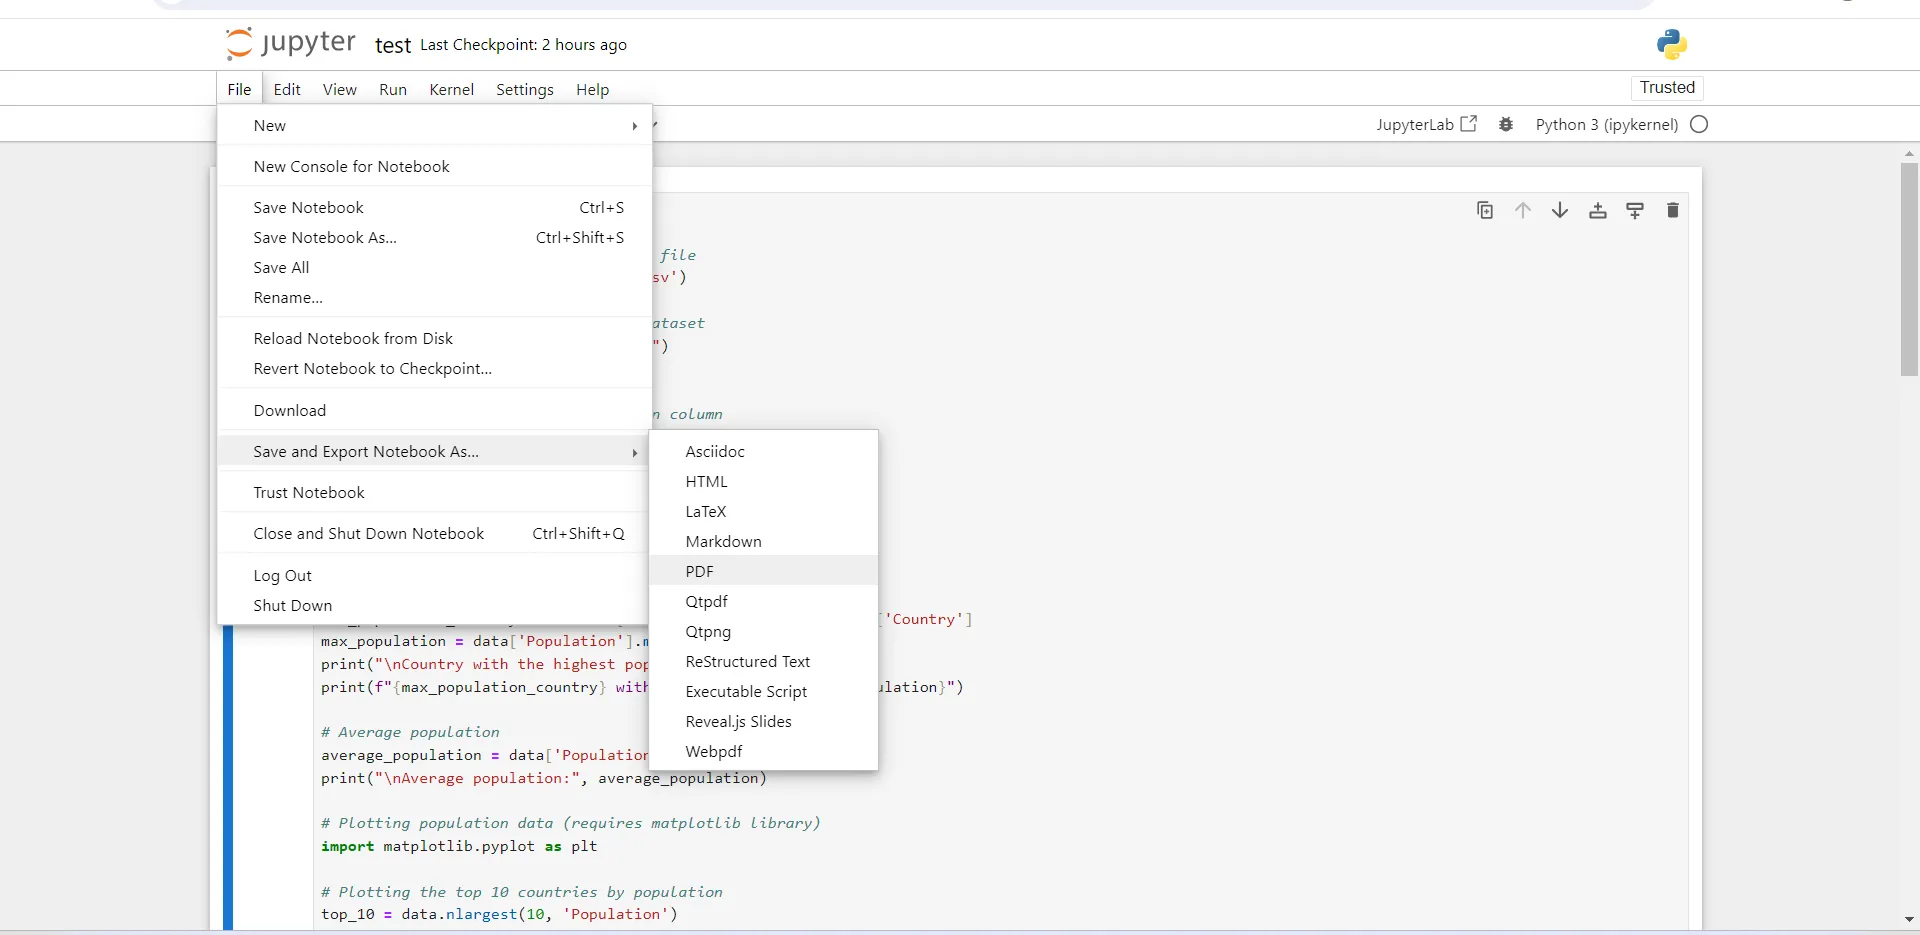
The Guide: From the "File" menu, select "Save and Export Notebook as > PDF". It will start the export and download the PDF file, which you can find in your "Download" folder. You can then copy the file and paste it to your folder of choice.
Part 4. How to Edit and Share the PDF Converted from Jupyter Notebook?
You may want to edit/annotate the PDF you just converted from Jupyter Notebook and want to share it too. If so, UPDF offers great tools to edit PDF generated directly from a text file, an image or a scanned file. You can edit text or images in your PDF file. You can also share the PDF link using UPDF. You can download UPDF now and use all the editing features.
Windows • macOS • iOS • Android 100% secure
So now, you want to know how to edit the PDF created from Jupyter Notebook? Here is the guide for you.
Step-1. Open you PDF you just converted
Start by opening the UPDF app and use "Open File" menu to open the PDF file.

Step-2. Edit PDF File
Once the PDF file is open, you will see a panel of options on the left, click on the "Edit" in "Tools" to open a banner of edit options. From here, you can click on the text or image to edit them directly. Or if you need to add new text, images, or links, you can click the icon on the top menu.
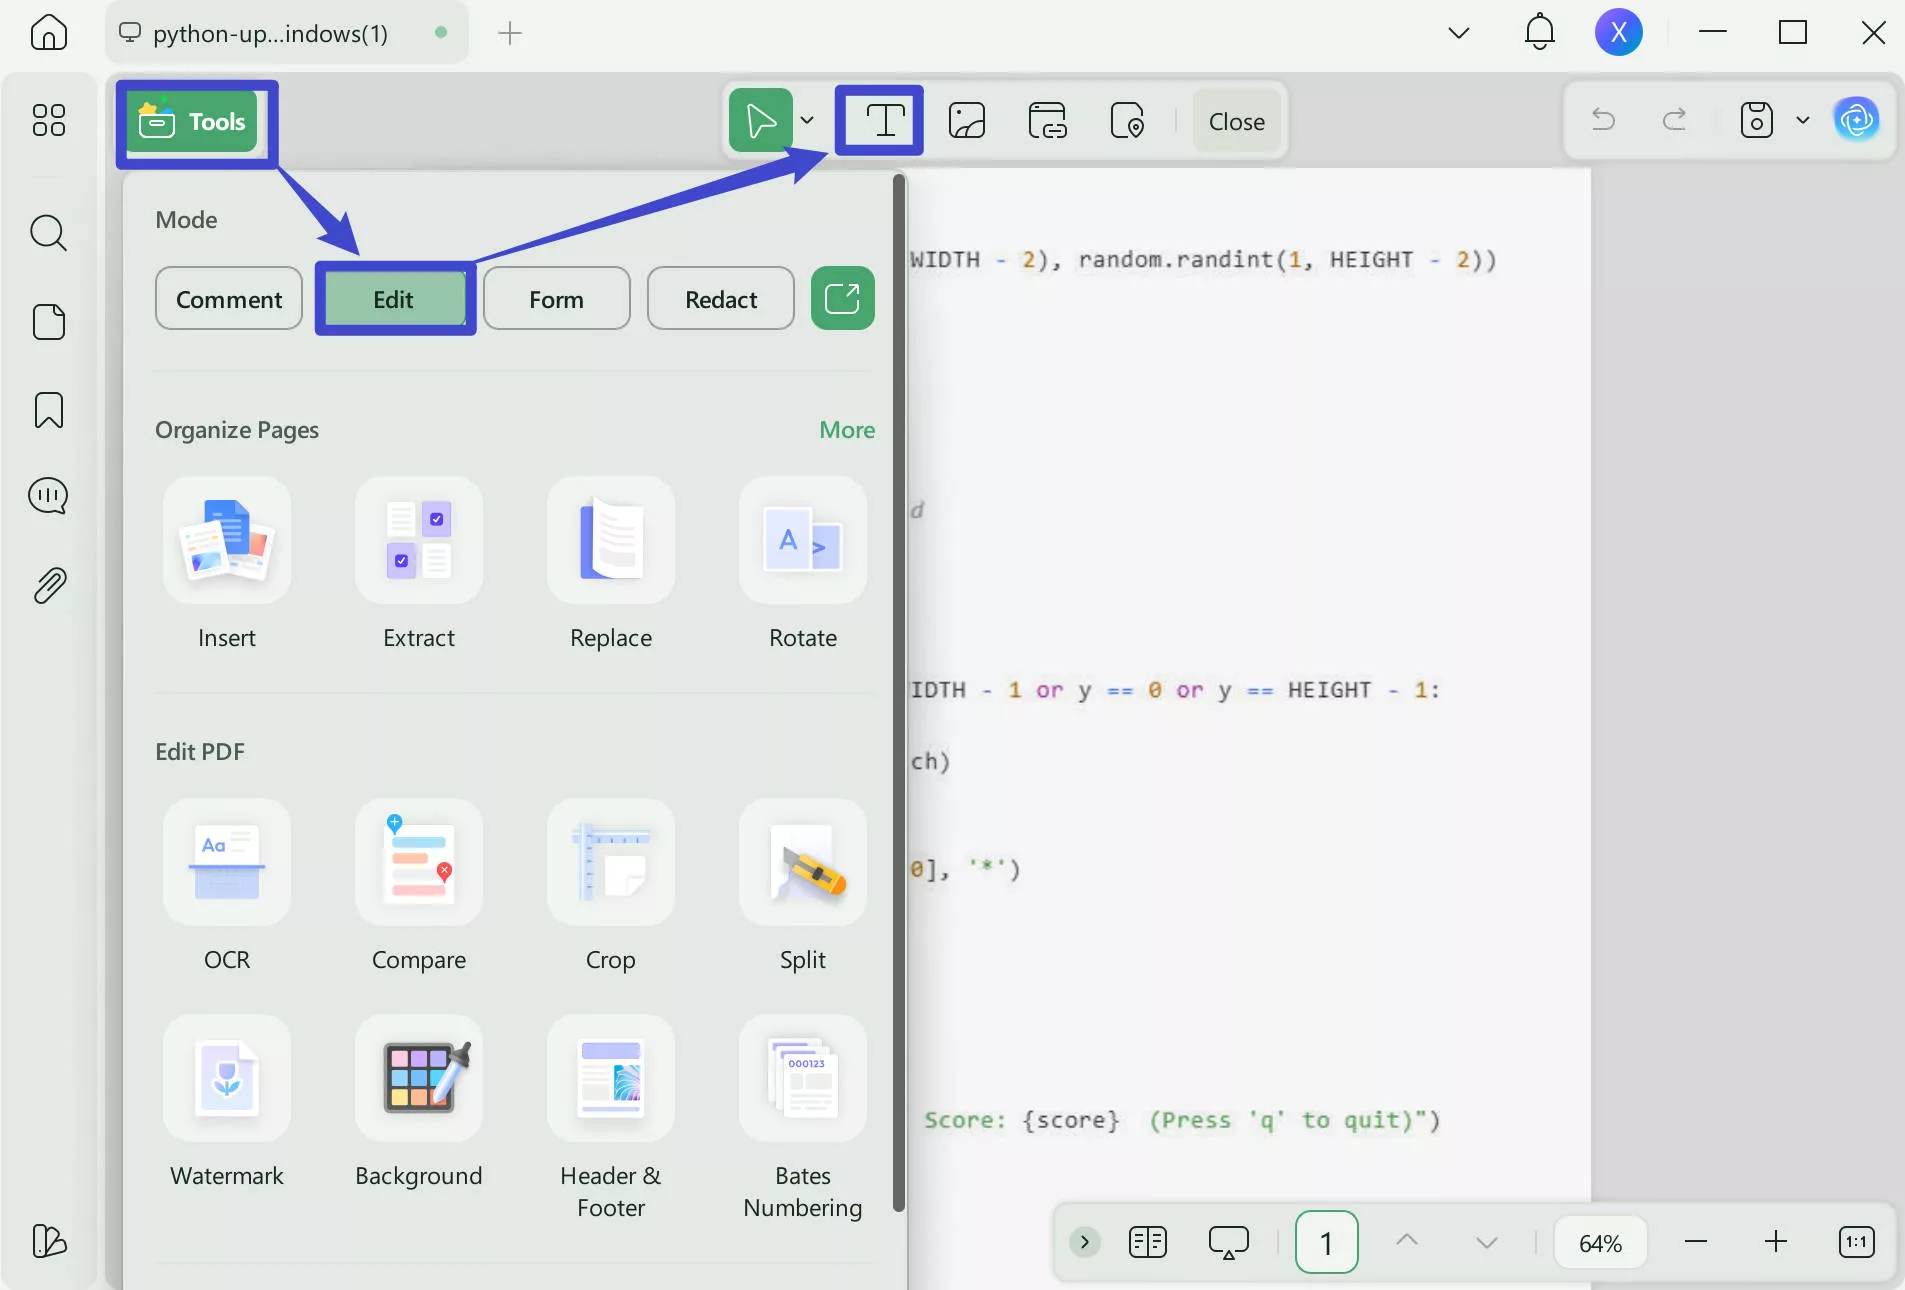
Step-3. Share Your PDF File
To share your file with someone, click on the "UPDF Share" icon, you can find towards the right of the screen. After creating a link, you can Copy a link to share with others or click the "Email" to share by email. Also, you can download a QR code and send the image to someone to use.
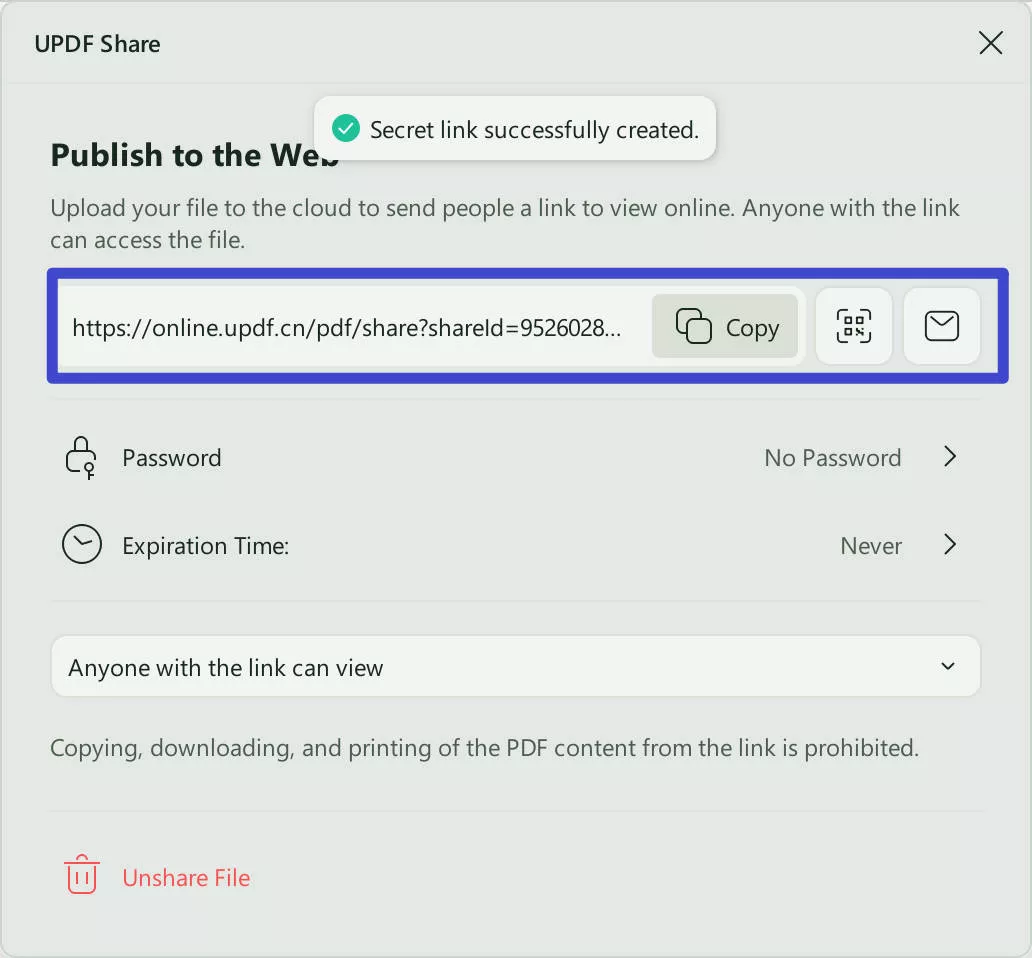
Besides PDF reading, editing, and sharing, UPDF has a range of tools like:
- Annotate PDF using pencil and eraser tool, add stickers, stamps, add attachment and comments
- Add bookmark, watermark, background, header and footer to PDF
- Organize, crop, combine pages, create and fill PDF forms
- Compress and Flatten PDF
- Protect PDF
- Print PDF
- Most importantly, UPDF has integrated AI, which can help you summarize, explain, translate, write and rewrite text
UPDF is very user-friendly and is compatible with Windows, Mac, iOS or Android. It is very cheap in comparison to comparable PDF editors. You can download UPDF now and buy an annual subscription for 25.99 USD to enjoy all the premium features. Before you purchase the annual subscription, you can also try the Free Trial with limited but still a lot of features. UPDF is also getting noticed by mainstream technology media on various platforms. You can also read the review of UPDF by "Laptopmedia" here and watch the YouTube review by clicking this link.
Part 5. FAQS About Jupyter Notebook to PDF
Q1. How to Convert Jupyter Notebook to PDF Without Code?
You can export Jupyter Notebook to PDF without code. Towards the right of the toolbar, there is a dropdown menu, select "Raw"from the menu. Now if you try to convert the file to PDF, it will not show the code.
Q2. How to Export Jupyter Notebook to PDF with Images?
In the "File" menu, choose "Save and Export Notebook as > PDF". The whole notebook with images will be downloaded as PDF automatically. Alternatively, you can print the notebook and then save it as PDF. The "Print" option can be found at the end of the "File" menu. Also, you can take a screenshot image and then convert it to PDF using UPDF.
Q3. How to Export Jupyter Notebook to PDF in Vscode?
Open your Jupyter Notebook files in Vscode. In the Vscode command palette write "Export" in the search bar and choose the "Jupyter: Export to PDF" option from the list. This will convert the notebook file to PDF and save it in the same folder.
Final Words
You can see that there are many ways to convert Jupyter Notebook to PDF. If you also want to edit and share the PDF, you can use UPDF, a very comprehensive PDF reader and editor. It is cheap and the tools offered are worth every penny. If you haven't already, download it right now by clicking here. Once you are satisfied with its functionality, upgrade to the UPDF Pro version to fully enjoy all the features of this tool.
Windows • macOS • iOS • Android 100% secure
 UPDF
UPDF
 UPDF for Windows
 UPDF for Mac
 UPDF for iPhone/iPad
 UPDF for Android
 UPDF AI Online
 UPDF Sign
 Edit PDF
 Annotate PDF
 Create PDF
 PDF Form
 Edit links
 Convert PDF
 OCR
OCR PDF to Word
 PDF to Image
 PDF to Excel
 Organize PDF
 Merge PDF
 Split PDF
 Crop PDF
 Rotate PDF
 Protect PDF
 Sign PDF
 Redact PDF
 Sanitize PDF
 Remove Security
 Read PDF
 UPDF Cloud
 Compress PDF
 Print PDF
 Batch Process
 About UPDF AI
 UPDF AI Solutions
 AI User Guide
 FAQ about UPDF AI
 Summarize PDF
 Translate PDF
 Chat with PDF
 Chat with AI
 Chat with image
 PDF to Mind Map
 Explain PDF
 Scholar Research
 Paper Search
 AI Proofreader
 AI Writer
 AI Homework Helper
 AI Quiz Generator
 AI Math Solver
 PDF to Word
 PDF to Excel
 PDF to PowerPoint
 User Guide
 UPDF Tricks
 FAQs
FAQs UPDF Reviews
 Download Center
 Blog
Blog Newsroom
 Tech Spec
 Updates
 UPDF vs. Adobe Acrobat
 UPDF vs. Foxit
 UPDF vs. PDF Expert




 Enrica Taylor
 Enola Davis
 Enola Miller