 UPDF
UPDF
 UPDF for Windows
 UPDF for Mac
 UPDF for iPhone/iPad
 UPDF for Android
 Nomostar
 UPDF AI Online
 UPDF Sign
 IvyCraft
 Edit PDF
 Annotate PDF
 Create PDF
 PDF Form
 Edit links
 Convert PDF
 OCR
OCR PDF to Word
 PDF to Image
 PDF to Excel
 Organize PDF
 Merge PDF
 Split PDF
 Crop PDF
 Rotate PDF
 Protect PDF
 Sign PDF
 Redact PDF
 Sanitize PDF
 Remove Security
 Read PDF
 UPDF Cloud
 Compress PDF
 Print PDF
 Batch Process
 About UPDF AI
 UPDF AI Solutions
 AI User Guide
 FAQ about UPDF AI
 Summarize PDF
 Translate PDF
 Chat with PDF
 Chat with AI
 Chat with image
 PDF to Mind Map
 Explain PDF
 PDF AI Tools
 Image AI Tools
 AI Chat Tools
 AI Writing Tools
 AI Study Tools
 AI Working Tools
 Other AI Tools
 AI Bookmark Generation
 AI Bookmark Summary
 AI Watermark Generation
 AI Background Generation
 AI Sticker Generation
 AI Stamp Generation
 AI Editing Suite
 UPDF Copilot
 AI Page Management
 AI Semantic Search
 PDF to Word
 PDF to Excel
 PDF to PowerPoint
 Enterprise Solution
 Enterprise Sign
 Enterprise AI
 Enterprise Plan
 Enterprise User Guide
 Enterprise Webinar
 IT
IT Education
 Construction
 Financial Service
 Healthcare
 Insurance
 Legal
Legal Manufacturing
 Government
 Researchers & PhDs
 Solopreneurs & Freelancers
 Lawyers & Legal Professionals
 Real Estate Agents & Brokers
 Education Solution
 Customer Stories
 User Guide
 UPDF Tricks
 FAQs
FAQs UPDF Reviews
 Download Center
 Blog
Blog Newsroom
 Tech Spec
 Updates
 UPDF vs. Adobe Acrobat
 UPDF vs. Foxit
 UPDF vs. PDF Expert

Quick answer:
Deleting an image and redacting sensitive content serve different goals. For example, delete an outdated product photo from a catalog; if a screenshot shows a customer's details, use redaction to remove the selected visible content and inspect the saved PDF before sharing it. This guide covers both choices below.
This is a companion piece to our full walkthrough on how to edit a PDF — start there if you also need to change text, links, or scanned pages.
Part 1. Which method should you use?
Pick the row that matches what you're actually trying to do. All methods run inside UPDF, so you don't switch tools between them.
| What you're trying to do | Method | Best for |
|---|---|---|
| Delete one or two pictures | Desktop Edit → click image → Delete | A stray logo, a duplicate photo, an image that no longer fits the layout |
| Remove every image on a page | Filter → Image only → Ctrl/⌘ + A → Delete | Photo-heavy brochures, catalogs, bug reports full of screenshots |
| Remove a picture on the go | iPhone/Android Edit → tap image → Delete | Clearing a photo off a file on your phone before you send it |
| Take out an image that holds sensitive data | Redaction (not delete) | ID scans, signature images, embedded screenshots of private screens |
Part 2. How to Remove an Image From a PDF on Windows and Mac
The desktop app gives you the fastest, most precise control — useful when a page has several images stacked close together. The steps are identical on Windows and Mac. Open the document in UPDF — if you don't have it yet, download UPDF for free and install it in under a minute.
Windows • macOS • iOS • Android 100% secure
Step 1. Click Open File on the main interface and choose your PDF.
Step 2. Click Edit on the top toolbar to enter editing mode.
Step 3. Click the image you want to remove.
Step 4. Right-click the image and choose Delete, or simply press the Delete key on your keyboard. The image is gone instantly.
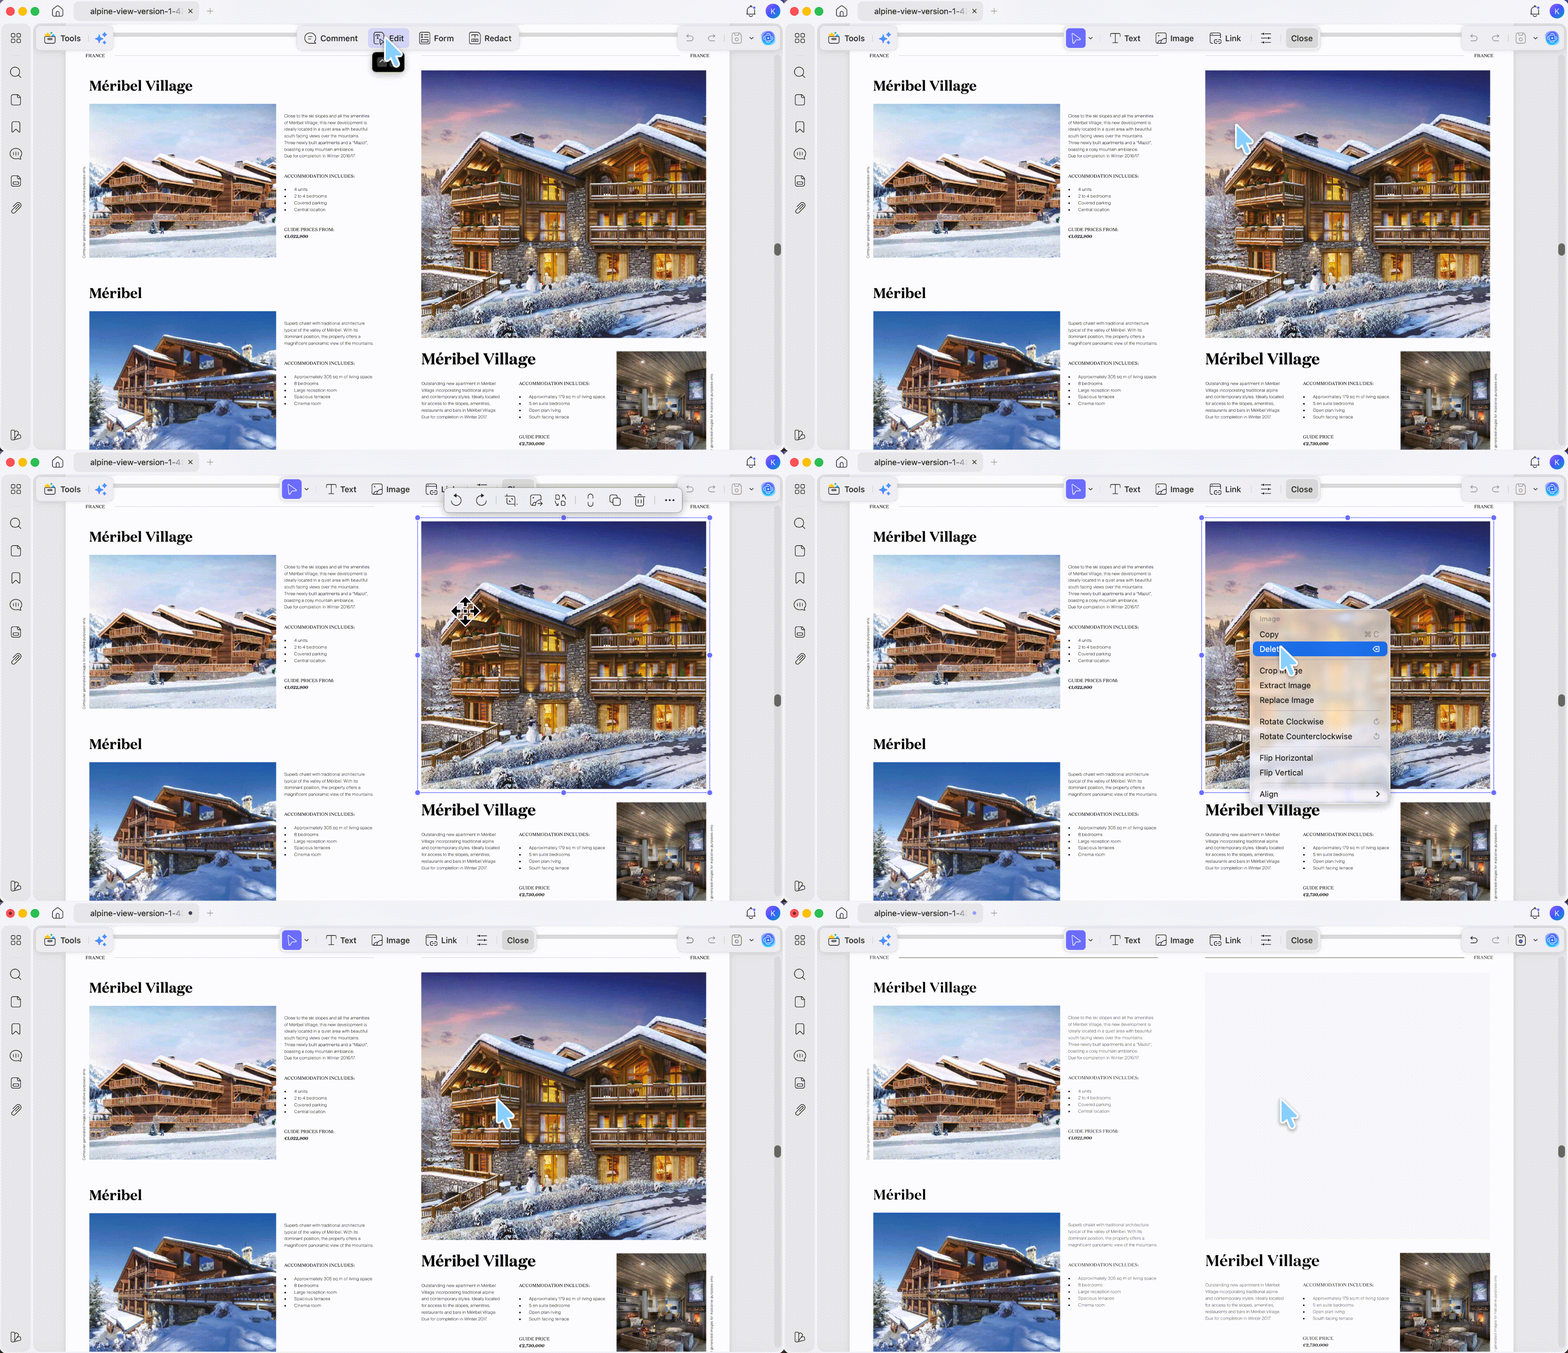
Step 5. Save the file or save as other to keep the original untouched and export a clean copy.
Delete every image on a page in one action
If a page is packed with pictures — a property brochure, a photo-heavy catalog — deleting them one at a time is slow. UPDF's Filter lets you select all the images on the current page at once.
Step 1. In Edit mode, click the Filter icon in the top editing toolbar to open Filter Options.
Step 2. Turn off every toggle except Image, so only images are selectable. Text, links, paths, and shading are now locked and won't be caught in your selection.
Step 3. Press Ctrl + A (Windows) or ⌘ + A (Mac) to select every image on the page at once.
Step 4. Right-click and choose Delete, or press the Delete key. Every image on the page disappears while the text and layout stay exactly in place.
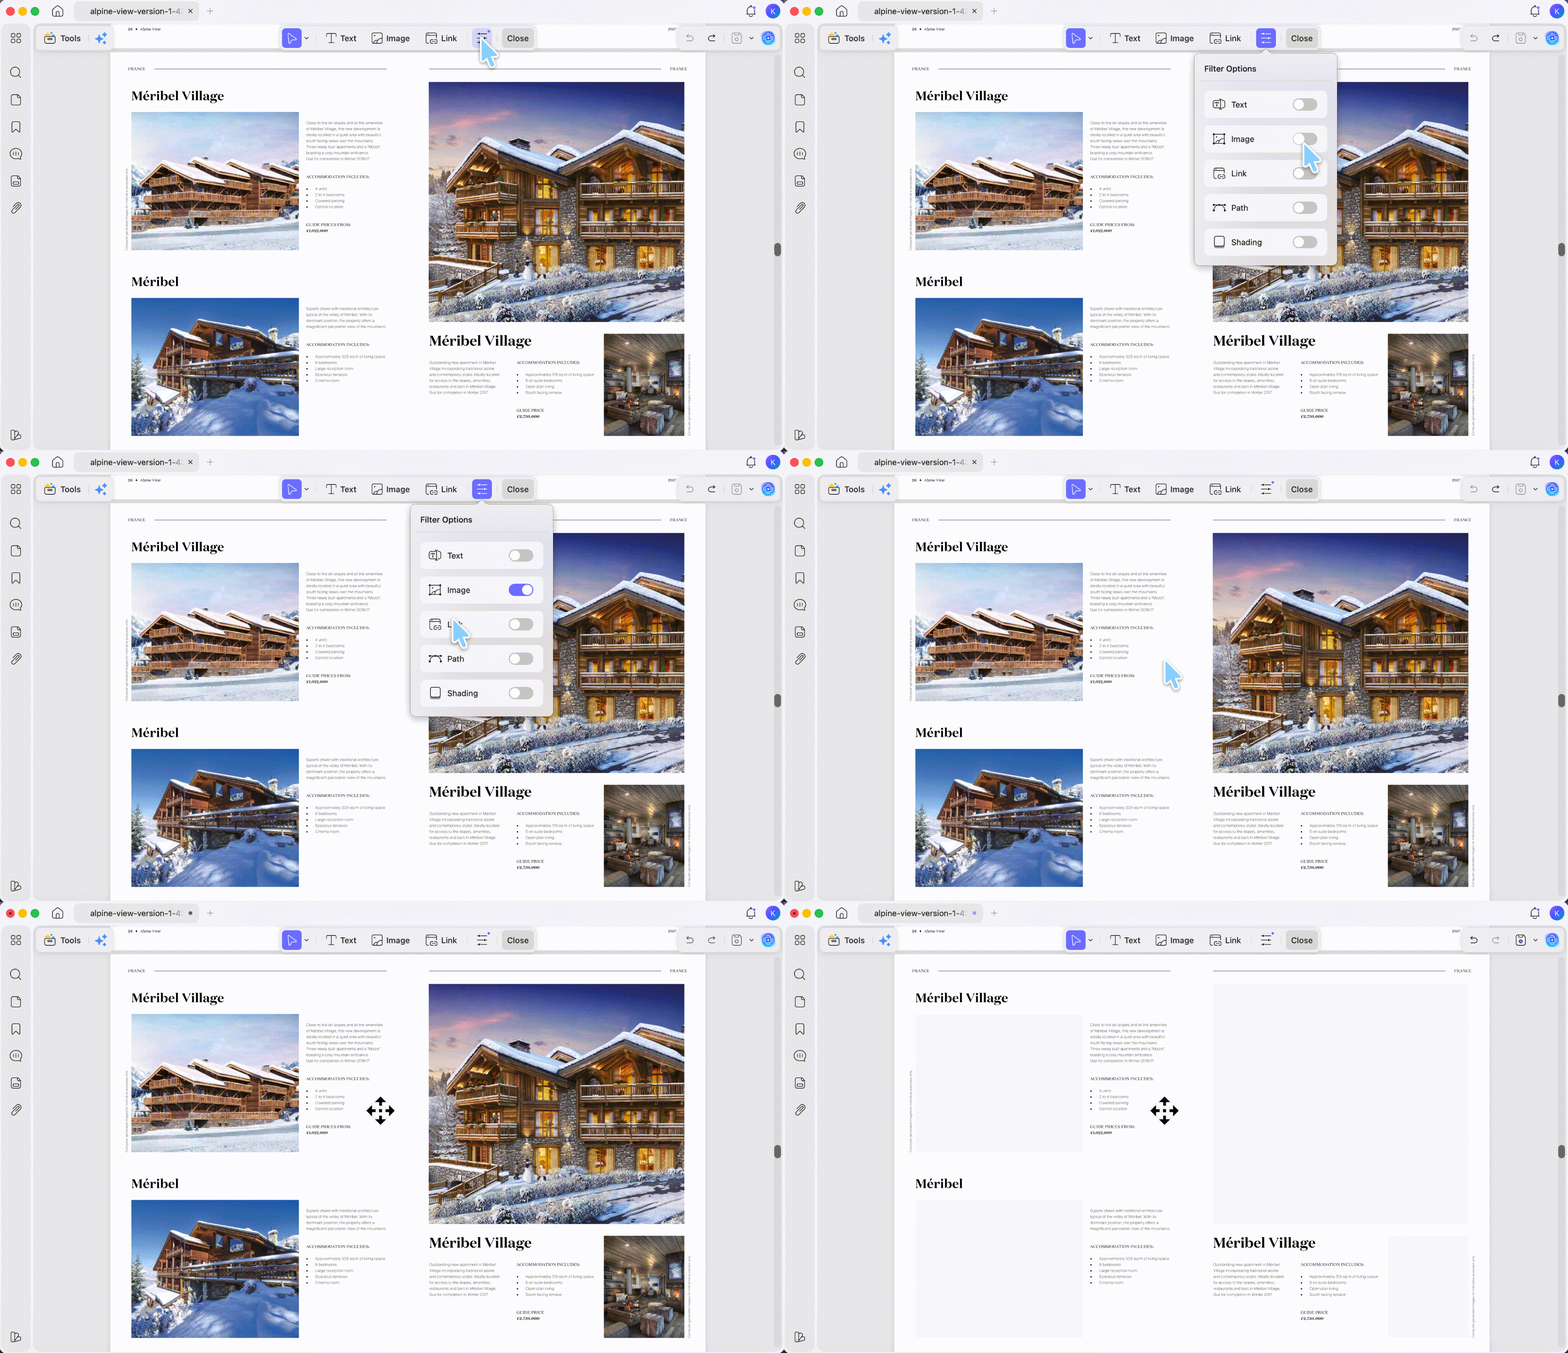
This is the fastest route for privacy clean-ups and template extraction, where you want the words but none of the pictures.
Download UPDF for free to try deleting an image on your own file — installation is free, and Pro features unlock when you need watermark-free export or advanced tools.
Windows • macOS • iOS • Android 100% secure
Part 3. How to Remove an Image From a PDF on iPhone and Android
UPDF's mobile apps are fully featured, not stripped-down viewers — image deletion works the same way it does on desktop, so you can clean up a file the moment it lands in your inbox. The steps are the same on iPhone, iPad, and Android; only the position of the Edit icon differs.
Step 1. Open the PDF in the UPDF app.
Step 2. Tap the Edit icon to enter editing mode.
Step 3. Tap the image you want to remove. A small bar appears with options to copy, delete, crop, replace, and more.
Step 4. Tap Delete, then save the file.
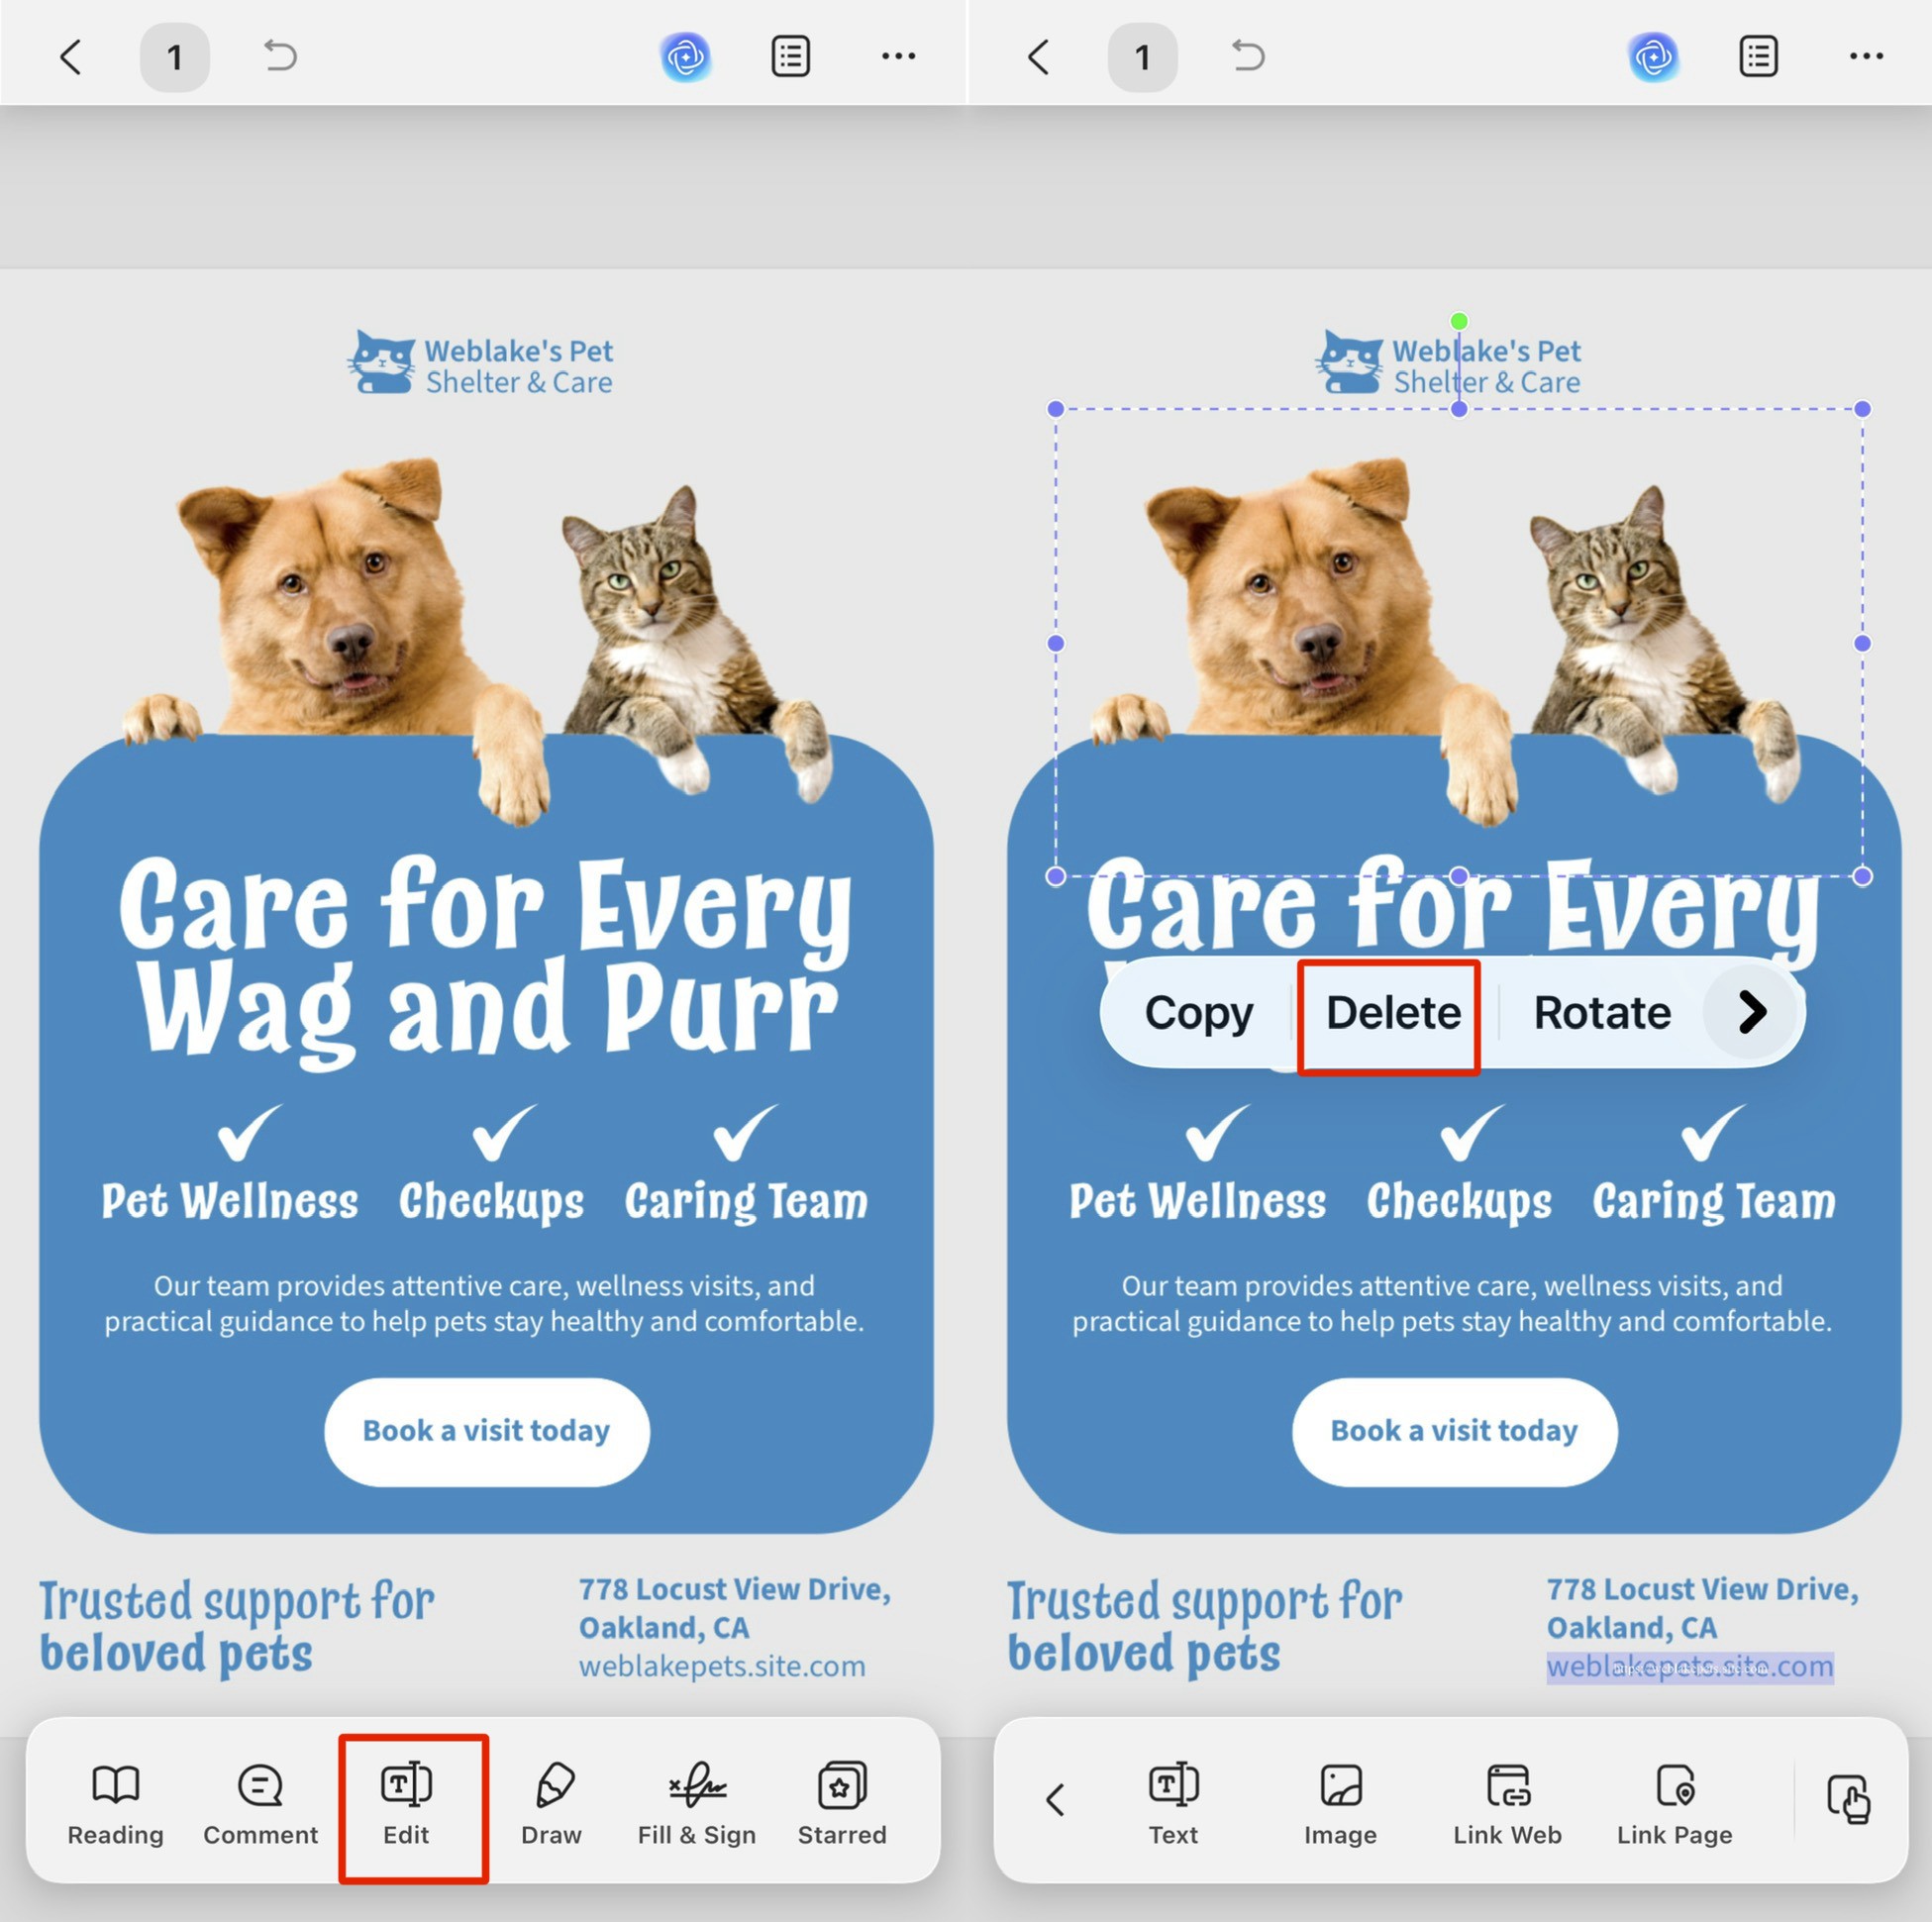
Because one UPDF license covers Windows, Mac, iOS, and Android, you can start a cleanup on your laptop and finish it on your phone without re-buying anything.
Part 4. When and Why People Remove Images From a PDF
"Remove image from PDF" is rarely about tidiness. Most of the time it's a privacy or reuse problem in disguise. Here are the situations where stripping images out solves a real headache — and the exact terms people search when they hit them.
Privacy clean-up before sharing. A bug report full of screenshots, a résumé with a headshot, or a quote studded with product photos all carry visual information you may not want to forward. The Filter shortcut in Part 1 lets you strip every image off a page in one action, keeping the text intact while dropping the visual exposure.
E-reader and focused-study mode. Colored charts and decorative figures make a document lag on a Kindle or e-ink tablet and pull the eye during deep revision. Strip the images and you get a light, text-only file that scrolls smoothly and is easier to read for long stretches.
Template extraction and catalog updates. Remove the pictures from a well-designed poster or brochure and you're left with a clean layout skeleton — text frames and grid — you can reuse. Product catalogs work the same way: pull the old product shots, keep the copy and layout, drop in the new images.
Legal and contract review. Reviewers often want just the clause text. Removing company logos, header/footer graphics, and scanned signature images keeps attention on the wording rather than the decoration.
Translation and localization prep. Feeding a PDF full of icons and diagrams into a CAT tool invites garbled output. Removing the images first gives translators clean text to work with, and the visuals can be re-inserted afterward.
Part 5. Delete vs. Cover vs. Redact — Which One You Actually Need
This is the distinction most articles skip, and getting it wrong is a genuine privacy risk. If the image you're removing contains sensitive information, "delete" may not be enough.
- Delete image → removes the picture as an object. Fast and clean for logos, duplicates, or images that no longer fit. The right choice when the picture itself isn't sensitive.
- Cover / black-out → drops a filled shape or box on top of the image. It looks hidden, but the original image data still sits underneath and can be recovered. Never use this for anything confidential.
- Redaction → permanently removes the underlying content, not just the visible mark. This is the correct method for ID scans, signature images, or screenshots of private data.
A one-line way to remember it: delete takes the picture off the page; cover just hides it; redaction removes the data itself. Think of a cover box as a sticker slapped over a photo — peel it off and the photo is still there — while redaction is shredding the photo before it ever reaches the recipient.
The technical reason matters: true redaction operates at the binary level — the distinction between "clearing" a visible mark and "purging" the underlying data that NIST SP 800-88 draws for media sanitization. Improperly hidden personal data can also be a reportable exposure under privacy regulations like GDPR Article 17. If your image holds regulated data, use UPDF's Redaction tool rather than a plain delete.
If you handle contracts, medical forms, or IDs, download UPDF for free and try redaction on a copy first, so you can confirm the data is truly gone before you share.
Part 6. Edge Cases: When the Image Won't Delete
The standard method covers almost every file. These are the exceptions and how to handle them.
- "I click the image but nothing selects." The graphic is likely a background or a page-level element, not an inline image. Use UPDF's Remove Background from PDF approach instead of Edit mode.
- "The image is part of a scan." In a scanned PDF, the whole page is one image, so there's no separate picture to delete. Run OCR first to separate text from graphics, or crop the region you want gone.
- "I deleted it, but it still prints." You almost certainly saved over a cached copy or exported before saving. Re-open the saved file and confirm the image is gone before printing.
- "The image looks blurry or broken and won't remove cleanly." A corrupted image object can resist selection; try right-click → Delete Image, and if it persists, delete and re-insert the page.
Part 7. FAQs
1. Will removing an image mess up the text layout?
No. Each image is an independent object, so deleting one leaves the surrounding text and formatting exactly where they were.
2. Can I get an image back after I delete it and save?
Only if you kept a copy. Undo works within your editing session, but once you save and reopen, the image is gone — so use Save As Other to keep the original if you might need it.
3. Why can I still see the image after deleting it in my browser?
Browsers and email previews often cache the old version. Fully close and reopen the saved file — if the picture is gone in UPDF, the saved copy is clean.
Conclusion
Removing an image from a PDF takes four steps in UPDF — open, Edit, click, Delete — and works identically on Windows, Mac, iPhone, and Android, so you can clean up a file wherever you are. When the picture holds sensitive information, reach for UPDF's Redact tool instead of a plain delete. For the full picture on changing text, links, and scanned pages, see our guide on how to edit a PDF.
A PDF copy is useful when you want the pictures to read as one set of pages. You can follow the video below for an introduction to editing PDF content in UPDF.
Download UPDF for free to try removing an image on your own file — installation is free, and Pro features are available when you need watermark-free export or advanced tools.
Windows • macOS • iOS • Android 100% secure





 Enrica Taylor

 Engelbert White
 Delia Meyer