 UPDF
UPDF
 UPDF for Windows
 UPDF for Mac
 UPDF for iPhone/iPad
 UPDF for Android
 Nomostar
 UPDF AI Online
 UPDF Sign
 IvyCraft
 Edit PDF
 Annotate PDF
 Create PDF
 PDF Form
 Edit links
 Convert PDF
 OCR
OCR PDF to Word
 PDF to Image
 PDF to Excel
 Organize PDF
 Merge PDF
 Split PDF
 Crop PDF
 Rotate PDF
 Protect PDF
 Sign PDF
 Redact PDF
 Sanitize PDF
 Remove Security
 Read PDF
 UPDF Cloud
 Compress PDF
 Print PDF
 Batch Process
 About UPDF AI
 UPDF AI Solutions
 AI User Guide
 FAQ about UPDF AI
 Summarize PDF
 Translate PDF
 Chat with PDF
 Chat with AI
 Chat with image
 PDF to Mind Map
 Explain PDF
 PDF AI Tools
 Image AI Tools
 AI Chat Tools
 AI Writing Tools
 AI Study Tools
 AI Working Tools
 Other AI Tools
 AI Bookmark Generation
 AI Bookmark Summary
 AI Watermark Generation
 AI Background Generation
 AI Sticker Generation
 AI Stamp Generation
 AI Editing Suite
 UPDF Copilot
 AI Page Management
 AI Semantic Search
 PDF to Word
 PDF to Excel
 PDF to PowerPoint
 Enterprise Solution
 Enterprise Sign
 Enterprise AI
 Enterprise Plan
 Enterprise User Guide
 Enterprise Webinar
 IT
IT Education
 Construction
 Financial Service
 Healthcare
 Insurance
 Legal
Legal Manufacturing
 Government
 Researchers & PhDs
 Solopreneurs & Freelancers
 Lawyers & Legal Professionals
 Real Estate Agents & Brokers
 Education Solution
 Customer Stories
 User Guide
 UPDF Tricks
 FAQs
FAQs UPDF Reviews
 Download Center
 Blog
Blog Newsroom
 Tech Spec
 Updates
 UPDF vs. Adobe Acrobat
 UPDF vs. Foxit
 UPDF vs. PDF Expert

Quick answer:
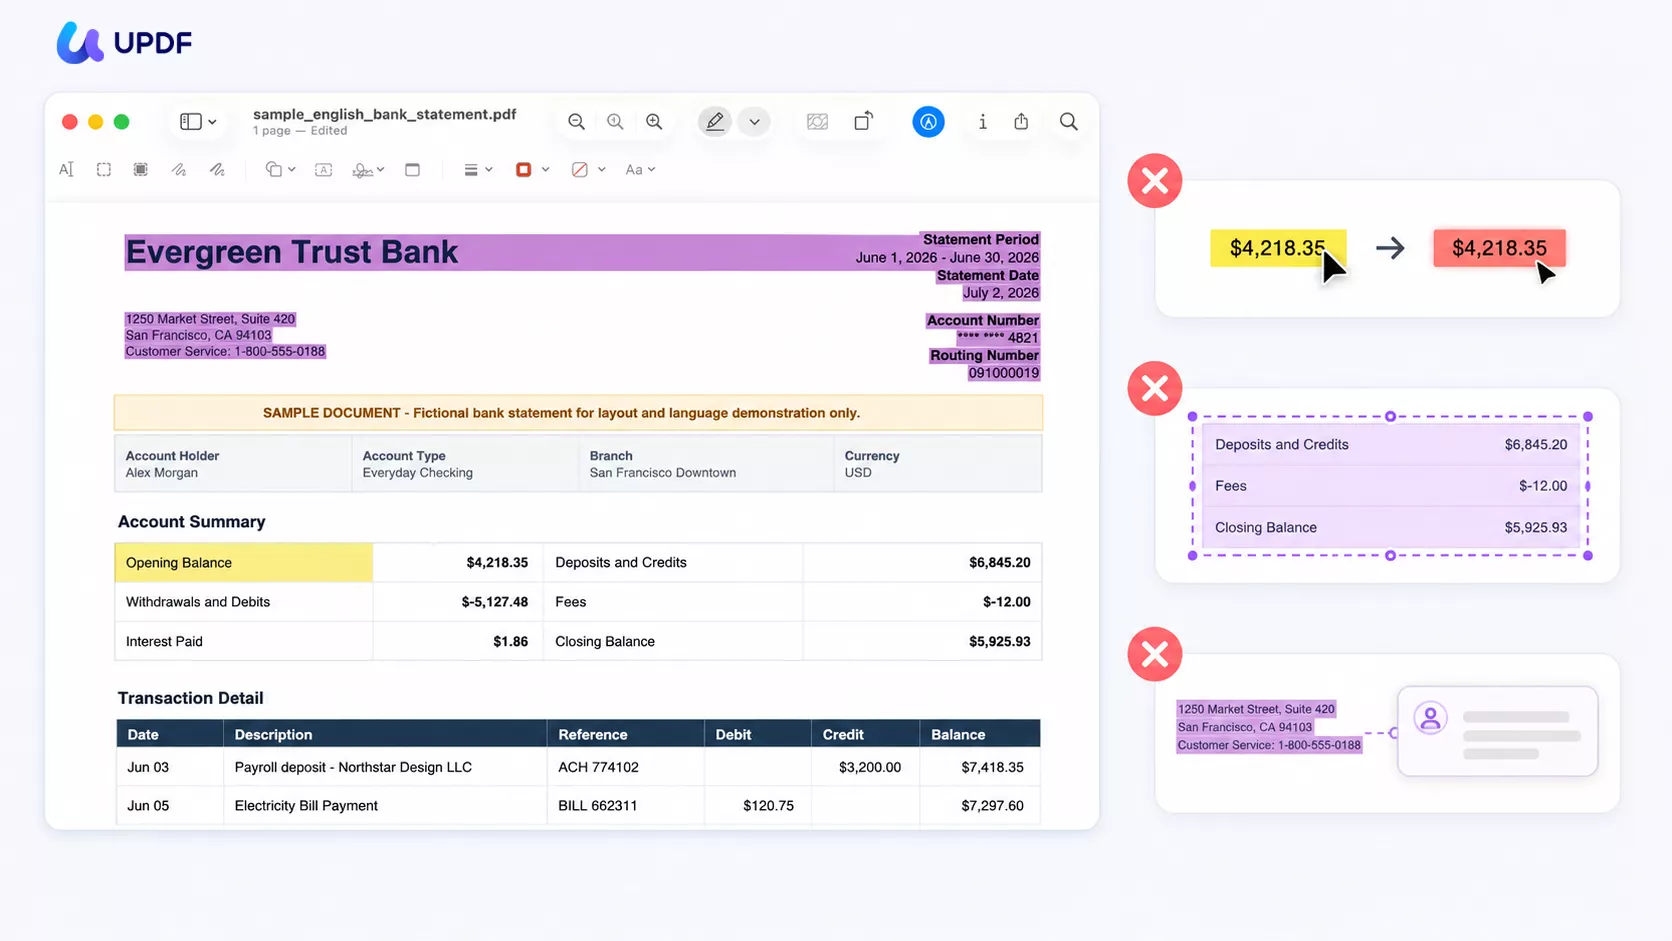
That covers most typed documents. But Preview's highlighter is deliberately basic, and you'll feel the ceiling the moment you try to do anything beyond a plain yellow mark: it locks the highlighter to five colors, it has no real area highlight for scans or images, and it can't attach a note to a highlight you've already made.
I ran into all three while marking up a bank statement on my Mac. Highlighting the typed rows in Preview was instant. Then I wanted to change one yellow mark to red, box a figure inside a scanned page, and pin a comment to a highlight I'd already placed — and Preview stopped me at every one. This guide walks through the full Preview workflow first, shows exactly where it hits a wall, and covers how UPDF picks up each of those three gaps when you need it.
Tested in August 2026 on a MacBook Air (M4, 2025) running macOS Tahoe 26.2, with Preview and UPDF for Mac v2.5.6. Menus and behavior may change in later releases.
Part 1. Which Method Fits Your Mac Highlighting Need
Highlighting on a Mac isn't one job — it depends on what's in the file and how much control you need. Use this table to jump to the right method.
| Your situation | Method | Best for |
|---|---|---|
| Quick mark on a typed PDF, no install | Preview (built-in) | Casual reading, 5 preset colors |
| Custom color / opacity beyond 5 presets | UPDF | Color-coded study and review |
| Highlight a scanned page or an image region | UPDF area highlight (or OCR first) | Scans, figures, tables |
| Recolor or attach a note to an existing highlight | UPDF floating menu | Heavy markup and re-editing |
Part 2. How to Highlight a PDF in Preview on Mac (Free, Built-In)
Preview ships with every Mac, so this needs no download and works offline. It handles selectable, typed text well.
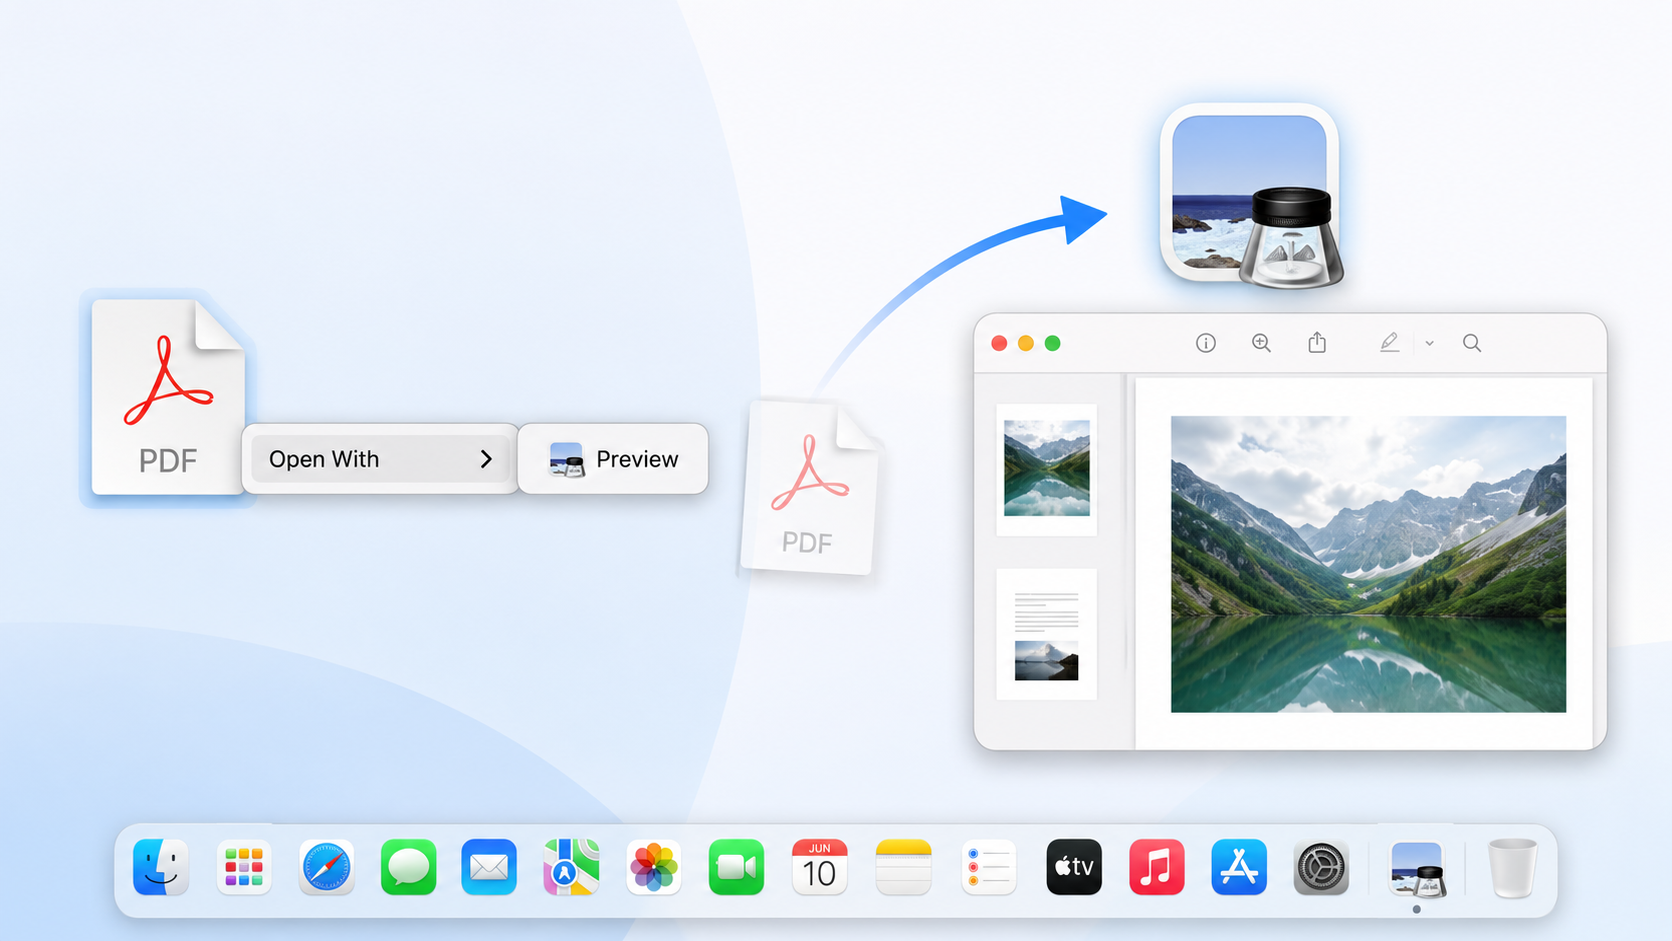
Step 1. Open the PDF in Preview — right-click the file, choose Open With → Preview, or drag it onto the Preview icon.
Step 2. Show the Markup toolbar by clicking the Markup (pen-tip) icon near the top of the window.
Step 3. Click the highlighter pen icon. Select the text you want to mark, and Preview snaps a colored block onto it.
Step 4. To switch colors, click the small arrow next to the highlighter icon and pick from the five presets (yellow, green, blue, pink, purple).
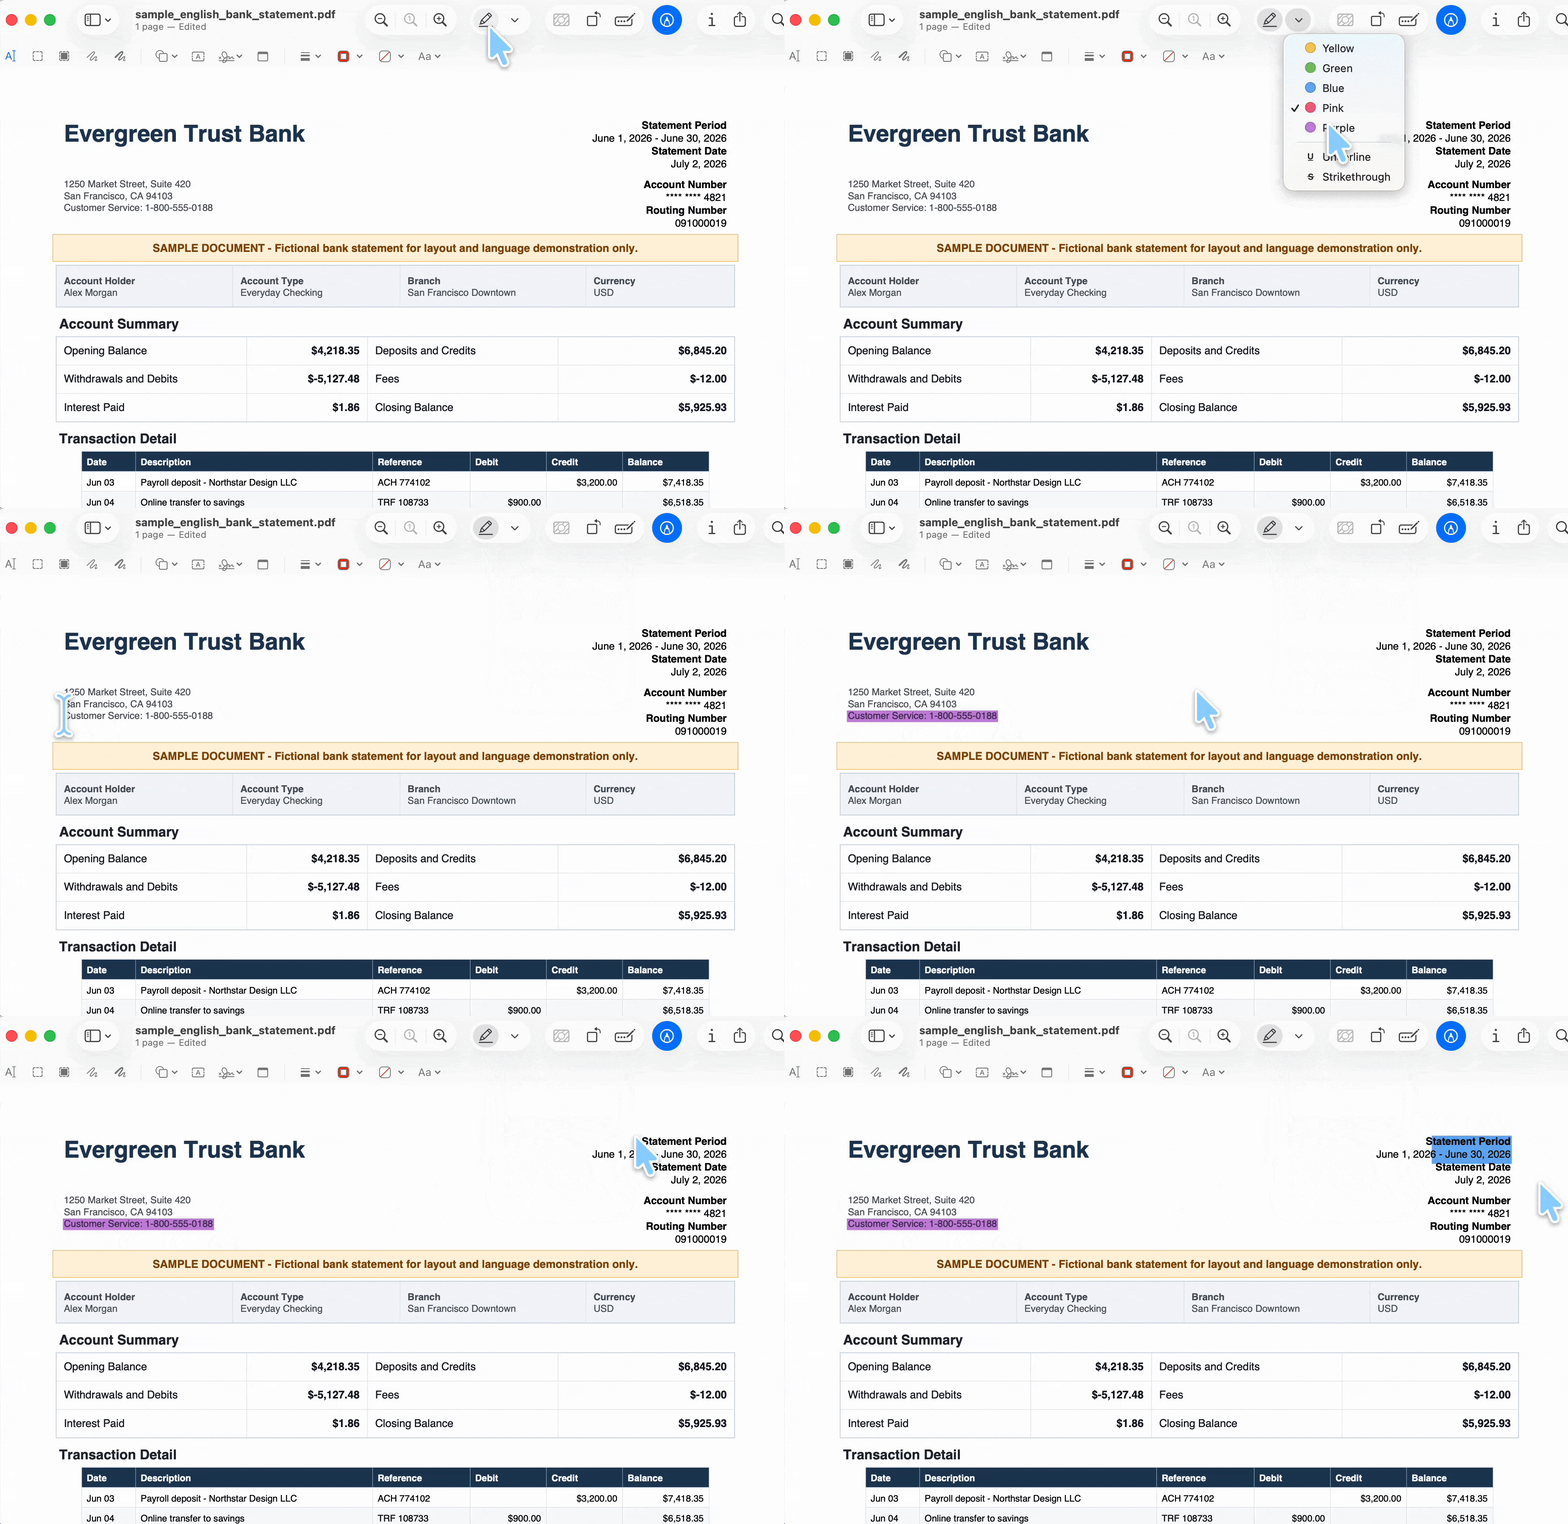
Step 5. Save with Command + S. To save a copy for sharing, use File → Export.
One handy shortcut:
Best for:
- Mac users who want zero-install, zero-cost highlighting on typed PDFs.
Not for:
- custom colors beyond the five presets, highlighting a scanned page or image region, or attaching a note to an existing highlight — the three walls covered next, and the exact gaps UPDF fills in Part 4.
Part 3. Where Preview Hits a Wall — 3 Real Limits (Tested on macOS Tahoe)
These aren't bugs — they're the edges of what Preview's highlighter was built to do. All three were confirmed by hand in Preview on macOS Tahoe 26.2 (August 2026).
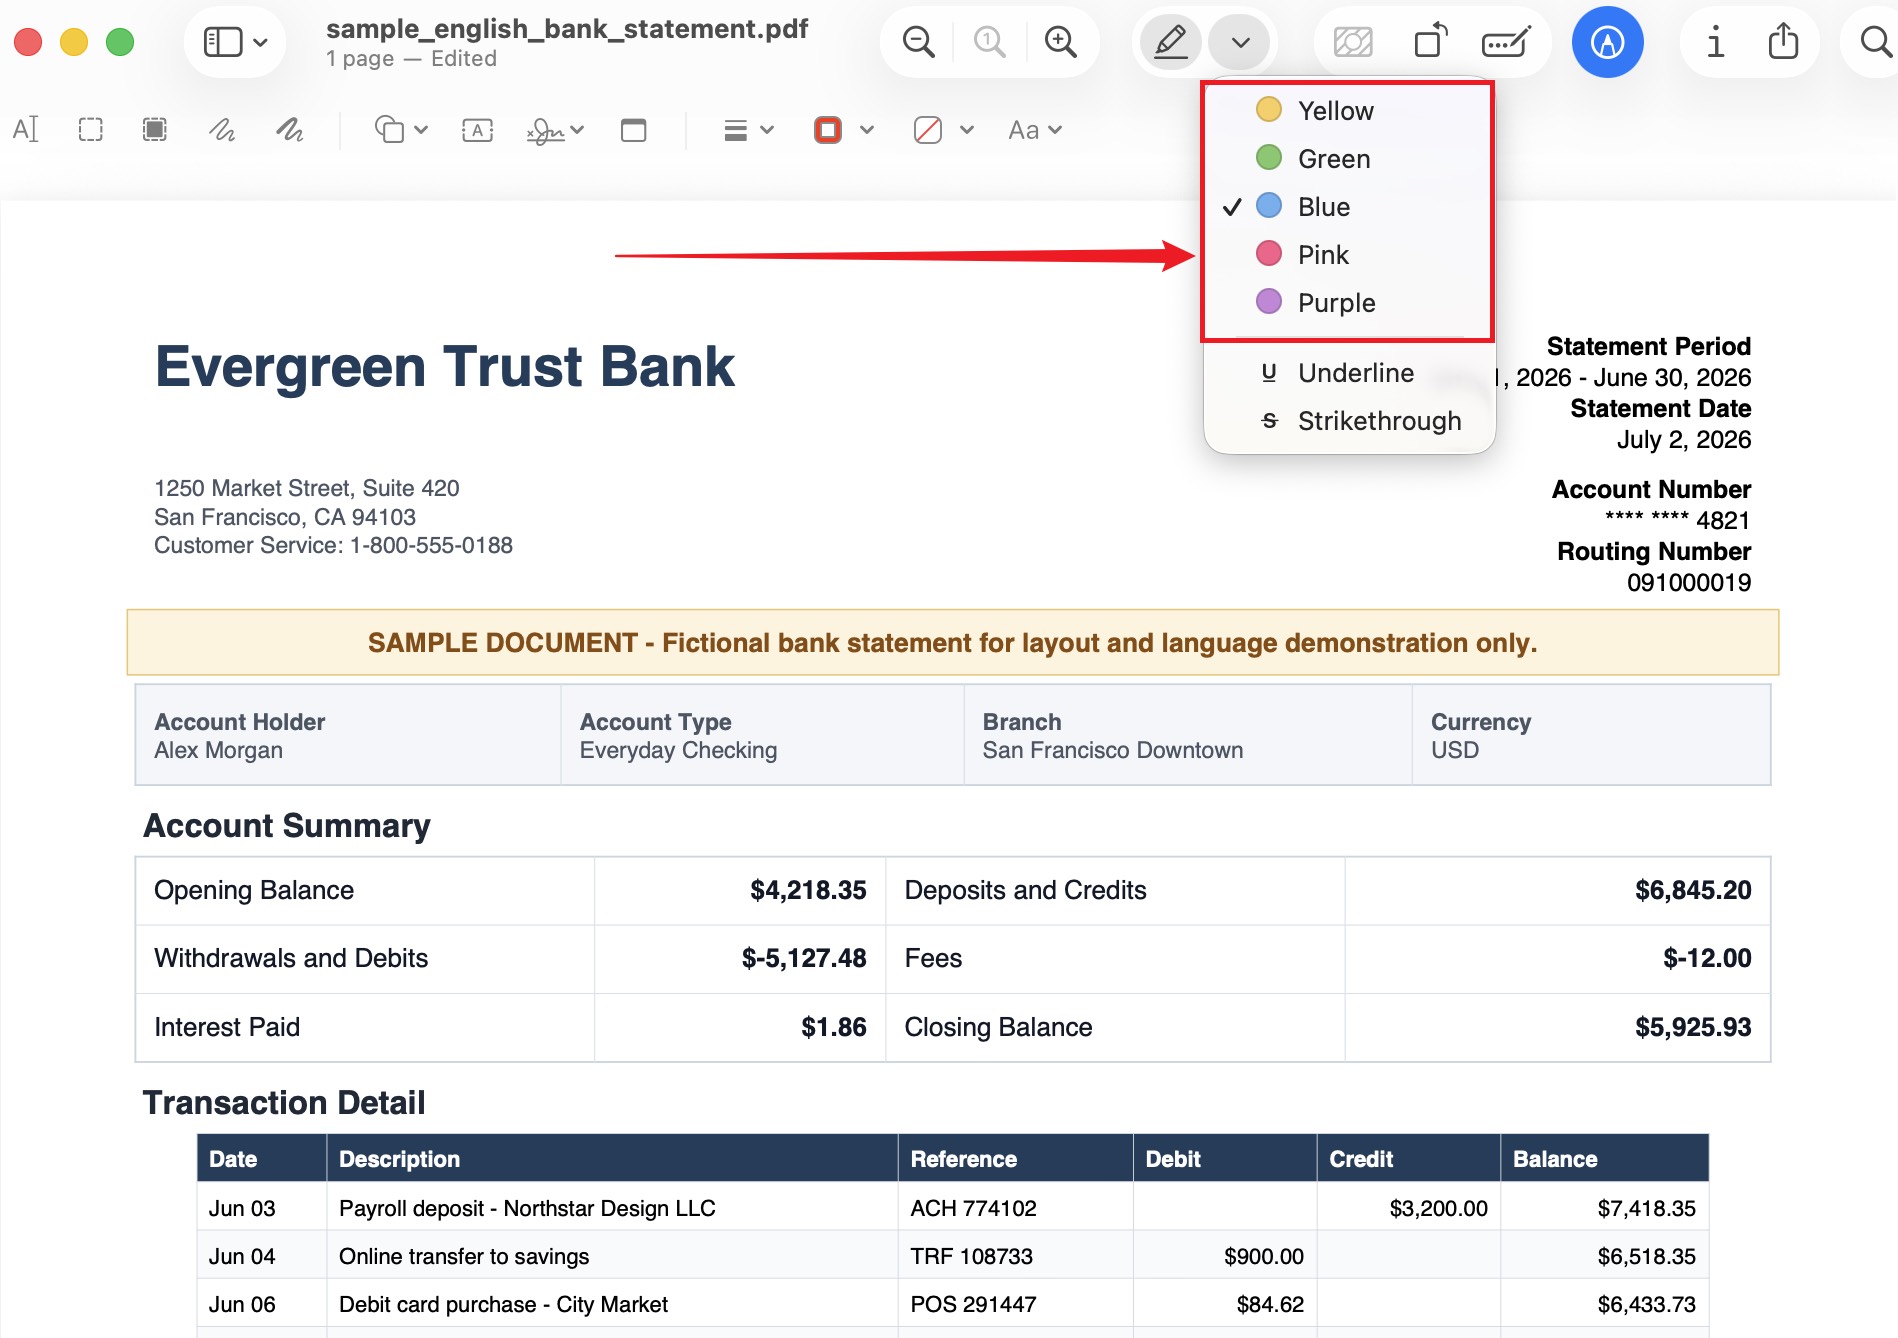
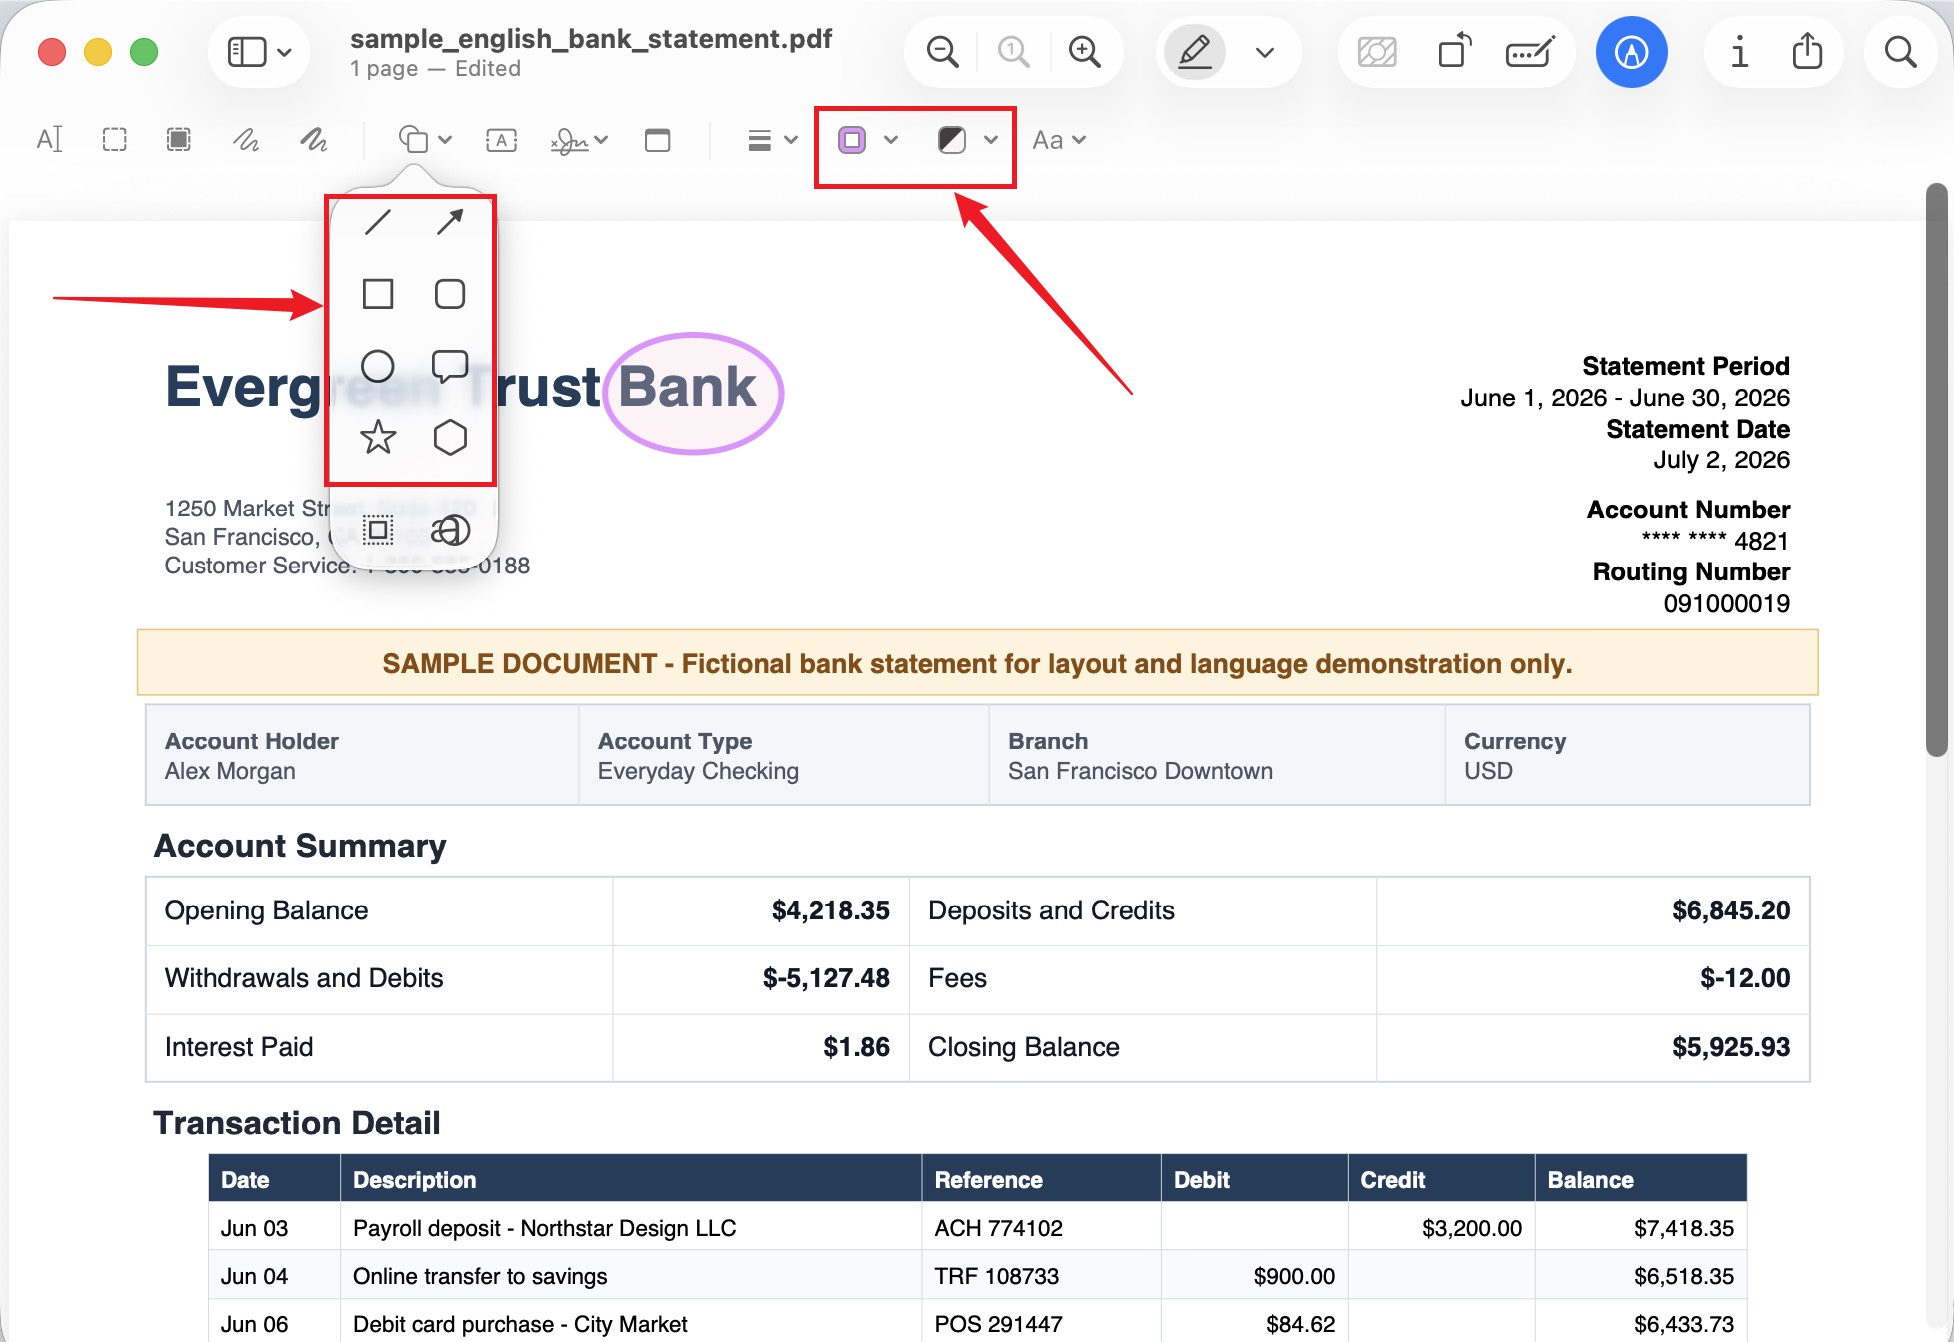
1. The highlighter pen is locked to five colors. Preview's highlighter offers only yellow, green, blue, pink, and purple — there's no color wheel, HEX input, or opacity control for it. You can reach Preview's full system color palette, but only through a different tool: the Shapes tool. That palette (and its "Show Colours…" wheel) belongs to shapes, not to the highlighter pen, so it doesn't help you recolor an actual text highlight. To get a custom color, you have to abandon the highlighter and draw a semi-transparent rectangle with the shape tool instead.
2. There's no true area highlight — only a shape workaround. For a scanned page, an image, or a table where the text isn't selectable, Preview can't highlight the region. The closest you can do is draw a shape rectangle over it. But a shape rectangle is a separate overlay object floating on top of the page — it doesn't "know" there's content underneath, it can be dragged away freely, and it covers with fill rather than letting the content show through like a highlight. It approximates a highlight; it isn't one.
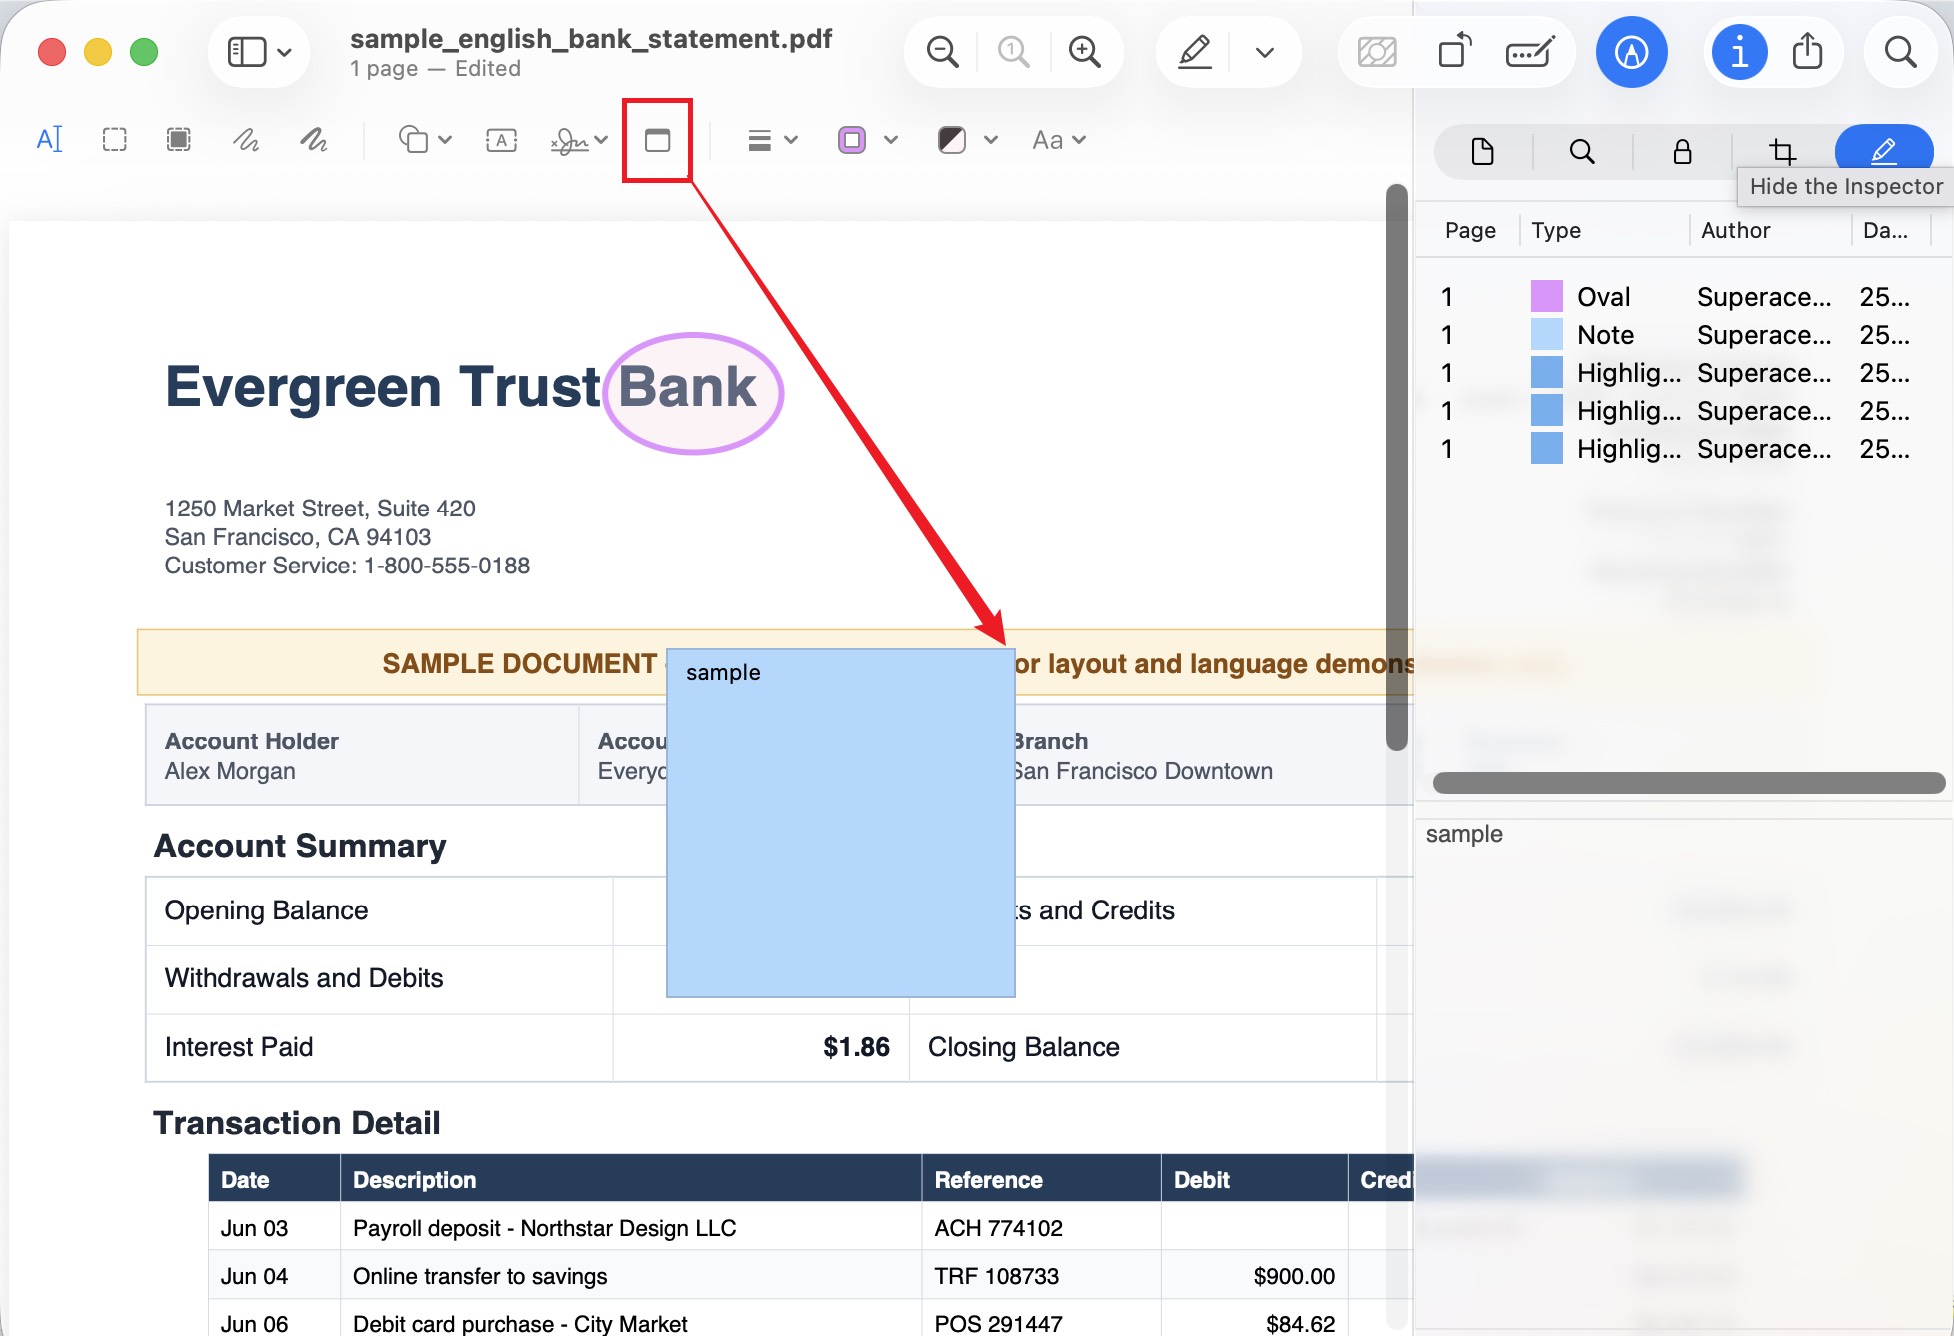
3. Highlights and notes are separate, unlinked objects. Preview can't attach a bound comment to a highlight. Right-click a highlight and nothing happens — there's no context menu and no floating toolbar. If you want a note beside a highlight, you click the separate Note button and drop an independent sticky, which has no relationship to the highlight at all; they just happen to sit near each other. Open the Inspector sidebar (Command + I) and you'll see them listed as two unrelated rows — one Highlight, one Note. Recoloring or deleting also has to happen row-by-row in that sidebar.
Together these mean Preview is fine for basic reading, but it can't do color-coded review, scan marking, or fast re-editing. For those you need a highlighter with a real custom-color picker, genuine area highlight, and an edit-in-place menu.
Part 4. How to Highlight in UPDF When Preview Falls Short
UPDF for Mac is a full PDF app whose highlighter closes exactly the three gaps above. Treat this as the next step when Preview stops you, not a replacement for quick jobs.
Step 1. Open your PDF in UPDF — if you don't have it yet, download UPDF for free and install it in about a minute — then click Comment in the top toolbar.
Windows • macOS • iOS • Android 100% secure
Step 2. Custom color and opacity. Click Highlight, mark your text, then open the color panel. Beyond the presets you get a full color wheel, sliders, a swatch grid, and an eyedropper for any exact color, plus an opacity control — so you can keep separate color codes for separate kinds of notes.
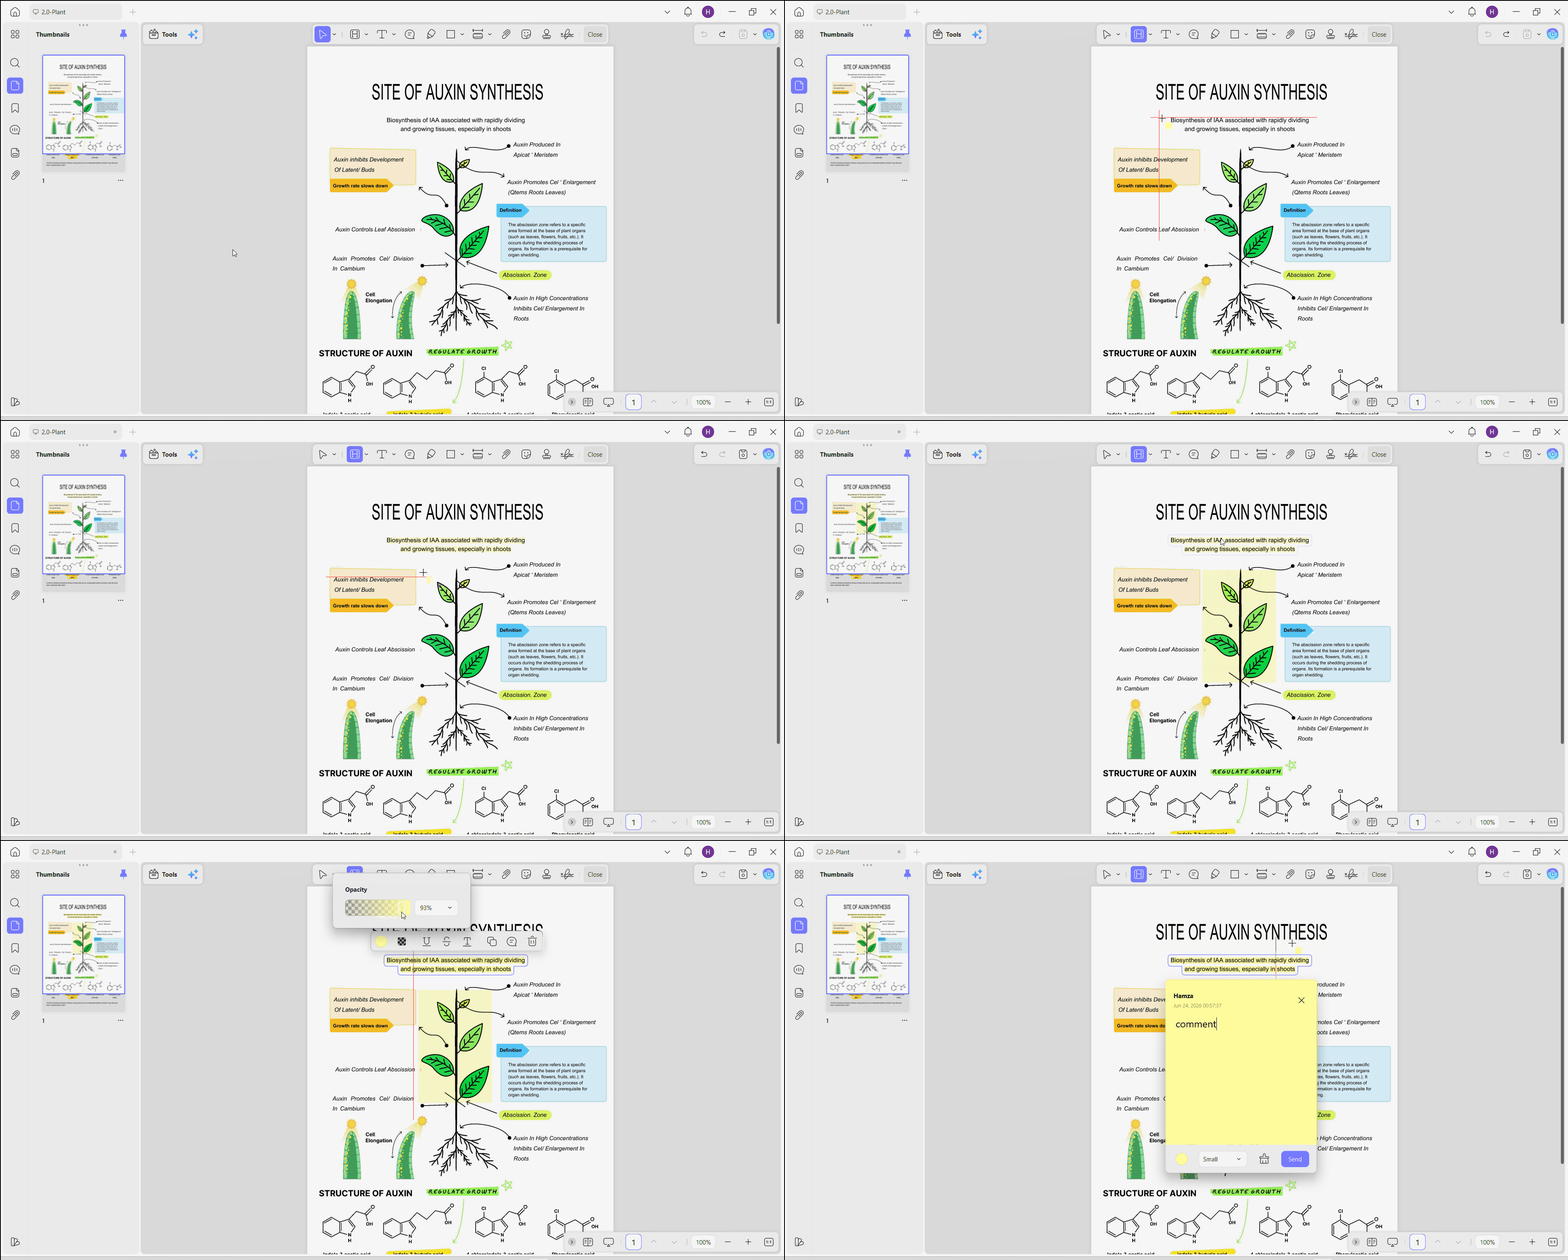
Step 3. Area highlight for scans and images. With Highlight active, drag a box over the region — UPDF places a real area highlight over a scanned page, figure, or table, not a loose overlay.
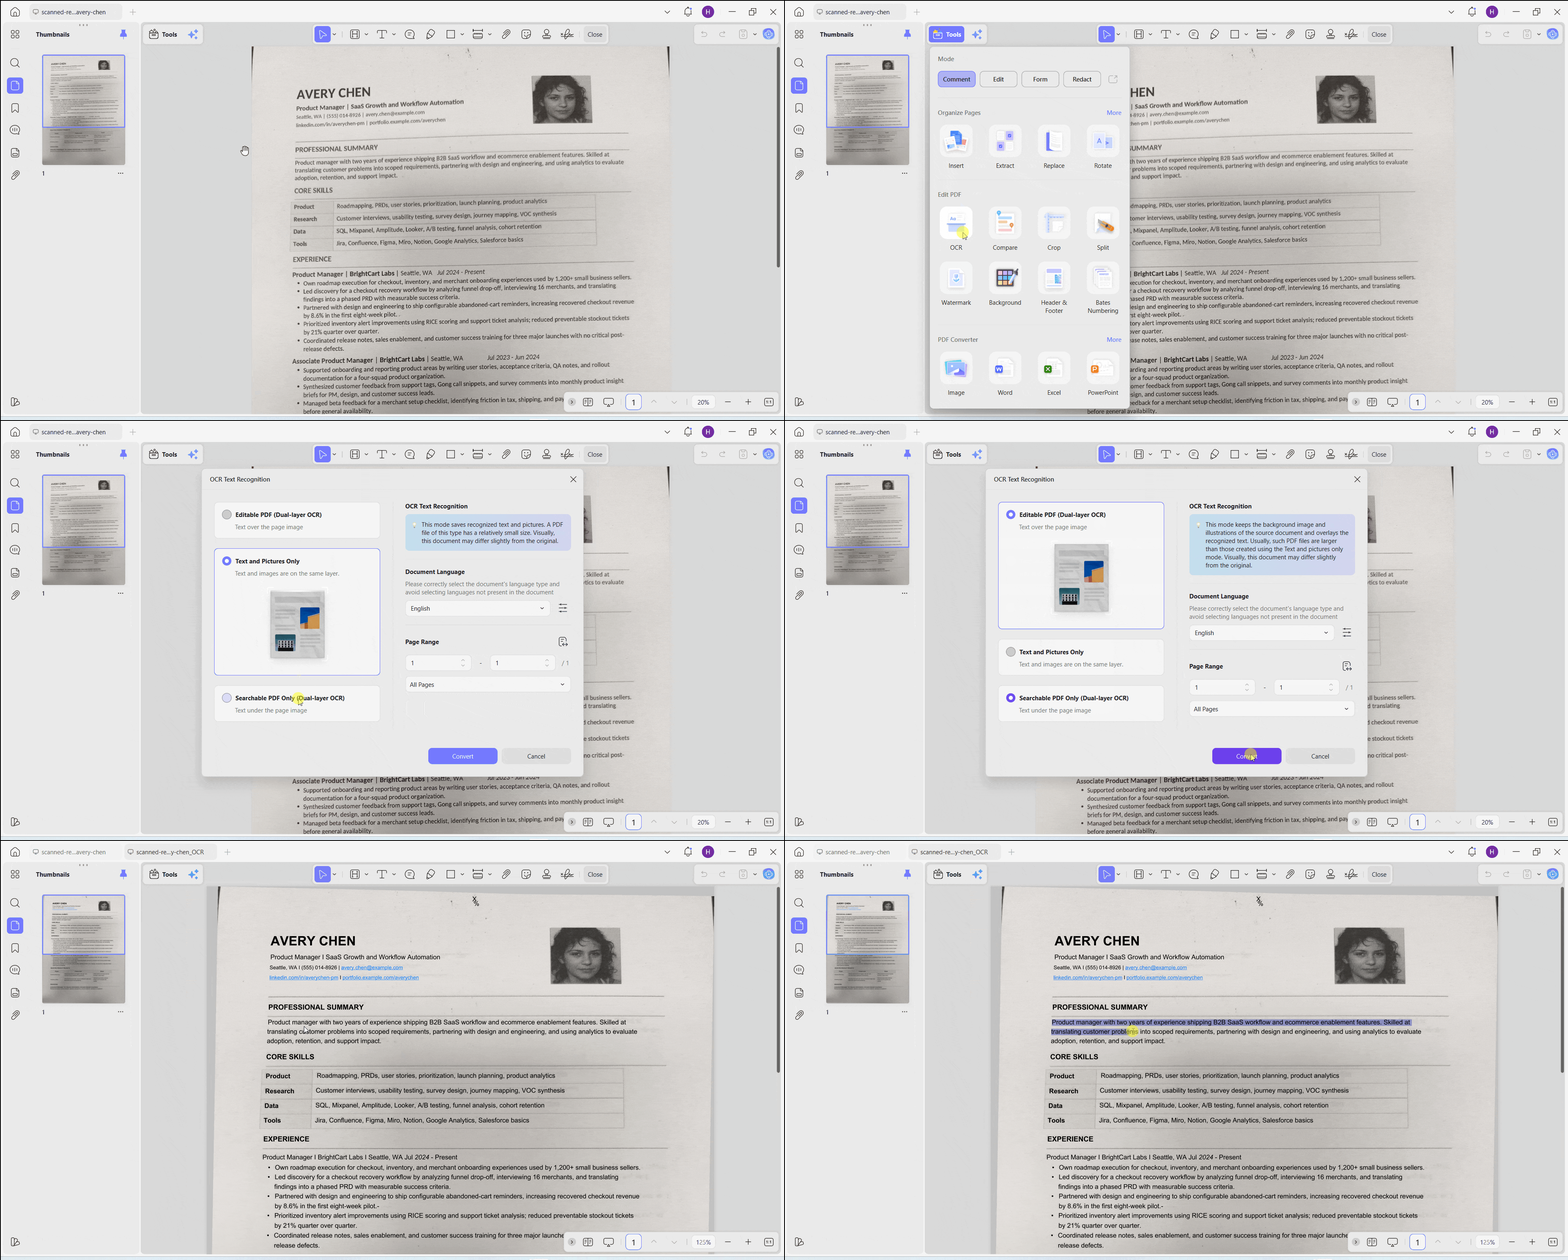
If the scan has no text layer and you need selectable, searchable text underneath, run OCR first (top toolbar → Tools → OCR), then highlight the recognized text normally.
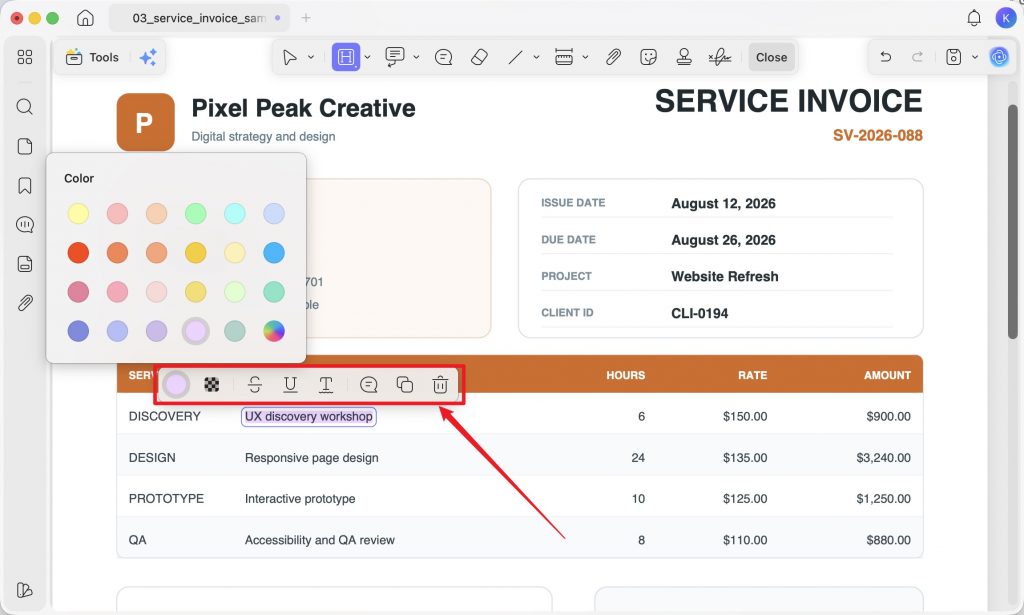
Step 4. Recolor or attach a bound note. Click any existing highlight and a floating menu appears right on it — change the color, adjust opacity, attach a sticky-note comment that stays linked to that highlight, copy the marked text, or delete it, all in one place. This is the piece Preview has no equivalent for.
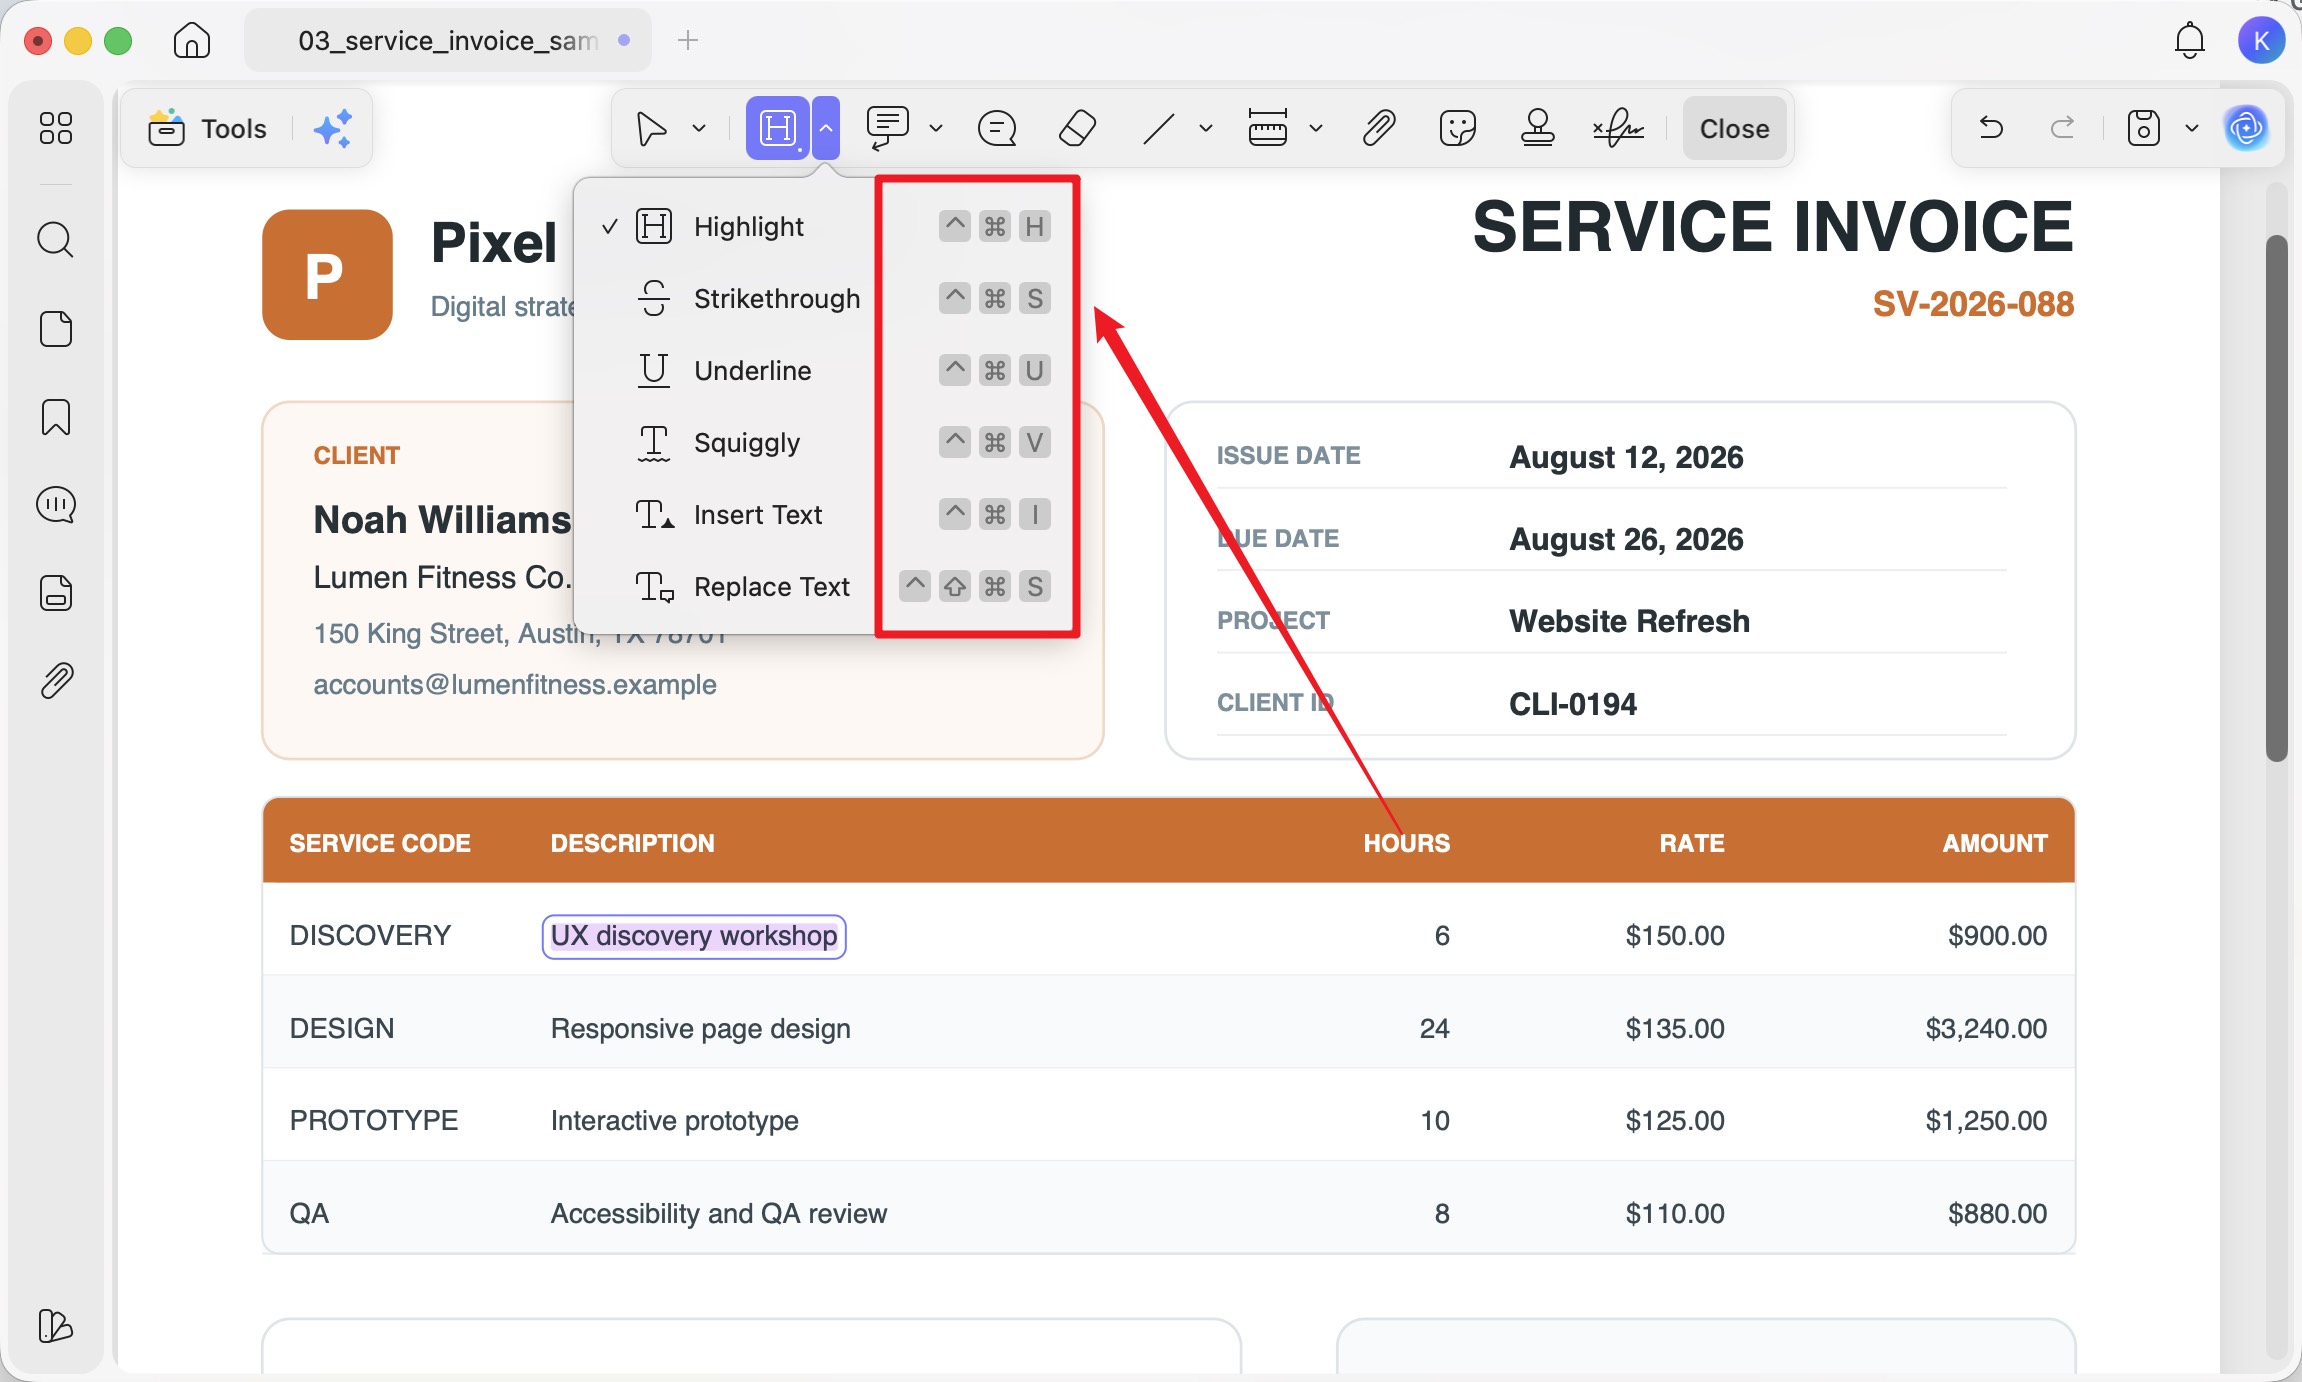
On Mac, UPDF also shows keyboard shortcuts next to each markup tool (highlight is ^⌘H, strikethrough ^⌘S, and so on), and a selected highlight or shape can be nudged into precise position with the arrow keys — small touches that add up over a long document (confirmed in our own testing on UPDF for Mac v2.5.6).
To see the workflow, watch the example of below.
A note on downloading UPDF for Mac:
Free vs. Pro for highlighting: UPDF's free version highlights and annotates fully — every markup tool above is usable for free; the only catch is a trial watermark when you export. Pro removes that watermark and is US$49.99/year or US$79.99 one-time, with one license covering Windows, Mac, iOS, and Android across up to four devices.
Download UPDF for free to try custom colors and area highlight on your own Mac file — installation is free, and Pro features are available when you need watermark-free export.
Windows • macOS • iOS • Android 100% secure
Part 5. Preview vs. UPDF on Mac — Quick Comparison
Both highlight typed text well. The difference shows up the moment you need custom color, scan marking, or fast re-editing.
| Capability | Preview (built-in) | UPDF for Mac |
|---|---|---|
| Custom color / opacity | Shapes only; highlighter locked to 5 presets | Wheel + HEX + eyedropper + opacity |
| Area / scan / image highlight | Shape-overlay workaround | True area highlight (drag) |
| Edit an existing highlight | Row-by-row in Inspector (⌘I) | Floating menu on the highlight |
| Note attached to a highlight | Separate, unlinked Note object | Bound sticky note via floating menu |
| Keyboard shortcuts | System-level | ^⌘H / ^⌘S and more, shown in-app |
| Chip support | All Macs | Apple-silicon (official-site build) |
| Price | Free | Free (watermark on export); Pro $49.99/yr or $79.99 lifetime |
If you'd rather compare highlighters across both Mac and Windows before committing, see our hands-on comparison of 10 PDF highlighters, which tests cross-page highlighting, area highlight, and color depth side by side.
Part 6. Edge Cases — When Highlighting Fails on Mac
Real situations that stop a highlight cold, and what actually fixes them:
- "Why can't I select the text on my scanned lecture notes?" The page is an image with no text layer, so a text highlighter has nothing to grab. Use area highlight to mark the region visually, or run OCR first to create selectable text, then highlight normally.
- The file won't let you highlight at all. It's likely permissions-protected. You'll need to enter or remove the restrictions first — and only do this on files you own or are authorized to edit.
- Highlights vanish or don't print in another reader. Preview sometimes stores marks as annotations that another app renders differently. When you need them permanently baked in, export a flattened or standard PDF copy rather than relying on the annotation layer.
- You want to highlight the image itself, not text on a page. That's a general, cross-platform task rather than a Mac-specific one — see how to highlight images and scanned PDFs for the full workflow.
Part 7. FAQs
1. Will my Preview highlights show up when someone else opens the PDF?
Usually yes, in any standard PDF reader. Preview saves highlights into the PDF's annotation layer, which Adobe Reader, Chrome, and most apps render fine. The exception is printing or a reader that ignores annotations — if it must always be visible, export a flattened copy so the mark is baked into the page.
2. Does highlighting change the original text, or just sit on top of it?
It sits on top — the text underneath is untouched. Both Preview and UPDF add the highlight as a separate annotation layer, so the words, layout, and any selectable text stay exactly as they were. You can recolor or delete the highlight later without affecting the document itself.
3. How do I remove a highlight I already added on Mac?
Select it and delete. In Preview, open the Inspector sidebar (Command + I), click the highlight's row, and delete it there. In UPDF, click the highlight and choose delete from its floating menu. Deleting the mark leaves the underlying text intact.
Conclusion
The clean way to think about highlighting on a Mac: start with Preview for free, built-in marking of typed text — it's genuinely good at that. Reach for UPDF the moment you hit one of Preview's three walls: you need a custom color instead of the five presets, you need to mark a scanned page or image region, or you need to recolor and attach a note to a highlight you've already made. They aren't rivals so much as two stages of the same workflow — Preview for the quick pass, UPDF when the document asks for more.
Download UPDF for free to try area highlight and custom colors on your own Mac document — installation is free, and Pro removes the export watermark when you're ready.
Windows • macOS • iOS • Android 100% secure




 Enrica Taylor
 Engelbert White
