PDF files are widely used worldwide for sharing information easily through various online and offline channels. However, deleting pages from PDF on Windows can be challenging. Most of the PDFs are set to preserve their original quality and are difficult to edit without a proper method.
So, in this guide, we will discuss four helpful PDF editing tools compatible with Windows. These tools will allow you to delete pages from your PDFs smoothly.
Part 1. Remove Pages from PDF on Windows Via UPDF
Deleting pages from PDFs can be a real hassle, but UPDF makes it super easy. This tool has an Organize mode that allows you to delete pages effortlessly. In addition, with UPDF, you can do much more, like extracting, splitting, inserting, rotating, and even replacing pages in your PDFs. The best part is that deleting pages will maintain the layout and quality of your document.
So, for a more precise understanding, try the steps given below to remove pages from PDF Windows. Before you start, go to download UPDF via the below button.
Windows • macOS • iOS • Android 100% secure
1.1 Remove Multiple Pages from PDF on Windows
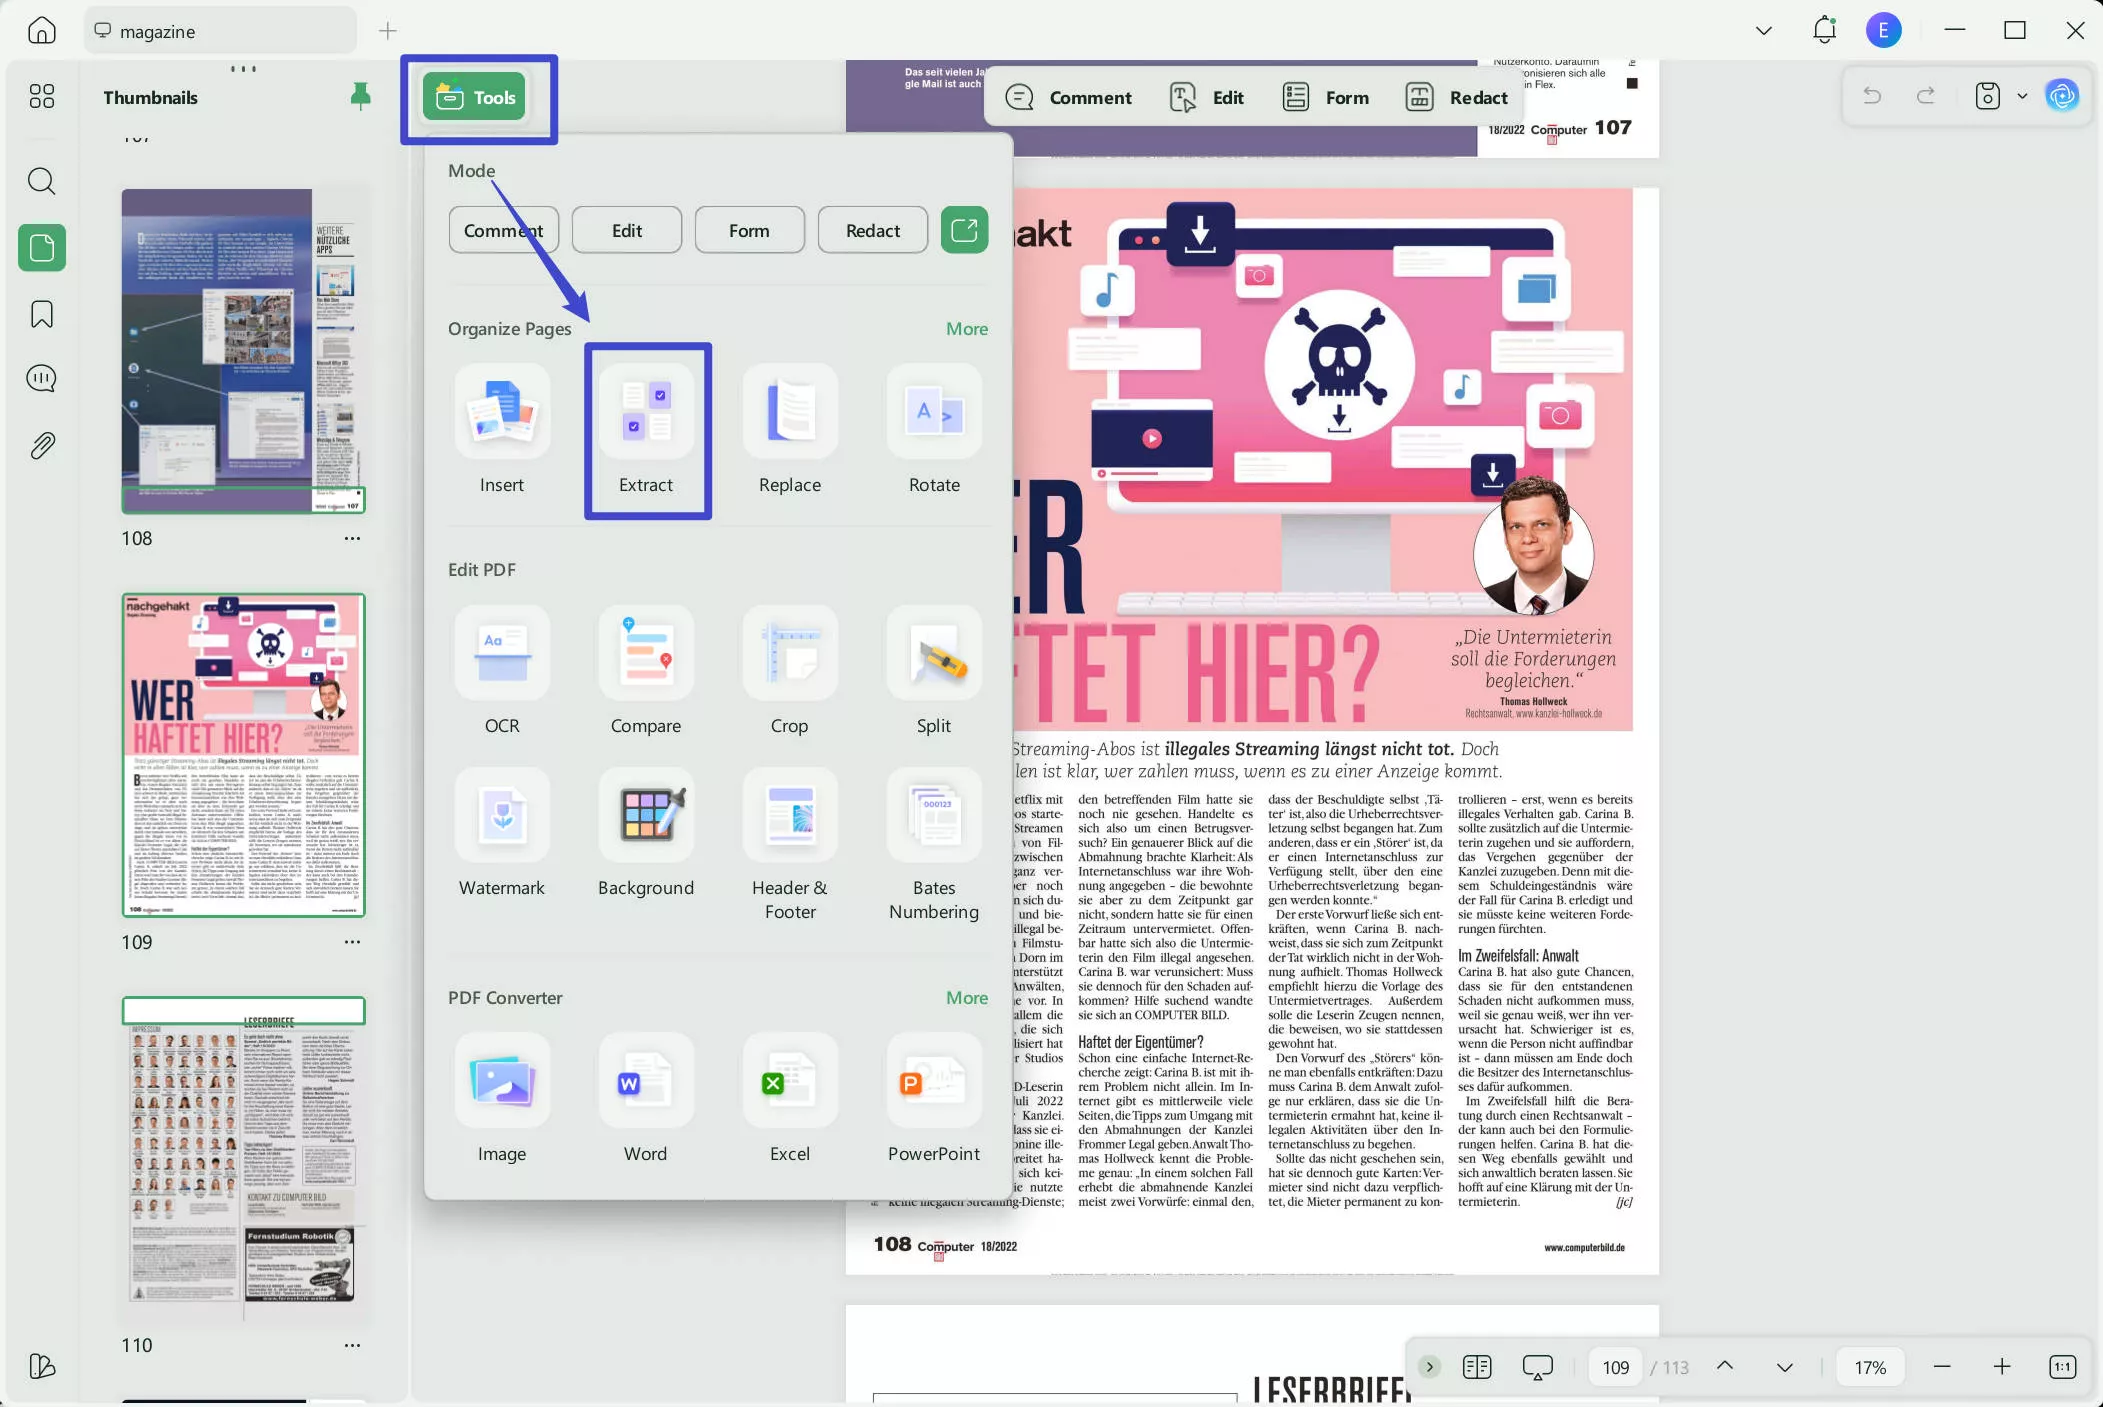
Step 1: Access the Organize Pages Mode
Open the PDF in UPDF by pressing the "Open File" button from the main screen. This will take you into the Reader mode of this innovative PDF tool once the file is loaded. Next, take your mouse to the left sidebar and choose the "Extract" tool.
Step 2: Delete the Desired PDF Pages
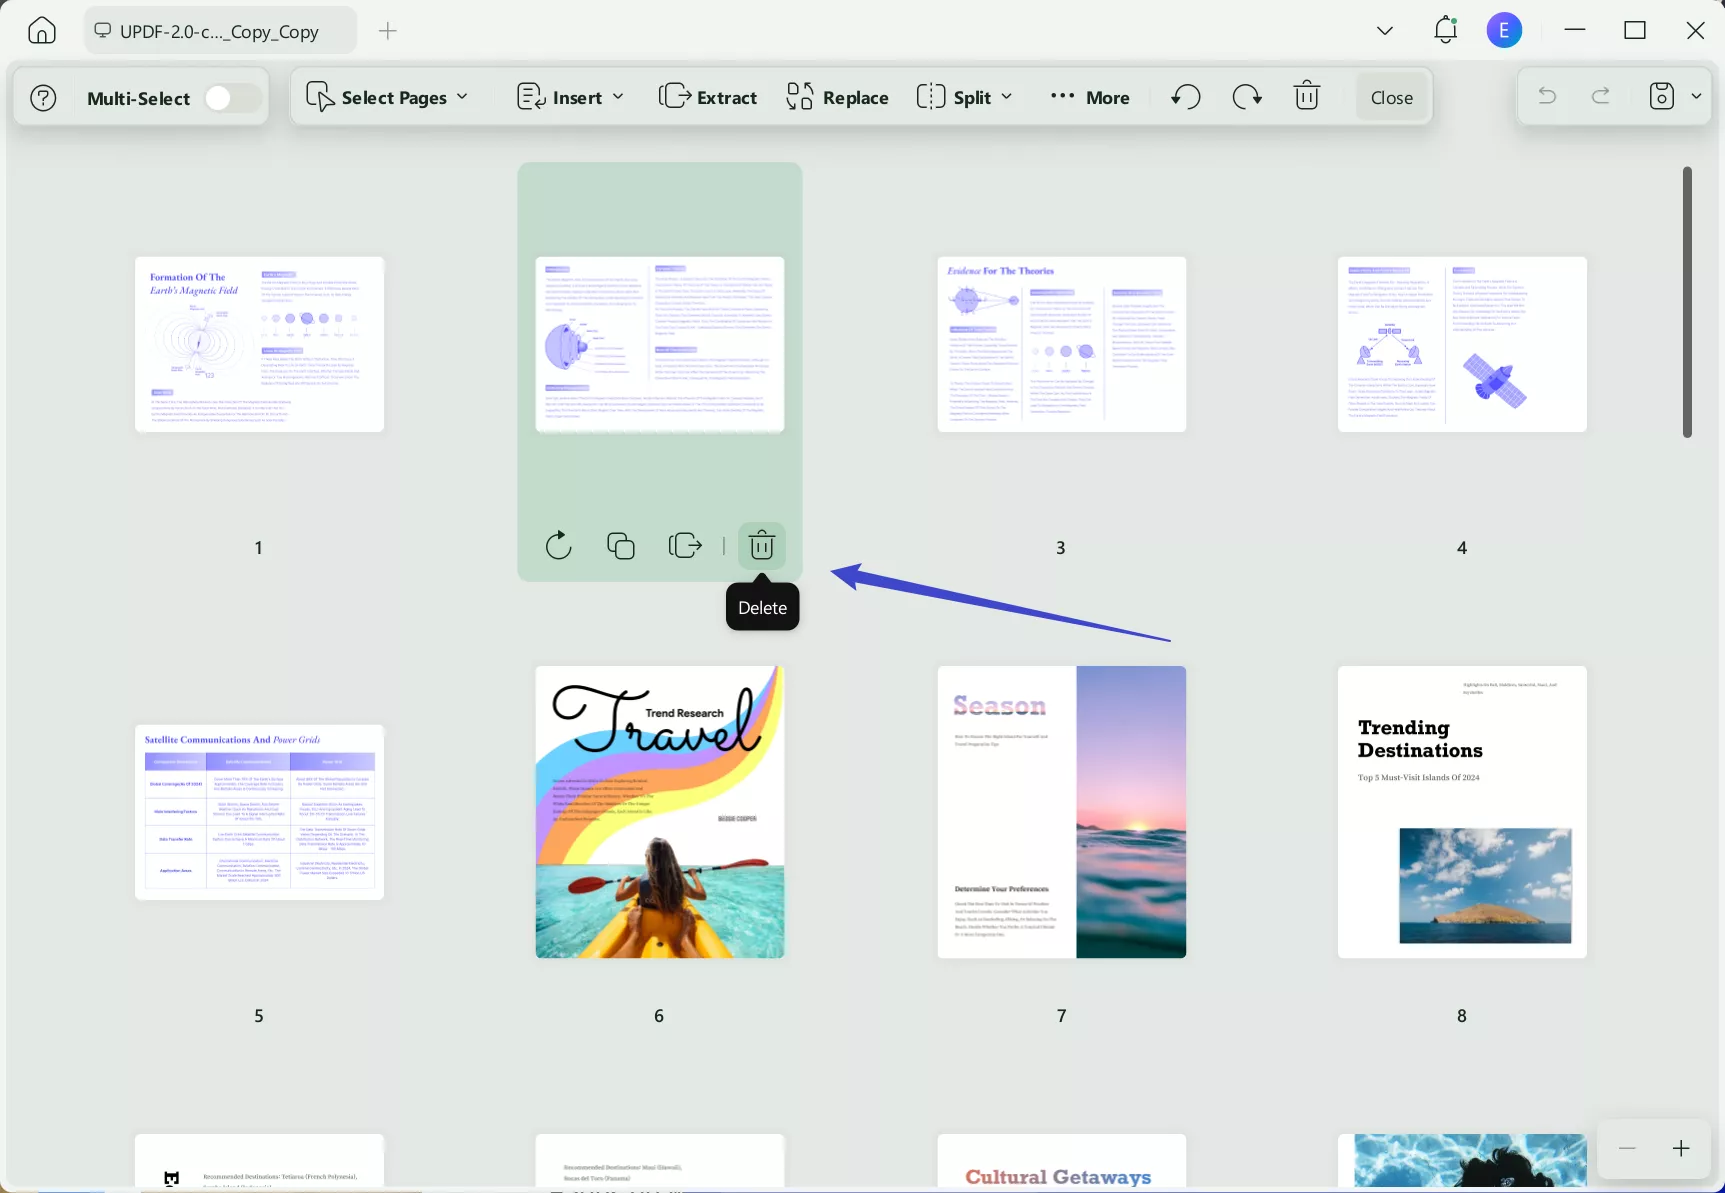
Following this, select the page you want to delete from the document, or you can select multiple pages by tapping on "Select Pages" from the toolbar. Press the "Delete" icon after performing the page selection.
Here is a short video to introduce how to organize PDF.
1.2 Remove One Page from PDF on Windows
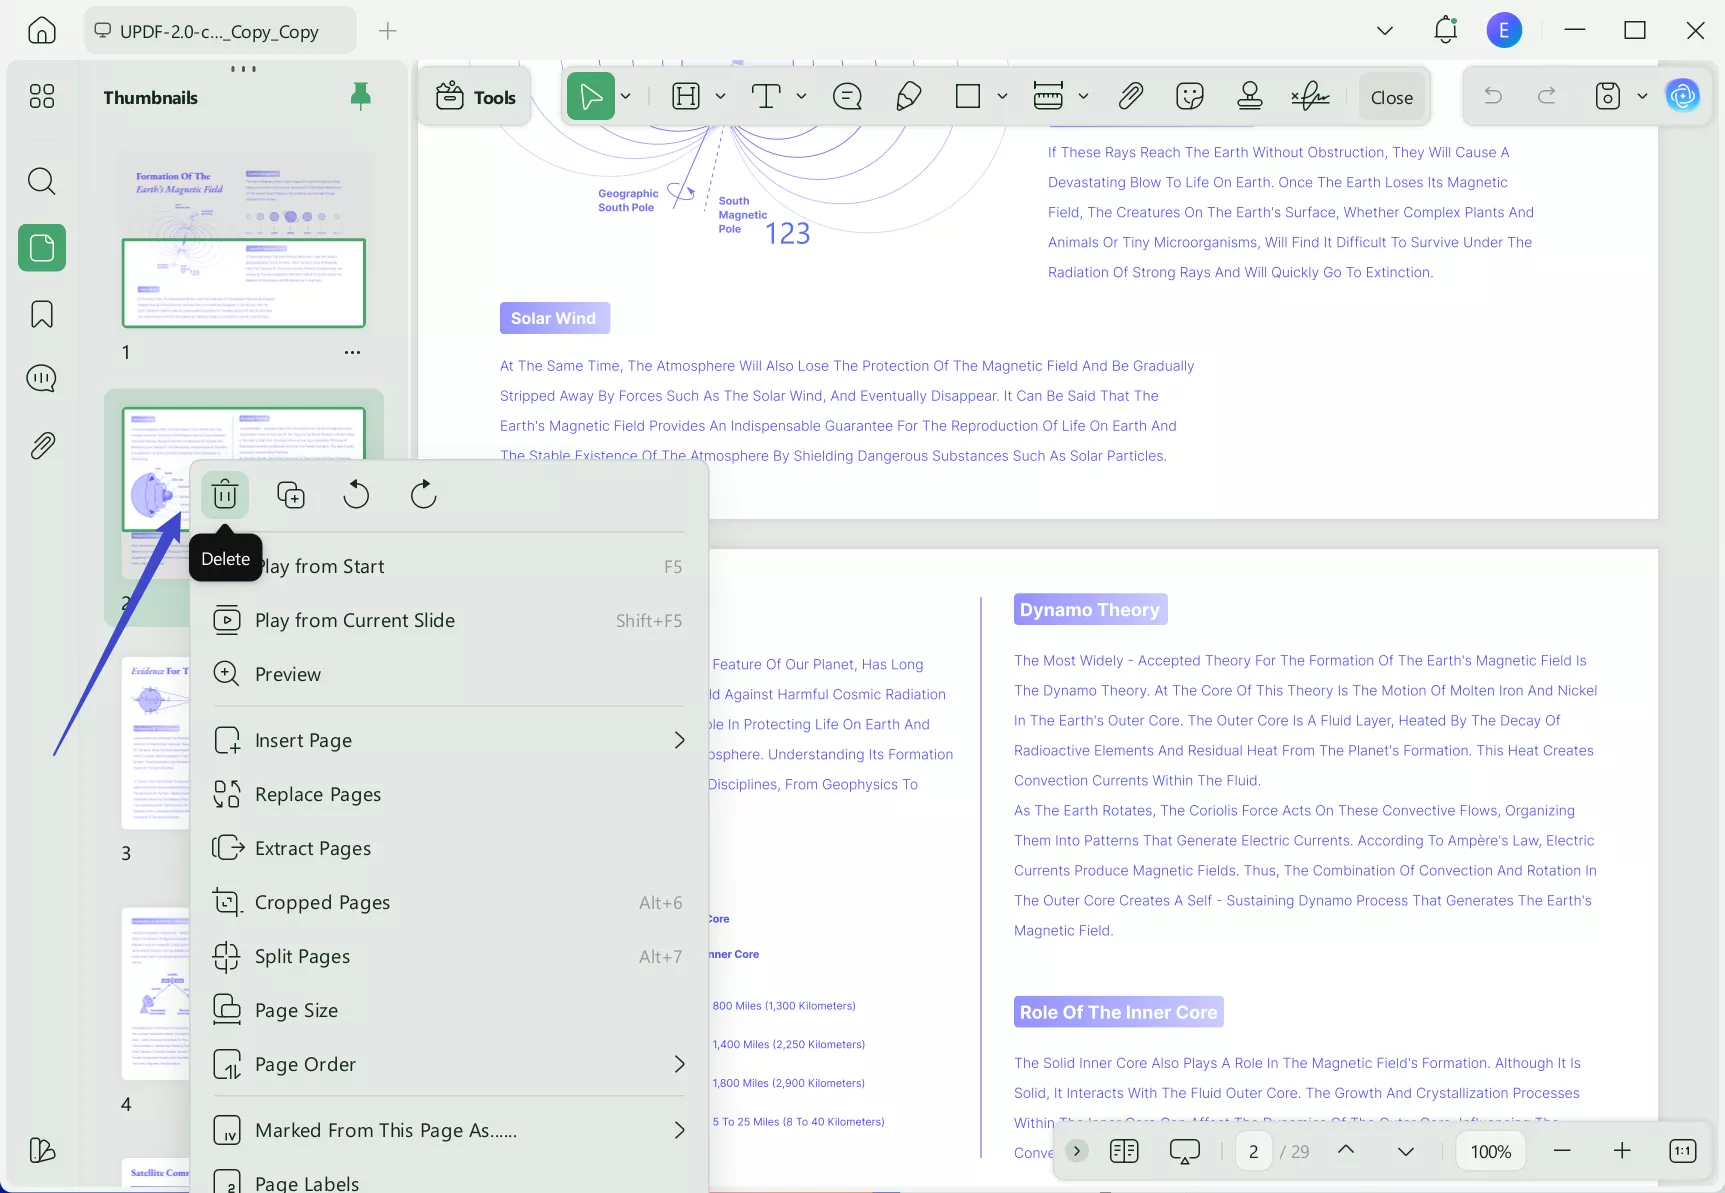
UPDF also allows you to remove a single page from your PDF document using the thumbnail feature in a few clicks. To remove the single page from PDF from the thumbnail, you can follow these instructions:
Instructions: Open your PDF document in UPDF using the "Open File" option and right-click on your page thumbnail from the left panel. Afterward, tap the "Delete" option, and your page will be removed permanently.
Once you are done with your changes, you can switch to "Edit PDF" mode to make further adjustments. Sharing your edited PDF is a breeze, too, with its built-in share features. Learn more about how to edit a PDF>
Download UPDF from the button below now and you will love it.
Windows • macOS • iOS • Android 100% secure
Part 2. Delete PDF Pages on Windows Via Microsoft Edge
In Microsoft Edge, you can easily delete pages from your PDFs without using any add-on because it's all built-in. Using the draw tool, you can even draw shapes and make notes on the PDF. Just click on the pen icon to start drawing freely or adjust the tool as you like. If you need to add text to the PDF, Edge lets you do it quickly.
Sometimes, PDFs don't have editable text, so you can use the freehand highlighter. Also, if you make any highlighting mistakes, you can easily erase them with the erase tool. Head to the steps mentioned below to delete PDF pages with Microsoft Edge:
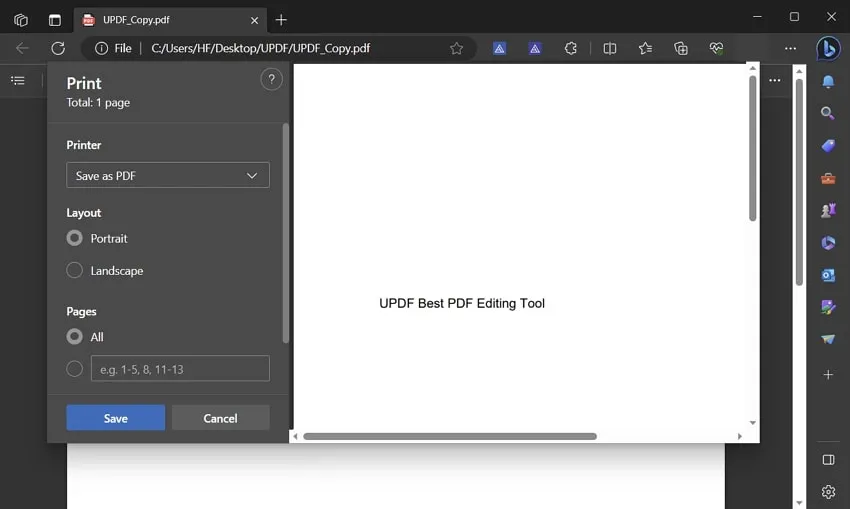
Instructions: Use Microsoft Edge to open the required PDF document and click on the "Print" icon from the top right corner. Next, choose "Save as PDF" as the Printer from the drop-down menu. Specify the page range of the document you want to save and press the "Save" button to complete the process. This will let you save only the page you want in a document.
Part 3. Remove PDF Pages on Windows Via Adobe Acrobat
A widely used tool for working with PDF files, Adobe Acrobat, was the best tool for years before UPDF. It has many helpful features like creating, editing, signing, compressing, annotating, and printing PDFs. With Adobe Acrobat, you can delete pages in a PDF on Windows and organize them differently.
However, it's important to note that Adobe Acrobat can be expensive, and some users find it a bit complicated. If you have the budget, you can use Adobe Acrobat to delete PDF pages. Therefore, you will need to follow the steps outlined below in order to use this tool smoothly:
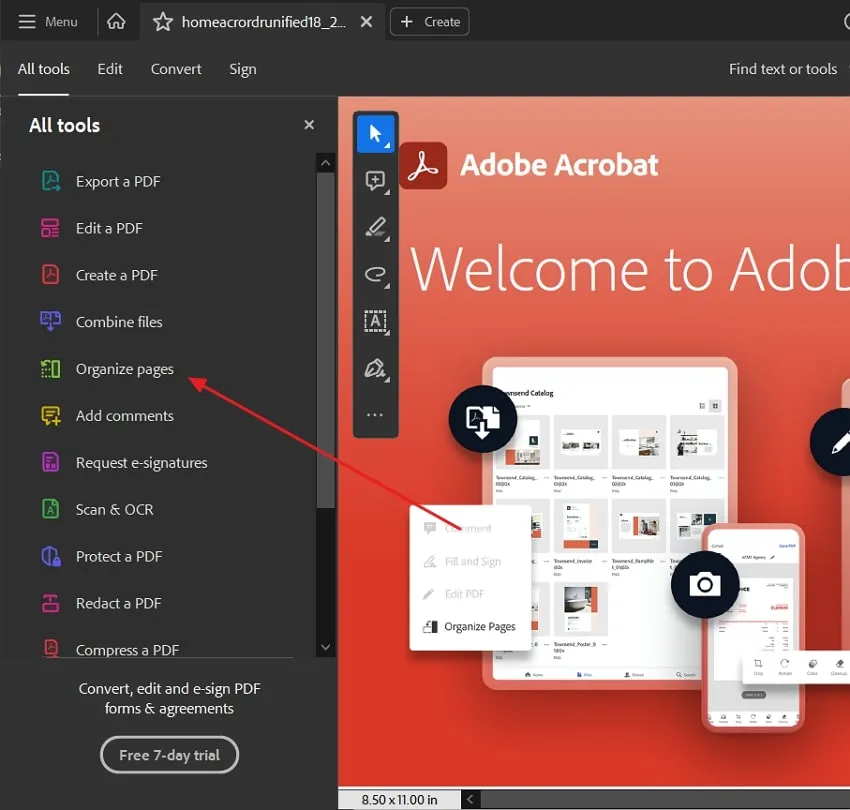
Step 1: Run the Adobe Acrobat application on your Windows PC and import the PDF file through which you want to delete the pages. Then, choose the "Organize Pages" tool from the "All Tools" panel to proceed.
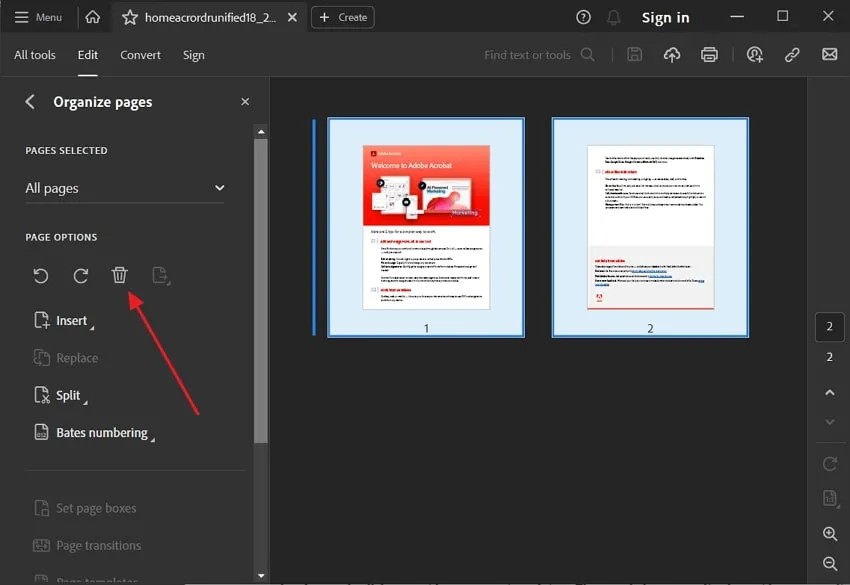
Step 2: Select the page you want to delete from the PDF file by using the "Preview" screen or through the "Pages Selected" drop-down menu. Afterward, click on the "Delete" icon from the "Page Options" tools.
Part 4. Delete PDF Page on Windows Using Foxit PDF Editor
With Foxit PDF Editor, removing pages from a PDF is very convenient. You only need to head to the Organize tab in the ribbon and follow the instructions. This powerful editor also allows you to create, eSign, and collaborate on documents smoothly. It works like a word processor, letting you reflow text, change layout, modify font and size, and even add multimedia.
Simply tap the desired area to make necessary changes and use the intuitive features to edit PDFs. You can also share and collaborate with teammates in real-time. The steps below are outlined to guide you regarding the usage of this tool to delete pages with Foxit PDF Editor:
Step 1: Launch Foxit PDF Editor by searching the tool using the Windows Search feature and import the PDF file by pressing the "Open" button from the File tab.
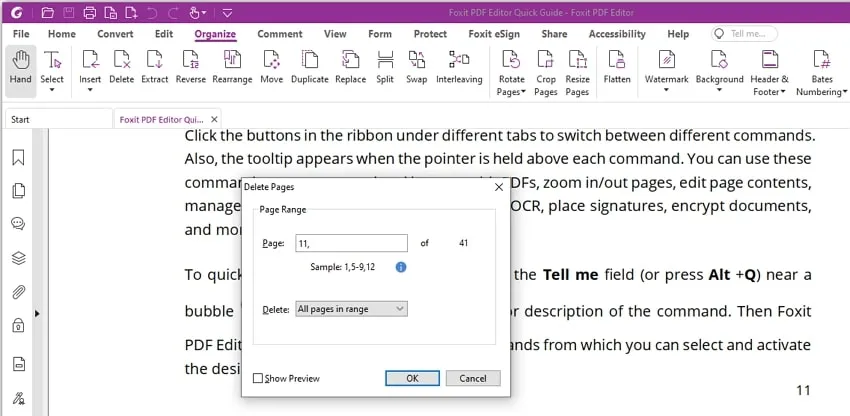
Step 2: Access the "Organize" tab and click on the "Delete" tool. This will open a small window in front of you where you will have to specify the pages you want to delete. To delete the pages after confirming the range, press the "OK" button, and Foxit PDF Editor will do the rest.
Part 5. Comparison of the Best 4 Tools to Delete PDF Pages on Windows
If you are confused about which tool to choose to remove unwanted pages from your document, you can check the detailed comparison provided below to pick the best PDF organizer.
| Metric | UPDF | Microsoft Edge | Adobe Acrobat | Foxit |
| Speed | Highest | Moderate | High | Moderate |
| Efficiency | Highest | Moderate | Moderate | High |
| AI Features | ||||
| Cost-Effevtive | ||||
| Lag Free | A little bit laggy | Sometimes, it slows down on large-size documents | ||
| Difficulty | Lowest | Low | Moderate | Moderate |
From the above-detailed comparison, we can clearly say that UPDF is the winner because of its advanced algorithms and engaging interface, which makes the process of deleting pages easier. Moreover, it is cost-efficient with a discount, and you can enjoy a single premium account on all your 4 devices. To get this advanced PDF organizer on your system, press the "Free Download" button provided below.
Windows • macOS • iOS • Android 100% secure
Part 6. FAQ about Deleting PDF Pages on Windows
1.Is there a way to delete multiple pages from a PDF on Windows?
Yes, there are various tools available to delete multiple pages from a PDF on Windows. However, UPDF is the best one because of its innovative algorithms for removing various pages from your document.
2.How do I delete unwanted pages in a PDF on Windows 10?
To delete the unwanted pages in a PDF on Windows, you can use the UPDF PDF editor by following these steps: Open the PDF file in UPDF by pressing the "Open File" button and click on the "Organize Pages" tool from the left side. Then, choose the unwanted pages from your document and tap on the "Delete" icon from the top toolbar.
3.How do I delete PDF pages from PDF on Windows 11?
Only a few PDF editors, such as UPDF, are fully optimized for Windows 11 and can work without lag. You can use the Organize Pages tool of UPDF to remove the unnecessary PDF pages from your document on Windows 11.
Final Words
To sum up, deleting pages from PDF Windows is now easy with the help of four powerful tools we discussed. By using these tools, you can easily remove unwanted pages and make desired edits to your PDF documents.
However, if you are looking for the best option with various other features, UPDF stands out among the rest. Moreover, using UPDF, you will explore additional features that enhance your PDF editing experience. Just download the free trial version via the below button to test on your own.
Windows • macOS • iOS • Android 100% secure
 UPDF
UPDF
 UPDF for Windows
 UPDF for Mac
 UPDF for iPhone/iPad
 UPDF for Android
 UPDF AI Online
 UPDF Sign
 Edit PDF
 Annotate PDF
 Create PDF
 PDF Form
 Edit links
 Convert PDF
 OCR
OCR PDF to Word
 PDF to Image
 PDF to Excel
 Organize PDF
 Merge PDF
 Split PDF
 Crop PDF
 Rotate PDF
 Protect PDF
 Sign PDF
 Redact PDF
 Sanitize PDF
 Remove Security
 Read PDF
 UPDF Cloud
 Compress PDF
 Print PDF
 Batch Process
 About UPDF AI
 UPDF AI Solutions
 AI User Guide
 FAQ about UPDF AI
 Summarize PDF
 Translate PDF
 Chat with PDF
 Chat with AI
 Chat with image
 PDF to Mind Map
 Explain PDF
 Scholar Research
 Paper Search
 AI Proofreader
 AI Writer
 AI Homework Helper
 AI Quiz Generator
 AI Math Solver
 PDF to Word
 PDF to Excel
 PDF to PowerPoint
 User Guide
 UPDF Tricks
 FAQs
FAQs UPDF Reviews
 Download Center
 Blog
Blog Newsroom
 Tech Spec
 Updates
 UPDF vs. Adobe Acrobat
 UPDF vs. Foxit
 UPDF vs. PDF Expert





 Enola Miller

 Enola Davis
 Delia Meyer