Do you know that while using a Mac, you can easily sign PDF files without needing to print or scan them? You can add your signature directly to any PDF through built-in features or innovative tools like UPDF and UPDF Sign. Hence, if you are wondering how to sign a PDF on Mac through these tools, we have covered you with our detailed guidelines.
Part 1. How to Sign PDFs on Mac Using UPDF - 2 Methods Provided
Starting with UPDF, it is a cutting-edge tool that allows users to easily digitally and electronically sign PDF files. The intuitive interface makes this tool the finest choice among all, making tool navigation easier for all types of users. Besides signing, a wide range of features such as prepare form or redact tool makes PDF editing seamless.
Since our main concern is signing the PDF, as mentioned, it is supported in two ways: digital and electronic. Hence, in this section, you will learn how to sign a PDF on a Mac by using these two approaches in detail with stepwise guidance.
Method 1. Detailed Steps to Digitally Sign PDFs Using UPDF
UPDF allows you to sign the PDF digitally with the help of its "Prepare Form" tool. For digital signs, there is an option to add the digital signature field that enables you to insert the text box in the desired PDF area.
Once you have inserted that, the reader mode allows you to create or import the digital signature. Hence, you can easily sign the forms digitally by filling in the credentials in this mode. For some reason, if these details baffle you, here is a comprehensive step-by-step guide to learning how to digitally sign a PDF on a Mac:
Step 1. Access the UPDF Tool and Import File
To begin with, download and launch the tool on your MacBook and tap on the "Open File" option from the main interface to import the PDF form.
Windows • macOS • iOS • Android 100% secure
Step 2. Insert the Digital Signature Box
As the form is displayed, locate the "Prepare Form" tool from the left side of the screen and tap on the "Digital Signature" icon from the top toolbar. This will allow you to paste the text box in the desired location to start digitally signing the form.
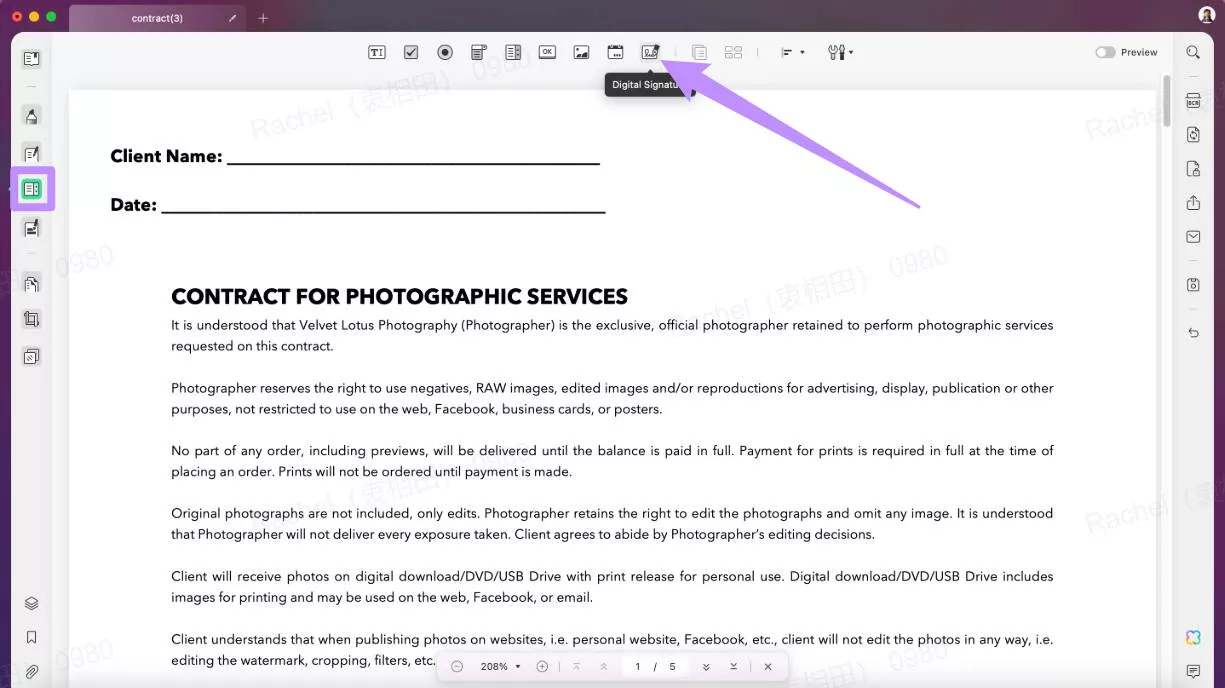
Step 3. Head to the Reader Tool to Create a Sign
Now that you have inserted the digital signature box, head to the "Reader" tool from the left menu, tap on the box, and hit the "Create" icon from the pop-up menu. You can also choose to import an existing one from your local storage.
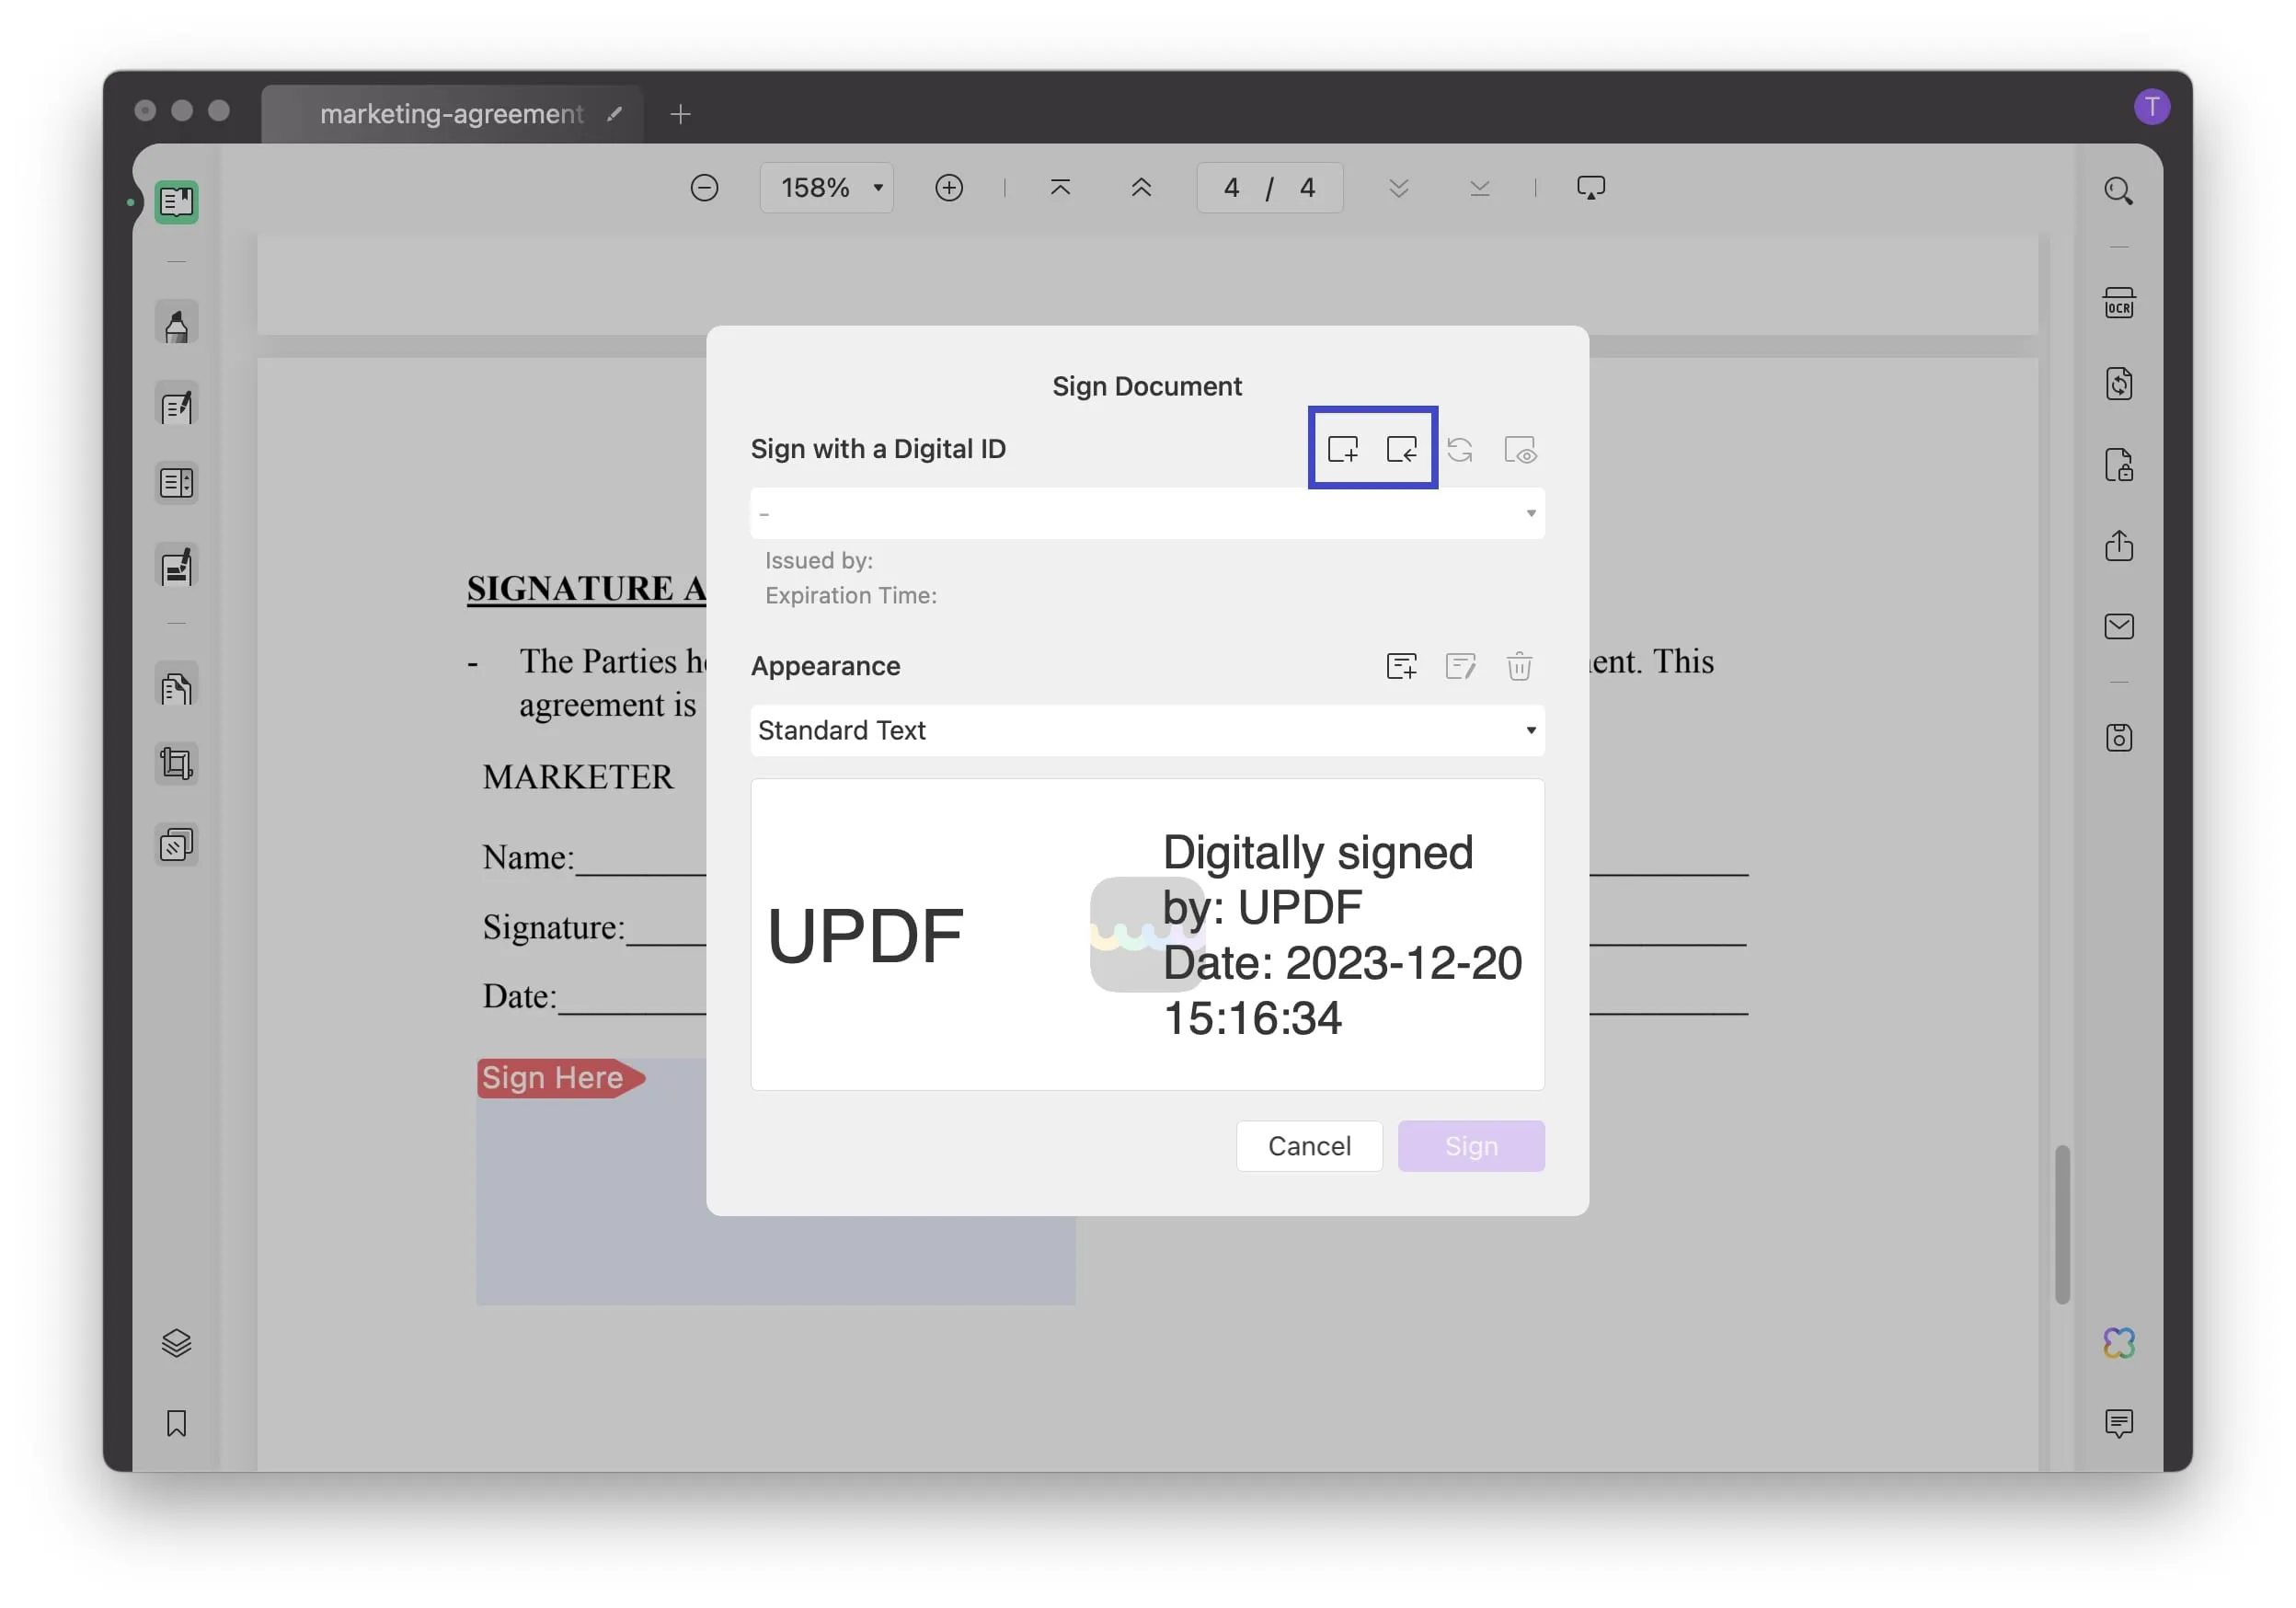
Step 4. Fill in the Sign Credentials
This will direct you to a new screen where you must fill in the name and email ID to sign the form digitally. As you are done, tap on the "OK" button, head back to the pop-up menu, and choose the sign option to finally sign the form.
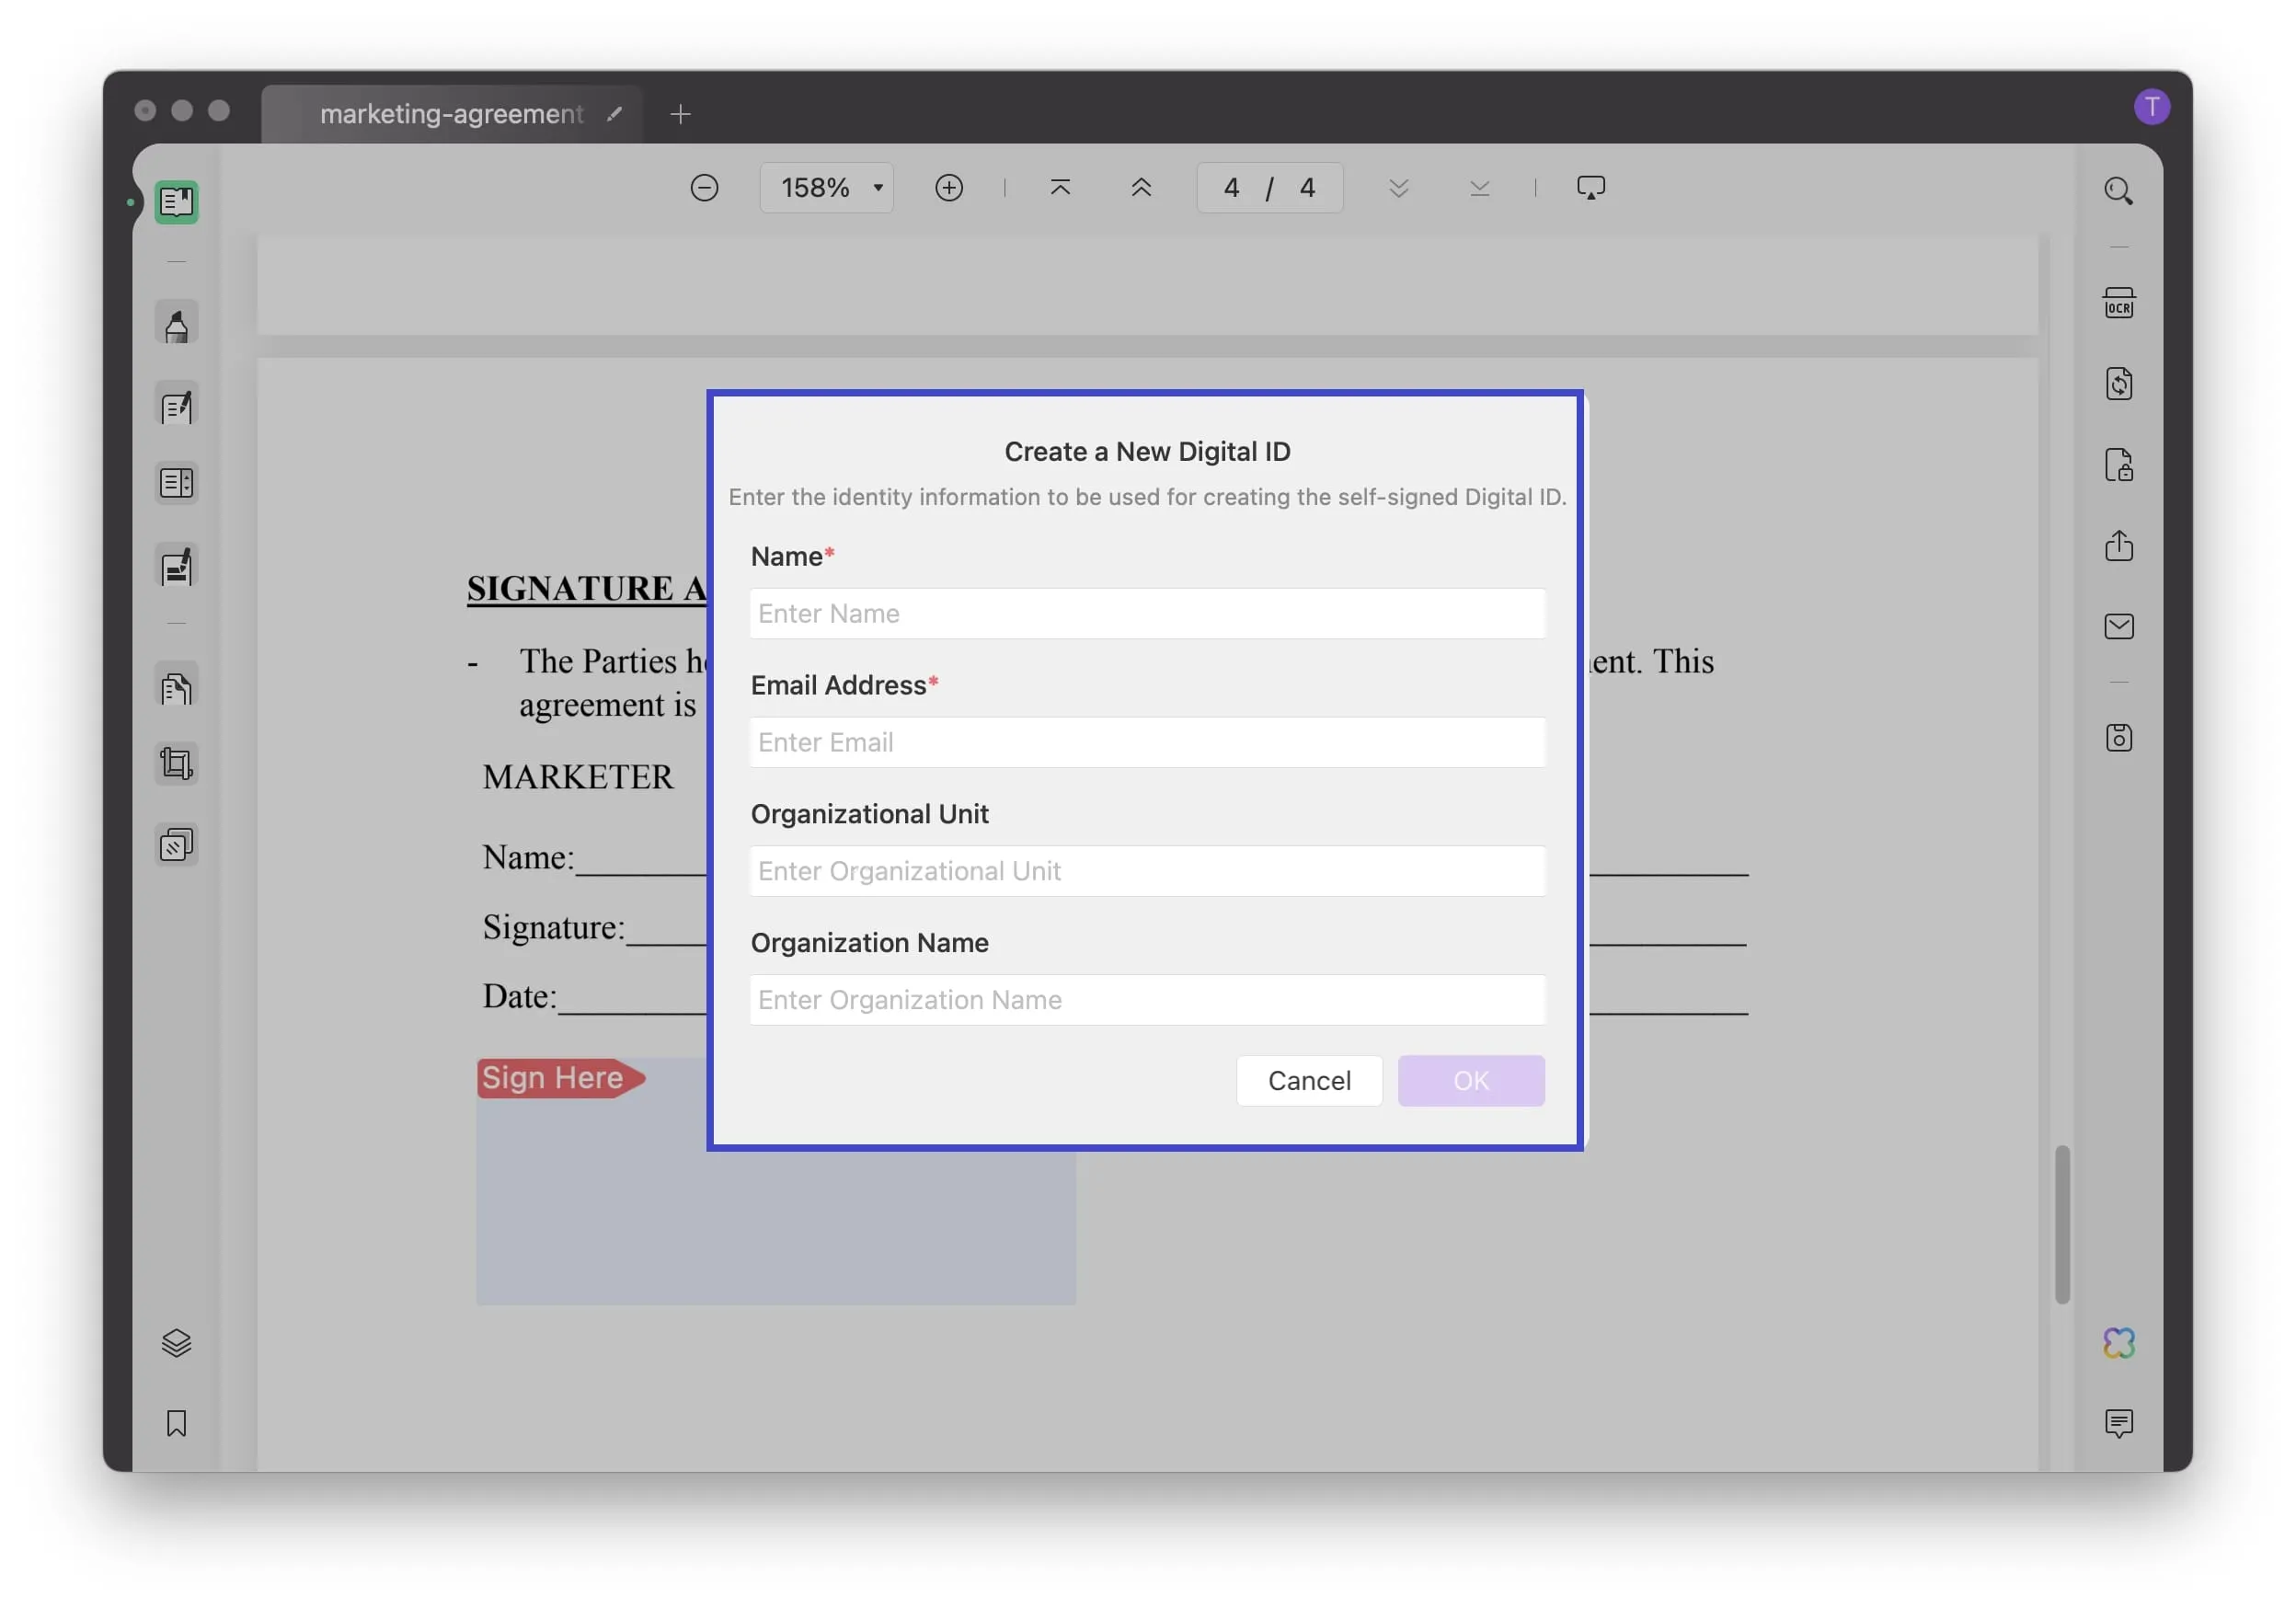
Step 5. Save the Signed Form to the Device
Upon tapping the option, a pop-up menu will appear on the screen, and you will have to choose the "Save" option to export the signed form to the device.
Bonus
With the powerful compatibility, UPDF also makes it convenient to sign PDFs on Windows, iOS, and Android. Besides, UPDF is more than a simple PDF signer, it is a comprehensive AI PDF editor that can edit, annotate, convert, AI chat with PDFs. Unlock all the premium features by upgrading the pro version!
Method 2. Detailed Steps to Electronically Sign PDFs Using UPDF
Besides digital signatures, users can also electronically sign the PDFs to streamline the signing process. For that, there is the annotation tool that contains a list of features like underlining, strike, or text box. However, for e-signatures, you can either upload, type the sign, or create them manually with available features.
Regardless of the method one opts for, users can easily change the style of their signature to make it appealing and distinctive. Hence, follow the given guide and learn how to sign PDF on a Mac with just a few taps.
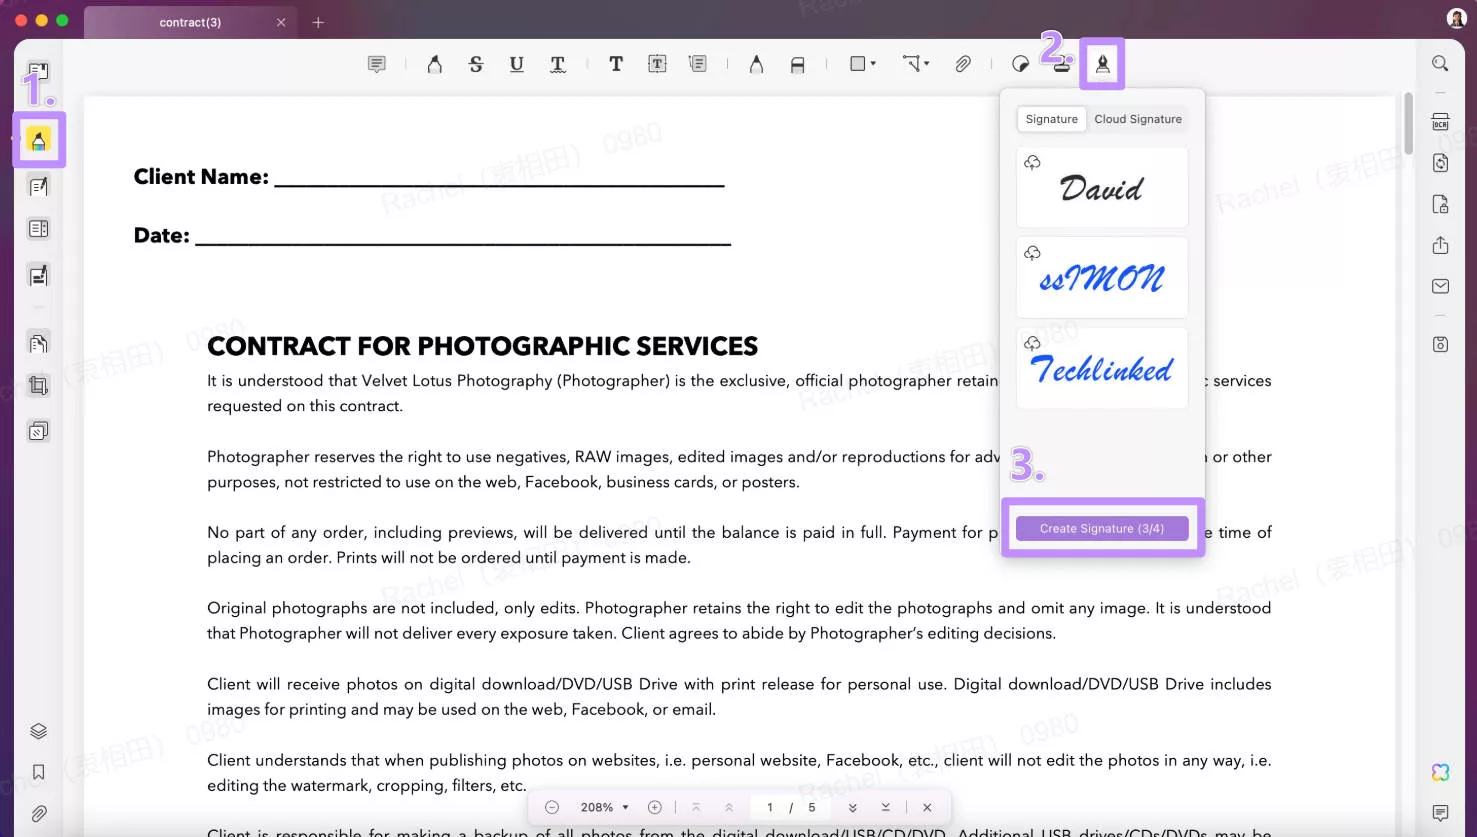
Instructions. Upon importing the file, search for the "Comment" section from the left toolbar and navigate to the "Signature" tool from the top-left corner. This will expand a menu where you have to press the "Create Signature" option to access a pop-up menu.
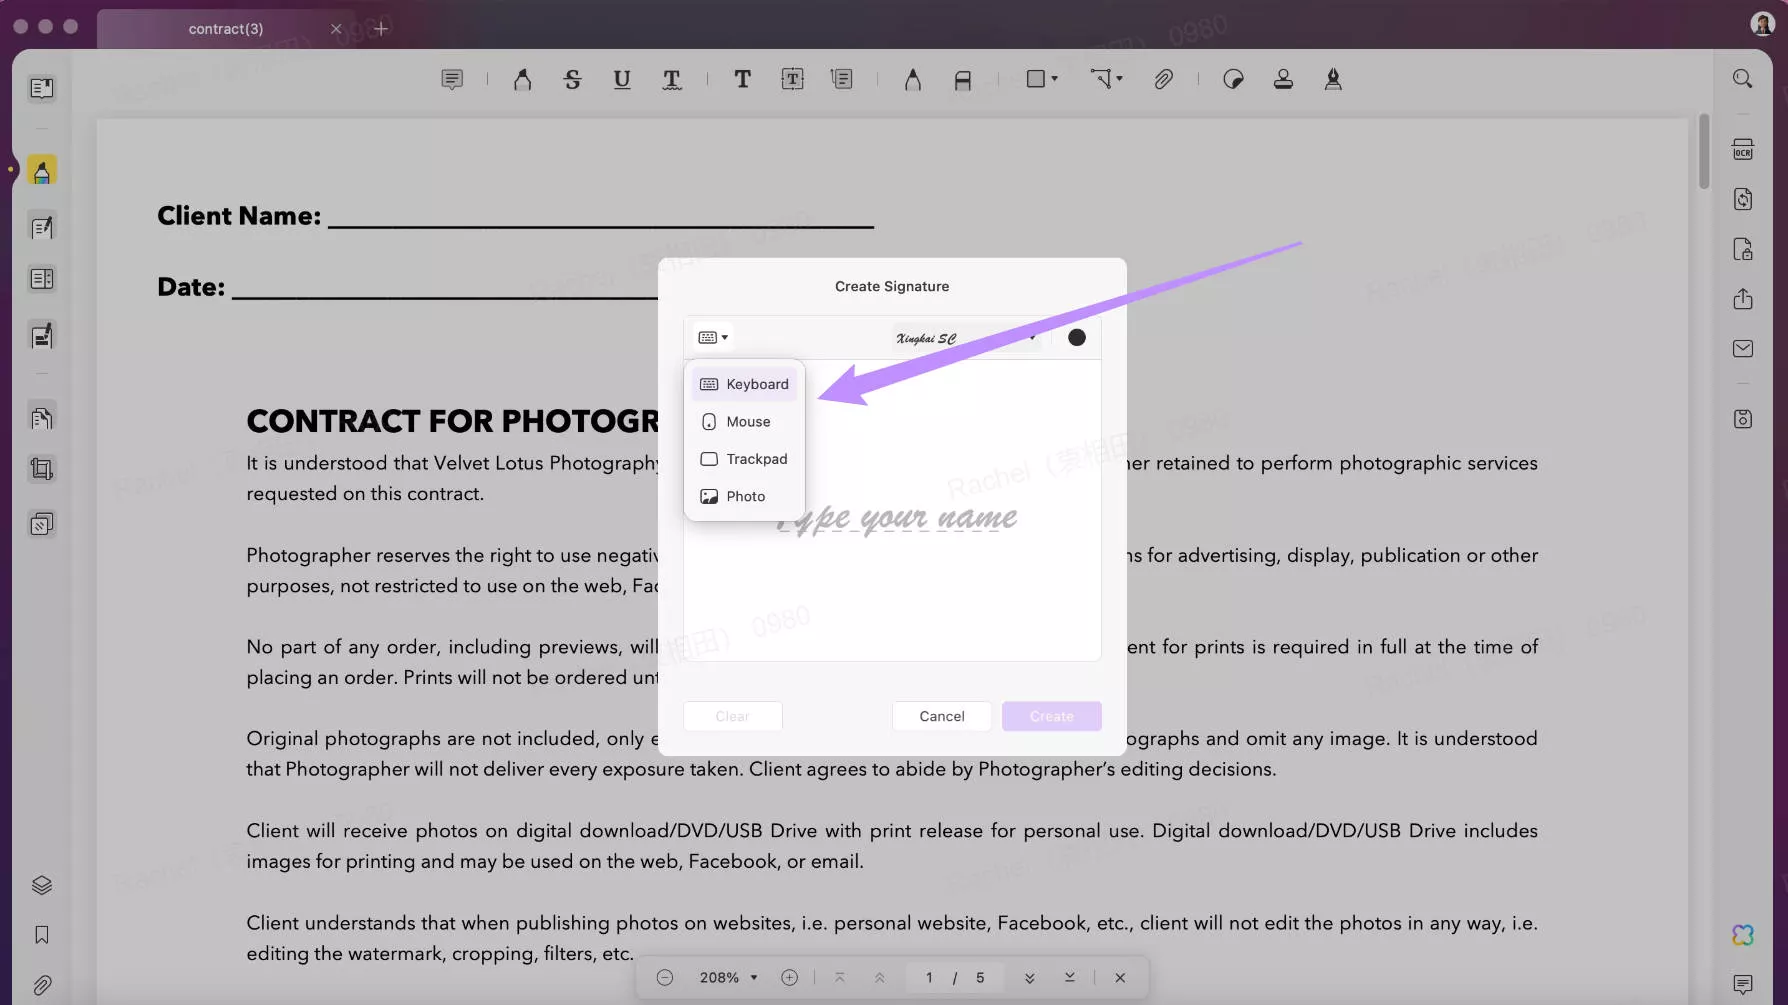
Expand the "Keyboard" icon, type your sign, and hit the "Create" option once you are done. You can also create the electronic signature through a mouse or trackpad or by importing a photo.
For expert assistance, we recommend you watch this video to know more about UPDF's fill and sign features.
Part 2. How to Sign PDFs on Mac Using UPDF Sign?
Since you know how to electronically sign PDFs on Mac and have resolved the electronic signature vs. digital signature debate, you can also use UPDF Sign to sign forms. However, it's important to note that users cannot directly upload a PDF to sign. For that, you need to send it to a recipient who can also be the sender themselves; they can upload the PDF form to sign it.
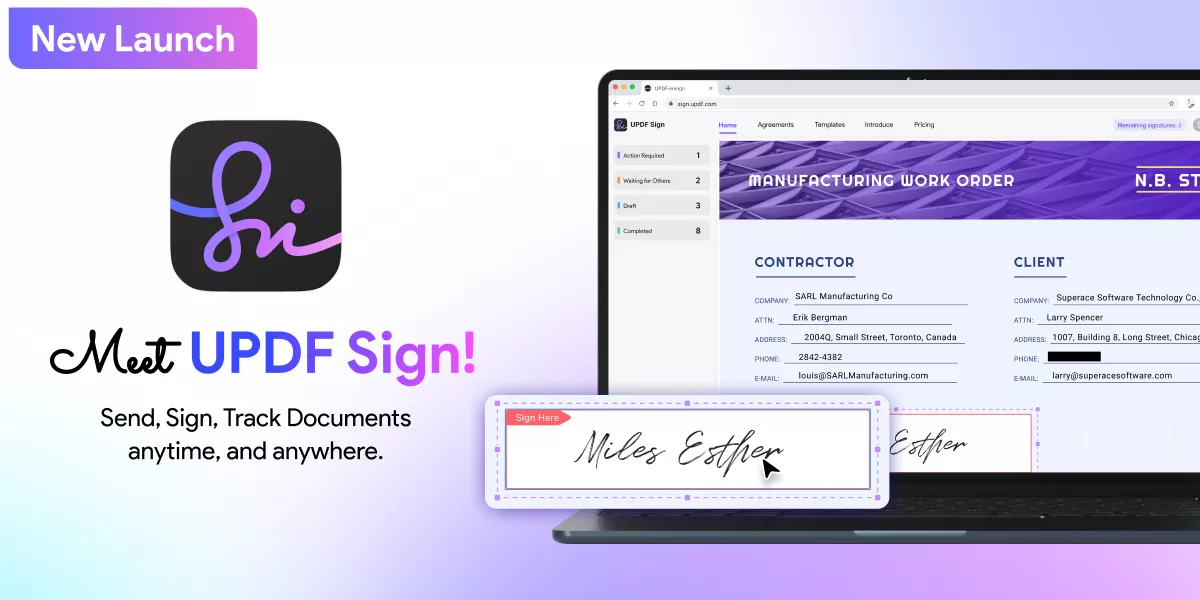
This feature makes UPDF Sign ideal for sending PDFs to others for signature, ensuring a smooth and professional workflow. Generally, UPDF Sign offers a variety of features, including easy document management, secure signing, and real-time notifications. Hence, to learn the signing process, dive into the mentioned guide:
Step 1. Start Creating the Form by Import PDF File
Click the button below to access UPDF Sign.
Start by sending the form since it does not support direct uploading of the PDF forms. To import the form, tap the "Initiate Signature" option from the main interface.
Step 2. Add Recipients and Other Signing Details
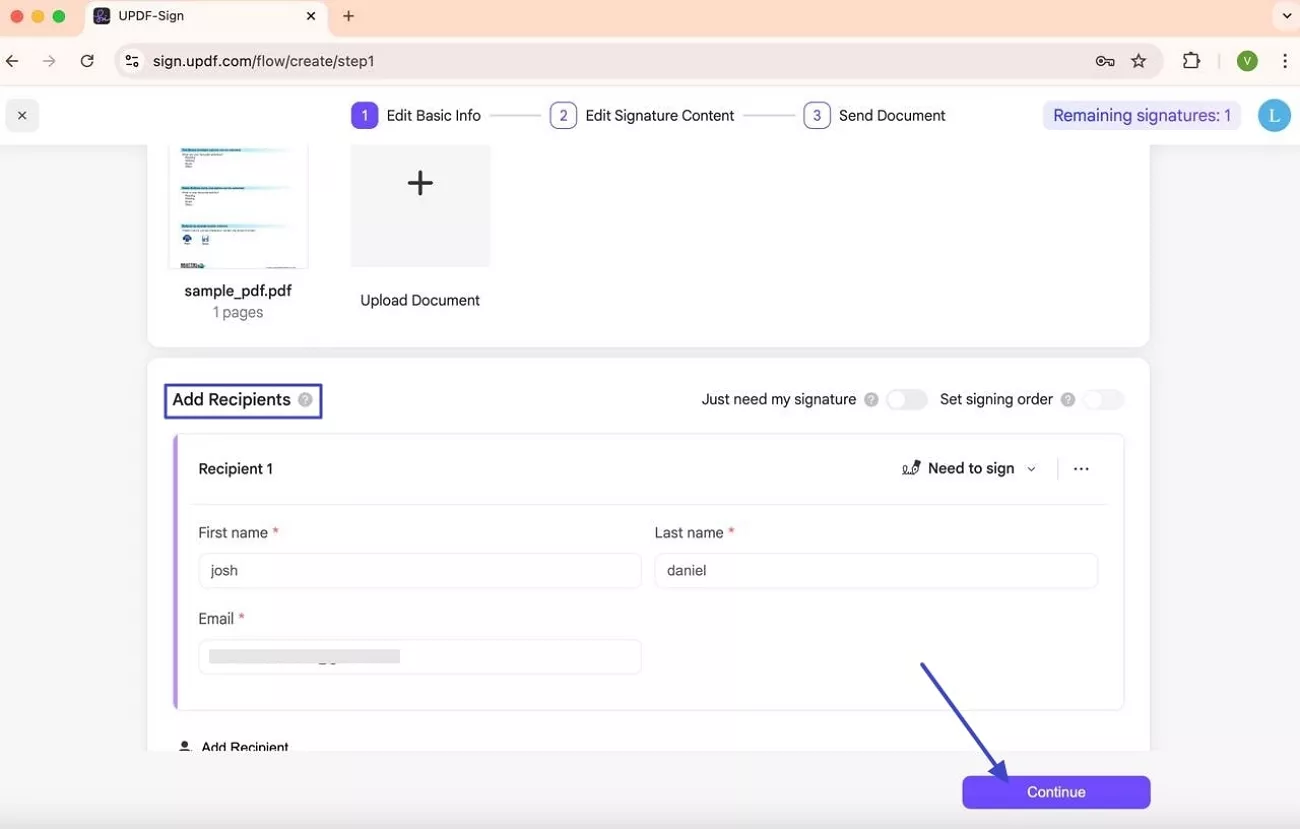
Now that the form is there, click the "Add Recipients" option and insert the receiver's details. As it's done, tap on the "Continue" option to continue the signing process.
Step 3. Add the Signature Box and Finish the Process
Moving to the new screen, pick the "Signature" option and drag the signature box to the desired location. Once it's placed, tap on the "Finish" option to access a new pop-up menu.
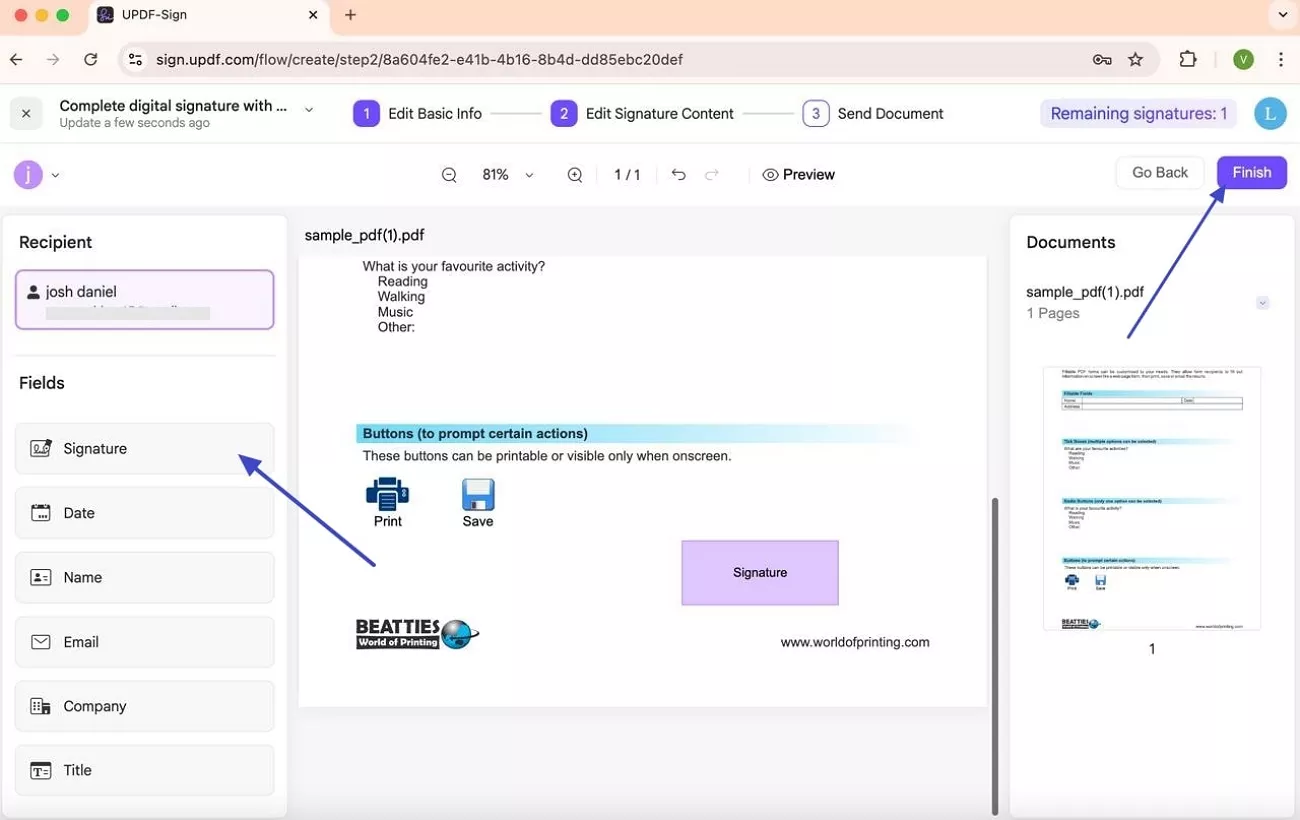
Step 4. Review the Details Before Sending
On the pop-up menu, review the details and choose the "Send' option to mail the form to the recipients.
Step 5. Receive Mail and Sign the Form
Now that you have received the form sign it as a recipient by accessing the notification you received in the mail. Upon adding the form passcode, toggle the "Click here to indicate that you agree to the User Agreement" option and hit the "Sign" option to proceed further.
Step 6. Fill the Signature Box by Drawing the Sign
Scroll down till you find the signature box, tap on it, and access a pop-up menu to choose the singing option. Pick the "Draw" option, sign it, and hit the "Confirm" button to sign the form.
Step 7. Change or Delete the Sign and End the Process
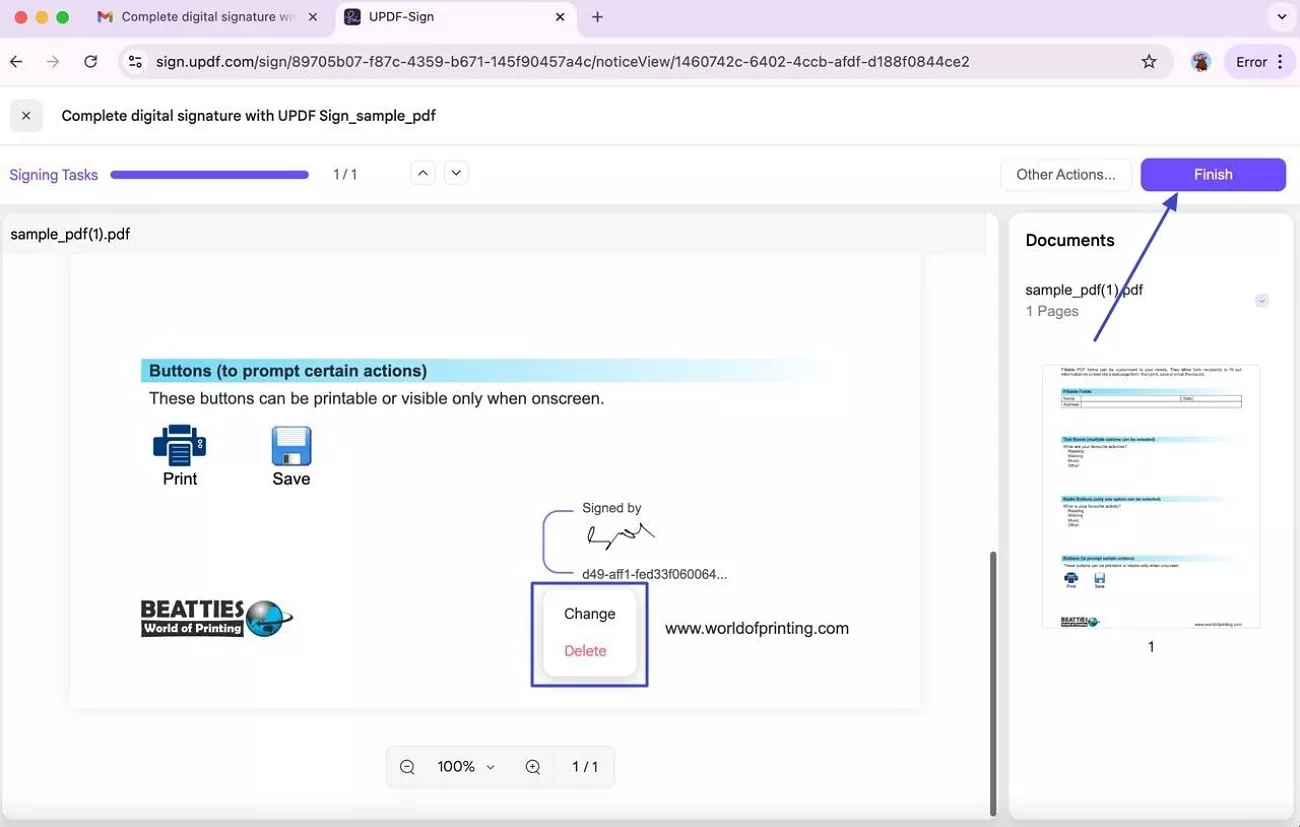
Now that you have signed tap on the sign again and decide whether you want to "Change" or "Delete" it. If it's final, choose the "Finish" option and end the signing process.
Part 3. FAQs About Signing a PDF on Mac
1. How do I sign a PDF on a Mac without Adobe?
If you don't have Adobe on Mac, use UPDF for Mac or UPDF Sign to sign your documents quickly. Using UPDF, you can easily upload the PDF form and electronically or digitally sign it as per your preferences.
2. Can you add a handwritten signature to a PDF?
Yes, with UPDF, you can add handwritten signs by uploading them manually. Moreover, it also offers options to draw signatures, which gives it a handwritten appeal.
3. How do I fill out a PDF on a Mac?
For filling out PDFs on Mac, UPDF offers you a wide range of tools, ranging from editor to reader. Using these tools, you can easily fill out PDFs on Mac without affecting its formatting and alignment.
Conclusion
In conclusion, signing the PDF form on a Mac is easier than ever if one knows how to sign a PDF form on a Mac with UPDF or UPDF Sign. Hence, in this guide, we have mentioned detailed steps to easily sign the form both digitally and electronically. Thus, review the details and explore the seamless methods to easily sign the PDF forms using UPDF.
Windows • macOS • iOS • Android 100% secure
 UPDF
UPDF
 UPDF for Windows
 UPDF for Mac
 UPDF for iPhone/iPad
 UPDF for Android
 UPDF AI Online
 UPDF Sign
 Edit PDF
 Annotate PDF
 Create PDF
 PDF Form
 Edit links
 Convert PDF
 OCR
OCR PDF to Word
 PDF to Image
 PDF to Excel
 Organize PDF
 Merge PDF
 Split PDF
 Crop PDF
 Rotate PDF
 Protect PDF
 Sign PDF
 Redact PDF
 Sanitize PDF
 Remove Security
 Read PDF
 UPDF Cloud
 Compress PDF
 Print PDF
 Batch Process
 About UPDF AI
 UPDF AI Solutions
 AI User Guide
 FAQ about UPDF AI
 Summarize PDF
 Translate PDF
 Chat with PDF
 Chat with AI
 Chat with image
 PDF to Mind Map
 Explain PDF
 Scholar Research
 Paper Search
 AI Proofreader
 AI Writer
 AI Homework Helper
 AI Quiz Generator
 AI Math Solver
 PDF to Word
 PDF to Excel
 PDF to PowerPoint
 User Guide
 UPDF Tricks
 FAQs
FAQs UPDF Reviews
 Download Center
 Blog
Blog Newsroom
 Tech Spec
 Updates
 UPDF vs. Adobe Acrobat
 UPDF vs. Foxit
 UPDF vs. PDF Expert





 Enid Brown
