 UPDF
 UPDF for Windows
 UPDF for Mac
 UPDF for iPhone/iPad
 UPDF for Android
 Nomostar
 UPDF AI Online
 UPDF Sign
 IvyCraft
 Edit PDF
 Annotate PDF
 Create PDF
 PDF Form
 Edit links
 Convert PDF
 OCR
 PDF to Word
 PDF to Image
 PDF to Excel
 Organize PDF
 Merge PDF
 Split PDF
 Crop PDF
 Rotate PDF
 Protect PDF
 Sign PDF
 Redact PDF
 Sanitize PDF
 Remove Security
 Read PDF
 UPDF Cloud
 Compress PDF
 Print PDF
 Batch Process

 About UPDF AI
 UPDF AI Solutions
 AI User Guide
 FAQ about UPDF AI
 Summarize PDF
 Translate PDF
 Chat with PDF
 Chat with AI
 Chat with image
 PDF to Mind Map
 Explain PDF
 PDF AI Tools
 Image AI Tools
 AI Chat Tools
 AI Writing Tools
 AI Study Tools
 AI Working Tools
 Other AI Tools
 AI Bookmark Generation
 AI Bookmark Summary
 AI Watermark Generation
 AI Background Generation
 AI Sticker Generation
 AI Stamp Generation
 AI Editing Suite
 UPDF Copilot
 AI Page Management
 AI Semantic Search
 PDF to Word
 PDF to Excel
 PDF to PowerPoint
 Enterprise Solution
 Enterprise Sign
 Enterprise AI
 Enterprise Plan
 Enterprise User Guide
 Enterprise Webinar
 IT
 Education
 Construction
 Financial Service
 Healthcare
 Insurance
 Legal
 Manufacturing
 Government
 Researchers & PhDs
 Solopreneurs & Freelancers
 Lawyers & Legal Professionals
 Real Estate Agents & Brokers
 Education Solution
 Customer Stories
 User Guide
 UPDF Tricks
 FAQs
 UPDF Reviews
 Download Center
 Blog
 Newsroom
 Tech Spec
 Updates
 UPDF vs. Adobe Acrobat
 UPDF vs. Foxit
 UPDF vs. PDF Expert


Quick Answer:
Need speaker notes or several slides on each PDF page? Use PowerPoint’s File > Print workflow in Method 3 and select the appropriate layout before saving as PDF.
Keep your original presentation for future slide edits. After conversion, check fonts, charts, images, and page order. A PDF provides a fixed-layout copy, but it is not necessarily smaller than the original PowerPoint file.
Method 1: Convert PowerPoint to PDF on Mac with UPDF
UPDF for Mac supports direct PowerPoint-to-PDF creation. Use drag-and-drop, the creation tools, or Batch Create.
Windows • macOS • iOS • Android 100% secure
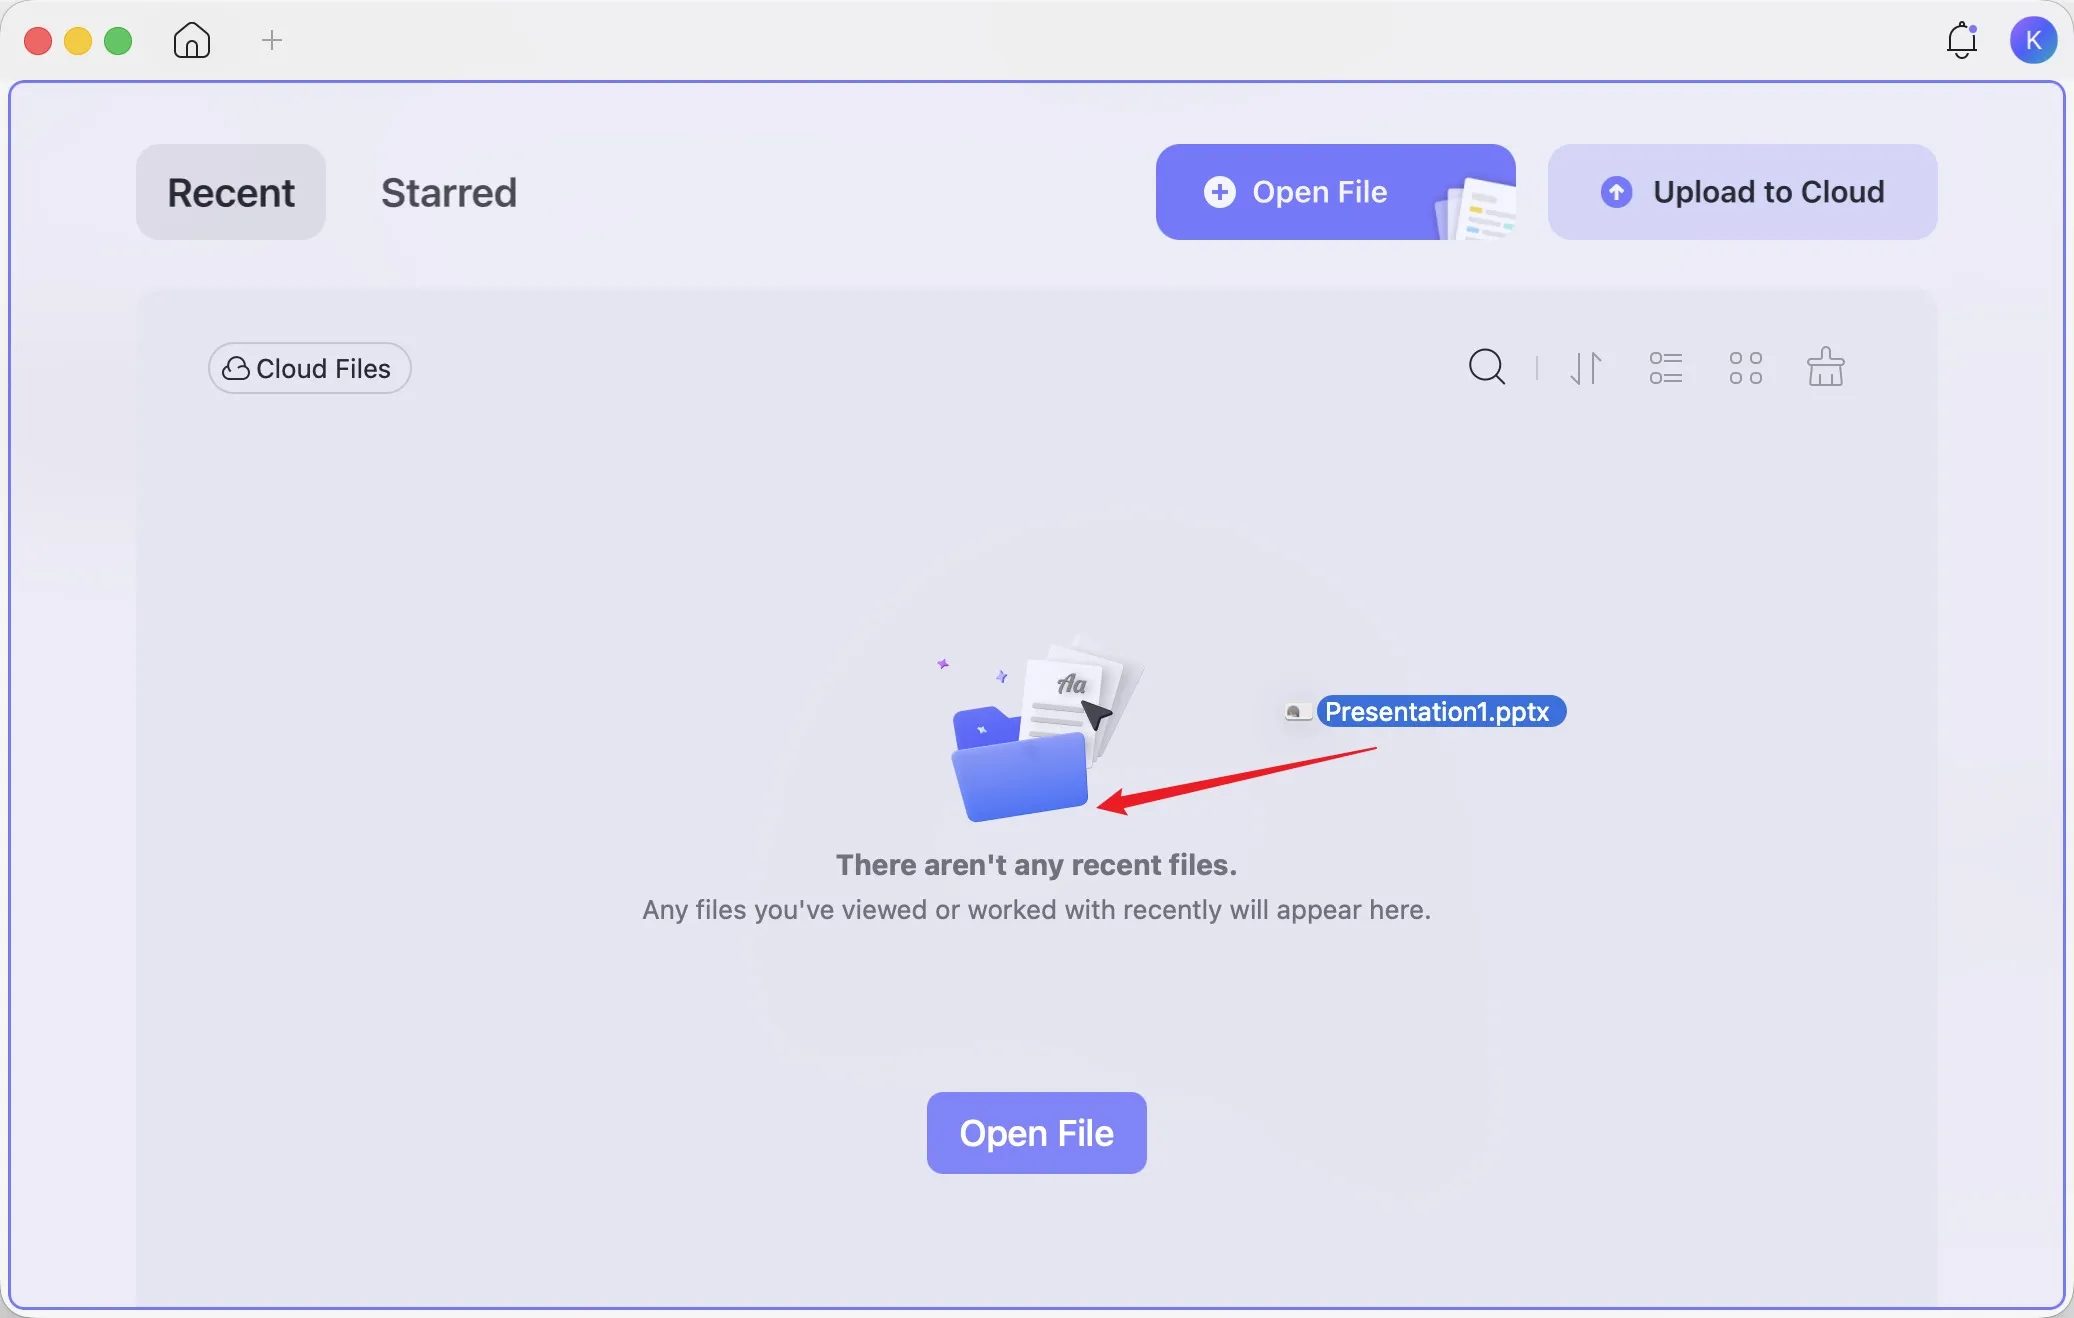
Option A: Drag and Drop a PowerPoint File into UPDF
- Open UPDF on your Mac.
- Drag your PowerPoint file from Finder into UPDF. It automatically converts to PDF.
- Choose Save, name the PDF, and choose a folder.
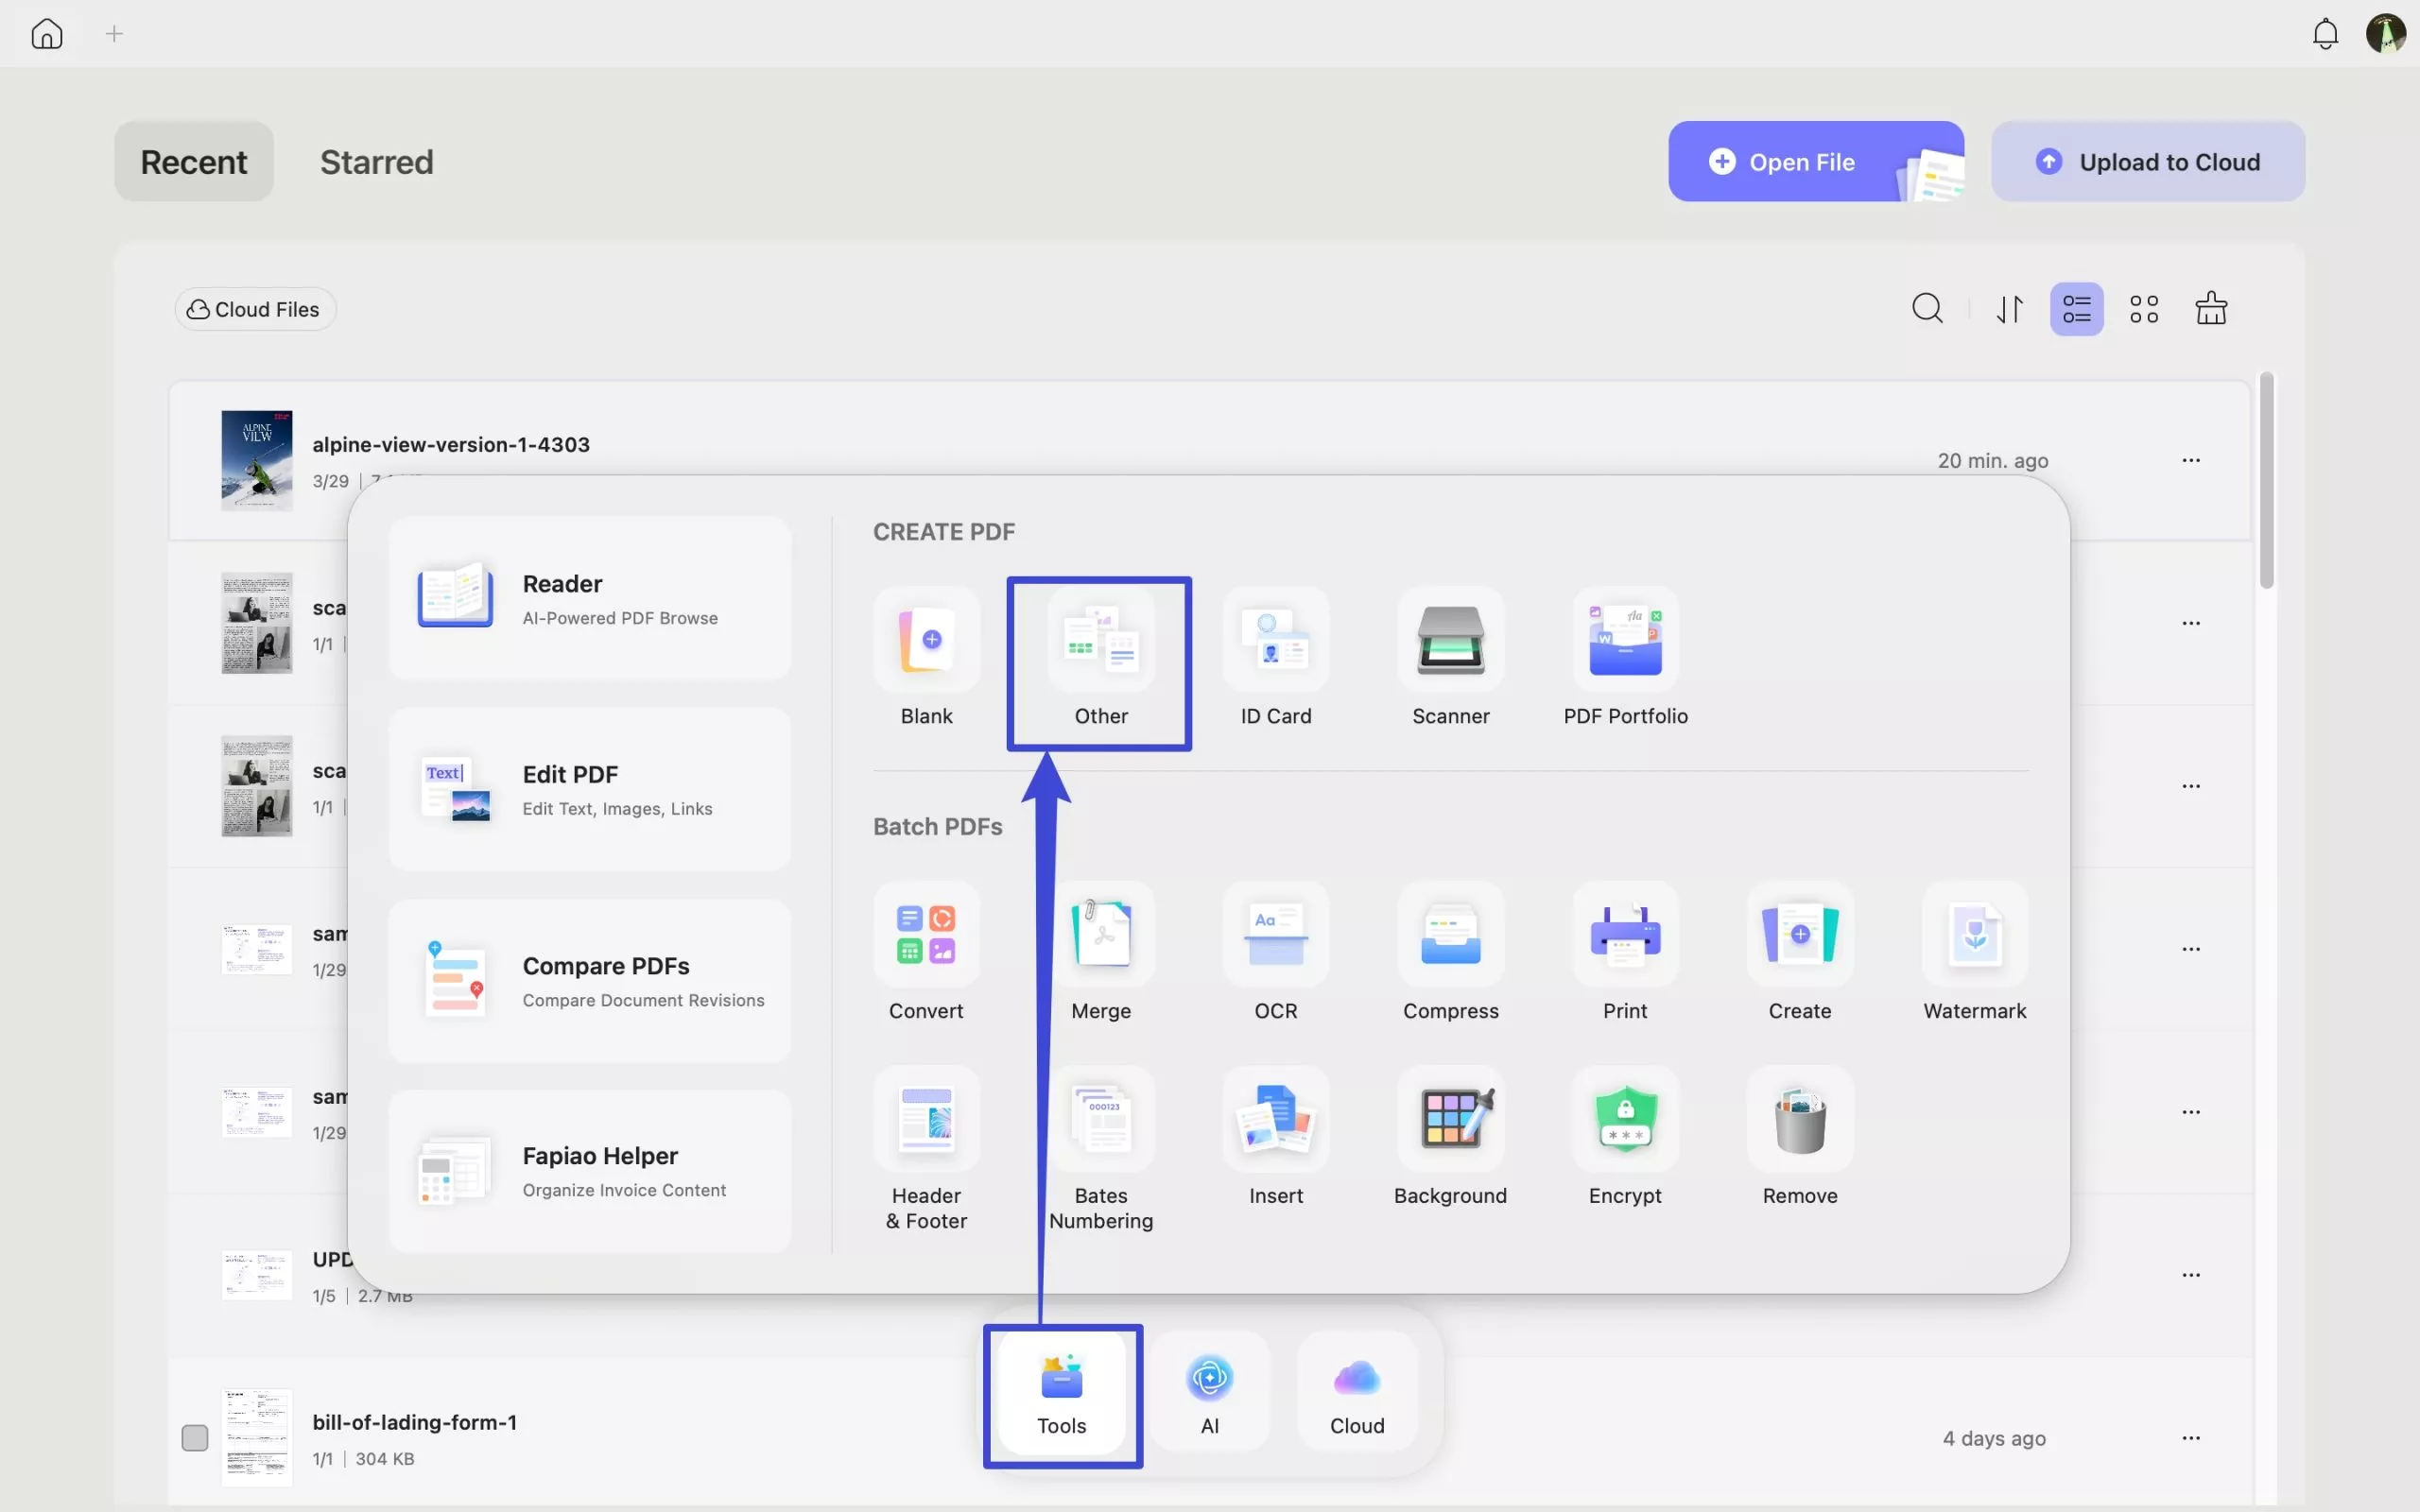
Option B: Use UPDF’s PDF Creation Tools
- Open Tools from UPDF’s home screen.
- Under CREATE PDF, select Other.
- Choose the PowerPoint creation option and click Select Files.
- Select your presentation and confirm to generate the PDF.
- Choose Save to save it.
Option C: Batch Convert PowerPoint Files to PDF
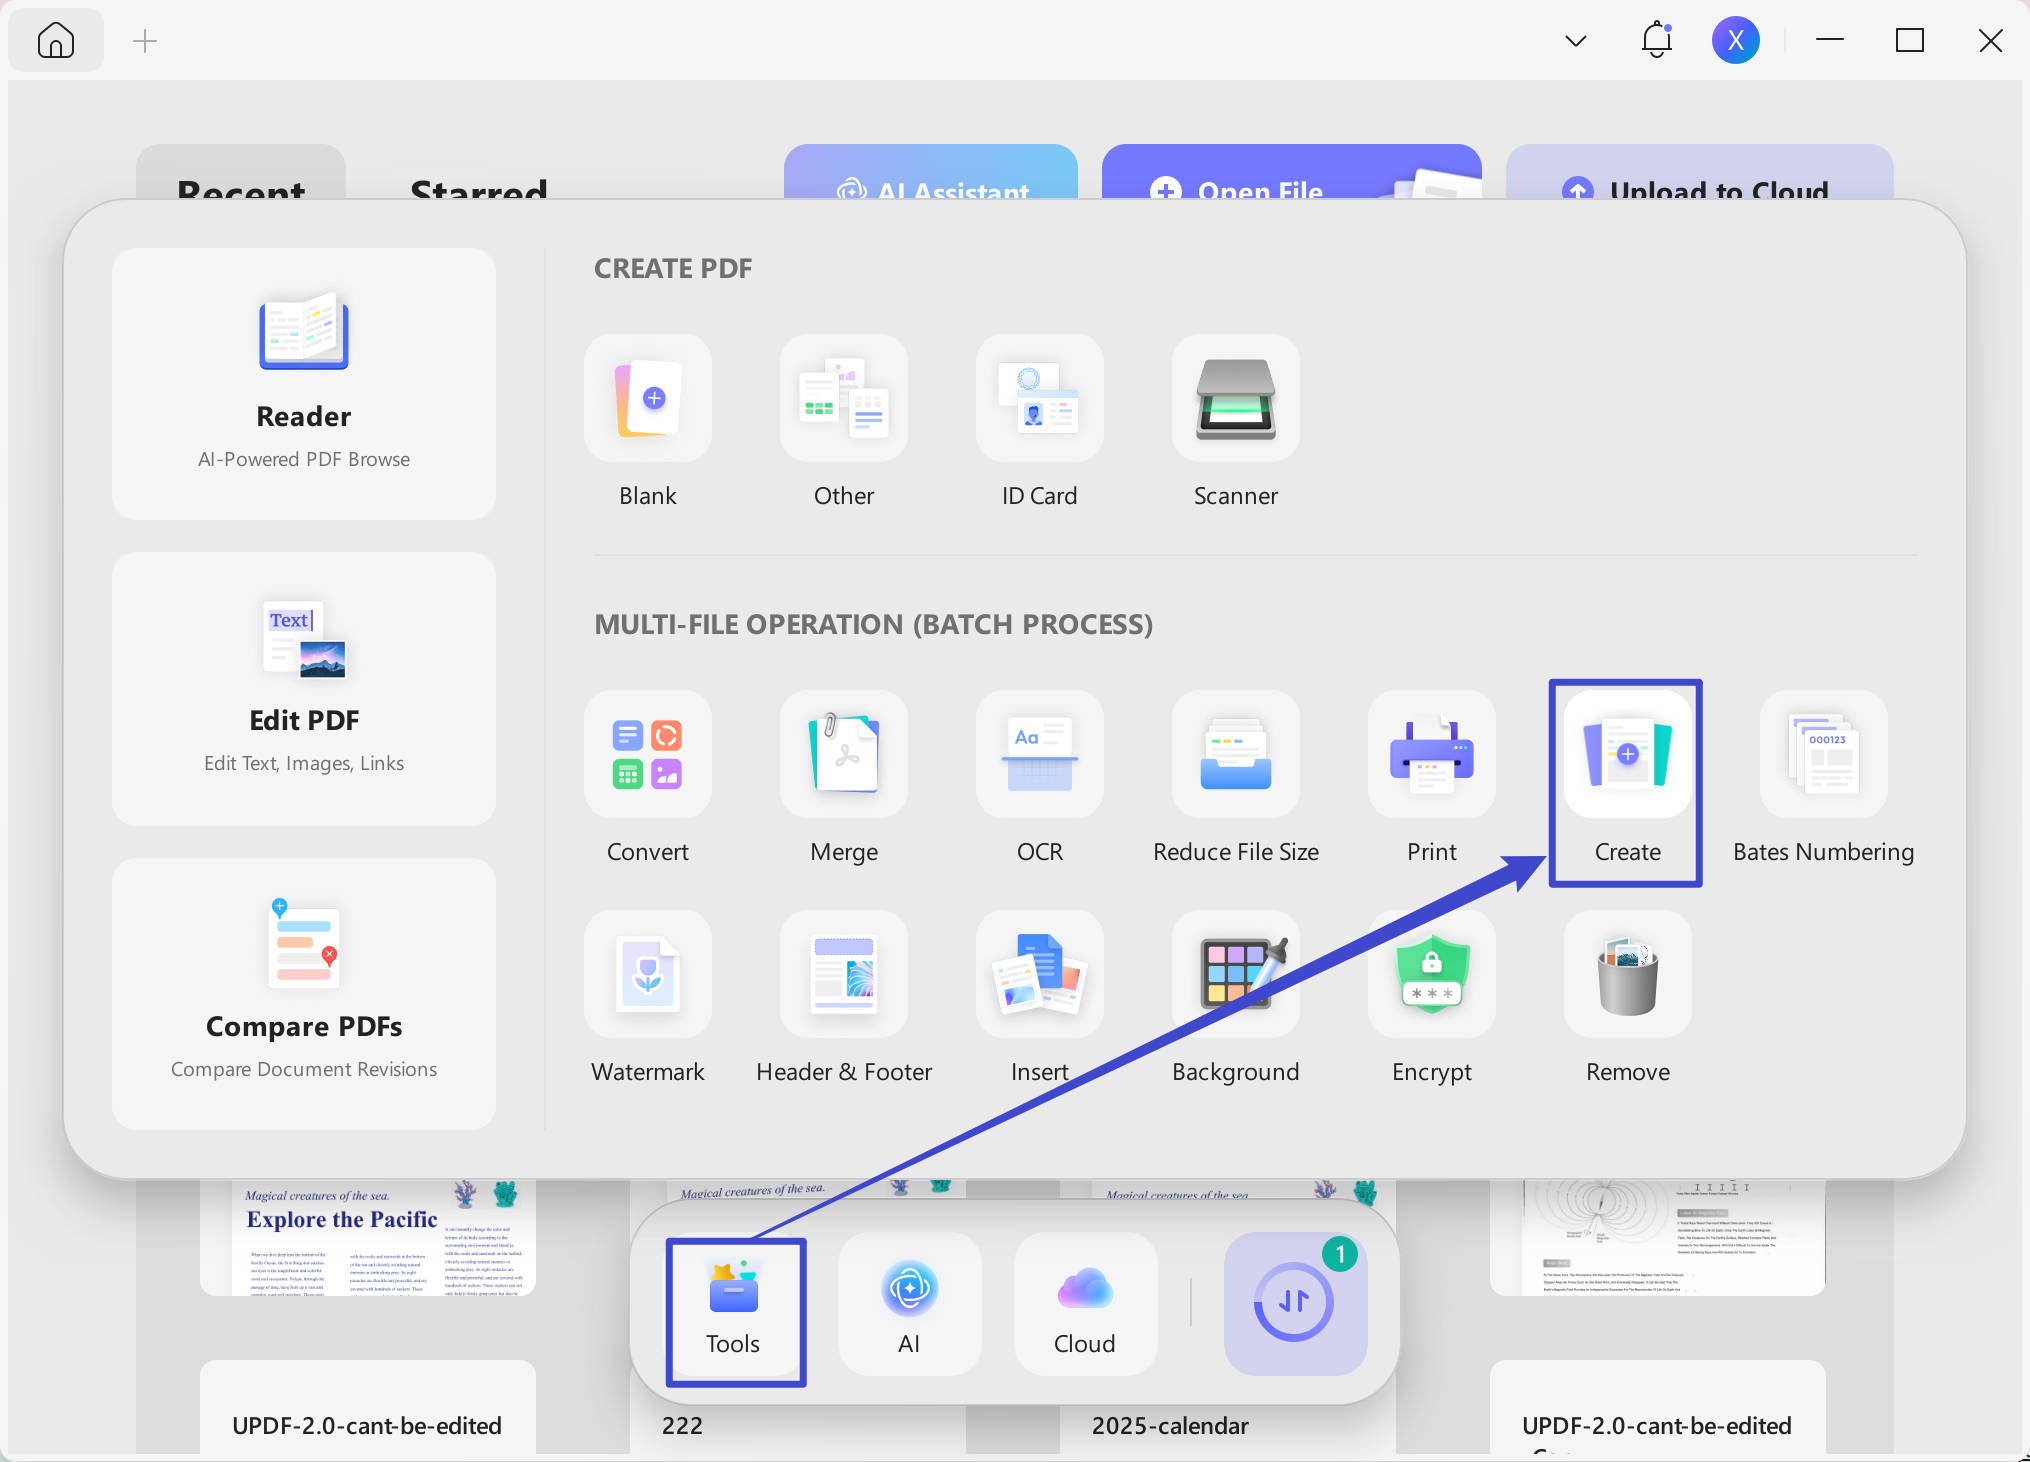
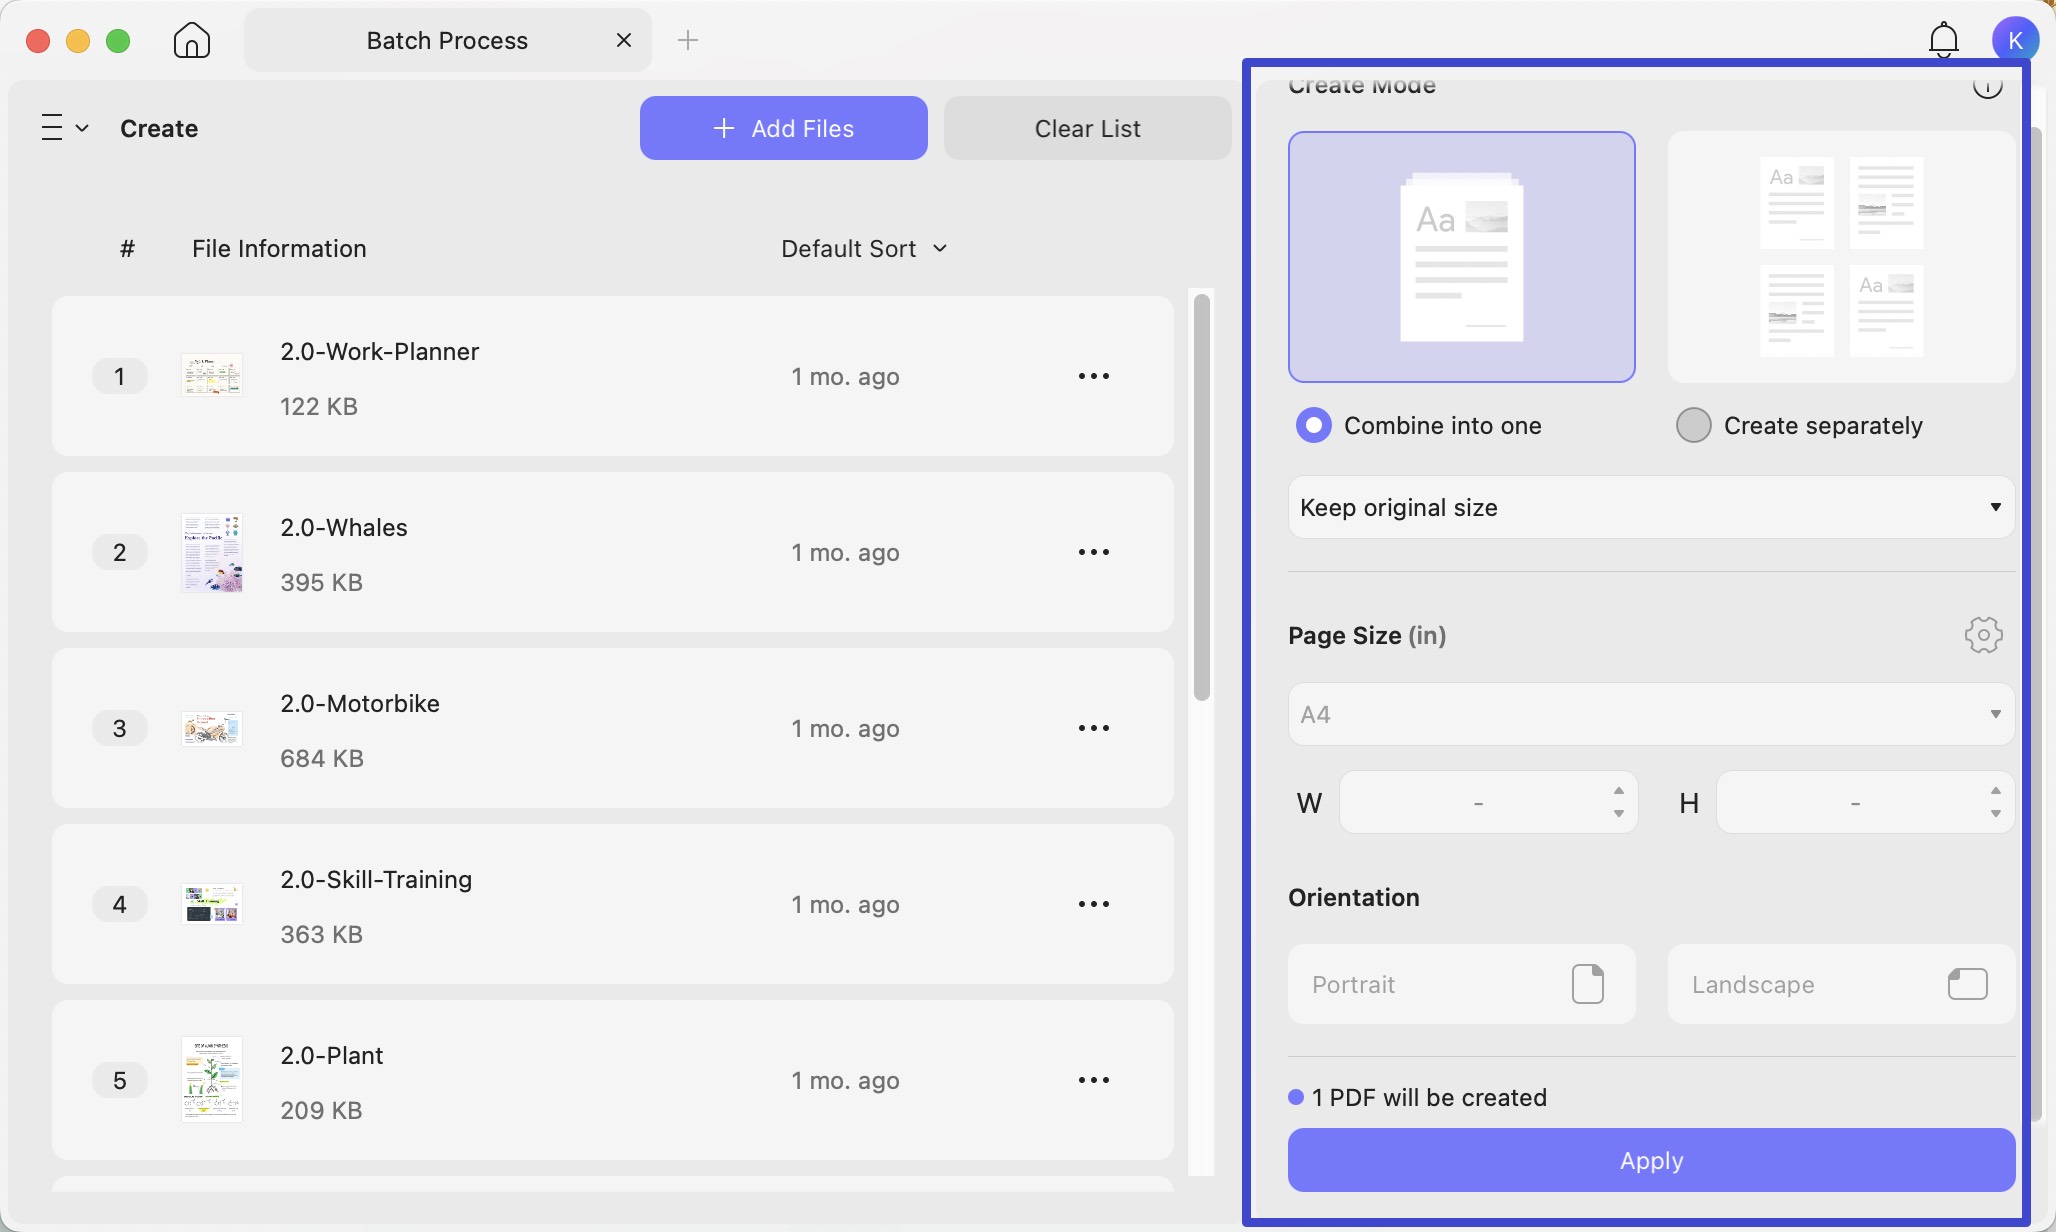
- Open Tools > Create under Batch PDFs.
- Click Add Files to select your presentations, or use Add Folders.
- Choose Create separately for one PDF per presentation, or Combine into one for a single PDF.
- Click Apply and follow the prompts to save the output.
For speaker notes or handouts, use Method 3 for PowerPoint’s explicit print-layout controls. After creating a PDF, UPDF also lets you edit text and images, annotate, organize pages, and compress the file.
The video below introduces UPDF for Mac and its PDF workflow.
Download UPDF for free to try converting a sample presentation—installation is free, and Pro removes the trial watermark from saved output.
Windows • macOS • iOS • Android 100% secure
Method 2: Save PowerPoint as PDF on Mac with Microsoft PowerPoint
If your presentation is already open in PowerPoint for Mac, save a PDF copy directly.
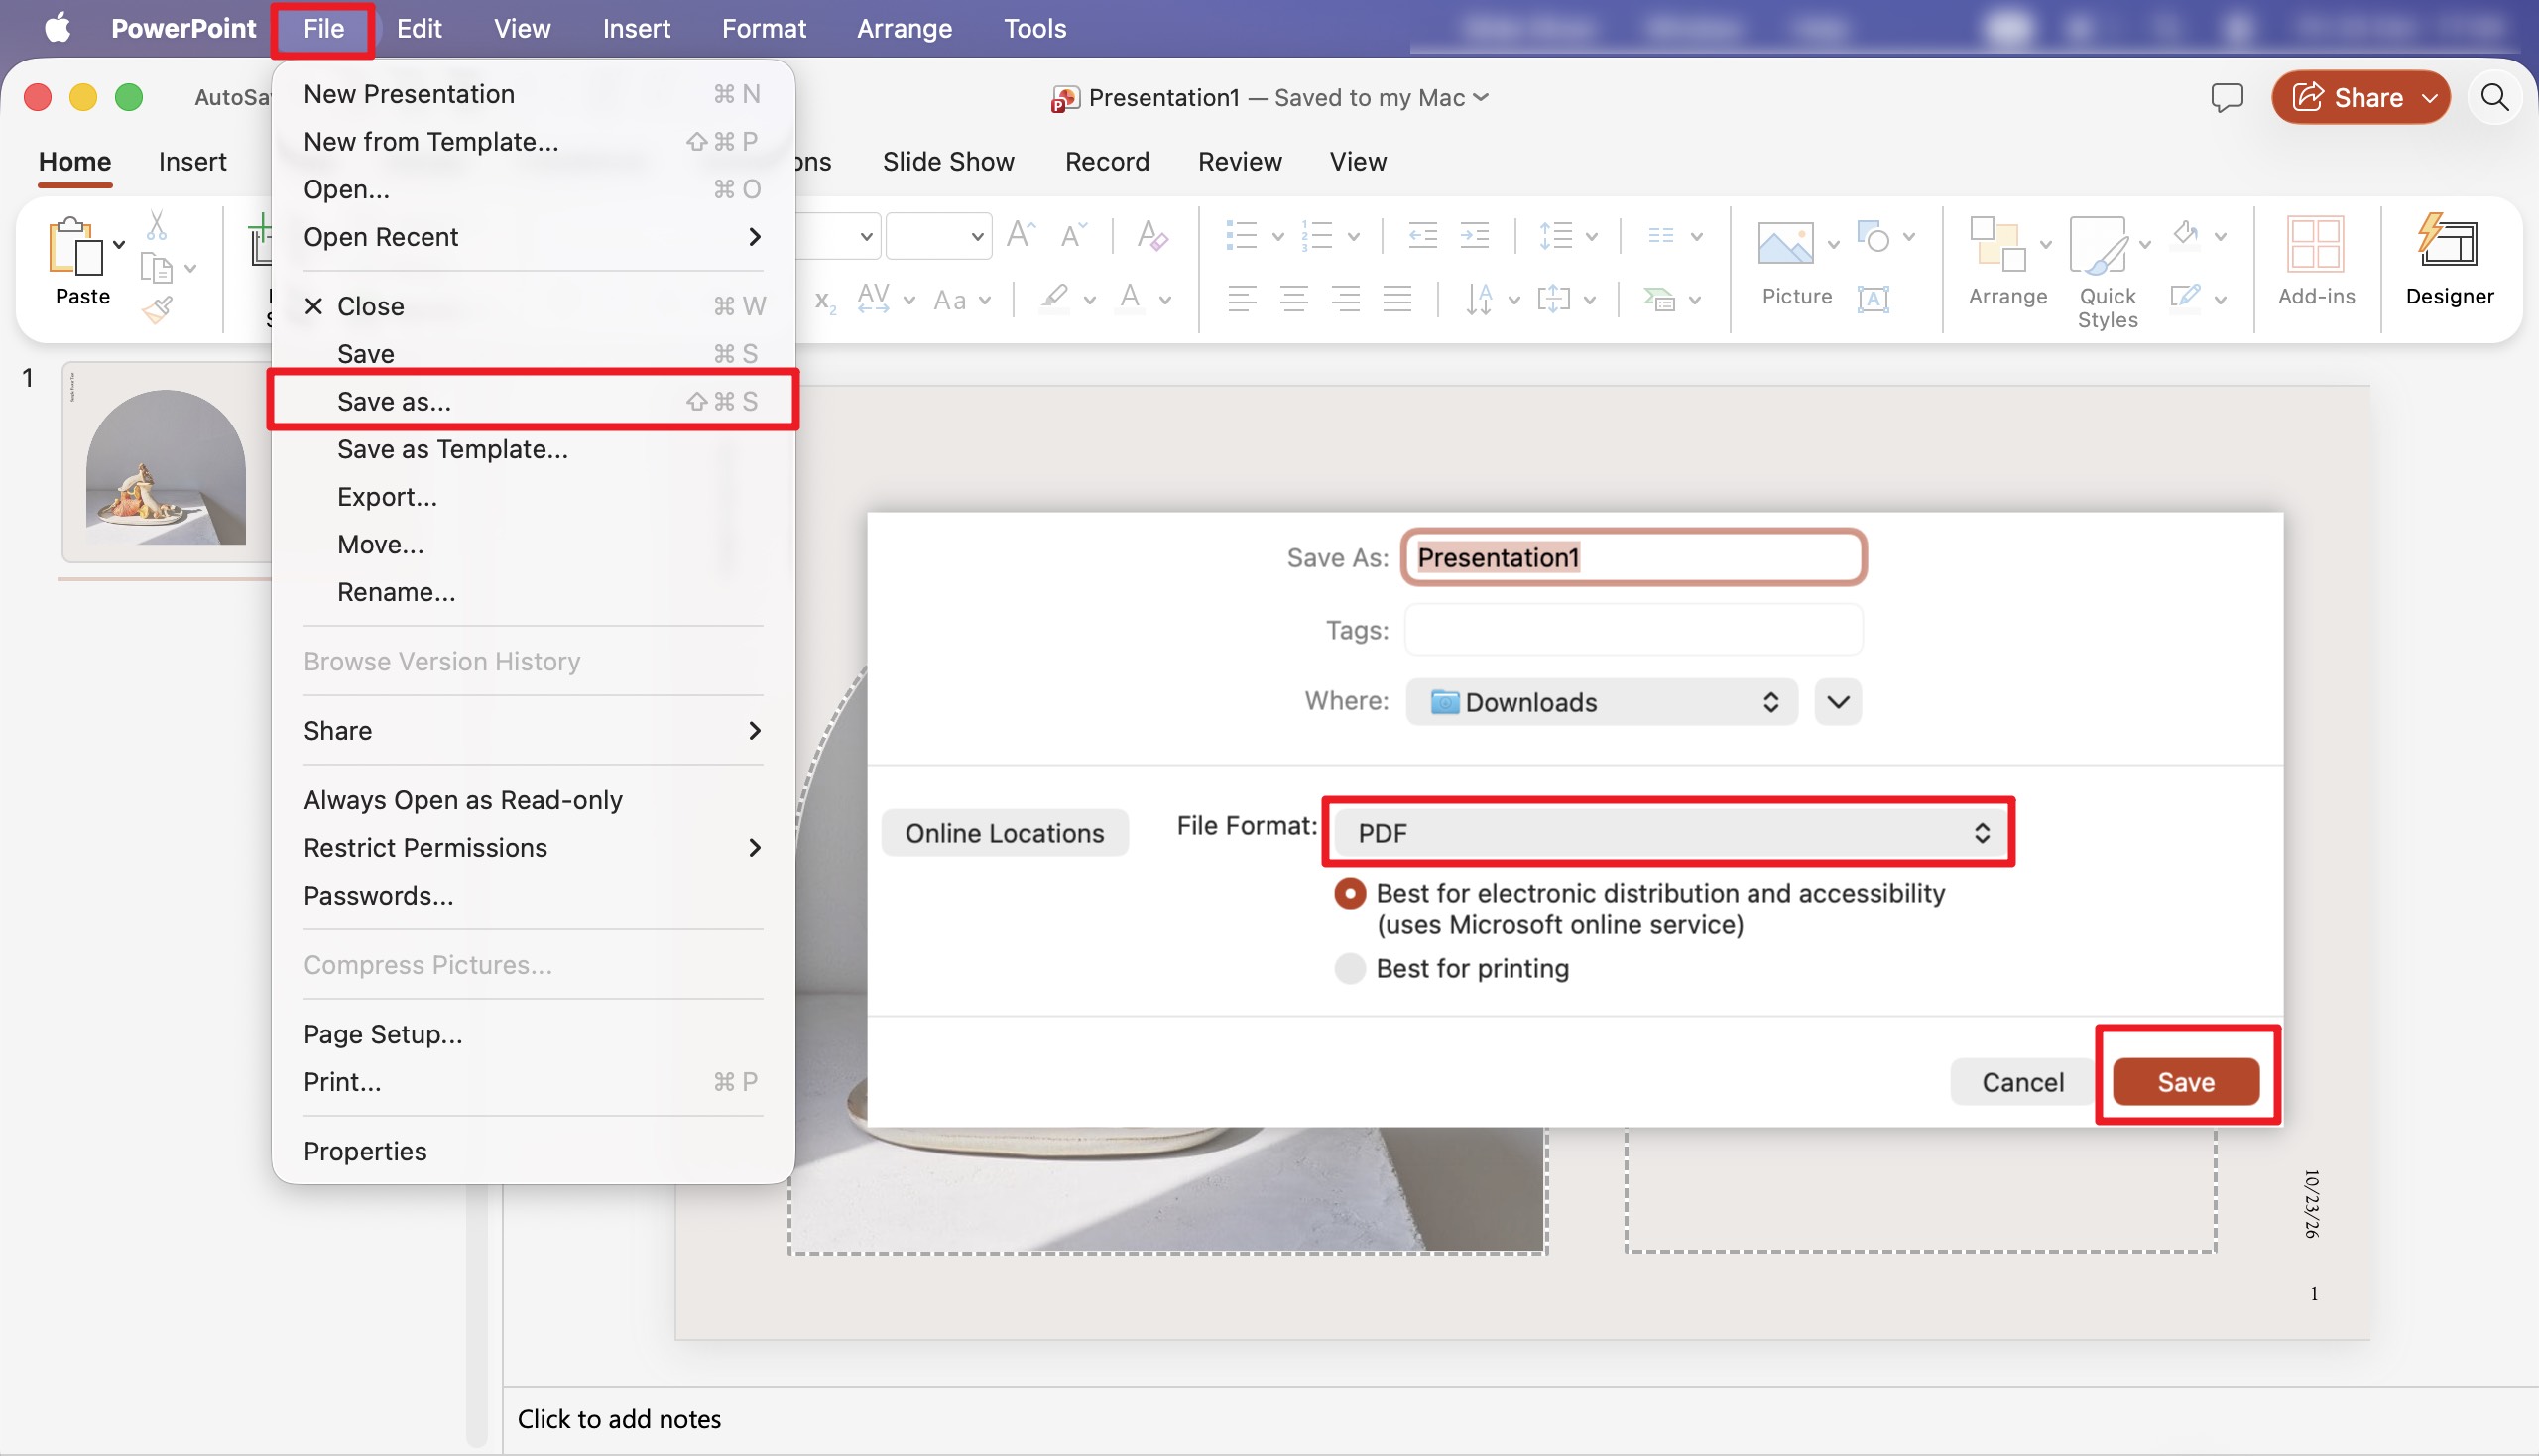
- Open your PPT or PPTX file in PowerPoint.
- Choose File > Save As.
- Enter a file name and choose a destination folder.
- Choose PDF from the File Format menu and click Save.
Alternatively, choose File > Export, select PDF, and click Export.
Open the PDF and check its fonts, charts, images, and slide order. Keep the original presentation for future slide edits. A PDF can still be edited in a PDF editor; conversion alone does not protect it against changes.
Method 3: Save PowerPoint as PDF with Notes or Multiple Slides per Page
Use PowerPoint’s Print dialog when your PDF needs speaker notes or a handout layout.
Option A: Save PowerPoint as PDF with Speaker Notes
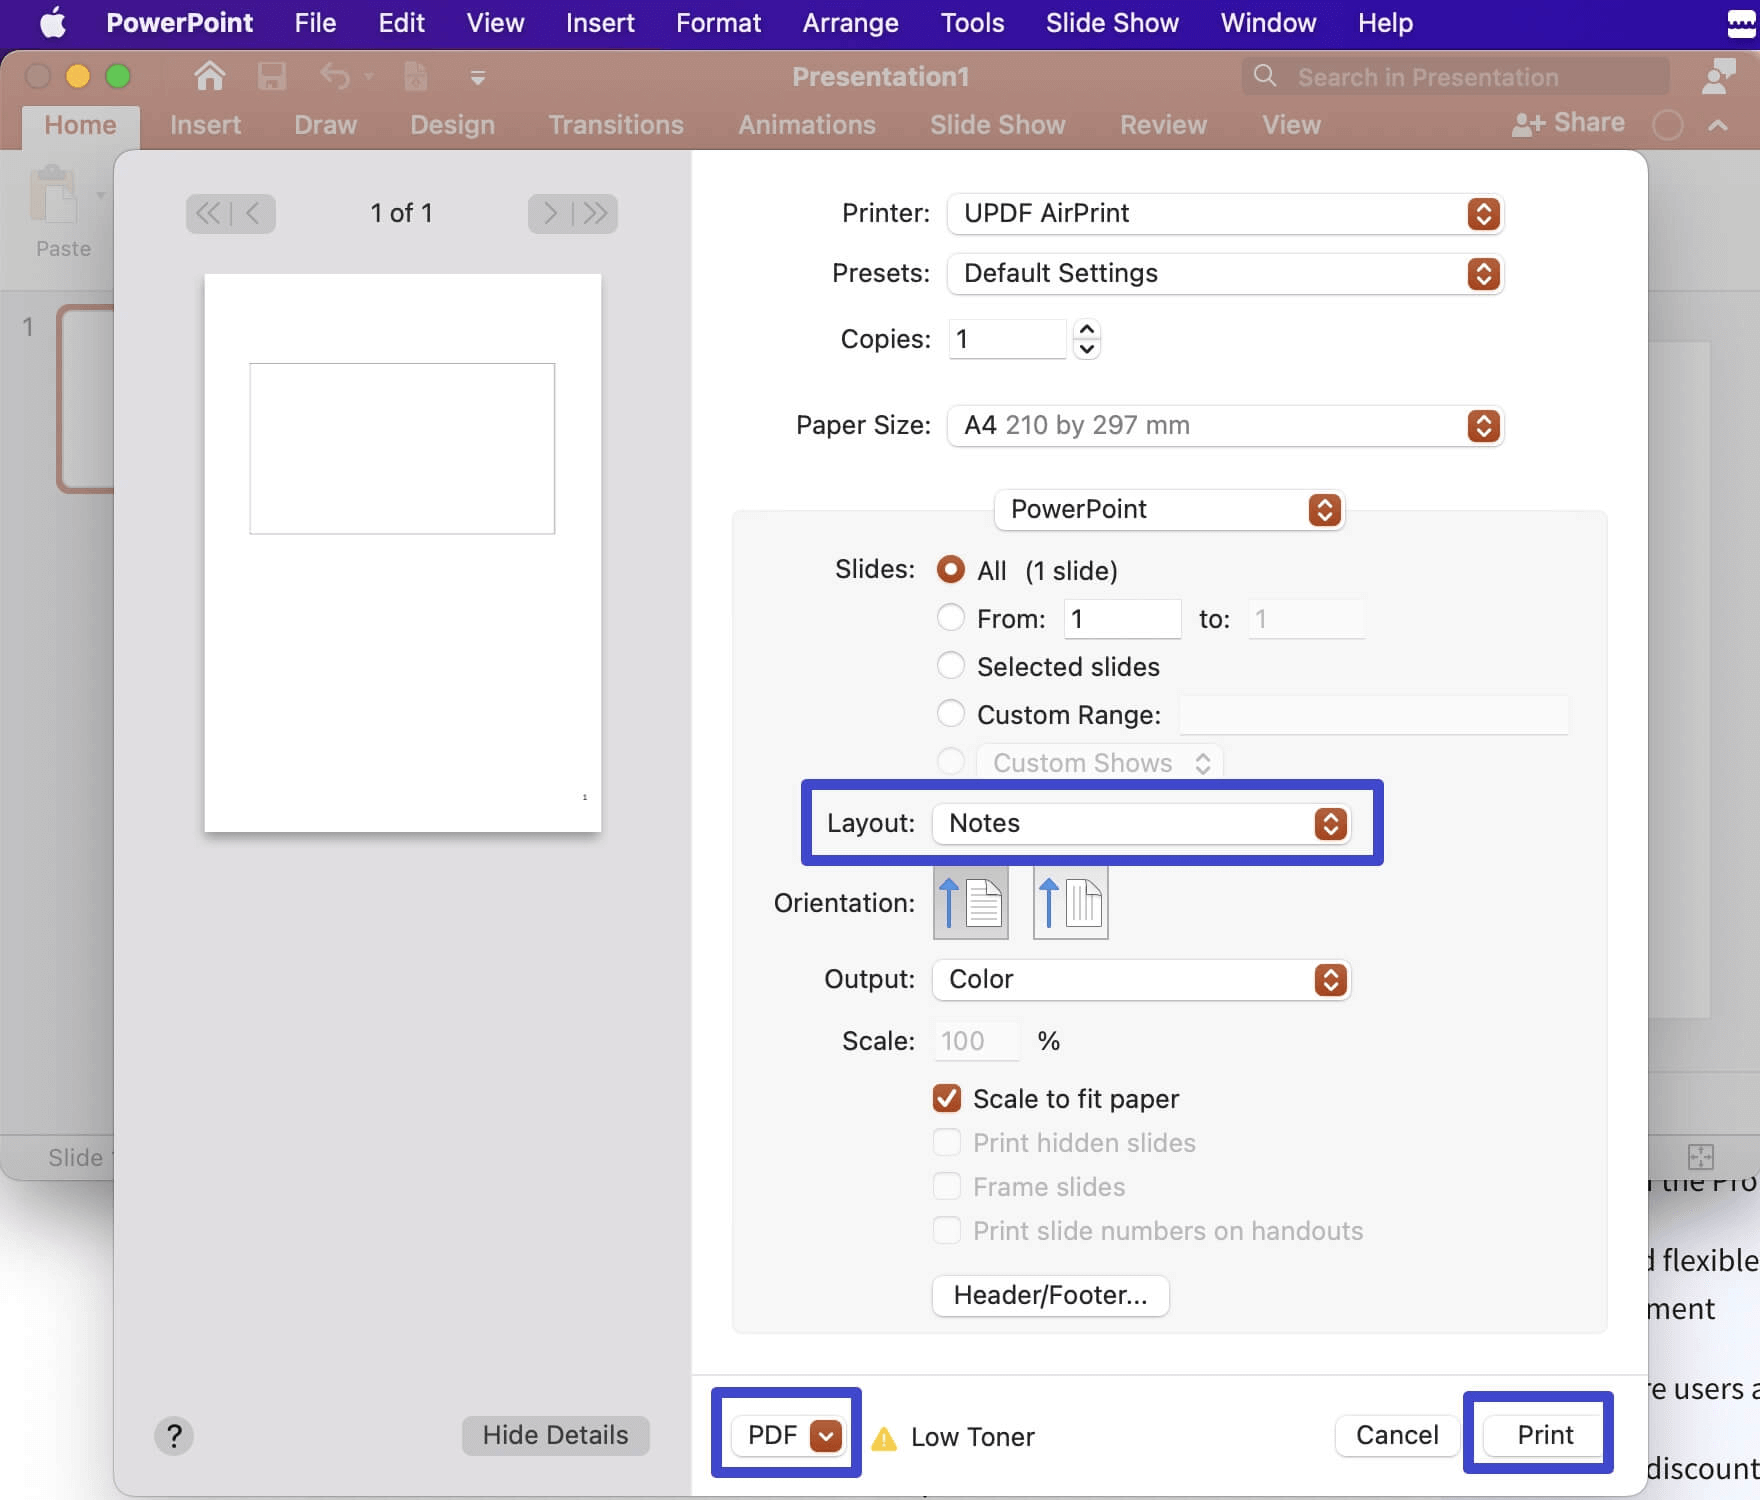
- Choose File > Print in PowerPoint for Mac.
- Expand the print settings if necessary; some versions show Show Details.
- In the PowerPoint options, choose Notes from the Layout menu.
- Check that the preview shows a slide with its speaker notes.
- Open the macOS PDF menu and choose Save as PDF.
- Name the file, choose a folder, and click Save.
Open the PDF and inspect a page containing notes, including the final lines. This workflow does not require an UPDF printer.
Option B: Save Multiple Slides per PDF Page
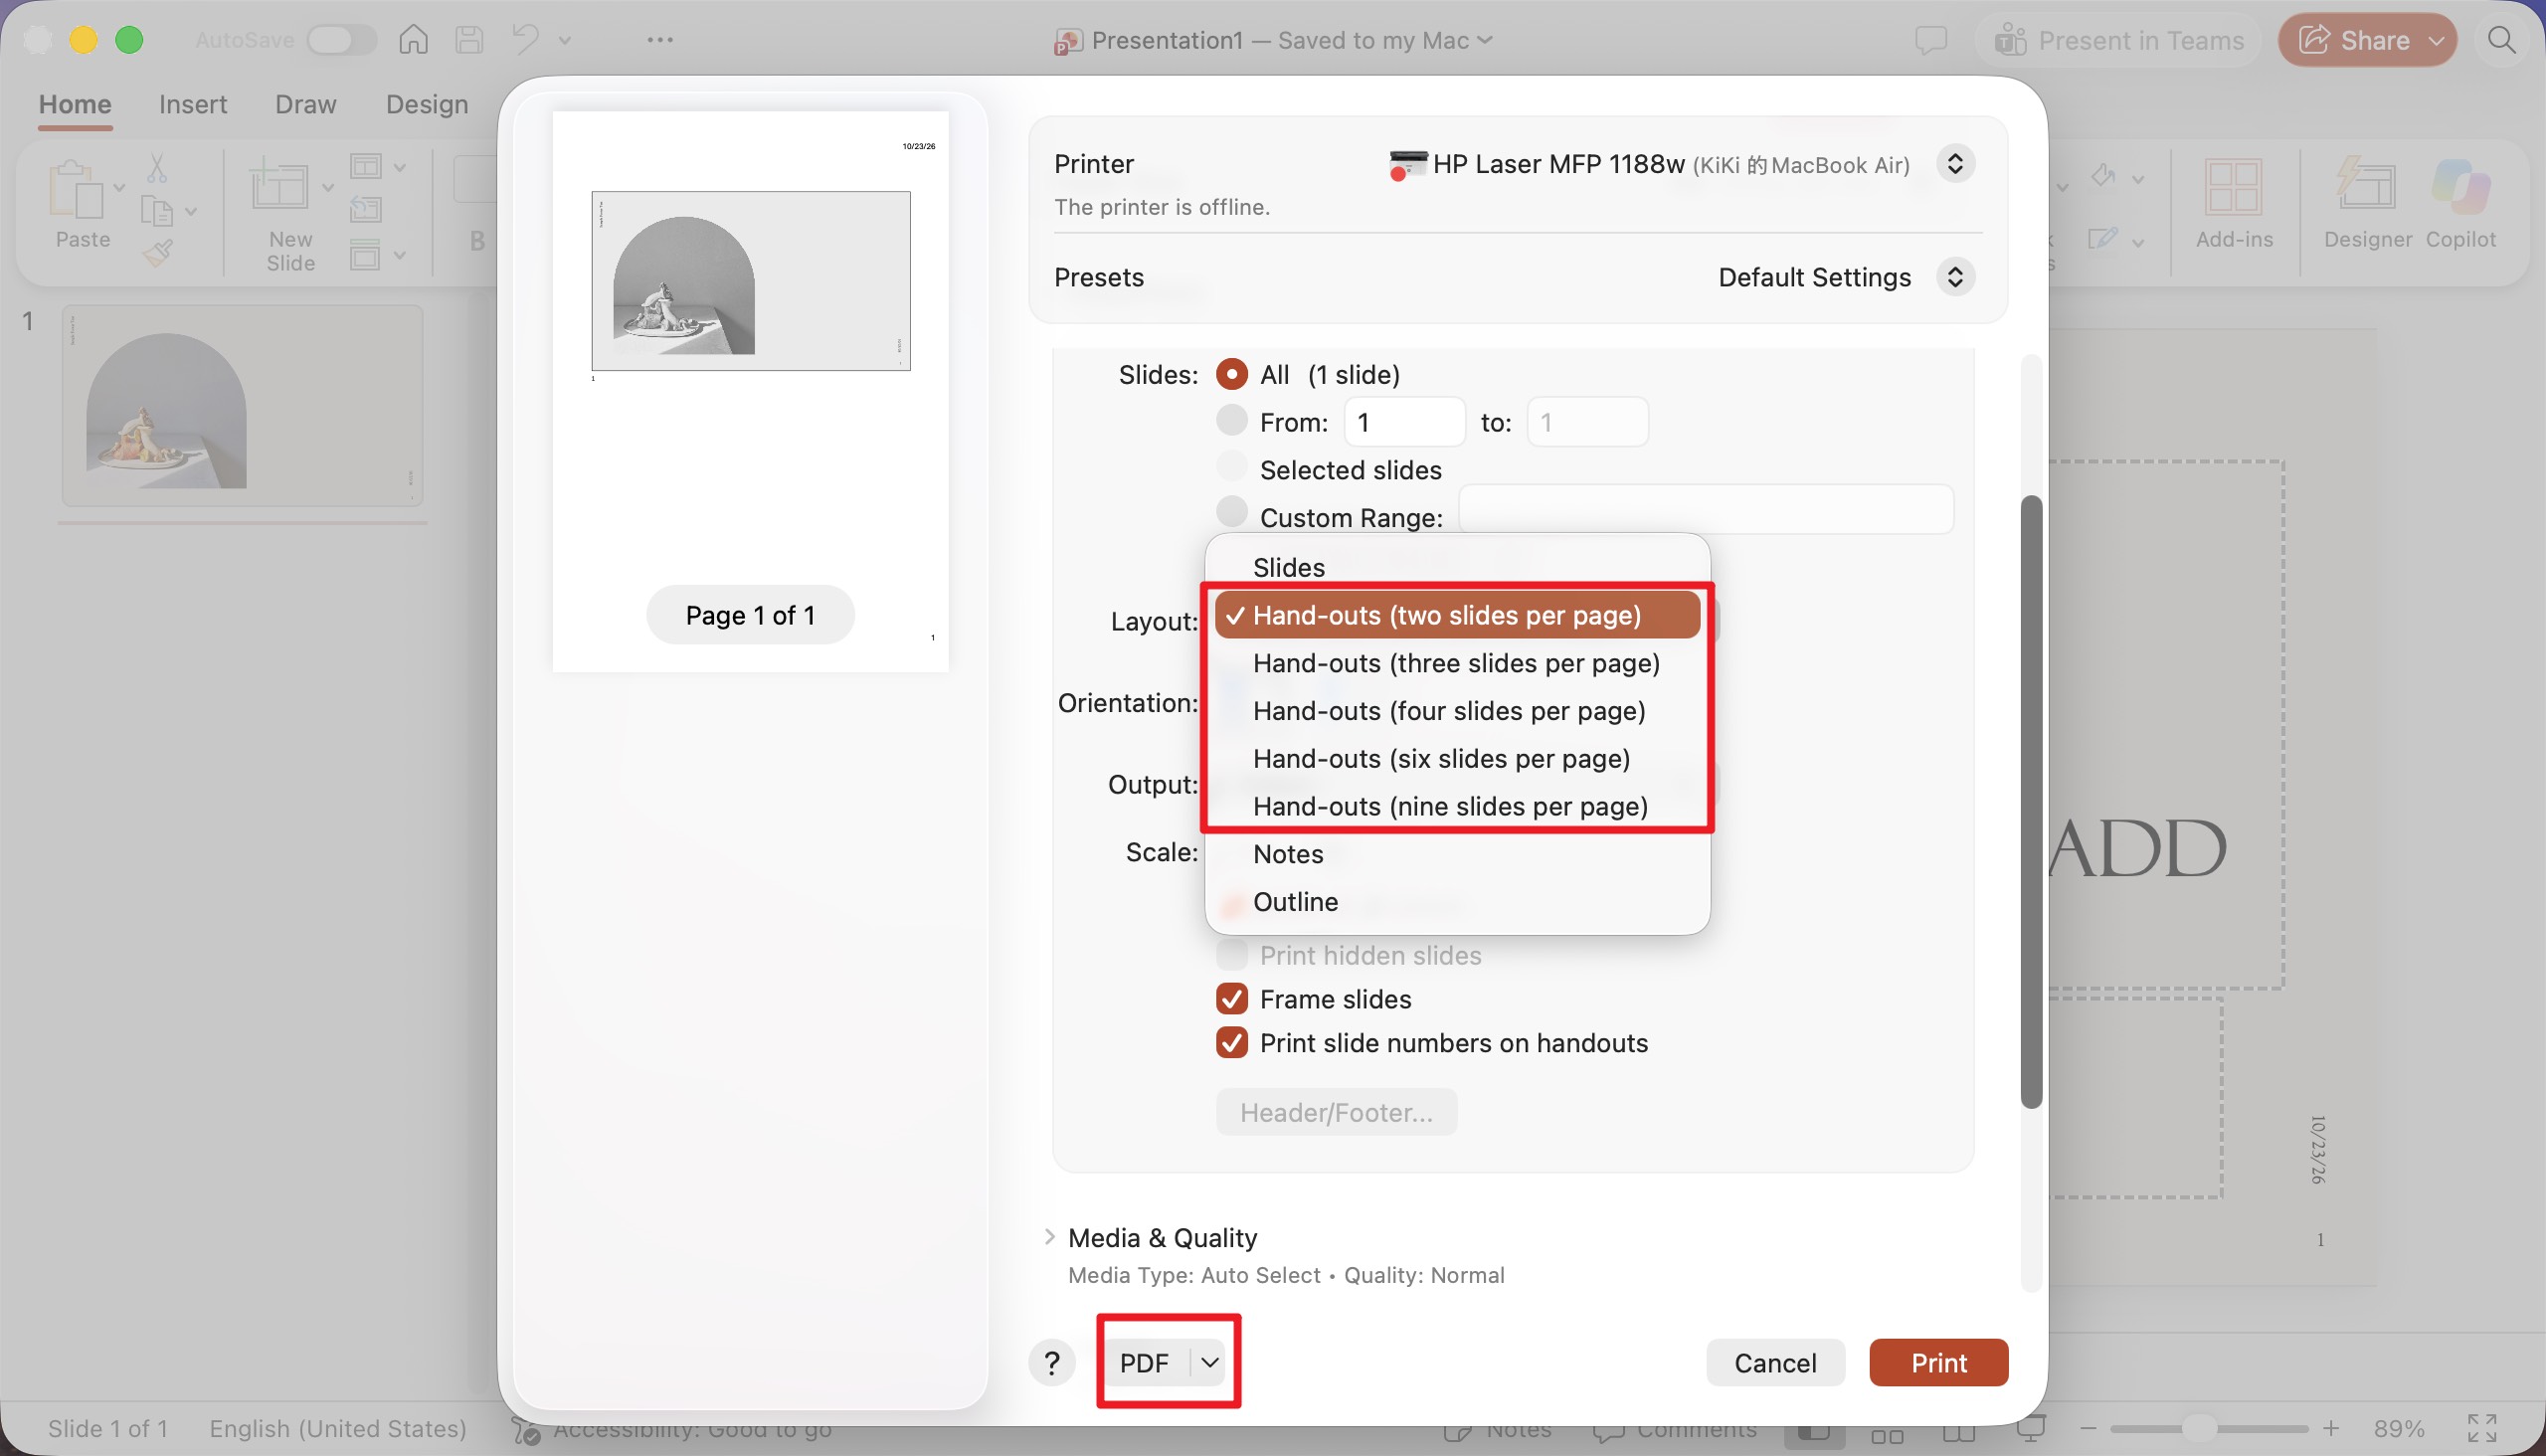
- Choose File > Print in PowerPoint.
- In PowerPoint’s Layout menu, select a Handouts option with the required number of slides per page.
- Check slide order, orientation, and readability in the preview.
- Choose PDF > Save as PDF, then name and save the file.
For example, a 12-slide presentation saved with six slides per page should produce two PDF pages when all slides are included.
Notes and handouts serve different purposes: Notes pages include speaker notes entered in PowerPoint. Blank lines in a handout provide space for handwritten notes; they do not contain your speaker notes.
Method 4: Convert PowerPoint to PDF with Google Slides
Google Slides provides a browser-based route for creating a PDF copy.
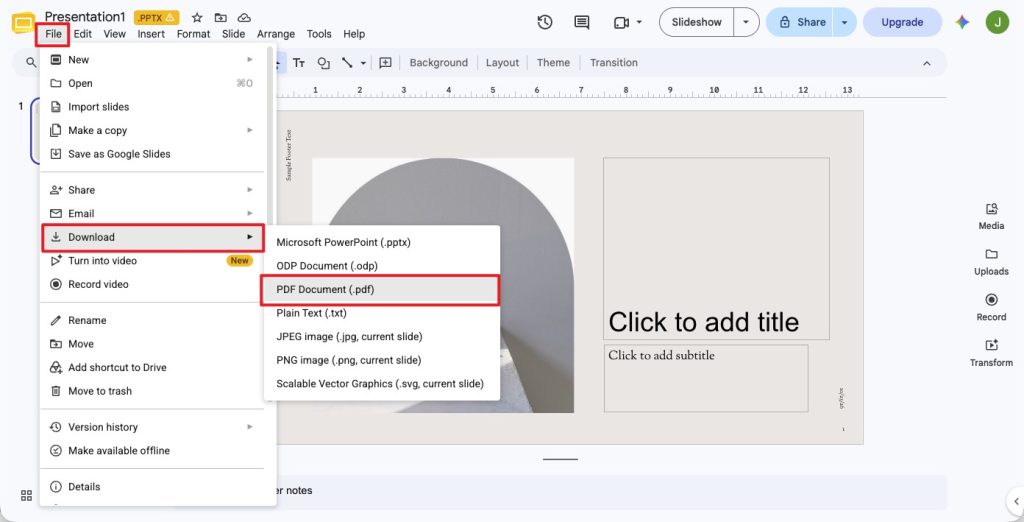
- Sign in to Google Drive and upload your PowerPoint file.
- Open the uploaded file with Google Slides.
- Review fonts, charts, and object positions.
- Choose File > Download > PDF Document (.pdf).
- Open the downloaded PDF and compare it with the original.
This uploads your presentation to Google Drive. Use it only when your file-sharing policies allow it. For the speaker-notes workflow in this guide, use Method 3.
Also read: How to Convert PPT to Google Slides
Method 5: Convert PowerPoint to PDF with an Online Tool
- Choose an online converter that supports your PowerPoint file format.
- Check its file-size limit, free-use restrictions, pricing, and file-retention policy before uploading.
- Upload the presentation and start the conversion.
- Download the PDF and check its page count, fonts, images, and layout.
Speaker-notes, handout, editing, and compression options vary by service. Verify the output options first. For presentations you are not permitted to upload, use an approved desktop workflow.
After Conversion: Check and Compress the PDF
Compare the PDF with the original presentation before sending it. If it exceeds an email or upload limit, open it in UPDF, use the menu beside the Save icon, and choose Reduce File Size. Select an output quality, save a separate copy, and check small text, charts, and images again.
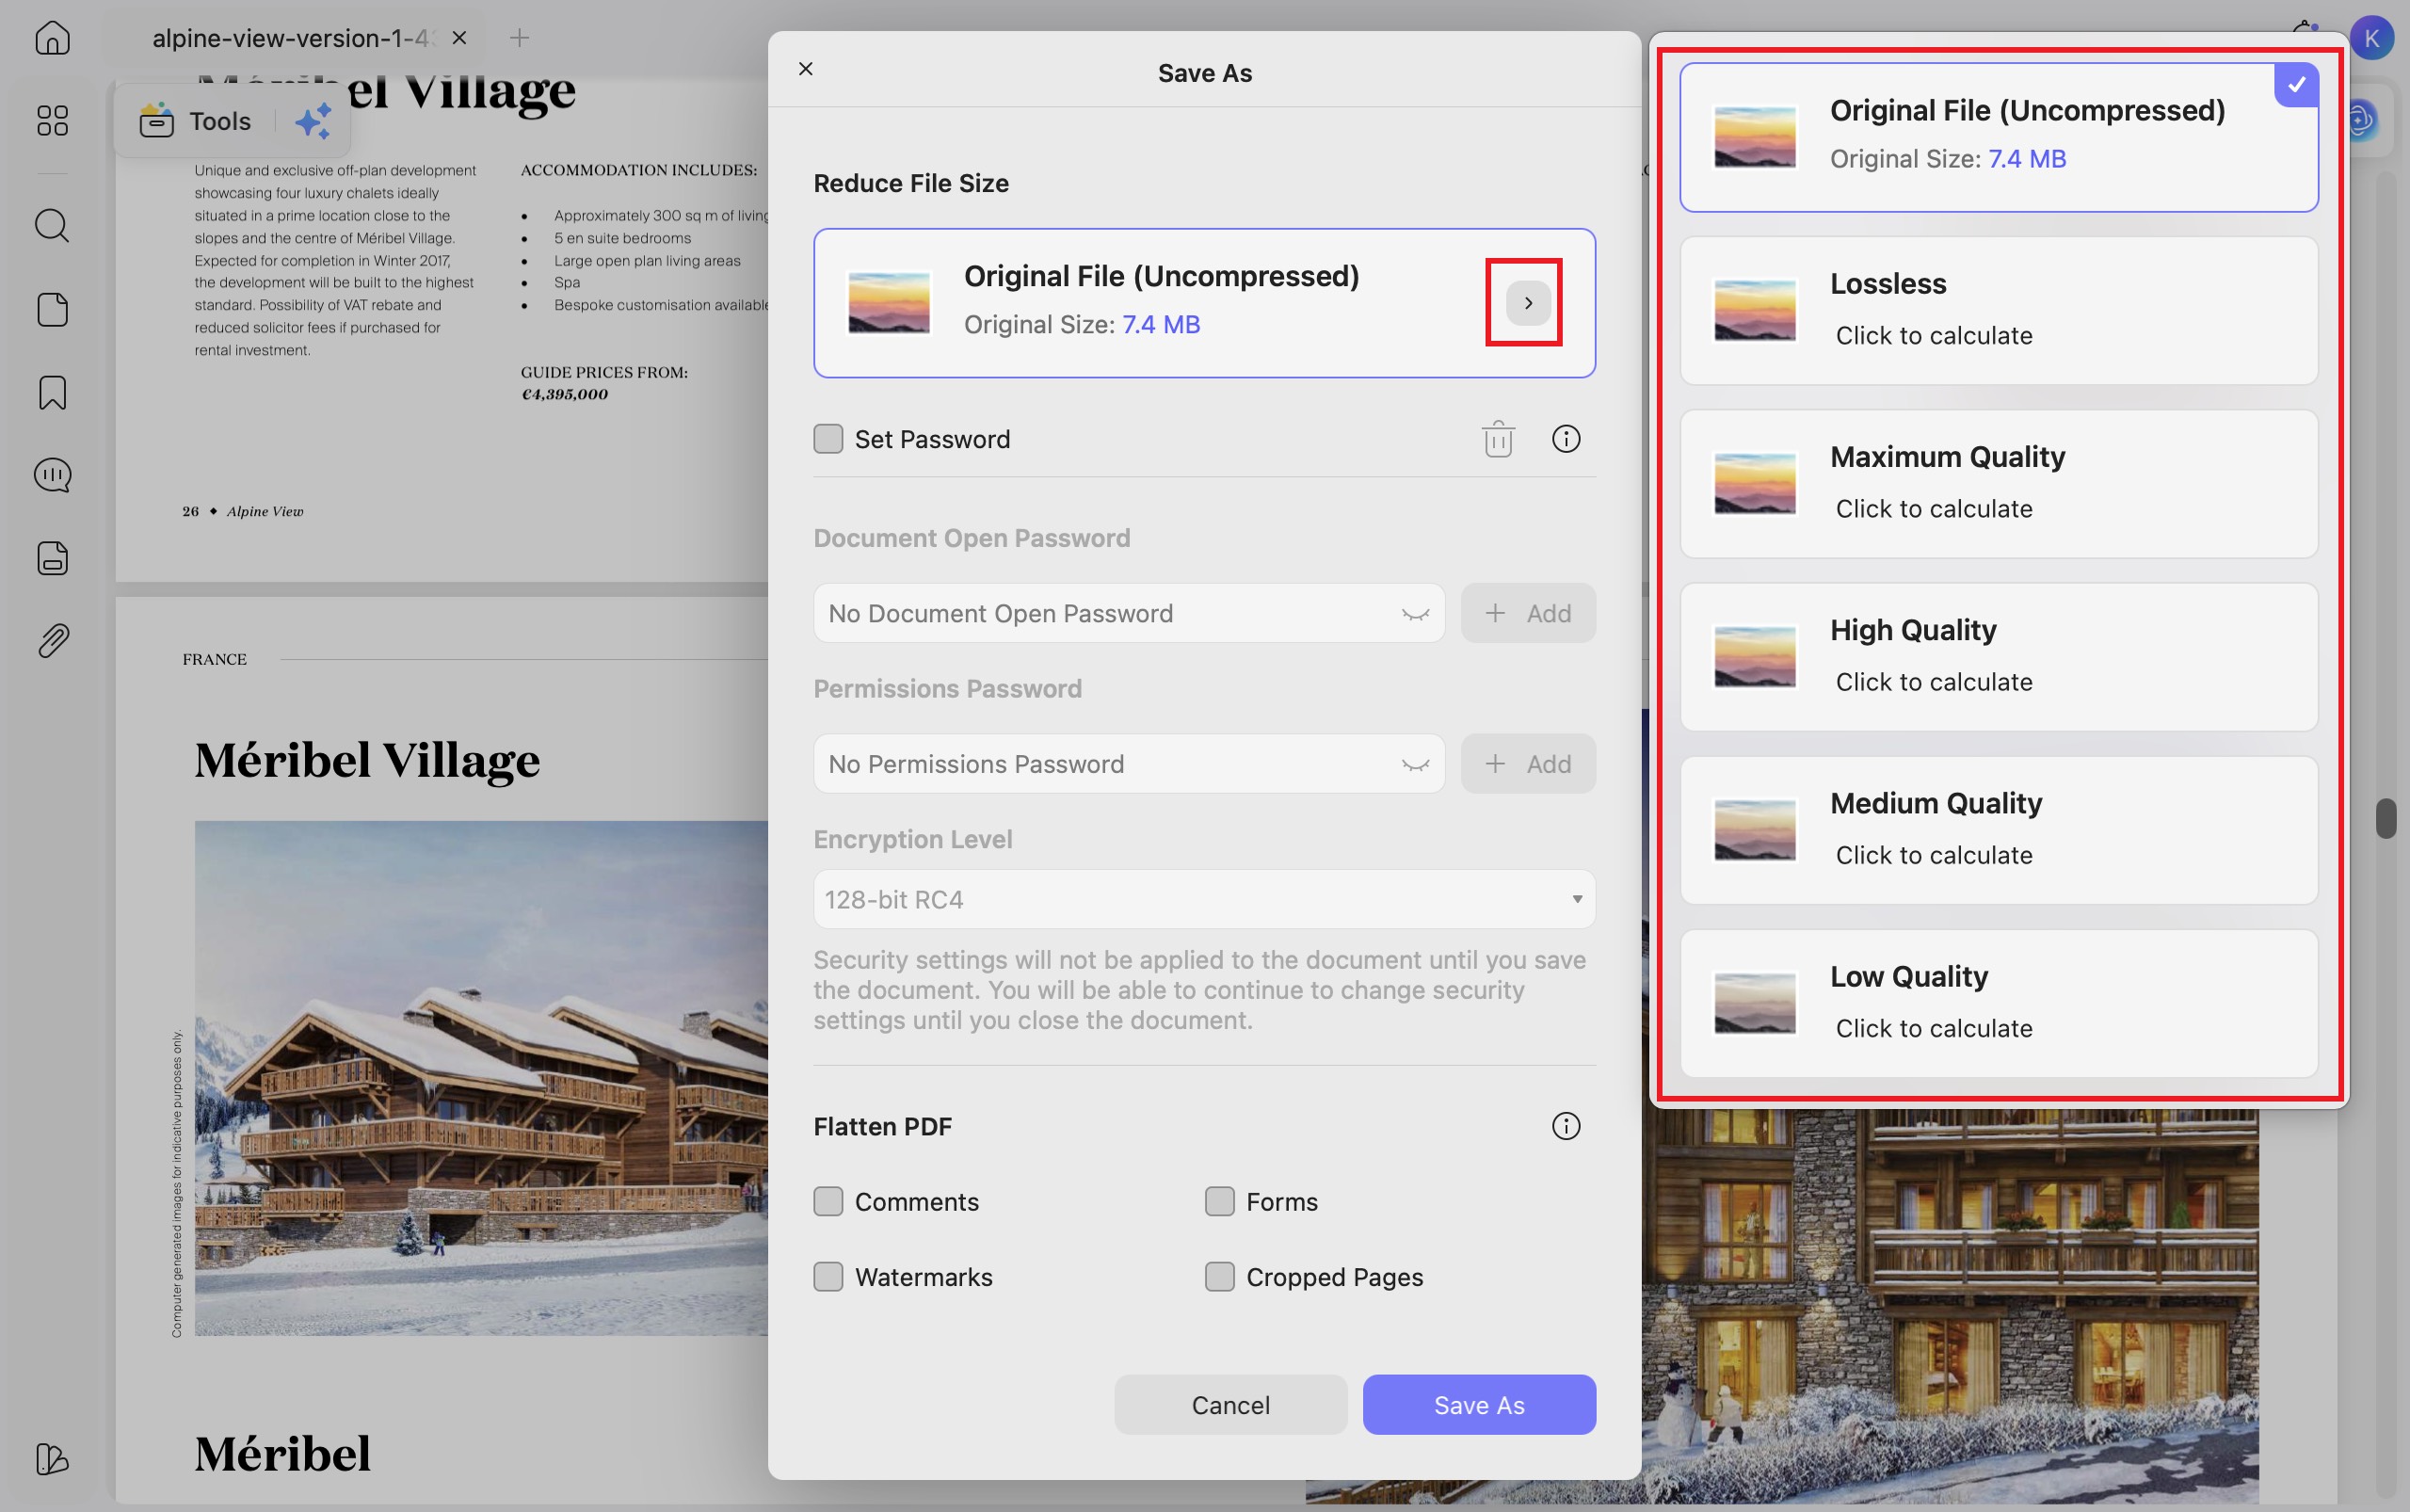
Download UPDF for free to try compressing a copy of your presentation PDF—installation is free, and Pro removes the trial watermark from saved output.
Windows • macOS • iOS • Android 100% secure
FAQs
1. Why do hyperlinks stop working after saving PowerPoint as PDF on Mac?
Microsoft notes that PowerPoint for macOS does not preserve hyperlinks in its PDF output. Save the presentation to OneDrive, open it in PowerPoint for the web, and download a PDF there to preserve hyperlinks. Test the links in the downloaded PDF before sharing.
2. Can UPDF protect a presentation PDF from unauthorized access?
Yes. UPDF can add an open password to restrict access and a permissions password to control actions such as editing, copying, or printing. Password protection cannot prevent every form of redistribution, so confidential files should still be shared carefully.
3. Can I rearrange or remove slides after converting PowerPoint to PDF?
Yes. UPDF’s page-management tools let you reorder, extract, replace, or delete PDF pages. If each slide was exported to its own page, each page corresponds to a slide. In a handout PDF, several slides share one page, so deleting that page removes all slides on it.
Conclusion
To convert PowerPoint to PDF on Mac with UPDF, drag in a presentation, use the PDF creation tools, or choose Batch Create for several files. Select separate PDFs for individual presentations or combine them into one.
For speaker notes or multiple slides per page, use PowerPoint’s Print dialog and save the selected layout as PDF. Always check the output before sharing.
Download UPDF for free to try converting and editing a presentation—installation is free, and Pro removes the trial watermark from saved output.
Windows • macOS • iOS • Android 100% secure






 Enid Brown

 Enola Davis