 UPDF
UPDF
 UPDF for Windows
 UPDF for Mac
 UPDF for iPhone/iPad
 UPDF for Android
 Nomostar
 UPDF AI Online
 UPDF Sign
 IvyCraft
 Edit PDF
 Annotate PDF
 Create PDF
 PDF Form
 Edit links
 Convert PDF
 OCR
OCR PDF to Word
 PDF to Image
 PDF to Excel
 Organize PDF
 Merge PDF
 Split PDF
 Crop PDF
 Rotate PDF
 Protect PDF
 Sign PDF
 Redact PDF
 Sanitize PDF
 Remove Security
 Read PDF
 UPDF Cloud
 Compress PDF
 Print PDF
 Batch Process
 About UPDF AI
 UPDF AI Solutions
 AI User Guide
 FAQ about UPDF AI
 Summarize PDF
 Translate PDF
 Chat with PDF
 Chat with AI
 Chat with image
 PDF to Mind Map
 Explain PDF
 PDF AI Tools
 Image AI Tools
 AI Chat Tools
 AI Writing Tools
 AI Study Tools
 AI Working Tools
 Other AI Tools
 AI Bookmark Generation
 AI Bookmark Summary
 AI Watermark Generation
 AI Background Generation
 AI Sticker Generation
 AI Stamp Generation
 AI Editing Suite
 UPDF Copilot
 AI Page Management
 AI Semantic Search
 PDF to Word
 PDF to Excel
 PDF to PowerPoint
 Enterprise Solution
 Enterprise Sign
 Enterprise AI
 Enterprise Plan
 Enterprise User Guide
 Enterprise Webinar
 IT
IT Education
 Construction
 Financial Service
 Healthcare
 Insurance
 Legal
Legal Manufacturing
 Government
 Researchers & PhDs
 Solopreneurs & Freelancers
 Lawyers & Legal Professionals
 Real Estate Agents & Brokers
 Education Solution
 Customer Stories
 User Guide
 UPDF Tricks
 FAQs
FAQs UPDF Reviews
 Download Center
 Blog
Blog Newsroom
 Tech Spec
 Updates
 UPDF vs. Adobe Acrobat
 UPDF vs. Foxit
 UPDF vs. PDF Expert

Quick Answer
Scanning class notes is easy; creating a PDF that remains readable during exam week is harder. Crooked pages, shadows, missing corners, duplicate pages, and meaningless filenames quickly turn a useful notebook into a confusing archive.
Best time to scan: immediately after a class or study session, while you still remember the intended page order and can retake an unclear page. If your source is already digital, follow this guide to save notes as a PDF without photographing the screen.
Part 1. Prepare Notes Before Scanning
Remove clips, flatten folded corners, and place each sheet on a plain contrasting surface. Use bright, even light from both sides when possible. Avoid placing a lamp directly above glossy paper because glare can erase pencil marks.
- Write a small page number on loose sheets before scanning.
- Capture the full page, including margins where annotations may appear.
- Use the same orientation for a complete set.
- Retake blurred pages immediately instead of promising to fix them later.
Part 2. How to Scan Notes to PDF with UPDF
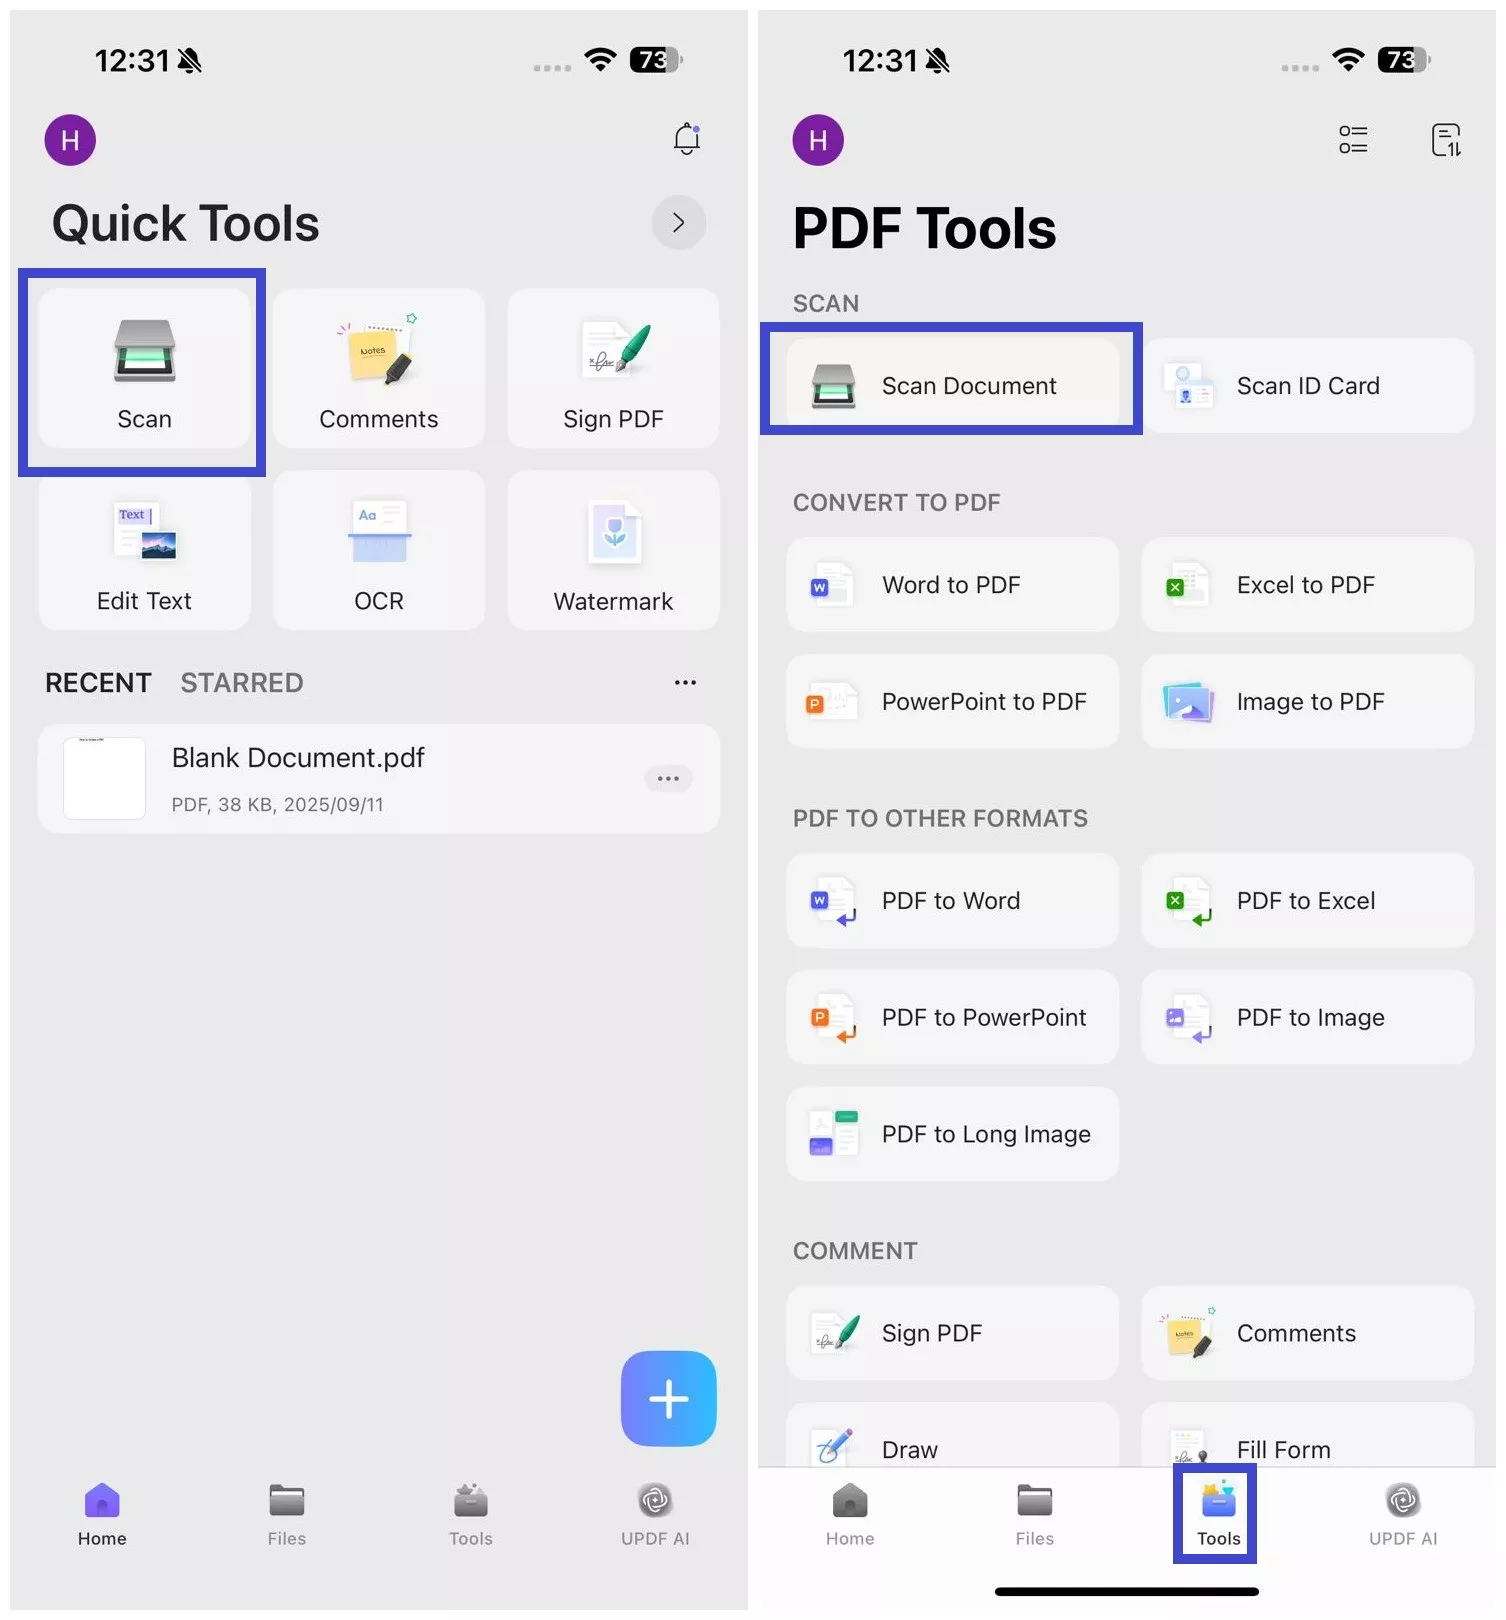
UPDF for iOS can scan paper notes and convert them to PDF. Open UPDF on an iPhone or iPad, tap + and choose Scan. You can also choose Scan Document from the dashboard or go to Tools > Scan Document.
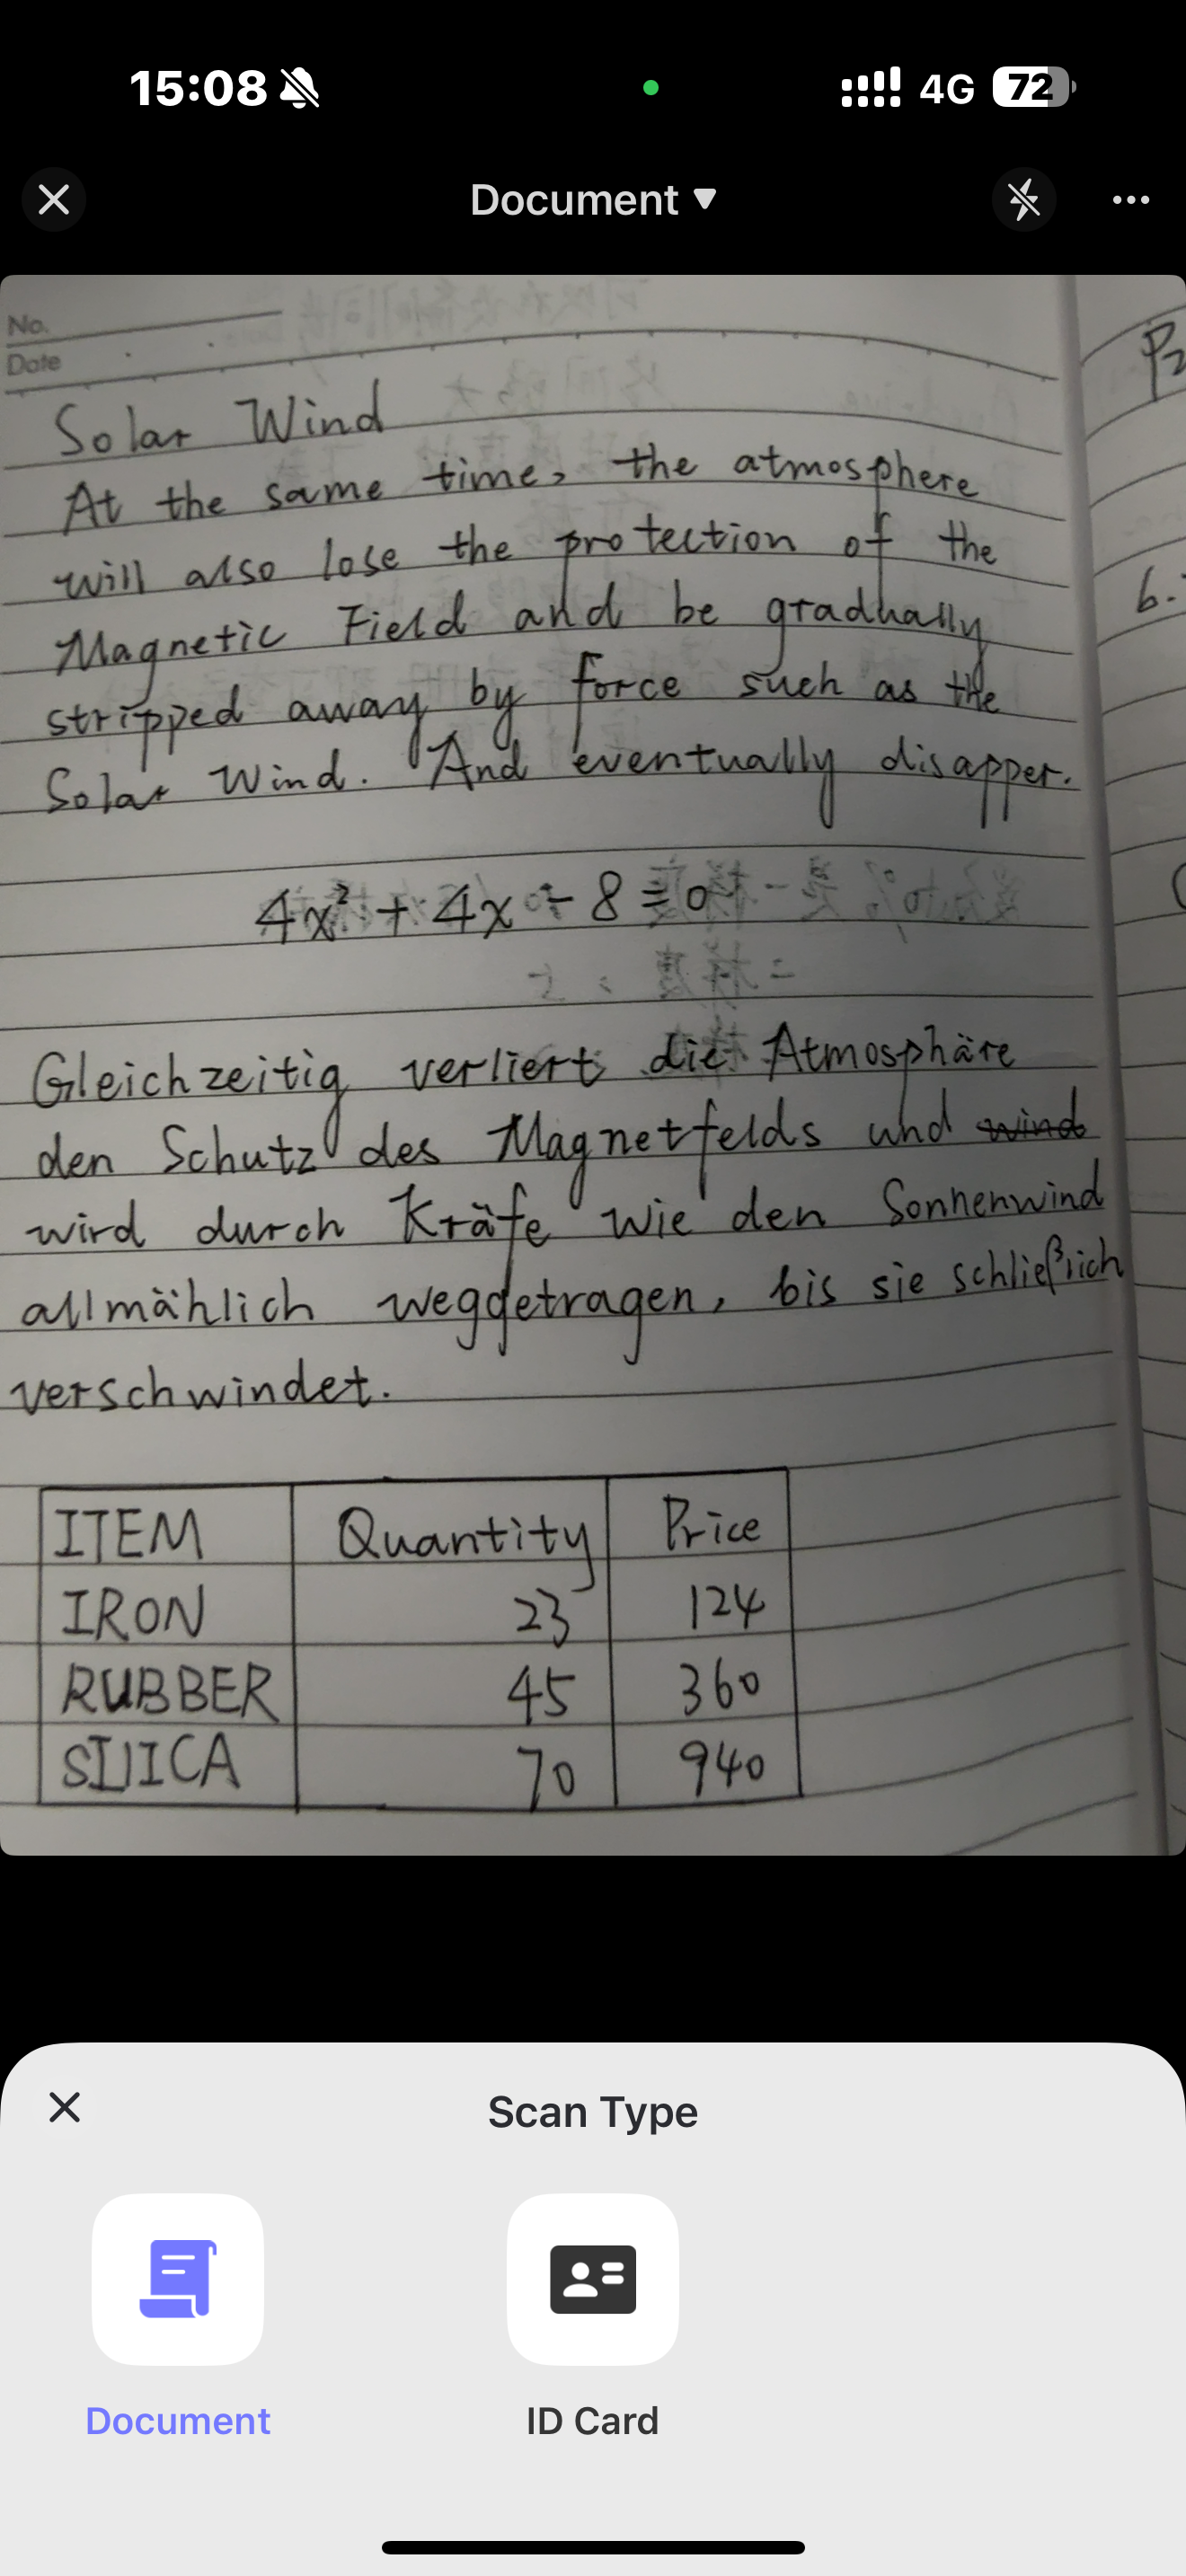
Step 1. Select Document mode and capture a test page
Open the scan-type menu and select Document. If helpful, enable auto-capturing and auto-cropping from the three-dot menu. Capture one page, then check faint handwriting, small symbols, margins, and detected edges. Tap Done when the page looks clear.
Windows • macOS • iOS • Android 100% secure
Step 2. Capture the remaining pages in reading order
Continue scanning in the order you want readers to follow. For double-sided sheets, use a consistent front-then-back sequence. When all pages are captured, tap the > icon.
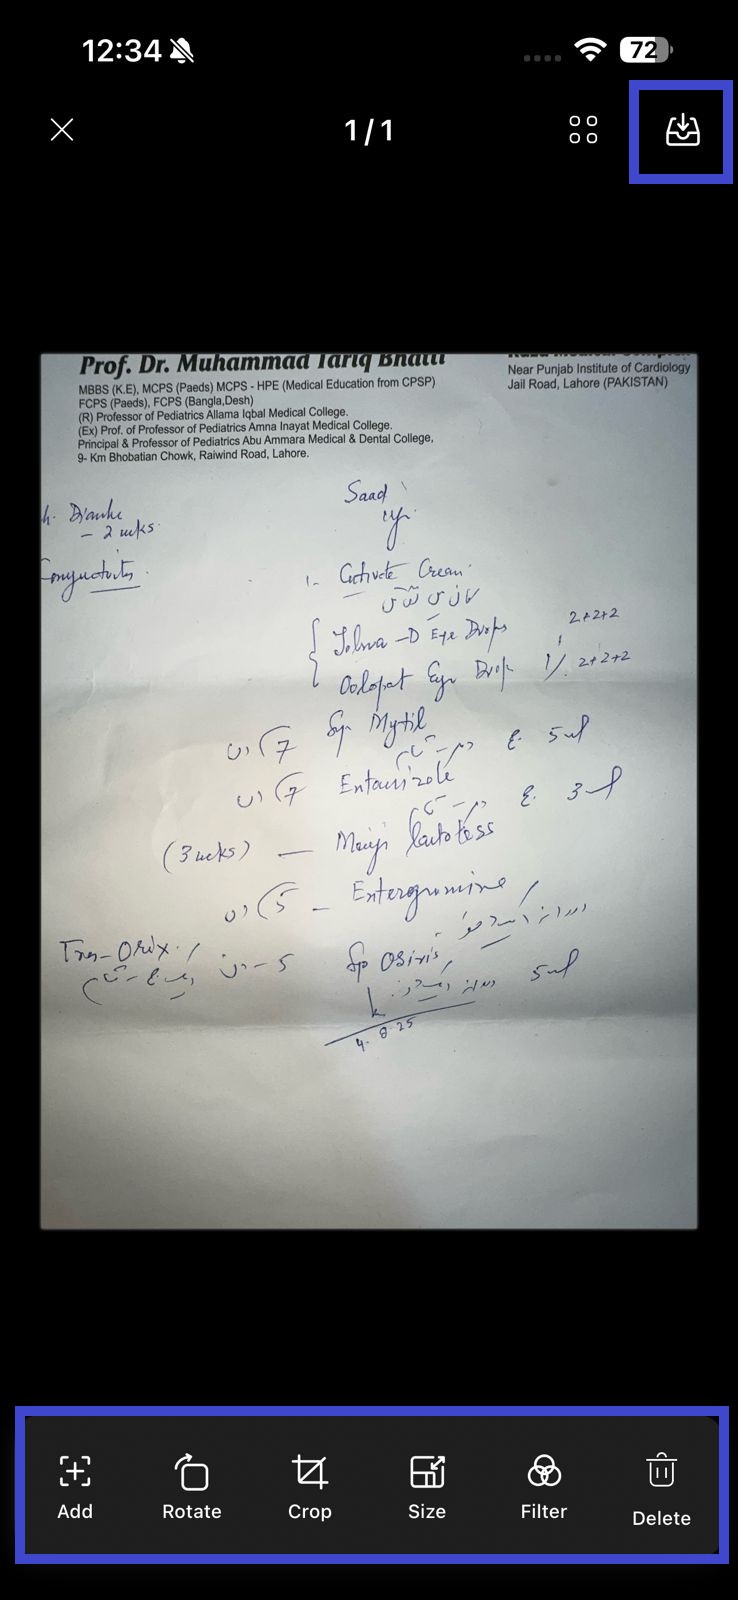
Step 3. Review and save the scan
Use the review screen to add pages, rotate, crop, resize, apply a filter, or delete an accidental frame. Tap Save in the top-right corner once every page is readable and complete.
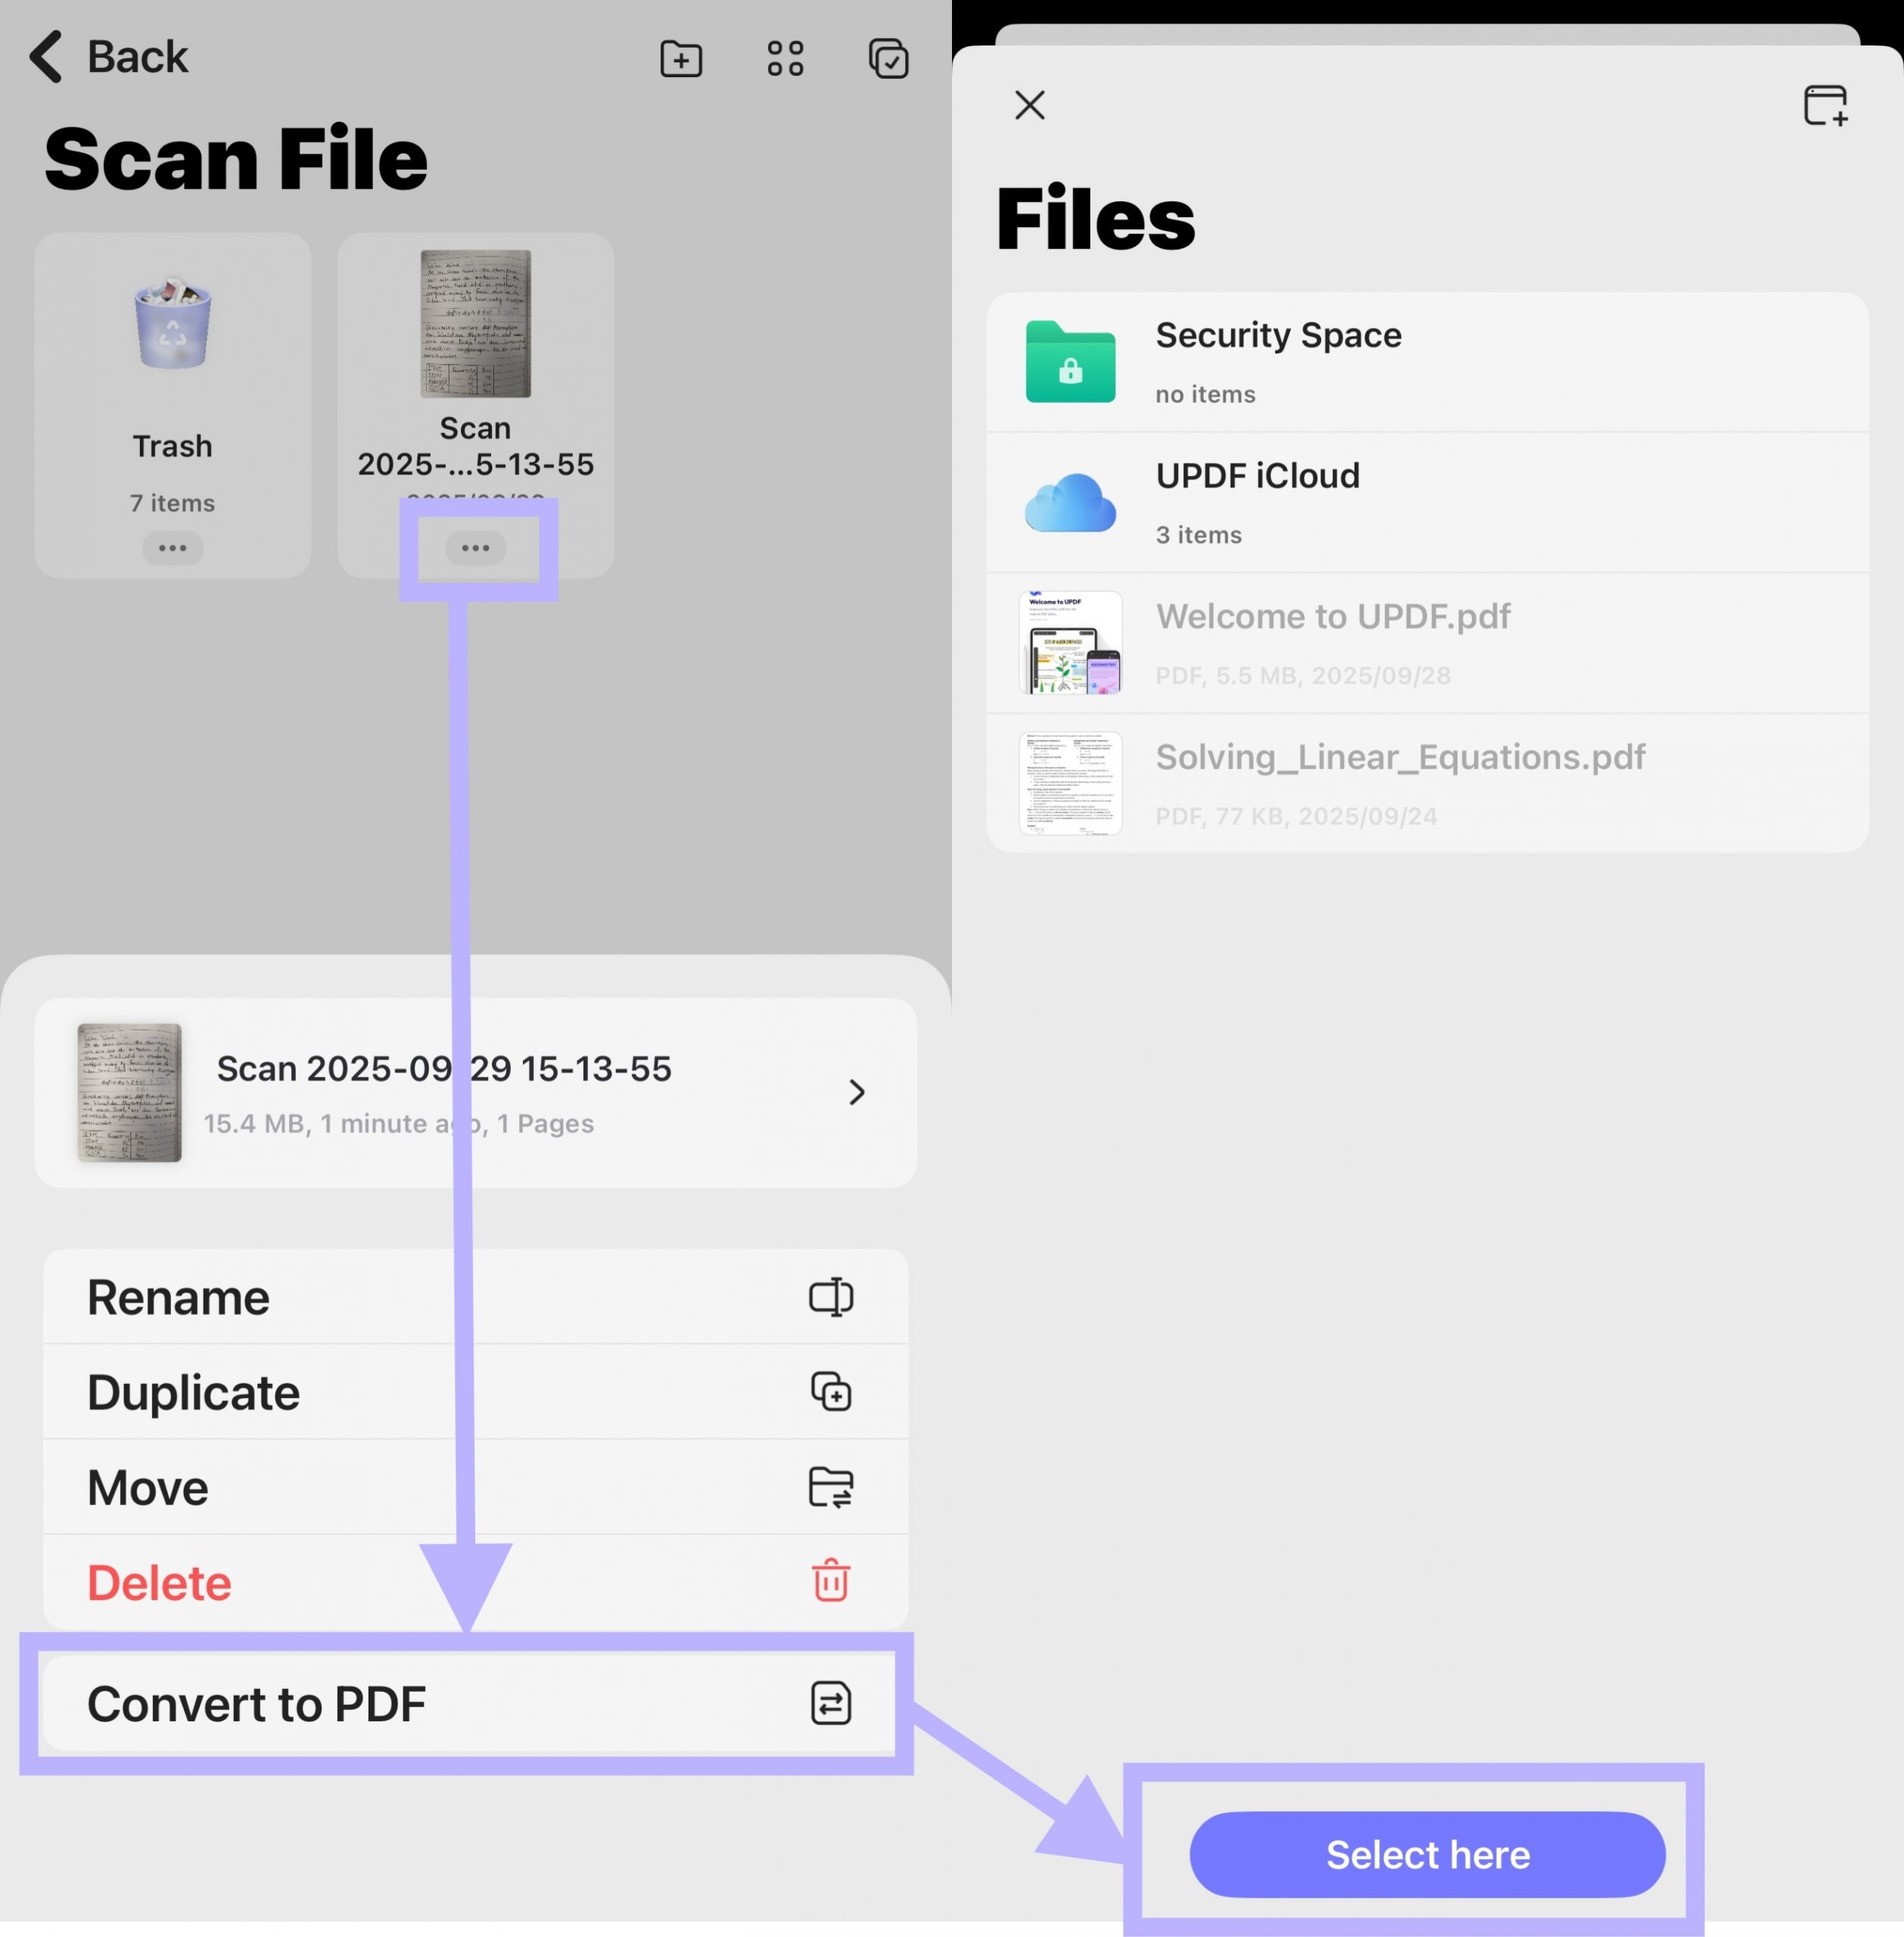
Step 4. Convert the saved scan to PDF
UPDF returns to the Scanner section after saving. Tap the three-dot icon beside the scan, choose Convert to PDF, and select a save location. UPDF creates the PDF and opens it for further work.
Best for
Not for
Download UPDF for free to scan paper notes, convert them to PDF, and continue organizing or reviewing the file in one app.
Windows • macOS • iOS • Android 100% secure
Part 3. Clean, Combine, and Name the PDF
After conversion, inspect page order at thumbnail size. A quick thumbnail review makes duplicates, missing pages, and inconsistent rotation obvious. Use a filename that will still make sense months later, such as biology-cell-division-week-03.pdf rather than scan001.pdf.
| Weak filename | Better filename |
| notes-final.pdf | economics-demand-supply-2026-09-08.pdf |
| scan12.pdf | client-meeting-project-alpha-2026-09-08.pdf |
| chapter.pdf | chemistry-organic-reactions-ch04.pdf |
UPDF can fix the file without making you rescan it. Open the PDF, tap the toolbar icon in the upper-right corner, and choose Organize Pages. Drag page thumbnails to reorder them, or select pages to rotate, delete, insert, extract, or split. If different sessions were saved as separate files, tap + on the UPDF home screen, choose Merge PDFs, select the files, and tap Continue.
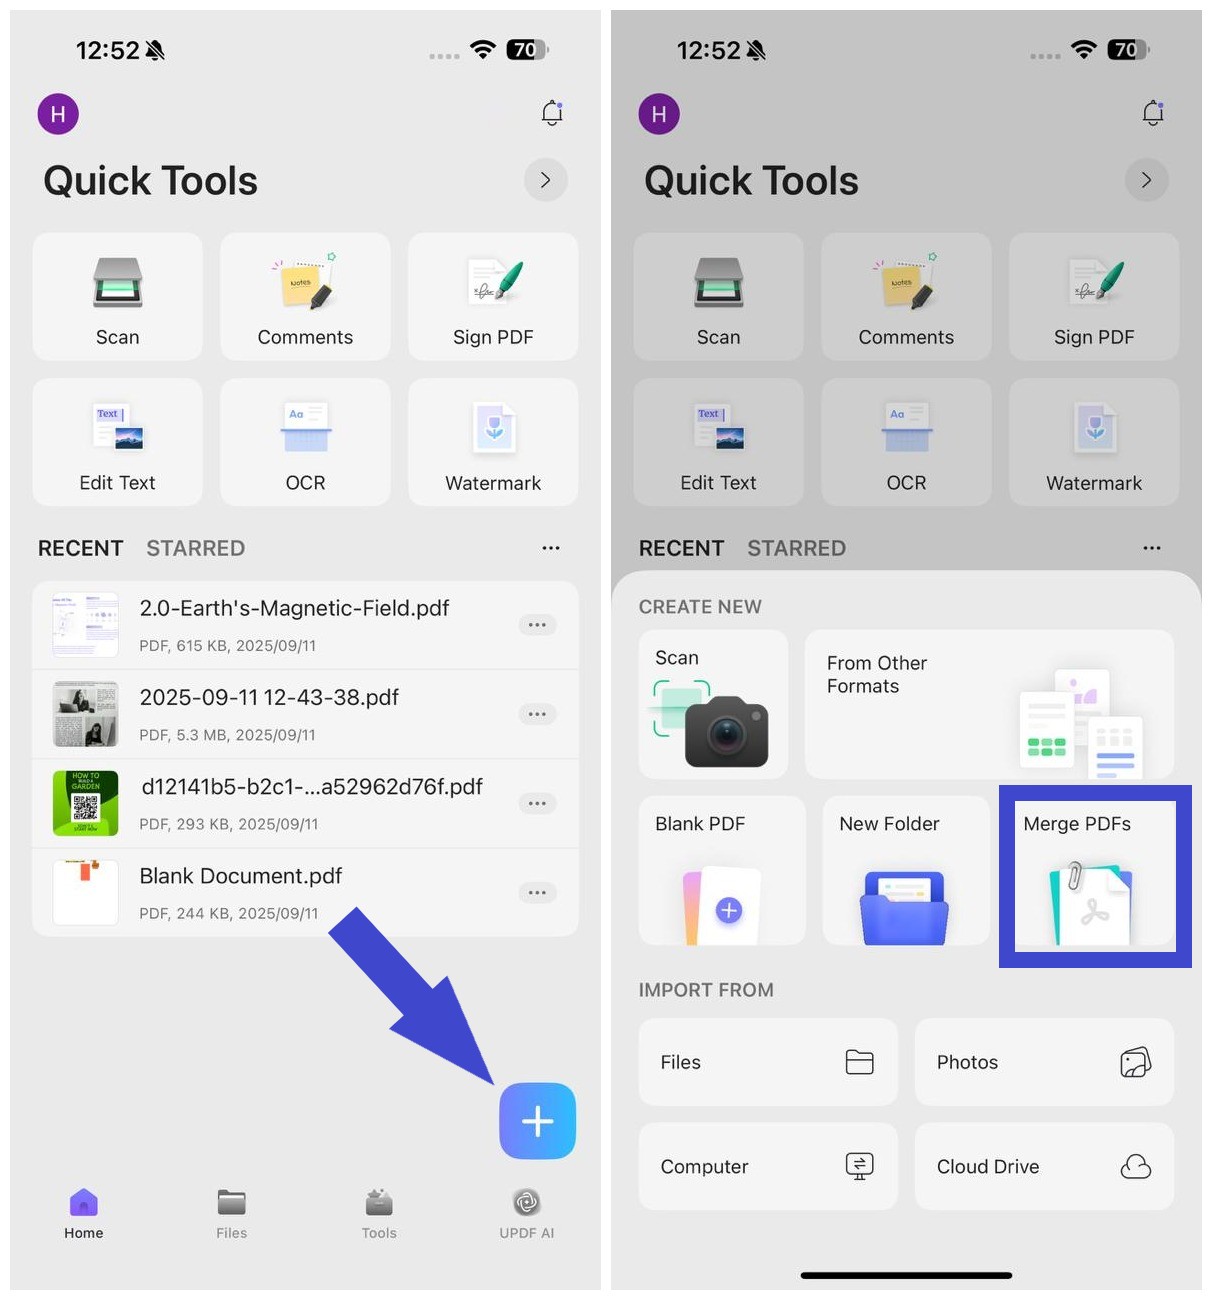
Keep one PDF per session when you normally search by date. Merge sessions into a topic file when you review by course, project, or concept; bookmarks can then separate the major sections.
Try UPDF for free to reorder, rotate, remove, insert, split, or merge note pages before filing the final study PDF.
Windows • macOS • iOS • Android 100% secure
Part 4. Make Scanned Notes Searchable
Printed notes can usually be made searchable with OCR. Handwriting is more variable: neat block letters may be recognized, while cursive, diagrams, arrows, and mixed formulas often need manual interpretation.
In UPDF for iOS, open the scanned PDF and tap OCR at the bottom, or choose OCR from Quick Tools or Tools > OCR. Select Editable PDF, Text and Pictures Only, or Searchable PDF Only, choose the document language, set the export location, and tap Done. For study notes, Searchable PDF Only is useful when you want to preserve the page image while adding a searchable text layer.
- Choose the correct OCR language, or multiple languages for mixed-language notes.
- Check headings and keywords you expect to search later.
- Verify numbers, chemical symbols, formulas, and proper names.
- Keep the original page image so you can check recognition errors.
If handwriting OCR is unreliable, use a hybrid method: keep the original scan and add searchable bookmarks, comments, or a one-page typed summary. That preserves the source while making the material easier to find.
Part 5. Turn the PDF into a Study System
A scanned notebook becomes valuable when it supports retrieval and review. In UPDF, add bookmarks to major topics and use the annotation tools to highlight definitions, underline key ideas, or place comments beside unclear passages. You can also search an OCR-processed PDF for a word or phrase instead of paging through every scan.
For long notes with readable text, use UPDF AI to summarize a section, explain a difficult concept, or generate review questions. Treat the AI output as a study aid and compare important claims, formulas, and quotations with the original page.
- Scan within 24 hours of the session.
- Name and file the PDF consistently.
- Run OCR when text search will save time.
- Add three to five topic bookmarks or annotations.
- Create a short summary or question list.
- Back up the file and review marked sections before the next session.
Download UPDF for free to turn scanned notes into organized, searchable, and annotated study material.
Windows • macOS • iOS • Android 100% secure
FAQs About Scanning Notes to PDF
Can I scan handwritten notes into a searchable PDF?
Sometimes. OCR works best on clear printed text and neat handwriting. Keep the original scan and verify the recognized text.
What resolution is best for note scanning?
Use a setting that keeps small handwriting clear without creating an unnecessarily large file. A sharp, well-lit capture matters more than extreme resolution.
Should I scan each page separately?
Capture pages separately, then combine them into one ordered PDF for a complete class, meeting, or topic.
How should I organize scanned class notes?
Use consistent filenames, folders by course or topic, bookmarks for sections, and annotations for questions or exam priorities.
Conclusion
The best scanned-note PDF is not merely a stack of page images. It is straight, complete, correctly ordered, sensibly named, searchable where possible, and easy to review. UPDF keeps scanning, page cleanup, OCR, bookmarks, annotations, and AI-assisted review in one workflow, so a few minutes of quality control at capture time saves much more time later.







 Lizzy Lozano

 Enola Davis
 Delia Meyer