Have you ever needed to convert a screenshot to a Word document? Maybe a coworker sent you their presentation as an image and you need to edit it. Or you found a really interesting article that you want to annotate, but you can't download the article so you need to take a screenshot.
How can you change a screenshot into a Word document? And how do you make the text in the screenshot editable? Figuring this out can be very time-consuming and frustrating, but we're here to help you!
In this article, we'll go over five very easy ways to convert a screenshot into a Word document, with step-by-step instructions so you can follow along.
Part 1. Convert Screenshot to Word Document on Windows and Mac (4 Ways)
With UPDF, you can easily convert screenshots into Word documents. There are several ways that you can do this: you can convert one screenshot to a noneditable Word document, convert a screenshot to an editable Word document, convert multiple screenshots into a Word document in a batch process, convert all screenshots into one Word document, and more!
In the next section, we'll show you all the different methods that you can use UPDF to convert screenshots into Word documents.
Way 1. Convert One Screenshot to One Noneditable Word
In this case, you probably won't need to edit the screenshot, so you will only need to convert it to Word.
You can follow the steps below to convert a single screenshot into a noneditable Word document.
On Windows:
Step 1 - Open Screenshot
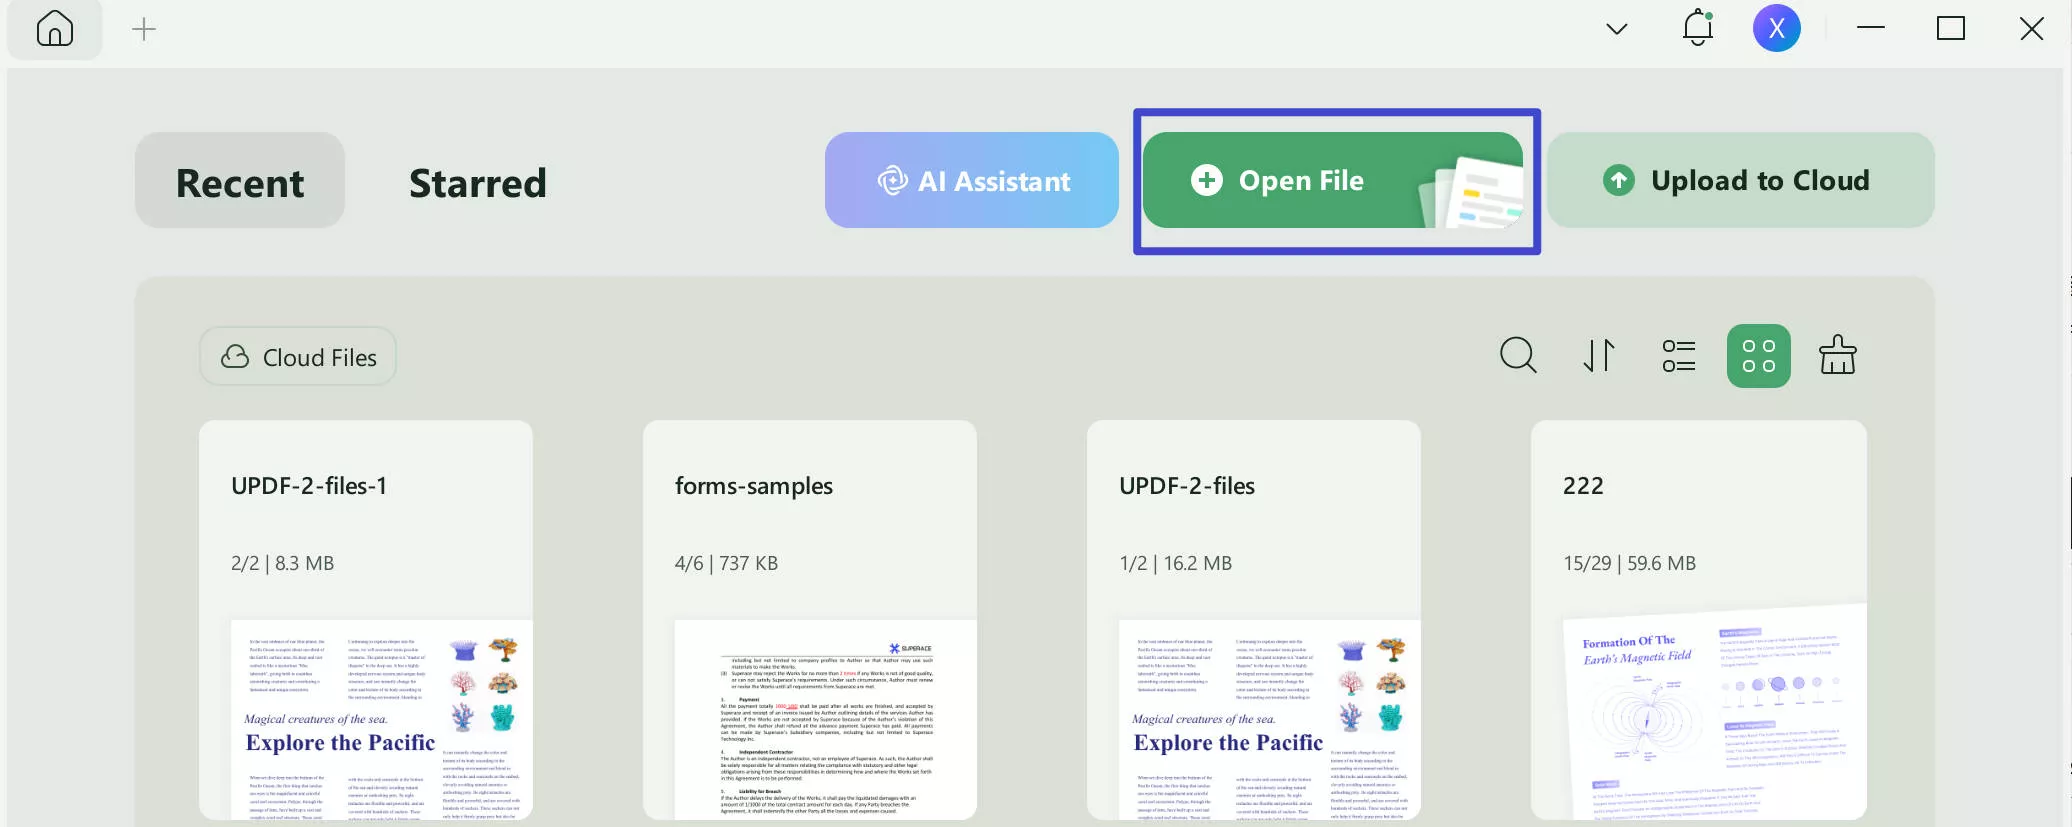
Open UPDF and drag and drop your screenshot into the "Open File" box.
Step 2 - Convert Screenshot
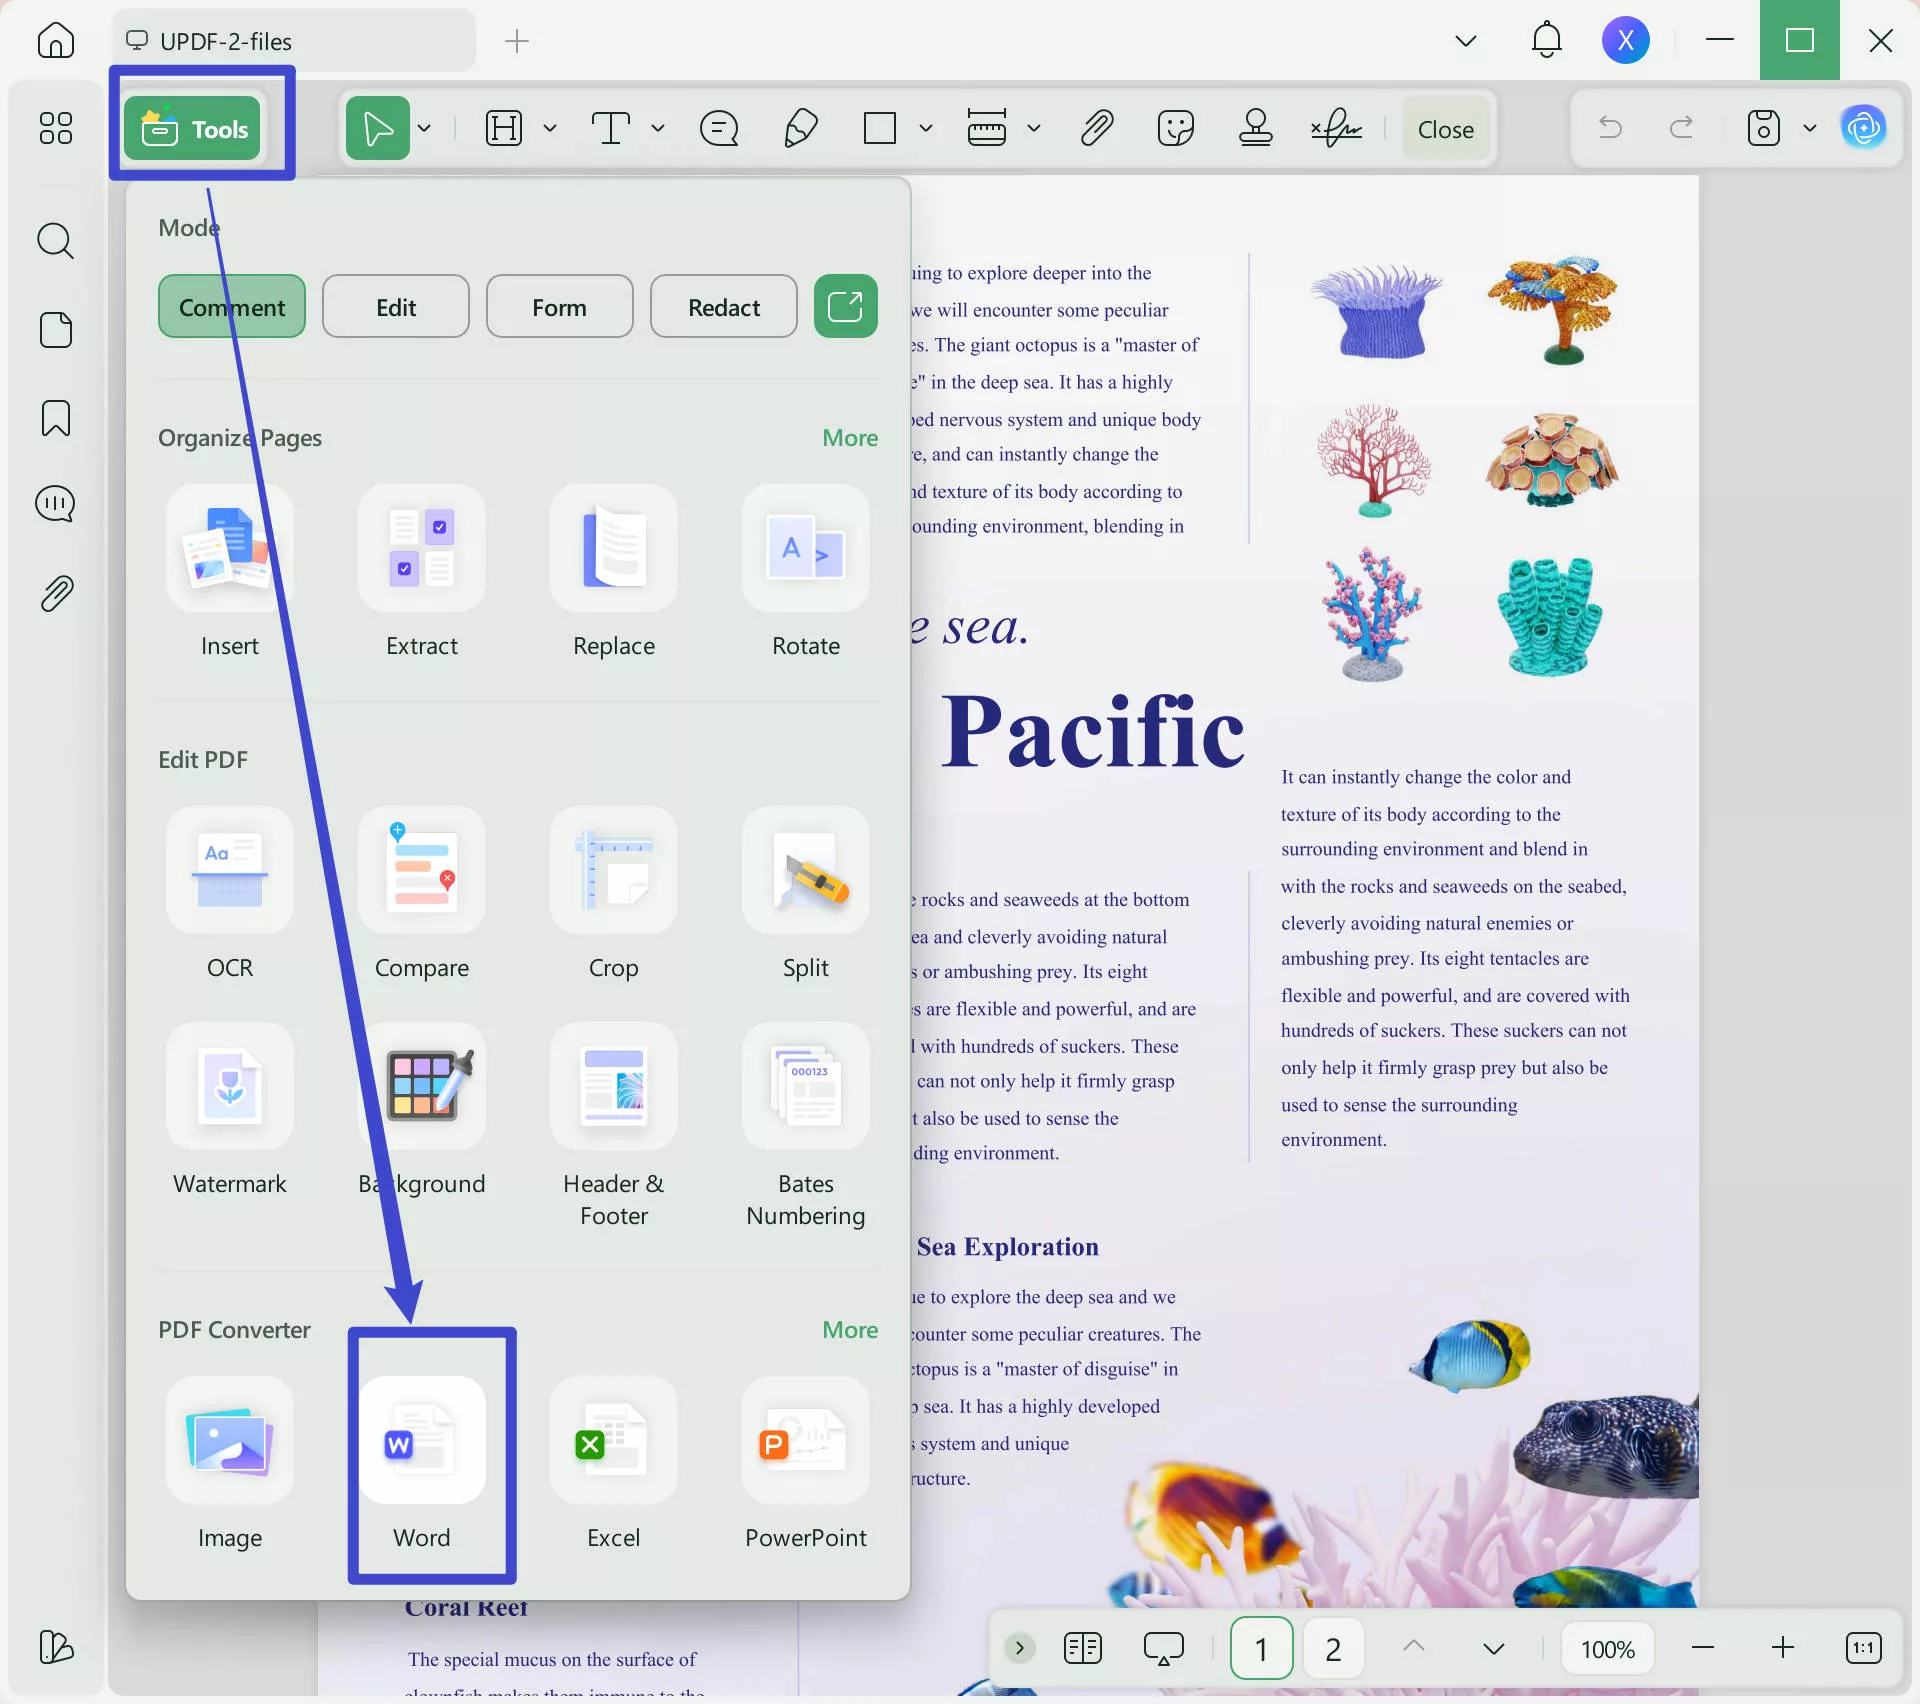
From the right side, select "Tools" > "Word (.docx)".
Step 3 - Adjust Settings
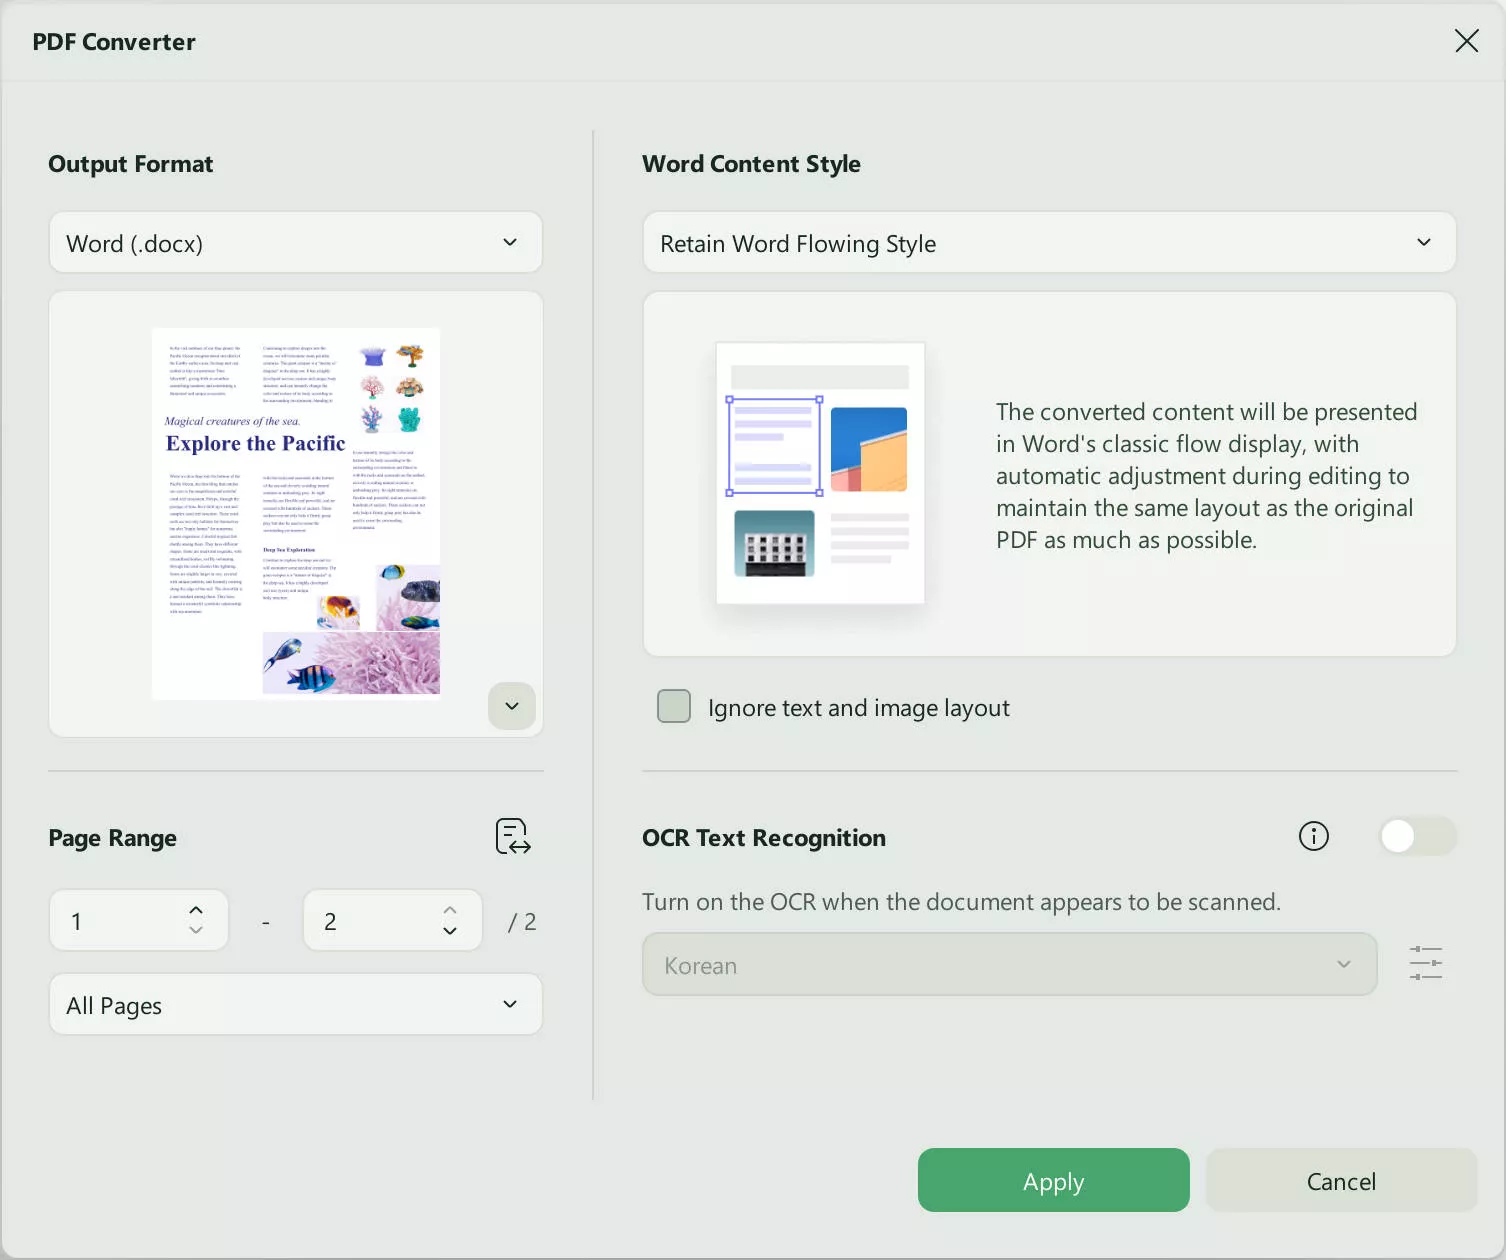
Adjust the settings based on your needs, and then click "Apply". Select a location to save your Word document, and then click "Save". You can now open the screenshot as a Word document.
On Mac:
If you have a Mac, there are two ways to convert a screenshot to a Word document. The first method is the same as the directions above for Windows. You open the screenshot in UPDF, and then export it into a Word document.
The second way is to use UPDF to directly take a screenshot. Follow these steps:
Step 1 - Open UPDF
Make sure the file or image that you want to screenshot is already open, and then open UPDF. Then, click the minimize icon to close the UPDF window.
Step 2 - Take a Screenshot
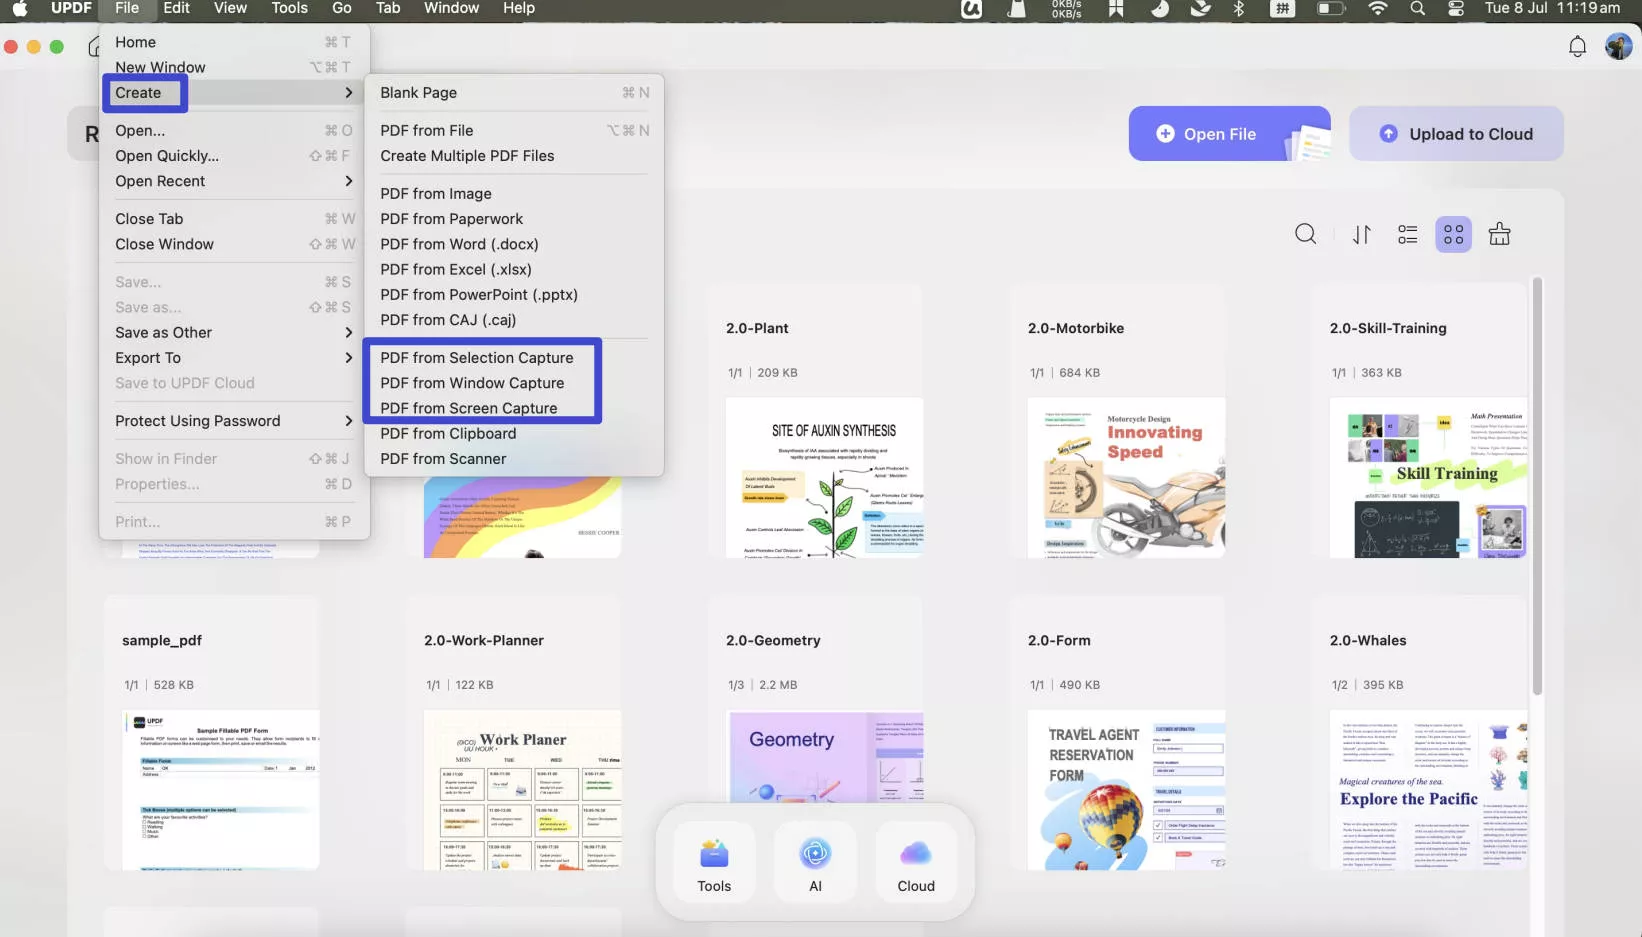
At the top of your screen, select "File" > "Create". You have three different options that you can select:
PDF from Selection Capture: This allows you to take a screenshot of just part of your screen by clicking your mouse and then dragging it across the area that you want to screenshot.
PDF from Window Capture: This allows you to take a screenshot of a specific window. You just need to select the window that you want, and UPDF will take a screenshot.
PDF from Screen Capture: This allows you to take a screenshot of your entire screen. If you click this option, UPDF will automatically take a picture of your entire screen and convert it to a PDF.
You can choose the screenshot option and screenshot the content in the PDF. When you finish screenshotting, it will open automatically in the UPDF.
Step 3 - Export PDF
You can now export the screenshot PDF to a Word document by clicking "Tools"> "Word (.docx)". Choose a location to save your file, and click "Save".
Way 2. Convert Screenshot to Editable Word
If you take a screenshot of text that you want to edit, translate, or add more information to, then you can convert that screenshot into an editable document in UPDF. Click the button below to download UPDF, and then follow the steps.
Windows • macOS • iOS • Android 100% secure
Step 1 - Open Screenshot
In UPDF, open your screenshot by dragging and dropping it into the "Open File" box, or if you have a Mac you can use the directions above to take a screenshot directly with UPDF. This will convert your screenshot to a PDF.
Step 2 - Perform OCR
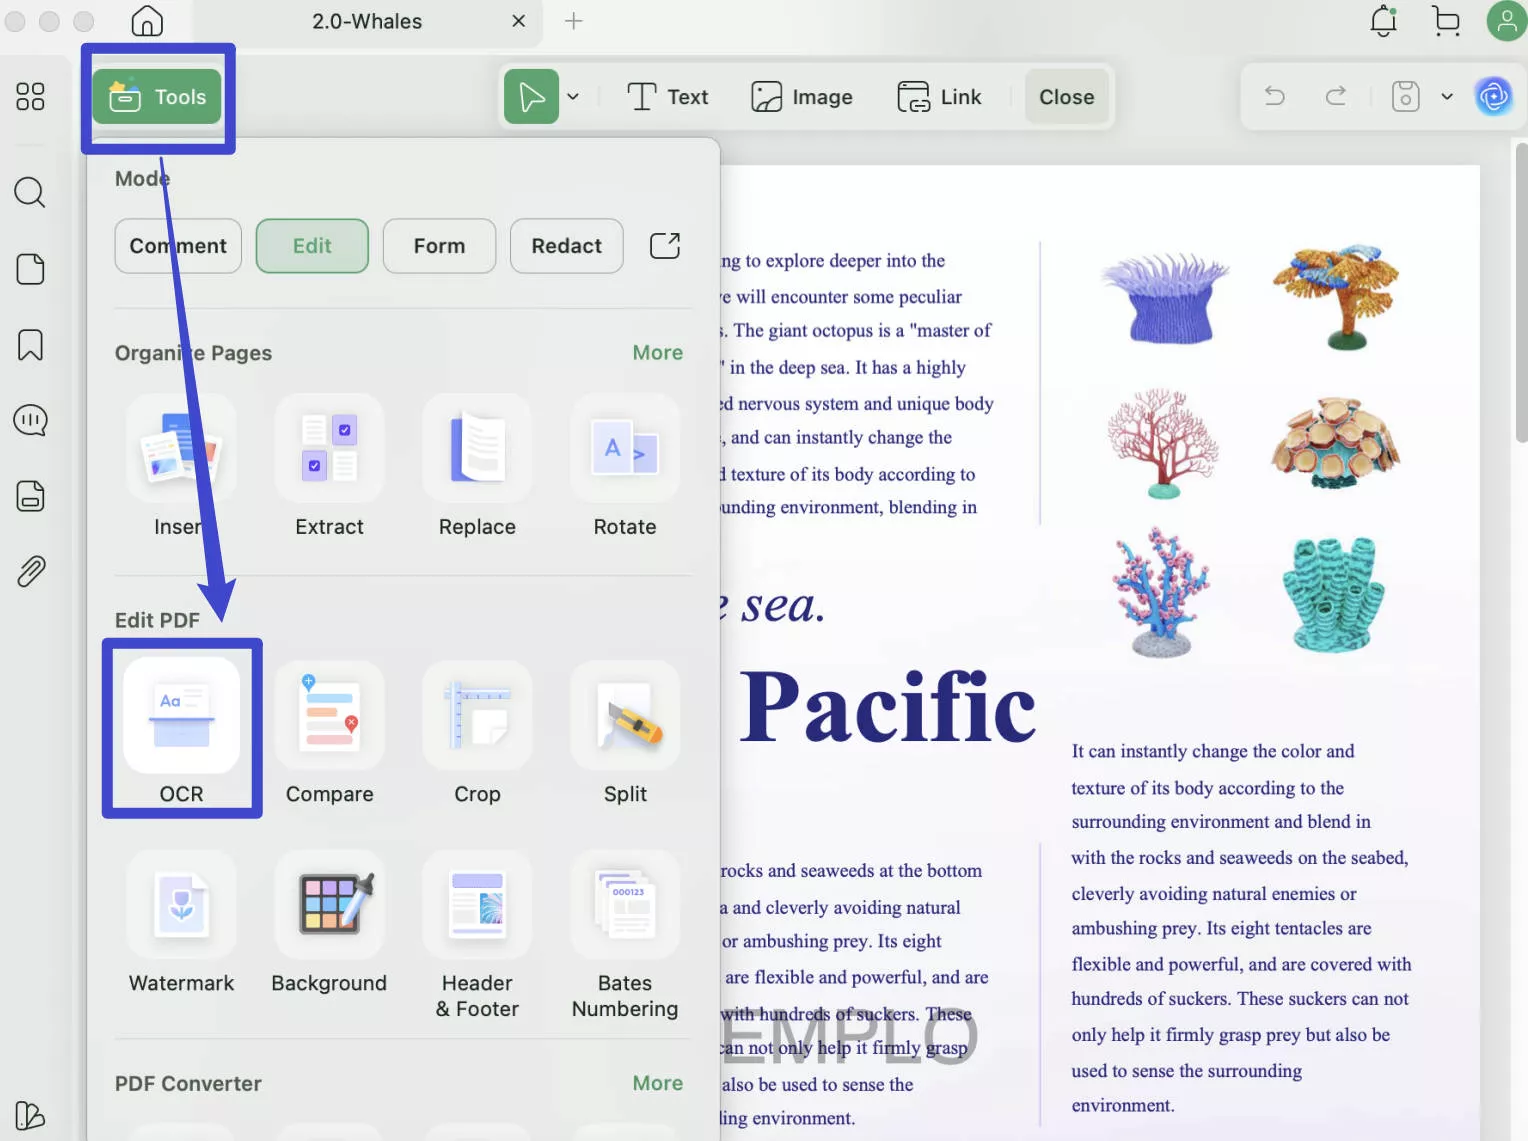
You will need to perform OCR to make the text editable. On the right side, select "OCR" in "Tools", and adjust the settings to your preferences. Click "Convert". Choose a file location, and click "Save".
Step 3 - Export PDF
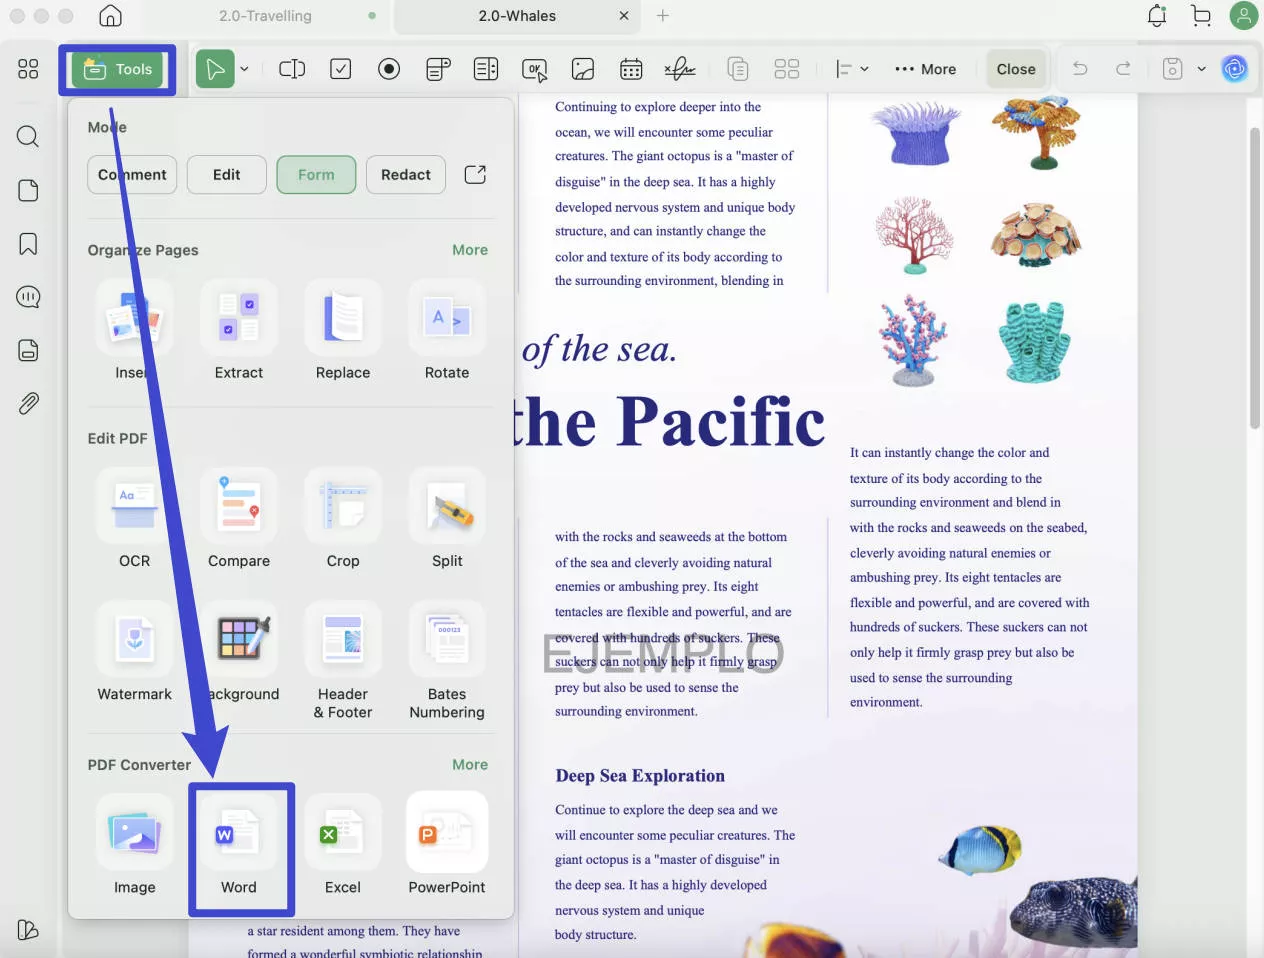
The OCR PDF will open in a new window in UPDF. You can now export by clicking "Tools" > "Word". Select a location to save your Word document, and click "Save".
Way 3. Convert Screenshots to Words in Batch
If you have many screenshots that you need to convert into Word documents (such as a very long digital article or the pages of a report), then you can convert all of the screenshots at once with a batch action. Before you follow these steps, make sure to download UPDF so you can try the batch feature.
Windows • macOS • iOS • Android 100% secure
Step 1 - Open the Batch Actions
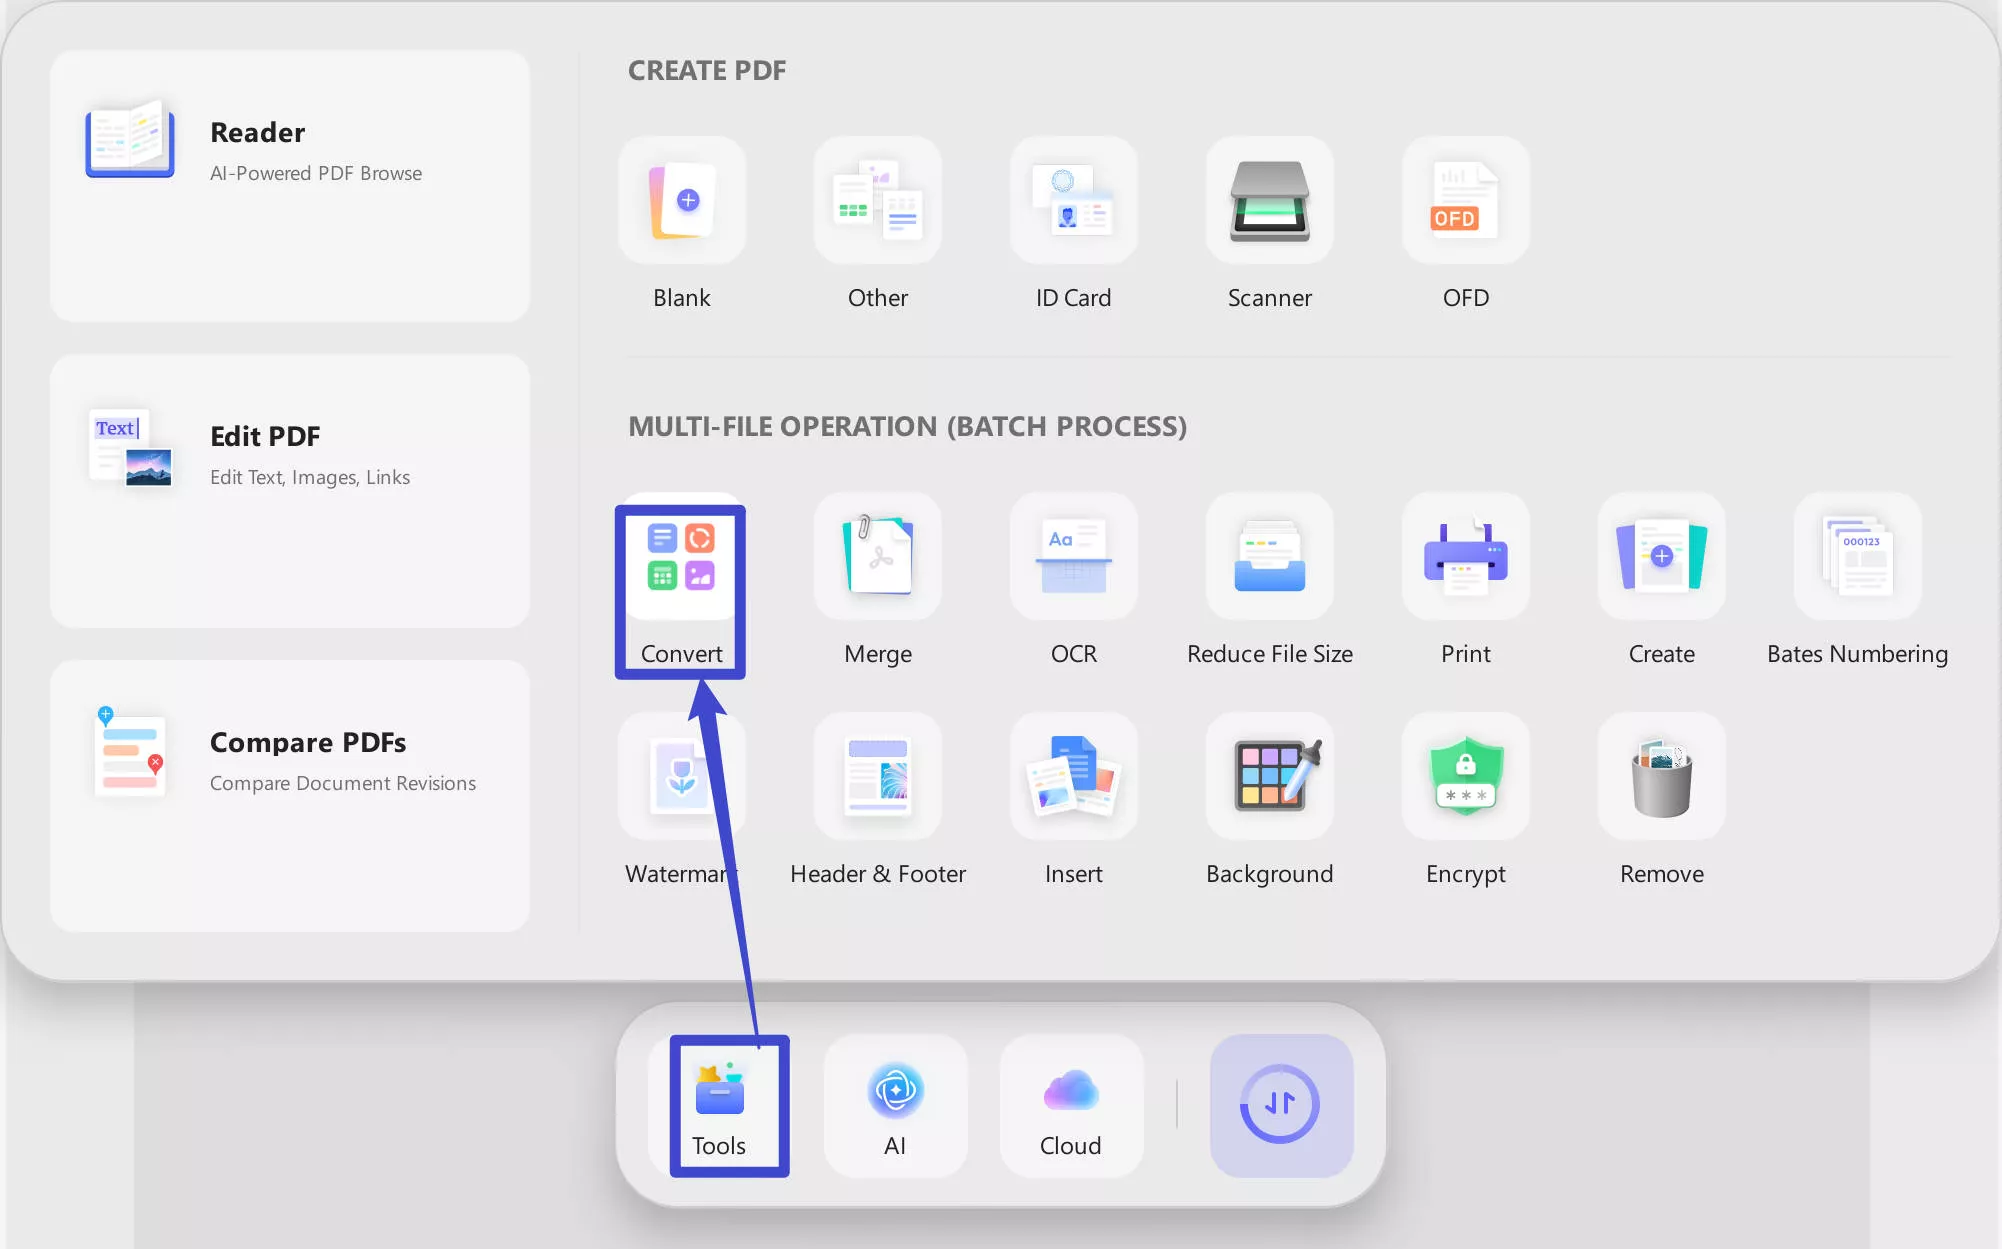
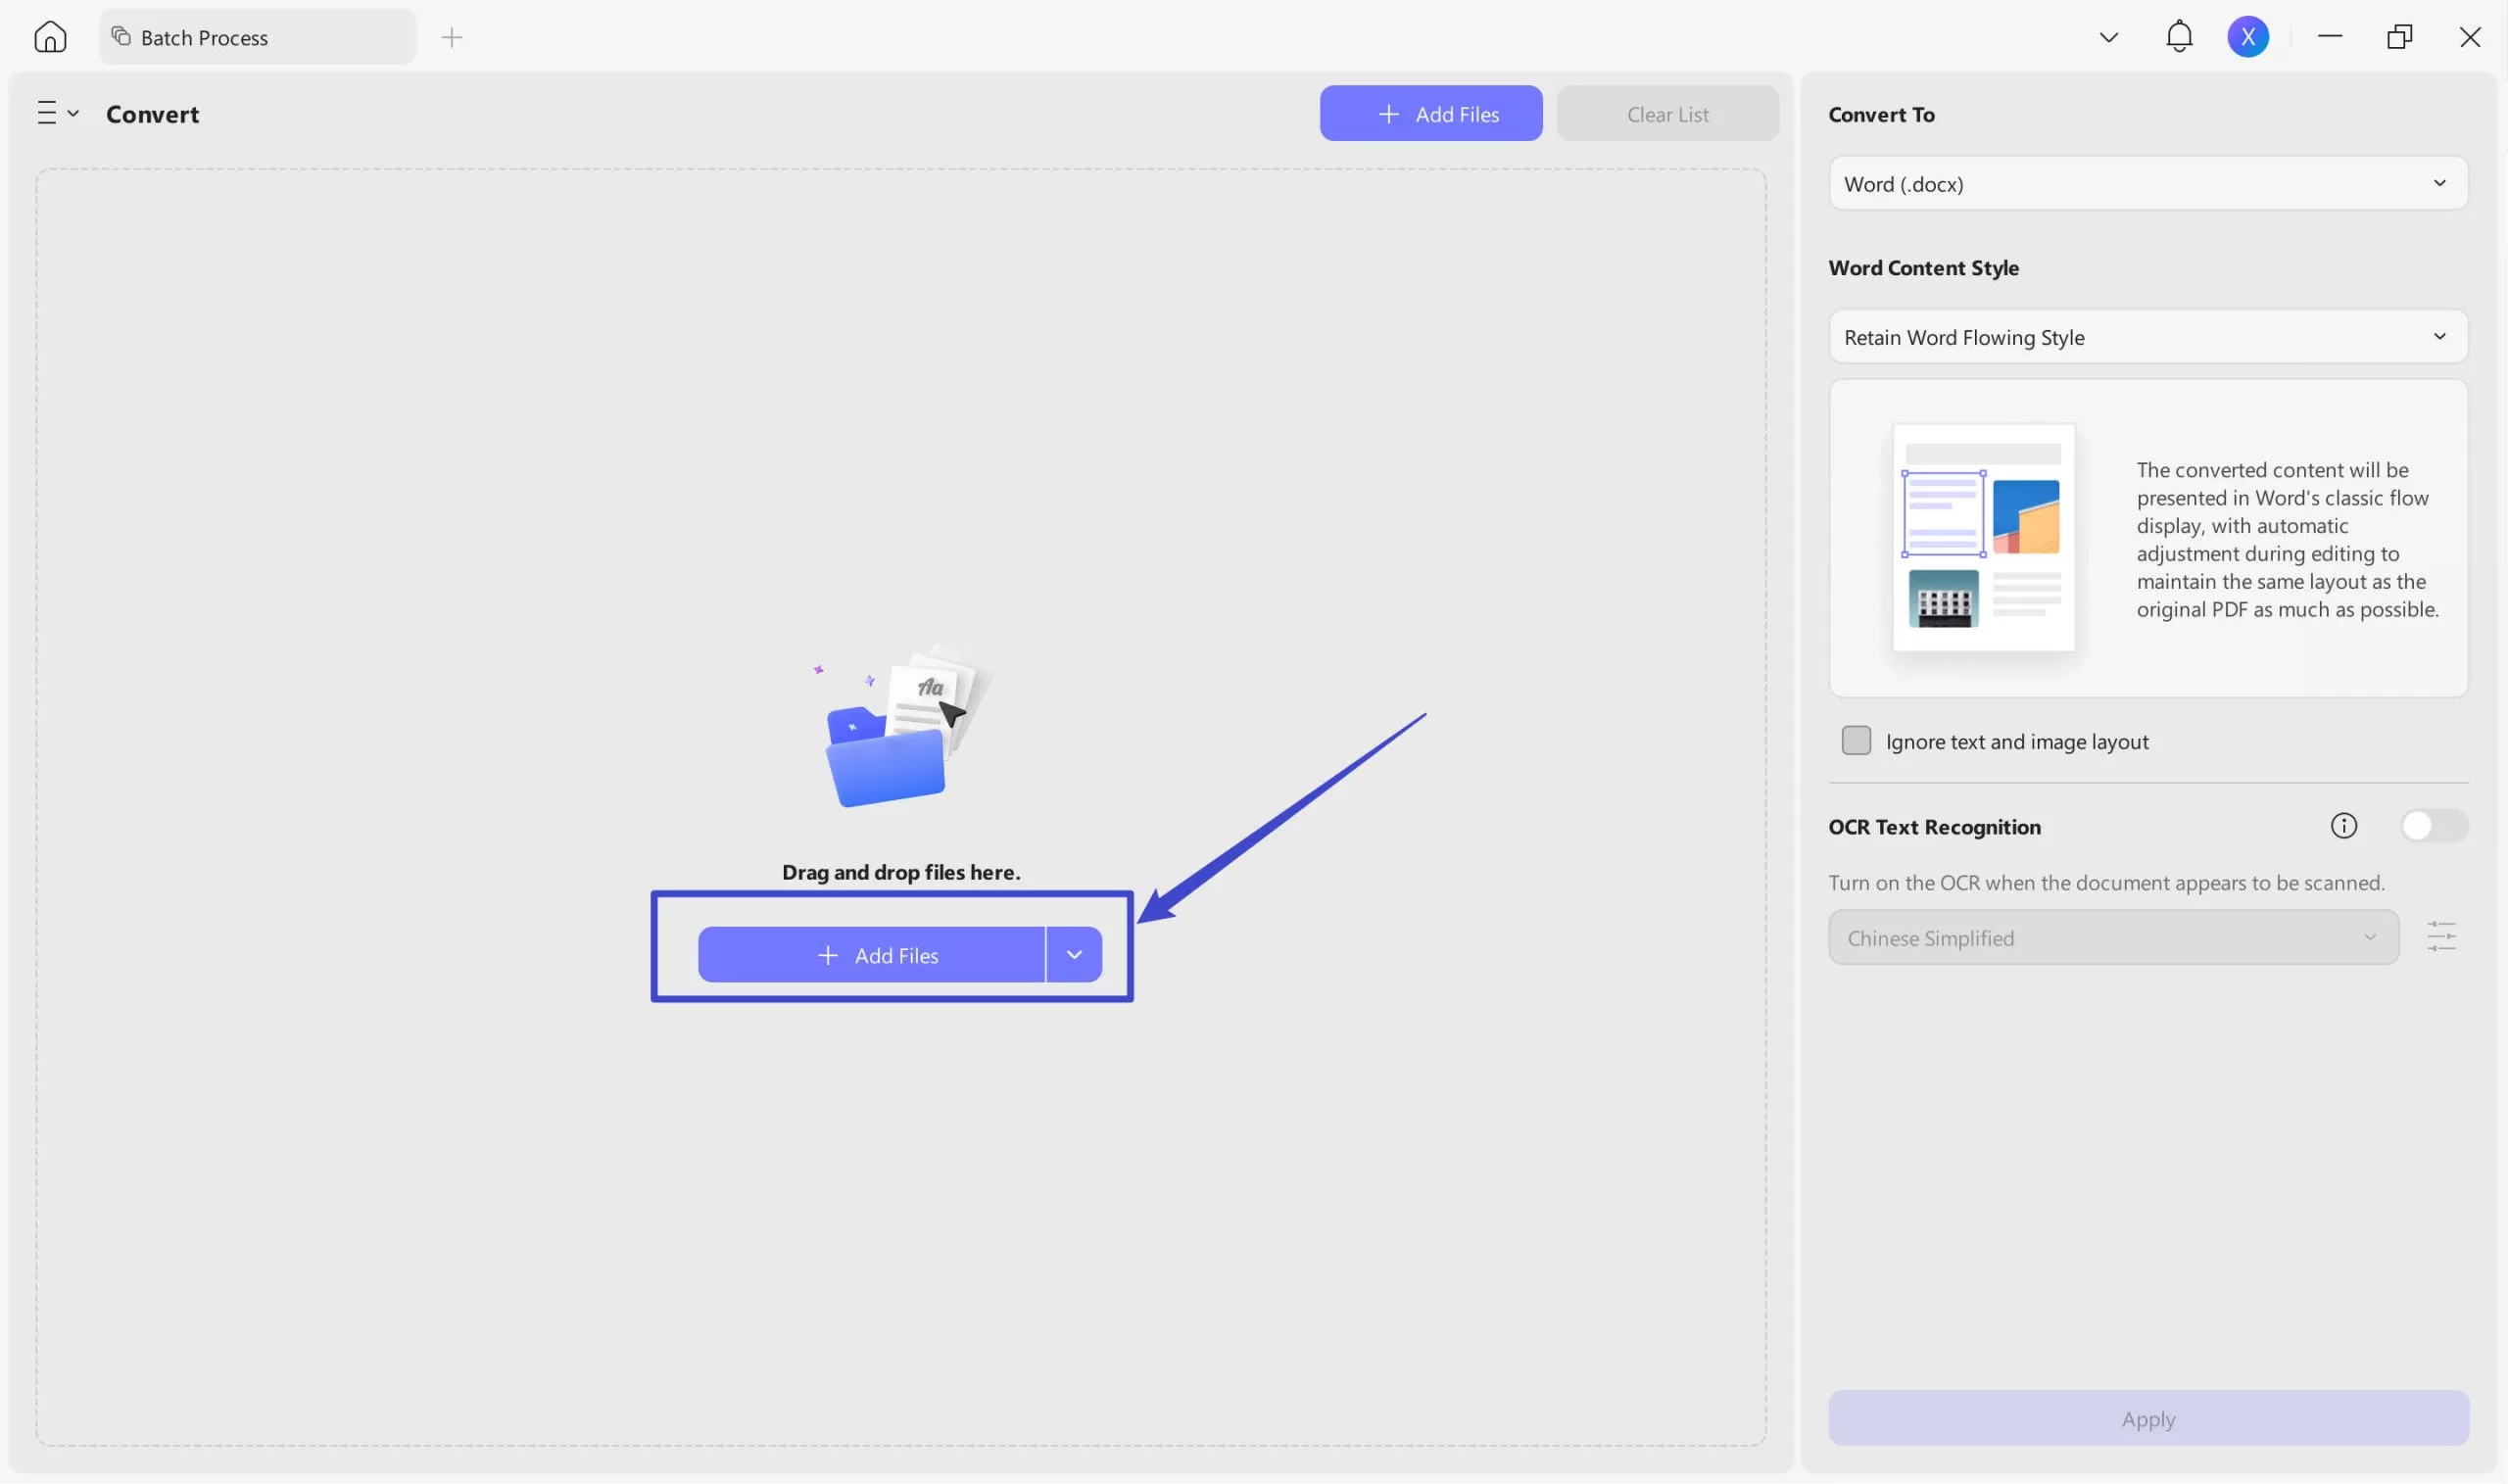
Open UPDF and click "Tools". From the batch actions, select "Convert".
Step 2 - Add Screenshots
Click on the "Add Files" button and select which screenshots you want to convert to Word documents. Then on the right, adjust the settings to your preference, and click "Apply".
Step 3 - Save Word Files
Select a location to save your Word files, then click "Save". A folder containing the converted Word documents will automatically open.
Please note if you are using the free trial version of UPDF, you can only add 2 files to convert them into PDF. To add more files, you need to upgrade to pro version.
Way 4. Convert Screenshots into One Word
If you have many screenshots that you want to combine into a single Word document, such as a digital presentation or an ebook, then you can use this method. Download UPDF to get started, and follow these directions:
Windows • macOS • iOS • Android 100% secure
Step 1 - Open Batch Actions
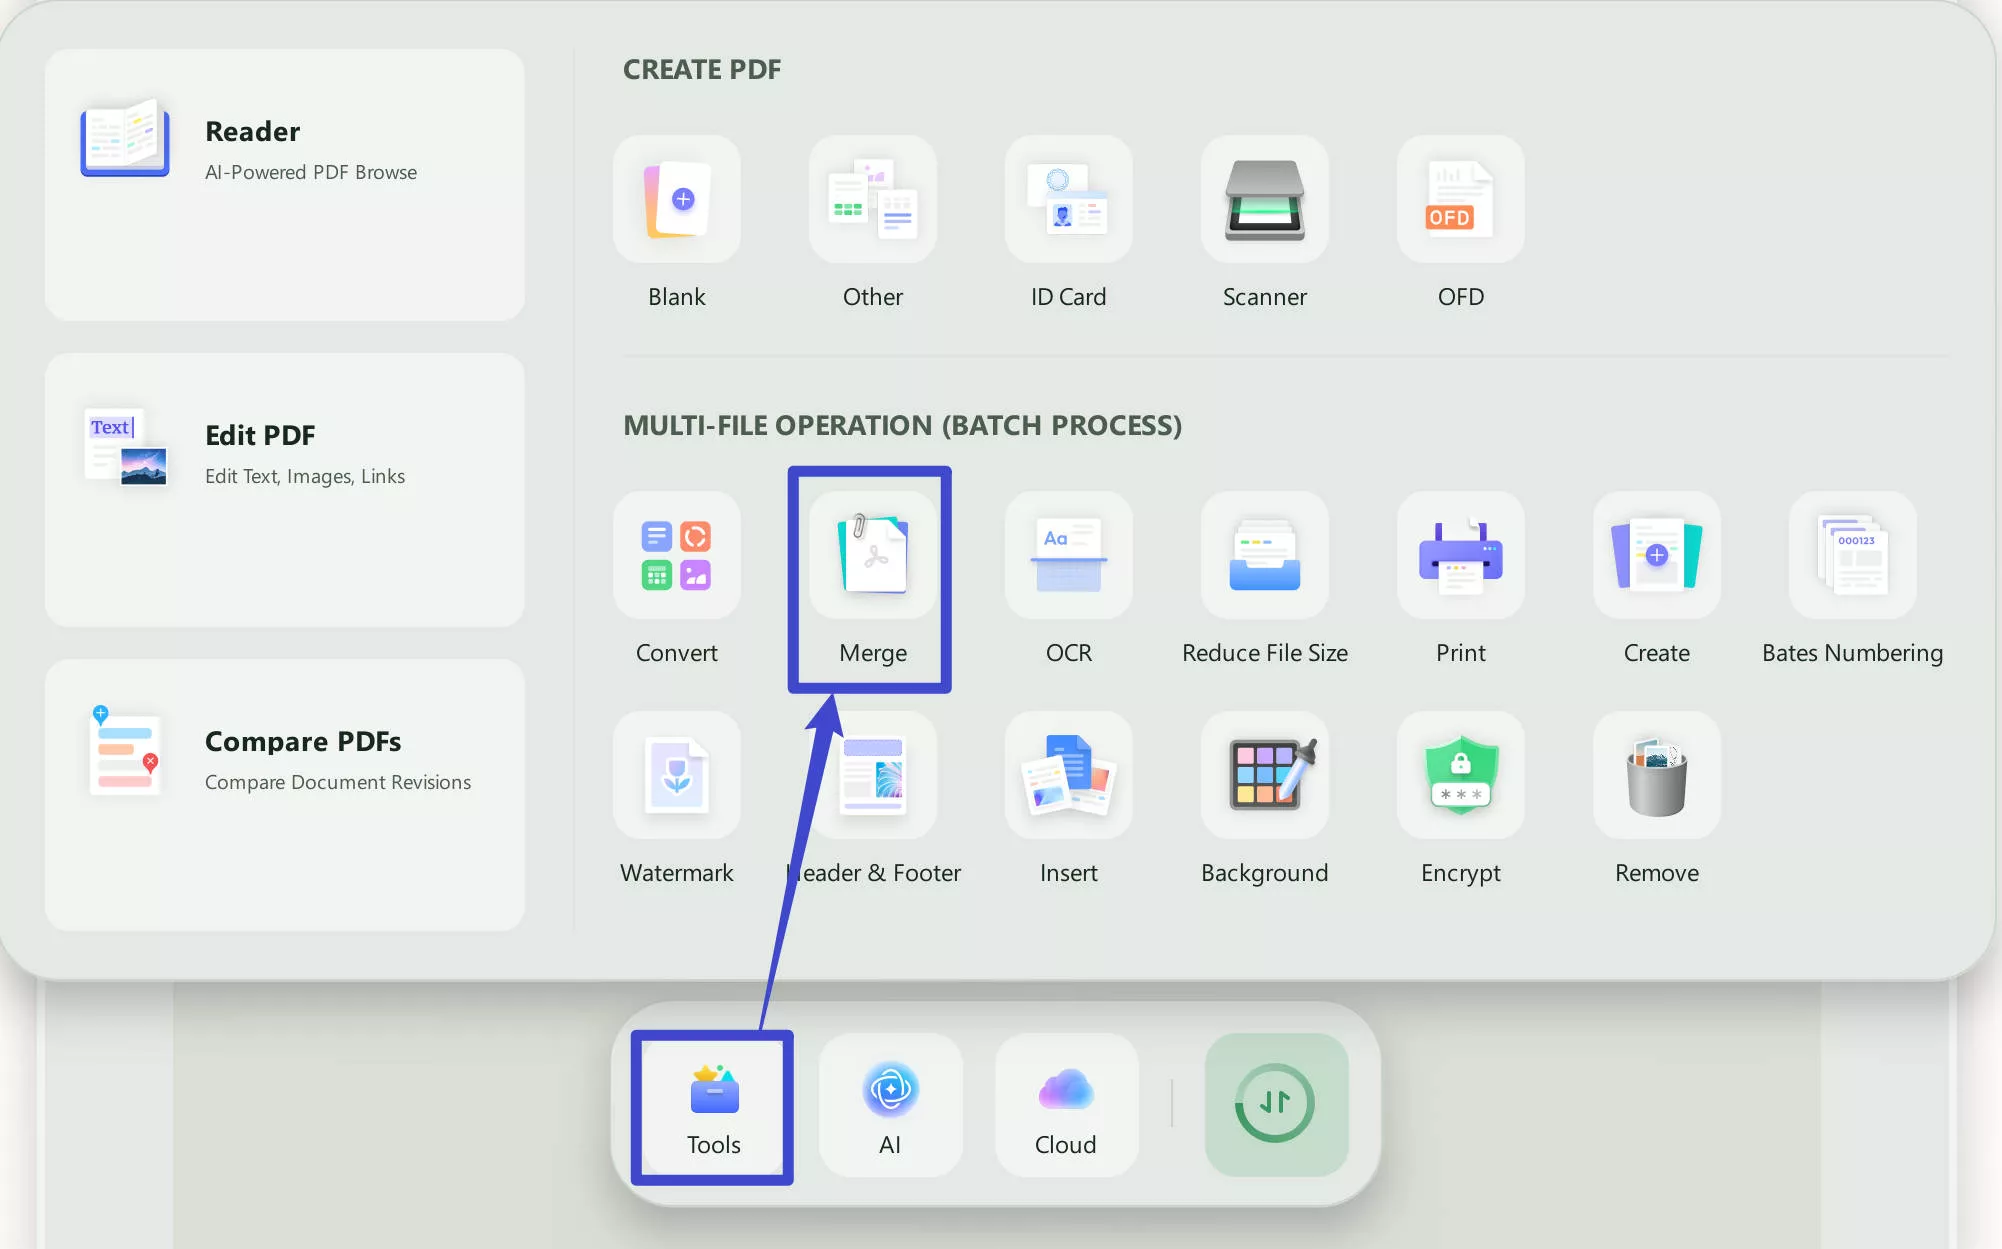
Open UPDF, and on the right side select "Tools". Then choose "Merge".
Step 2 - Add Screenshots
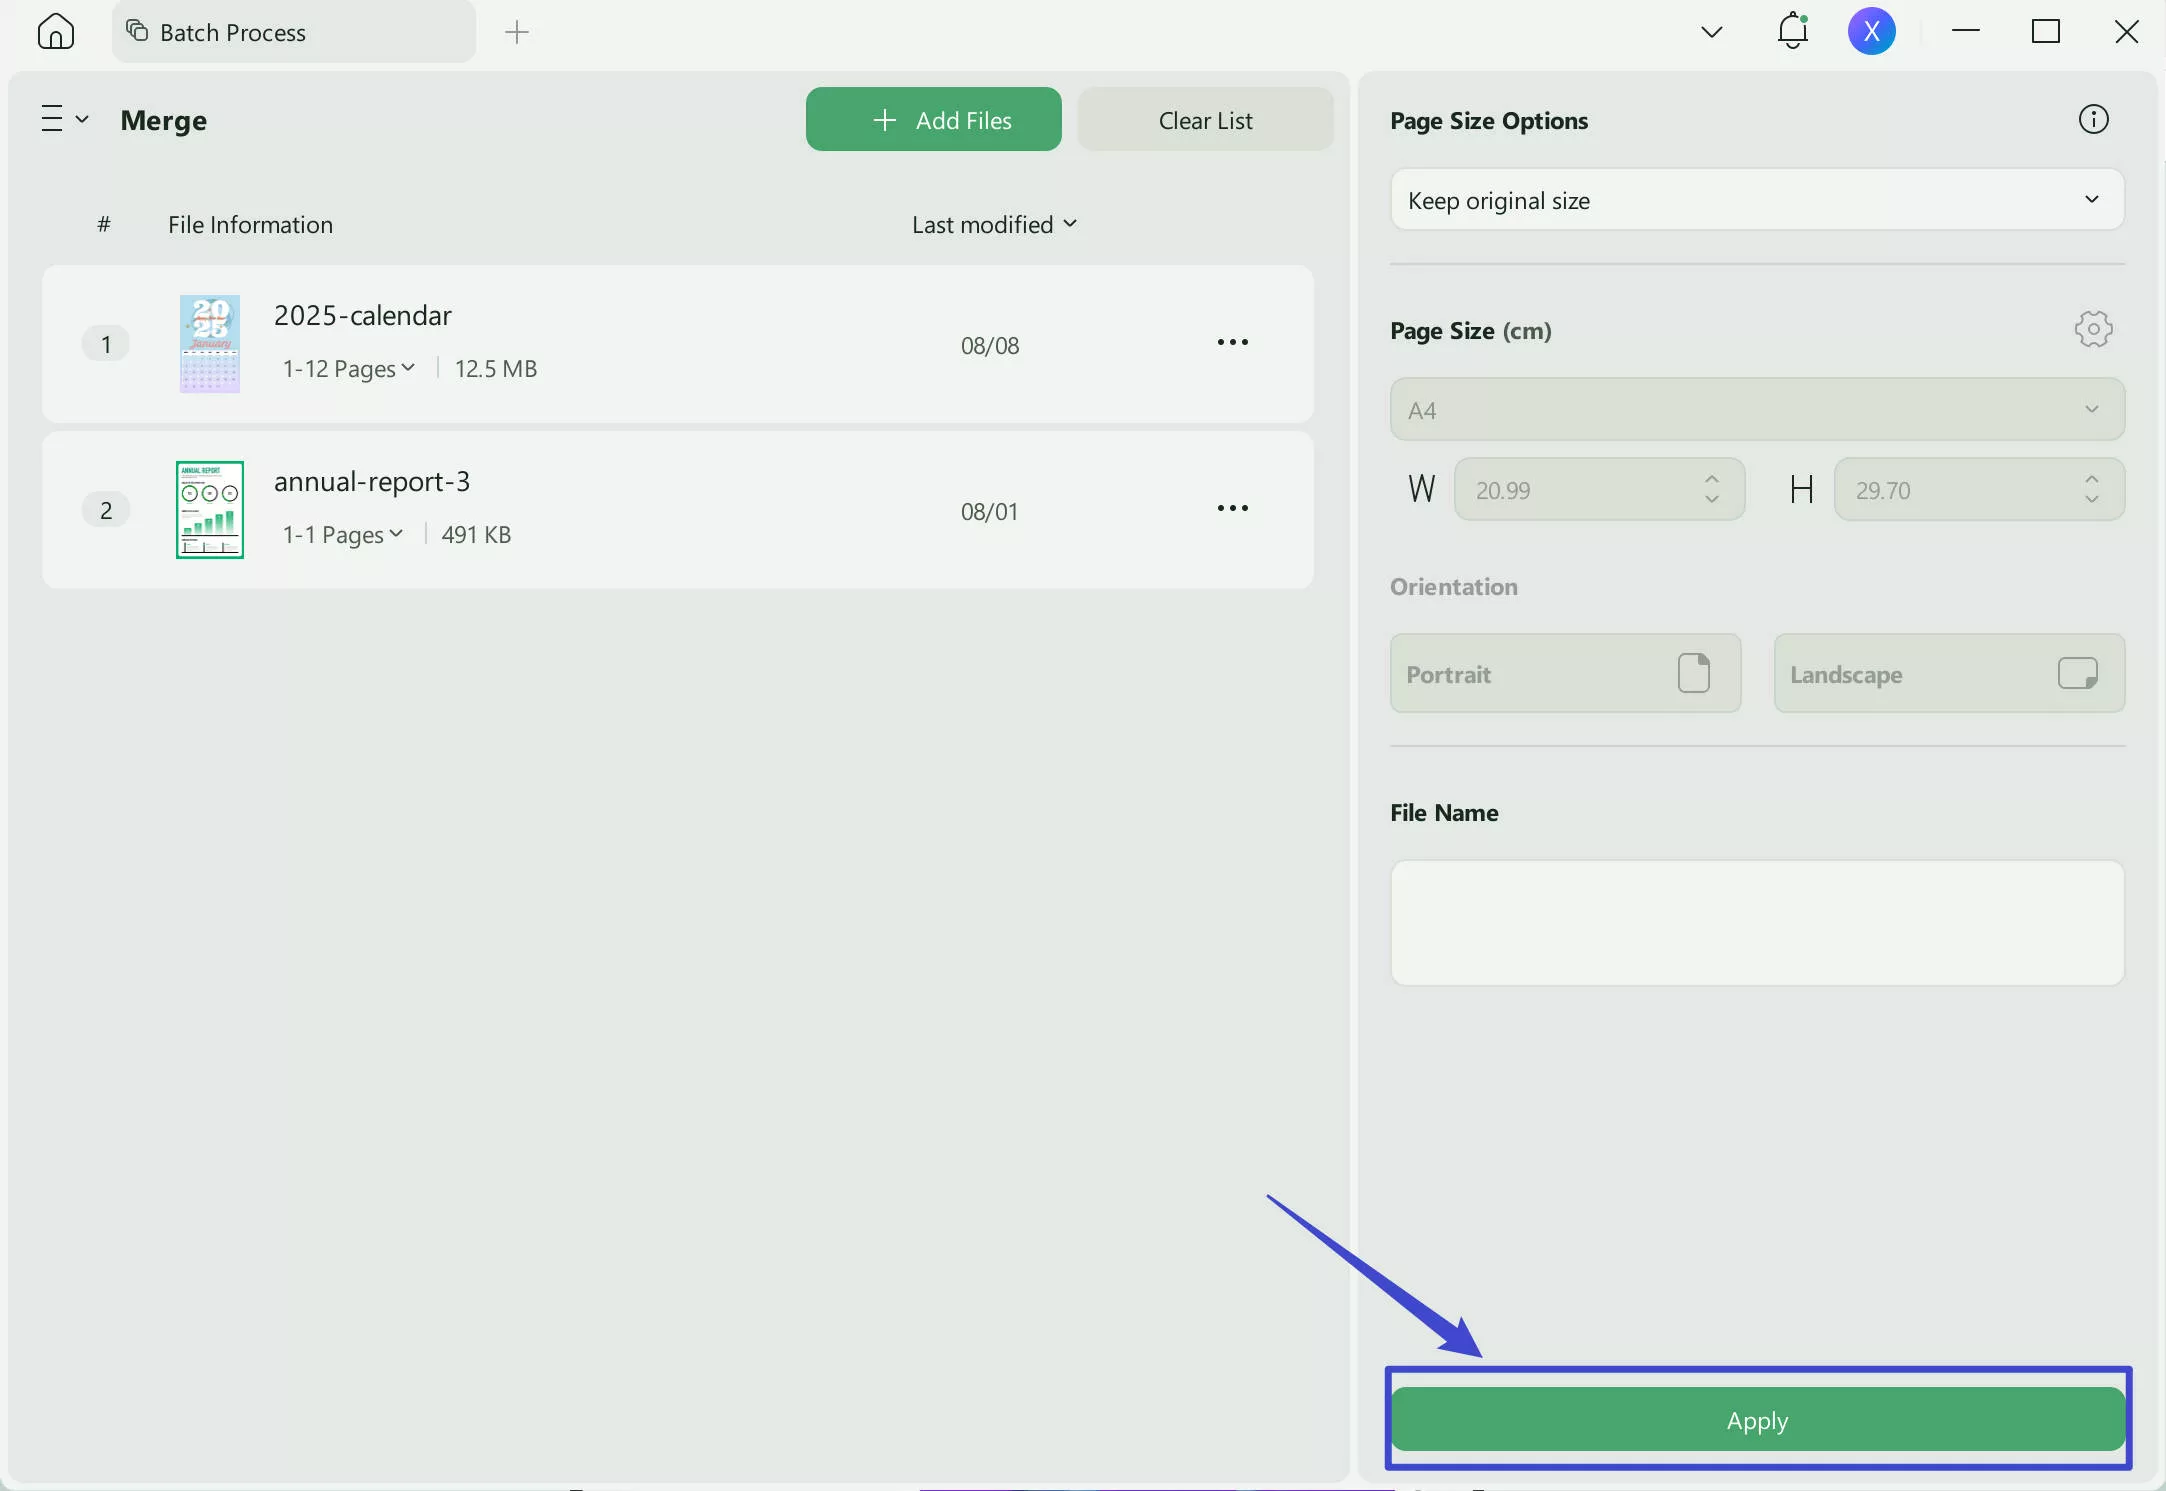
Click "Add Files", select the screenshots you want to combine, and then click "Open". From here, you can drag and drop the files to change the order if needed. Click "Apply". Select a location to save your merged PDF.
Step 3 - Convert to Word Document
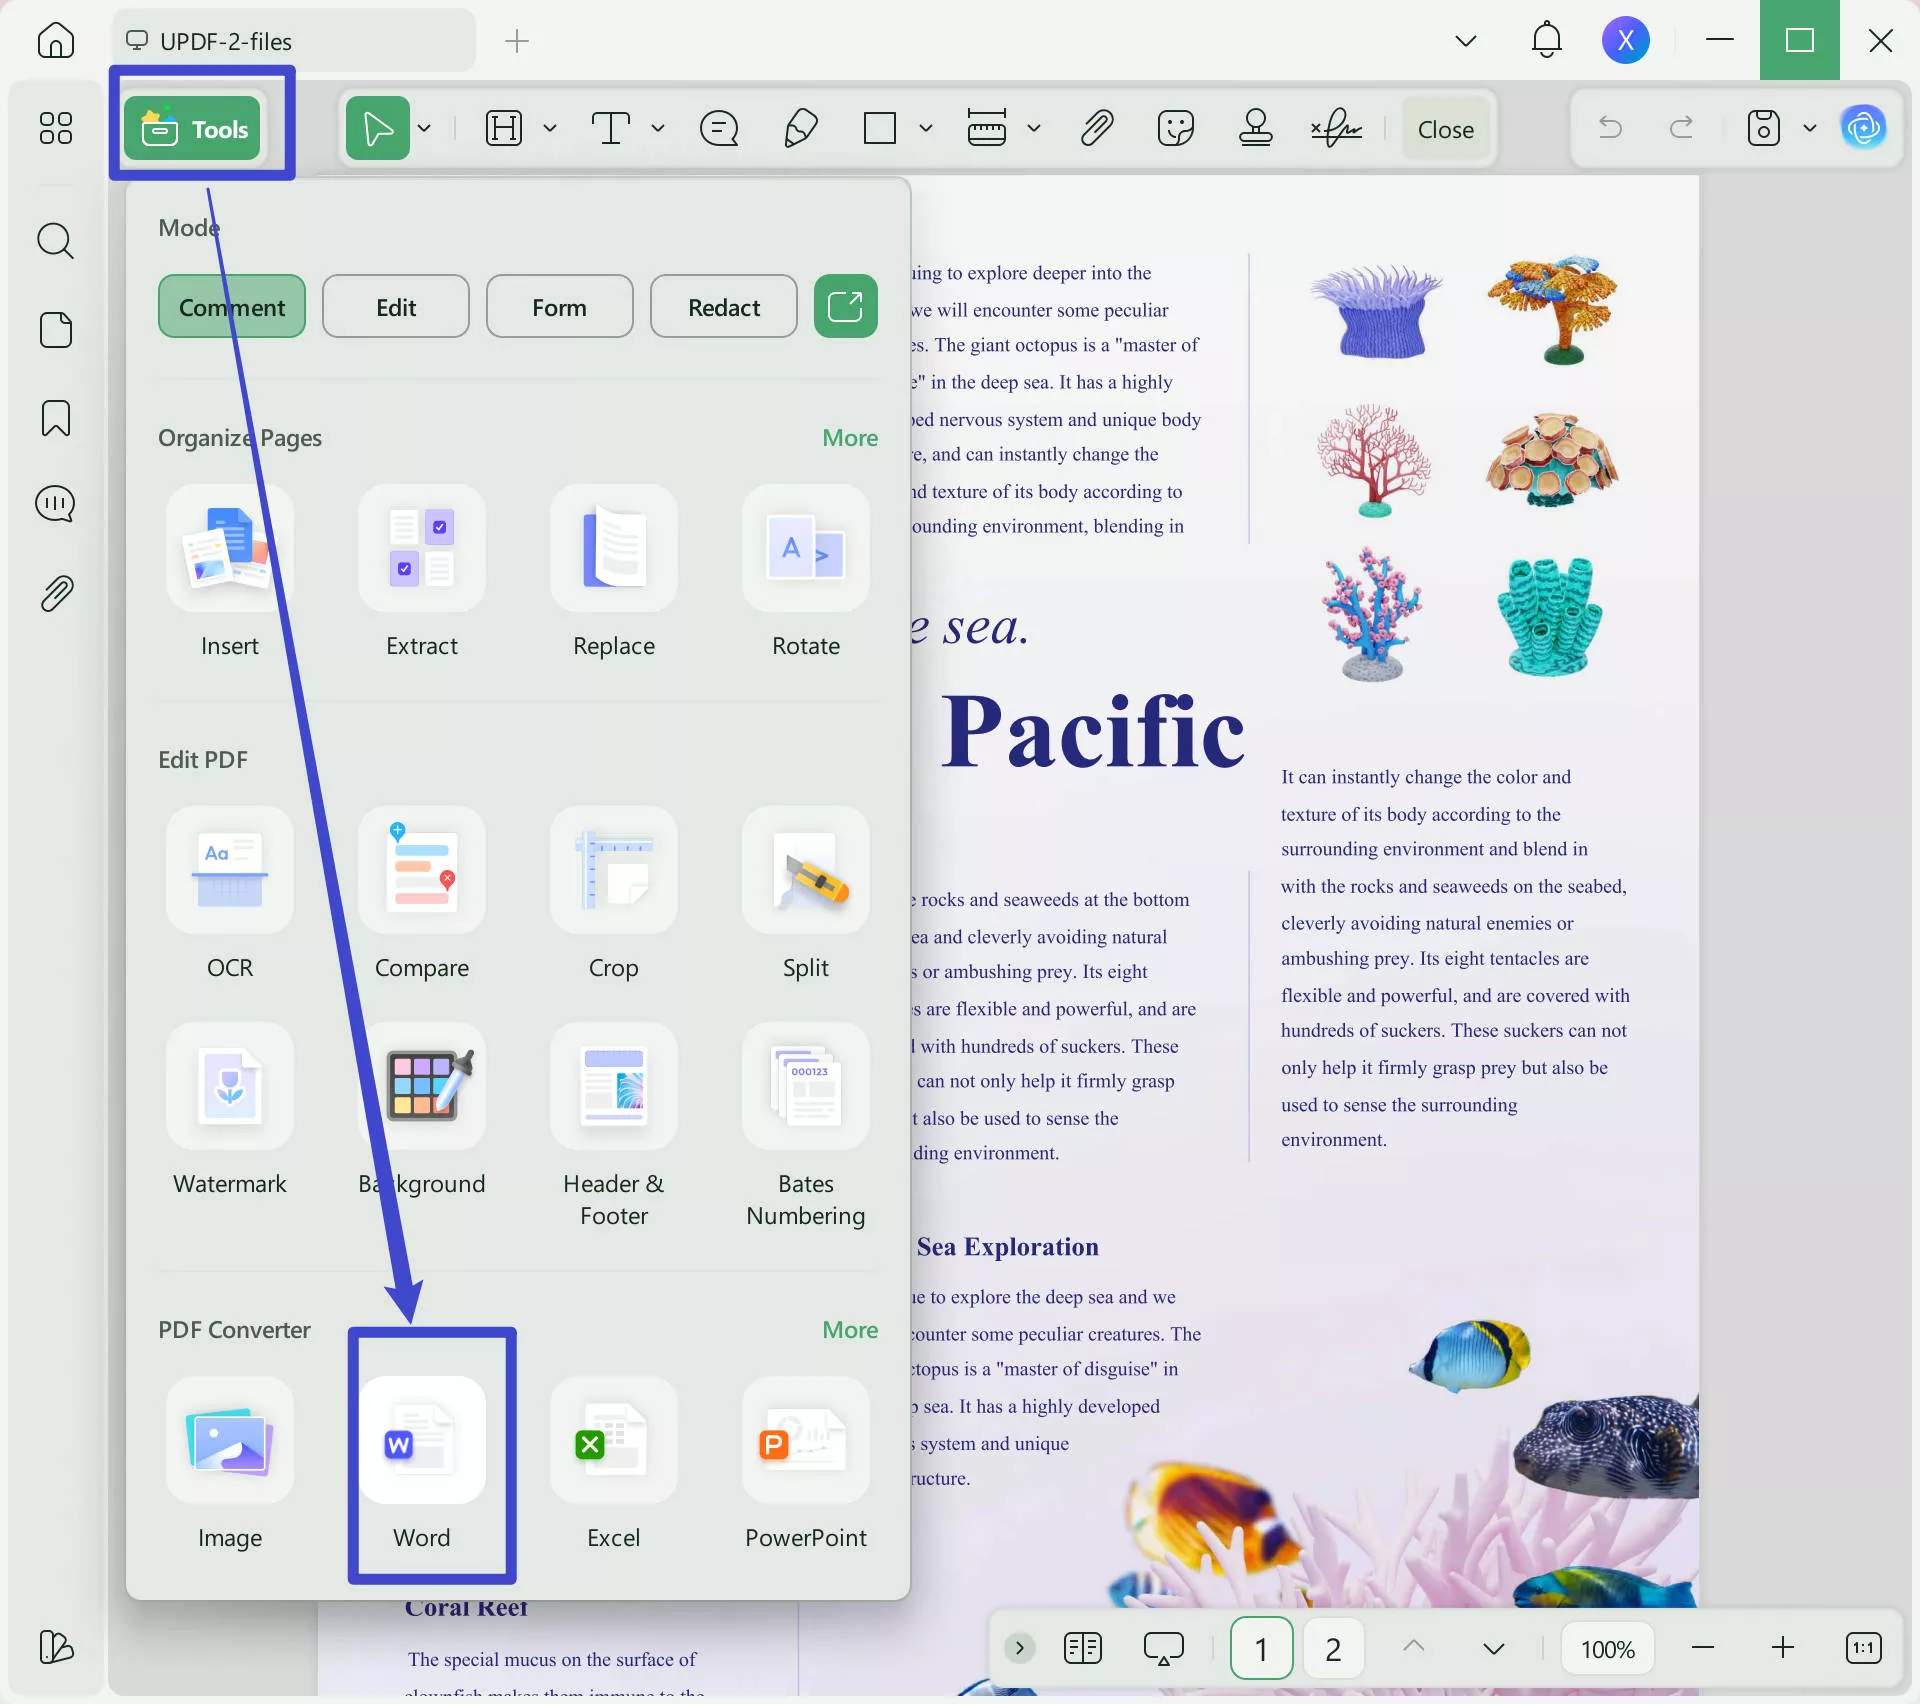
You can now convert the merged PDF to a Word document. Open the merged document in UPDF, and then select "Tools" > "Word". Adjust the settings as needed, then click "Apply". Select a location to save your Word file, and then click "Save".
Except converting screenshots to Word, UPDF has many other features to help you with editing and customizing PDFs. After uploading a screenshot and using OCR to create editable text, you can then use UPDF's editing and annotating tools to add text, images, URLs, sticky notes, stickers, highlighted text, and more. You can also use UPDF's powerful AI features to explain, summarize, translate, or generate content for your PDFs.
You can learn more about UPDF by reading this review from Howtogeek and watching the below video tutorial. If you're curious about UPDF's features, then make sure you click the button below to download UPDF and start your free trial!
Windows • macOS • iOS • Android 100% secure
Part 2. Convert Screenshot to MS Word Online Via ASPOSE
If you need an online-only tool for converting a screenshot to a Word document, you can use ASPOSE. This method is quick and easy but doesn't have the same robust features as UPDF.
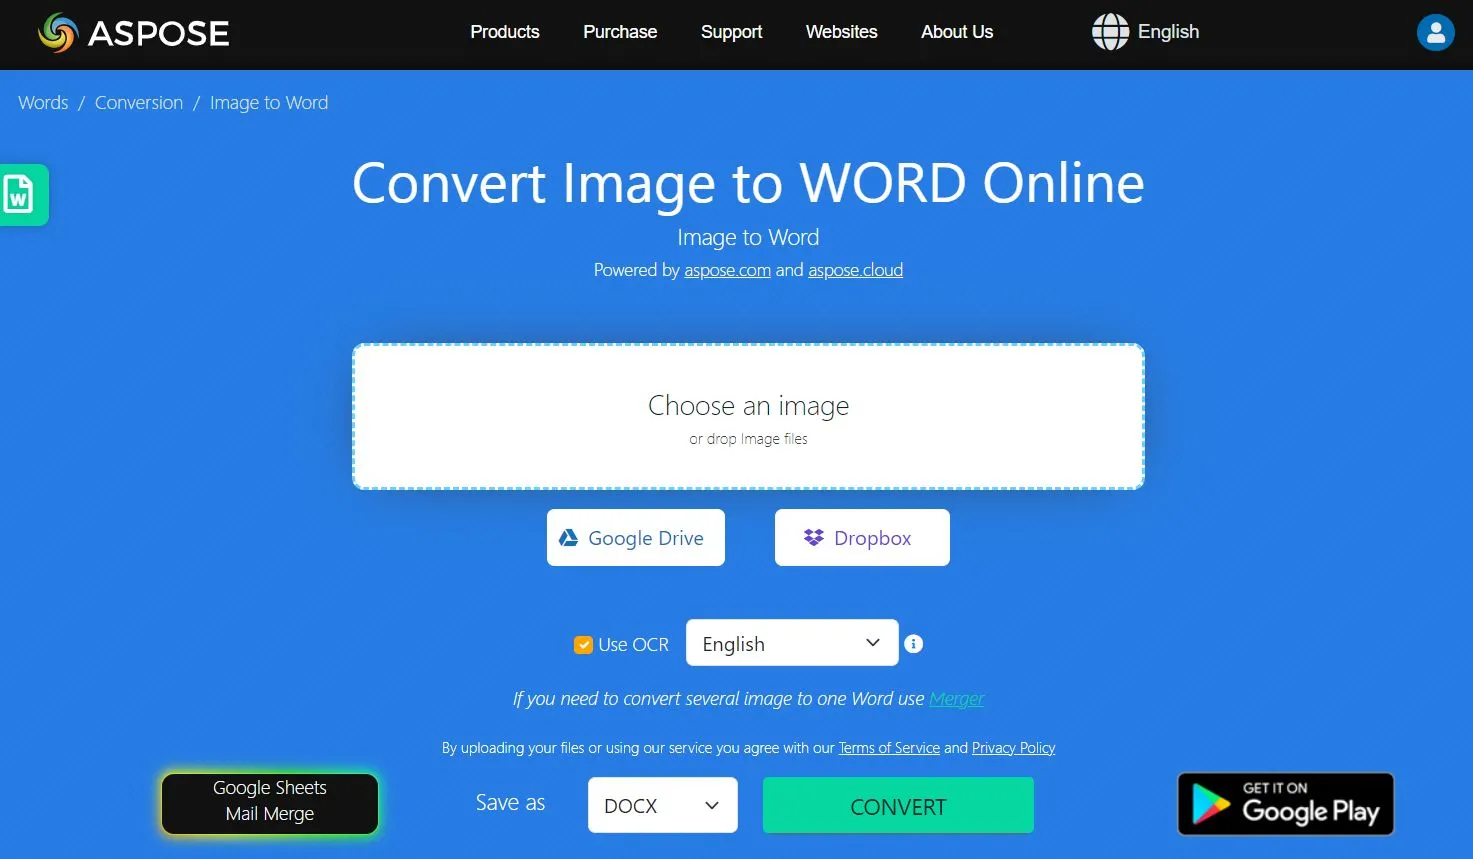
Step 1 - Select Screenshot
Navigate to the ASPOSE image to Word conversion tool, and select a screenshot by clicking on the "Choose an image" box. You can also drag and drop a screenshot onto this box. You can also choose to run OCR, and then select the preferred language. Click "Convert".
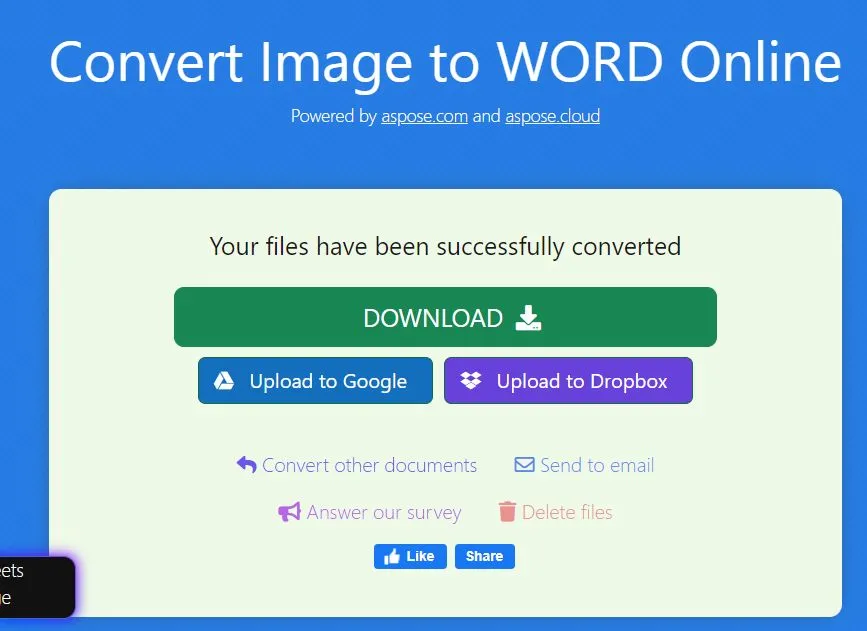
Step 2 - Download Word File
You may have to wait a few minutes for the file to convert, but when it's done, click the green "Download" button (you may have to sit through a short ad to download the file". You can also choose to upload the Word document to Google Drive or Dropbox or send the file via email.
Conclusion
After reading this article, you now know 5 easy ways to convert screenshot to Word. You can use UPDF to convert a single screenshot to a non-editable Word document, you can convert a single screenshot to an editable Word document, you can batch convert screenshots into Word documents, and you can convert many screenshots into one Word document. You can also use ASPOSE to convert screenshots into a Word document, although it doesn't have as many customization options.
If you're ready to try UPDF's conversion tools (along with its other amazing features), click the link below to download UPDF and start your free trial.
Windows • macOS • iOS • Android 100% secure
 UPDF
UPDF
 UPDF for Windows
 UPDF for Mac
 UPDF for iPhone/iPad
 UPDF for Android
 UPDF AI Online
 UPDF Sign
 Edit PDF
 Annotate PDF
 Create PDF
 PDF Form
 Edit links
 Convert PDF
 OCR
OCR PDF to Word
 PDF to Image
 PDF to Excel
 Organize PDF
 Merge PDF
 Split PDF
 Crop PDF
 Rotate PDF
 Protect PDF
 Sign PDF
 Redact PDF
 Sanitize PDF
 Remove Security
 Read PDF
 UPDF Cloud
 Compress PDF
 Print PDF
 Batch Process
 About UPDF AI
 UPDF AI Solutions
 AI User Guide
 FAQ about UPDF AI
 Summarize PDF
 Translate PDF
 Chat with PDF
 Chat with AI
 Chat with image
 PDF to Mind Map
 Explain PDF
 Scholar Research
 Paper Search
 AI Proofreader
 AI Writer
 AI Homework Helper
 AI Quiz Generator
 AI Math Solver
 PDF to Word
 PDF to Excel
 PDF to PowerPoint
 User Guide
 UPDF Tricks
 FAQs
FAQs UPDF Reviews
 Download Center
 Blog
Blog Newsroom
 Tech Spec
 Updates
 UPDF vs. Adobe Acrobat
 UPDF vs. Foxit
 UPDF vs. PDF Expert



 Enid Brown
 Grace Curry
 Engelbert White