While PDFs have changed the way we share documents and information, they’re not without their drawbacks. Because the PDF format is intended to preserve its original layout and content, it can be extremely difficult to make changes to these documents. Important documents are often in PDF forms and need to be filled out and signed. Luckily, there are ways to accomplish this. In this article, we’ll discuss how to write on a PDF form with online and offline methods.
Part 1. How to Type on a PDF Form on Mac/Windows via UPDF?
One of the simplest ways to write in a PDF form is to type it. Unfortunately, most PDF applications are limited to viewing only and don’t allow a user to click and type. However, UPDF offers software compatible with both Mac and Windows users. UPDF includes a comprehensive suite of PDF tools and features to meet all your PDF needs and scenarios including the ability to type on both fillable and nonfillable PDF forms. Get those documents filled out with ease today by downloading UPDF with the link below.
Windows • macOS • iOS • Android 100% secure
Way 1. Write on a Fillable PDF Form Directly
Before we dive deeper into the complexities of writing on PDF form, we should point out that many PDF documents are preformatted with fields that allow a user to click inside the field and begin typing. These are called fillable fields. If you’re lucky enough to be working with a document like this, here are the steps you can take to write on a PDF form with fillable fields.
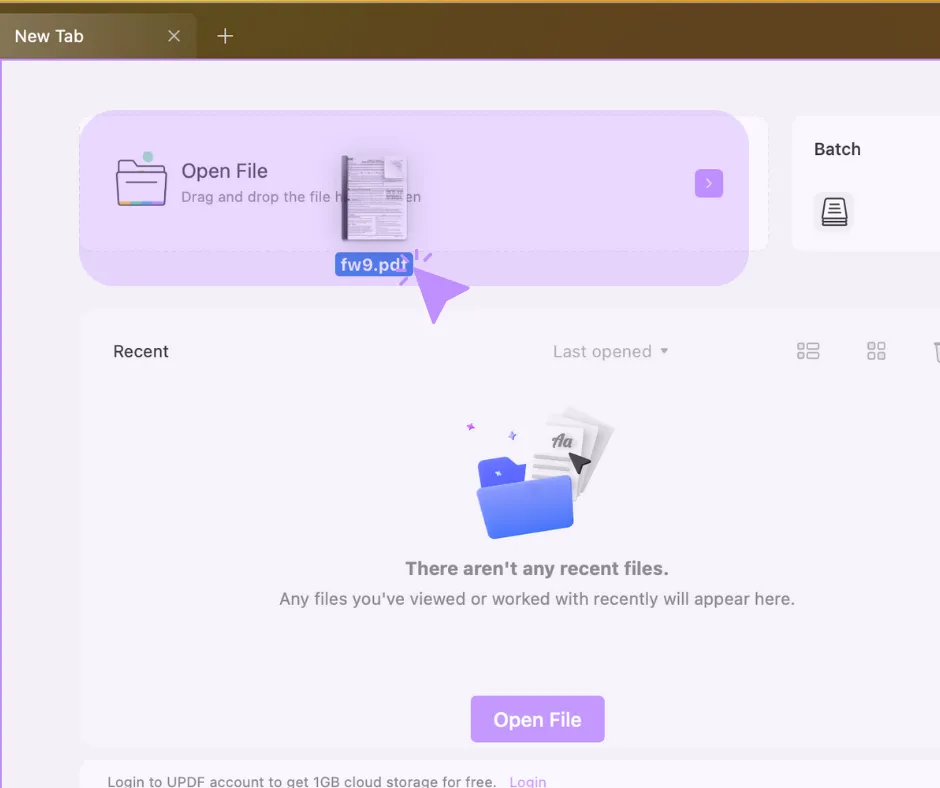
Step 1 - Launch UPDF and Open the PDF
To get started with UPDF, simply locate and open the UPDF application on whichever device and operating system (Mac or Windows 10) you’re using. With the application open, you can simply drag and drop your PDF document into the 'Open File’ section at the top of the window. Alternatively, you can click the purple arrow button to launch the open file function and select your file from the storage location on your device.
Step 2 - Open the 'Comment’ Mode
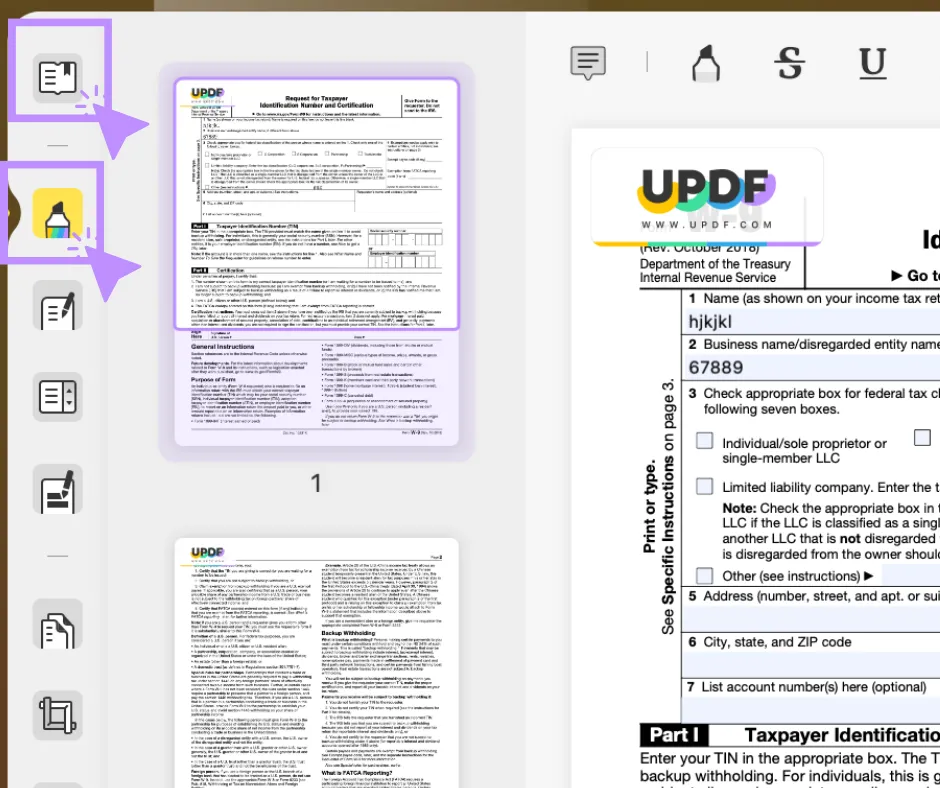
In order to type in a fillable field, you’ll need to work in either the 'Reader’ mode or the 'Comment’ mode. When you open the file, UPDF will automatically open the file in 'Comment’ mode. However, if you have any trouble or get lost, you can open the 'Reader’ mode or the 'Comment’ mode by locating the icons in the lefthand icon menu.
Step 3 - Type in the Fillable Fields
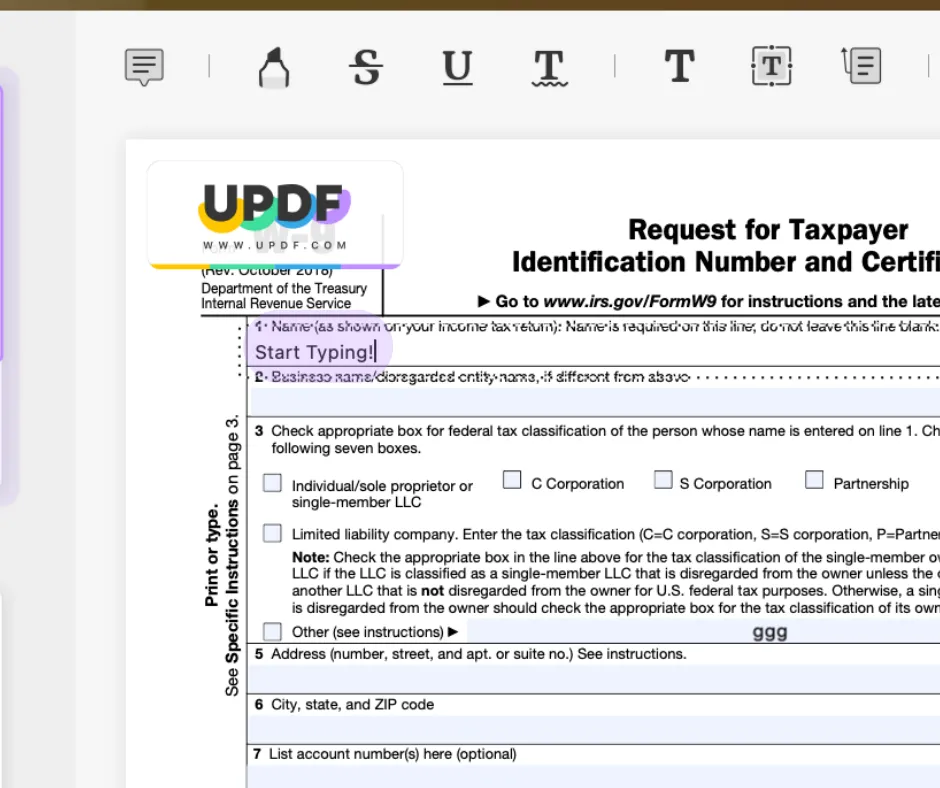
With the document opened in either 'Reader’ mode or 'Comment’ mode, the next step is to simply click inside the field you wish to type in and begin typing.
Way 2. Write on a Non-Fillable PDF Form With The Help of Form Field Recognition
As previously mentioned, not all PDF forms are preformatted with fillable form fields. Luckily, UPDF has a simple, easy-to-use feature that quickly turns those non-fillable form fields into fillable fields. Just follow these simple steps.
Step 1 - Open the 'Prepare Form’ Mode
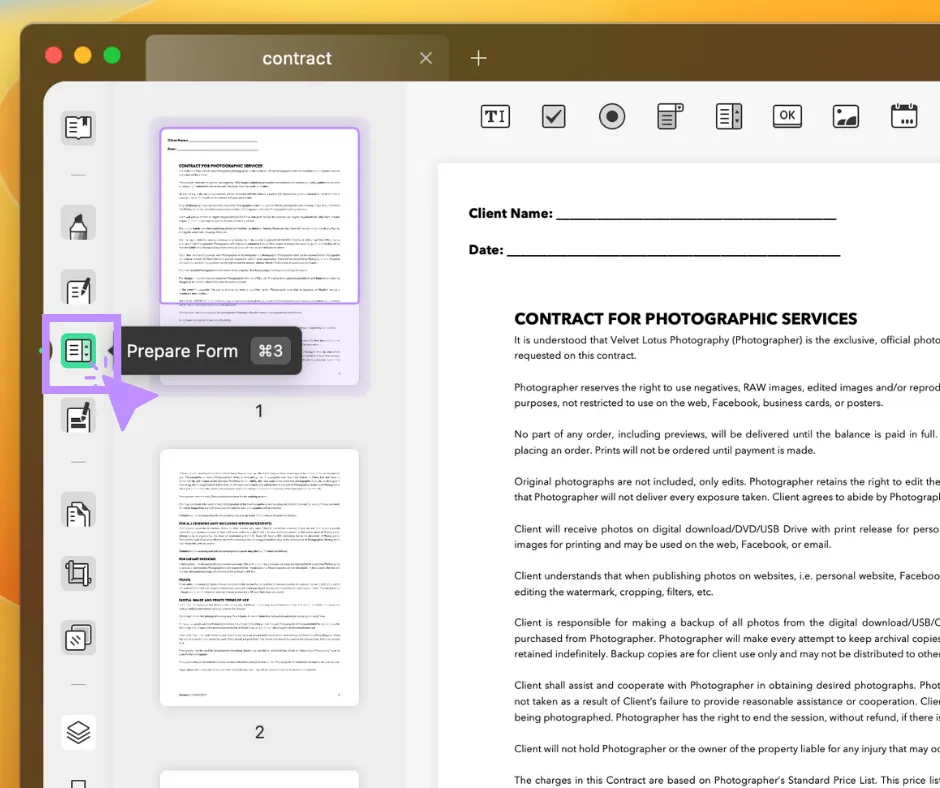
In order to type in a non-fillable field, you’ll need to work in 'Prepare Form’ mode located in the lefthand icon menu.
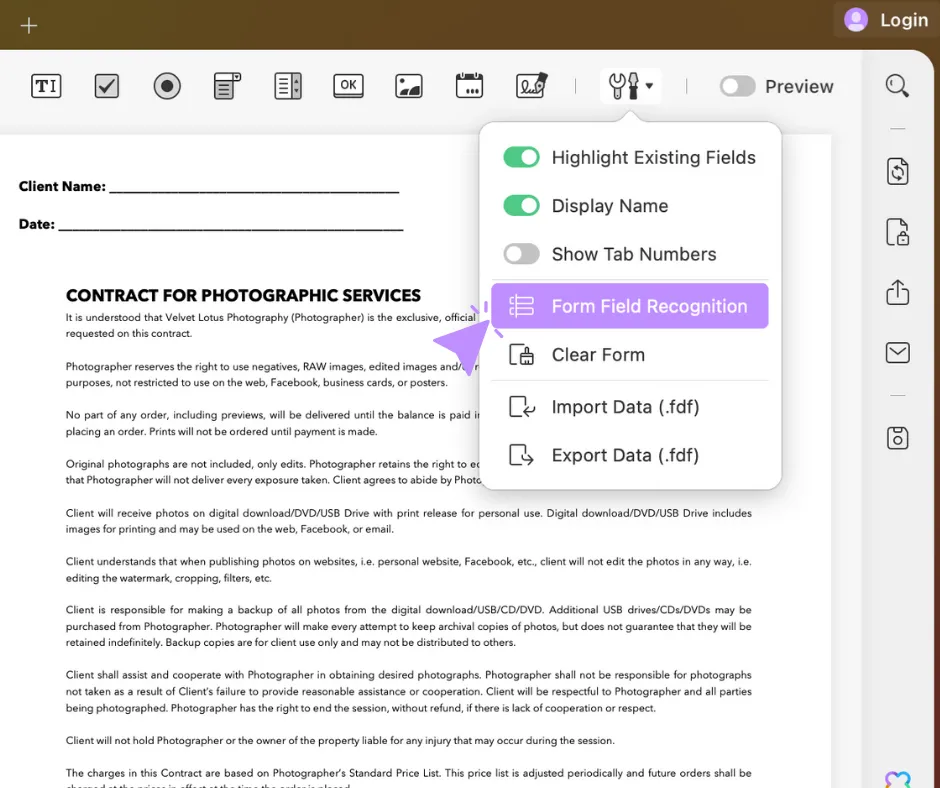
Step 2 - Use the Form Field Recognition Tool to Create Fillable Fields
Next, locate the Form Field Recognition Tool in the dropdown menu under the additional tools icon in the top toolbar. Click on 'Form Field Recognition’.
Step 3 - Enable the Preview Setting
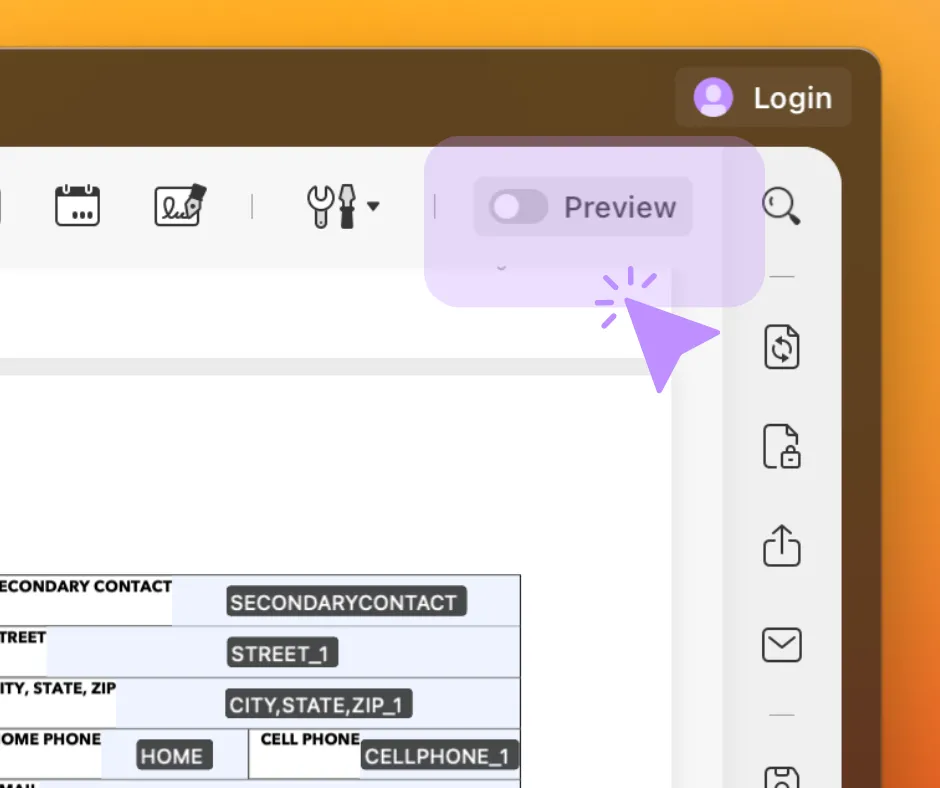
Now, you’ll see that UPDF has automatically scanned your PDF document for fillable fields and created the fillable form field for each one with the ability to type in them. However, you’ll need to enable the 'Preview’ setting before you can type. Locate the 'Preview’ setting in the top toolbar on the far righthand side and click on it.
Step 4 - Type in the Fillable Fields
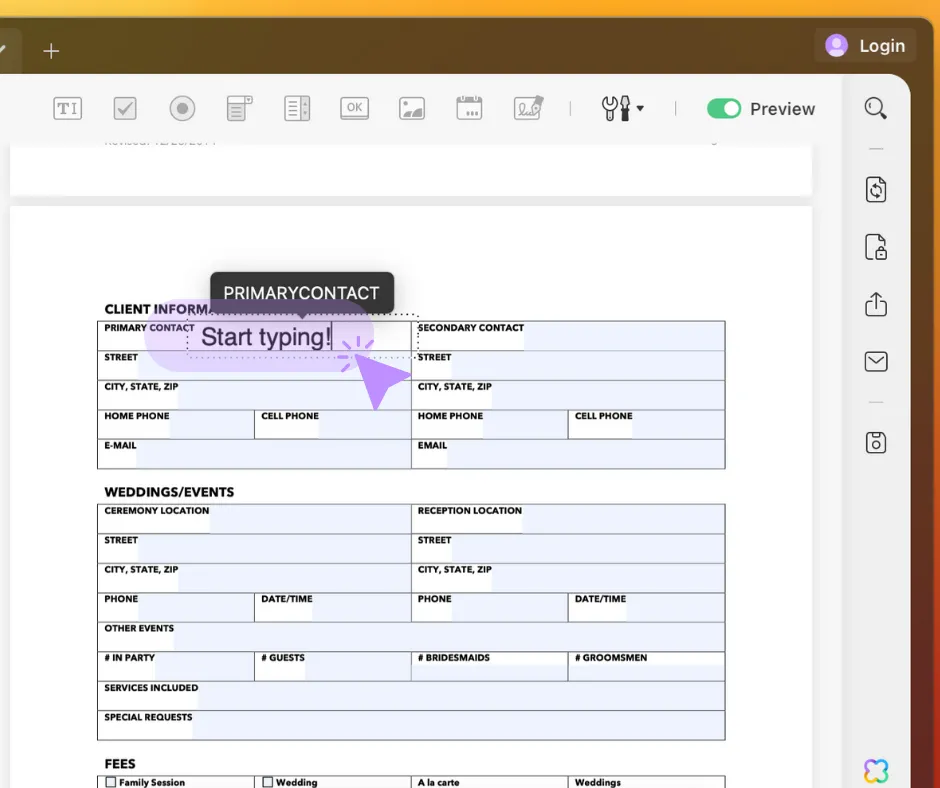
Now, you can simply click on one of the fillable form fields and begin typing.
Way 3. Type on Non-Fillable PDF Form With Adding Text Field
While the previous two methods will satisfy most needs, there may be instances where you’ll need to manually add a fillable form field like when you may need to add information where there is no pre-defined space. Download UPDF here and use the following steps to manually create and add a fillable form field.
Windows • macOS • iOS • Android 100% secure
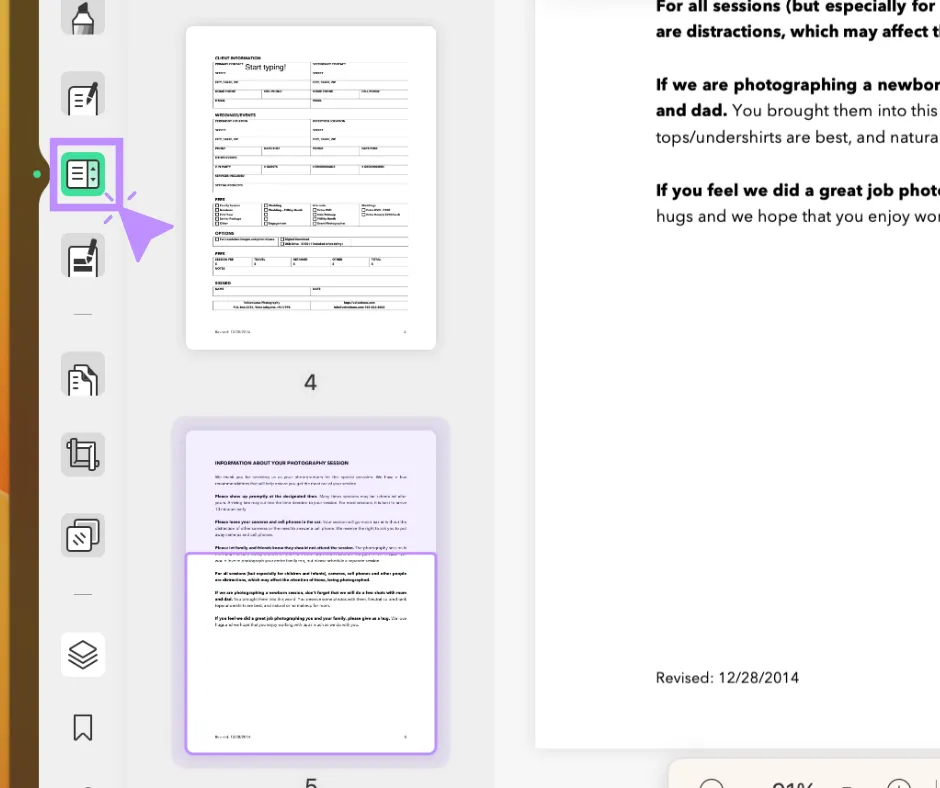
Step 1 - Open the 'Prepare Form’ Mode
Just like in the previous method for a non-fillable field, you’ll need to work in 'Prepare Form’ mode located in the lefthand icon menu.
Step 2 - Access the Text Field Tool
To manually add a fillable form field, locate the 'Text Field’ tool in the top toolbar at the far left and click it.
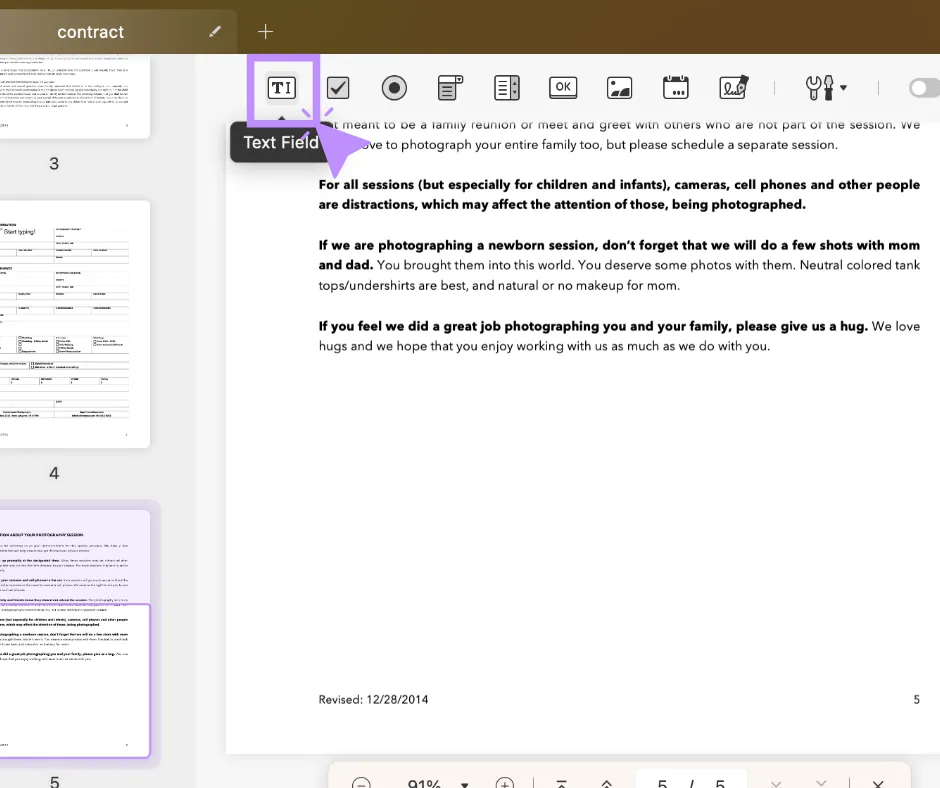
Step 3 - Create a Text Field
Using the Text Field tool, choose a place in the document where you’d like to place the new text field. Click and drag across the screen to create the new text field.
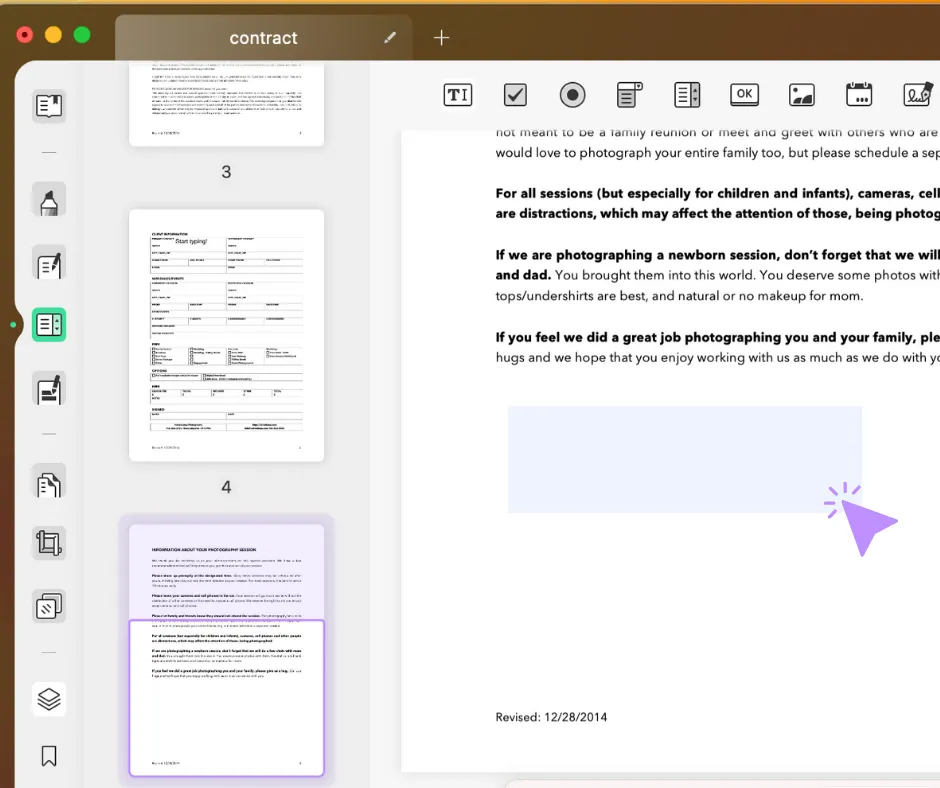
Step 4 - Enable the Preview Setting
You should now see the text field you just created. However, as in the previous method, you’ll need to enable the 'Preview’ setting before you can type. Locate the 'Preview’ setting in the top toolbar on the far righthand side and click on it.
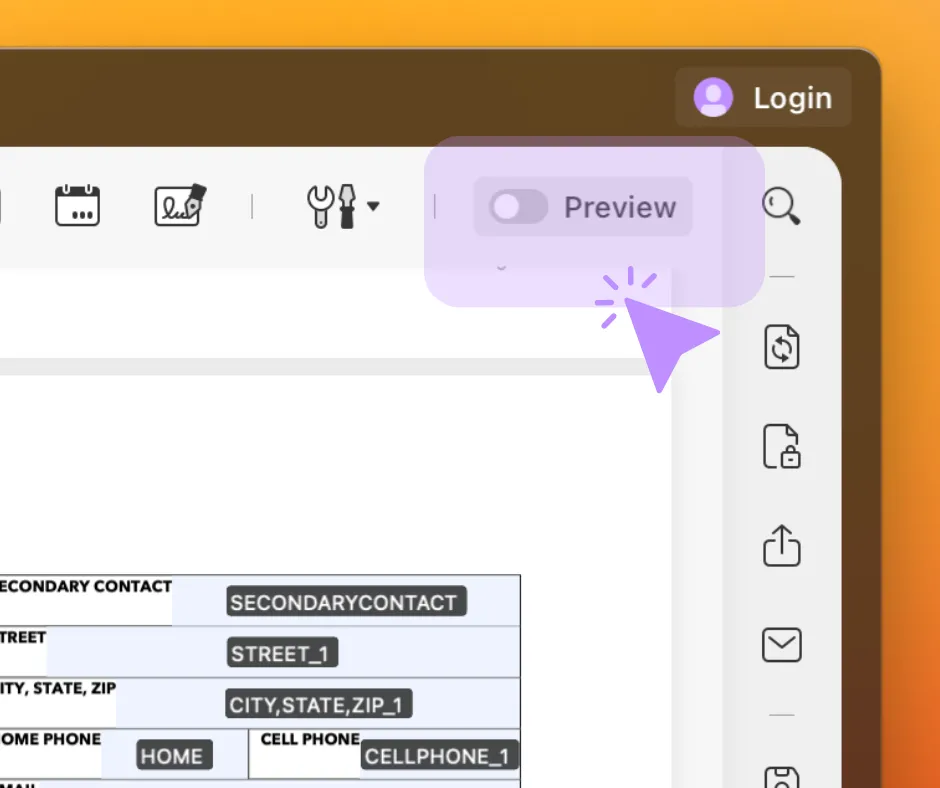
Step 5 - Type in the Fillable Fields
Now, you can simply click on the fillable form field you just created and begin typing.
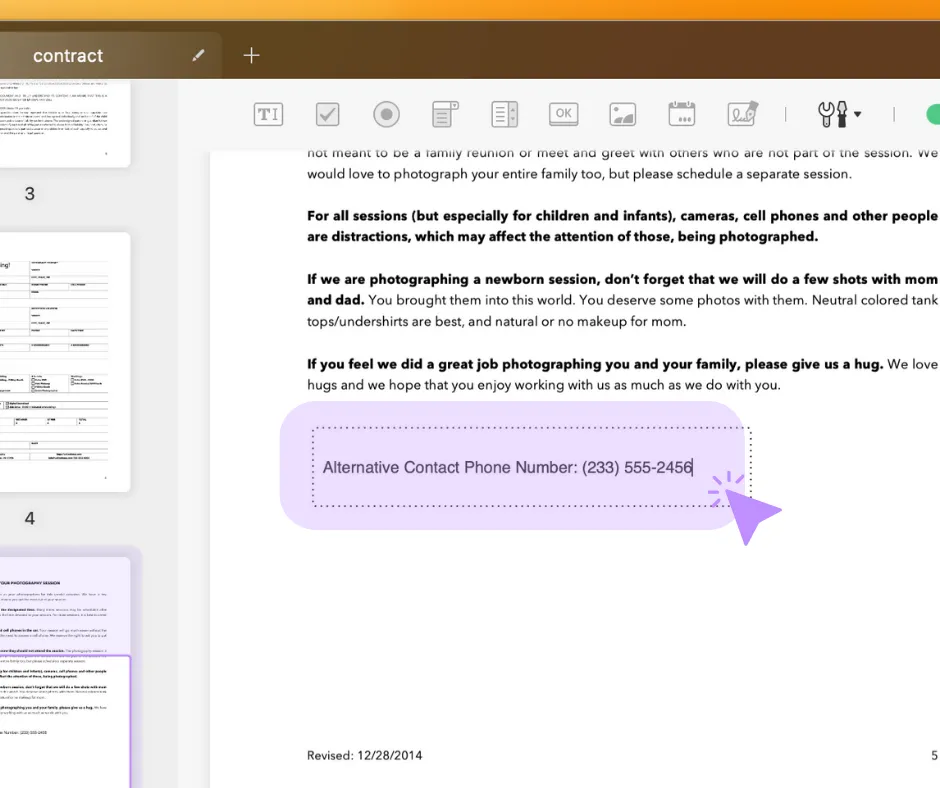
Way 4. Type on a Non-Fillable PDF Form By Adding a Text Box
While the previous three methods will enable a user to fill in empty form boxes, some situations might require adding a text box to a PDF document, for example, adding notes or comments while annotating a document. Follow these steps to create a text box anywhere in your document.
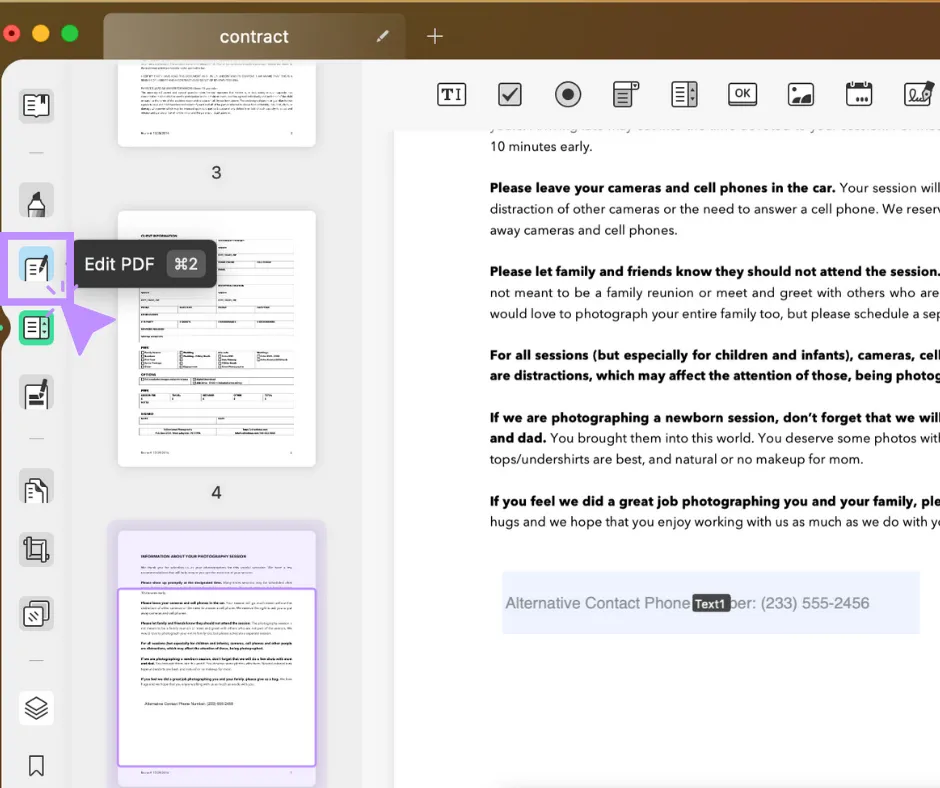
Step 1 - Open the 'Edit PDF’ Mode
When creating a text box, you’ll need to work in 'Edit PDF’ mode. Open 'Edit PDF’ mode by locating the 'Edit PDF’ icon in the lefthand icon menu.
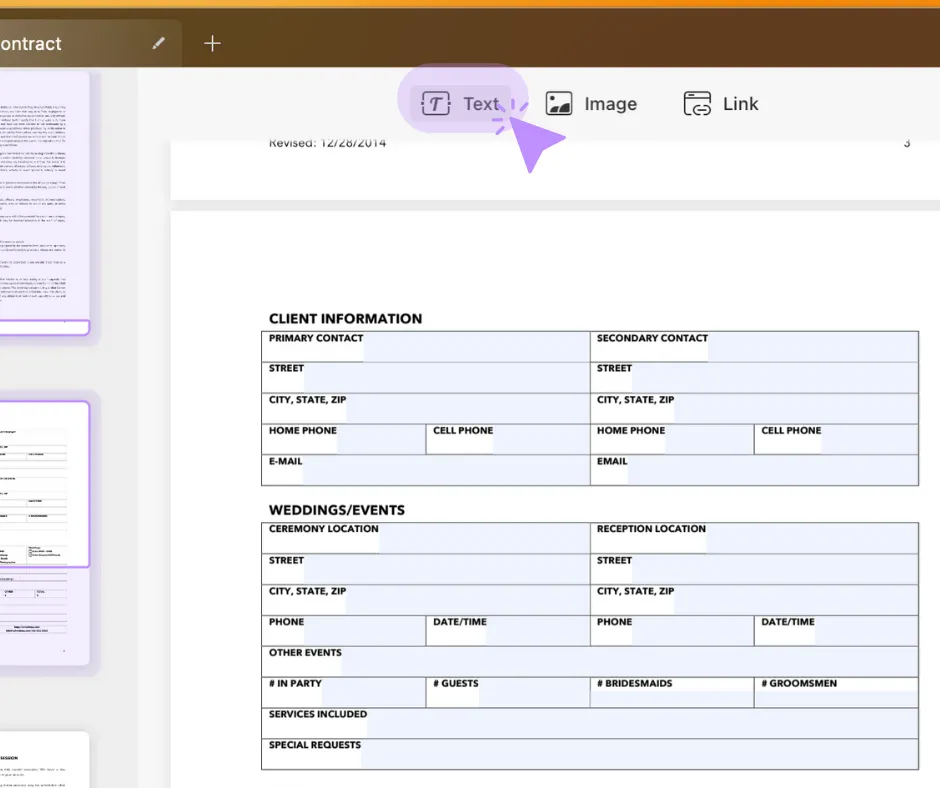
Step 2 - Locate the Text Box Tool
With the document opened in 'Edit PDF’ mode, the next step is to locate the 'Text Box’ tool in the top toolbar.
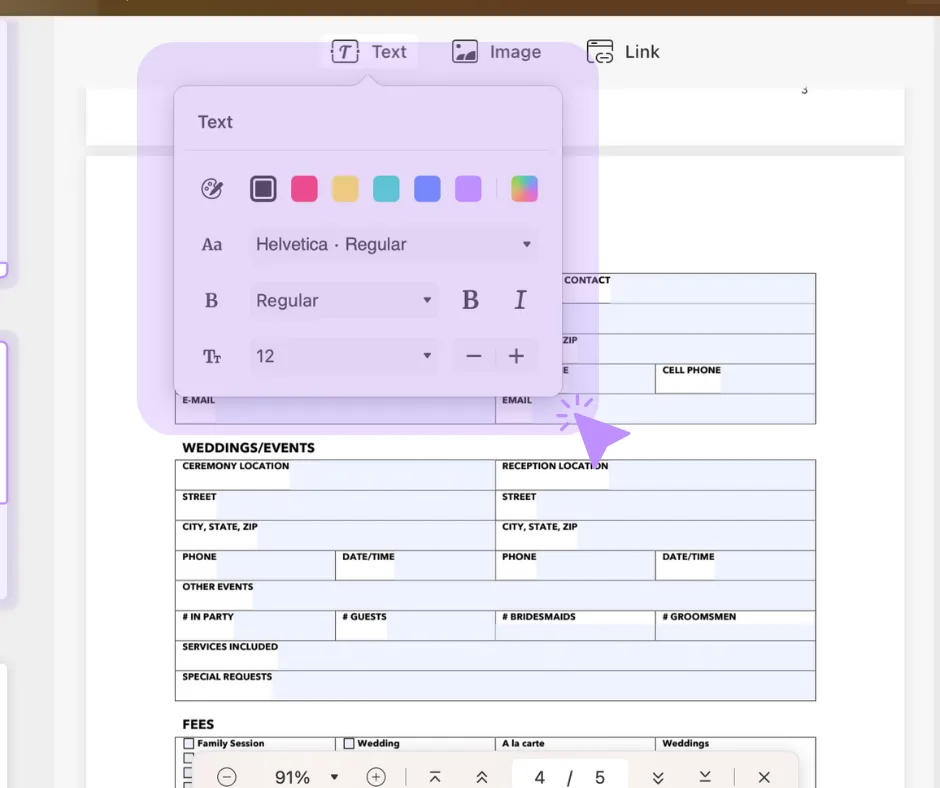
Step 3 - Select Font Settings
Clicking on the 'Text Box’ tool will open a dropdown menu where you can change your font settings including the font, style, size, and color.
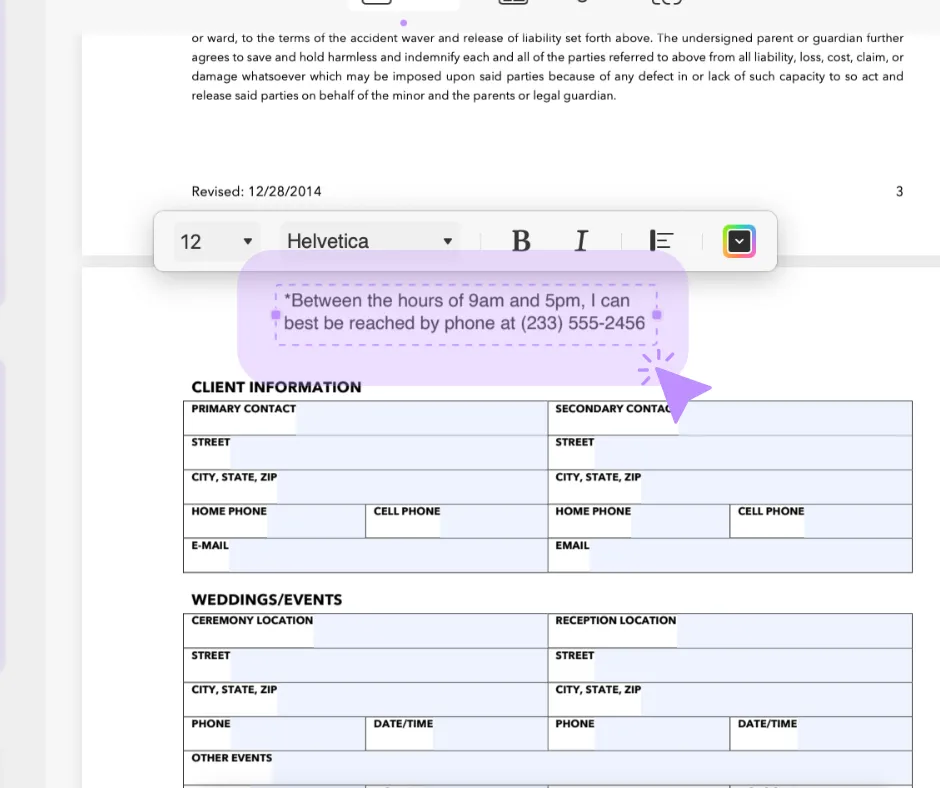
Step 4 - Create a Text Box
To create the text box, click anywhere on the document where you’d like to add text. When you’ve clicked on the document using the 'Text Box’ tool, you will create a text box. Once you’ve accomplished this, you can now type inside the box.
In addition to its ability to type in PDFs with fillable and non-fillable forms, UPDF also comes with several other features. Additional UPDF features enable users to:
- Edit Additional Elements Such as Images, Links, Watermarks, and More
- Annotate Documents with Highlighting and Marking Tools
- Boost Productivity with AI Tools to Simplify Tasks and Execute Them Quickly
- Convert PDFs to Various Formats
- Text Translation with OCR PDF Technology
- Utilize Batch PDF Functions for Repetitive Tasks
- Organize PDFs to Rearrange and Modify Pages with Ease
- Compress PDFs to Reduce the File Size
- Fill and Sign PDF Forms in Seconds
- Store and Access Documents Anytime Anywhere with UPDF Cloud
- Protect PDFs with Powerful Security Tools
You can learn more about UPDF’s features and tools by reading the following review at How to Geek or check out this video review and tutorial on YouTube.
Also, you can click the below button to test all features on your own. And when you like UPDF and would like to upgrade to pro version, you can click the below button.
Windows • macOS • iOS • Android 100% secure

Part 2. How to Write on a PDF Form Online Via PDFFiller?
While UPDF offers a ton of useful tools and functions, some may prefer to avoid downloading software and simply utilize an online tool. PDFFiller provides a simple PDF service that allows users to fill PDF forms using their web browser. To fill a PDF form online with PDFFiller, follow these steps.
Step 1 - Go to PDFFiller’s Website
Use the address bar to visit pdffiller.com.

Step 2 - Open the PDF
Like with UPDF, you can simply drag and drop your PDF into the PDFFiller drag-and-drop window to open the document.
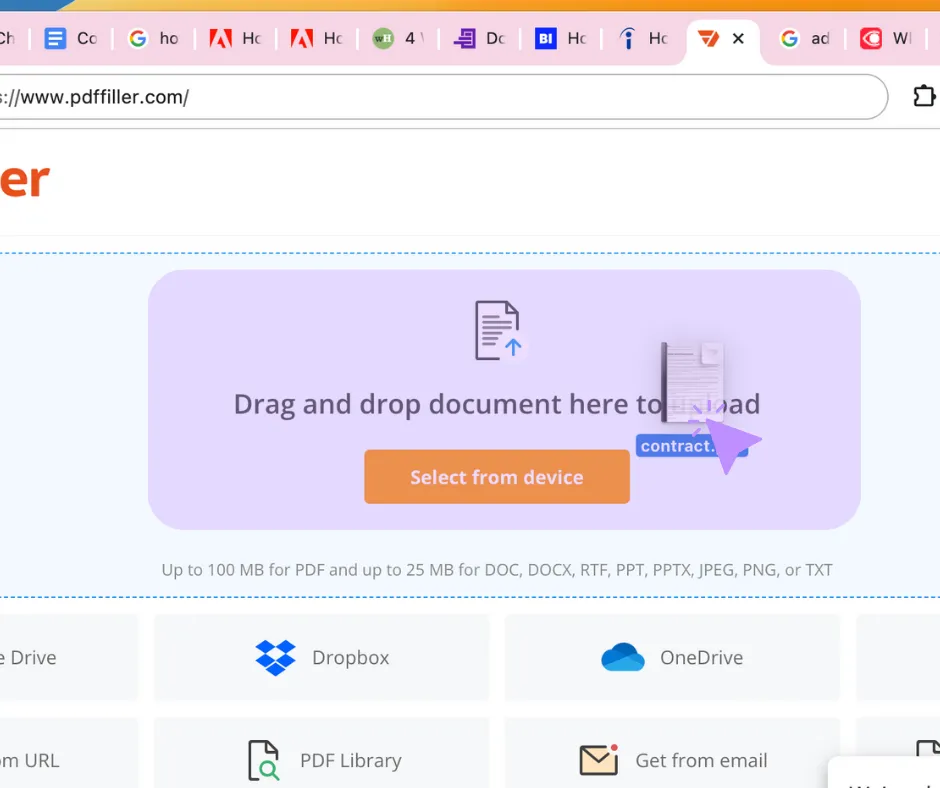
Step 3 - Use PDFFiller Tools to Fill PDF Forms
PDFFiller has a few different methods for filling both fillable and non-fillable PDF forms.
Option 1: PDFFiller will show fillable form fields in organe. To add text to a fillable form field, hover over the field, click, and you can begin typing in the field.
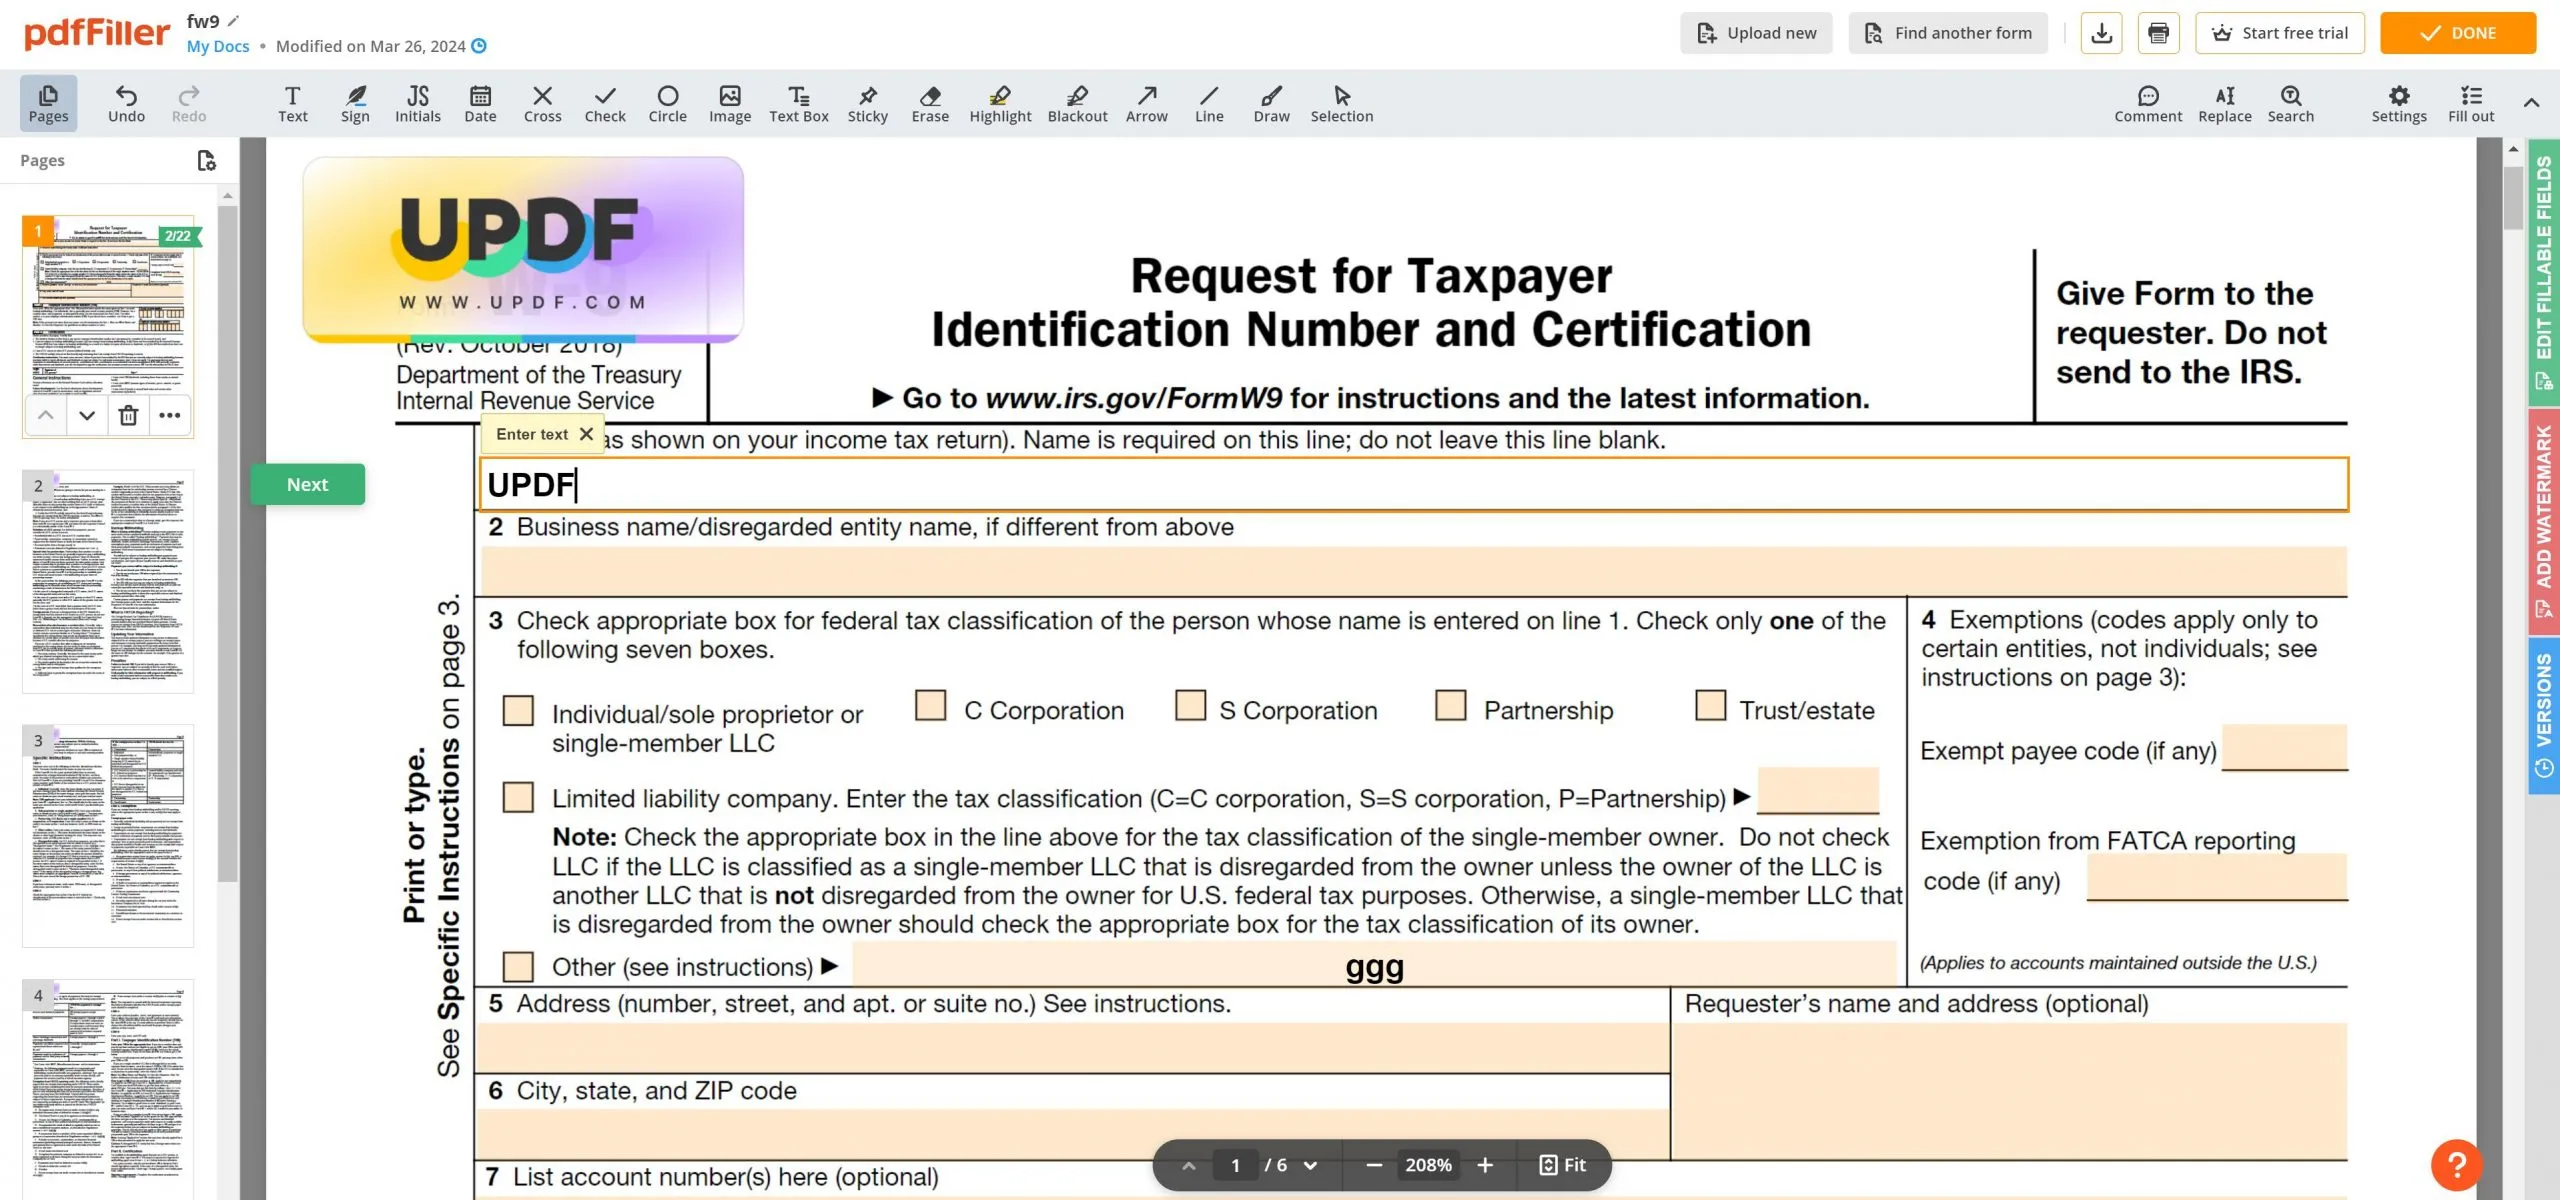
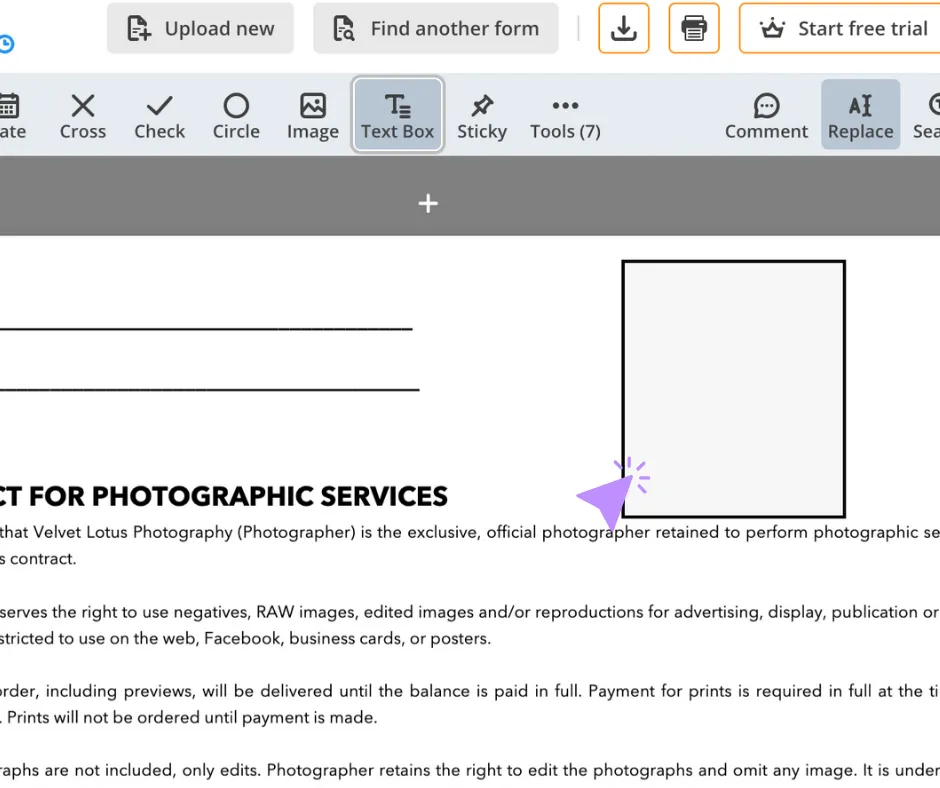
Option 2: If you have a non-fillable form, you can also use PDFFiller to add your own text box. Locate the 'Text Box’ tool in the toolbar at the top of the window, and click anywhere on the document where you’d like to add the text.
Part 3. Which Method is Better to Write on a PDF Form
While both, UPDF and PDFFiller, can be used to type on a PDF form along with some other similarities, there are some key differences, too.
| Items | UPDF | PDFFiller |
| Type on Fillable PDF Forms | ||
| Write on Non-fillable PDF Forms by adding Text Boxes | ||
| Write on Non-fillable PDF Forms Via Adding Text Field | — | |
| Write on Non-fillable PDF Forms Via Form Field Recognition | — | |
| Create PDF Forms | ||
| Edit PDF Forms | ||
| AI Features | — | |
| Convert PDF | ||
| Annotate PDF | ||
| Compress PDF |
UPDF and PDFFiller both offer an excellent selection of tools to serve most PDF needs. However, PDFFiller does not offer an AI feature and cannot meet all your PDF form typing requirements. UPDF’s AI tool, powered by GPT-5, can supercharge PDF productivity with functions like quickly summarizing main ideas, translating text, defining difficult terms and concepts, and even chatting with users about any content. Without AI functionality, UPDF has the edge over PDFFiller.
Final Words
Now, you know how to type on PDF form by using the online and offline methods. However, compared with online method, we recommend you to use the offline method – UPDF as it has all features you need to type on PDF form.
If you’re ready to type on PDF form quickly and work more on PDF document, get started using UPDF and its GPT-5 powered AI features by downloading with the link below.
Windows • macOS • iOS • Android 100% secure
 UPDF
UPDF
 UPDF for Windows
 UPDF for Mac
 UPDF for iPhone/iPad
 UPDF for Android
 UPDF AI Online
 UPDF Sign
 Edit PDF
 Annotate PDF
 Create PDF
 PDF Form
 Edit links
 Convert PDF
 OCR
OCR PDF to Word
 PDF to Image
 PDF to Excel
 Organize PDF
 Merge PDF
 Split PDF
 Crop PDF
 Rotate PDF
 Protect PDF
 Sign PDF
 Redact PDF
 Sanitize PDF
 Remove Security
 Read PDF
 UPDF Cloud
 Compress PDF
 Print PDF
 Batch Process
 About UPDF AI
 UPDF AI Solutions
 AI User Guide
 FAQ about UPDF AI
 Summarize PDF
 Translate PDF
 Chat with PDF
 Chat with AI
 Chat with image
 PDF to Mind Map
 Explain PDF
 Scholar Research
 Paper Search
 AI Proofreader
 AI Writer
 AI Homework Helper
 AI Quiz Generator
 AI Math Solver
 PDF to Word
 PDF to Excel
 PDF to PowerPoint
 User Guide
 UPDF Tricks
 FAQs
FAQs UPDF Reviews
 Download Center
 Blog
Blog Newsroom
 Tech Spec
 Updates
 UPDF vs. Adobe Acrobat
 UPDF vs. Foxit
 UPDF vs. PDF Expert





 Enola Miller
 Engelbert White

 Lizzy Lozano