 UPDF for Windows
 UPDF for Mac
 UPDF for iPhone/iPad
 UPDF for Android
 Nomostar
 UPDF AI Online
 UPDF Sign
 IvyCraft
 Edit PDF
 Annotate PDF
 Create PDF
 PDF Form
 Edit links
 Convert PDF
 OCR
OCR PDF to Word
 PDF to Image
 PDF to Excel
 Organize PDF
 Merge PDF
 Split PDF
 Crop PDF
 Rotate PDF
 Protect PDF
 Sign PDF
 Redact PDF
 Sanitize PDF
 Remove Security
 Read PDF
 UPDF Cloud
 Compress PDF
 Print PDF
 Batch Process
 About UPDF AI
 UPDF AI Solutions
 AI User Guide
 FAQ about UPDF AI
 Summarize PDF
 Translate PDF
 Chat with PDF
 Chat with AI
 Chat with image
 PDF to Mind Map
 Explain PDF
 PDF AI Tools
 Image AI Tools
 AI Chat Tools
 AI Writing Tools
 AI Study Tools
 AI Working Tools
 Other AI Tools
 AI Bookmark Generation
 AI Bookmark Summary
 AI Watermark Generation
 AI Background Generation
 AI Sticker Generation
 AI Stamp Generation
 AI Editing Suite
 UPDF Copilot
 AI Page Management
 AI Semantic Search
 PDF to Word
 PDF to Excel
 PDF to PowerPoint
 User Guide
 UPDF Tricks
 FAQs
FAQs UPDF Reviews
 Download Center
 Blog
Blog Newsroom
 Tech Spec
 Updates
 UPDF vs. Adobe Acrobat
 UPDF vs. Foxit
 UPDF vs. PDF Expert
Anyone can easily tamper with local clocks, casting doubt on the accuracy of the timestamp embedded within the PDF. Moreover, documents with these local timestamps will not hold up in legal cases. You can use global timestamp servers to synchronize your PDF documents with reliable atomic clocks to avoid such issues. Combining digital signatures and date stamps will provide extra verification that the document’s content is not being altered.
However, you need an efficient PDF editor to add timestamps to your documents for verification purposes. So, this article will solve your confusion about how to create a digital signature in PDF with a timestamp. If you find the steps are too complex, we also introduce a simple and cost-effective tool - UPDF to help you add a digital signature to PDF. Try it now.
Windows • macOS • iOS • Android 100% secure
Way 1. How to Add Timestamp Server in PDF Document Using Adobe?
Adobe Acrobat helps its users verify the documents by allowing them to add timestamp servers. To do so, you have to access the signature preferences settings of this PDF document editor. In addition, you can import or paste timestamp servers to Adobe within the server settings to boost your document's credibility.
Moreover, you are allowed to set a particular server as default to save future documents with a specific timestamp. Let's analyze the steps to add date and time servers to documents using Adobe Acrobat:
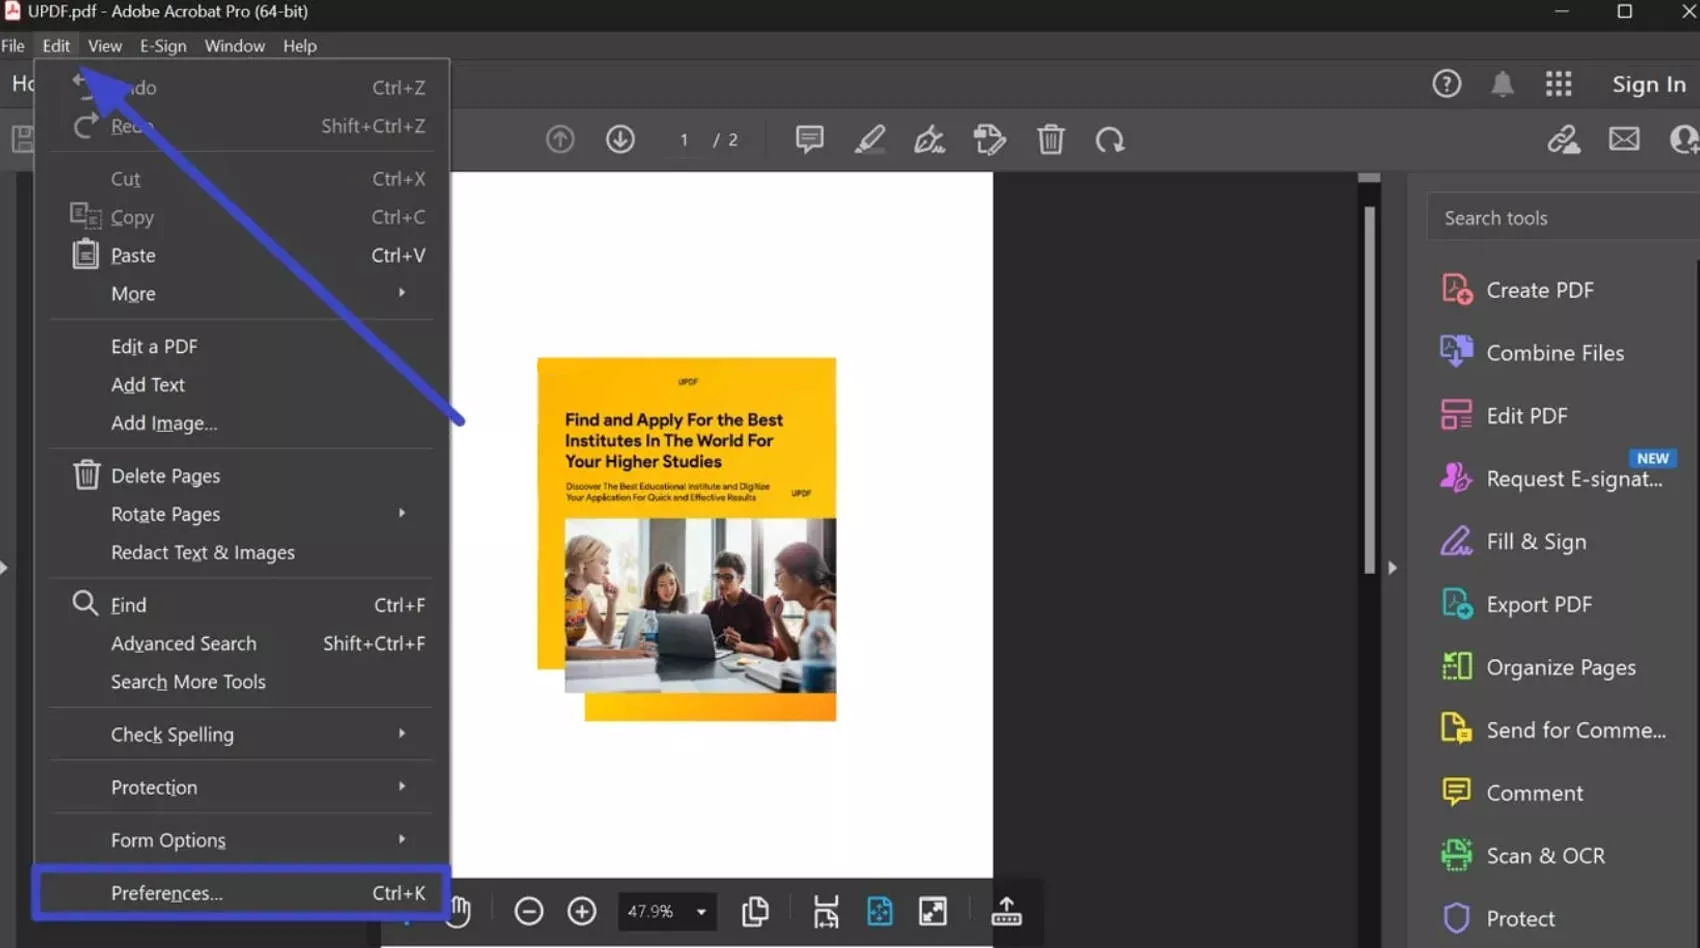
Step 1: After opening the PDF document, click the "Edit" tab to access a new drop-down menu. On this menu, choose the "Preferences" option to enter a new window with several preferences settings.
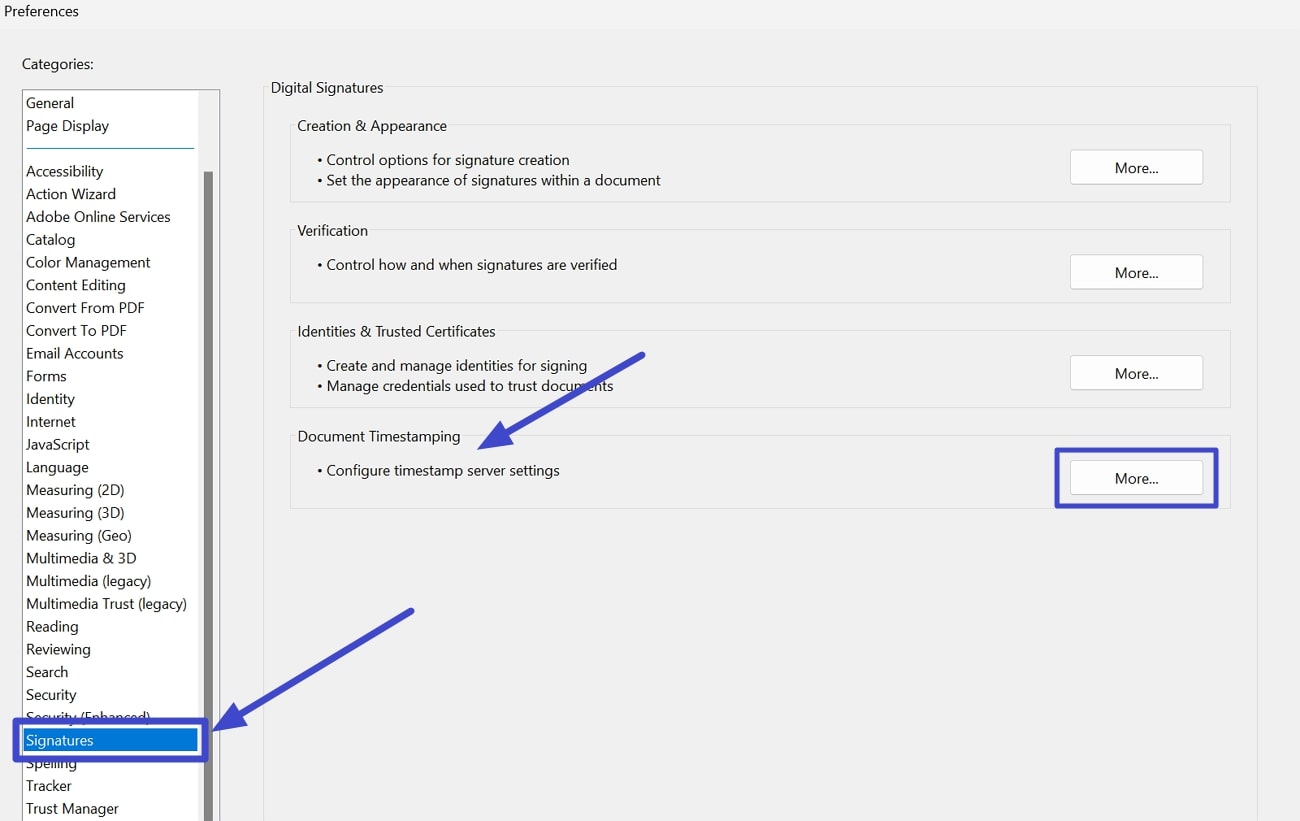
Step 2: Now, hit the "Signatures" tab on the left side of your screen under the "Categories" section. Afterward, press the "More" button in front of the "Configure Timestamp Server Settings" option to add a new server for document verification.
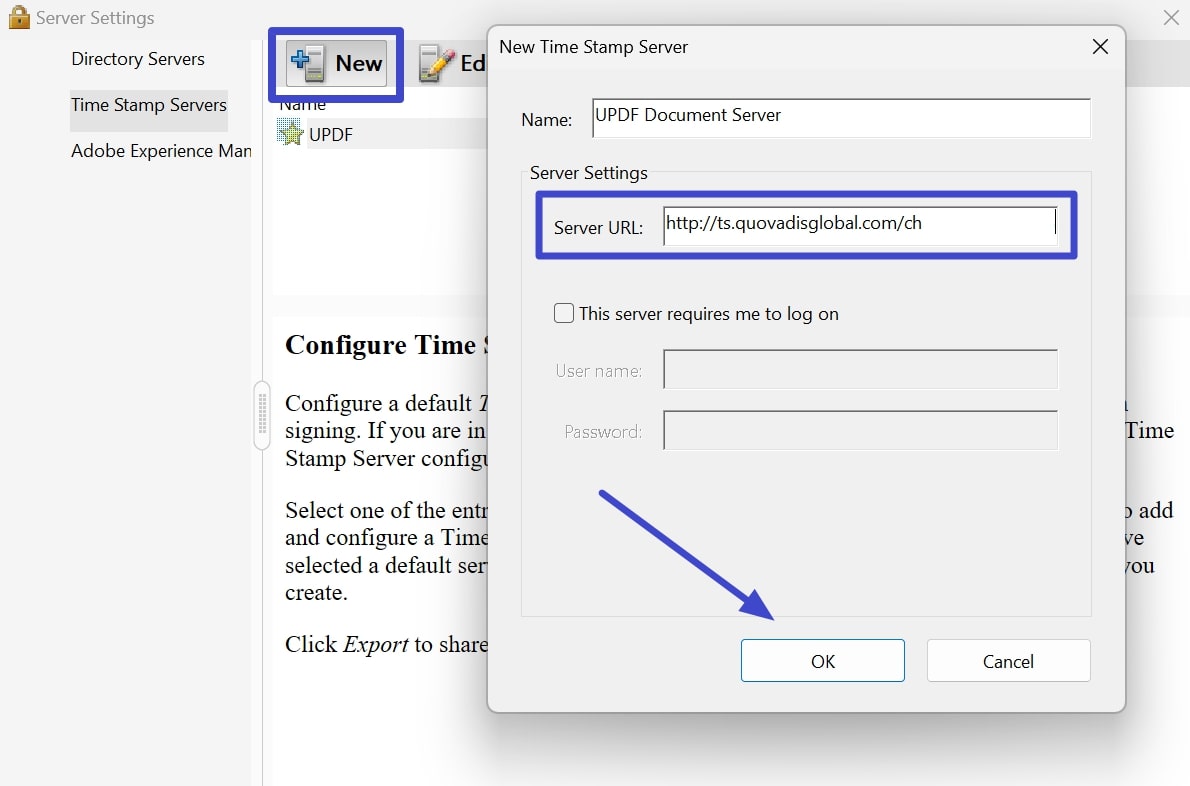
Step 3: Upon accessing the "Server Settings" window, click the "New" button. By doing so, you will access a new pop-up settings window where you can write names for your server. Then, simply paste the server link in the "Server URL" text box. Optionally, you will also be able to add a username or password to the server. Once you finish all these settings, hit the "OK" button to move forward.
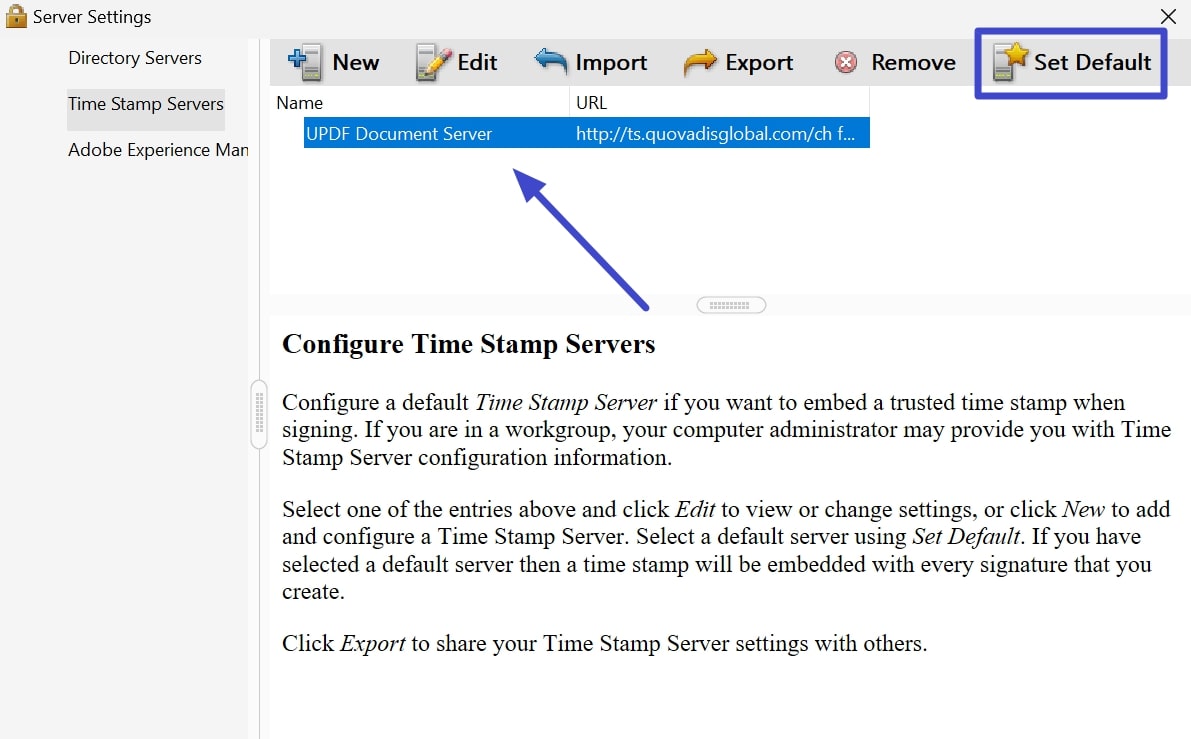
Step 4: Next, click on the recently added timestamp server after reaching the "Server Settings" window again. Moving forward, press the "Set Default" button to save this server for future document verification. By doing so, you will see a star appearing beside the name of your selected server.
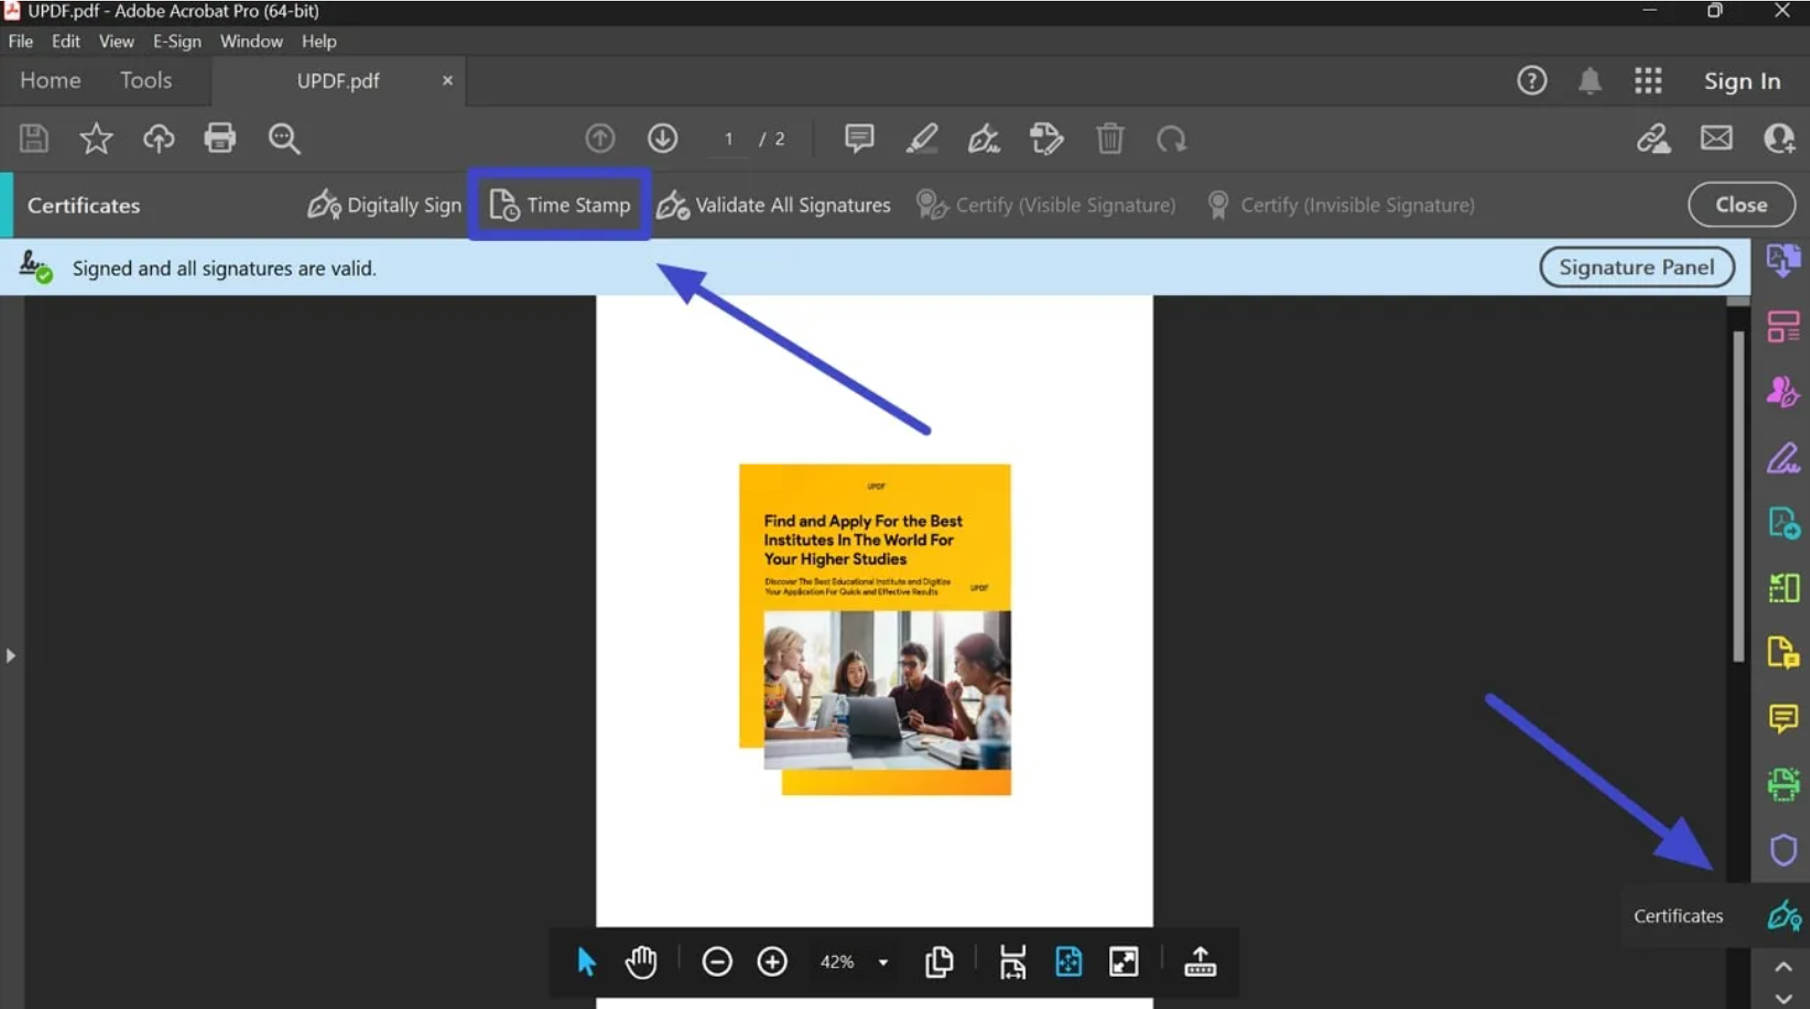
Step 5: Once you have added the timestamp server to Adobe Acrobat, access the "Certificates" feature and hit the "Time Stamp" option on the newly appeared toolbar. This will allow you to save the timestamped document on your device.
Way 2. How to Add Timestamp Server URL for Foxit?
Foxit is another PDF editor that allows you to attach signature and date stamps to documents. With this tool, you can add or edit server URLs to authenticate your PDF files for legal use. In addition, it lets you remove any expired or inaccurate servers from the document to replace them with better ones.
After saving the document with a timestamp, you can observe the added servers through this tool's signature panel. Therefore, without wasting any time, go through these steps to insert a timestamp server URL for Foxit:
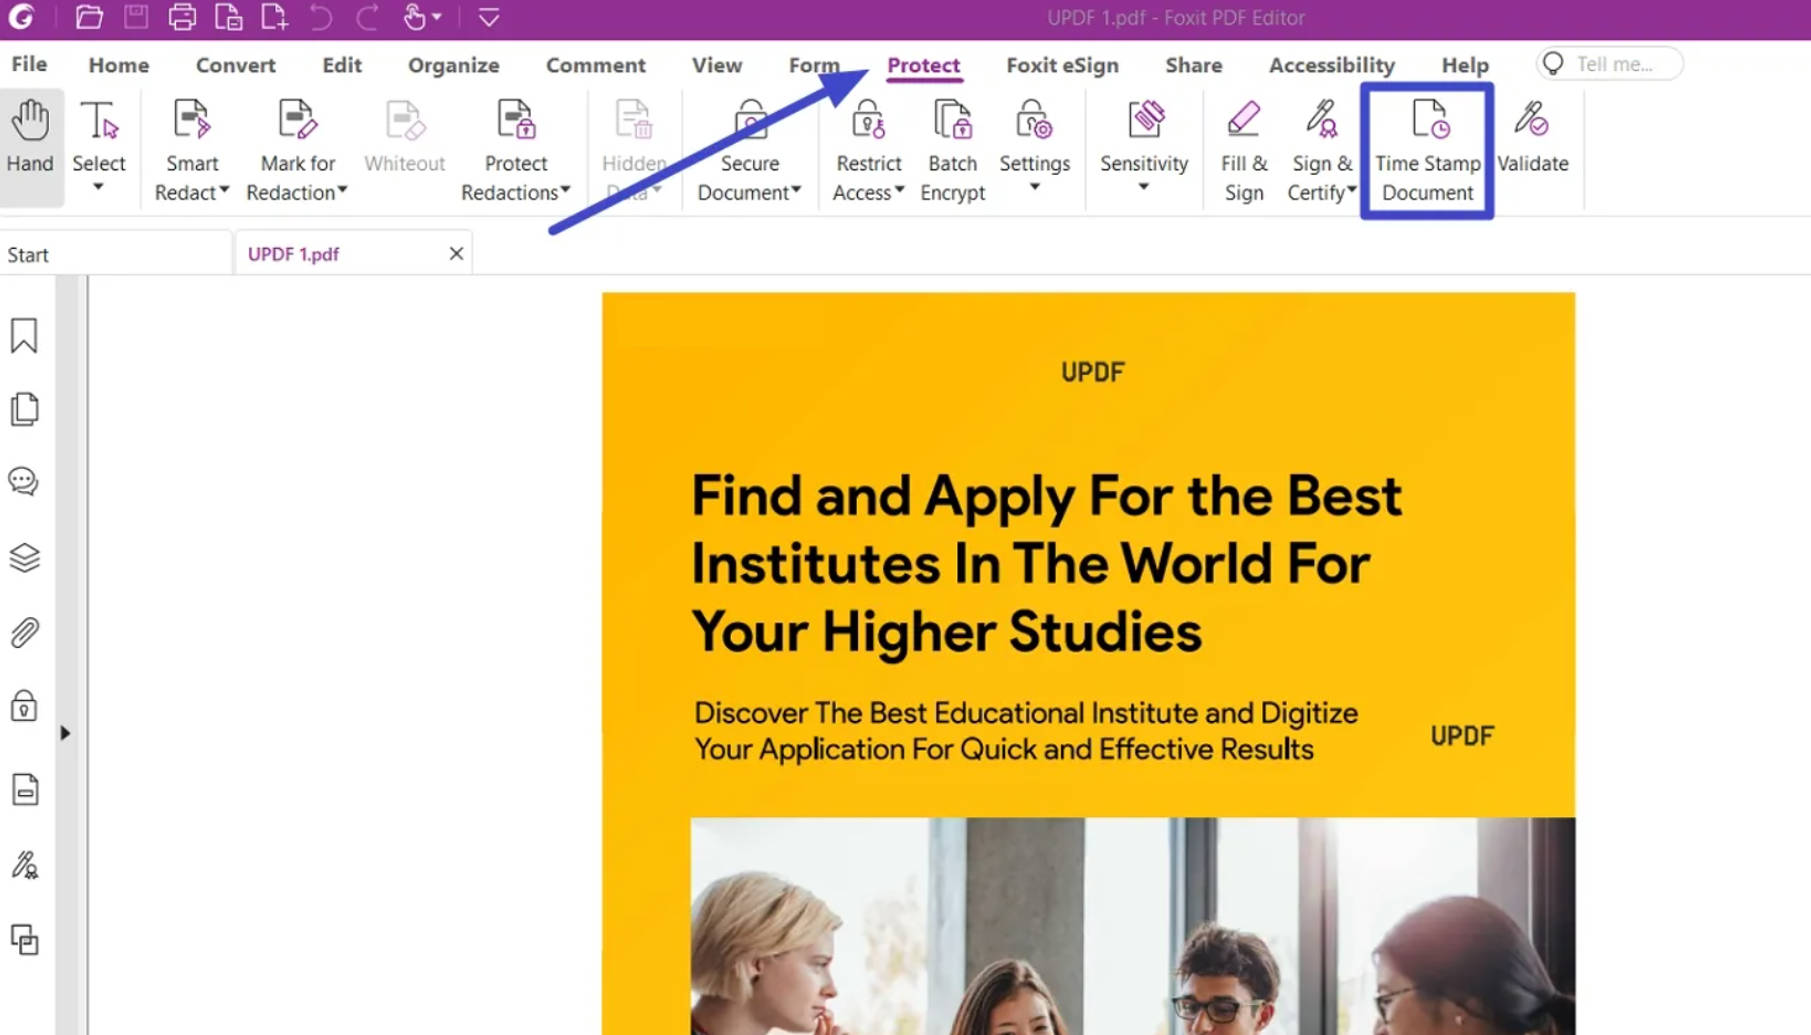
Step 1: First, open your desired document with the Foxit PDF editor to start the document authentication process. Now, access the "Protect" tab from the top panel and click the "Time Stamp Document" feature to open a new pop-up window.
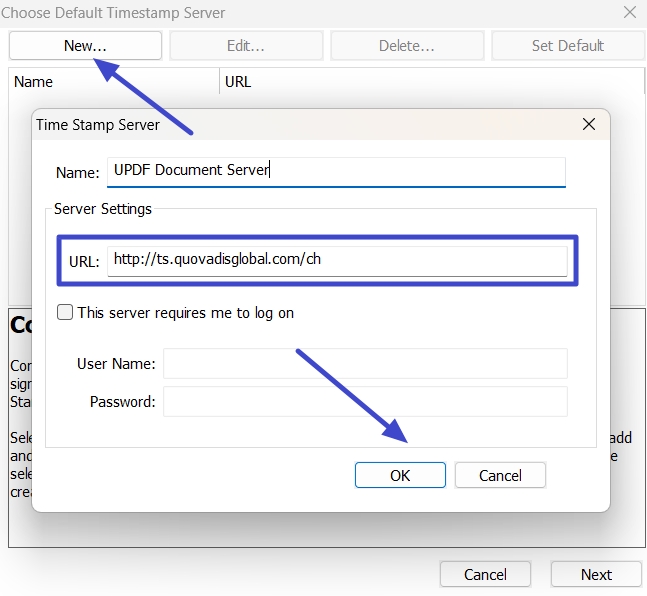
Step 2: After accessing the "Choose Default Timestamp Server" window, hit the "New…" button to go to the next screen. On this "Time Stamp Server" pop-up window, write your server's name to differentiate it from others. Next, paste the URL of the timestamp server in the "URL" text box and complete other optional settings. Finally, press the "OK" button to save these settings for the document verification process.
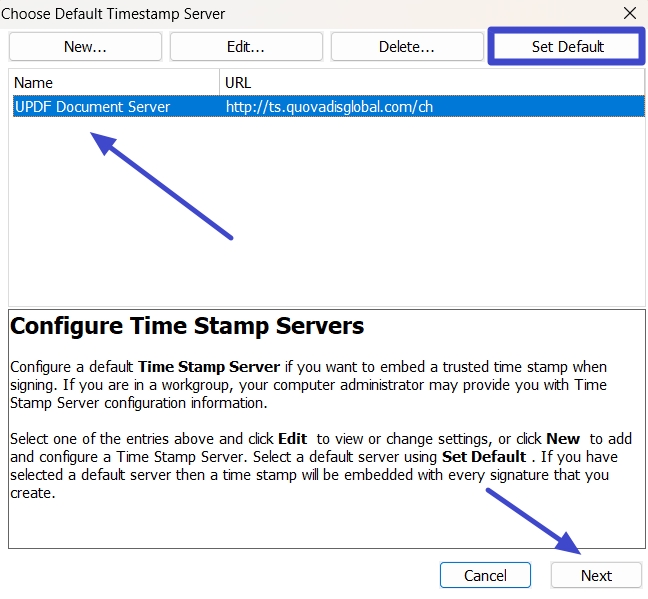
Step 3: Now, you will return to the previous settings window, where you have to select the newly added timestamp server. Afterward, click the "Set Default" button to configure this server for future PDF authentication. Moving forward, hit the "Next" button to save this timestamped document into your device.
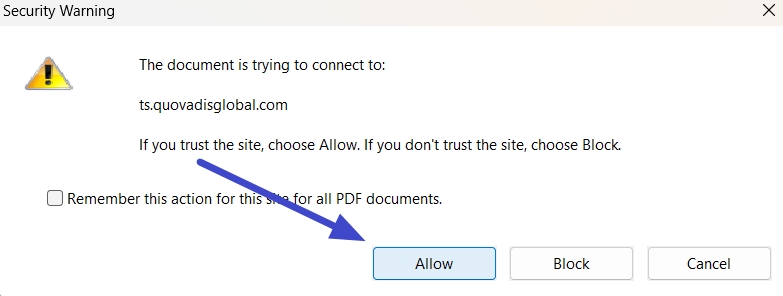
Step 4: Upon saving this document, it will automatically open in Foxit PDF Editor with a security warning. Here, press the "Allow" button to complete this process of adding date and time with Foxit to your PDF document.
Way 3. How to Add a Timestamp Server in Nitro?
If you are looking for some alternate method to add digital timestamps to your PDF, Nitro will prove to be a good option. It lets you add a timestamp server to your files with the time and date as proof of integrity. You can import or paste these timestamps from a trusted authority to add an extra layer of verification to your documents.
Other than adding timestamps, you can edit or remove them to adjust according to the legal needs. Now, follow the steps given below to clarify the question of how to create a digital signature in PDF with a timestamp.
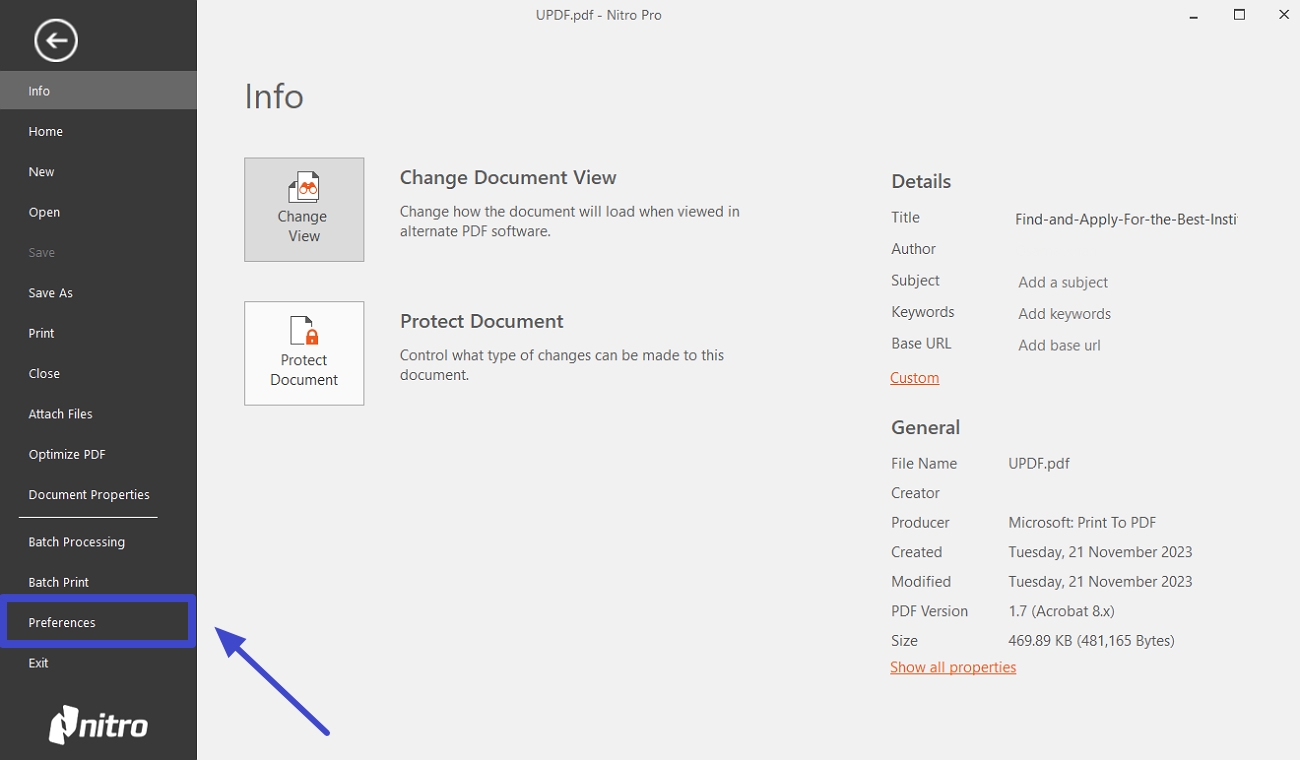
Step 1: Upon opening your PDF file with Nitro Pro, hit the "File" tab to access a set of options on the left side of your screen. From these options, click the "Preferences" tab to open the preferences settings window.
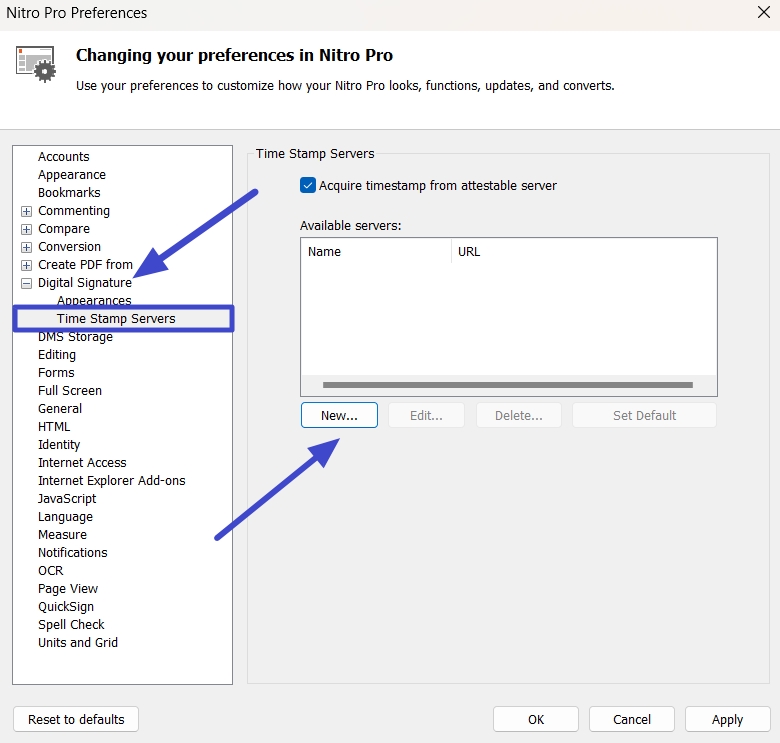
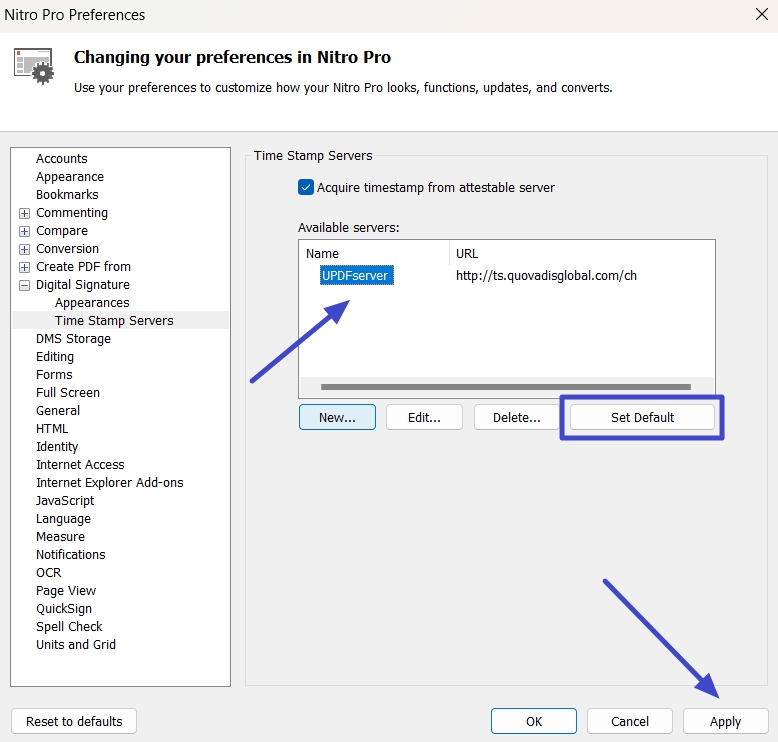
Step 2: Once you enter the "Nitro Pro Preferences" window, double-click on the "Digital Signature" option to reveal new settings. Now, press the "Time Stamp Servers" option to access additional settings on the right side of your screen. Here, you have to enable the "Acquire timestamp from attestable server" checkbox and press the "New" button to proceed forward.
Step 3: Afterward, you will access a new "Time Stamp Server" pop-up window. In this window, write the name of your server in the "Name" text box. Moving further, paste the server link in the "URL" text box before pressing the "OK" button. Moreover, you get the option to add a username and password to your timestamp server to prevent others from making changes.
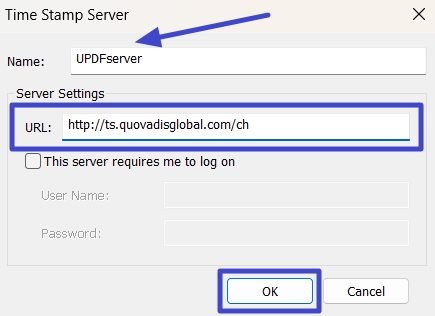
Image alt: write name and paste url of server
Step 4: On the previous window, tap on the name of the server you recently added. Next, click the "Set Default" button to save this server for future document verification process. Finally, hit the "Apply" button to save all these server preferences settings.
Bonus: How to a Create Digital Signature in PDF with a Timestamp?
In case you find this process of adding a timestamp server a bit complex, we have a simpler option for you. UPDF is an all-in-one PDF editor that allows you to add digital signatures with time and date to your documents. By adding these digital signatures, you can fulfill the need to insert timestamps for document verification. Through this digital signer, you can customize the properties of the added signature box to apply a personal touch to your document.
While digitally signing PDFs, UPDF allows you to import or create new signatures to the files. Moreover, users get the chance to alter the appearance of a digital sign with the option to add a date and location to it. If you want to learn more about the functionality of this PDF signer, watch this video for a better understanding. After recognizing its functionality, hit the "Free Download" button pasted below to get your hands on this tool.
Windows • macOS • iOS • Android 100% secure
Steps to Generate Digital Signature in PDF with a Timestamp
The UPDF team is currently working to add timestamp server functionality to the tool, so you can expect its release in the near future. However, this tool lets you add a digital signature with a timestamp to the PDF document through the following steps.
Step 1: Import the PDF Document and Add a Digital Signature Field
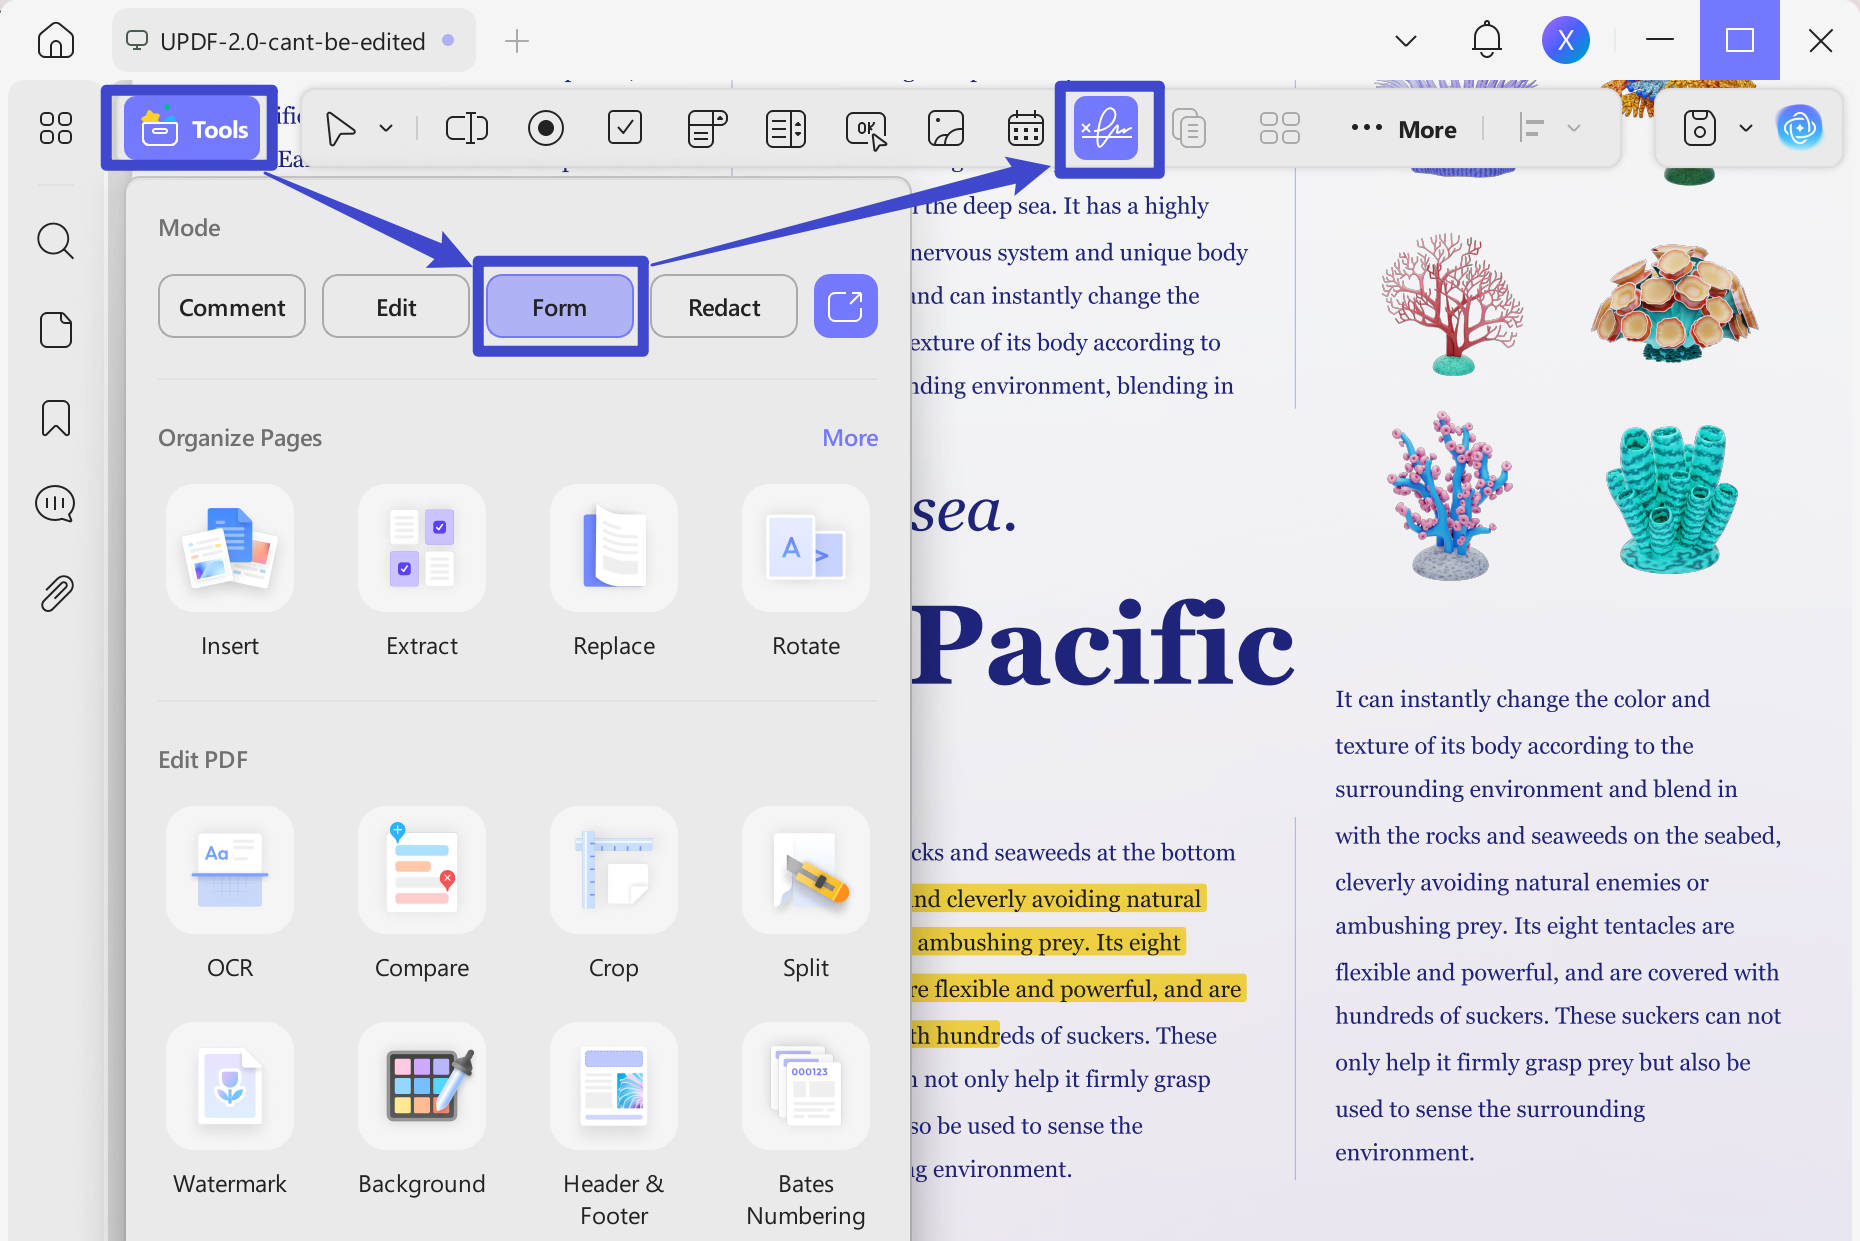
First, hit the "Free Download" button given below to install this document signer on your device. Then, import the PDF to this tool and hit the "Form" icon in "Tools" to access a new set of form fields. Now, press the "Digital Signature" icon on top of your screen and hit anywhere in the document afterward to add a digital sign field to your document.
Windows • macOS • iOS • Android 100% secure
Step 2: Create a New Digital ID to Fill Signature Field
Upon adding a signature field, press the "Comment" icon in "Tools" and then click on the added field to access a new pop-up menu. On this menu, tap on the "Create" icon in front of the "Sign with a Digital ID" section to access a new window further. Here, you have to fill in all the personal information to create a new digital ID to sign your document with a timestamp.

Step 3: Adjust the Appearance of Your Digital Sign
Once you have added the digital ID, press the "Create" icon beside the "Appearance" section to personalize the look of your sign. Now, tick the "Date," "Location," and "Logo" checkboxes to add a signature and date stamp to your document. Afterward, press the "OK" button and then the "Sign" button to finish this process.
Timestamp Meaning and Its Major Use Cases Within Documents
A timestamp is a record of the date and time at which a particular document was generated or modified. You can also find out when someone viewed or opened the document using these timestamps. Moreover, these timestamps are commonly used in documents to preserve their authentication and verify them for legal purposes.
Therefore, it functions similarly to a physical timestamp, where a rubber stamp is used to mark the date and time on paper documents. After understanding the timestamp's meaning, let’s discuss some of its common use cases within documents:
- Document Version Control: As discussed, you will be able to track revisions and edits made to a document using timestamps. Each time a document is modified, the timestamp can be updated to reflect the date and time of the change. By doing so, users can ensure that they are working with the most recent version.
- Authentication and Verification: Timestamps will authenticate your documents to present evidence that a piece of data existed at a certain point in time. In addition, you will be able to encrypt these timestamps to prevent any tampering.
- Legal and Regulatory Compliance: You can utilize these signatures and date stamps in legal and regulatory contexts to establish the timing of certain events. In legal proceedings, it serves as crucial evidence to demonstrate compliance with deadlines or regulations.
- Audit Trails: Managers add these timestamps to audit trails to track activities such as file accesses or system events. By doing so, they can keep an eye on a chronological record of actions.
Conclusion
After going through this article, you now understand the importance of timestamp servers in legal proceedings. We have discussed several methods to add digital signatures and timestamps to the PDF documents. You can use any of these ways to preserve your files and authenticate them for legal purposes. However, if you find it challenging to configure timestamp servers with Adobe, Nitro, or Foxit, we have an easier solution for you.
You can make use of the UPDF PDF signer to add digital signatures and date stamps to your files. So, it will serve as a perfect alternative to servers for document authentication. We recommend you download UPDF now to try out this feature yourself for PDF verification. Also, you can visit appleinsider to read an in-depth analysis of this PDF document signer.
Windows • macOS • iOS • Android 100% secure


 Enola Miller
 Enid Brown

 Engelbert White