Whenever you need to sign a PDF document, you will encounter two options. They are initial and signature. Both can be used to add your personalized signature to a document, but they are different in their own unique ways. So, neither look the same nor are they used in the same context.
If you are also confused about how to use your signatures and initials to sign a PDF document, you have come to the right place. Moreover, at the end of the article, we will explain how you can create each one for future use. In case that you need to create initial and signature urgently, you can click the button below to download UPDF and jump to Part 4 and part 5 to learn how to do it.
Windows • macOS • iOS • Android 100% secure
Part 1. What is Initial?
An initial can be defined as the first letter of a person's name. Initial is used to refer to the first letter of someone's name. In many cases, one signs using initials to endorse documents or as a sign of reception. For instance, one can just write an abbreviation rather than writing one's full name at the end of each page.
This practice ensures that every page has been checked to ensure no changes are made to the pages of the legal documents. Initials are utilized. They give informal confirmation to documents without necessarily having to put their actual signature. However, the initials may be weaker than writing out the person's name in a signature.
Part 2. What is Signature?
A signature is a wholly written name, symbol, or an individual's way of writing their name to authenticate documents. It is used as an official stamp or seal of approval in documents. Legal signing is employed and serves as a validation that embraces the signer's acceptance of the document's content. Signatures can be in cursive, printed, or even just a symbol unique to the person.
A signature often corresponds to a sample signature given on IDs to prevent such circumstances. In the present world, where everything is digital, digital signatures are also used as a personal mark that conveys legal responsibility.
Also Read: Electronic Signature vs. Digital Signature: Unraveling the Key Differences
Part 3. Signature vs Initial: When to Use
There is a difference between signatures and initials regarding when to use them in documents. Choose a signature for official documents, contracts, and other papers when you need complete identification and intention. A signature is also used to show that one has understood the document's content and agrees to the document signed.
On the other hand, initials are generally used for faster signings and rushes, like acknowledging individual pages of a stretched document. We also use initials to ensure that one has gone through all the pages, minimizing cases of modifications made by other people.
Thus, signatures are legal, while initials subsequently serve as additional controls. Initials are convenient, while signatures are a formal way of putting the name. Sometimes, both are necessary, with signatures on the last page and initials on other pages to indicate that they were read.
Part 4. How to Create Signatures with UPDF?
UPDF is a comprehensive PDF suite that can be used for many PDF tasks, One of those tasks is creating and adding signatures to your PDF document. The one we will be focusing on here is creating signatures. When creating signatures with UPDF. You can use different input options like a mouse or trackpad or scan a picture for a realistic signature.
When you use a mouse or trackpad with your computer, you can choose the color for your signatures. Moreover, when using this feature for professional purposes, you can customize the color to match the one you usually use for your designation.
As it is straightforward to create signatures with UPDF, it makes things even better when using other features like PDF editing, OCR, UPDF AI, UPDF Cloud, etc. Moreover, if you create Cloud Signatures, they will be synced across all your devices for convenience. Learn more about UPDF's features by watching the below video or reading this article.
So, download UPDF today on all your computers and smartphones to experience its efficiency at creating signatures. Purchase UPDF Pro to access the most premium features without any restrictions.
Windows • macOS • iOS • Android 100% secure
Once you have downloaded UPDF, you may follow these steps to create your signatures.
Step 1:
Run the UPDF application software on your computer by clicking the desktop icon for it. Click "Open File" and click on the file that you want to sign, then click "Open." Now, that file will open in UPDF. Alternatively, you may click "File," then select "Create," and choose "Blank Page” to create your signature for future usage.
Step 2:
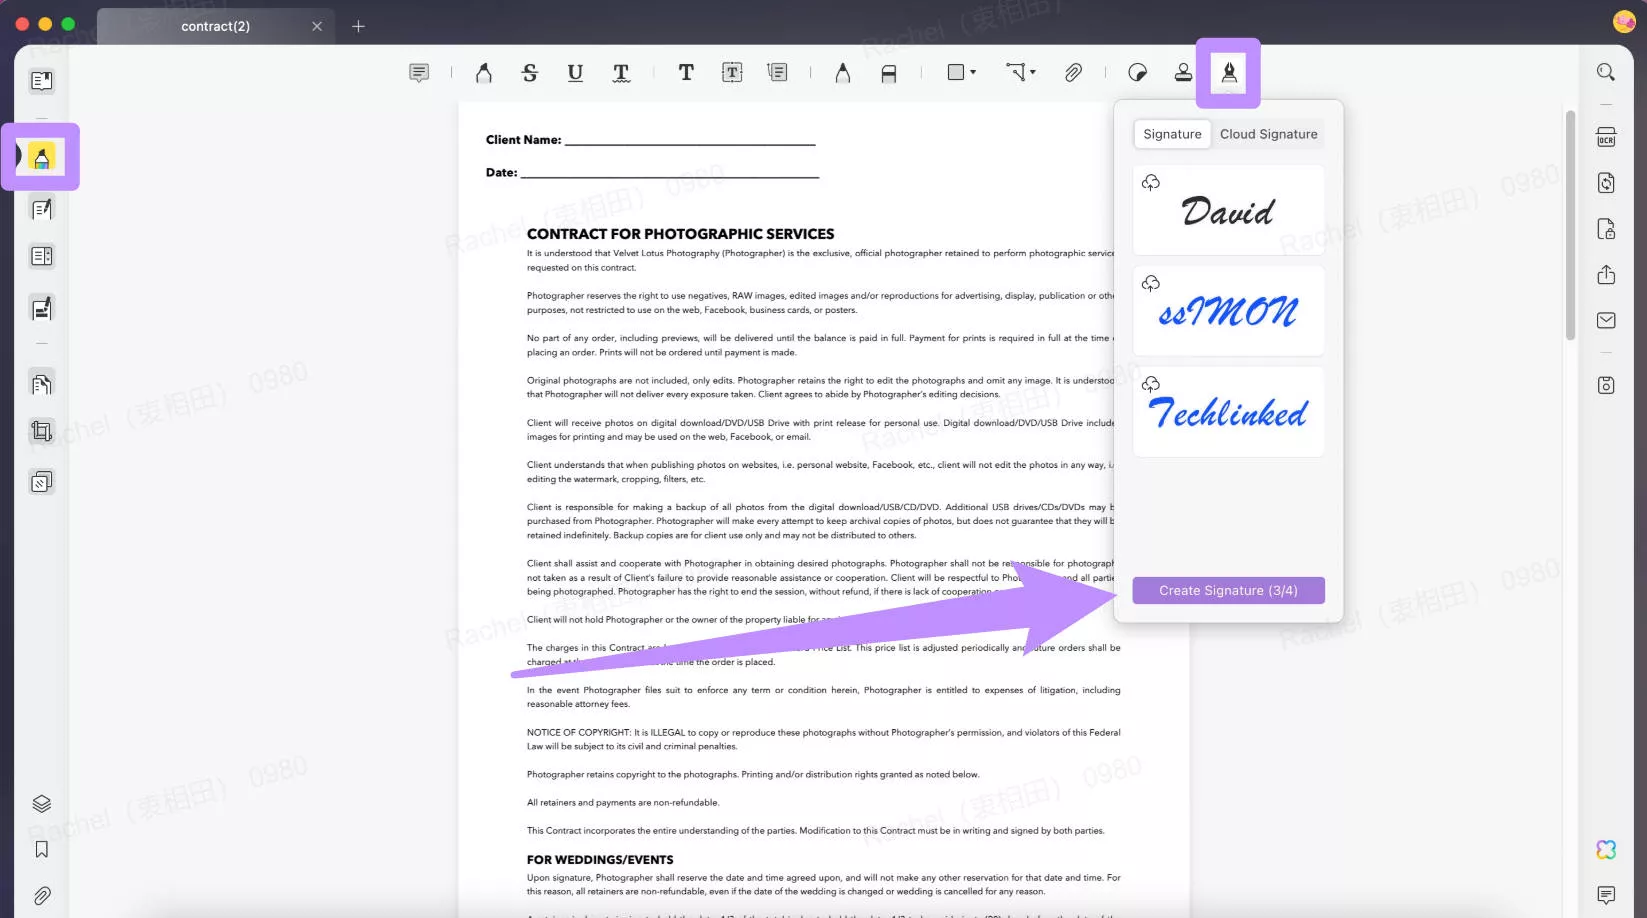
When your document opens in UPDF, click "Comment” from the left menu bar. Now select “Signature" from the top right menu. Click "Signature" and the "Create Signature" Button to access the signature creation feature.
Step 3:
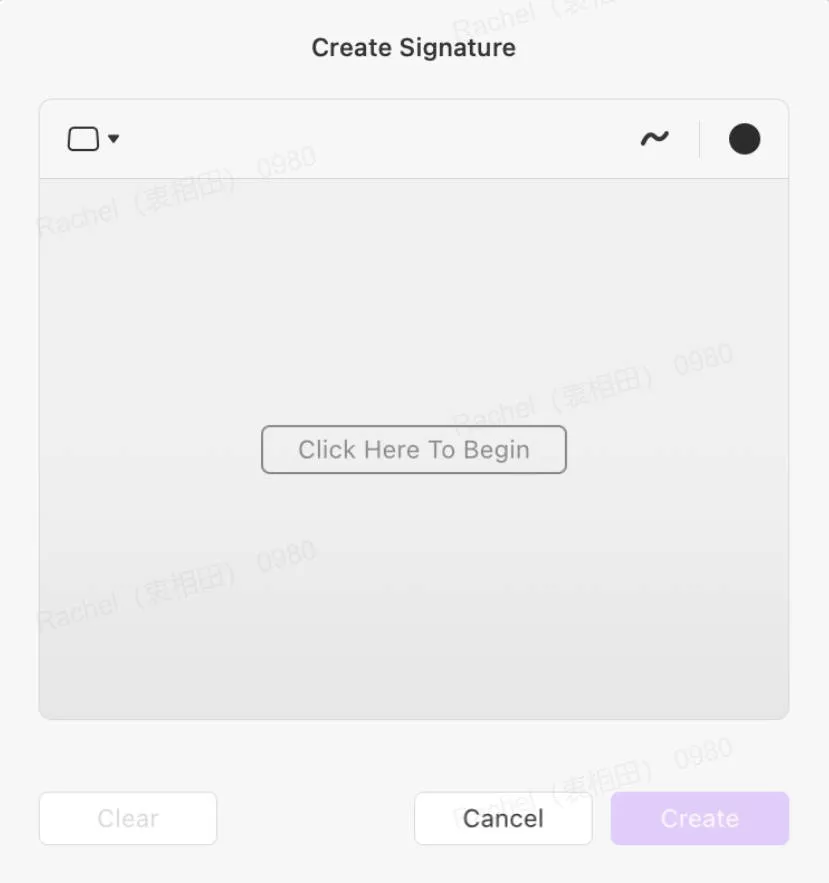
Select the input source from the top left corner of the popup window. If you use a laptop, "Trackpad” will be the right option. Now, click the "Click Here to Begin" button. Carefully sign on your laptop's trackpad, which will appear in the UPDF window. Press any key on the keyboard when you are done. If you are satisfied with the signature, you may click "Create;" otherwise, click "Clear” and start over by clicking “Click Here to Begin."
Now, your signature is created and saved with UPDF. Whenever you want to sign a document, you just need to click the Signature button from the Comment section and click on the available signature to add it to the document.
Part 5. How to Create Initial with UPDF
Just like you can create your signatures with UPDF, it also allows you to create your initial and use it to verify documents. We use the same signature feature when making the initial, but the input source is the keyboard. You can type your name initials and create initials for PDFs.
The cool part about creating your initial with UPDF is that you can change the font color and style to make your initial look more attractive. Creating an initial with UPDF does not take long, as it can be quickly done with the following steps:
Step 1:
When the PDF opens in UPDF, click "Comment" from the left-hand menu. Now, click the "Signature” button from the top menu bar. Select “Signature” and click “Create Signature." UPDF will now open a popup window where you can create your initials for signing PDFs.
Step 2:
Select "Keyboard" as the input source from the top left in the popup window. Now, type your initials using the keyboard keys. On the top, you will have a "Font" option that you can use to change the font style of your initials. When you are done, click "Create," your initial will be created in UPDF.
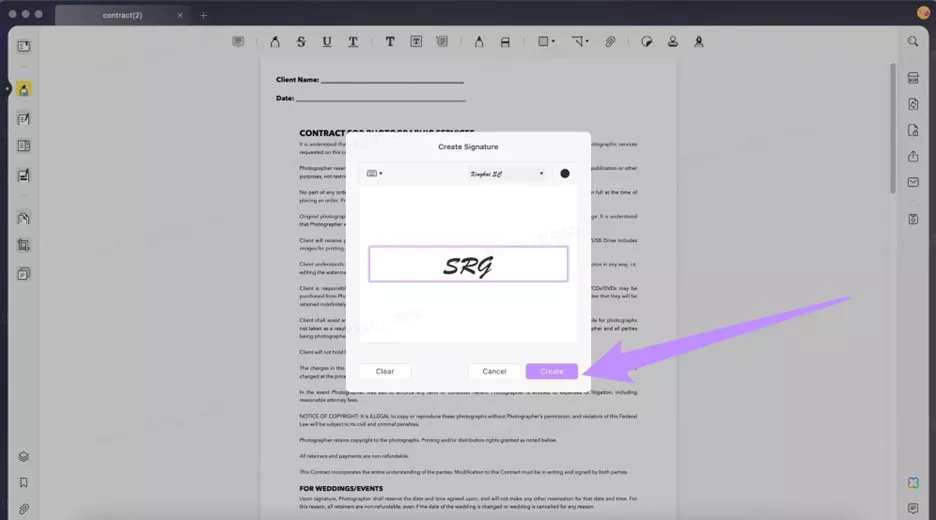
Now, whenever you want to add your initials to a PDF document, just click comment and go to signature. There, you will find your initial saved, which you can add to the PDF by clicking it.
Part 6. How to Create Signature and Initial Online with UPDF Sign
Sometimes, you may need to sign a document with Signature and Initial. No worry, you can use UPDF Sign. It allows you to create and sign with signature and initial at the same time. For those who need to send the PDF and collect signatures from different persons, UPDF Sign is the awesome option. The most important part is that UPDF Sign is legally bonded. You can click the button below to give it a try.
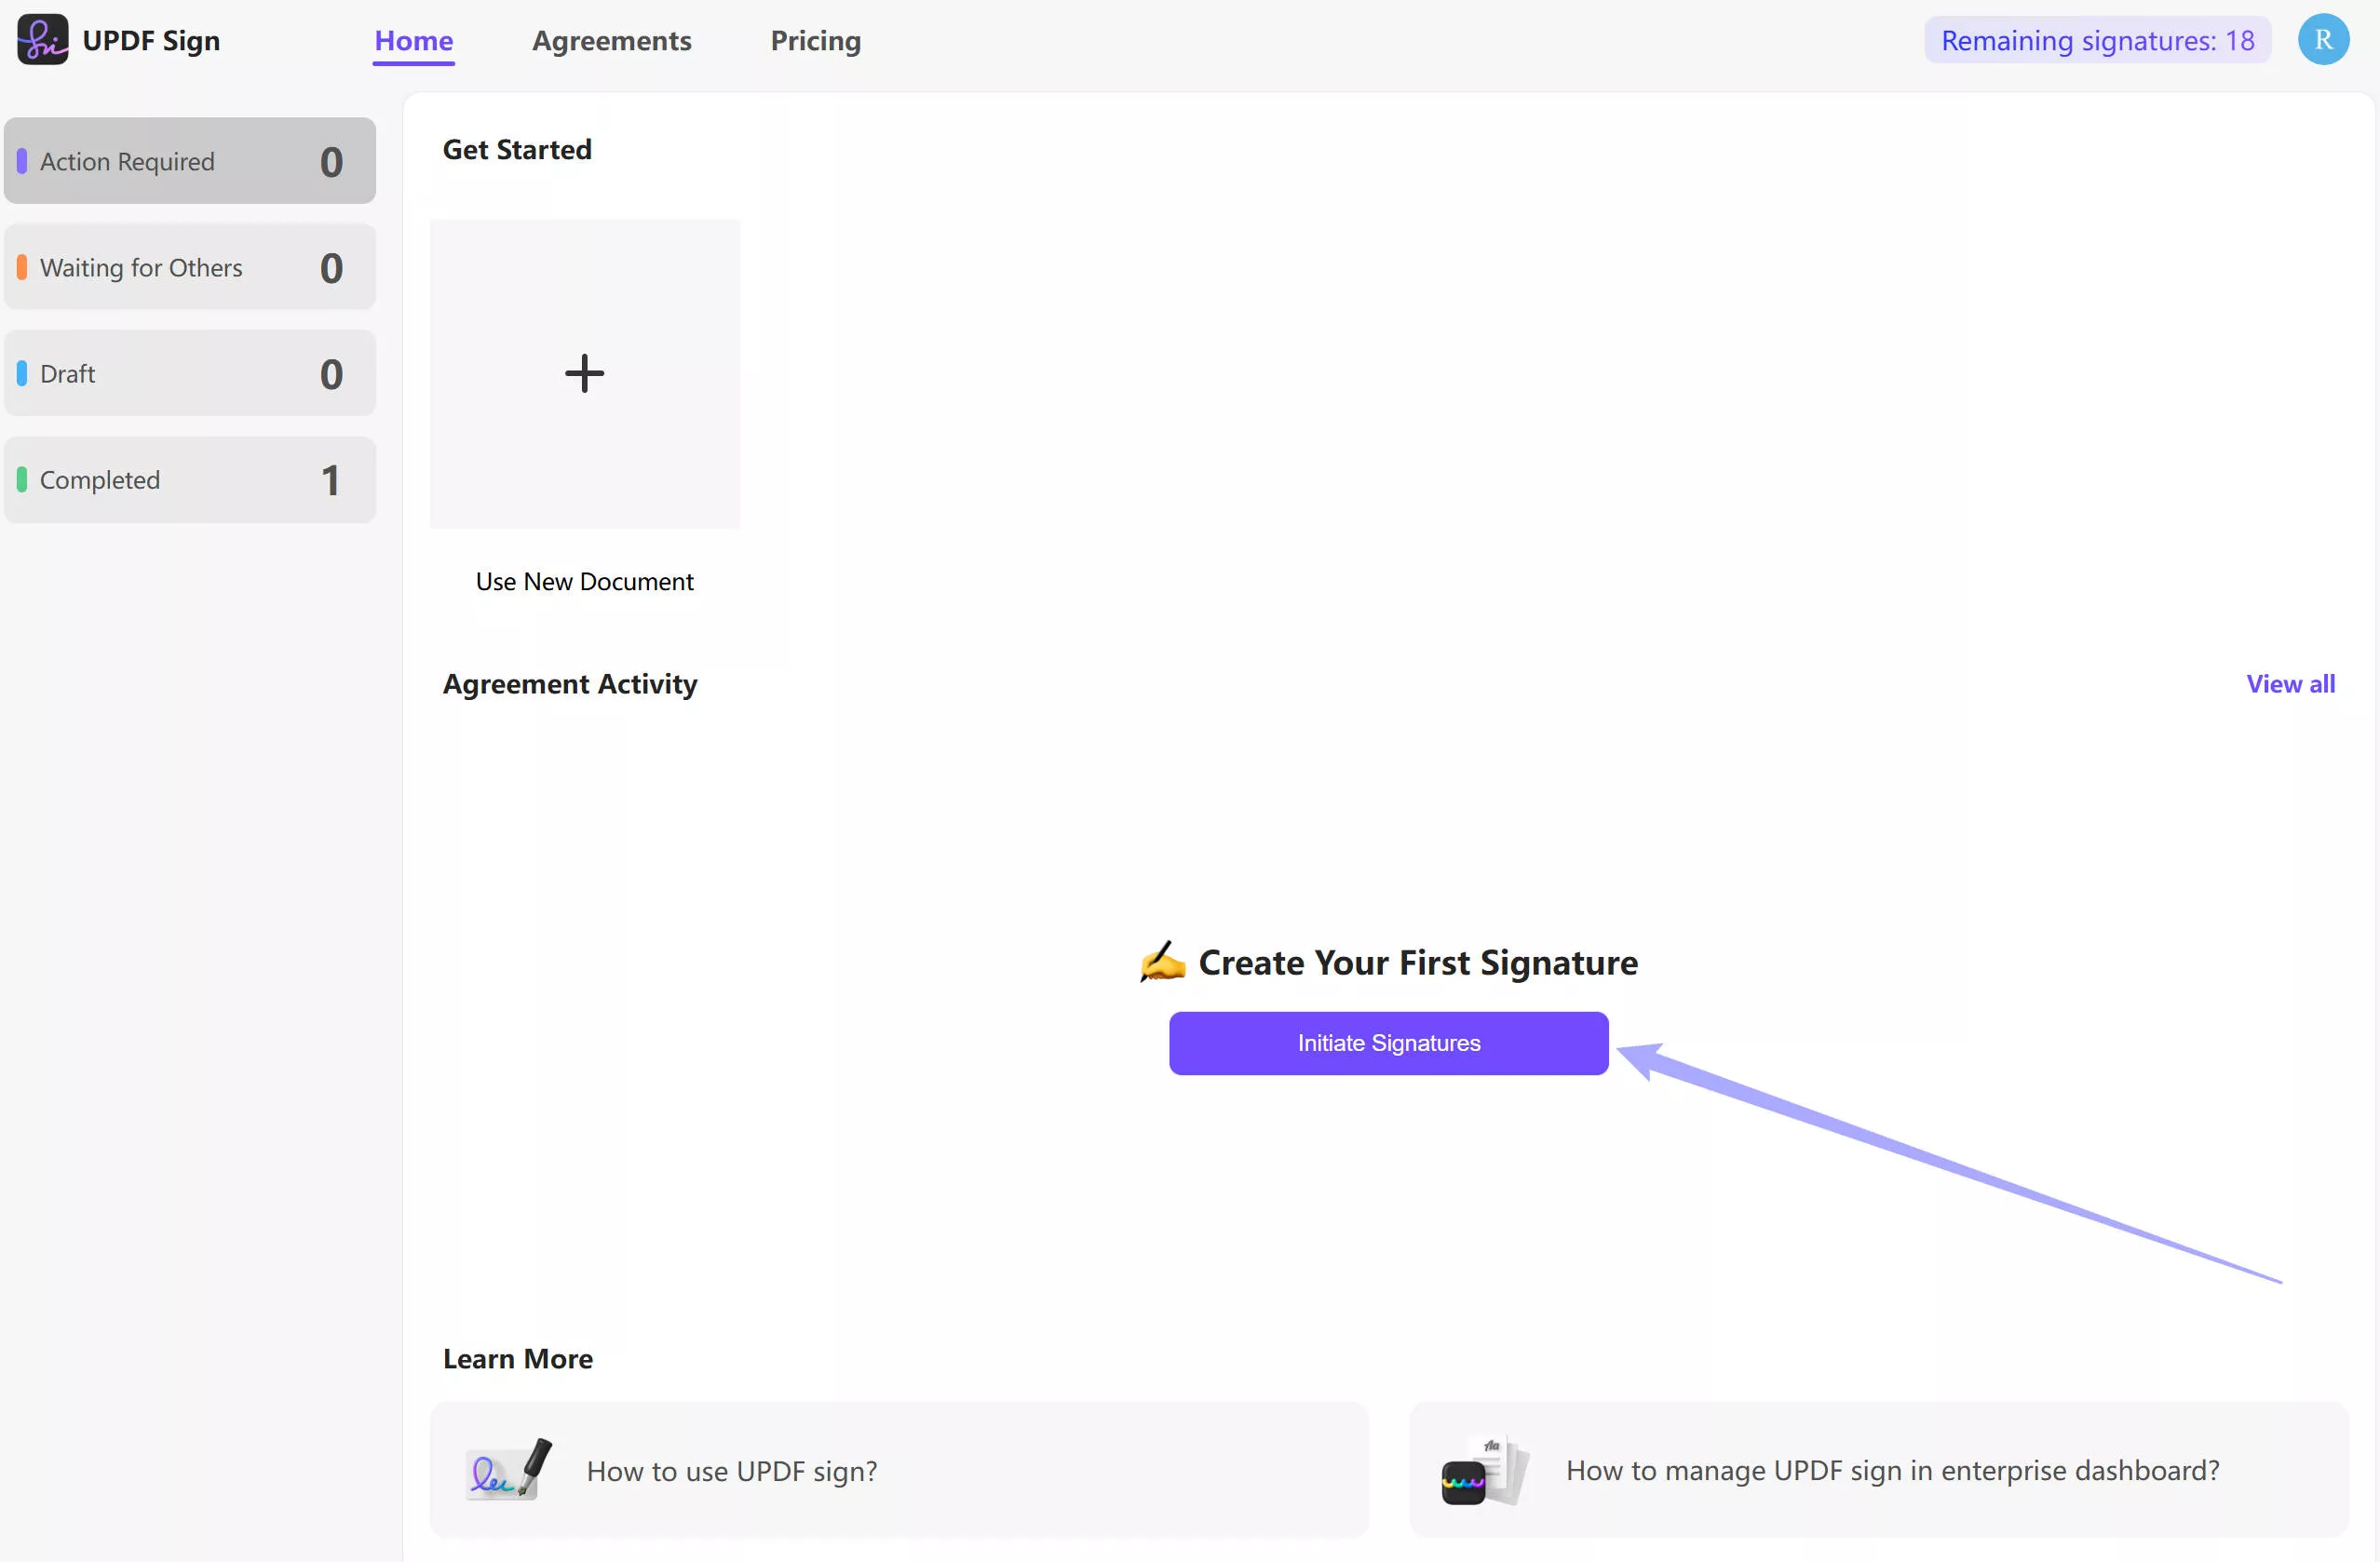
Step 1. Visit UPDF Sign website, click on the "Start Free Trial" to log in or create an account. Now, click on the "Initiate Signature" button.
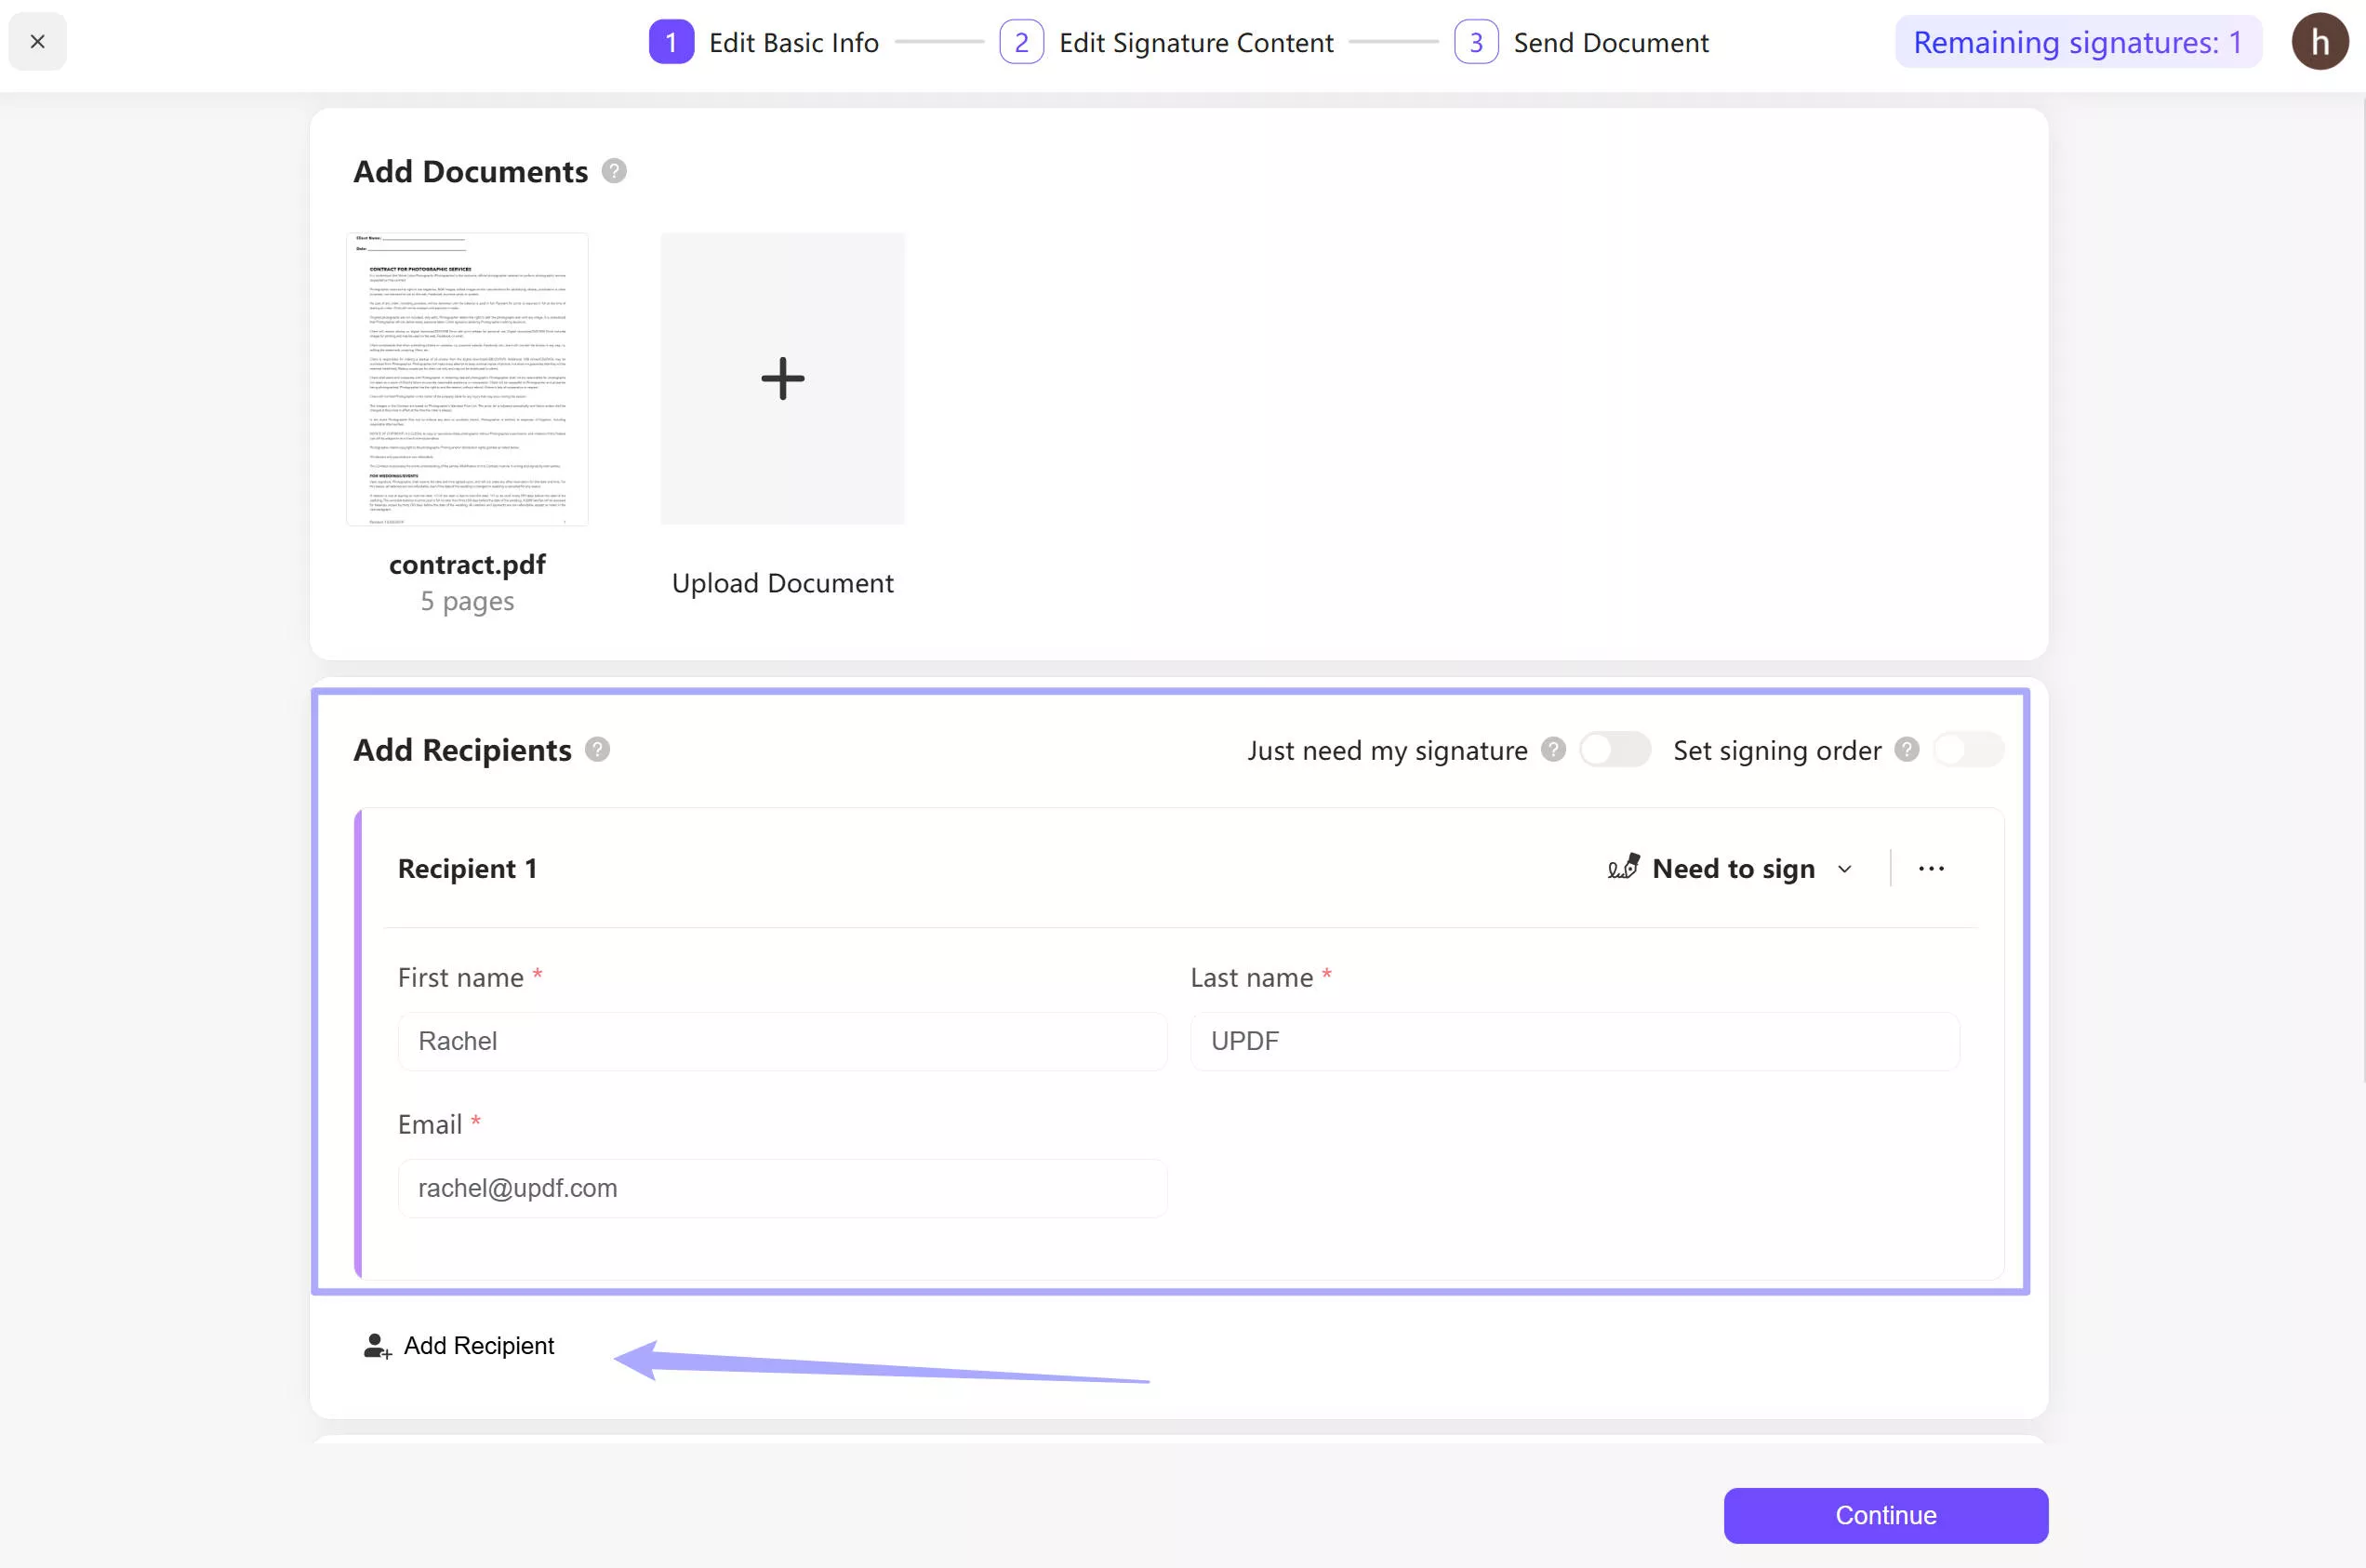
Step 2. Upload the PDF document and add recipients. If you need to sign on your own, you can add your own email or switch on "Just need my signature". If you need to collect signatures from other persons, you can add their emails and names, then, enter the messages to send.
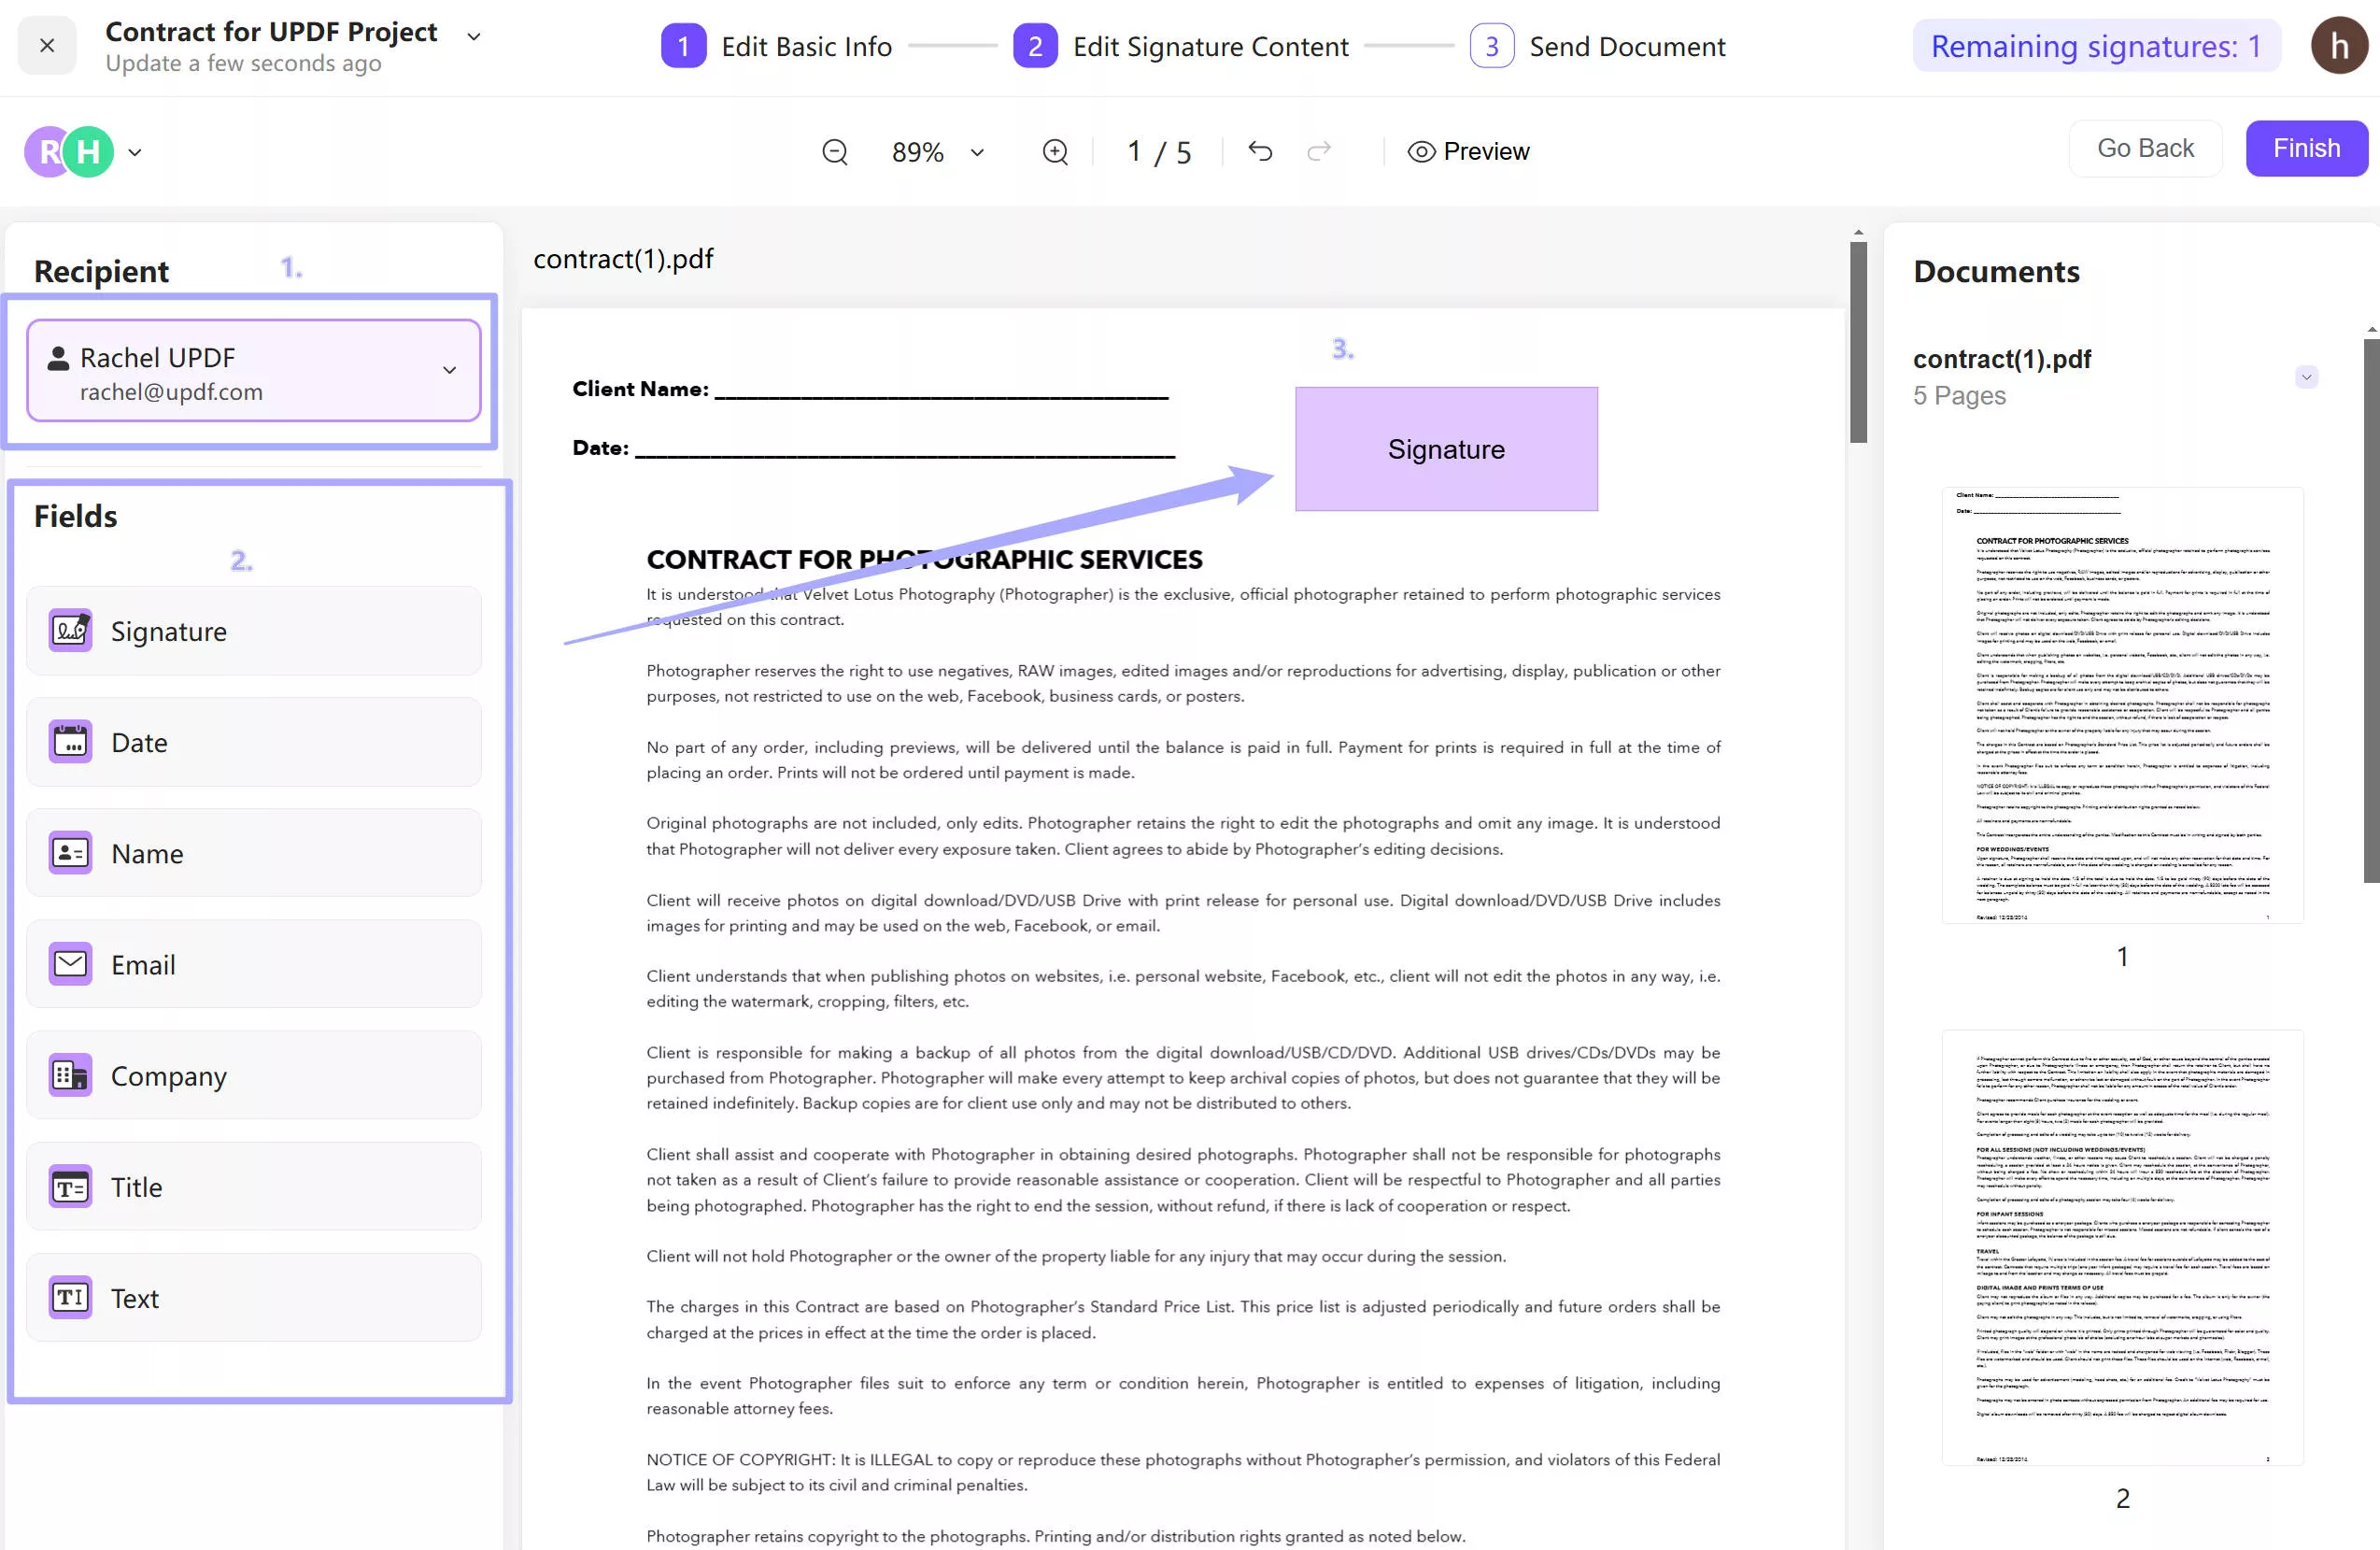
Step 3. Now, you can select the recipient, and drag the signature field to the place where you need to recipient to sign. If your document needs to be signed by different persons, you can select the recipient one by one and add the signature field for them. Then, click on the "Finish" to send the document to be signed.
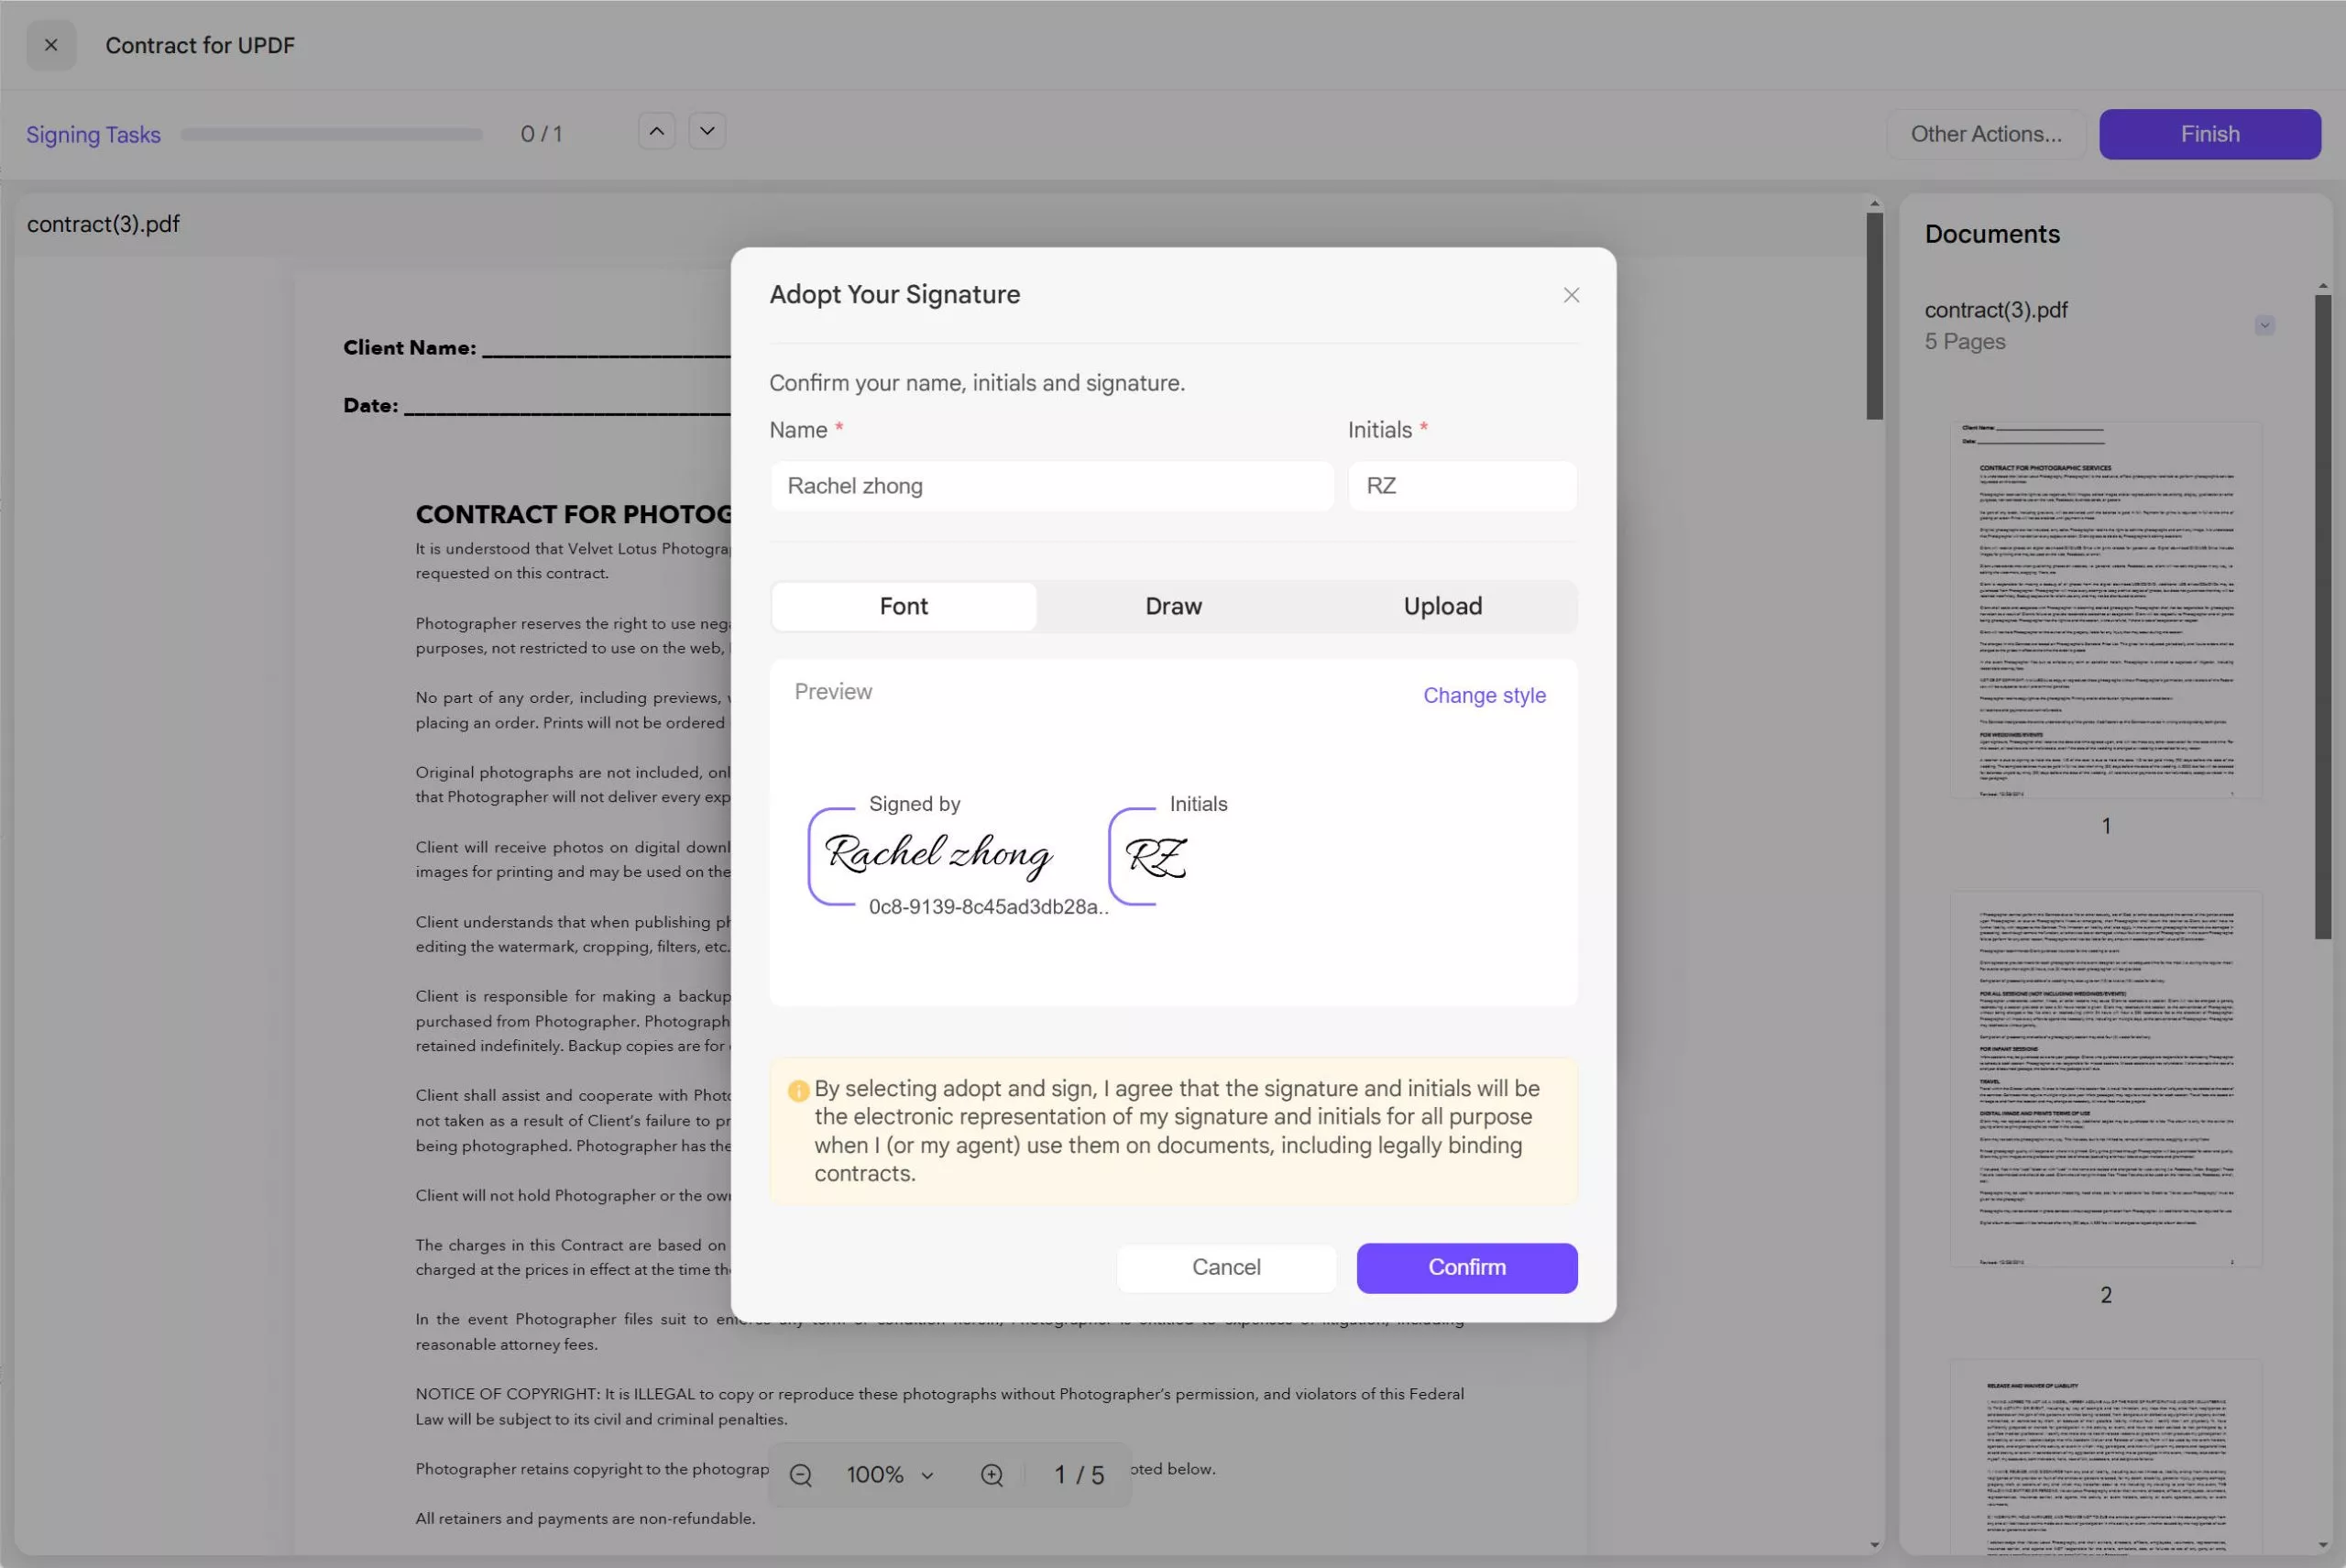
Step 4. Now, if you are the recipient, you can find an email. Click on the link in the email to sign. When you click on the signature field in the PDF, you can enter the name and it will generate the initials for you. Now, you can click on the "Confirm" button to sign the PDF with signatures and initials.
Ending Note
Using your initial and signature will be equally important when you need to personalize and sign a PDF document. While both are useful for verifying and authorizing PDFs, they are used differently. So, if you often must use these, you must know which one to use and when it will be correct.
With this article's detailed guide, we hope you can efficiently create your initials and signatures to verify PDFs. Moreover, now you know exactly where to use your initials and where to use your signatures for digital documents. So, what are you waiting for? Download UPDF now to make verifying your documents significantly more straightforward.
Windows • macOS • iOS • Android 100% secure
 UPDF
UPDF
 UPDF for Windows
 UPDF for Mac
 UPDF for iPhone/iPad
 UPDF for Android
 UPDF AI Online
 UPDF Sign
 Read PDF
 Annotate PDF
 Edit PDF
 Convert PDF
 Create PDF
 Compress PDF
 Organize PDF
 Merge PDF
 Split PDF
 Crop PDF
 Delete PDF pages
 Rotate PDF
 Sign PDF
 PDF Form
 Compare PDFs
 Protect PDF
 Print PDF
 Batch Process
 OCR
OCR UPDF Cloud
 About UPDF AI
 UPDF AI Solutions
 FAQ about UPDF AI
 Summarize PDF
 Translate PDF
 Explain PDF
 Chat with PDF
 Chat with image
 PDF to Mind Map
 Chat with AI
 User Guide
 Tech Spec
 Updates
 FAQs
FAQs UPDF Tricks
 Blog
Blog Newsroom
 UPDF Reviews
 Download Center
 Contact Us



 Lizzy Lozano
  Enid Brown
 Donnie Chavez

 Cathy Brown