 UPDF
UPDF
 UPDF for Windows
 UPDF for Mac
 UPDF for iPhone/iPad
 UPDF for Android
 Nomostar
 UPDF AI Online
 UPDF Sign
 IvyCraft
 Edit PDF
 Annotate PDF
 Create PDF
 PDF Form
 Edit links
 Convert PDF
 OCR
OCR PDF to Word
 PDF to Image
 PDF to Excel
 Organize PDF
 Merge PDF
 Split PDF
 Crop PDF
 Rotate PDF
 Protect PDF
 Sign PDF
 Redact PDF
 Sanitize PDF
 Remove Security
 Read PDF
 UPDF Cloud
 Compress PDF
 Print PDF
 Batch Process
 About UPDF AI
 UPDF AI Solutions
 AI User Guide
 FAQ about UPDF AI
 Summarize PDF
 Translate PDF
 Chat with PDF
 Chat with AI
 Chat with image
 PDF to Mind Map
 Explain PDF
 PDF AI Tools
 Image AI Tools
 AI Chat Tools
 AI Writing Tools
 AI Study Tools
 AI Working Tools
 Other AI Tools
 AI Bookmark Generation
 AI Bookmark Summary
 AI Watermark Generation
 AI Background Generation
 AI Sticker Generation
 AI Stamp Generation
 AI Editing Suite
 UPDF Copilot
 AI Page Management
 AI Semantic Search
 PDF to Word
 PDF to Excel
 PDF to PowerPoint
 Enterprise Solution
 Enterprise Sign
 Enterprise AI
 Enterprise Plan
 Enterprise User Guide
 Enterprise Webinar
 IT
IT Education
 Construction
 Financial Service
 Healthcare
 Insurance
 Legal
Legal Manufacturing
 Government
 Researchers & PhDs
 Solopreneurs & Freelancers
 Lawyers & Legal Professionals
 Real Estate Agents & Brokers
 Education Solution
 Customer Stories
 User Guide
 UPDF Tricks
 FAQs
FAQs UPDF Reviews
 Download Center
 Blog
Blog Newsroom
 Tech Spec
 Updates
 UPDF vs. Adobe Acrobat
 UPDF vs. Foxit
 UPDF vs. PDF Expert

When you need to resize multiple images at once, manual editing is not an option. Processing each file individually in Photoshop can take time and increase the risk of errors.
In addition, image resizing can mean different things depending on your goal. You might want to compress images to reduce their size. Or, you may need to adjust the canvas size so every image has identical dimensions.
Because of these differences, choosing the right tool is essential. To simplify the process, this guide explains how to batch resize images on Windows, Mac, Android, and iPhone, using various practical tools.
Part 1: What Type of “Batch Resize Images” Are You?
Many users who want to mass-resize images either need to standardize dimensions of multiple images, compress file sizes, or achieve both tasks at once.
For example, an e-commerce operator may want to standardize product image dimensions so they are perfectly uniform before publishing on platforms like Amazon.
In contrast, a website admin who wants all web pages to load faster will need to batch compress images to reduce their sizes, such as 5MB files to 500KB files.
However, many free tools do not offer dedicated options to address these needs. Therefore, you should first identify your exact goal before selecting a tool.
Consider the following scenarios to understand your situation.
- Scenario 1: Uniform Dimensions: You want all your images to have the same width and height. This need is common for e-commerce sellers and social media managers. In this case, you need a tool that supports resizing by pixels, percentage, and cropping.
- Scenario 2: File Size Compression: You need to reduce the file size for storing or sharing, regardless of how the dimensions change. For this purpose, you need a tool that lets you set a target file size for compression.
- Scenario 3: Balancing Both: You need to resize multiple images at once while also controlling the output file size. This requires a tool that combines dimension controls with quality and format settings in a single workflow.
Part 2. How to Batch Resize Images on Windows/macOS?
If you’re looking to batch reduce image file sizes in Scenario 2, UPDF offers the best solution. It is an AI-driven, complete PDF editor available across Windows, Mac, iOS, and Android.
The image should fit the page without pushing the surrounding content out of place. The video below gives you an on-screen reference for editing PDF content in UPDF.
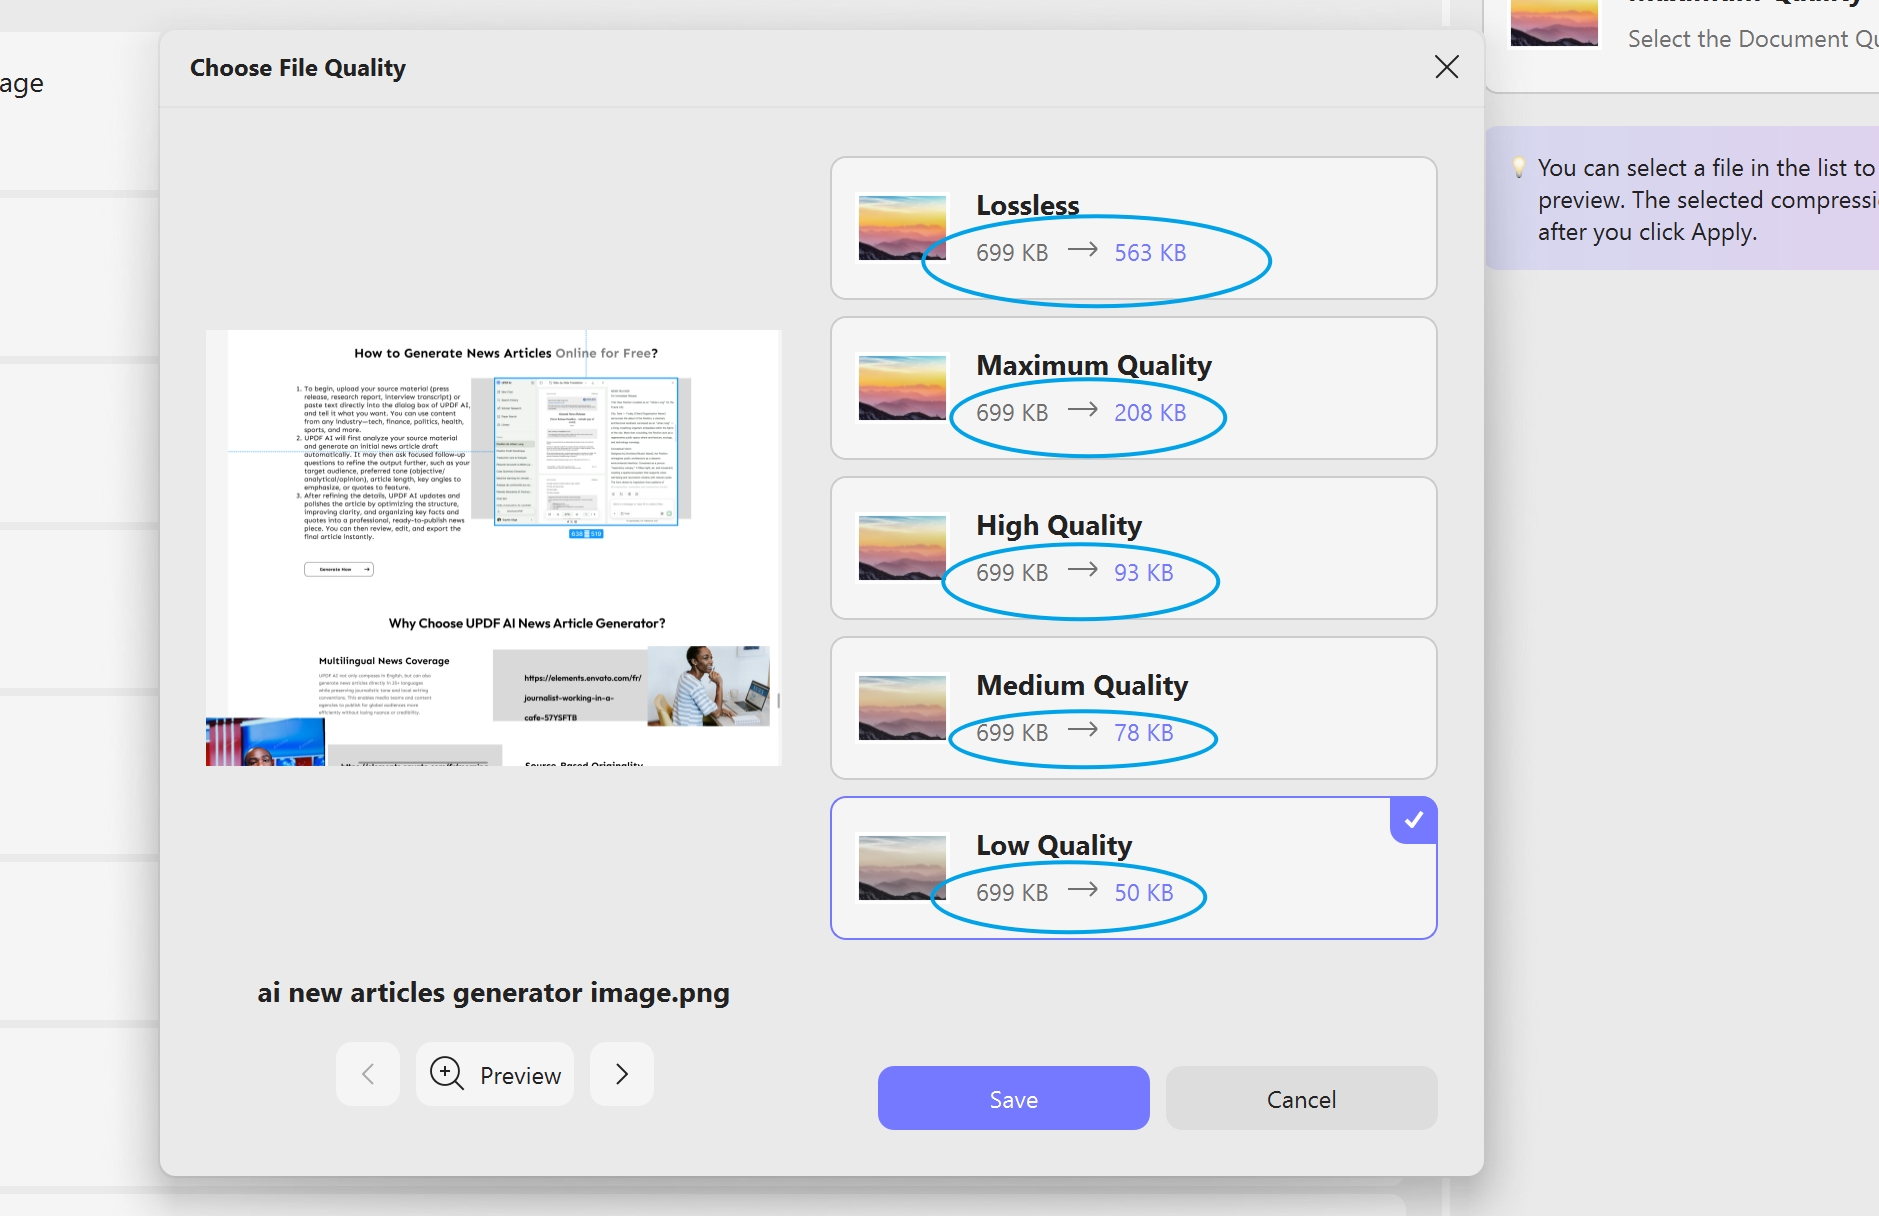
On your desktop, UPDF lets you batch compress images by five compression levels based on the image quality and file size you need. Before saving the files, you can also view the estimated output size to balance image quality and storage requirements more accurately.
In addition, UPDF includes built-in cloud storage. After compressing images on your desktop, you can save them to UPDF Cloud and access them from your phone, tablet, or other connected devices. As a result, you can manage and sync resized images in PDF format across all platforms.
That said, the steps to compress images are the same on both Mac and Windows. Let’s review these.
Windows • macOS • iOS • Android 100% secure
Steps to Batch Resize Images with UPDF Desktop
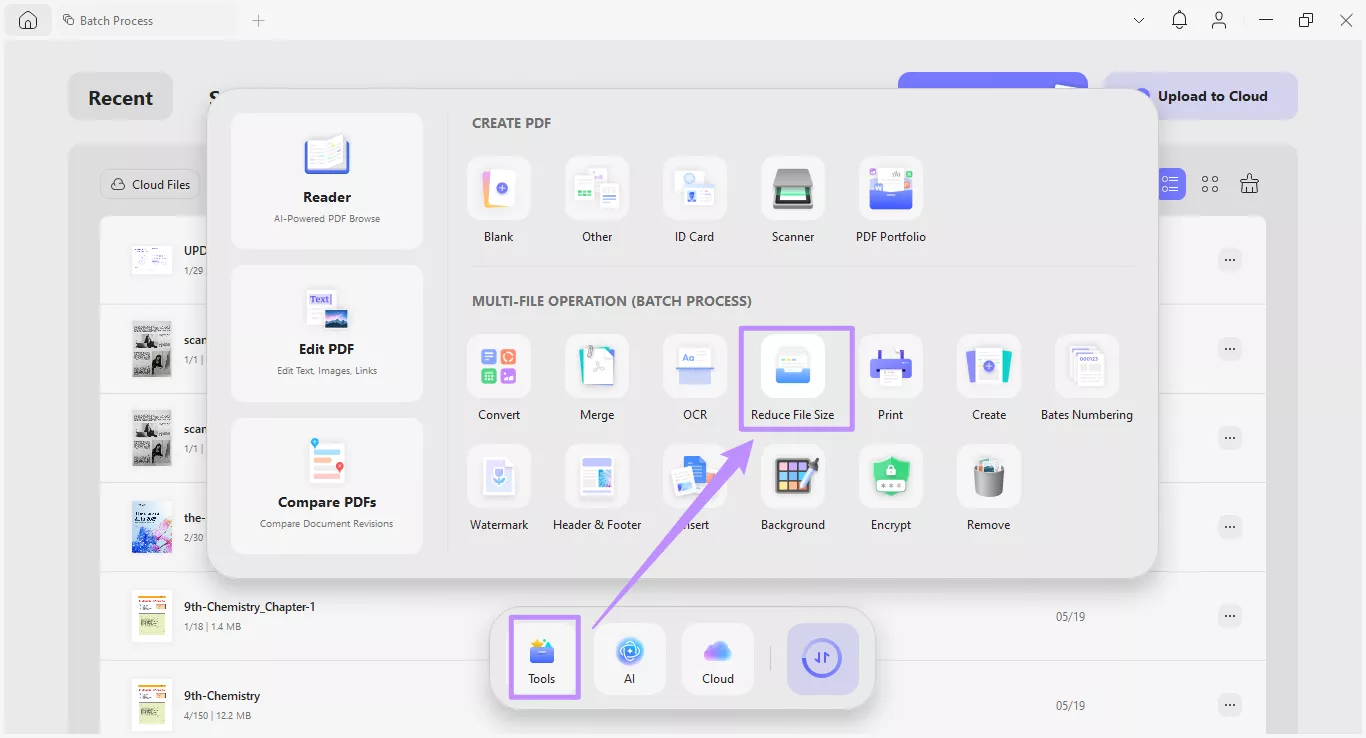
Step 1. Open UDPF and click “Tools” from the bottom. Then, select the “Reduce File Size” option under Multi-File Operation (Batch Process).
Step 2. Click “Add Files” to upload your desired image files to UPDF.
Step 3. Once uploaded, go to the Compress panel on the right and click the Maximum Quality dropdown menu.
Step 4. Select your desired image quality from the options. You can also click “Click to calculate” to preview the output image size. Then, click “Save.”
Step 5. Click “Apply” from the right panel to save your resized images.
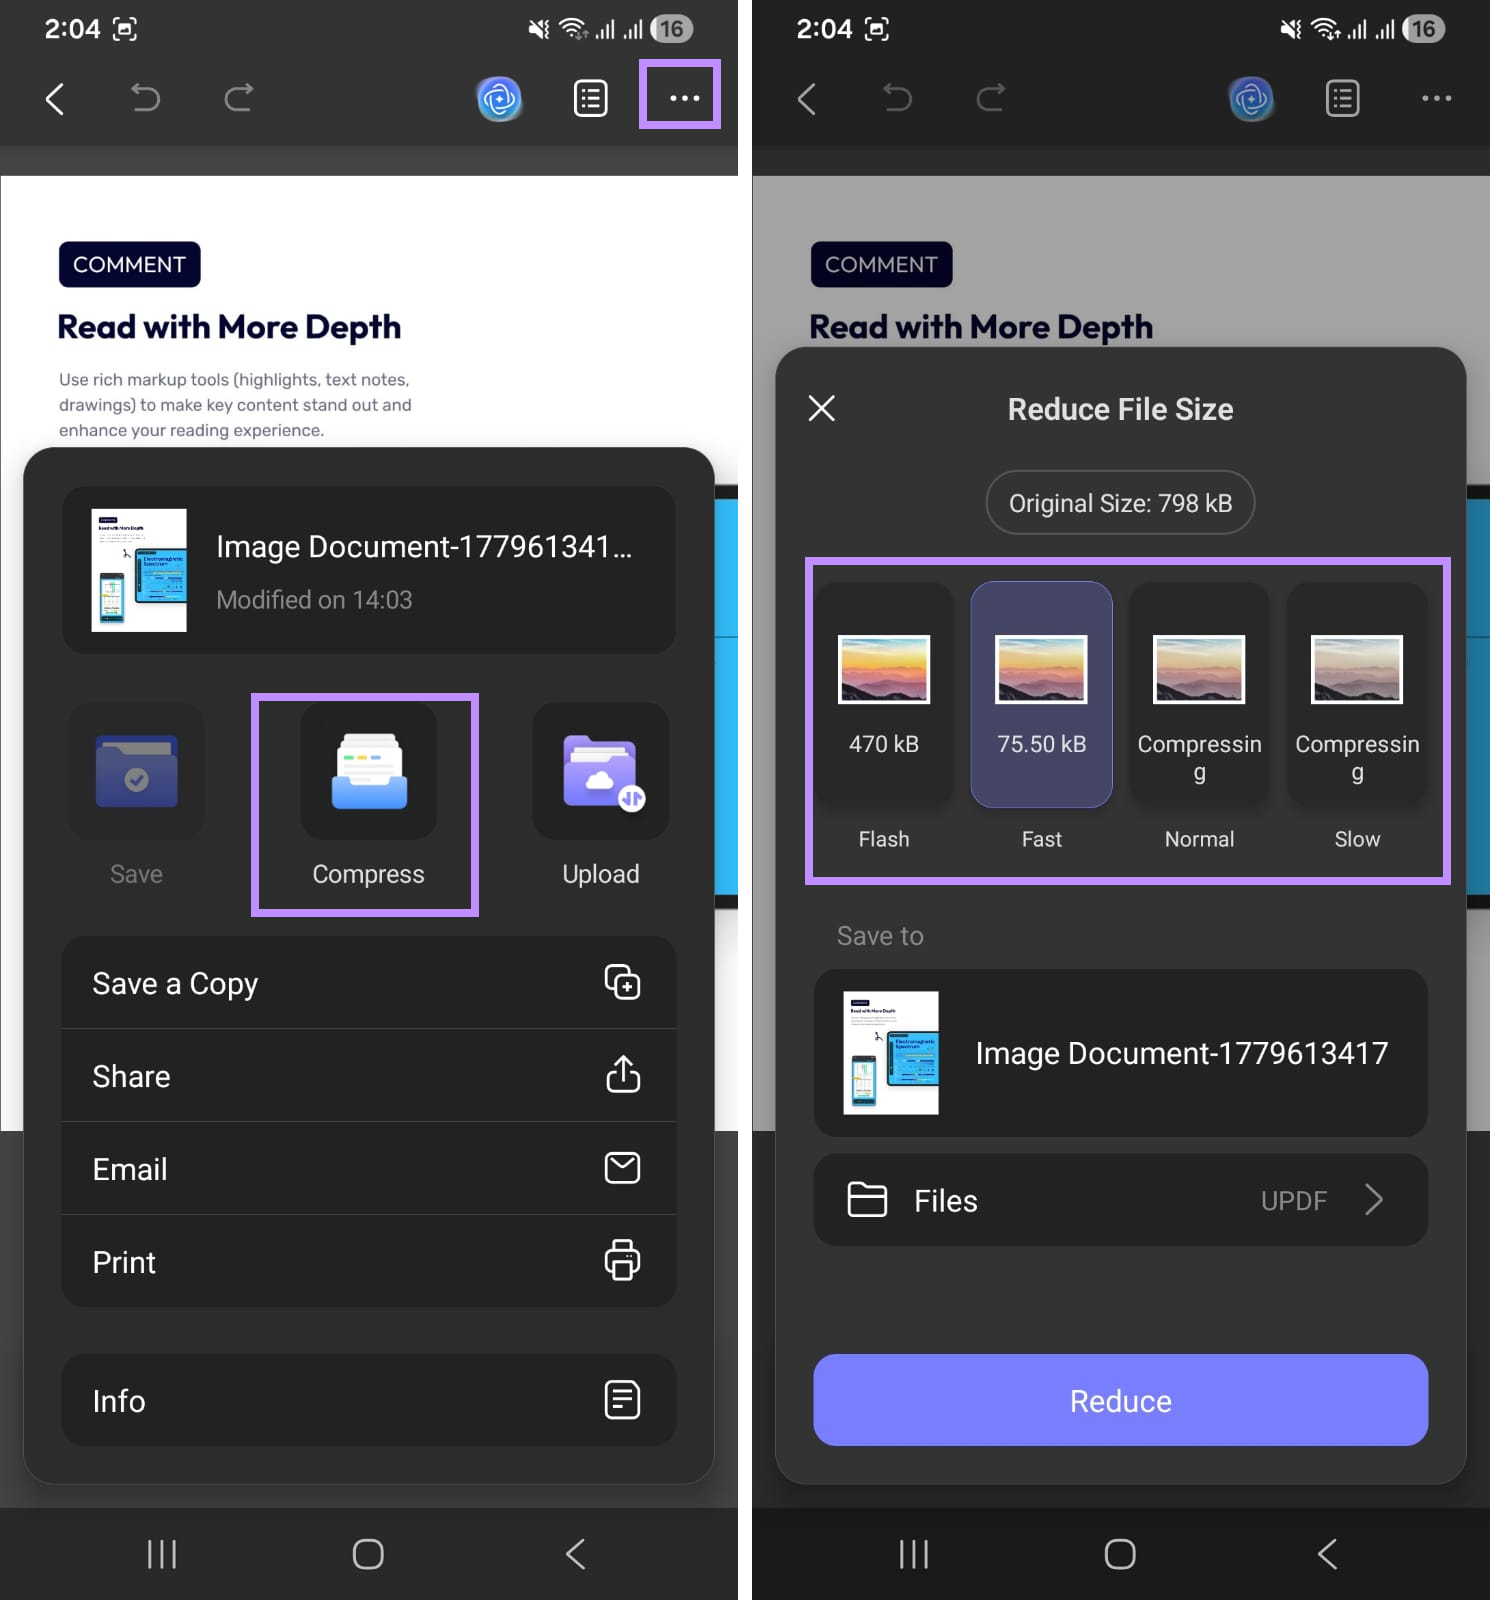
Note: UPDF also supports image compression on mobile devices. It offers four compression levels based on file size and compression speed. However, the mobile app does not support batch image resizing, and the compressed images are saved as PDFs whether you compress them on your desktop or phone. Resizing images in PDF is also supported on UPDF.
Part 3. How to Batch Resize Images on Windows 11/10/8/7?
Many Windows users think they need to manually batch-resize images in Photoshop. However, you can do it easily using dedicated batch processing tools such as Microsoft’s official PowerToys or various third-party options.
PowerToys Image Resizer:
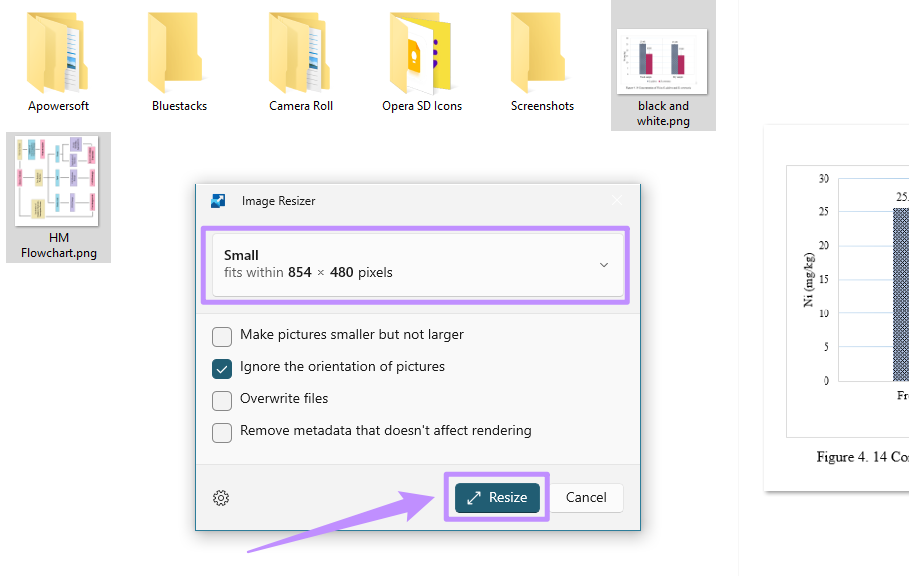
PowerToys is Microsoft's official app that allows you to resize multiple images by pixels and percentage. It offers various size presets, along with the option to custom-create new presets.
Here are the steps.
- Download and open Microsoft PowerToys and enable the Image Resizer tool.
- Select your images and right-click. Then, choose “Resize with Image Resizer.”
- Click the presets dropdown and choose your preferred size from the small, medium, large, and phone options.
- Adjust other settings if needed and click “Resize.”
IrfanView Batch Processing:
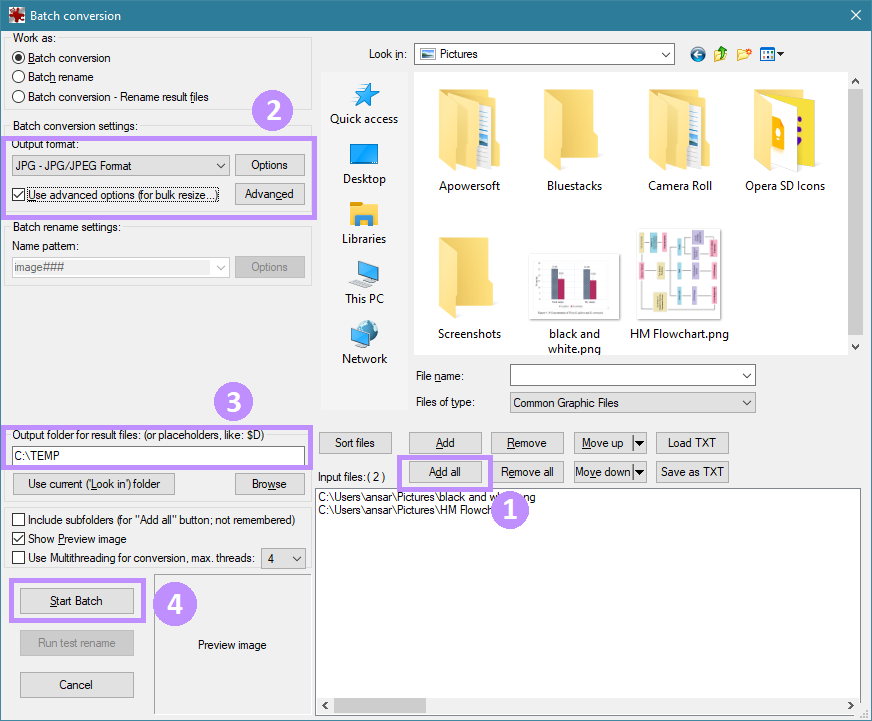
InfanView allows you to resize multiple photos by pixels, percentage, cropping, and more. Moreover, you can convert files into 20 image formats.
Here’s how it works.
- Download and open IrfanView and click “File.” Then, choose “Batch Conversion/Rename” from the list.
- Locate your images using the right panel. Then, click “Add all” to select them.
- Click the Output format dropdown and choose your desired format.
- Select “Use advanced options for bulk resize” and click the “Advanced Options” button.
- Adjust the image dimension settings under the Resize section and click “OK.”
- Set the output folder and click “Start Batch” to proceed.
FastStone Photo Resizer:
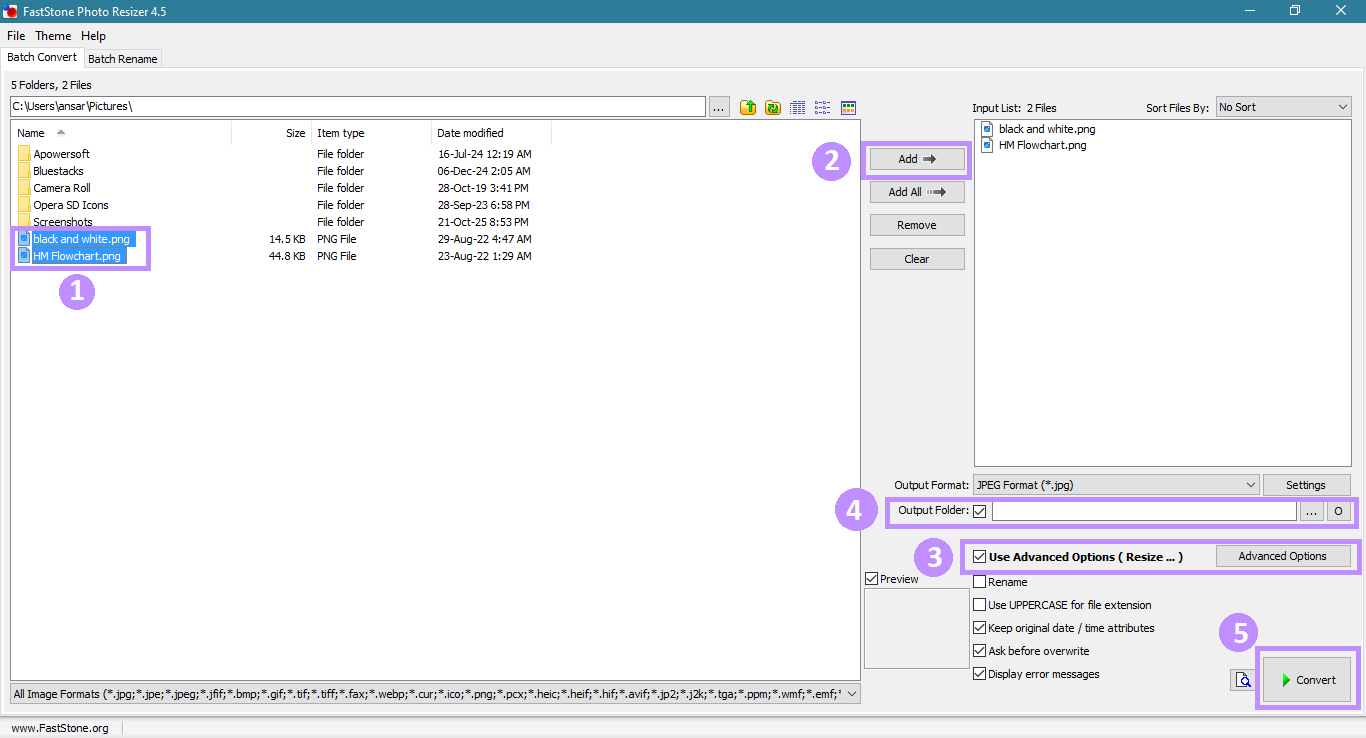
FastStone is a free app that allows you to batch convert and rename multiple images. Before exporting, you can resize images by pixels, percentage, print size, and the dimensions of one side of the image.
Follow these steps to batch-resize images.
- Download and open the FastStone app and go to the folder containing your images.
- Select the desired images and click “Add” from the right.
- Check “Use Advanced Options” and click the Advanced Options button.
- Select the Resize option. Then, choose a method for resizing.
- Set the resize dimensions and click “OK.”
- Choose an output folder and click “Convert” to resize all images.
Part 4. How to Batch Resize Images on macOS?
To batch resize images on Mac, you can either use built-in tools such as Preview and Automator workflow or third-party apps such as Freshly Squeezed.
Preview App Batch Adjustment:
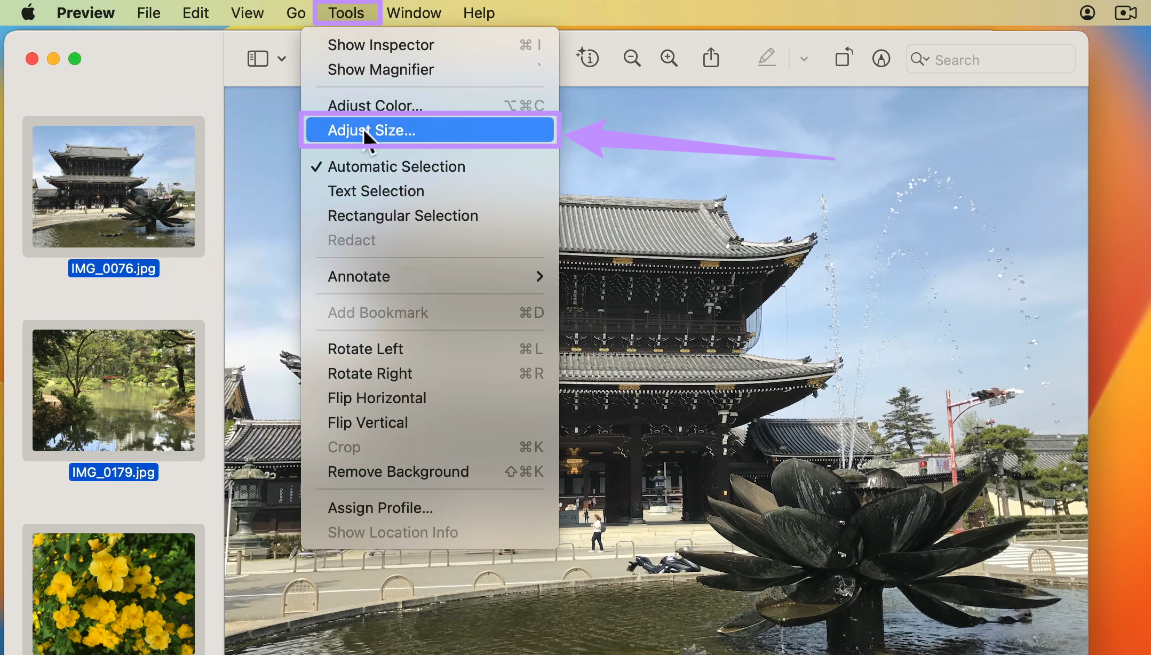
With Mac Preview, you can open multiple images and adjust their size by width, height, and image resolution.
- Select the images to resize in Finder. Then, click “File” and choose “Open.”
- Select all images and click “Tools” at the top. Then, choose “Adjust size.”
- Set the image dimensions for all images and click “OK.”
Automator Workflow:
If you're working with a large batch of images, the Automator app allows you to batch-resize images for free by creating an automatic workflow.
- Open the Automator app and select the “Quick Actions” option.
- Select “Photos” and drag “Scale Images” to the workflow window.
- Click “Add” to allow copying of original files.
- Set a folder to save copied images. Then, customize the image scaling size.
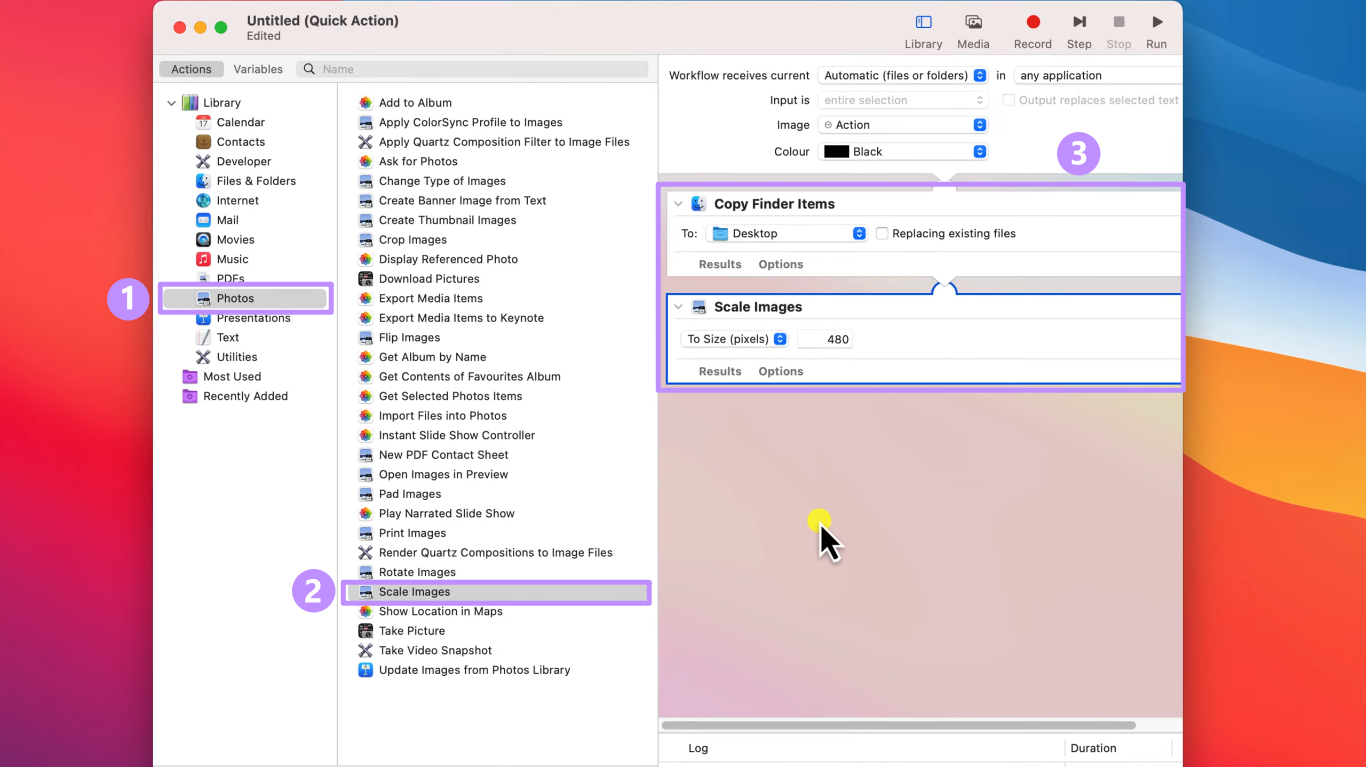
- Go to “File” and click “Save.” Rename the action as “Resize Photos” and click “Save.”
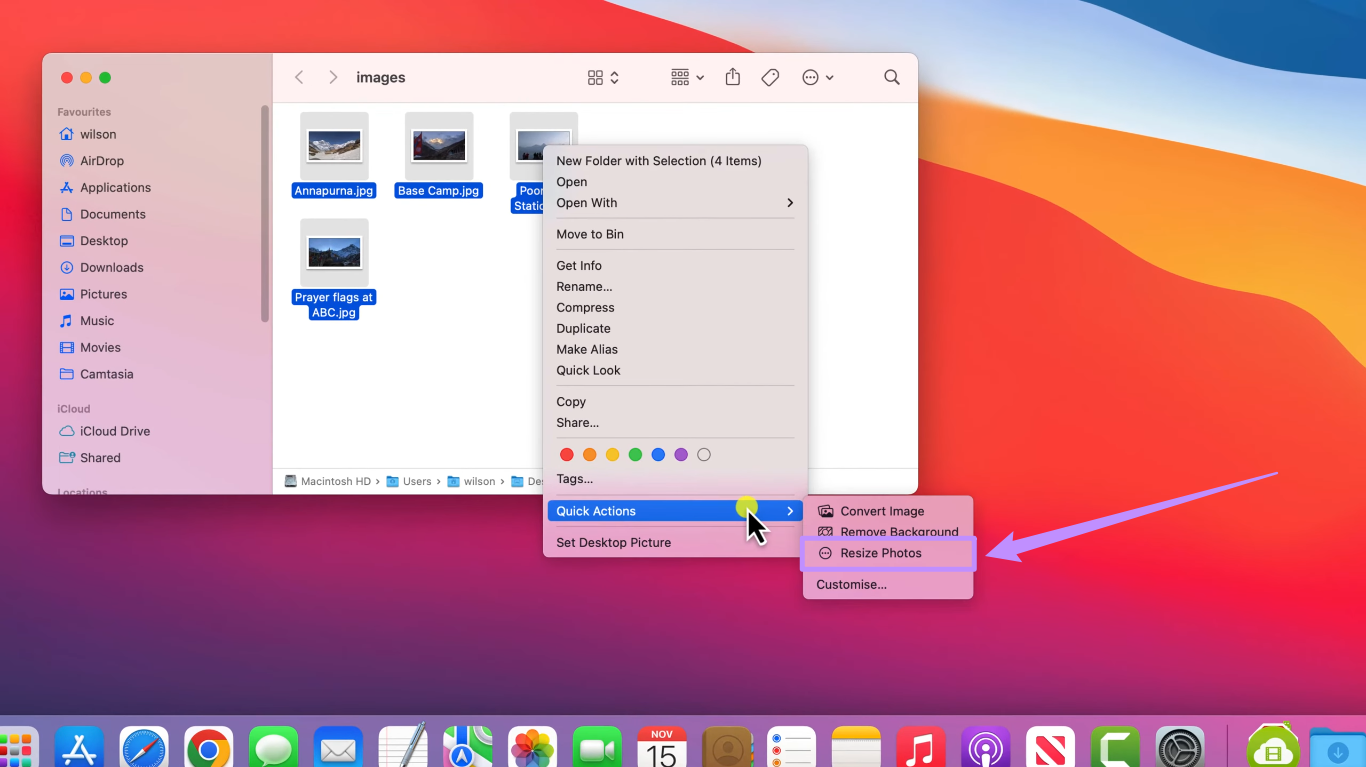
- Select the images you want to resize. Then, right-click and choose “Quick Actions.”
- Select “Resize Photos” from the list and click “OK’ to proceed.
Freshly Squeezed:
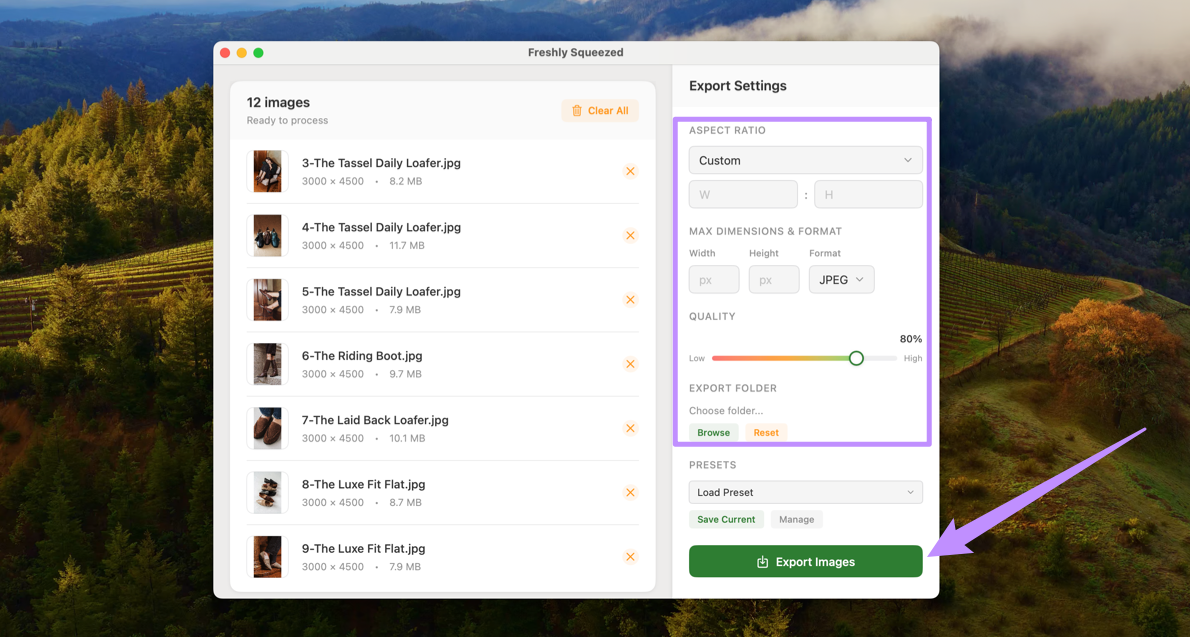
Freshly Squeezed is a user-friendly app that allows you to resize images by their aspect ratio, dimensions, and quality.
- Open the Freshly Squeezed app on Mac and drag and drop your images to its interface.
- From the right panel, adjust the image ratio, dimensions, and quality as needed.
- Set an export folder and click “Export images.”
Also Read: Check How to Resize PDF Size on Mac
How to Batch Resize Images on Your Phone?
If you’re working on your smartphone, you can use the following apps to resize images.
PhotoFlow: Batch Processing App for iOS
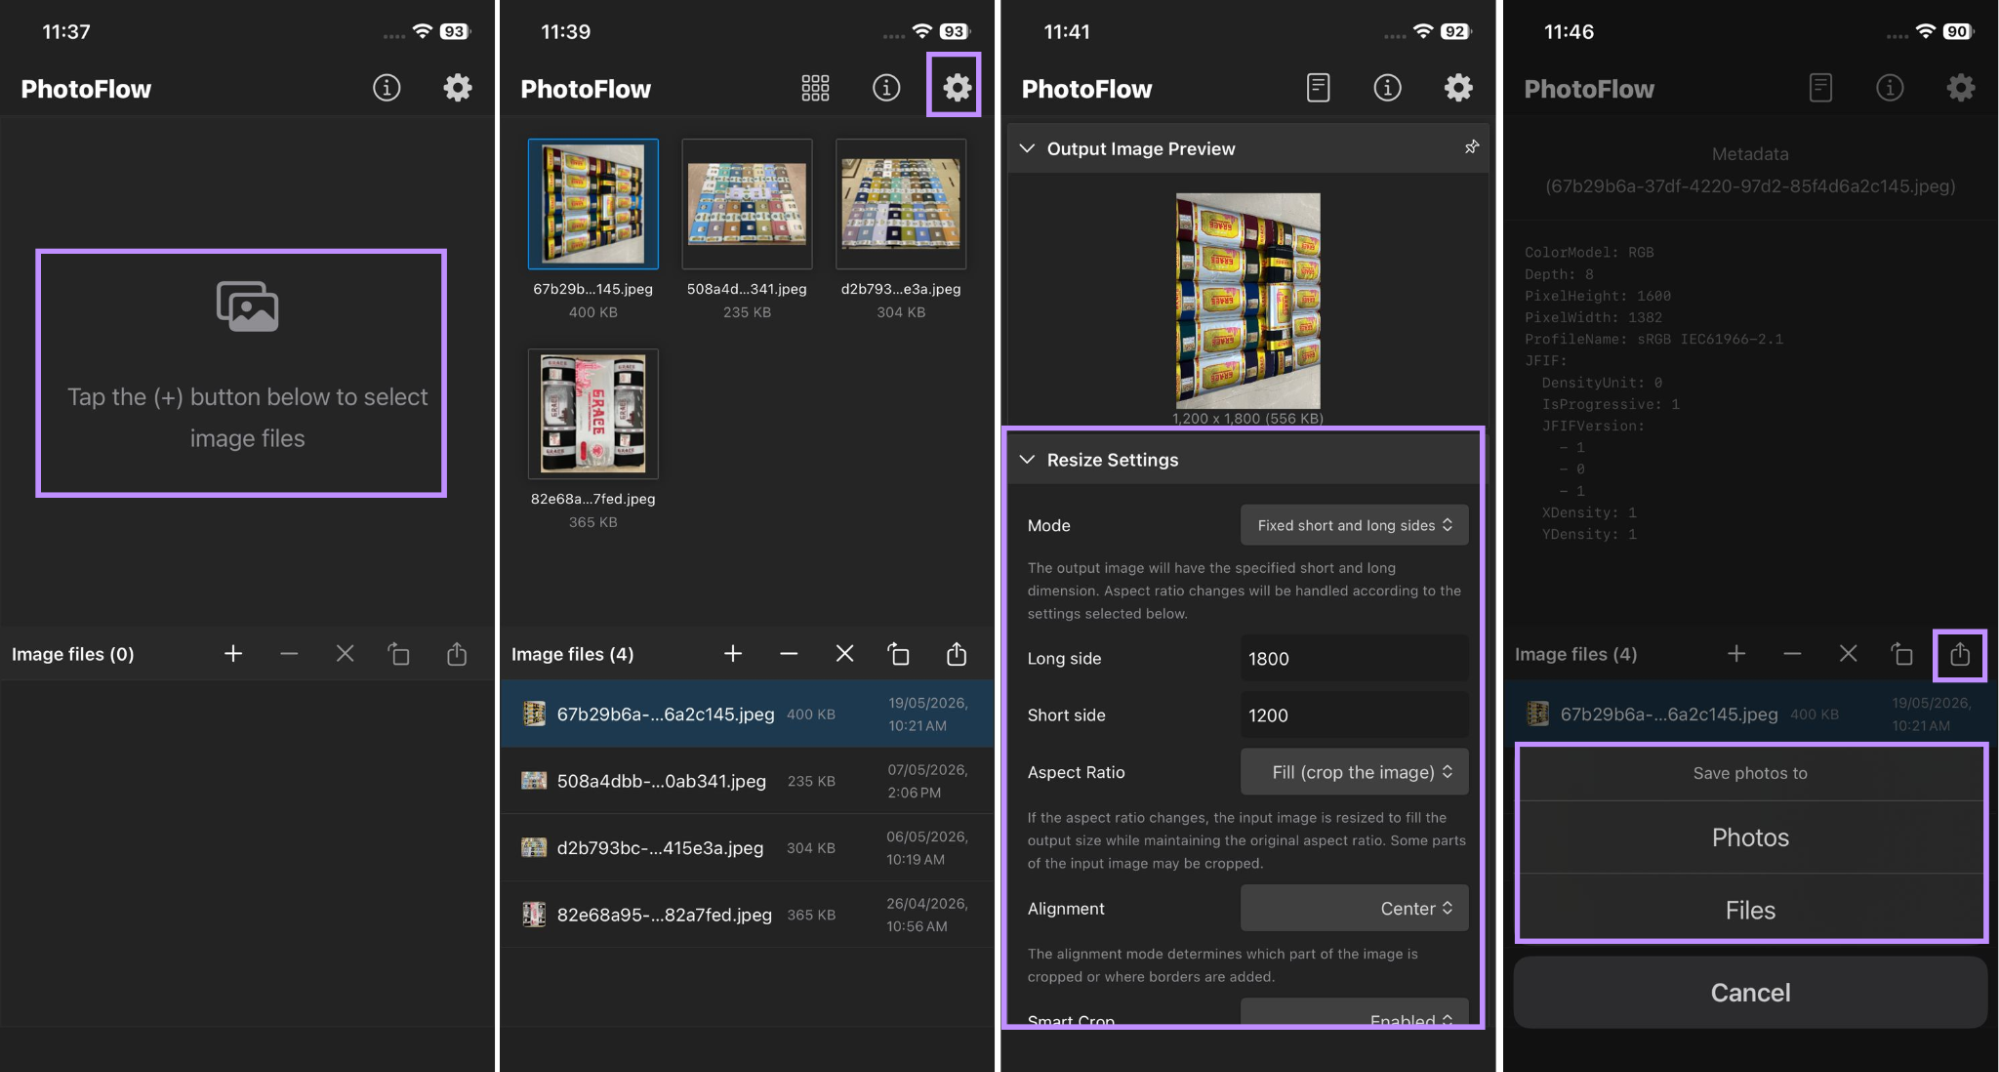
PhotoFlow lets you resize images by width, height, aspect ratio, and more.
- Open the PhotoFlow app and tap the “+” button to add your images.
- Tap the “Settings” icon at the top and adjust the resize settings.
- Then tap the file view icon at the top to view your images.
- Tap the “Share” icon and choose where to save the resized images.
Pixelcut: Mobile AI Batch Processing for Android
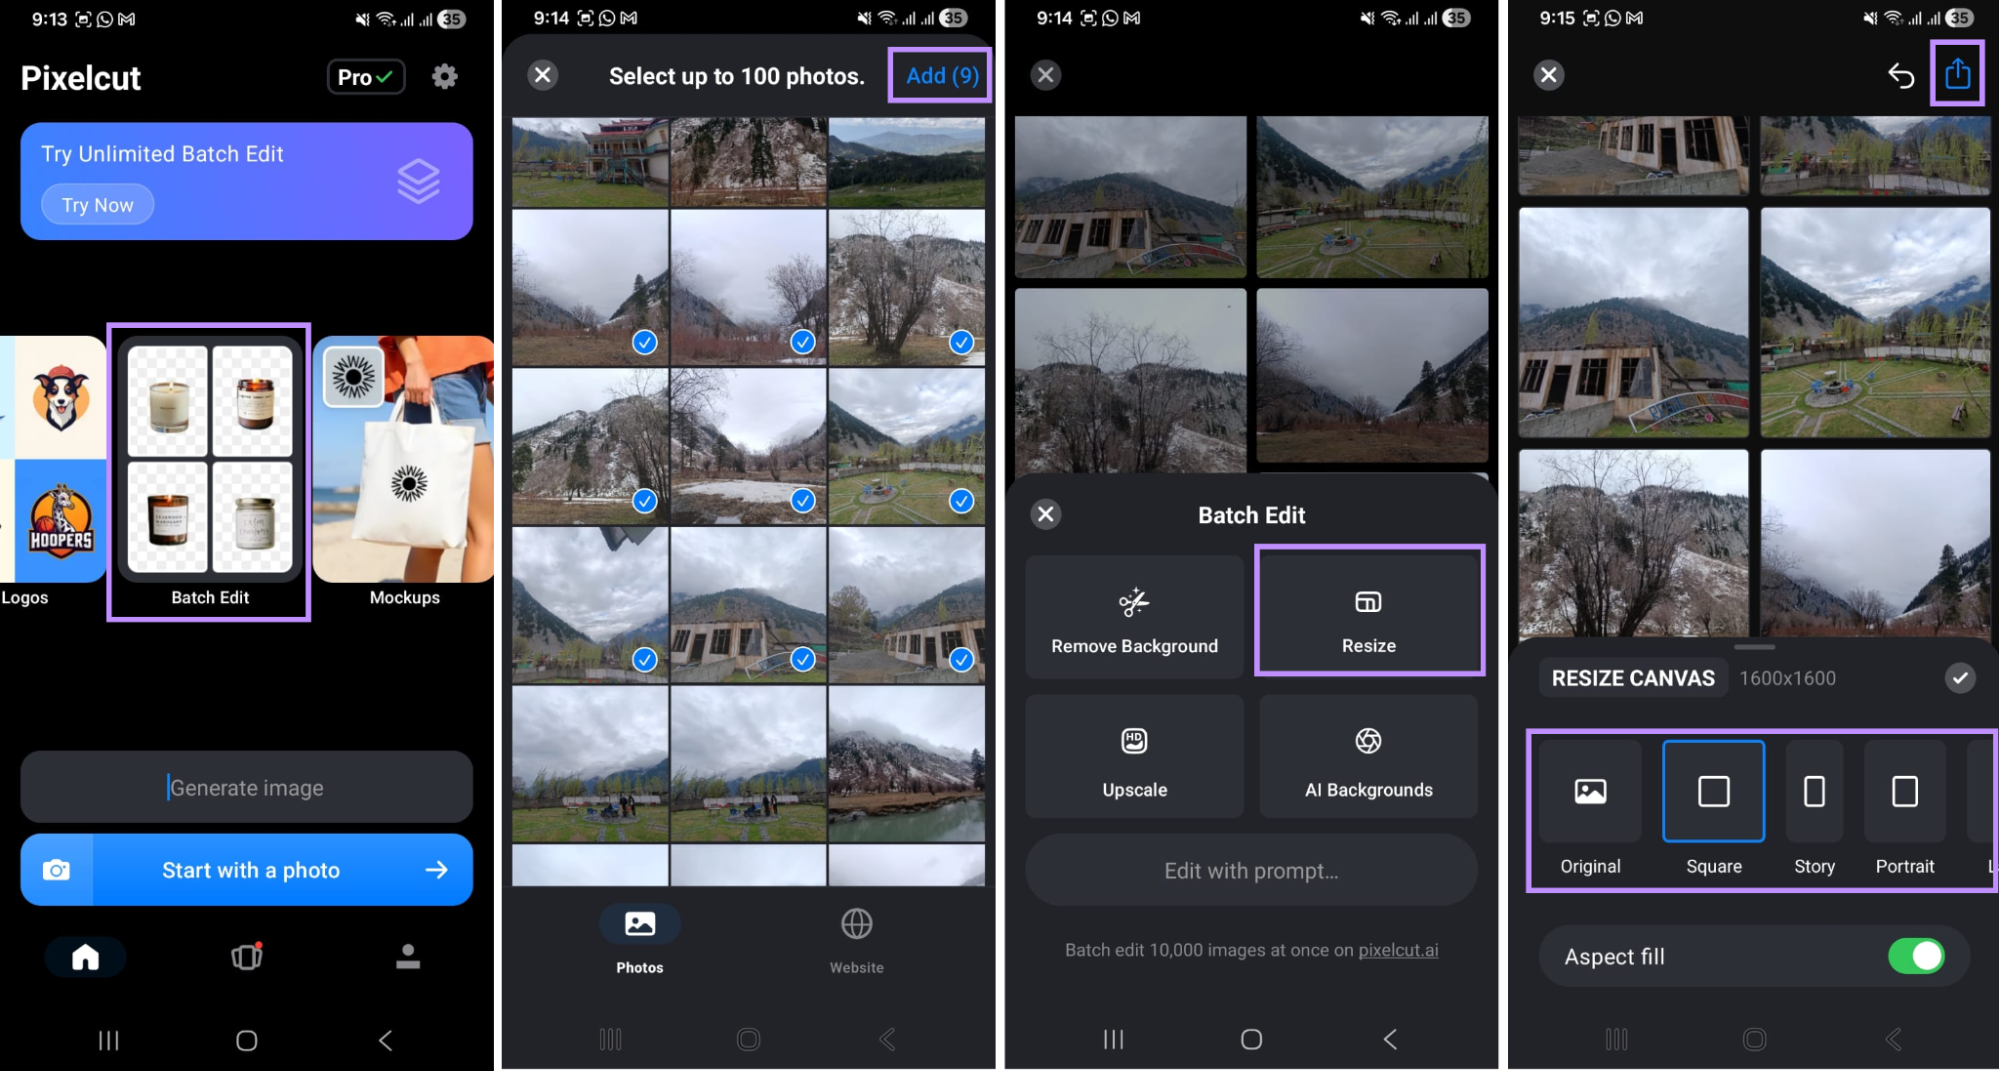
Pixelcut is an AI-driven photo editing app with the option to batch-resize images by adjusting their canvas size.
- Open Pixelcut and select the “Batch Edit” tool.
- Select all the images you want to resize and tap “Add.” Then, tap on “Resize.”
- Then, select the desired image dimensions and enable “Aspect fill” if needed.
- Tap the “Share” icon at the top and set export settings. Then, tap “Download images.”
Wrapping Up
Batch resizing images doesn't have to be complicated, whether you need to standardize dimensions, compress file sizes, or do both at once. Every platform has reliable tools to get the job done. However, if you want one solution that handles all three scenarios seamlessly across Windows, Mac, iOS, and Android, UPDF is the clear choice. Download and try UPDF today!
Windows • macOS • iOS • Android 100% secure





 Estrella López
 Enrica Taylor
 Enola Miller