Knowing how to add a digital signature in PDF has become essential for professionals and businesses alike. It reduces the need for printing, signing, and scanning files, making the process faster and more efficient. Whether you're dealing with contracts, agreements, or legal documents, adding a digital signature ensures both security and convenience. This article will walk you through the steps to seamlessly add a digital signature using UPDF, a powerful PDF tool designed to make document signing a breeze. Let's explore how you can simplify your workflow with UPDF's signature features.
Part 1. How to Add a Digital Signature in PDF
Imagine you're finalizing an important contract with a client. Both parties are working remotely, and time is of the essence. Instead of printing, signing, and scanning documents back and forth, you can securely add your digital signature to the PDF within minutes, saving both time and effort.
UPDF makes it incredibly easy to add digital signatures to PDFs. With its user-friendly interface, you can sign any document in just a few clicks. UPDF ensures that your signature is legally binding and securely encrypted, protecting your personal information. When adding a digital signature, you have the option to create a new one or import an existing signature from your local storage.
Additionally, it allows for easy collaboration, enabling others to sign the same document. This tool supports a wide range of signature formats, including handwritten, typed, and image-based signatures. Download UPDF today and simplify your PDF management tasks—whether it's for contracts, agreements, or personal documents—streamline your workflow with a few quick steps!
Windows • macOS • iOS • Android 100% secure
Method 1: Create and Add a Digital Signature
Step 1: Open Your PDF File
First, run the UPDF software on your computer. To open the PDF file you want to sign, click on the "Open File" button, or users can simply drag and drop the file into the UPDF window. This will instantly load your document into the editor.
Step 2: Switch to Prepare Form Mode
Once your file is open, navigate to the top toolbar and select the "Tools" and, then, "Form" mode. This enables the features necessary for adding form fields to your PDF. From here, click on the "Digital Signature" option located in the top menubar.
Step 3: Create a Signature Field
With the Digital Signature option selected, you'll now create a signature field. Choose any location on the PDF where you want the signature to appear. Once placed, you can adjust the size of the field by dragging its corners. To further customize the field, double-click on it to access additional settings for the signature.
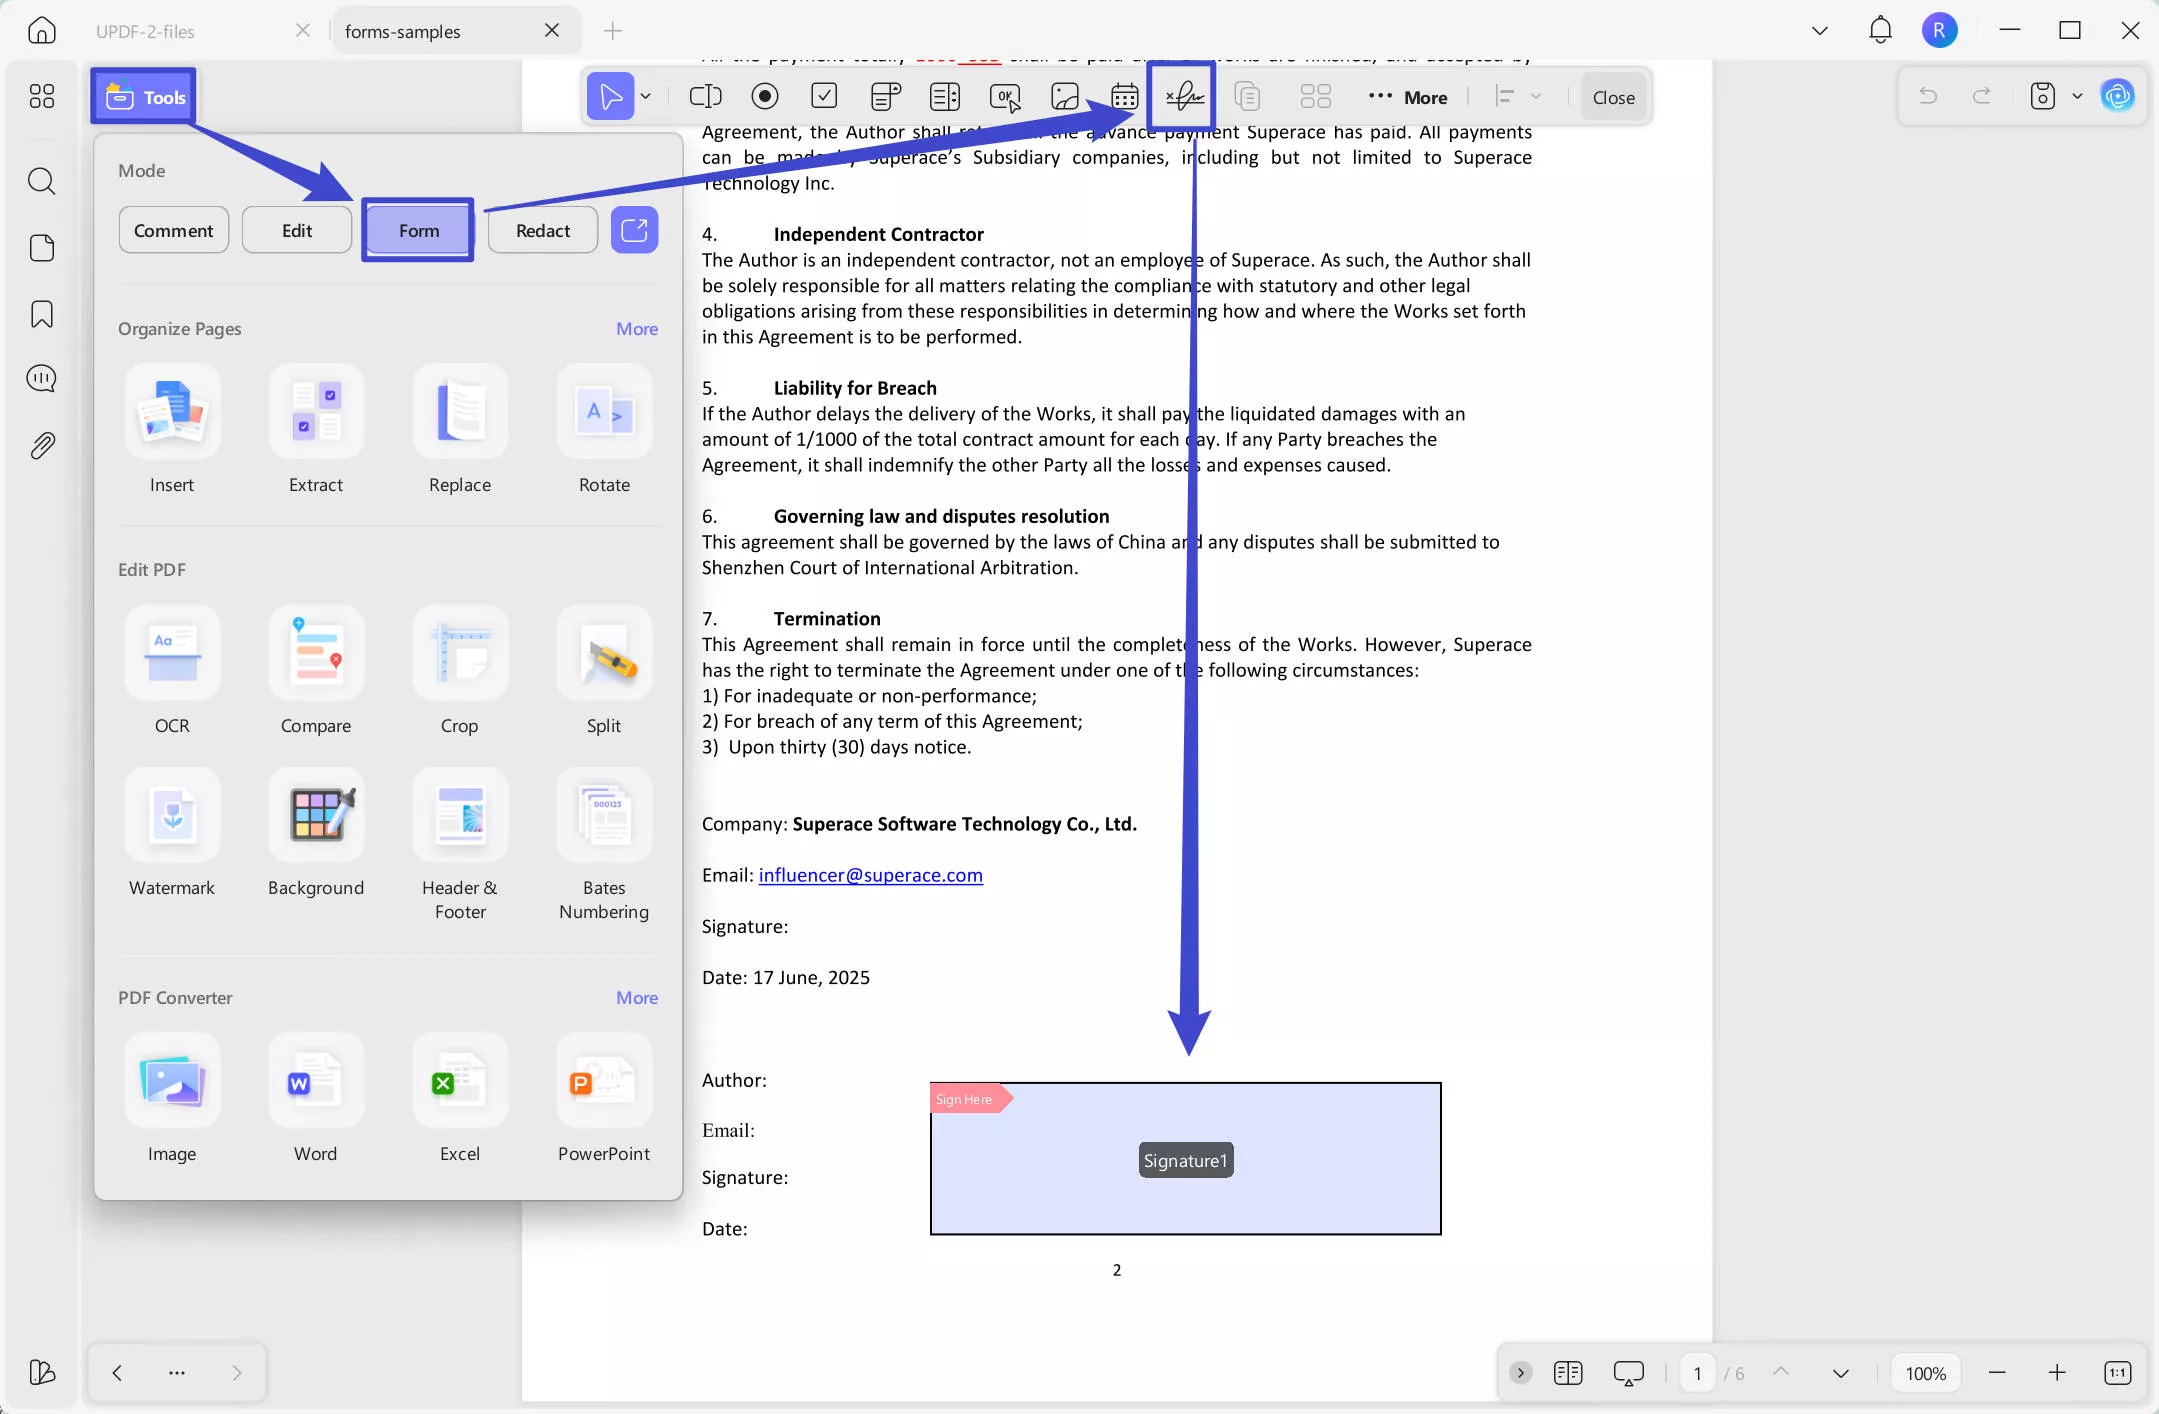
Step 4: Add the Digital Signature
Clicking on the "Close" icon on the top menu to exit the "Form" mode. Now, you can start to add the signature by clicking on the signature field.
You can create a signature directly within the program. Simply click on "Create" to enter your name or other information, then, click on the "OK" to create a digital signature. Select a location to save it and add a password, then, click on the "OK".
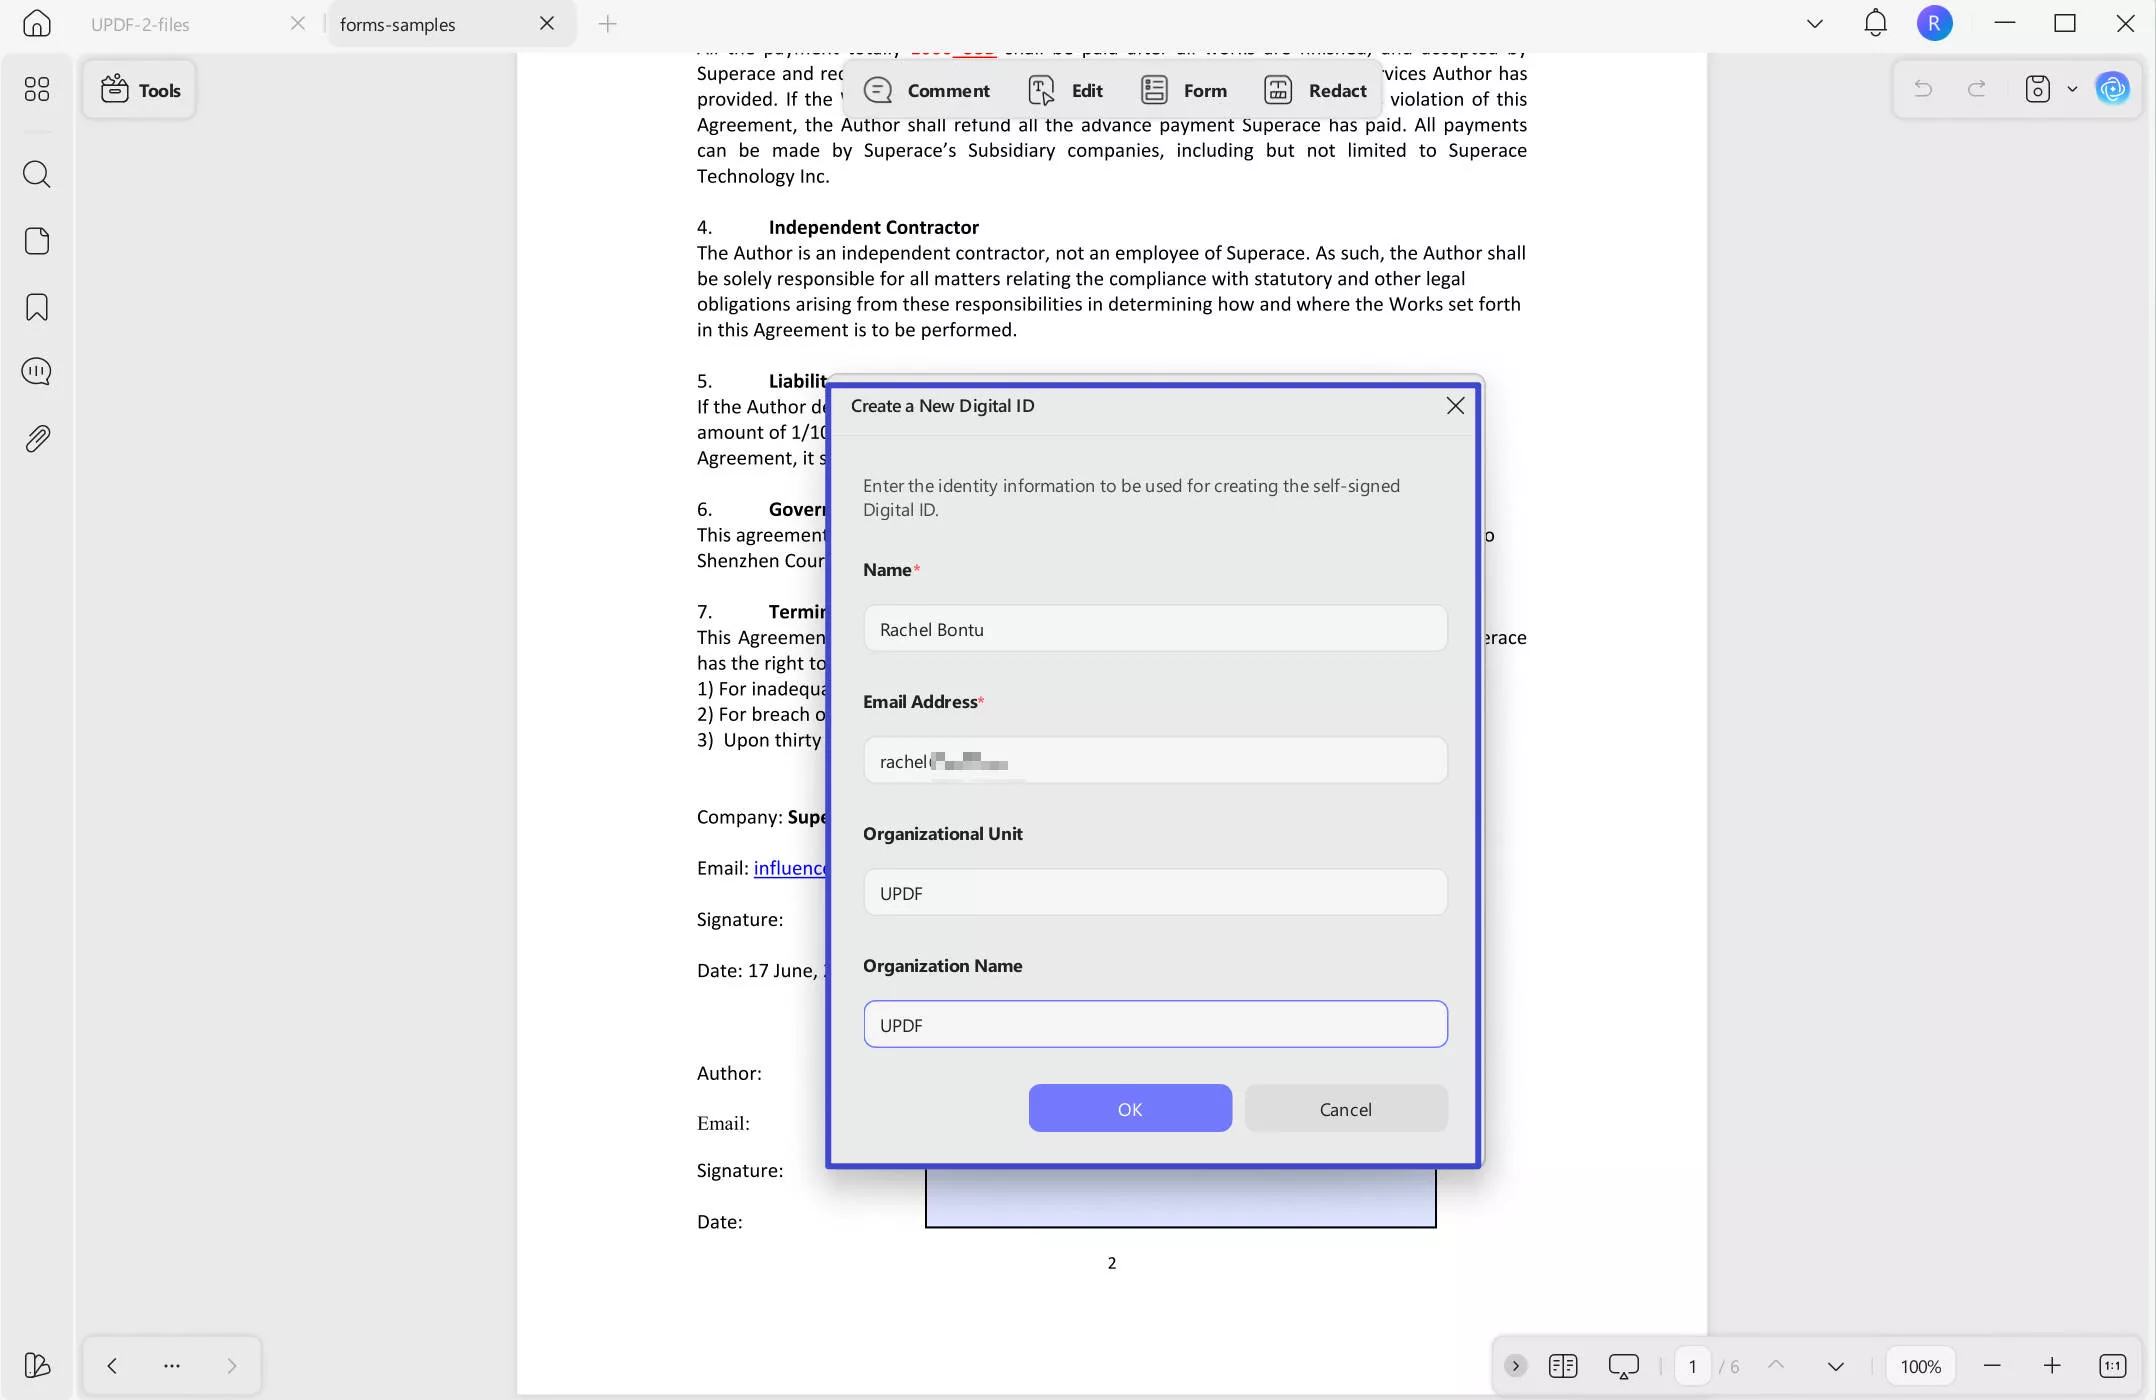
Step 5: Sign and Save the File
After creating the signature, click on "Sign" to place it in the designated field. Once the signature is in place, select the location where you'd like to save the signed PDF. The signature is now securely embedded in the document.
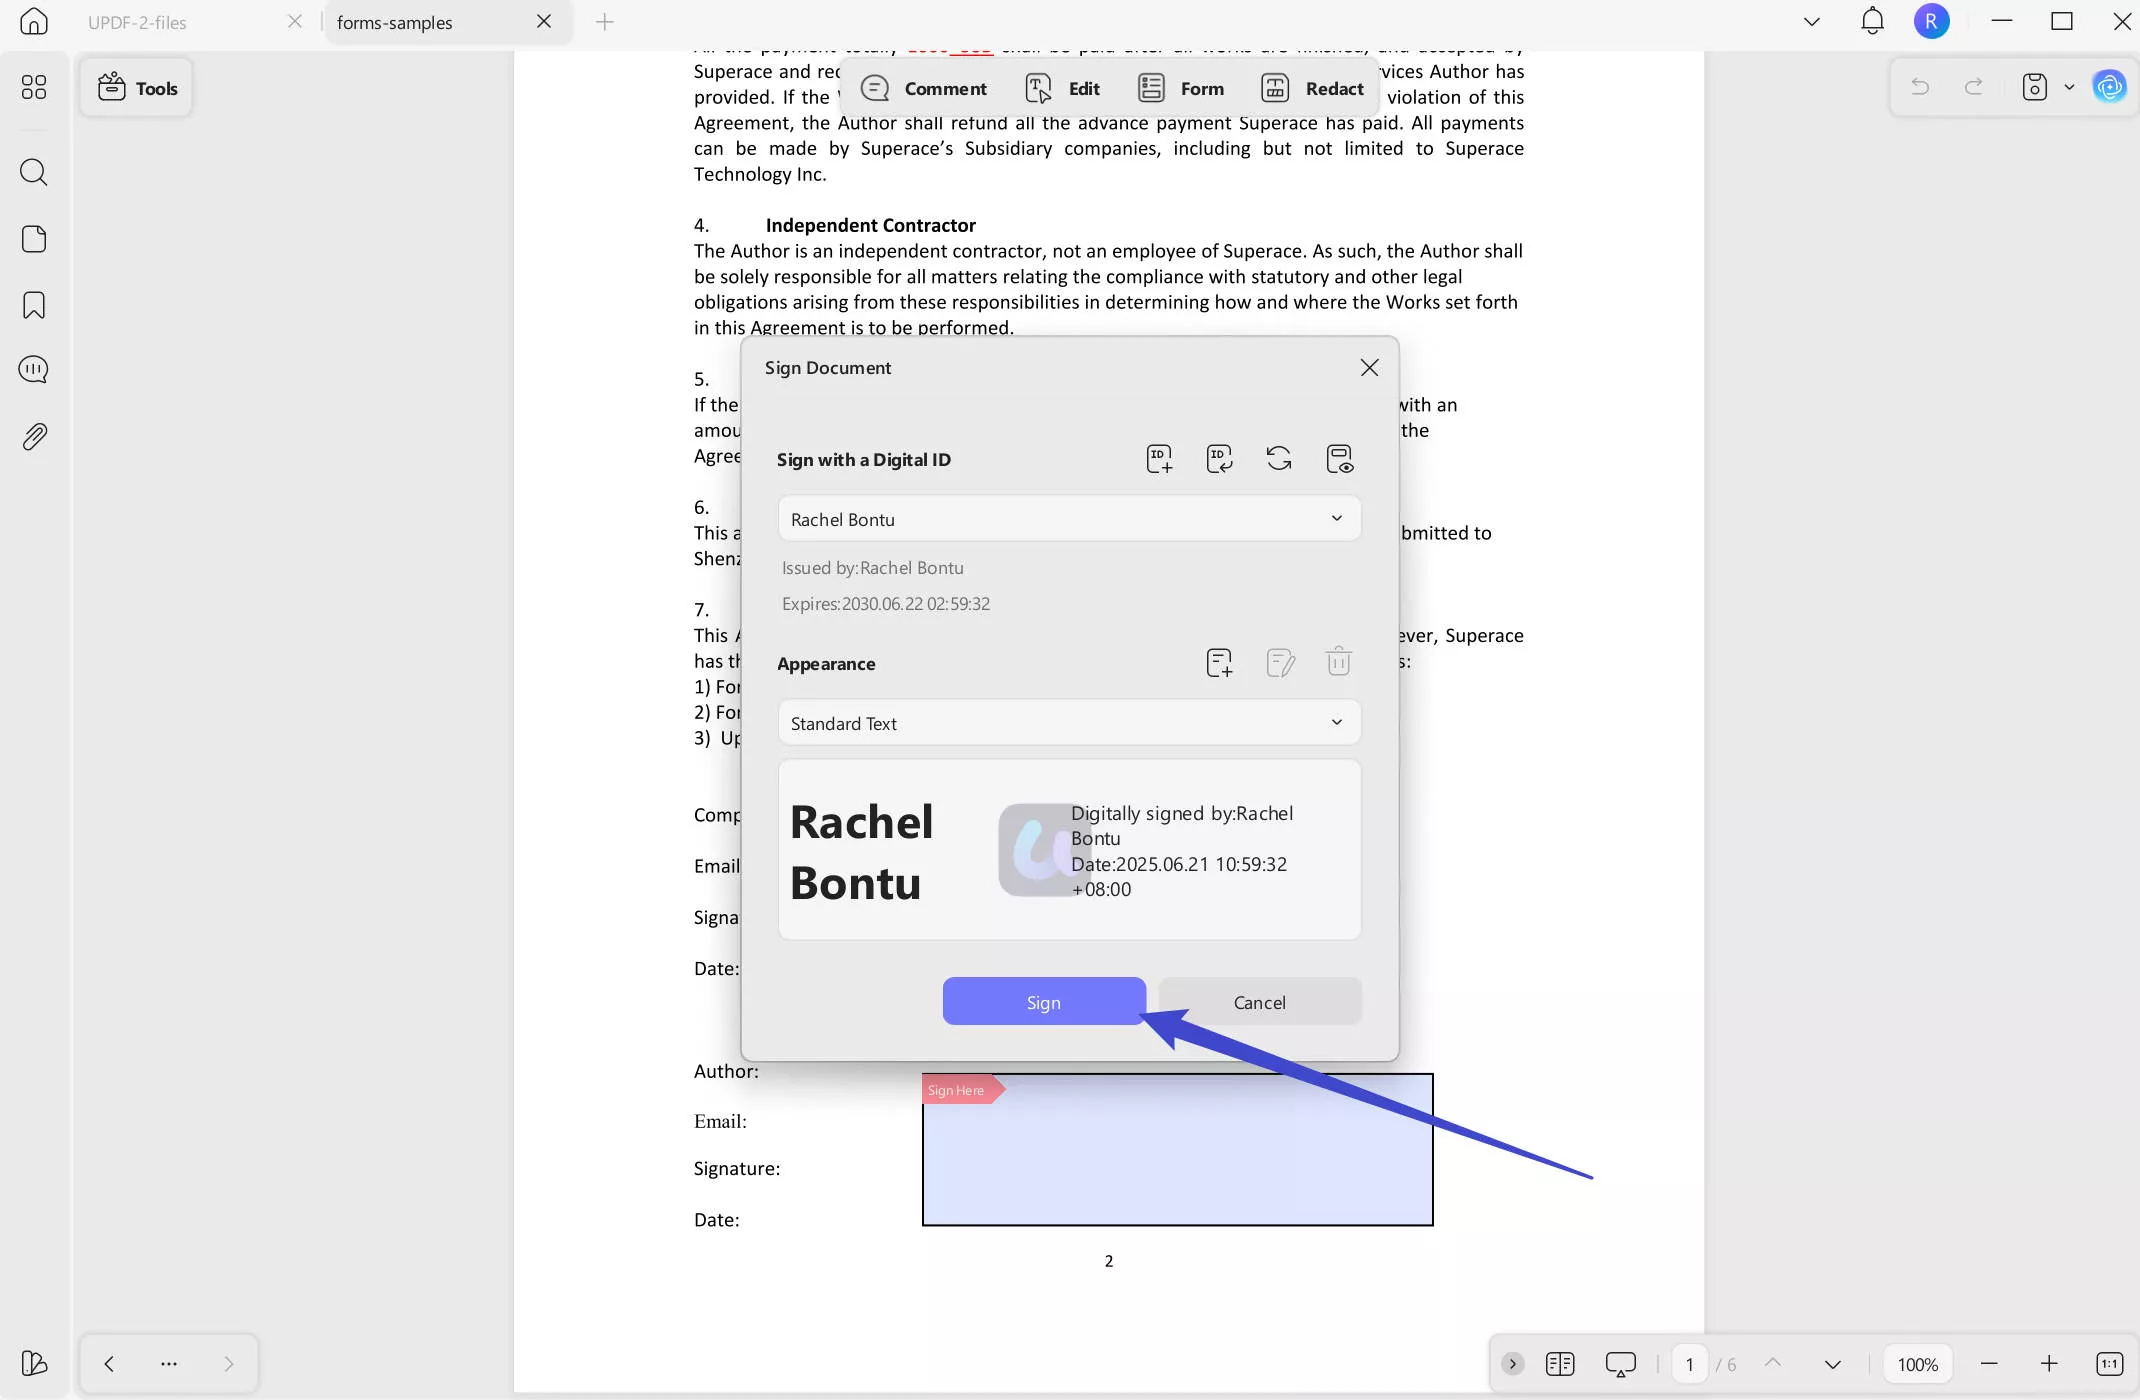
Method 2: Add a Digital Signature by Importing
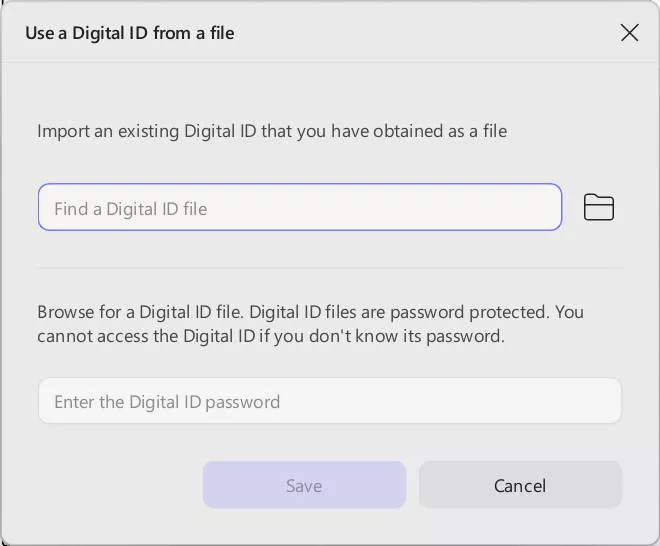
Once you've completed Steps 1 to 3 from Method 1, you can proceed by importing an existing signature. After clicking on the signature field, instead of creating a new signature, choose the "Import" option.
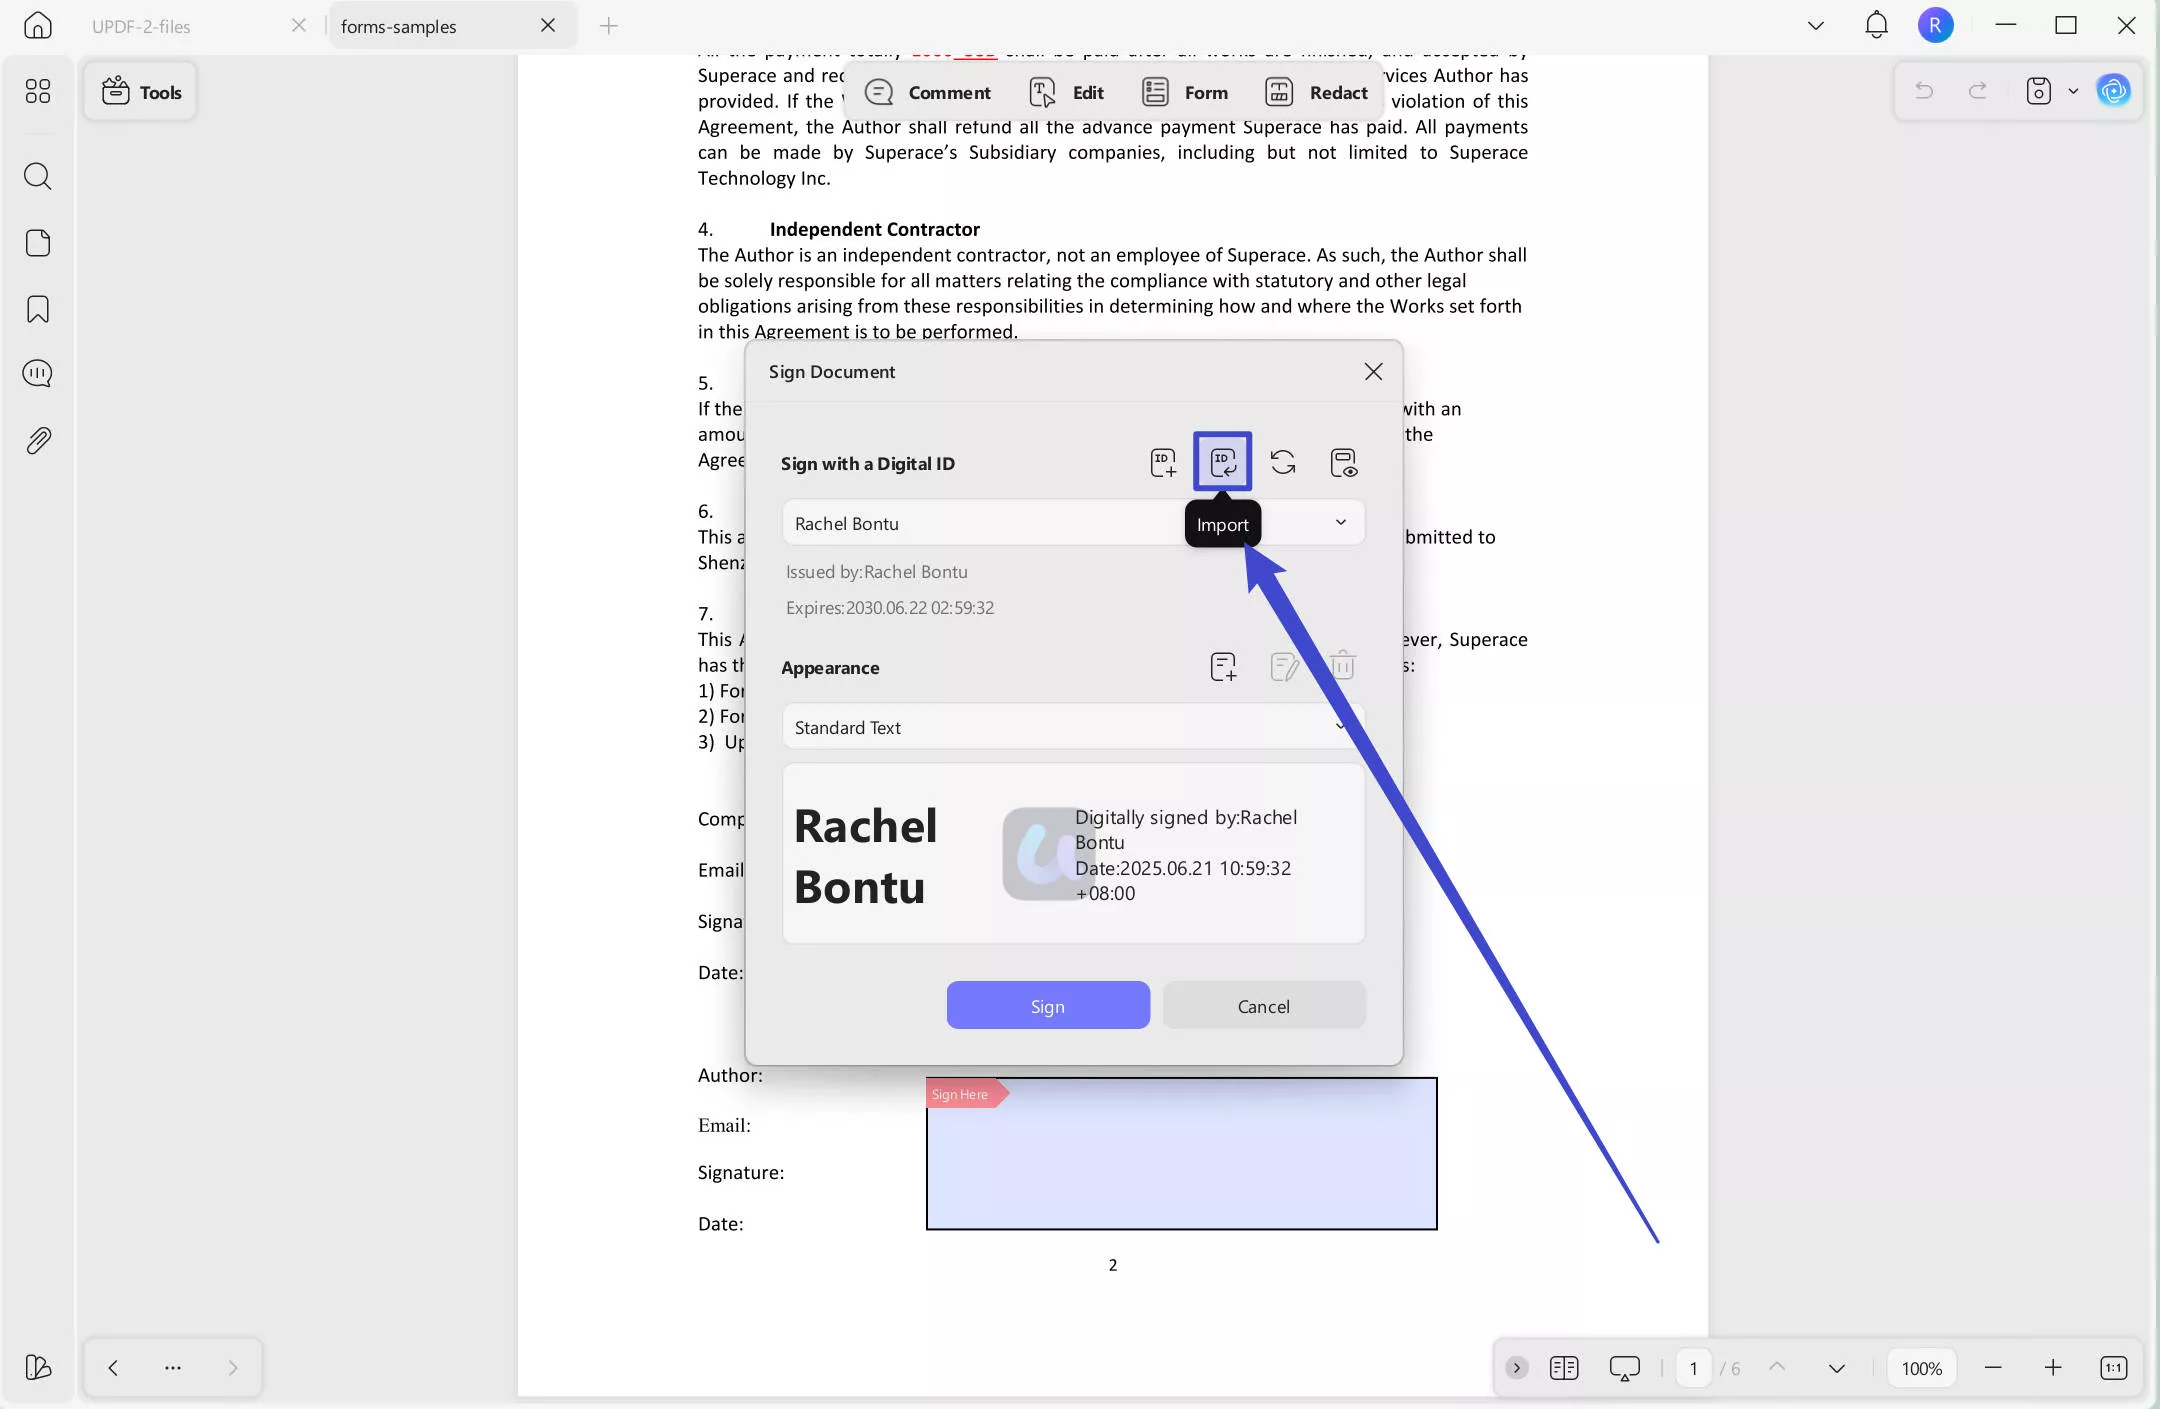
Upload a pre-existing signature image file from your device, click on the "Save", and then click "Sign." Save the file to finalize.
Unlock the full potential of UPDF by upgrading to the Pro version today! Gain access to premium features like unlimited digital signatures, advanced PDF editing tools, and enhanced security options. Elevate your PDF workflow and handle documents more efficiently. Upgrade now and experience the power of UPDF Pro!
Part 2. Why Choose UPDF for Adding Digital Signatures?
UPDF stands out as a user-friendly solution for adding digital signatures, making the process both secure and efficient. Whether you're creating a signature from scratch or importing one, UPDF's simple interface ensures that your signature is applied seamlessly. With features like customizable signature fields and easy document saving, it's a top choice for managing digital signatures.
In addition to signatures, UPDF offers comprehensive PDF protection features. You can redact sensitive information, preventing unauthorized access to private details, and add watermarks to your documents for branding or security. Furthermore, password protection is available to safeguard your PDFs from unauthorized viewing or editing. These features work together to enhance both the privacy and professionalism of your documents.
UPDF offers a wide range of additional tools to enhance your PDF management experience. Watch the following video to explore everything UPDF can do for you!
Conclusion
Adding a digital signature to your PDFs is a straightforward process when using UPDF. By following the outlined steps, you can efficiently create secure, professional documents, complete with customizable signature fields. Beyond its signature capabilities, UPDF offers a variety of advanced features like redaction, password protection, and watermarks, making it an all-in-one PDF solution. Whether you're managing contracts or sharing important documents, UPDF ensures both privacy and ease of use. Give UPDF a try and experience its powerful tools for yourself—it's the perfect way to streamline your document workflow.
Windows • macOS • iOS • Android 100% secure
 UPDF
UPDF
 UPDF for Windows
 UPDF for Mac
 UPDF for iPhone/iPad
 UPDF for Android
 UPDF AI Online
 UPDF Sign
 Edit PDF
 Annotate PDF
 Create PDF
 PDF Form
 Edit links
 Convert PDF
 OCR
OCR PDF to Word
 PDF to Image
 PDF to Excel
 Organize PDF
 Merge PDF
 Split PDF
 Crop PDF
 Rotate PDF
 Protect PDF
 Sign PDF
 Redact PDF
 Sanitize PDF
 Remove Security
 Read PDF
 UPDF Cloud
 Compress PDF
 Print PDF
 Batch Process
 About UPDF AI
 UPDF AI Solutions
 AI User Guide
 FAQ about UPDF AI
 Summarize PDF
 Translate PDF
 Chat with PDF
 Chat with AI
 Chat with image
 PDF to Mind Map
 Explain PDF
 Scholar Research
 Paper Search
 AI Proofreader
 AI Writer
 AI Homework Helper
 AI Quiz Generator
 AI Math Solver
 PDF to Word
 PDF to Excel
 PDF to PowerPoint
 User Guide
 UPDF Tricks
 FAQs
FAQs UPDF Reviews
 Download Center
 Blog
Blog Newsroom
 Tech Spec
 Updates
 UPDF vs. Adobe Acrobat
 UPDF vs. Foxit
 UPDF vs. PDF Expert







 Lizzy Lozano

