 UPDF
UPDF
 UPDF for Windows
 UPDF for Mac
 UPDF for iPhone/iPad
 UPDF for Android
 Nomostar
 UPDF AI Online
 UPDF Sign
 IvyCraft
 Edit PDF
 Annotate PDF
 Create PDF
 PDF Form
 Edit links
 Convert PDF
 OCR
OCR PDF to Word
 PDF to Image
 PDF to Excel
 Organize PDF
 Merge PDF
 Split PDF
 Crop PDF
 Rotate PDF
 Protect PDF
 Sign PDF
 Redact PDF
 Sanitize PDF
 Remove Security
 Read PDF
 UPDF Cloud
 Compress PDF
 Print PDF
 Batch Process
 About UPDF AI
 UPDF AI Solutions
 AI User Guide
 FAQ about UPDF AI
 Summarize PDF
 Translate PDF
 Chat with PDF
 Chat with AI
 Chat with image
 PDF to Mind Map
 Explain PDF
 PDF AI Tools
 Image AI Tools
 AI Chat Tools
 AI Writing Tools
 AI Study Tools
 AI Working Tools
 Other AI Tools
 AI Bookmark Generation
 AI Bookmark Summary
 AI Watermark Generation
 AI Background Generation
 AI Sticker Generation
 AI Stamp Generation
 AI Editing Suite
 UPDF Copilot
 AI Page Management
 AI Semantic Search
 PDF to Word
 PDF to Excel
 PDF to PowerPoint
 Enterprise Solution
 Enterprise Sign
 Enterprise AI
 Enterprise Plan
 Enterprise User Guide
 Enterprise Webinar
 IT
IT Education
 Construction
 Financial Service
 Healthcare
 Insurance
 Legal
Legal Manufacturing
 Government
 Researchers & PhDs
 Solopreneurs & Freelancers
 Lawyers & Legal Professionals
 Real Estate Agents & Brokers
 Education Solution
 Customer Stories
 User Guide
 UPDF Tricks
 FAQs
FAQs UPDF Reviews
 Download Center
 Blog
Blog Newsroom
 Tech Spec
 Updates
 UPDF vs. Adobe Acrobat
 UPDF vs. Foxit
 UPDF vs. PDF Expert

Quick answer:
The reason you're adding an arrow is rarely the shape itself — it's to make one number, one clause, one step, or one spot on a scan impossible for the other person to miss. Whether you're flagging a figure in a report, marking a change without editing the original, pointing at text inside a scanned invoice, or laying out a sequence of steps, the job is the same: get someone to look exactly where you want. This guide shows the fastest way to do that, plus a second method (Text Callout) when the arrow needs words attached, with full steps for Windows, Mac, iPhone, iPad, and Android.
Arrows are one tool in a bigger markup kit. If you also highlight, comment, or stamp your files, the complete workflow lives in our guide on how to annotate a PDF. If you only need a straight mark across a chart, see how to draw lines on a PDF instead.
Part 1. How to add an arrow in a PDF (Windows & Mac)
UPDF draws arrows through its Comment tools, and the steps are identical on Windows and Mac.
Step 1. Open your PDF in UPDF. If you don't have it yet, download UPDF for free and install it in under a minute, then drag the file onto the window.
Windows • macOS • iOS • Android 100% secure
Step 2. Click Comment in the left toolbar, open the Shapes drop-down, and choose Arrow.
Step 3. Click where you want the tail, drag to where you want the tip, and release. The arrowhead lands where you release.
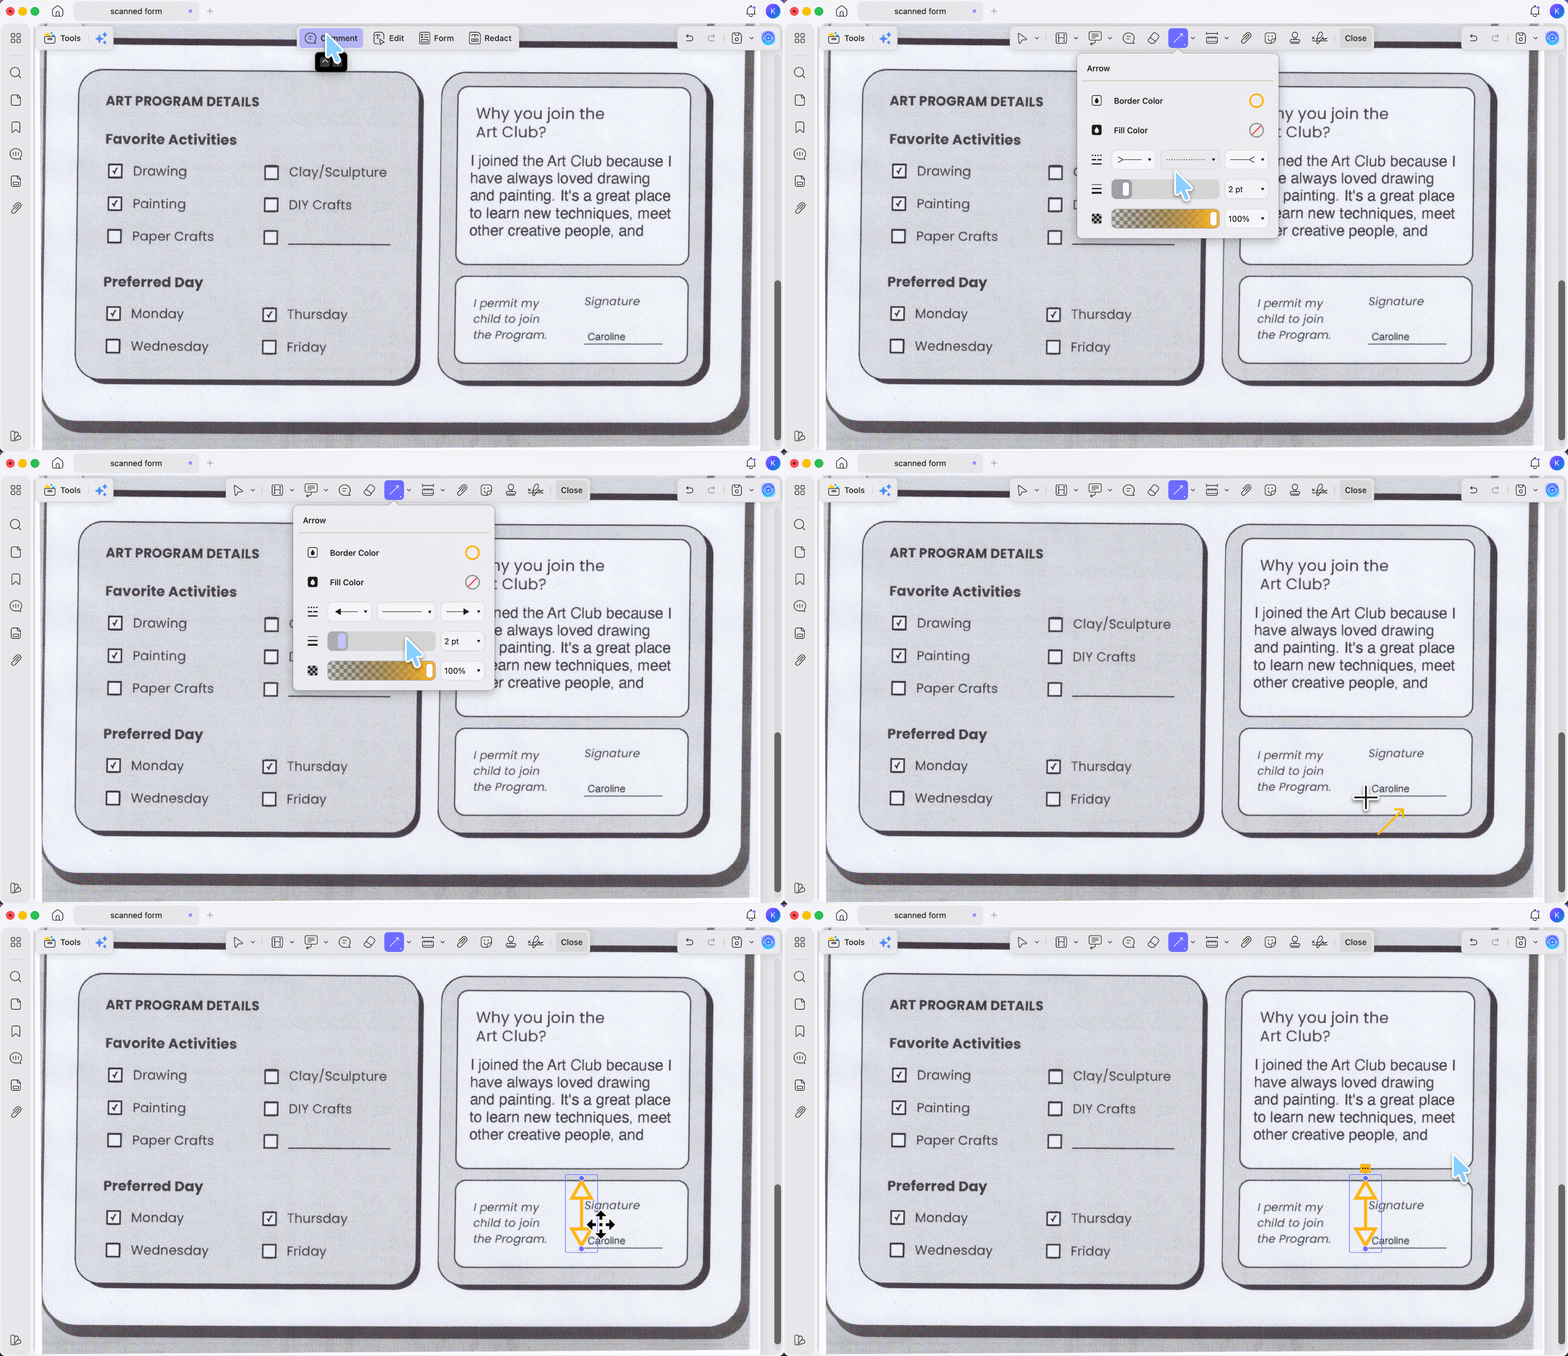
Two habits make the difference between a tidy mark and a crooked one:
- Hold Shift while dragging and the arrow snaps to horizontal, vertical, or 45°. This is the fix for the "my arrow is slightly off" problem, no steady hand required.
- After drawing, select the arrow and tap the arrow keys to nudge it one step at a time — far more precise than dragging when the tip needs to land exactly on a word or data point.
To restyle, single-click or right-click the arrow to choose Properties and set color, opacity, line width, line type (solid or dashed), and the start/end cap to flip which end carries the head. Keep the arrow a contrasting color and a heavier width so it survives printing and compression.
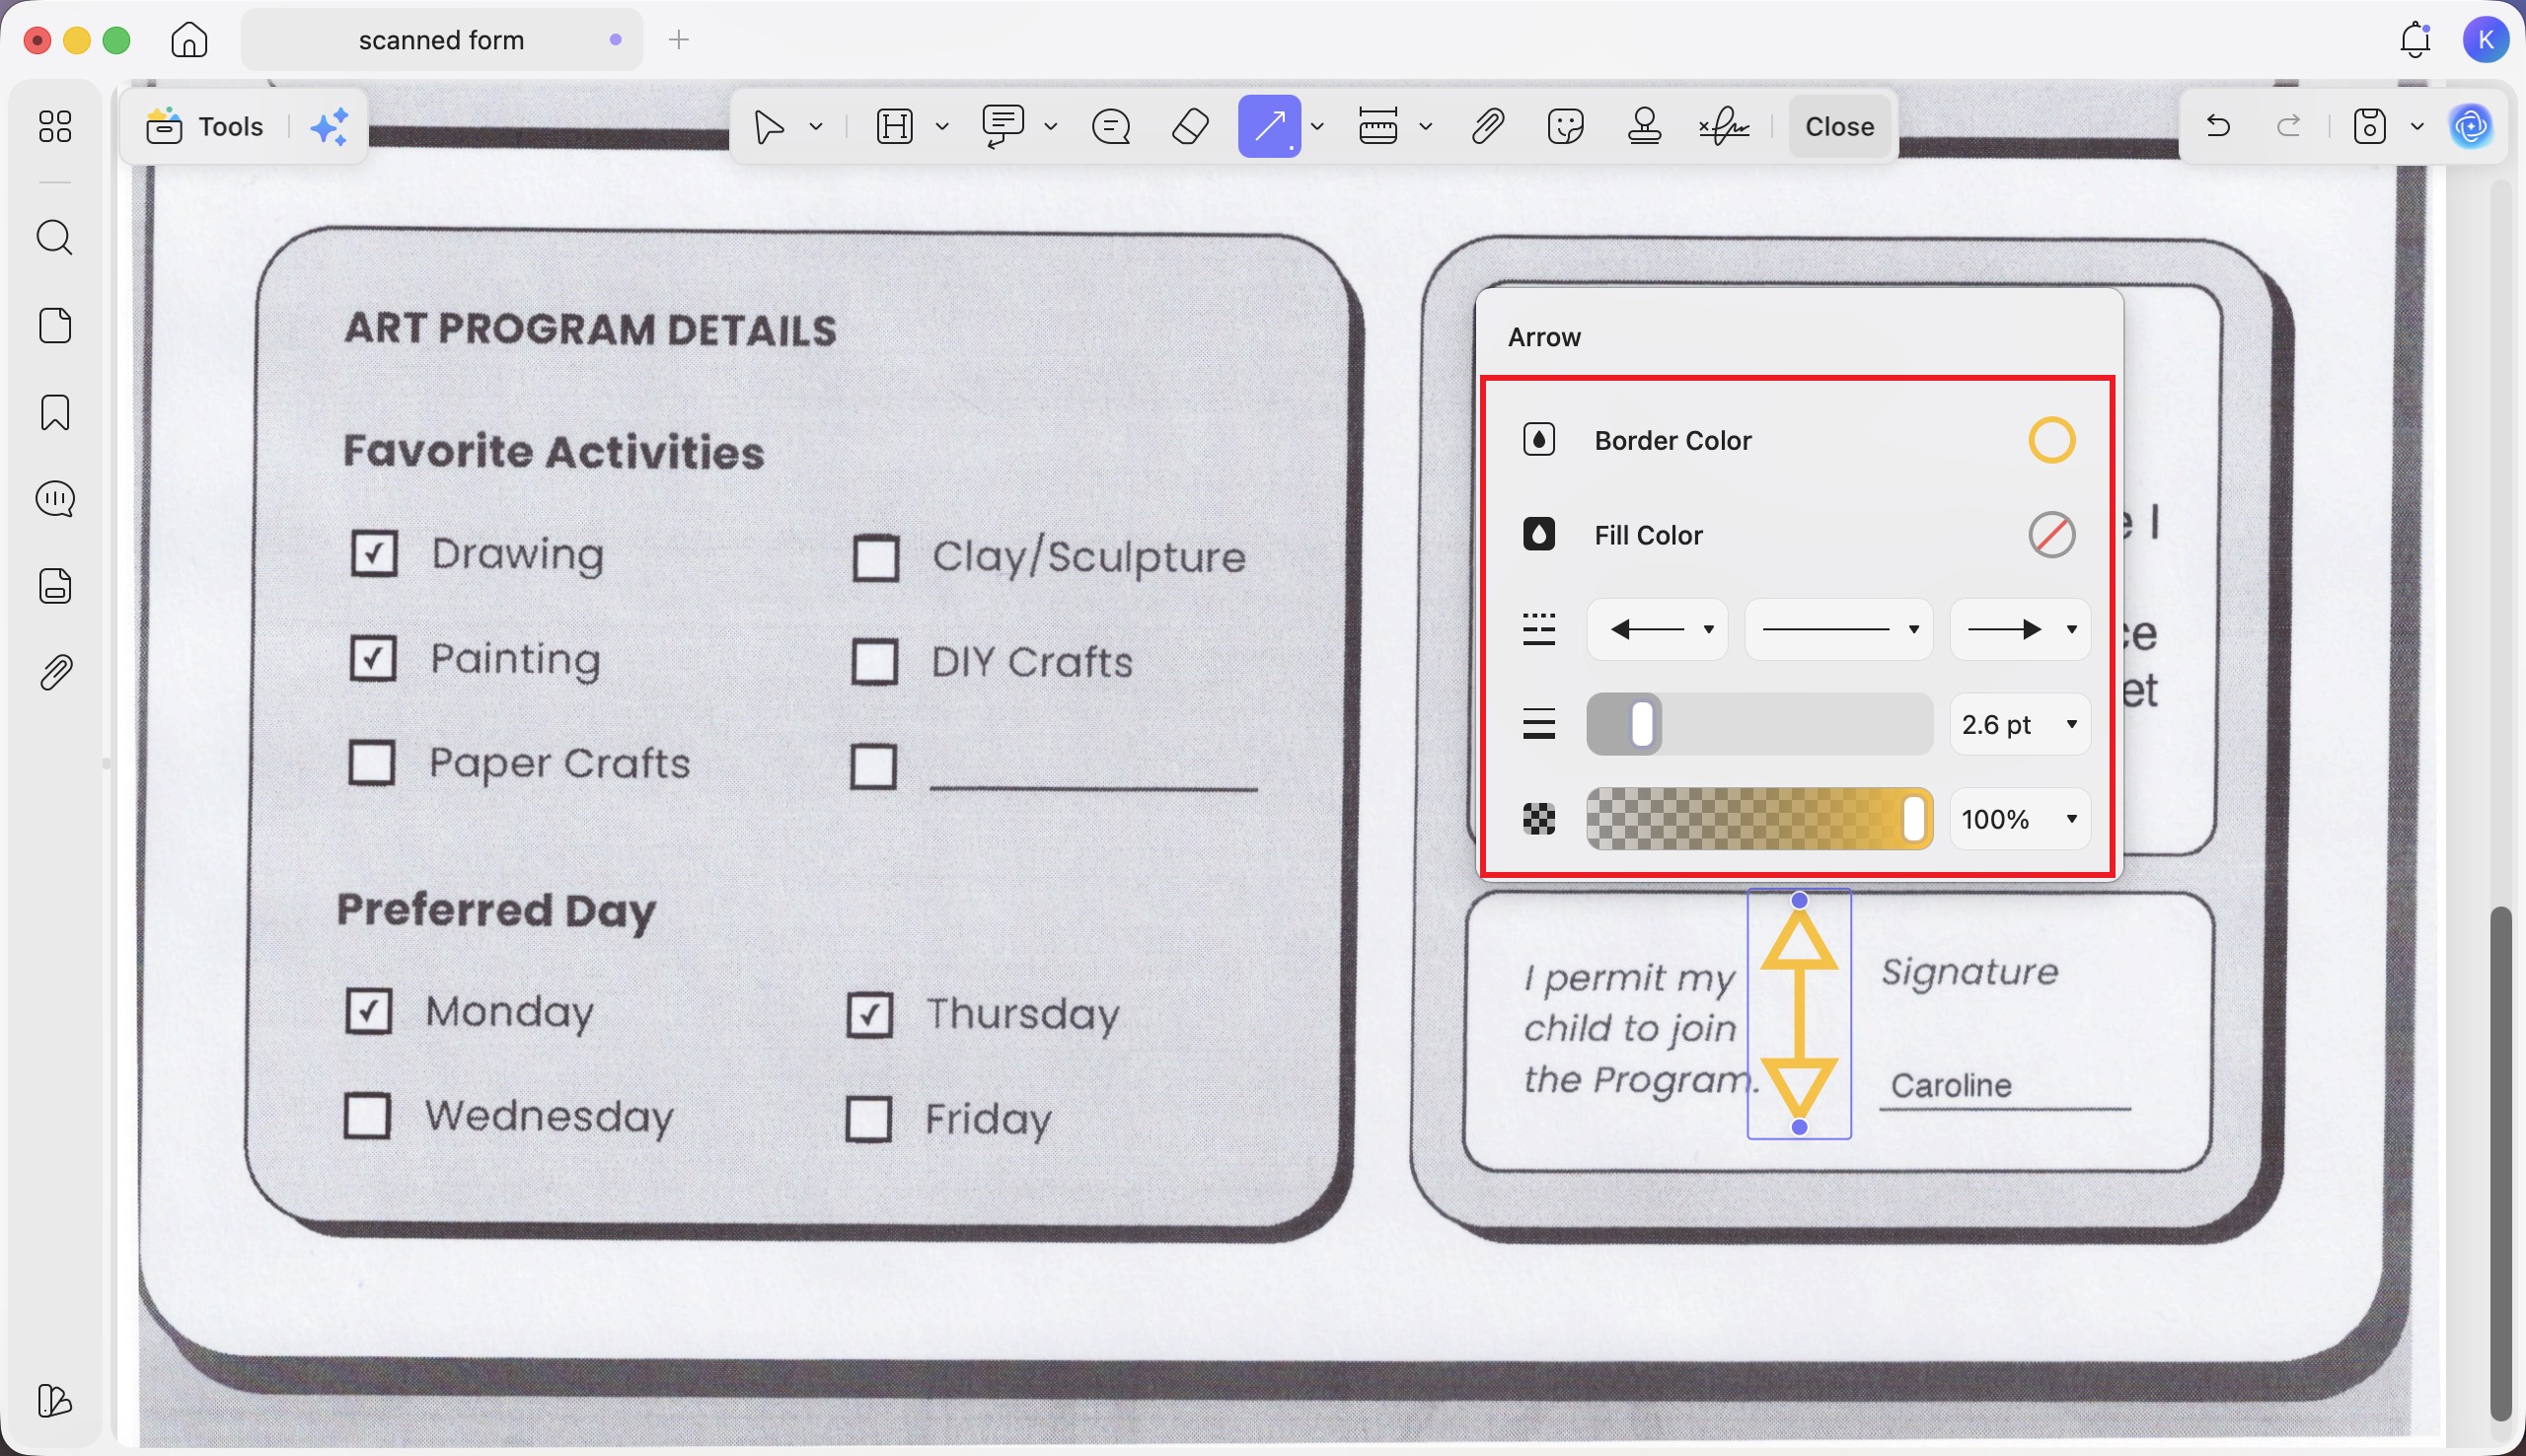
Download UPDF for free to try adding a straight, angle-locked arrow on your own file — installation is free, and Pro features are available when you need watermark-free export or advanced tools.
Windows • macOS • iOS • Android 100% secure
Part 2. Add an arrow with a note attached: two ways
Most of the time you don't just want an arrow — you want to point and say why. UPDF gives you two ways to do that:
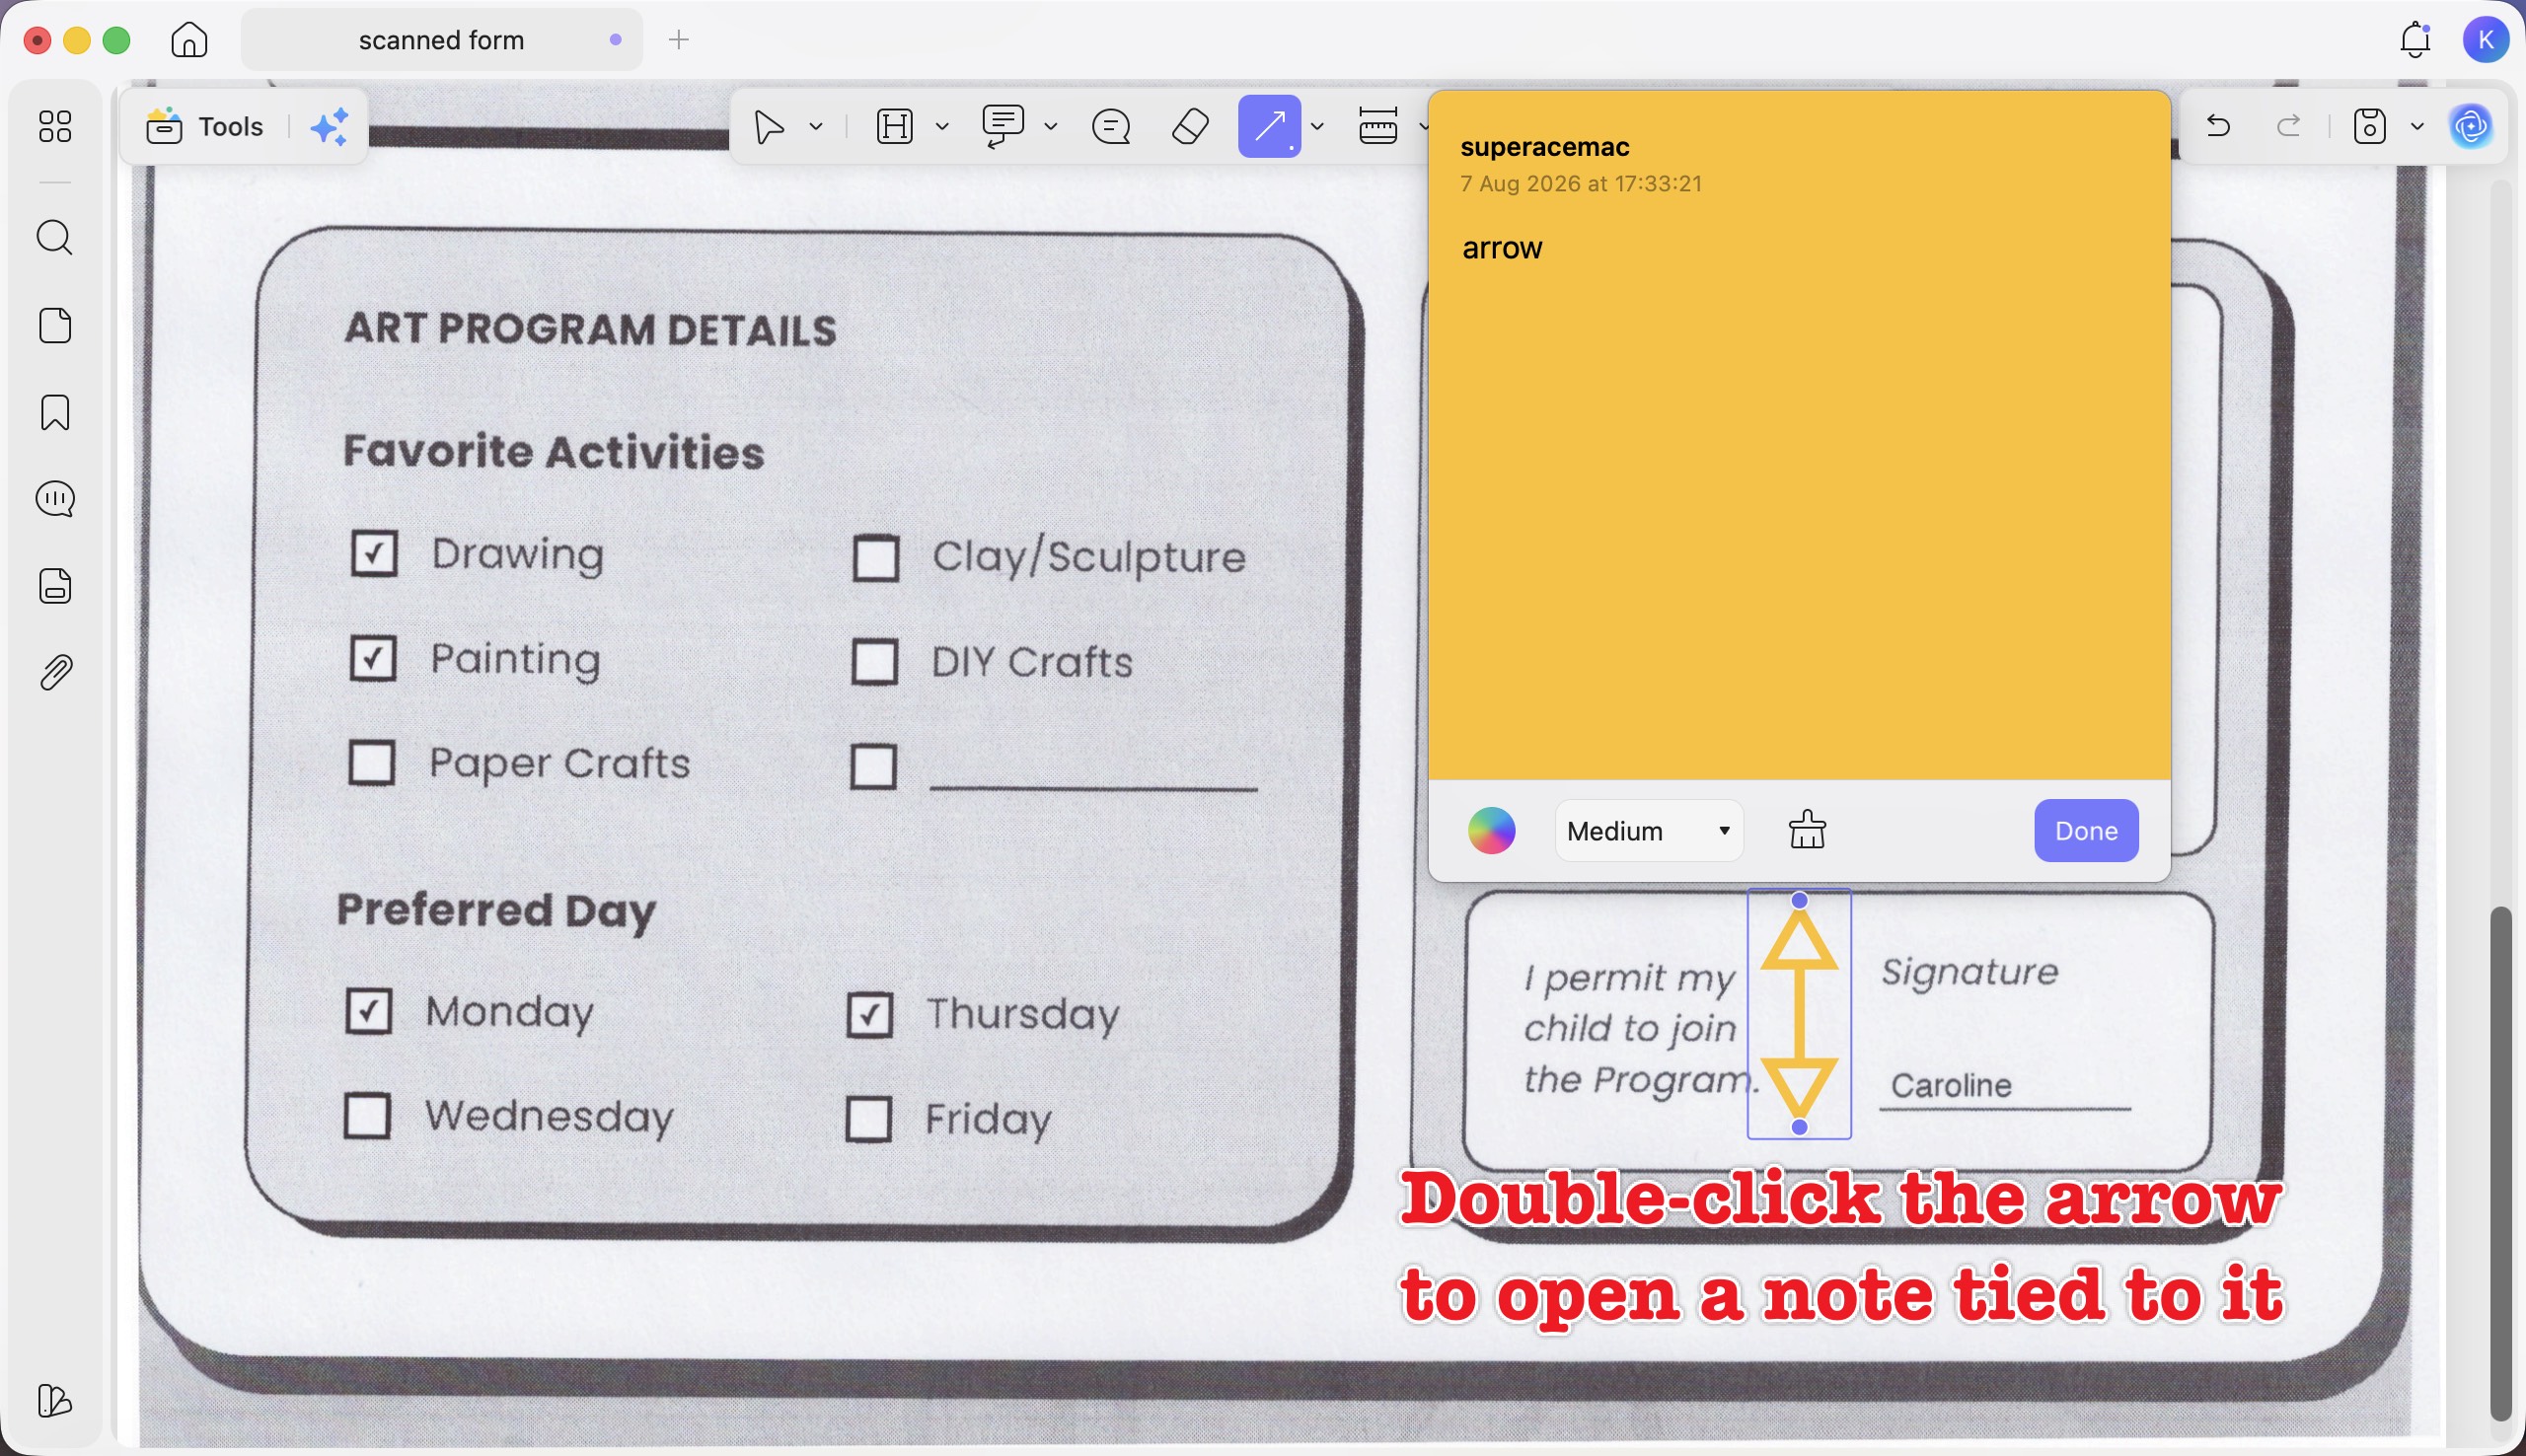
- Double-click the arrow. After drawing an arrow, double-click it to open a note tied to that arrow, and type your context — "this is the figure that changed." In our testing, the note stays attached to the arrow, so the pointer and the explanation travel together instead of floating as a separate text box.
- Use a Text Callout instead. When you want the pointer line and the text box as one combined object, go to Comment → Text Callout (available on desktop and mobile). It draws a leader line — with a selectable arrowhead — running straight into a text box, so "point here, and here's the note" is a single markup. This is the cleaner choice for client feedback or review comments where every arrow needs a written reason next to it.
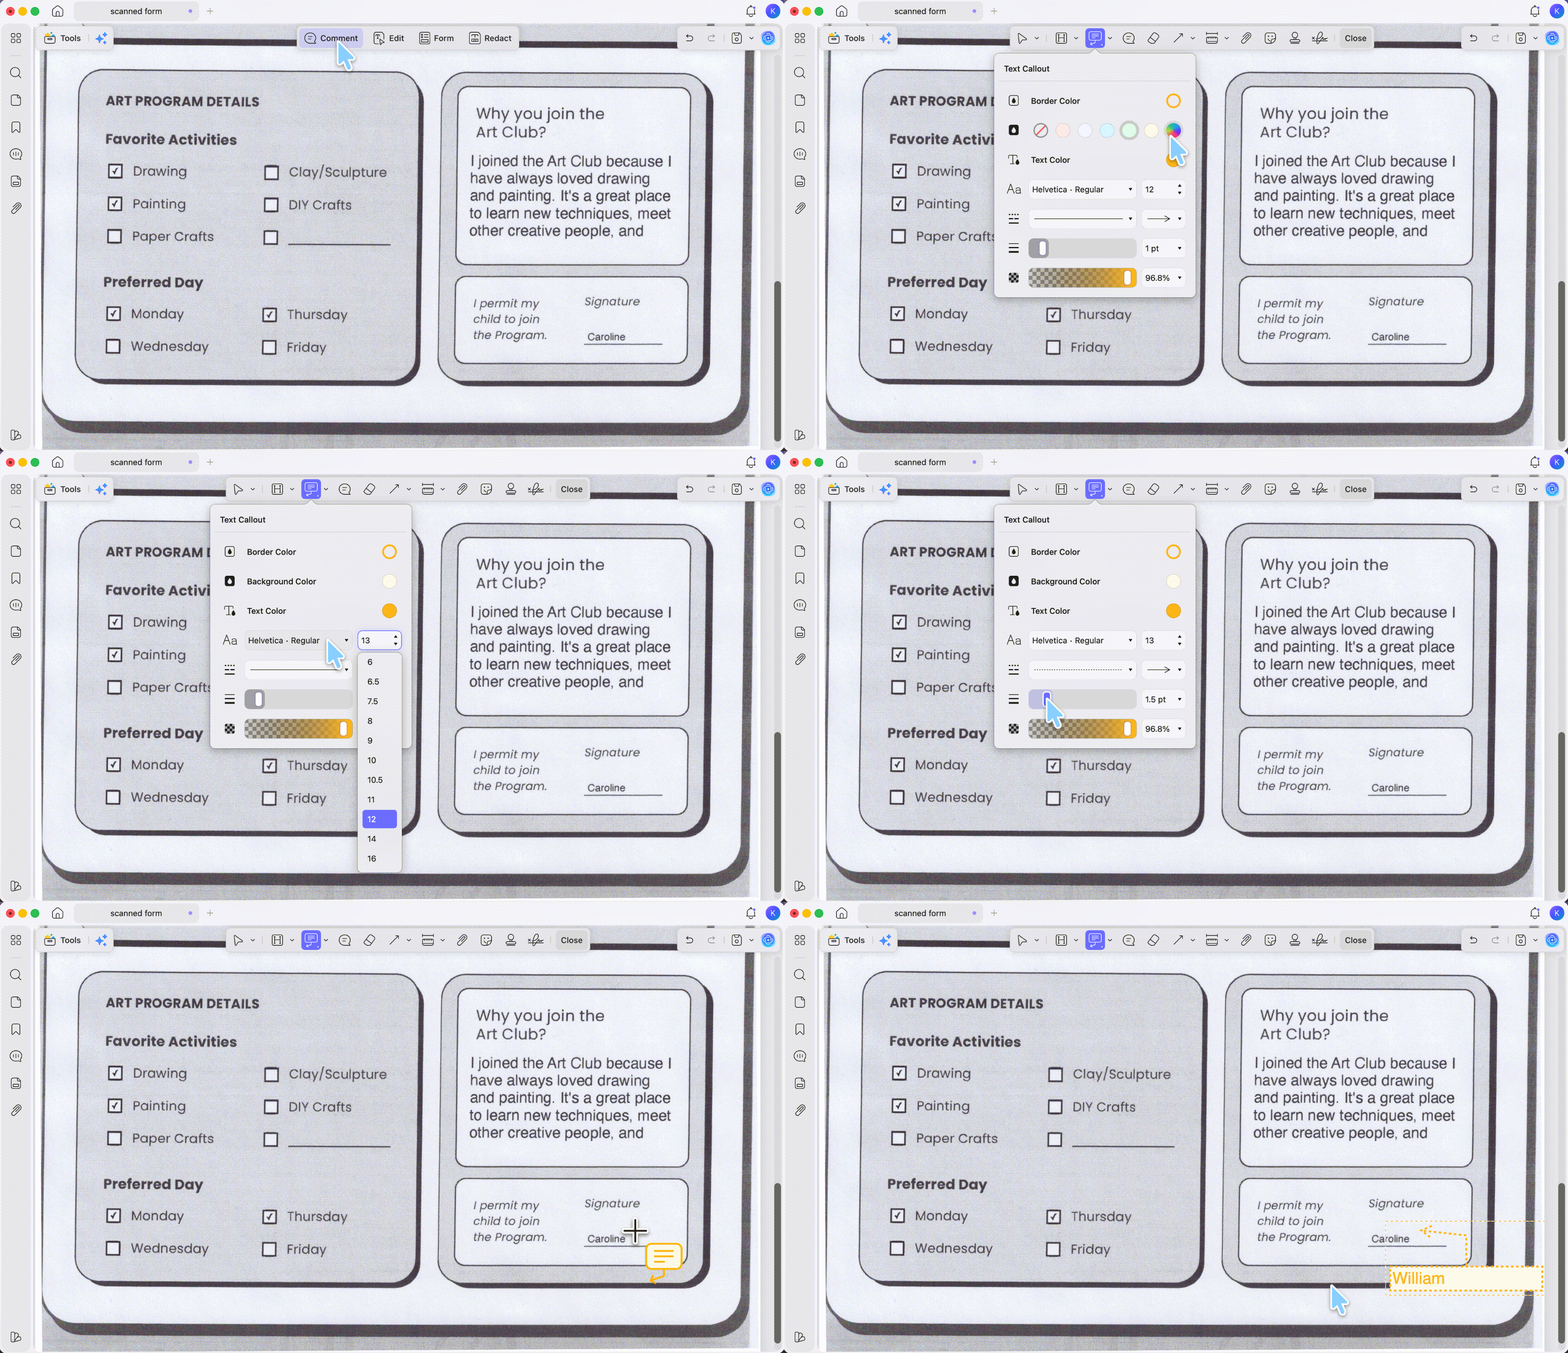
Because both an arrow and a callout are markup objects layered on top of the page, the underlying text is never altered — which is exactly why they suit contract redlining, editorial review, and design feedback, where preserving the original is the whole point. They also work on scanned invoices, contracts, or blueprints: an arrow is drawn on the page, not tied to selectable text, so you don't need OCR just to point at something.
Part 3. How to add an arrow on iPhone, iPad & Android
UPDF's mobile apps carry the same tools, so you can flag a figure on your phone or mark up a proof on an iPad with an Apple Pencil.
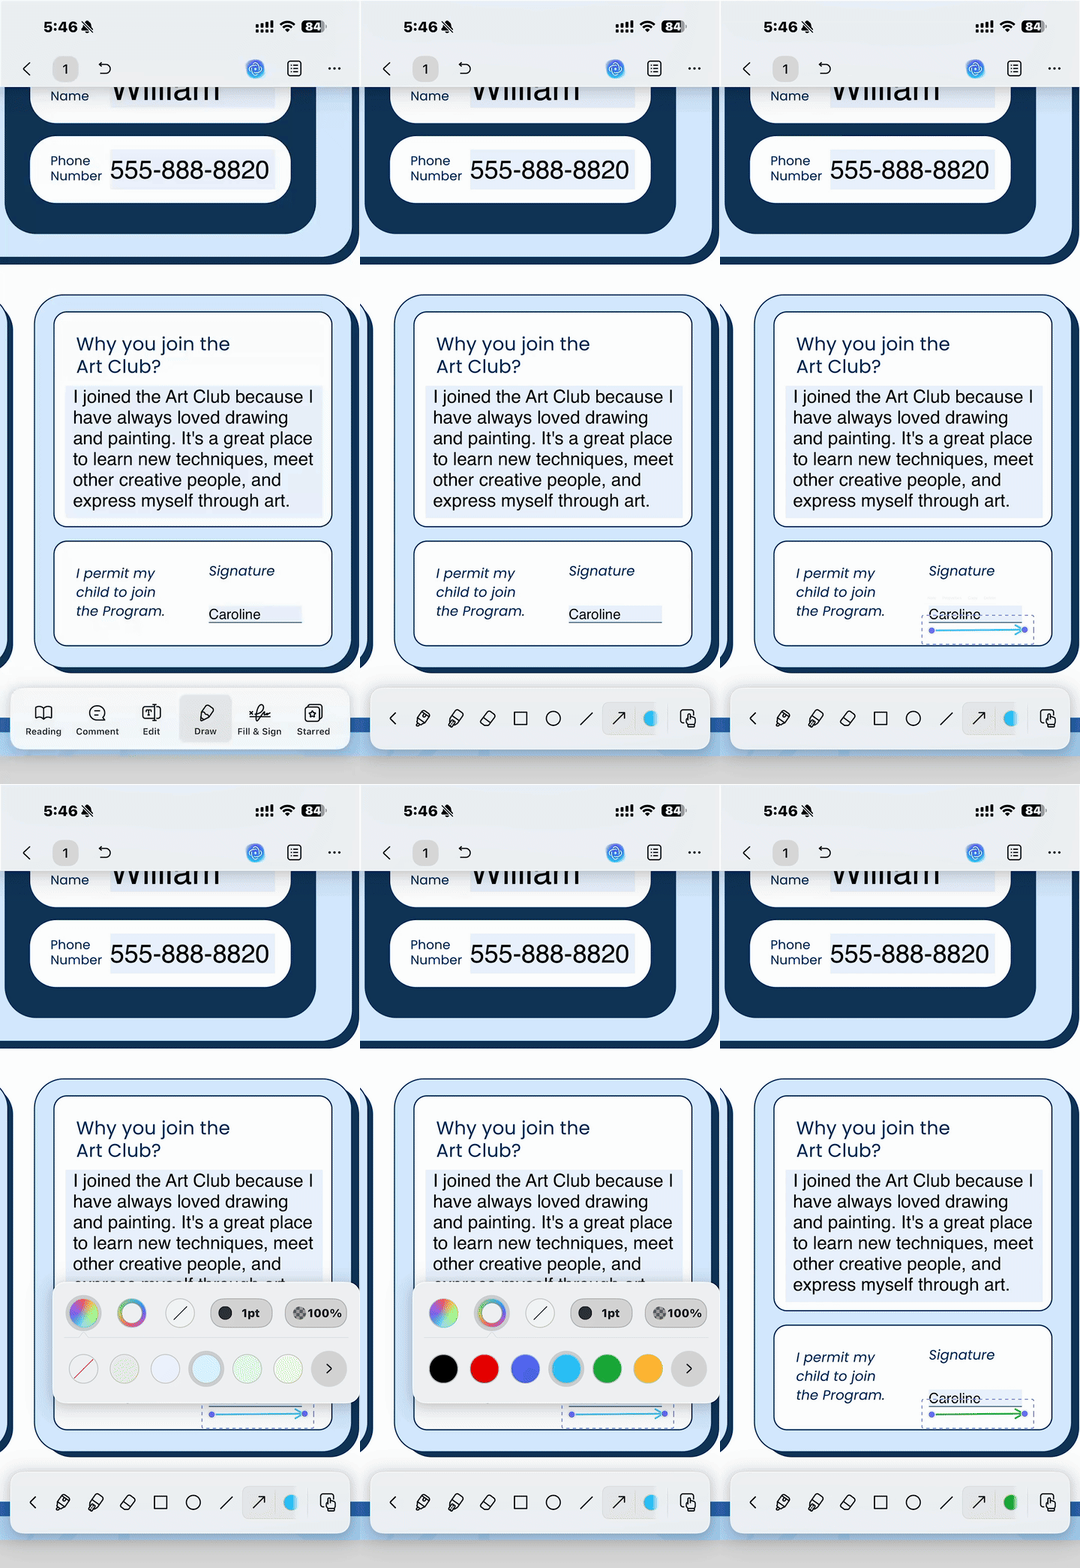
Add an arrow:
Step 1. Open the PDF in the UPDF app and tap Draw.
Step 2. Tap the Arrow tool.
Step 3. Drag your finger or Apple Pencil from tail to tip, then tap the arrow > choose Properties to change color, thickness, or opacity.
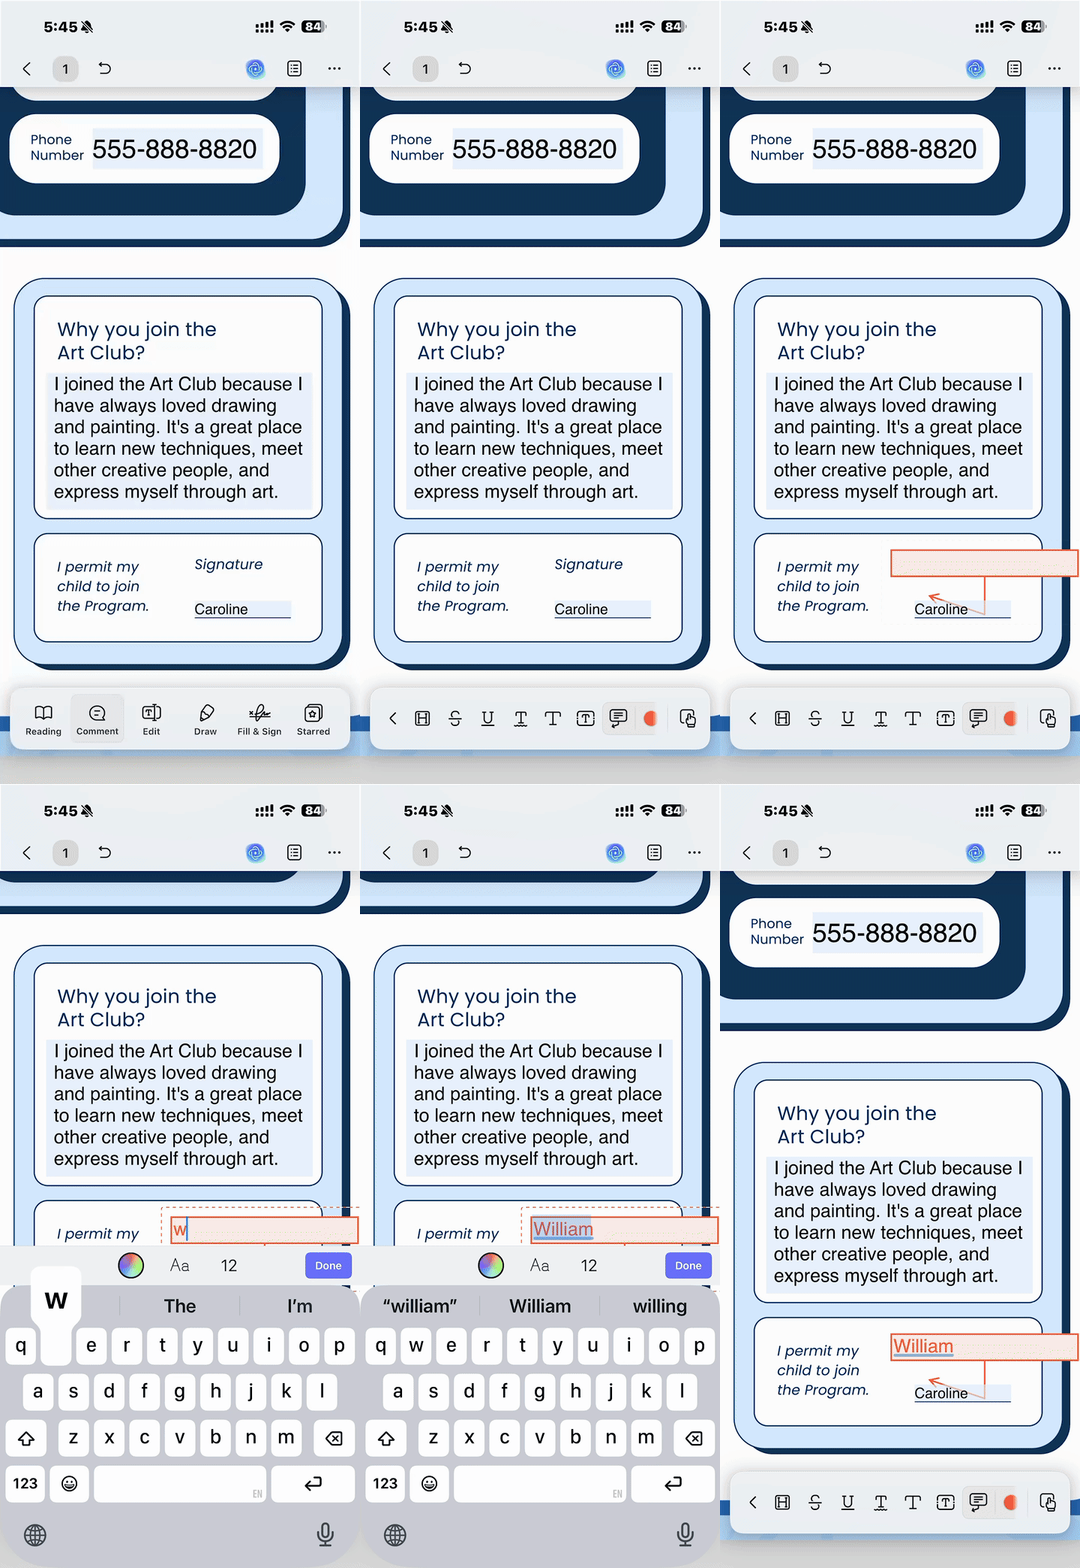
Add an arrow with text (Text Callout):
Tap Comment → Text Callout, place it, and type your note — the same combined pointer-plus-text object you get on desktop.
Mobile drawing is finger- or stylus-driven, so the desktop Shift-to-lock trick isn't available. For a dead-straight arrow, an iPad with an Apple Pencil gives the steadiest result; for the cleanest alignment, draw on desktop and sync the file.
Part 4. Arrow vs Line vs Connected Lines — what to draw
Picking the wrong tool is a common reason arrows look off:
- Arrow — a straight pointer with a head on one end. Use it to point at something: a figure, a clause, a signature field.
- Line — the same straight stroke with no head. Use it to underline or separate, not to point.
- Connected Lines (polyline) — several straight segments joined into a path. Use it for a call-out that has to bend around content before reaching its target.
Think of the Arrow as a laser pointer, the Line as a ruler underline, and Connected Lines as a bent elbow-pipe that routes around obstacles. On desktop, holding Shift locks each of these to horizontal, vertical, or 45°.
Part 5. Edge cases most guides skip
"I need a dashed or dotted arrow." After drawing, open the arrow's properties and switch line type from solid to dashed — handy for showing a proposed change versus an existing one.
"I want a curved or hand-drawn arrow." The Arrow tool is always straight. For a freehand curve, use the Pencil tool and draw the head yourself, or use Connected Lines to fake a bend with straight segments. A true single-stroke curved arrow isn't a standard PDF shape in most editors.
"My arrow won't print or show for the recipient." An arrow is a markup object, so it can be hidden if the reader's app is set to hide annotations, or if its width or opacity is set to zero. Check both are above zero. To bake the arrow permanently into the page so it prints and displays in any reader, flatten the PDF before sending.
"The arrow points the wrong way." Don't redraw it — select it and swap the start/end cap in Properties, or rotate the whole arrow.
Part 6. Want a decorative arrow instead of a pointer?
Everything above is about a functional arrow — precise, straight, aimed at a figure or clause. If what you actually want is a decorative arrow graphic — for a journal page, a social-media image, or a playful slide — UPDF's AI Sticker (desktop only) can generate one. Enter Comment → Sticker → AI Sticker, type a prompt like "a cute blue arrow," and hit Generate, then drop the result onto the page. Full steps are in UPDF's AI Sticker guide. You can also directly choose the preset arrow stickers provided by UPDF.
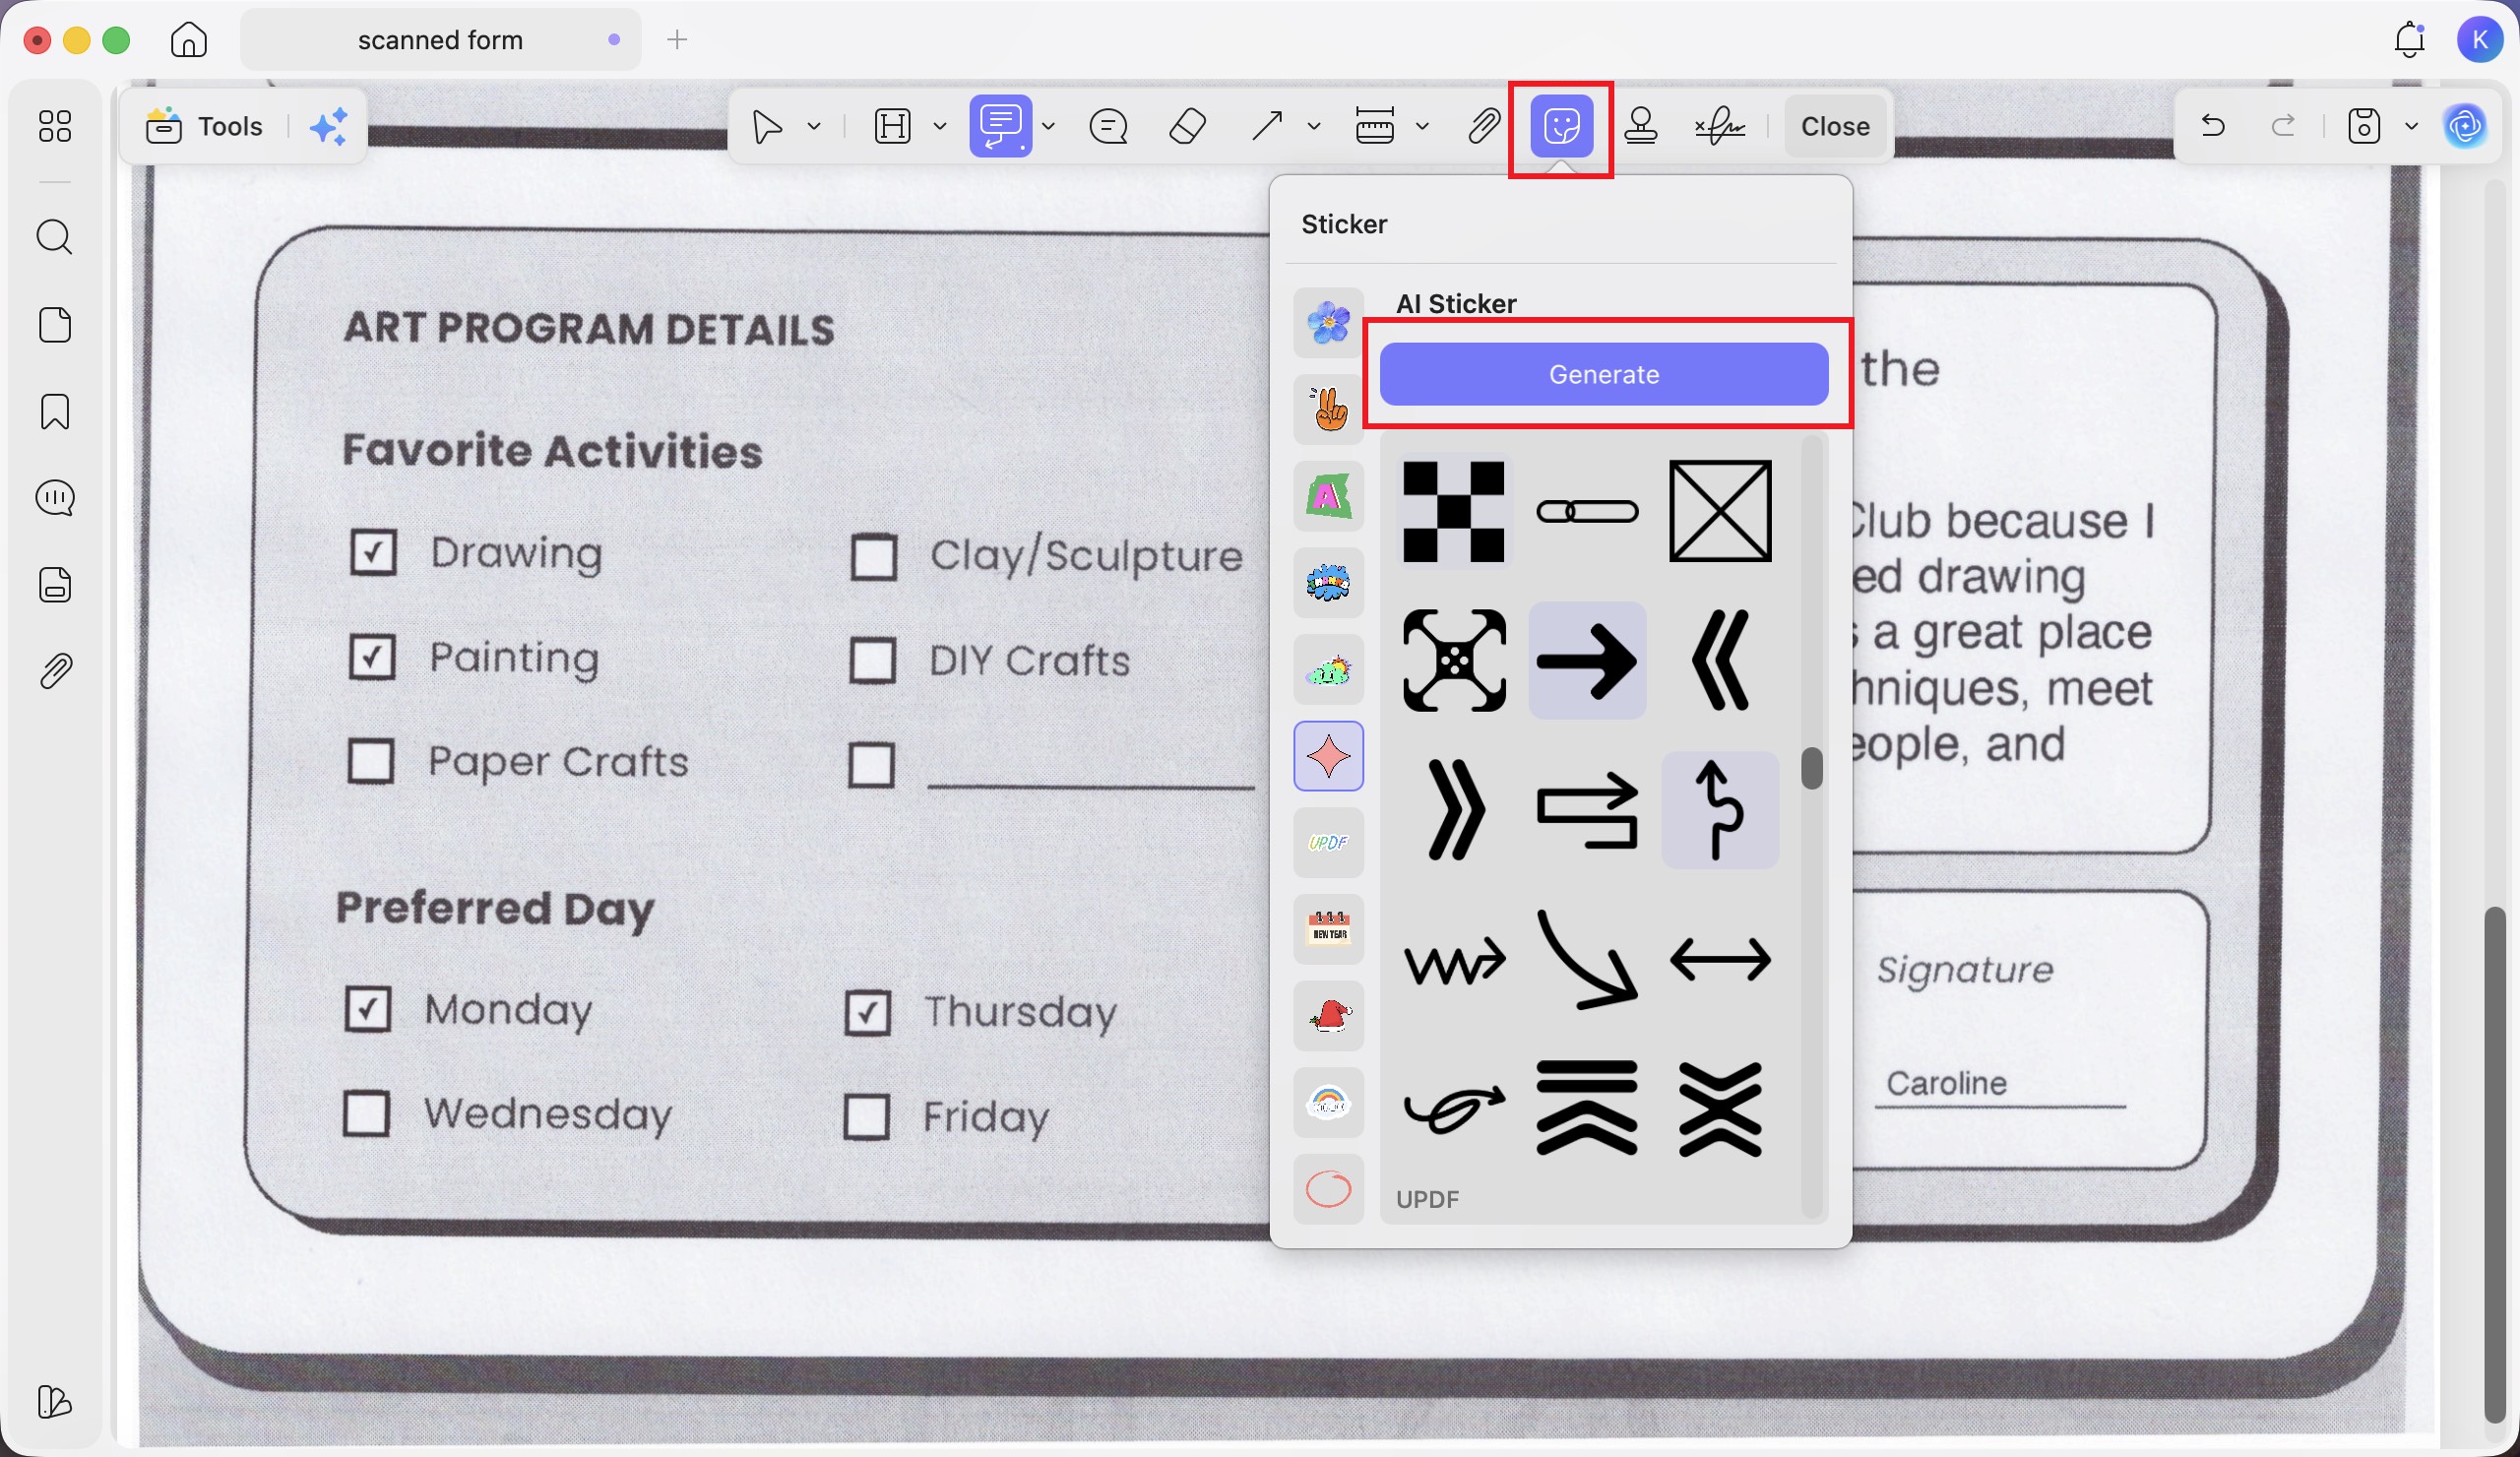
Keep the two uses separate, though: a sticker is a decorative image, not a precise pointer. For flagging data in a report or marking a clause in a contract, use the Arrow tool from the earlier sections — it's straight, adjustable, and meant to point.
Part 7. FAQs
1. Can I add arrows to a scanned PDF?
Yes. An arrow is drawn on top of the page, so it works the same on a scanned image-only PDF as on a text PDF. You only need OCR if you also want to select or edit the underlying text, not just point at it.
2. Once I send the file, can the recipient move or delete my arrow?
Yes, if they open it in a PDF editor — an arrow is an editable markup. If you need it locked in place, flatten the PDF before sending so the arrow becomes part of the page and can't be shifted or removed.
3. How do I reuse the same arrow across several pages?
Draw it once, then copy and paste it onto the other pages so the size and angle stay identical, rather than redrawing each one by hand.
Conclusion
Adding an arrow to a PDF is three clicks — but the point is never the shape. It's getting someone to look exactly where you want: the figure that changed, the clause that's wrong, the spot on a scan, or the next step in a sequence. Draw it straight by holding Shift, nudge it into place with the arrow keys, and either double-click it or use a Text Callout to attach the note that says why it's there. UPDF does all of that on Windows, Mac, iPhone, iPad, and Android, alongside the highlights, comments, and stamps that round out a full markup.
Download UPDF for free to try pointing a reader straight at what matters on your own file — installation is free, and Pro features are available when you need watermark-free export or advanced tools. For the complete markup workflow, see our guide on how to annotate a PDF.
Windows • macOS • iOS • Android 100% secure





 Engelbert White
  Enid Brown
 Delia Meyer

 Enya Moore