In a world where people are full of ideas, it is essential to express and save them somewhere. Due to this need, Goodnotes PDF serves as a notepad, offering many features, from annotation to handwriting facilities. Speaking of annotation, it is an integral part of preparing meeting notes or college lectures. To understand the functionality of the Goodnotes PDF annotation functionality, read this article till the end.
Part 1. Can You Annotate PDF in Goodnotes?
Yes, Goodnotes has a PDF annotation feature that lets you add more information and comments to a pre-existing document. With its easy-to-use markup tools, it lets users draw with a pen in the thickness and color of their choice. People looking for a more freehand drawing can use the pencil tool and make a lead-like markup.
When preparing for an exam, annotate the important points using the multicolored freehand highlighter. In addition, users can enhance the document's accessibility by drawing freehand shapes, sticky notes, images, and text.
However, due to versatile compatibility and the comment management feature, UPDF is a better alternative to Goodnotes for annotating PDFs. Unlike Goodnotes, UPDF allows users to view the marked annotations on other PDF viewing apps.
Thus, explore its exclusive features in detail after downloading its latest version to your device, whether it's Mac or Windows.
Windows • macOS • iOS • Android 100% secure
Part 2. How to Make Annotations on PDFs in Goodnotes?
After learning about this annotation tool in detail, let us have a look at how to conveniently mark up your documents. Read the step-by-step guide mentioned below to learn the procedure of annotating a file using Goodnotes:
Step 1. Start the Process by Importing the Document
To initiate the Goodnotes PDF annotation process, head to the official website on your browser. On the homepage, expand the "New" drop-down menu and select the "Import" option to add the file you want to mark up.
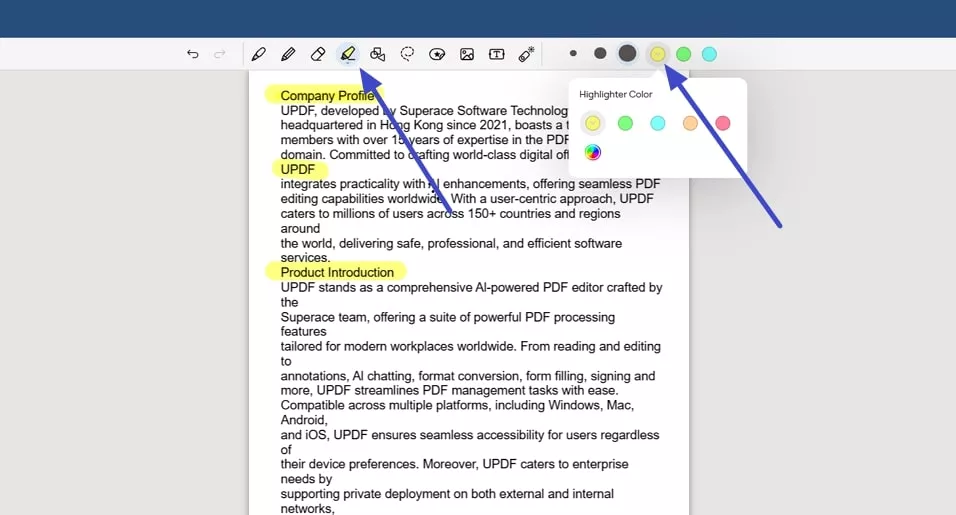
Step 2. Opt for the Highlighter and Highlight Text
In the following interface, when the document is successfully imported, head to the toolbar above the page and select the "Highlighter" icon. This will enable a few color options; select the color for your emphasizing tool. Pick the size of the highlighter and drag the cursor to the area of the page that you want to highlight.
Step 3. Access the Shapes Tool of Goodnotes
Once you have highlighted the critical parts, access the same toolbar and press "Shape Tools" to enable the different sizes and of it. Next, draw the line under the important word or phrase or slide over it for a strikethrough. You can adjust the line size per your requirements by dragging its slider.
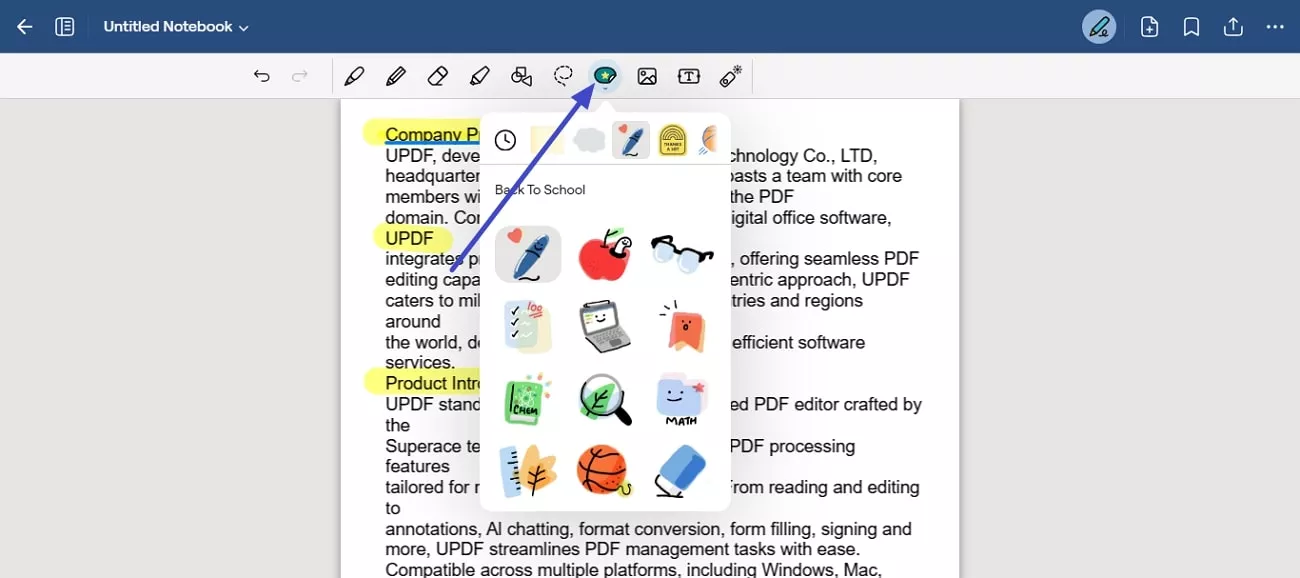
Step 4. Add Interactive Elements To the Document
Moving forward, acquire the "Elements" icon to enable a list of interesting stickers and choose your desired element. Drag it to the area of the page where you want to add the selected sticker and resize it according to your preference by dragging its corner.
Step 5. Choose the Laser Pointer For Markup
If you are reading a presentation and want to draw the audience's attention to a specific word or area, access the "Laser Pointer" tool from the platform's toolbar. You can select strike lasers or simple pointers as per your preferences.
Step 6. Add Text Annotations Within PDF
To give commands or comments for a specific part of the document, you can add text by accessing the "Text" icon from the toolbar. Drag the textbox to the area of your choice and type in the next. Next, change the color, size, and font styles from the toolbar to make the comment stand out.
Step 7. Select a Pen or Pencil for Free Hand Drawing
If you want to add a freehand drawing, opt for the "Pen" icon or the "Pencil" icon from the toolbar. Select the color and size and drag the cursor on the document for freehand Goodnotes annotate PDF. Once done, head to the top right corner and click the "Export" button to save the annotated file as PDF to your device.
Part 3. How to Annotate Your PDFs and Manage/Export the Annotations More Conveniently?
Despite offering a comprehensive annotation facility, Goodnotes annotate PDF has limited compatibility with other PDF readers. The files marked with Goodnotes cannot be accessed by any other tool, adding to the limitations of this platform. As a better alternative, UPDF is a practical PDF tool that offers diverse compatibility across devices and platforms. Therefore, download UPDF on your device and start benefitting from its amazing annotation and more tools.
Windows • macOS • iOS • Android 100% secure
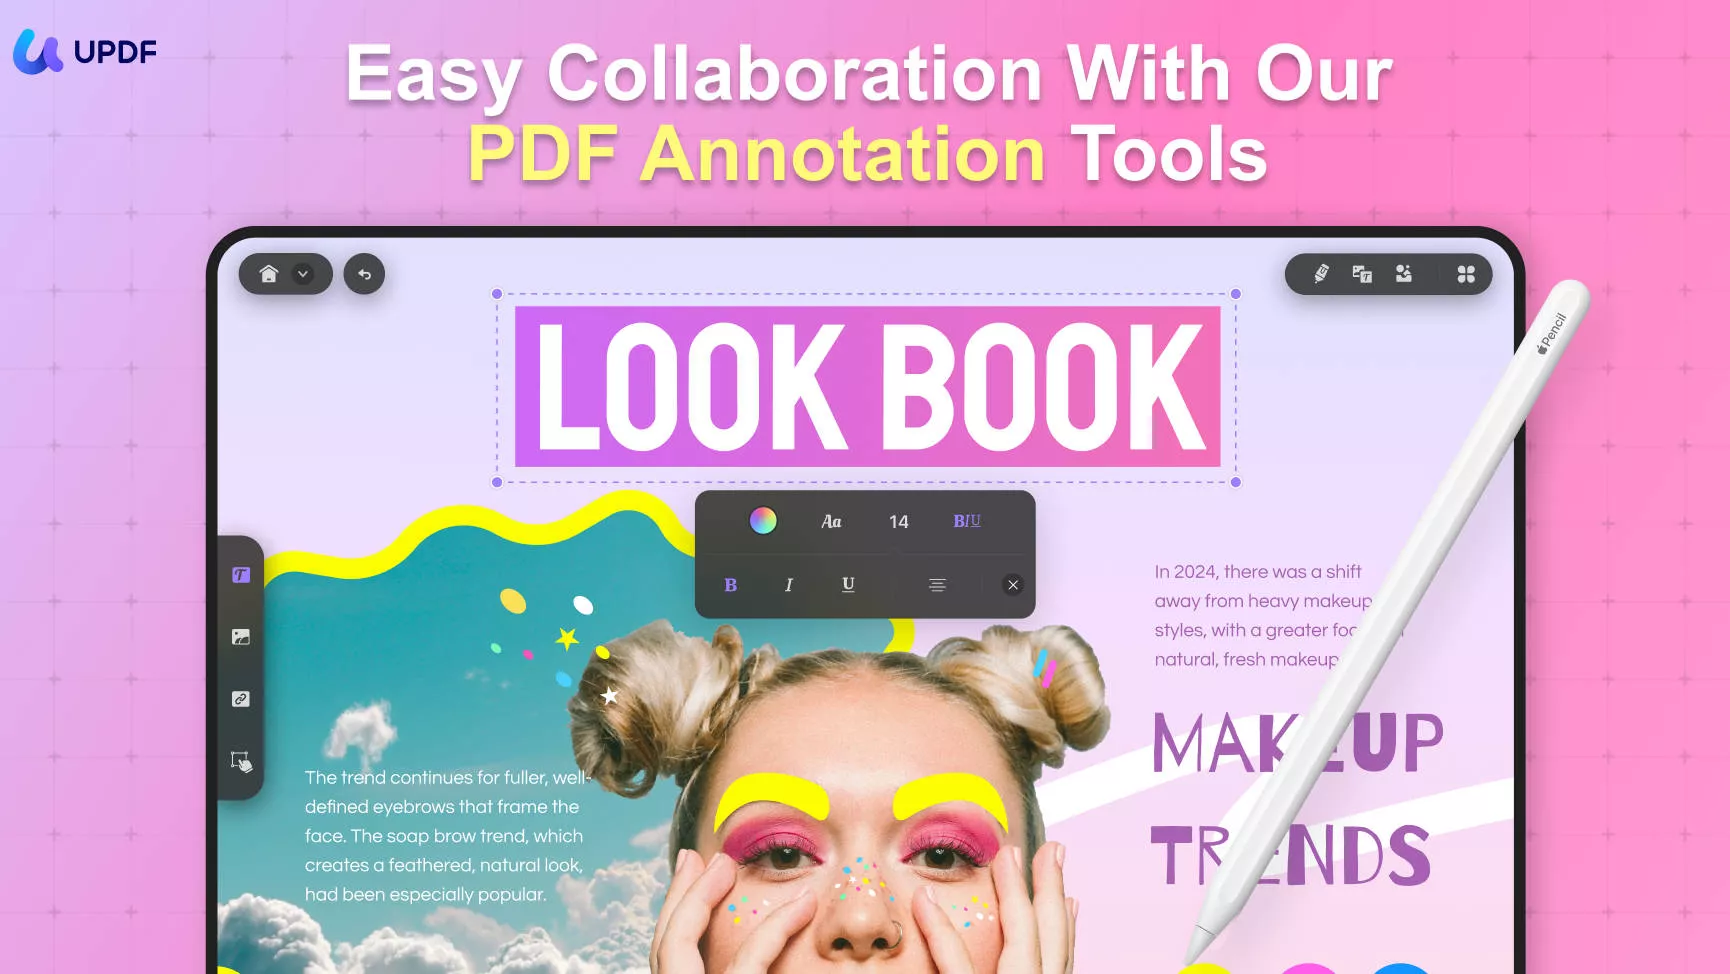
This extensive annotation software even provides users with 13 markup tools, each having unique traits and functionalities. From strikethroughs to multiple underlines, UPDF has all essential markup facilities. After marking the document, you can authorize it using your personal stamp or e-signature beyond highlighting text and commenting.
A Detailed Guide on Using UPDF Annotation Features to Mark a Document
To benefit from the annotation tools of this tool, you must learn from a tutorial. Explore the following guide to learn how to use this Goodnotes PDF annotation alternative:
Step 1. Open a File on UPDF to Start
First, open UPDF on your device and use the main interface to click the "Open File" button. Now, search your device to select the desired PDF file for annotation.
Step 2. Access the Comment Mode to Add a Sticky Note
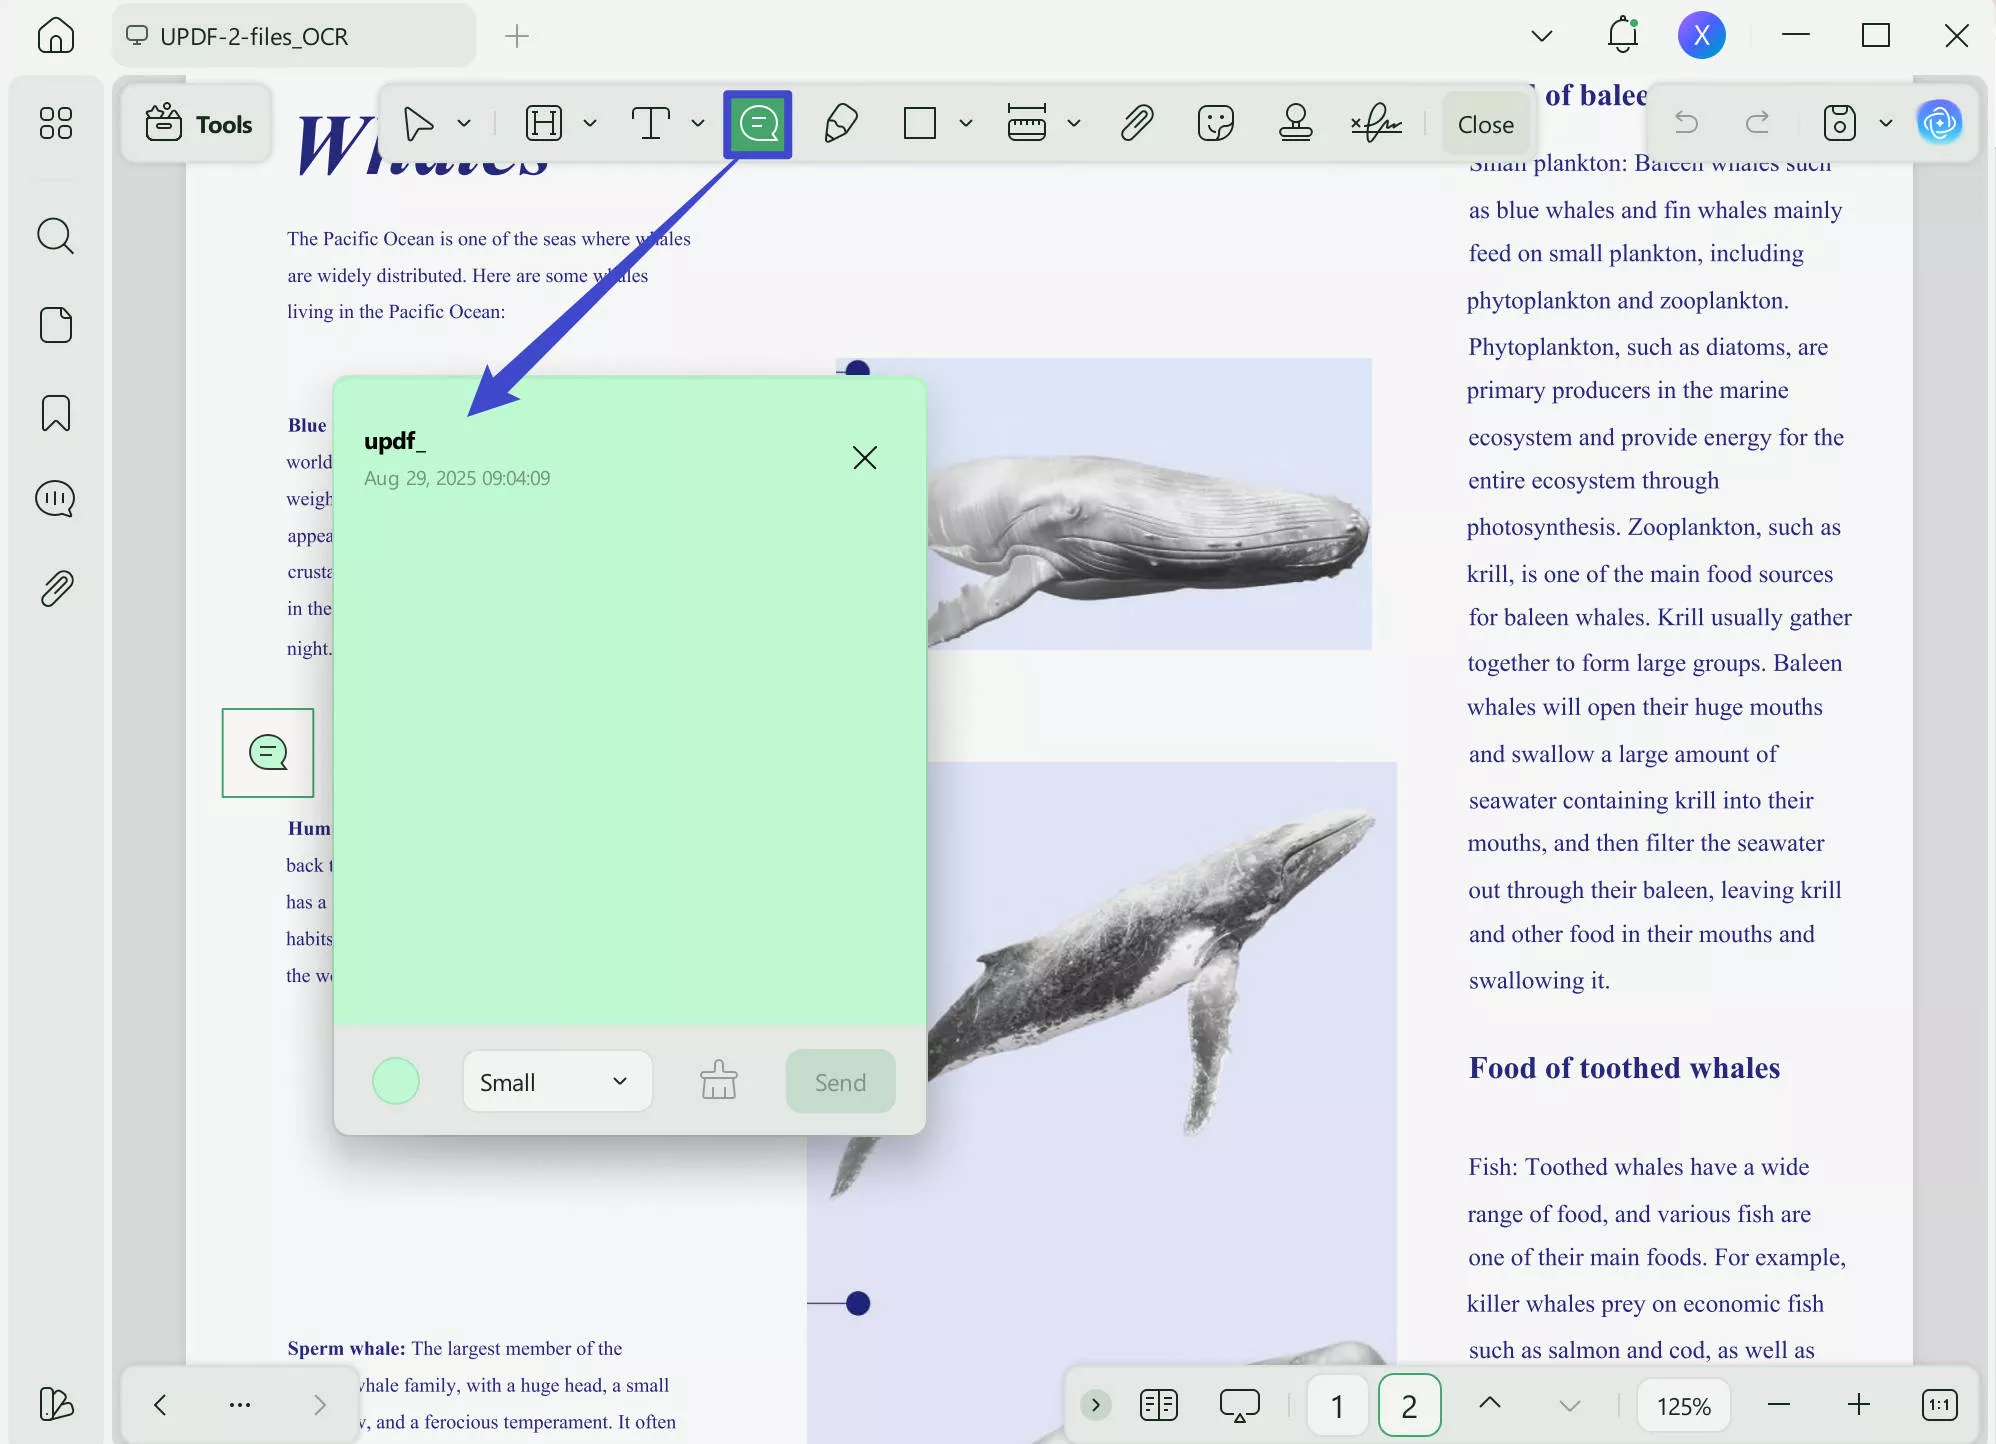
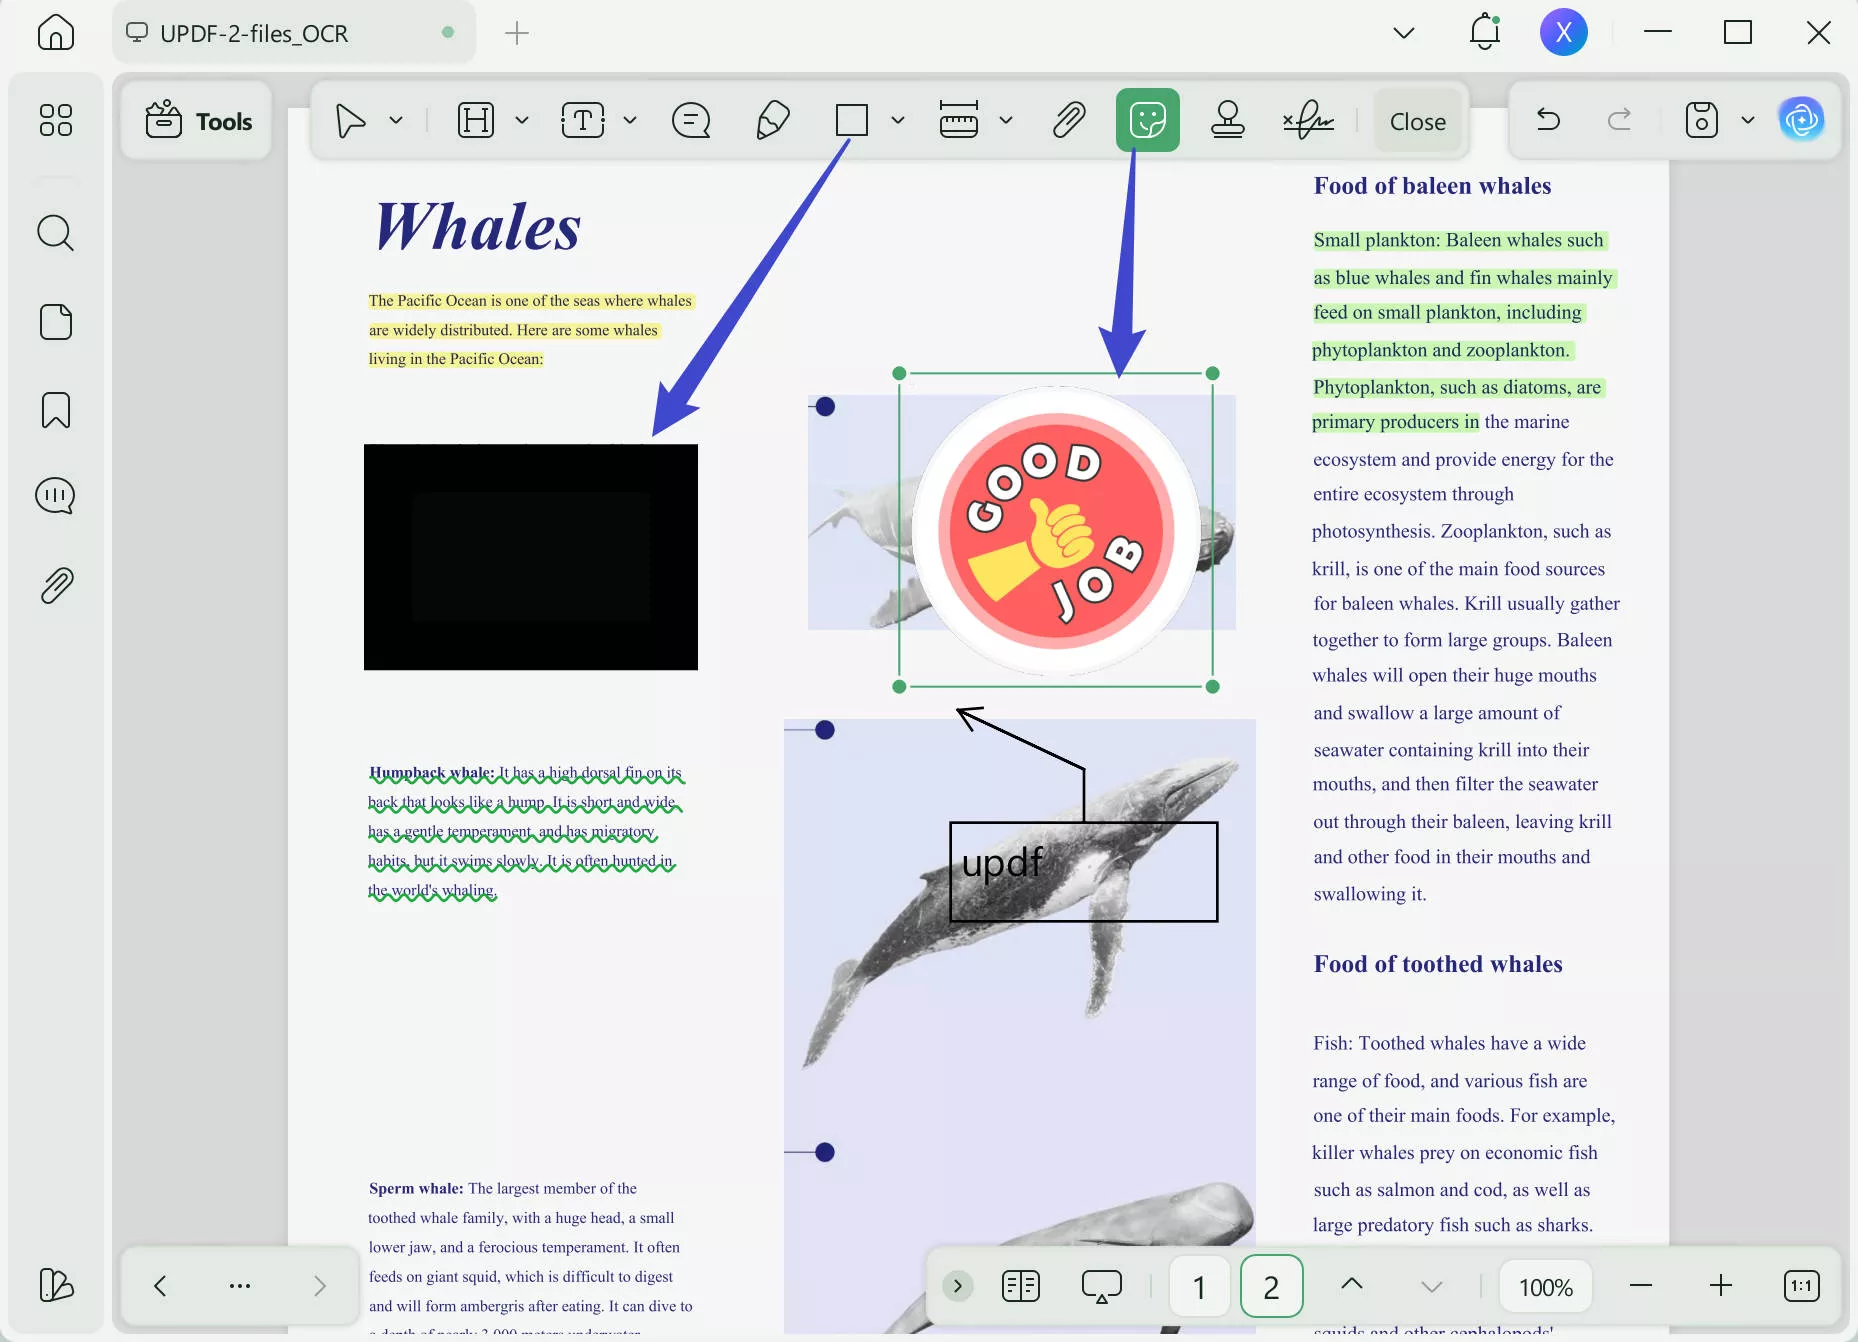
As the uploaded file opens in the next window, navigate to the left panel to open the "Comment" in "Tools". Using the next interface, click the "Sticky Note" button at the top toolbar and add a comment within the sticky note.
Step 3. Correct a Mistake By Using the Text Comment Tools
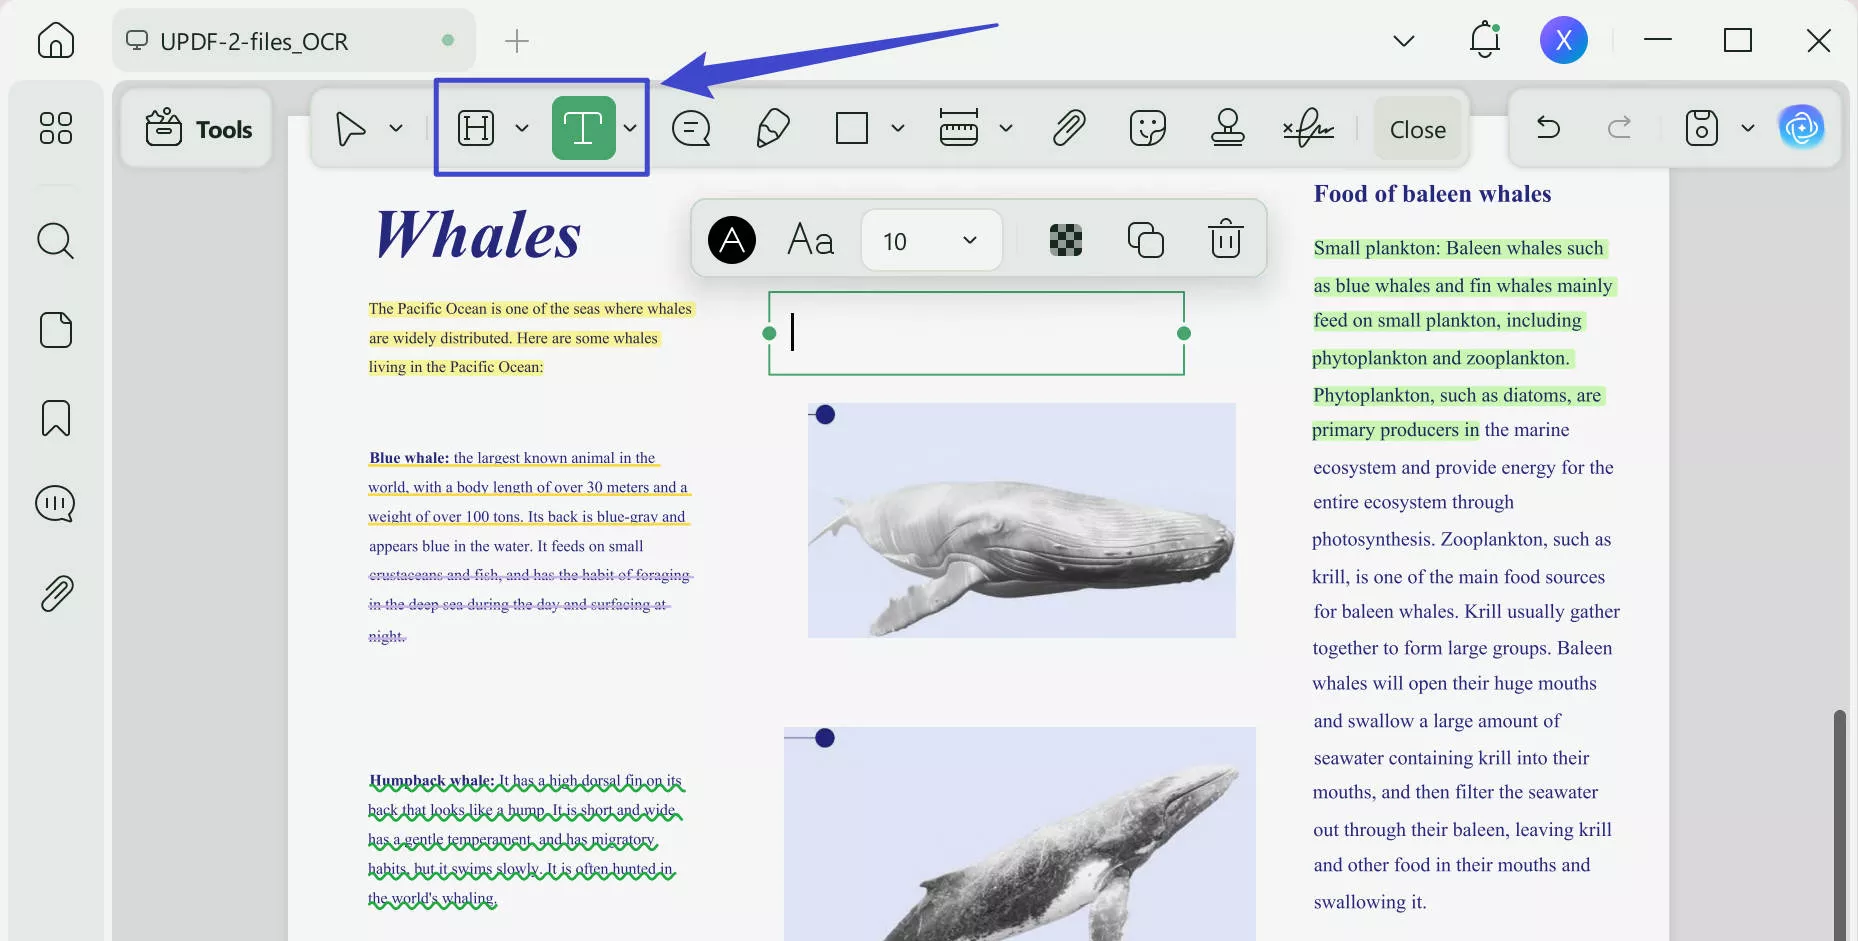
When you spot any inaccurate text in the document, use the "Highlight" and mark the faulty information in your desired color. If you have any suggestions for inaccurate information, use the "Strikethrough," "Underline," or "Squiggly" to draw a line through the text. Next, click the "Text Comment" button from the toolbar to add your suggestions.
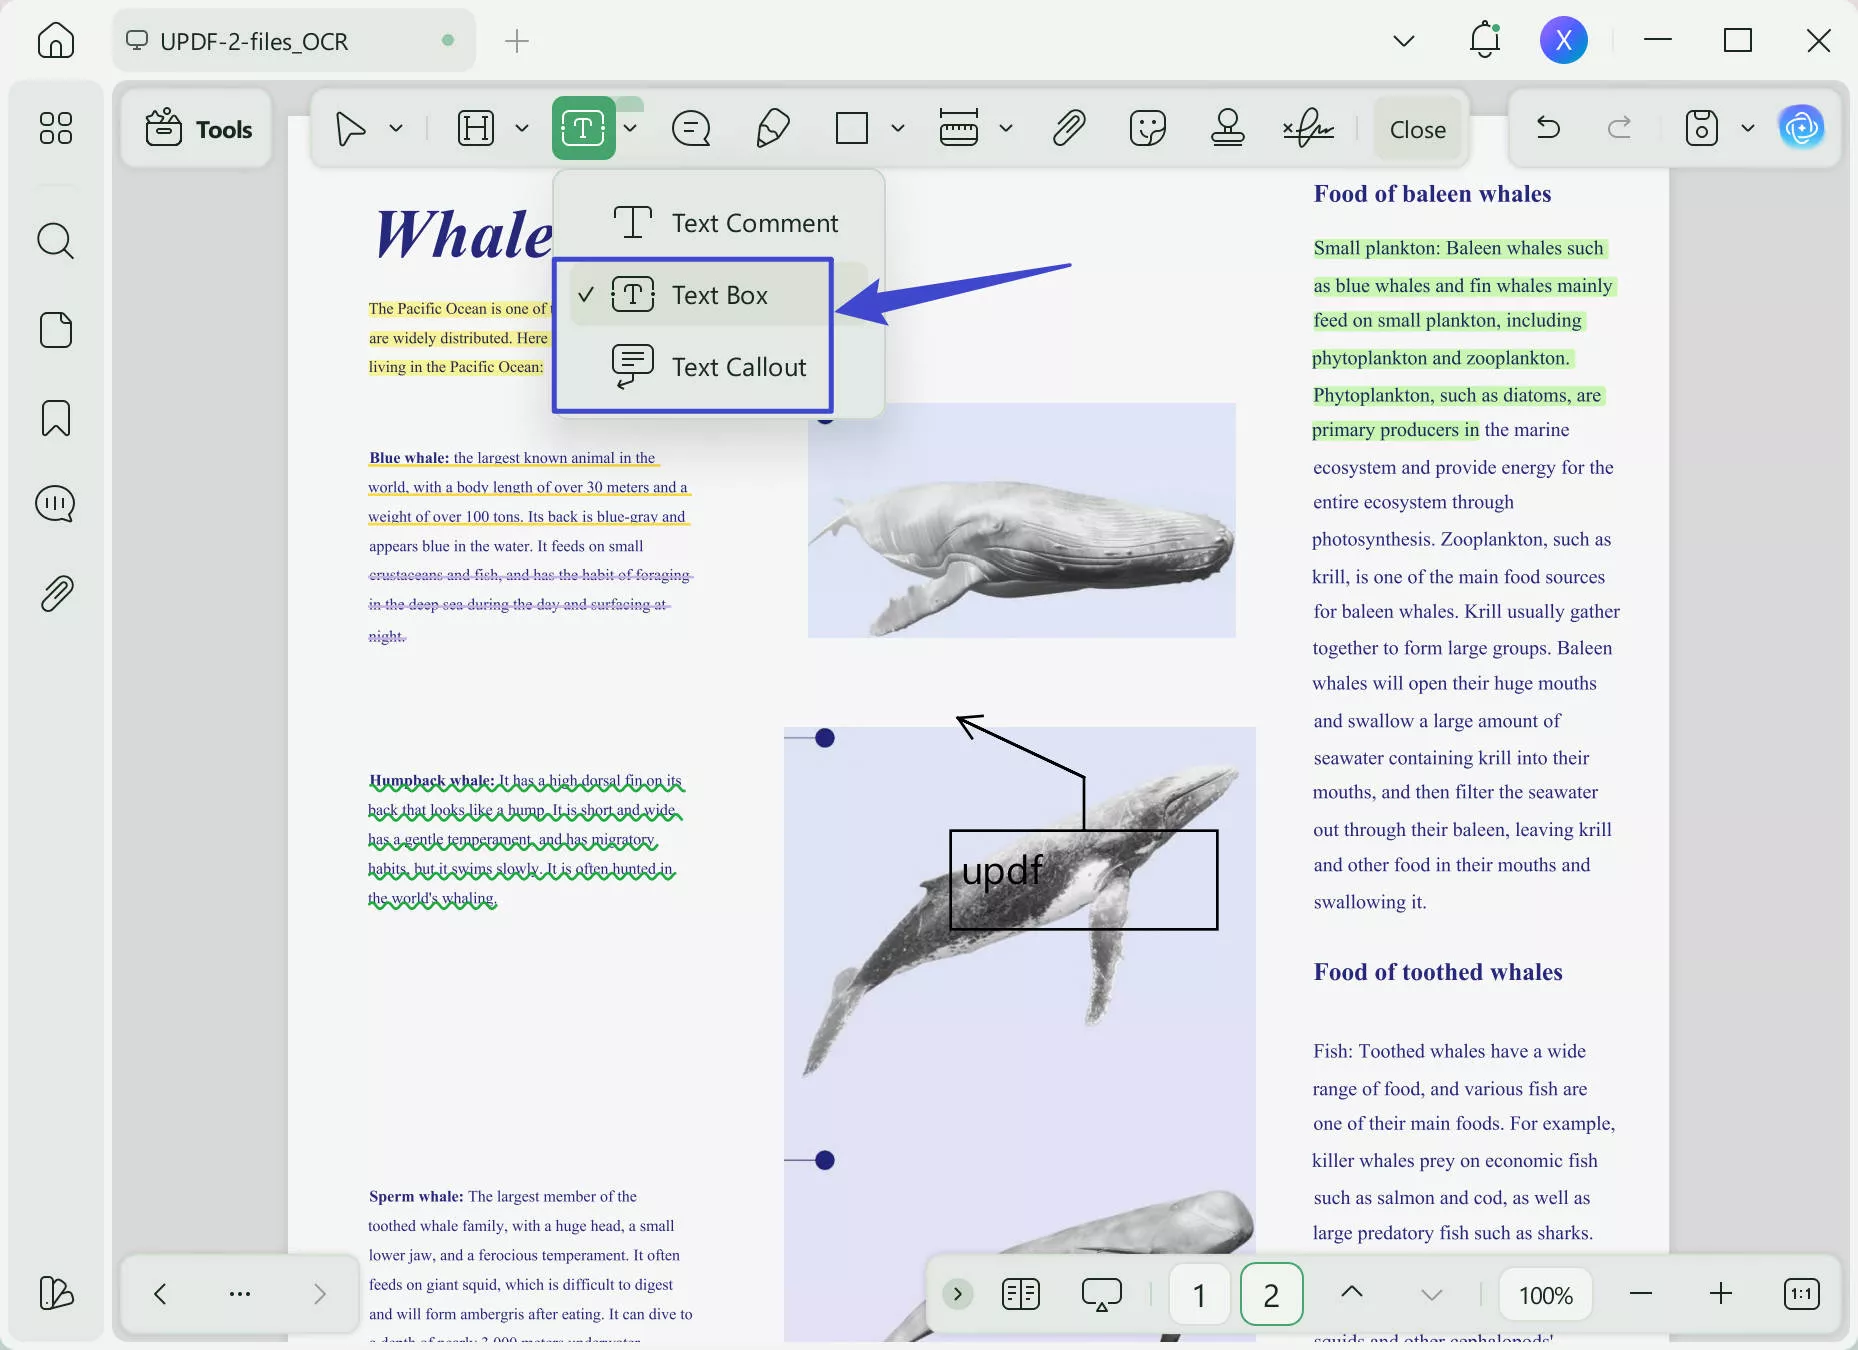
Step 4. Add Additional Information By Inserting a Text Box and a Text Callout
To add extra information to the pre-existing text, draw a "Text Box" and type the text in desired font settings. Additionally, use the "Text Callout" button to draw an extended text box for extra information. Next, select the border, fill, and text colors of your choice depending on the desired readability.
To give the makeup a handwritten outlook, use the "Pencil" tool from the top toolbar and draw it where needed. If you spot an errored drawing, use the eraser in your desired size to remove the mistake.
Step 6. Incorporate Shapes and Stickers
If the document has some sensitive information, draw a "Rectangle" or any other shape over that information in the color of your choice. Alternatively, you can use the redaction tool to permanently hide the content. To add comments to the document, draw a "Sticker" and place it where needed in the file.
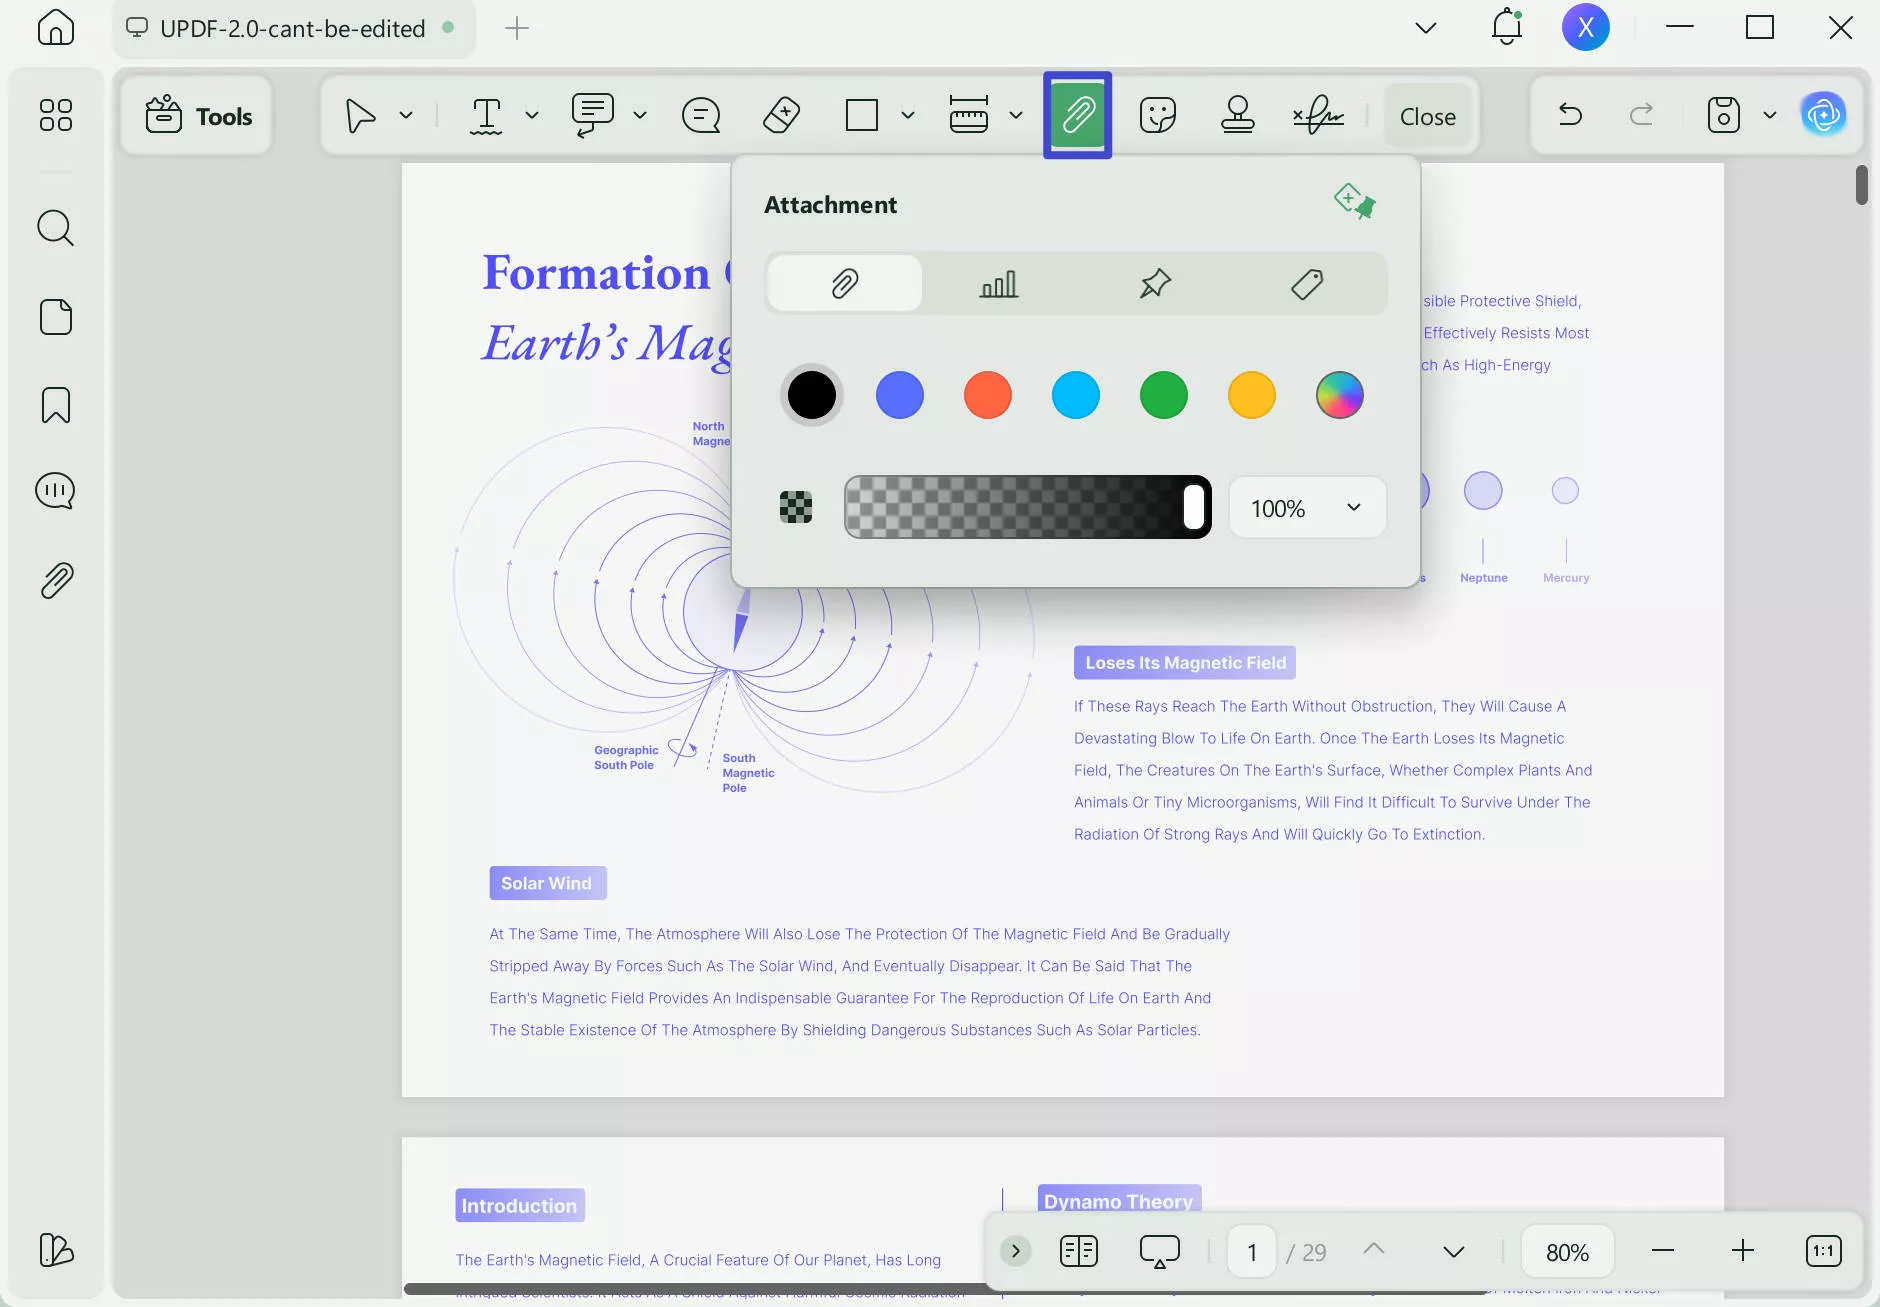
Step 7. Attach a File for Increased Accessibility
Afterward, access "Attachment" from the top toolbar to insert an attachment into the document. Select the document that you need to attach to the file and use the "Pin" to add the attached file to the relevant text.
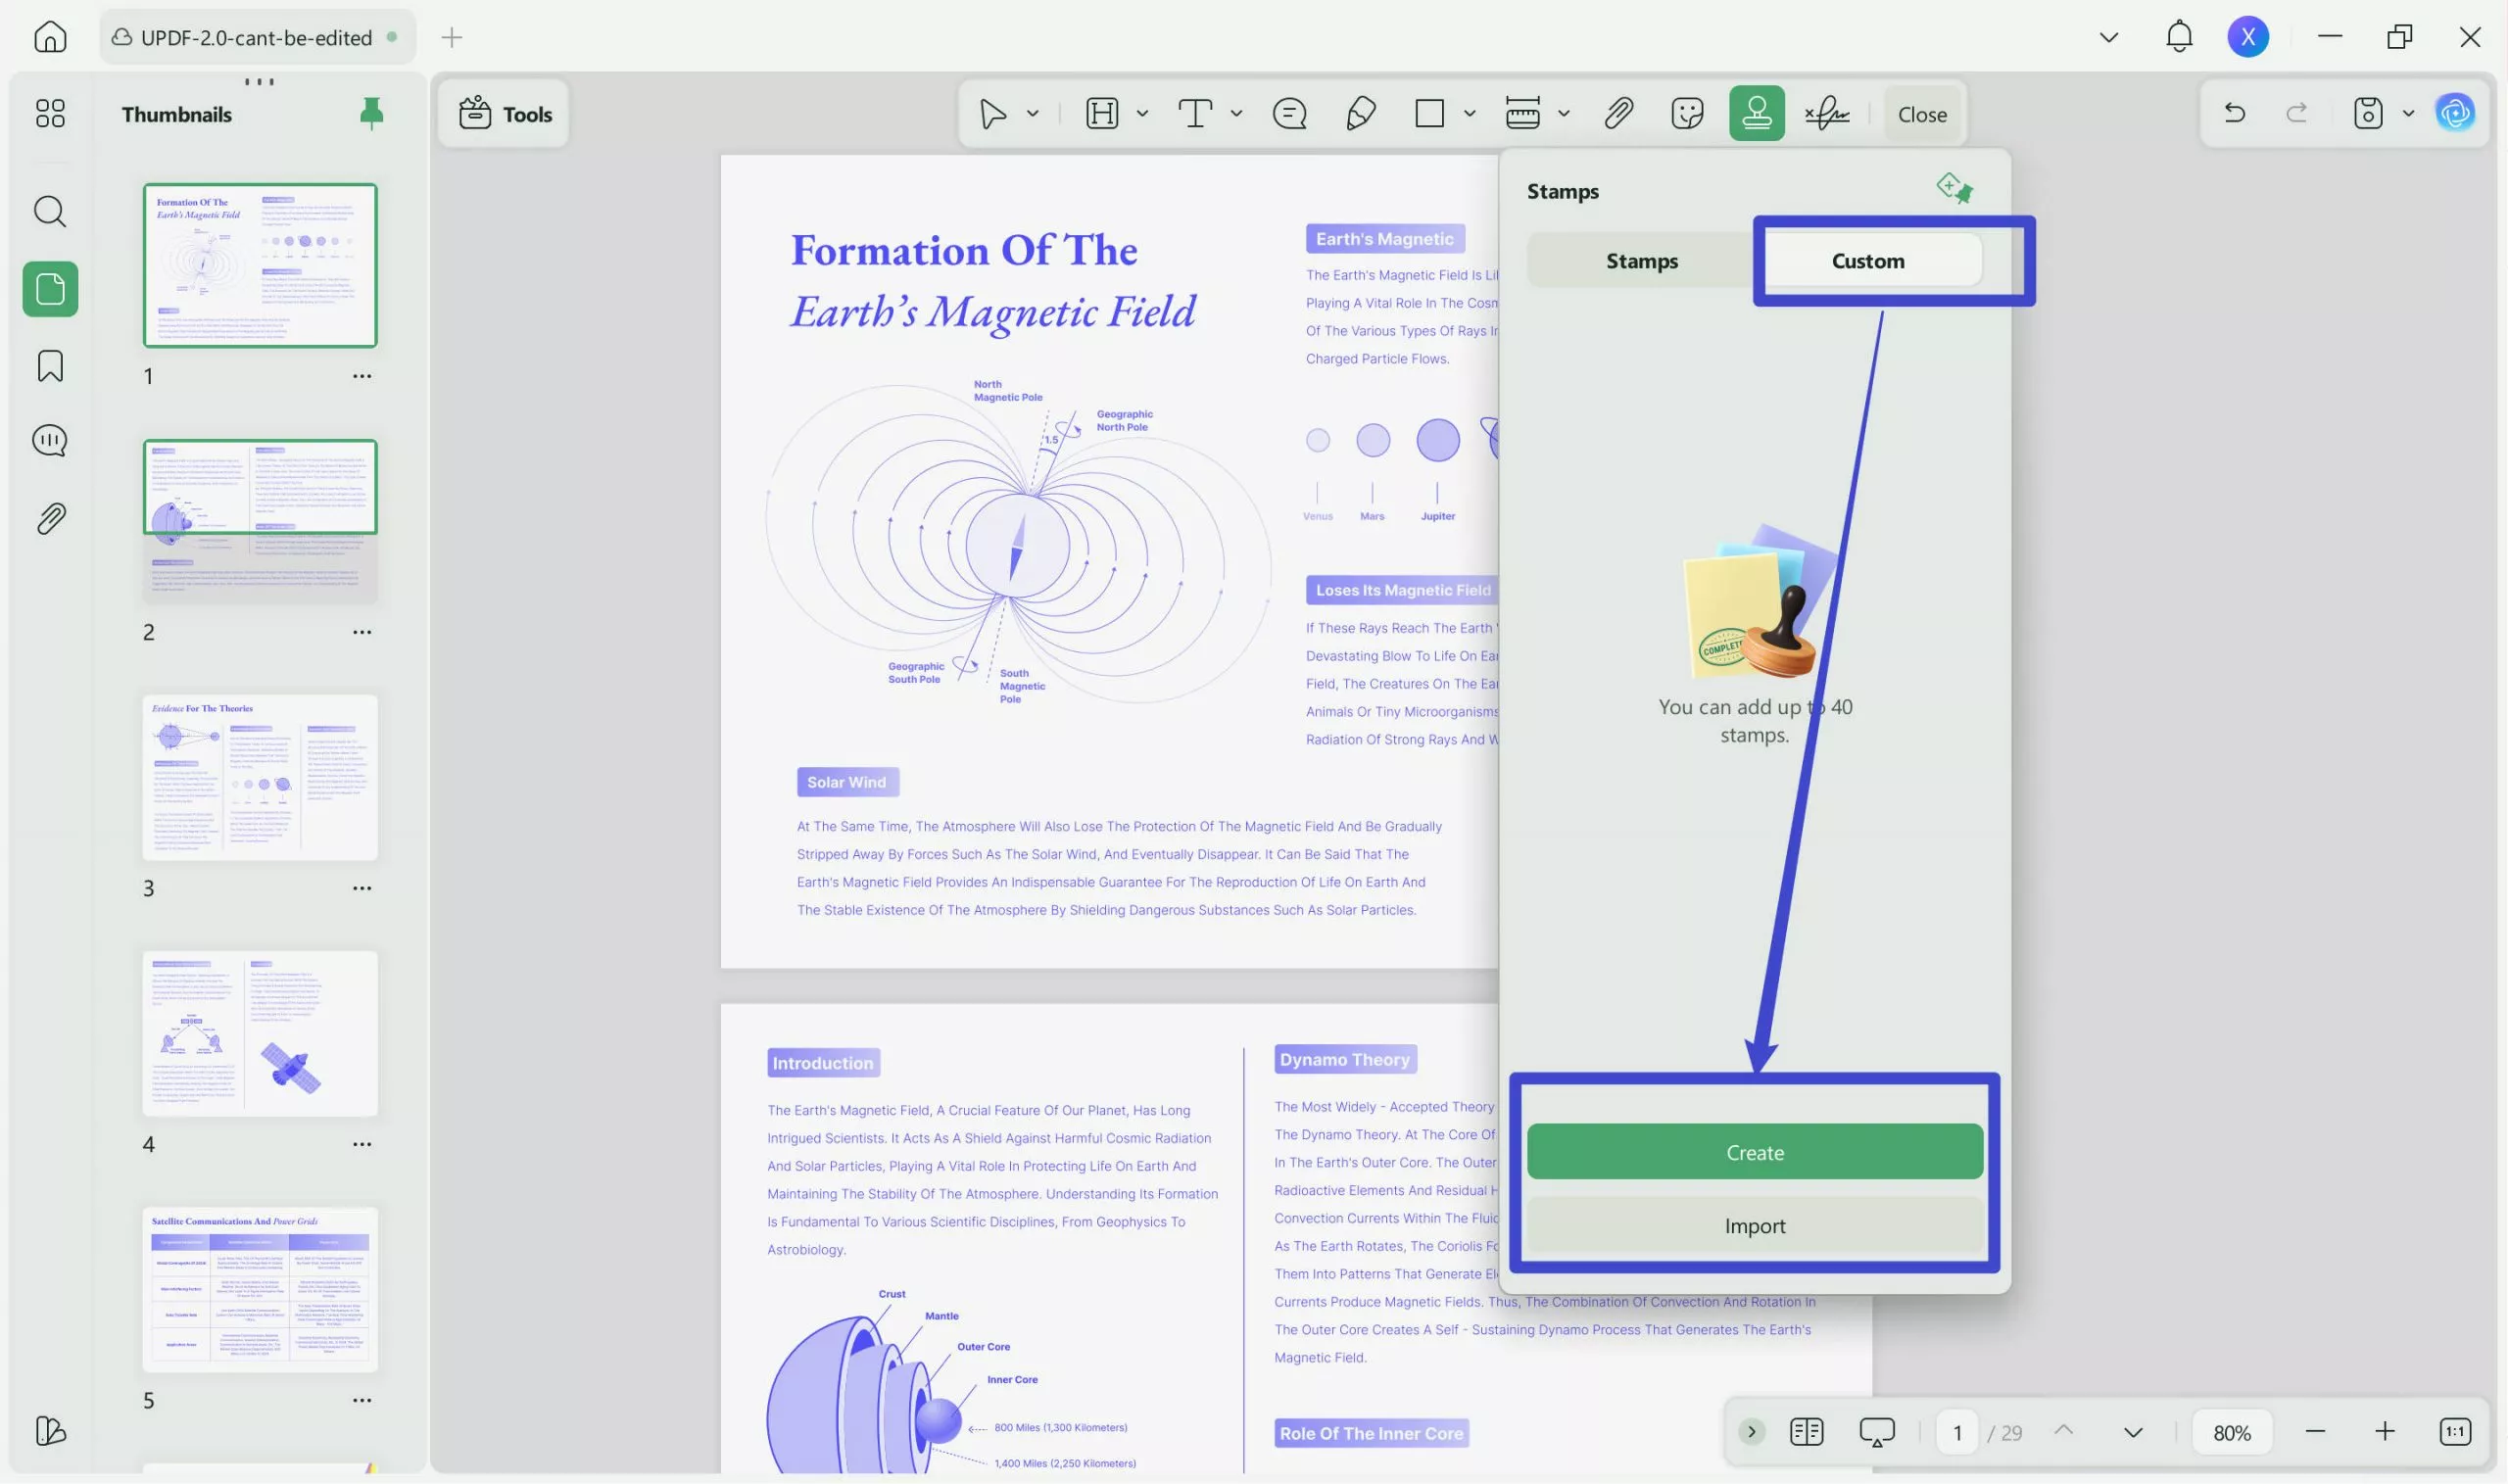
Step 8. Attest the Document Using the Stamp Feature
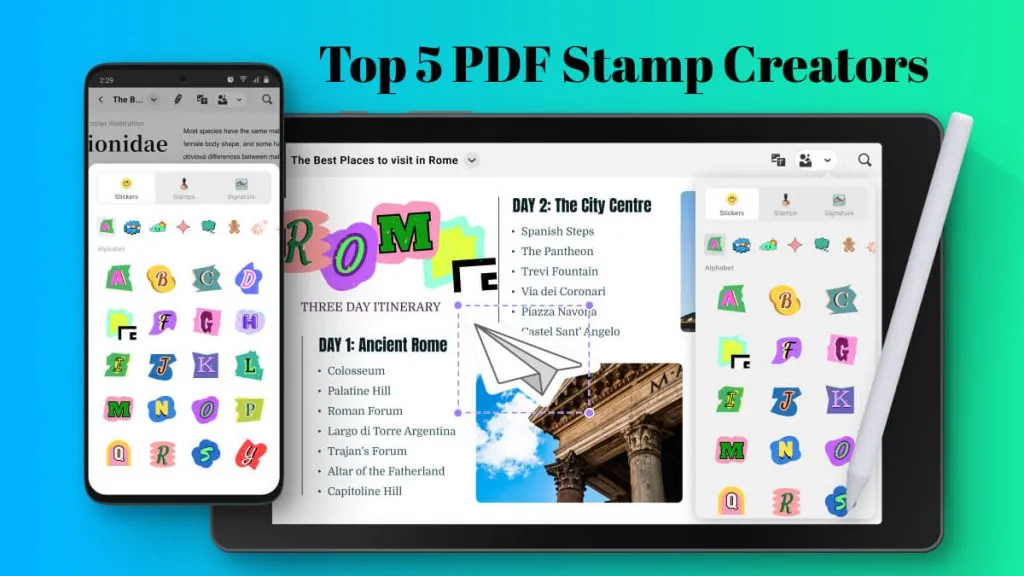
To attest the file after checking, access the "Stamp" button and "Create" a "Custom" stamp or use the pre-existing stamp options. Using the next window, choose the desired stamp template and type the sample text you need to add to the stamp.
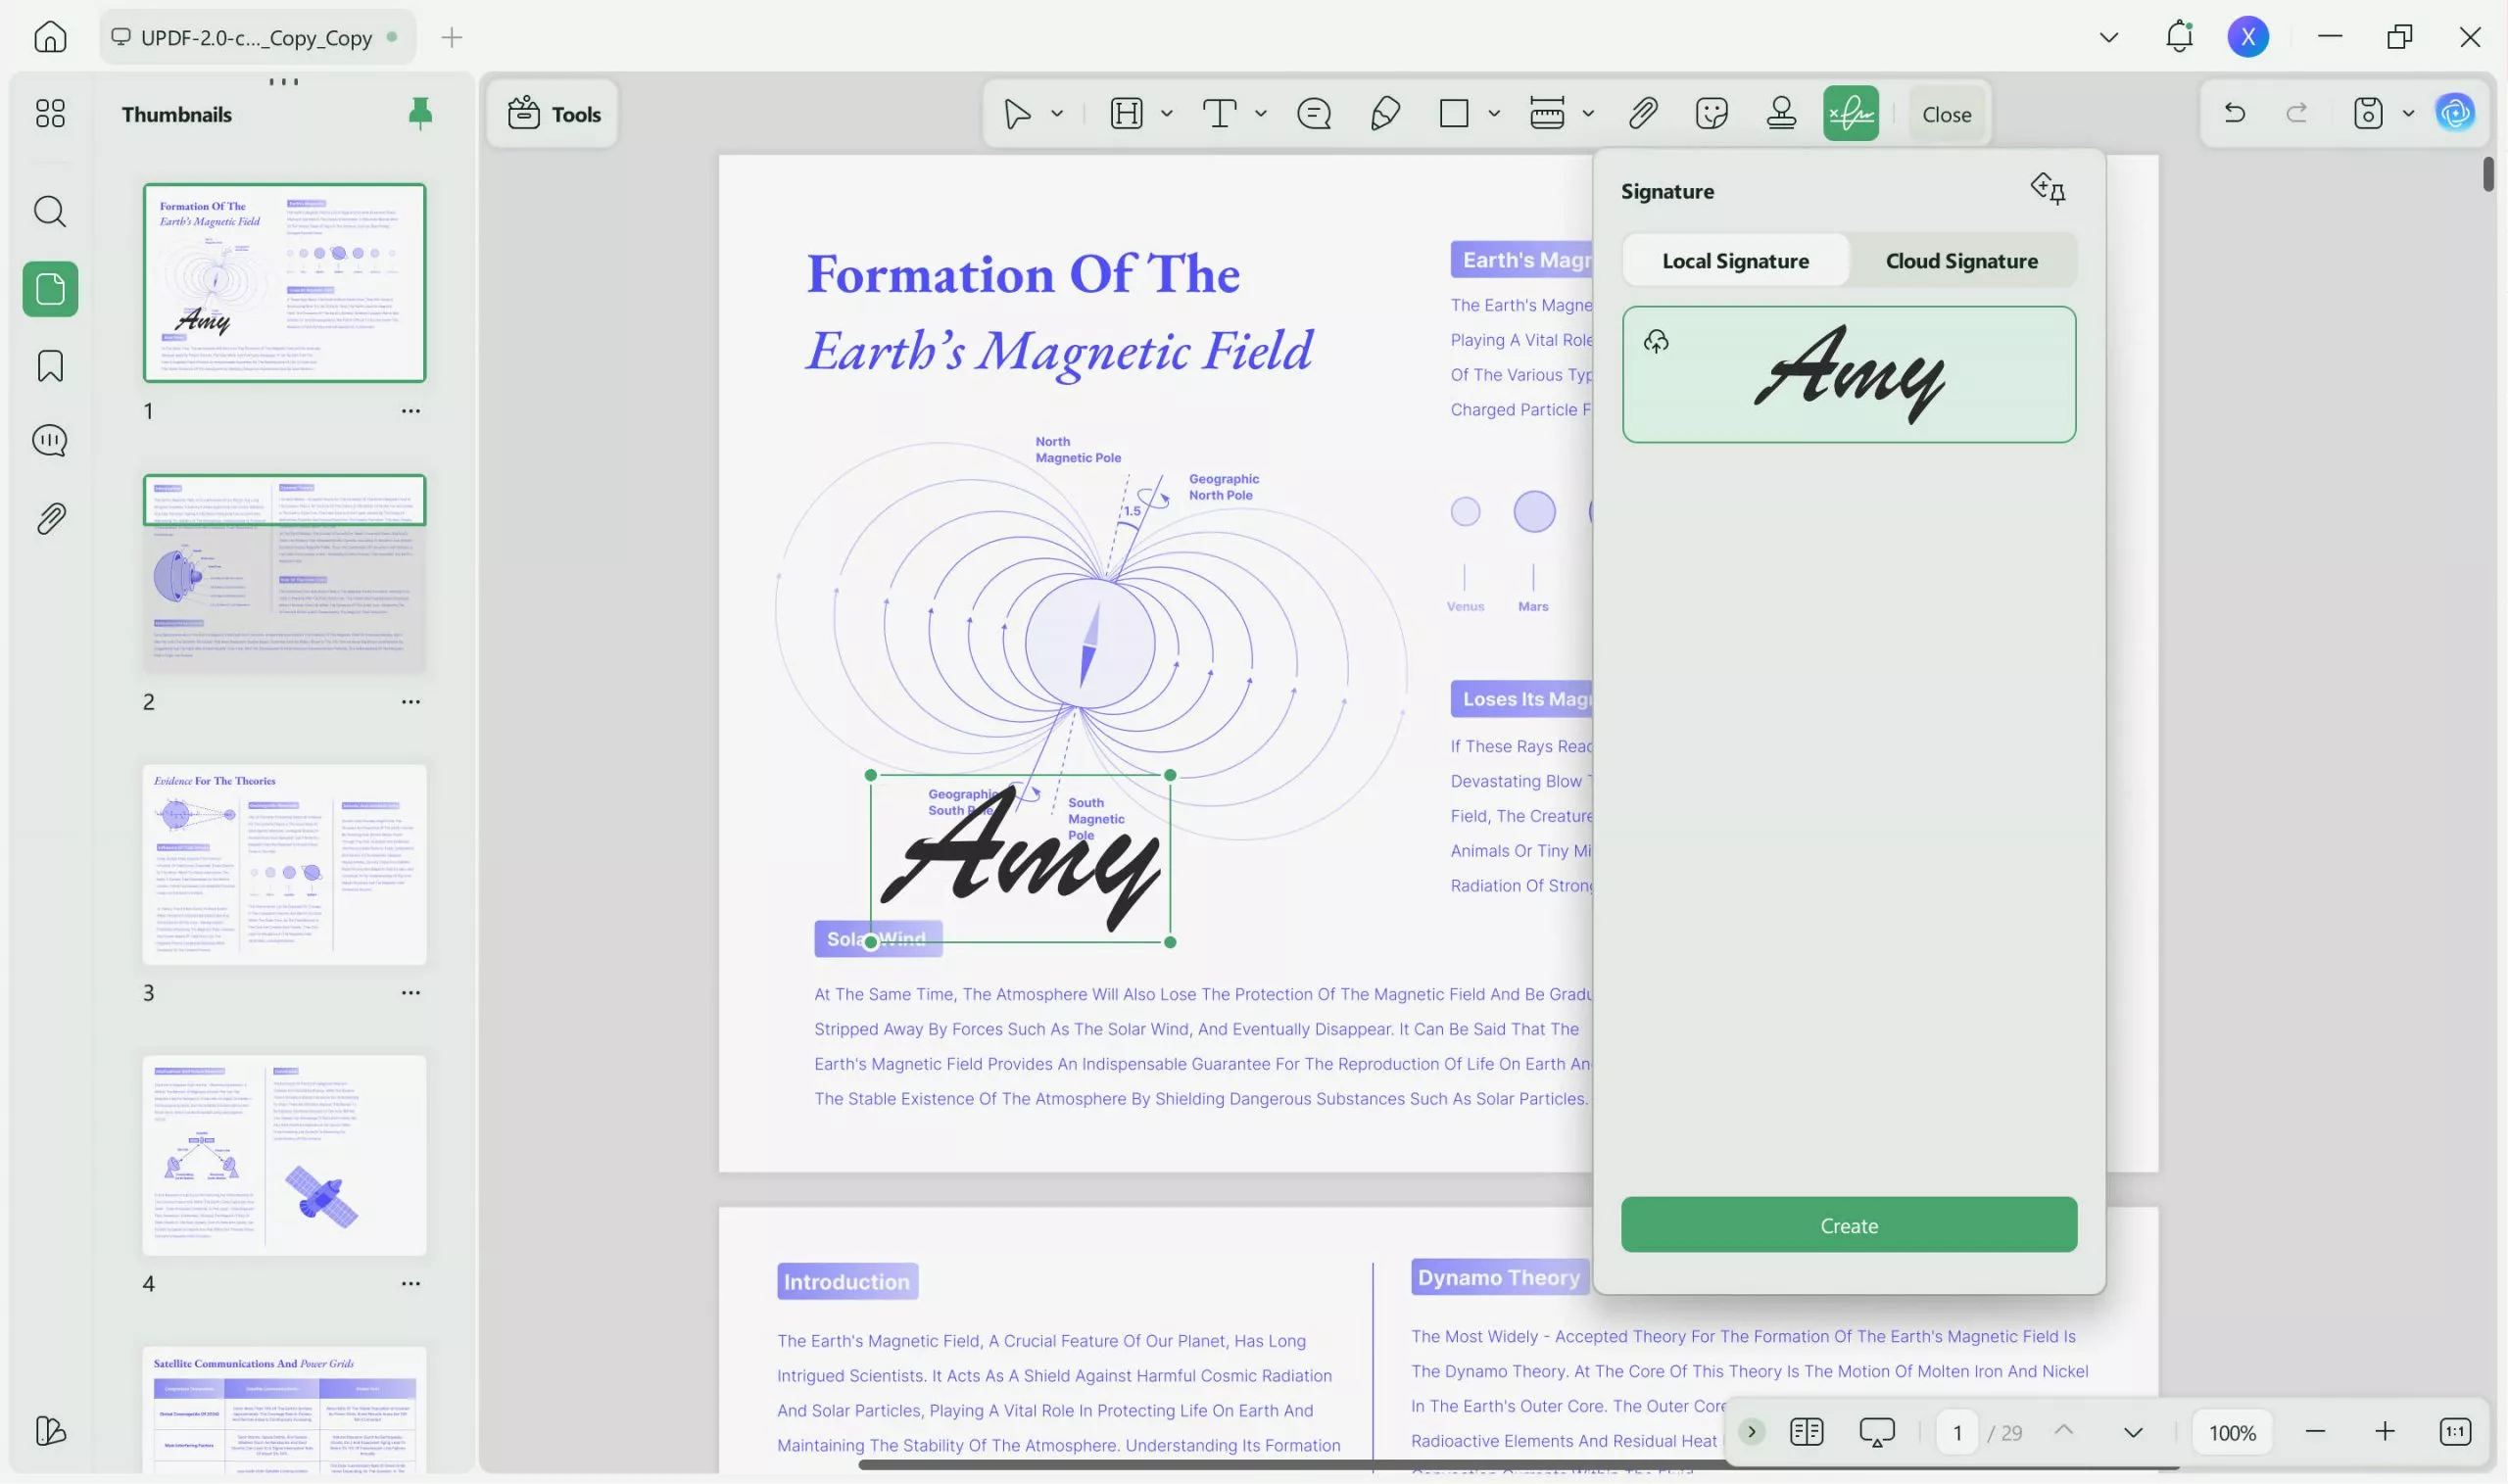
Step 9. Authorize the Document Through the Signature Feature
Finally, add a signature to the PDF by clicking the "Signature" button. Using the pop-up window, use a local or a cloud signature. After selecting the signature, adjust its shape and position on the page.
Moreover, if you want, you can export the comments through the Comment Management List.
UPDF is much more than a mere annotation tool; it offers various PDF-related features that help you manage a file. If you have an incomplete document, you can import it on this platform and edit it to perfection. When creating a file with sensitive information, use UPDF's password protection feature to prevent unauthorized people from accessing it and making changes to it. Consequently, its AI Assistant makes it seamless to understand PDFs and go through entire content in less time.
Conclusion
To summarize, this article provided a detailed guide on how to access Goodnotes PDF annotations for your PDF files. Moreover, the article also discussed how UPDF is a better option when it comes to making the document more understandable using markups. Undoubtedly, it is an all-in-one solution for all your PDF annotation and management needs, offering an extensive set of functionalities.
Windows • macOS • iOS • Android 100% secure
 UPDF
UPDF
 UPDF for Windows
 UPDF for Mac
 UPDF for iPhone/iPad
 UPDF for Android
 UPDF AI Online
 UPDF Sign
 Edit PDF
 Annotate PDF
 Create PDF
 PDF Form
 Edit links
 Convert PDF
 OCR
OCR PDF to Word
 PDF to Image
 PDF to Excel
 Organize PDF
 Merge PDF
 Split PDF
 Crop PDF
 Rotate PDF
 Protect PDF
 Sign PDF
 Redact PDF
 Sanitize PDF
 Remove Security
 Read PDF
 UPDF Cloud
 Compress PDF
 Print PDF
 Batch Process
 About UPDF AI
 UPDF AI Solutions
 AI User Guide
 FAQ about UPDF AI
 Summarize PDF
 Translate PDF
 Chat with PDF
 Chat with AI
 Chat with image
 PDF to Mind Map
 Explain PDF
 Scholar Research
 Paper Search
 AI Proofreader
 AI Writer
 AI Homework Helper
 AI Quiz Generator
 AI Math Solver
 PDF to Word
 PDF to Excel
 PDF to PowerPoint
 User Guide
 UPDF Tricks
 FAQs
FAQs UPDF Reviews
 Download Center
 Blog
Blog Newsroom
 Tech Spec
 Updates
 UPDF vs. Adobe Acrobat
 UPDF vs. Foxit
 UPDF vs. PDF Expert





 Enid Brown
 Lizzy Lozano
 Delia Meyer