 UPDF for Windows
 UPDF for Mac
 UPDF for iPhone/iPad
 UPDF for Android
 UPDF AI Online
 UPDF Sign
 Edit PDF
 Annotate PDF
 Create PDF
 PDF Form
 Edit links
 Convert PDF
 OCR
OCR PDF to Word
 PDF to Image
 PDF to Excel
 Organize PDF
 Merge PDF
 Split PDF
 Crop PDF
 Rotate PDF
 Protect PDF
 Sign PDF
 Redact PDF
 Sanitize PDF
 Remove Security
 Read PDF
 UPDF Cloud
 Compress PDF
 Print PDF
 Batch Process
 About UPDF AI
 UPDF AI Solutions
 AI User Guide
 FAQ about UPDF AI
 Summarize PDF
 Translate PDF
 Chat with PDF
 Chat with AI
 Chat with image
 PDF to Mind Map
 Explain PDF
 PDF AI Tools
 Image AI Tools
 AI Chat Tools
 AI Writing Tools
 AI Study Tools
 AI Working Tools
 Other AI Tools
 PDF to Word
 PDF to Excel
 PDF to PowerPoint
 User Guide
 UPDF Tricks
 FAQs
FAQs UPDF Reviews
 Download Center
 Blog
Blog Newsroom
 Tech Spec
 Updates
 UPDF vs. Adobe Acrobat
 UPDF vs. Foxit
 UPDF vs. PDF Expert
Several users have faced difficulties with their Wi-Fi not working after the macOS Tahoe update. These issues include problems with Wi-Fi connections, disconnections, complete failure to establish a Wi-Fi connection, or inability to access the internet. To address these Wi-Fi connection issues in macOS Tahoe, we will explore 11 effective solutions.
These solutions will help you to restore your online connectivity. You can resolve any Wi-Fi-related queries by taking care of these troubleshooting steps. Moreover, this article will also introduce a blazing-fast PDF editor for your MacOS Tahoe.
Part 1. 8 Some Common Tips to Fix Wi-Fi Not Working on MacOS Tahoe
Is your MacBook connected to Wi-Fi, but you cannot access the internet after updating it to MacOS Tahoe? This can happen for various reasons, such as issues with your router, internet service provider, or MacBook software. But we have some helpful tips that can help you fix this problem:
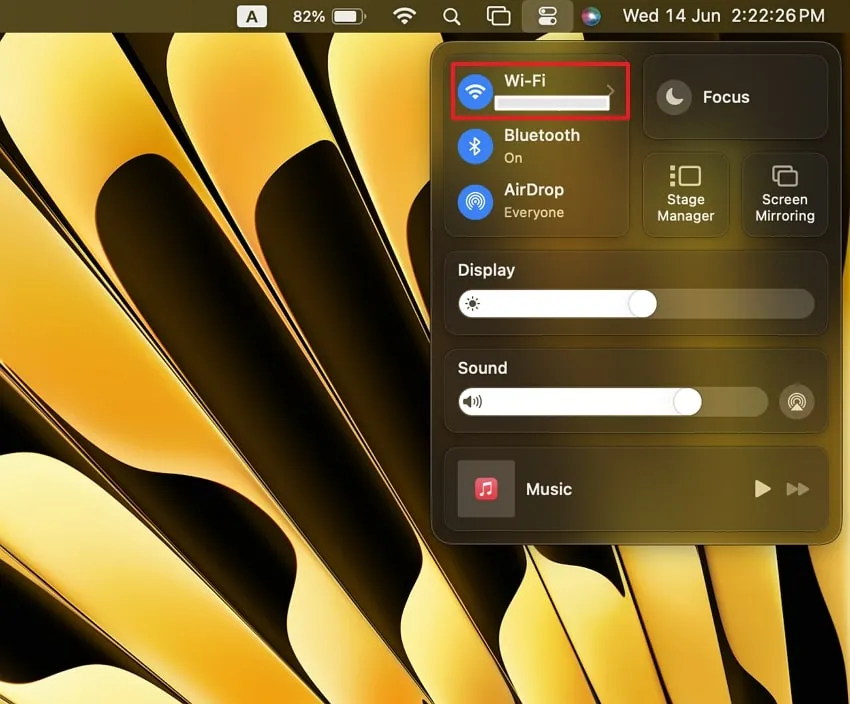
Tip 1: Disable and Enable Wi-Fi
Sometimes, when you have trouble connecting to the internet on your MacBook, try turning the Wi-Fi on and off because it can remove all basic bugs. Follow the below instruction to do it quickly:
Instruction: Start by moving the cursor to the menu bar at the top of your Mac screen. Now, tap the "Wi-Fi" icon and toggle the switch next to the "Wi-Fi." This will disable your Wi-Fi connectivity. Again, toggle the same switch to turn it on and check if the connectivity has been restored.
Tip 2: Power Off and Power On Your Router
In case you are still facing trouble with your internet after enabling the Wi-Fi, try turning off your router and turning it back on. You can do this by using the “On/Off” switch at the back of the router. Also, make sure that all the cables are connected correctly. After you turn on the router again, wait at least 2 minutes before trying to connect again.

Tip 3: Disconnect All External Devices
Make sure the devices you connect to your MacBook have shielding. If they don't, they might make your Wi-Fi or internet stop working. First, disconnect every device from your Mac, like the mouse, keyboard, and hard drive. Then, try connecting to the internet again. If you can go online now, it means one of your devices is causing the problem.
To resolve this, connect your devices back one by one to notice which one is causing trouble. If you find the one causing the problem, get it repaired or buy a new one.

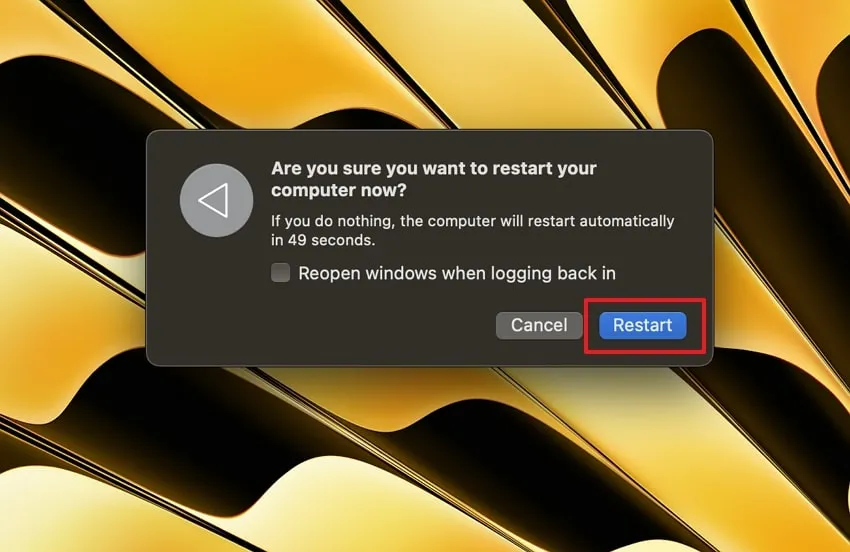
Tip 4: Restart Your Mac
Normally, this is a fast and trustworthy way to solve all basic problems of MacBook, such as Wi-Fi not working after the macOS Tahoe update. First, make sure to save the files or documents you are currently working on. Afterward, follow the instructions provided below:
Instruction: On your Mac, in the top left corner, hit the "Apple" icon. As the drop-down list appears, tap the "Restart" option. Then, in the pop-up window, press the "Restart" button again to switch Mac off. Afterward, wait a few seconds, and it will turn on again.
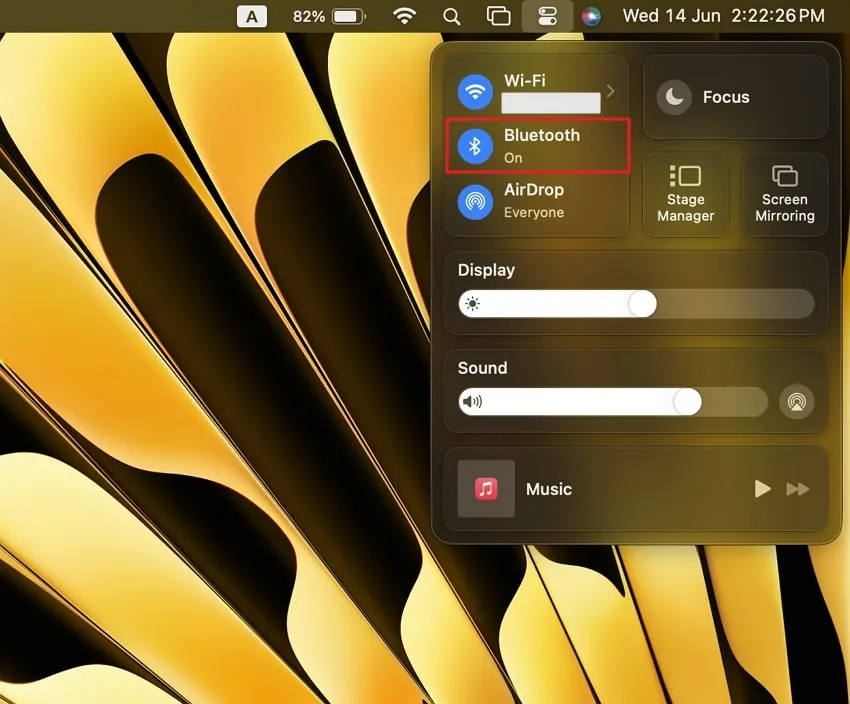
Tip 5: Disable Bluetooth
At times, the Bluetooth on your Mac might disrupt your Wi-Fi connection. If you are not using Bluetooth for any purpose, switching it off is advisable. To turn it off:
Instruction: Head to the top-right corner and select the "Control Centre" icon. Then, from the available options, click "Bluetooth" and toggle the switch to the off position. This will disconnect Bluetooth on your Mac.
Tip 6: Re-add Wi-Fi Connection
Most of the time, if there is a problem with your Mac setup, it can make the Wi-Fi not work properly. In that case, you must remove the Wi-Fi connection and add it back to your preferences. Explore the following steps to get the process done:
Step 1: Hit the "Apple" icon at the top-left on your Mac screen and then select "System Settings" from the list. Now, from the left sidebar, tap the "Network" option and choose "Wi-Fi" from the right side.
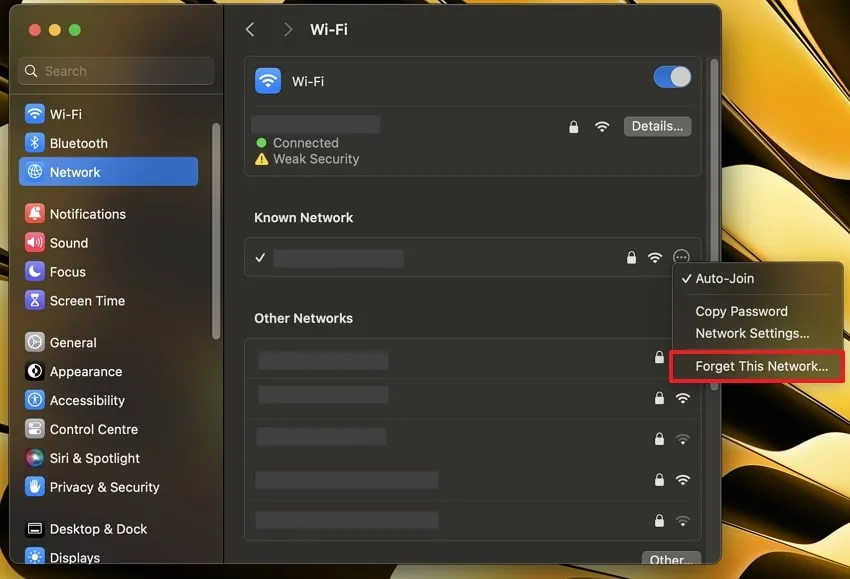
Step 2: Afterward, under the “Known Network” section, you will see a connected Wi-Fi. There, tap the three dots and select “Forget this Network.” Following this, hit the “Remove” button to unjoin the network.
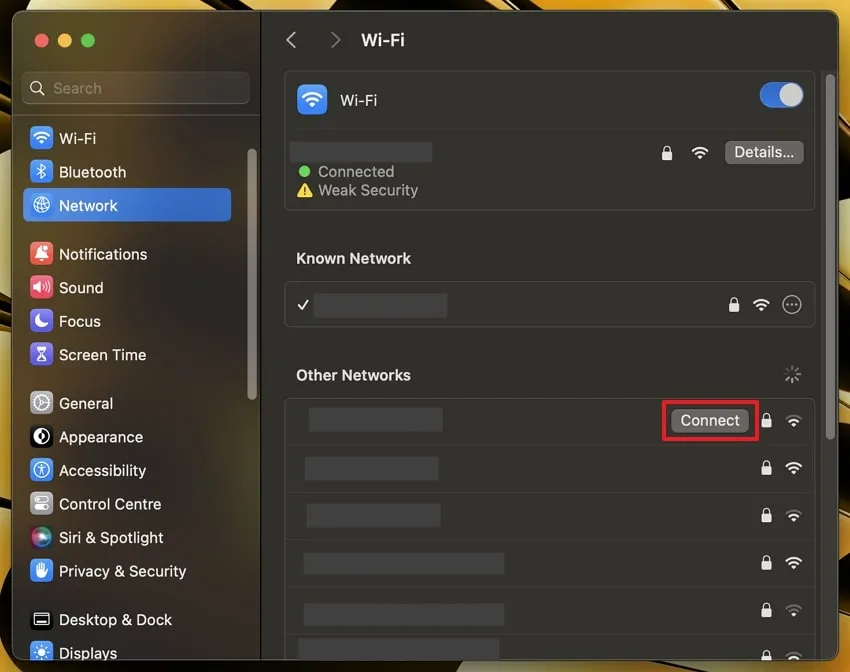
Step 3: Once removed, search for the desired network under the “Other Networks” section. When you place the cursor on the network, you will notice a “Connect” button. Select it, and type the “Password” for that network. Finally, press the “OK” button to re-add the connection.
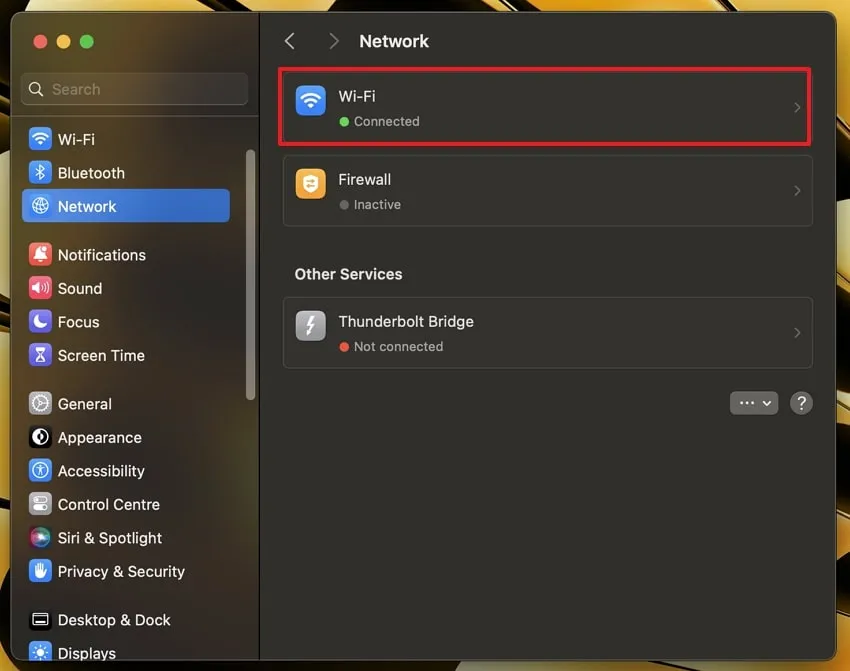
Tip 7: Turn Off the Firewall
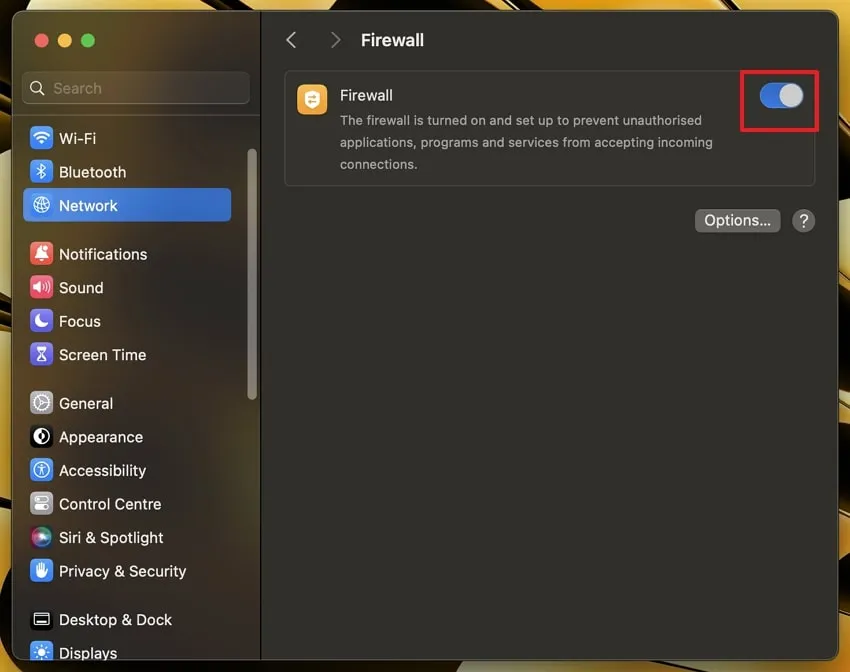
Sometimes the Firewall on your Mac can cause issues with your Wi-Fi. To solve this problem, you can turn off the Firewall with the given steps:
Instruction: In the "System Settings" on your Mac, hit the "Network" option from the left sidebar. Continue tapping the "Firewall" option in the "Network" section window. Toggle the switch to turn off the Firewall for your Mac.
Tip 8: Move Closer to Router
Usually, when your Mac is far from the Wi-Fi router or network, it may have trouble connecting. Even if it shows connected, the signal might need to be stronger to give you a good internet connection. The bars in the Wi-Fi symbol on your Mac's menu bar show how strong the signal is. Move and place your Mac where the signal bars reach at least three. This will build a stronger Wi-Fi connection.
Part 2. 3 Professional Ways to Fix Wi-Fi Not Working After MacOS Tahoe Update
If the Wi-Fi not working issue is not resolved after applying the basic tips, some other things might be interfering with your network. Considering this, we have some professional ways to help you figure out the Wi-Fi not working after the macOS Tahoe update issue.
Way 1. Delete the VPN
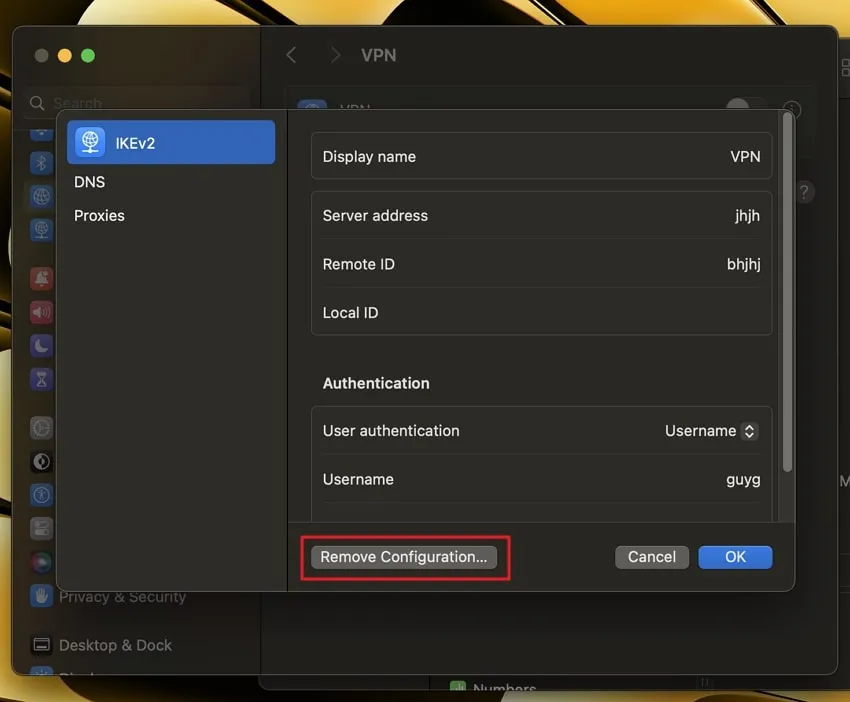
Moving on, if you ever set up a VPN on your Mac but no longer use the service, removing it entirely from your macOS Tahoe is the wise option. Follow the steps below to delete it:
Instruction: You need to navigate to the "System Settings" first, then under the "Network" option, tap on "VPN." This will show the connected VPN on the right side. Toggle the switch off, tap on the "i" icon next to the VPN, and at the bottom left, click "Remove Configuration." This will delete your VPN network.
Way 2. Run Wireless Diagnostics
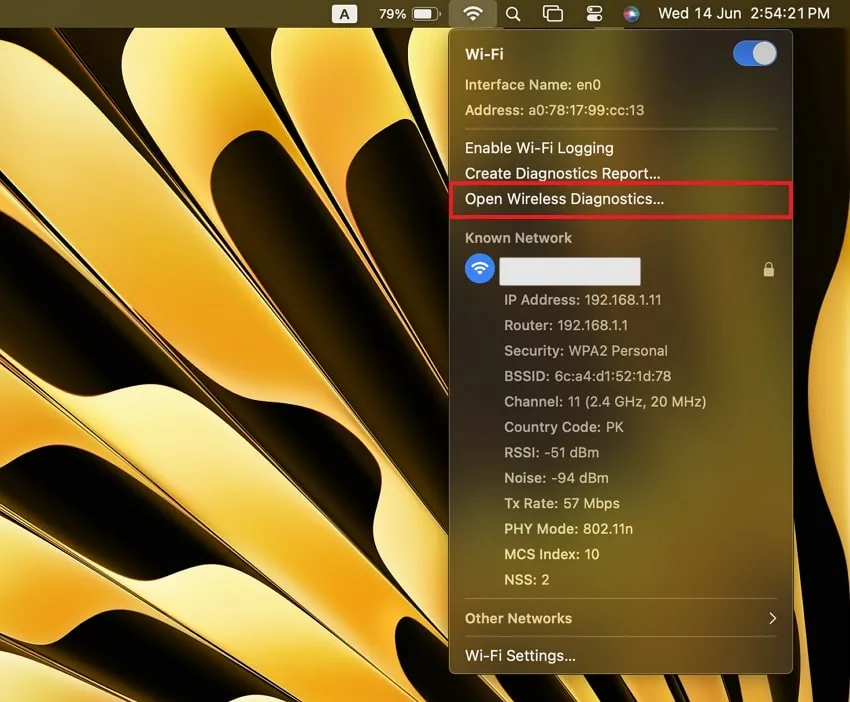
Now, let's talk about a simple yet effective way to find out what is wrong with your network on your Mac. You can use a Wireless Diagnose way to do this. It is a process that happens automatically, so you don't have to do much. Follow the steps mentioned to resolve Wi-Fi not working after the macOS Tahoe update:
Instruction: Locate the Wi-Fi icon from the top right side of the MacBook toolbar. Afterward, click on the Wi-Fi icon while holding the “Option” key. This will open the details related to your Wi-Fi network. Next, choose the “Open Wireless Diagnostics” option and press the “Continue” button to initiate the diagnostics process.
Way 3. Update DNS Settings
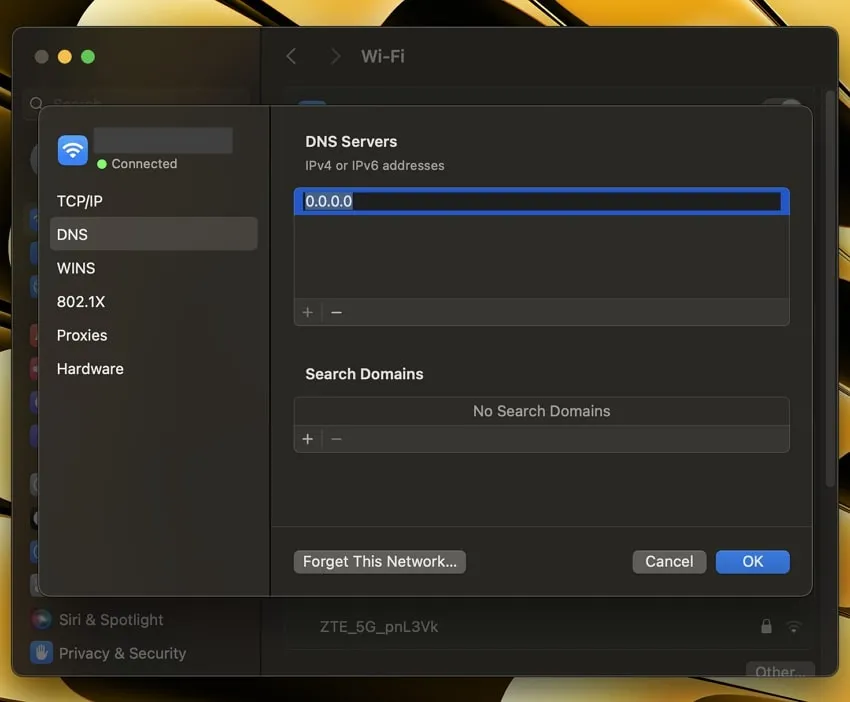
If your Wi-Fi seems fine, but you can't access the internet, it could be due to a problem with your ISP's Domain Name Server. In such cases, you can use a free, public DNS instead. One option is Google's reliable DNS service. Following the steps below will help you update the DNS:
Instruction: Access and open the "Network" section on your Mac from "System Settings." Then choose "Wi-Fi" and locate and press the "Details" button next to your Wi-Fi name. Access the "DNS" tab from the left sidebar. Afterward, under the "DNS Servers" box, hit the "+" icon and insert the addresses "8.8.4.4" or "8.8.8.8," and tap the "OK" button to start browsing again.
Part 3. Bonus Tip: The Most Professional PDF Editor on MacOS Tahoe
For years, it used to be hard to edit PDFs, and you had to spend a lot of money on expensive software, but UPDF for Mac changed that perspective. With its support on macOS Tahoe, users can access all the features of this expert PDF. With UPDF, you can add your electronic signature to your PDF wherever possible. Moreover, you can share your PDF files easily. You can send the PDF as a link through email, no matter the file size.
Windows • macOS • iOS • Android 100% secure

Furthermore, you can organize your PDF files with UPDF by changing the order of the pages, deleting or inserting, splitting or extracting, or replacing them. It also lets you fill out digital forms without printing them. In addition, UPDF also enables you to protect your PDF files with encryption. Add passwords to prevent others from opening or changing your files.
Why not give this awesome PDF editor on your MacOS Tahoe?
Final Words
To conclude, if you are experiencing Wi-Fi not working after the macOS Tahoe update issue, there are some effective solutions you can try, as mentioned in this article. The steps we have mentioned are easy to follow and will resolve your Wi-Fi connectivity queries.
Additionally, we recommend UPDF PDF Editor for your macOS Tahoe as a reliable tool for all your PDF requirements. This tool will amplify your PDF editing experience with its array of features.
Windows • macOS • iOS • Android 100% secure


 Lizzy Lozano
 Enola Davis
 Enola Miller
