 UPDF for Windows
 UPDF for Mac
 UPDF for iPhone/iPad
 UPDF for Android
 UPDF AI Online
 UPDF Sign
 Edit PDF
 Annotate PDF
 Create PDF
 PDF Form
 Edit links
 Convert PDF
 OCR
OCR PDF to Word
 PDF to Image
 PDF to Excel
 Organize PDF
 Merge PDF
 Split PDF
 Crop PDF
 Rotate PDF
 Protect PDF
 Sign PDF
 Redact PDF
 Sanitize PDF
 Remove Security
 Read PDF
 UPDF Cloud
 Compress PDF
 Print PDF
 Batch Process
 About UPDF AI
 UPDF AI Solutions
 AI User Guide
 FAQ about UPDF AI
 Summarize PDF
 Translate PDF
 Chat with PDF
 Chat with AI
 Chat with image
 PDF to Mind Map
 Explain PDF
 PDF AI Tools
 Image AI Tools
 AI Chat Tools
 AI Writing Tools
 AI Study Tools
 AI Working Tools
 Other AI Tools
 AI Bookmark Generation
 AI Bookmark Summary
 AI Watermark Generation
 AI Background Generation
 AI Sticker Generation
 AI Stamp Generation
 AI Editing Suite
 UPDF Copilot
 AI Page Management
 AI Semantic Search
 PDF to Word
 PDF to Excel
 PDF to PowerPoint
 User Guide
 UPDF Tricks
 FAQs
FAQs UPDF Reviews
 Download Center
 Blog
Blog Newsroom
 Tech Spec
 Updates
 UPDF vs. Adobe Acrobat
 UPDF vs. Foxit
 UPDF vs. PDF Expert
Making Tagged PDFs might not be a common thing to do but it is very important and relevant not just to us but to our target audience and the people that are going to use it. Tagged PDFs also known as Accessible PDFs. It has all the tags like in the HTML which define its structure. Most of PDF files are not tagged and many tools do not have the feature to help you create a tagged PDF. No worry, in this article, we will show all the effective ways to help you make a tagged PDF you need.
But before that, if you need to create a PDF before making a tagged PDF, we recommend you to use UPDF which is an all in one AI PDF editor. And it is much easier and cheaper to use when compared with Adobe Acrobat. You can click the below button to download UPDF and create the PDF directly, then, follow the below guide to create a tagged PDF.
Windows • macOS • iOS • Android 100% secure
Part 1. What Does Create Tagged PDF Mean?
Tagged PDFs, also known as Accessible PDFs, are PDF files that contain tags that aid in the file's overall readability as well as accessibility. Tagged PDFs provide an outline using tags to identify the different content that is presented in a given PDF. It is just like in the HTML, with proper tags, you can have a better experience to read the document on the different devices.
As you may need to make your PDF tagged, we will show you how to tag your PDF files using three different software so that you can choose which one fits your needs and preferences.
Part 2. How to Create a Tagged PDF in Adobe Acrobat Pro?
For our first method, we will be using Adobe Acrobat Pro. It can help you create a tagged PDF automatically, then, add the tags manually if you need.
Step 1. Select the PDF file you want to be tagged to open it with Adobe Acrobat.
Step 2. Click on the "Tools" > "Accessibility" to open the feature to tag PDF.

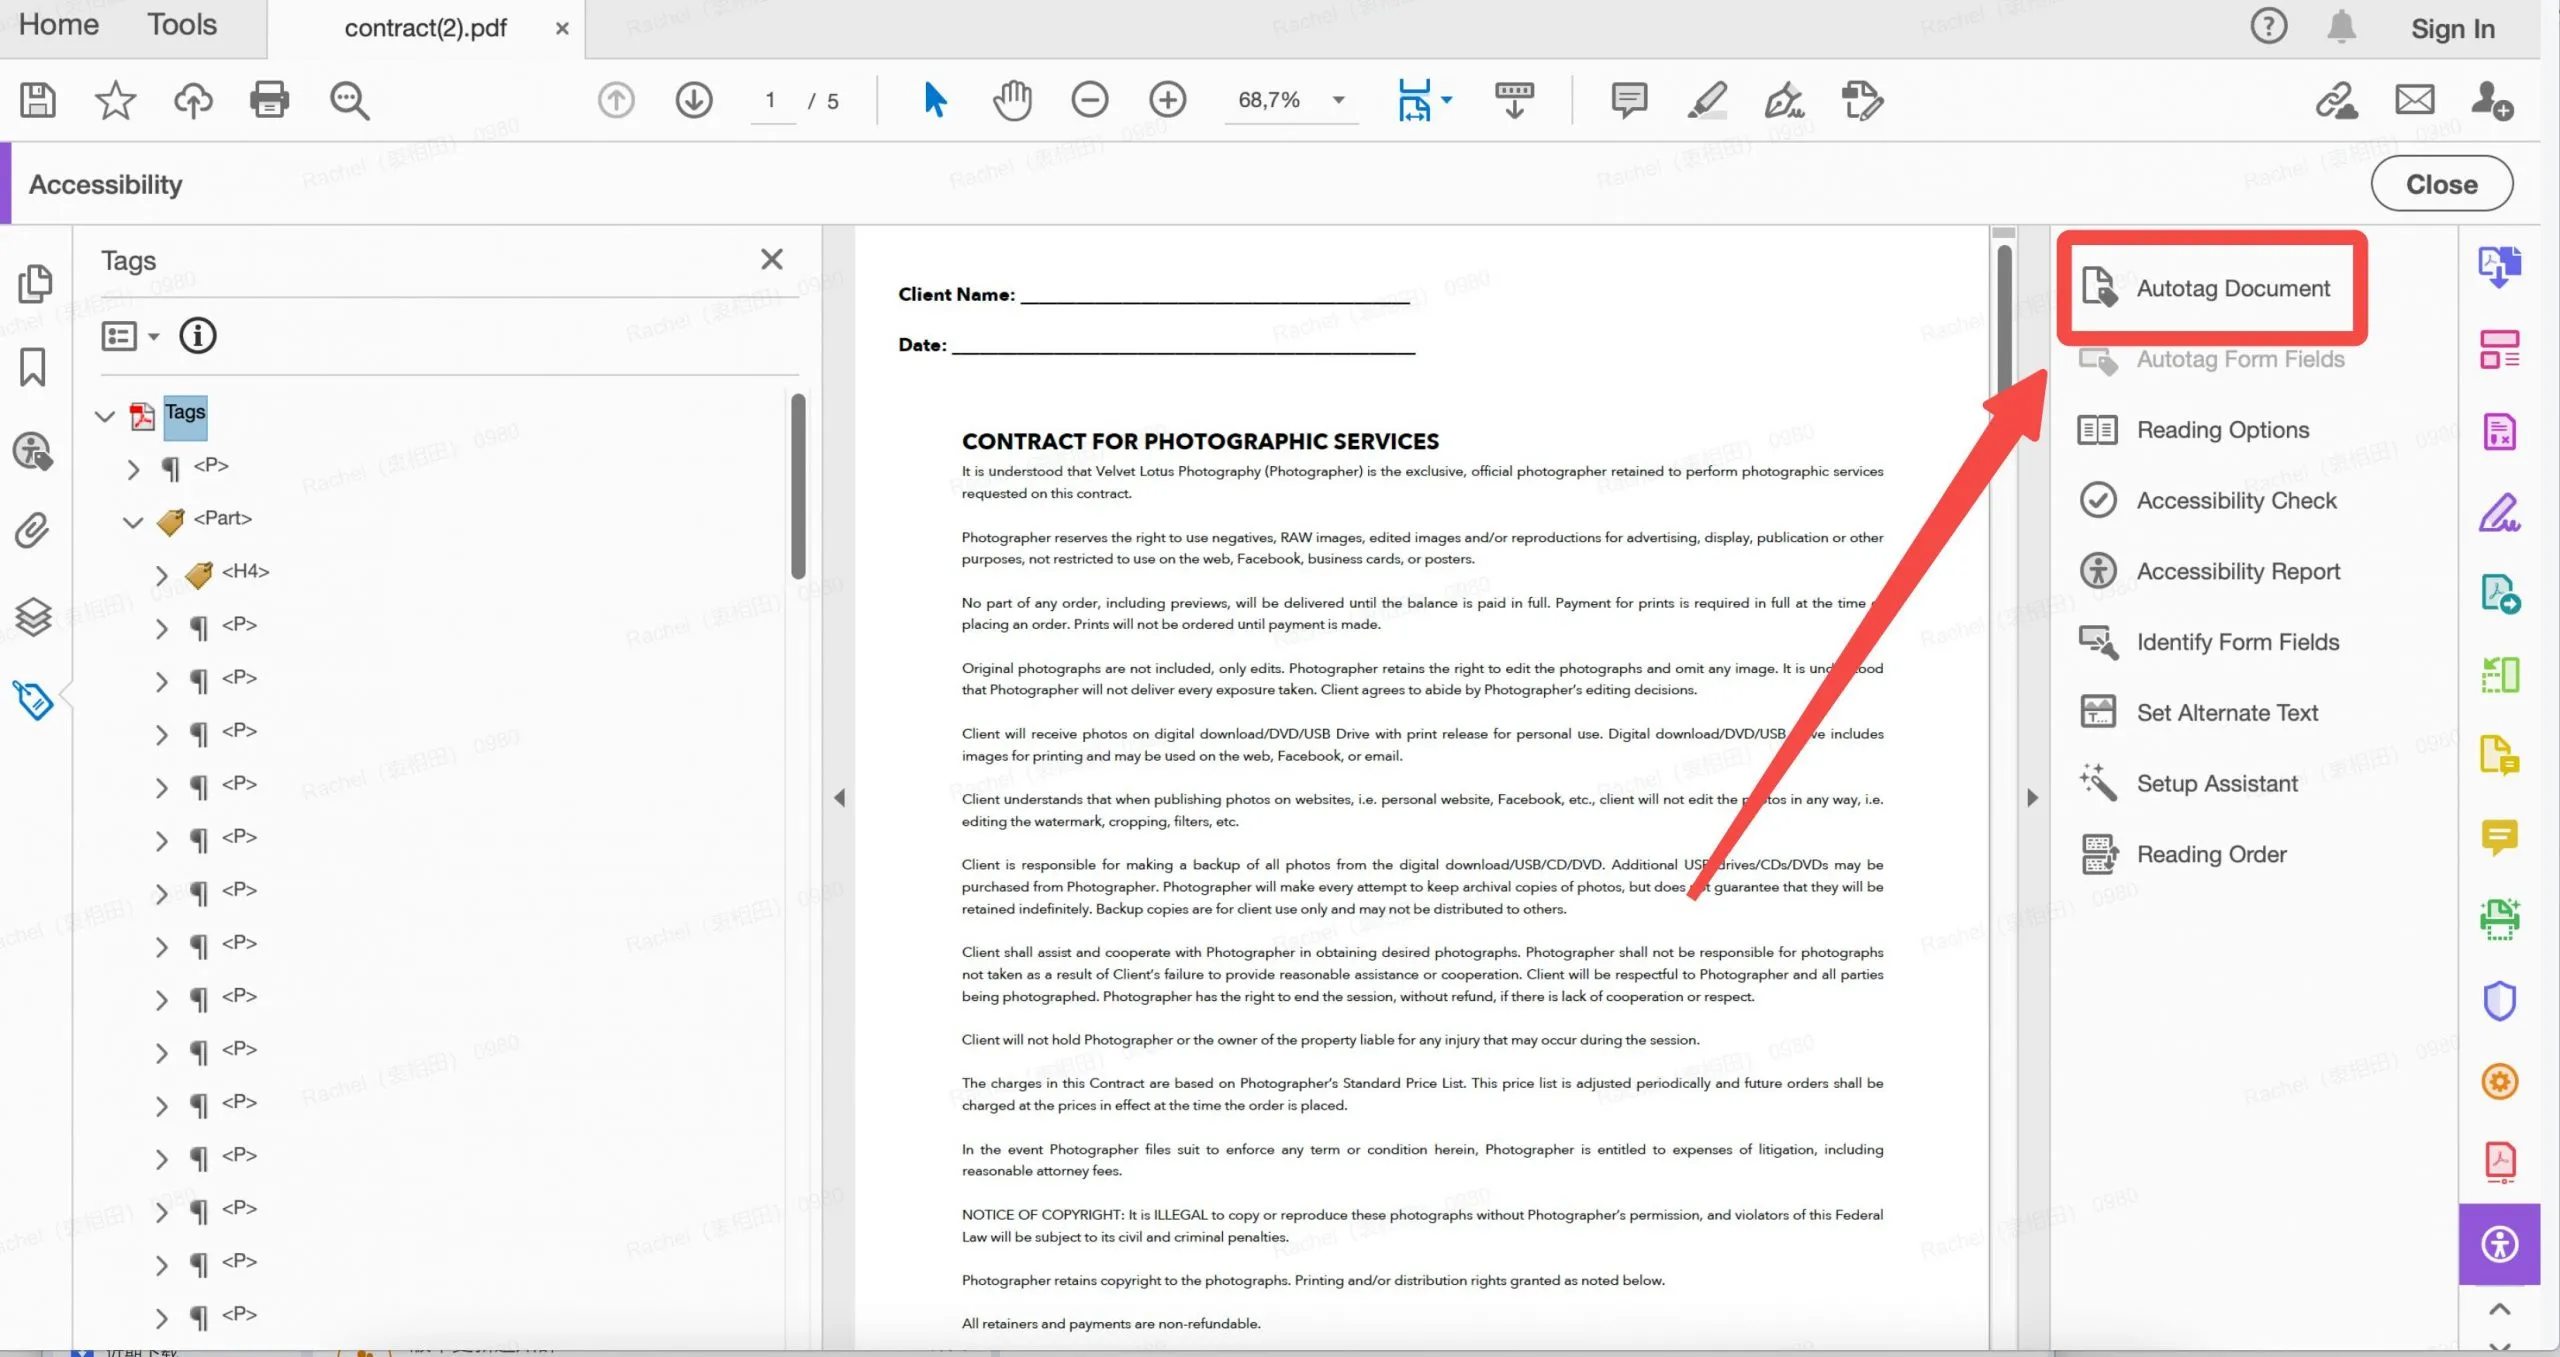
Step 3. Click on the "Autotag Document" to let Adobe Acrobat automatically generate tags for the PDF. Then, click on the "Tag" feature at the left side panel to show all tags you added.
Step 4. If you have some tags to be added manually, you can select the tag you need, right click on to select the "New Tag" to add the new tag you need.
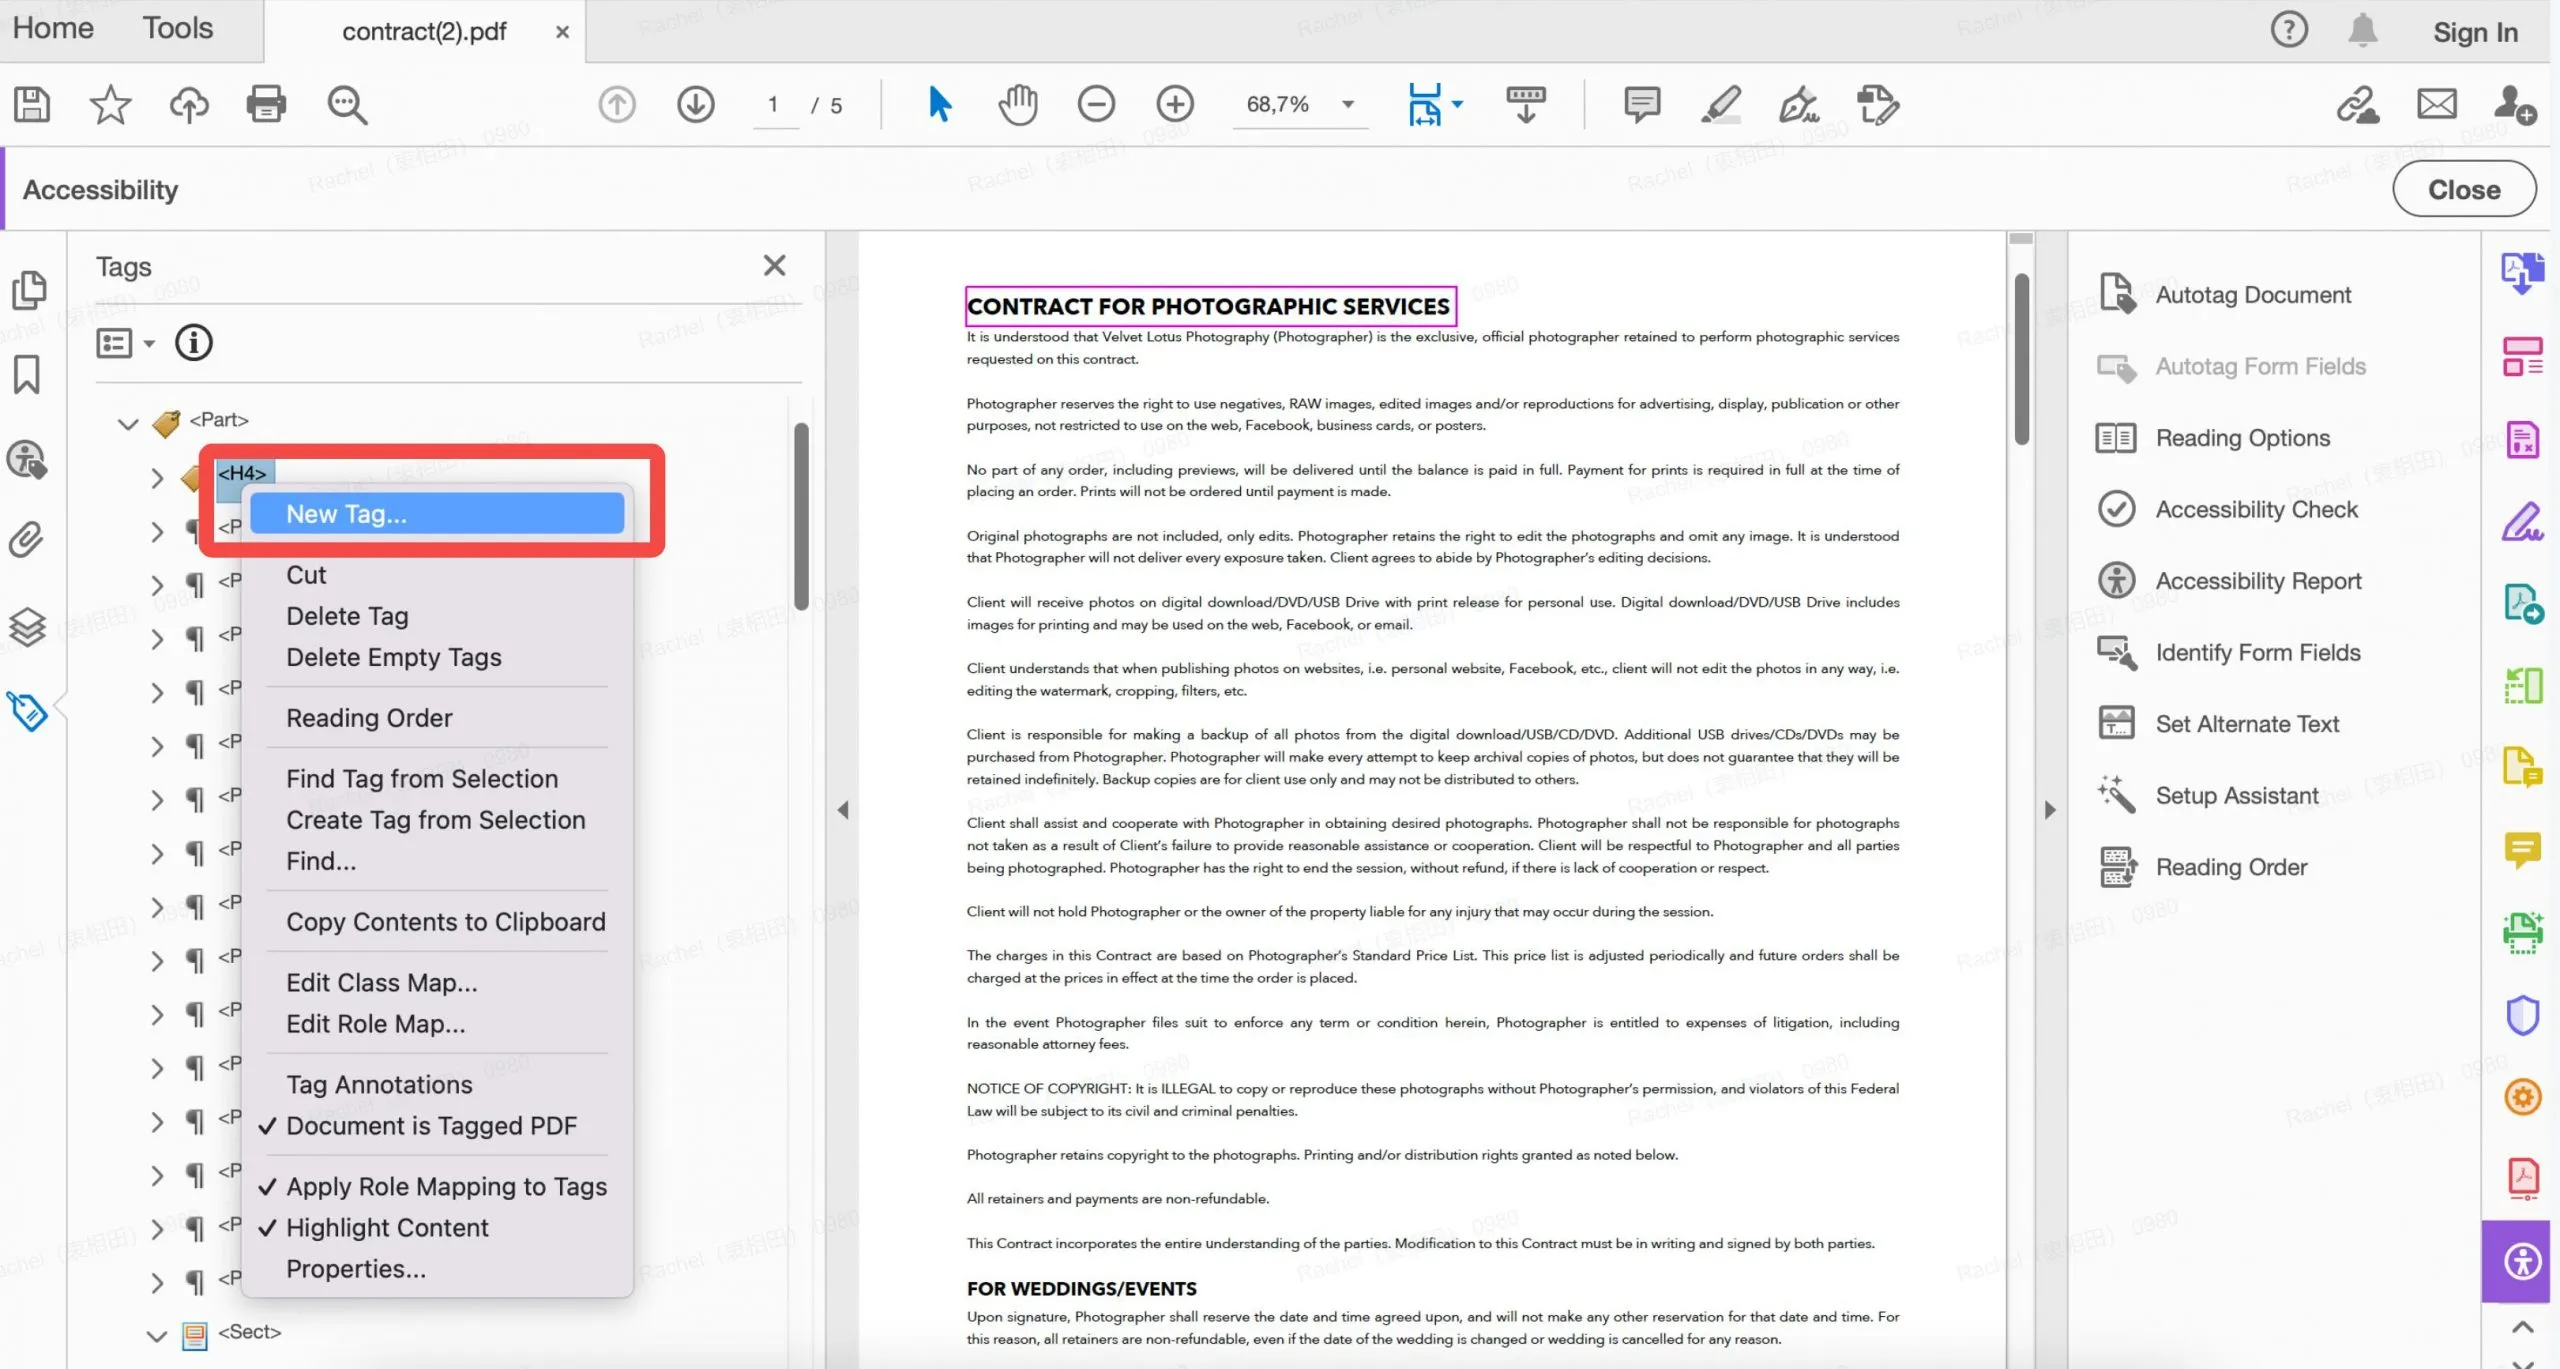
When everything is OK, you can save the tagged PDF on your computer.
Part 3. How to Create Tagged PDF in Word?
For our second method, we will go to use Microsoft Word. This method is free and easy to use. But you have to manually add the structures in the converted Word file. Here is the guide.
Step 1. Right click on the PDF file that you want to add the tags on, then, choose "Open with" > "Word" to convert PDF to Word. Now, you need to prepare your structure by adding headings, lists, tables, and other necessary elements to make the structure clearly.
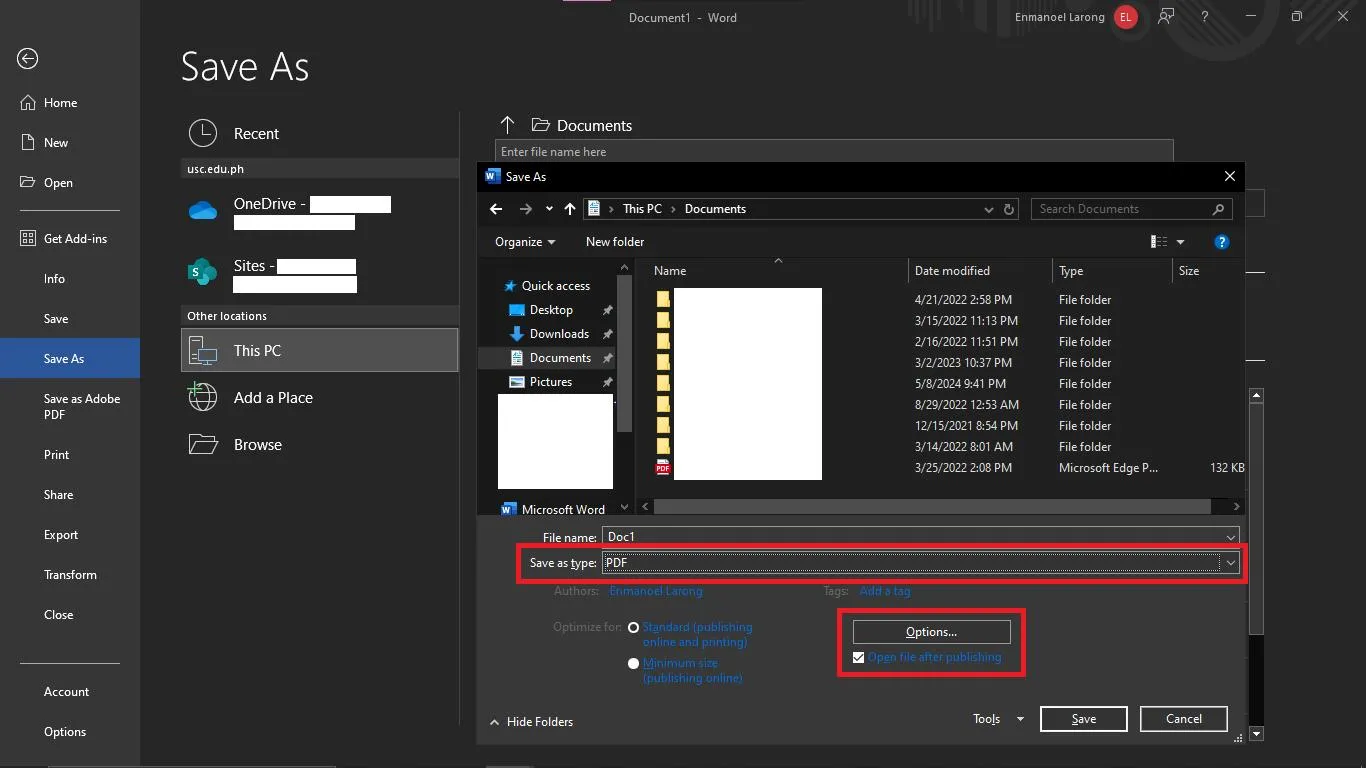
Step 2. After you have made your PDF file accessible, click the "File" menu on the upper left side of your screen and click "Save As". Then find the folder or destination you want it to be saved in.

Step 3. After finding your destination folder. Click the "Save as type" option and select PDF. Once done, click the "Options" button to open a new tab.
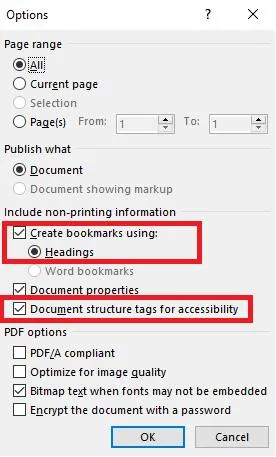
Step 4. In the next part, you must tick three options to make your document a Tagged PDF. Check the "Create bookmarks using:" option as well as the "Heading" option. Also, check the "Document structure tags for accessibility" option. After that click "OK".
There you have it. Making a tagged PDF using Microsoft Word. It is as simple as that. We will now show you the last method of creating a tagged PDF.
Part 4. How to Create Tagged PDF in inDesign?
If you have inDesign, you can also use it to create a Tagged PDF. Here is the detailed guide for you.
Step 1. Open the PDF file you want to be made accessible or you want to convert into a Tagged Document.
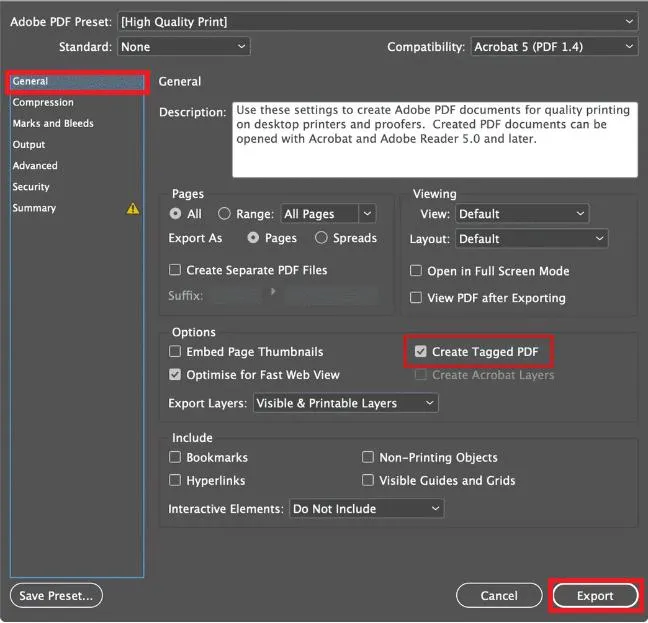
Step 2. Click "Export" which will open a new window.
Step 3. Go to the "General" tab then find and check the "Create Tagged PDF" option. After you are satisfied with your presets and settings Click "Export"
There you have it. Three ways using Three different software to make your normal PDFs into more accessible Tagged PDFs. You can choose between the three which among them helped you the most or were the most easy to follow along with.
Part 5. Bonus Tip: How to Create a PDF with UPDF
Now that we have shown you the different ways how to make Tagged PDFs. But before making the tagged PDF, you need to create the PDF. In this case, you can use the UPDF which is the perfect tool to get you started. UPDF offers its users a lot of customization and tools for all their PDF needs from editing, annotating, and creating. It gives its users the option to create blank PDFs where they can start from scratch and be in full control of everything inside the document. Or you can find the desired PDF template from the UPDF template store and download them for free, then, customize it per your needs. UPDF also can create PDFs from other formats like Word, Excel, or even PowerPoint. To learn more about UPDFs features, you can click the below button to try its all features or watch this video we have prepared for you.
Windows • macOS • iOS • Android 100% secure
What may surprise you is that you will only need one license to use UPDF on all your devices which cannot be done by other brands. Despite this, UPDF remains cost-efficient and affordable for everyone to enjoy. You can check UPDF's price here.
Creating PDFs with UPDF has never been easier, now enhanced with the latest AI technology, you can now create content when making PDFs on UPDF. This ensures a more optimal and stress-free workflow for everyone who uses it.
How to Create a PDF?
Let us get you started in your PDF journey with UPDF. We will make a blank PDF but you can do so much more once you get the hang of it.
Step 1. Click the above button to download it for your device. Go to login or create an account.
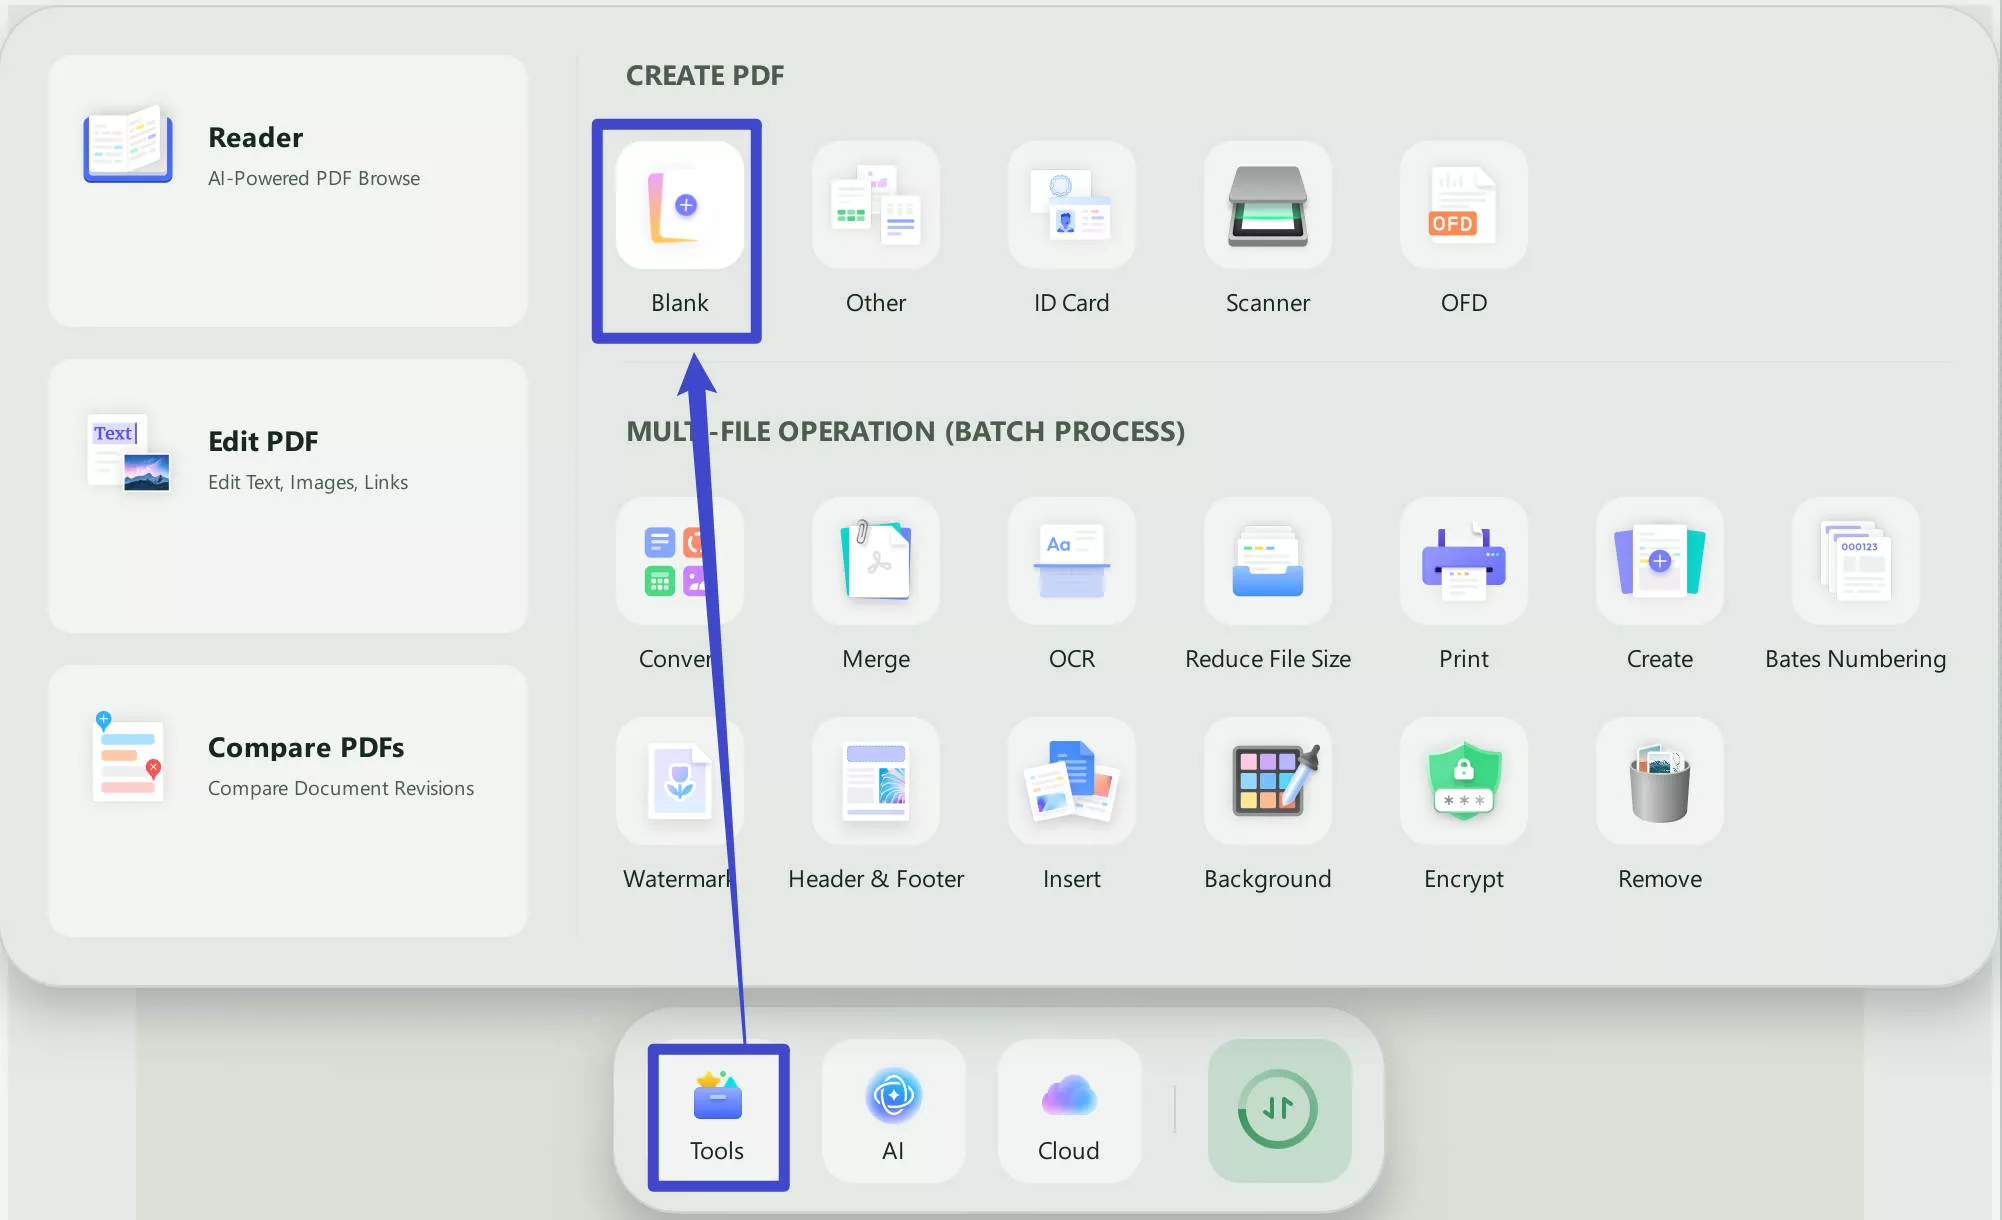
Step 2. Then click "Tools" on the upper left part of the application. Go down to "Blank". You can also click the other options if you want to make a PDF from other formats like Word or PowerPoint.
Step 3. A window will pop out that will give you the option to change the document name, page size, paper styles, and orientation.
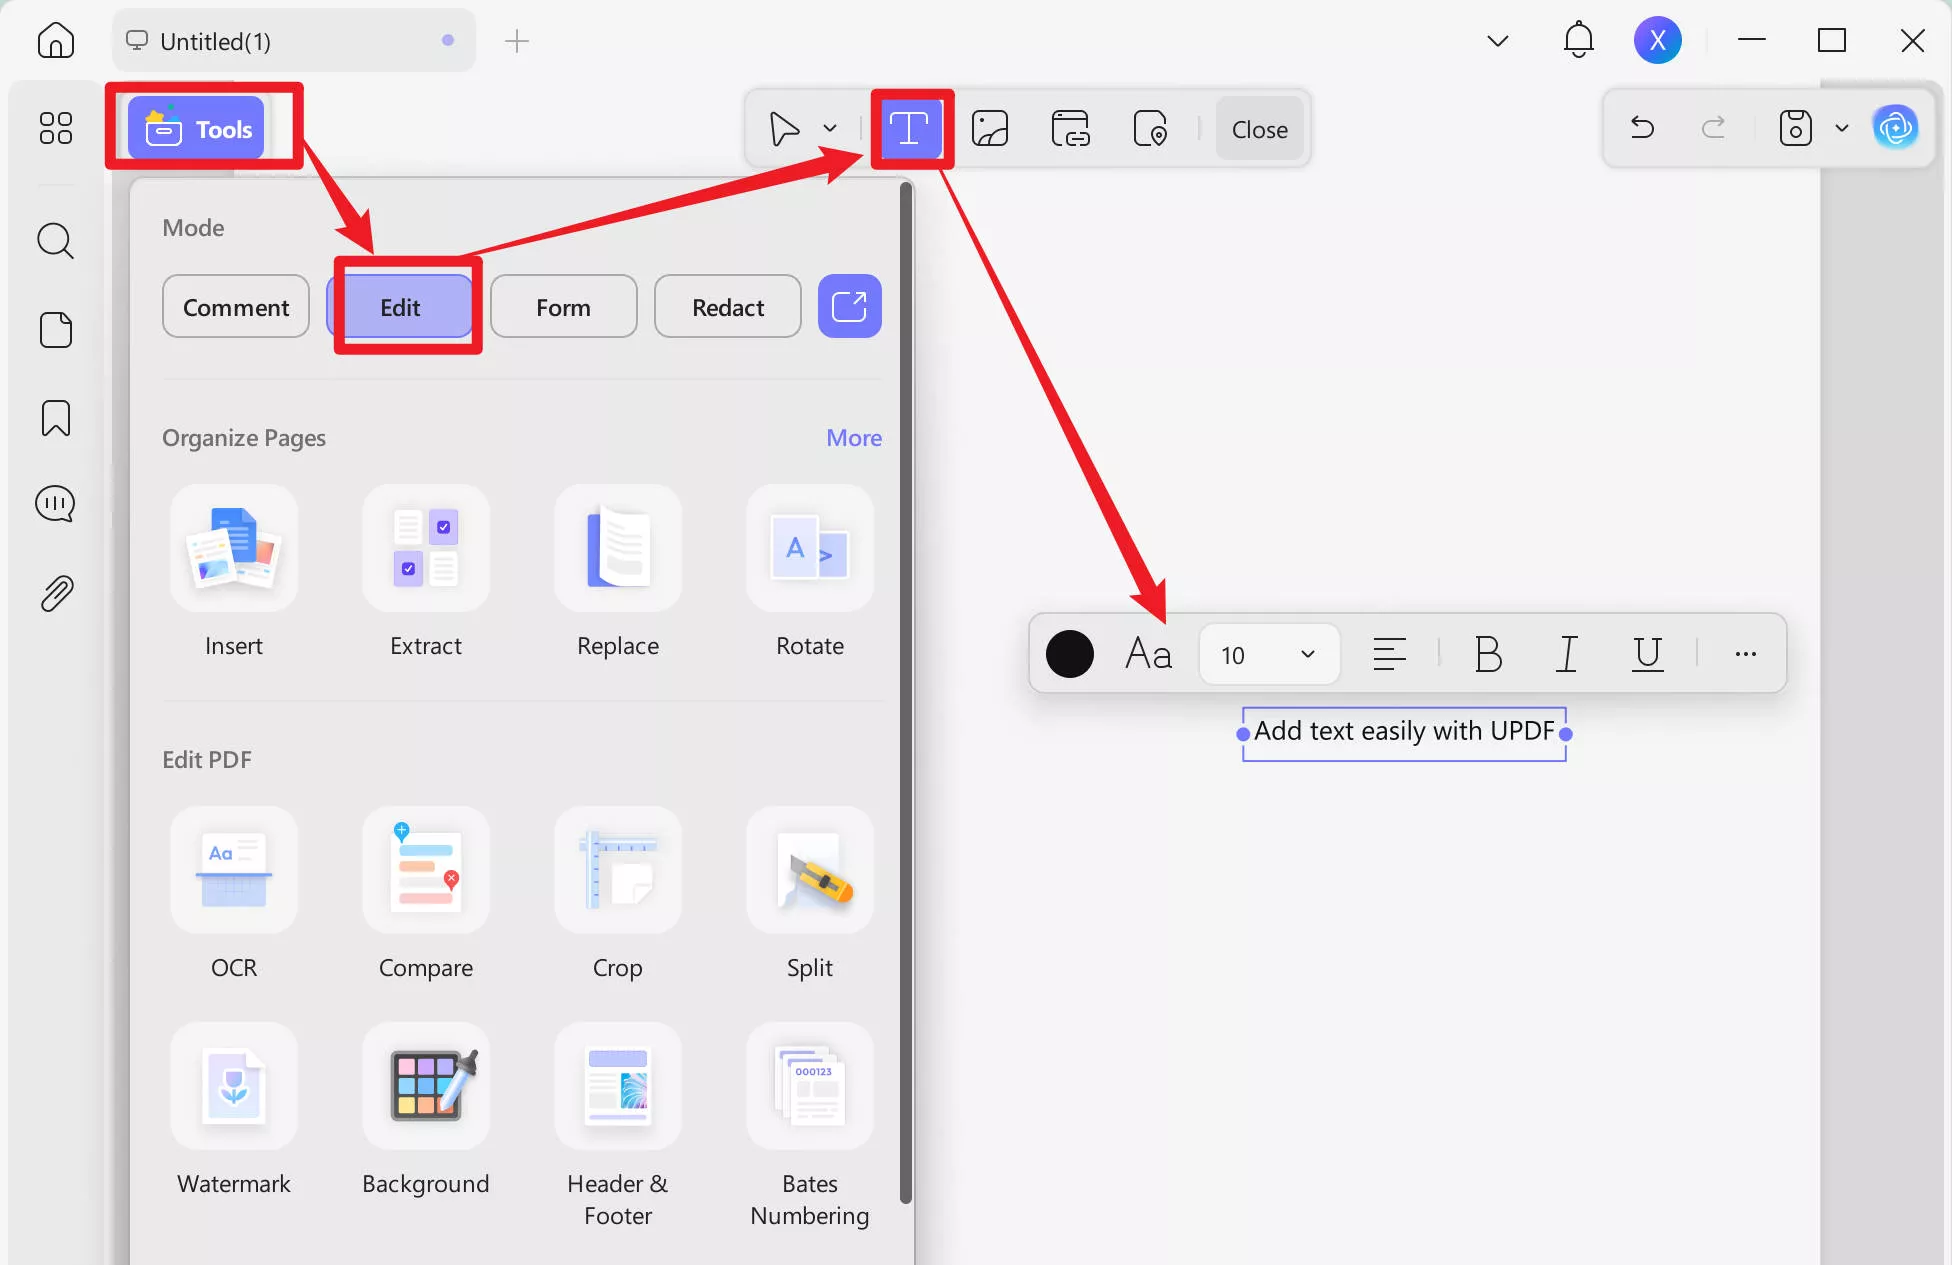
Step 4. After choosing your preferred settings, you may now start adding the content to your PDF by using the "Text", "Image" and "Link" features in the "Edit PDF" part.
Step 5. Once you have finished inputting your content, it is now to save your PDF. Click "Save". There you have it, you have made your very own PDF with the help of UPDF.
Final Words
To sum it all up, mastering the art of making Tagged PDFs is important to make sure that your documents are accessible and organized. You can create a tagged PDF with tools like Adobe Acrobat Pro, Microsoft Word, and inDesign. But before generating tagged PDF, you have to create a PDF. For this requirement, we recommend you to use UPDF as it has all features you need. You can click the below button to test all features.
Windows • macOS • iOS • Android 100% secure


 Enrica Taylor
 Enid Brown
 Engelbert White

 Delia Meyer