 UPDF for Windows
 UPDF for Mac
 UPDF for iPhone/iPad
 UPDF for Android
 UPDF AI Online
 UPDF Sign
 Edit PDF
 Annotate PDF
 Create PDF
 PDF Form
 Edit links
 Convert PDF
 OCR
OCR PDF to Word
 PDF to Image
 PDF to Excel
 Organize PDF
 Merge PDF
 Split PDF
 Crop PDF
 Rotate PDF
 Protect PDF
 Sign PDF
 Redact PDF
 Sanitize PDF
 Remove Security
 Read PDF
 UPDF Cloud
 Compress PDF
 Print PDF
 Batch Process
 About UPDF AI
 UPDF AI Solutions
 AI User Guide
 FAQ about UPDF AI
 Summarize PDF
 Translate PDF
 Chat with PDF
 Chat with AI
 Chat with image
 PDF to Mind Map
 Explain PDF
 PDF AI Tools
 Image AI Tools
 AI Chat Tools
 AI Writing Tools
 AI Study Tools
 AI Working Tools
 Other AI Tools
 AI Bookmark Generation
 AI Bookmark Summary
 AI Watermark Generation
 AI Background Generation
 AI Sticker Generation
 AI Stamp Generation
 AI Editing Suite
 UPDF Copilot
 AI Page Management
 AI Semantic Search
 PDF to Word
 PDF to Excel
 PDF to PowerPoint
 User Guide
 UPDF Tricks
 FAQs
FAQs UPDF Reviews
 Download Center
 Blog
Blog Newsroom
 Tech Spec
 Updates
 UPDF vs. Adobe Acrobat
 UPDF vs. Foxit
 UPDF vs. PDF Expert
Before We Begin
Windows • macOS • iOS • Android 100% secure
PDF XChange Editor is a popular tool for viewing and editing PDFs. One of its key features is the highlight tool. It makes it easy to point out important details or review documents.
But if you tried using the highlight feature in full-screen mode, you likely ran into a problem. It simply isn’t there! This means switching back to windowed mode whenever you need to highlight text. This can get frustrating really fast.
So, can PDF XChange Editor full-screen mode highlight text? This guide explains it in detail. Plus. You'll also learn how to add, remove, and troubleshoot highlights in the windowed mode.
Let’s get started.
Part 1. Can PDF XChange Editor Full-Screen Mode Highlight Text?
Yes, you can highlight text in PDF XChange Editor while in full-screen mode. However, this feature is turned off by default. The full-screen mode in PDF XChange Editor is designed as a presentation mode by default. This means you can only view and navigate through the pages. In this default state, you cannot use PDF XChange Highlight or other editing tools.
To enable highlighting in full-screen mode, you need to disable the presentation mode in the preferences. After that, the highlights and annotation features will still be accessible when you switch to full screen.
Here’s how to highlight in PDF XChange Editor full-screen mode.
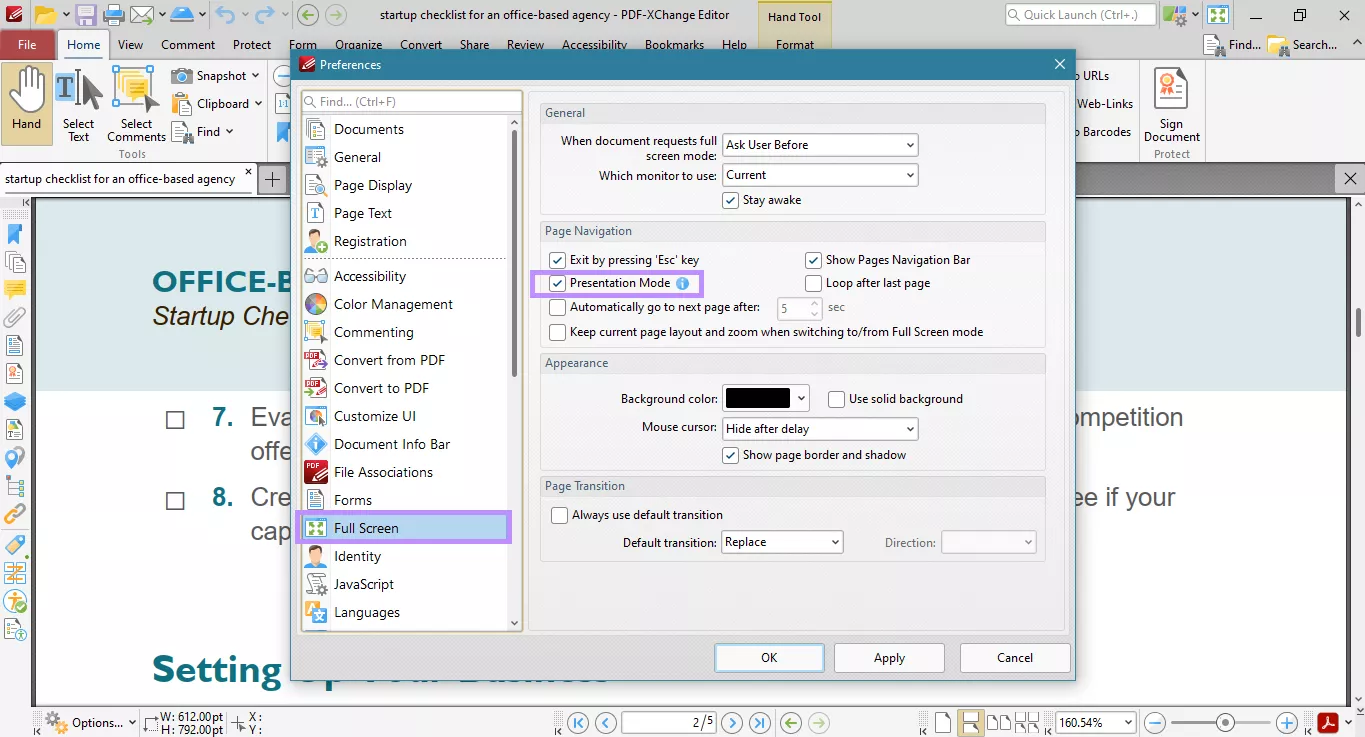
Step 1. Open PDF XChange Editor and import your document. Then, press the “CTRL + K” keys on your keyboard to open the Preferences panel.
Step 2. Select “Full Screen” from the left. Then, under the Page Navigation section, uncheck “Presentation Mode.” Then click “OK.”
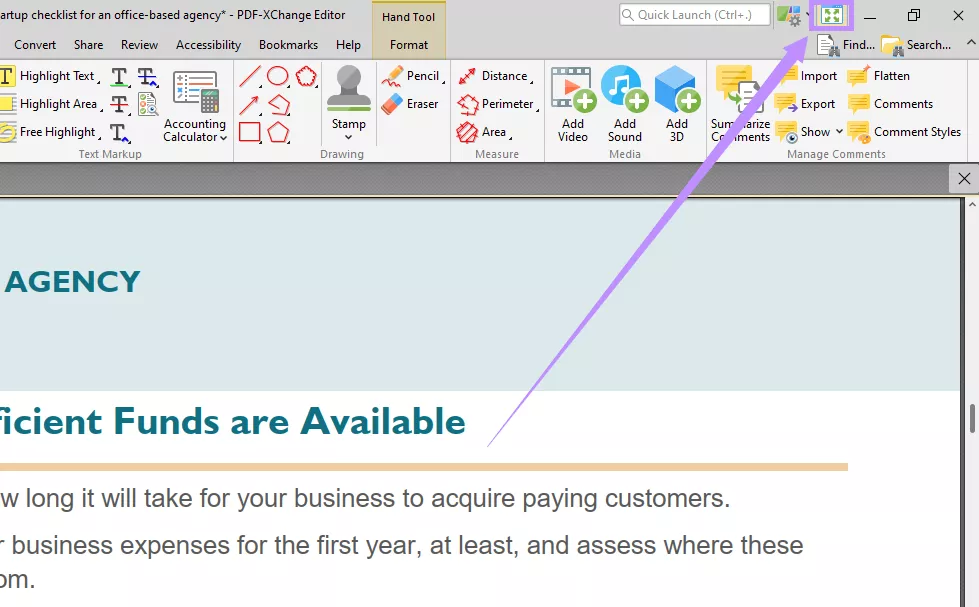
Step 3. To enter full-screen mode, press “F11” on your keyboard. Otherwise, click the Full Screen mode option in the top right.
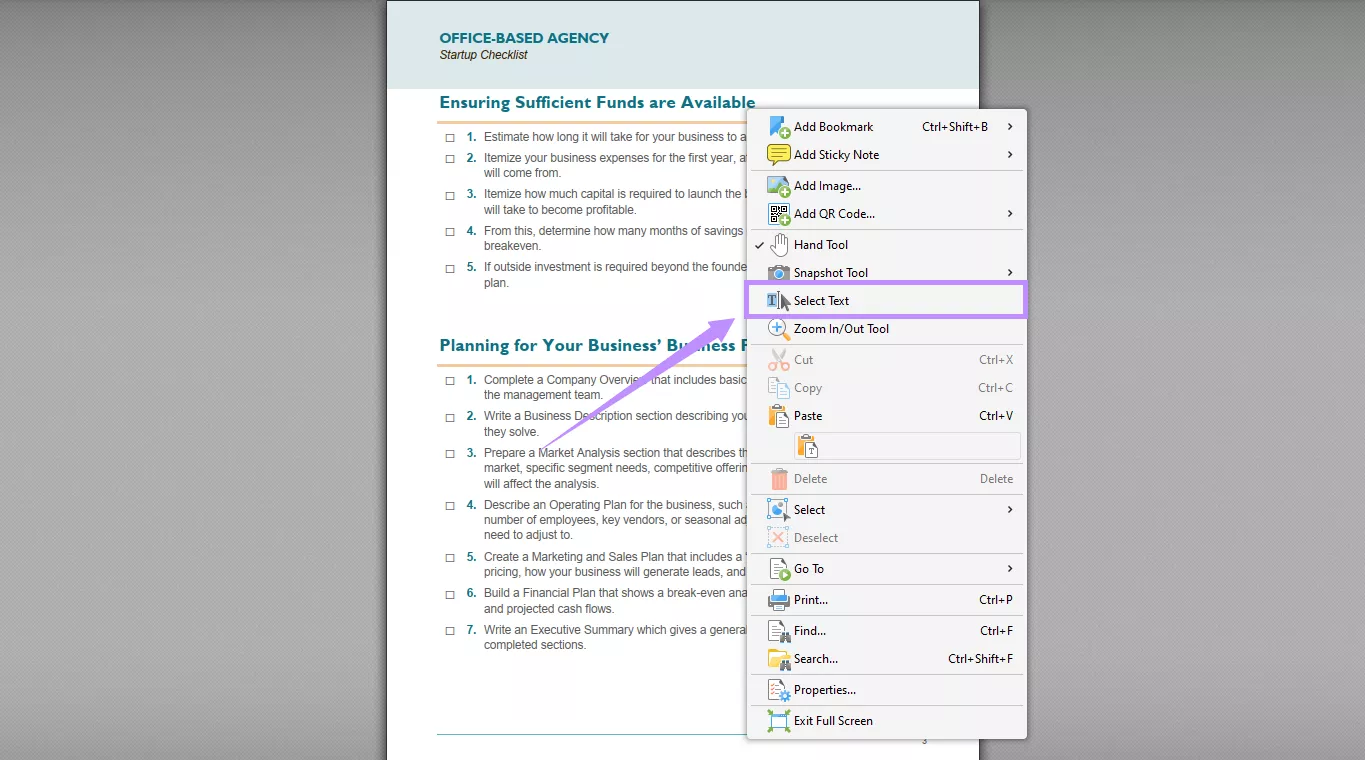
Step 4. Once you’re in full screen, right-click the page. Then, choose “Select Text.”
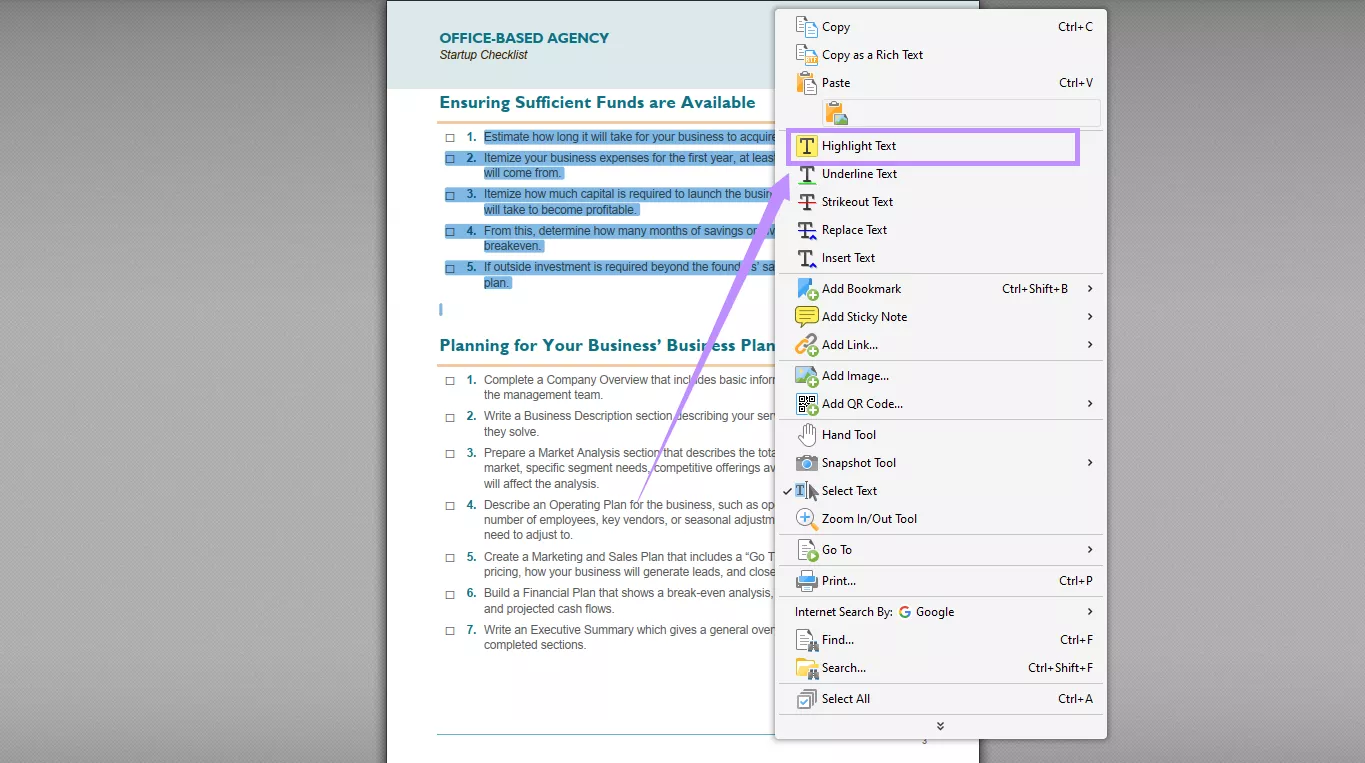
Step 5. Select the text you want to highlight. Then, right-click and choose “Highlight Text” from the context menu.
Part 2. How to Highlight Text in PDF XChange Editor?
The full-screen mode in PDF XChange Editor offers only the basic highlight tool. Apart from this, it offers three useful ways to highlight text in the regular windowed mode. In this mode, you can highlight individual text, use the freehand, or the PDF XChange Editor highlight area tool. However, these tools aren’t visible on the Home screen. If you’re wondering how to access and use them, follow the steps below.
Step 1. Open your PDF in PDF XChange Editor. Then, select “Comment” from the top menu.
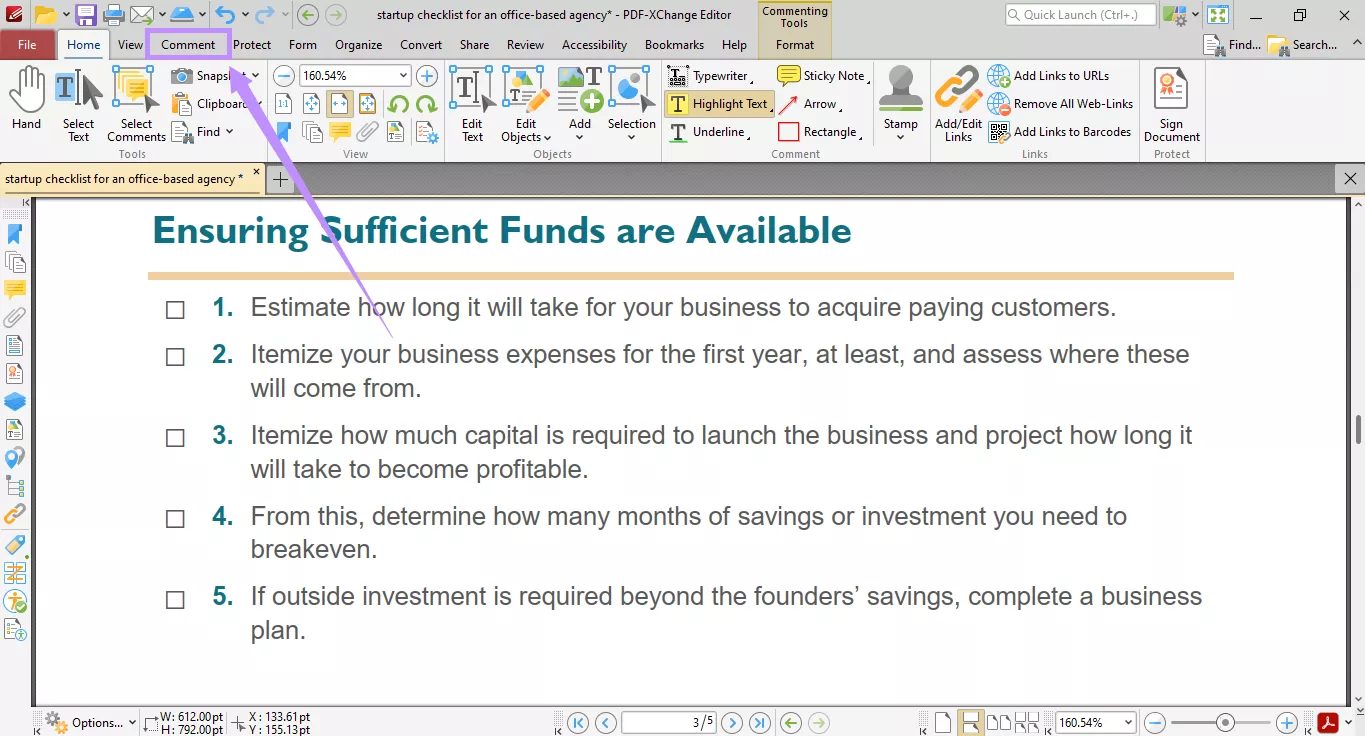
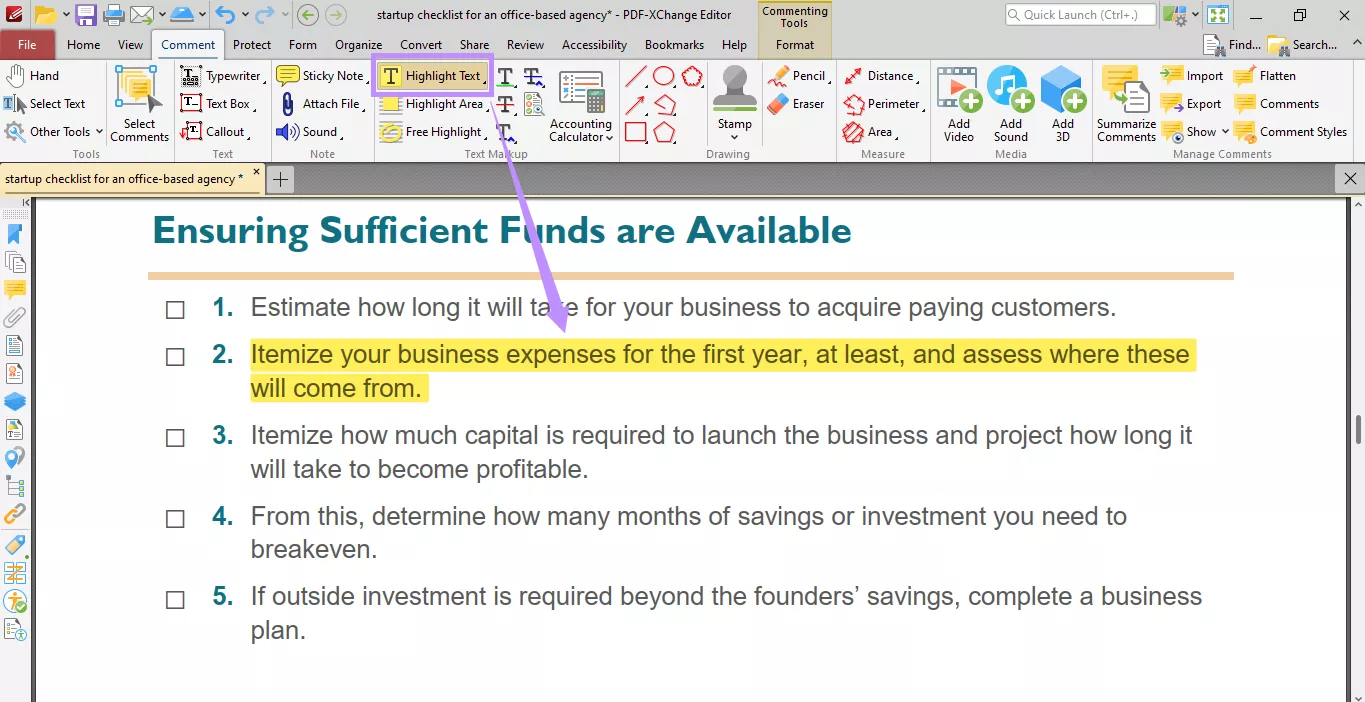
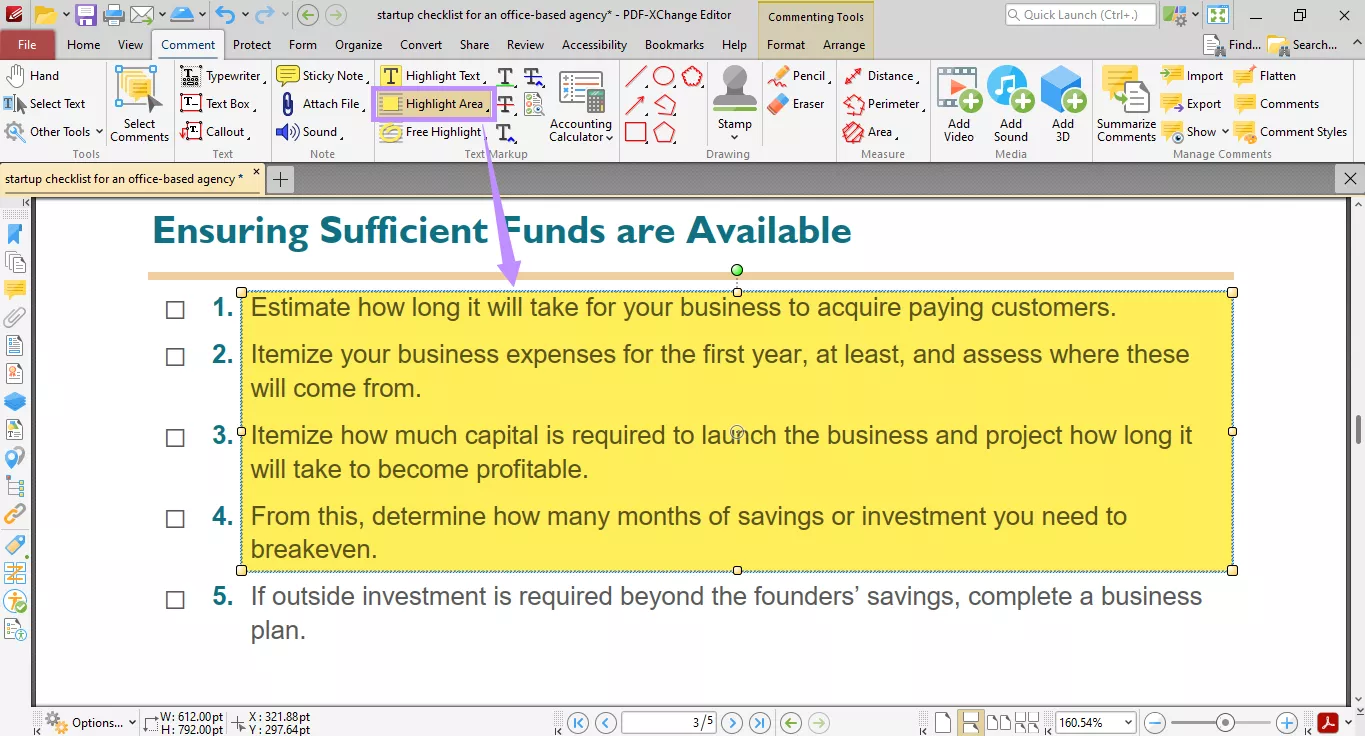
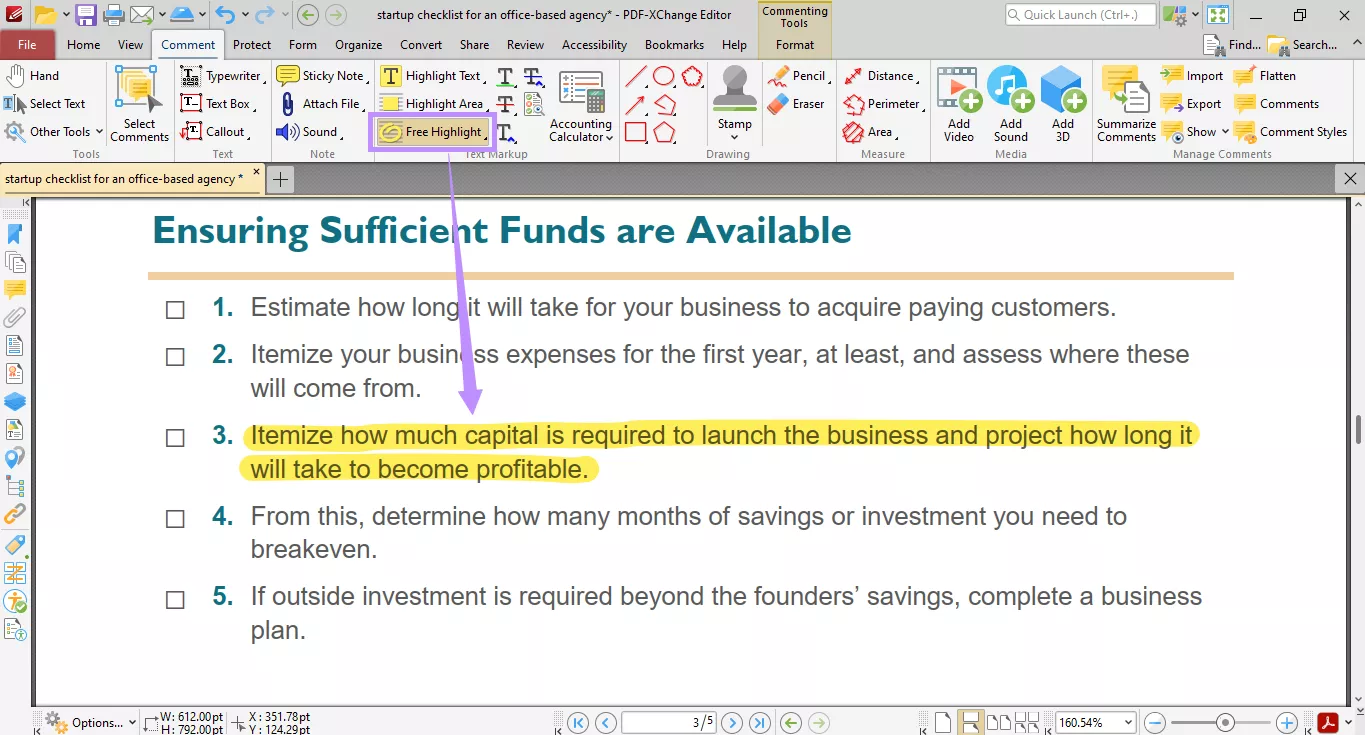
Step 2. In the Text Markup section, you will see three highlight tools:
- Select the “Highlight Text” option. Then select your desired text. Once you release the cursor, the highlight applies automatically.
- Choose the “Highlight Area” mode. Then click and drag to select the area you want to highlight.
- Go with the “Free Highlight” tool. Then click and drag your cursor over your desired text to manually draw the highlight.
Part 3. How to Remove Highlight in PDF XChange Editor?
Sometimes, you may not be satisfied with a highlight or you might need to clean up your document before sharing it. In that case, PDF XChange Editor makes it easy to remove highlights. You can delete them one by one or clear multiple highlights at the same time.
Here’s how to use PDF XChange Editor to remove highlights.
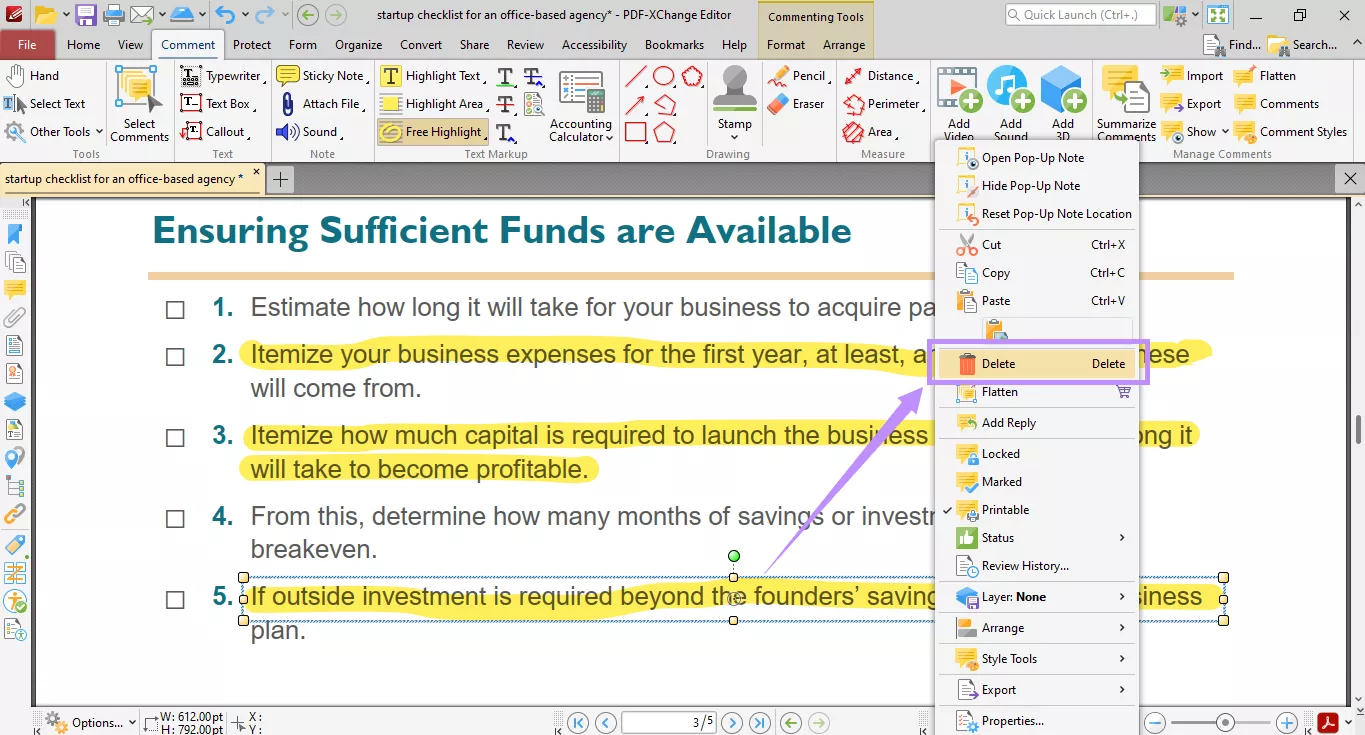
Step 1. Navigate to the place where you've added the highlight. Click on it to select it. Now you can delete it in two ways:
- Press “Delete” on your keyboard to remove the highlight.
- Right-click the highlighted area. Then, select “Delete” from the context menu.
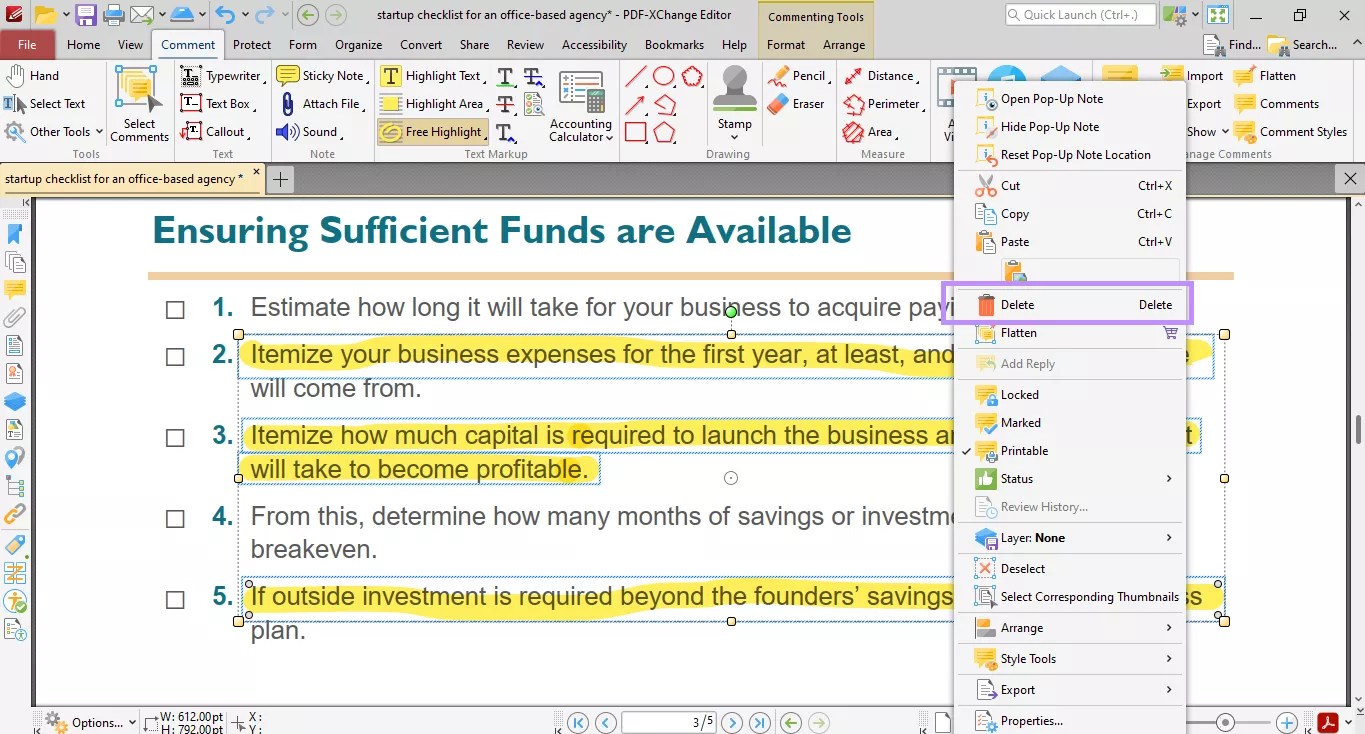
Step 2. You can also remove multiple highlights at once. To do this, press the “CTRL” key and click on all the highlights to select them. Then, press the “Delete” key. Alternatively, right-click the selected highlights and choose “Delete” from the menu.
Part 4. PDF XChange Editor Highlight Text Not Working
If the highlight tool still isn’t working even after following the steps above, the issue may be with the document or the program itself. Here are the most common reasons behind it.
- Scanned PDF: You might be working with a scanned or image-based PDF. The highlight tool does not work on images because you cannot select the text. In this case, use the built-in OCR feature to convert it into editable text.
- Print to PDF: When you print a web page to PDF, your browser converts text into shapes instead of fonts. This prevents you from selecting and highlighting text. To solve this issue, you can run OCR on the file to recognize the text.
- Software Bugs: The highlighting issue may be due to bugs with the software itself. If so, update your program to the latest version to fix any underlying errors. This can help you use all annotation tools normally.
Part 5. Bonus Tip: The Best Alternative Tool to Highlight and Remove Highlights in PDF
PDFXChange Editor may offer a built-in highlight tool. But it is not very reliable. At times, the highlight tool simply doesn’t work due to random issues with the software.
If you want to avoid these issues, you can use UPDF as an alternative. It is a powerful PDF editor with all the tools you need to annotate your PDFs effectively. You can highlight text instantly after opening a file. This means no digging through extensive menus. So, get started today! Click below to download and try it now!
Windows • macOS • iOS • Android 100% secure
Why Choose UPDF?
Here are the key benefits that make UPDF the best alternative tool to highlight text.
- Highlight text in any color. Choose from six preset colors or create your own custom shade.
- Use continuous highlight mode to mark multiple parts of text without having to reselect every time.
- Attach additional notes to the highlight to provide more context and details.
- View all highlights in one list to track and jump between important sections.
- Export all annotations as summary notes or a plain text file in PDF format.
- Batch remove highlights from multiple PDFs at once and save valuable time.
Steps to Highlight Text in PDF Files
Step 1. Open UPDF and click “Open File” to import your PDF.
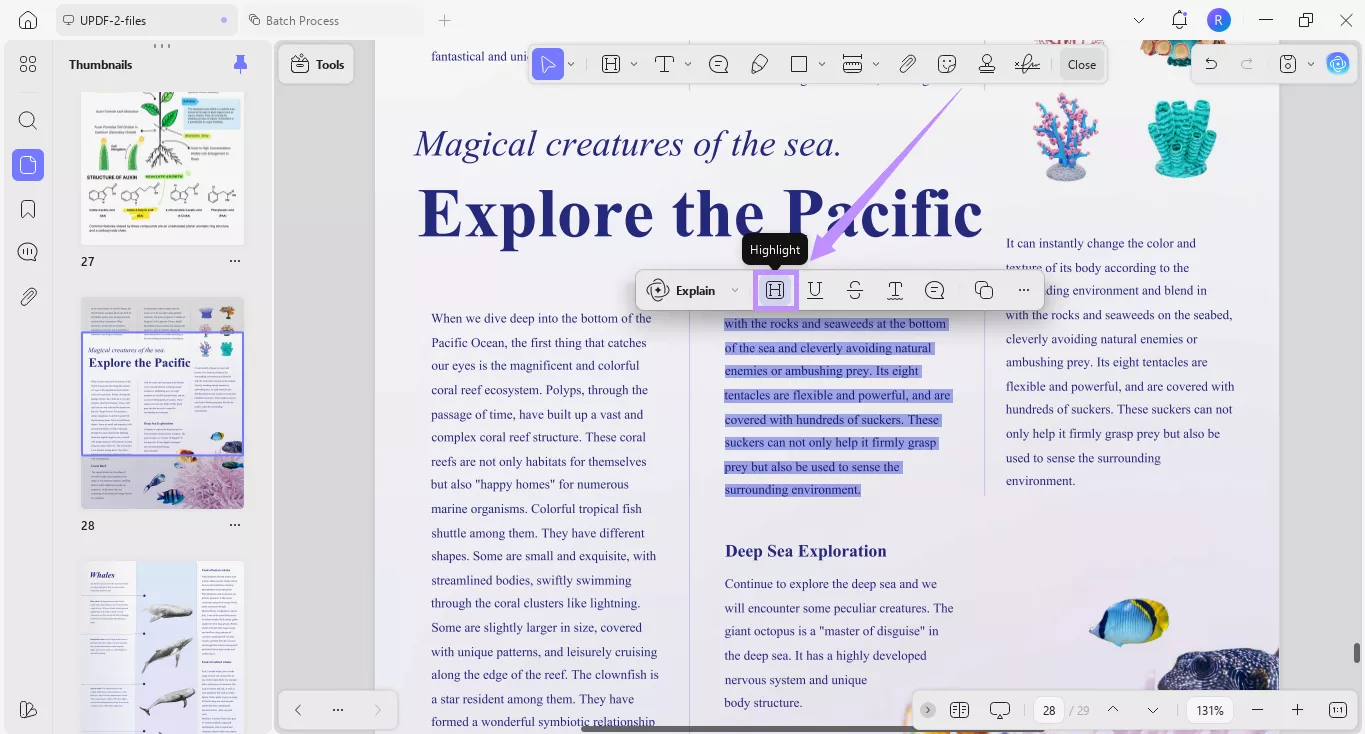
Step 2. Once your file opens, you can add highlights in two easy ways:
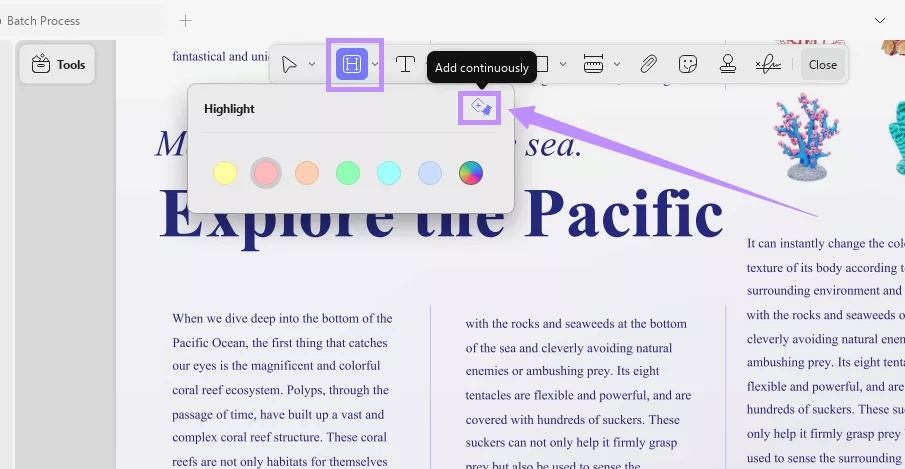
- Select your desired text. A floating toolbar will appear. Click the “H” icon from here to highlight the text.
- Click the “H” icon from the top toolbar. Choose your desired color from the popover menu. If you want to highlight continuously, click the “Add continuously” switch and select the text you want to highlight.
Step 3. After adding a highlight, you will see several options in the floating toolbar. From here, adjust the highlight’s color and opacity, or switch to underline, strikethrough, squiggly, or even add notes.

Steps to Remove Highlights from the PDF
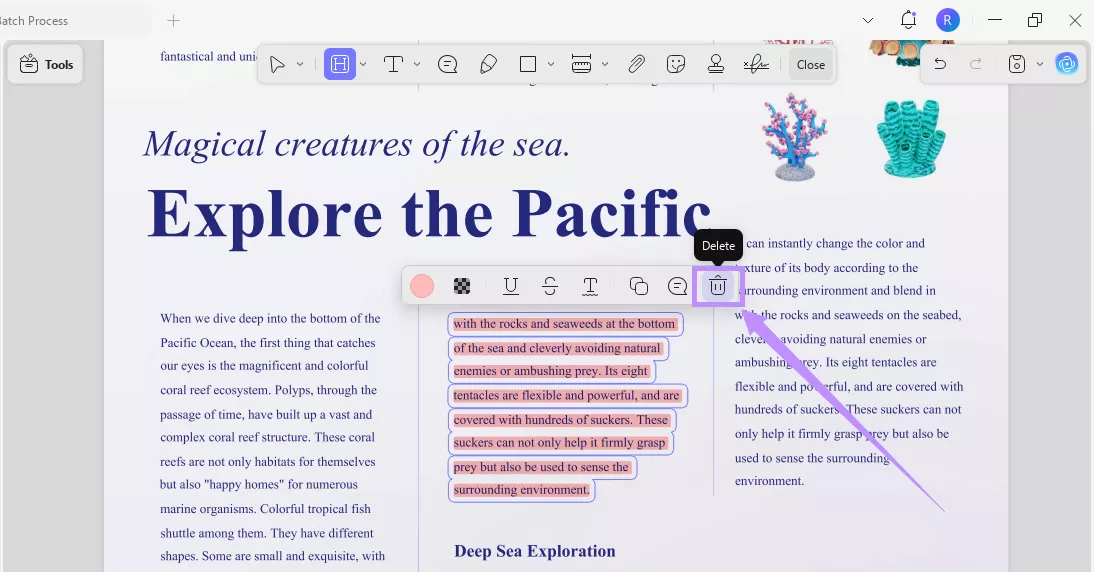
Step 1. Select the highlight you want to remove. Then, click the “Bin” icon in the floating toolbar to delete it.
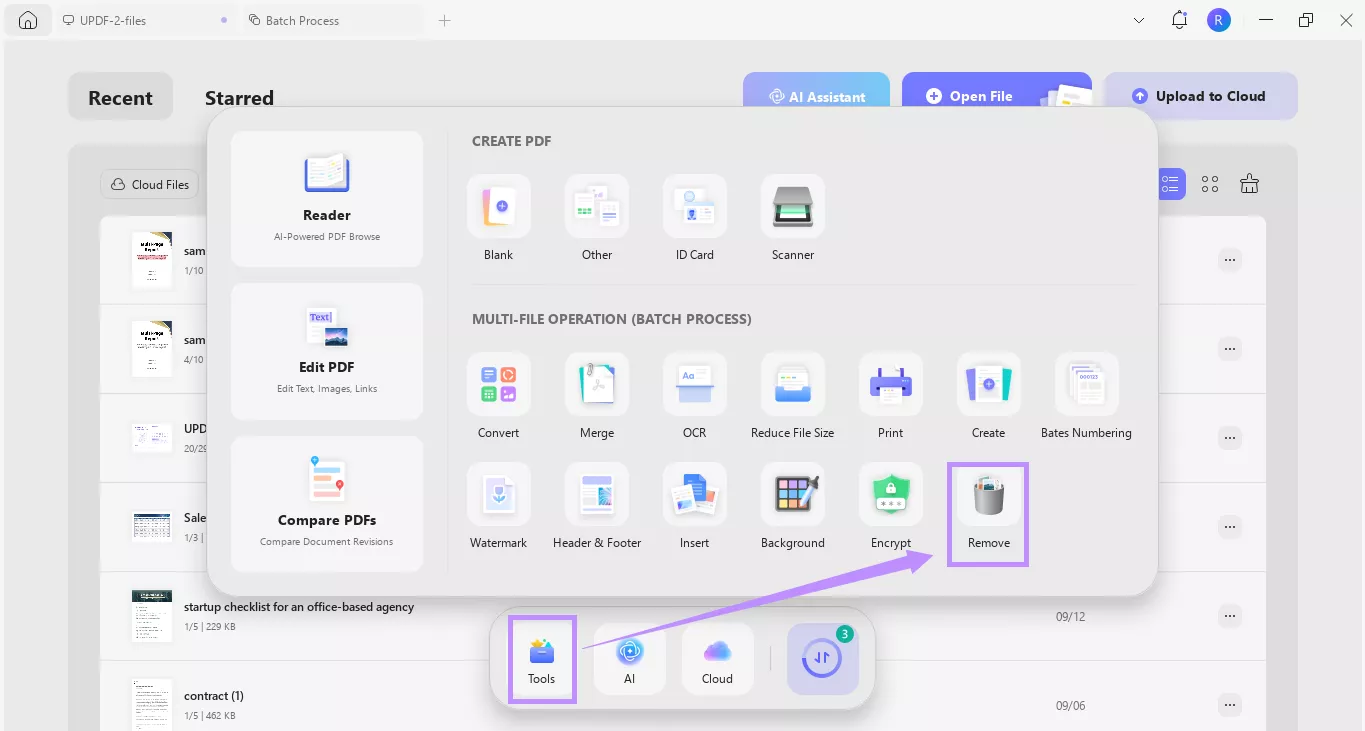
Step 2. To remove highlights from multiple PDFs, click “Tools” from the Home screen. Then, select “Remove” from the window.
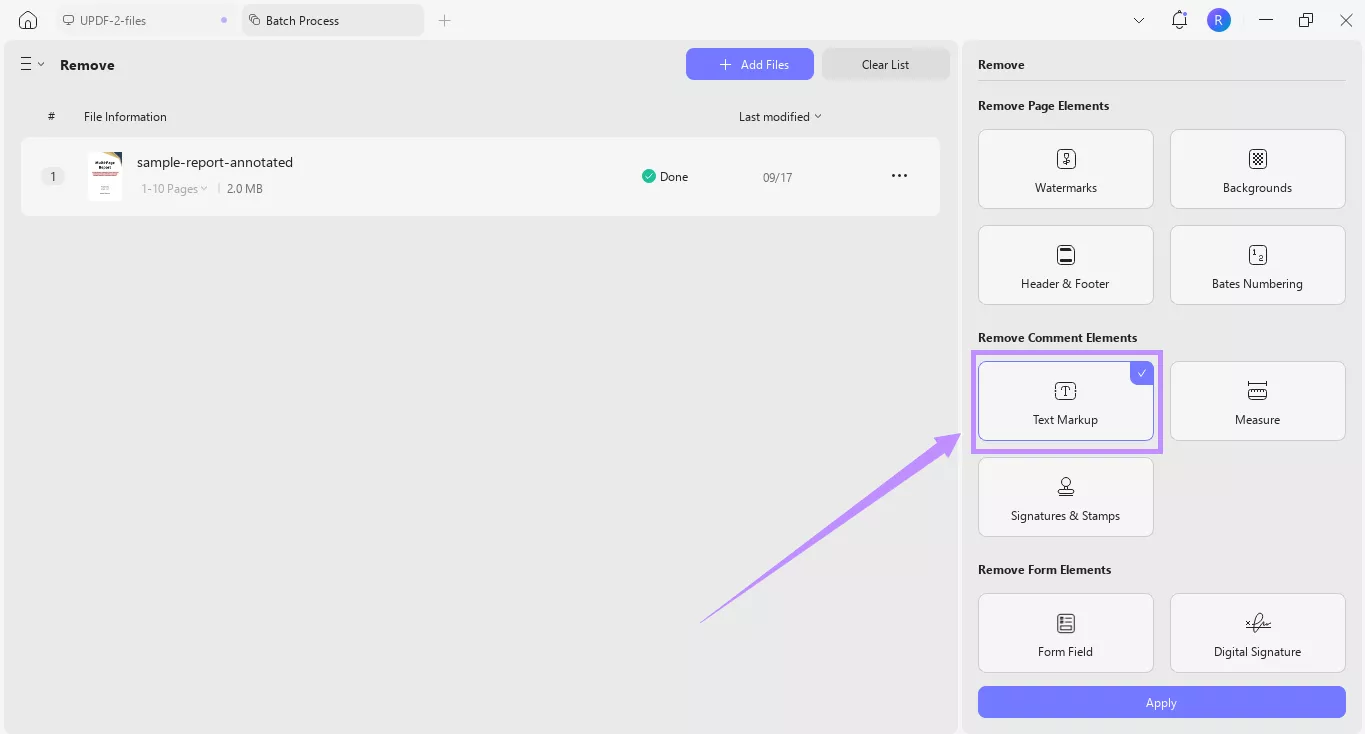
Step 3. Click “Add Files” to import your documents. Once imported, select “Text Markup” from the right. Then, click “Apply.”
UPDF is more than a PDF annotation tool. It is packed with features that can help you work smarter. If you want to learn more, watch the video below or read this review of UPDF.
Final Words
That’s all about using the PDF XChange Editor full-screen mode highlight tool. You can also highlight in the windowed mode. While PDF XChange Editor offers useful highlight tools, it is not very reliable. If you’re having issues working with it, UPDF offers the best alternative. You can easily highlight text and customize it. Removing it is also easy. You can even batch remove markups from multiple documents at once. So, don’t miss out. Download and try it now!
Windows • macOS • iOS • Android 100% secure


 Enola Davis
 Enya Moore
 Enid Brown
  Enrica Taylor
 Lizzy Lozano