In any business or company, invoices play a significant role in managing bills, paperwork, and data organization. If you want to keep a data record of the financial status of your business, invoices can greatly assist you. They are not only necessary for legal reasons but also help in tracking the cash flow of your business. It also adds a professional impact on your customers or clients while taking payments from them.
If you have started a small business, you must know how to make an invoice perfectly. This article will guide you on using different tools to generate invoices flawlessly. Thus, to flourish your business, consider this article to produce professional invoices.
Part 1: How to Create an Invoice Using Templates?
When generating invoices professionally, you can try a famous tool known as UPDF. This well-reputed tool offers various compelling features that can help you in editing and modify your PDF invoices. You can insert headers and footers, watermarks, hyperlinks, images, text, and different backgrounds through its editing tools. Moreover, it contains annotating tools that can assist you in using the markup tools on your PDF invoices.
Windows • macOS • iOS • Android 100% secure
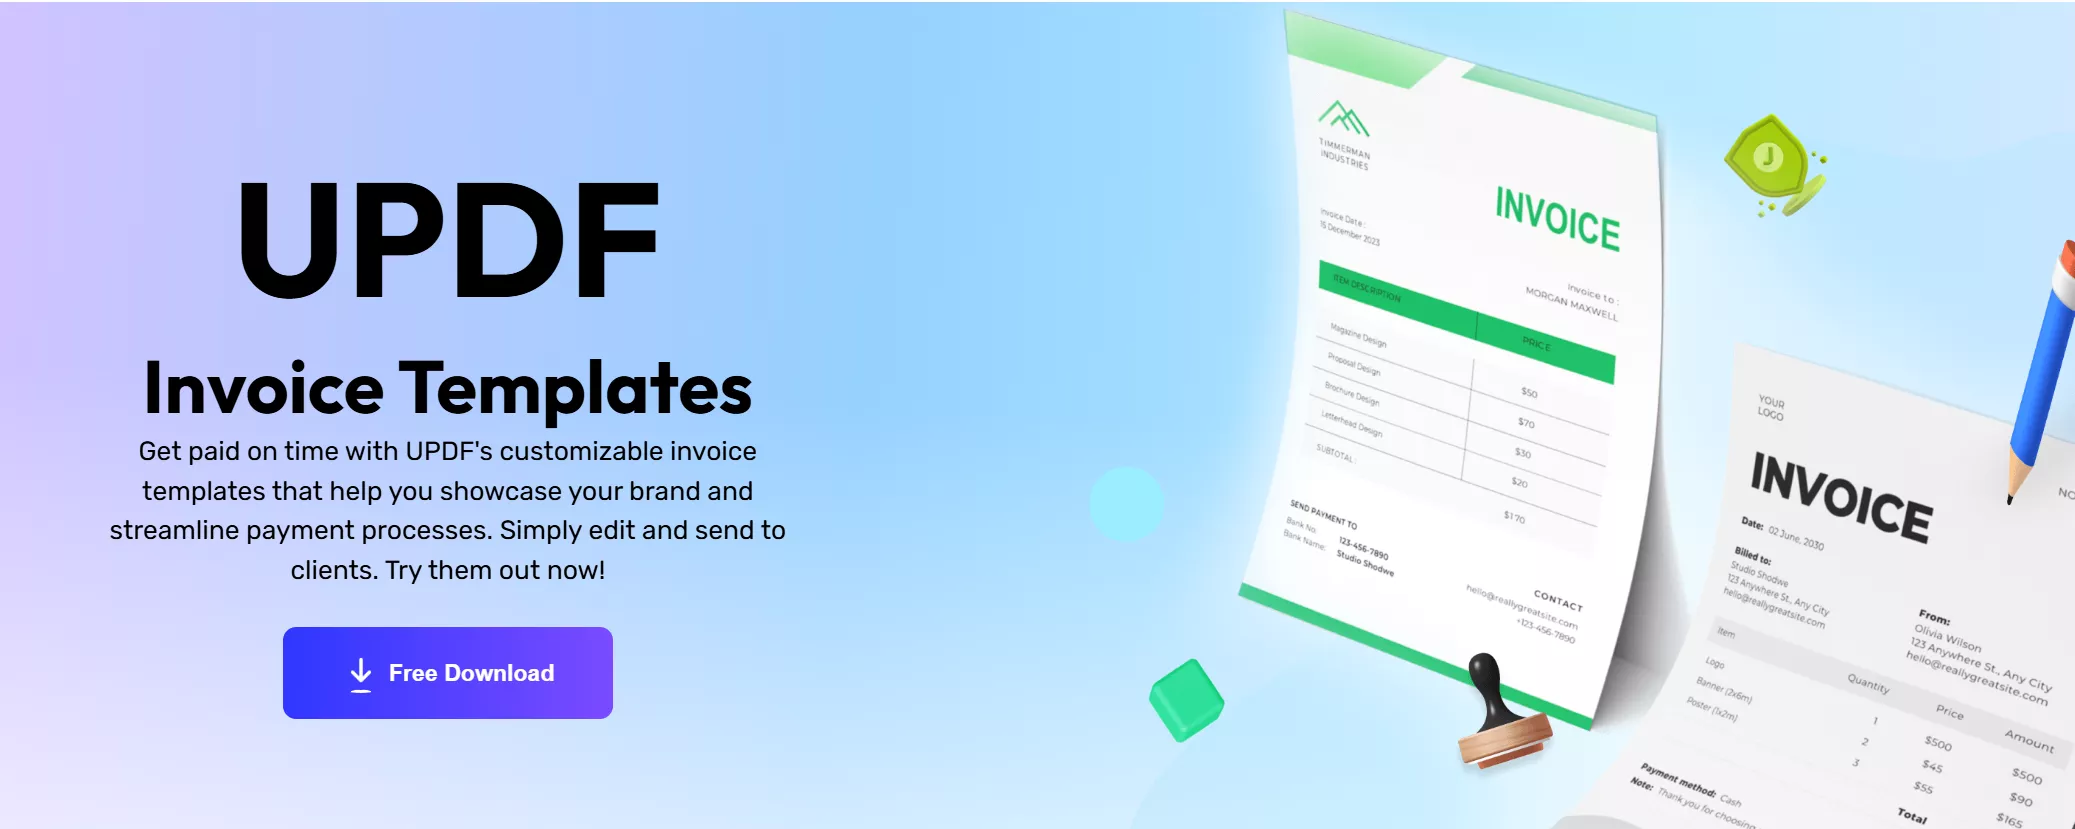
Furthermore, UPDF offers multiple editable invoice templates that can save you time from manual effort. You can explore various invoice templates with different designs and colors in their interface. You can also personalize the invoice template on UPDF by using its various editing tools. Moreover, you can access your invoice templates from different devices, such as iOS, Android, Mac, and Windows.
If you want to create an invoice on UPDF, visit the official website of UPDF through your web browser. Once done, navigate to its "Template Library" from the "Resources" tab and choose your favorite template. Download your preferred template and install UPDF on your device.
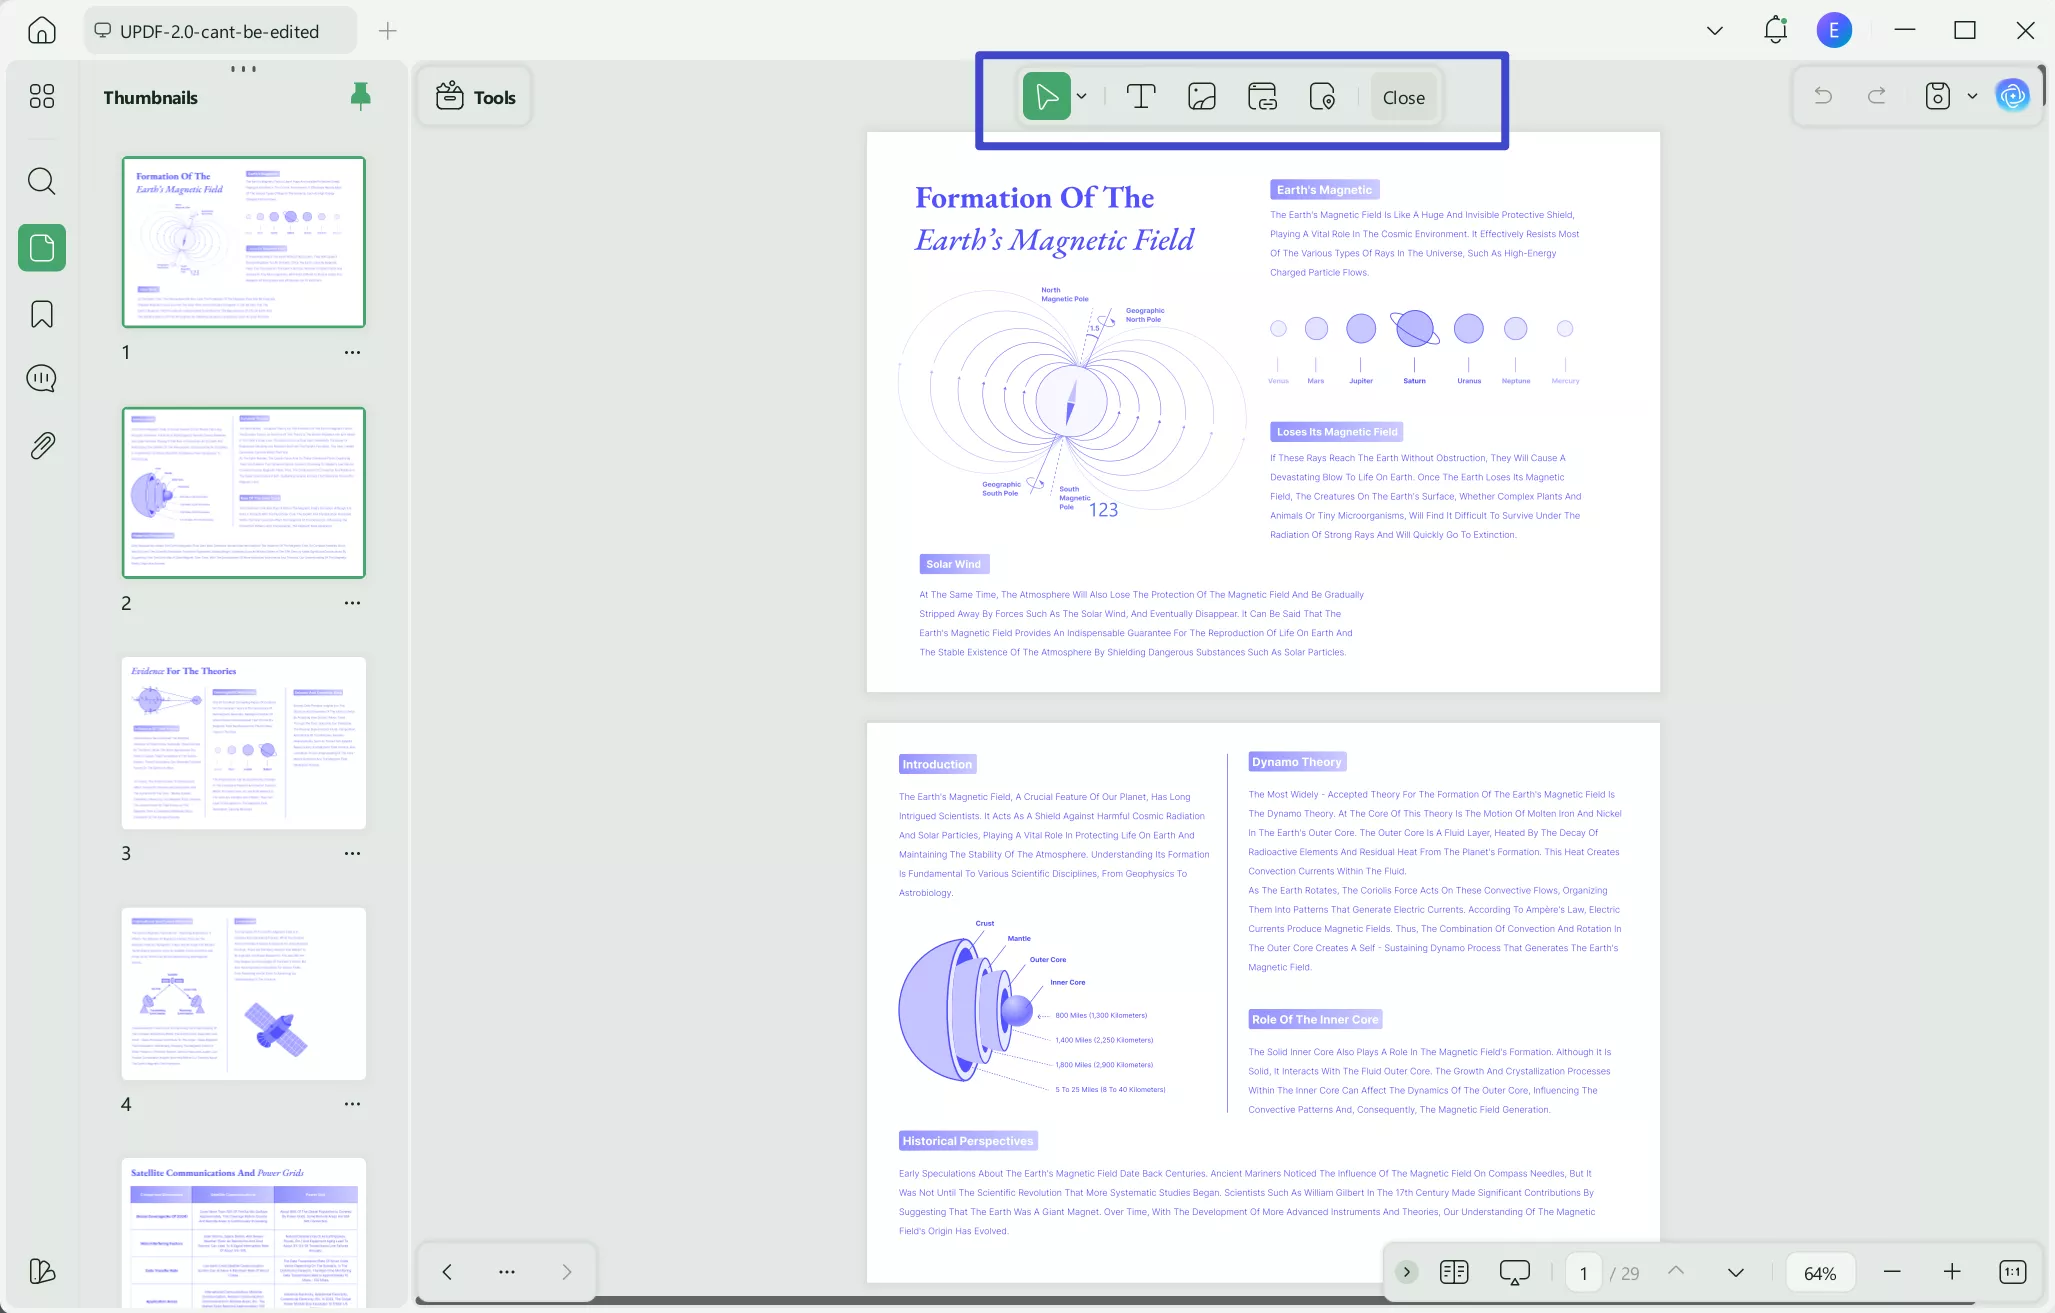
Once the tool is installed, you can edit the invoice by opening and selecting the "Edit PDF" option from the left sidebar. By doing so, you can edit the text and images in your PDF invoice easily.
Part 2: How to Create a Blank Invoice?
Many people want a blank invoice to add text and images in a personalized manner. In this way, you can customize the invoice from scratch, such as where you want to add the text, image, or signature area. It even helps you in selecting the font of your choice from the start. Here, UPDF can help you in creating blank invoices efficiently.
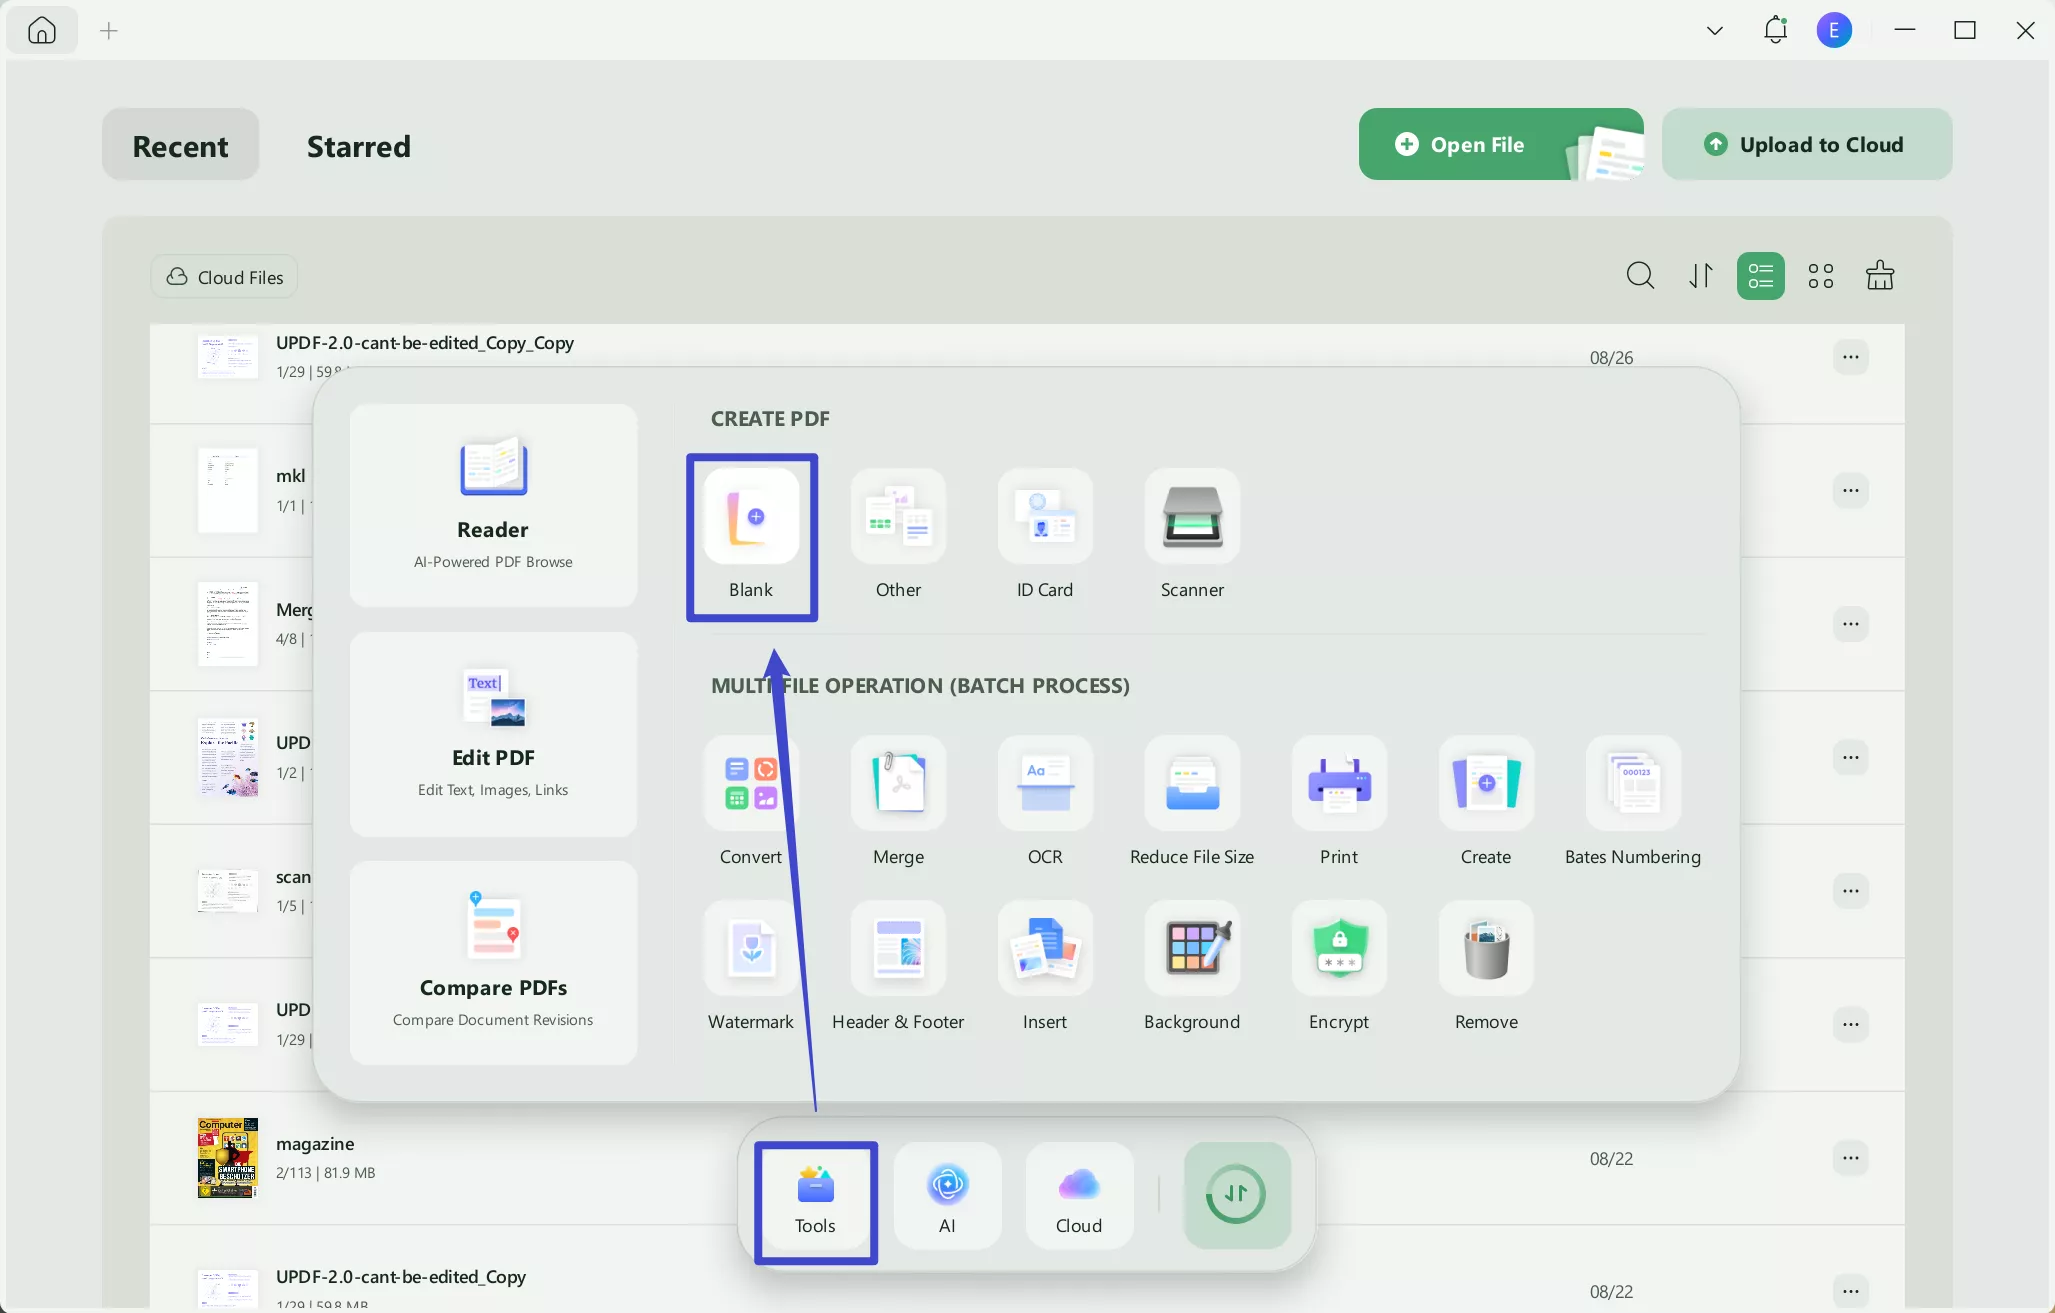
To do so, launch UPDF and head to the "Tools" button. Find the "CREATE PDF" option and select "Blank."
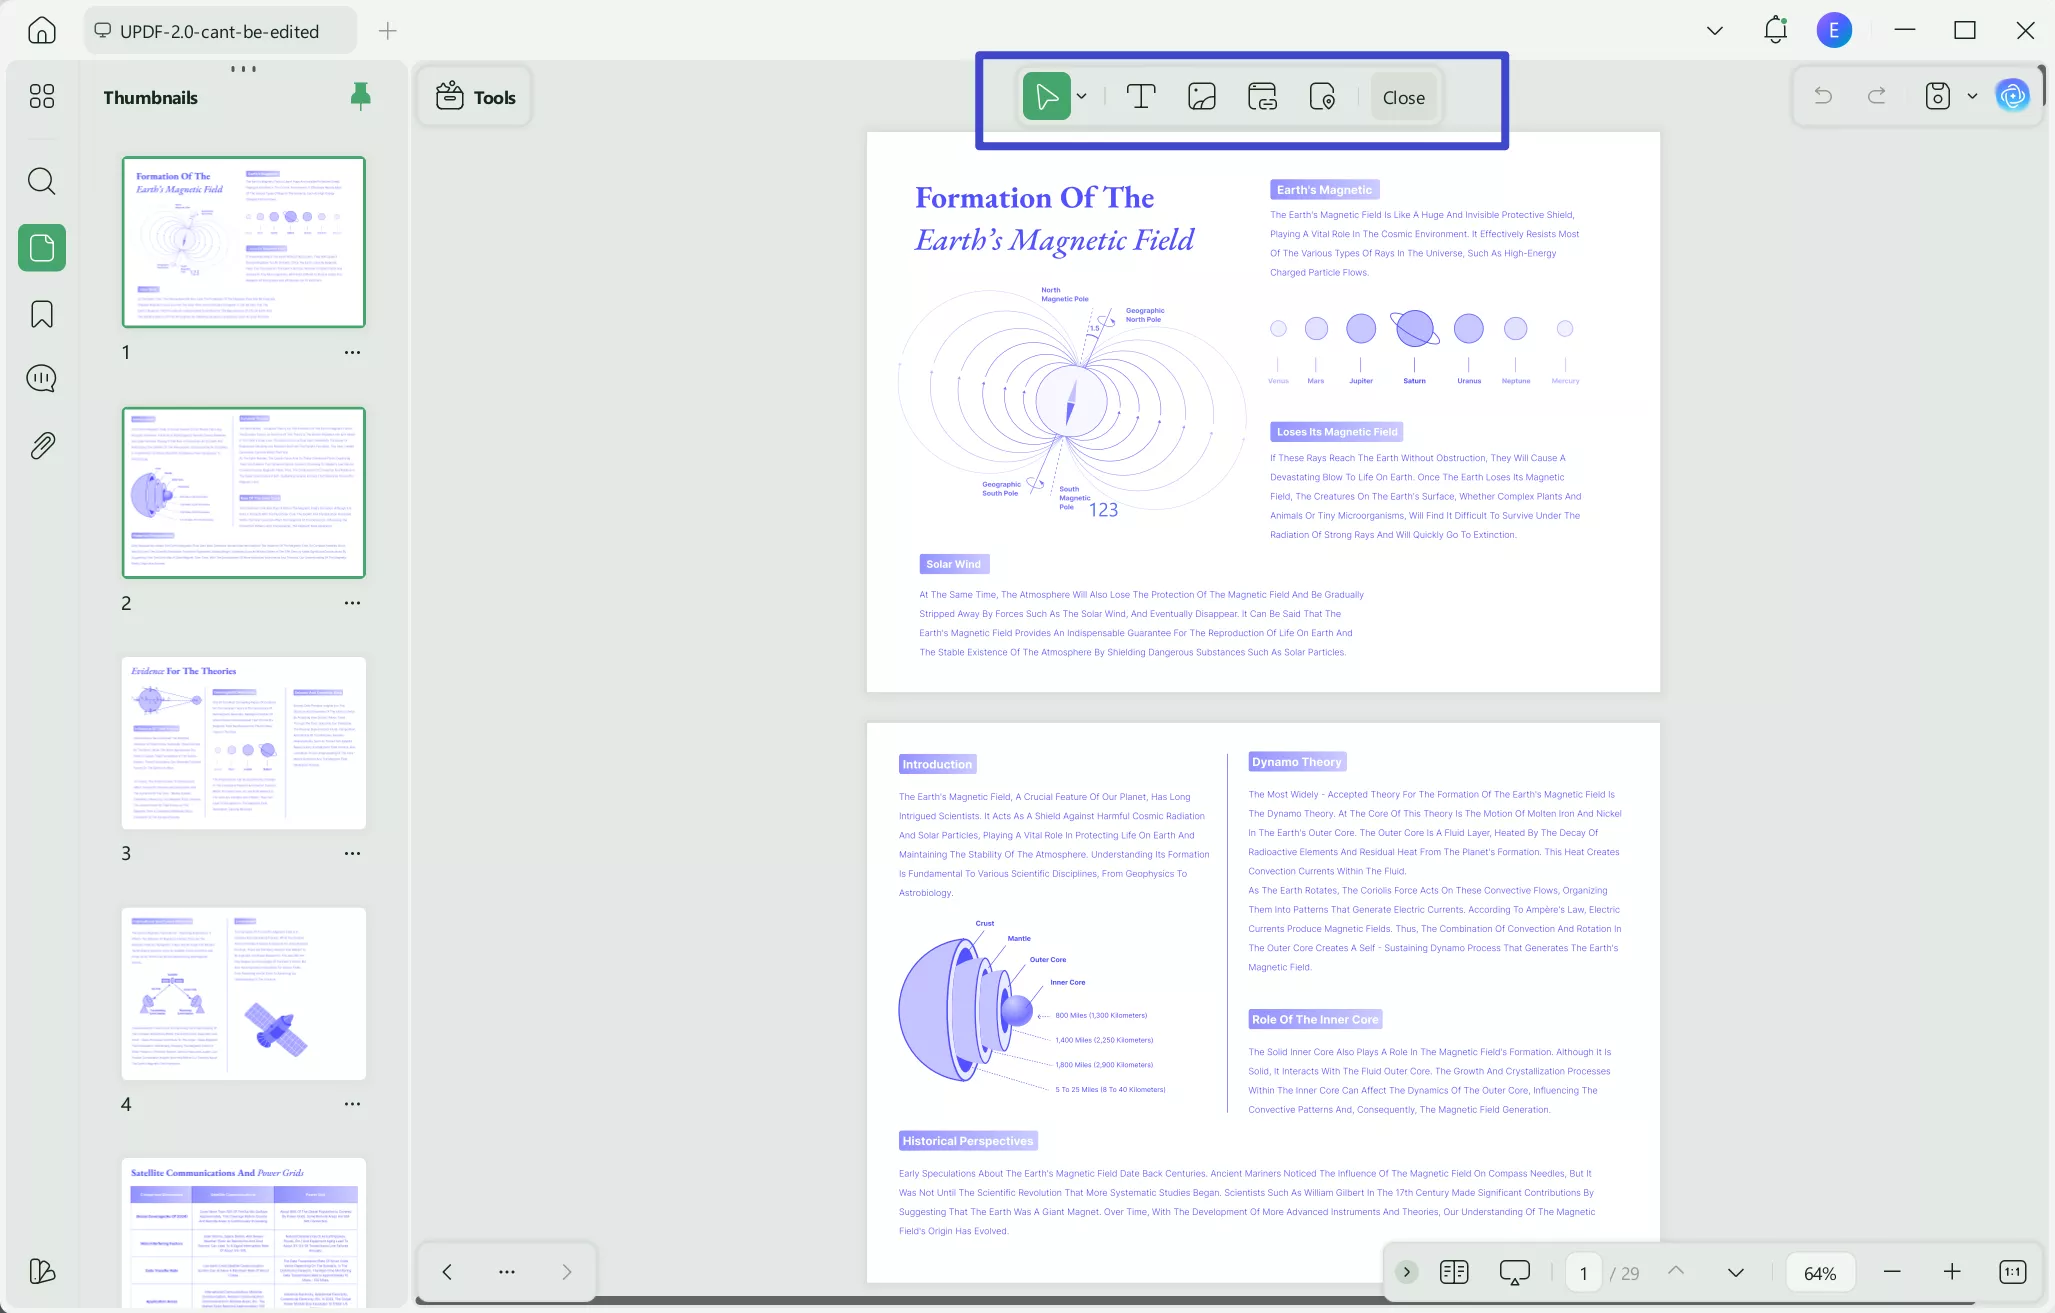
Now, you can add text and images to this blank invoice proficiently. To insert text, tap on the "Text" tool from the toolbar and start writing the required details. Following this, select the "Image" tool from above and add the preferred images instantly.
Windows • macOS • iOS • Android 100% secure
Also Read: How to Edit Bill? (3 Easy Methods)
Part 3: How to Create an Invoice in Excel?
- Open the Excel program on your MacBook or Windows PC and search for its invoice templates.
- Before searching, make sure to connect to the internet connection. You can type "Invoices" to explore the templates.
- Once you have selected and analyzed your favorite invoice template, open it to add personalization through editing. Afterward, you can save the changes in Excel easily.

Part 4: How to Create an Invoice in QuickBooks?
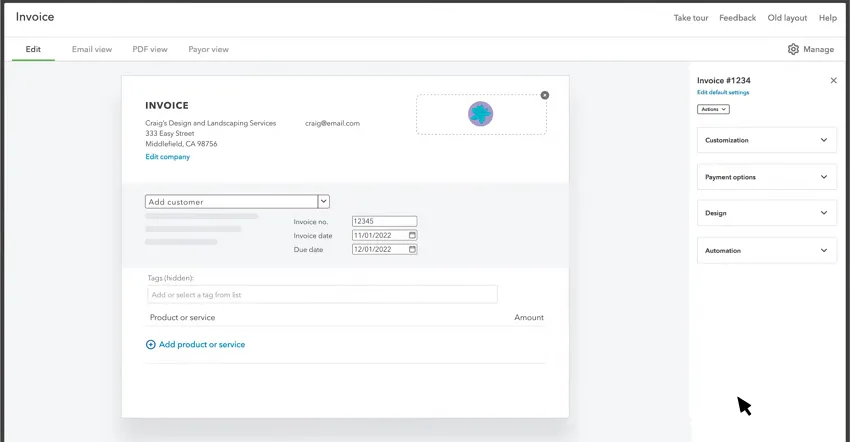
- In QuickBooks, tap the "Plus" icon and choose "Invoice". Afterward, select "Add Customer" to insert your customer's information.
- You can analyze the terms, due date, and invoice date to avoid the chances of errors. Afterward, click "Add product or service" and choose the product or service from the displayed drop-down menu.
- Now, choose the method to calculate your charge amount in the invoice. You can also add the quantity and rate for additional information.
- To change the design and outlook of your invoices, tap on the "Manage" option. Once done, you can save and share the invoice.
Part 5: How to Create an Invoice in PayPal?
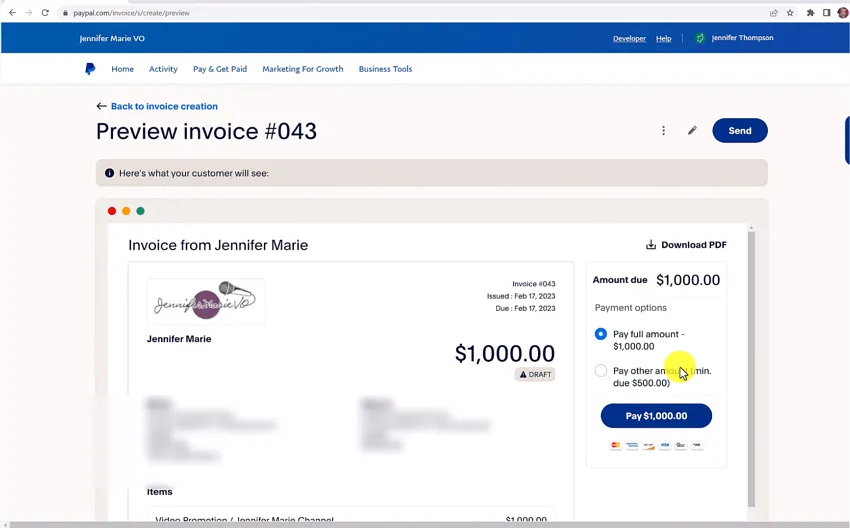
- First, sign into your PayPal account and click "Invoicing" from its main page. On the new page, you can check the paid and pending invoices.
- Afterward, press the "Create Invoice" button displayed at the top of the screen. You can choose whether to bill single or multiple customers from the displayed options.
- Now, you can fill out all the required information, such as the customer’s name, email address, and your information.
- Ensure to save all the changes and also draft a link that you can share with your customer. Afterward, select the correct currency and add the item list with the respective price. You can also add multiple items.
- Following this, select the payment options from the right side carefully. You can also add the minimum amount due and a message for your client. Afterward, add the invoice date, due date, and invoice number.
- Once done, click the "Preview" button to carefully check the invoice. You can also edit the changes by clicking on the Edit button. Once you are satisfied with your invoice, click on the "Send" button.
Part 6: How to Make an Invoice in Word?
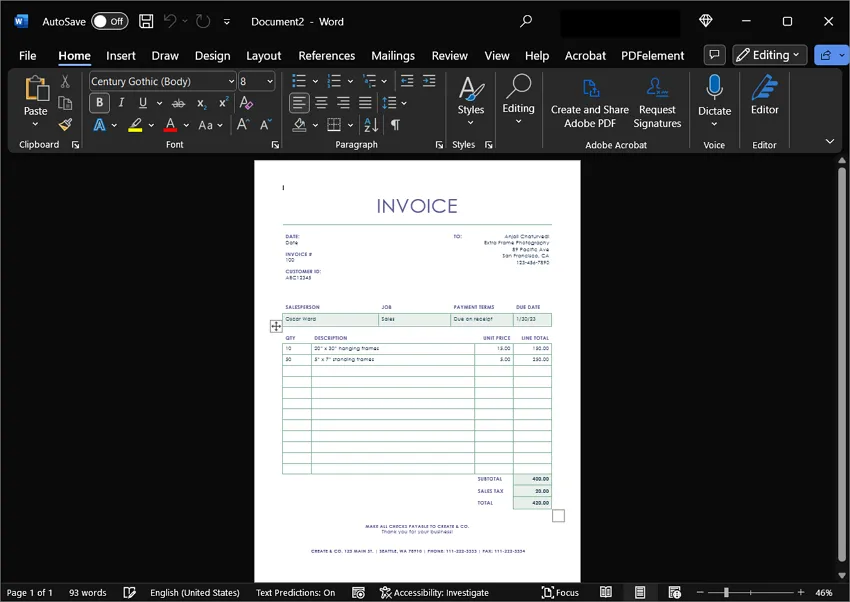
- Open your Word and select "File," and tap on "New Blank Document." This will bring a blank page in front of your screen.
- Now, create a header to add the heading "Invoice," your business name, contact information, and logo professionally. You can style the design by choosing the font, color, and size from the options.
- On the right side of your invoice, you must add the due date, invoice number, and billing date.
- To proceed, you should add your client’s information, such as email address, phone number, fax, and client’s name.
- Moreover, you can insert the itemized list of products and services in the invoice. You can specify taxes, discounts, unit prices, and quantity of products.
- Once done, you can insert additional information, like your terms and conditions. Afterward, you can save your invoice as a PDF file and share it with your client.
Part 7: How to Generate an Amazon Invoice?
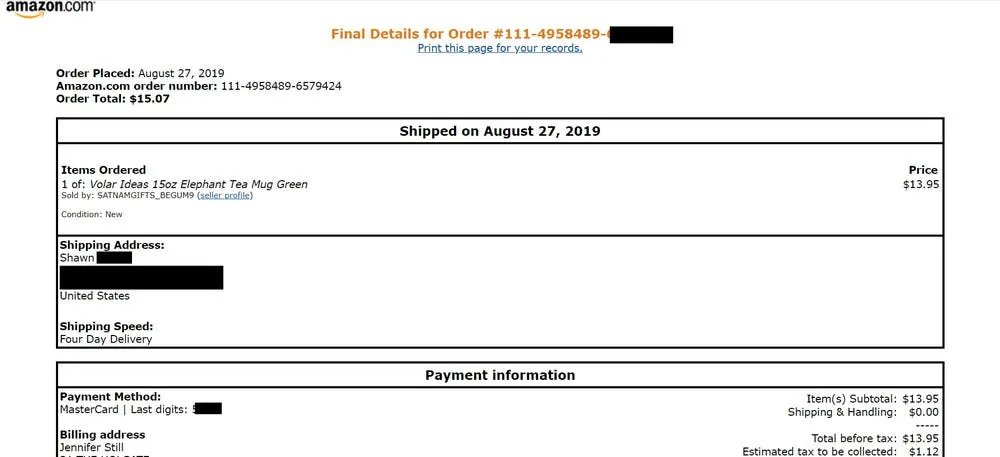
- Once you have purchased anything from Amazon, you can get Amazon receipts manually. To do so, log in to your Amazon account using your email address and password.
- Now navigate to the "Hello" greeting displayed in the upper right corner. From the "Your Account" tab list, choose the "Your Orders" option.
- Afterward, choose the order whose invoice you want to generate and then select "View Invoice."
- From the top, click on the "Print This Page for Your Records" option that will instantly download the invoice.
Part 8: How to Generate an Invoice in GST Portal?
- Start by visiting the official website of the GST e-invoice system from your web browser. Afterward, go to the "Registration" tab and select the e-invoice registration forum. Follow the on-screen instructions to make your registration successful.
- Now log in to your e-invoice system by entering your username and password. Afterward, you can check your dashboard easily.
- Once done, return to the homepage and select the "Help" tab. From the drop-down menu, choose "Tools" and click "Bulk Generation Tools."
- From the given instructions, download the GePP tool. After downloading it, click "Supplier Profile" and enter the required details. Similarly, fill out the information of your "Recipient Master" and "Product Master."
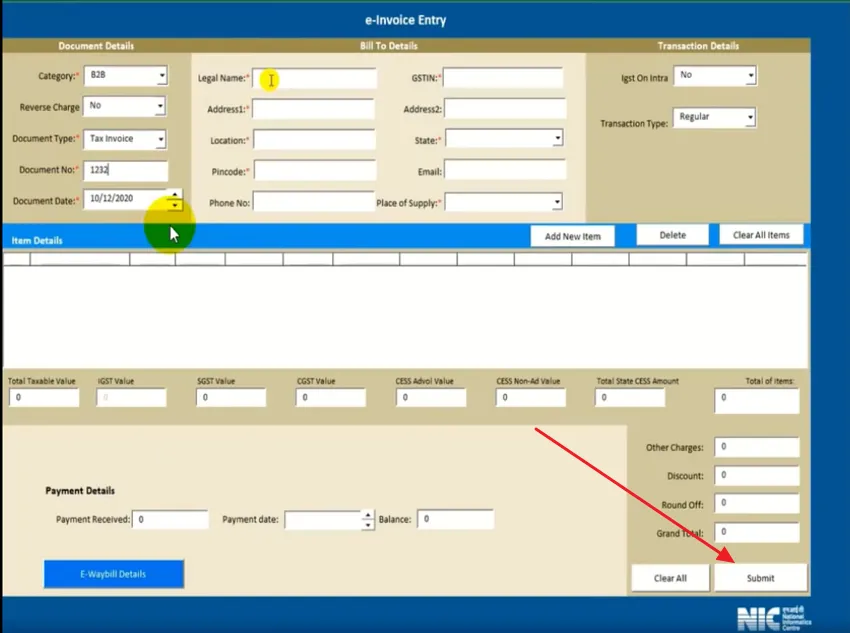
- Now, on the menu of the e-invoice entry, add the demand details as shown on the screen. Make sure to insert your contact information correctly. You can add new items, products, and payment details to the given boxes. Afterward, click on the "Submit" button.
Part 9: How to Generate an Invoice in Tally Prime?
- First, you have to create IRN and print the QR code to initiate the process. To do so, make sure to register your organization on IRP. Afterward, select Tally Pvt Ltd as the GSP to generate an API user. Also, you have to enter the details of the API user in the prompt menu.
- Once done, activate e-invoicing in TallyPrime and insert information like tax rates, supply details, and stock items.
- Moreover, ensure to insert the pin code and address in the party masters to complete the required information. Also, if you are an exporter, make sure to update the ISO code. Now, while saving your invoice, you can produce an IRN easily.
- Once you have started recording the GST sales transaction, enter the voucher details carefully. You can also use multiple GST registrations while creating the voucher.
- Ensure your invoice number does not start with special characters and zero numbers. Afterward, choose "Yes" for "Provide e-invoice details."
- Once the e-invoice screen appears, determine the "Ship to Place" and "Bill to Place" details. Now, press "Ctrl +A" to save the entered details and return to the voucher.
- Now, press "Ctrl +A" again to save the voucher. From the prompt display "Do you want to generate e-invoice?", press the "Enter" button. Afterward, add the e-invoice login information and again press the "Enter" button.
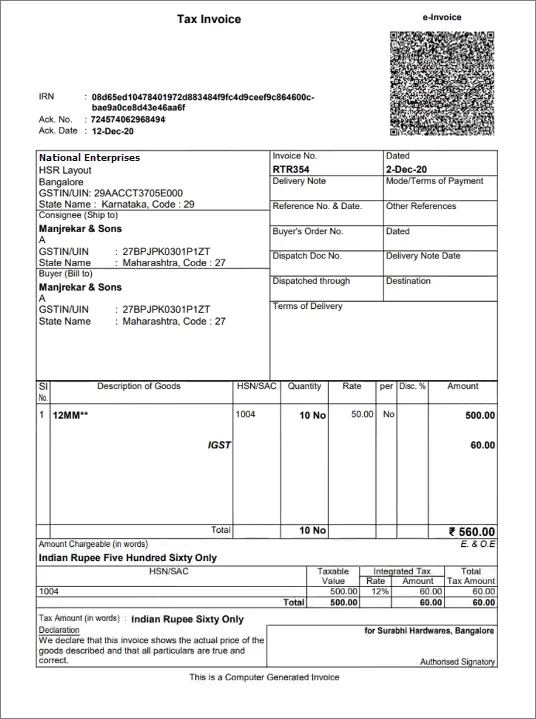
- Once all the requirements are fulfilled successfully, the invoice details will be carried to the e-invoice system. Once done, the notification will appear, showing the message "e-invoice generated successfully." Afterward, you can print the invoice easily.
Part 10: FAQs on Generating Invoices
1. What are the 5 things that should be included in an invoice?
First of all, your invoice must include the name of your brand, business, or organization for identification purposes. It should also include the required legal information, such as your email address, billing date, due date, description for charging, and the charged amount.
If you are registered for VAT, it should also include your VAT number. Moreover, you should carefully insert the price number to process a clear payment. Also, add a clear description to avoid confusion and your banking details for the payment process.
2. Is it legal to create your invoice?
If you own a business in which you are providing goods or services to your customers, you can create your invoices easily. Thus, if you are the sole proprietor, you can generate personal invoices as per requirements.
3. Can an invoice be handwritten?
Yes, you can create handwritten invoices for your small business. You can add your contact information, products list, payment terms, amount due, invoice number, and client contact information. However, creating handwritten invoices is not recommended as they don’t look professional and neat.
4. What makes an invoice valid?
Make sure to include "Invoice" as the heading and insert the invoice number and date carefully. Afterward, enter your business name, email address, and the client's information. You should also clearly describe the products or services with the quantity. Also, ensure to add the total amount and unit price to your invoice. When you insert such information in a professional manner, it makes your invoice valid and legal.
5. Do invoices need to be signed?
Professionally, invoices don’t need to be signed. However, signing an invoice can be helpful as it can make this document more legal. By acknowledging your customer, your invoice can be more definitive and make the payment process easier.
Conclusion
If you are running a small business selling goods or services, you have to create invoices for various reasons. Invoices are necessary for legal reasons and display your financial health in an organized manner. Through this detailed article, you can easily learn how to make an invoice flawlessly.
If you want an easy-to-use invoice management and creation tool with unlimited advanced features, you can try UPDF. This tool consists of multiple advanced features that can help you generate organized and professional invoices.
Windows • macOS • iOS • Android 100% secure
 UPDF
UPDF
 UPDF for Windows
 UPDF for Mac
 UPDF for iPhone/iPad
 UPDF for Android
 UPDF AI Online
 UPDF Sign
 Edit PDF
 Annotate PDF
 Create PDF
 PDF Form
 Edit links
 Convert PDF
 OCR
OCR PDF to Word
 PDF to Image
 PDF to Excel
 Organize PDF
 Merge PDF
 Split PDF
 Crop PDF
 Rotate PDF
 Protect PDF
 Sign PDF
 Redact PDF
 Sanitize PDF
 Remove Security
 Read PDF
 UPDF Cloud
 Compress PDF
 Print PDF
 Batch Process
 About UPDF AI
 UPDF AI Solutions
 AI User Guide
 FAQ about UPDF AI
 Summarize PDF
 Translate PDF
 Chat with PDF
 Chat with AI
 Chat with image
 PDF to Mind Map
 Explain PDF
 Scholar Research
 Paper Search
 AI Proofreader
 AI Writer
 AI Homework Helper
 AI Quiz Generator
 AI Math Solver
 PDF to Word
 PDF to Excel
 PDF to PowerPoint
 User Guide
 UPDF Tricks
 FAQs
FAQs UPDF Reviews
 Download Center
 Blog
Blog Newsroom
 Tech Spec
 Updates
 UPDF vs. Adobe Acrobat
 UPDF vs. Foxit
 UPDF vs. PDF Expert






 Enrica Taylor
 Enid Brown
 Delia Meyer