Commercial printing is an important part of many industries. Especially in the print industry, the files need to be perfect when given for mass printing.
Files that are not designed or prepared well enough for commercial printing can affect both the document and the print outcome with problems such as color distortion, crop marks, missing text, and so on.
This is where a press-quality PDF is required for converting into an optimized format that is flexible for all commercial printing purposes.
This blog will introduce you to what Print Ready PDF is and the necessary steps you can take to have the document converted into a press-quality file. Besides that, a practical PDF editor will also be mentioned before printing PDF files. Check it out.
Part 1. What is a Print-ready PDF?
A Print Ready PDF is a technical term used to imply that the PDF document has been converted in such a way that it can be printed effectively by commercial printers. Since PDF is the most preferred format for printing purposes as it includes all important components like fonts, color, etc., you will hear this term used often in the print industry. In a nutshell, it describes a file that should be of ‘press quality’ to avoid any issues while printing.
The functions of a Print Ready PDF consist of correct sizing of the file, adjusting the photo resolution, optimizing font quality, adjusting crop marks, avoiding any color distortion, etc.

Also Read: How to Fix "Can't Print PDF" Issue
Part 2. Differences Among Print-ready & Print to & Save As PDF
To avoid any confusion, let us clear up the major difference between "Print Ready", "Save As", and "Print to", when we view the options in a PDF file.
- Save As: It means that the original PDF version of the document is saved and it can be converted into another format if needed.
- Print to: It means to print exactly the current PDF version and you would often preview it on the app first before printing it.
- Print Ready: Otherwise called a press-ready PDF means it will be converted into a format that would contain the right colors for painting purposes, and all the texts, borders, etc., will be modified for successful printing. Just think of it as an upgraded and optimized version of printing when compared to the "Print to" option.
Part 3. A PDF-Editor Wildcard to Make Your Files Print-Ready
Now that you have understood the differences and know the importance of a Print Ready PDF, let us explore the steps you can take to find this option and get your PDF ready for commercial printing.
In daily life, some users store PDF files on their phones while others prefer storing documents on desktops. In such a case, there is a universal tool that can solve all your PDF needs and have your document ready for Press Quality.
Introducing, UPDF — a powerful PDF software that allows you to comfortably view your PDF files, edit them, annotate them, organize them, and print them efficiently.
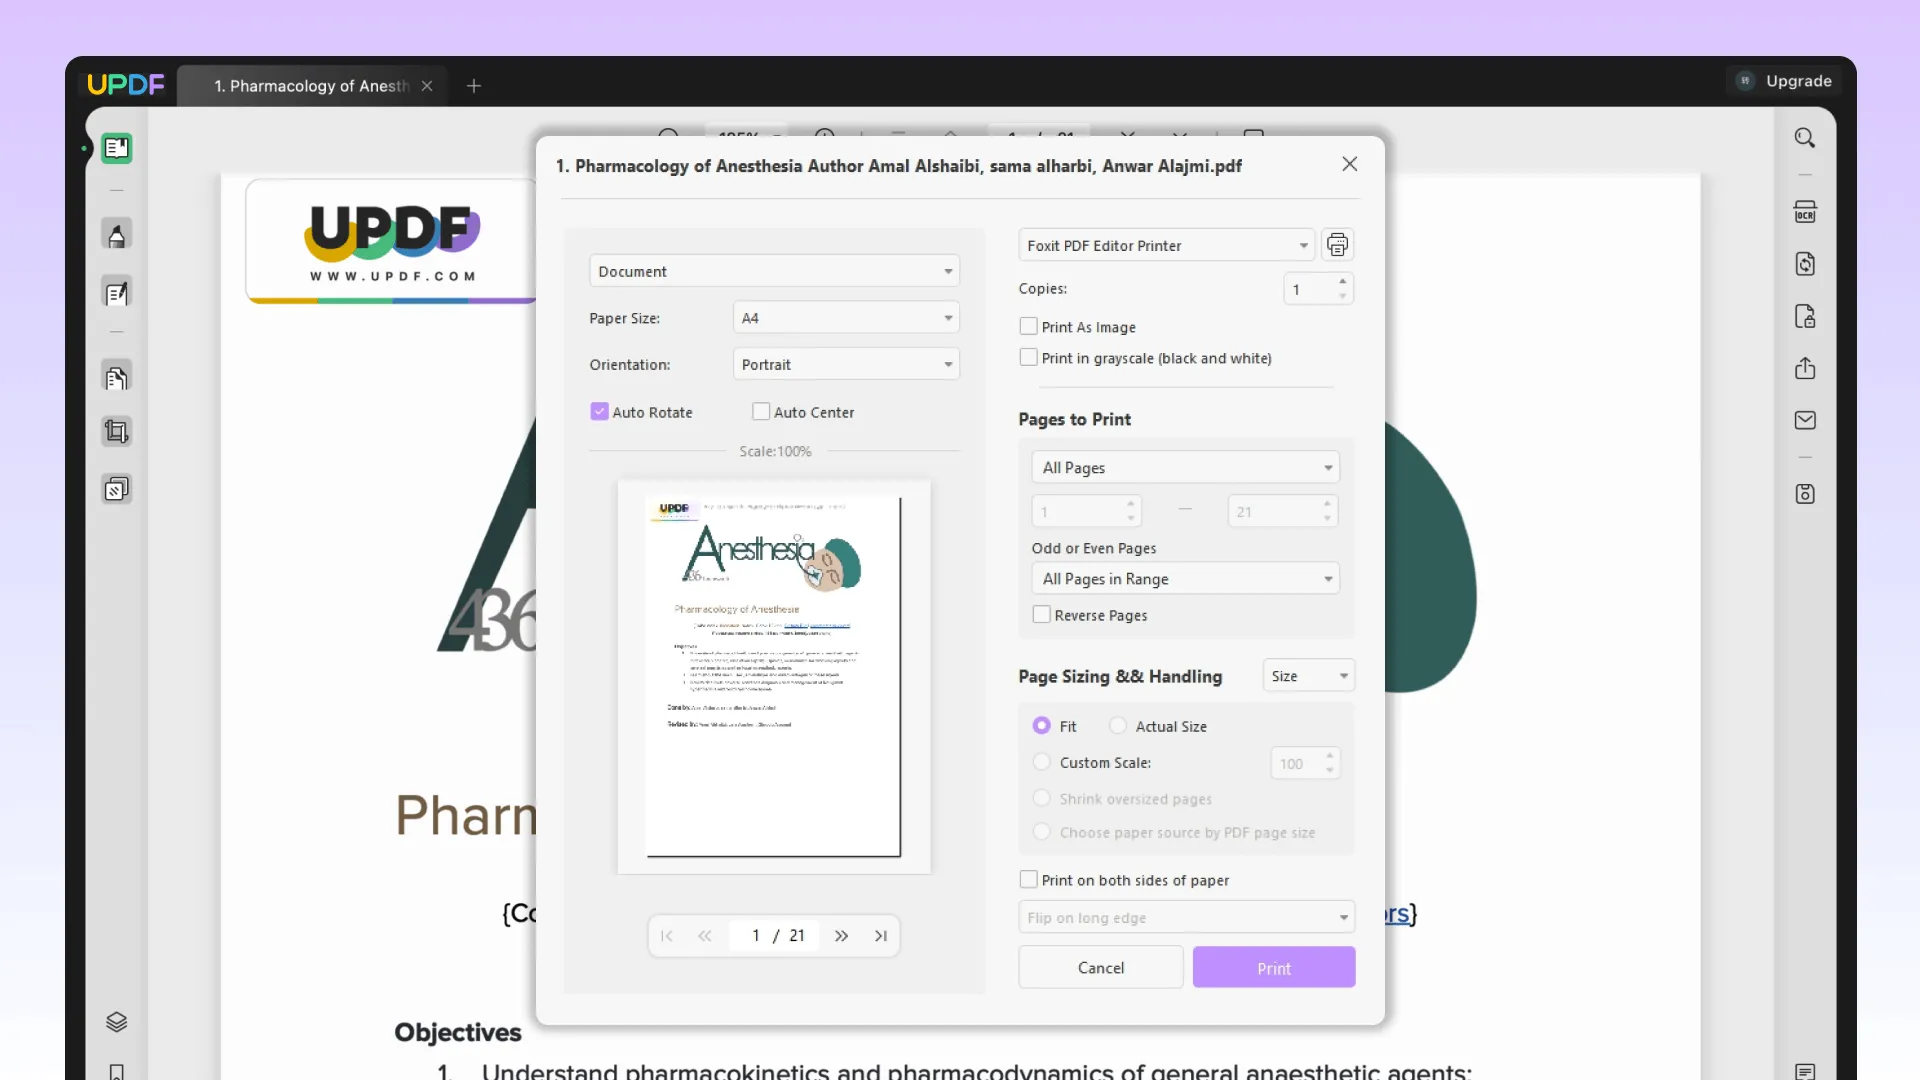
Follow the steps below to get your PDF ready for printing using UPDF:
Step 1. Download and install UPDF on your computer or smartphone. Then, upload the PDF file to UPDF.
Windows • macOS • iOS • Android 100% secure
Step 2. Click on the "File" and choose "Print…", and customize the settings before printing.
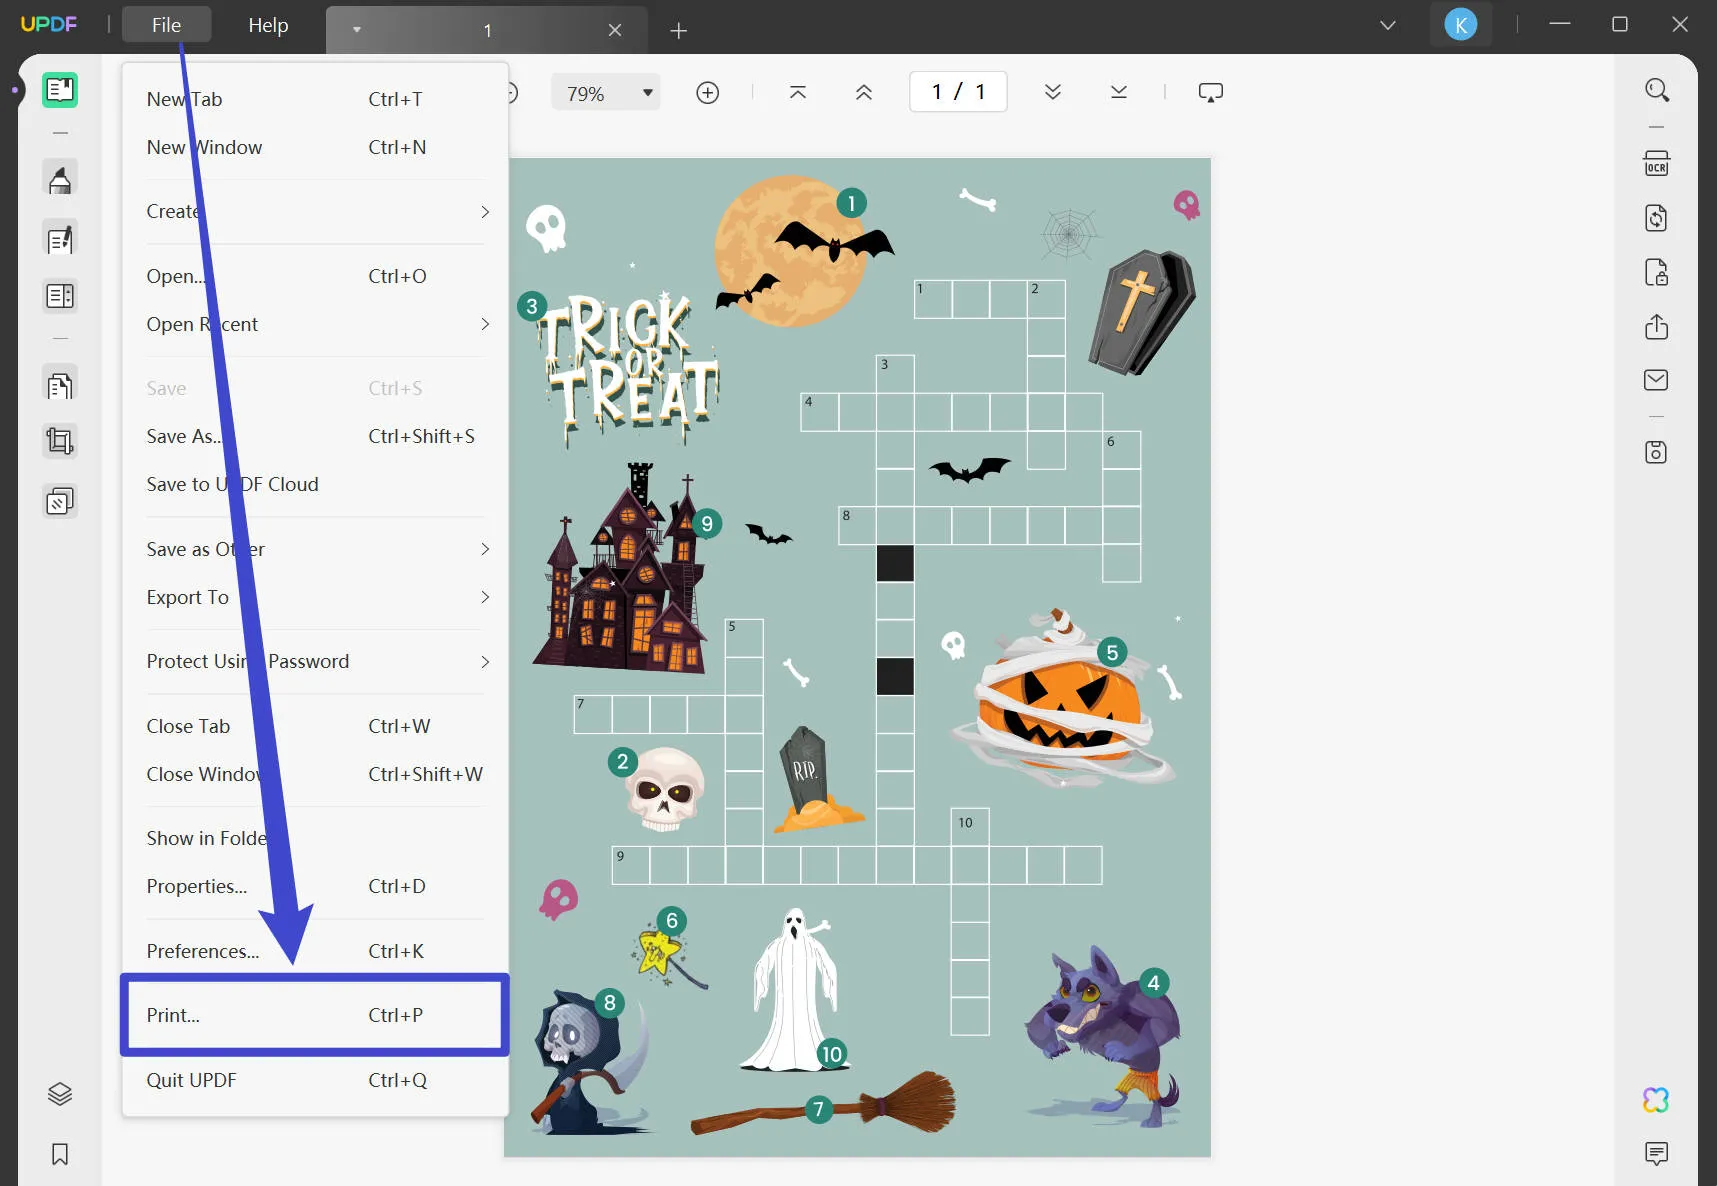
That's all - simple and effortless. This software is user-friendly and beginners don't need any prior technical knowledge to use this tool effectively. You can watch the video below to learn how to print PDF with UPDF in detail.
Besides, UPDF also has many advanced features:
- Advanced annotation tools
- Wide range of reading modes
- Seamless editing tools
- Robust document protection
- Convenient conversion to various formats
- Optimizing or reducing the PDF file size
- Inserting a PDF into multiple PDF files batch
Part 4. Create a High-resolution Print-ready PDF with Adobe
Some users might have Adobe Acrobat or other Adobe applications installed on their computers, so they can simply take advantage of these apps to create print-ready PDFs. Next, we will explore where you can find these options.
4.1 Using Adobe Acrobat
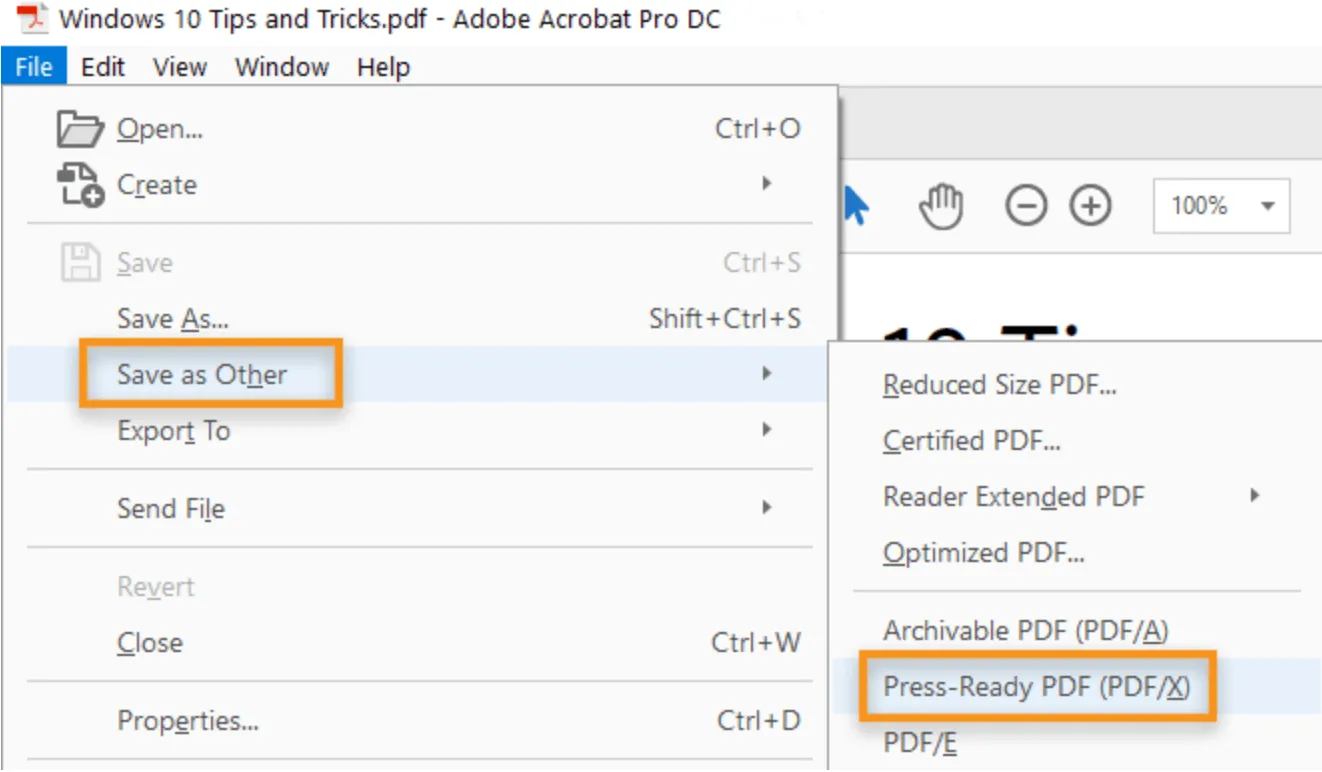
- Step 1. In your Adobe Acrobat, head over to "File", then "Save as Other", and then click on the option "Press-Ready PDF (PDF/X)".
- Step 2. A new dialog will appear asking you to "Save As PDF". Click on "Settings".
- Step 3. Another dialog (Preflight) will appear. Select the option "Save as PDF/X-4". And finally, click "OK".
4.2 Using Adobe Illustrator
- Step 1. In your Adobe Illustrator, head over to "File", then click on "Save a Copy".
- Step 2. Head over to "Format" and change it to "Adobe PDF (pdf)". Name your file and click on "Save".
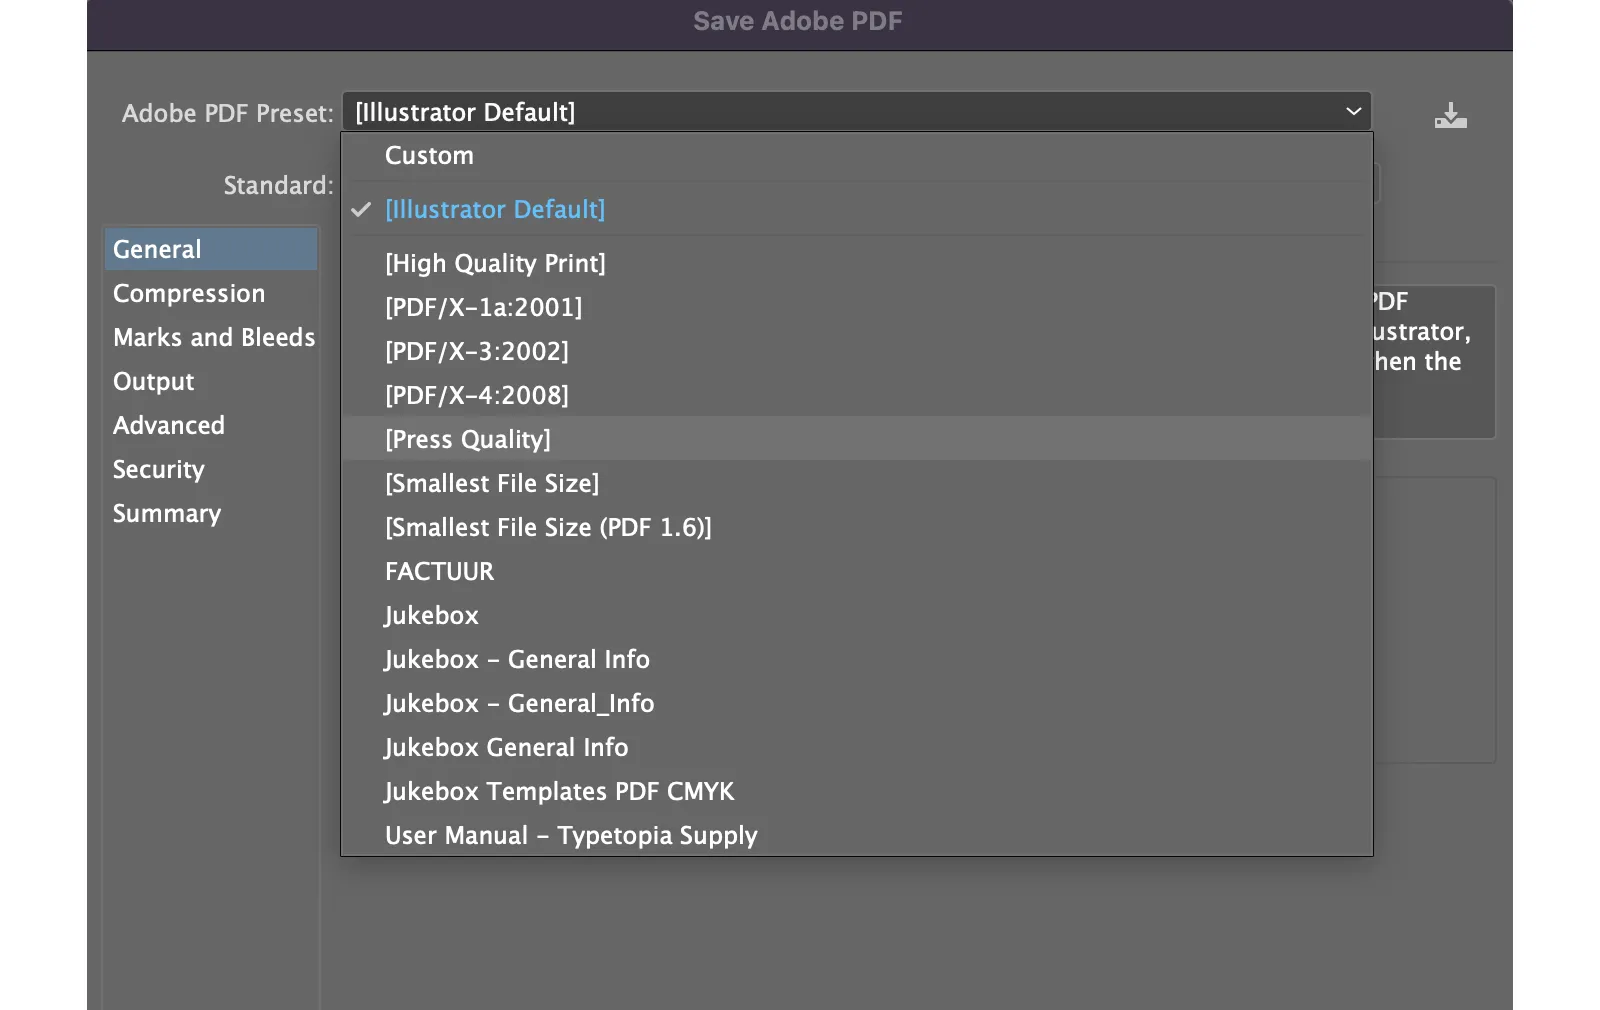
- Step 3. A "Save Adobe PDF" dialog will appear. Under "Adobe PDF Preset", select [Press Quality] from the drop-down list.
- Step 4. Under the "Marks and Bleeds" section on the left-hand side of the dialog, check the box "Trim Marks".
- Step 5. Finally, click on "Save PDF".
4.3 Using Adobe InDesign
- Step 1. In your Adobe InDesign, head over to "File" and click on "Export".
- Step 2. In the dialog, select the format "Adobe PDF (Print)". Name your file and click on "Save".
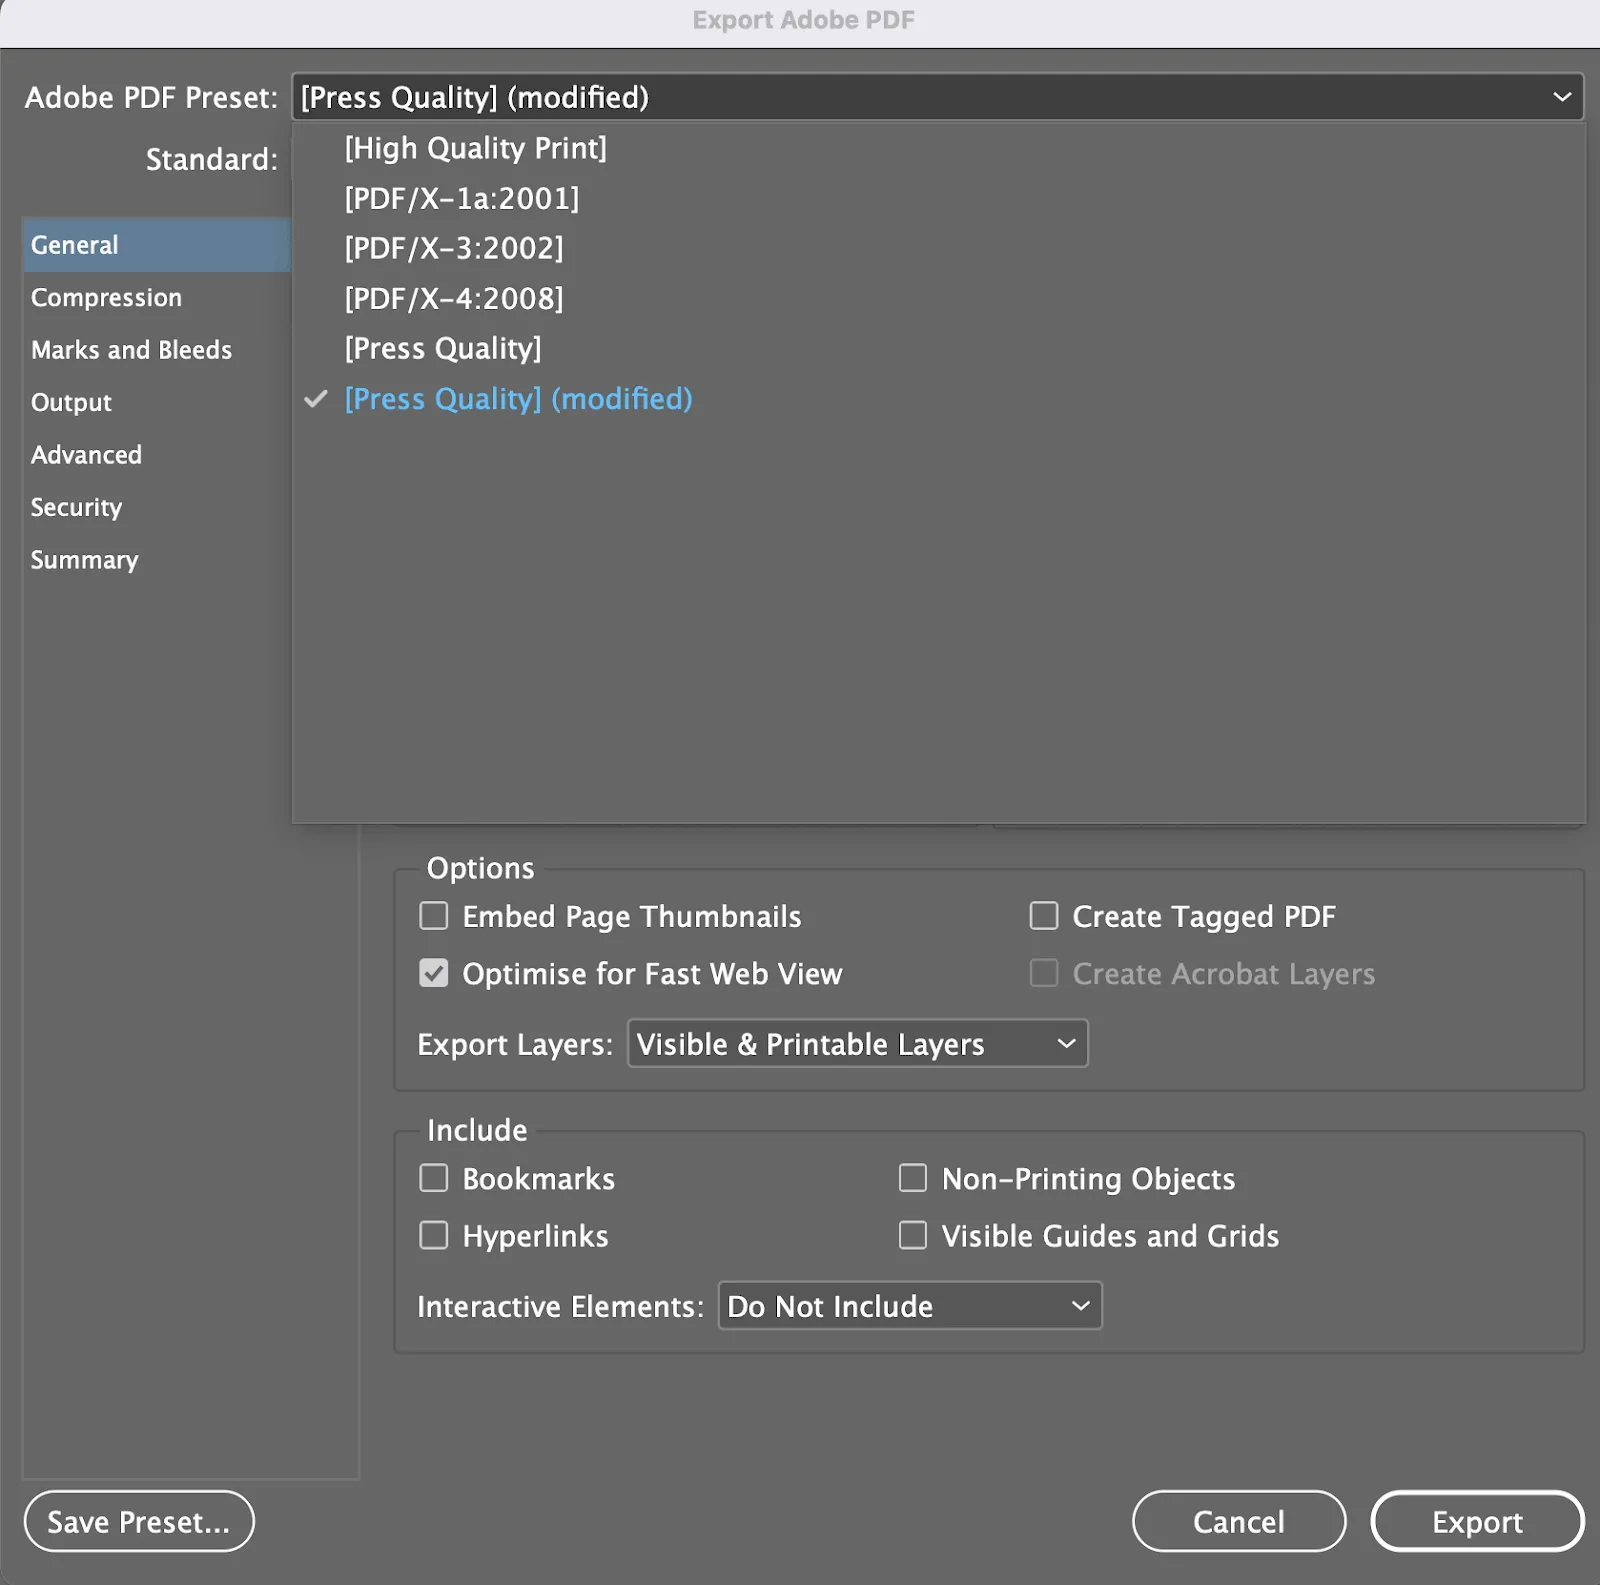
- Step 3. An "Export Adobe PDF" dialog will appear. Under the "Adobe PDF Preset", select [Press Quality] (modified) from the drop-down list.
- Step 4. Under the "Marks and Bleeds" section on the left-hand side of the dialog, check the box "Crop Marks".
- Step 5. Lastly, click on "Export".
4.4 Using Adobe Photoshop
- Step 1. In your Adobe Photoshop, head over to "File", and click on "Save As".
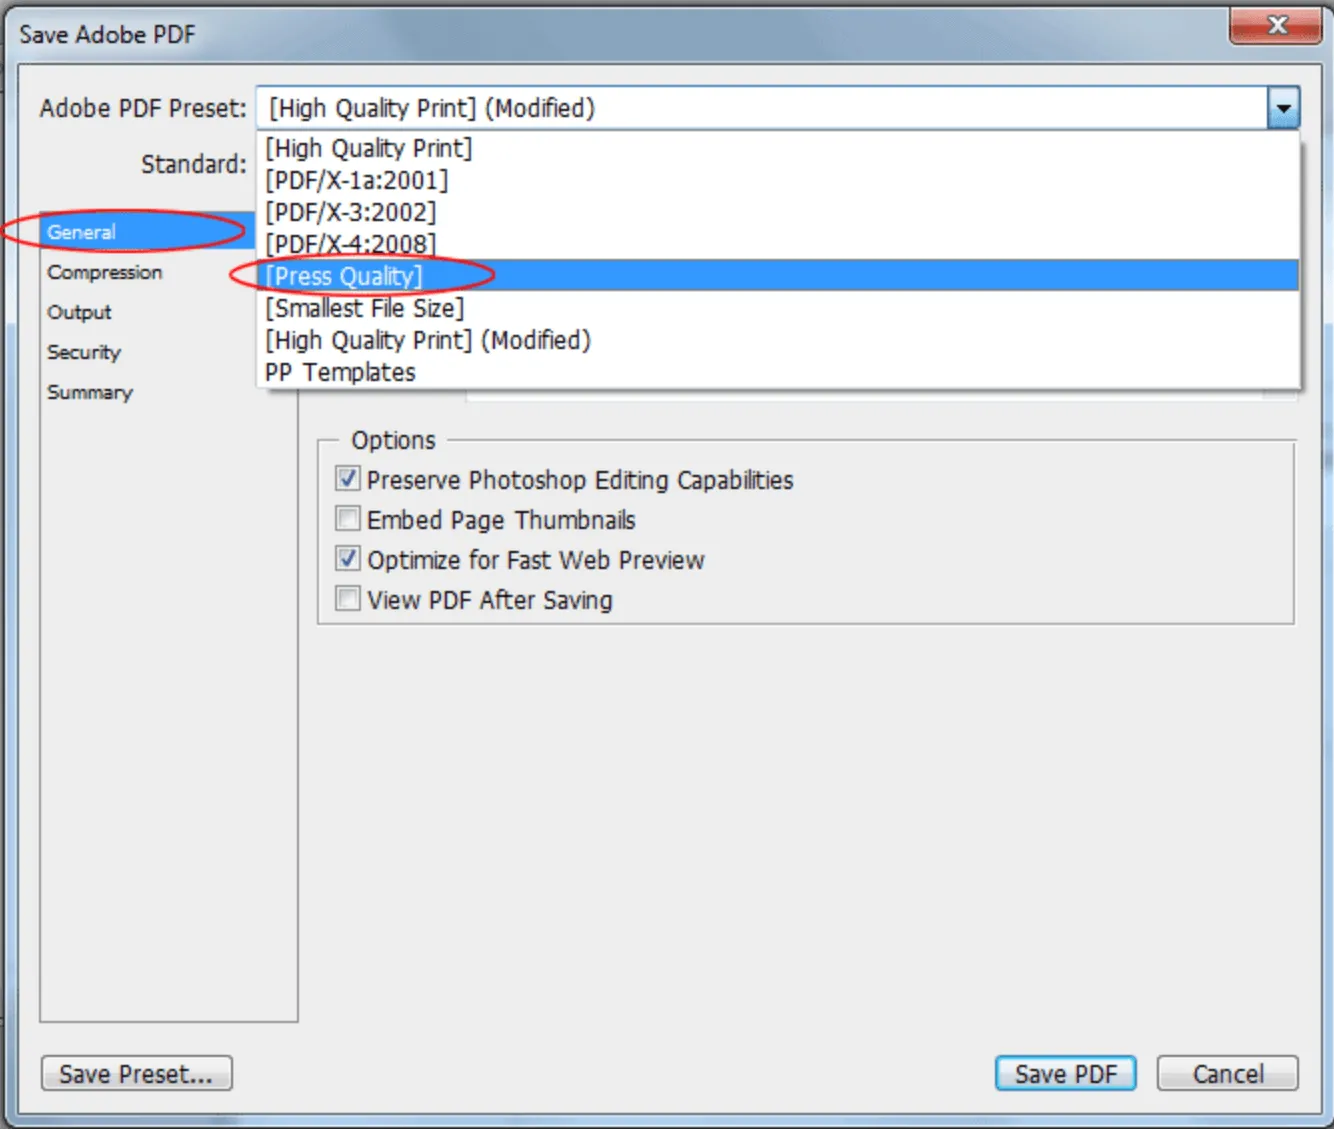
- Step 2. The "Save Adobe PDF" dialog will appear. Under "Adobe PDF Preset", select [Press Quality] from the drop-down list.
- Step 3. Below that, you will find a menu called "Standard". Select the option "PDF/X-1a:2001" from the drop-down list.
- Step 4. On the left-hand side of the dialog, click on the "Compression" section, and you will find a section "Options" beside it. Ensure the text fields match the parameters for the image below.
- Step 5. Lastly, click on "Save PDF".
Part 5. FAQs About Print-ready PDF
Q1. Are all PDFs print-ready?
Common standard PDFs are usually not print-ready. In most cases, it might contain poor-quality images and colors which can lead to low-quality prints. This is why it is manually needed to make a PDF print-ready.
Q2. Why are some PDFs not printable?
By default, you will find most PDF files opened inside the browsers, so this can cause some printing issues, for instance. In other cases, the printer driver could be outdated which can lead to PDf printing issues. Hence, you will need to update the printer driver.
Conclusion
Now that you know everything about print-ready PDFs, you can easily prepare your documents for optimal printing. By utilizing all the methods described in this article, anyone will be able to convert simple PDFs to print-ready ones. However, if you are looking for the best way to create such PDFs, UPDF is the best tool that can help you in this regard.
With its easy-to-use interface and multiple PDF printing options, UPDF emerges as the perfect tool for optimizing your printing tasks. So, without wasting any time, click on the "Free Download" button to streamline your office operations. Moreover, if you get satisfaction from its functionality, buy the UPDF Pro version to enjoy its limitless features.
Windows • macOS • iOS • Android 100% secure
 UPDF
UPDF
 UPDF for Windows
 UPDF for Mac
 UPDF for iPhone/iPad
 UPDF for Android
 UPDF AI Online
 UPDF Sign
 Read PDF
 Annotate PDF
 Edit PDF
 Convert PDF
 Create PDF
 Compress PDF
 Organize PDF
 Merge PDF
 Split PDF
 Crop PDF
 Delete PDF pages
 Rotate PDF
 Sign PDF
 PDF Form
 Compare PDFs
 Protect PDF
 Print PDF
 Batch Process
 OCR
OCR UPDF Cloud
 About UPDF AI
 UPDF AI Solutions
 FAQ about UPDF AI
 Summarize PDF
 Translate PDF
 Explain PDF
 Chat with PDF
 Chat with image
 PDF to Mind Map
 Chat with AI
 User Guide
 Tech Spec
 Updates
 FAQs
FAQs UPDF Tricks
 Blog
Blog Newsroom
 UPDF Reviews
 Download Center
 Contact Us


 Enid Brown

 Lizzy Lozano
 Grace Curry