You've got some great photos of last night's party on your iPhone 17 - how to transfer those photos to your Mac computer? Do you want to learn how to transfer photos from iPhone to Mac the easy way? How about three easy ways? The following tutorial contains the actual steps you'll need to duplicate to upload photos from iPhone 17 to Mac in three different ways, all of which are relatively easy to execute. Let's begin with the easiest and most effective way.
Method 1. How to Import Photos from iPhone to Mac without a Cable
The UPDF for iOS app for Apple's mobile devices is a comprehensive file management system and "Swiss Army Knife" for iOS and iPadOS that is loaded with useful features to import, organize, modify, compress, and secure your local device files in a protected environment accessible only to you. Whew! In short, it's an awesome file manager! Why? That's because of its rich features and the benefits they bring:
Windows • macOS • iOS • Android 100% secure

- First of all, the interface is extremely user-friendly so you know exactly what to do as soon as you launch the app
- Second, it's super easy to create folders, add files, move them around, and generally manage them in an efficient manner
- Third, the Security Space feature gives you ample room to protect your most private and confidential files and media
- Fourth, it comes with useful tools to scan photos to PDF directly from the camera, compress files to make them easier to share online, and even transfer files wirelessly to your Mac - which is what this article is all about!
- Fifth, you can open PDF documents or any media without leaving the UPDF interface!
- Finally, you can synchronize files with UPDF Cloud on Windows, Mac, iOS, and Android devices.
Step 1: Import Photos to UPDF
After you launch UPDF, tap the "+" symbol to see the file import options.
Select the "Computer" option and note the URL provided.
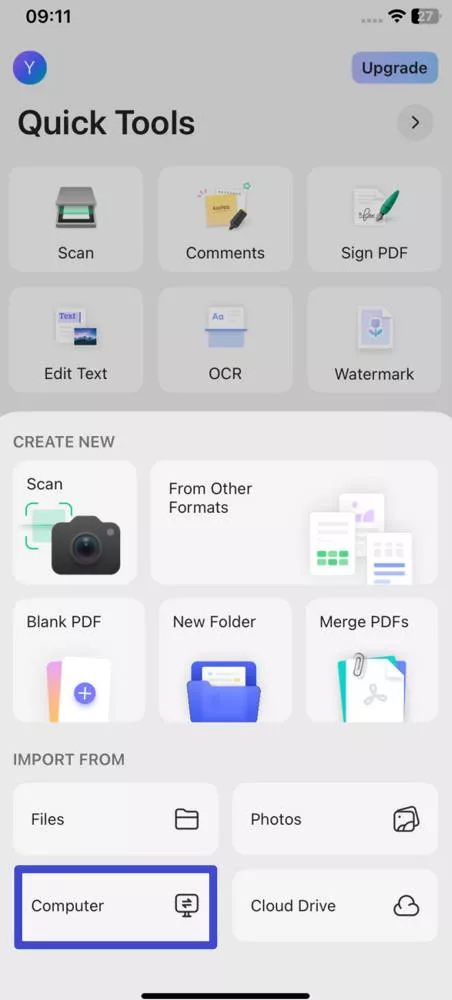
Step 2: Connect Your iPhone to Your Mac
Make sure that both devices are on the same Wi-Fi network, type the URL from the UPDF app into your Mac browser address bar, and hit Enter.

When you see your UPDF folders on your Mac, it means the connection has been established successfully.
Step 3: How to Sync Photos from iPhone to Mac
You will see all the photos and files in UPDF on your browser. You can click the download icon to download photos from iPhone 17 to Mac.

The photos can now be accessed by Preview or other Mac apps.
UPDF also allows you to share PDF files via AirDrop, but we've also shown you a different way to do that in Method 3 below. UPDF is more than just a replacement for your Files app, which is a solid app on its own; however, UPDF extends that functionality with additional security features and useful tools to help organize PDF documents from the comfort of your iPhone or iPad.
Windows • macOS • iOS • Android 100% secure
Method 2: How to Transfer Photos from iPhone to Macbook with a USB Cable
If you prefer the more hands-on wired method of data transfer, it's equally easy to do that between an iPhone 17 and a Mac. If you want to know the best way to transfer photos from iPhone 17 to Mac with a cable, this is it.
Step 1: Connect the Device to the Mac
Hook up your iPhone 17 to your Mac with the Lightning-to-USB charging cable, which doubles as a data transfer cable.
The device needs to be recognized properly by the Mac, as indicated in the next step.
Step 2: Go to the Import Screen in the Photos App
Launch the Photos app on your Mac.
The Import screen should appear by default if your device is properly connected - if not, check the cable again or use a different USB cable.
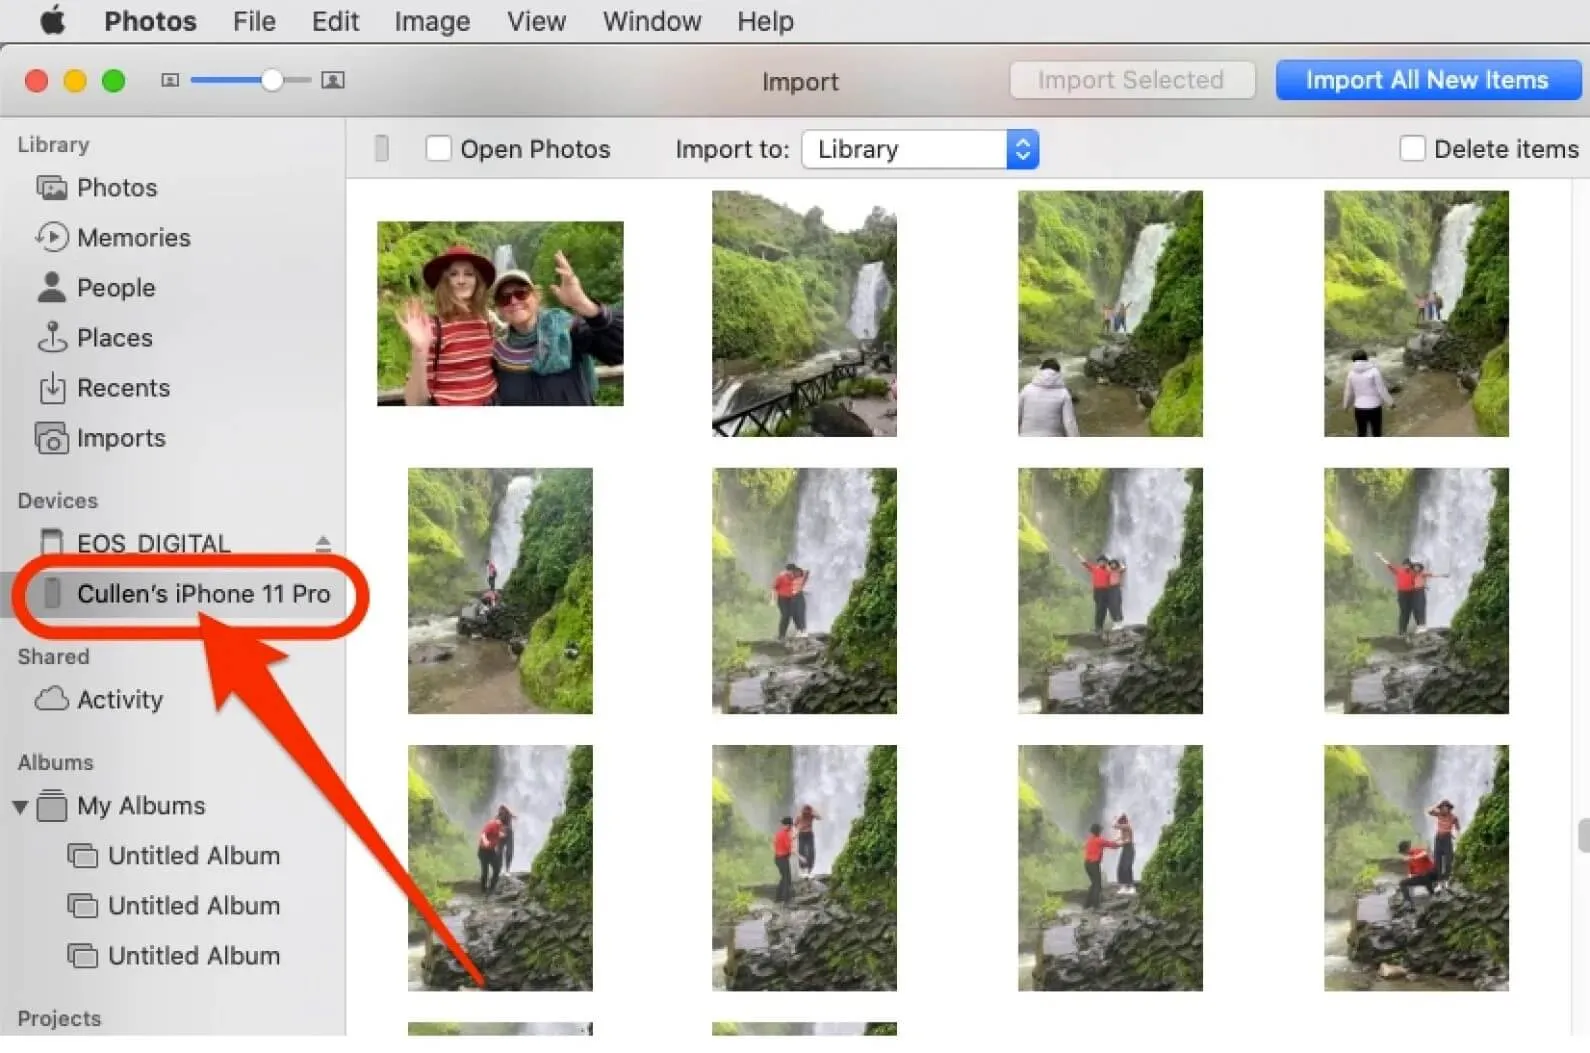
If you don't see the import screen but you see the device listed in the sidebar, click the device name.
Step 3: How to Import Photos from iPhone to Mac
Note: Before proceeding, you may need to Trust this Computer on your iPhone 17 after unlocking it with the passcode. Locked devices aren't always detected properly, which could be another issue if you don't see the device name or the Import screen.

On the Import screen, you can select random ones, and photos that are open, and even choose to import all new photos that aren't already on your Mac, which is a handy feature.
Specify the target folder in the "Import To" dropdown.
Finally, click "Import Selected" or "Import All New Items" as required.
Once it's done, disconnect the iPhone 17 from the Mac after ejecting it properly in Finder.
This method is reliable so it's quite popular. However, if you don't want to hassle with cables and all that, you can use AirDrop. As mentioned earlier, AirDrop is one of the Share options in UPDF. You can also send files directly with the AirDrop app, as shown in the next section.
Method 3: How to Transfer Photos from iPhone to a MacBook with AirDrop
This method is relatively simple but requires some setting up before you can initiate the photo transfer from your iPhone 17 to your MacBook. Follow the steps as described below:
Step 1: Enable AirDrop on the iPhone and Mac
To access the Control Center on iPhone X and later, swipe inward from the top-right corner - on older iPhones, use the swipe-up motion on the home screen.
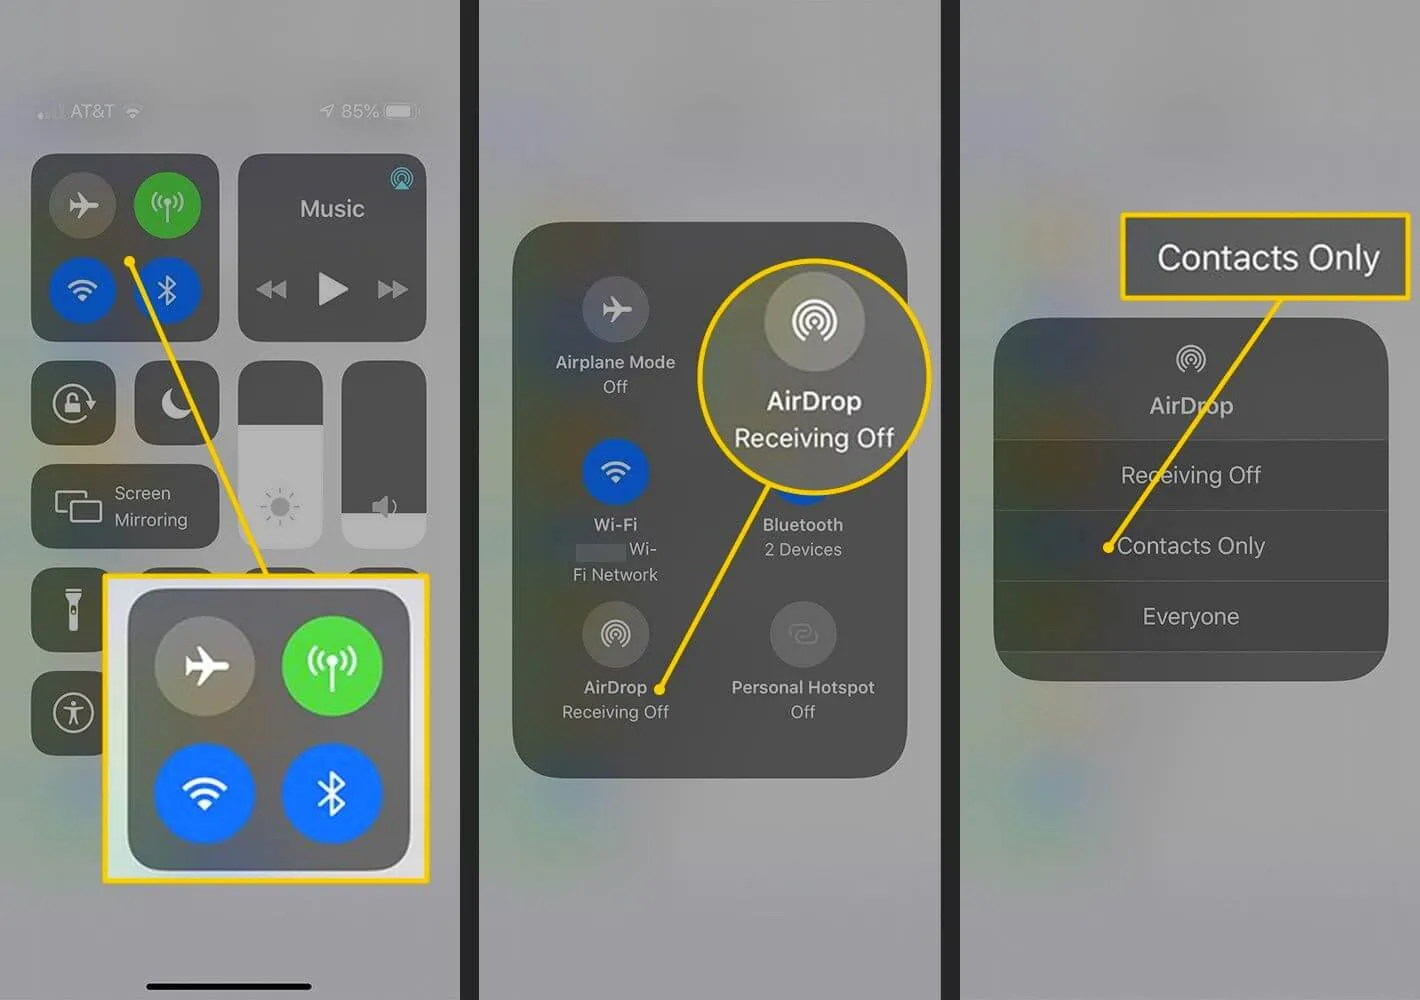
Enable AirDrop and set it to Everyone or Contacts Only.
On the MacBook, go to Finder and click the Go menu option at the top.

Select AirDrop to see the settings - you may also see AirDrop under the Favorites list in Finder.
Set the utility to receive files from Everyone.
Step 2: Select the Photos and Send Them from the iPhone
Go to your Camera Roll and select the photo you want to transfer from the iPhone 17 to the MacBook.
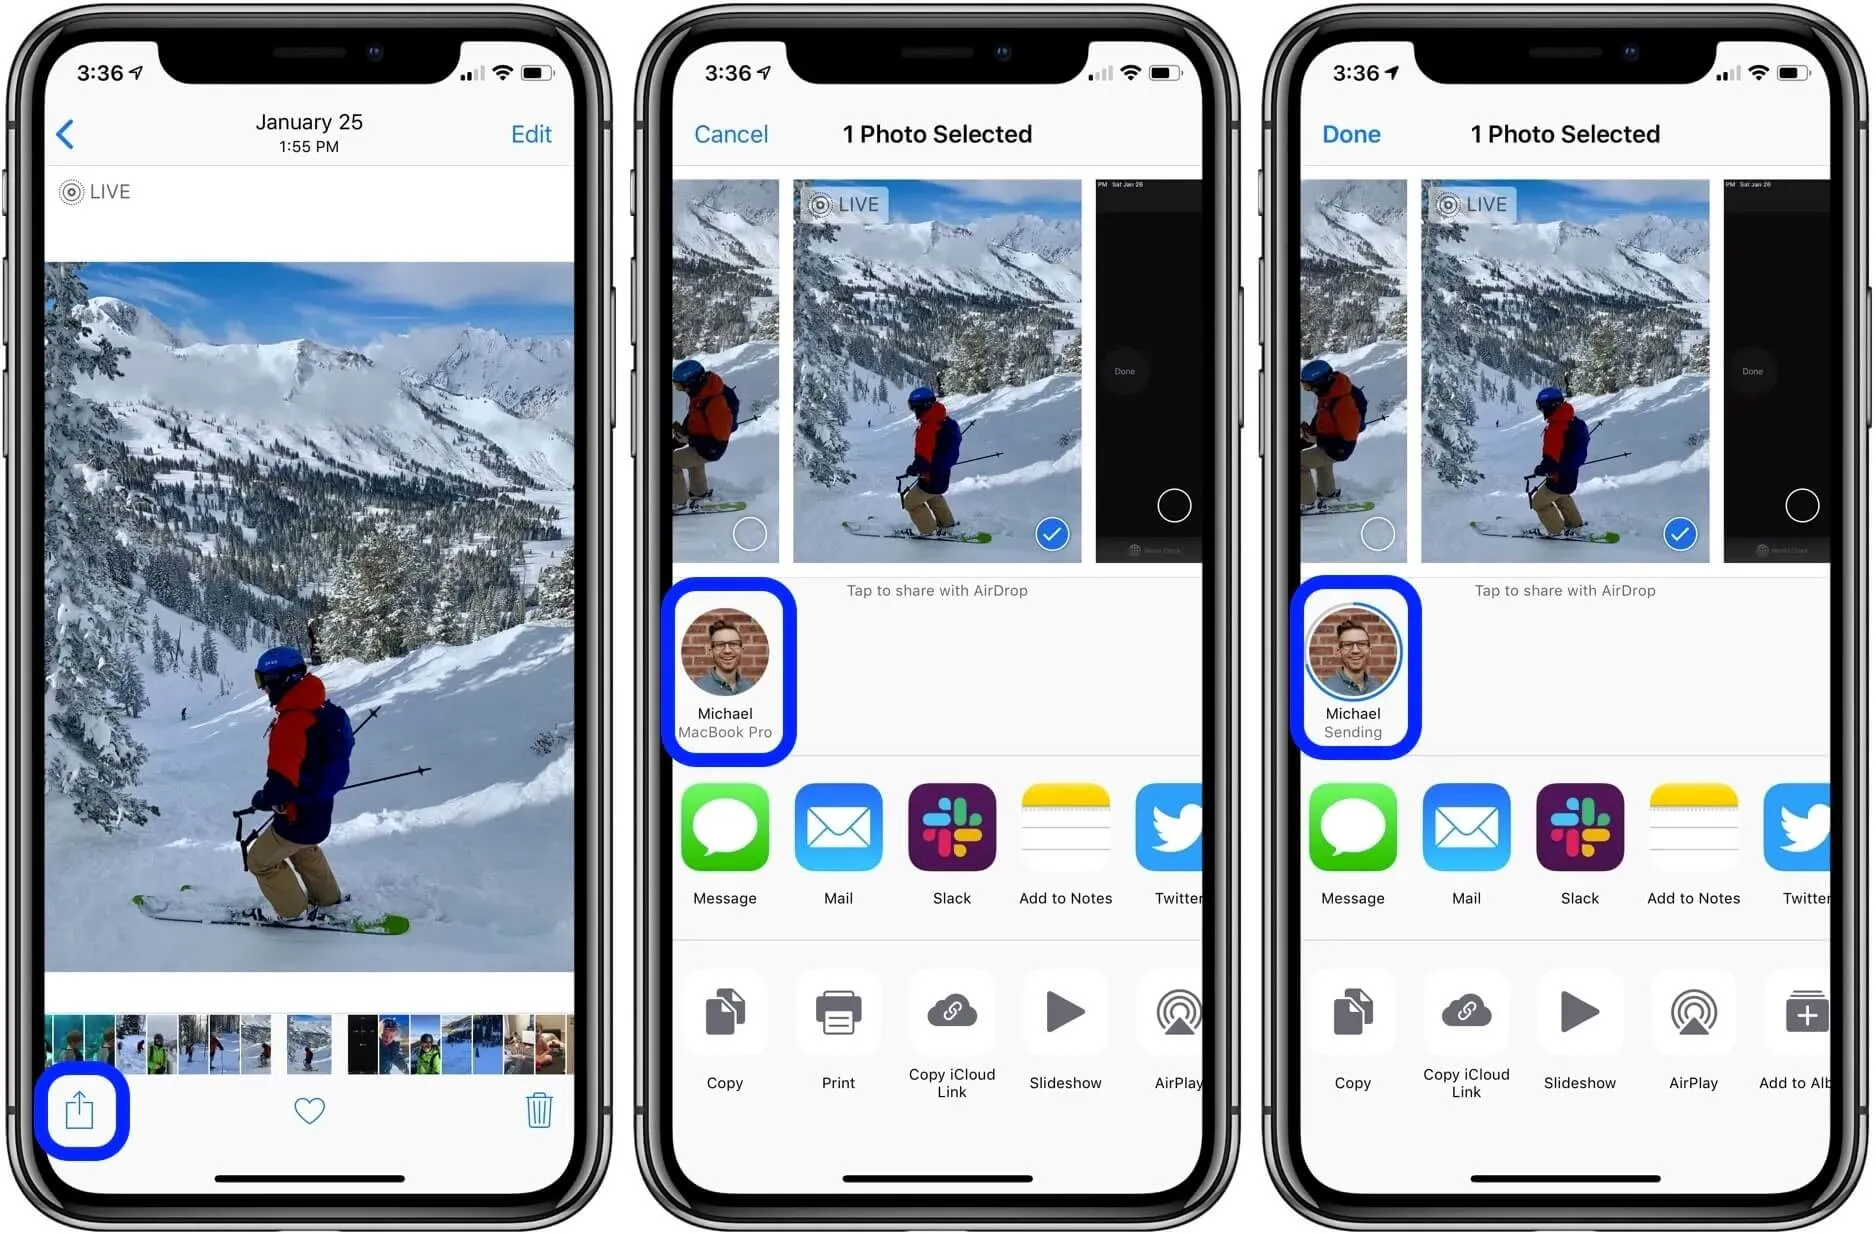
Use the Share option and wait for it to display your Mac's name under the Tap to Share with AirDrop section of the share pane.
Step 3: Receive the Photos on the Mac
Once the image is sent, you'll see an alert on the Mac - click "Accept" to receive the photo and then click "Open" in Photos to see the image in the Photos app.
This is a good way to send photos wirelessly using Wi-Fi and Bluetooth. However, it requires a lot of preparatory steps and doesn't offer any additional tools. It also leaves your Mac exposed to receiving content from other devices that you don't really want.
In Conclusion
The second and third methods are both useful but only serve a single purpose - how to move photos from iPhone 17 to Mac. Neither of them addresses the larger needs of the user. For example, what do you do with very large photos taken in high resolution? UPDF offers a compression tool to bring down the size of the file before you share it, and everything is done from within the UPDF iOS app without the need for any other third-party tools. Likewise, if you need to secure a very private photo on your device, you can lock it inside Security Space in UPDF to protect it from unauthorized viewing. All these useful features make this the best answer to the question of how to transfer iPhone photos to Mac in the most secure and simplest manner possible.
Windows • macOS • iOS • Android 100% secure
 UPDF
UPDF
 UPDF for Windows
 UPDF for Mac
 UPDF for iPhone/iPad
 UPDF for Android
 UPDF AI Online
 UPDF Sign
 Edit PDF
 Annotate PDF
 Create PDF
 PDF Form
 Edit links
 Convert PDF
 OCR
OCR PDF to Word
 PDF to Image
 PDF to Excel
 Organize PDF
 Merge PDF
 Split PDF
 Crop PDF
 Rotate PDF
 Protect PDF
 Sign PDF
 Redact PDF
 Sanitize PDF
 Remove Security
 Read PDF
 UPDF Cloud
 Compress PDF
 Print PDF
 Batch Process
 About UPDF AI
 UPDF AI Solutions
 AI User Guide
 FAQ about UPDF AI
 Summarize PDF
 Translate PDF
 Chat with PDF
 Chat with AI
 Chat with image
 PDF to Mind Map
 Explain PDF
 Scholar Research
 Paper Search
 AI Proofreader
 AI Writer
 AI Homework Helper
 AI Quiz Generator
 AI Math Solver
 PDF to Word
 PDF to Excel
 PDF to PowerPoint
 User Guide
 UPDF Tricks
 FAQs
FAQs UPDF Reviews
 Download Center
 Blog
Blog Newsroom
 Tech Spec
 Updates
 UPDF vs. Adobe Acrobat
 UPDF vs. Foxit
 UPDF vs. PDF Expert





 Enola Miller
 Enola Davis
