UPDF for Windows
 UPDF for Mac
 UPDF for iPhone/iPad
 UPDF for Android
 UPDF AI Online
 UPDF Sign
 Edit PDF
 Annotate PDF
 Create PDF
 PDF Form
 Edit links
 Convert PDF
 OCR
OCR PDF to Word
 PDF to Image
 PDF to Excel
 Organize PDF
 Merge PDF
 Split PDF
 Crop PDF
 Rotate PDF
 Protect PDF
 Sign PDF
 Redact PDF
 Sanitize PDF
 Remove Security
 Read PDF
 UPDF Cloud
 Compress PDF
 Print PDF
 Batch Process
 About UPDF AI
 UPDF AI Solutions
 AI User Guide
 FAQ about UPDF AI
 Summarize PDF
 Translate PDF
 Chat with PDF
 Chat with AI
 Chat with image
 PDF to Mind Map
 Explain PDF
 PDF AI Tools
 Image AI Tools
 AI Chat Tools
 AI Writing Tools
 AI Study Tools
 AI Working Tools
 Other AI Tools
 PDF to Word
 PDF to Excel
 PDF to PowerPoint
 User Guide
 UPDF Tricks
 FAQs
FAQs UPDF Reviews
 Download Center
 Blog
Blog Newsroom
 Tech Spec
 Updates
 UPDF vs. Adobe Acrobat
 UPDF vs. Foxit
 UPDF vs. PDF Expert
Apple often comes up with new versions of macOS and each incremental version comes with new and upgraded features. The beta program provides users with a chance to try out the new OS and its features. However, it is likely that once you have tried out the beta version and the generally available macOS versions are out, you will need to install macOS 13 Ventura or remove macOS Ventura Beta. This article details how to install macOS 13 Ventura and how to remove macOS Ventura Beta from your MacBook.
How to Install macOS 13 Ventura?
You must remember that whenever you are upgrading or installing a new macOS version, you are dealing with all your data and programs installed on your macOS. Therefore, it is imperative that you are extremely careful and ensure to back up your Mac and all the files on your MacBook. Only once you have taken a backup of the programs and data, you should actually proceed to install macOS 13 Ventura.
You may follow the below steps to install macOS 13 Ventura on your MacBook.
Step 1 - Backup your Mac (You Can Use the Time Machine)
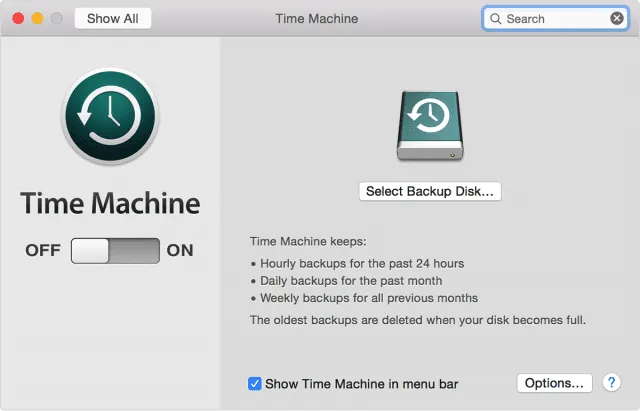
Time Machine is a built-in backup feature in macOS. This feature allows you to back up all your apps, pictures, music, documents, and personal data. Follow the below steps to backup your Mac with Time Machine -
- Firstly, you must connect an external storage device like a USB or Thunderbolt device to your MacBook.
- From the upper left corner of your screen, click on the Apple menu and select system preferences. Launch Time Machine feature.
- Click on the backup disk.
- Select the name of your disk and click on "Use Device".
- Time Machine now creates a disk backup.
Step 2 - Backup Your Files on Mac with the iCloud Drive
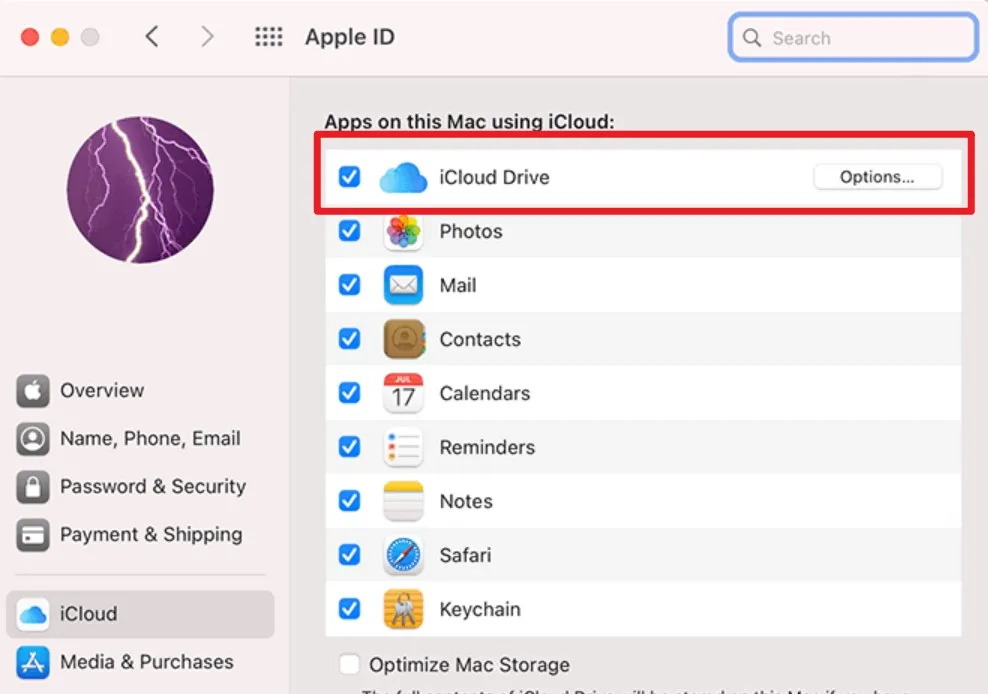
You may also choose to backup your data with iCloud Drive if you have enough storage capacity by following the below steps -
- Launch system preferences.
- Click on Apple ID and select iCloud.
- Click on "Options" associated with the iCloud Drive.
- Check the box for "Desktop & Documents Folders" and click "Done" to finish.
Step 3 - Download and Install macOS 13 Ventura
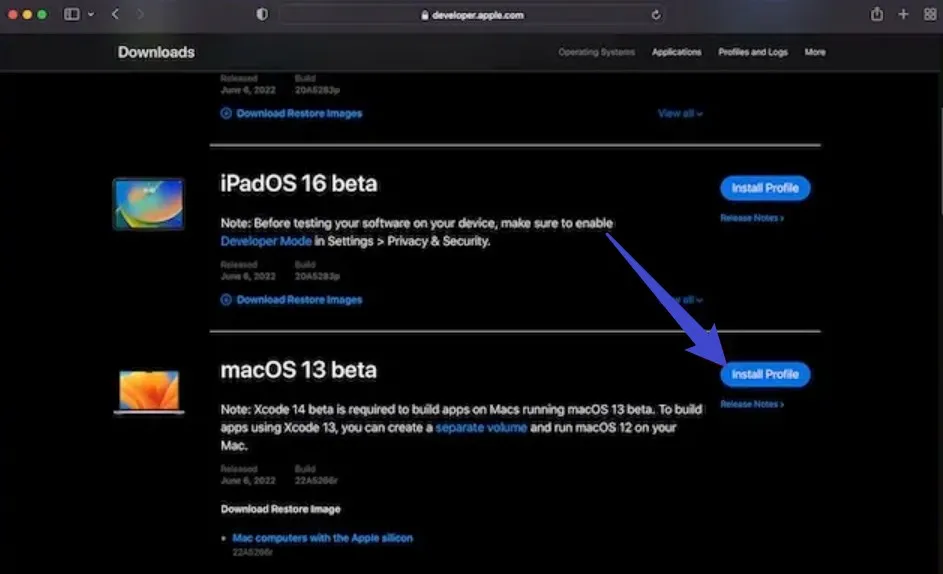
You may now sign in to your Apple account and find macOS 13 Ventura on the downloads page.
- Find "macOS 13 beta" and you may click on "Install Profile" next to the listing and the .pkg file will download onto your system. You may now double-click the macOSDeveloperBetaAccessUtility.pkg to run the macOS Ventura installer.
- In the pop up Do you want to allow downloads on "developer.apple.com"? You need to click the "Allow" option.
- Open your downloads folder on your Finder and double click the file named "macOS13DeveloperBetaAccessUtility" and you may now launch the installer and follow the installer to install macOS 13 Ventura.
Warnings and Tips for Installing macOS 13 Ventura
It is important to take note of some warnings and tips as you install macOS 13 Ventura -
- It is extremely important to ensure that your MacBook system can support the new operating system version. Therefore, it is imperative to check the system and operating system compatibility prior to installing the new macOS 13 Ventura.
- It is very important to take a full backup of all your files and applications as any operating system install time failure could lead to a permanent loss of your data.
- While installing macOS 13 Ventura you must ensure to plugin your MacBook and keep it charging. This is extremely important as the system reboots several times during the installation process.
- It is always a good idea to create a second volume or external drive and install the macOS 13 Ventura onto this volume to avoid any disruption to your existing system and corresponding operations.
How to Remove macOS Ventura and Downgrade to macOS 12 Monterey
If your latest update to macOS Ventura is causing you havoc because your applications or system is not functioning as expected, it is likely that you will want to downgrade to the final version of macOS 12 Monterey. Below are the steps to achieve the downgrade -
Step 1 - First to Leave the macOS Ventura Beta
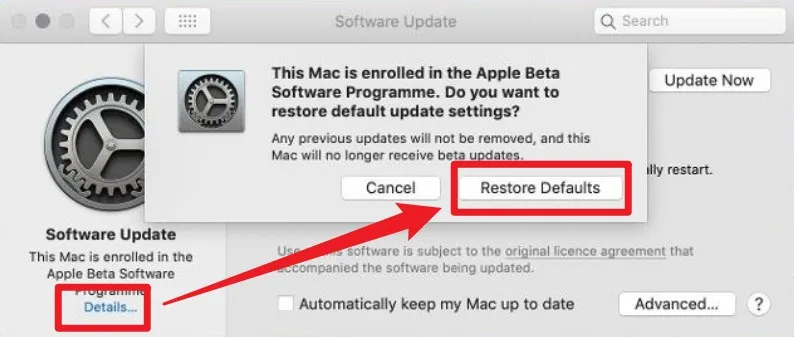
If you are enrolled in the macOS 13 Ventura Beta program and you wish to downgrade to the final version of macOS 12 Monterey, you must first leave the beta program. This can be done from the "Software Update" section in "System Preferences".
- First, you need to open the "System Preferences" on your Mac computer.
- Second, find the "Software Update" option and click on it.
- Third, under the cog icon, you can click the "Details…" option now.
- Then you need to click the "Restore Defaults" button to leave the macOS 13 Ventura.
- Once you opt out of the program, you will no longer receive beta updates. However, it is important to note that this does not downgrade your system to macOS 12 Monterey.
Step 2 - Remove the macOS 13 Ventura Beta from Your Mac
It is now time to remove the macOS 13 Ventura Beta from your Mac. There are a few ways to do so. The method you pick must depend on the specific version of macOS you wish to revert to and whether you made a backup.
It is easy to downgrade from a beta to macOS Monterey or an earlier macOS. However, downgrading to anything predating High Sierra is difficult because Apple deployed a new file system from High Sierra. The simple way is to install the current version of macOS via "Software Update".
Step 3 - Reinstall macOS 12 Monterey or Older Version
Follow the below steps to reinstall macOS 12 Monterey -
- Click the "System Preferences" from the Mac menu bar.
- Again, you need to click on the "Software Update" option.
- Your Mac will start searching for the update. When you see a confirmation that an update is available for your Mac, you can click on "More info" to get the lowdown on what the update brings. Click "Update Now" when you are ready to update your Mac.
- You will see a different prompt to update and restart your Mac. You can choose "Not Now" or "Restart", depending on whether now is a good time for your Mac to be out of action for half an hour or more.
The Best PDF App for Mac (Compatible with All macOS Systems)
If you are looking for the best PDF app for Mac, your best bet is to choose UPDF for Mac. UPDF is a modern tool blessed with a delightful interface. UPDF makes your work with multiple PDF documents very seamless. All types of users can quickly get started with the tool.
Windows • macOS • iOS • Android 100% secure
UPDF offers almost any action that you would like to perform on a PDF document. You can edit text, read the PDF file in a very eyes-friendly PDF reader, convert the PDF to other formats, annotate PDFs, organize PDF pages, and even easily manage PDF files and navigate through them.
UPDF is a cross platform tool that enables you to edit images very easily and quickly. You can resize, replace, extract, insert, delete, or crop the images in a PDF document. All these actions require a zero learning curve. The interface of the tool is extremely intuitive and comes with helpful snap-to guidelines.

UPDF is explicitly designed to meet the desire of most users for a stunning yet very comprehensible interface that is not just only for beginners. Start to use it today!
Conclusion
In this article, you have learned how to install or remove macOS 13 Ventura. these methods are sufficient to solve your problem. If you need a PDF editor for Mac, then UPDF is for you. It's all in one so you don't have to download multiple software.
Windows • macOS • iOS • Android 100% secure


 Lizzy Lozano
 Enola Davis