 UPDF for Windows
 UPDF for Mac
 UPDF for iPhone/iPad
 UPDF for Android
 UPDF AI Online
 UPDF Sign
 Edit PDF
 Annotate PDF
 Create PDF
 PDF Form
 Edit links
 Convert PDF
 OCR
OCR PDF to Word
 PDF to Image
 PDF to Excel
 Organize PDF
 Merge PDF
 Split PDF
 Crop PDF
 Rotate PDF
 Protect PDF
 Sign PDF
 Redact PDF
 Sanitize PDF
 Remove Security
 Read PDF
 UPDF Cloud
 Compress PDF
 Print PDF
 Batch Process
 About UPDF AI
 UPDF AI Solutions
 AI User Guide
 FAQ about UPDF AI
 Summarize PDF
 Translate PDF
 Chat with PDF
 Chat with AI
 Chat with image
 PDF to Mind Map
 Explain PDF
 PDF AI Tools
 Image AI Tools
 AI Chat Tools
 AI Writing Tools
 AI Study Tools
 AI Working Tools
 Other AI Tools
 PDF to Word
 PDF to Excel
 PDF to PowerPoint
 User Guide
 UPDF Tricks
 FAQs
FAQs UPDF Reviews
 Download Center
 Blog
Blog Newsroom
 Tech Spec
 Updates
 UPDF vs. Adobe Acrobat
 UPDF vs. Foxit
 UPDF vs. PDF Expert
Signing PDF documents is a common task, but sometimes it can be tricky or expensive. However, if you are using the browser, it becomes simple and free to add a signature to PDF in Microsoft Edge. Signatures are essential for giving your approval or consent on various documents.
So, in this guide, we will explore two methods to sign PDFs using Microsoft Edge. Moreover, we will also introduce two alternative options for adding signatures. One is UPDF and the other is UPDF Sign. You can click the button below to download UPDF and visit UPDF Sign website to test and compare them with Microsoft Edge and see which method is for you.
Windows • macOS • iOS • Android 100% secure
Part 1. How to Add Signature in Microsoft Edge?
Microsoft Edge is a helpful tool for viewing PDFs on your device. Adding your signature is simple with this browser. You have two methods to choose from, one is using the draw tool, and the other is using a text box. With the Draw tool, you can draw your signature directly on the PDF without extensions or additional programs. It's a quick and straightforward way to sign your documents digitally.
In addition to the Draw tool, Microsoft Edge's PDF reader offers basic reading and navigation features like zoom, rotate, fit page/width, jump to page, and search. These functions are easily accessible through a toolbar at the top of the PDF content. So, below we will discuss the two methods so that you can learn how to add digital signatures in Microsoft Edge to sign and certify documents.
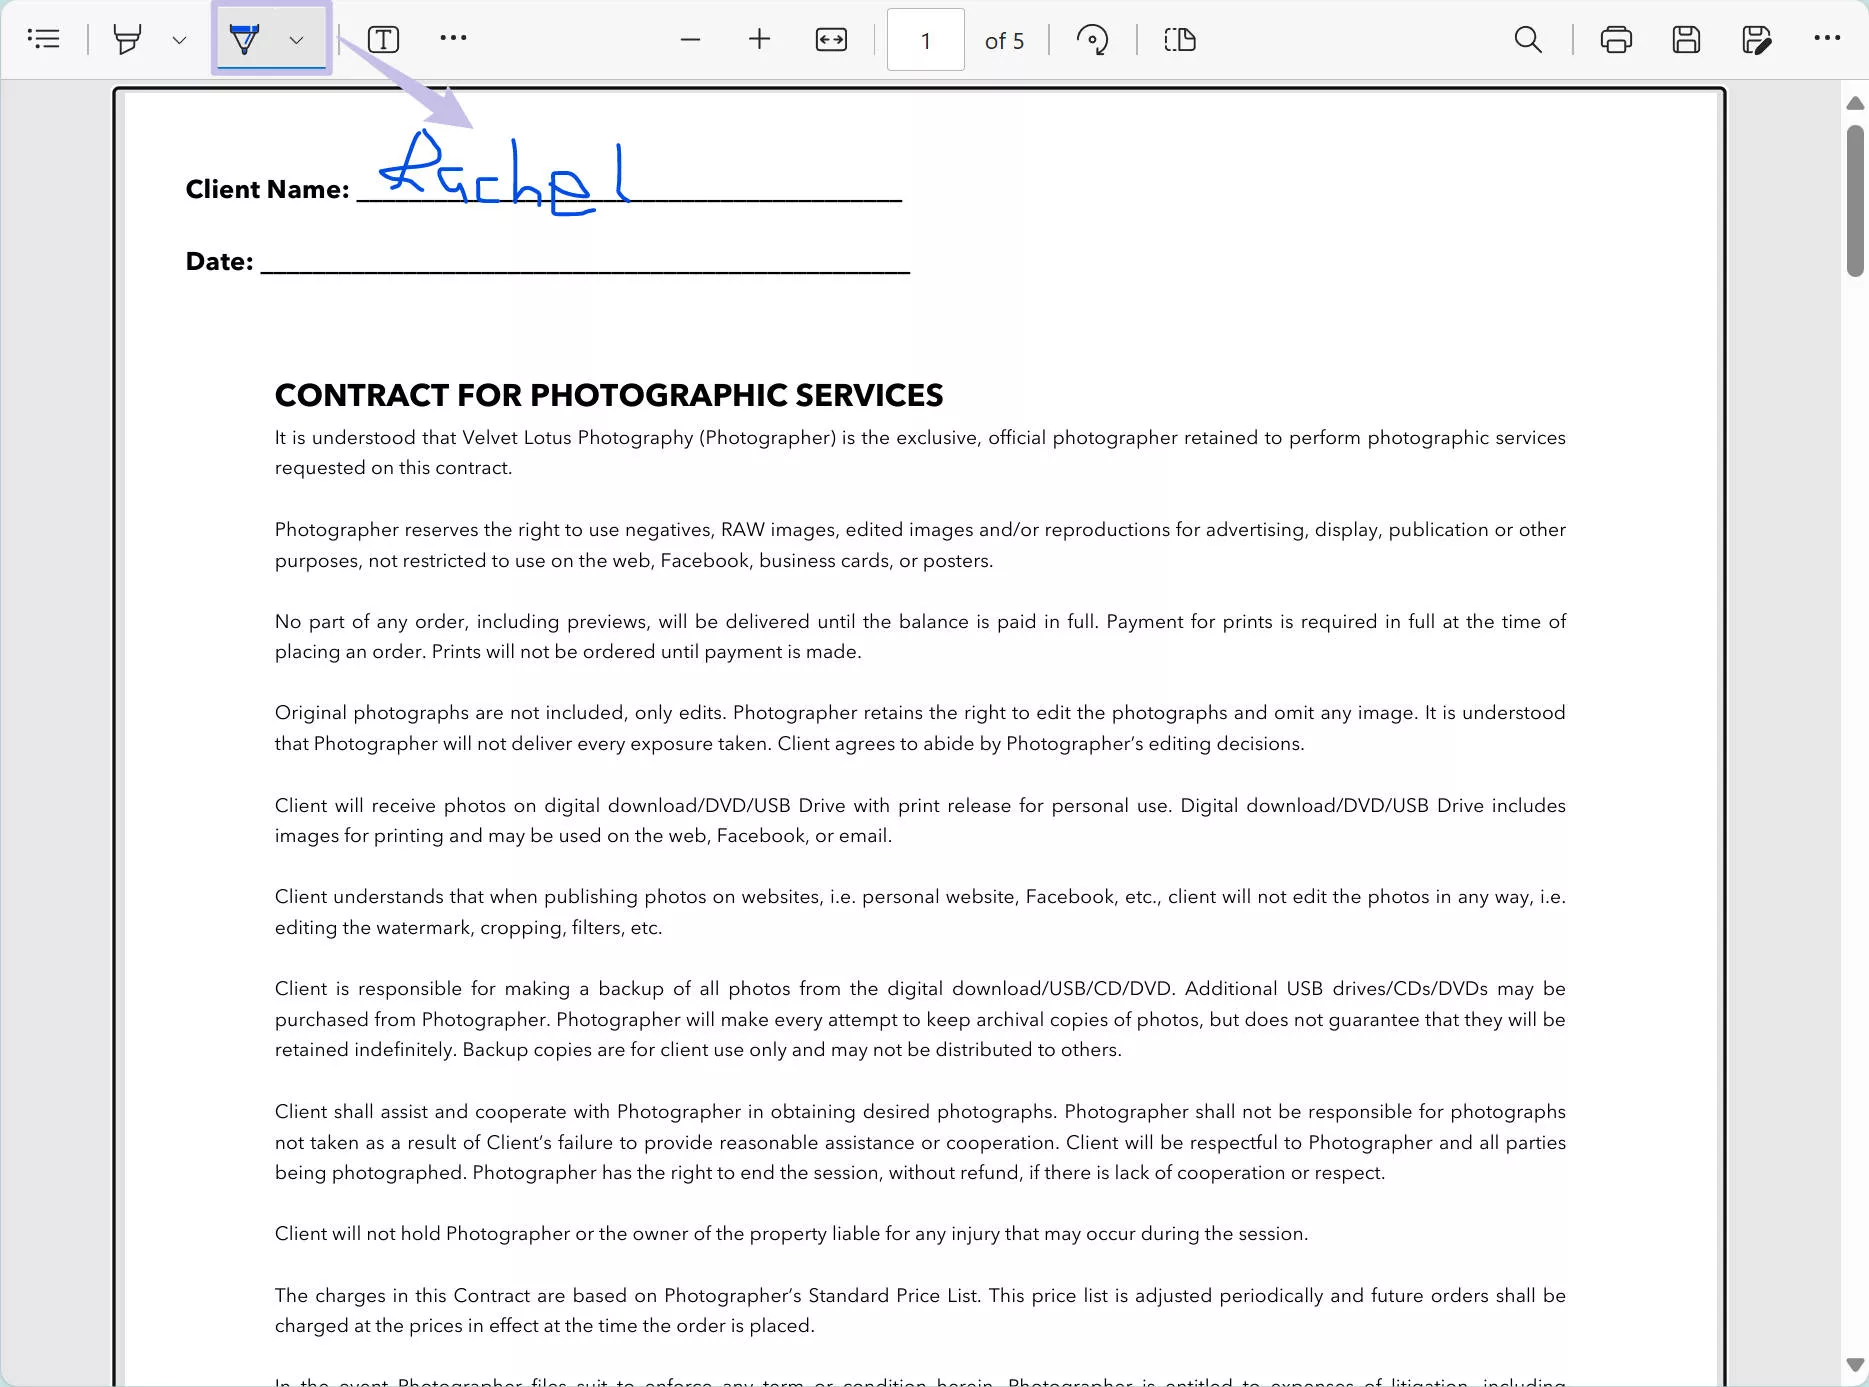
Way 1. Add a Signature via Draw Tool
We will first start with adding a signature using the draw tool. This method is very simple and offers you options to adjust the size of a pen while drawing a signature. Start by:
Instructions: Add the PDF in Microsoft Edge by dragging and dropping it on the Edge interface. Next, choose the “Draw” tool from the tools available at the top. You can also change the color and size of the Draw tool. Locate the point where you want to add the signature on the document and draw it using the Edge Draw tool.
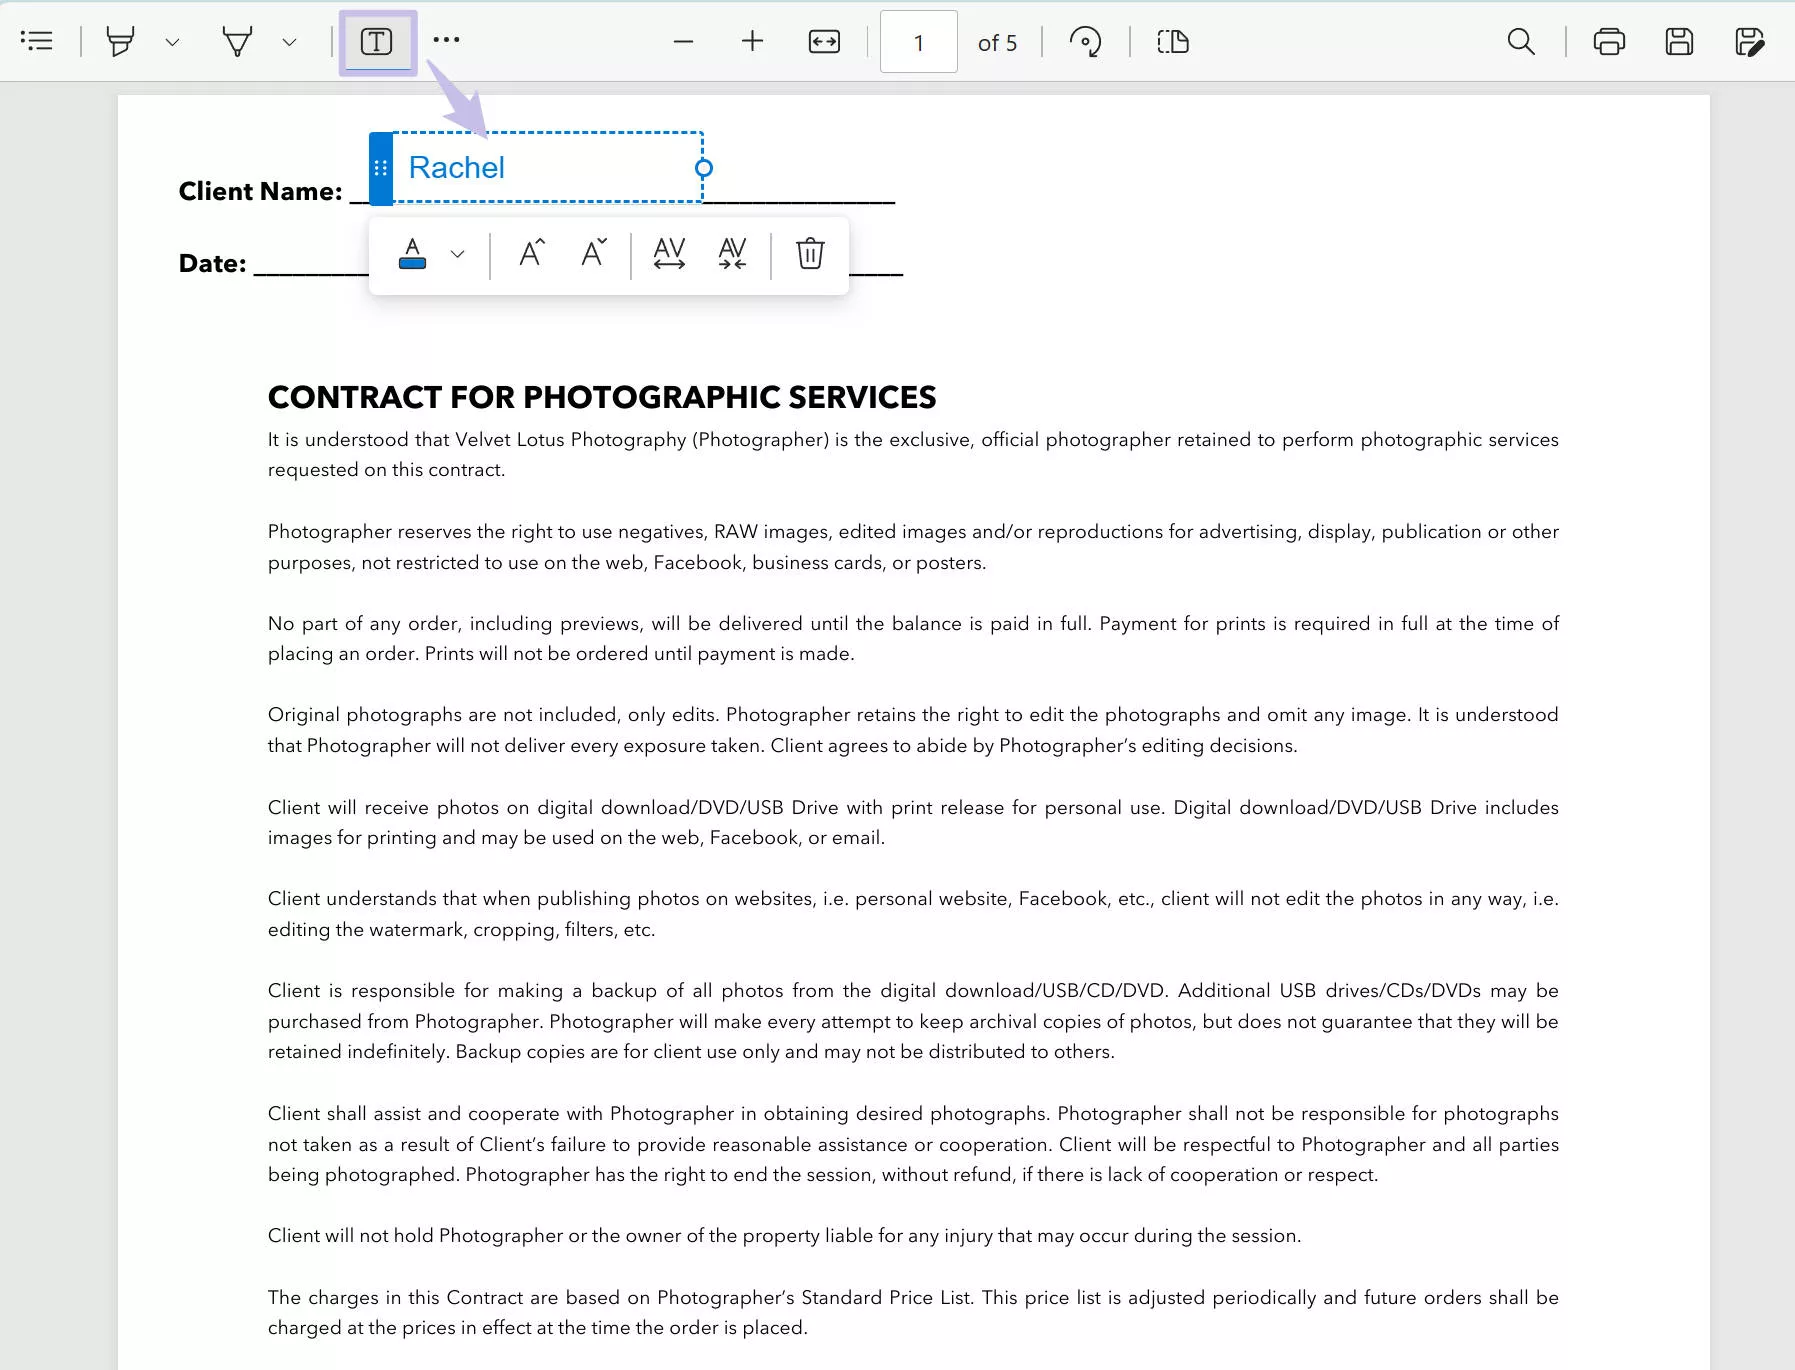
Way 2. Add a Signature via Text Box
Another great method regarding how to add a digital signature in Microsoft Edge is via text box. This allows you to adjust the text box anywhere on your PDF file. You can even move the text box based on your requirements. Follow the steps to make your documents look professional:
Instructions: After opening the PDF file in Microsoft Edge, click on the "Text" tool from the top toolbar and place the text box where you want to add the signature to the document. Afterward, type the signature and customize it from the options provided by Edge.
Part 2. How to Insert Signature in PDF Without Microsoft Edge? (2 Ways)
If your workflow requires more than a simple scribble—such as sending documents for others to sign or applying a legally-binding digital ID—Microsoft Edge will fall short. This is where dedicated tools like UPDF come in.
Way 1. 4 Ways to Add a Signature to PDF without Microsoft Edge Via UPDF
UPDF offers four easy ways to add your signature to PDFs, making it perfect for users with different requirements. With the built-in signature feature, you can add your signature using your mouse or keyboard. You also have the option to draw a signature by adjusting the pen size and color to your liking. If you have the image format signature on your computer, you can use its image features to add a signature or you can add a digital signature for professional files with sensitive information. You can download UPDF via the link below to try.
Windows • macOS • iOS • Android 100% secure
Additionally, UPDF provides other useful tools to help you organize PDFs, crop pages, and even use built-in AI tools for more productive work on your PDFs. The AI tools help you to summarize, write, or explain the terms in PDFs so that you do not need to switch tools.
1. Via Adding Image
Do you already have a signature saved as an image? No worries, as using UPDF, you can insert a signature image and integrate it without any complexity. Therefore, check the given steps and learn how to do it:
Instructions: Open the PDF file in UPDF by clicking on the “Open File” button and then access the “Edit” mode in "Tools" from the left side toolbar. Following this, click on the “Image” tool from the top and choose the signature file from the device. Adjust the added signature image size and location as needed.
You can download the UPDF to add the signature directly by adding an image via the button below.
Windows • macOS • iOS • Android 100% secure
2. Via Pencil
In case you are looking to sign a PDF in a completely new way, using a pencil tool can assist you greatly. Follow the steps highlighted below and start signing PDFs:
Instructions: In the Comment mode in "Tools" of UPDF, tap on the “Pencil” tool and draw your signature anywhere on the document. You can also customize the Pencil tool properties before drawing the signature by hovering over the tool icon.

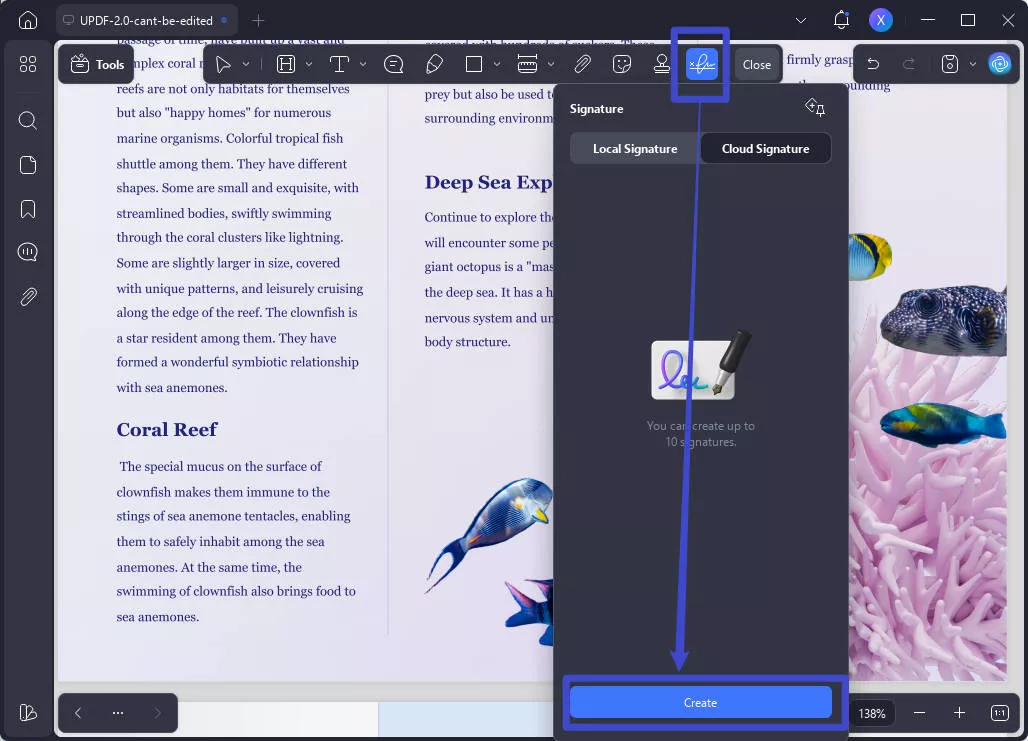
3. Via Signature Feature
Here is the most recommended way to add signatures in PDFs with the UPDF tool. This is via using the Signature tool itself. Need to familiarize yourself with it? Head to the steps mentioned below and learn all you need to know:
Note: if you do not want to check the guide on UPDF, you can watch the video guide.
Instructions: Access the “Comment” mode in "Tools" of UPDF. Choose the “Signature” tool from the top toolbar. Tap on the “Create” button and create your signature. After creating the signature, customize it and place it on the document. This will also save your signature for future use. Then, place it where you want to put it.
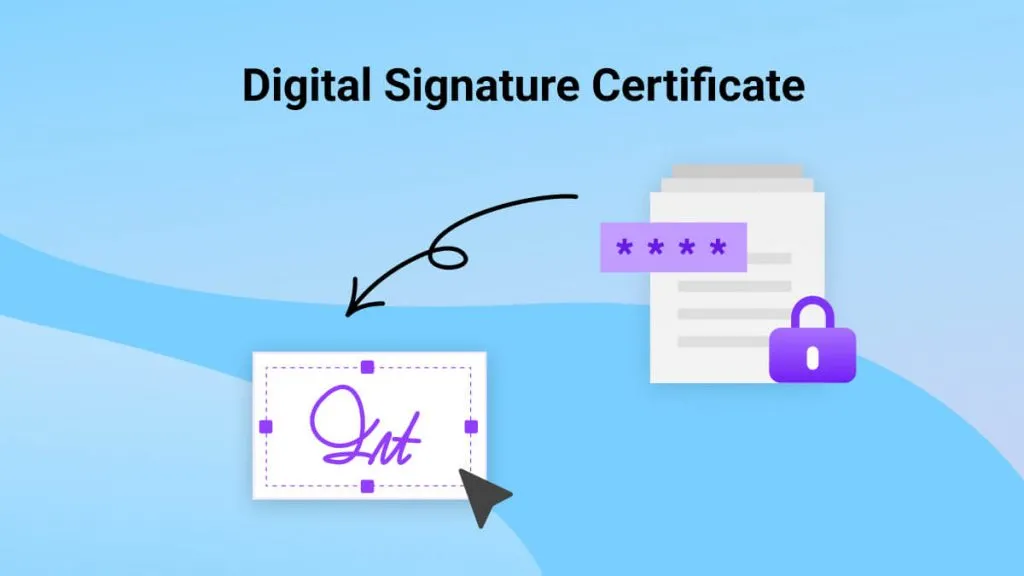
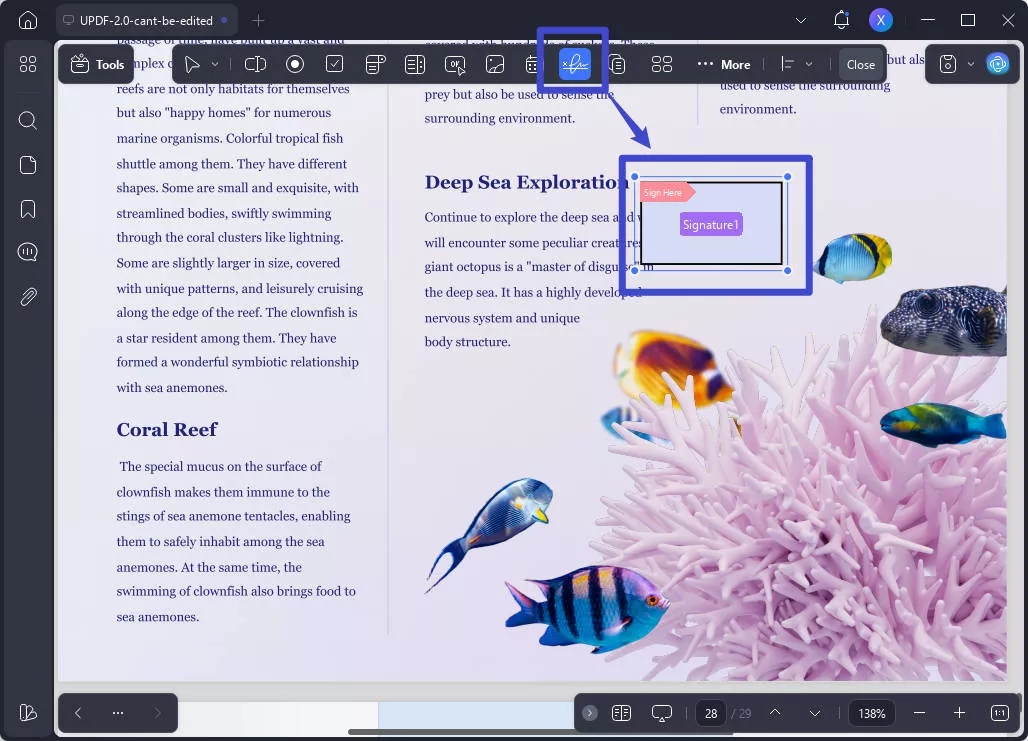
4. Via Digital Signature
For professional PDF files, you can add a digital signature to protect your PDF files. Here is the guide: Download UPDF via the below button. Open PDF in UPDF. Click on "Tools" > "Form" > "Signature" and draw a rectangle in the place where you want to add a digital signature. Create one digital signature, including name, style, and so on.
Windows • macOS • iOS • Android 100% secure
UPDF has so many features to help you add a signature in PDF, so why not upgrade to the pro version with a great discount now?
Way 2. Add Digital Signature in PDF Without Microsoft Edge Via UPDF Sign
Adding digital signatures to PDFs has always been challenging. But, with UPDF Sign, you can save time, cut costs, and boost productivity by electronically signing PDFs from almost anywhere.
Plus, It not only allow you to sign the PDF online, but also allow you to collect signatures from others. Learn the given steps and make your PDFs productive with signatures:
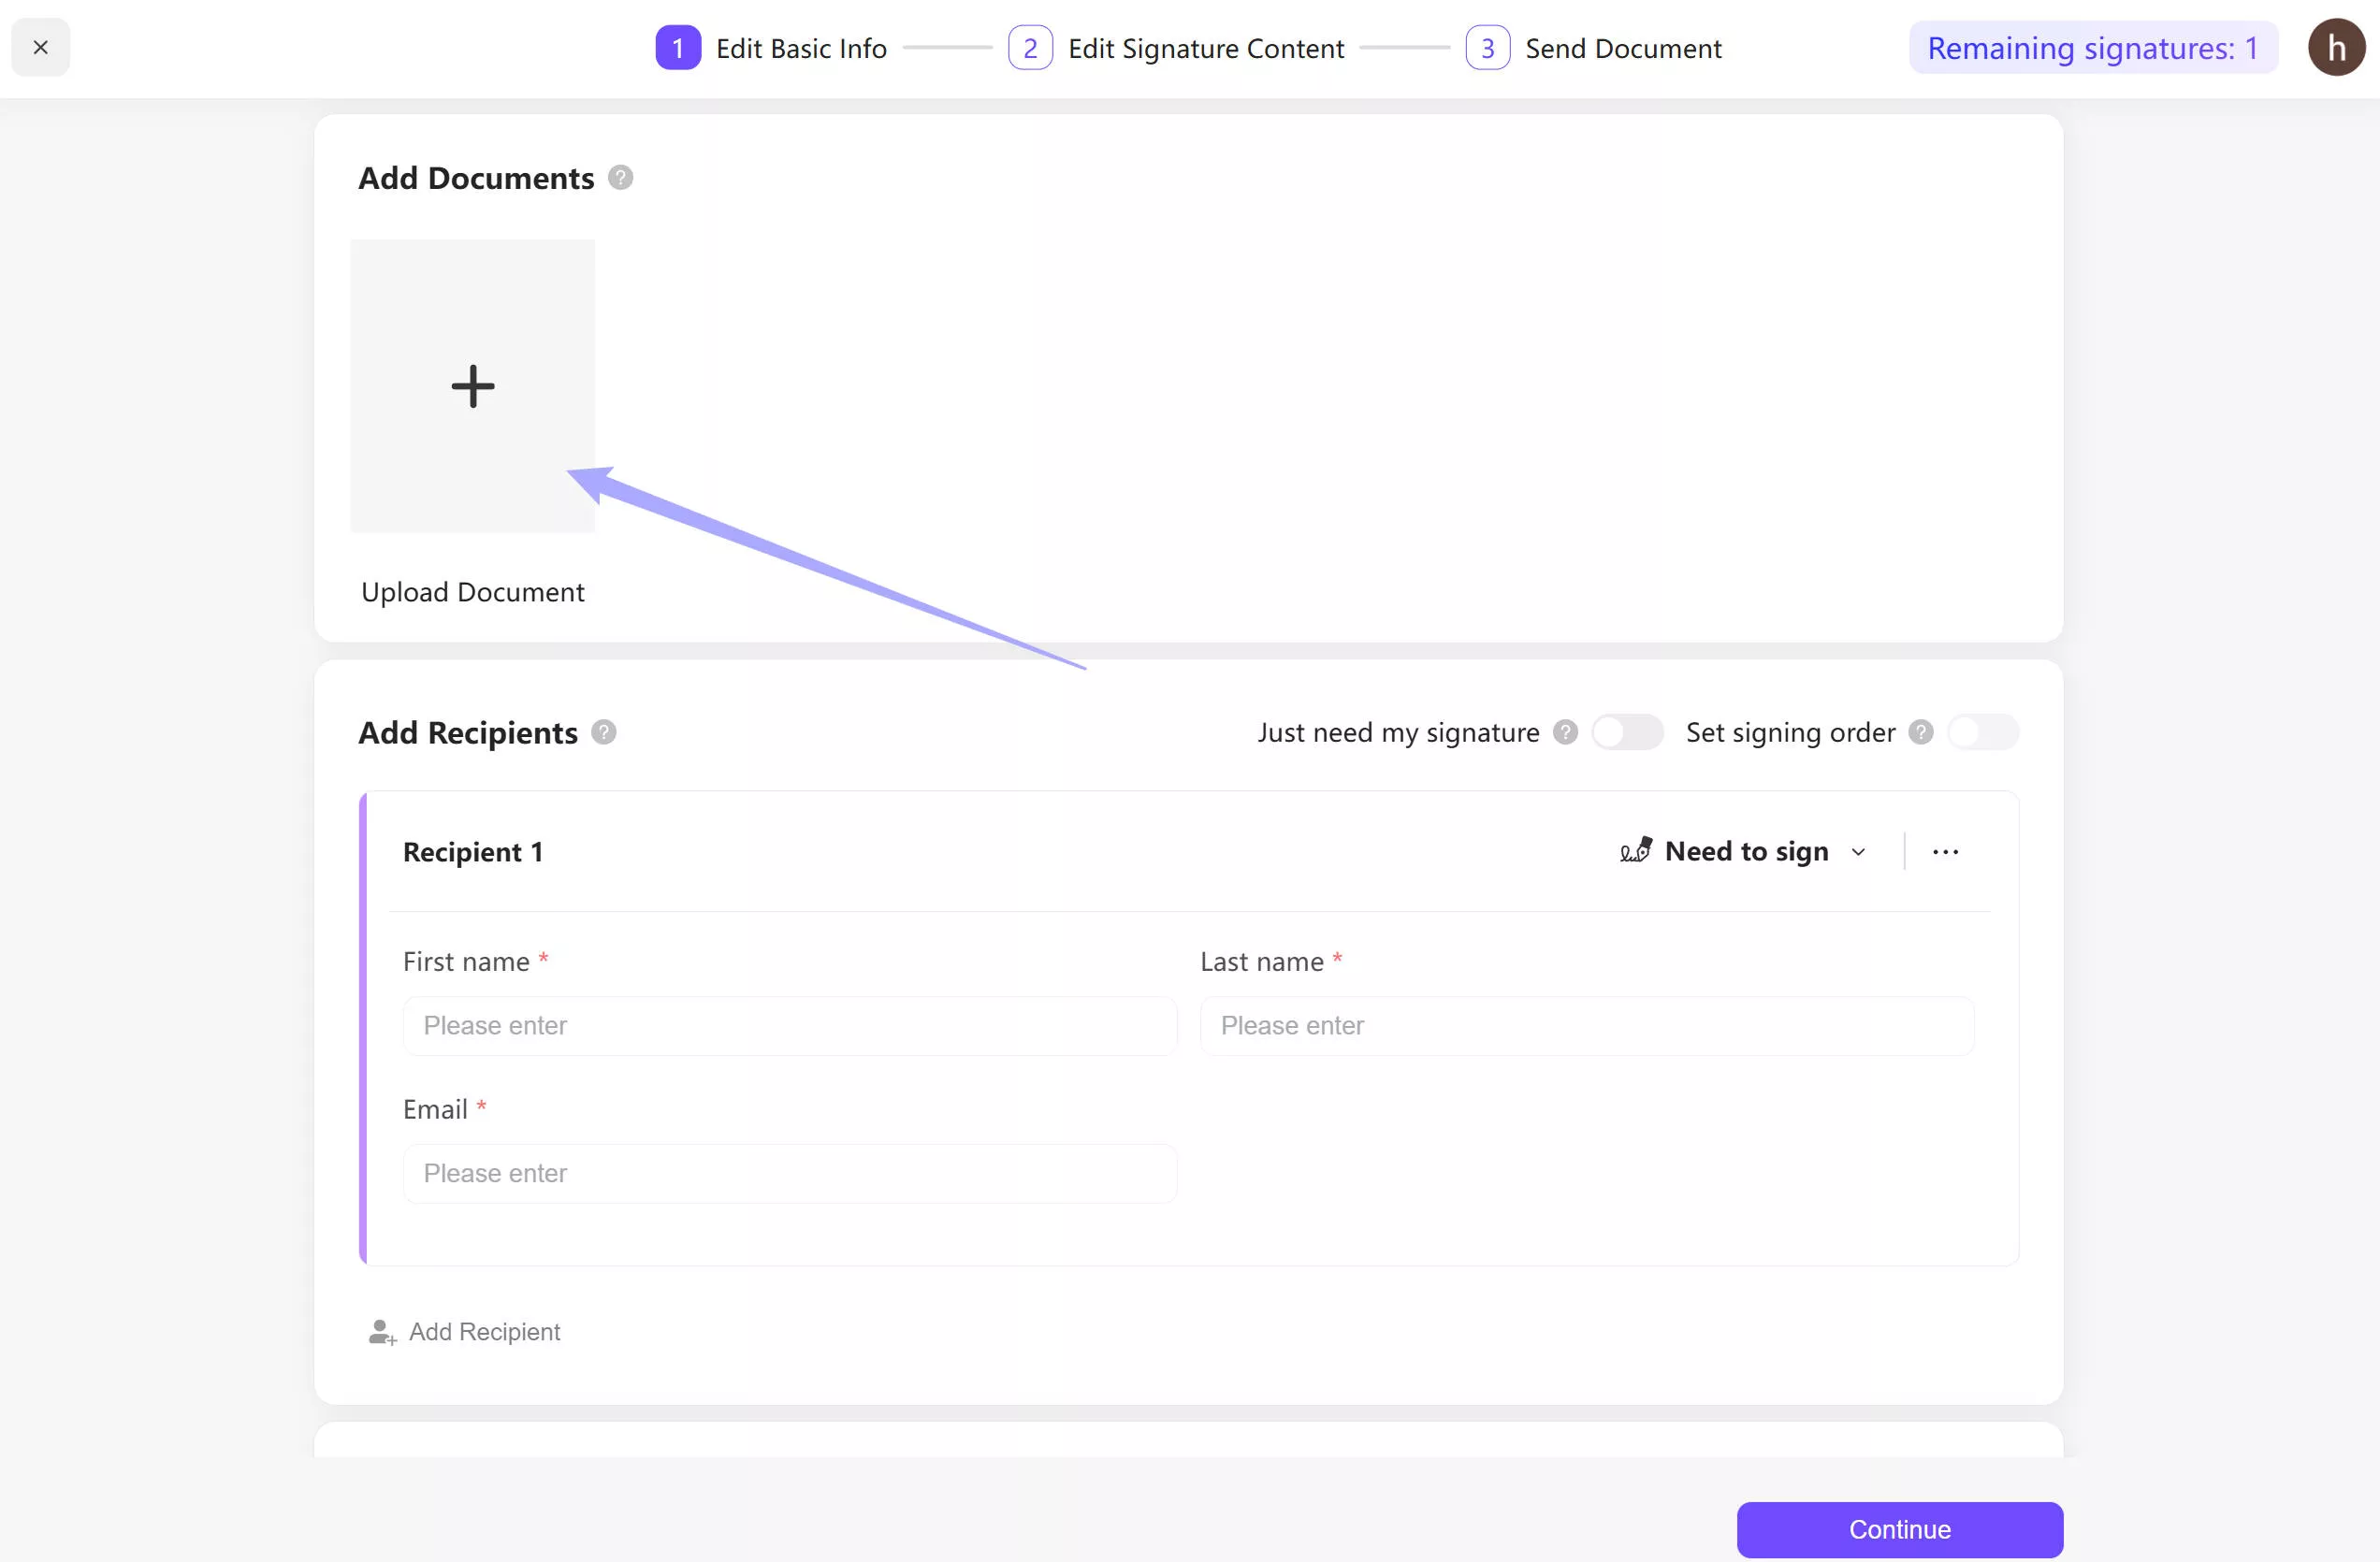
Step 1: Access the UPDF Sign official website by clicking the button below, and create an account or log in to your account. After this, tap on the “Initial Signature” button and upload your PDF document by using the “Upload Document” button. Once the PDF file is uploaded, enable the “Just need my signature” option in the “Add Recipients” section.
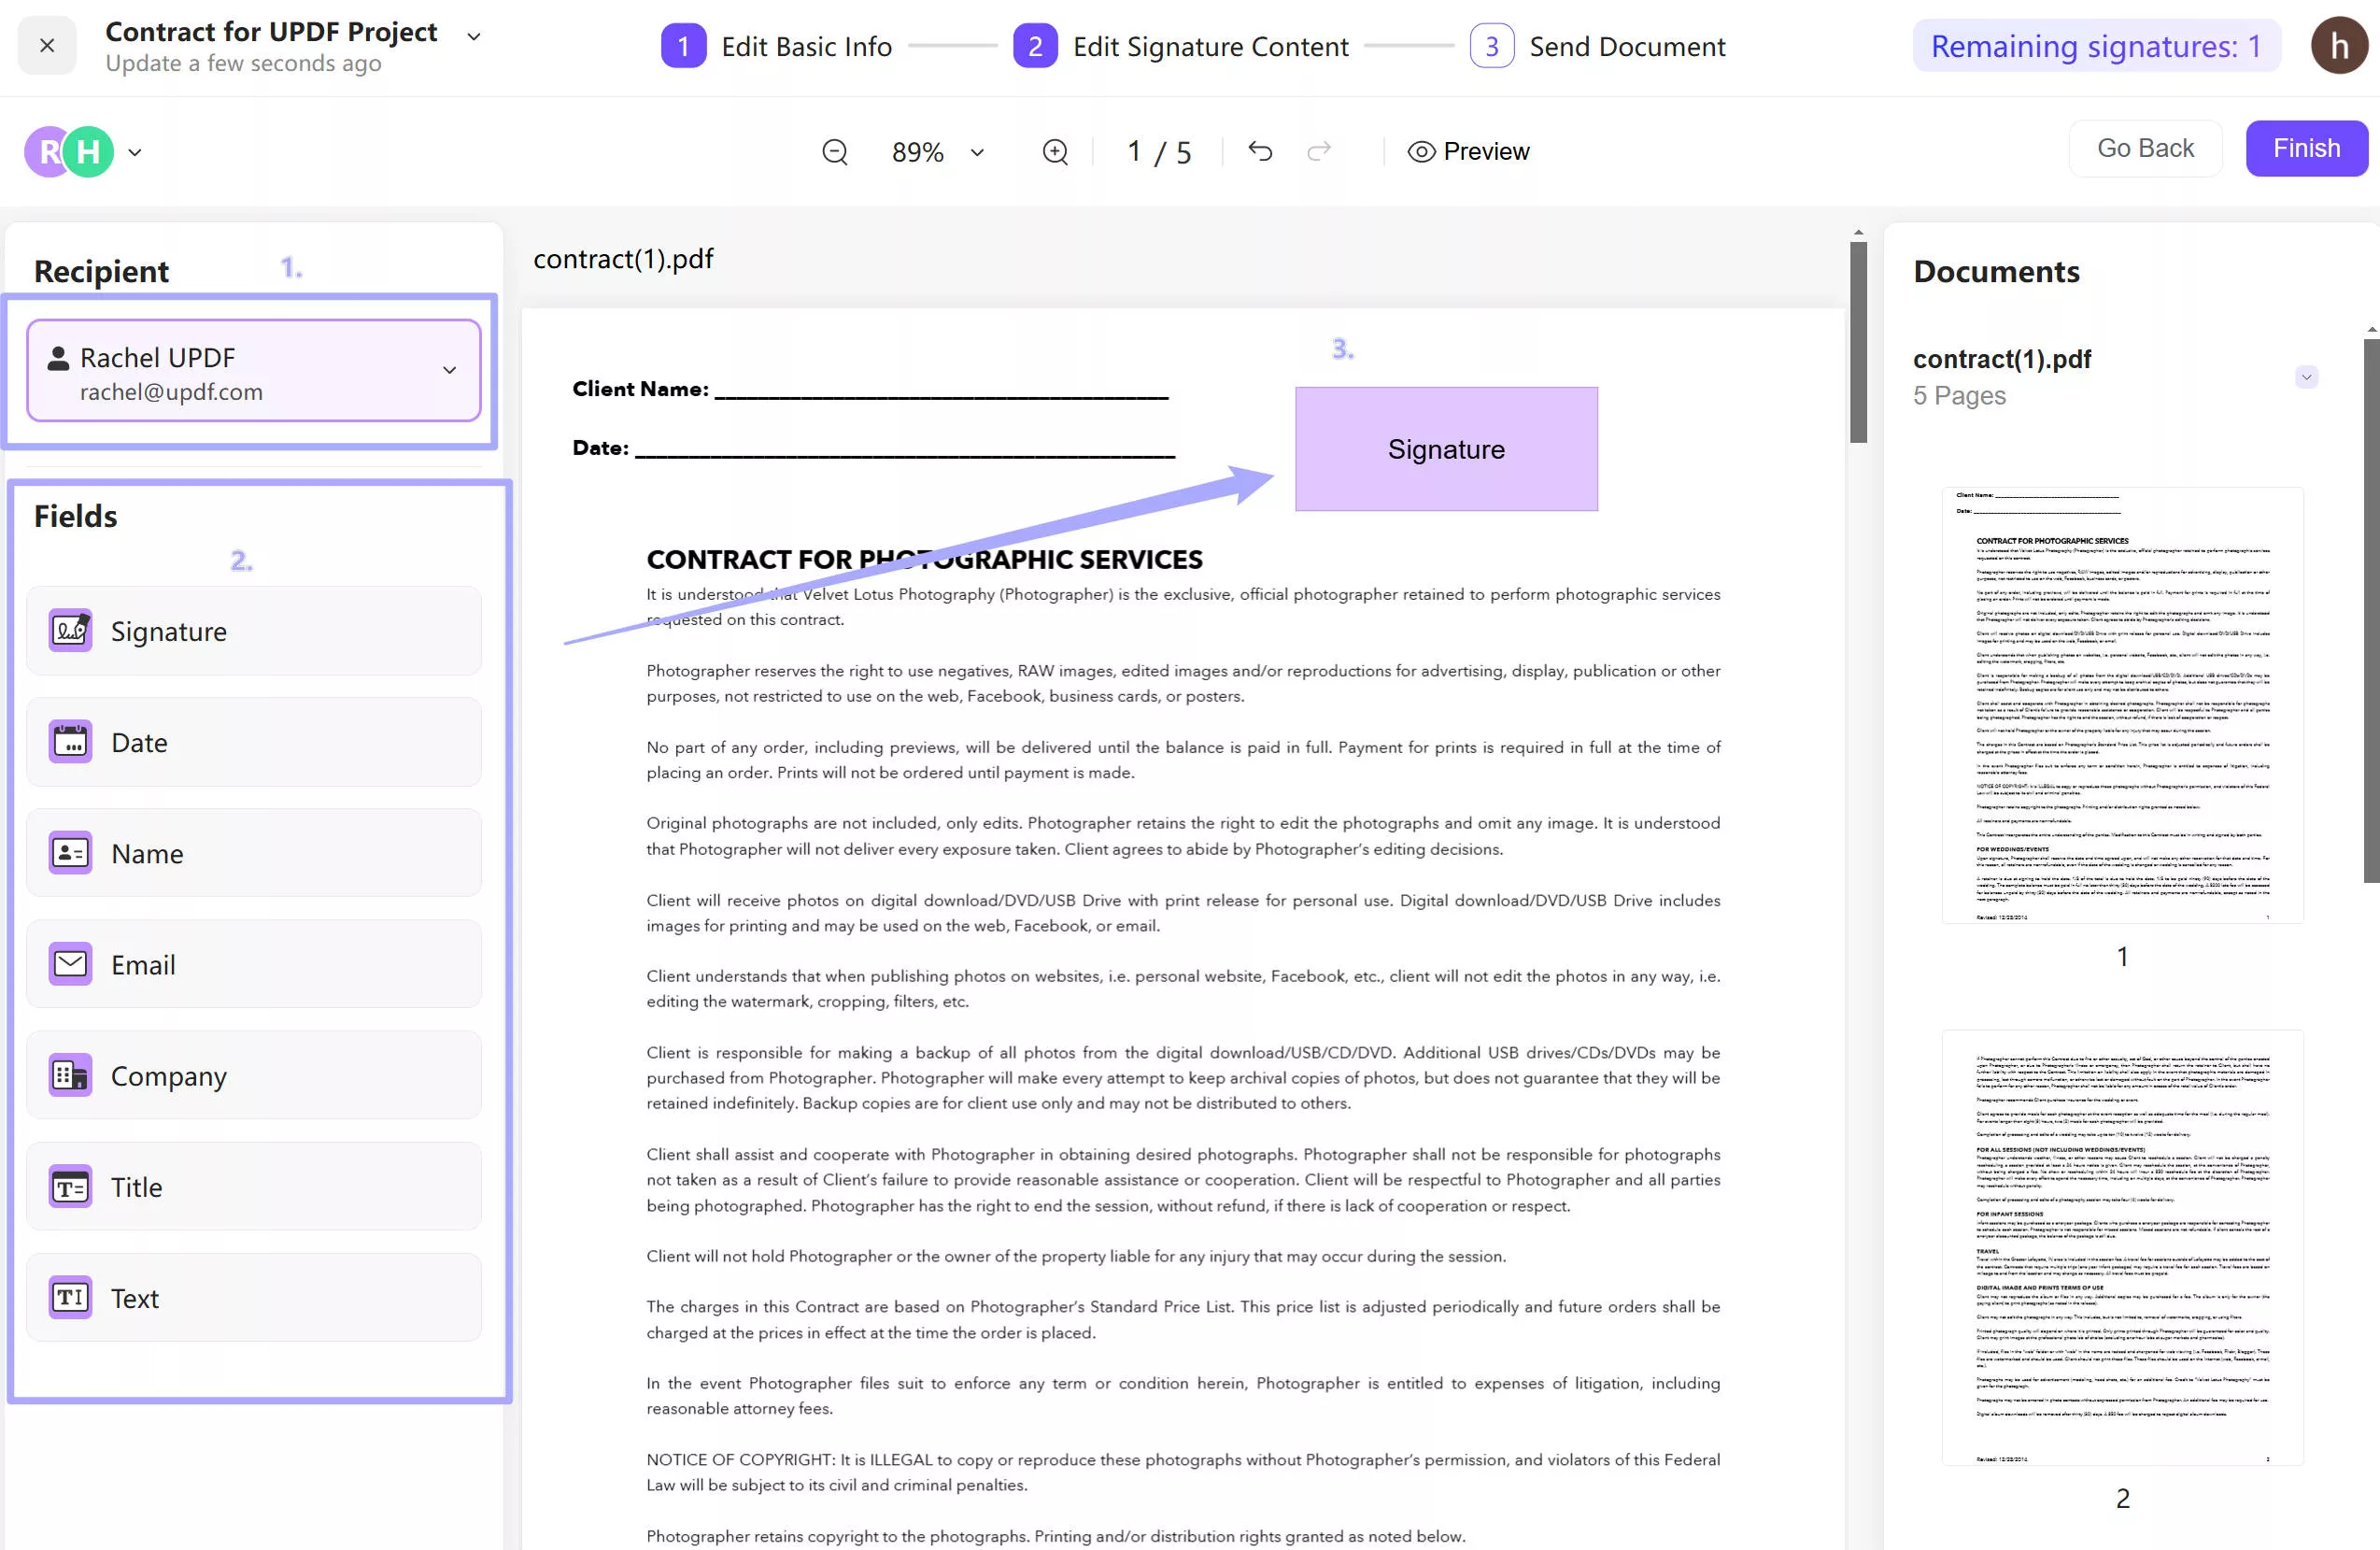
Step 2: Next, tap on the “Continue” button from the bottom right corner of the window and choose the “Signature” option from the “Fields” panel. Click anywhere on the document where you want to add the signature and customize the signature settings. Afterward, tap on the “Finish” button. Check the information and click on the "Finish" again.
Step 3. Once done, you can go to the sign page, click on the "Signature" area. In the pop-up Window, you can enter your name, draw, or upload an image to sign the PDF.

Final Words
To sum up, learning how to add signatures to PDF in Microsoft Edge is a valuable skill that can save you time and make work more efficient. Following the steps and exploring the two alternative options in this guide, you can easily sign important documents electronically.
While Microsoft Edge offers a simple way to sign PDFs, UPDF and UPDF Sign are two better choices. Download UPDF via the button below or visit UPDF Sign here to try and see they are what you need.
Windows • macOS • iOS • Android 100% secure


 Enola Miller

 Lizzy Lozano
 Enola Davis
 Grace Curry