UPDF for Windows
 UPDF for Mac
 UPDF for iPhone/iPad
 UPDF for Android
 Nomostar
 UPDF AI Online
 UPDF Sign
 IvyCraft
 Edit PDF
 Annotate PDF
 Create PDF
 PDF Form
 Edit links
 Convert PDF
 OCR
OCR PDF to Word
 PDF to Image
 PDF to Excel
 Organize PDF
 Merge PDF
 Split PDF
 Crop PDF
 Rotate PDF
 Protect PDF
 Sign PDF
 Redact PDF
 Sanitize PDF
 Remove Security
 Read PDF
 UPDF Cloud
 Compress PDF
 Print PDF
 Batch Process
 About UPDF AI
 UPDF AI Solutions
 AI User Guide
 FAQ about UPDF AI
 Summarize PDF
 Translate PDF
 Chat with PDF
 Chat with AI
 Chat with image
 PDF to Mind Map
 Explain PDF
 PDF AI Tools
 Image AI Tools
 AI Chat Tools
 AI Writing Tools
 AI Study Tools
 AI Working Tools
 Other AI Tools
 AI Bookmark Generation
 AI Bookmark Summary
 AI Watermark Generation
 AI Background Generation
 AI Sticker Generation
 AI Stamp Generation
 AI Editing Suite
 UPDF Copilot
 AI Page Management
 AI Semantic Search
 PDF to Word
 PDF to Excel
 PDF to PowerPoint
 User Guide
 UPDF Tricks
 FAQs
FAQs UPDF Reviews
 Download Center
 Blog
Blog Newsroom
 Tech Spec
 Updates
 UPDF vs. Adobe Acrobat
 UPDF vs. Foxit
 UPDF vs. PDF Expert
Batch Process
UPDF offers 13 batch processing features and assists users in converting, OCR, compressing, combining, inserting, printing, etc.
Windows • macOS • iOS • Android 100% secure
To execute the process, open UPDF on your Windows device and click the Tools to choose the features under Batch PDFs.
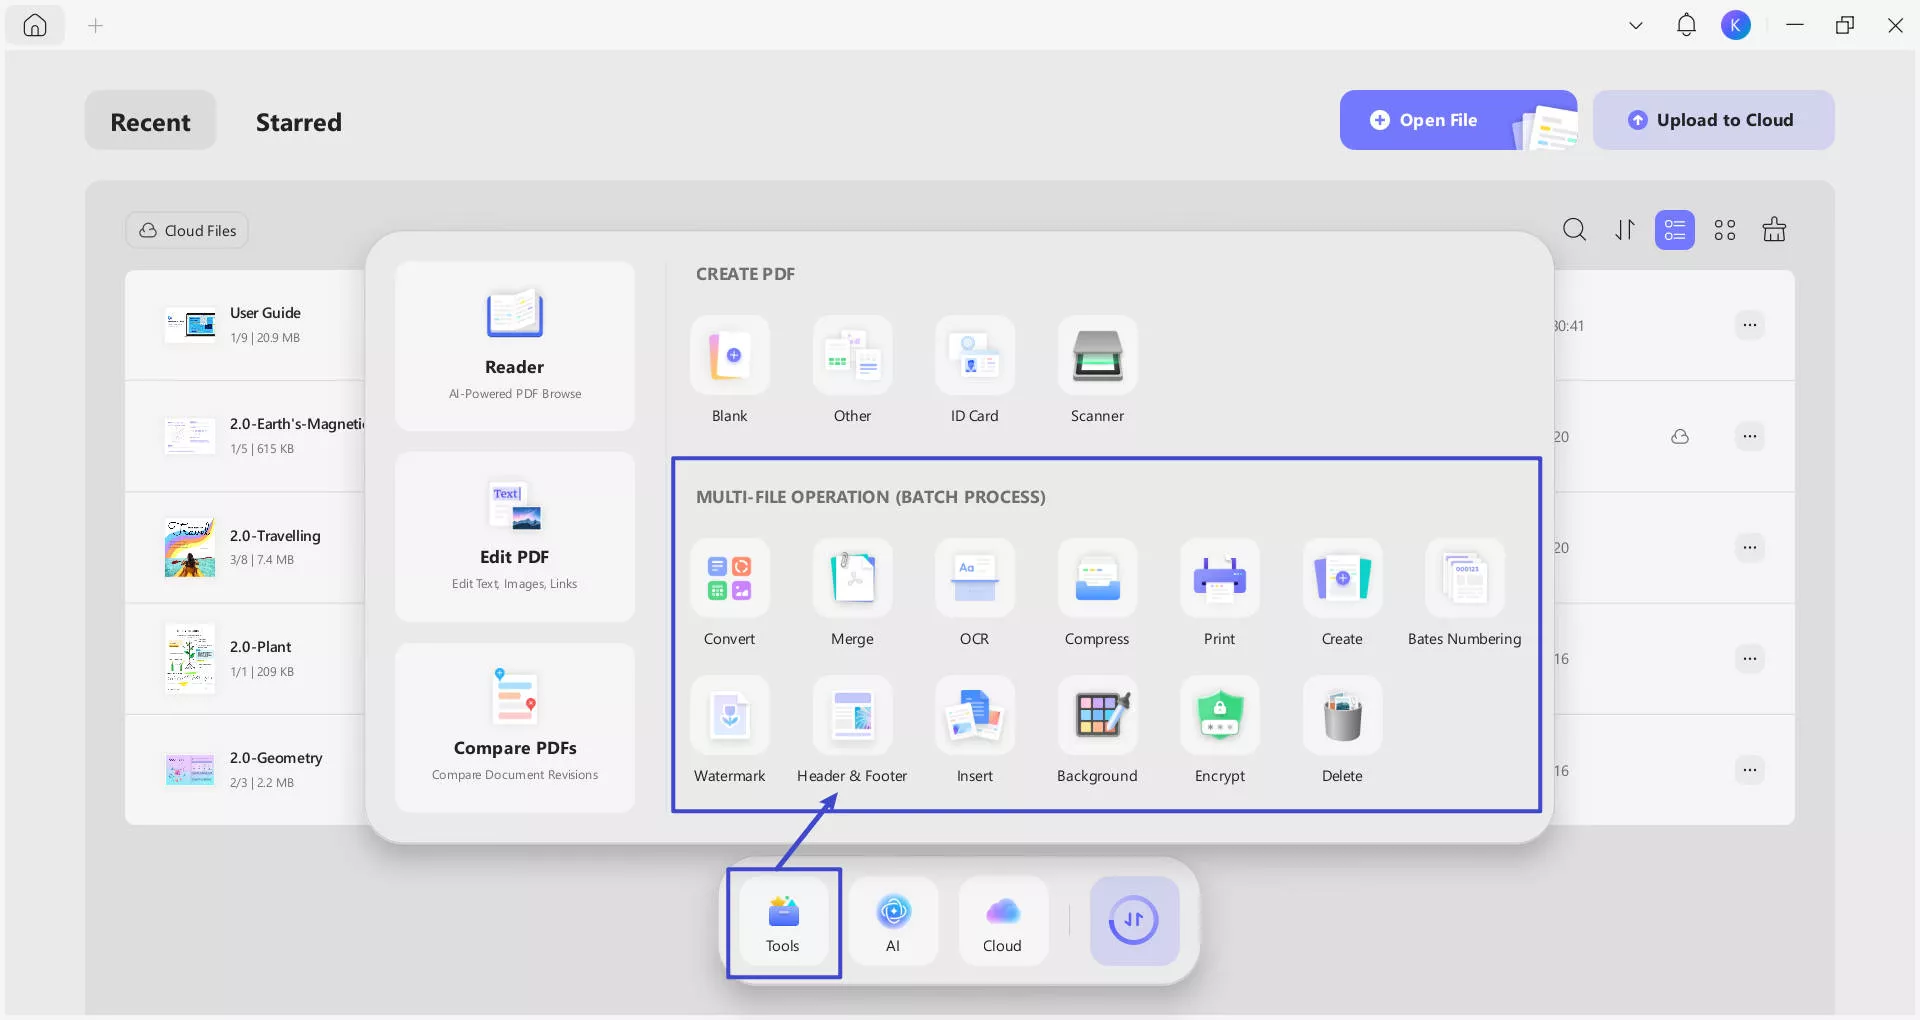
In the following content, we'll guide you through how to use these batch tools in UPDF.
1. Batch Convert
For those who seek to convert multiple PDF files to different file formats, they can consider using the batch conversion feature offered by UPDF.
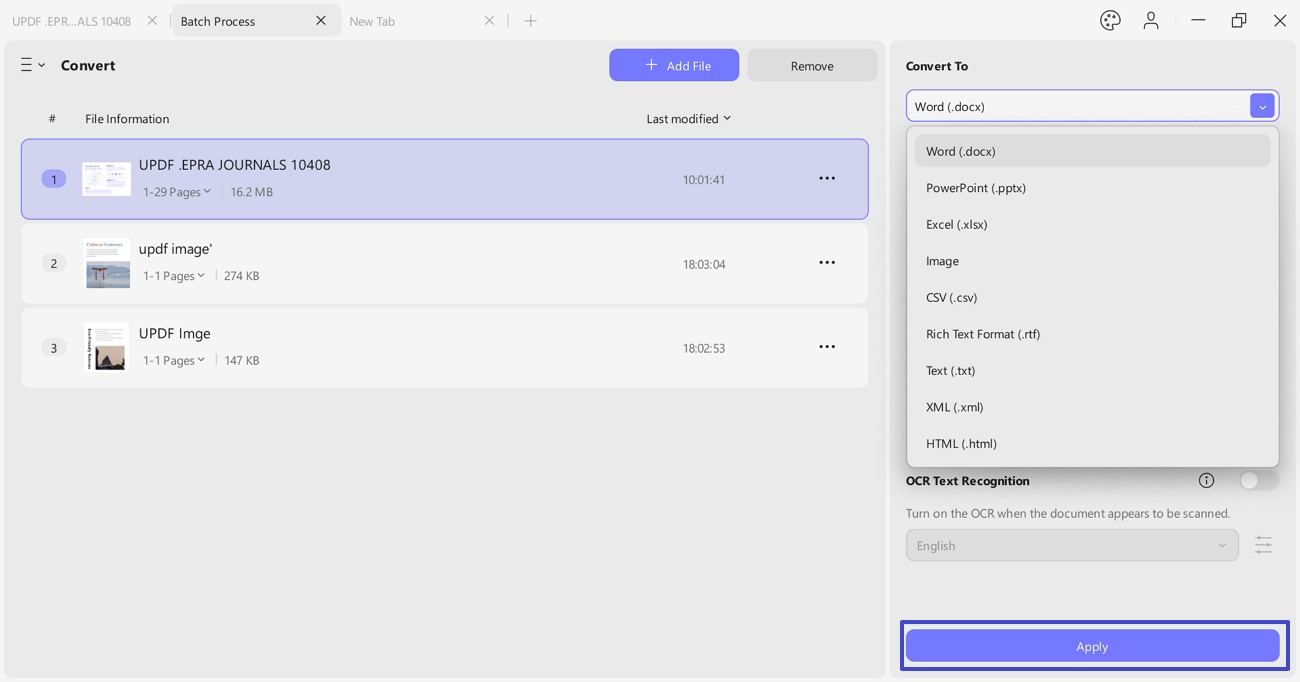
Click the "Tools" tab. As a new window opens on the front, select "Convert" from the options to proceed next.
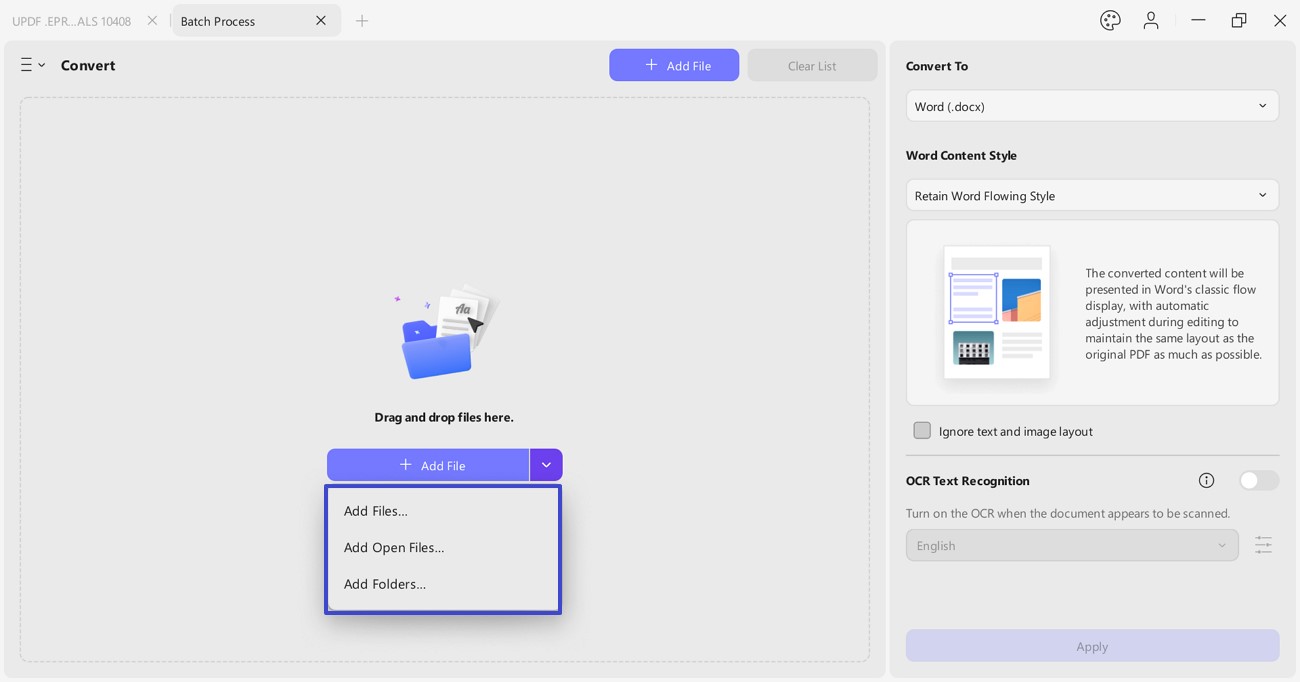
Step 1. Add Files
You will have to add some PDF files to the platform by clicking on the "Add Files" button. To add the pre-opened files on UPDF, click the arrow-head icon adjacent to the option and select "Add Open Files" to continue. If you have a complete folder, select the "Add Folders" option from the drop-down menu.
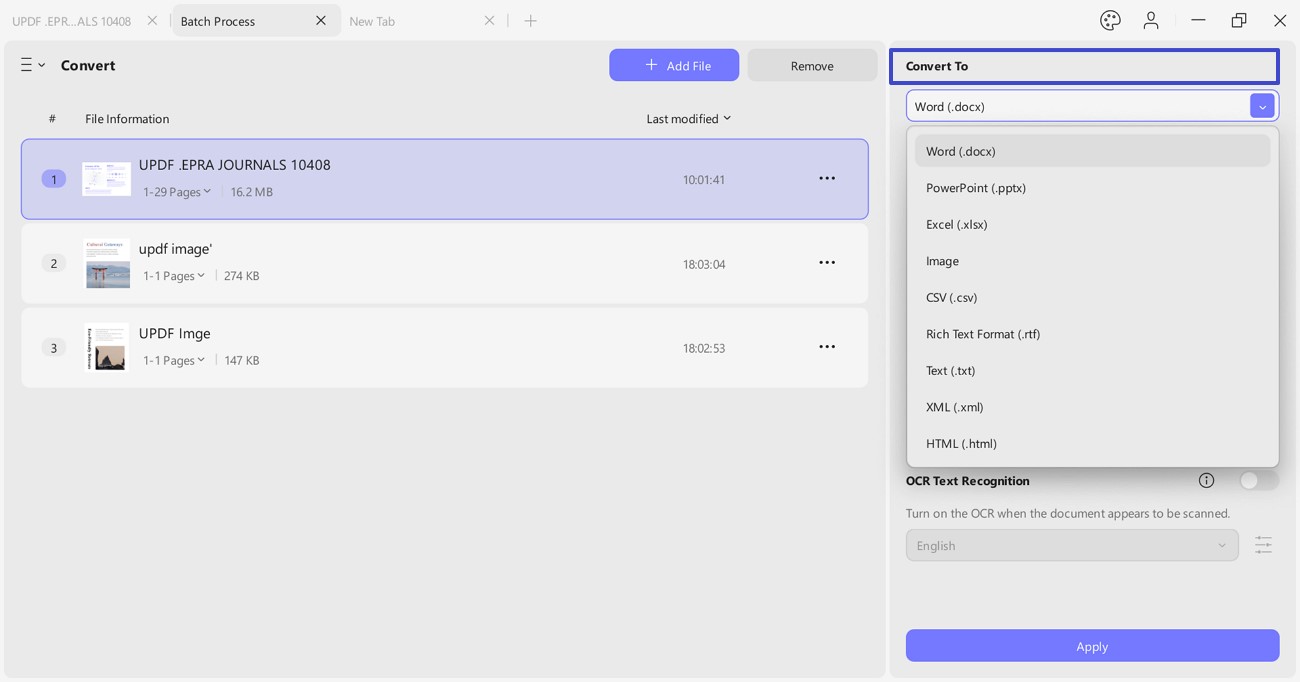
Step 2. Define Output Format
After adding the PDF files, set the file format under the "Convert to" drop-down menu. Here, you can select the output format as Word, PowerPoint, Excel, CSV, RTF, Image (BMP, JPEG, PNG, TIFF, GIF), XML, and HTML.
Step 3. Set Layout Settings (Optional)
You can also enable "Text Recognition Settings" during conversion, which is useful for batch-converting multiple scanned PDFs into editable Word documents. After conversion, the text in the scanned documents will be editable.
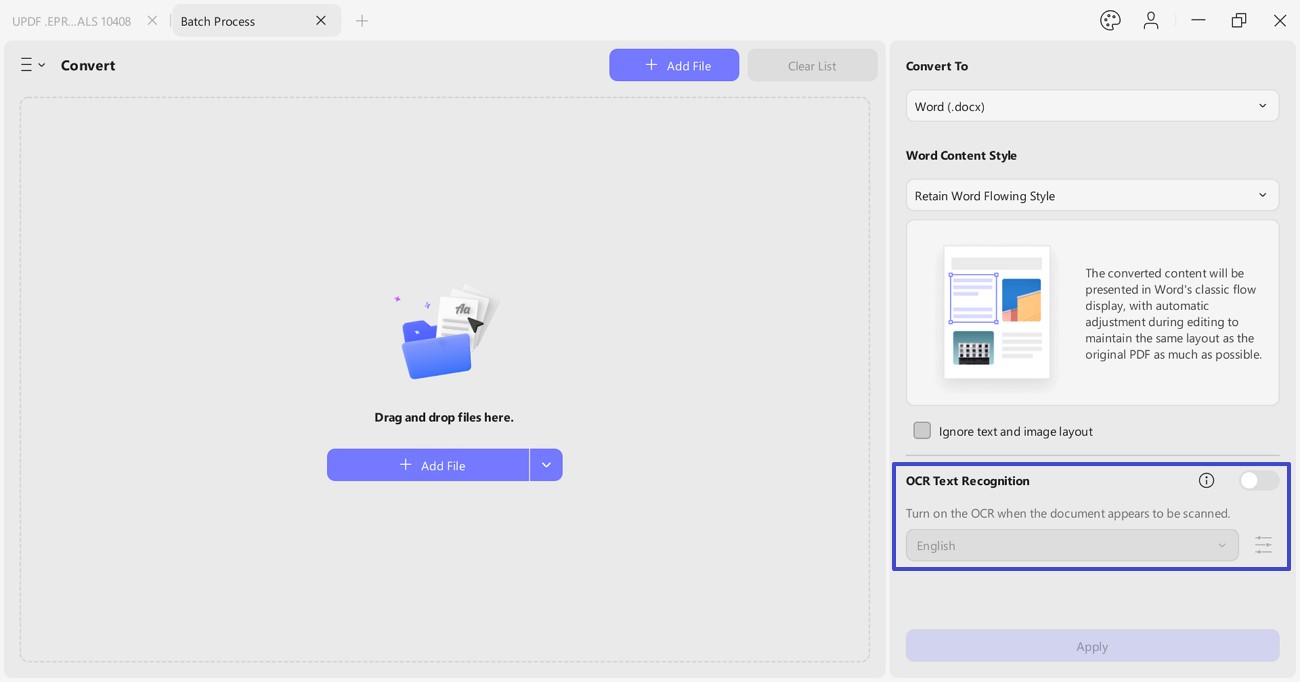
Step 4. Apply Conversion of PDF Files
Once you are done setting all options for conversion, click "Apply" to conclude the process. Set a location for the converted PDFs and click "Select Folder" once you are done specifying the location.
Other Settings of the Files
- Observe the File Location of a PDF
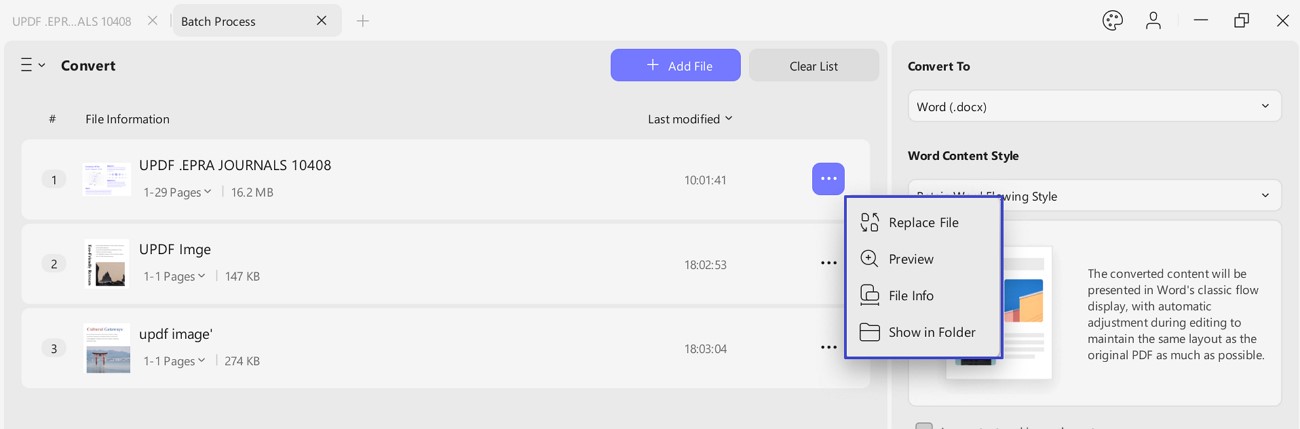
If you seek to check the specific settings of a PDF file within the Batch Convert feature, navigate to the specific file and click the "three-dotted" icon to open a menu. If you seek to observe the file location of the PDF, select "Show in Folder".
- Remove File
To delete any unnecessary files, you can hover over the target file and choose the "Delete" icon.
- Replace File
In any case, if you accidentally add the wrong file, you can click the three dots and choose the "Replace File" option from the pop-up menu.
- Preview
For file confirmation, whether you added the accurate file or not, it offers a "Preview" option by clicking the three dots. This option shows a pop-up screen of the document you imported for verification.
- File Info
To review the settings of a particular file, click on "File Info" to open a new window with all the file details.
- Show in Folder
If you seek to observe the file location of the PDF, select Show in Folder.
- Check the File Settings of a PDF
To review the settings of a particular file, click on "File Setting" to open a new window with all the file details.
- Clear the Complete List of PDFs
To clear out the complete list of PDF files, select the "Clear List" button at the top of the window.
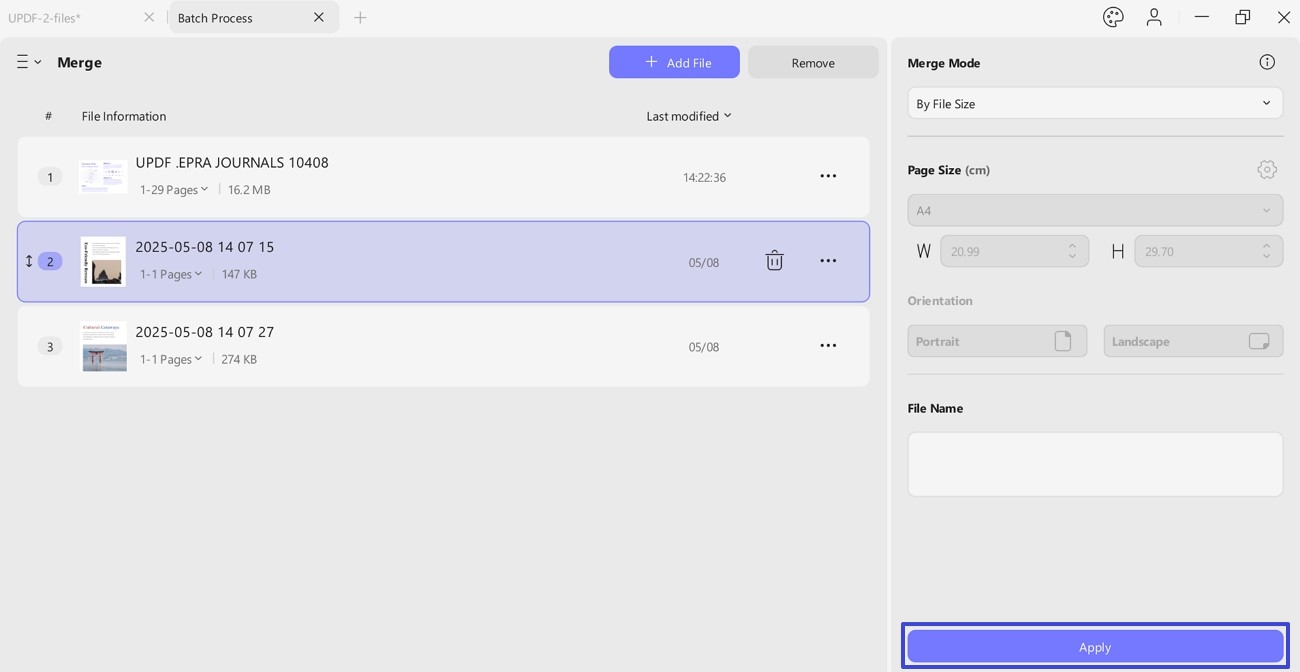
2. Batch Merge
UPDF provides a comprehensive function of combining PDF or image files into a single PDF using its batch merge feature. Follow the guidelines below to know how to utilize it properly:
Step 1: Proceed to click the Three Lines of Batch PDF. Continue to select "Merge" from the options to activate the "Batch Merge" feature.
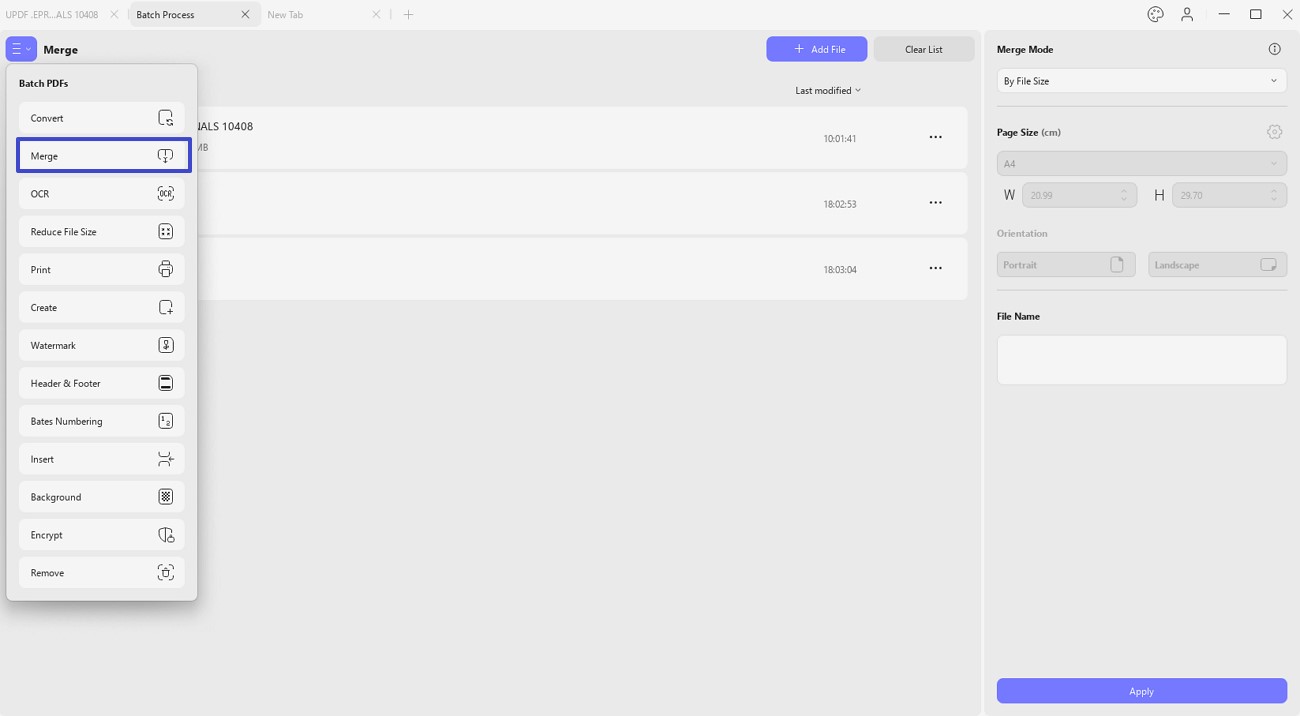
Step 2: Use the "Add Files" button or the arrowhead alongside it to add files, opened files on UPDF, or folders.
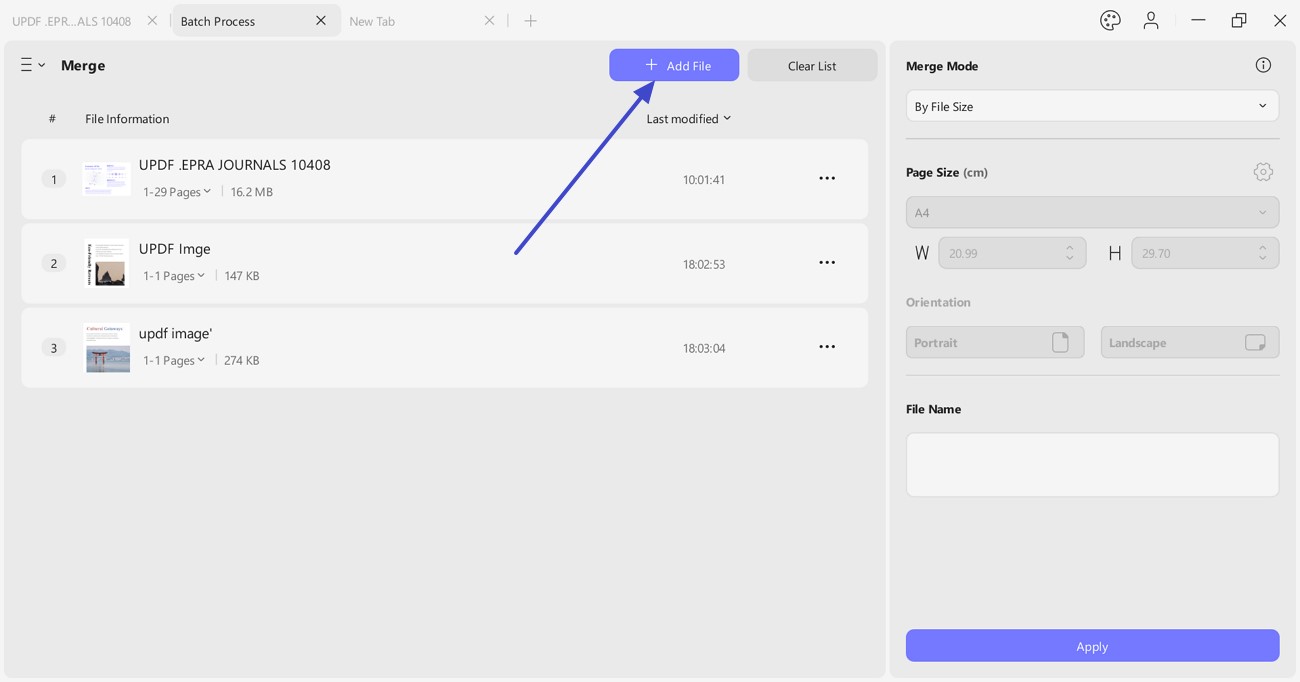
Step 3: After adding the files, change their positions by drag and drop, if needed. Continue to click "Apply" to browse a location for your output file and execute the process by clicking "Save."
Note: For detailed introductions, please follow this guide on combing files in a batch.
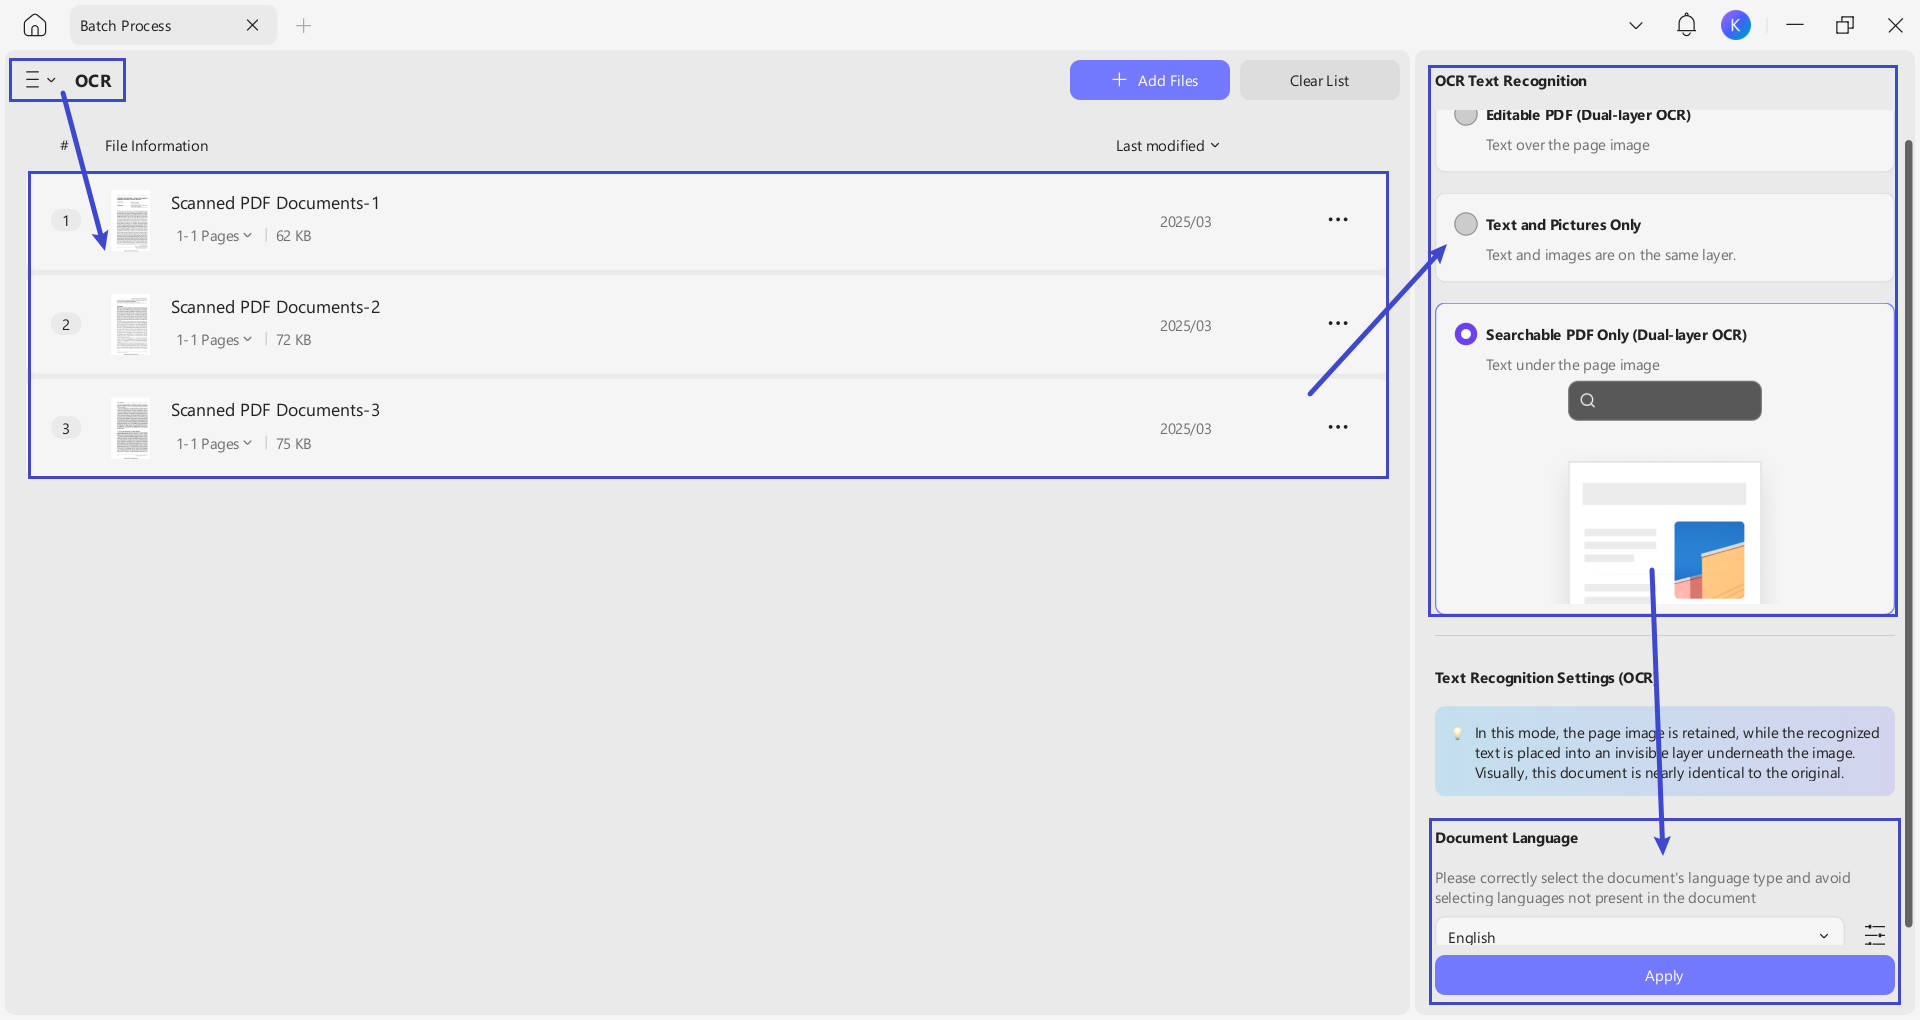
3. Batch OCR
If you have multiple scanned PDF files and want to convert them into editable, you can use the batch OCR features.
Click the Three Lines of Batch PDFs, select "OCR" this time. "Add File" to select all the scanned PDF files, select the "Editable PDF (Dual-layer OCR)", "Text and pictures Only", or "Searchable PDF Only (Dual-layer OCR)" per your needs, choose the document language, and click on the "Apply" to batch convert your non editable PDF files into editable or searchable ones.
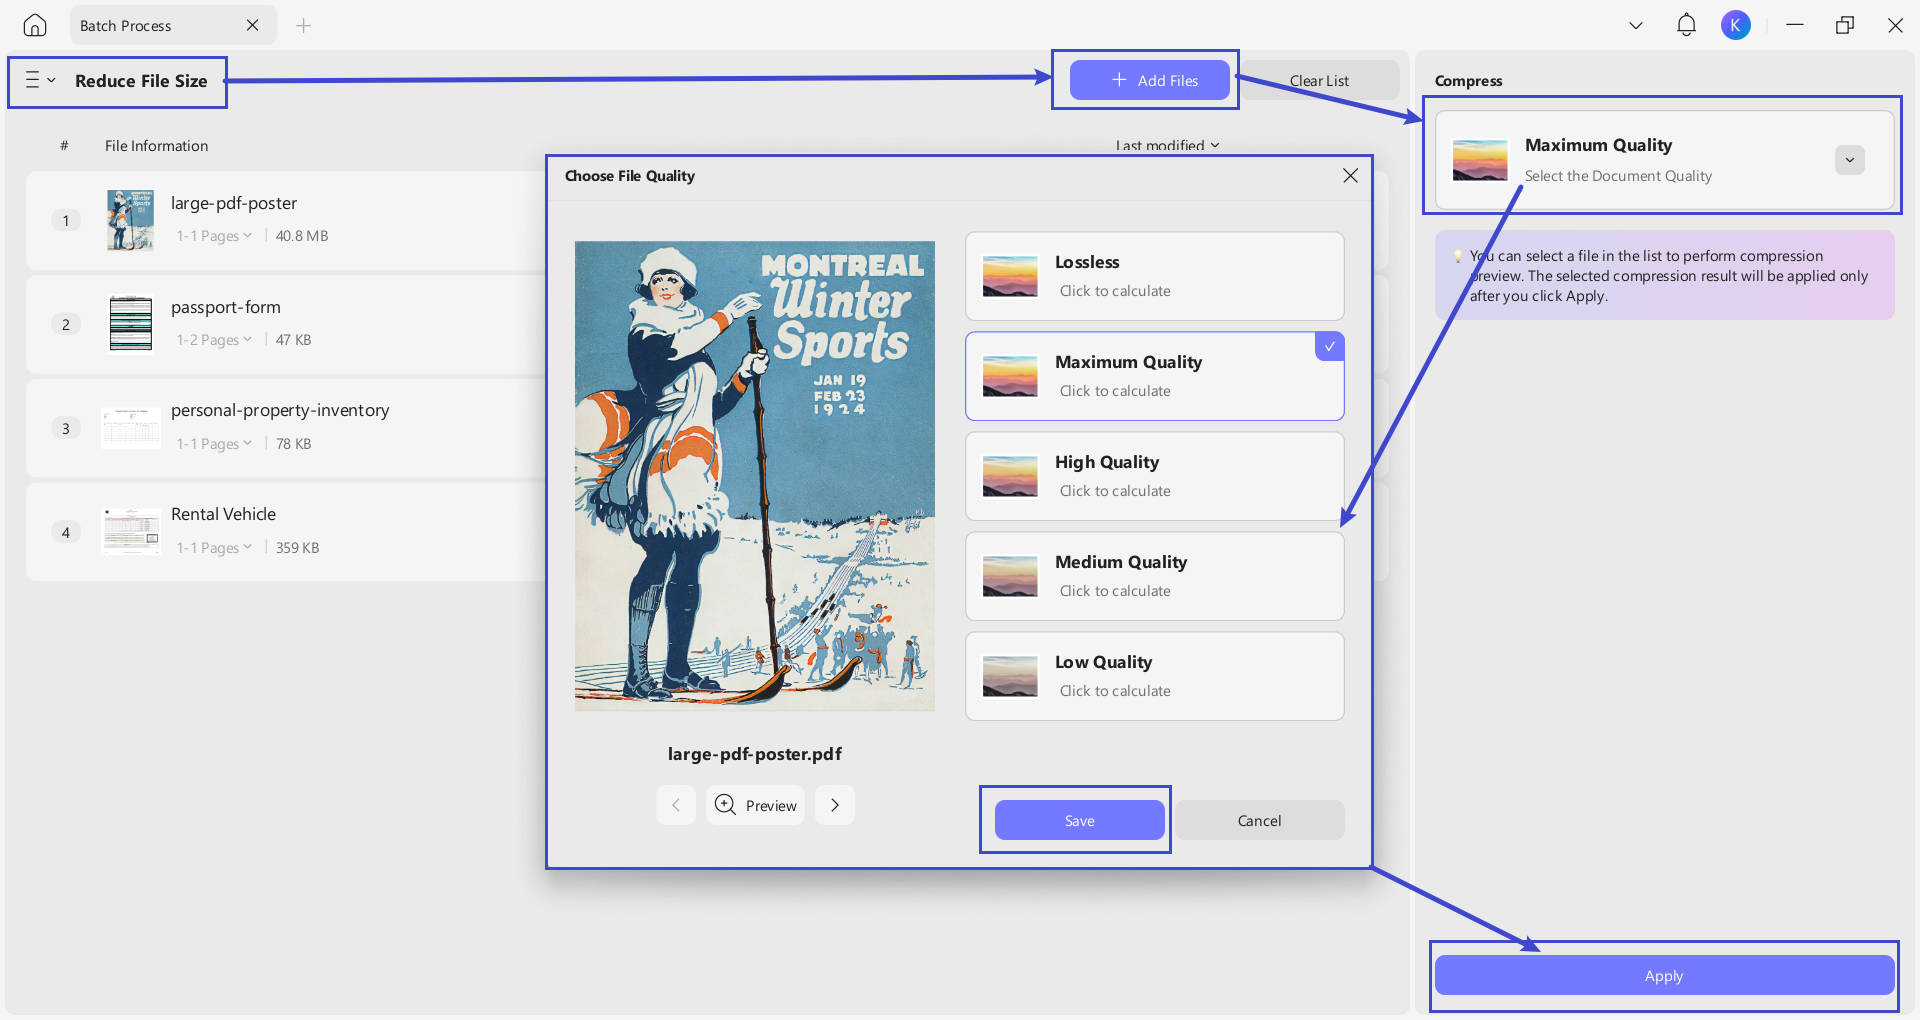
4. Batch Compress
Have many large files and want to compress them at once to share or upload? You can follow this guide.
Switch to choose "Reduce File Size" now, click on the "Add File" to upload the PDF files on your computer, click on the "Maximum Quality", select the quality you need, click on the "Save", then, click on the "Apply".
5. Batch Insert
You can try inserting your required PDFs into a single file collectively with the help of the Batch Insert feature. Learn more on how it is done properly with UPDF:
Step 1. Click the Three Lines of Batch PDFs. Continue to select "Insert "from the options to activate the "Batch Insert" feature.
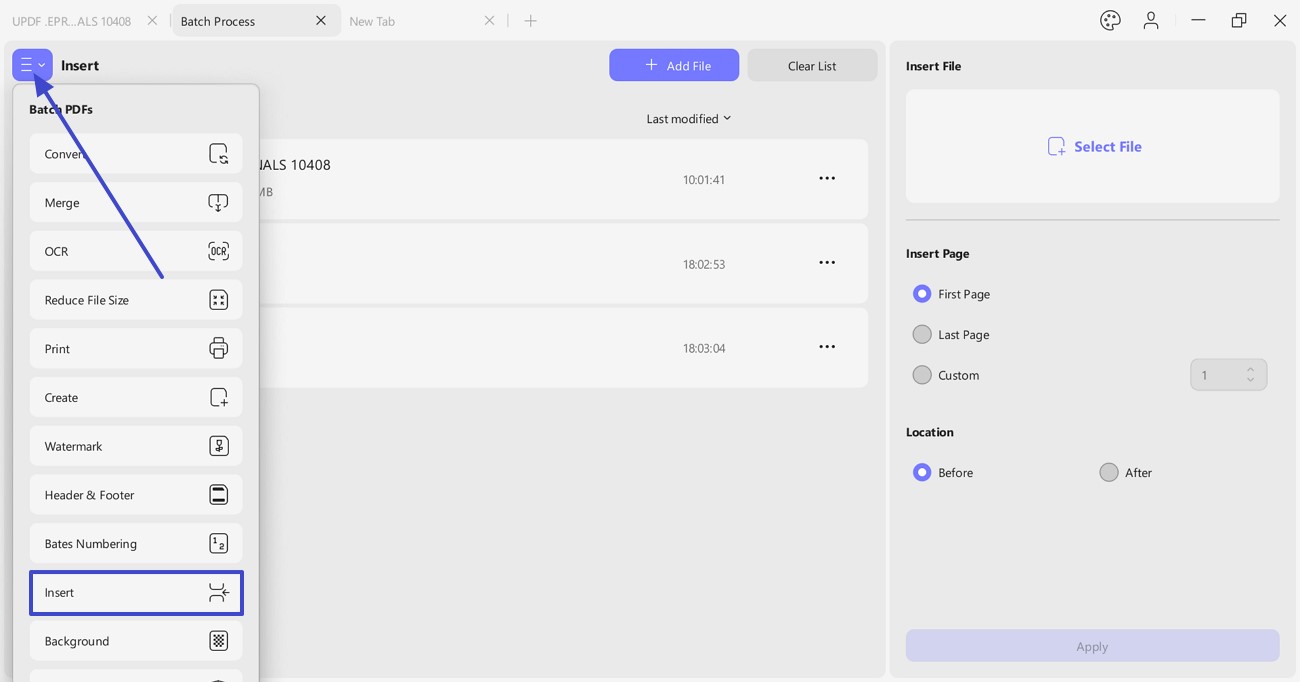
Step 2: Click the "Add Files" or the arrowhead to import the PDF files, opened files, or folders into the platform.
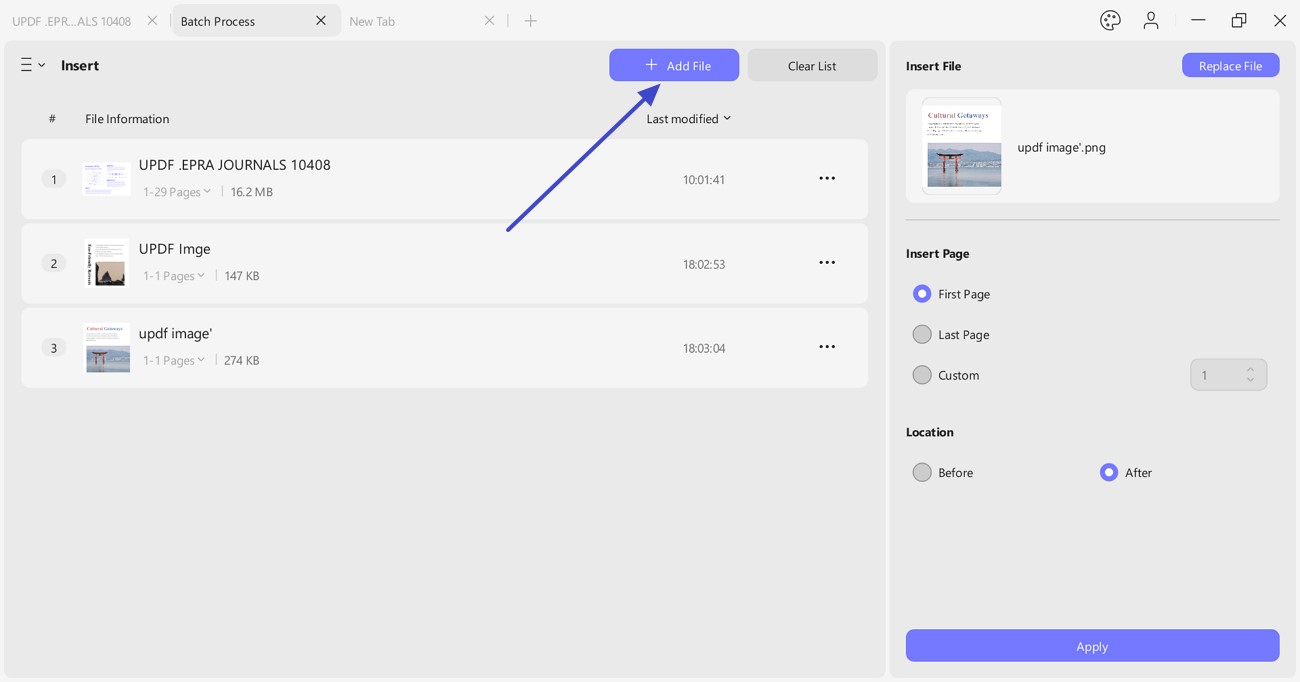
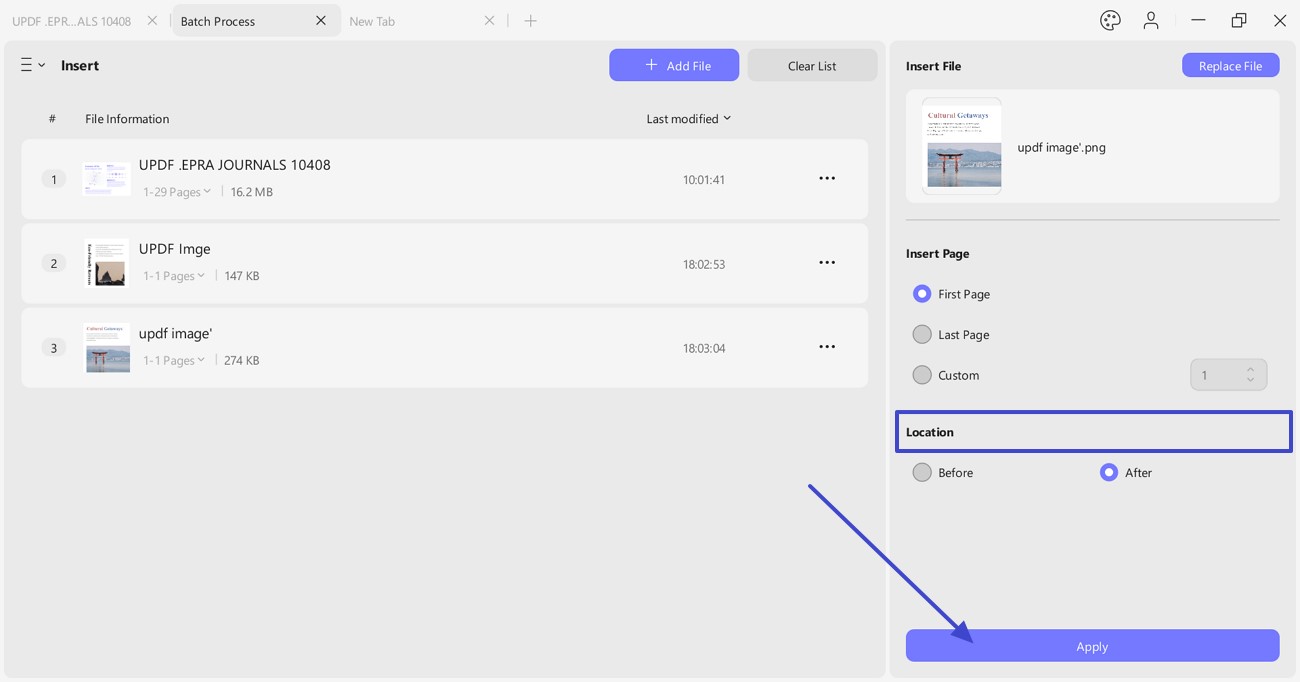
Step 3: To add a specific file across every imported PDF, continue to browse the file in the "Insert File" tab. Proceed to define its "Location" and hit "Apply" to make the required changes. Select a location where you want to save all the files and execute by clicking "Save."
Besides this, it provides "Insert Page" section where you can add page as "First Page", "Last Page" and "Custom" (manually entering page numbers).
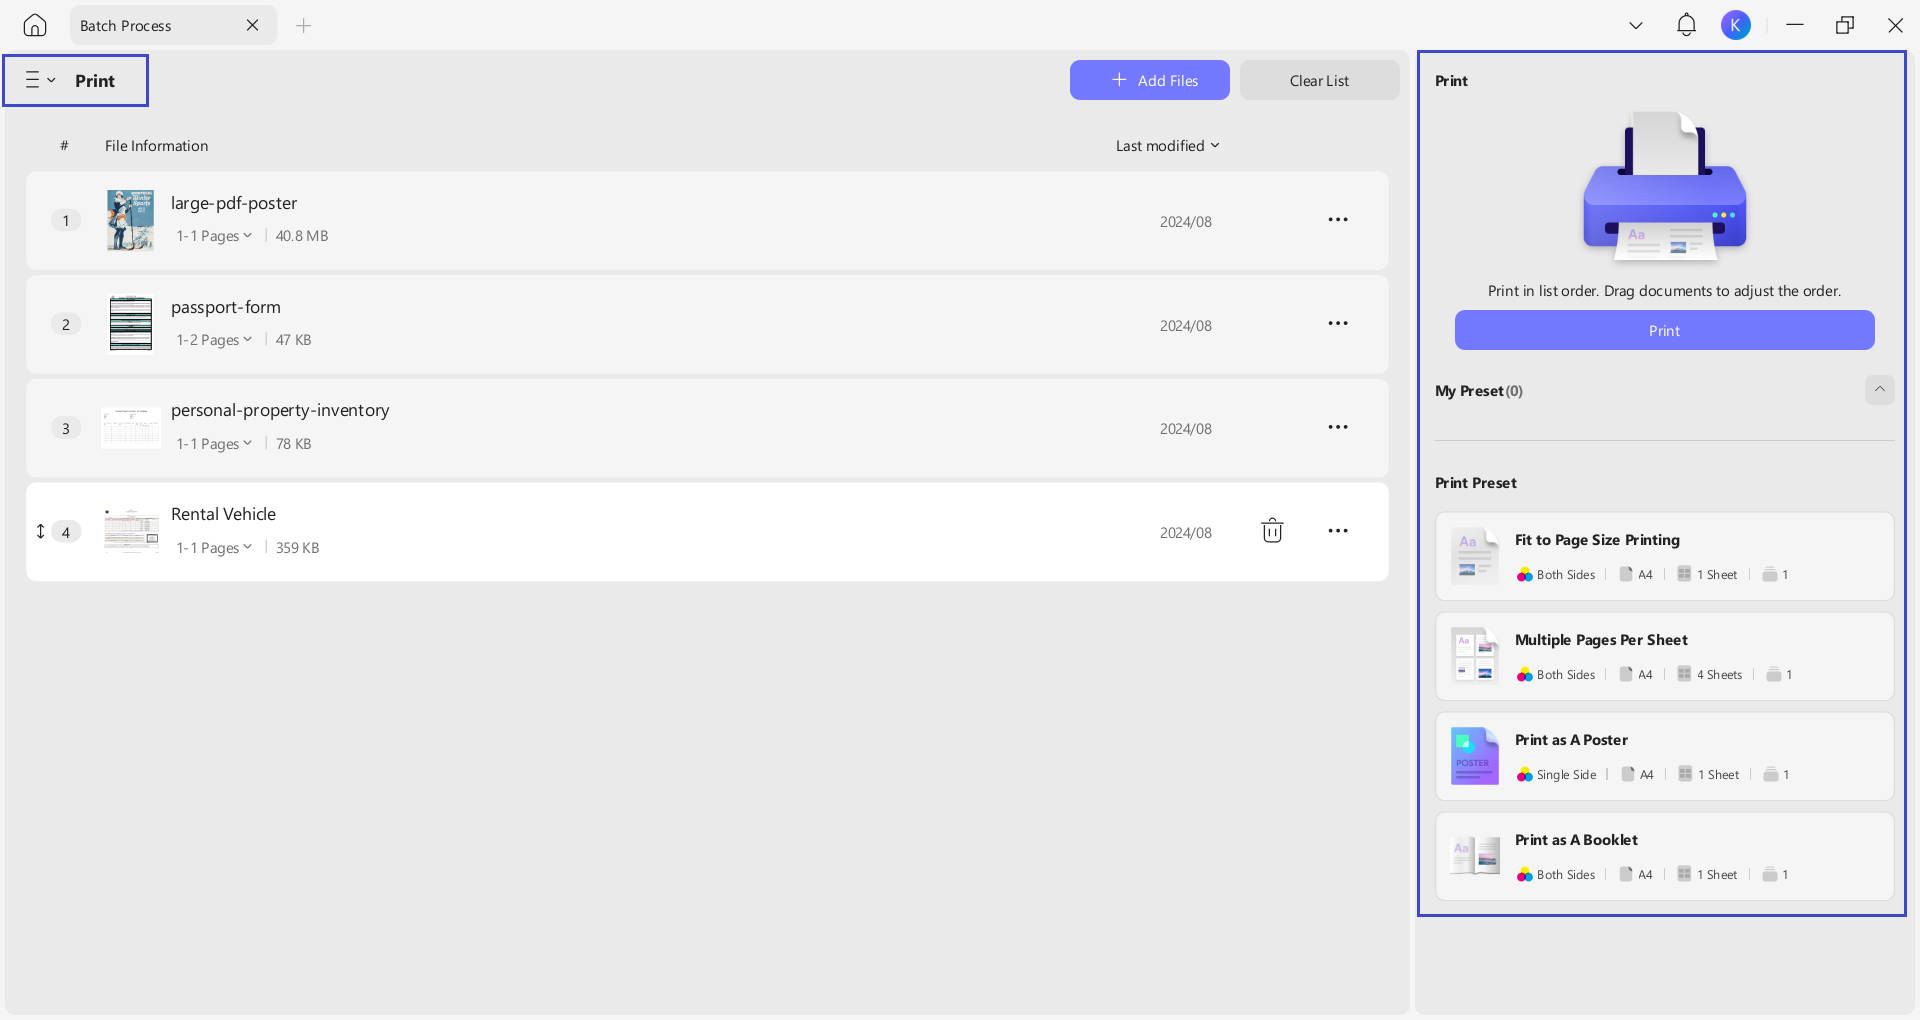
6. Batch Print
If you have a collection of PDF documents with you, UPDF offers a progressive tool in the form of batch printing.
Click the Three Lines of Batch PDFs. Continue to select the "Print" option from the list to activate the "Batch Print" feature.
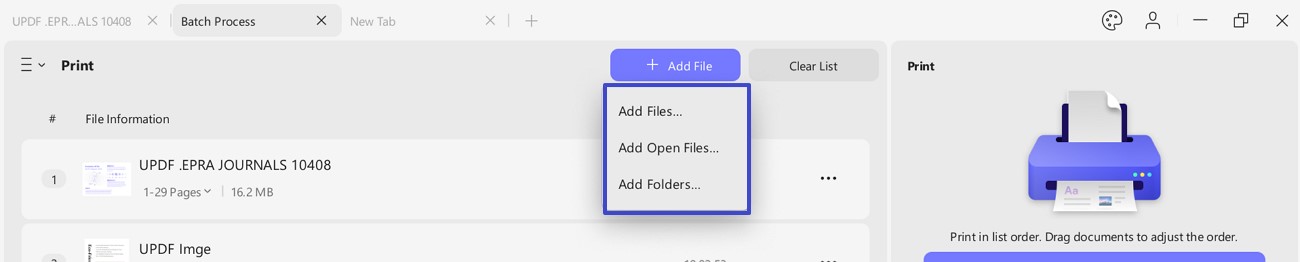
Step 1. Import Files to the Batch Printing Section
To add files within the platform, click the "Add Files" button and browse all documents that need printing. Secondly, you can also tap on the arrow icon adjacent to this option and select "Add Open Files" if you wish to import all files opened on UPDF. Use the "Add Folders" button if you wish to add a complete folder to UPDF.
Step 2. Settings for Batch Printing
You can choose different Print Presets, such as "Fit to Page Size Printing", "Multiple Pages Per Sheet", "Print as A Poster", and "Print as A Booklet" as you need. Then hit the "Print" button.
7. Batch Encrypt
For those who want to put an encryption or password on their PDF files to protect a complete set of documents, they can consider the batch encrypt option provided by UPDF.
After opening the "Batch PDFs" from the "Tool" feature, click the Three Lines on the left side. Then, select the "Encrypt" option from the list to choose the "Batch Encrypt" feature.
Step 1. Import Files for Encryption
Click the "Add Files" button to import the PDF files that you wish to encrypt. Select the arrowhead icon and select the "Add Open Files" button if you seek to import PDFs that are already open on UPDF. Choose "Add Folders" if you want to add a complete folder for PDF encryption.

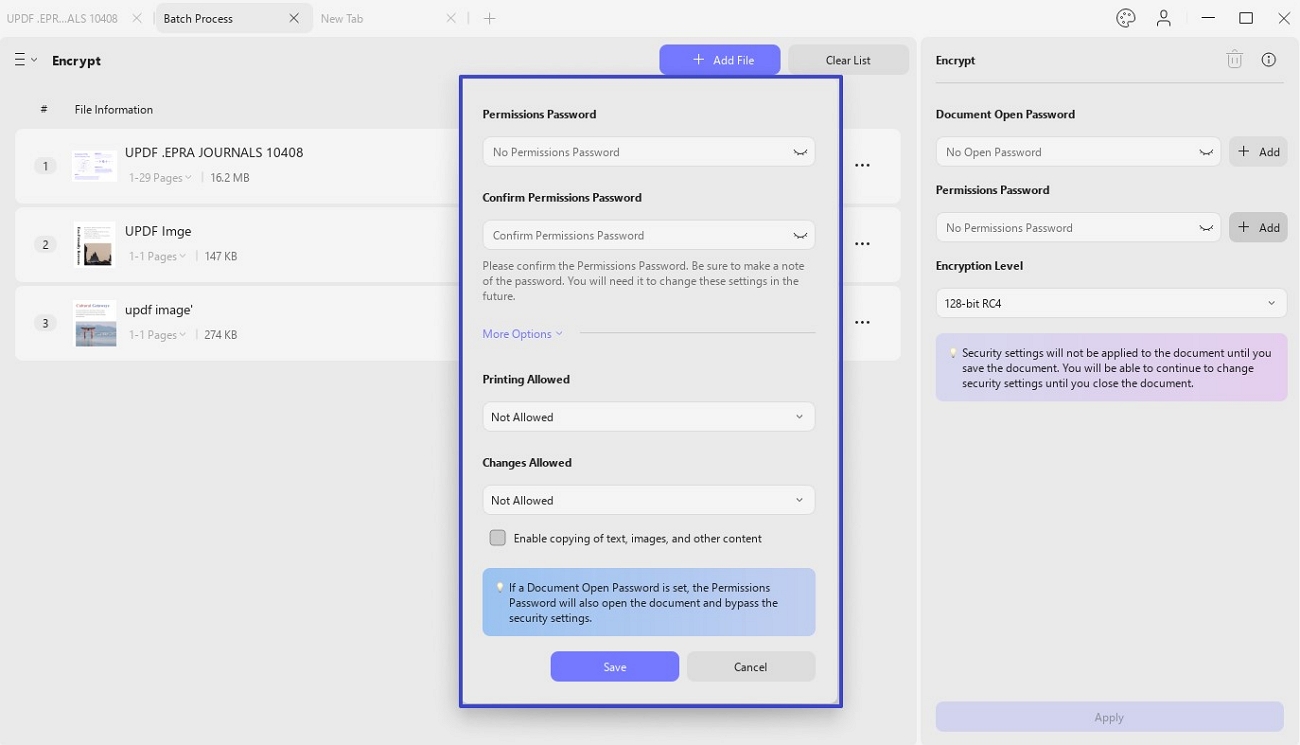
Step 2. Set Passwords on Batch Encryption
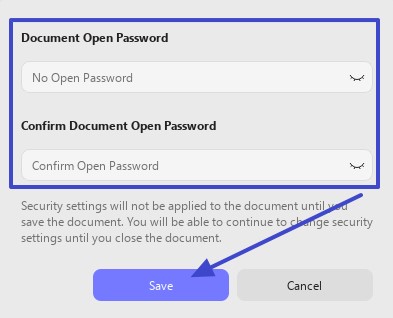
- Set Open Passwords
From the "Document Open Password" on the right panel, add the desired password by clicking the "+Add" button. Upon clicking the "+Add" button, a pop-up menu will appear where you can add the "No Open Password" and "Confirm Open Password". Then, press the "Save" button to complete the process.
- Set Permissions Passwords
add a password for your PDF file. Verify the password by adding the chosen password again under the "Confirmed Password" section.
- More Options
Afterward, from the More Options, you can choose whether you want to allow the protected document to print or edit from the "Printing Allowed" and "Changes Allowed" section.
- Enable Editing
You can also turn on the "Enable Copying of Text", "Images", and "Other Content" as you like. Once you are done setting all the changes, click the "Save" button to apply the password successfully.
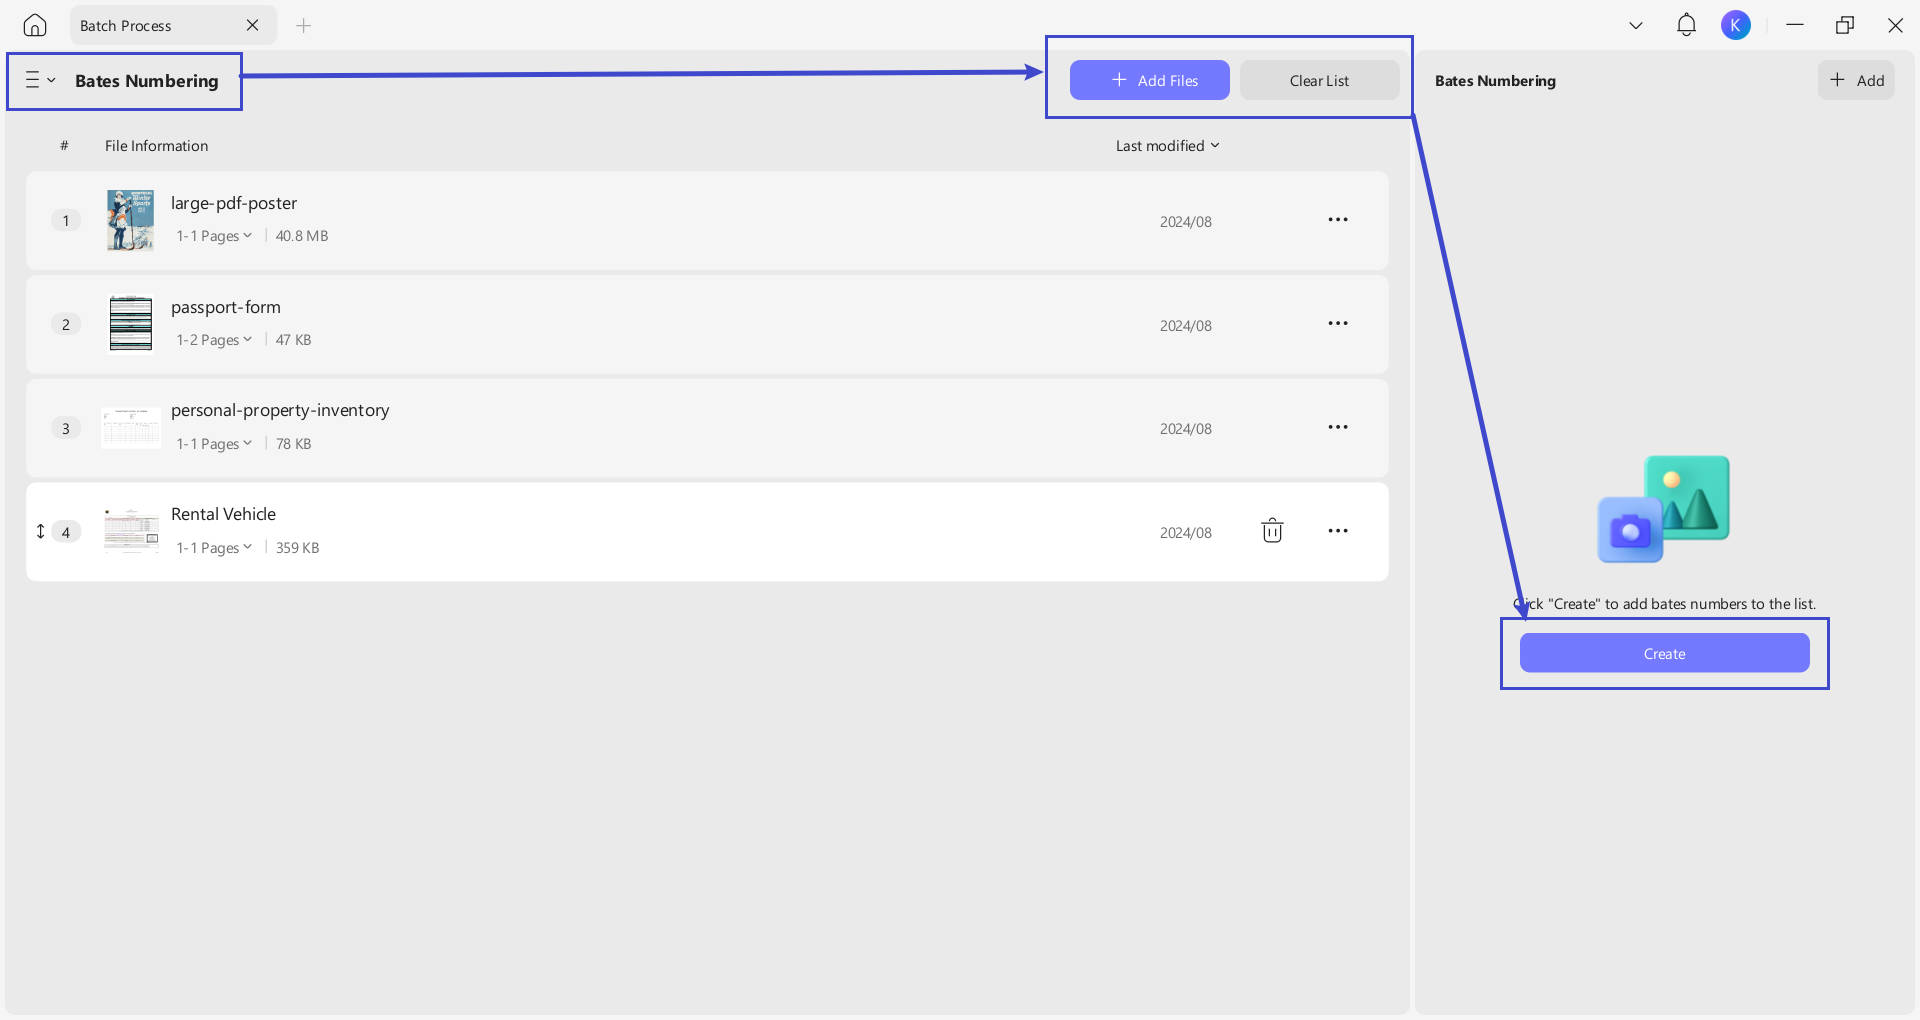
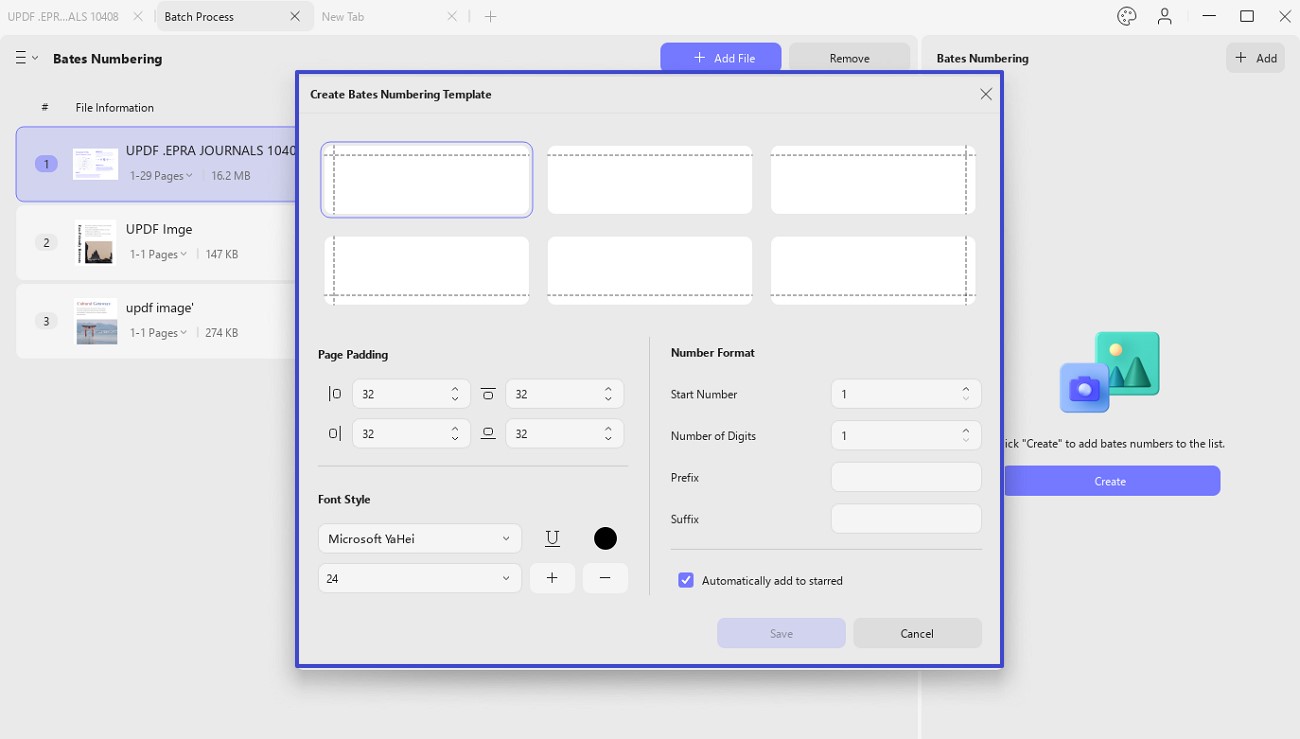
8. Bates Numbering
Have you received a task to add Bates numbers to multiple files and wondered how hectic it would be to deal with each manually? With UPDF, you can skip all the hassle of adding Bates numbering to multiple files simultaneously. Simply launch UPDF, hit the "Tools" option, and choose "Bates Numbering" in the Batch PDFs section.
Hop on below to learn what you will have to do next:
Step 1: Add files by hitting the relevant button, or you may add folders by selecting the "Add Folders" option from the drop-down menu.

Tip
If you have added the wrong files, remove them by selecting "Clear List" from the List option from the top bar.
Step 2. Now, tweak the settings according to your preferences. You can set the following parameters by clicking the "Create" button on the right panel:
- Create Bates Numbering Template: Choose from the six different options available.
- Start Number Format: Insert a number from where you want to start Bates numbering.
- Number of Digits: Choose the number of digits to mark the page number for a document with a large number of pages.
- Prefix: Include prefix if you want to add any.
- Suffix: Include suffix, if needed.
- Font Style: Select font styles from many available options, ranging from Arial and Microsoft YaHei to more. You can also underline your text or change font color.
- Font Size: Choose from the different font size options available. Moreover, use the "+Plus" and "-Minus" icons for more adjustment.
- Automatically Add to Starred: To save the changes, you can enable the "Automatically add to Starred" button and use it later for other documents.
- Save Changes: When you have set all the parameters, press the "Save" button.
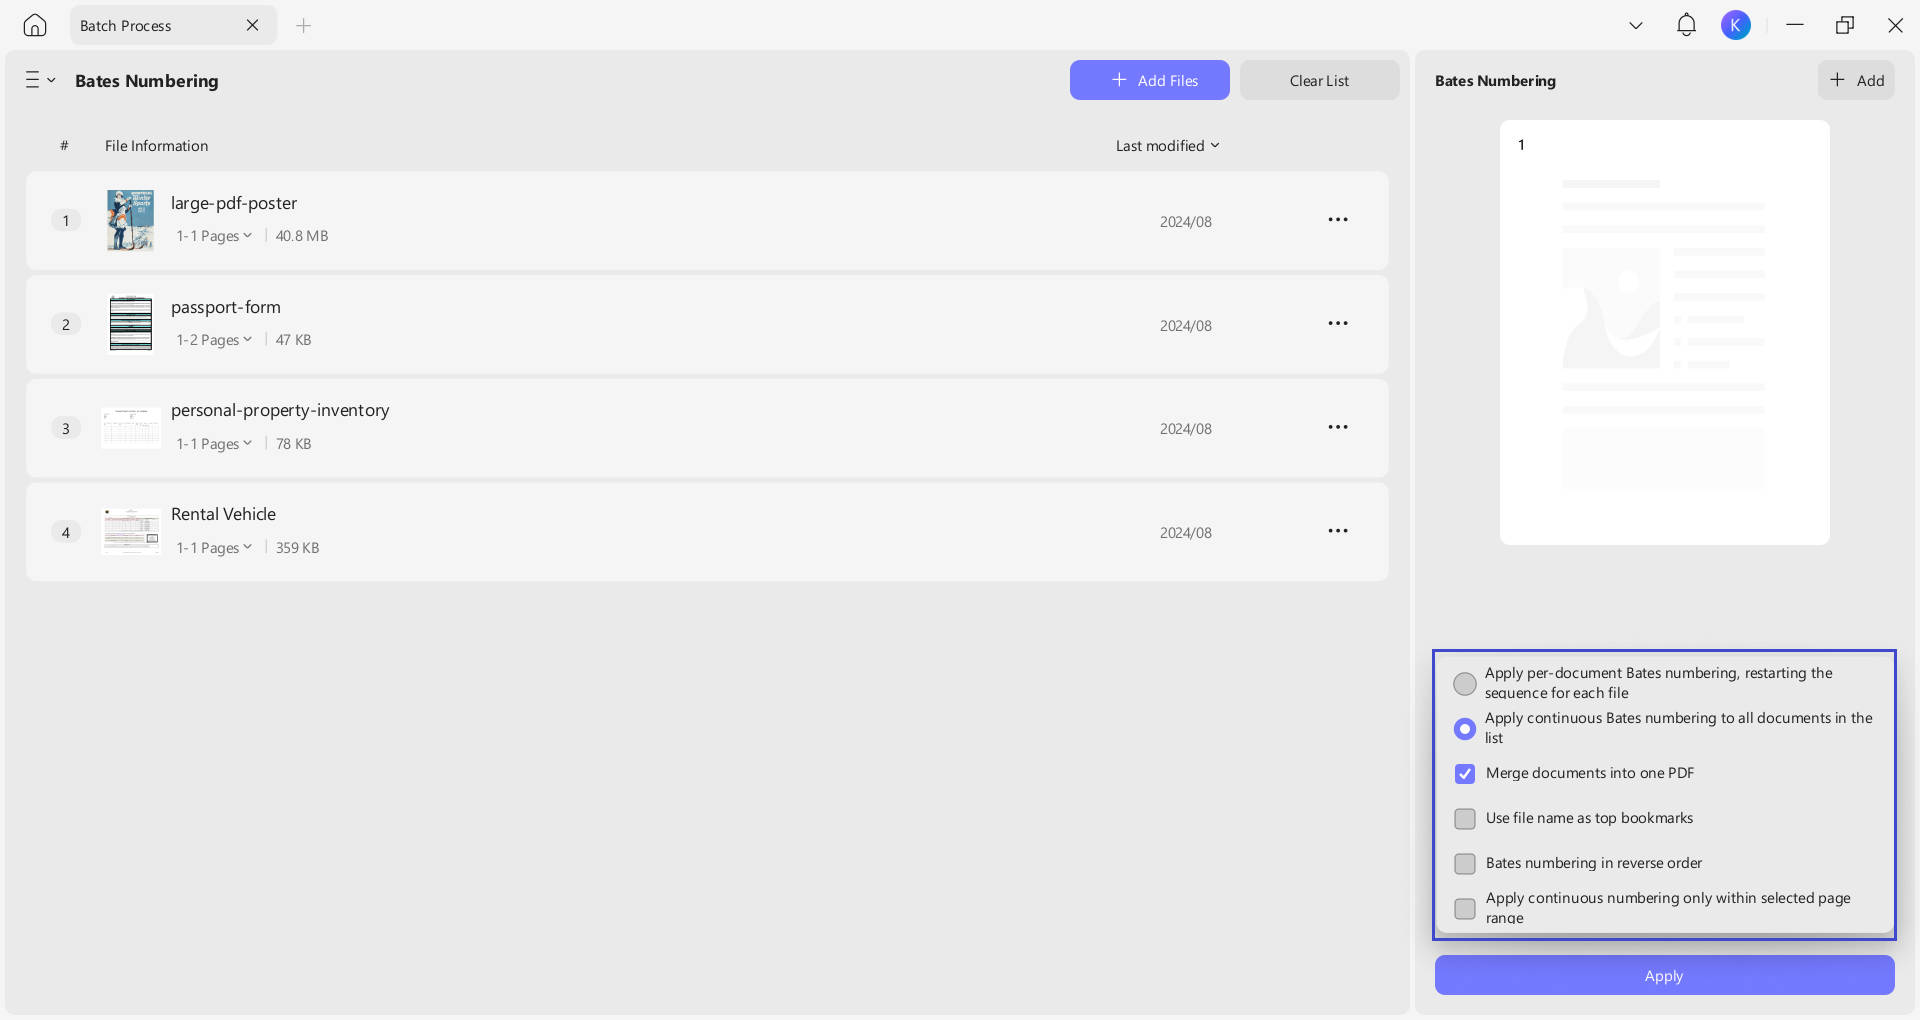
Step 3. Enable the Successive addition of documents to the list, check "Merge documents into one PDF" if needed, and then click the "Apply" button once again to proceed.
Apart from this, you’ll see further options including, "Apple per-document Bates numbering, restarting the sequence for each file", "Use file name as top bookmarks", "Bates numbering in reverse order" and "Apply continuous numbering only within selected page range".
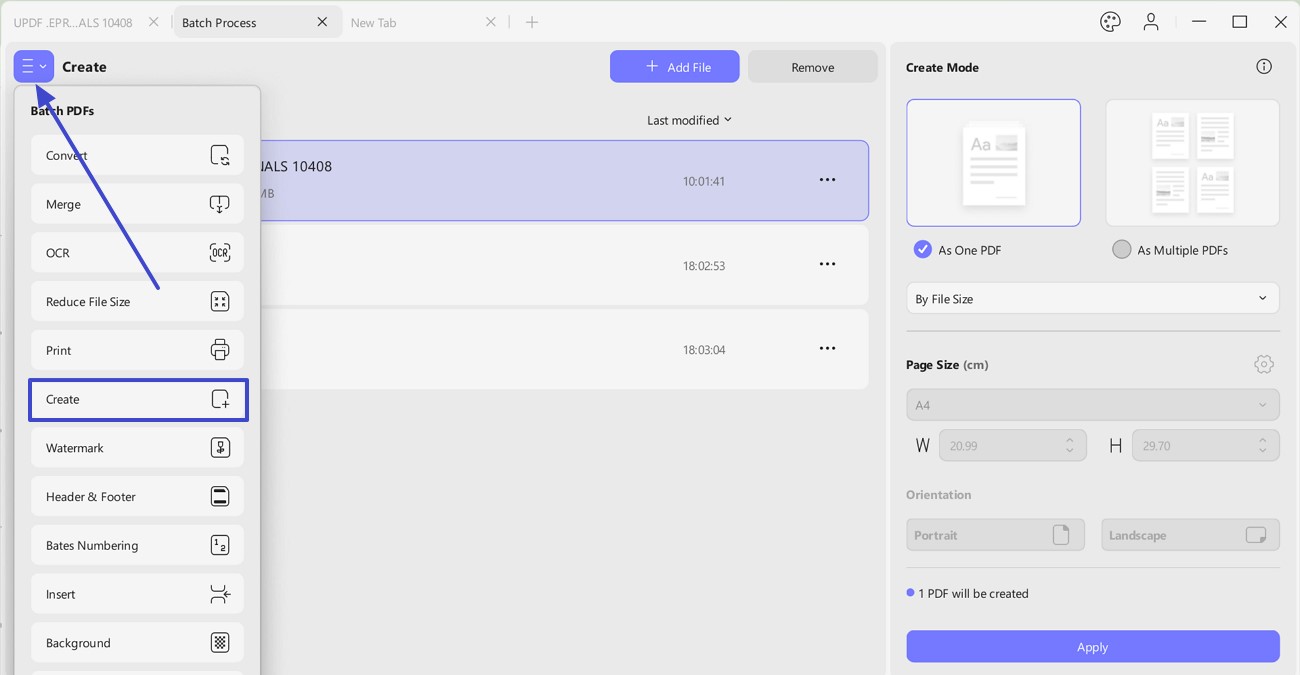
9. Batch Create
The batch PDF creation feature is also available in UPDF for Windows. With it, you can create multiple PDFs. Click the Three lines to choose the "Create" options.
Step 1: Now add files via the drag and drop feature or hit the "Add Files" button to add from the device manually. You can also add folders by revealing the drop-down menu on the "Add Files" button and selecting "Add Folders".
Tips
- To change the location of a file, drag and drop it above or below wherever you want to place it in your PDF.
- UPDF allows selecting multiple files in different formats simultaneously for creating PDFs. These formats include images, Word, Excel, PowerPoint, Visio, and CAJ files.
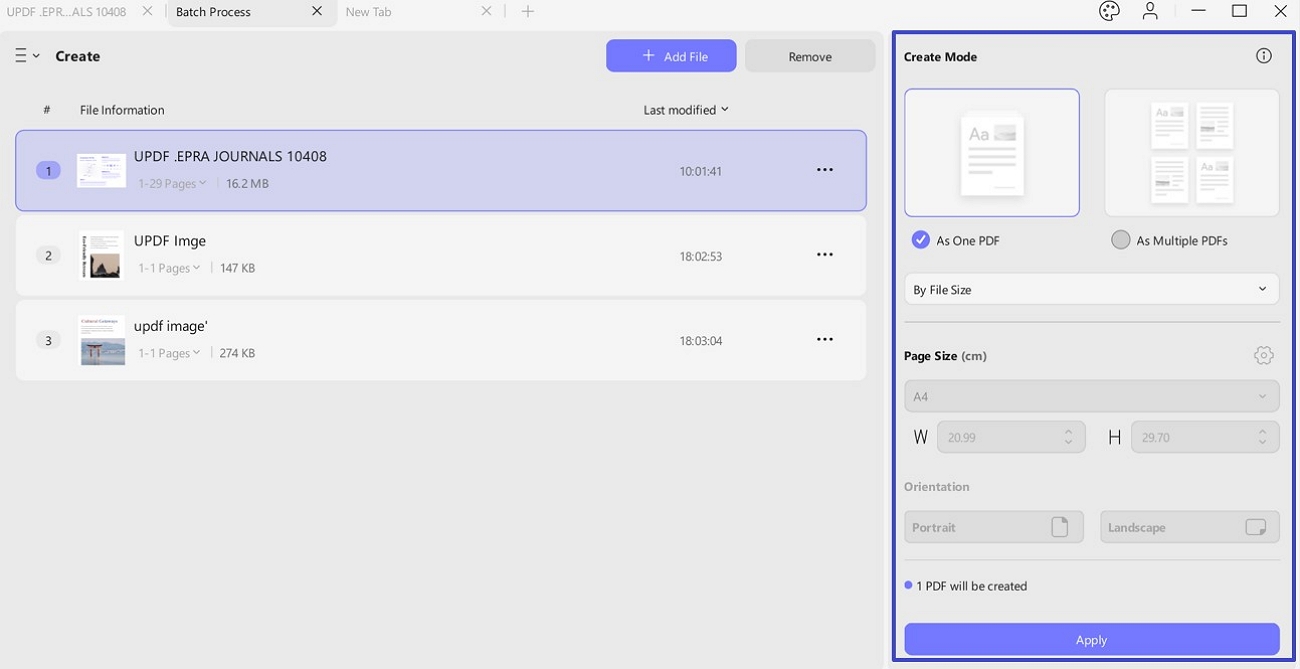
Step 2. Now you can edit the document further from the Right panel
Apply Settings: Click the "Apply" button at the bottom to generate the PDFs.
Select Create Mode: Choose "As One PDF" if you want to combine all files into a single PDF. Alternatively, choose "As Multiple PDFs" if you want separate files.
Sort Files: Use the dropdown menu to sort files (such as "By File Size" or other available options).
Set Page Size: Confirm the "Page Size" (default is A4), or click the gear icon to customize dimensions.
Adjust Dimensions: If needed, manually set the "Width (W)" and "Height (H)" in centimeters.
Choose Orientation: Select either "Portrait" or "Landscape" (if editable).
Step 3: When creating multiple PDF files, UPDF will ask you to select a folder where you want to save your PDF files.
Step 4: Once the files are saved, they will open up in different tabs, so you can perform further editing.
10. Batch Watermark
Want to add watermarks to multiple PDF files? You should download UPDF on your Windows and follow the guide below.
Step 1. Switch to "Watermark" here, click on the "Add File" to upload the PDF files, then, click on the "Create" and select "Text Watermark" or "File Watermark".
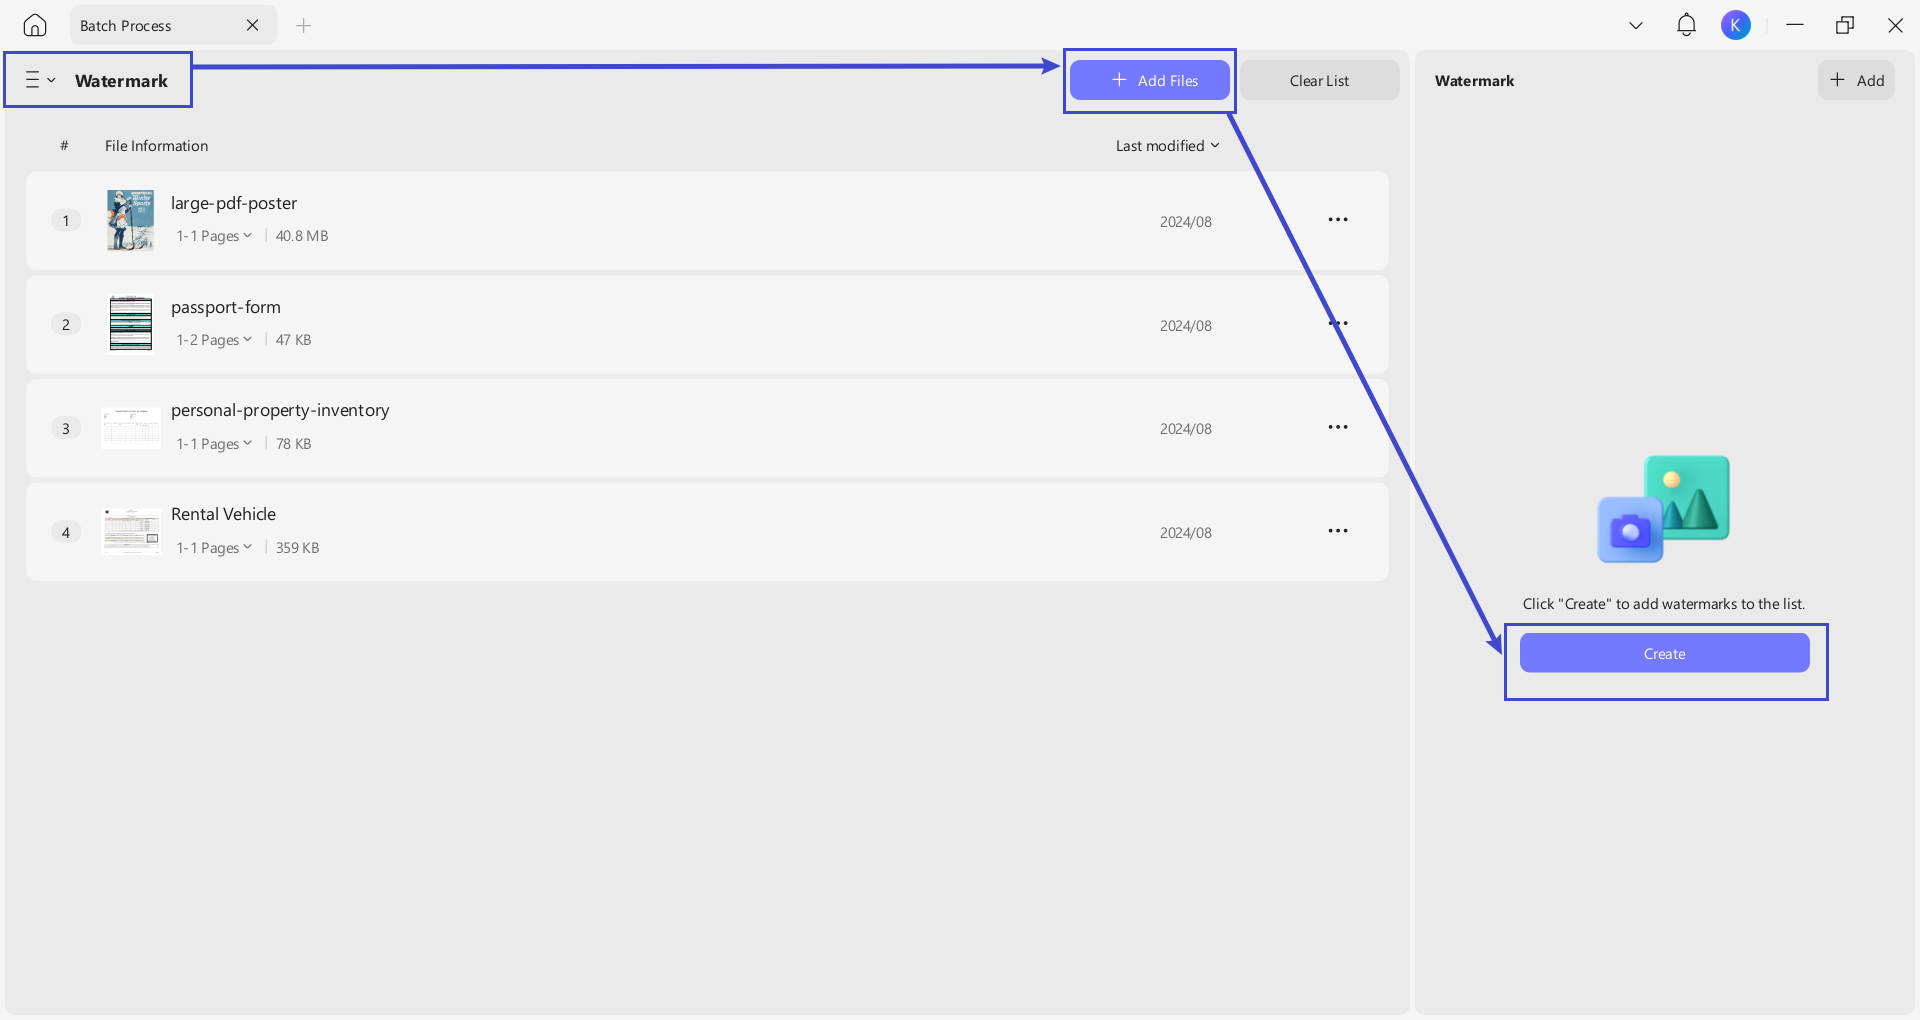
Step 2. In the pop up window, enter the watermark, choose "Single" or "Grid" for the layout, make other settings like the text font, color, opacity, and more. Then, click on the "Save" and "Apply".
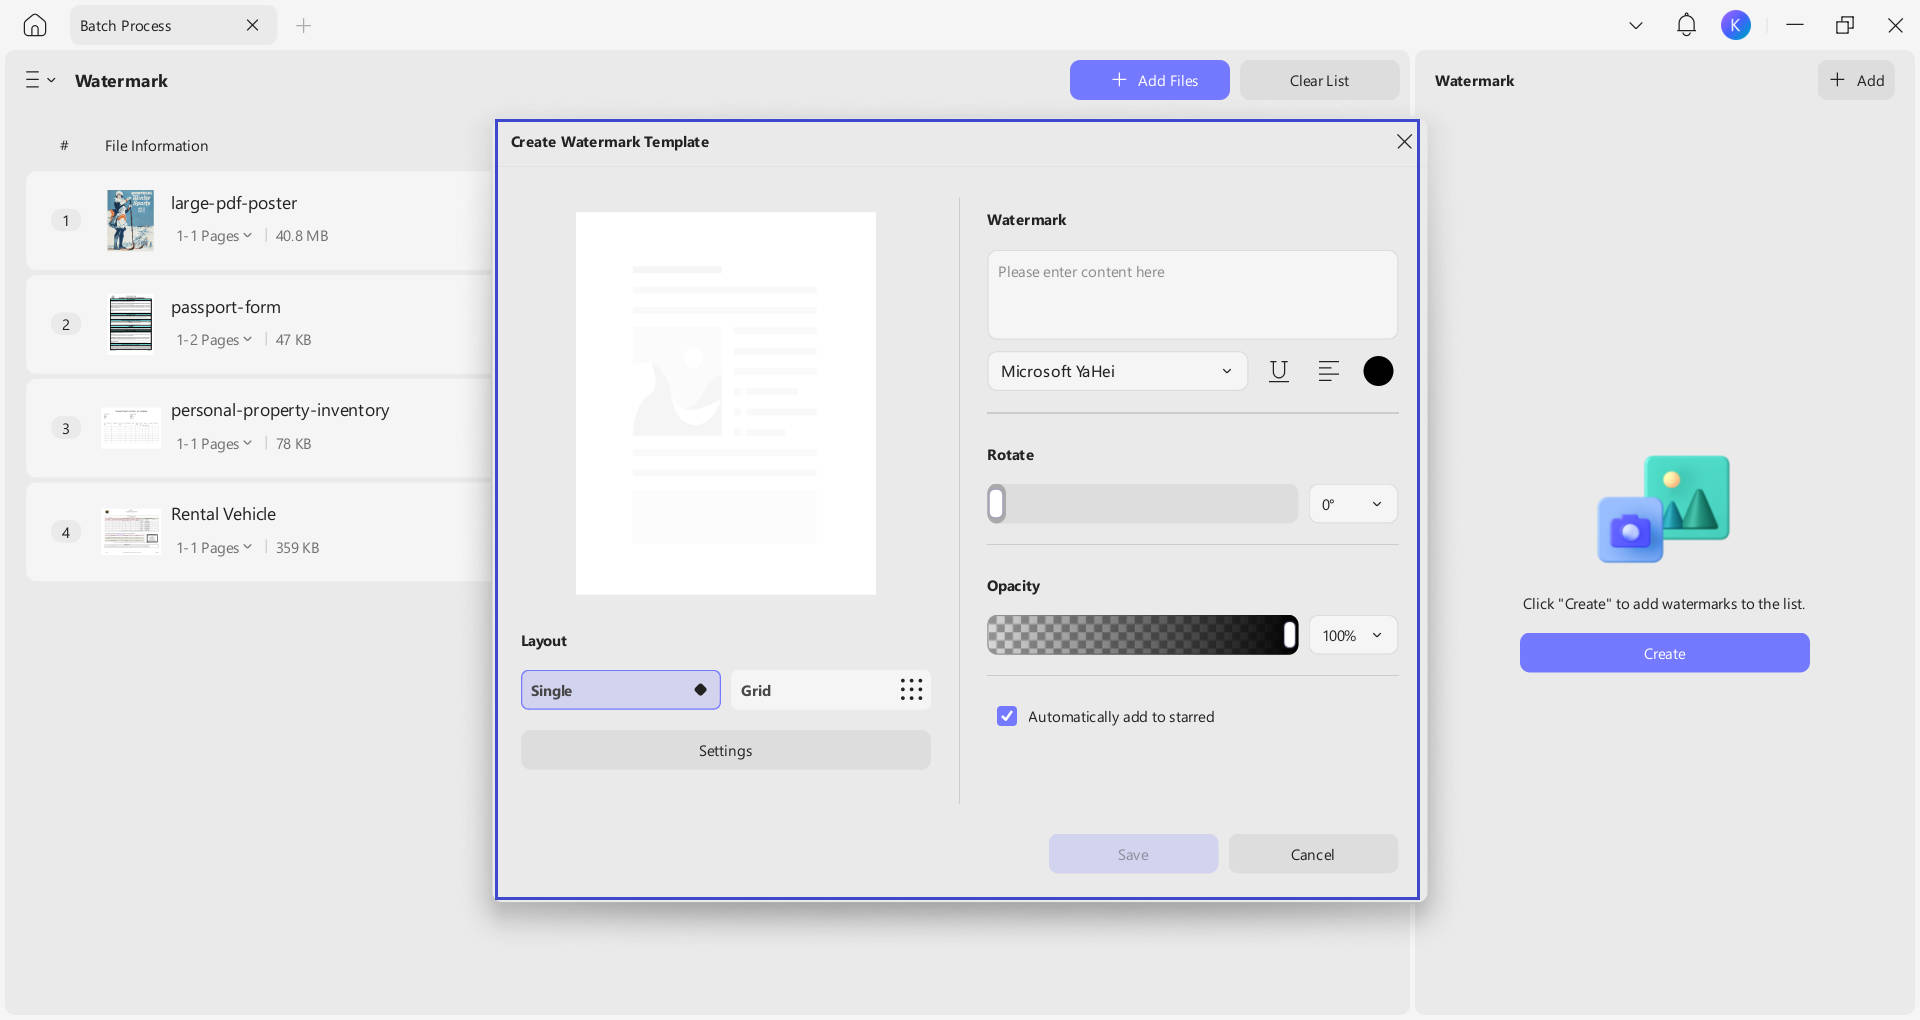
11. Batch Header and Footer
You can also add the header and footer to PDF files in batch. The guide is also simple. Just go to "Header and footer", "Add File", "Create", select "Page Number", "Text", "Date", or "Image", then, customize the position, style, and format, click on the "Save" and "Apply".
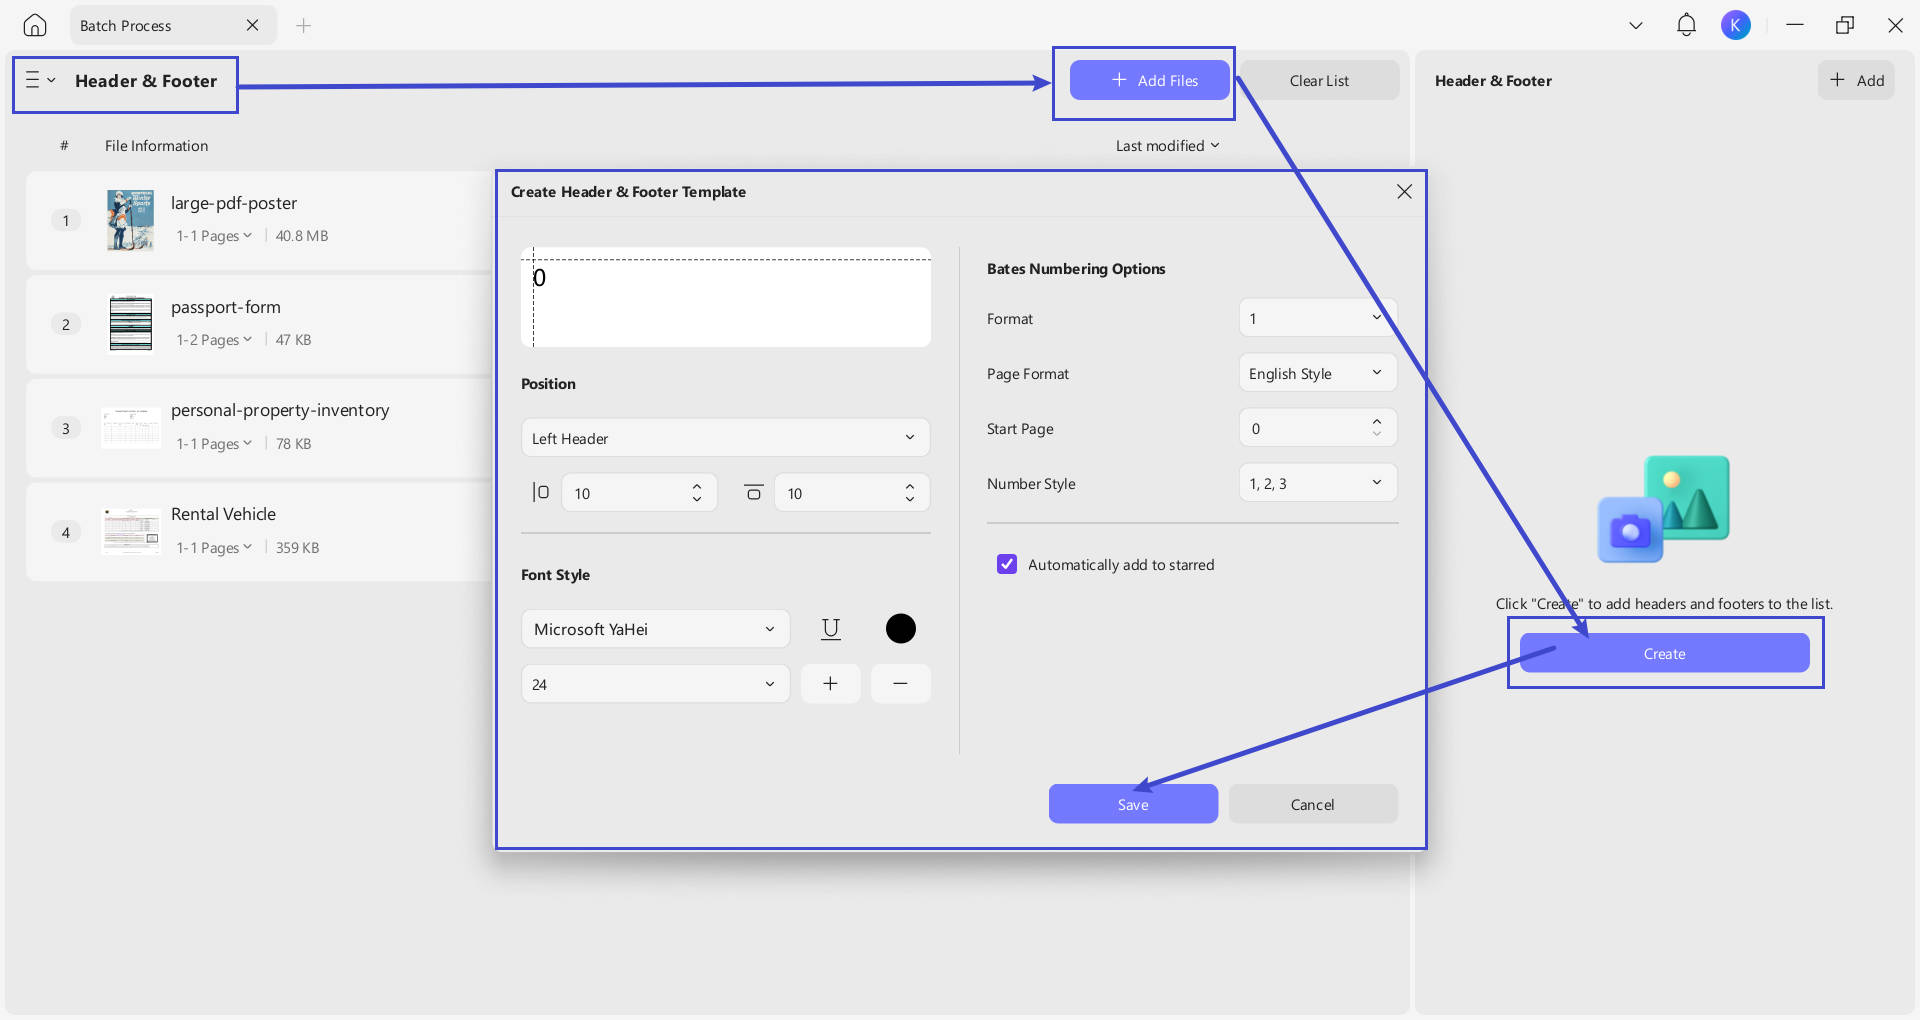
12. Batch Background
To add background to different PDF files, you need to go to "Background", "Add Files", "Create", customize the background by changing it size, opacity, and more, click on the "Save" and "Apply".
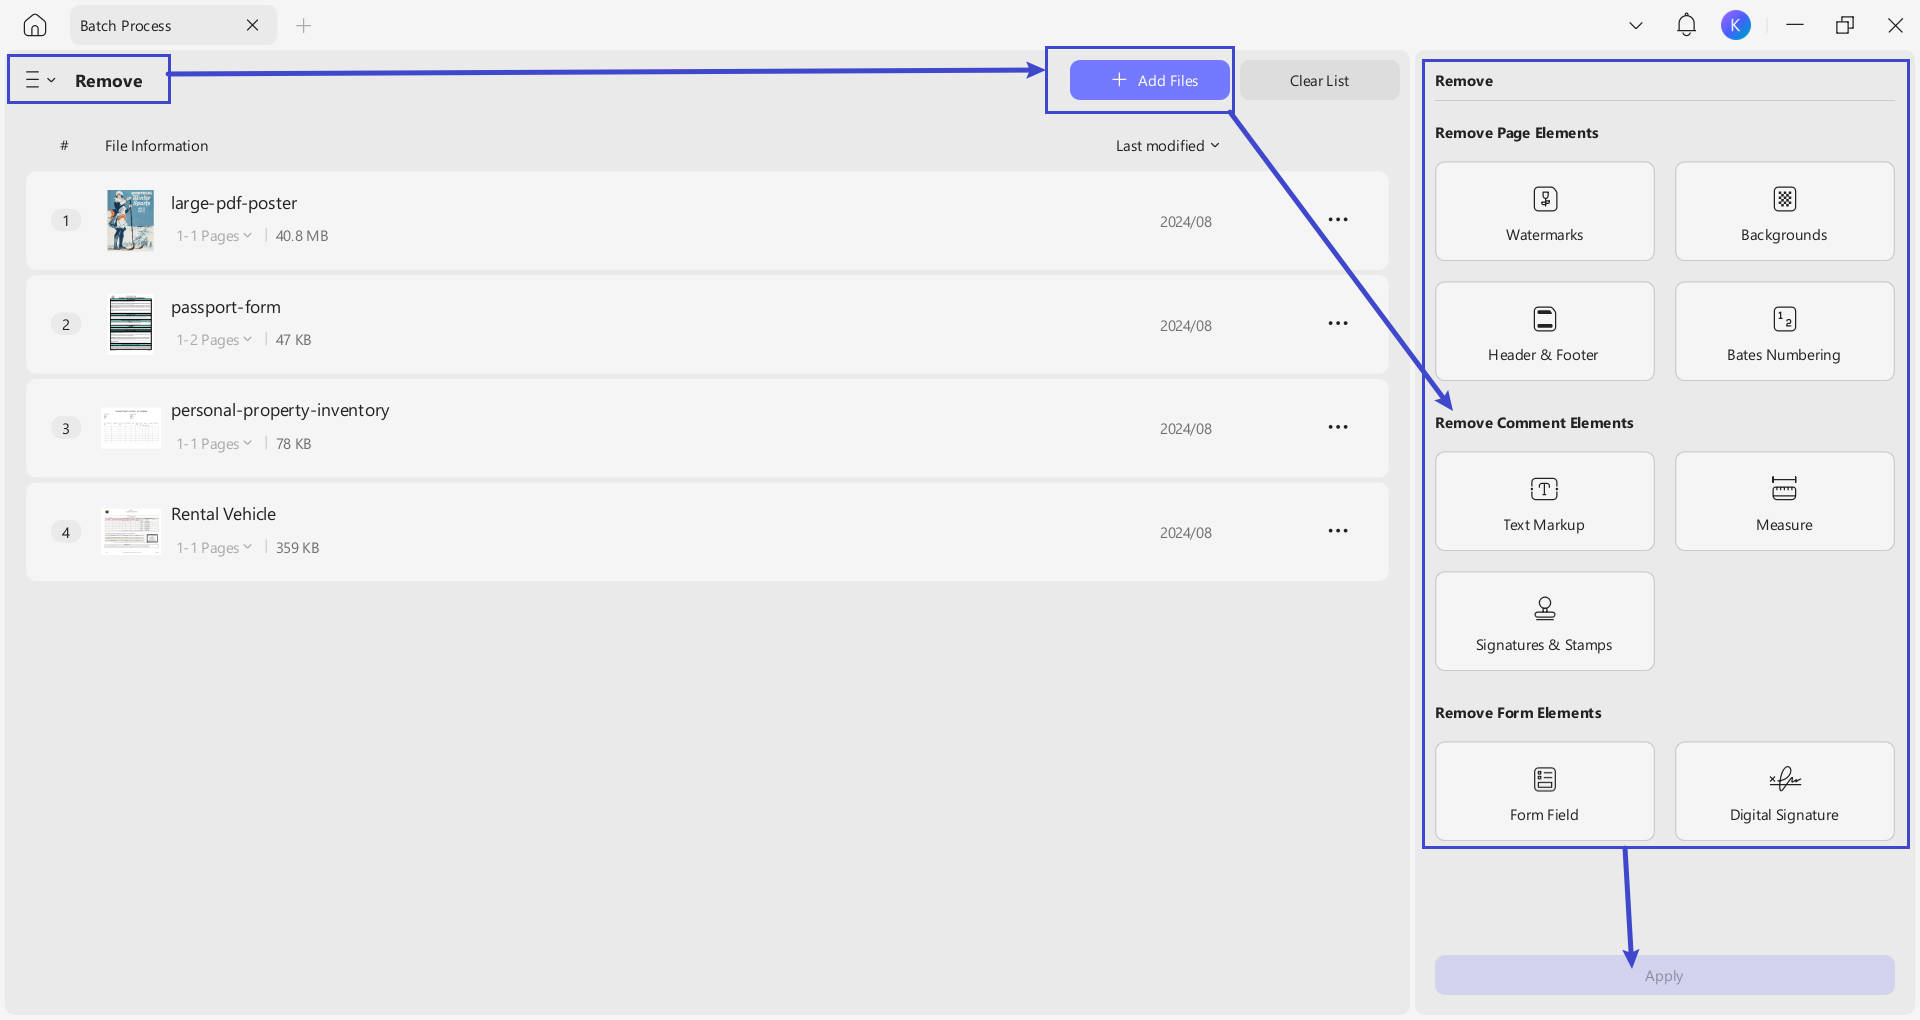
13. Batch Remove
With UPDF on Windows, you can also batch remove all the watermarks, backgrounds, headers and footers, Bates number, text markup, measurements, signatures and stamps, form field, and digital signatures.
Click on the "Remove" this time, "Add File" to upload the files you need, select the elements that you want to remove, and click on the "Apply" to remove them all.