 UPDF for Windows
 UPDF for Mac
 UPDF for iPhone/iPad
 UPDF for Android
 UPDF AI Online
 UPDF Sign
 Edit PDF
 Annotate PDF
 Create PDF
 PDF Form
 Edit links
 Convert PDF
 OCR
OCR PDF to Word
 PDF to Image
 PDF to Excel
 Organize PDF
 Merge PDF
 Split PDF
 Crop PDF
 Rotate PDF
 Protect PDF
 Sign PDF
 Redact PDF
 Sanitize PDF
 Remove Security
 Read PDF
 UPDF Cloud
 Compress PDF
 Print PDF
 Batch Process
 About UPDF AI
 UPDF AI Solutions
 AI User Guide
 FAQ about UPDF AI
 Summarize PDF
 Translate PDF
 Chat with PDF
 Chat with AI
 Chat with image
 PDF to Mind Map
 Explain PDF
 PDF AI Tools
 Image AI Tools
 AI Chat Tools
 AI Writing Tools
 AI Study Tools
 AI Working Tools
 Other AI Tools
 PDF to Word
 PDF to Excel
 PDF to PowerPoint
 User Guide
 UPDF Tricks
 FAQs
FAQs UPDF Reviews
 Download Center
 Blog
Blog Newsroom
 Tech Spec
 Updates
 UPDF vs. Adobe Acrobat
 UPDF vs. Foxit
 UPDF vs. PDF Expert
Protecting your work from unauthorized use is more important than ever these days. One effective way to do this is by adding a watermark to your documents. Watermarks are subtle yet visible markings that can be added to images, documents, or other types of digital content to indicate ownership or authenticity. In Microsoft Word, adding a watermark is an easy process, for which we shall discuss a few steps in this guide.
Knowing how to make a watermark in Word can be essential if you're a graphic designer, writer, or business owner. In this article, we'll teach you how to make a watermark in Word, from selecting the appropriate image or text to customizing its appearance and placement.
With these simple steps, you can add a professional touch to your documents while safeguarding your intellectual property. Besides the obvious methods available in Word to add watermarks, a big surprise awaits you in the article, so let's get started!
Part 1: A One-stop Solution to Add Watermarks to Word/PDF [FREE]
If you're looking for an easy and universal way to add watermarks to Word, then this method will work for you. UPDF is a comprehensive tool to add watermarks to Word without any hassle. It only requires you to turn Word into PDF files and simply add watermarks on them with one click. Next, we’re going to discuss the steps in detail.
Windows • macOS • iOS • Android 100% secure
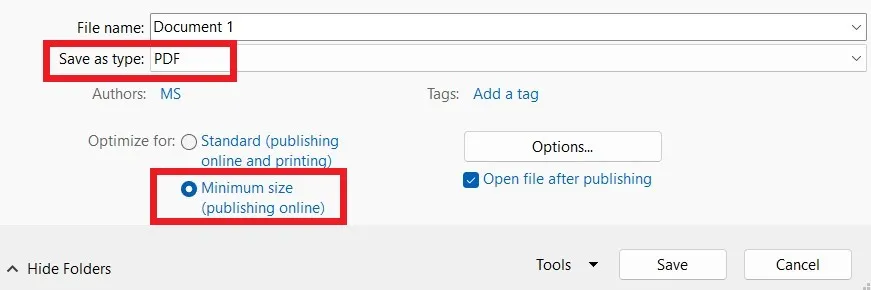
Step 1. Saving Word Files as PDF Documents
As mentioned before, PDF editors do not support the .docs file format, and before adding watermarks in Word with UPDF, you need to convert or save it as a PDF file. To do that, here are some easy steps:
- Open the document.
- Go to File > Save As.
- Now, select the folder.
- Click Save as Type to open the dropdown menu.
- Select PDF and save the file.
It will save your Word files in PDF format, and now you can move toward adding watermarks to them using UPDF.
Step 2. Adding Watermark in Word using UPDF
Now that you have saved your Word files in PDF format to add watermarks in them using UPDF, here is the complete step-by-step guide to doing it:
- Download and install UPDF.
Windows • macOS • iOS • Android 100% secure
- Open the PDF document in the editor.
- Click the 'Tools' option from the left menu in UPDF.
- Now, Click the 'Watermark' button.
- Select the 'Text' or 'File' watermark option depending on what type you will use.
- In case of an image, import an image from your computer by clicking this option.
- Customize the watermark using the 'Rotate' and 'Opacity' sliders.
- Click the 'Done' button.
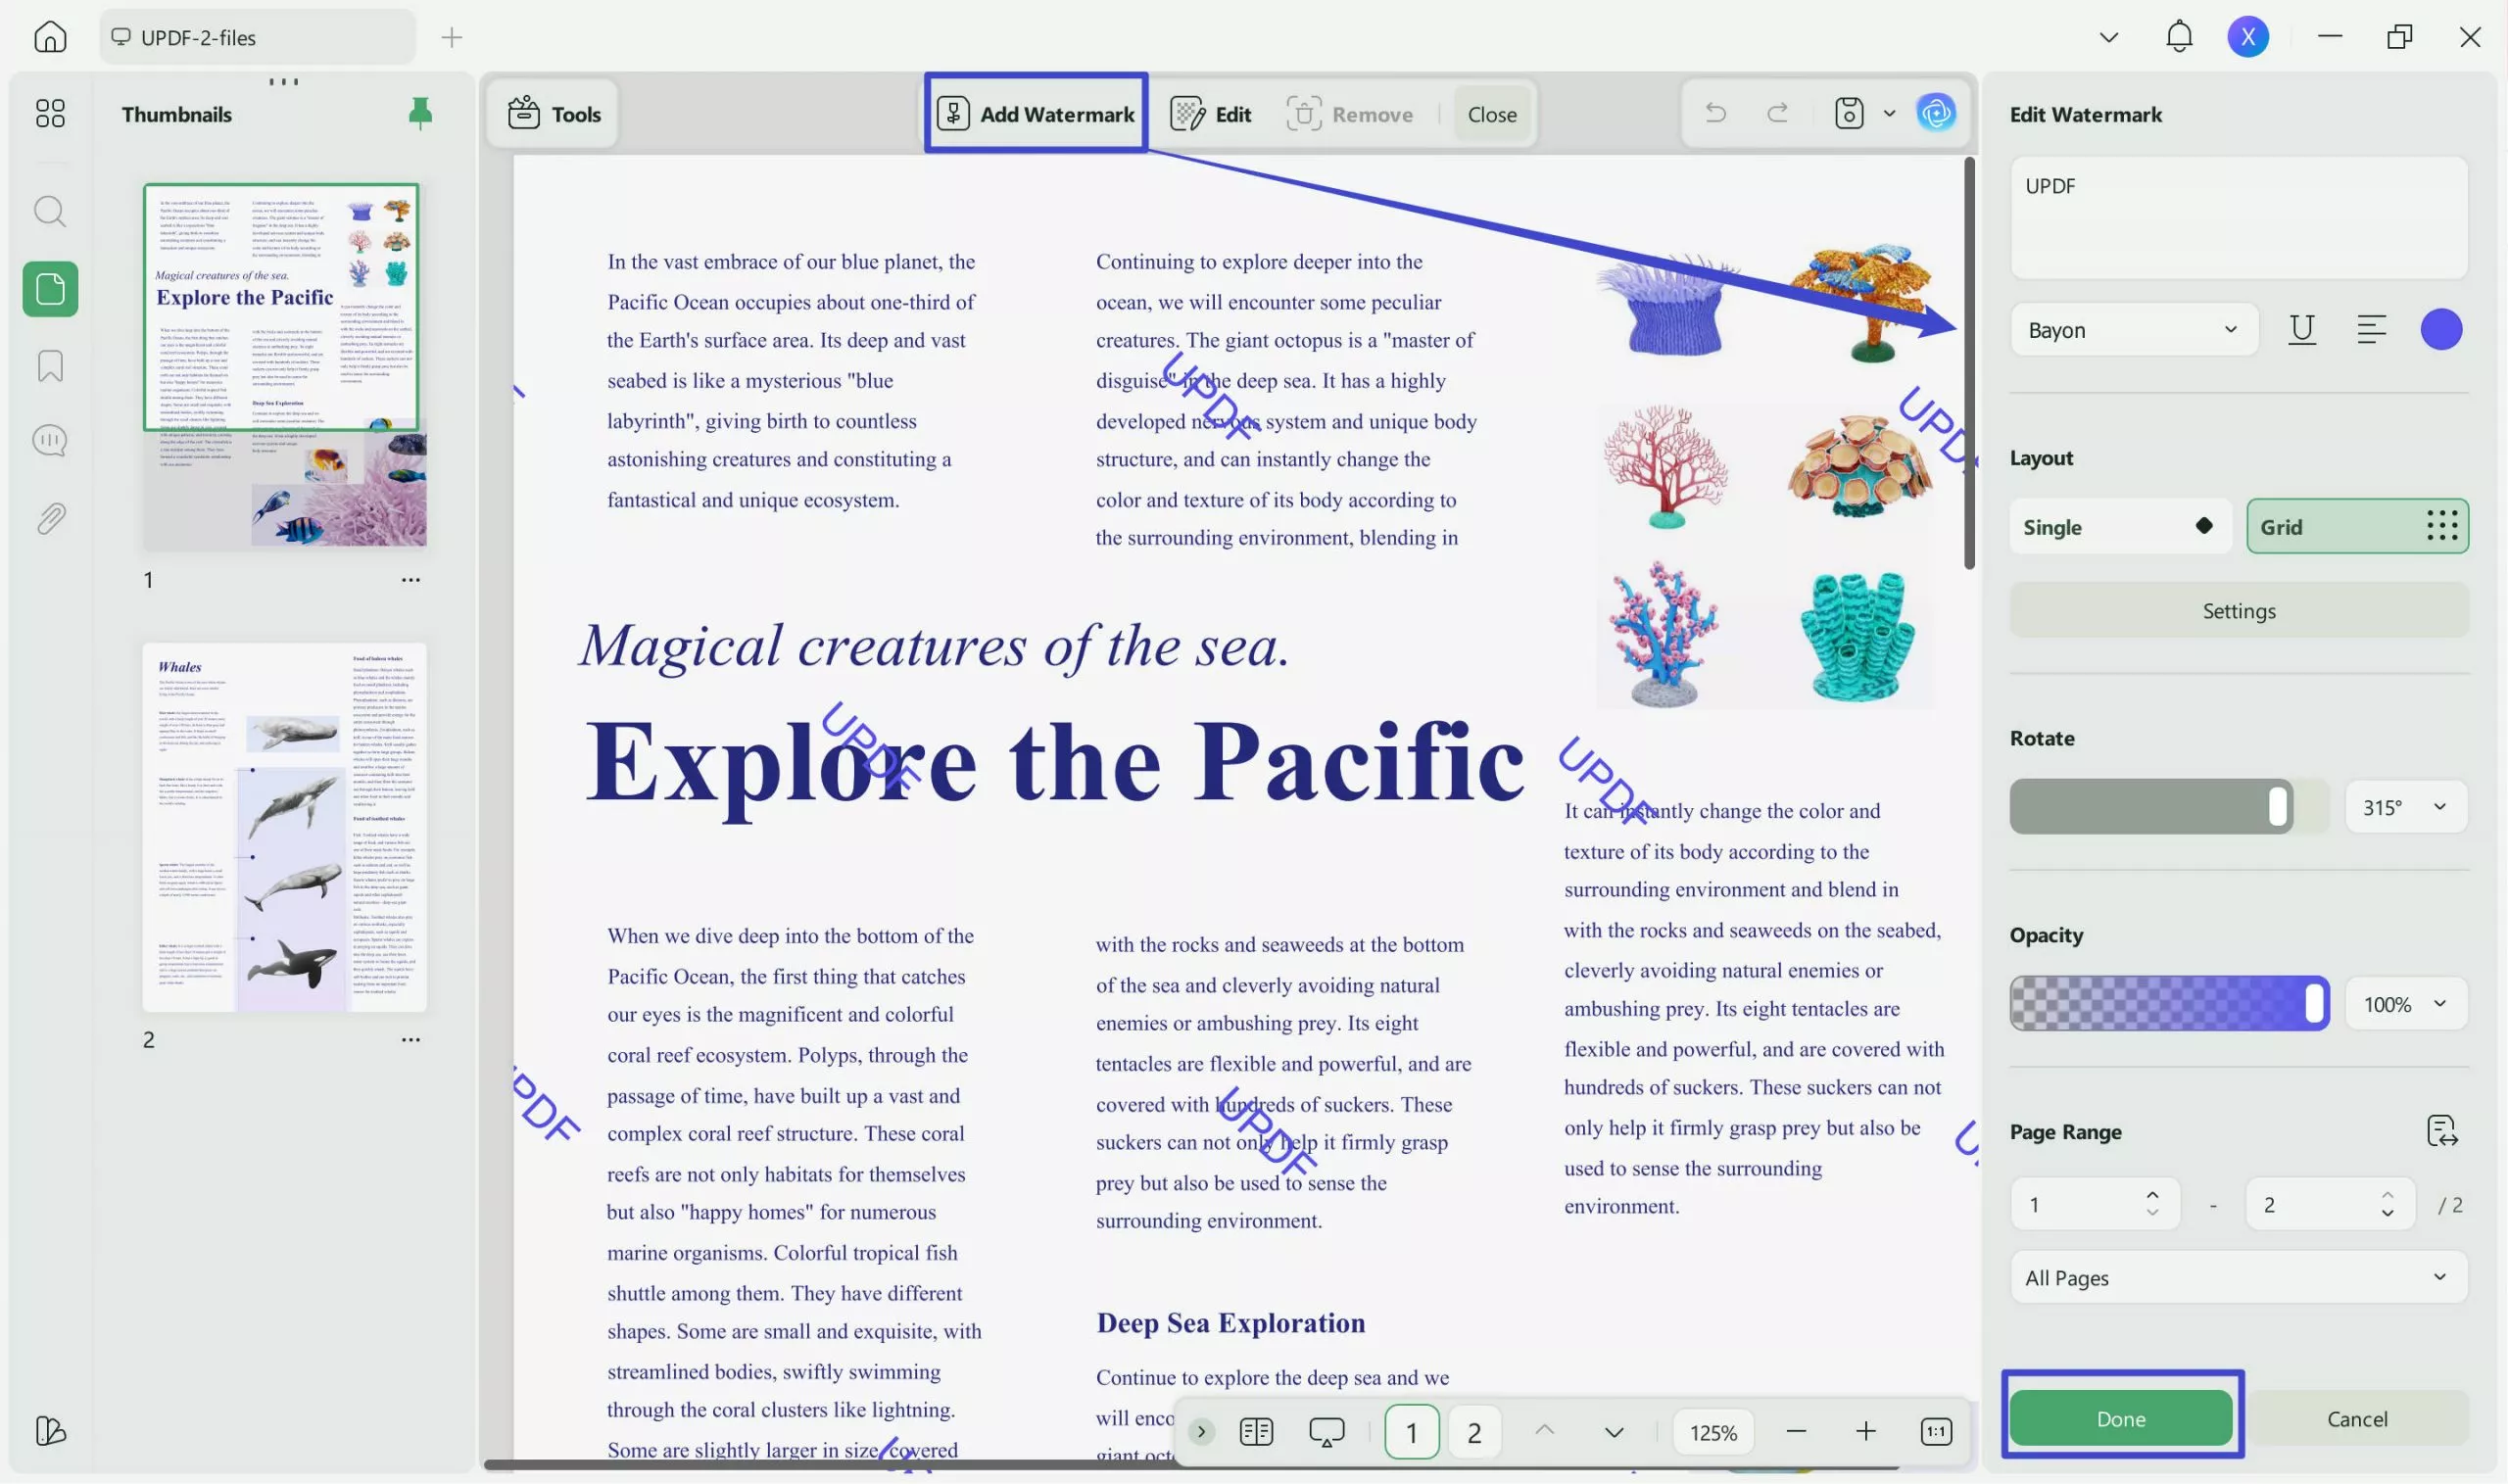
Doing this will add the watermark to all document pages in UPDF.
Advantages of Using UPDF for Making/Adding Watermarks in Word Documents
While several benefits are convincing enough for people to use UPDF, here are some that enlist why you should be using this masterful PDF editor for adding watermarks to documents:
- You can add watermarks to PDF documents conveniently.
- Compatibility with multiple operating systems, including iOS, Windows, macOS, and Android.
- It is a user-friendly editor that allows you to add watermarks with just a few clicks.
- UPDF provides a wide range of customization options for your watermarks.
- UPDF offers a free trial version, so you can try it out before purchasing the full version.
And this is how easy it is to use UPDF to add watermarks in Word documents, with plenty of customization available.
Part 2: Two Methods How to Make a Watermark in Word
There are various types of watermarks that you can use in Word, such as picture watermarks, text watermarks, and custom watermarks. You can choose from these options depending on your preference and the purpose of your document.
So, in this section of the article, we will bring two methods to add or insert a watermark in Word, including a direct method and then the custom watermark. So, without further delay, let us bring you the complete step-by-step guide.
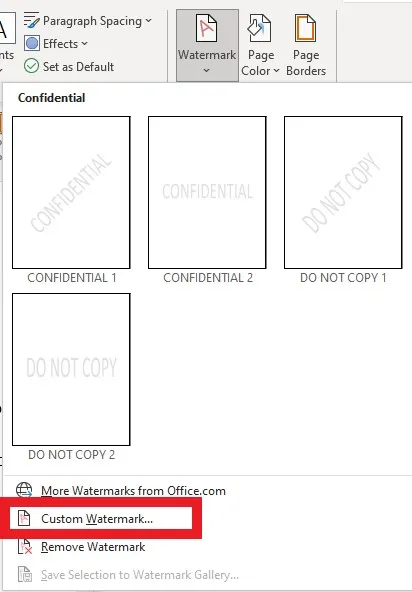
1. Directly insert a watermark into Word
You can directly insert a watermark in Word using the built-in options. Follow these steps:
- From your PC, open the Word document that needs to be watermarked.
- Click the "Design" tab.
- Click the "Watermark" option in the "Page Background".
- Choose a built-in watermark from the list, such as "CONFIDENTIAL," "DRAFT," or "URGENT".
- The watermark will be added to your document.

2. Make and add a custom watermark to Word
To add a custom watermark to a document in Word, you can follow these steps:
- Open the file that needs to be watermarked.
- Click the "Design" tab.
- Click the "Watermark" option under the "Page Background" group.
- Select the "Custom Watermark" option.
- Choose the "Text watermark" or "Picture watermark" option.
- If you choose "Text watermark," enter the text you want to use, select the font, size, and color, and adjust the layout and orientation.
- If you choose "Picture watermark," select the image you want to use, and adjust the size, layout, and washout.
And by following these steps, you should be able to make and insert watermarks in Word without much hassle.
Part 3: FAQs About Making Watermarks in Word
1. How do I edit the watermark in Word?
Follow the steps below to edit a watermark in Word:
- Open the watermarked document that needs editing.
- Open the "Design" tab.
- Click the "Watermark" button in the "Page Background" group.
- From the dropdown menu, select "Custom Watermark".
- In the "Printed Watermark" window, you can change the settings for the watermark, such as the text, font, size, color, and layout.
- Once you have made the desired changes, click "OK" to apply the new watermark to your document.
2. How do I delete the watermark in Word?
Here are the steps to delete the watermark in Word:
- Open the Word document that contains the watermark.
- Click on the 'Design' tab.
- Click the Watermark button in the 'Page Background' group.
- Select 'Remove Watermark' from the drop-down menu.
- The watermark will be removed from the document.
Conclusion
So, in this article, we discussed different methods to make watermarks in Word, including directly inserting a watermark, making and adding a custom watermark, and using different types of watermarks such as text, pictures, or a combination of both. We have also provided solutions to frequently asked questions about editing or deleting watermarks in Word.
We hope that adding UPDF to the guide for adding watermarks was a great surprise, as we intended for our users. Do not forget to download and use it to simplify your reading and document editing jobs. There is no doubt that UPDF is the ultimate best one-stop solution that allows you to add watermarks to PDFs on Windows, macOS, iOS, and Android.
Always remember that adding watermarks is an effective way to protect your documents from unauthorized use. With the help of the above methods and tools, you can easily add watermarks to your documents and ensure their security.
Windows • macOS • iOS • Android 100% secure


 Lizzy Lozano
 Enola Davis
 Enya Moore