Do you have a bunch of screenshots you want to share for collaboration? What could be a better way than a secure file format like PDF? By compiling all of the screenshots in one complete document, you can share them with ease while making sure the content remains untampered.
So, how can you possibly do it? Lucky for you, there are various ways! If you don't know how to save a print screen as a PDF, this article will offer 4 easy ways. We will also provide a step-by-step guide for all of these methods so you can save your print screen to PDF without any trouble.
Let's get started!
Part 1. How to Save a Print Screen As a PDF on Windows and Mac With UPDF?
When it comes to taking screenshots and saving them as PDFs, there is no better way than UPDF. Why? Well, UPDF is full of versatile tools to effectively manage all aspects of your documents. Saving your screenshots as PDFs is a given. But, you can also take screenshots directly with UPDF if you are using a Mac computer!
The best part? UPDF lets you edit all the elements of the screenshots including text, and images. If you want to hide any sensitive information in your snaps, you can use UPDF's redact tool to mask it. Plus, UPDF offers a snazzy annotation tool that lets you add comments, shapes, stickers, and highlights to upscale your collaboration.
Despite its versatile features, it is super easy to use. And we will show you how with a step-by-step guide. So, click the below button to download UPDF on your device if you want to know how to convert print screen to PDF effortlessly.
Windows • macOS • iOS • Android 100% secure
Way 1. How to Save Print Screen as PDF on Windows 10/11?
Alright folks! Let's start with how to save the print screens as a PDF on Windows 10/11. If you don't know how to capture your screen on Windows 10 or 11, we will guide you on that as well. So, let's get started with the stepwise guide.
Step 1. Take Screenshots with Shortkeys
Open the page you want to screenshot. Press "Windows + Print Screen" to capture the full-screen view. Or, hold "Windows + Shift + S" to snip a specific part of your screen. Then drag the cursor over the area of your screen you want to capture.
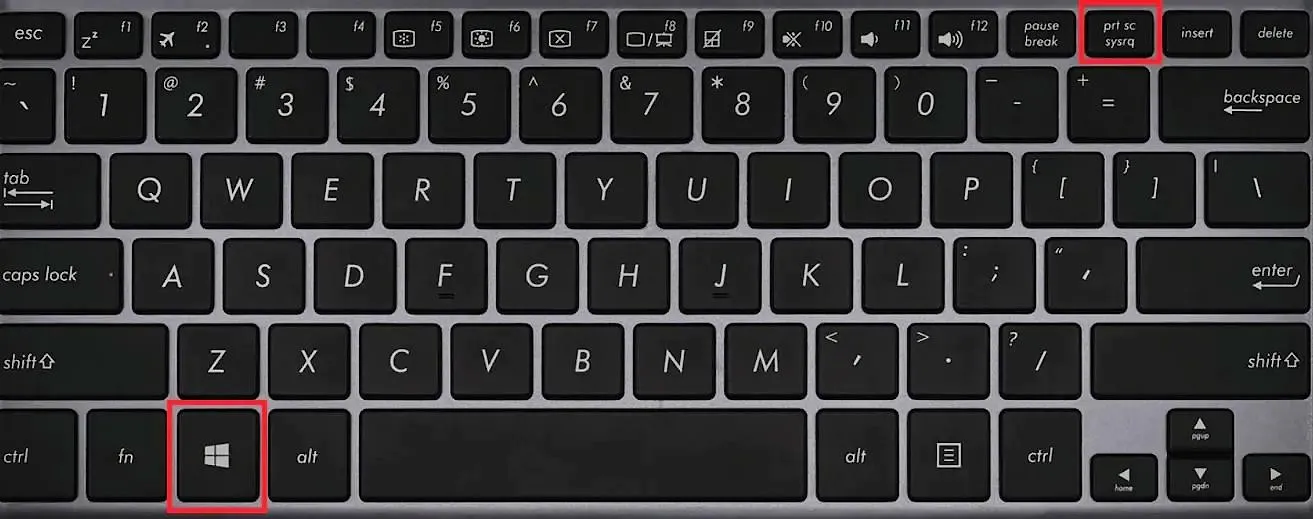
Step 2. Save and Access Your Screenshots
Once the snipping tool captures your screen, open the captured snap. Then click on "Save as" located near the top right corner. Select the destination folder and click "Save." To access the screenshots of the full-screen view, go to "This PC > Pictures > Screenshot."
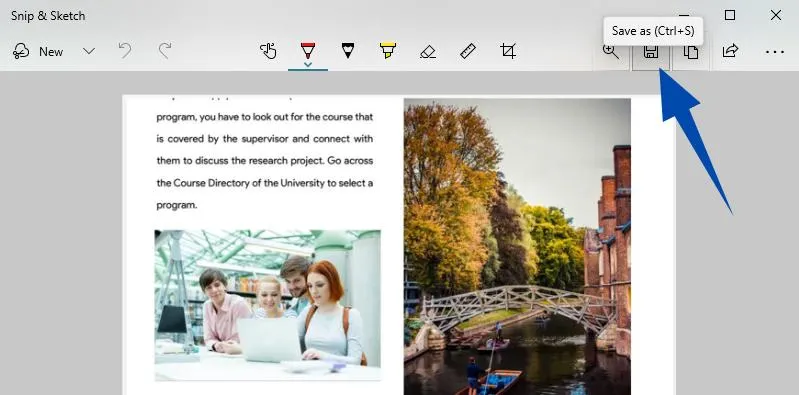
Step 3. Open the Screenshots with UPDF
Once your screenshots are saved, launch UPDF on your PC. Click on the "File" tab. Then, click on "Create" and select "PDF from Image" from the dropdown list. Now, select the screenshots to import and click "Open."
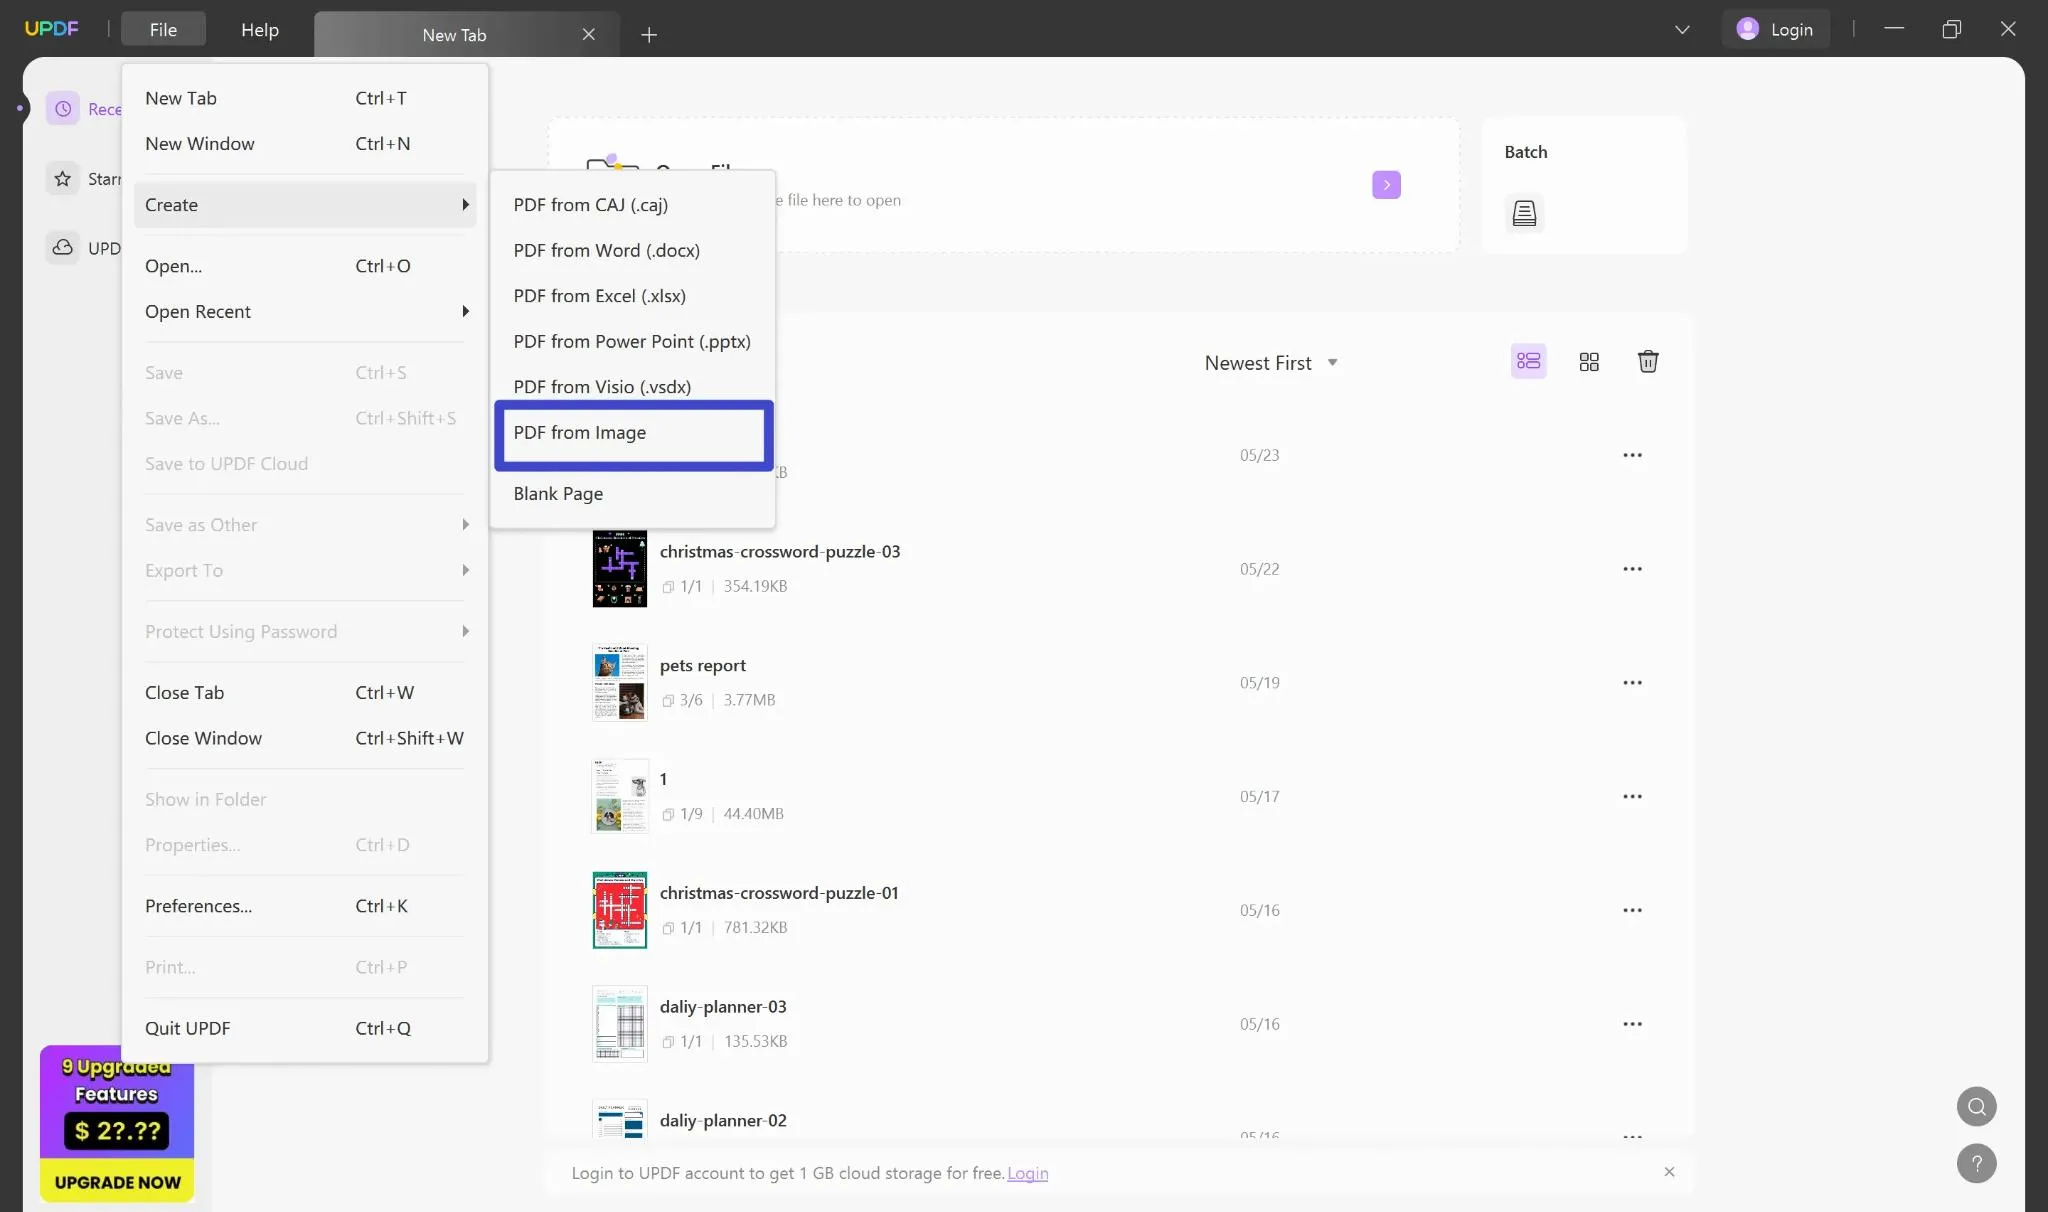
Step 4. Save Print Screen as PDF
With your screenshots imported into UPDF, you can make any changes you want. You may click on "Comment" from the left side panel to add comments, stickers, or shapes. Once done, click "File" and choose "Save" to save the print screen as a PDF.
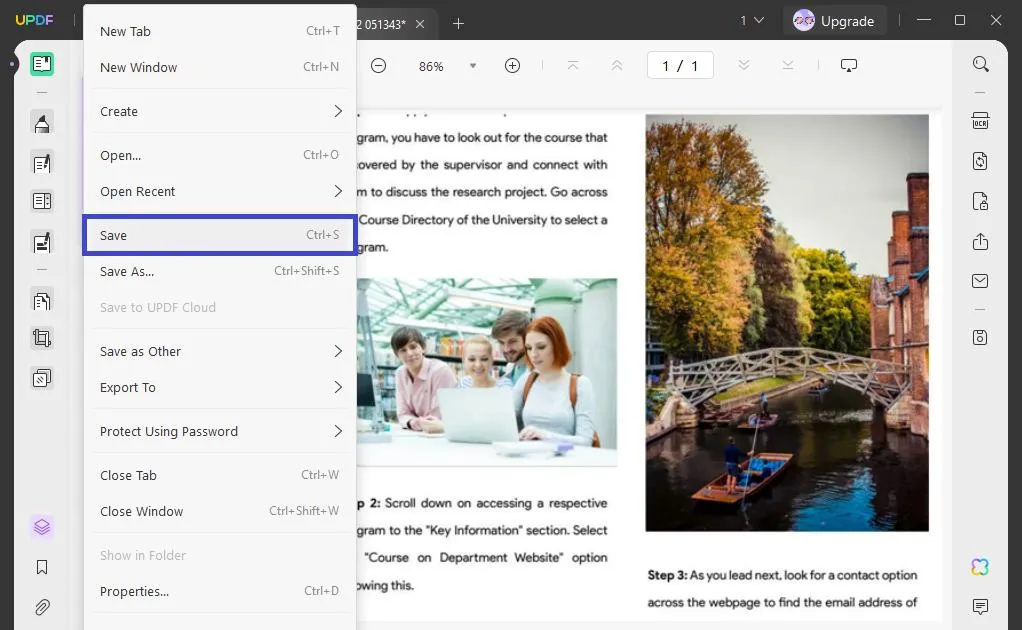
And that's how to save the print screens as a PDF on Windows 10/11 with UPDF. It was effortless, right? Now let's move forward and explore how to do it on Mac.
Way 2. How to Save Print Screen as PDF on Mac?
Mac users can enjoy the benefit of taking screenshots and saving them as PDFs directly with UPDF. This can save you all the time spent on capturing multiple snaps before being able to convert them to PDF. But for your convenience, we'll show you how to do both.
Let's first start with how to capture screenshots with UPDF.
Method 1. Screenshot and Save with UPDF
This method is especially useful if you want to take snaps from a PDF document. It lets you view your PDF, take screenshots and automatically convert it to a PDF all under one platform. Here's how to use this method in simple steps.
Step 1
Open UPDF on your Mac. Then, click on "Open File" to import your desired PDF document.
Step 2
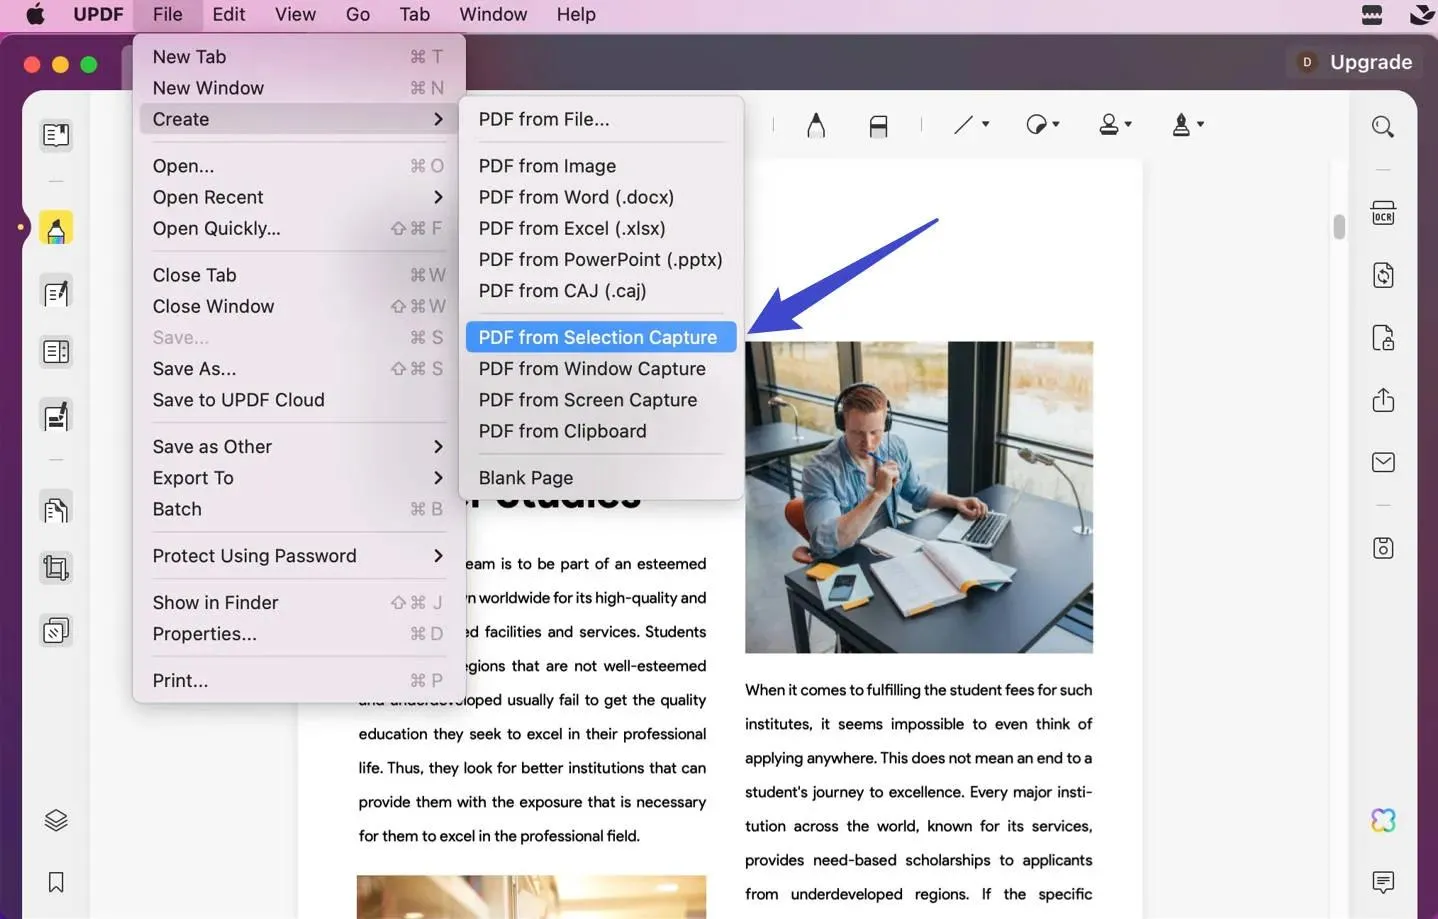
Once your document is imported, click the "File" tab from the top left corner. Select "Create" and choose "PDF from Selection Capture." You can also capture the entire screen and the window.
Step 3
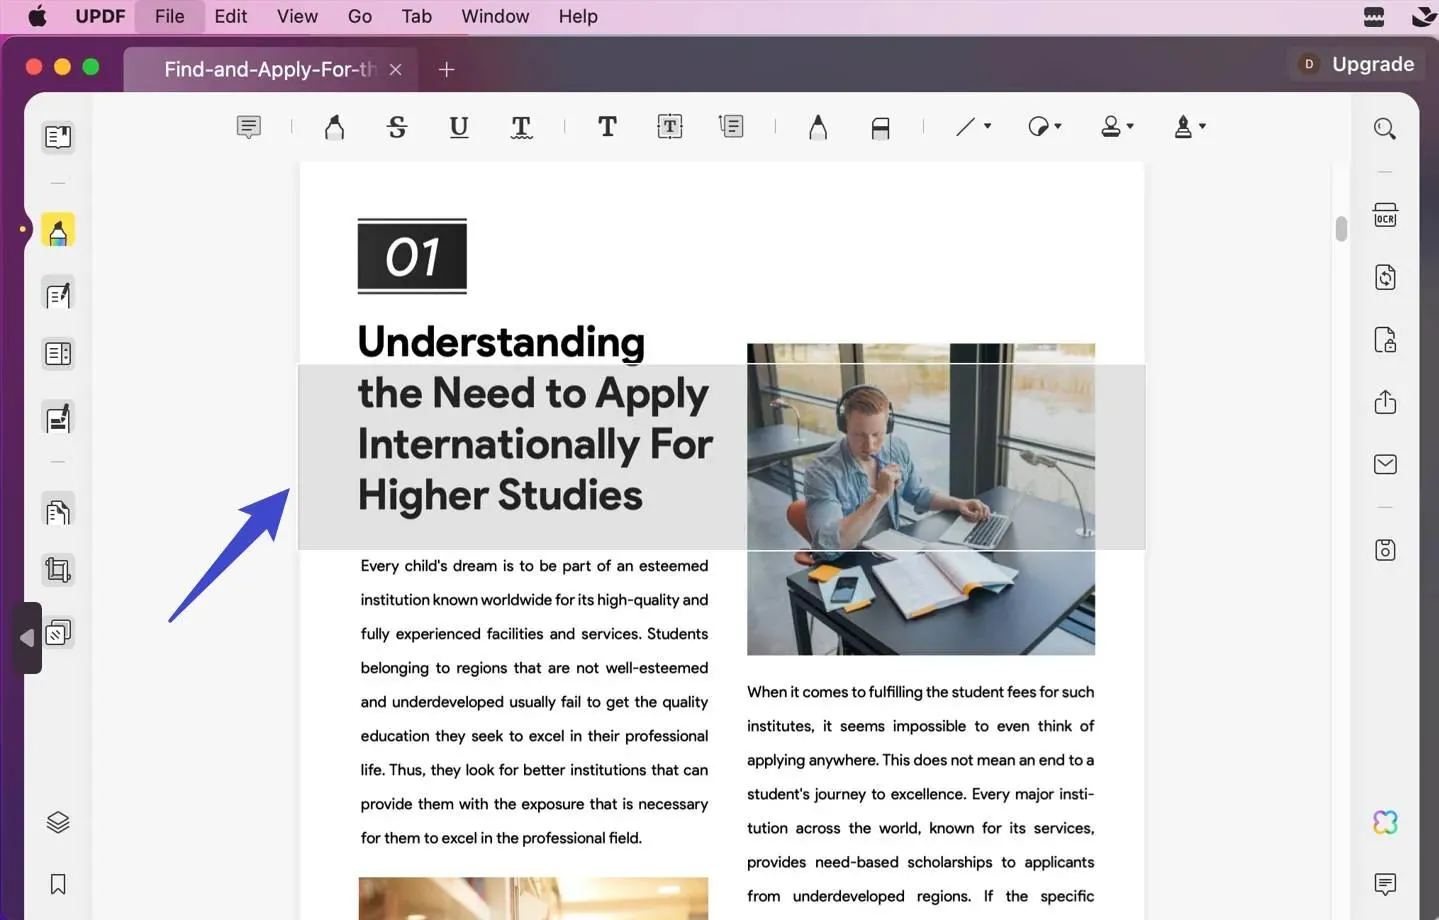
Now, you can capture the specific content from your screen. Simply, click and drag the cursor over the desired part of the document to capture a screenshot.
Step 4
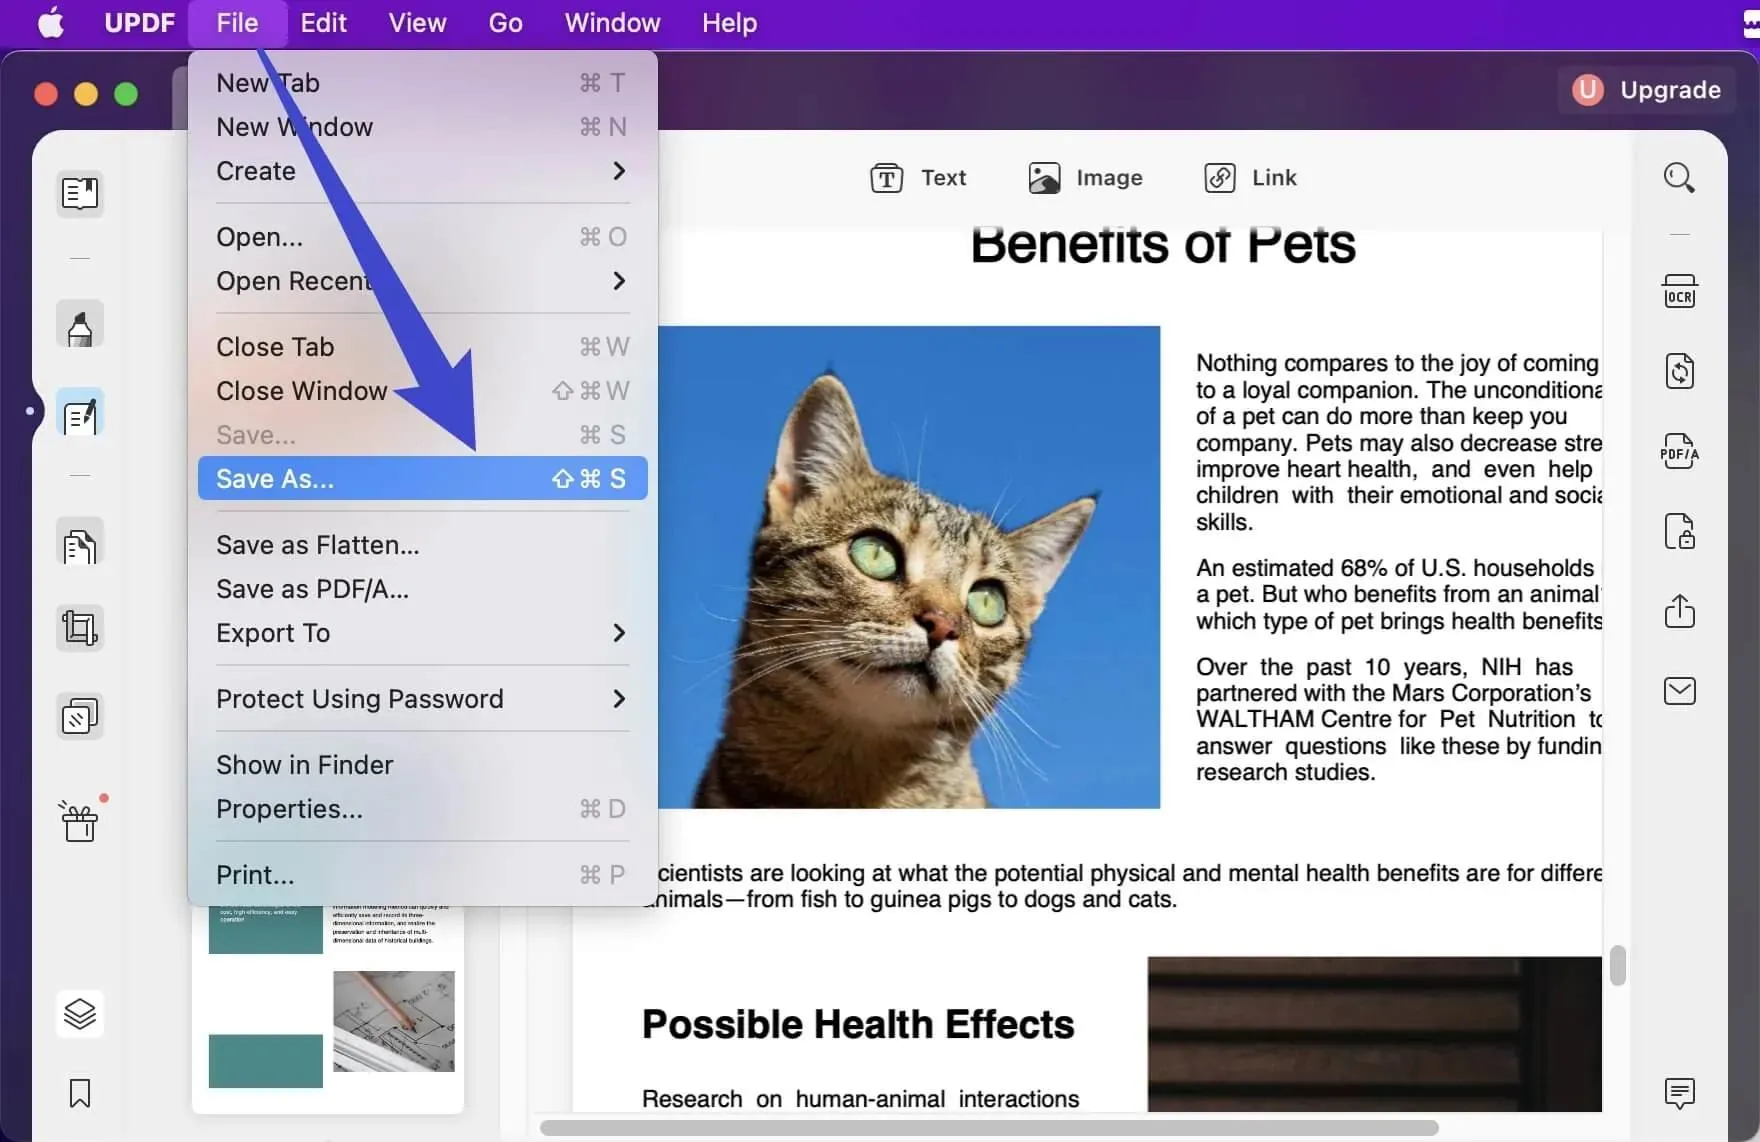
UPDF will automatically open the screenshot in a new tab as a PDF file. Go to the tab and select the "File" tab. Then click on "Save as" to save the PPDF on your device
That was easy, right? UPDF makes it a breeze to directly capture screenshots and convert them to a PDF file. Now, let's move forward to the next method to save the print screen as a PDF on Mac.
Method 2. Screenshot with Mac and Save with UPDF
Our second method involves taking screenshots directly with Mac's default screen capture tool. You can use this method to take several screenshots and then convert them all into one complete PDF document. Here's the step-by-step guide to do this.
Step 1
Open the page you want to screenshot. Press "Shift, Command, and 3" to capture the full-screen view. Or, press "Shift, Command, and 4" to capture a specific part of your screen. Then drag the crosshair over the area you want to capture.

Step 2
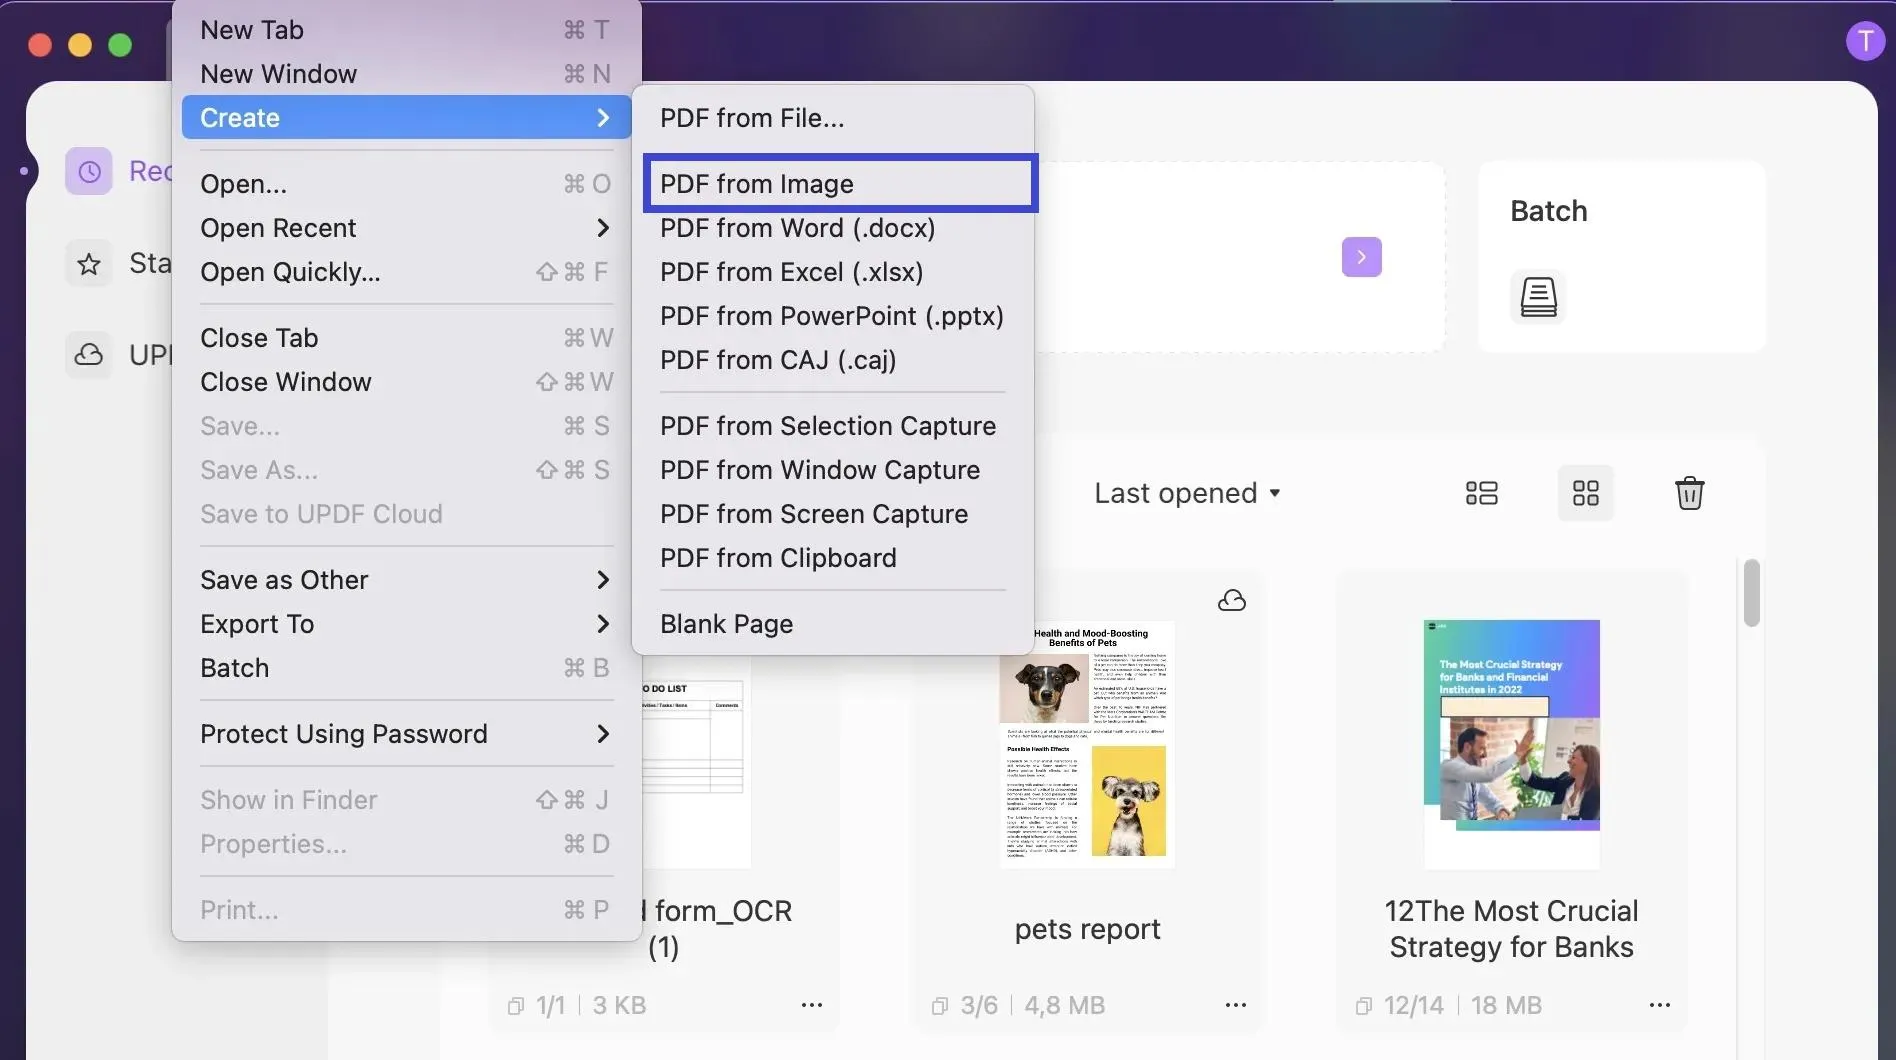
Once your screenshots are saved, open UPDF on your Mac. Click on the "File" tab and hover over the "Create" option. Then select "PDF from Image"
Step 3
Select the screenshots you want to upload. UPDF will ask you if you want to merge them into a single document. Click "Yes" if you want to merge all files.
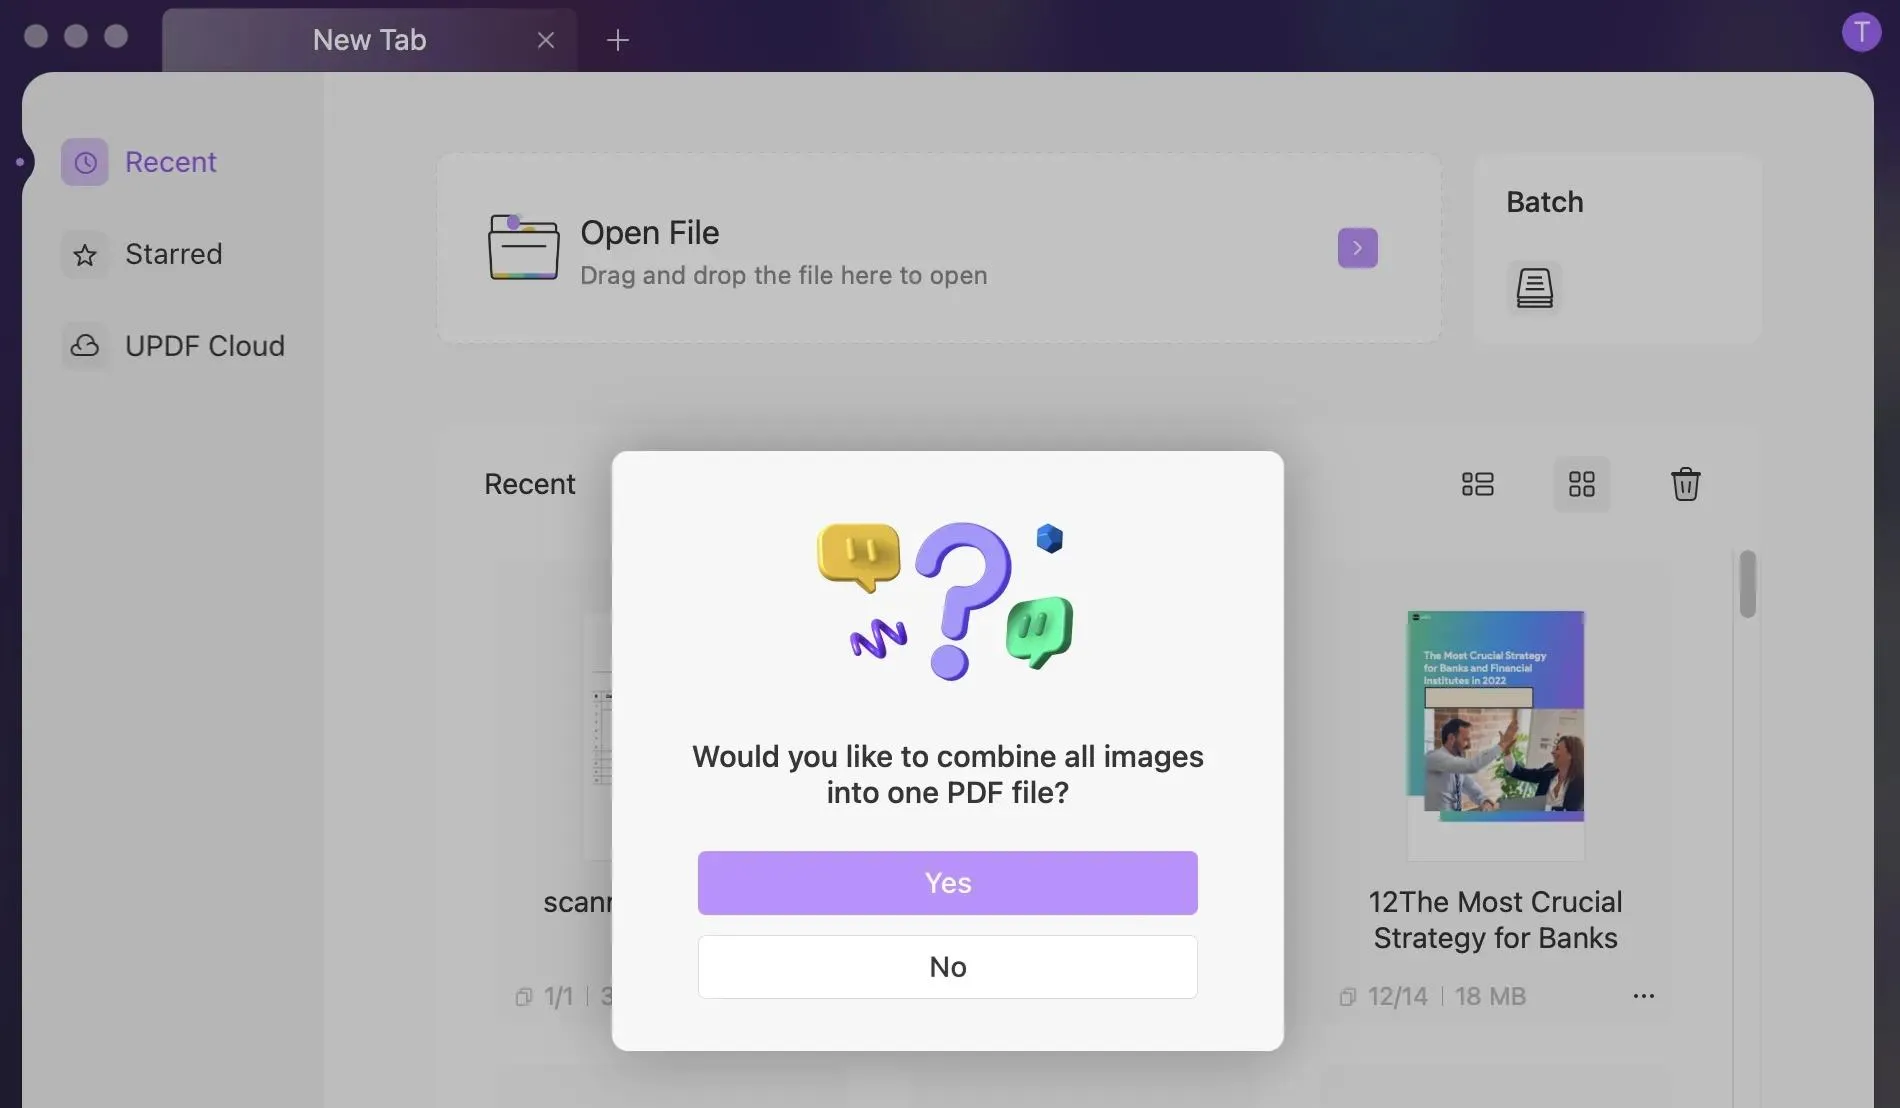
Step 4
You can edit and annotate all the screenshots once they are imported into UPDF. Then, go to the "File" tab and choose "Save" to save the print screens as a PDF on your device.
That's all about how to save print screens as a PDF on Mac in simple steps. But that's just a glimpse of UPDF's advanced capabilities! It has a lot of other nifty tricks under its belt. Let's find out what these are!
UPDF is More than a Tool to Create PDFs!
UPDF is the one-stop complete solution to all of your PDF needs! Powered with AI, it offers a full suite of advanced PDF solutions right on your desktops and mobile phones. Apart from being a PDF creator, UPDF is also a:
- Powerful AI Assistant: Brainstorm unique ideas with UPDF AI. It is your trusty companion to summarize, translate, explain and rewrite any type of content.
- All-in-One PDF Editor: UPDF gives you the freedom to edit all elements of your PDF such as text, images, links, headers, footers, backgrounds and more!
- Creative PDF Annotator: Add comments, sticky notes, text callouts, shapes, stamps, and stickers! Or, let your creativity run wild with the pencil tool – you choose it!
- Reliable PDF Converter: UPDF lets you convert your PDF to and from various file formats such as Word, PPT, Excel, Text, PNG, TIFF and the list goes on.
- Accurate OCR Tool: Need to extract text from scans and images? No problem! UPDF's AI-powered OCR tool will convert your scans to editable and searchable PDFs in a snap!
- Efficient PDF Organizer: Organizing PDFs with UPDF is as easy as a quick drag and drop! You can add, delete, crop, split, merge, replace and even extract PDF pages!
Apart from these, UPDF also lets you password-protect, redact, fill and sign, compress and batch-process PDF documents, all under one roof! Watch the video below to fully explore UPDF's powerful capabilities. You can also read an in-depth review of UPDF by HowtoGeek.
Either way, you will find UPDF is jam-packed with all the features you need for efficient document management. Click the below button to download UPDF now and experience the most productive PDF solutions right at your fingertips! And if you want to upgrade to pro version after testing, you can click the below button to upgrade to pro version.
Windows • macOS • iOS • Android 100% secure

Part 2. How to Save a Print Screen as a PDF on iPhone/iPad With UPDF?
Now, let's talk about how to turn the print screen into a PDF on iOS devices. We recommend using the UPDF iOS app for this purpose. It works fast and requires no intricate steps. Just click the below button to download UPDF on your iOS device. Then use our step-by-step guide to explore the iPad's print screen to PDF feature with UPDF.
Step 1
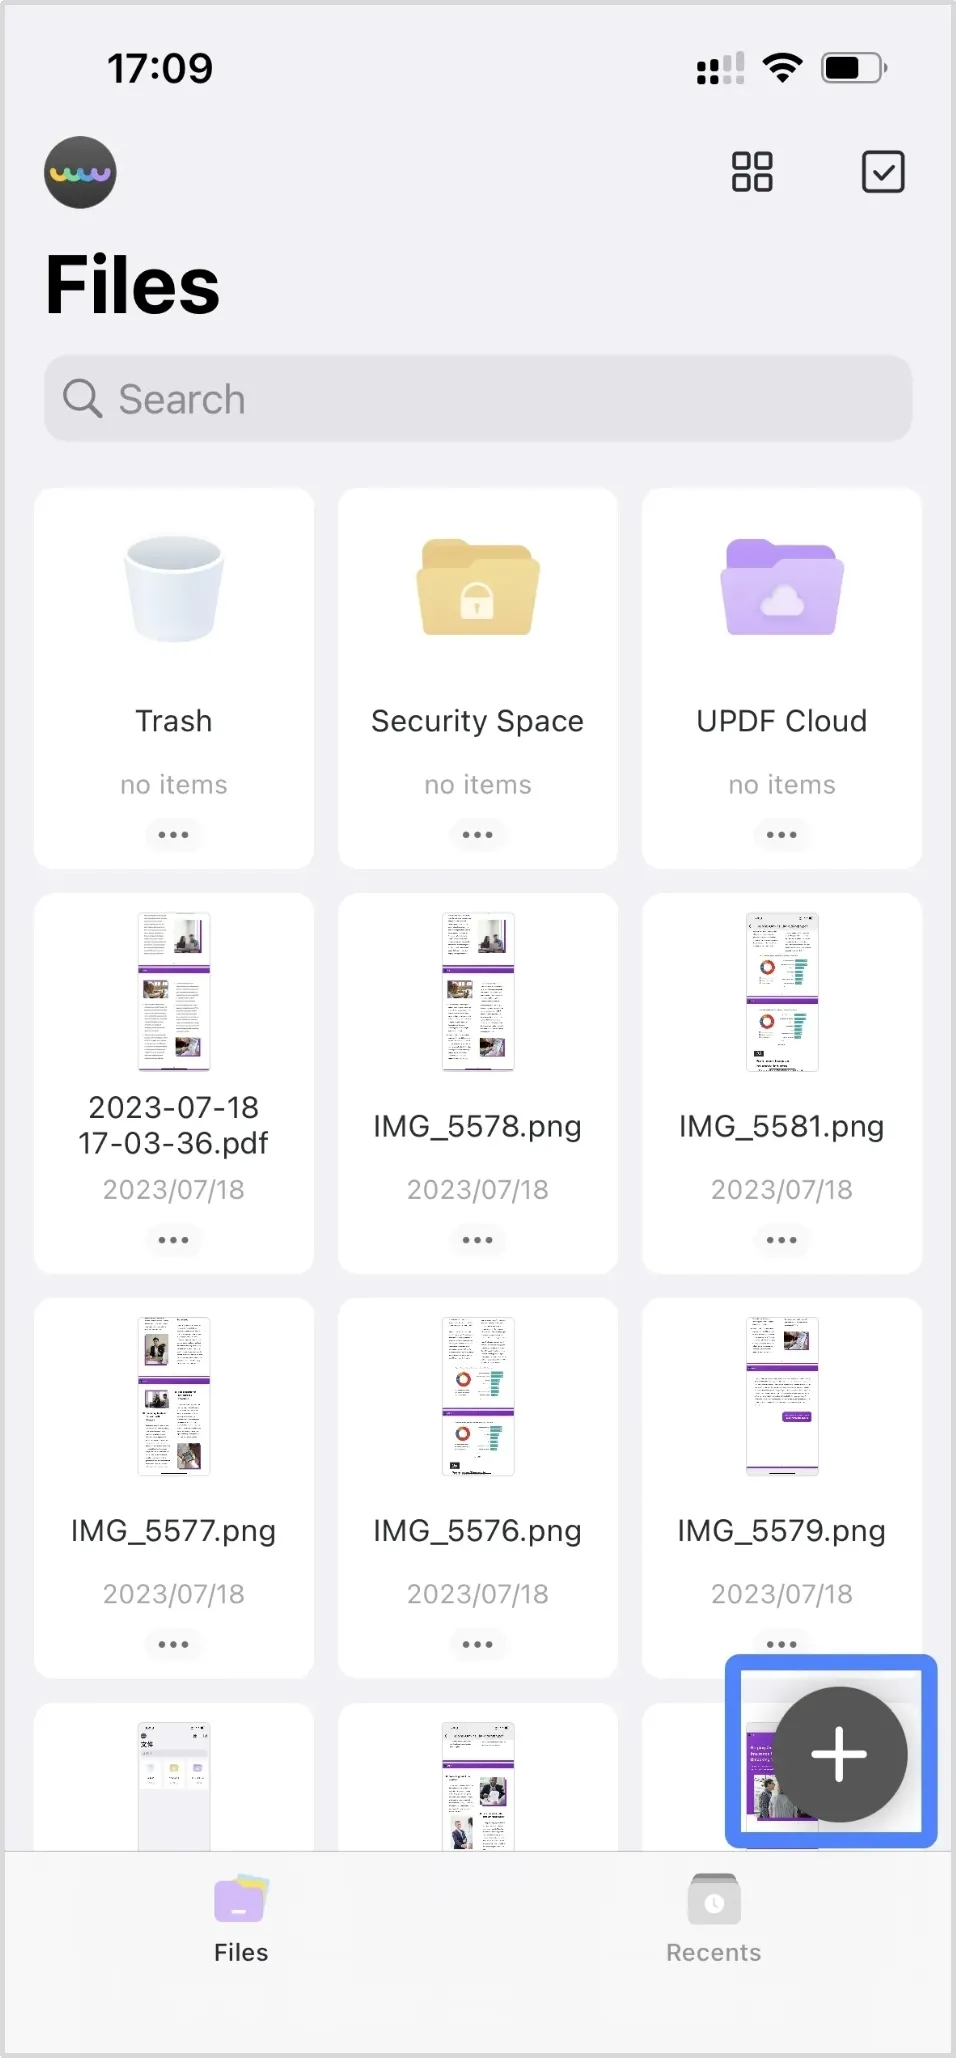
Open UPDF on your iPhone or iPad. Then tap on the "+" symbol found in the bottom-right corner of the screen. Select the screenshots you want to import from the Photos gallery.
Step 2
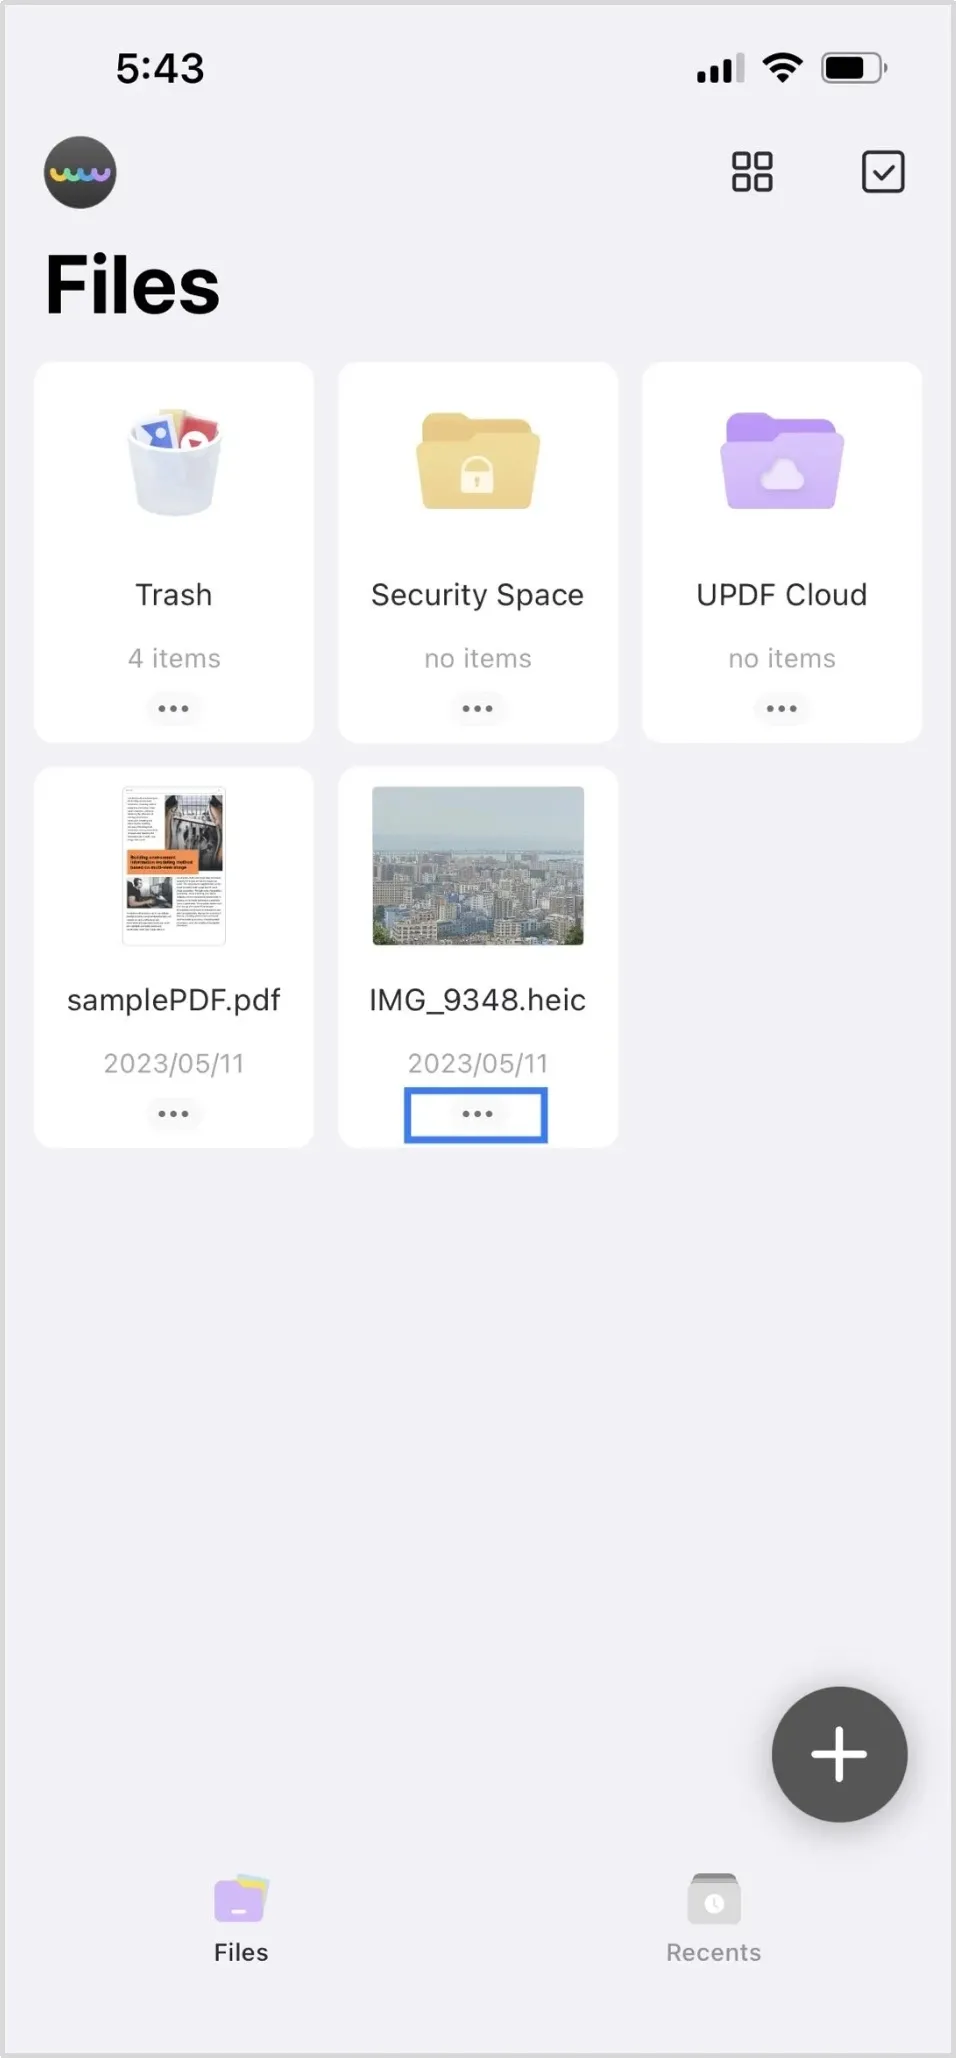
After your file is uploaded, find the three horizontal dots (...) below the image. Tap on them to open up several options for managing the image.
Step 3
Find the "Convert to PDF" option near the bottom of your screen. Tap on it to convert the print screen to PDF.
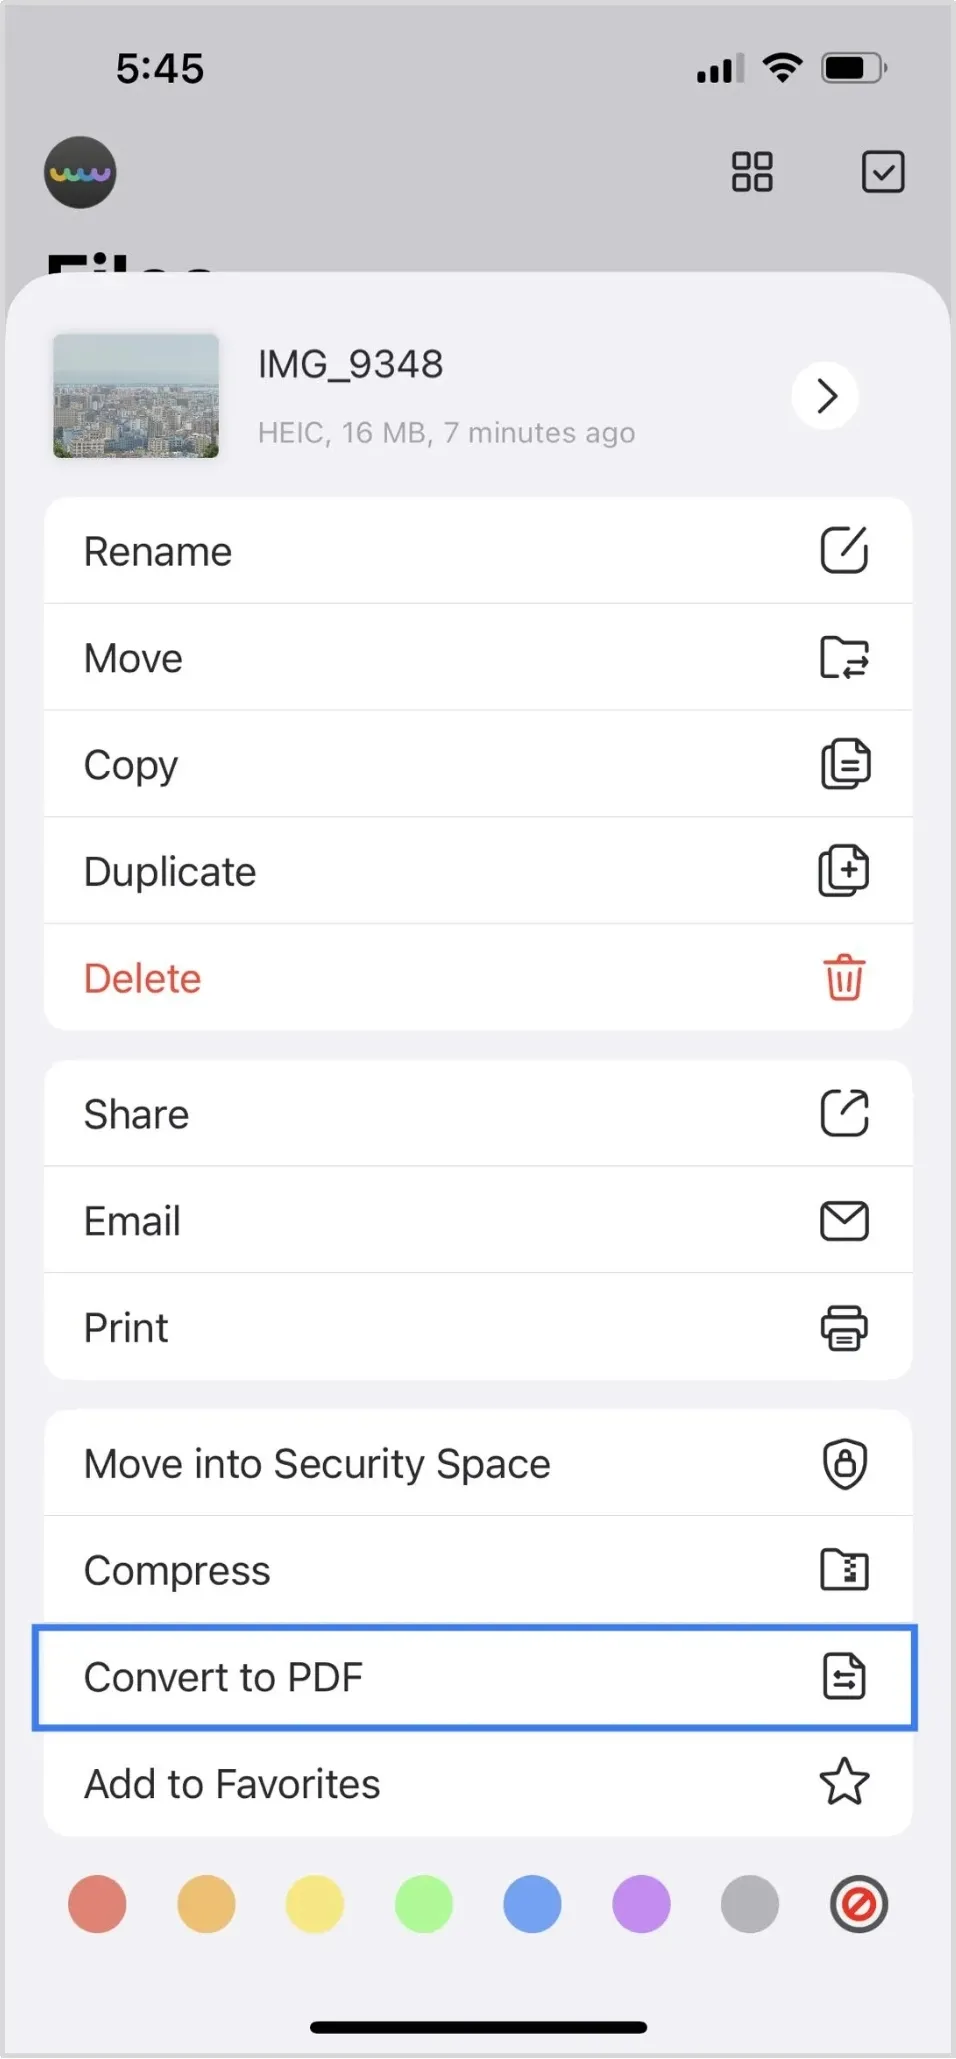
And that's how the iPhone print screen to PDF function works in three simple steps. Now, let's move forward and find out how to convert screenshots to PDF on Android.
Part 3. How to Turn Print Screen into PDF on Android via iLovePDF?
iLovePDF is a great app for managing your documents productively. It offers a rich variety of tools for a smarter PDF workflow. From creating documents to editing, converting, annotating and filling PDFs, you can find all the PDF solutions you need. But here is the catch! The app only allows you to carry out 4 free tasks in one day which can be quite limiting.
Keeping that in mind, let's find out how to use it to convert print screens to PDF.
Step 1
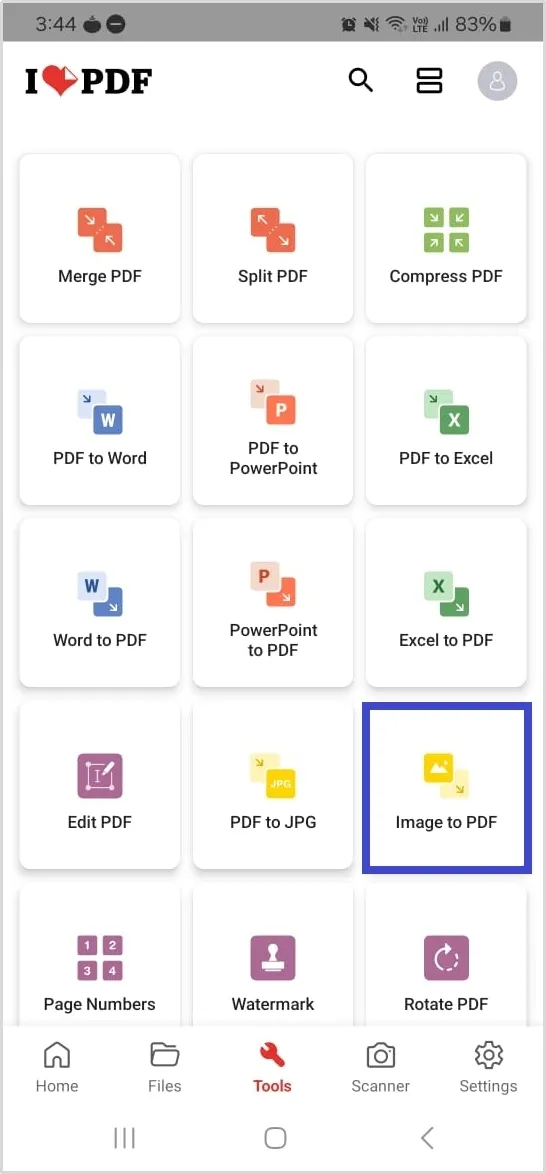
Install the iLovePDF app on your Android device and open it. On the main page, tap on "Tools" and select "Image to PDF."
Step 2
Select the screenshots to convert to PDF from your phone's internal storage. Then tap on "Next" to proceed.
Step 3
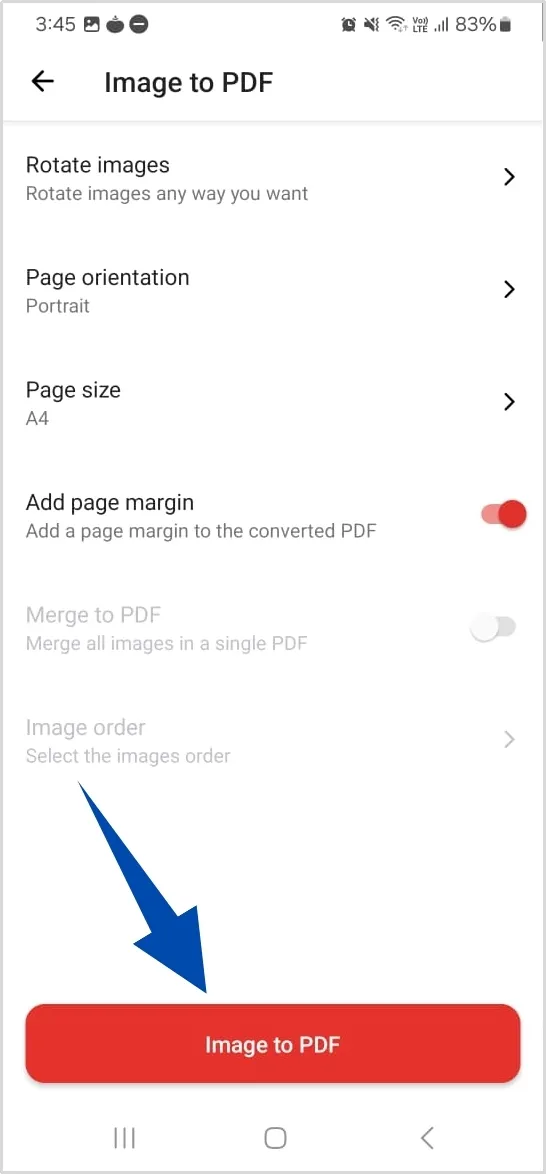
Now, you can configure the settings for the PDF page such as the orientation and page size. Once you are done, tap on the "Image to PDF" button to start the process.
That's all about using iLovePDF on Android to print screens to PDF. But if you are looking for an online solution, you try our next method.
Part 4. How to Save a Print Screen as a PDF Online Via SmallPDF?
While you can use Chrome to print screens to PDF online, SmallPDF is the hub of all the tools you need to effectively manage your documents. The platform covers a versatile range of PDF solutions including merging, eSigning, editing, and converting to and from PDFs.
You can use this platform to convert screenshots to PDFs online. But make sure you have a stable internet connection to process your files faster. Let's explore how to use SmallPDF to save screenshots as a PDF file.
Step 1
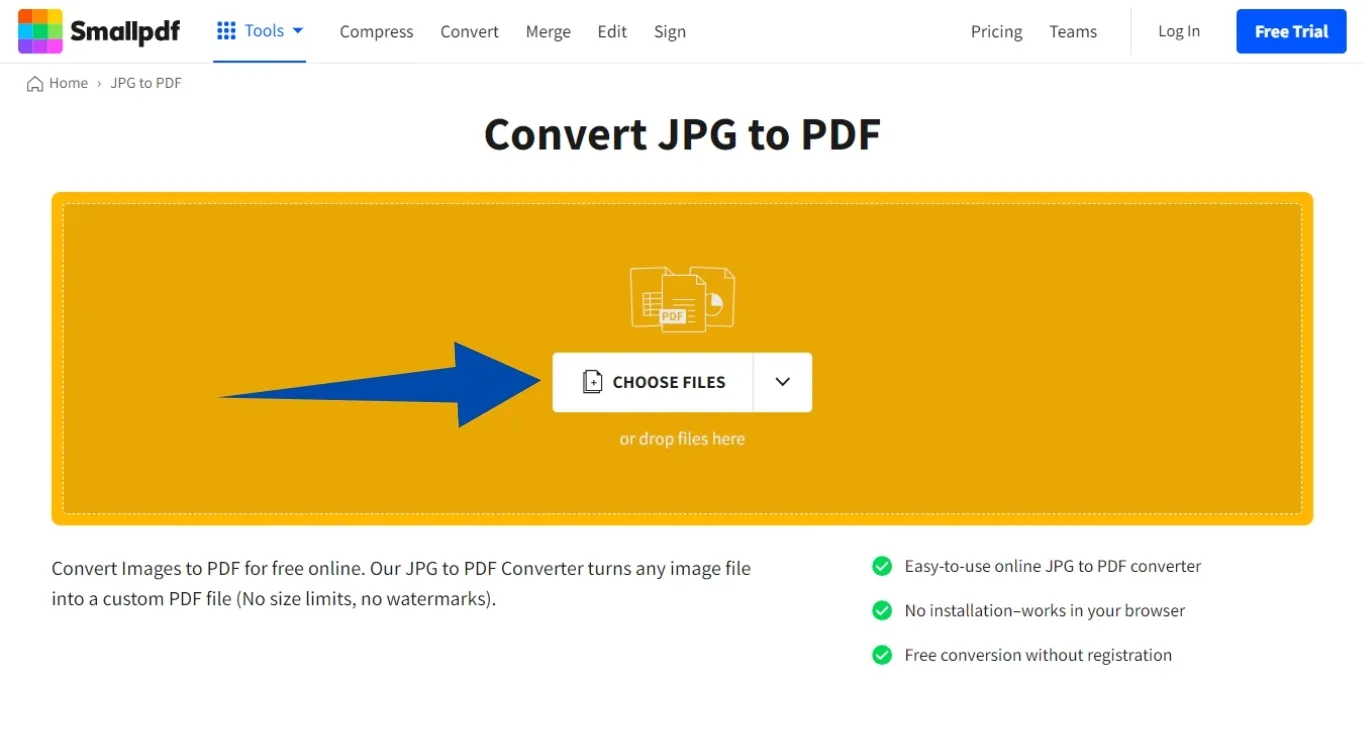
Go to SmallPDF's official website and scroll down to find the "JPG to PDF" tool. Click on it to access the interface for this tool.
Step 2
Click on "Choose Files" to upload your screenshots to the platform. You can select multiple files to import at once.
Step 3
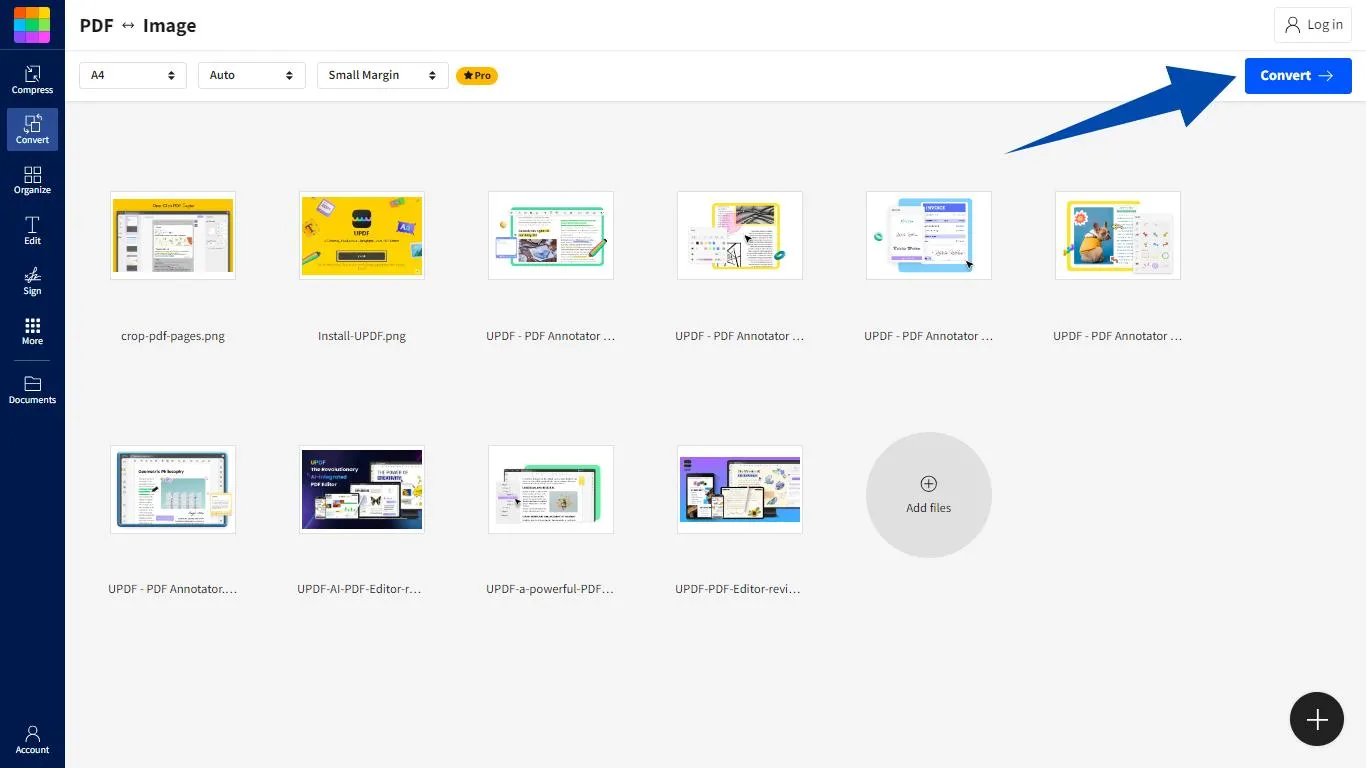
Click on the "Convert" button on the top right side of the screen once your files are uploaded. This will initiate the process of image-to-PDF conversion.
Step 4
Click on the blue "Download" near the top right side after your files are converted. This will save the print screens as a PDF on your device.
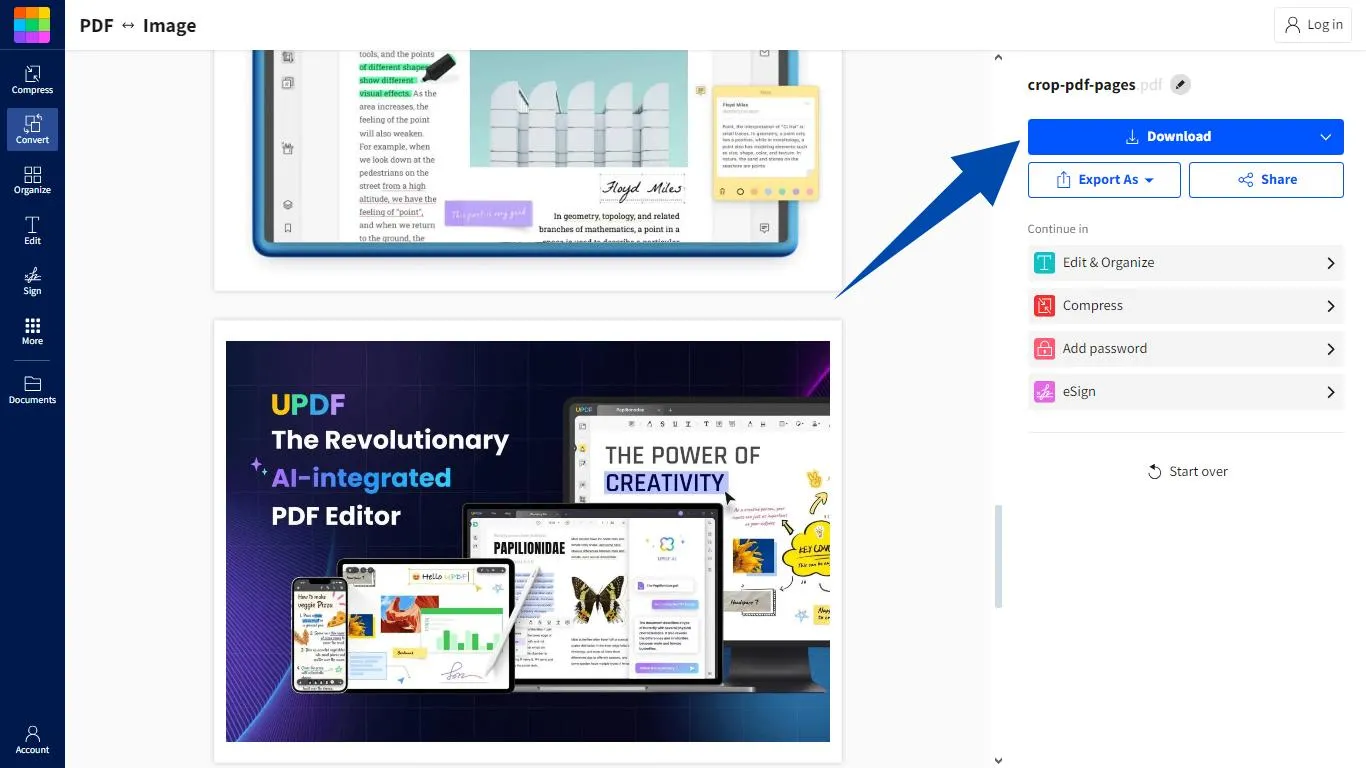
So there you have it! All four ways to save the print screens as a PDF! We hope you found the method that worked for you the best!
Final Words
PDFs are the most reliable way to compile screenshots and share them across any platform. We hope you're now smarter about how to print screens to PDF with our full guide. We have provided four simple yet effective ways to convert your screenshots to a PDF on Windows, Mac, iOS and Android.
While all the methods offer great solutions, UPDF stands tall with its AI-powered productive PDF tools. With UPDF, you can not only create PDFs from images but also edit, annotate, convert and chat with a powerful AI assistant. So, why wait? Click the below button to download UPDF and explore all the possibilities for productive document management!
Windows • macOS • iOS • Android 100% secure
 UPDF
UPDF
 UPDF for Windows
 UPDF for Mac
 UPDF for iPhone/iPad
 UPDF for Android
 UPDF AI Online
 UPDF Sign
 Edit PDF
 Annotate PDF
 Create PDF
 PDF Form
 Edit links
 Convert PDF
 OCR
OCR PDF to Word
 PDF to Image
 PDF to Excel
 Organize PDF
 Merge PDF
 Split PDF
 Crop PDF
 Rotate PDF
 Protect PDF
 Sign PDF
 Redact PDF
 Sanitize PDF
 Remove Security
 Read PDF
 UPDF Cloud
 Compress PDF
 Print PDF
 Batch Process
 About UPDF AI
 UPDF AI Solutions
 AI User Guide
 FAQ about UPDF AI
 Summarize PDF
 Translate PDF
 Chat with PDF
 Chat with AI
 Chat with image
 PDF to Mind Map
 Explain PDF
 Scholar Research
 Paper Search
 AI Proofreader
 AI Writer
 AI Homework Helper
 AI Quiz Generator
 AI Math Solver
 PDF to Word
 PDF to Excel
 PDF to PowerPoint
 User Guide
 UPDF Tricks
 FAQs
FAQs UPDF Reviews
 Download Center
 Blog
Blog Newsroom
 Tech Spec
 Updates
 UPDF vs. Adobe Acrobat
 UPDF vs. Foxit
 UPDF vs. PDF Expert




 Delia Meyer
  Enola Miller
 Enrica Taylor
  Čserná Anna