UPDF for Windows
 UPDF for Mac
 UPDF for iPhone/iPad
 UPDF for Android
 Nomostar
 UPDF AI Online
 UPDF Sign
 IvyCraft
 Edit PDF
 Annotate PDF
 Create PDF
 PDF Form
 Edit links
 Convert PDF
 OCR
OCR PDF to Word
 PDF to Image
 PDF to Excel
 Organize PDF
 Merge PDF
 Split PDF
 Crop PDF
 Rotate PDF
 Protect PDF
 Sign PDF
 Redact PDF
 Sanitize PDF
 Remove Security
 Read PDF
 UPDF Cloud
 Compress PDF
 Print PDF
 Batch Process
 About UPDF AI
 UPDF AI Solutions
 AI User Guide
 FAQ about UPDF AI
 Summarize PDF
 Translate PDF
 Chat with PDF
 Chat with AI
 Chat with image
 PDF to Mind Map
 Explain PDF
 PDF AI Tools
 Image AI Tools
 AI Chat Tools
 AI Writing Tools
 AI Study Tools
 AI Working Tools
 Other AI Tools
 AI Bookmark Generation
 AI Bookmark Summary
 AI Watermark Generation
 AI Background Generation
 AI Sticker Generation
 AI Stamp Generation
 AI Editing Suite
 UPDF Copilot
 AI Page Management
 AI Semantic Search
 PDF to Word
 PDF to Excel
 PDF to PowerPoint
 User Guide
 UPDF Tricks
 FAQs
FAQs UPDF Reviews
 Download Center
 Blog
Blog Newsroom
 Tech Spec
 Updates
 UPDF vs. Adobe Acrobat
 UPDF vs. Foxit
 UPDF vs. PDF Expert
Quick answer:
Word's own Insert > Object route doesn't lay a multi-page PDF out as readable pages — on Mac it drops in just the first page as a picture, and on Windows it inserts a clickable icon that opens the PDF in a separate reader. Neither gives you a normal, freely resizable image. Exporting each page to a real image file first removes those limits and lets you place any page, anywhere, as a regular picture.
One choice decides how sharp the result looks: pick PNG for pages that are mostly text, tables, diagrams, or line art, and JPEG only for photo-heavy pages. PNG keeps edges and small type razor-sharp; JPEG compresses them and makes thin text smear. Most people inserting a PDF into Word are inserting a contract clause, a chart, or a form — that's PNG territory.
This guide covers exporting on desktop, a quick screenshot, and the mobile route, plus how they differ from Word's built-in Insert > Object and how to fix the blur problem when it shows up. Desktop steps work the same on Windows and Mac.
Part 1. Export the PDF as an Image with UPDF, Then Insert It
This is the reliable route when you need a clean, resizable image — or when you want to insert several PDF pages as separate pictures. UPDF exports a PDF page to PNG, JPEG, BMP, TIFF, or GIF while preserving the original layout, then you drop that file straight into Word.
Step 1. Download UPDF and open the PDF you want to insert (Windows or Mac).
Windows • macOS • iOS • Android 100% secure
Step 2. Click Tools on the right side, then choose Image under the converter options.
Step 3. In the pop-up, set Output Format to PNG (text/diagrams) or JPEG (photos), set the Page Range to the page or pages you want, then click Convert.
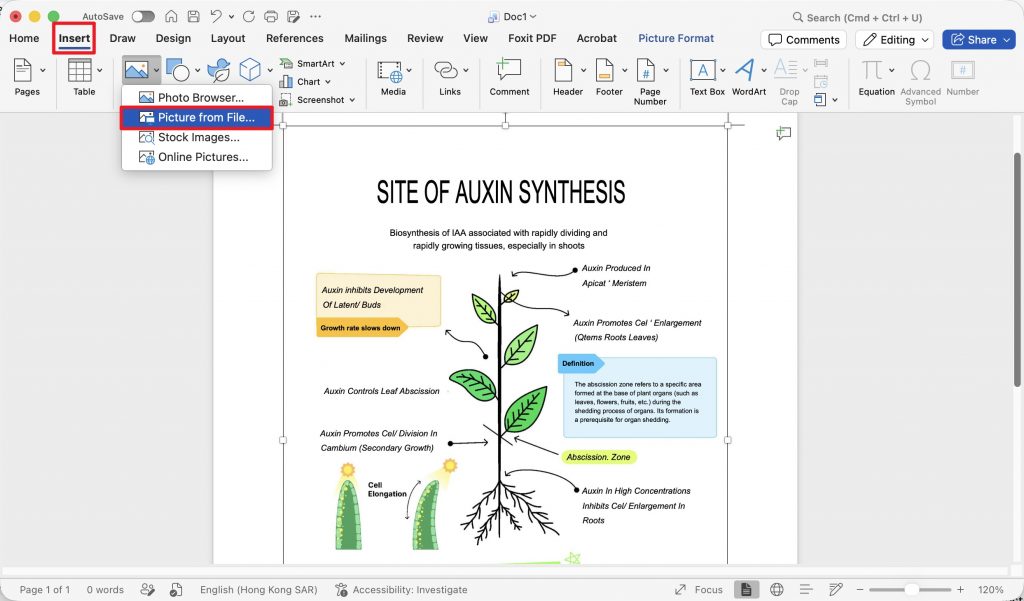
Step 4. Open your Word document, go to Insert > Pictures > Picture from File, and select the exported image to place it on the page.
This route fits any case where the picture needs to stay sharp, get resized, or land on multiple pages. If you only need a single block of content and don't care about resizing later, Part 2 is faster.
Part 2. Screenshot a Section and Paste It into Word
When you need just one region of a page — a single table, a logo, one paragraph — a screenshot is quicker than a full export. The trade-off is honest: a screenshot captures only what's on screen at that zoom level, so blowing it up larger in Word will soften it. Use it for "drop it in and move on," not for anything you'll scale up.
On Mac, UPDF captures the region for you without leaving the app: right-click and drag across the area you want, then choose Copy as Image from the pop-up. Paste it into Word with Cmd+V. Capturing inside UPDF avoids the extra quality loss you'd get bouncing through a separate screenshot tool.

On Windows, use the built-in Snipping Tool (Win+Shift+S) to select the region, then paste it into Word.
Either way, zoom the PDF to a comfortably large view before you capture — the bigger it is on screen, the more pixels the screenshot grabs, and the less it falls apart in Word.
Part 3. Insert a PDF as an Image into Word on Your Phone
The same export-first approach works on mobile — you just export the image in the UPDF app, then insert it in whichever app you're writing in. The steps are identical on iOS and Android.
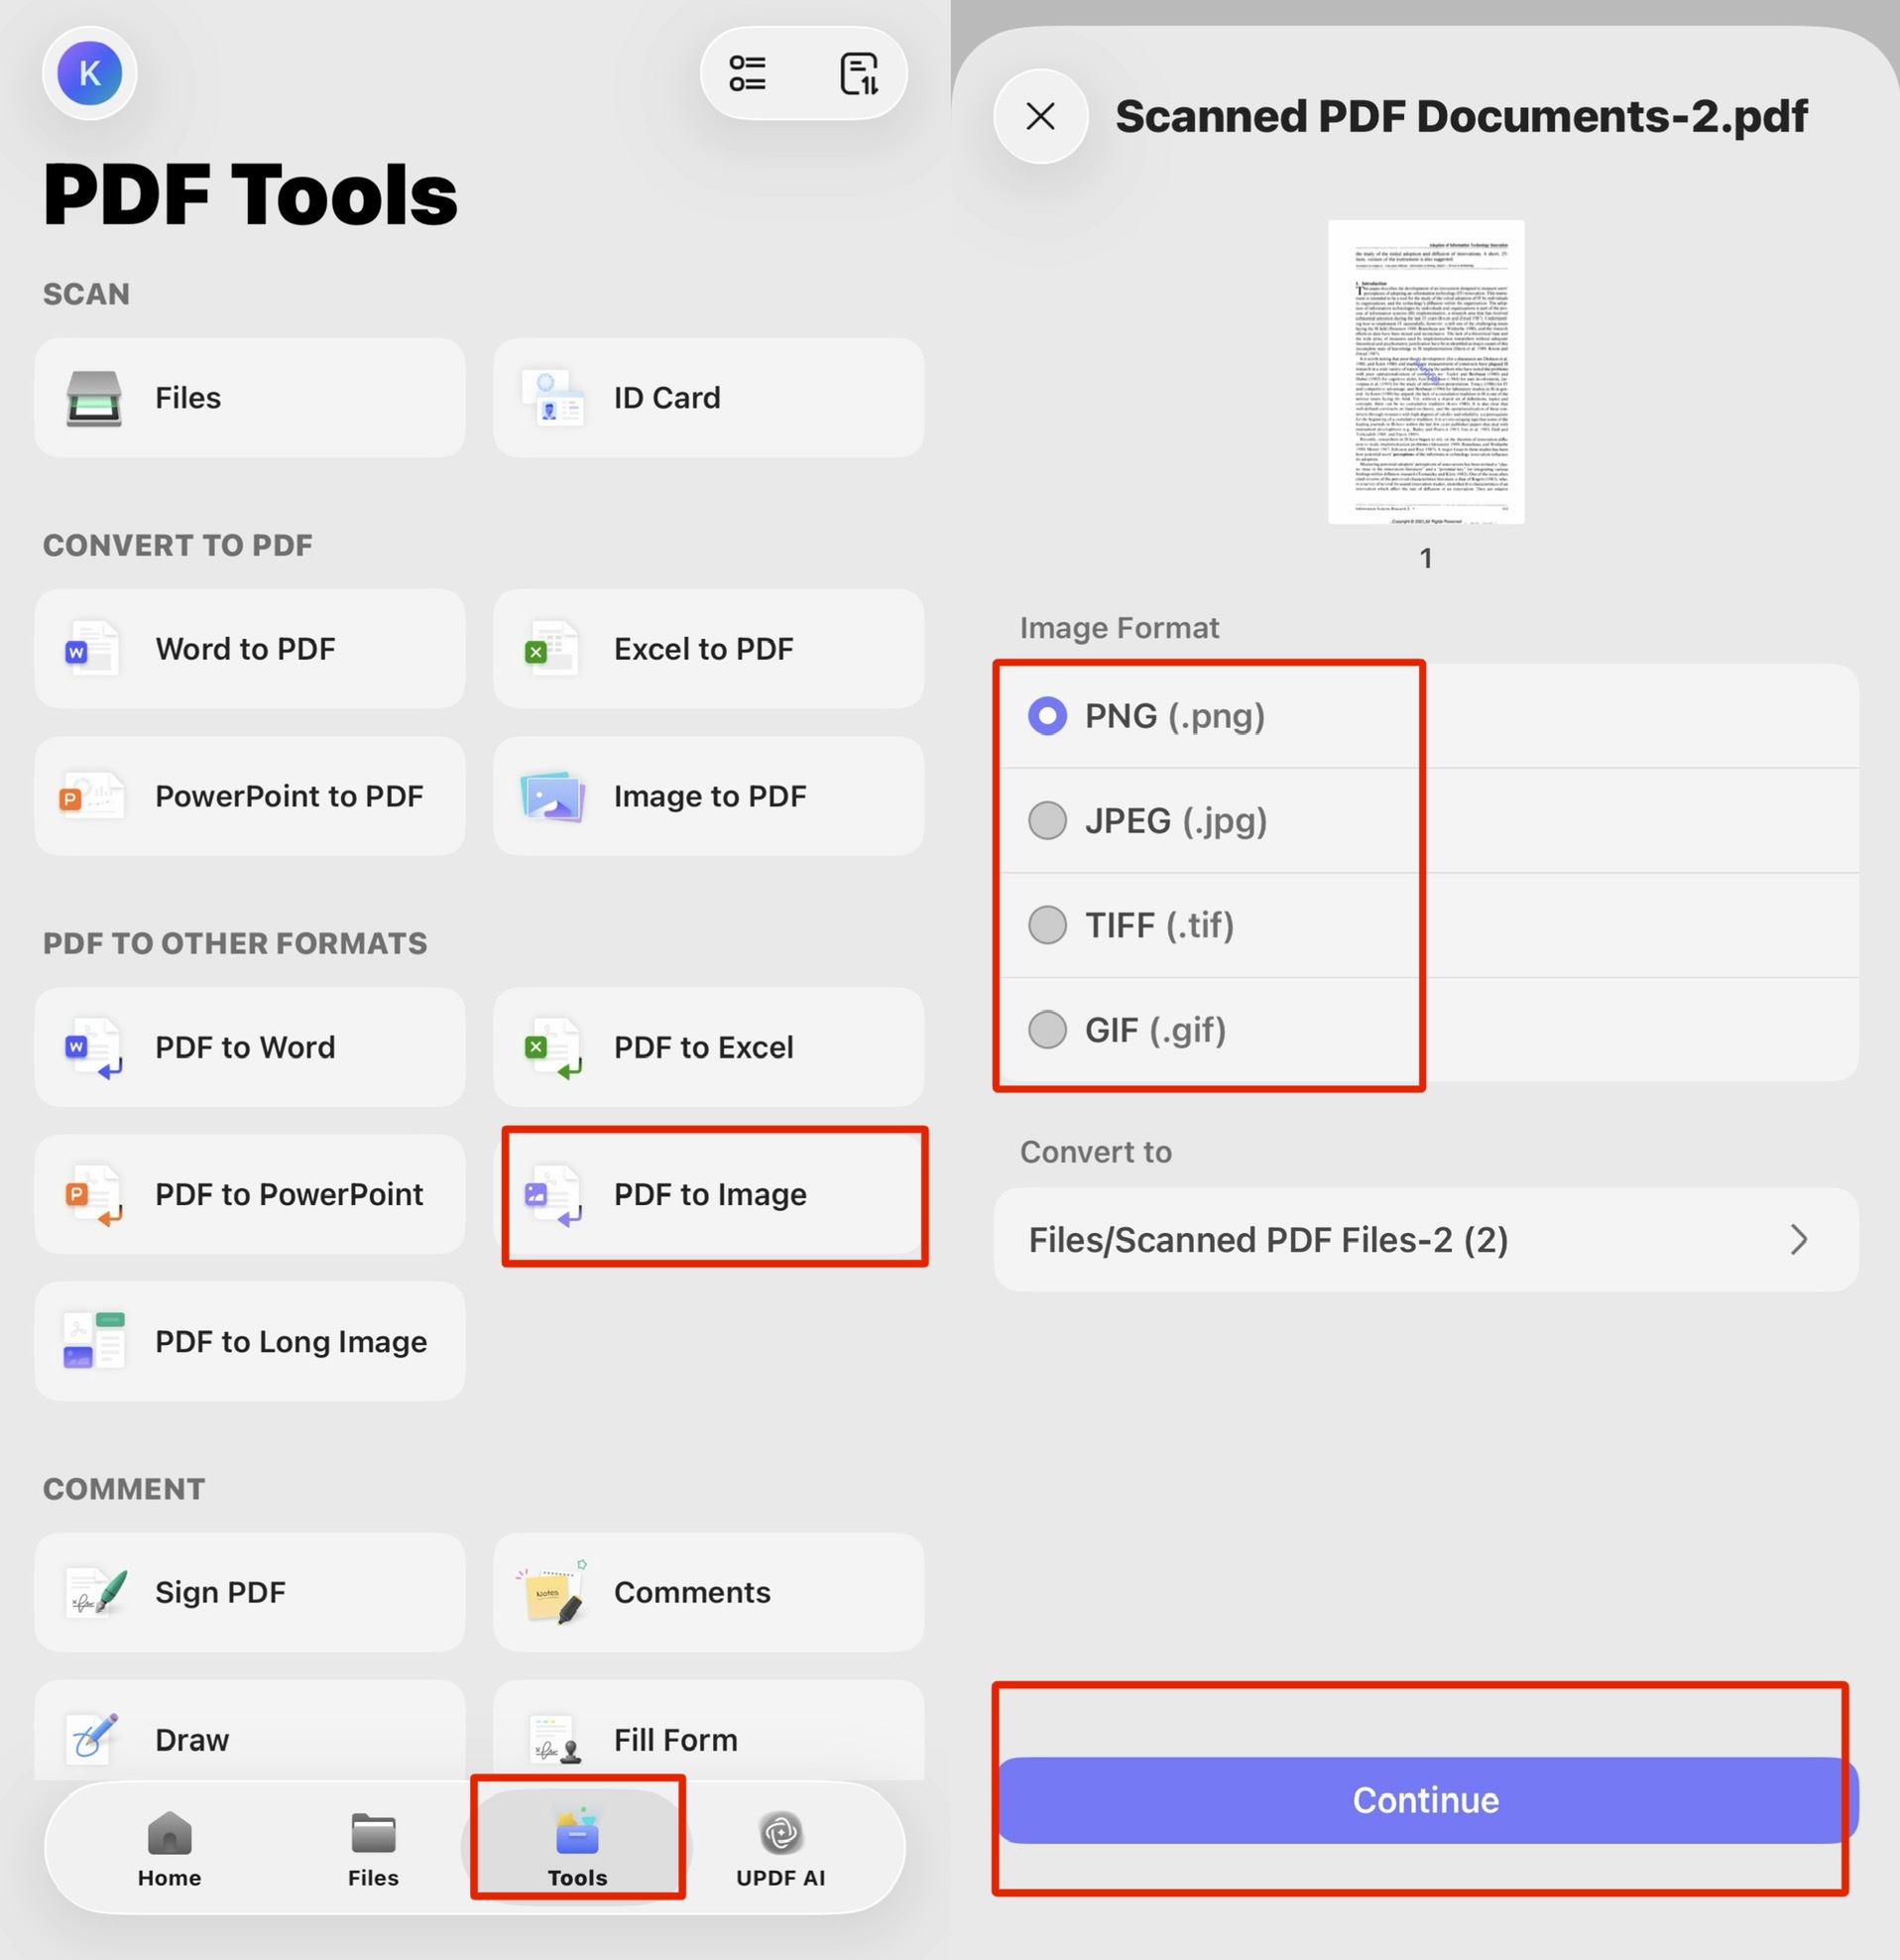
Step 1. Open the PDF in the UPDF mobile app and tap Tools.
Step 2. Choose PDF to Image, pick PNG (text/diagrams) or JPEG (photos), and save the image to your album.
Step 3. Open your document in the mobile Word app (or Google Docs), tap where you want the image, and insert it from your photos like any other picture.
The Mac-only right-click "Copy as Image" capture from Part 2 isn't available on mobile, so exporting is the route here.
Part 4. Insert as Image vs. Insert as Object vs. Screenshot — What's the Difference?
These three routes get confused constantly, and the confusion is why people end up with the wrong result.
- Insert as image (Part 1): you first turn the PDF page into a real PNG/JPEG file, then place that file. It behaves like any photo — you can drag it anywhere, resize it, wrap text around it, and place a different page on every Word page. The catch isn't sharpness; it's that Word may compress the image when you save.
- Insert as object (
Insert > Object > From File): this behaves very differently on the two platforms, because the underlying technology (OLE) is Windows-only.- On Windows: the PDF is embedded as a true OLE object and shown as a clickable icon — not a picture of the page. Double-clicking the icon opens the complete PDF in your system's PDF reader. The pages aren't displayed on the Word page at all; they live inside the embedded object and open externally.
- On Mac: You can't embed the full PDF as a clickable attachment the way Windows does. Word for Mac renders the first page as a picture inside the document (page 2 onward never appear). Double-clicking enters image cropping/formatting — which tells you it's a first-page preview image, not a full PDF attachment.
- Either way, it's the wrong tool for a multi-page document or for anything you need to resize and lay out like a normal image.
- Screenshot (Part 2): you capture whatever pixels are on screen. Quality is capped by your monitor and zoom level, not the PDF.
Rule of thumb: if the PDF has multiple pages, or you need to resize and position it like a normal picture, export to images (Part 1). Insert > Object only makes sense in the narrow case where you want a single PDF kept with the document — and it behaves differently enough on Mac and Windows that you should know which one you're on first. For a quick one-region grab, screenshot (Part 2).
Edge Cases: When the Image Still Looks Wrong
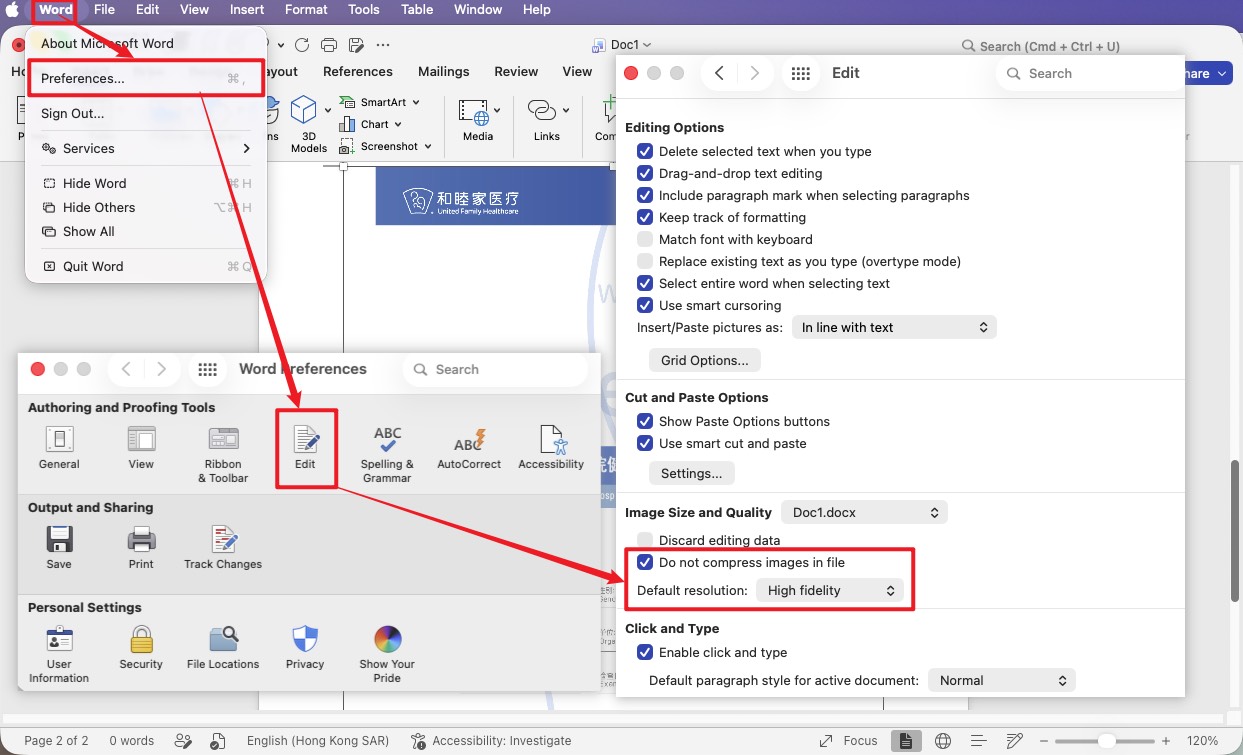
"I exported a clean PNG, but it turned blurry after I saved the Word file." The fix differs by platform. On Windows, Word compresses images on save by default — turn it off via File > Options > Advanced > Image Size and Quality, tick Do not compress images in file, and set default resolution to High fidelity (a per-document setting). On Mac, click Word > Preferences > Edit > Do not compress images in file, and set default resolution to High fidelity.
"I need the image to sit on top of text or other content with no white box around it." JPEG can't hold transparency, so it bakes in a white rectangle. Export to PNG instead — it supports a transparent background, so the inserted graphic layers cleanly over whatever's beneath it.
"My PDF has 12 pages and I need all of them in Word." Insert > Object won't help here — on Mac it shows only the first page, and on Windows it just drops in an icon, so the rest of the pages never appear as content. Export instead: in UPDF's Image export, set the page range to the full document and choose each page as an image. You get a numbered image per page in one pass, ready to drop into Word in order, one per page.
"The page is a scan or photo and it's still soft no matter what I do." If the source PDF is a low-resolution scan, no export setting invents detail that isn't there — you're capped by the original. Zoom in on the PDF first to confirm the source itself is sharp; if it's already grainy at 100%, that's the ceiling. For a scanned document where you actually need the text rather than a picture of it, run UPDF's OCR to pull editable text instead of inserting a blurry image.
FAQs
1. Can I still edit the text after inserting a PDF as an image into Word?
No — an inserted image is a picture, not text. The words become pixels Word can't select or edit. If you need editable text in Word, convert the PDF with PDF to Word instead of inserting it as an image.
2. Will inserting PDF images make my Word file huge?
It can. High-resolution PNGs add up fast across many pages. If file size matters more than perfect sharpness, use JPEG for photo pages instead of PNG, or shrink the file deliberately — on Windows leave image compression on, and on Mac run File > Reduce File Size. It's a direct trade between size and quality.
Conclusion
Inserting a PDF as an image into Word comes down to one decision made early: export the page to a real PNG or JPEG first (Part 1, or Part 3 on a phone) for anything multi-page, resizable, or laid out, or screenshot a single region (Part 2) when you just need it dropped in. Skip Word's Insert > Object unless you only want a single page kept with the document — it can't show the rest, and it behaves differently on Mac and Windows. And if a clean export still looks soft once saved, the fix is almost always Word's own image compression, switched off in two clicks.
Download UPDF to export PDF pages as sharp images and insert them into Word on Windows or Mac.
Windows • macOS • iOS • Android 100% secure


 Enrica Taylor


 Enola Davis