Interactive elements like checkboxes and drop-down menus play a pivotal role in enhancing the form-filling experience within Word documents. Such elements allow users to create dynamic forms that can be electronically completed. This process is particularly beneficial for business forms that require user input, as it reduces the time spent on manual data entry and increases accuracy.
For professionals looking to integrate checkboxes into their digital forms in the Word format, MS Word provides specialized developer's tab. With a range of editing options, users can ensure that the interactive elements in their documents are intuitive and accessible. For your ease, this article explores the methods on how to add checkboxes in Word files and PDFs.
Part 1. The Absolute Ways of Adding Check Boxes in Word
Upon understanding the basics of this topic, let us dive into the ways you can add checkboxes on Microsoft Word. This part of the article will help you choose which method of adding checkboxes within Word best suits your requirements.
Method 1. Using the Options Window in Word
With this method's help, you can add interactive checkboxes to your Word file. Since you can access the "Developer" tab through the Options section, the insertion of various form fields into files get simpler. Apart from checkboxes, the developer tab lets you add drop-down interactive menus to Word, which is visible across the steps below to insert the check box in Word.
Step 1. As you open up the Microsoft Word file on your desktop device, go to the "Options" section from the "Home" interface of the software.
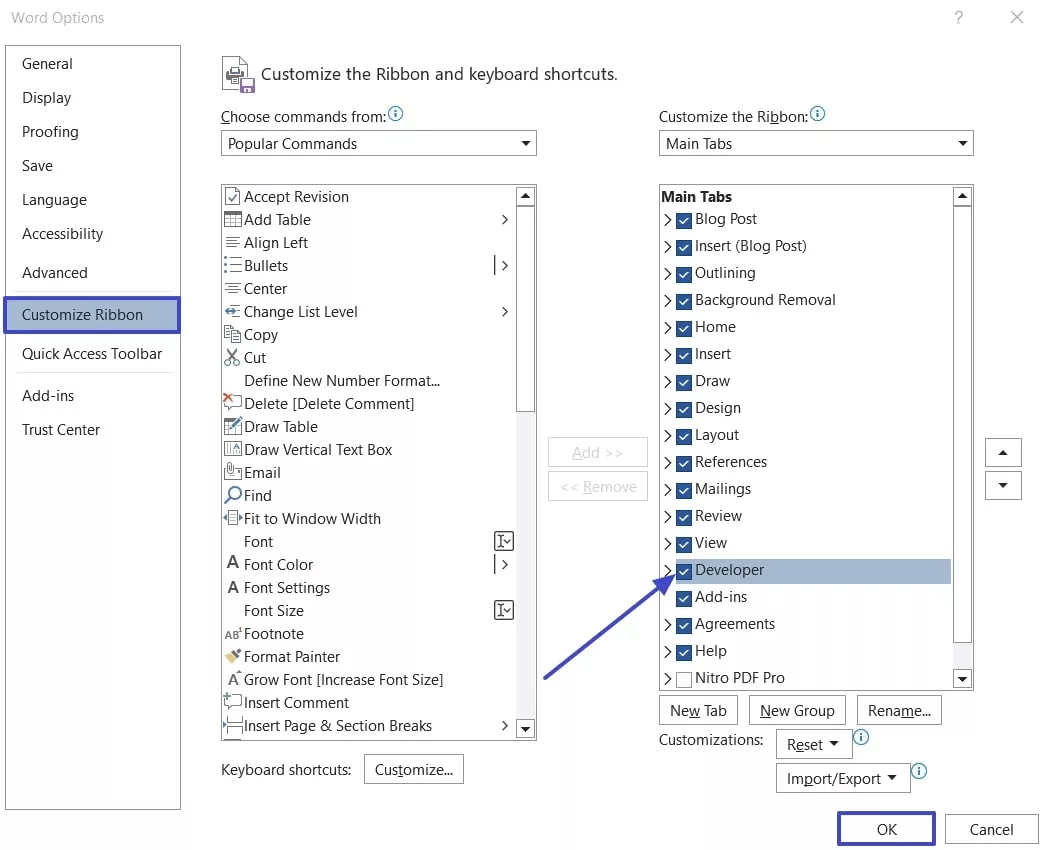
Step 2. This will open the "Word Options" window, where you need to navigate to the "Customize Ribbon" tab. Within the "Main Tabs" section scroll bar, locate the "Developer" check box, and check it to hit the "OK" button at the bottom.
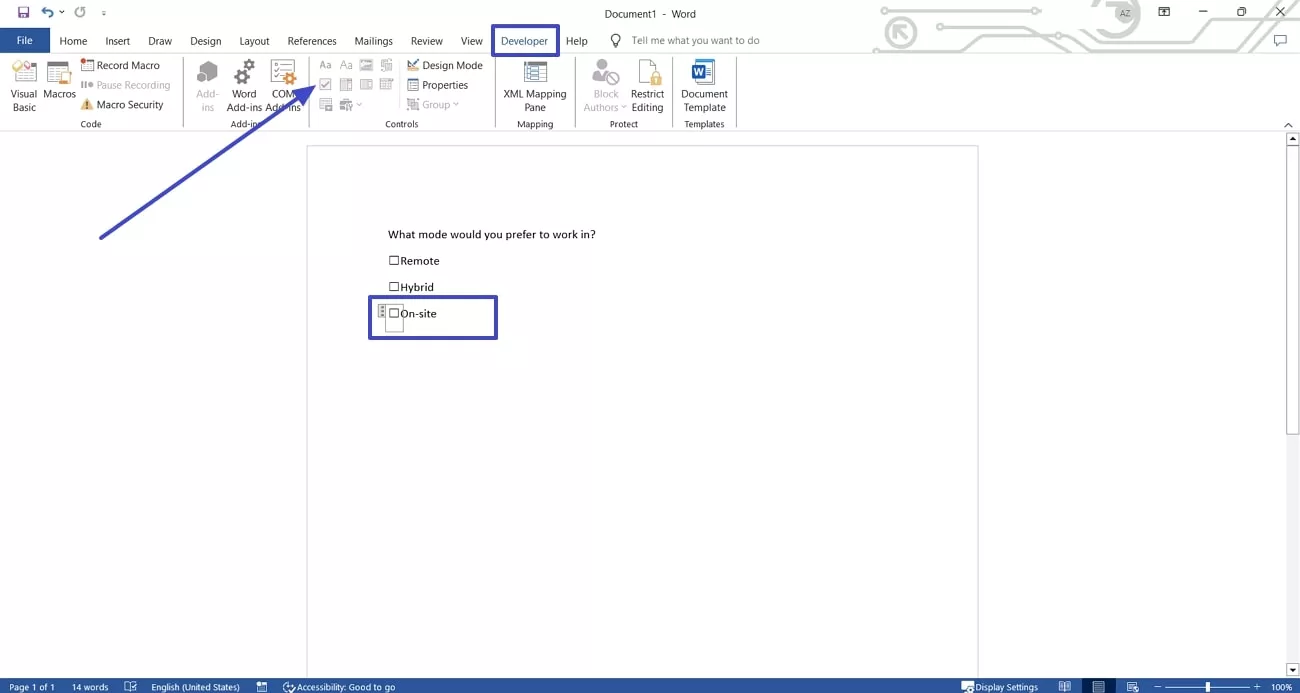
Step 3. After accessing the Word file again, go to the "Developers" tab and click the "Checkboxes" present within the "Controls" section. Now, simply tap the area on your file where you want to insert this check box.
Method 2. Creating a New Bullet Option in Word
An alternative way to learn how to add checkboxes in Word files is to create a new bullet option. This method is good for users who want to print out the forms they are creating so that the participants can physically fill them out. Take a look at the steps below to see how this process takes place on Word:
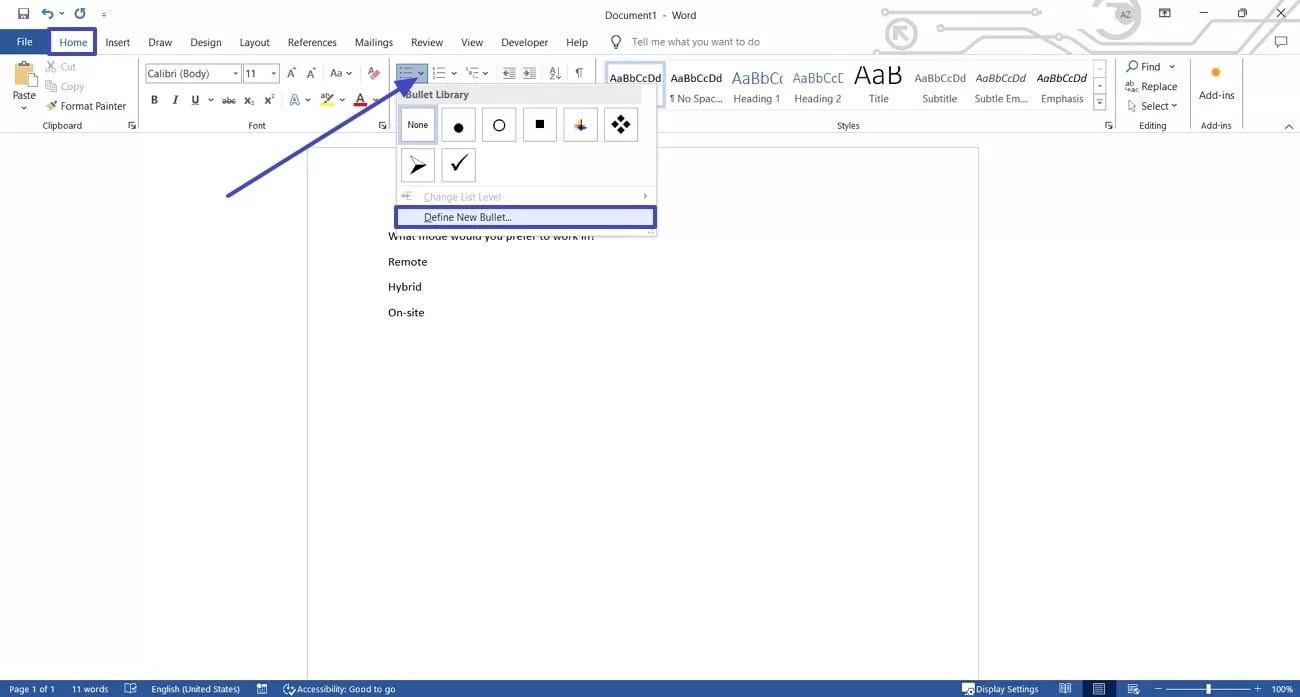
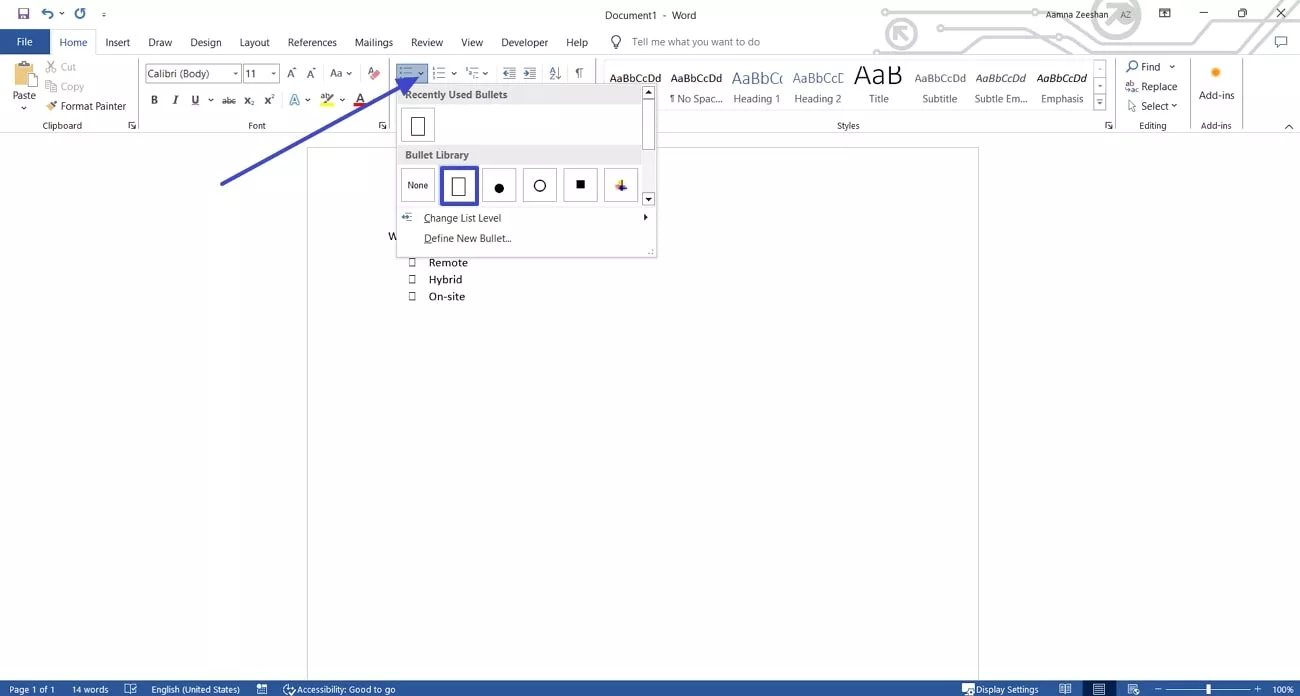
Step 1. Initiate the process by opening the Word form you are creating and navigating to the "Paragraphs" section within the "Home" tab. Here, click on the downward arrow on the "Bullets" section to open up a drop-down menu. Choose the "Define New Bullet" option from the menu to start creating a new style.
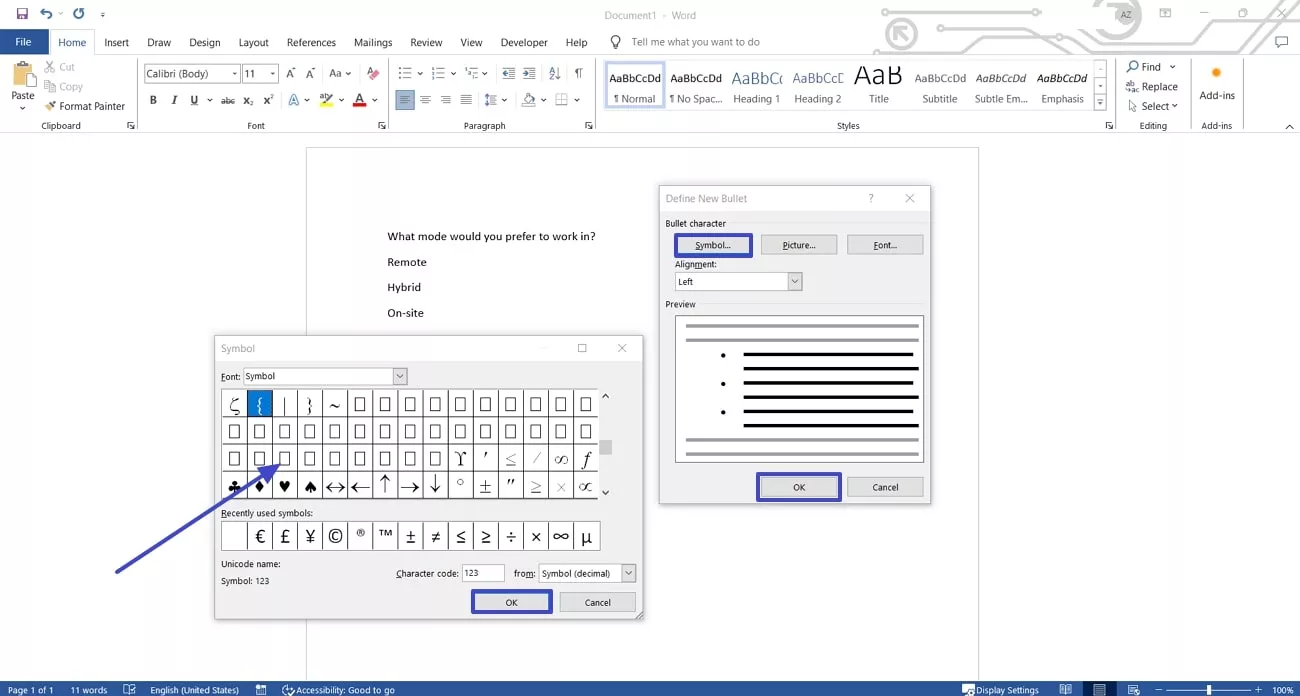
Step 2. As the "Define New Bullet" menu pops up, hit the "Symbol" button to open another popup menu. Within the "Symbol" menu, scroll and select the "Checkbox" that best fits your requirements and hit the "OK" button. Click the "OK" within the "Define the Bullet" menu to finalize the checkbox style.
Step 3. Lastly, in your workspace, tap on the area where you want to add the checkboxes. Then, click the downward arrow button on the bullets to pick the new style you have just created.
Part 2. Adding Check Boxes in PDF Documents - UPDF
Instead of inserting checkboxes in Word, you can even use a third-party tool to insert checkboxes and drop-down menus within a PDF file. To do so, users need an advanced PDF manager like UPDF so that they can add checkboxes and adjust the style.
UPDF allows you to select the trigger and action on how the boxes are activated. With the in-depth guide given below, you will be able to effectively create checkboxes in PDFs through UPDF software:
Step 1. Install UPDF to your Device and Open up the PDF Form
Start by installing the UPDF software to your device through the official website.
Windows • macOS • iOS • Android 100% secure
Now, access the tool and click the "Open File" tab to import the PDF form that you want to add checkboxes on.
Step 2. Enter the Prepare Form Tool and Insert the Check Box
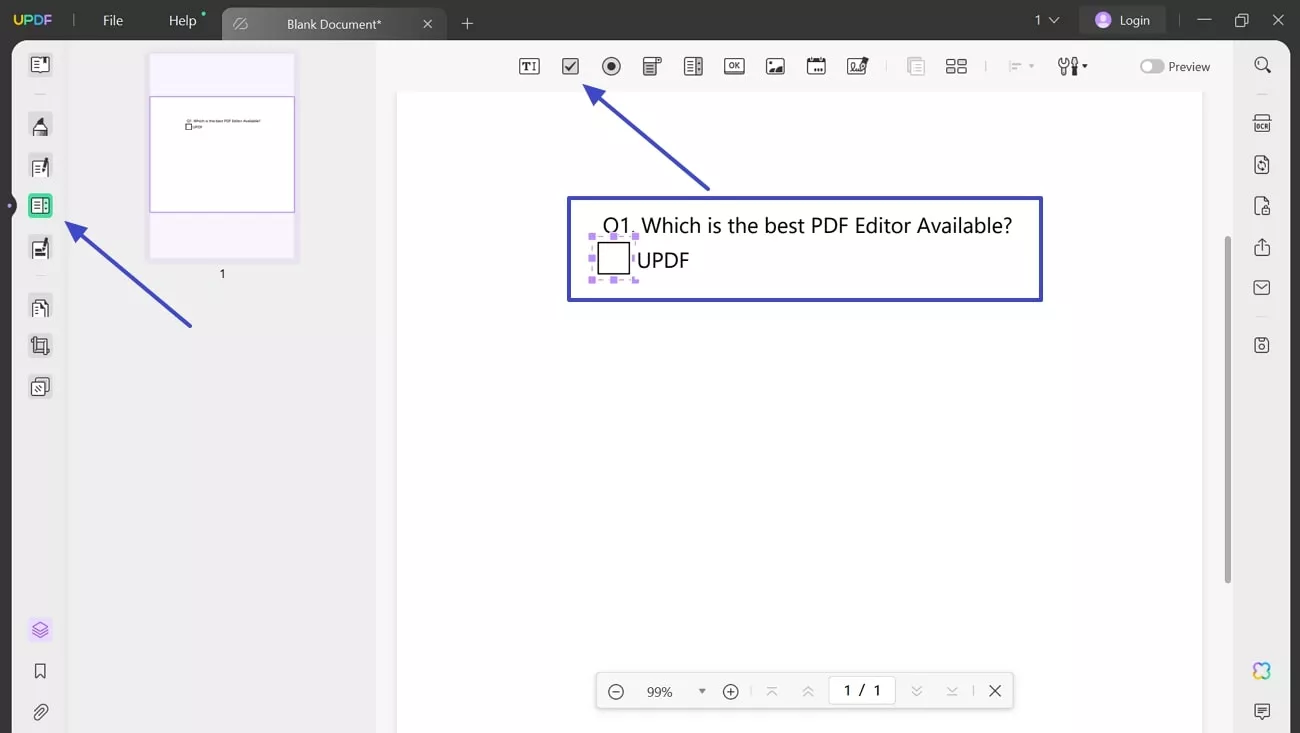
Once you import the PDF file into the software, you will be redirected to the editing tab to choose the "Prepare Form" icon at the left toolbar. Afterward, hit the "Check Box" icon from the top menu and tap the place where you want to insert this box.
Step 3. Fine-Tune the Properties of the Check Box
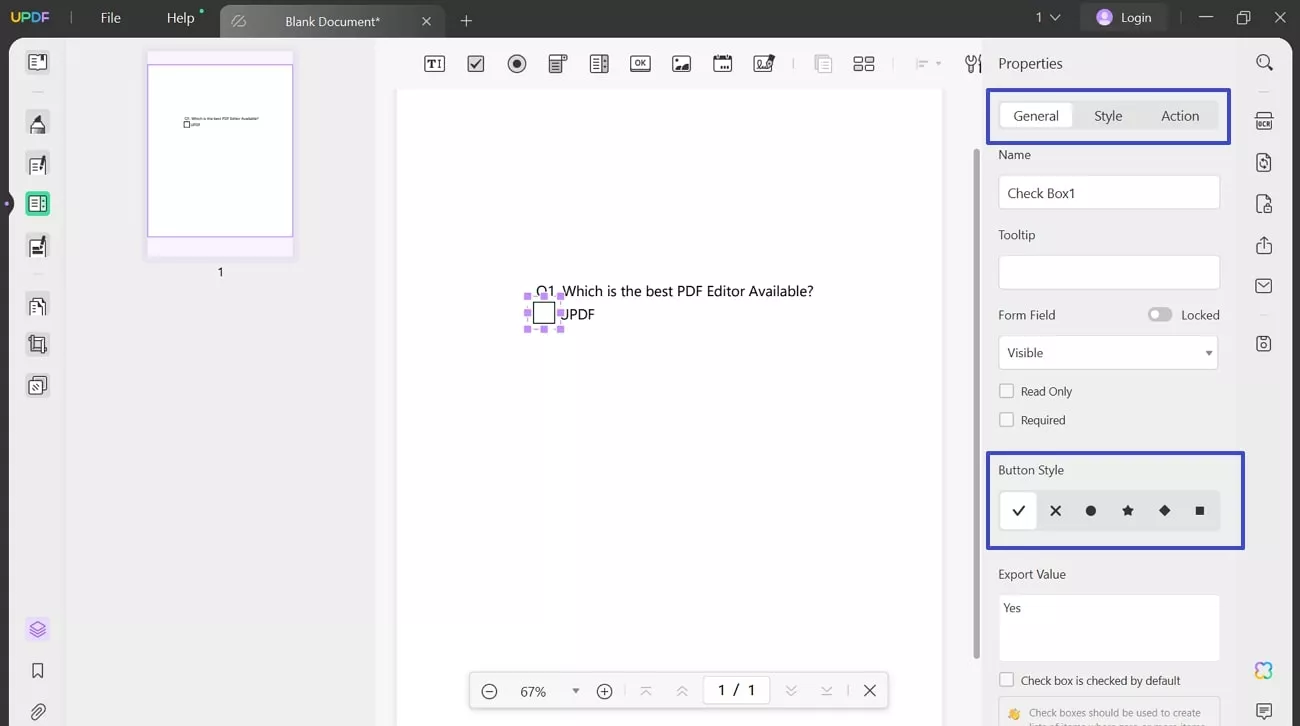
Afterward, double-click the newly created check box to access the properties panel. From here, you will be able to adjust the advanced properties of the added checkboxes.
Conclusion
In conclusion, this article has discussed the top two methods you can apply when you want to know how to add check boxes in Word documents. We also investigated UPDF which is an efficient PDF editor that allows users to edit the PDF forms in just a few clicks. However, if you are looking for an effective PDF editor tool to edit a PDF form, UPDF is the best fit option for you. Give it a try!
Windows • macOS • iOS • Android 100% secure
 UPDF
UPDF UPDF for Windows
 UPDF for Mac
 UPDF for iPhone/iPad
 UPDF for Android
 UPDF AI Online
 UPDF Sign
 Read PDF
 Annotate PDF
 Edit PDF
 Convert PDF
 Create PDF
 Compress PDF
 Organize PDF
 Merge PDF
 Split PDF
 Crop PDF
 Delete PDF pages
 Rotate PDF
 Sign PDF
 PDF Form
 Compare PDFs
 Protect PDF
 Print PDF
 Batch Process
 OCR
OCR UPDF Cloud
 About UPDF AI
 UPDF AI Solutions
 FAQ about UPDF AI
 Summarize PDF
 Translate PDF
 Explain PDF
 Chat with PDF
 Chat with image
 PDF to Mind Map
 Chat with AI
 User Guide
 Tech Spec
 Updates
 FAQs
FAQs UPDF Tricks
 Blog
Blog Newsroom
 UPDF Reviews
 Download Center
 Contact Us


 Katherine Brown
 Bertha Tate
