A fillable field in a PDF document allows users to type in specific areas without requiring an editor. Although it makes form-filling easier, sometimes you need to remove them. So, learn the top 9 ways how to remove fillable fields in PDF.
Part 1. How to Remove Fillable Fields from PDF With UPDF
The first way to remove fillable fields is by using UPDF. UPDF is a complete PDF editing suite with multiple features, including Cloud, OCR, sharing, annotations, etc. When working on PDF fillable forms, you can use features like fillable text boxes, checkboxes, radio buttons, dropdowns or lists, buttons, and many more.
So, when you want to remove the fillable fields, you can use 4 different ways by downloading UPDF.
Windows • macOS • iOS • Android 100% secure
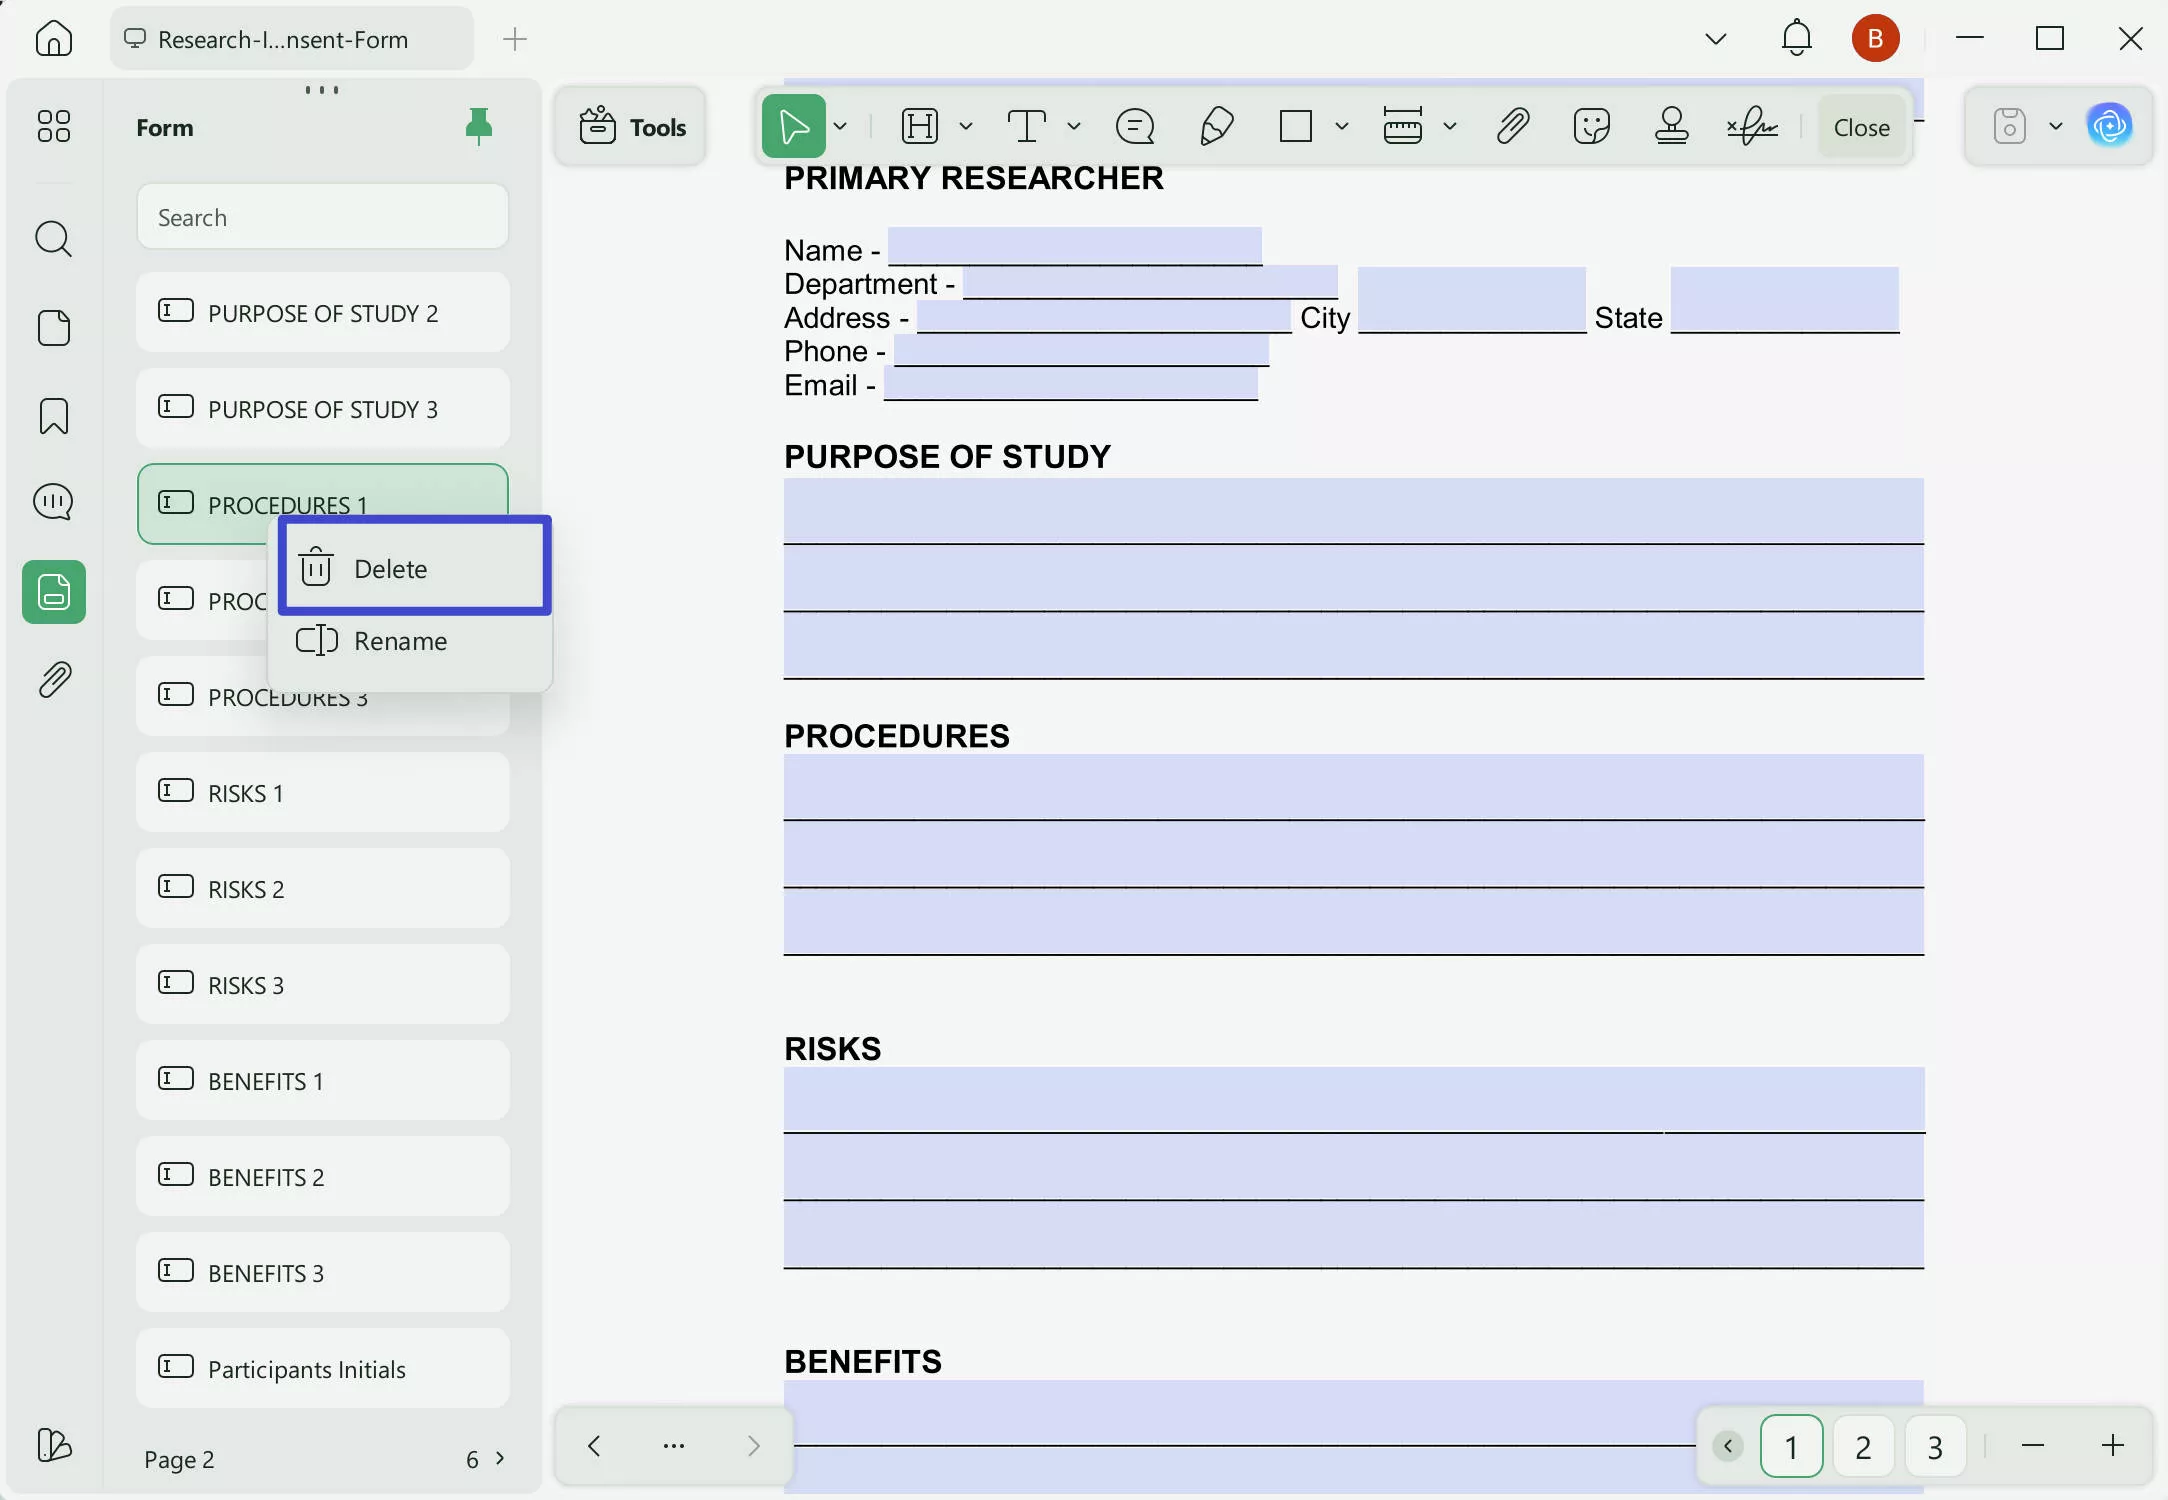
Way 1. Remove Fillable Fields from PDF via the Field Management List
UPDF provides a form field management list that allows you to easily delete fillable fields from a PDF. Follow the steps below:
Step 1. Open the PDF from which you want to remove fillable fields.
Step 2. Click "Forms" in the left panel. You will see a list of all form fields in the PDF.
Step 3. Right-click the field you want to remove and select "Delete."
Way 2. Remove Fillable Fields from PDF by Deleting
Sometimes, you don't want to remove all the fillable fields from a PDF document. However, it is essential to remove selective ones, and this method is the best choice in such use cases.
1. Open PDF document in the UPDF app
Double-click the icon of UPDF on the desktop to run the app. Next, click "Open File" and choose the PDF document with fillable fields in it.
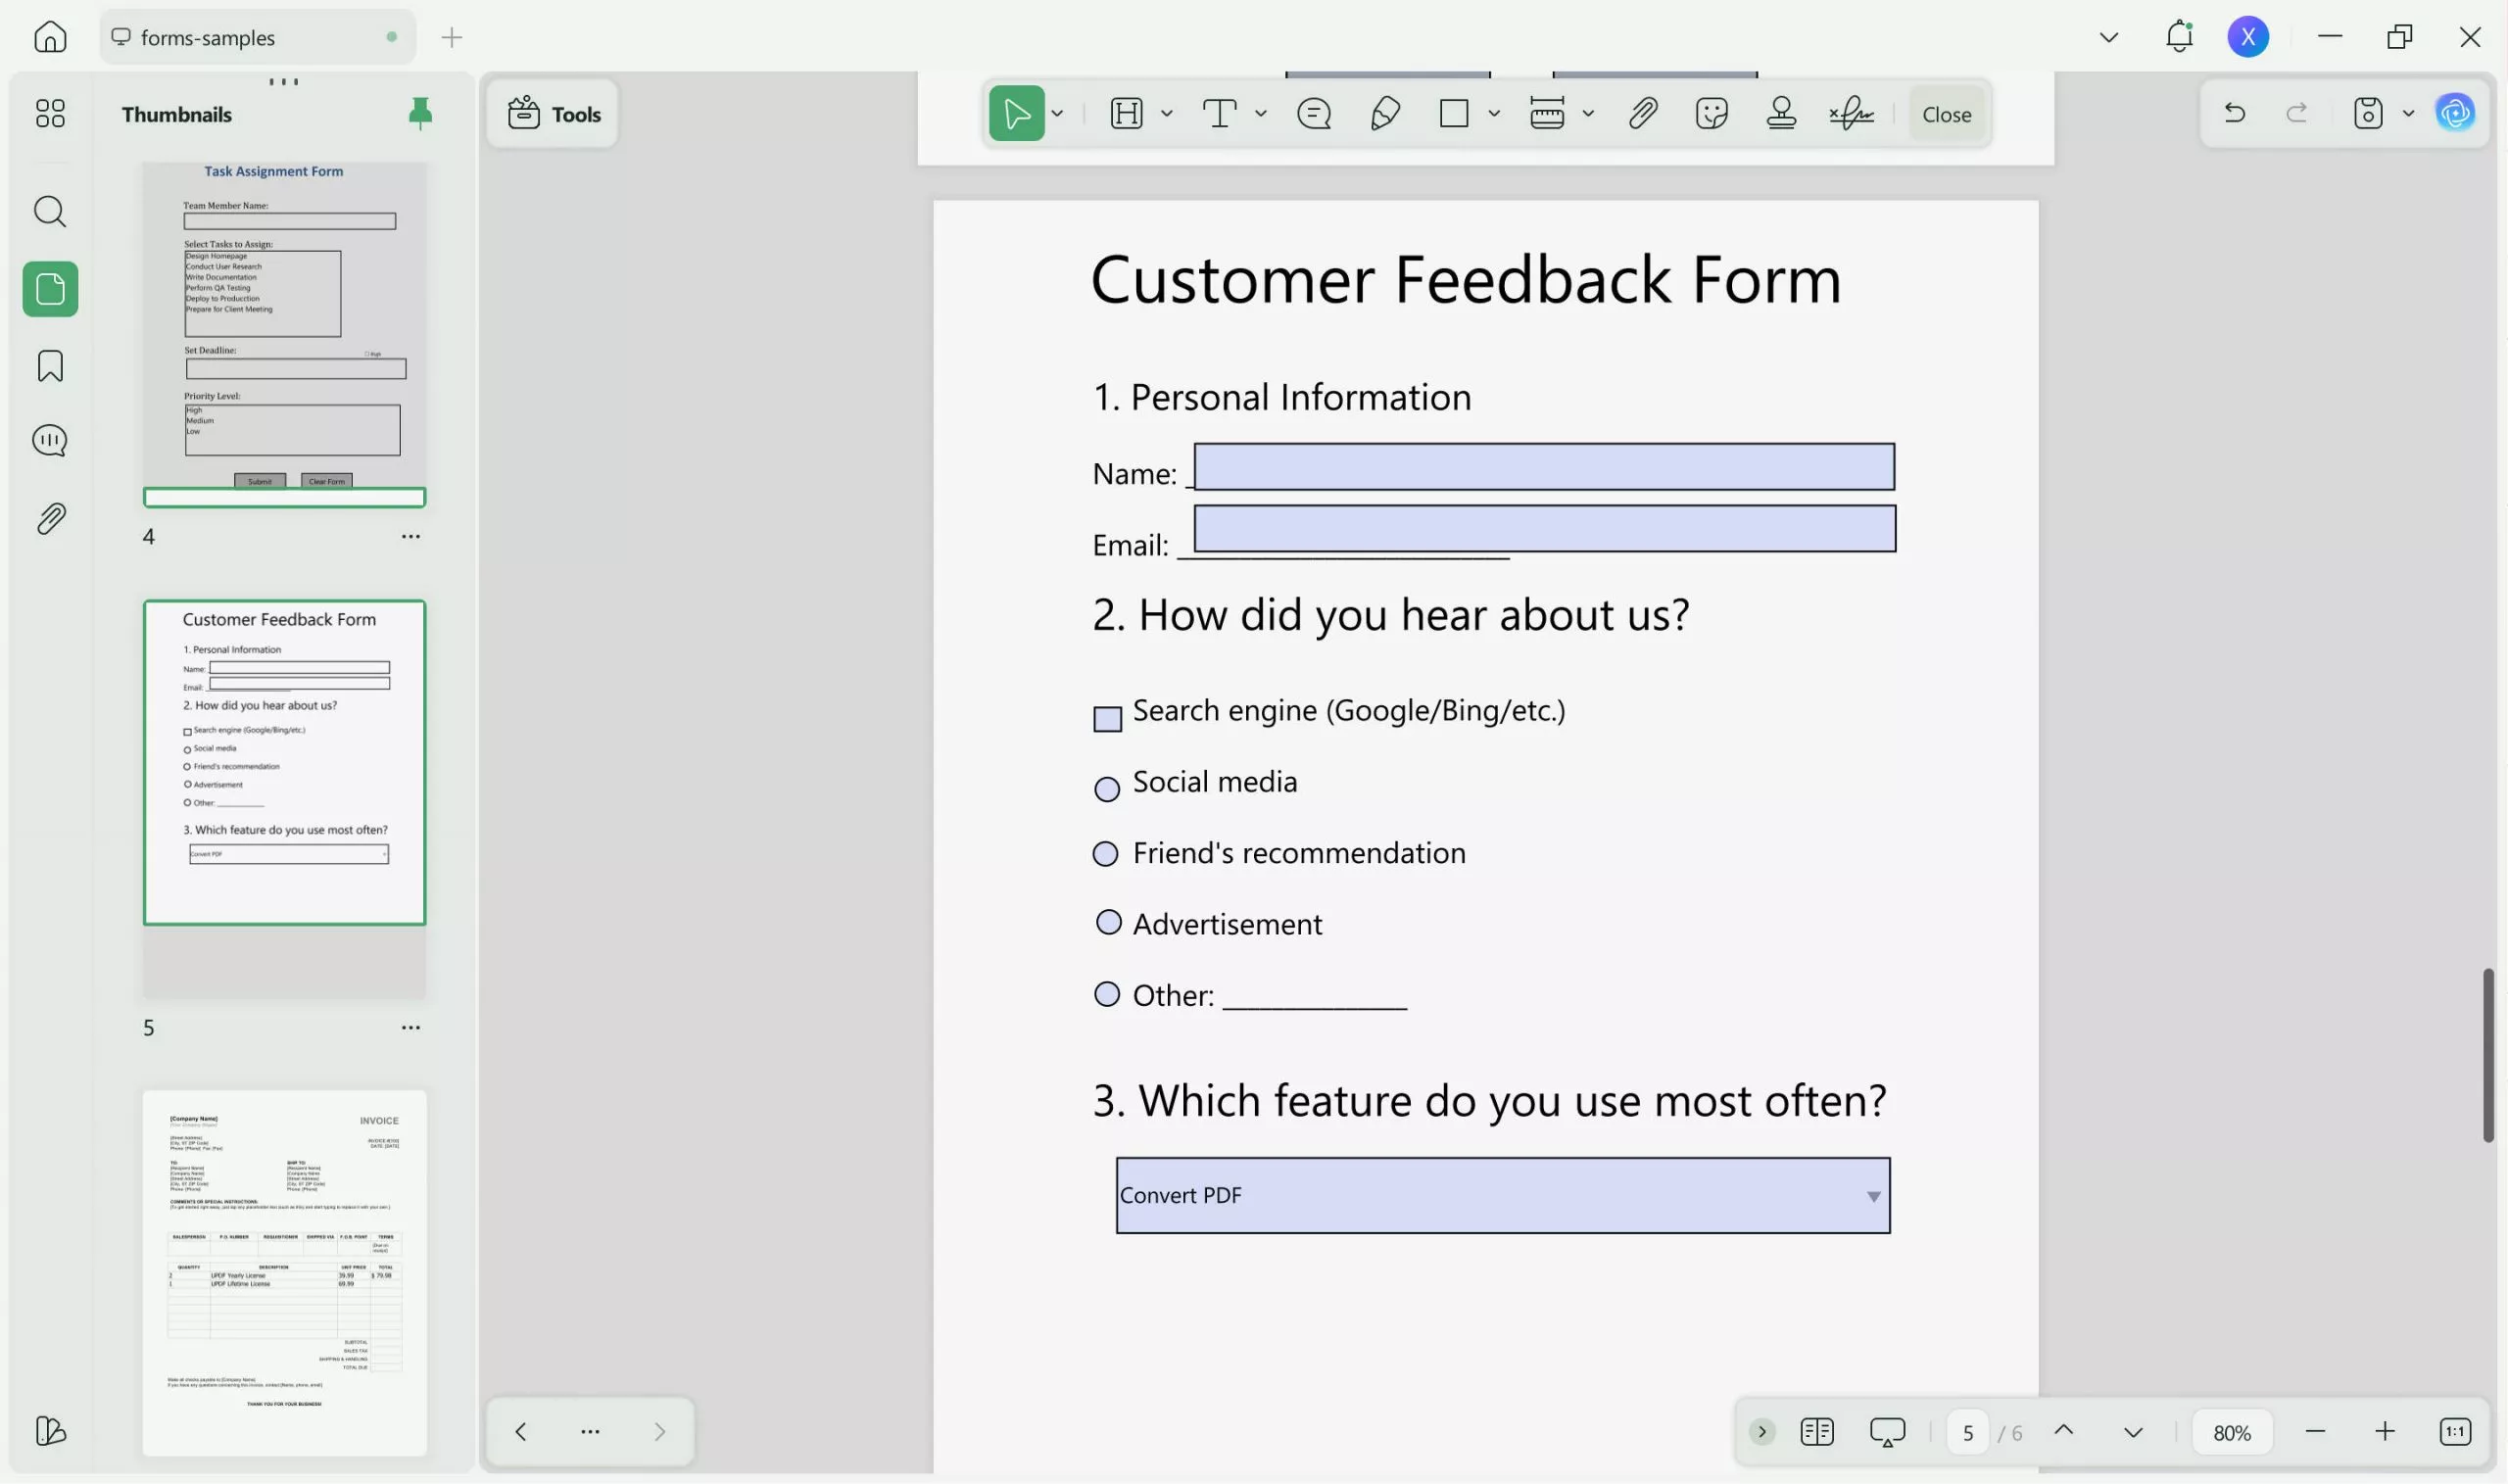
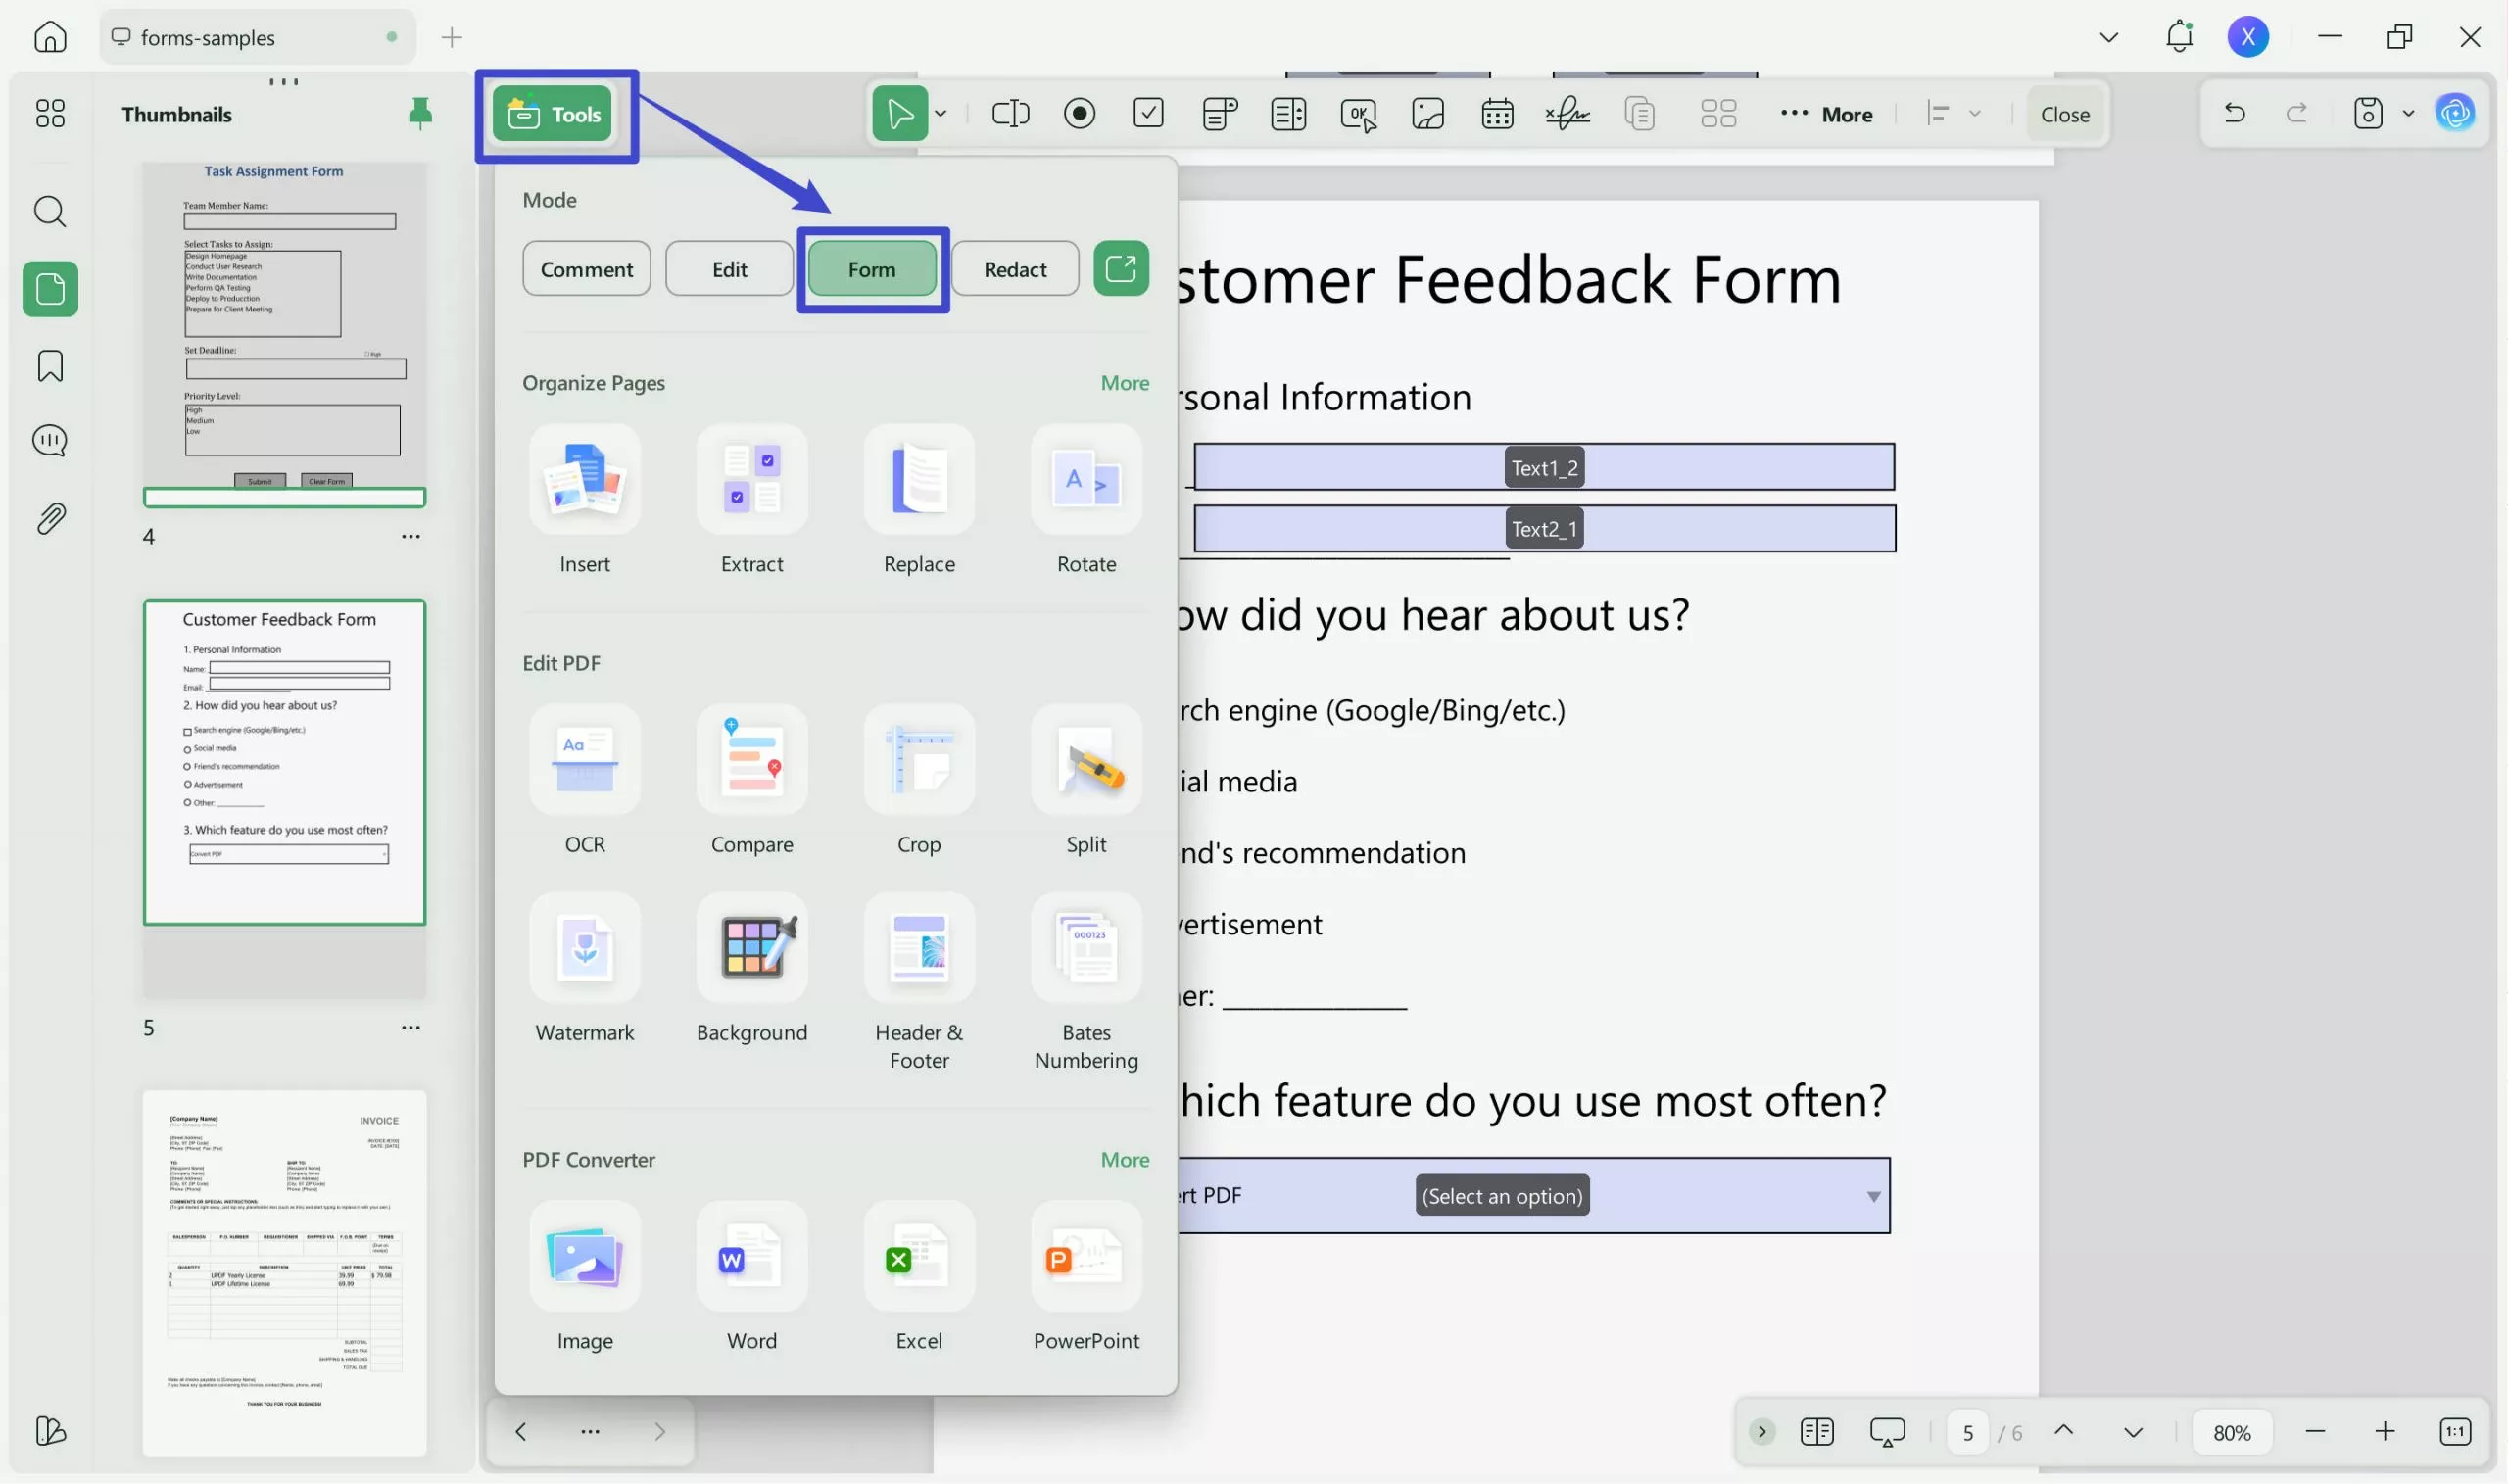
2. Go to Prepare Form and Right Click to Delete
From the left pane, you need to click "Form" in "Tools". All the fillable fields will be highlighted in purple color. You can right-click on any field to reveal options. In the pop-up menu, there will be the delete option. Click that, and the field will be deleted. To select multiple fields at once, hold the control/command button and click them to select, then right-click to delete.
Also Read: How to Uncheck a Box in PDF?
Way 3. Remove Fillable Fields from PDF By Printing
If you need the final form of your PDF document by removing all the fillable fields, then using the printing method will be a quick solution. So, download UPDF and try printing documents with the following steps:
Windows • macOS • iOS • Android 100% secure
1. Open UPDF and open PDF document
If you have set UPDF as your default PDF viewer, then double-click the PDF file to open it inside UPDF. Otherwise, use the UPDF icon to open the software and then open the PDF document in it.
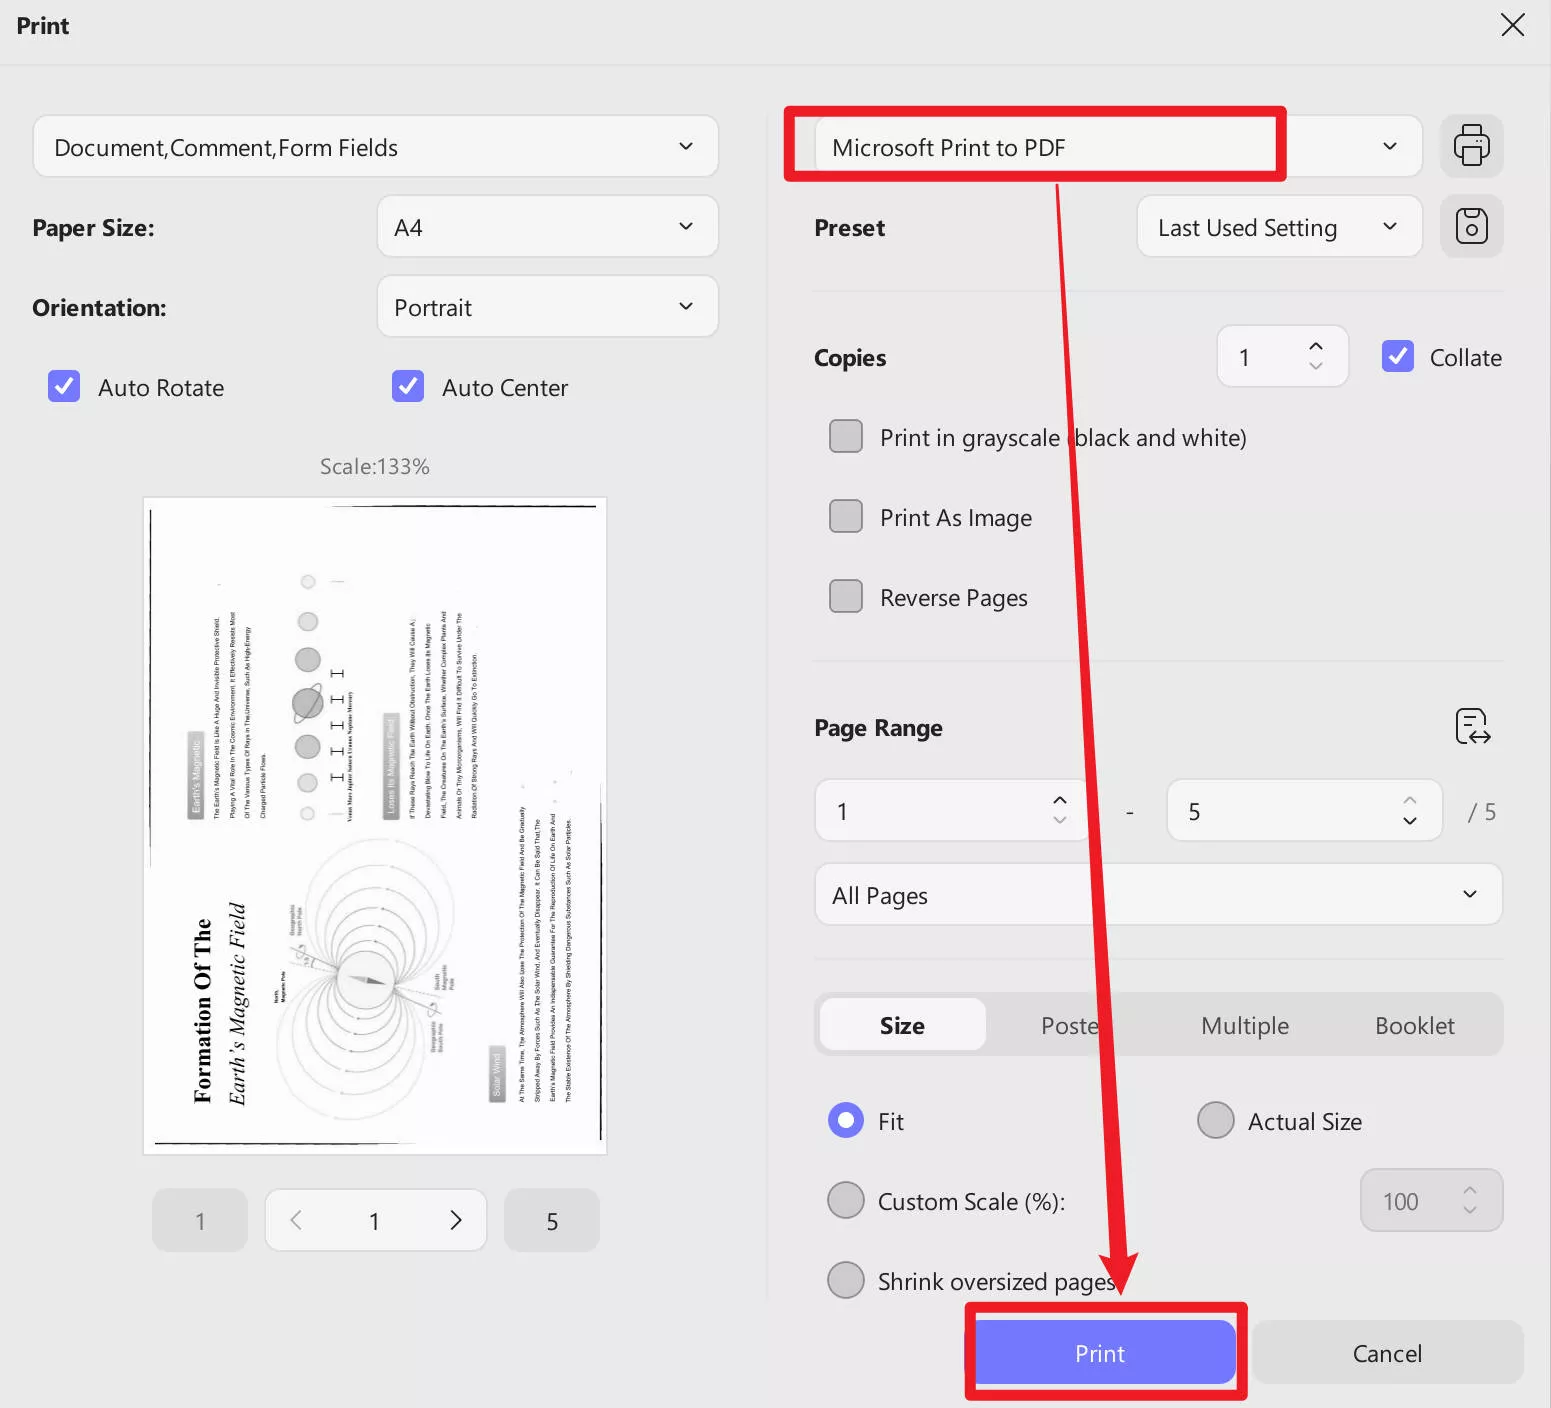
2. Select Print from File and Print.
Once the file opens, you need to click the File tab from the top left. Navigate to the Print option located at the bottom of the pop-up screen. Alternatively, you may press Ctrl + P combination. Either way, you can get print options, and there, select "Microsoft Print to PDF" as your printer and Print. The new PDF saved on your device will not have those fillable fields.
Way 4. Remove Fillable Fields from PDF by Flattening
Fillable fields are present as layers in a PDF document. So, using the flattening option will help remove not only those fields but other annotations at once. Since most tools don't provide this feature, use UPDF after downloading and remove these fields in a few clicks.
Windows • macOS • iOS • Android 100% secure
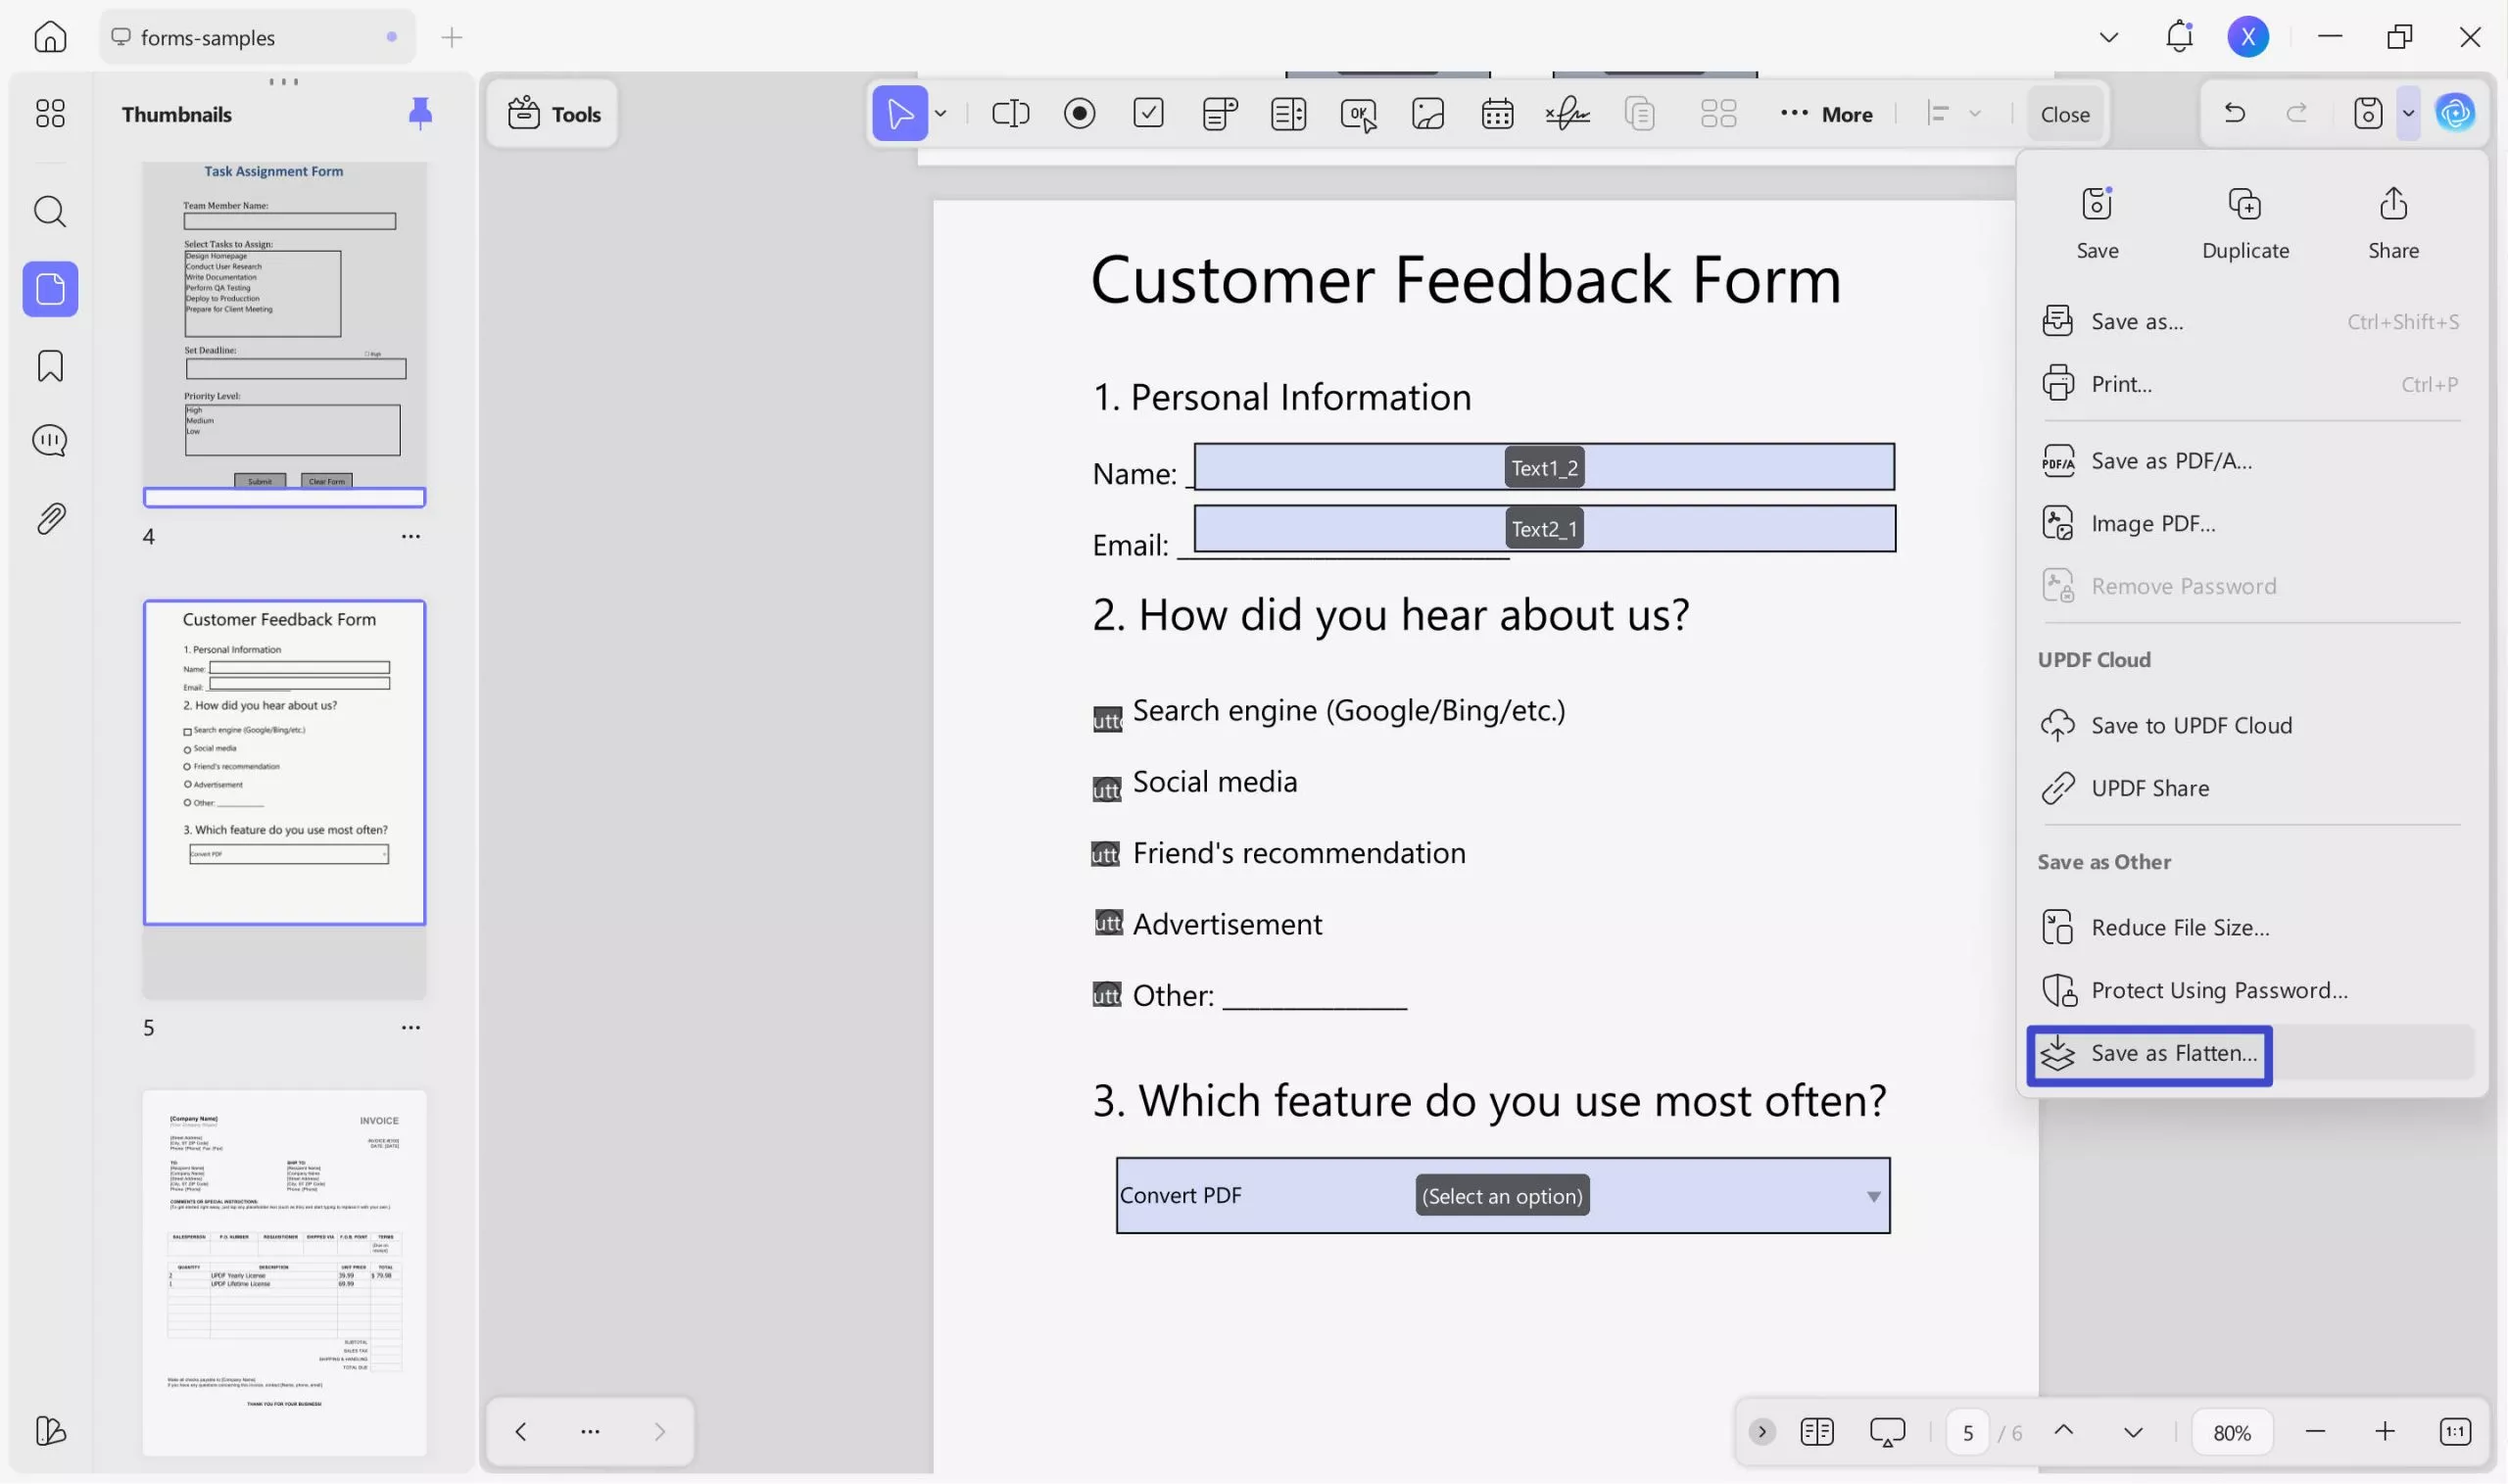
1. Open PDF in UPDF and go to Save as Other
Since the fillable fields are layers in a PDF document, you need a PDF tool that can work on them. UPDF is one of those, so you need to open the PDF document in it. When the PDF opens, click the narrow next to "Save" and choose "Save as Flatten".
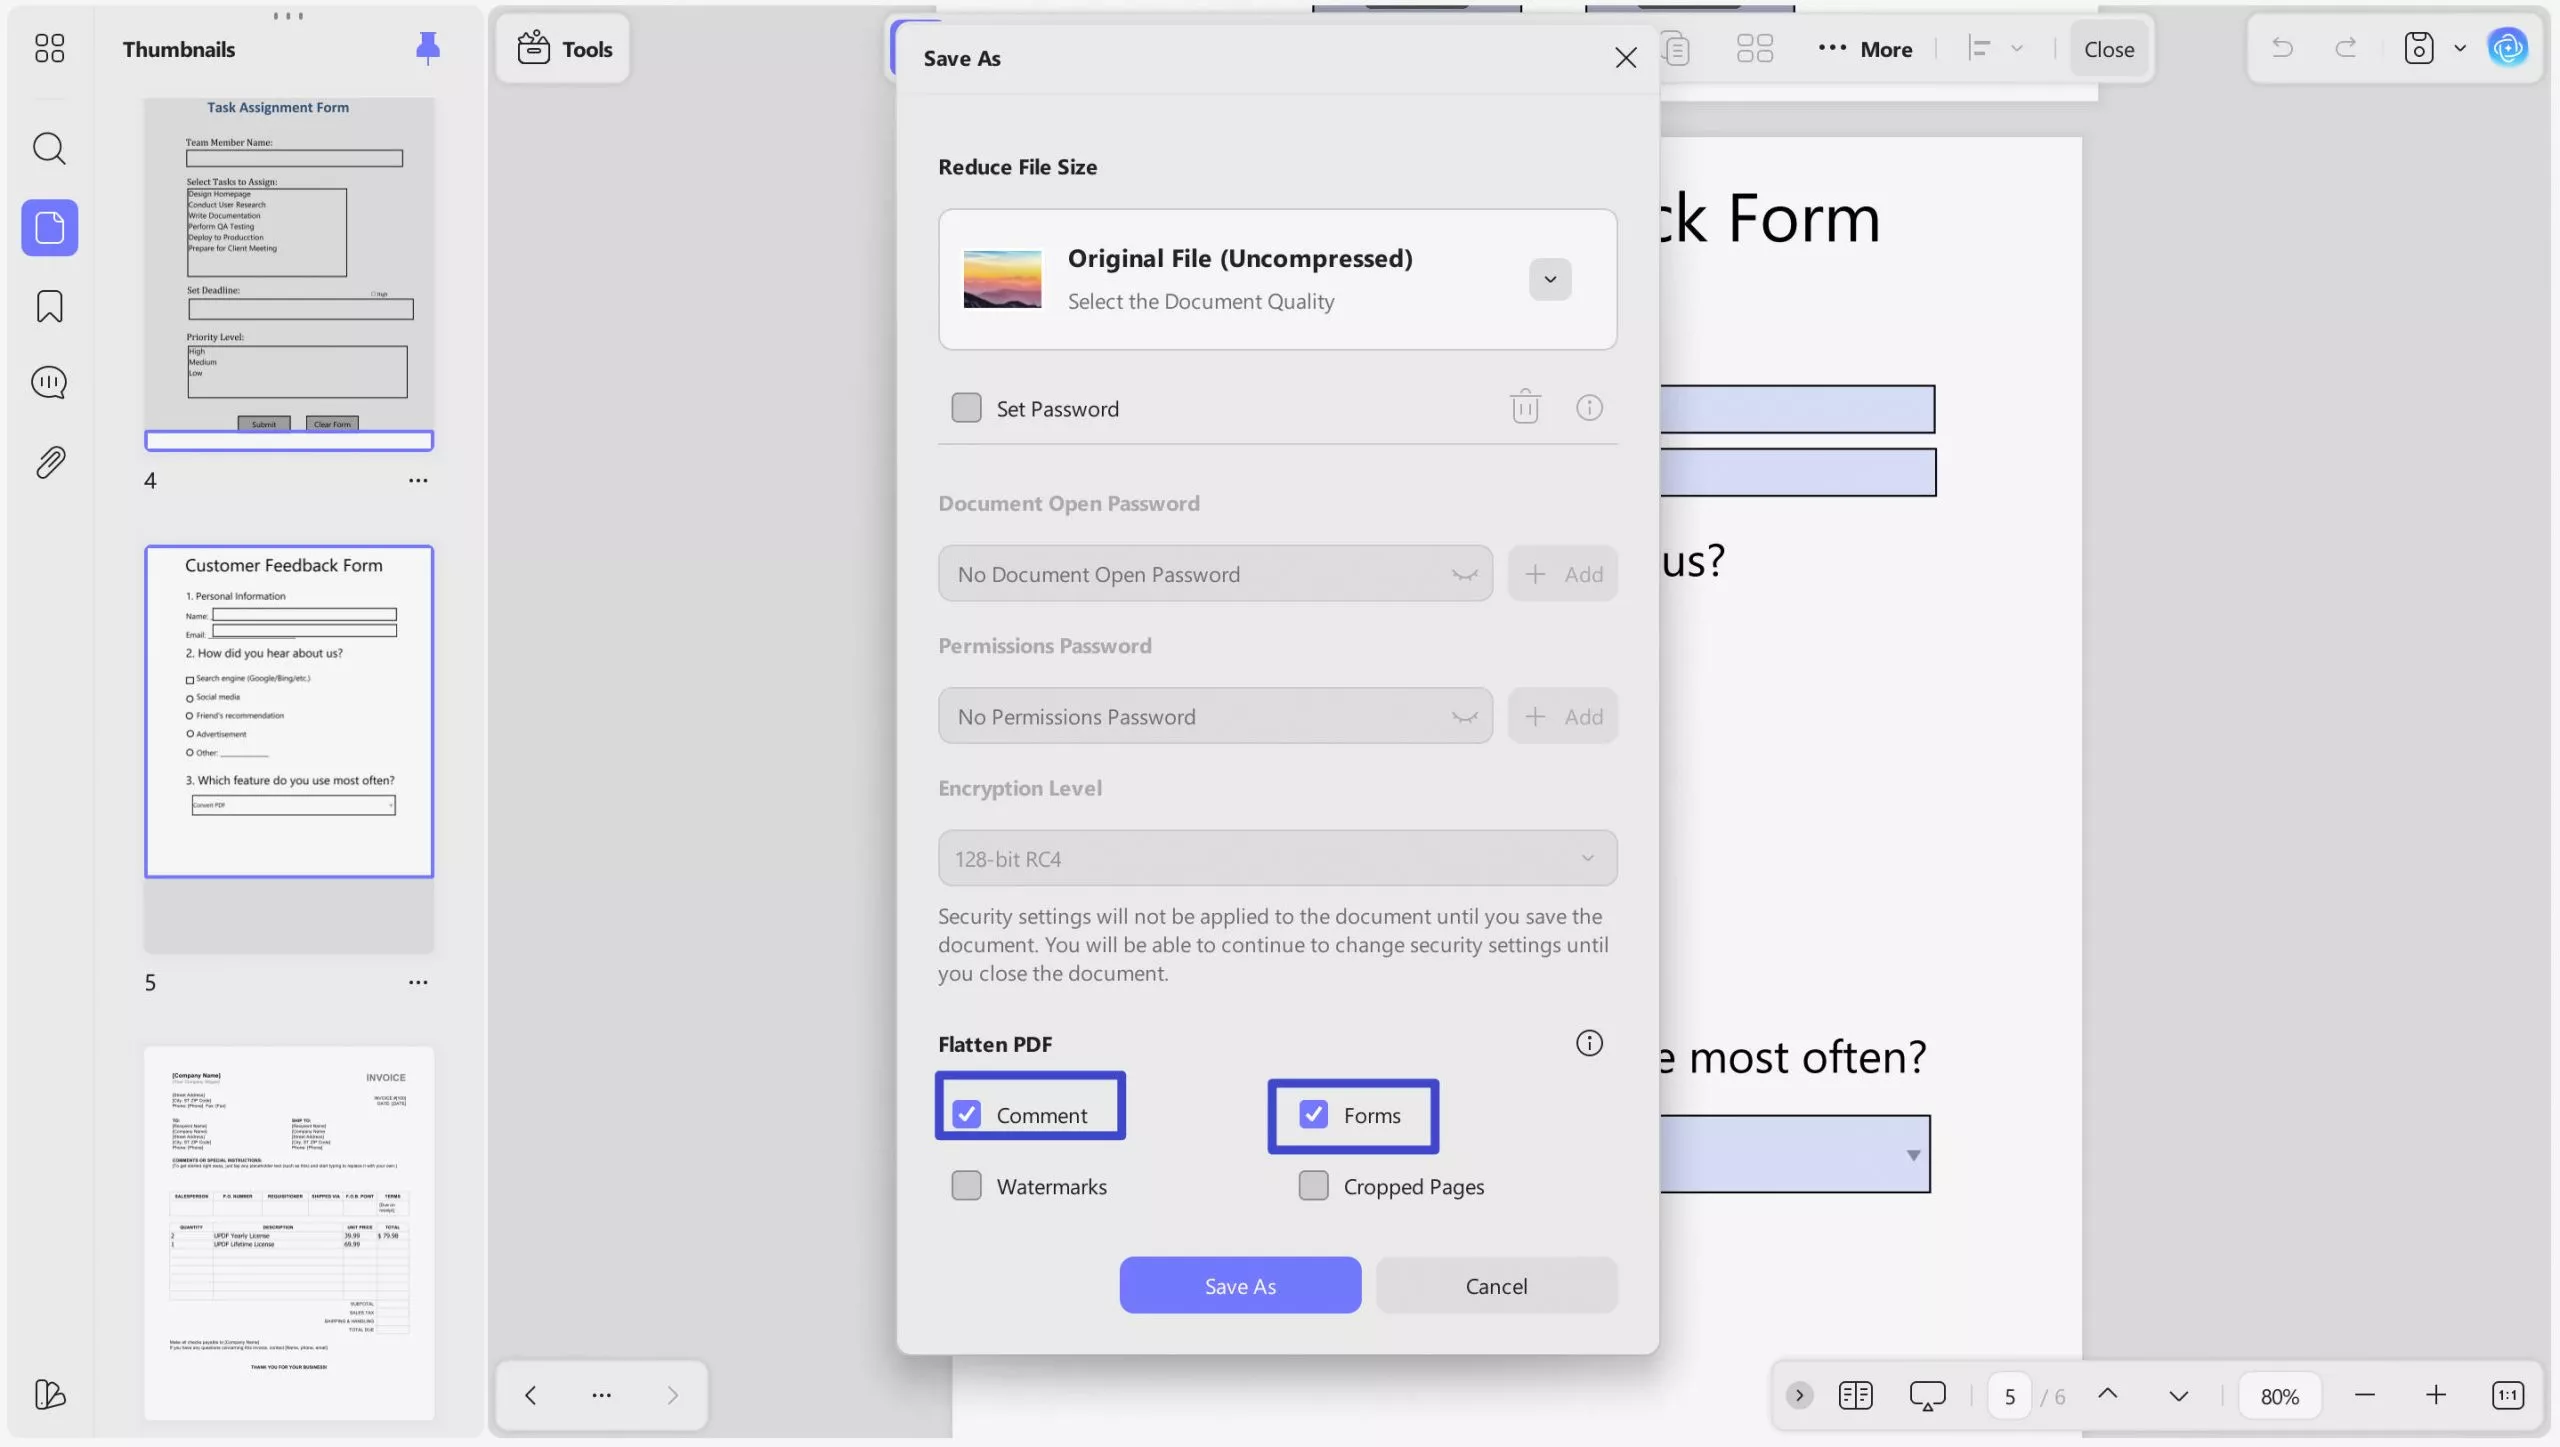
2. Flatten Annotations and Forms
Now click save as Flatten (what is a flattened PDF), and there will be 3 different options to choose from. Choose "Comment" or "Form". Now, you will save the PDF document on your PC, and this new saved file will not contain any fillable fields.
Way 5. Remove Fillable Fields from Multiple PDFs by Batch Printing
Sometimes, you may need to remove the fillable fields from multiple PDF documents. Using the UPDF batch print feature will remove these fields from multiple documents at once. You may download UPDF and follow the steps below:
Windows • macOS • iOS • Android 100% secure
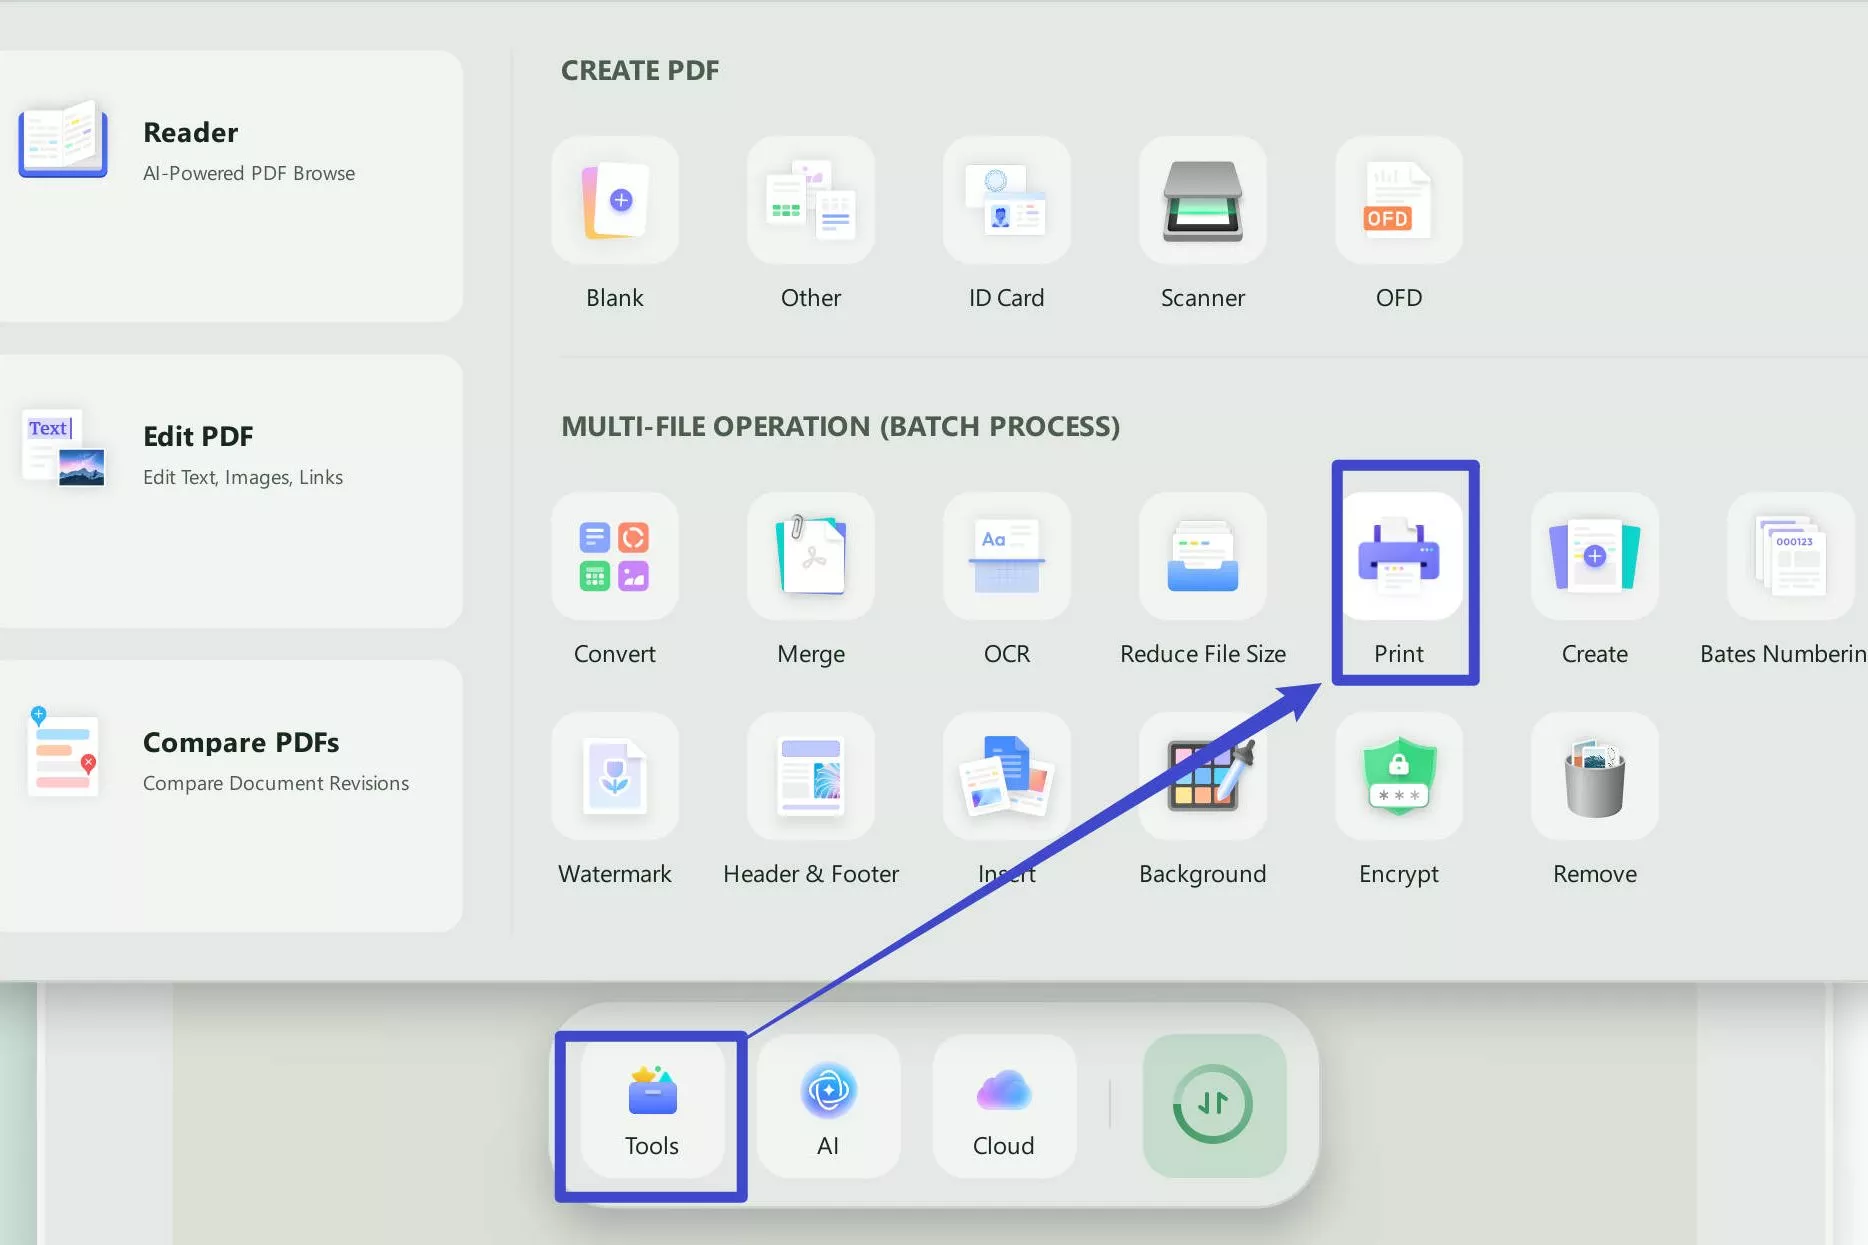
1. Open PDF and go to Batch, then Print
Run the UPDF app with its icon on your PC. When the tool runs, you need to click the Batch option right next to Open File. In the Batch option, you will see 5 different options where you need to click Print.
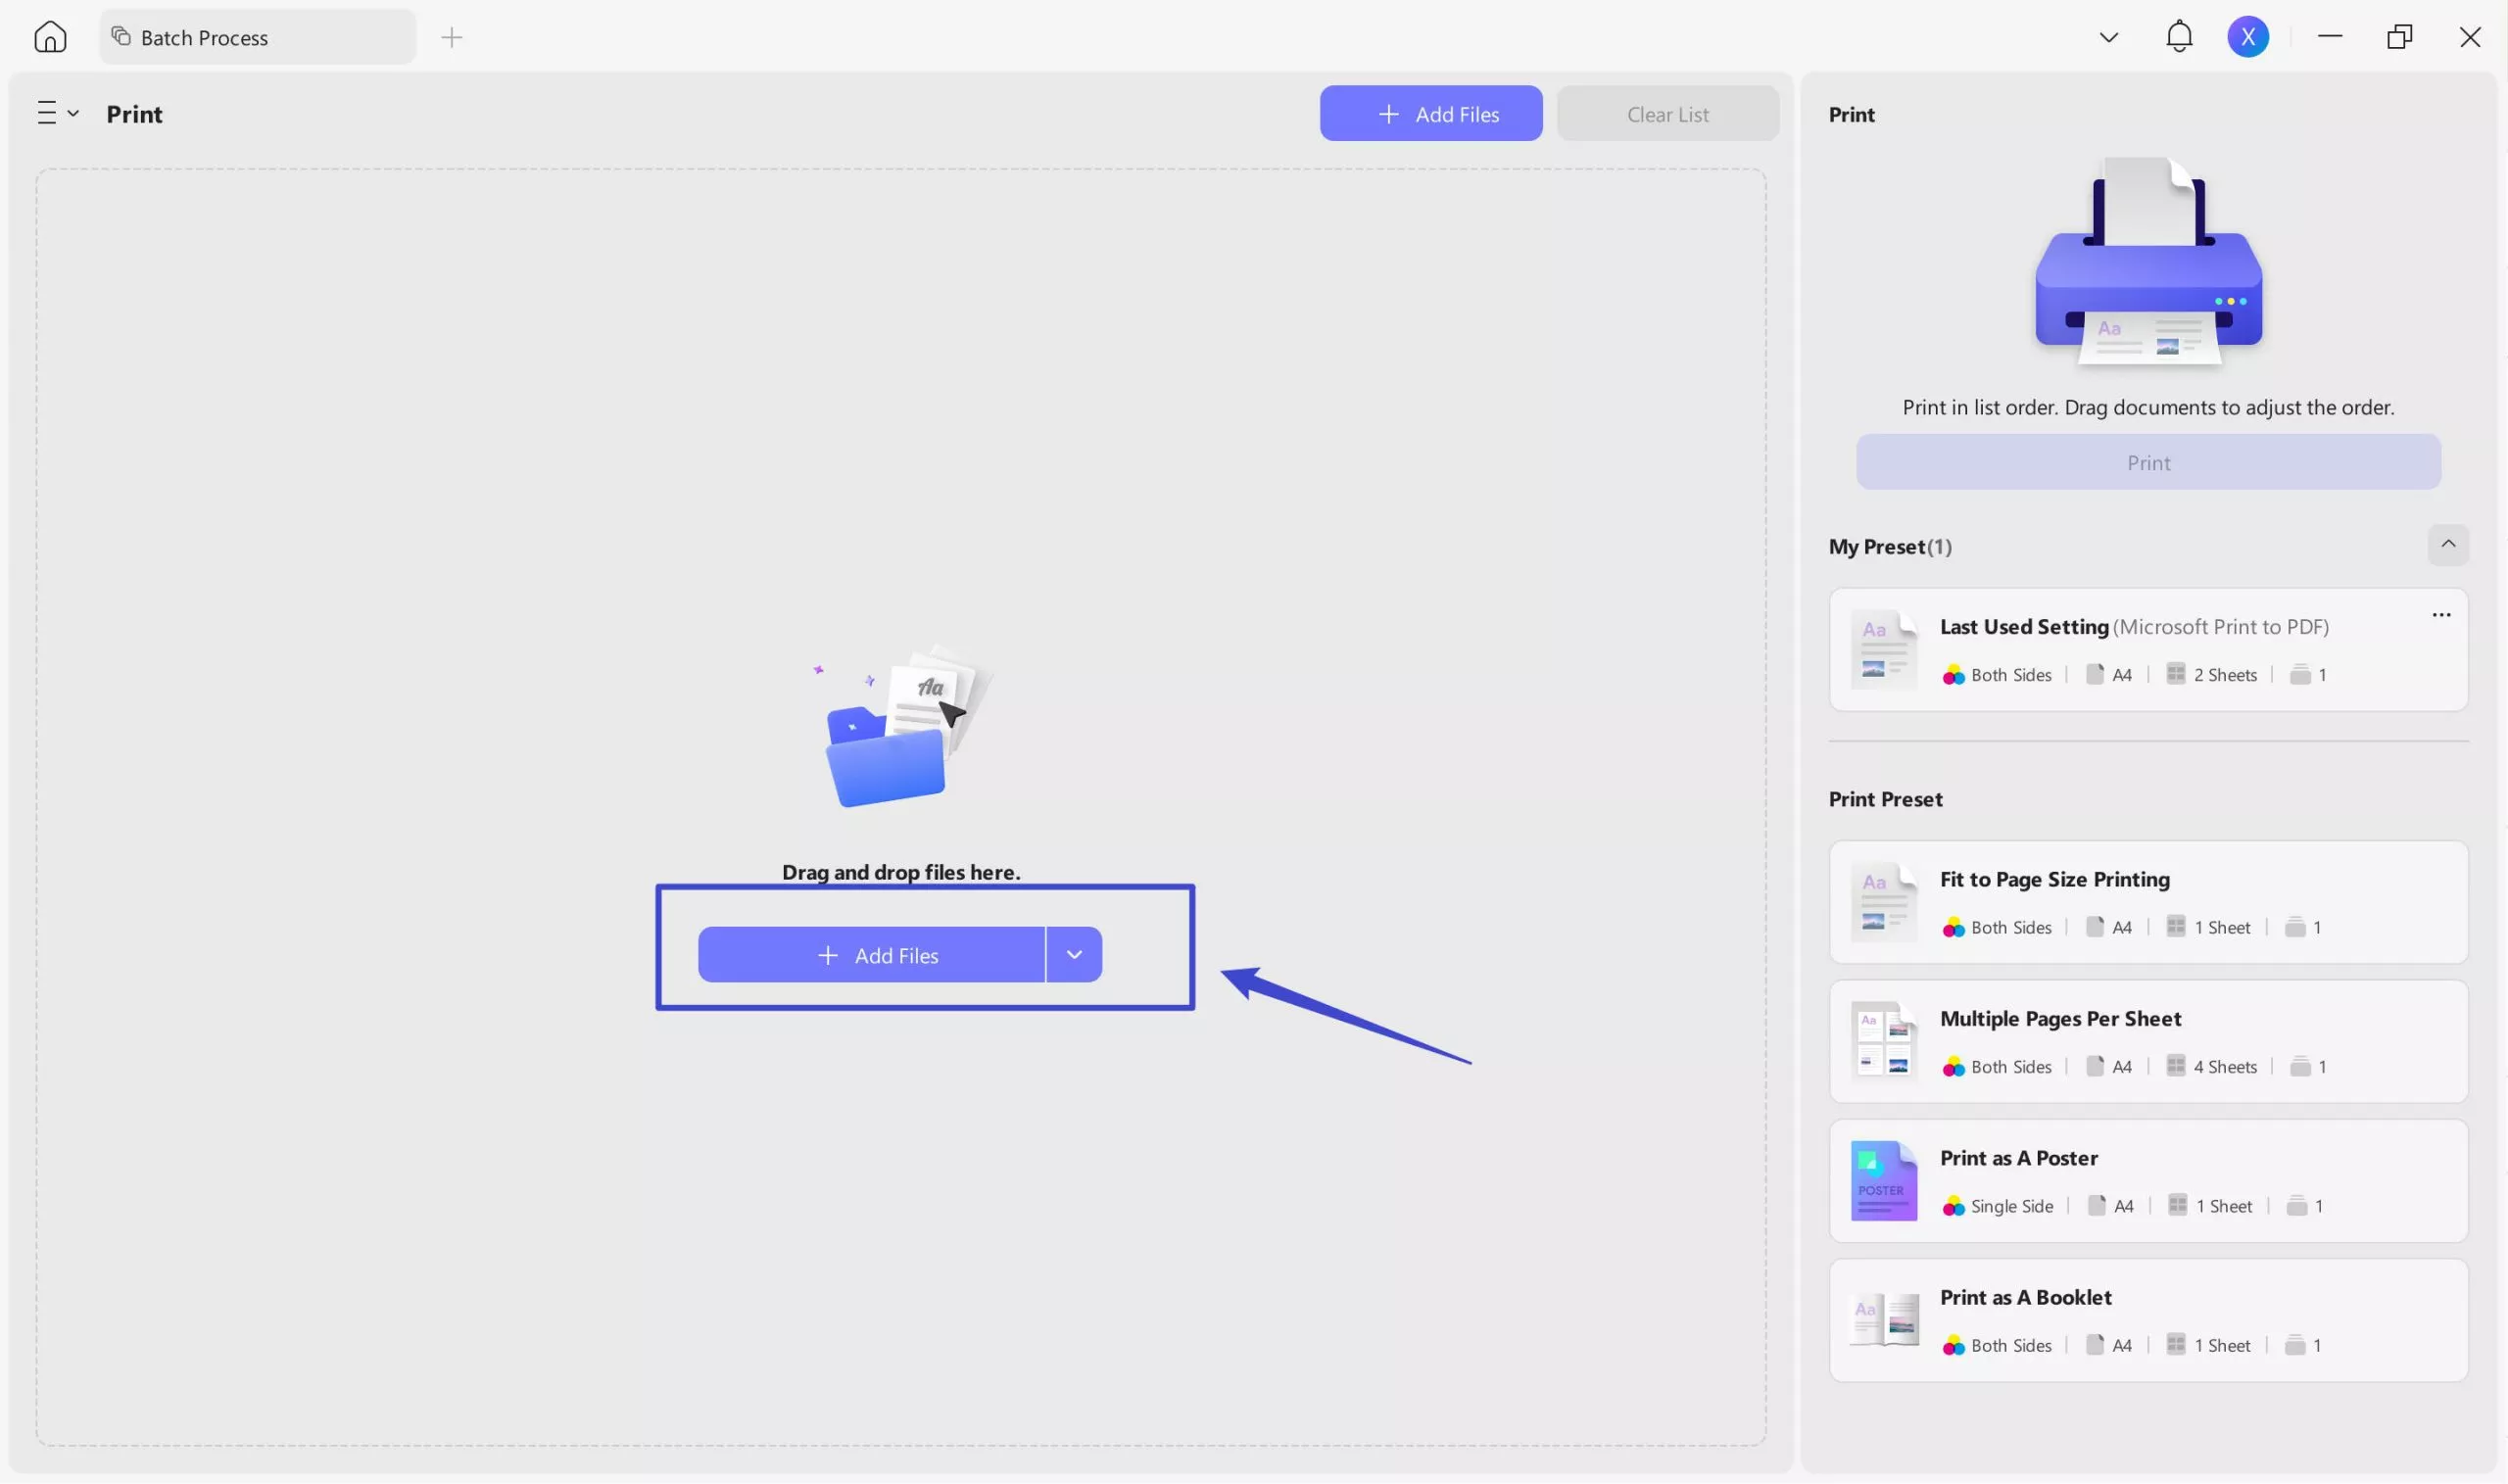
2. Add multiple PDF files and click "Apply" to save
Now add as many PDF files in UPDF as you want and ensure to select the printer as Print to PDF. Now, you only need to click "Print", and a browse window will open, asking you for the saving location. Save those PDF files, and the fillable fields will be deleted.
What Else Can UPDF Do for You?
Apart from removing fillable fields, UPDF can:
- Edit PDF text, images, and links
- Provide cloud storage to share and store PDF files
- Sync your work across all devices with the same account
- Provide AI chatbot assistance built-in, etc.
So, you may download it for free and purchase a premium subscription to enjoy all these features.
Windows • macOS • iOS • Android 100% secure
Also Read: How to Remove OCR from PDF? (3 Ways)
Part 2. How to Remove Fillable Fields with Adobe Acrobat
Adobe Acrobat is among the most popular PDF tools, and it allows you to remove fillable fields with ease. Apart from removing, you can create and fill these fields, write text in different fonts and colors, etc.
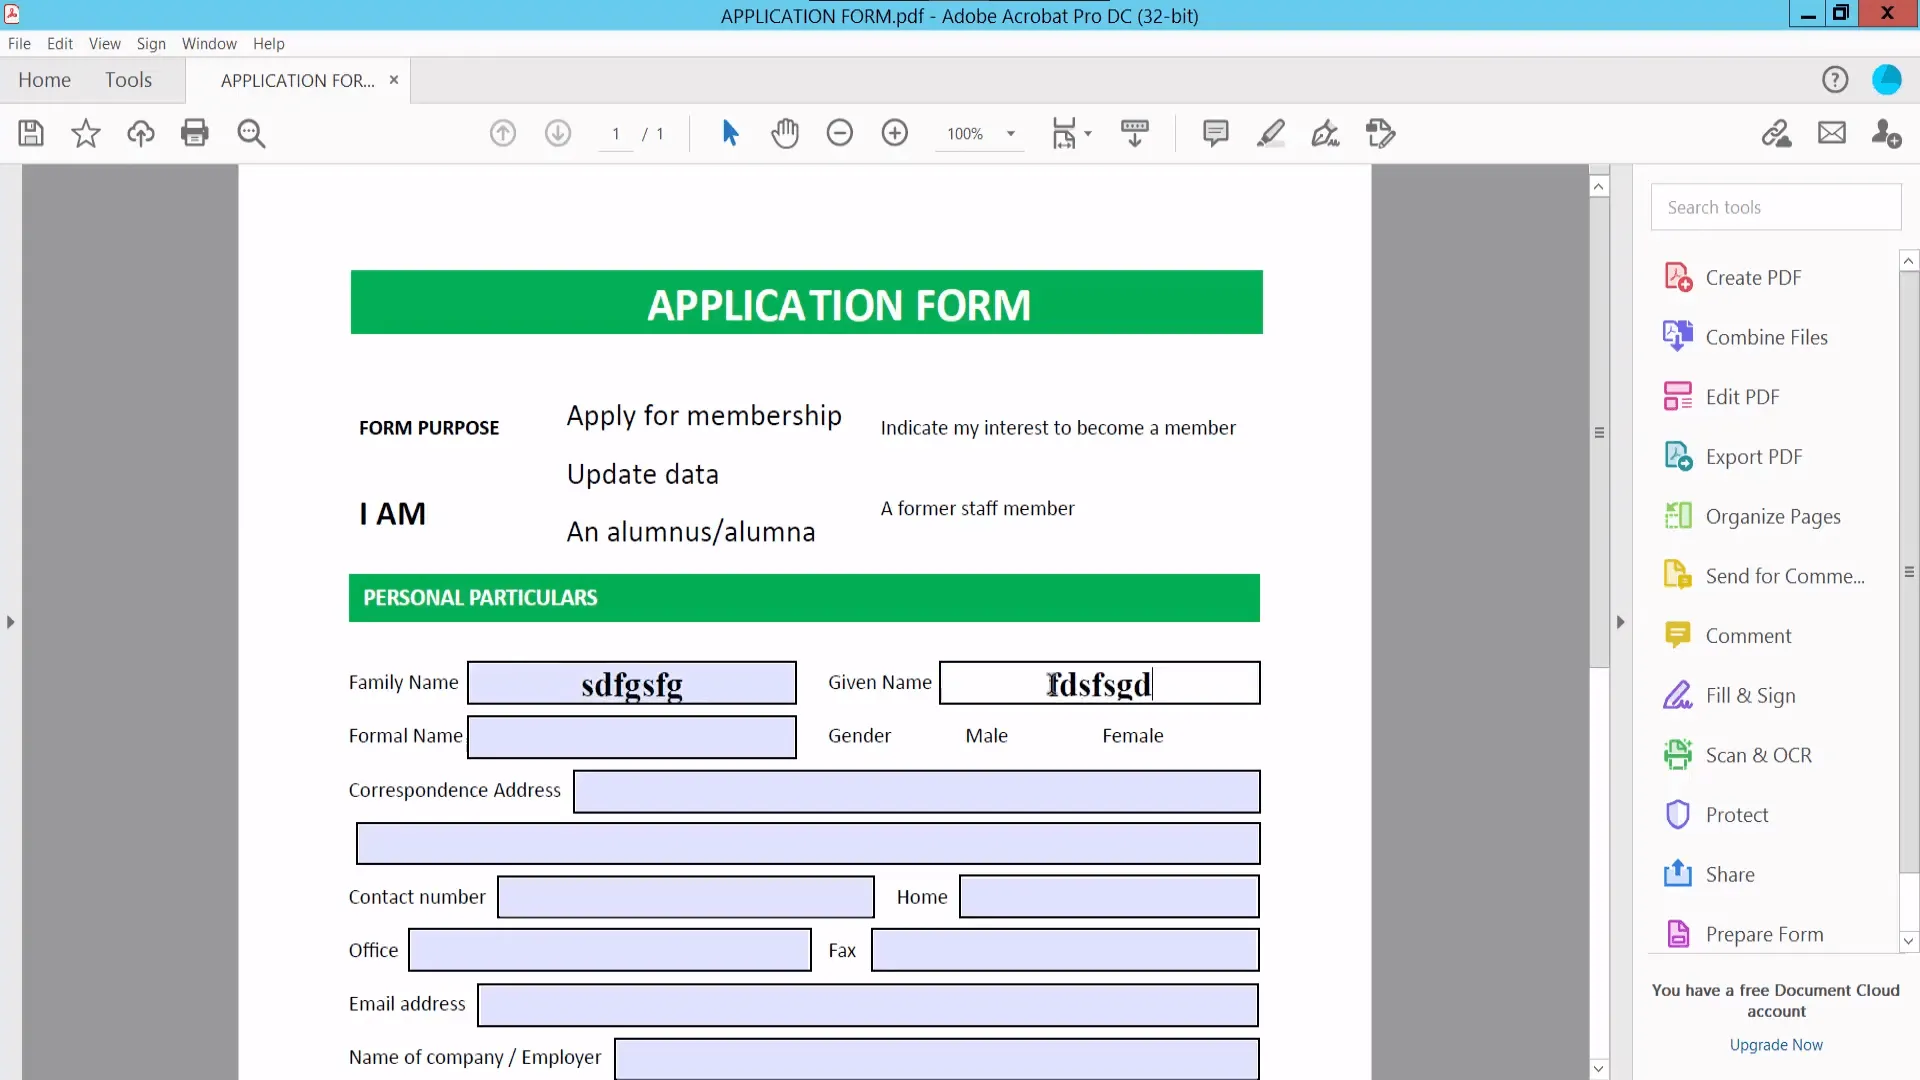
1. Open the PDF in Acrobat.
Run Adobe Acrobat and, using the Open option, open your PDF file in it.
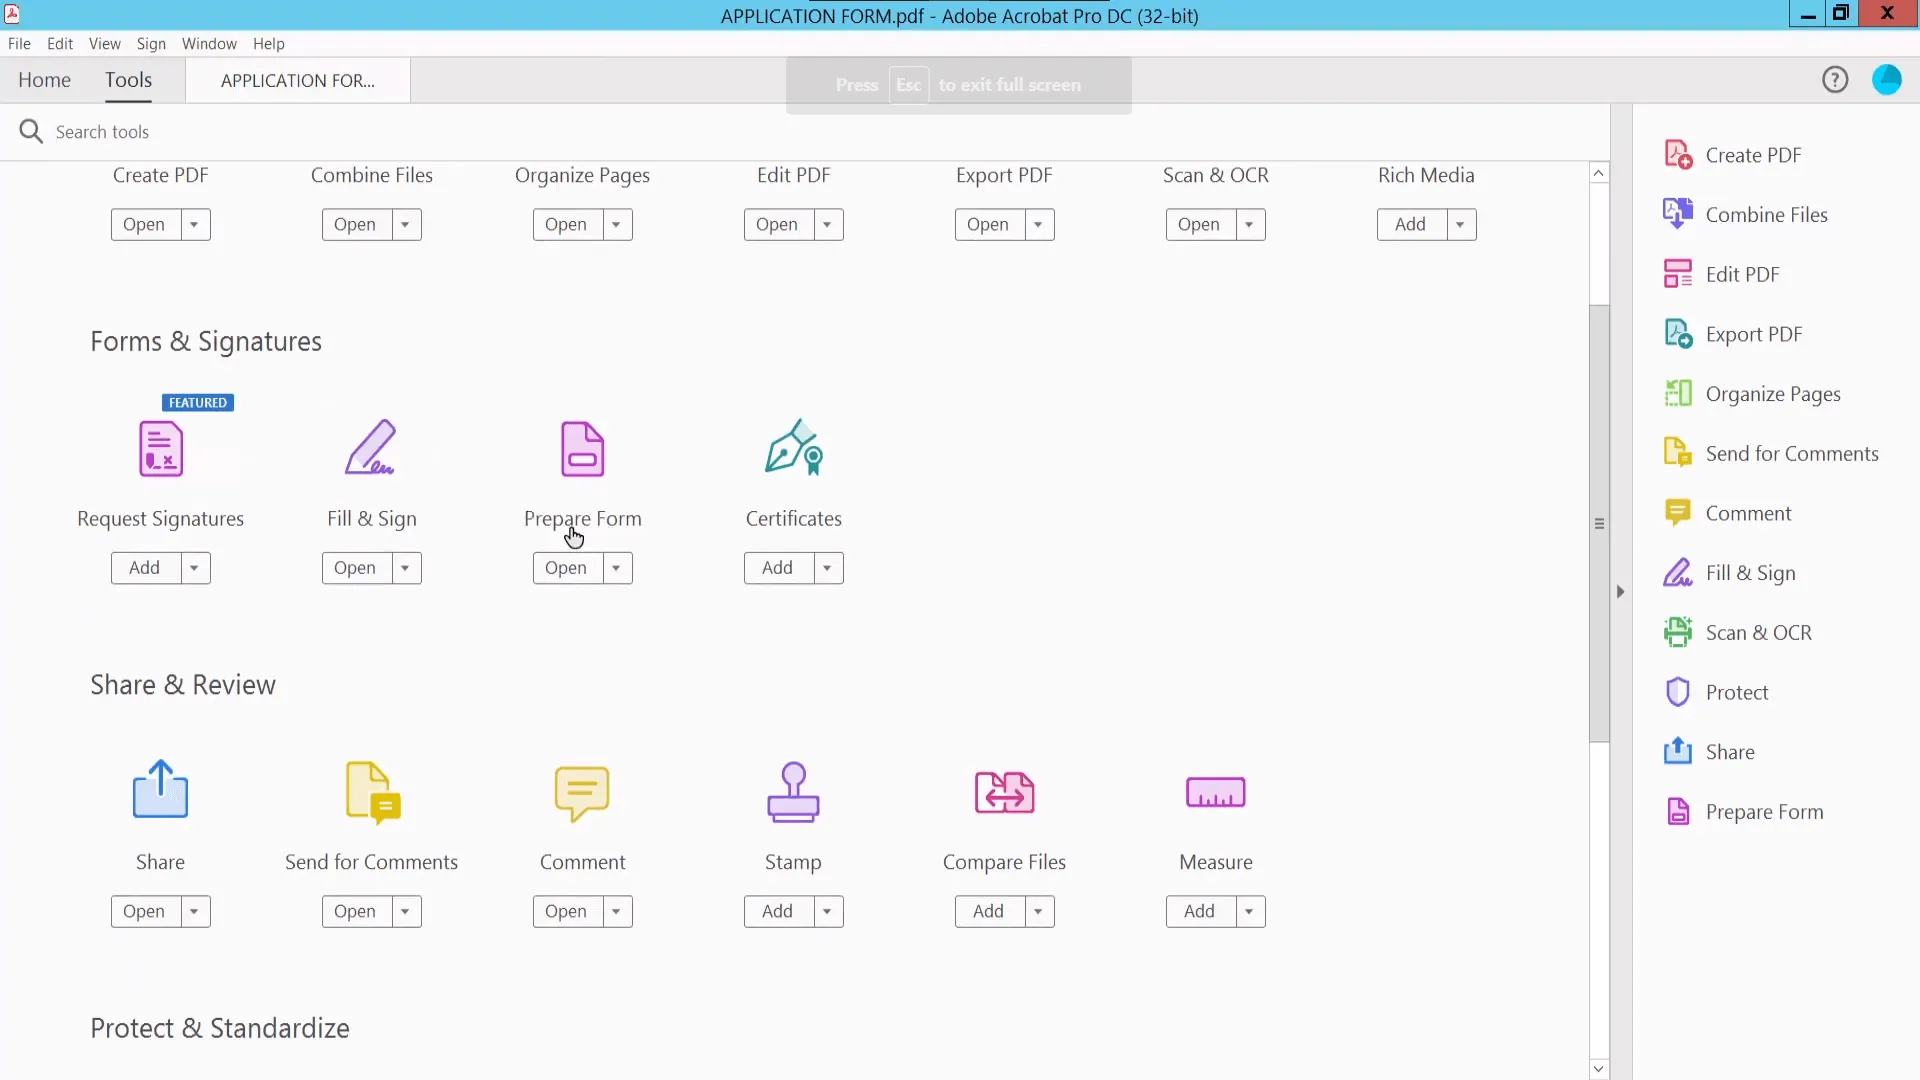
2. Go to Tools and select Prepare Form.
Click the Tools tab from the top left and scroll down. Locate the Prepare Form option and click it. You will again go to the PDF viewing screen but with form tools.
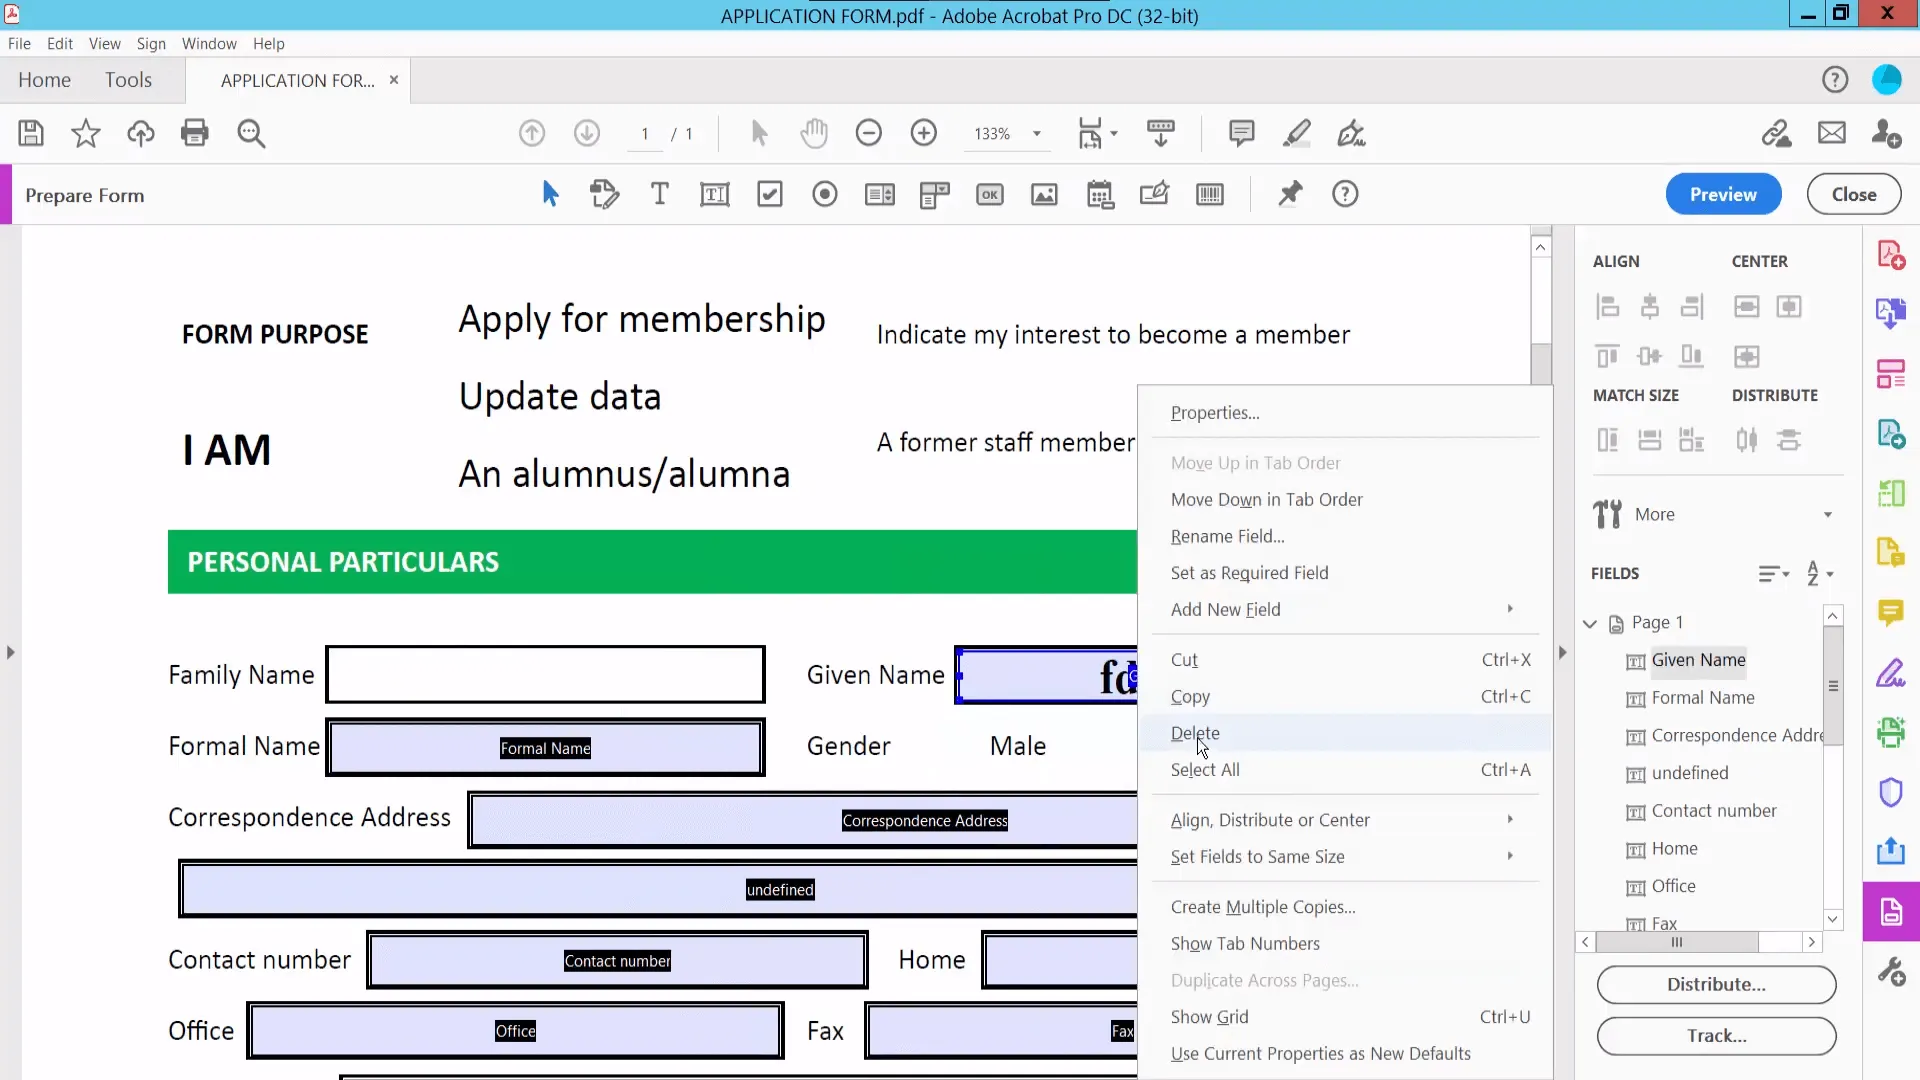
3. Click to select a field, right-click, and select delete
The fillable fields will be highlighted in a bluish-purple color. You can click on any field to select it and right-click to reveal options. From the options, click Delete and the field will be deleted. Some fields have outlines that are not part of fillable fields but only a design. Next, you can also repeat the process to delete those outlines.
The method to remove fillable fields in PDF is easy. However, it requires a subscription to access Adobe Acrobat, and it is expensive.
Part 3. How to Remove Fillable Fields from PDF Online with PDFfiller
PDFfiller is an online PDF editing tool that comes with PDF editing and reading features. Since it is web-based, it can work on any device and OS where you may remove the fillable fields.
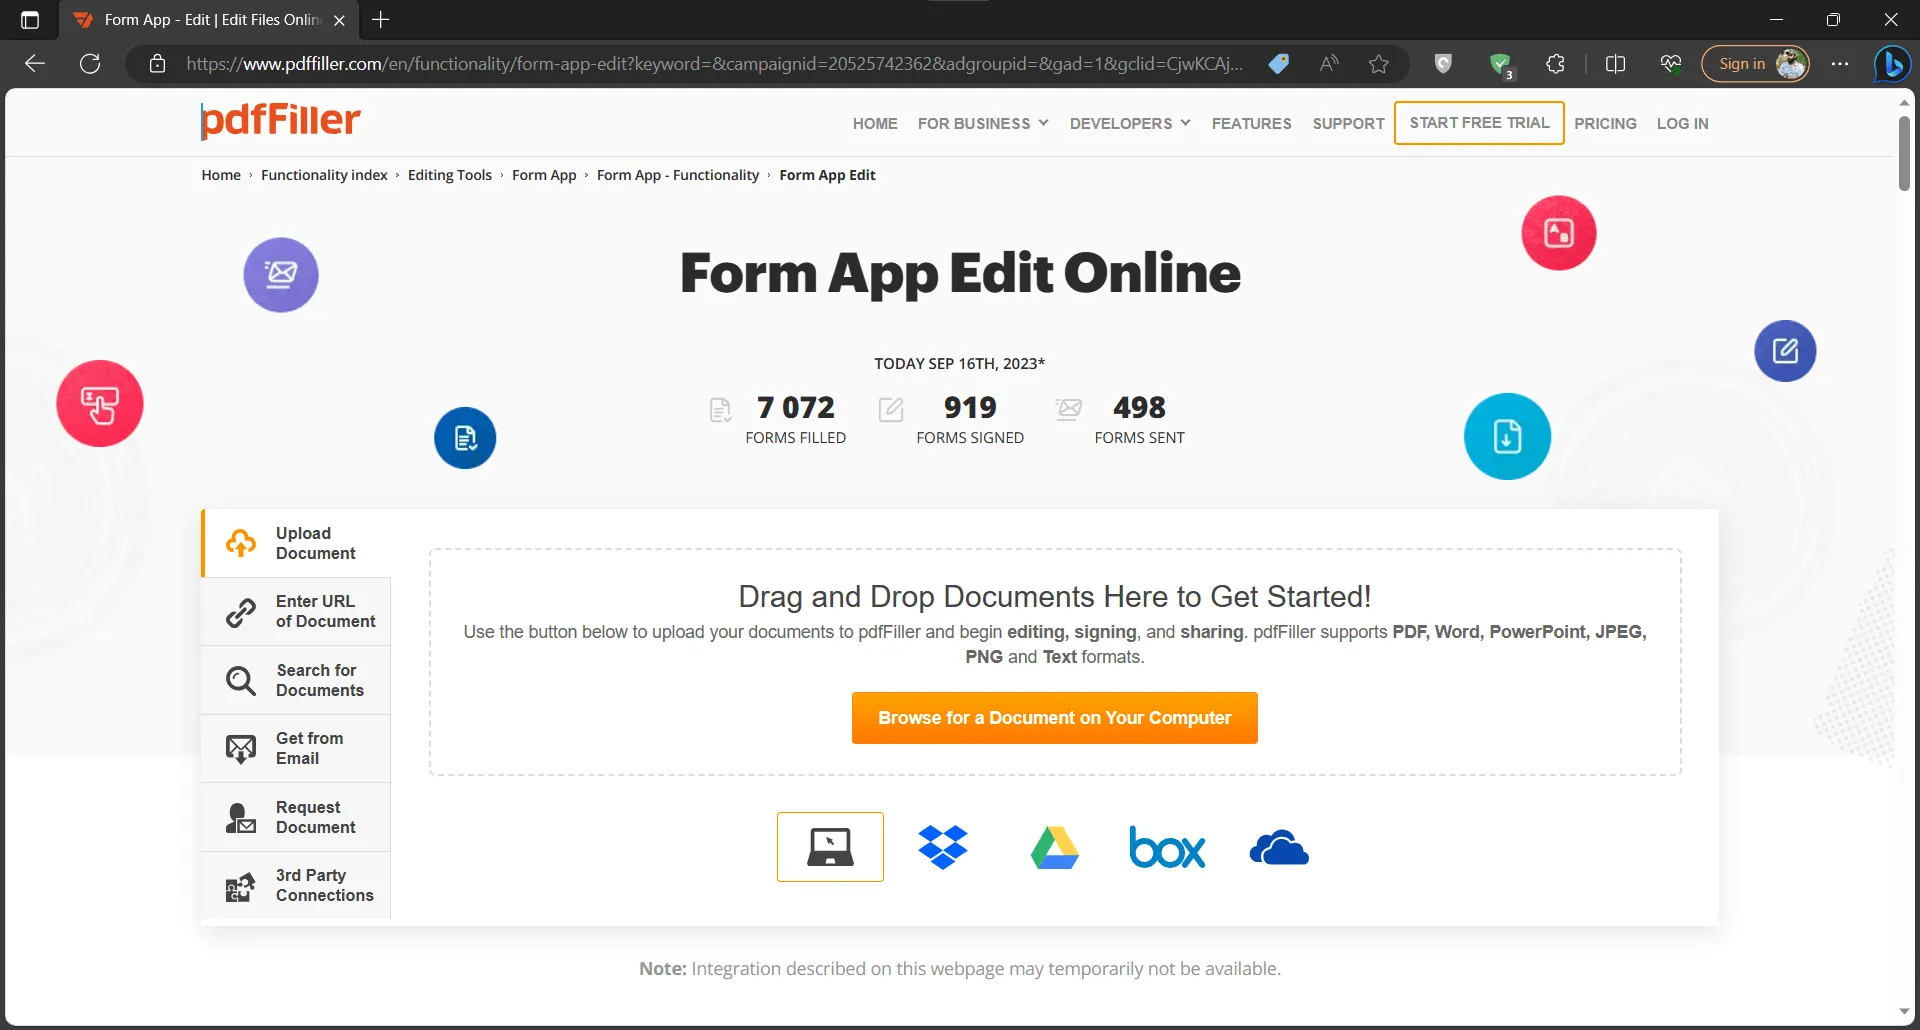
1. Open the PDFfiller website and upload a document.
Open the PDFfiller website and, using the upload option, upload a PDF document with fillable fields in it. Depending on your connection speed, you may need to wait for a few seconds before you get PDF viewer mode.
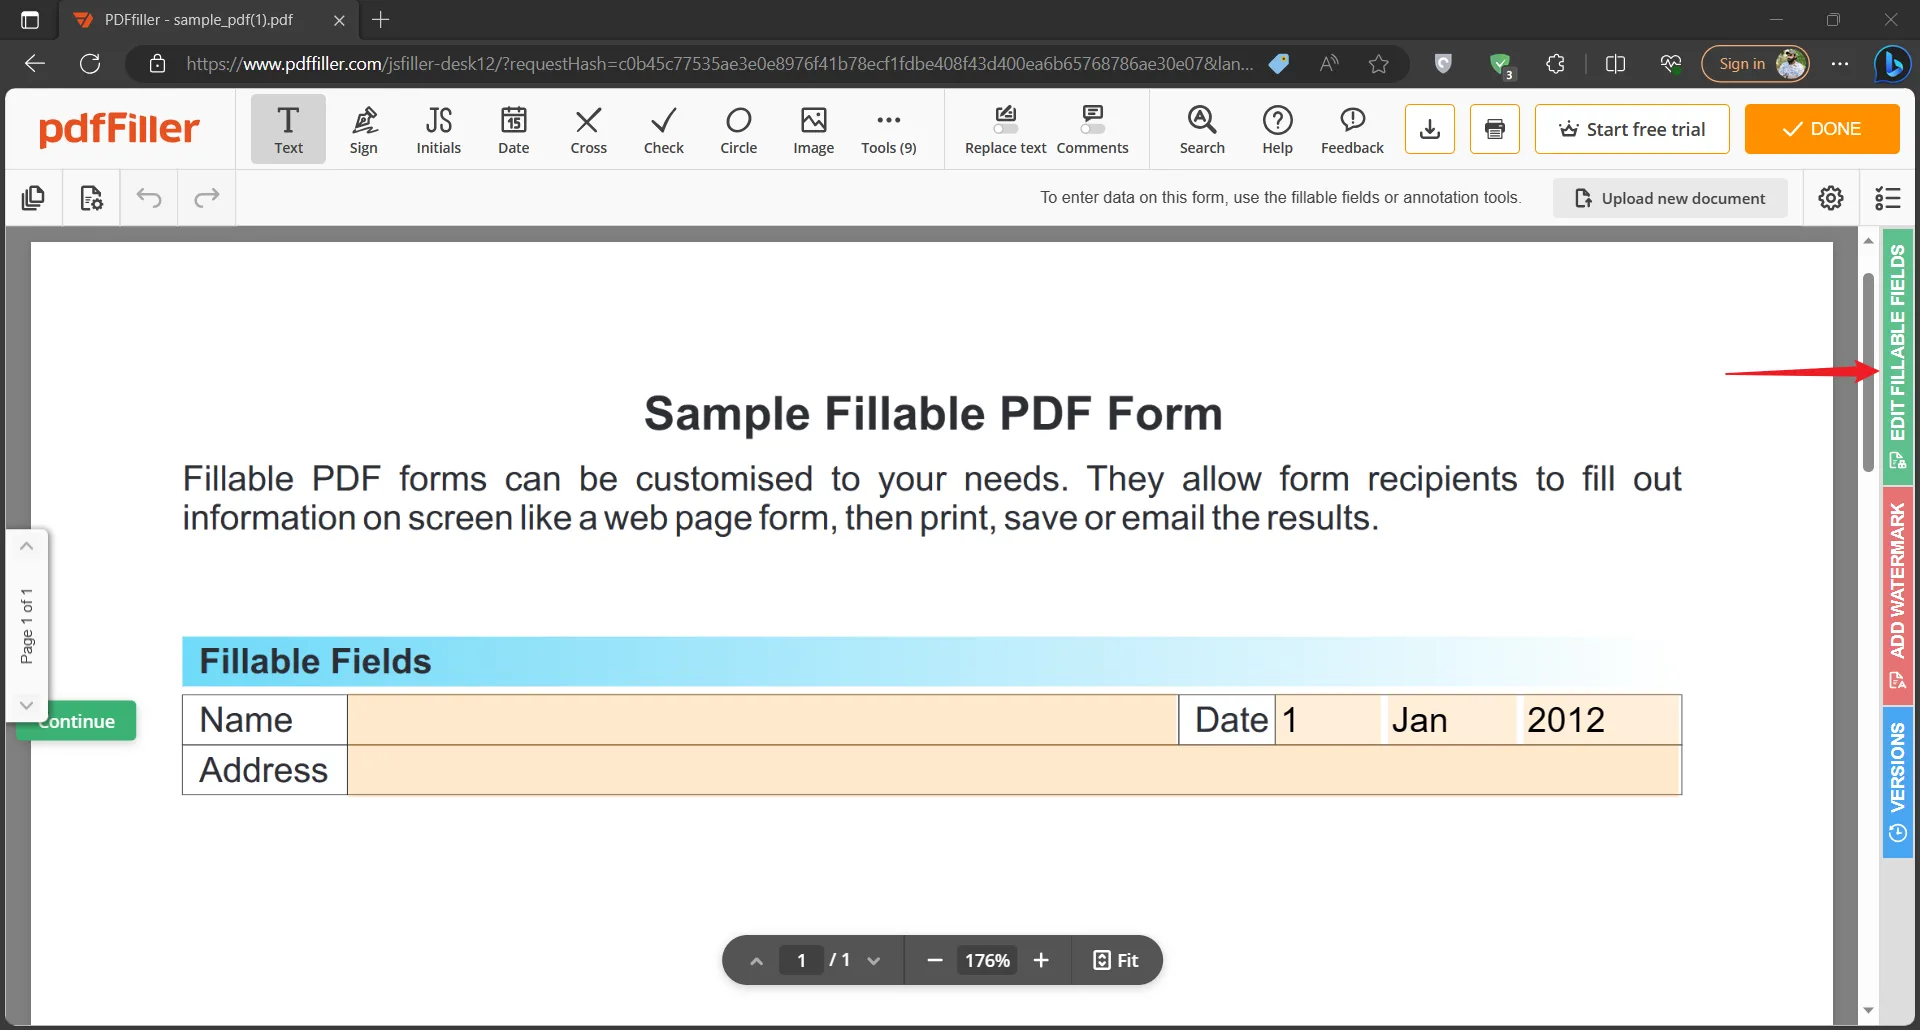
2. Click the Edit Fillable Fields button.
The website interface will have different elements, but on the right side of the screen, there will be a green button to edit fillable fields. Click it to reveal options.
3. Click to select and delete the fillable field.
PDFfiller highlights the fillable fields in a light orange color. You can locate them easily and click to select. As you click, it will become green, and on the right side of the field, a trashcan icon will appear. Click that icon and the fillable field will be successfully deleted.
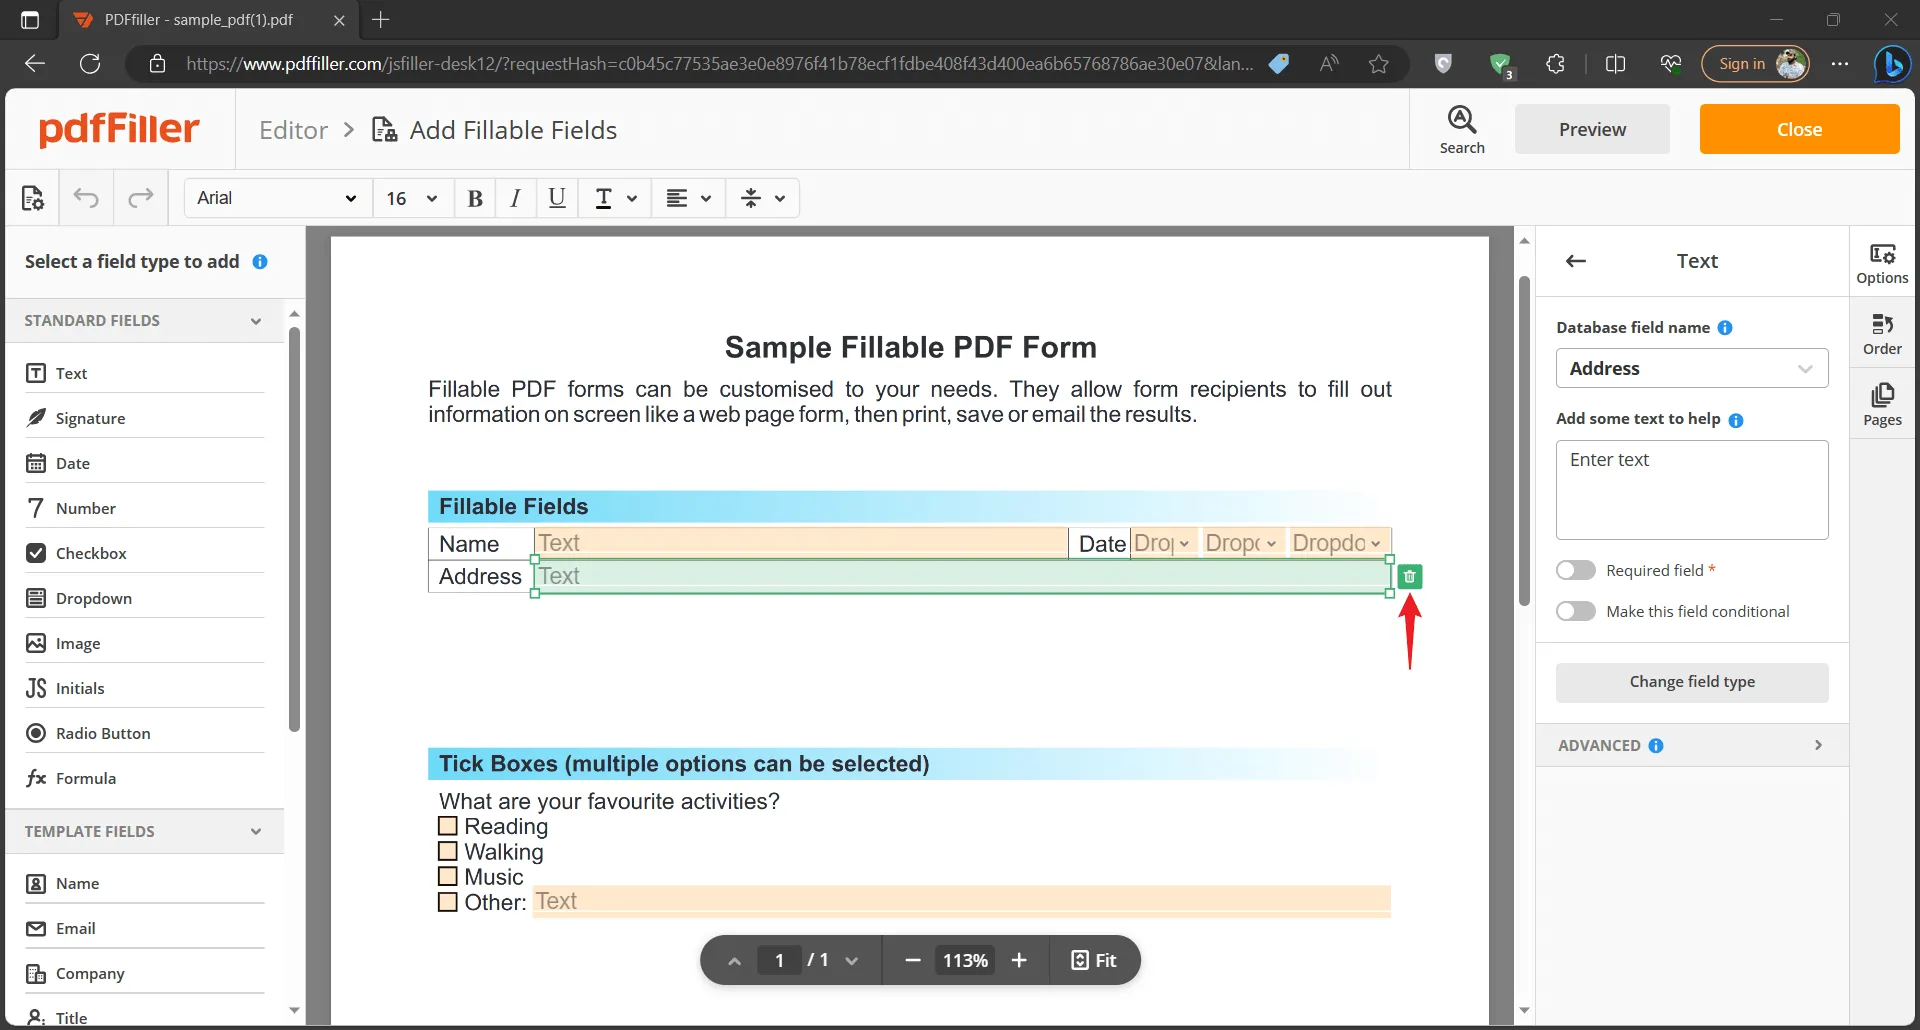
This method is convenient since it requires no installation of any app. However, it is not suitable for users who want to remove fillable fields from a multi-page PDFs.
Part 4. How to Remove Fillable Fields from PDF With Foxit Reader?
Foxit Reader is a PDF reader tool that does not come with in-depth editing features. With Foxit, you can import and export forms, reset their input to the original state, and do much more. Additionally, you can still use it for removing fillable fields with the steps below:
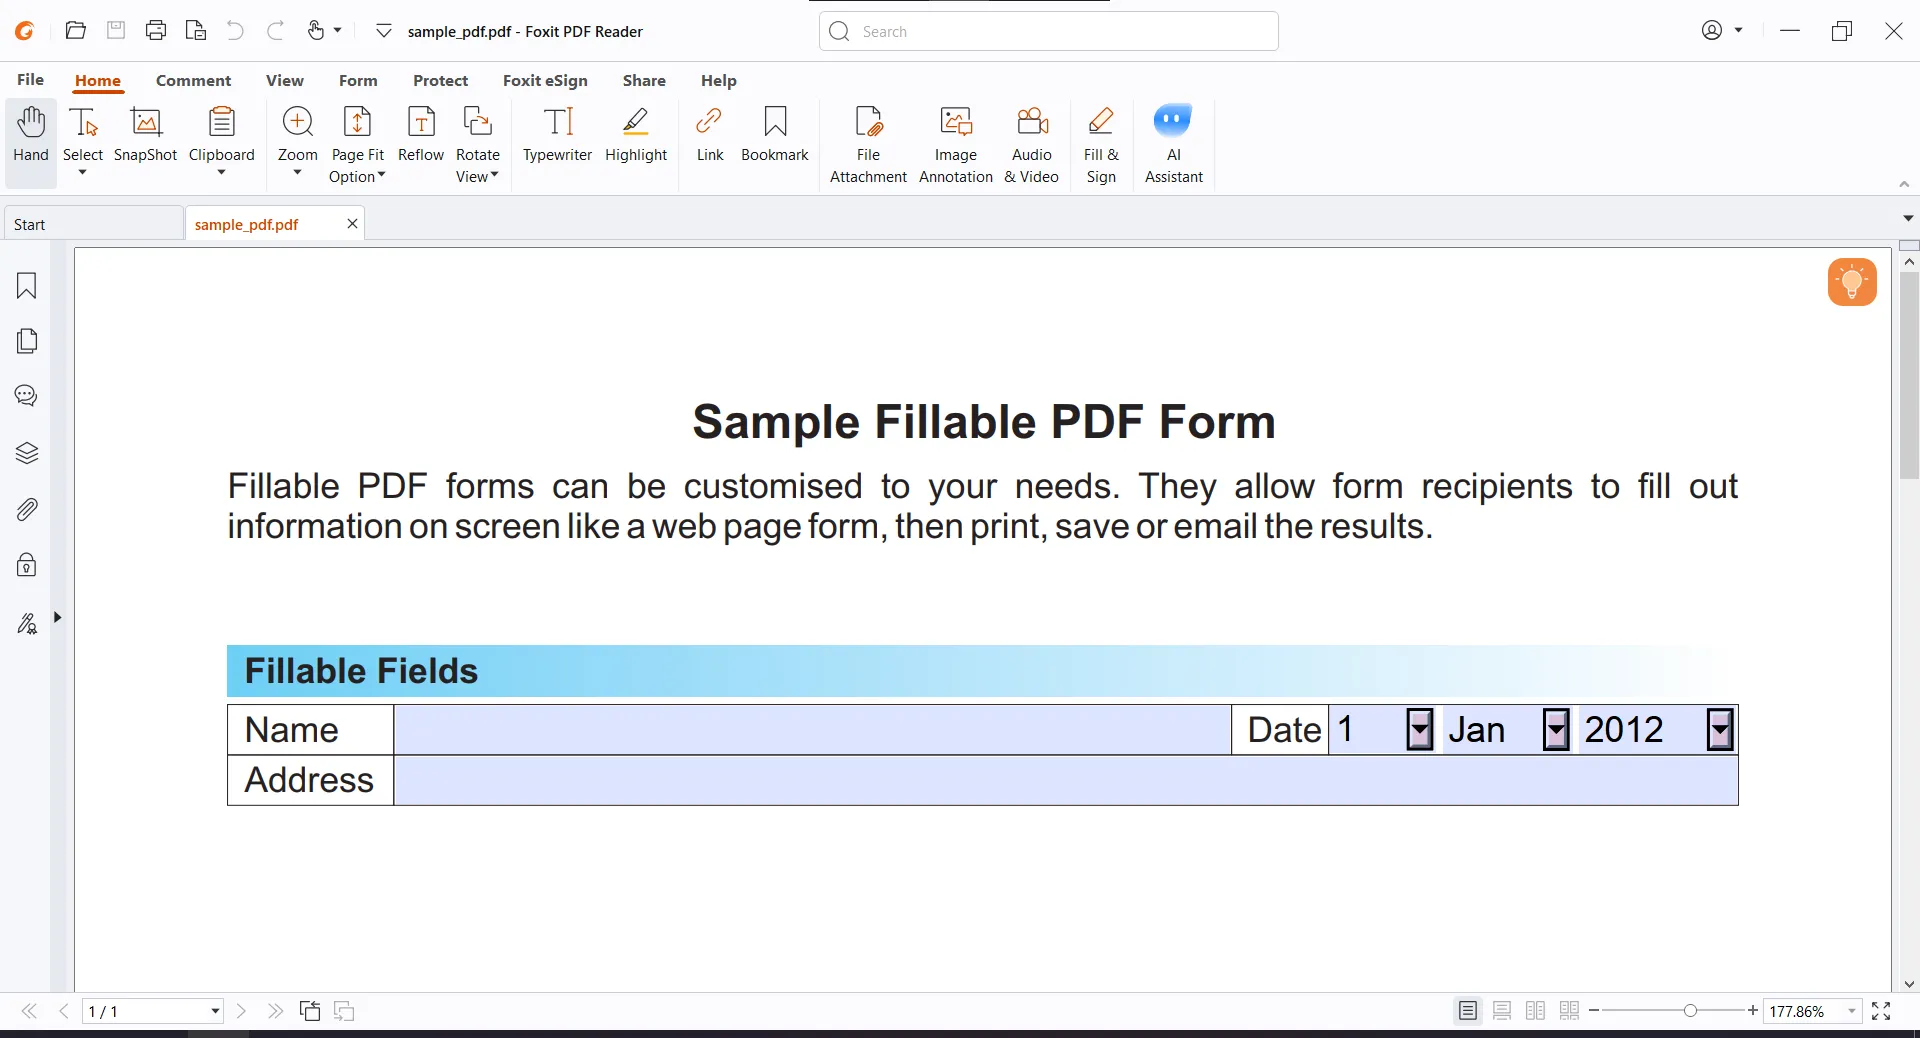
1. Open the document in Foxit Reader
Start Foxit Reader on your PC and click the Open File button to open the PDF document in it.
2. Print the Document as a PDF
As you go into the PDF viewer mode, hit the Ctrl + P combination on your keyboard to reveal printing options. The printer must be set as Print to PDF, and when you click OK, the new PDF file will be saved on your PC that will not have any fillable fields in it.
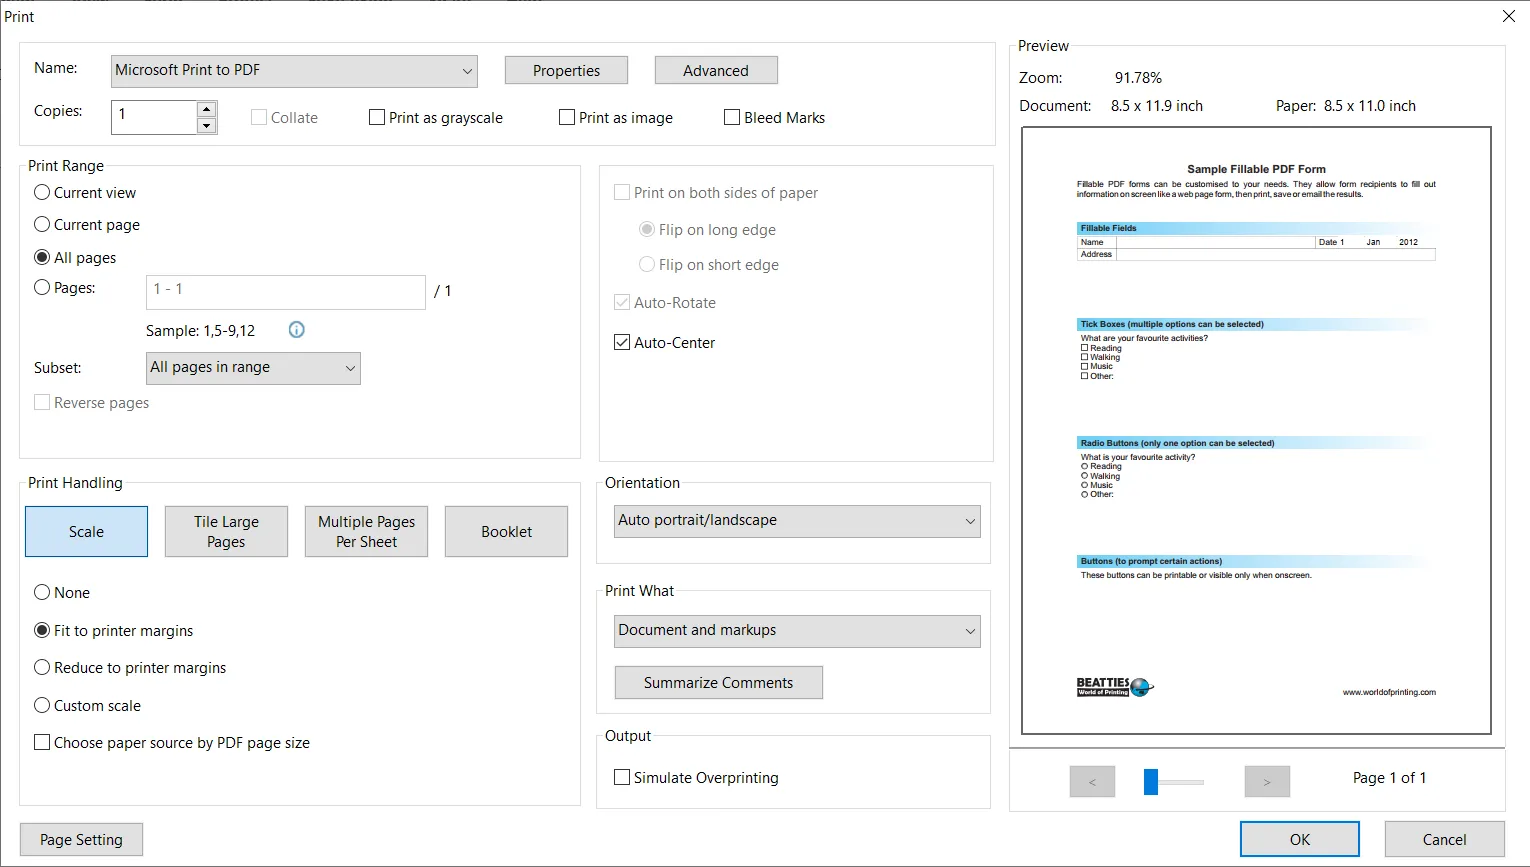
Using Foxit to remove fillable fields in a PDF is also a good choice. However, it is not that intuitive compare to other tools introduced in this article.
Part 5. How to Remove Fillable Fields from PDF in Mac with Preview?
Mac OS comes with the built-in Preview tool where you open PDF documents. It allows you to add text in those fillable fields in different fonts, colors, and sizes. Although it is not a PDF editing tool, it still supports removing fillable fields with the following steps:
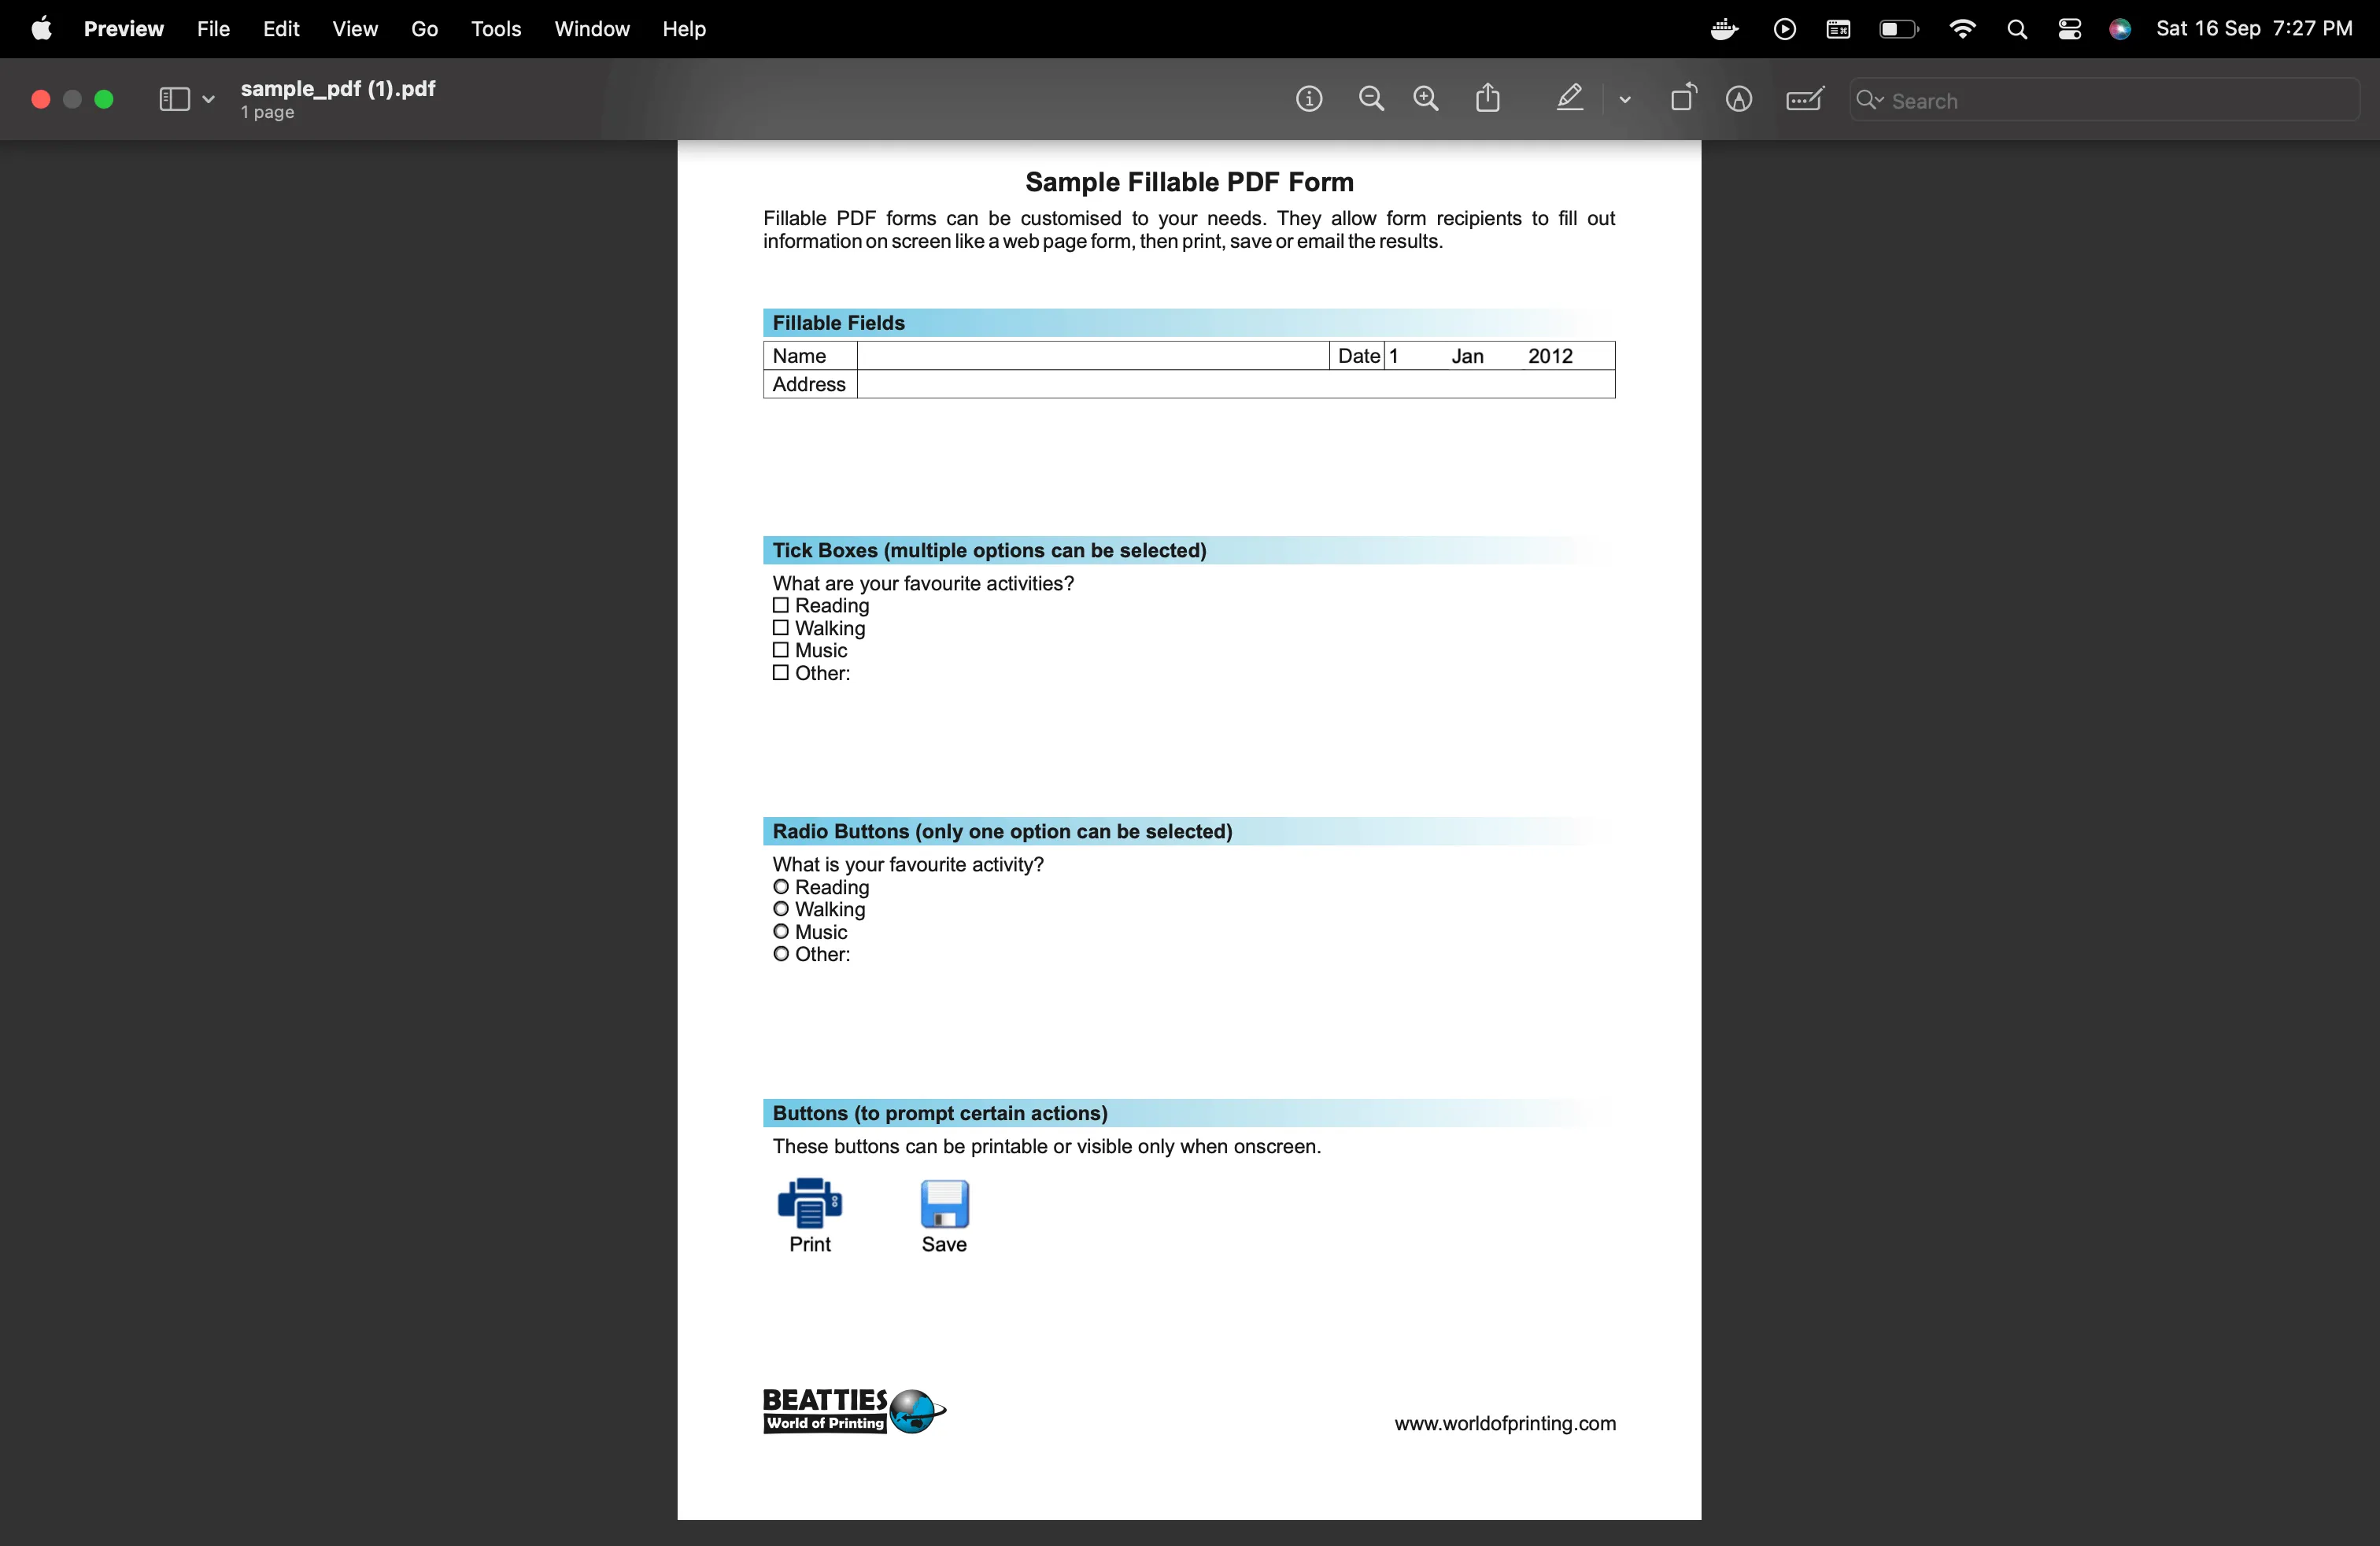
1. Open the document in Preview on Mac
Double-click the PDF file saved on your Mac, and it will open in the Preview app on your Mac. It is the default app for viewing PDF documents.
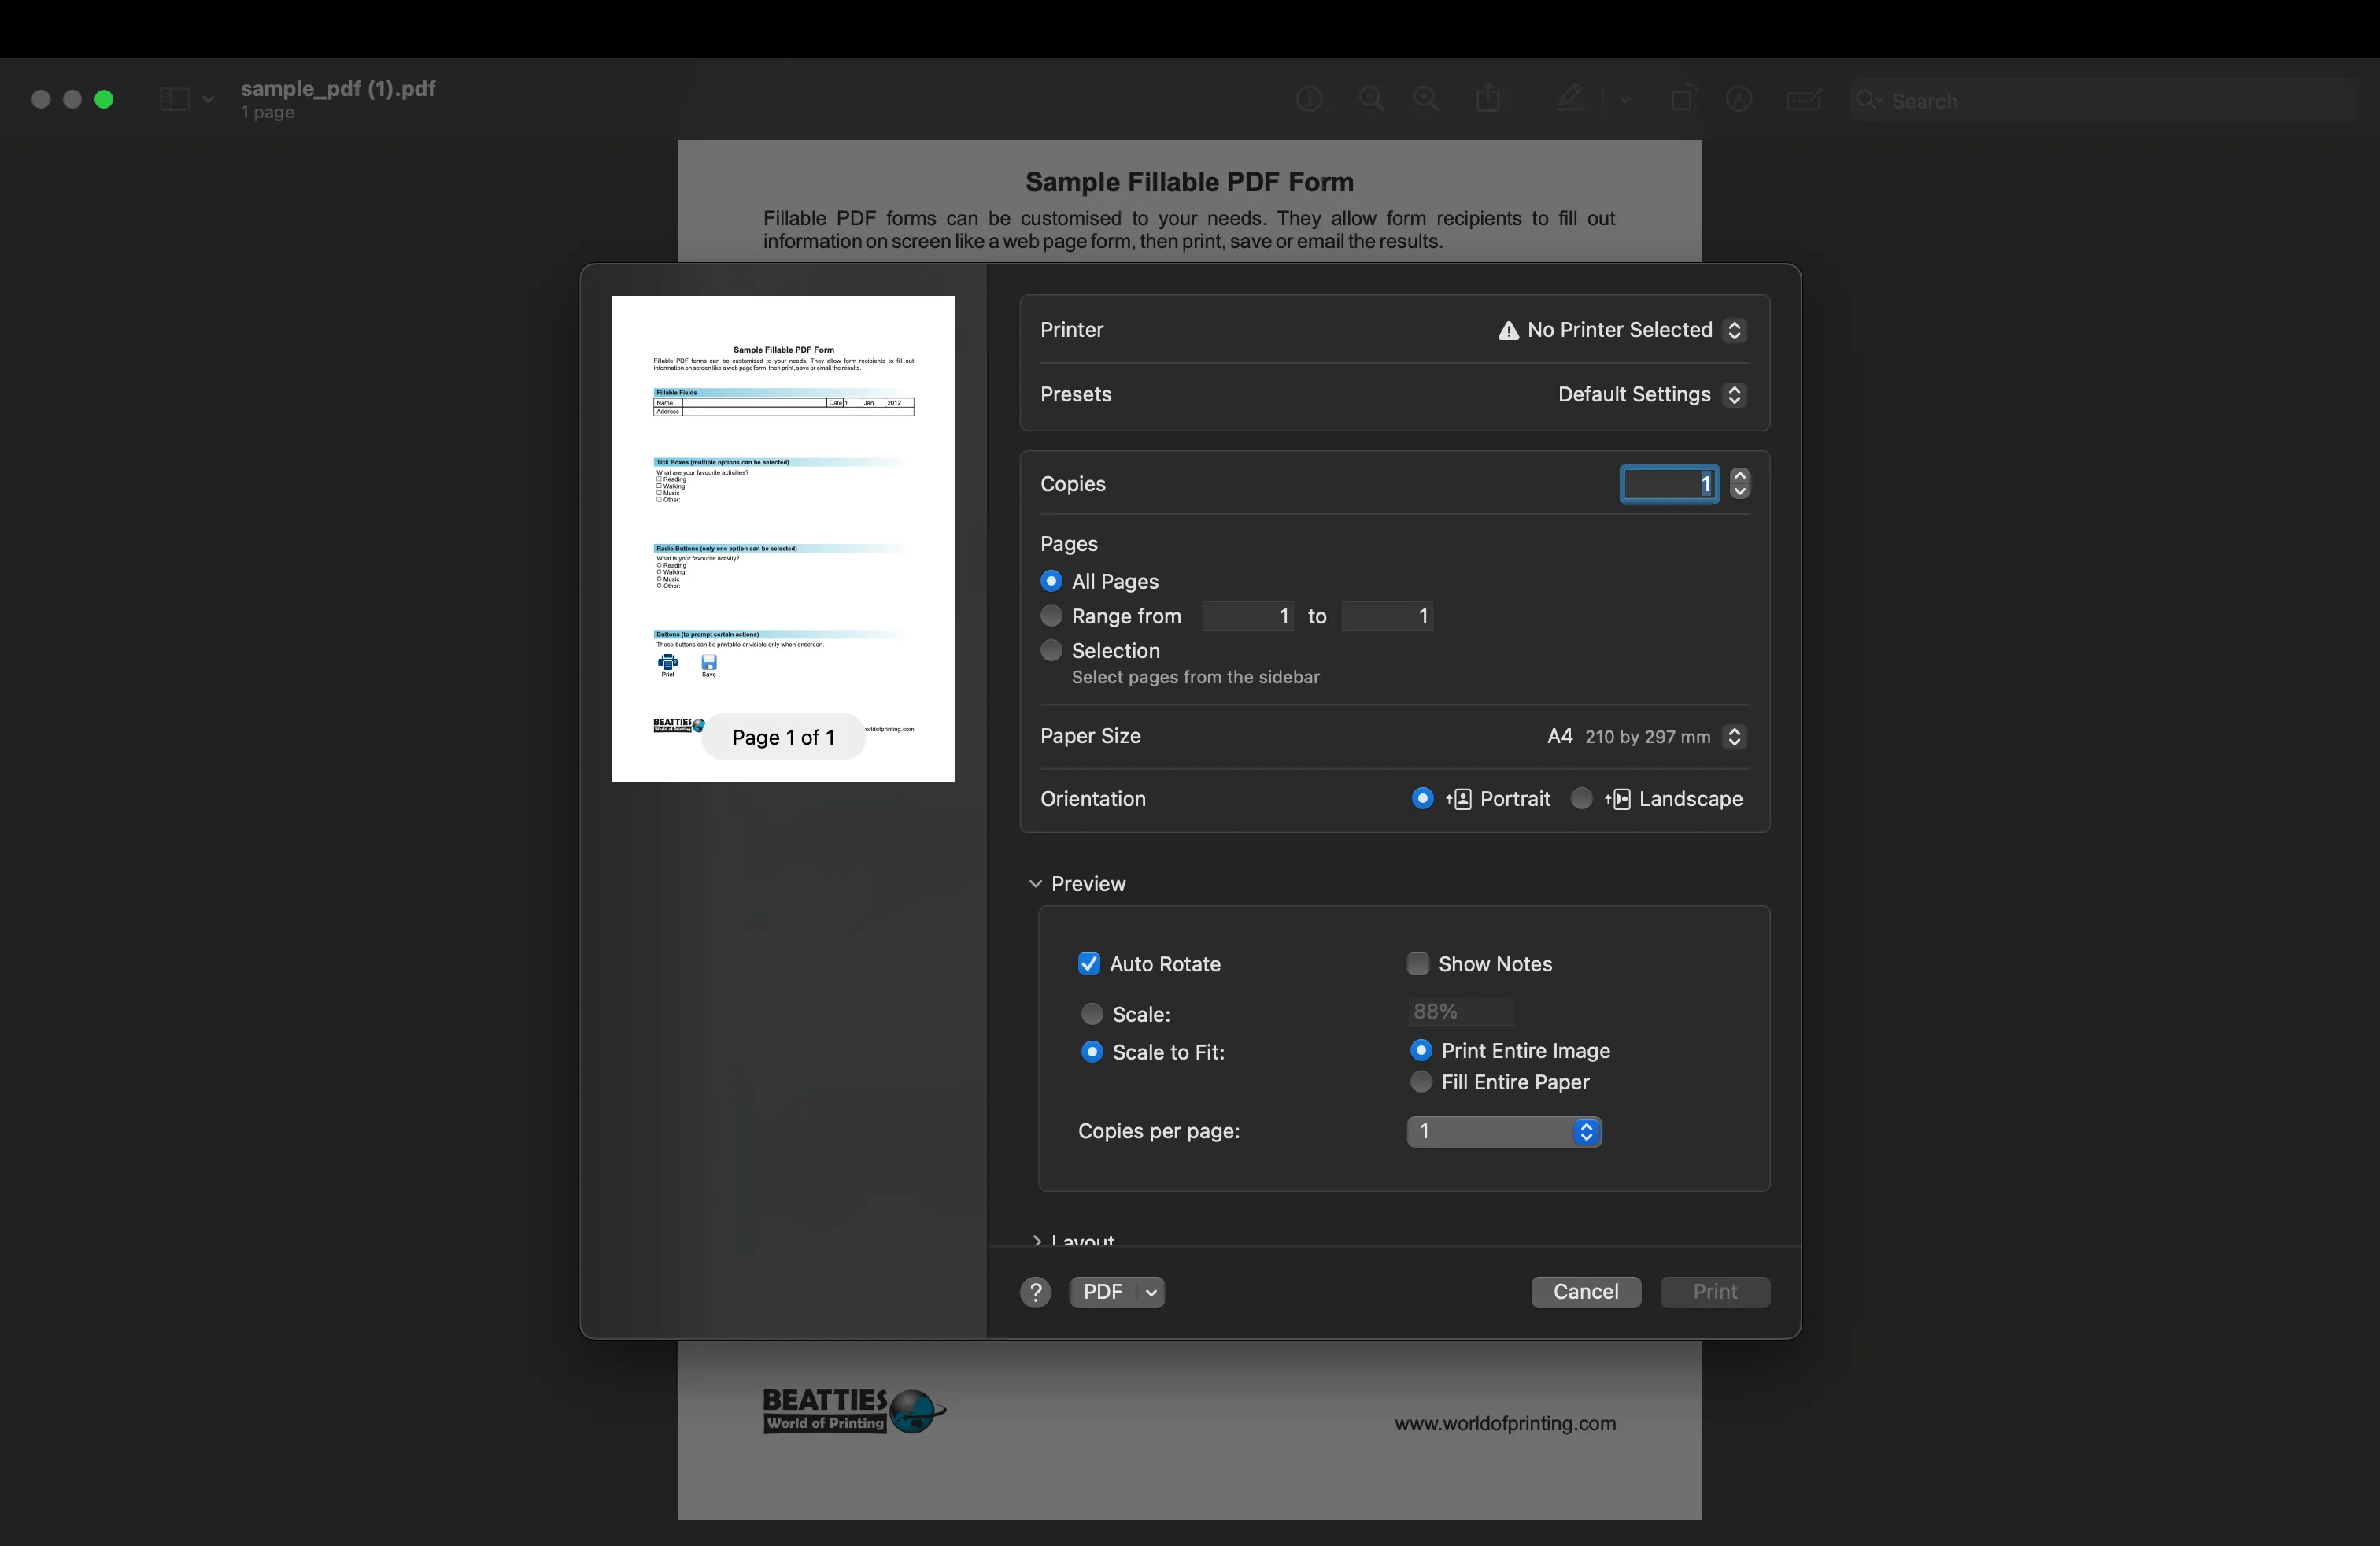
2. Print the Document as a PDF
Now, hit the Command + P shortcut. Here, you need to ensure that you don’t select any printer. Also, there will be a dropdown option at the bottom of the page; select Save as PDF from that dropdown and click Print. Now, it will flatten all the fillable fields as the PDF is saved as a new file. Hence, the fillable fields will be removed.
Final Words
With the 5 effective methods for how to remove fillable fields in PDF, we hope that you can easily remove these fields using the method that fits your needs the best. Remember, whenever you select a PDF tool, choose one that brings the best functionality with the best experience. If you need a reliable tool that meets all your needs, then you can try UPDF. Download it for free and enjoy multiple features, including deleting fillable fields, OCR, UPDF AI, and more.
Windows • macOS • iOS • Android 100% secure
 UPDF
UPDF
 UPDF for Windows
 UPDF for Mac
 UPDF for iPhone/iPad
 UPDF for Android
 UPDF AI Online
 UPDF Sign
 Edit PDF
 Annotate PDF
 Create PDF
 PDF Form
 Edit links
 Convert PDF
 OCR
OCR PDF to Word
 PDF to Image
 PDF to Excel
 Organize PDF
 Merge PDF
 Split PDF
 Crop PDF
 Rotate PDF
 Protect PDF
 Sign PDF
 Redact PDF
 Sanitize PDF
 Remove Security
 Read PDF
 UPDF Cloud
 Compress PDF
 Print PDF
 Batch Process
 About UPDF AI
 UPDF AI Solutions
 AI User Guide
 FAQ about UPDF AI
 Summarize PDF
 Translate PDF
 Chat with PDF
 Chat with AI
 Chat with image
 PDF to Mind Map
 Explain PDF
 Scholar Research
 Paper Search
 AI Proofreader
 AI Writer
 AI Homework Helper
 AI Quiz Generator
 AI Math Solver
 PDF to Word
 PDF to Excel
 PDF to PowerPoint
 User Guide
 UPDF Tricks
 FAQs
FAQs UPDF Reviews
 Download Center
 Blog
Blog Newsroom
 Tech Spec
 Updates
 UPDF vs. Adobe Acrobat
 UPDF vs. Foxit
 UPDF vs. PDF Expert






 Enya Moore

 Grace Curry
 Enid Brown