The era of handwritten forms, where errors in fields were irreversible, is long behind us. PDF forms have replaced the conventional form-filling ways by introducing form fields like drop-down menus and checkboxes. Using these text fields, you can make your forms easy to access and fill. If you are looking for ways to add form fields to PDF, read this article to the end.
Part 1. How to Add Form Fields to PDF
If you are looking for effective and efficient platforms to prepare forms, UPDF is your best bet. Using this tool for form preparation, you can enhance the interactivity of the file by incorporating relevant fields. Besides preparing forms, this platform offers quick solutions to edit and fill in the fields. The forms prepared using UPDF give the author the liberty to incorporate open-ended and close-ended responses.
Relevant Features of UPDF
- Checkboxes: When adding checkboxes to PDF forms with UPDF, you have the flexibility to set default selections by choosing whether to pre-fill the boxes as checked. Once the checkboxes are added, you can also change their properties by editing their button style.
- List Boxes: By incorporating list boxes in the editable PDFs, users can choose between keeping the list items visible or hidden to allow a cleaner form layout. You can also enable multiple item selection for the audience that needs to select more than one option.
- Image Field: After adding image fields in the form, UPDF allows you to select the image field icon from your device, offering flexibility with the styling. This feature gives the audience the ability to insert their photos for easy identification.
- Digital Signature: As you add form fields to PDF, you can end the process by inserting a signature field, ensuring your audience can easily add an e-sign for validation. When the field has been added, you can adjust its appearance by editing the field box fill and border colors.
- Other Form Fields: UPDF also supports adding, editing, and removing other form fields, including text boxes, radio buttons, drop-down lists, buttons, and date fields.
After learning the unique form-preparing features of UPDF, you might want to use it. To benefit from the above-mentioned and many other utilities of this platform, download UPDF on your devices.
Windows • macOS • iOS • Android 100% secure
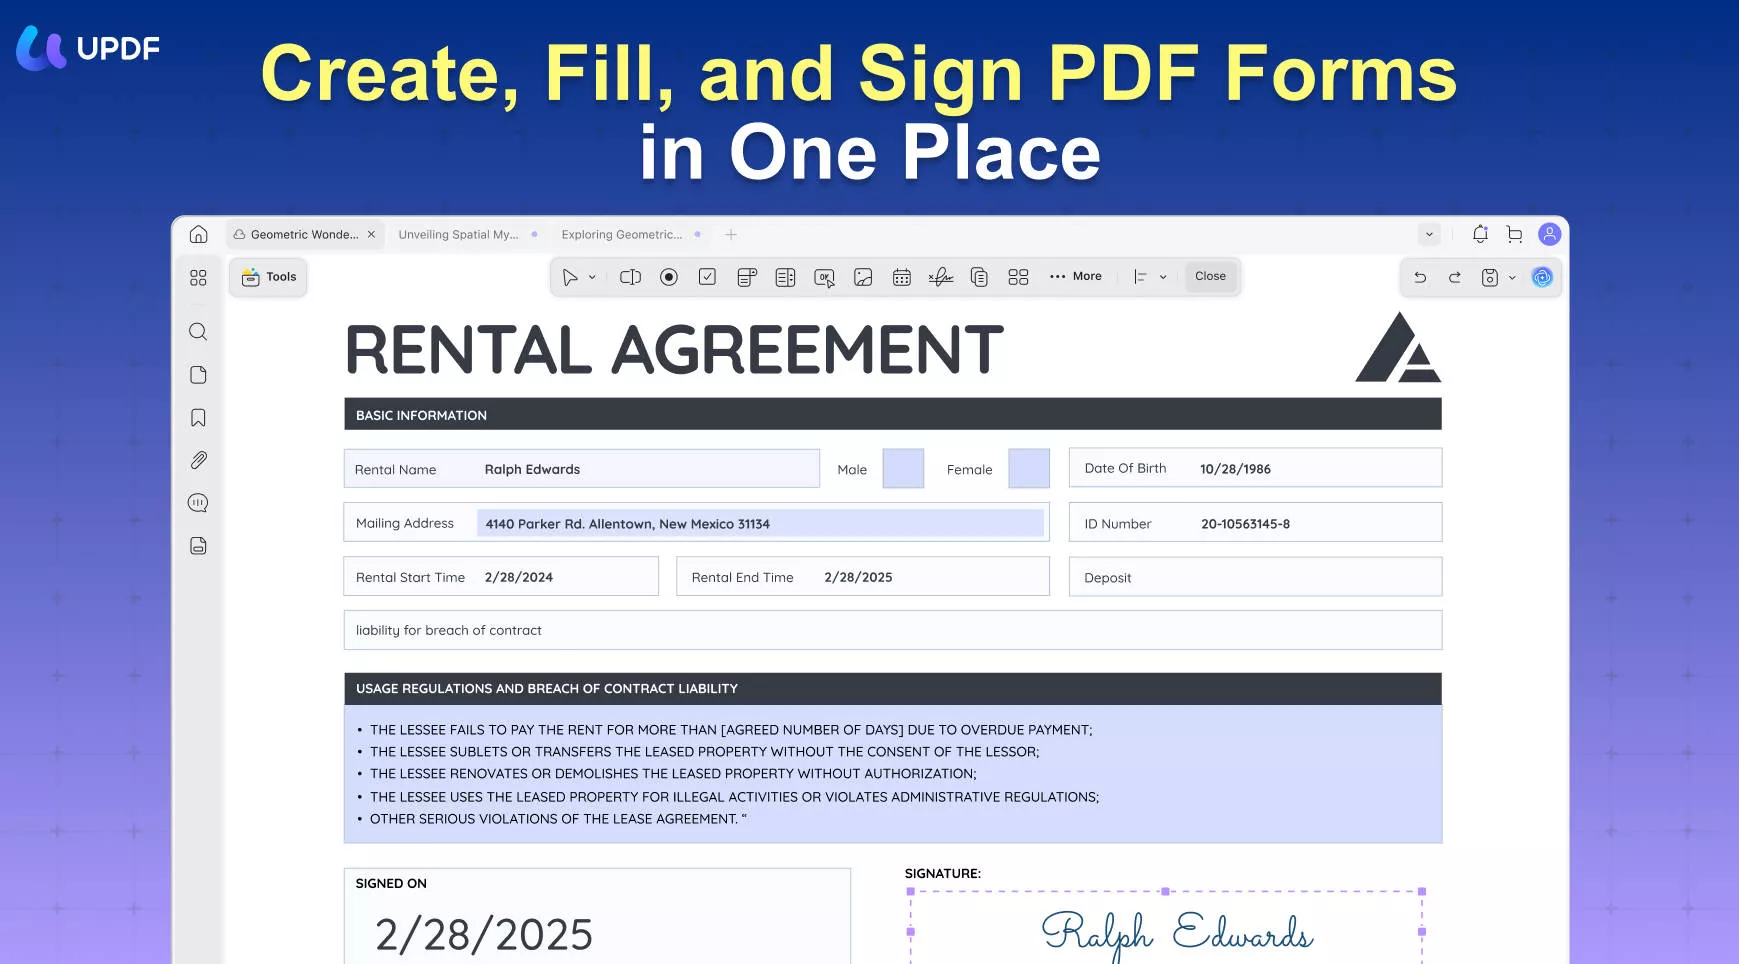
A Guide to Adding and Editing PDF Form Fields Using UPDF
This platform provides its users with effective features that enable easy form preparation. Explore the following guide to learn how to add form fields in PDF with the help of UPDF:
Step 1. Start With Opening a PDF File
To begin the process of creating a form using UPDF, download and open the desktop application and explore the main interface. From the top of the page, click the "Open File" button to upload a PDF form successfully.
Step 2. Access the Prepare Form Mode
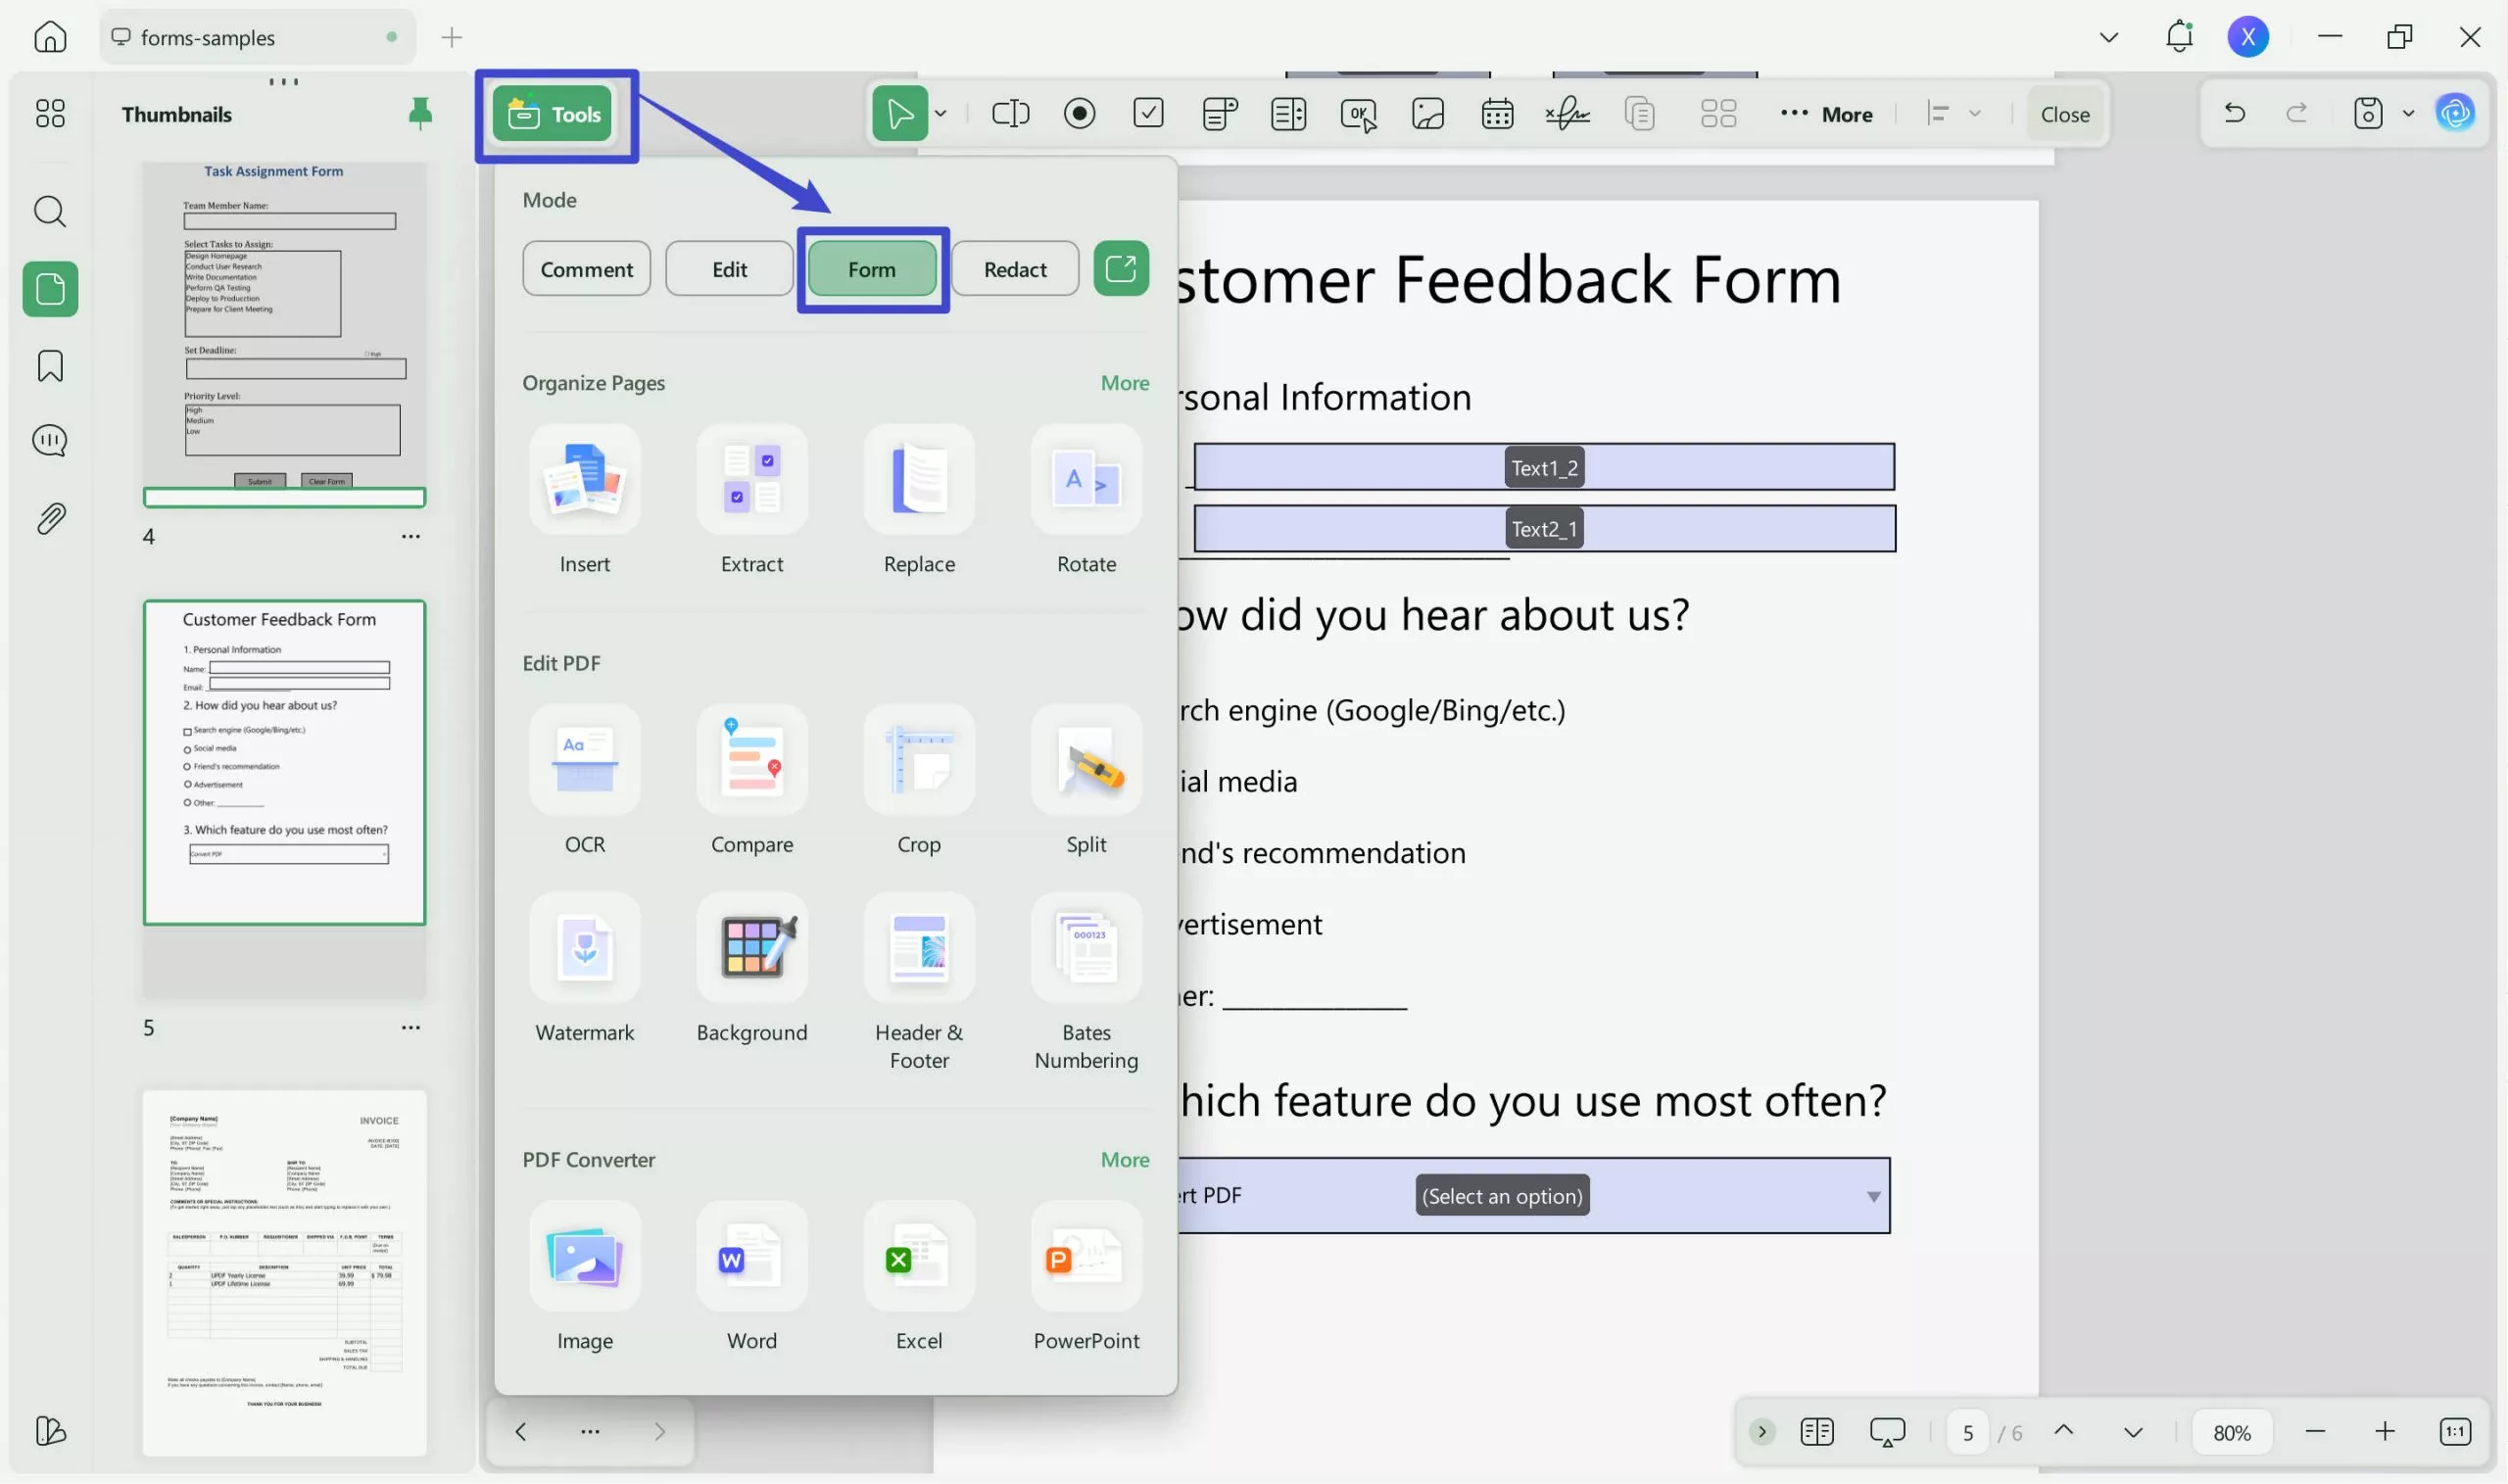
When the uploaded file appears on the screen, navigate to "Tools" in the left side panel and click the "Form" button. This will take you to a new screen where you will see the form field buttons on the top of the page.
Step 3. Add Text Fields to the Form
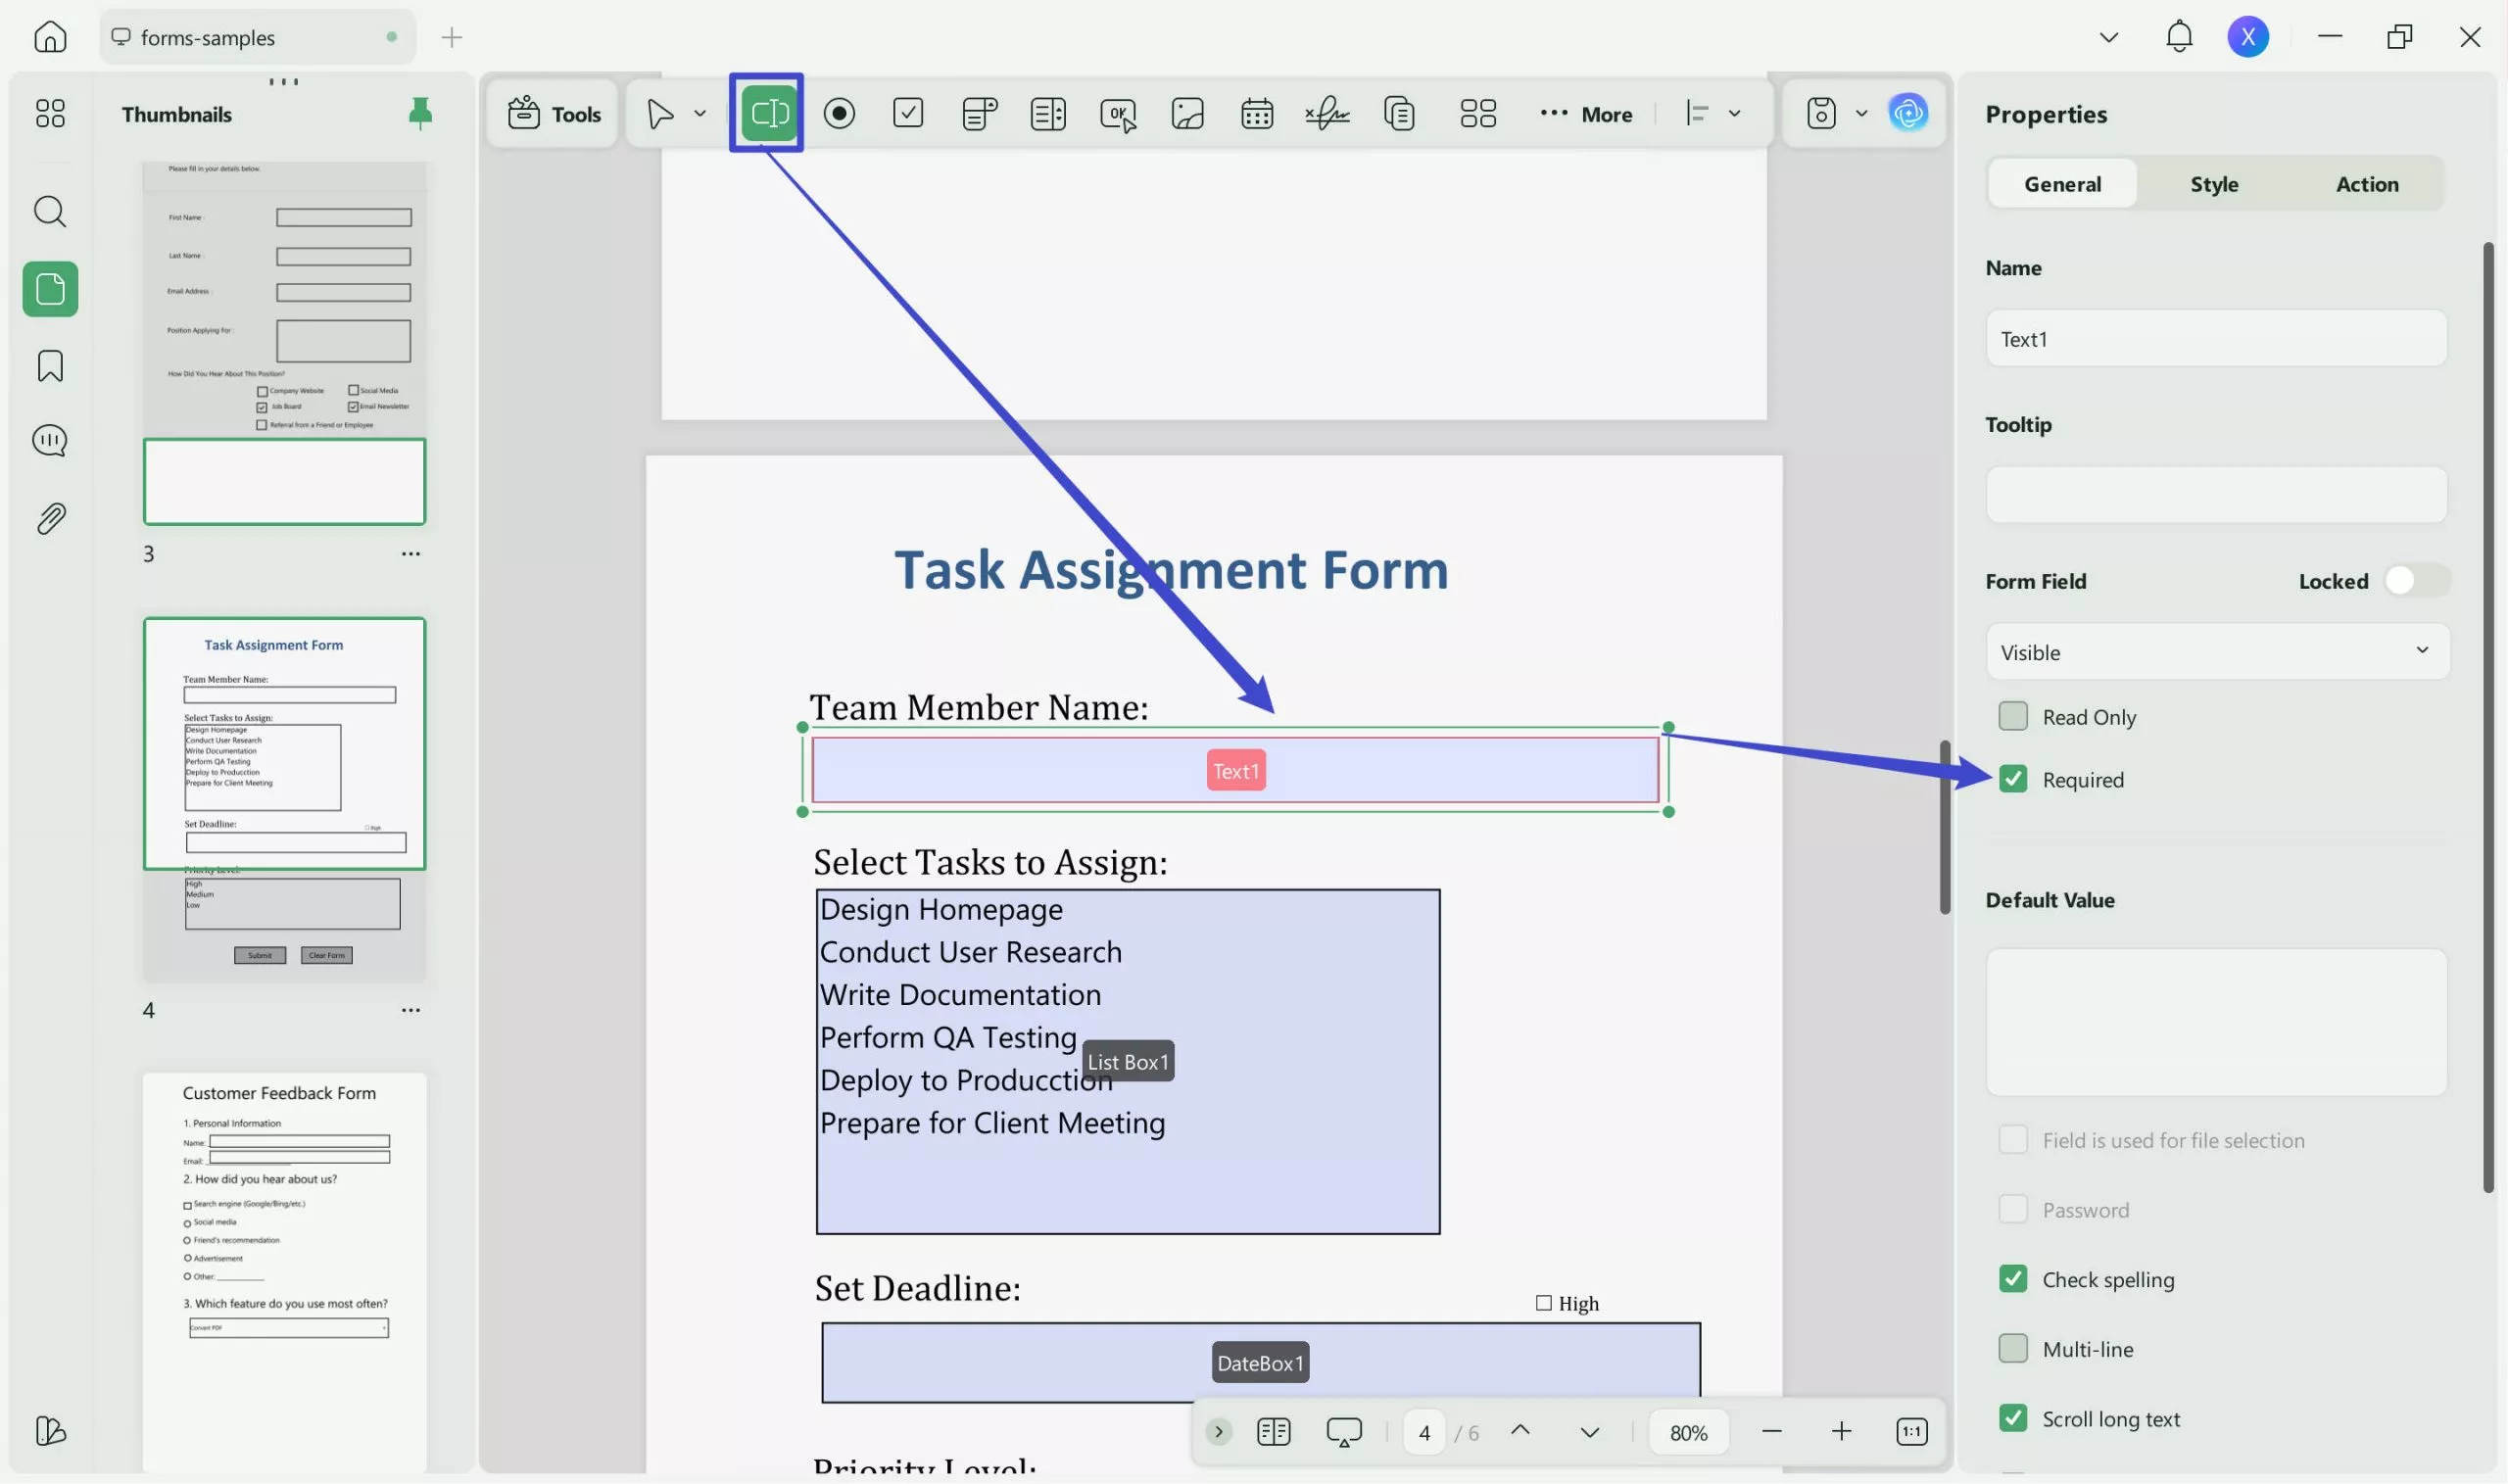
To begin the process, select the "Text Field" button from the top toolbar to draw a text field with your mouse. Double tap on the added field to access the field "Properties" panel on the right. From that panel, check the "Required" box to make this text field mandatory to fill.
Step 4. Insert a Drop-Down Menu and a List Box
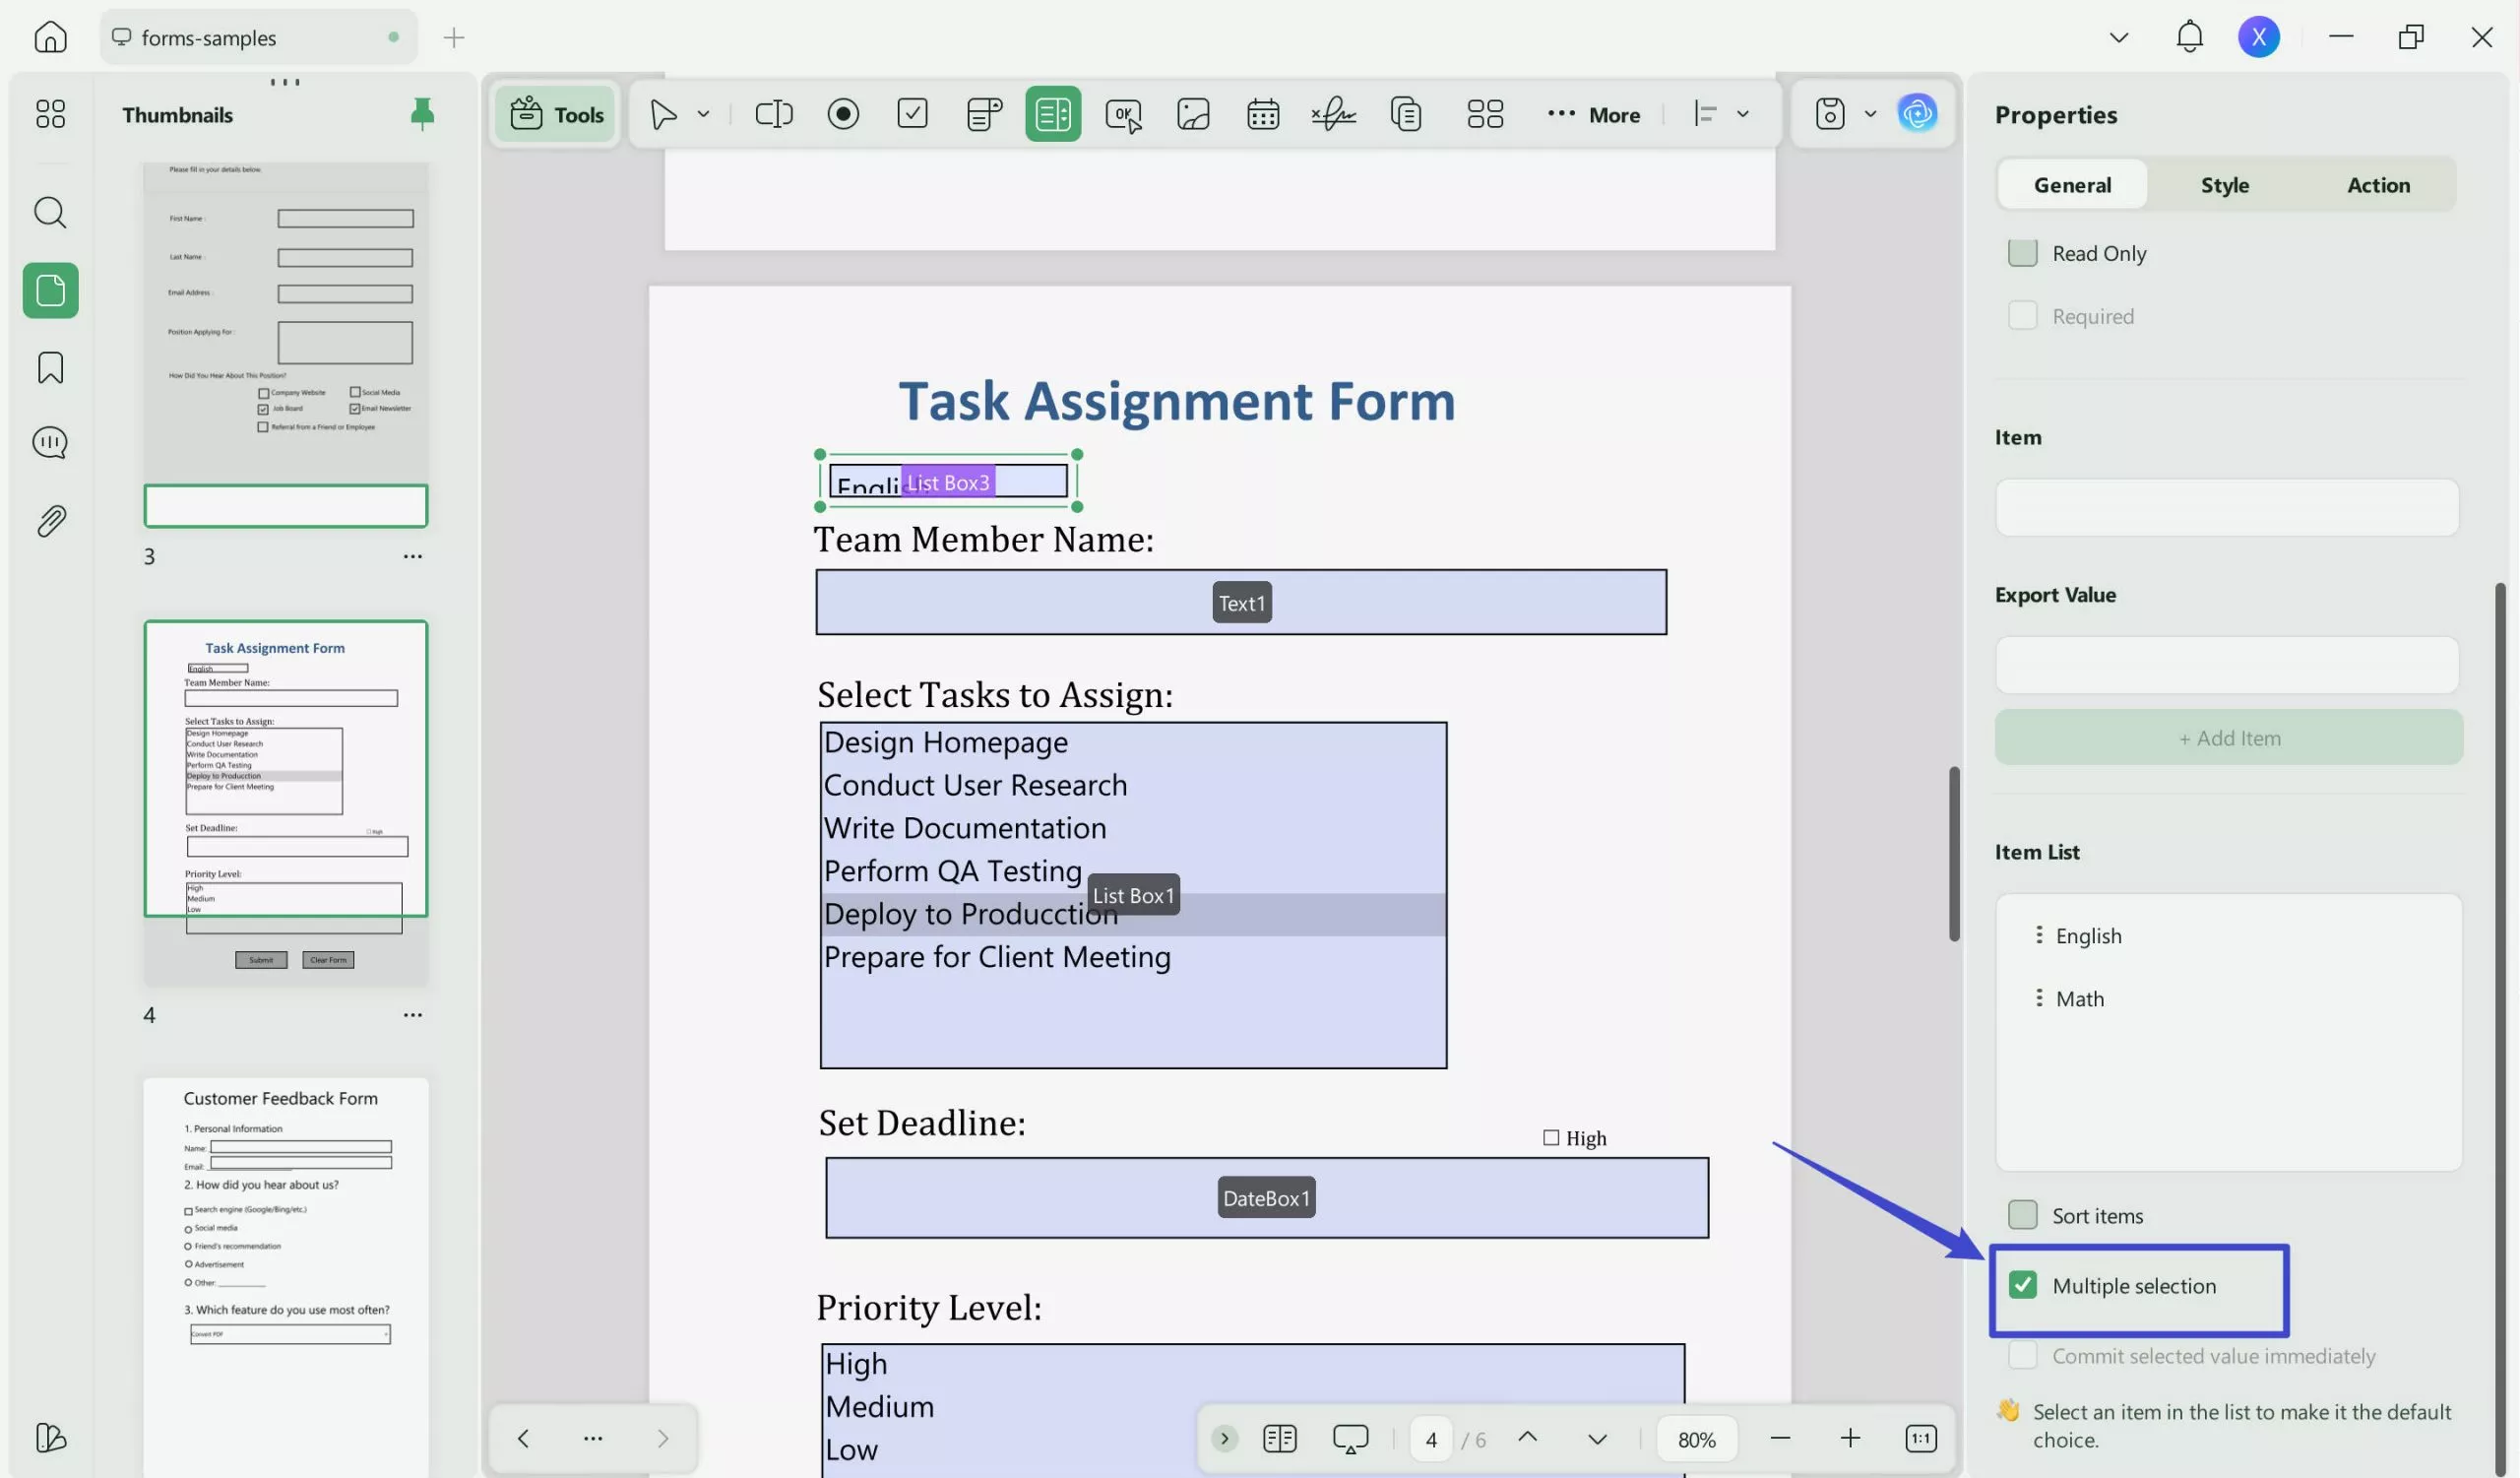
Now, add a list box and a drop-down menu to let the audience choose from the provided responses only, by clicking the "List Box" or "Drop-Down" button. Draw the box of the desired size where it is needed and from the right side panel, enter the item names in the "Item" box. Once done, check the "Multiple Selection" button to allow the audience to select more than one option.
Step 5. Incorporate a Radio Button and a Checkbox
Next, click the "Check Box" button to add a checkbox next to your desired item. After adding the checkbox, enter the "Properties" section and assign a button style to the checkbox. If you need to add a radio button, click the "Radio Button" option from the top and repeat these steps.
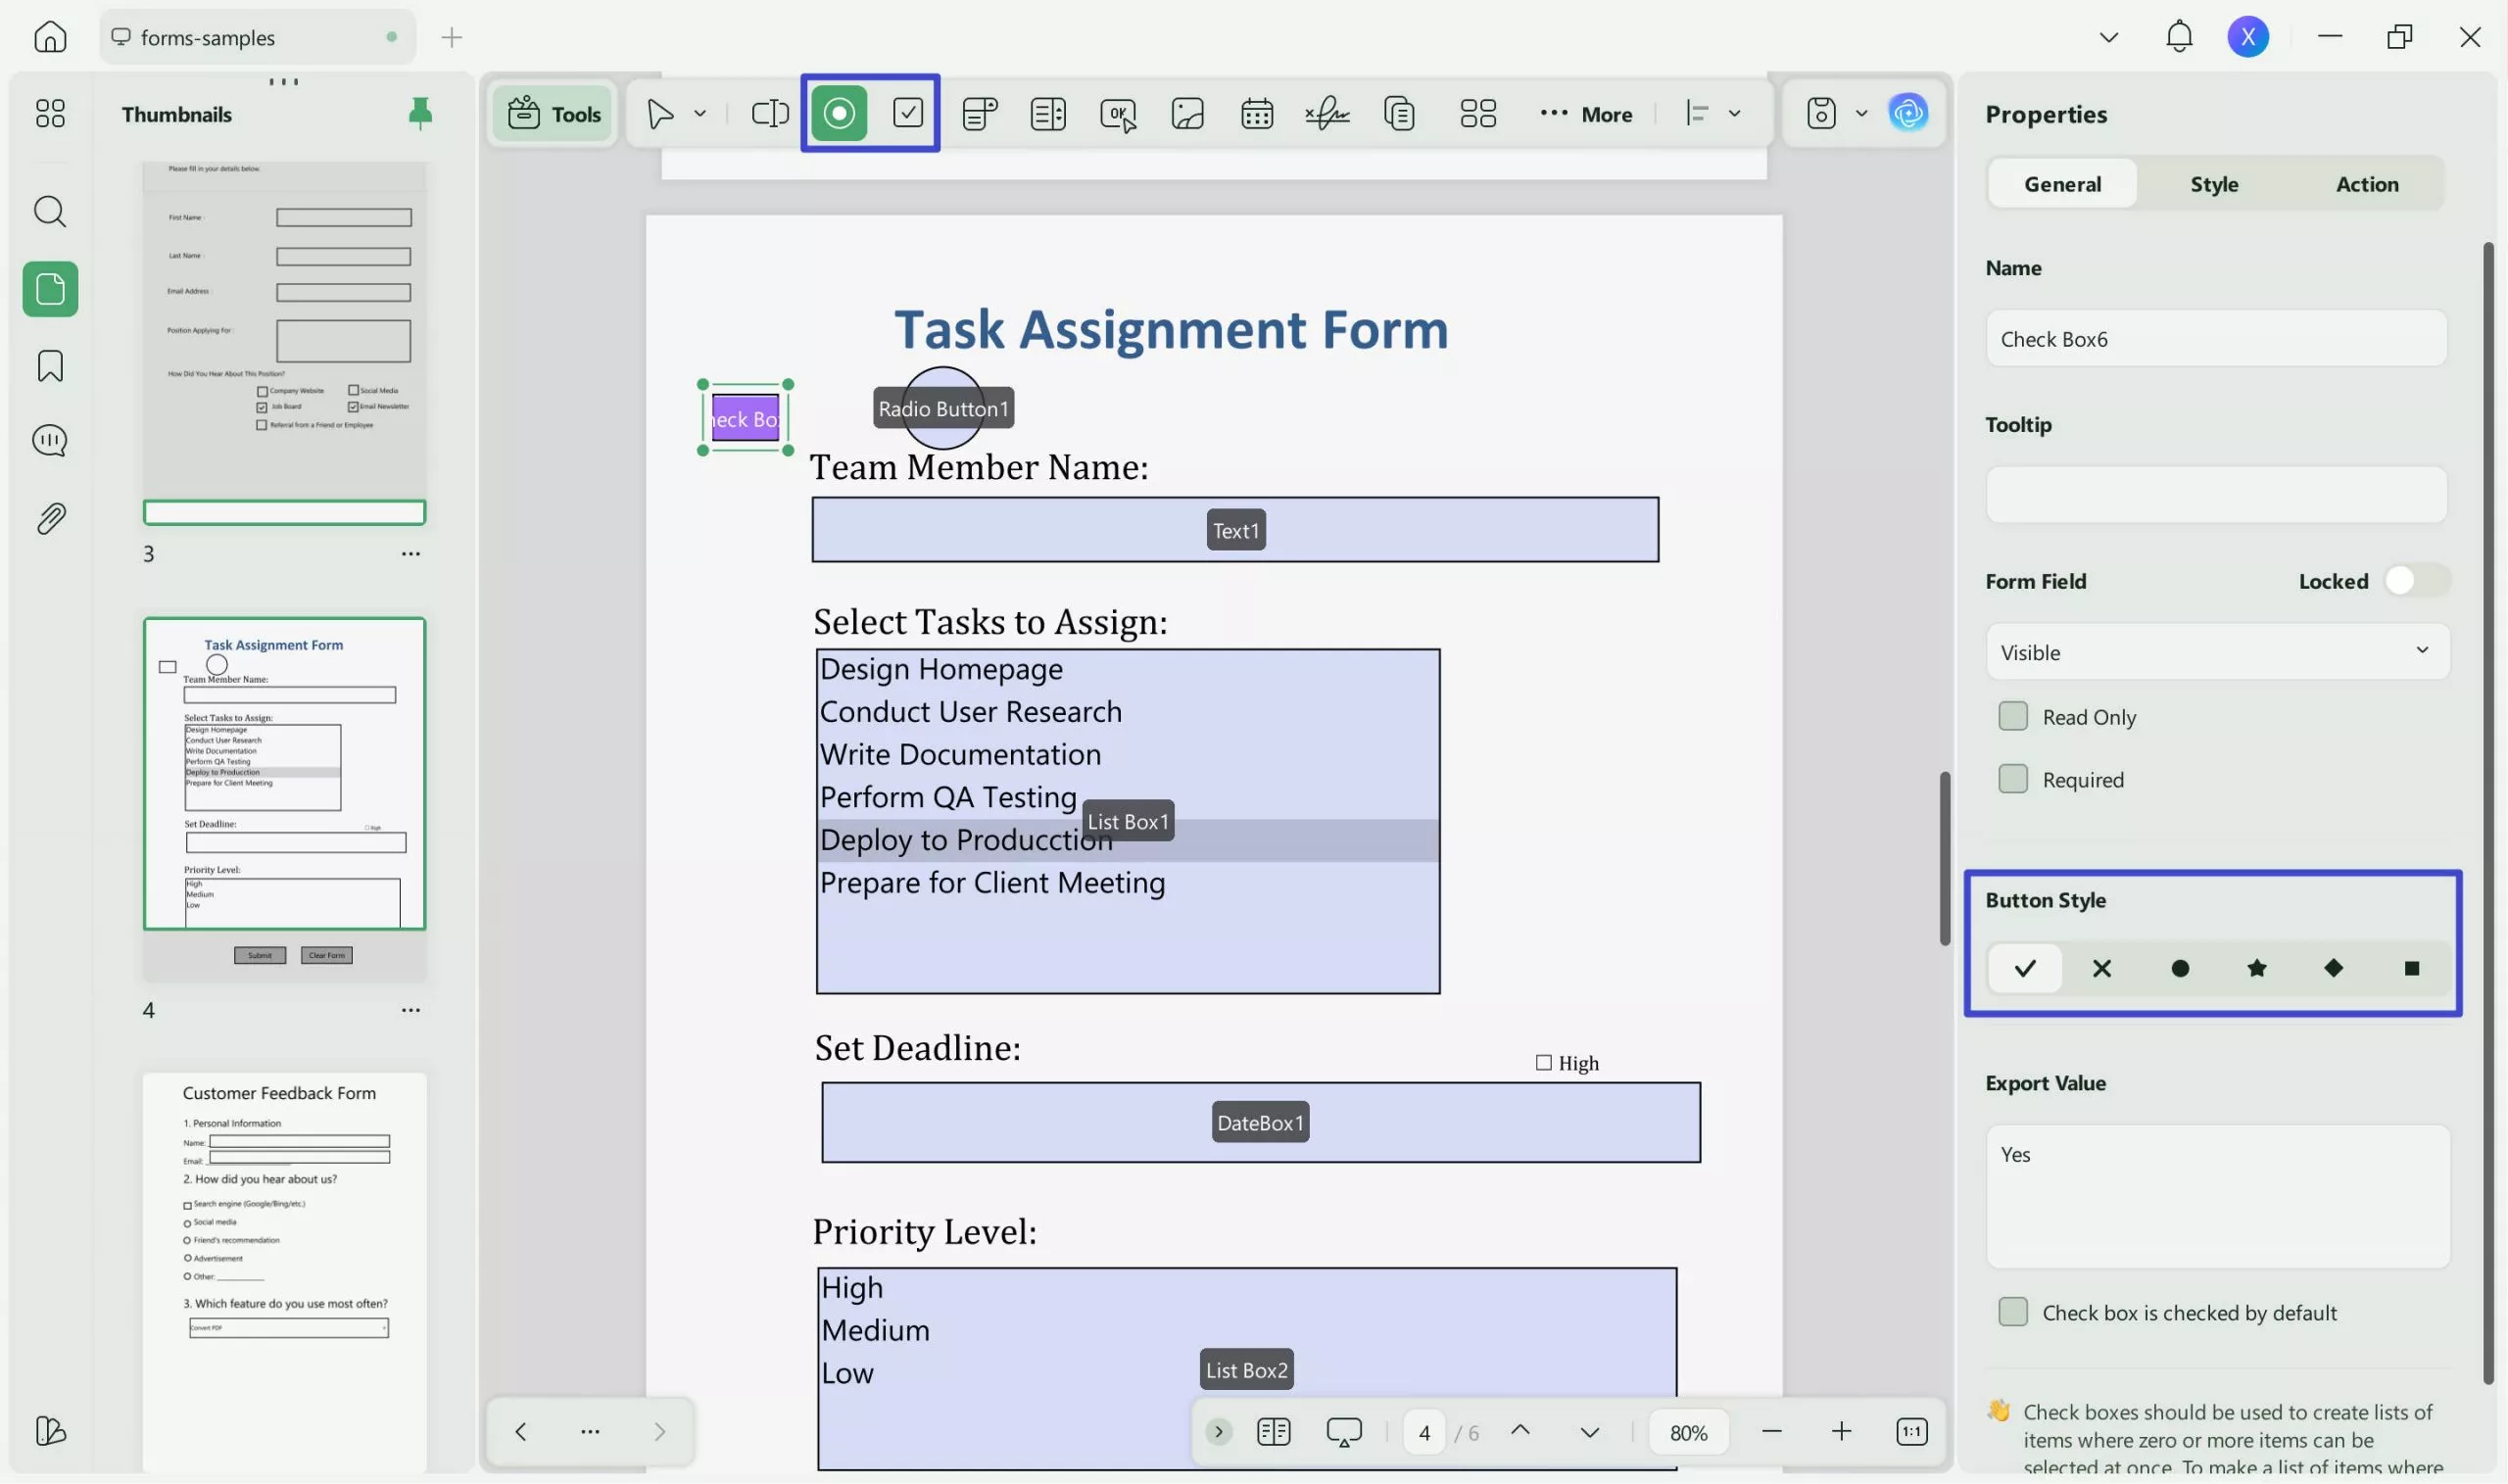
Step 6. Introduce a Button and an Image Field Into the PDF Form
Now, insert a button to the page by clicking the "Button" option from the toolbar. After drawing the button, refer to the right side panel to access the "Action" section. Here, go to the "Select Action" menu and choose "Open a Web Link" to direct the audience to a webpage when they click it. In order to add an image field, repeat the same steps as those of adding the button.
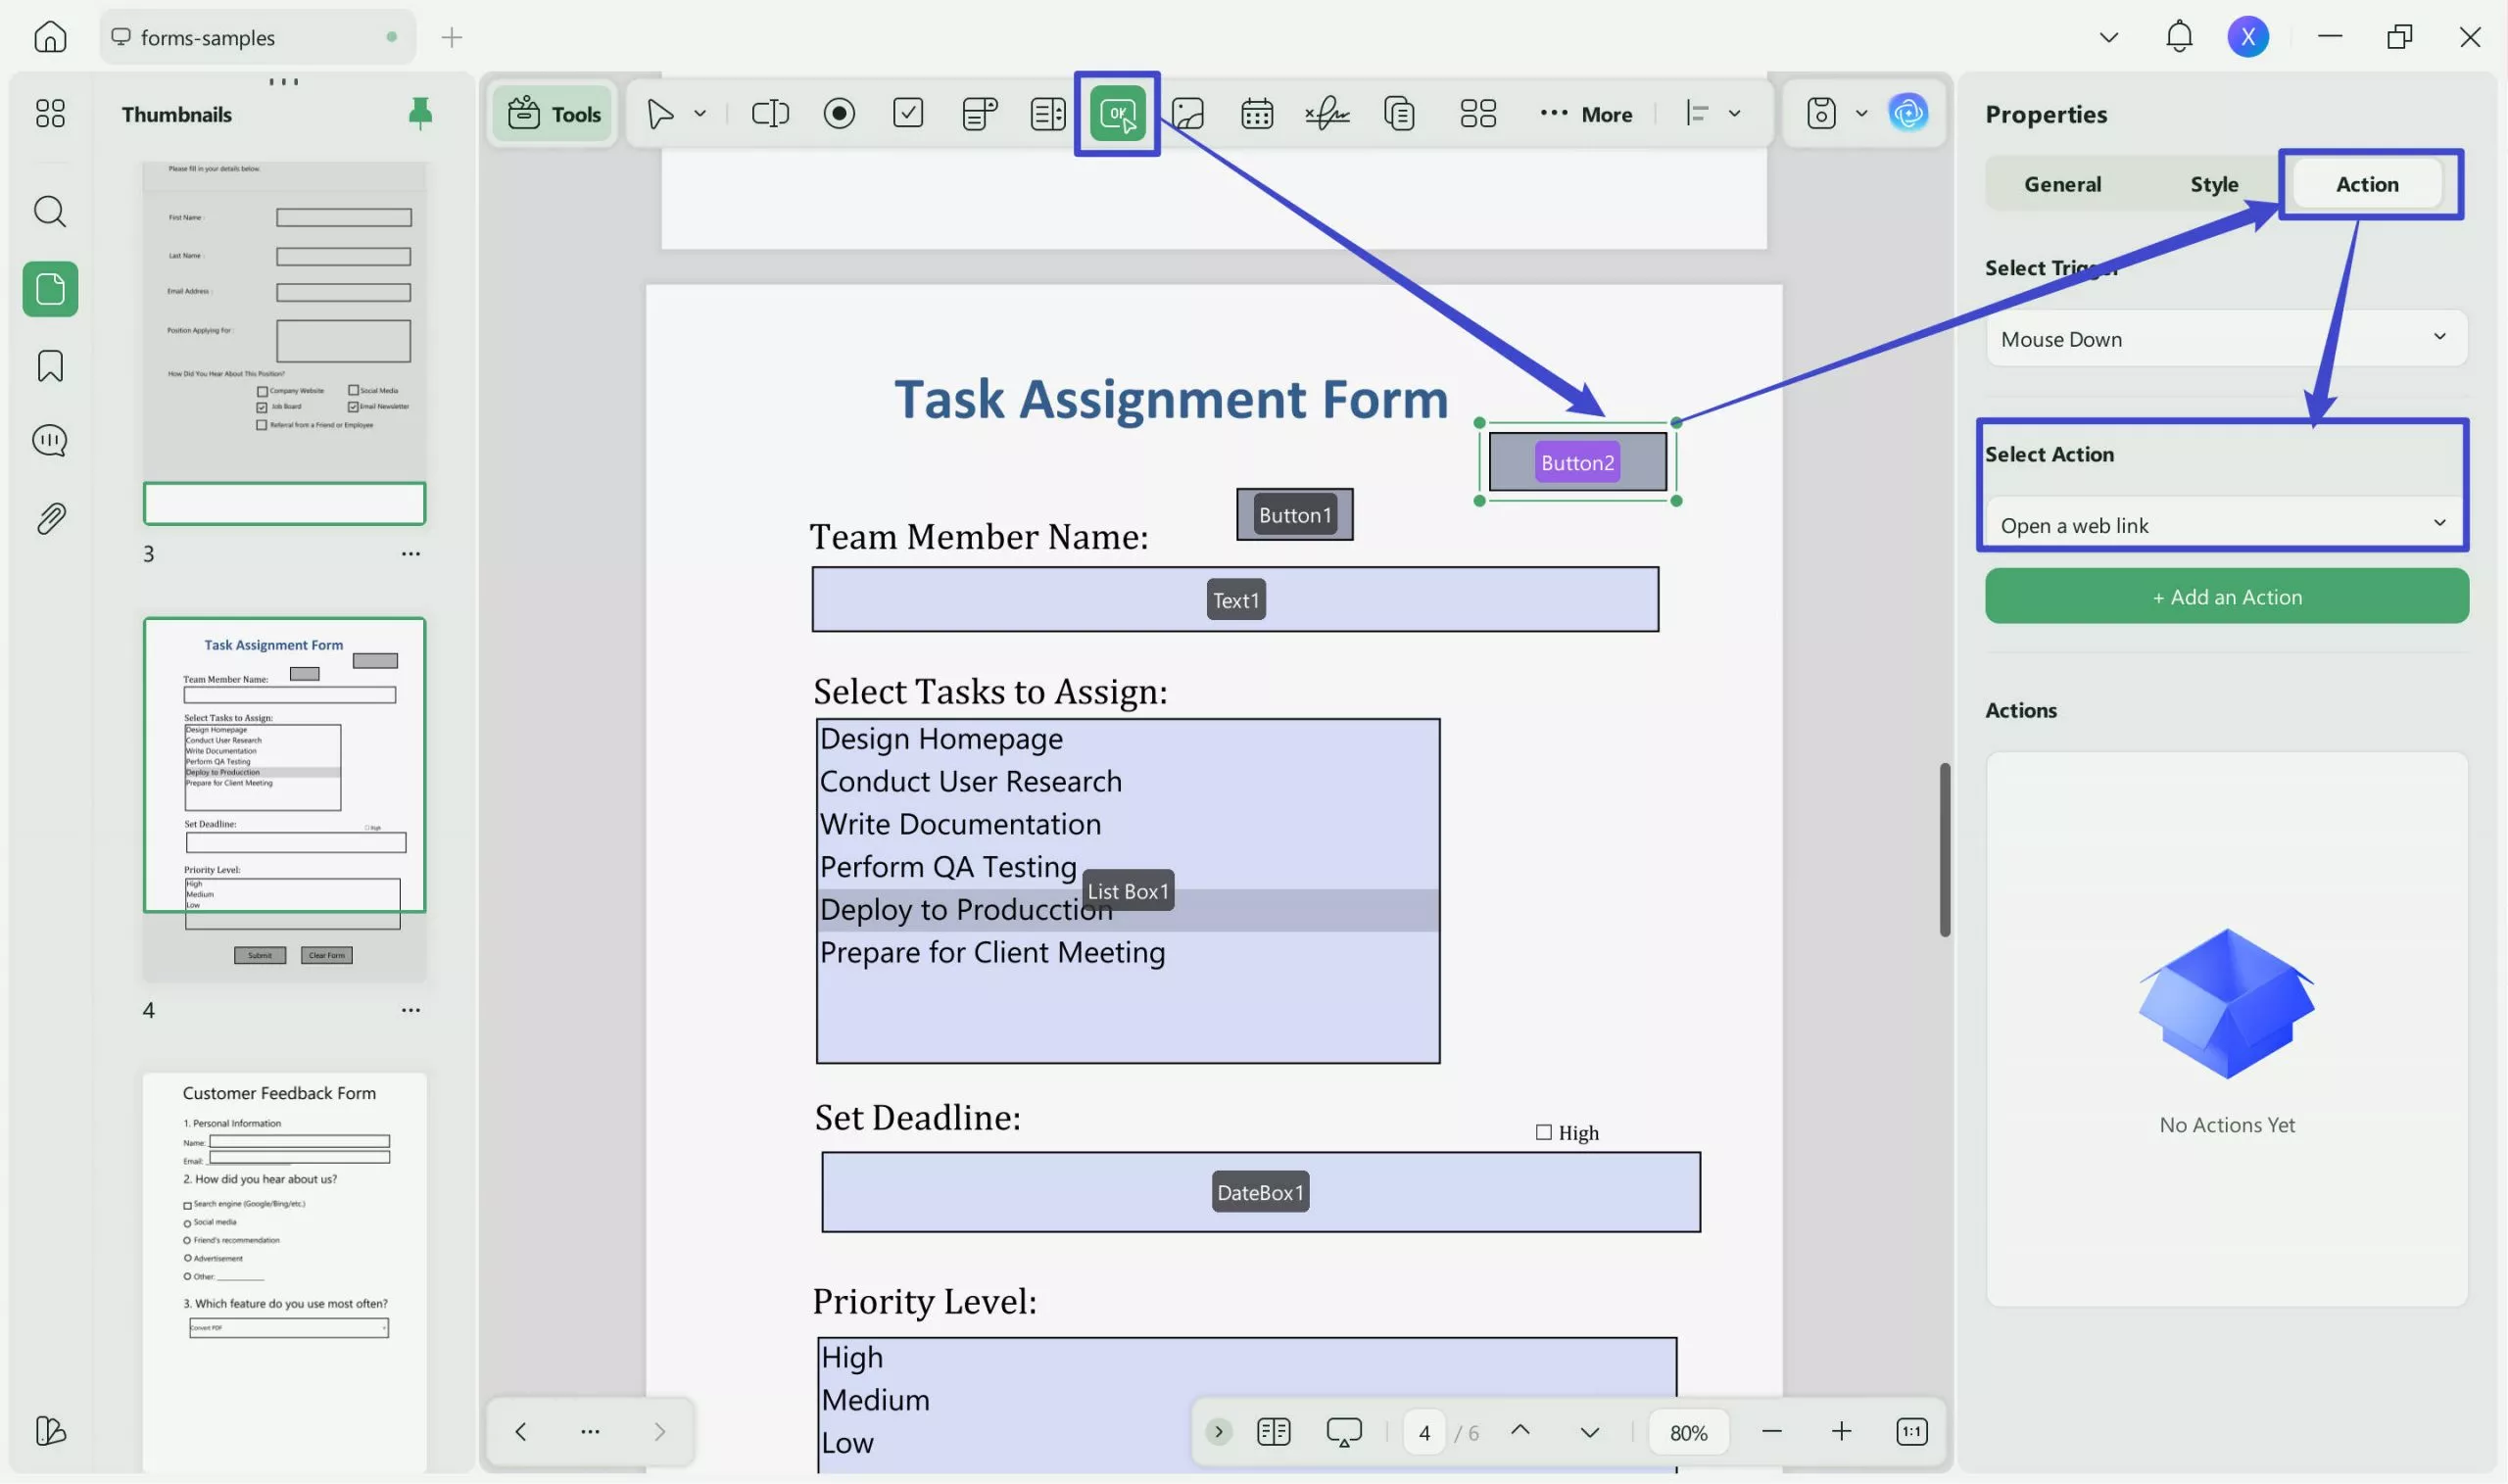
Step 7. Continue By Fixing a Date Field
Now, continue and click the "Date Field" button from the same toolbar and explore the "Style" section from the right panel. From the "Style" section, choose the box border and fill colors to make the field pop.
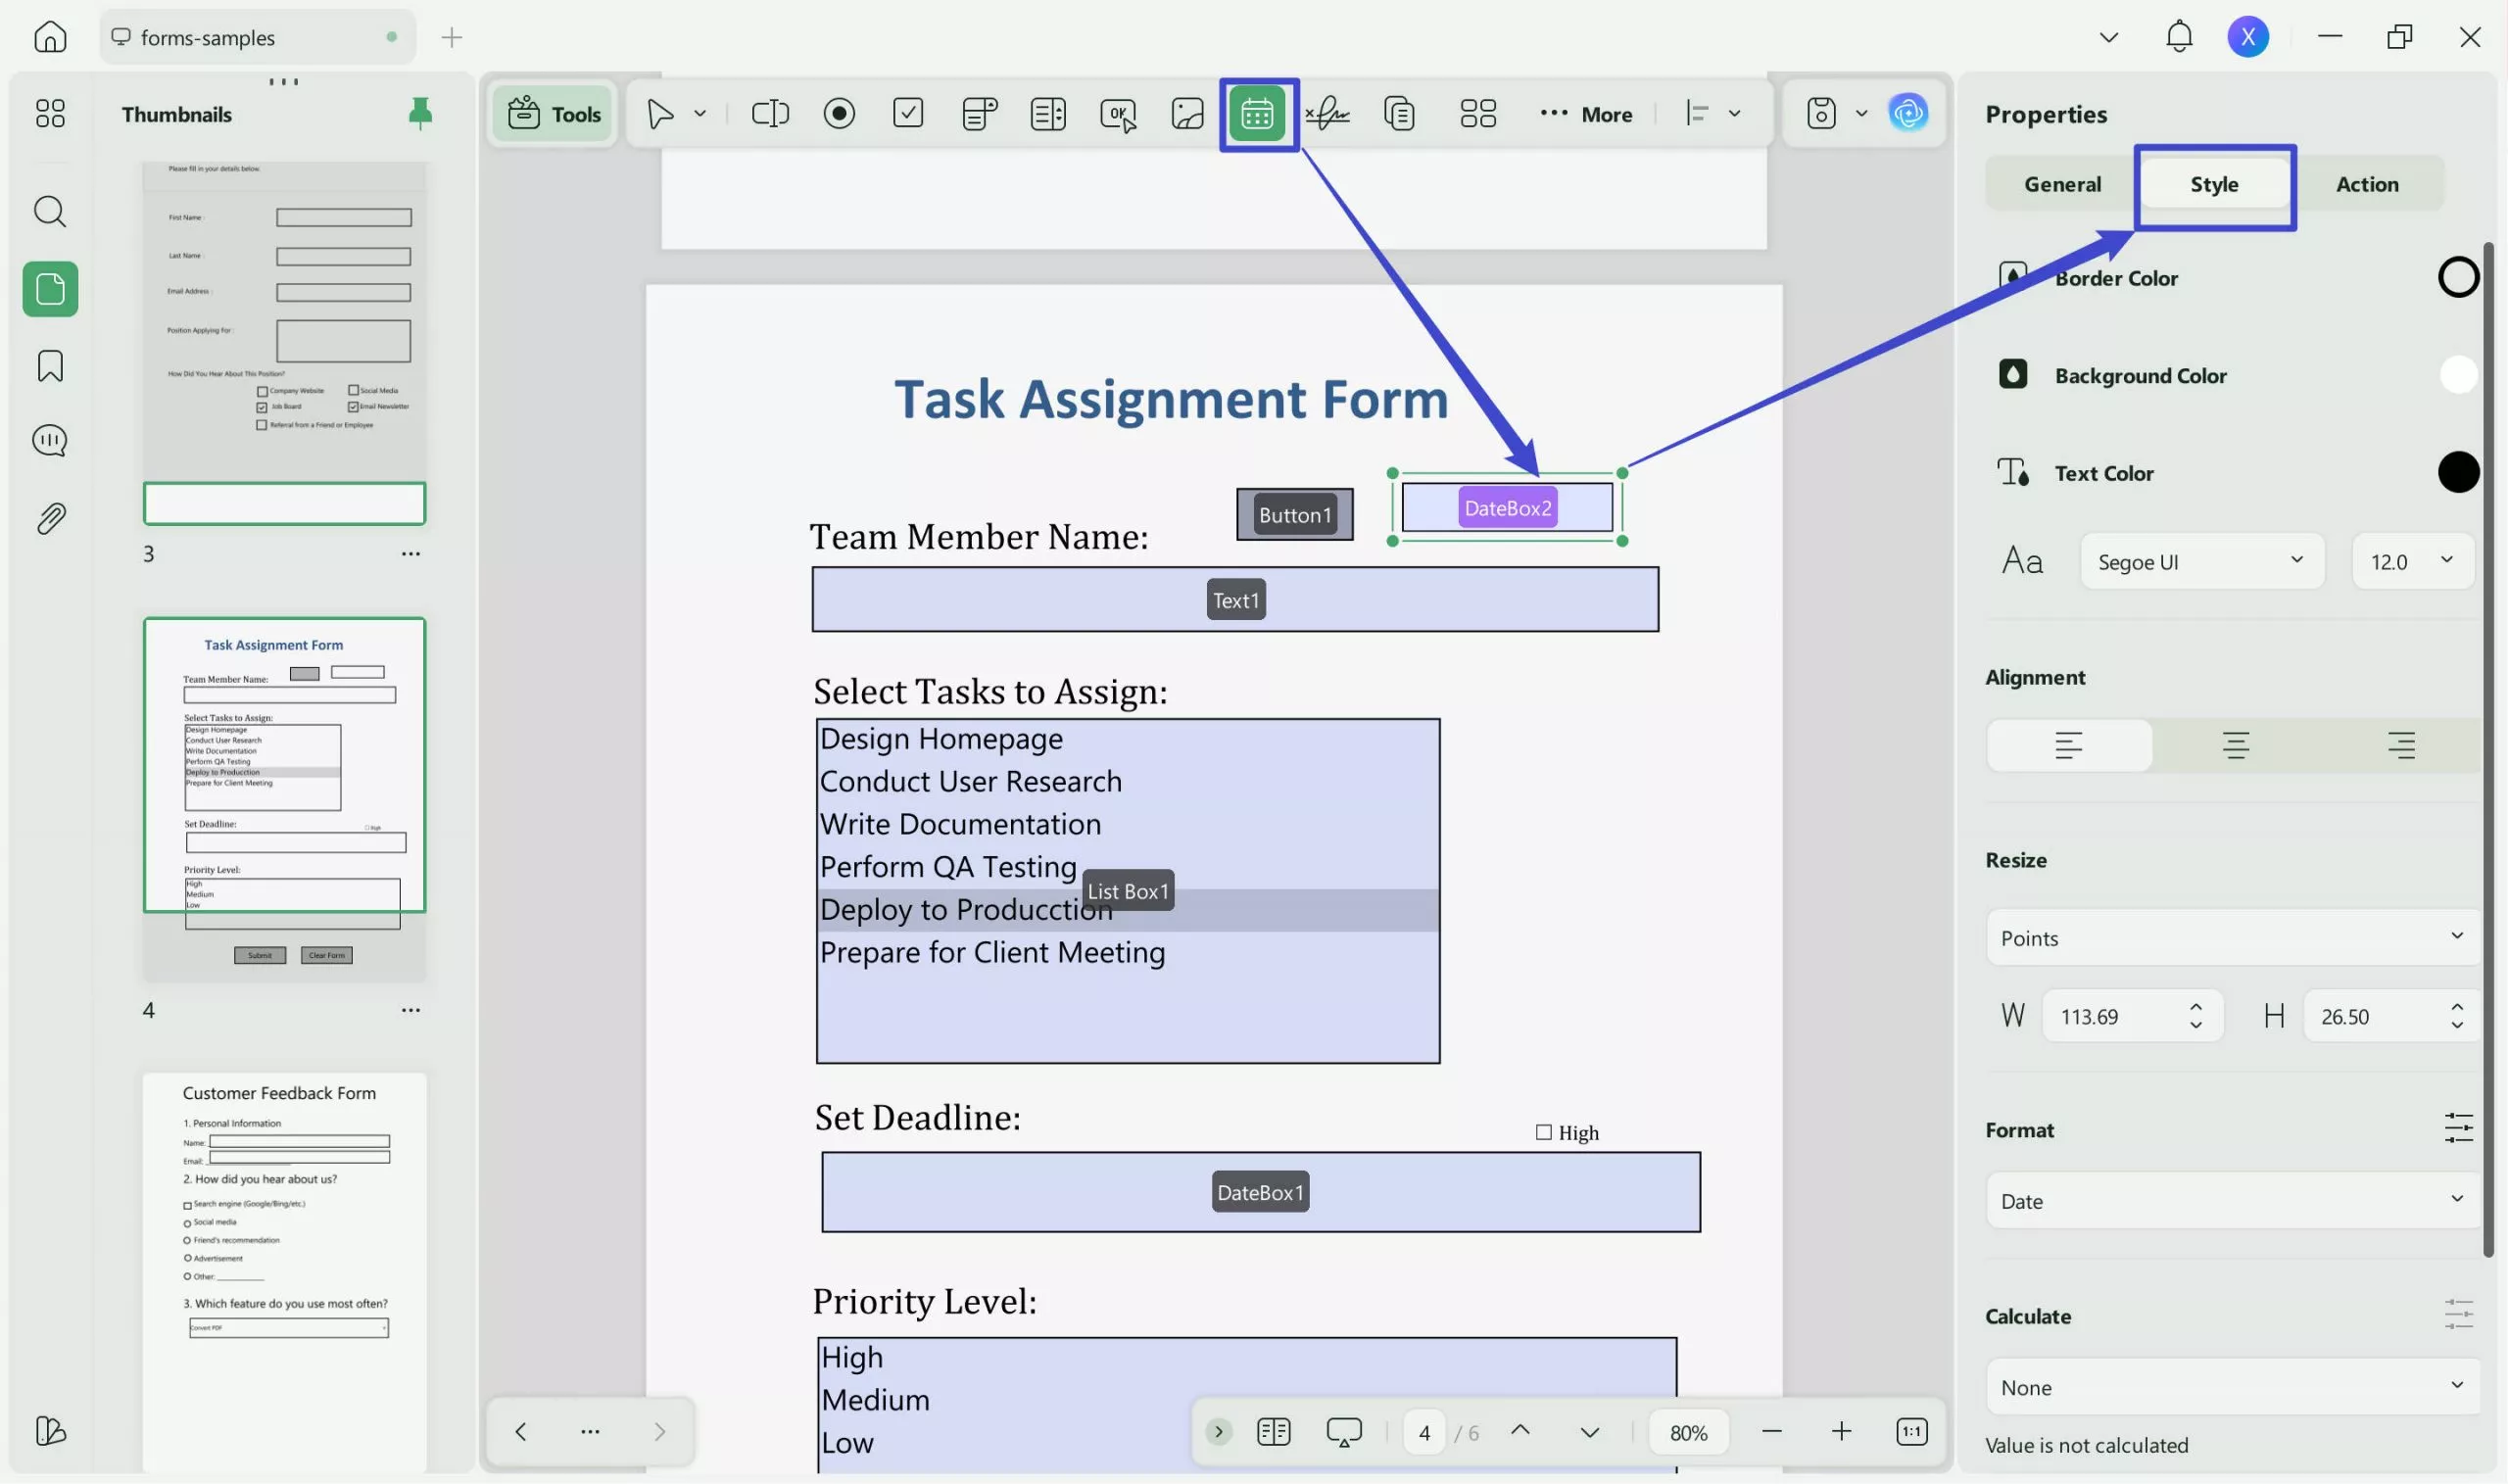
Step 8. End With a Signature Field
Lastly, select the "Digital Signature" field from the top toolbar, and when the right panel unveils it, check the "Required" box to make the sign field mandatory.
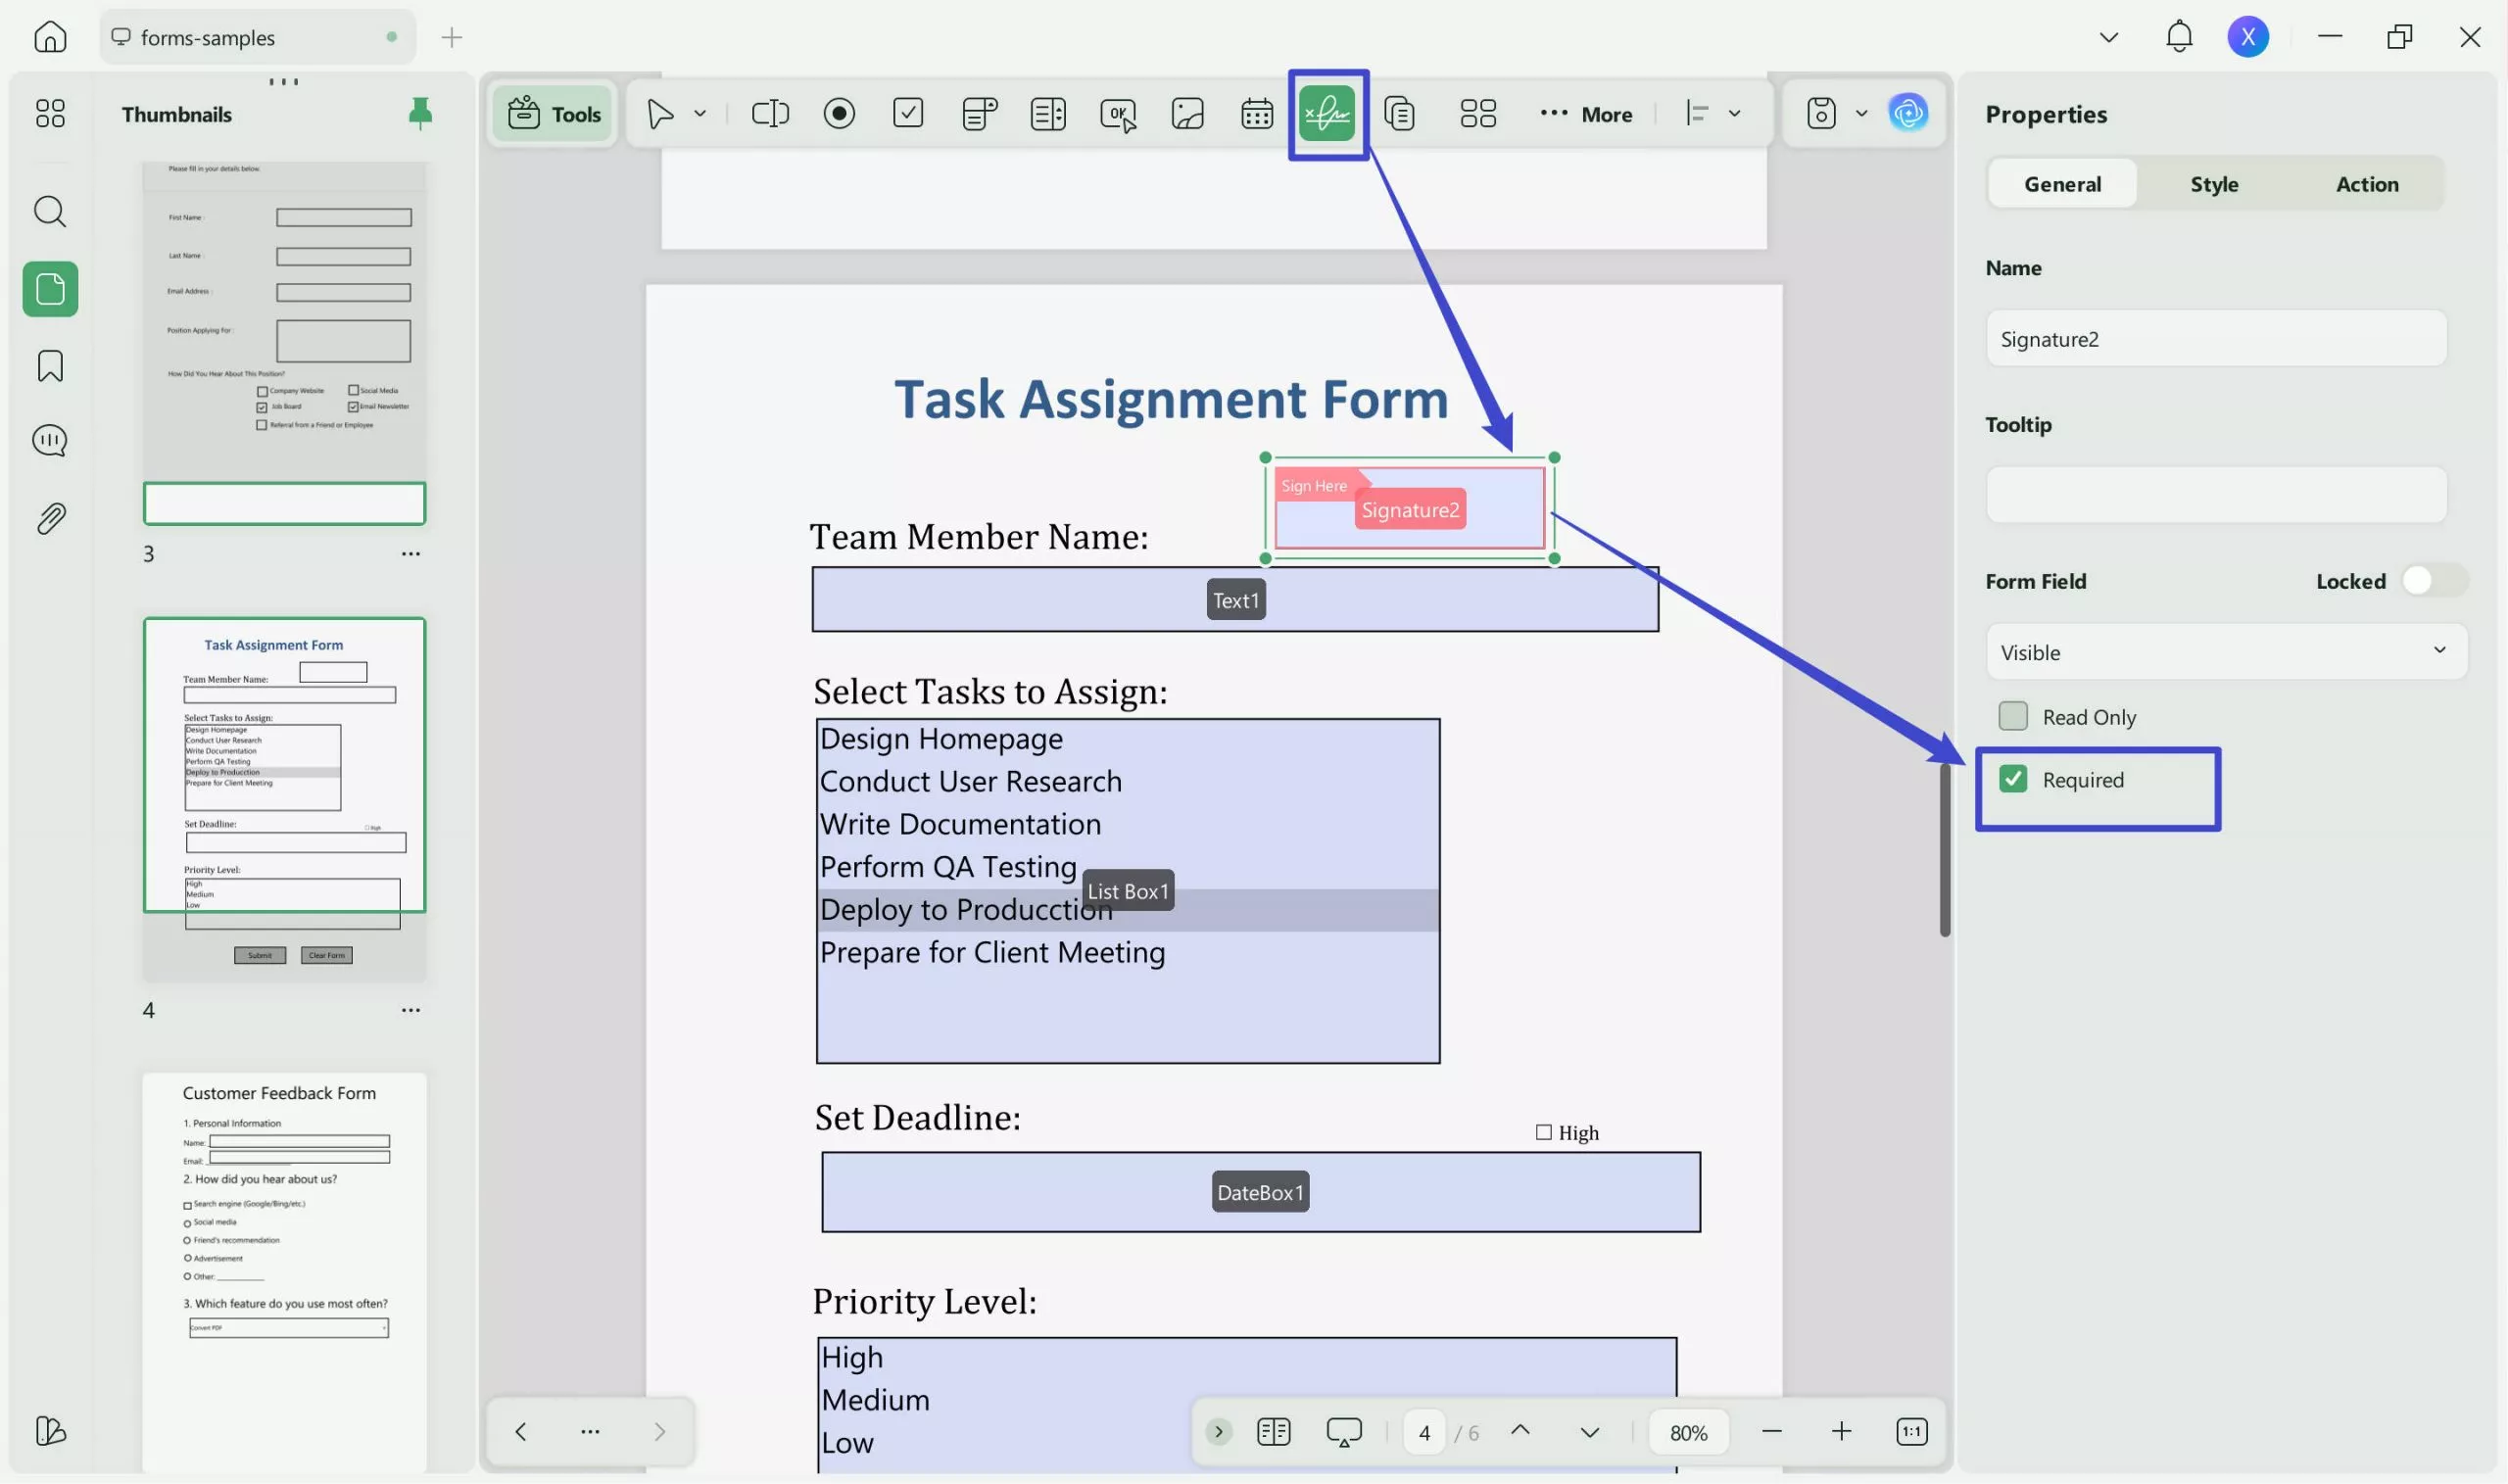
Step 9. Edit a Pre-Existing Form Field
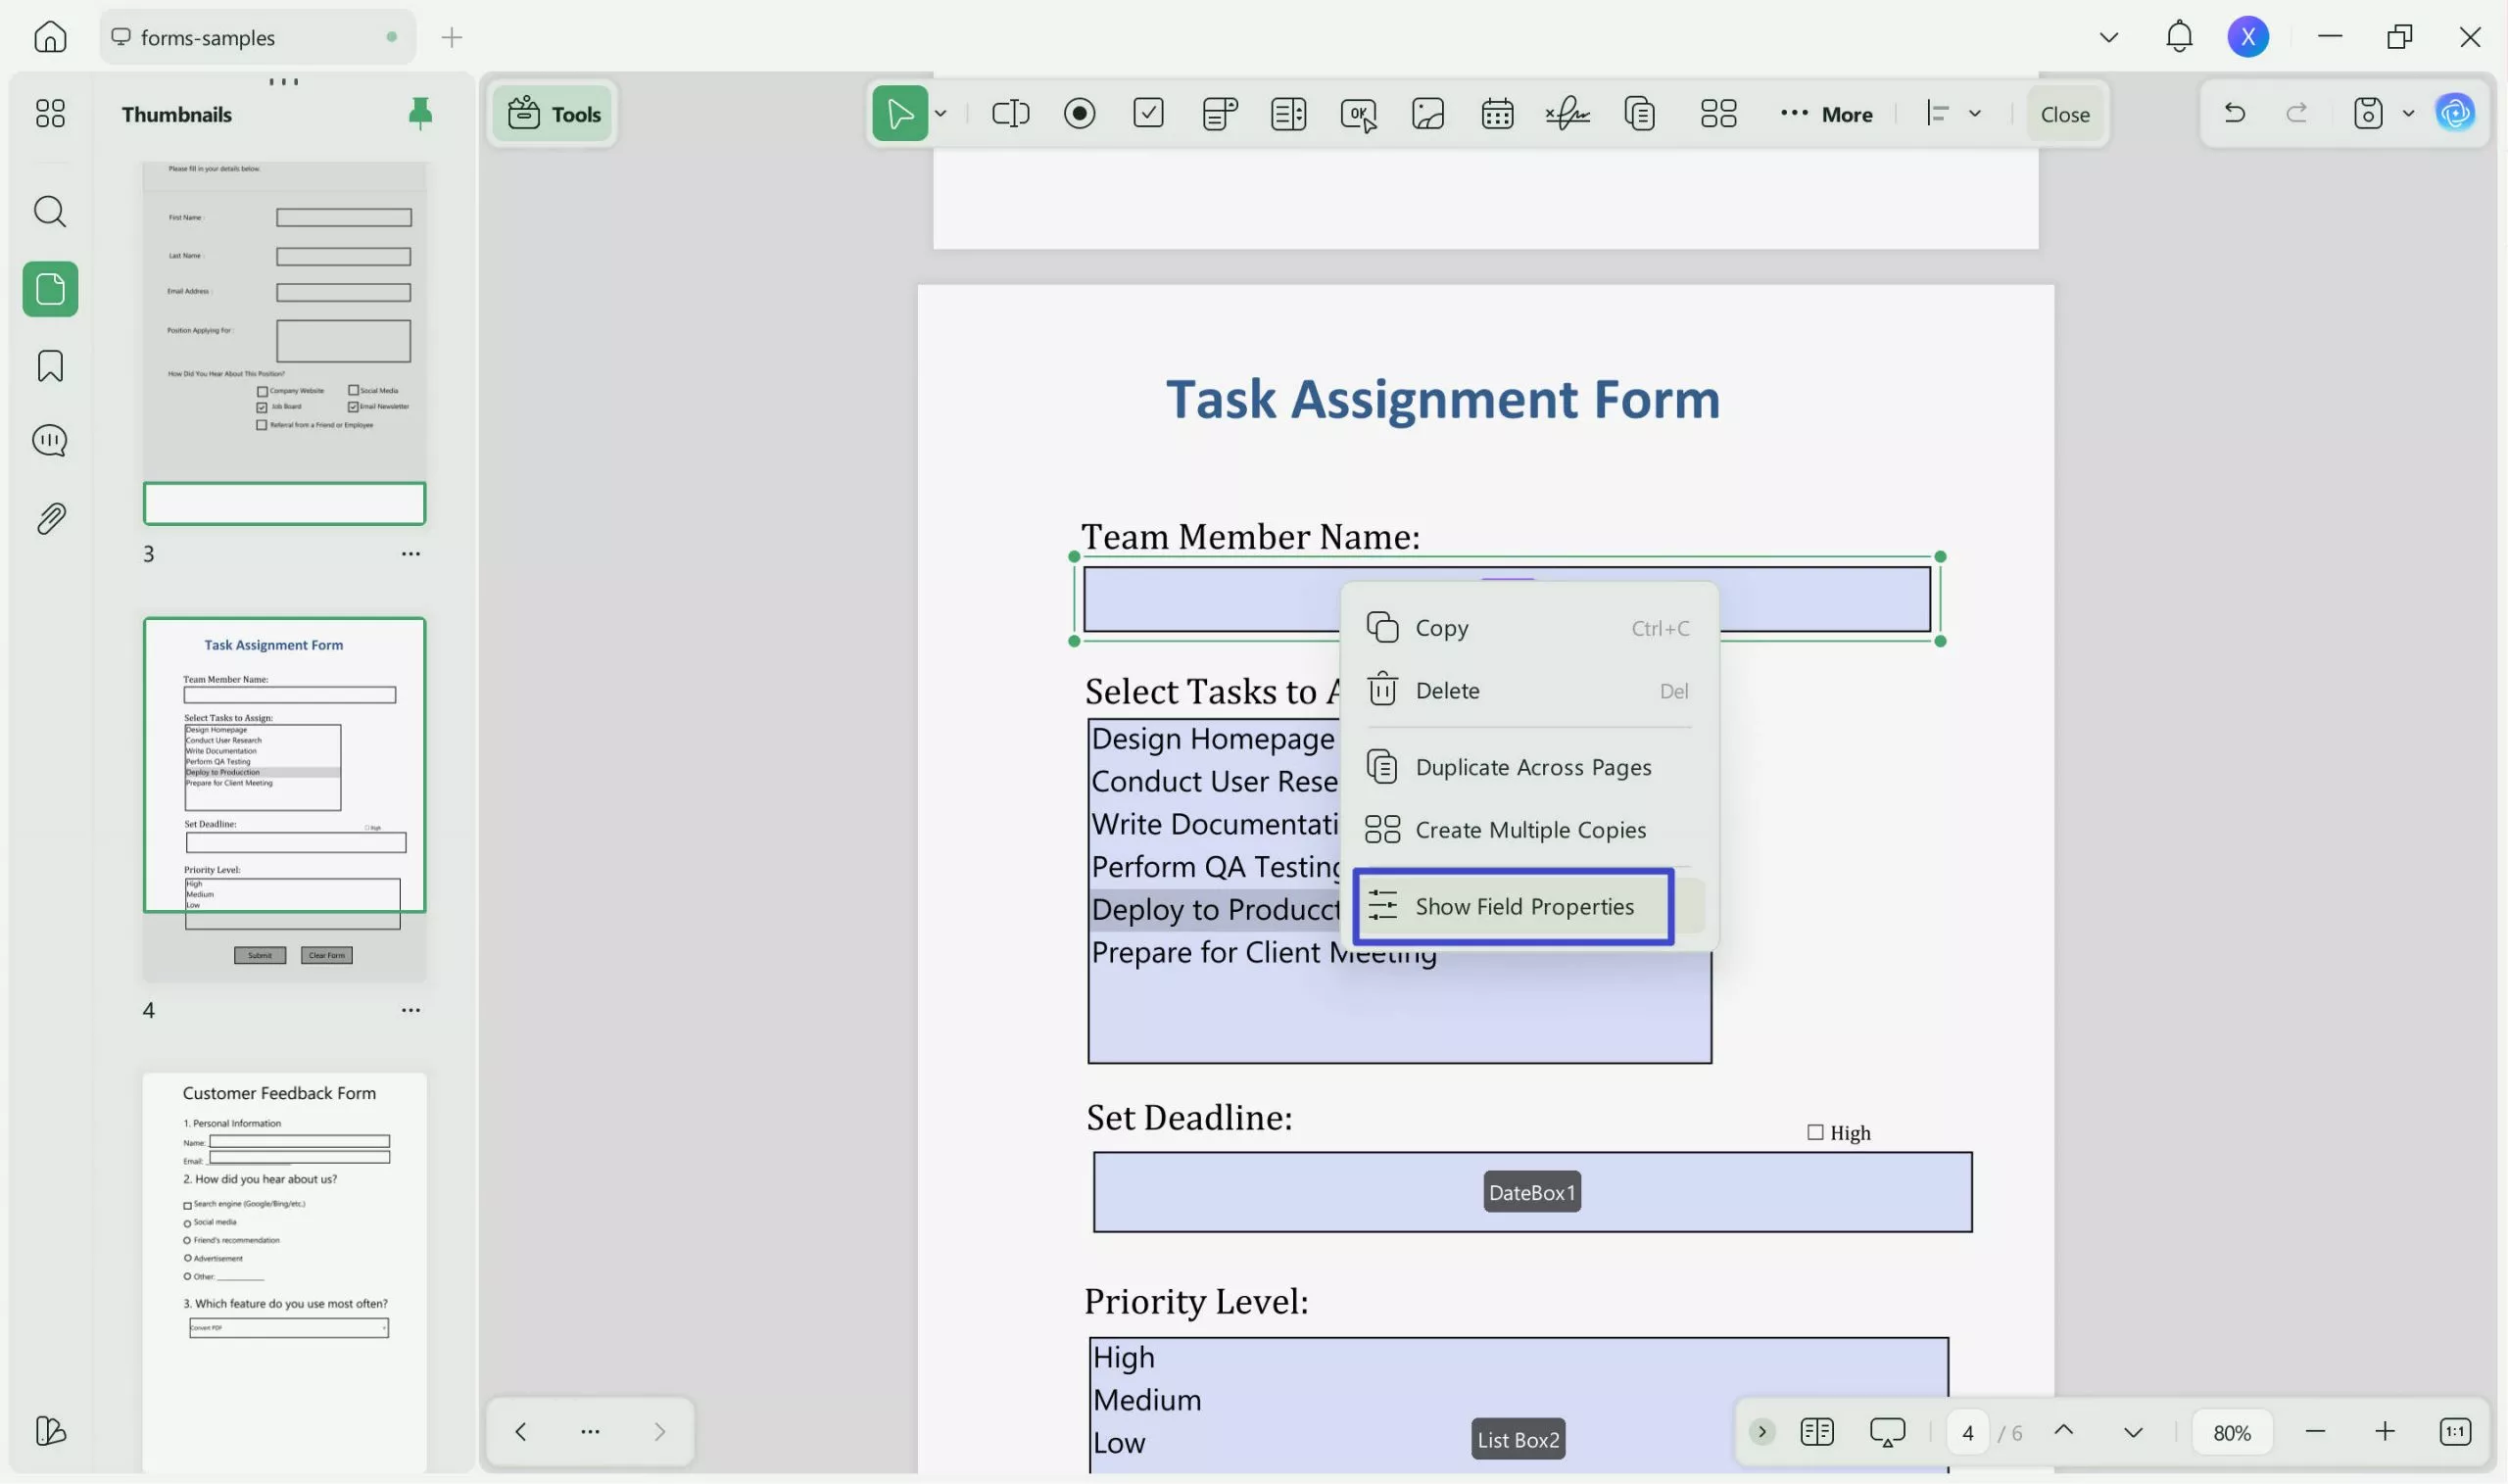
If you need to make edits to a pre-existing form field in your editable PDF, just select the relevant field and right-click on it. When the pop-up opens, select the "Show Field Properties" option and choose the required settings in the "Properties" panel that follows.
In essence, UPDF is an all-in-one solution for your form preparation, editing, and filling queries. To get a better understanding of the utilities of this platform, watch the following video till the end. If you want to benefit from the extensive features of UPDF, acquire it on your device and upgrade to the premium version. You can visit the pricing page of UPDF to learn more about the discounted subscription plans.
Part 2. FAQs About Adding Form Fields to PDF
1. How do I allow the filling of form fields in PDF?
Using UPDF, when a PDF form opens, a user can automatically fill it in without any permissions. As your form opens in the "Form" mode, you can enable the "Form Field Recognition" to highlight all the form fields. And then switch to the "Comment" mode, you can start filling in the form by clicking the form fields and typing in the text boxes.
2. Can you link fillable fields in PDF?
Yes, you can link fillable fields in PDF files using UPDF by entering the "Edit" mode of this tool. As the editing interface appears, use the "Link" button on the top to insert URLs in the relevant fields.
3. How do I edit a PDF with form fields?
To edit a PDF with form fields, you will need UPDF's editing feature. Using the PDF editing mode, you will be able to edit your file by inserting or extracting text.
4. How do I auto-populate a fillable PDF?
To auto-populate forms, you will need a PDF editor that offers the auto-filling features. Many PDF editors have integrated auto population features for forms that allow auto-filling of the text fields. This feature saves users time by reducing the need for repetitive data entry, ensuring consistency across multiple fields.
Conclusion
In conclusion, form fields play an essential role in simplifying the add form fields to the PDF process by letting you enter one-click responses. UPDF is a robust PDF tool that helps users create, edit, and fill in e-forms in a simplified way. Using this tool, you can enter signatures as well, to ensure that the form is validated.
Windows • macOS • iOS • Android 100% secure
 UPDF
UPDF
 UPDF for Windows
 UPDF for Mac
 UPDF for iPhone/iPad
 UPDF for Android
 UPDF AI Online
 UPDF Sign
 Edit PDF
 Annotate PDF
 Create PDF
 PDF Form
 Edit links
 Convert PDF
 OCR
OCR PDF to Word
 PDF to Image
 PDF to Excel
 Organize PDF
 Merge PDF
 Split PDF
 Crop PDF
 Rotate PDF
 Protect PDF
 Sign PDF
 Redact PDF
 Sanitize PDF
 Remove Security
 Read PDF
 UPDF Cloud
 Compress PDF
 Print PDF
 Batch Process
 About UPDF AI
 UPDF AI Solutions
 AI User Guide
 FAQ about UPDF AI
 Summarize PDF
 Translate PDF
 Chat with PDF
 Chat with AI
 Chat with image
 PDF to Mind Map
 Explain PDF
 Scholar Research
 Paper Search
 AI Proofreader
 AI Writer
 AI Homework Helper
 AI Quiz Generator
 AI Math Solver
 PDF to Word
 PDF to Excel
 PDF to PowerPoint
 User Guide
 UPDF Tricks
 FAQs
FAQs UPDF Reviews
 Download Center
 Blog
Blog Newsroom
 Tech Spec
 Updates
 UPDF vs. Adobe Acrobat
 UPDF vs. Foxit
 UPDF vs. PDF Expert





 Enola Miller
 Enola Davis
 Enid Brown
 Enya Moore
 Lizzy Lozano