 UPDF for Windows
 UPDF for Mac
 UPDF for iPhone/iPad
 UPDF for Android
 Nomostar
 UPDF AI Online
 UPDF Sign
 IvyCraft
 Edit PDF
 Annotate PDF
 Create PDF
 PDF Form
 Edit links
 Convert PDF
 OCR
OCR PDF to Word
 PDF to Image
 PDF to Excel
 Organize PDF
 Merge PDF
 Split PDF
 Crop PDF
 Rotate PDF
 Protect PDF
 Sign PDF
 Redact PDF
 Sanitize PDF
 Remove Security
 Read PDF
 UPDF Cloud
 Compress PDF
 Print PDF
 Batch Process
 About UPDF AI
 UPDF AI Solutions
 AI User Guide
 FAQ about UPDF AI
 Summarize PDF
 Translate PDF
 Chat with PDF
 Chat with AI
 Chat with image
 PDF to Mind Map
 Explain PDF
 PDF AI Tools
 Image AI Tools
 AI Chat Tools
 AI Writing Tools
 AI Study Tools
 AI Working Tools
 Other AI Tools
 AI Bookmark Generation
 AI Bookmark Summary
 AI Watermark Generation
 AI Background Generation
 AI Sticker Generation
 AI Stamp Generation
 AI Editing Suite
 UPDF Copilot
 AI Page Management
 AI Semantic Search
 PDF to Word
 PDF to Excel
 PDF to PowerPoint
 User Guide
 UPDF Tricks
 FAQs
FAQs UPDF Reviews
 Download Center
 Blog
Blog Newsroom
 Tech Spec
 Updates
 UPDF vs. Adobe Acrobat
 UPDF vs. Foxit
 UPDF vs. PDF Expert
If you're working with Excel, you may deal with blank rows, making your data look disorganized and difficult to read. However, removing these blank rows can be simple with the right knowledge.
In this guide, we'll explore how to remove blank rows in Excel using different methods. Keep reading to tidy up your data and make it easier to read and understand.
Part 1. How to Automatically Remove Blank Rows in Excel?
When working with a large Excel spreadsheet, it's common to come across blank rows that can make your data look cluttered and difficult to analyze. It makes you wonder, how do I automatically delete blank rows?
Removing these blank rows can be time-consuming, and even more, if you have a lot of data to sift through. Here, we will discuss how to auto-remove blank rows in Excel.
Follow these simple steps to automatically remove blank rows in Excel.
Step 1: Select the range of data in your Excel spreadsheet.
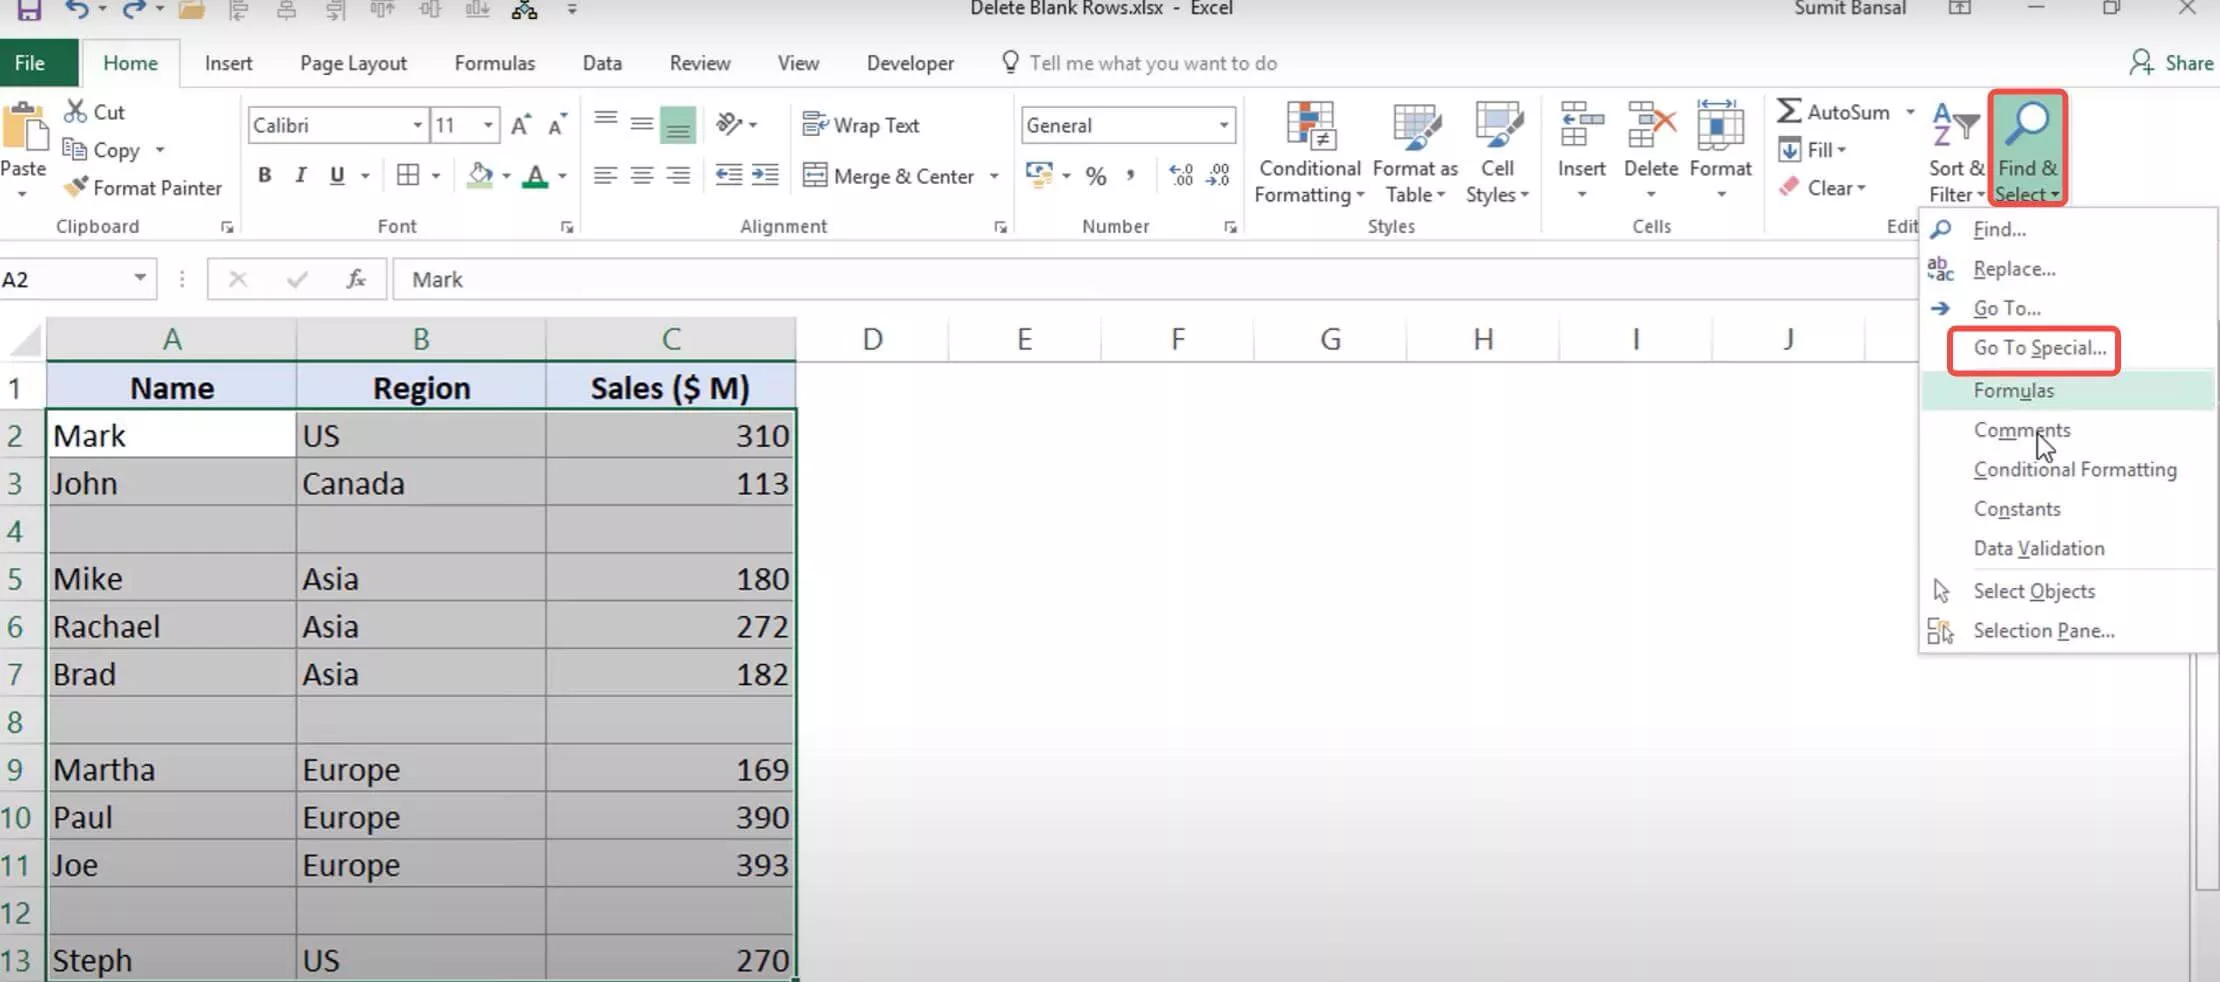
Step 2: In the next step, you need to click on the "Find & Select" button in the "Editing" section of the Home tab.
Step 3: Now, head over to "Go to Special" from the drop-down menu.
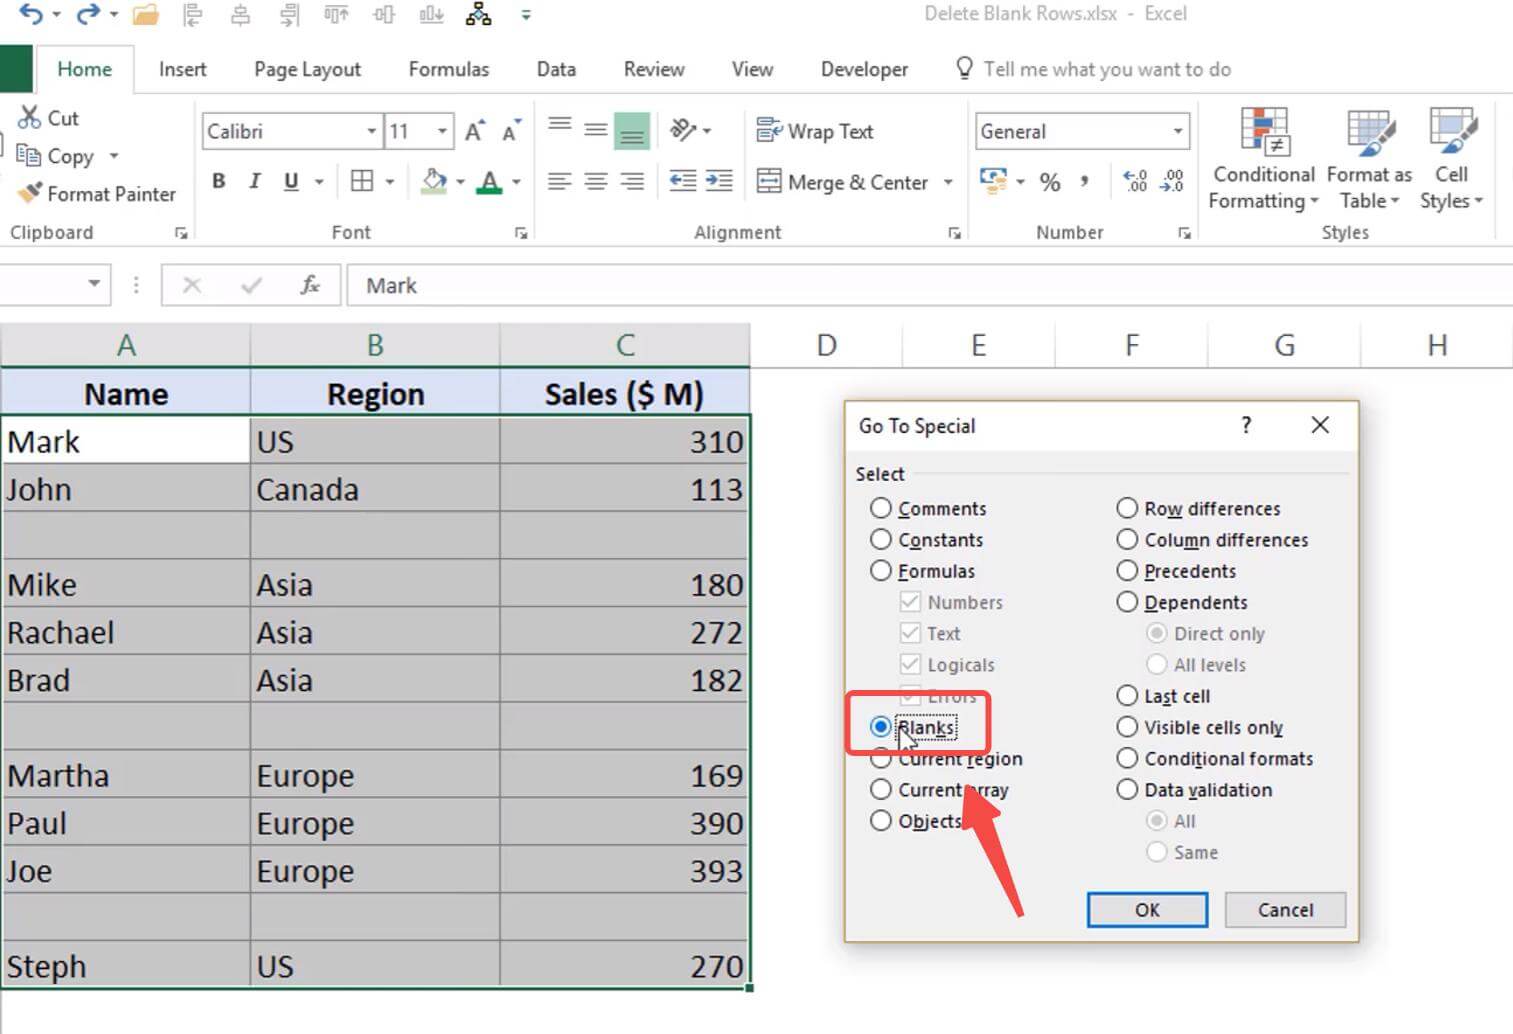
Step 4: Under the "Go to Special" dialog box, select the "Blanks" option and click "OK" for confirmation. This will select all blank cells in your Excel spreadsheet.
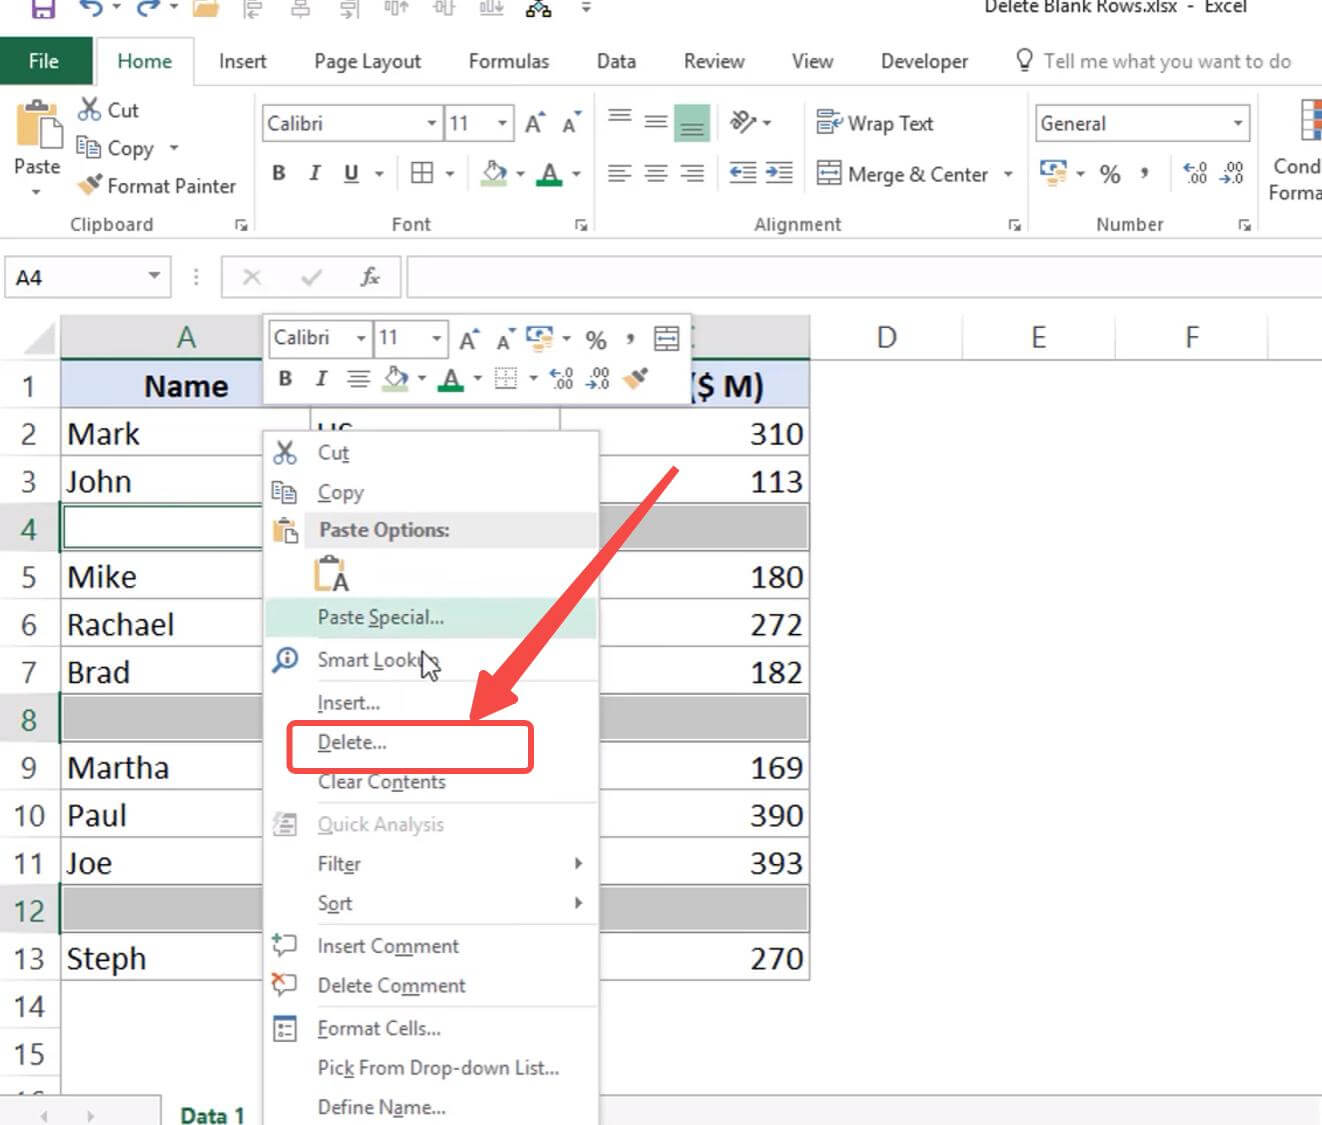
Step 5: Right-click on one of the selected/highlighted cells and choose "Delete" from the context menu.
Step 6: In the "Delete" dialog box, select "Entire row" and click "OK."
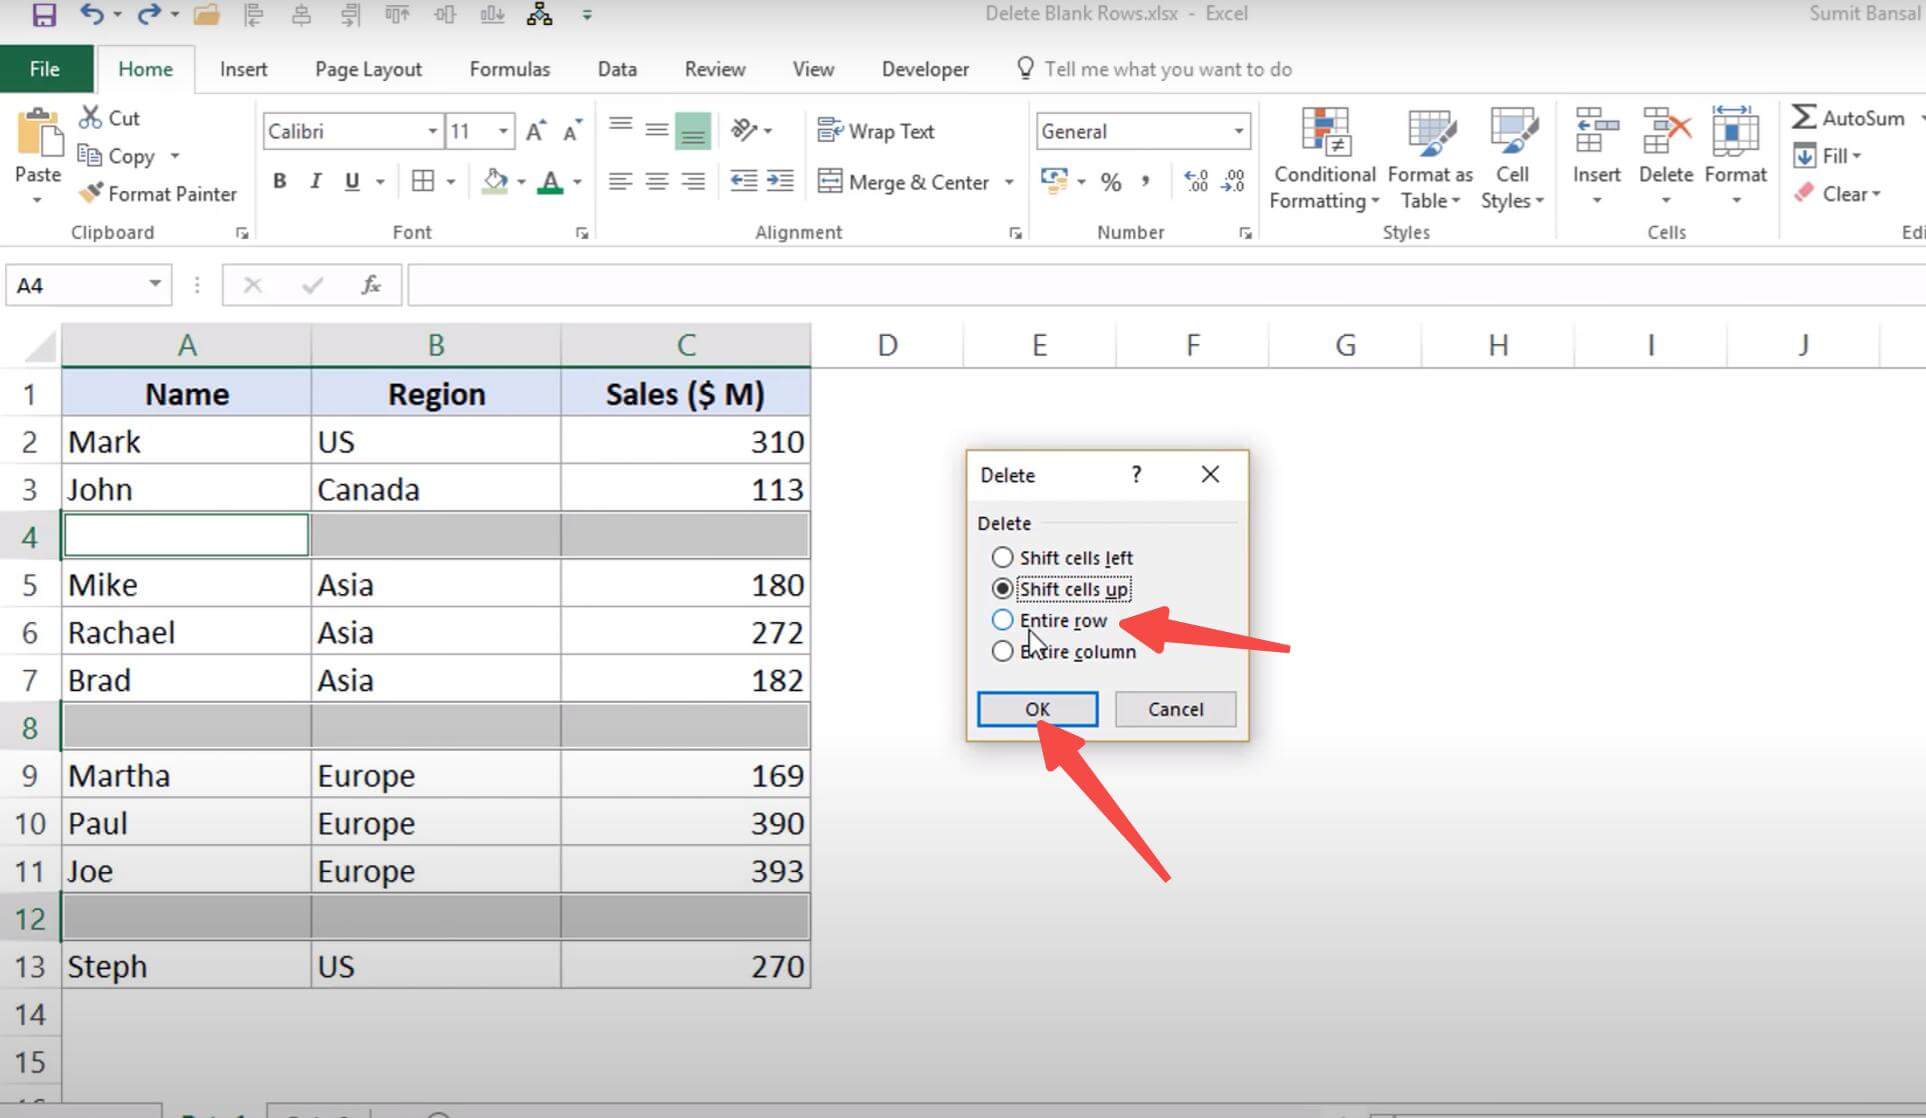
Step 7: This will remove all blank rows from your Excel spreadsheet.
Following these simple steps, you can quickly and easily remove all blank rows from your Excel spreadsheet. This method is ideal for anyone who wants to save time and streamline the process of removing blank rows from their data.
Part 2. How to Remove All Blank Rows in Excel Manually? (7 Ways)
When it comes to removing blank rows in Excel, there are some manual ways to do it, too, if you have a smaller dataset. Here we'll talk about 7 different ways to manually remove blank rows in Excel. Whether you're more comfortable with using the keyboard or the mouse, there's a method that suits your preference.
- 1). How to Remove Multiple Blank Rows in Excel With Shift or Ctrl Keyboard?
- 2). How to Delete Blank Rows in Excel Using Keyboard Shortcuts?
- 3). How to Remove All Blank Rows in Excel at Once Using Filter?
- 4). How to Remove Blank Rows in Excel Using Find and Replace Option?
- 5). How to Delete Empty Rows in Excel Using Sort?
- 6). How to Remove Blank Rows in Excel using Formula?
- 7). How to Remove Blank Rows in Excel Using Third-party Tools?
1). How to Remove Multiple Blank Rows in Excel With Shift or Ctrl Keyboard?
In Microsoft Excel, it is common to encounter situations where there are multiple blank rows in a spreadsheet. One way to remove multiple blank rows in Excel is by using Shift or Ctrl keyboard shortcuts.
This method can be used when contiguous or non-contiguous blank rows in the data need to be removed. For example, if you have a large dataset and there are several rows that are completely empty, you can use this method to quickly remove them.
To remove multiple contiguous blank rows in Excel using the Shift key, follow these steps:
Step 1: Select the first row, then tap on the “Shift” key and click the final row that needs to be deleted.
Step 2: When you are done selecting the rows, release the Shift and perform right-click on any of the rows.
Step 3: Select "Delete" from the context menu to simply remove multiple contiguous blank rows.
In case, there are multiple non-contiguous rows that need to be removed, you can follow these steps:
Step 1: First of all, you will need to select the non-contiguous rows that needed to be removed. To do this, click on the first row and hold on the “Ctrl” keyboard and select the remaining rows that you want to select.
Step 2: Once you have selected the rows you want to delete, right-click on one of the row headings.
Step 3: From the drop-down menu, simply select “Delete” to remove the blank rows.
2). How to Delete Blank Rows in Excel Using Keyboard Shortcuts?
Using keyboard shortcuts to delete blank rows in Excel is a quick and efficient method that does not require using the mouse. It involves selecting the blank rows manually and deleting them using a keyboard shortcut.
To delete multiple adjacent or contiguous blank rows in Excel using keyboard shortcuts, follow these steps:
Step 1: Manually choose the rows with a hold on “ctrl” or “shift” to select all blank rows you need to delete.
Step 2: Press Ctrl and - (minus sign) keys altogether to delete the selected blank rows.
3). How to Remove All Blank Rows in Excel at Once Using Filter
This method is particularly useful when you have a large dataset with many rows of data and you want to remove all the blank rows at once.
The Filter feature allows you to filter out specific rows based on certain criteria, such as blanks. This method can save you time and effort compared to manually deleting each blank row.
Follow these simple steps:
Step 1: Select the entire range of data you want to filter, including the column headers.
Step 2: Under the "Data" tab of the ribbon, click the "Filter" button in the “Sort & Filter” section. This will add drop-down arrows to the column headers.
Step 3: Click on the drop-down arrow in the first column header, and from the drop-down menu, uncheck the “Select All” option. This will automatically unselect all the pre-selected options.
Step 4: Next, checkmark only the “Blanks” option and click “OK” to confirm the selection.
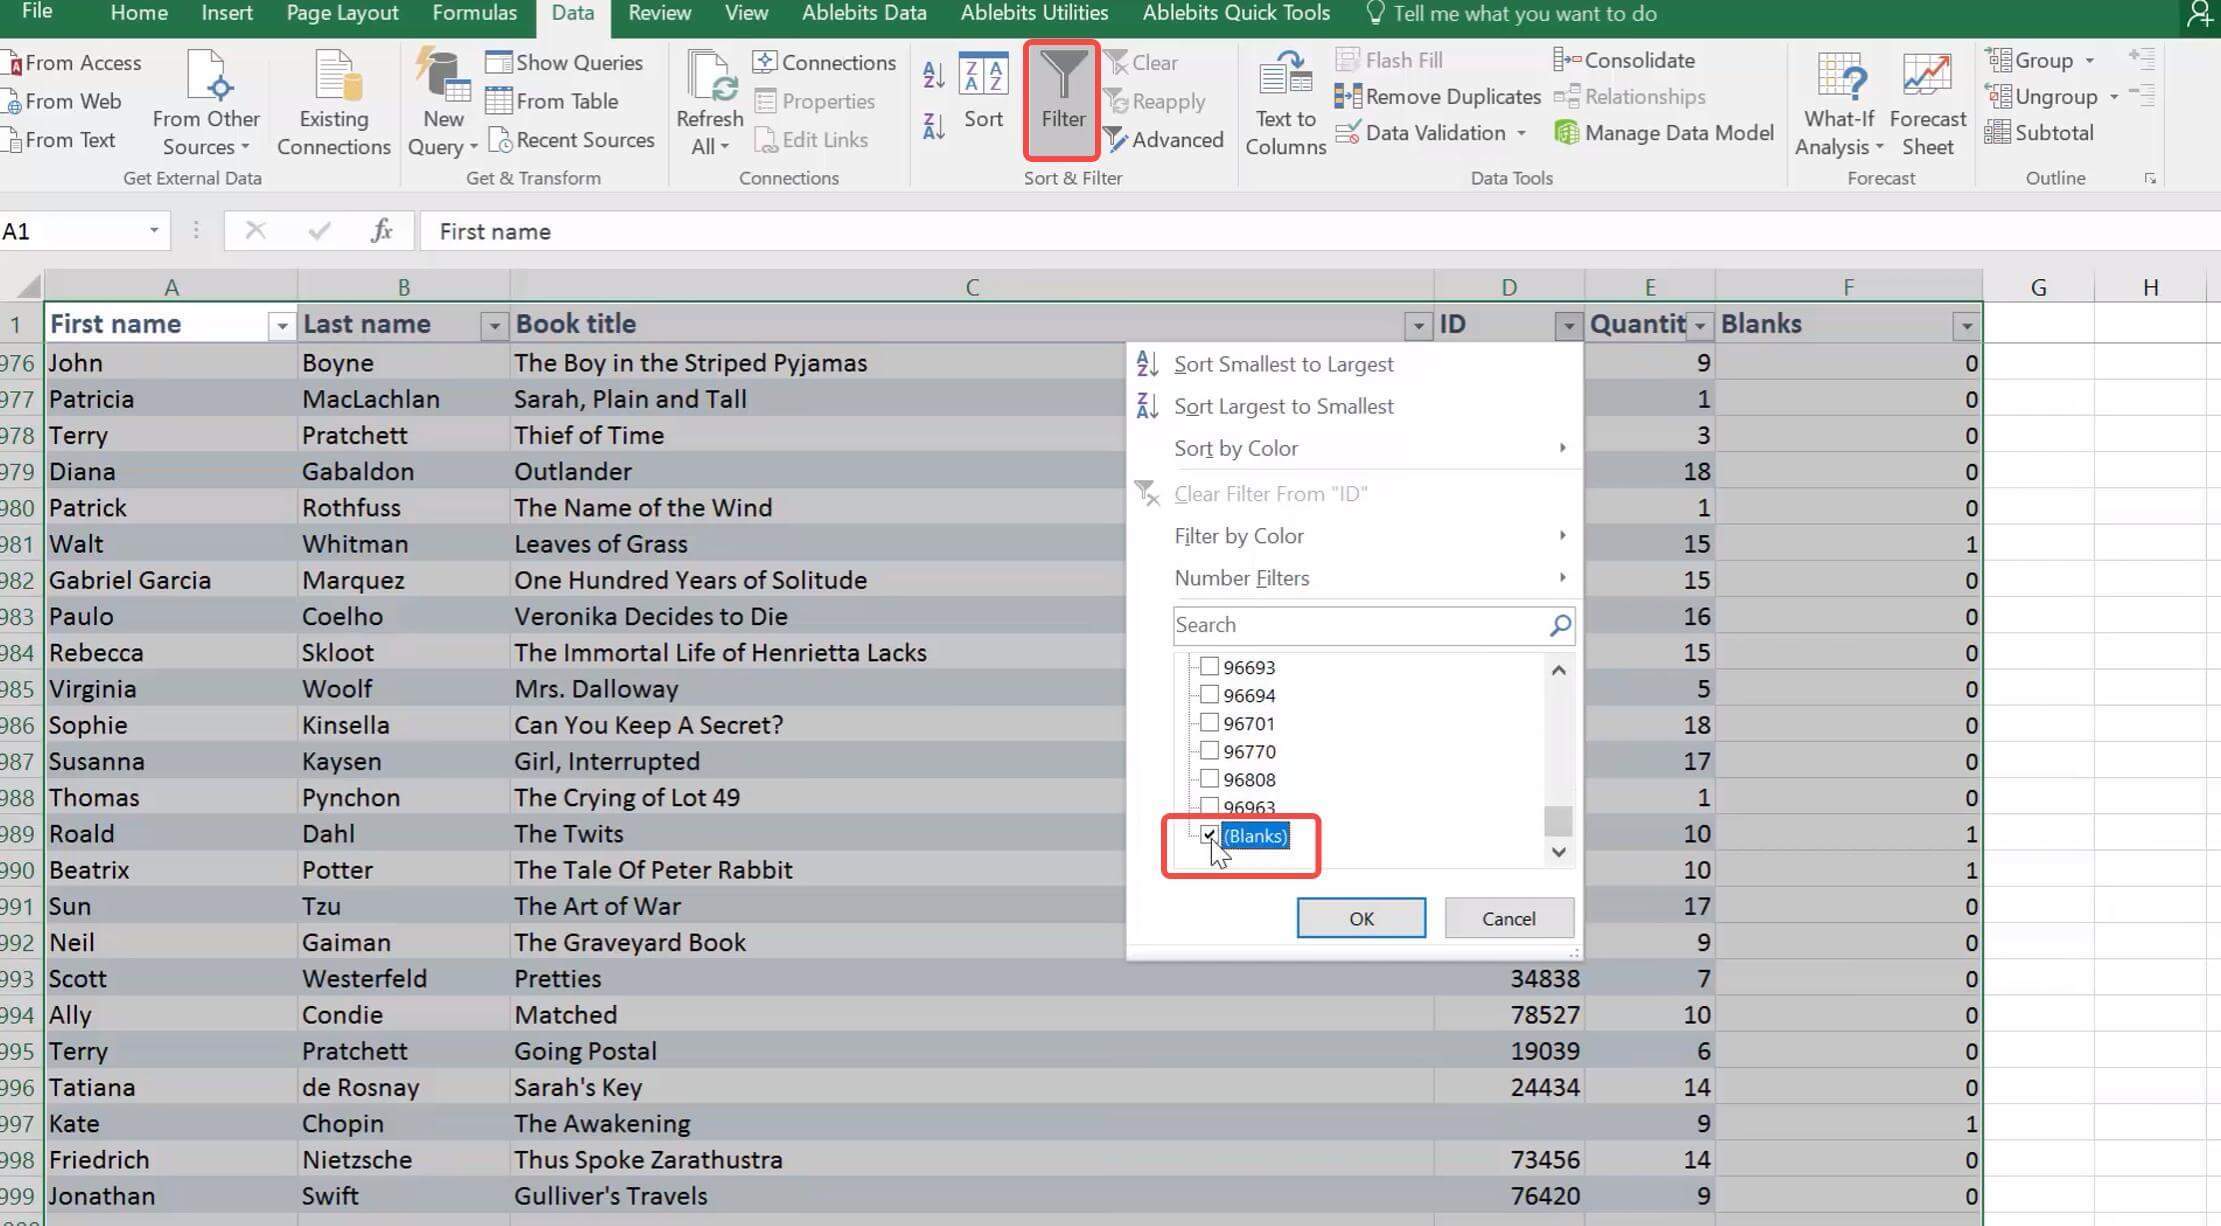
Step 5: This will get you the blank rows filtered.
Step 6: Now, you will need to select all the blank rows and right-click on any of the selected rows. Then, choose "Delete Row" from the context menu and the selected blank rows will get deleted.
Step 7: Click again on the drop-down arrow in the first column header and checkmark the “Select All” option. Finally, head over to the Data tab and click on the “Filter” button to remove the filtering.
4). How to Remove Blank Rows in Excel Using Find and Replace Option
When your data contains too many empty rows side by side or randomly in Excel, performing any manual task could be a real headache and needs a lot of effort. But you don’t need to worry; removing many blank spaces is not that difficult and can be done easily by using the Find and Replace Command.
Here are the steps to remove blank rows in Excel using Find and Replace:
Step 1: Select a column of your data containing all the blank rows. You can do that by selecting the first cell, and then, holding the Shift key and selecting the last cell.
Step 2: Go to the Home tab of Excel, and select the “Find” option under the “Find & Select” command. This will open the Find & Replace menu for you.
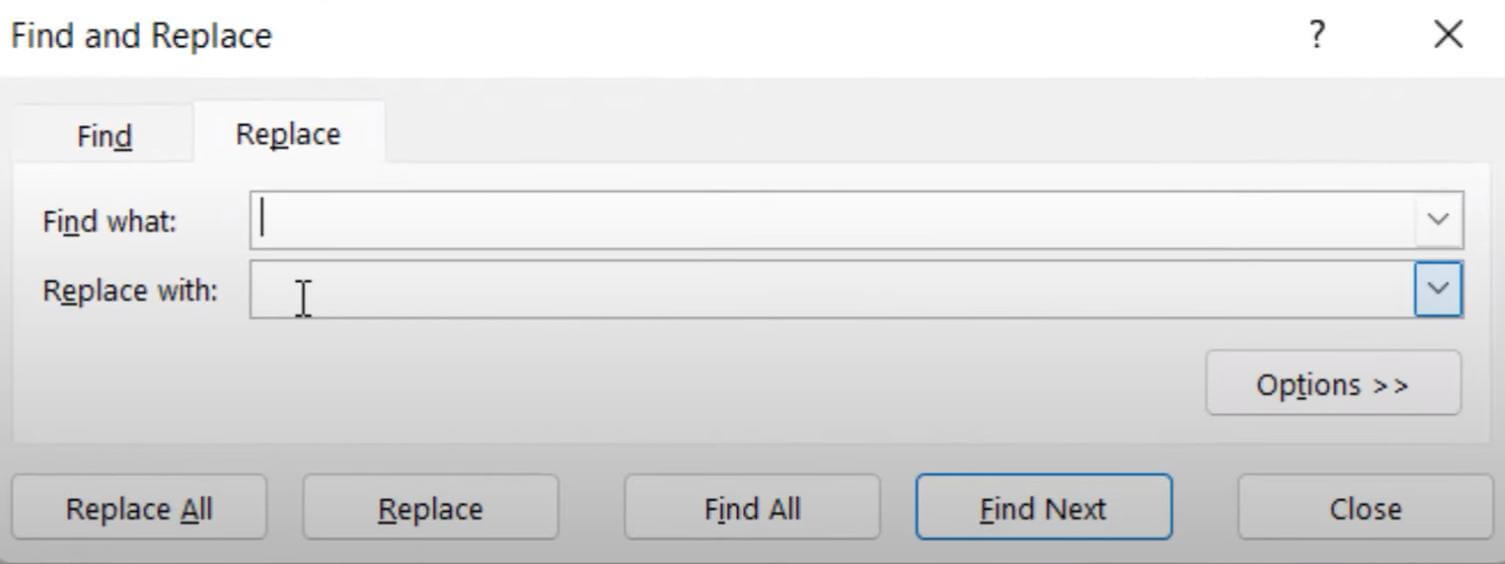
Step 3: In the Find menu, expand the “Options” tab and leave the “Find what” input field empty.
Step 4: Now, checkmark the “Match entire cell contents” option and select “Sheet” in the “Within” option. Also, choose “Values” under the “Look in” option.
Step 5: Then, Hit the “Find All” button to get all the blank cells in your Excel sheet.
Step 6: Next, you will have a list of all the blank cells located at the bottom of the Find menu. You can press Ctrl + A to select them all, and then, click the “Close” button to close the menu.
Step 7: In the final step, right-click and select “Entire row” in the “Delete” option to delete all the selected blank rows in your data.
5). How to Delete Empty Rows in Excel Using Sort
Deleting empty rows in Excel using the Sort function is another method to clean up a large dataset. This method is useful when you have a dataset with a large number of empty rows that are scattered throughout the worksheet.
By using the Sort function, you can easily move all the empty rows to the top or bottom of your worksheet and then delete them in one go.
The steps to delete empty rows in Excel using Sort are as follows:
Step 1: Select the range of cells or the worksheet you want to sort.
Step 2: Click on the "Sort & Filter" button in the "Editing" group on the "Home" tab.
Step 3: In the "Sort & Filter" drop-down menu, select "Custom Sort."
Step 4: Choose the desired column to be sorted by in the "Sort" dialog box. If you want to sort by multiple columns, click the "Add Level" button and select the additional columns.
Step 5: In the "Sort On" drop-down menu, select "Values."
Step 6: In the "Order" drop-down menu, select "Smallest to Largest" or "Largest to Smallest," depending on the order you want the empty rows to appear.
Step 7: Click on the "OK" button to sort the data.
Step 8: Right-click on the selected cells and choose "Delete" from the context menu.
Step 9: In the "Delete" dialog box, select "Entire Row" and click on the "OK" button.
Step 10: The empty rows will now be deleted from your worksheet, and the remaining data will be sorted according to your selected criteria.
6). How to Remove Blank Rows in Excel using Formula?
You can also use Excel formulas to delete blank rows out of your worksheet. The following is the formula that can be placed to identify empty lines in an Excel sheet:
| =IF(COUNTA(A2:D2)=0, "Blank", "Not blank")Here, A2 being the first whereas D2 is the last used cell of the first data row. |
If you have a table in Excel with blank rows that you want to delete while preserving the data in non-blank rows, follow these steps:
Step 1: Open your Excel spreadsheet and select the range of cells that you want to check for blank rows.
Step 2: Identify the first and last used cell of the first data row. Let's say they are A2 and D2, respectively.
Step 3: In a blank column (such as column E), enter the formula in cell E2:
=IF(COUNTA(A2:D2)=0, "Blank", "Not blank")
Step 4: Drag the fill handle of cell E2 down to apply the formula to all the rows in the selected range. The formula will make "Blank" for empty rows and "Not blank" for non-empty rows.
Step 5: Click on any cell in the header row of your table, then click on the "Sort & Filter" button on the "Home" tab of the Excel ribbon.
Step 6: Click on the drop-down arrow in the header cell of the formula column, uncheck "Select All," and then check "Blank." Excel will filter the table to show only the blank rows.
Step 7: By clicking on the first cell of the first filtered row and hitting "Ctrl + Shift + End" you can select all the filtered rows.
Step 8: Right-click on the selection, choose "Delete row" from the context menu, and confirm that you want to delete the entire rows.
Step 9: Excel will delete all the blank rows, preserving the data in the non-blank rows.
Step 10: To Remove the filter press "Ctrl + Shift + L" or click on the "Sort & Filter" button and uncheck "Filter."
7). How to Remove Blank Rows in Excel Using Third-party Tools?
Third-party tools are software programs or add-ins that Excel can use to perform various tasks, including removing blank rows. These tools can be particularly useful when you quickly remove blank rows from a large dataset.
Several third-party tools can help you remove blank rows in Excel, including Kutools for Excel, ASAP Utilities, and others. These tools offer a variety of features that can help you work more efficiently, such as the ability to filter, sort, and analyze data and automate repetitive tasks.
Kutools for Excel is an Excel add-in that includes a variety of tools to improve your productivity. To remove blank rows using Kutools for Excel:
- Select the range of particular cells from which you wish to remove blank rows.
- Go to the "Kutools" tab and click on "Delete Blank Rows" in the "Delete" group.
- In the "Delete Blank Rows" dialog box, select the "Entire row" option and click "OK."
- The blank rows will be deleted.
Part 3. How to Convert PDF to Excel for Removing Blank Rows?
PDF files are great for sharing and presenting information, but when it comes to editing or data analysis, Excel is a more flexible tool. However, converting PDF to Excel can be a challenging task, especially when dealing with complex tables and data.
For this purpose, we recommend using UPDF, a powerful PDF editing tool that can easily convert PDF to Excel. UPDF is a feature-rich tool that offers a wide range of editing and conversion options, making it a one-stop solution for all your PDF needs.
Windows • macOS • iOS • Android 100% secure

Salient Features
UPDF has several features, including:
- Edit Text in PDF: UPDF allows you to edit the text in PDF files with ease, making it easy to correct typos, update information, or make any necessary changes to your documents.
- Built-in PDF Image Editor: With UPDF, you can easily edit images in your PDF files. The built-in image editor allows you to manipulate images, making it easy to improve the visual quality of your documents.
- Convert PDF to Any Popular Format: UPDF supports the conversion of PDF files to various popular formats, including Word, Excel, PowerPoint, HTML, and image formats.
- OCR Text in PDF: UPDF's OCR technology allows you to convert scanned PDFs into editable text documents, making it easy to extract information from scanned documents and improve their accessibility.
- Intuitive Page Management: UPDF allows you to easily manage pages in your PDF files. You can merge, split, and rearrange pages and add or delete pages from your documents.
How to Convert Pdf to Excel Using UPDF?
Step 1: Install UPDF on your Computer
First, ensure you have downloaded and installed the latest version of UPDF on your Windows operating system.
Windows • macOS • iOS • Android 100% secure
Step 2: Add Your PDF File
Open UPDF and load the PDF file you want to convert. You'll see an "Tools" icon to find "PDF Converter". Click on "More" to choose the output format that you want to change.

Step 4: Adjust the Conversion Settings
A pop-up window will appear, offering a selection of formats to which you can convert your PDF file. Choose the format that you want to convert the PDF file to, as Excel in this case. Some of the available formats include Word, Excel, CVS, and others.
After selecting the output format, you can adjust the settings of the output file, such as the format, page range, and document language.
Step 4: Convert PDF to Excel
Once you've configured the output settings, click the "Export" button and select the destination folder. After the conversion gets completed successfully, the converted Excel file will be saved to the destination folder of your computer.
To Sum Up
In this article, we have discussed 8 different ways to know how to remove blank rows in Excel, both automatically and manually. You can try all of these methods one by one and check which one works best for you. If you're facing difficulties with managing blank rows in PDF documents, we highly recommend using UPDF to change the format of your PDF to an Excel file first. With UPDF, you can quickly and easily convert your PDF to Excel format without losing any formatting or data.
UPDF also offers a user-friendly interface and intuitive design, making it easy for anyone to use, even if they have no prior experience with PDF conversion tools. Once you have your Excel file, you can easily use one of the 8 ways mentioned above to remove blank rows.
Windows • macOS • iOS • Android 100% secure


 Enola Davis

 Enid Brown