 UPDF
UPDF
 UPDF for Windows
 UPDF for Mac
 UPDF for iPhone/iPad
 UPDF for Android
 Nomostar
 UPDF AI Online
 UPDF Sign
 IvyCraft
 Edit PDF
 Annotate PDF
 Create PDF
 PDF Form
 Edit links
 Convert PDF
 OCR
OCR PDF to Word
 PDF to Image
 PDF to Excel
 Organize PDF
 Merge PDF
 Split PDF
 Crop PDF
 Rotate PDF
 Protect PDF
 Sign PDF
 Redact PDF
 Sanitize PDF
 Remove Security
 Read PDF
 UPDF Cloud
 Compress PDF
 Print PDF
 Batch Process
 About UPDF AI
 UPDF AI Solutions
 AI User Guide
 FAQ about UPDF AI
 Summarize PDF
 Translate PDF
 Chat with PDF
 Chat with AI
 Chat with image
 PDF to Mind Map
 Explain PDF
 PDF AI Tools
 Image AI Tools
 AI Chat Tools
 AI Writing Tools
 AI Study Tools
 AI Working Tools
 Other AI Tools
 AI Bookmark Generation
 AI Bookmark Summary
 AI Watermark Generation
 AI Background Generation
 AI Sticker Generation
 AI Stamp Generation
 AI Editing Suite
 UPDF Copilot
 AI Page Management
 AI Semantic Search
 PDF to Word
 PDF to Excel
 PDF to PowerPoint
 Enterprise Solution
 Enterprise Sign
 Enterprise AI
 Enterprise Plan
 Enterprise User Guide
 Enterprise Webinar
 IT
IT Education
 Construction
 Financial Service
 Healthcare
 Insurance
 Legal
Legal Manufacturing
 Government
 Researchers & PhDs
 Solopreneurs & Freelancers
 Lawyers & Legal Professionals
 Real Estate Agents & Brokers
 Education Solution
 Customer Stories
 User Guide
 UPDF Tricks
 FAQs
FAQs UPDF Reviews
 Download Center
 Blog
Blog Newsroom
 Tech Spec
 Updates
 UPDF vs. Adobe Acrobat
 UPDF vs. Foxit
 UPDF vs. PDF Expert

Quick answer:
I had a 12-page unit from our Grade 4 reader sitting on my iPad — "The Fisherman and the Golden Fish" — and three weeks to turn it into something 22 kids could perform. Retyping the whole thing into Word was a non-starter, and every article I found either handed me a finished script to download or explained the theory of playwriting. Nobody showed me what to actually do with the PDF on my screen: how to get the locked textbook text out, mark who says what, pull each child's lines into their own sheet, and hand the class a clean, navigable script.
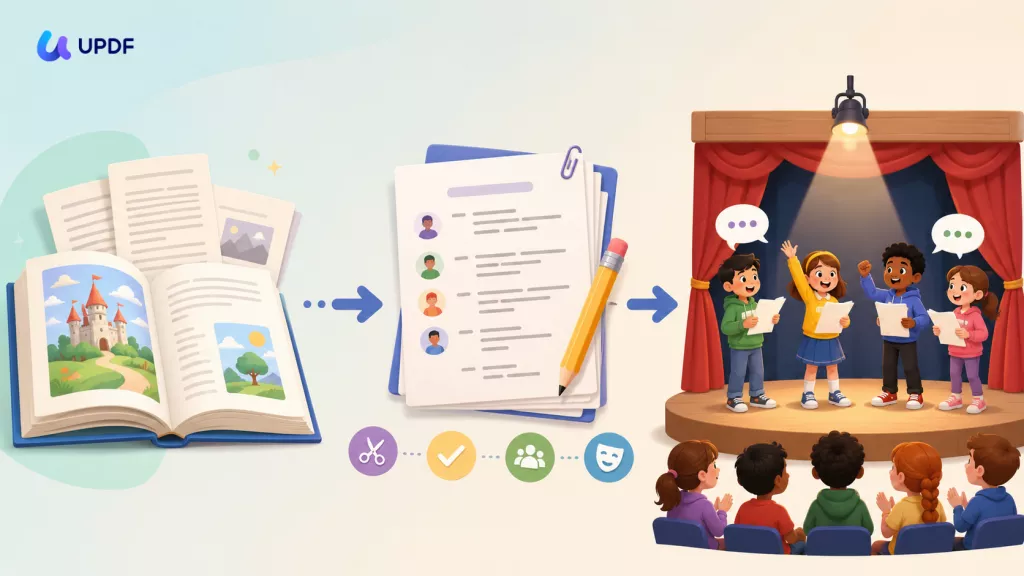
That gap is what this guide fills. Below is the full page-to-stage workflow — from a dense source page to a distribution-ready script — with the exact document steps at each stage. Part 6 covers the part I wish I'd known first: how to pull each student's lines into their own rehearsal sheet in one pass.
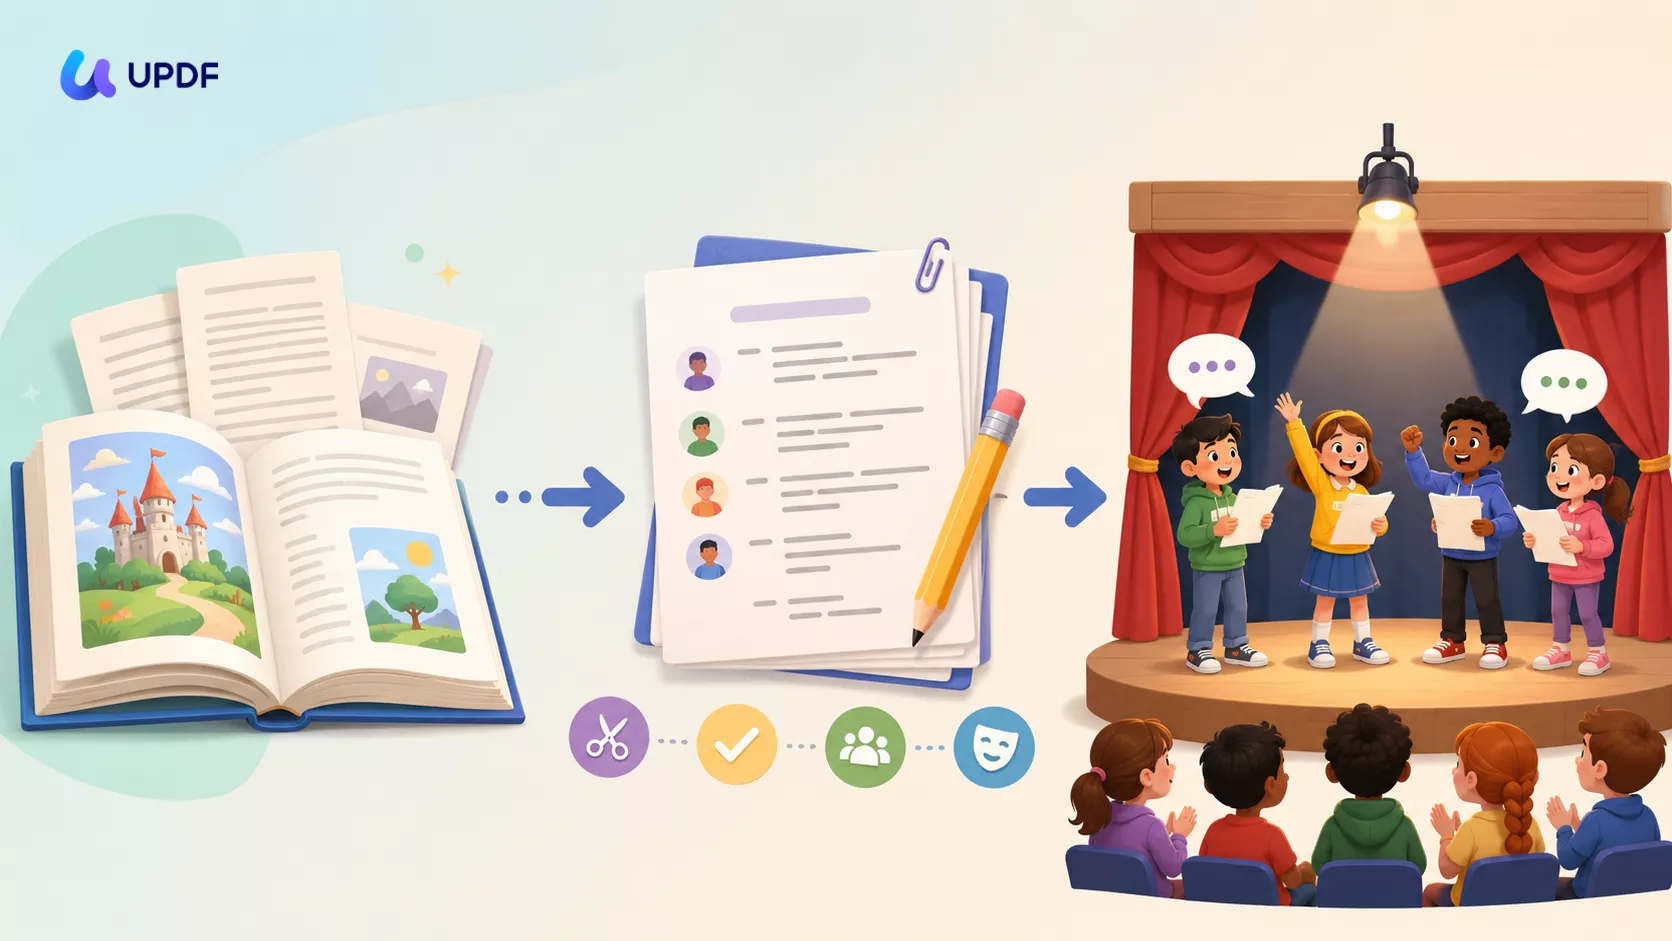
Part 1. Reader's Theater vs. a Full Play Script: Pick Your Target First
"A script for a story" isn't one thing. There are two adaptation targets, and they call for very different work. Reader's theater keeps most of the original text and simply splits it by speaker — students read from the page, with expression, no memorizing. A full classroom play restages the story with acts, scenes, and stage directions, which means rewriting the narration into spoken lines and action. Choosing wrong is the most common reason an adaptation balloons from a Tuesday reading lesson into a month of prep.
| Dimension | Reader's Theater script | Full classroom play |
|---|---|---|
| Memorization | None — students read from the script | Usually yes, at least partly |
| What you do to the text | Restructure and color-code the existing wording | Rewrite narration into dialogue + stage directions |
| Costumes & staging | None; read standing or seated | Optional to full |
| Prep time | Low | High |
| Best for | Fluency practice, large classes, ESL/EFL readers building confidence | End-of-term showcases, older students |
Reader's theater
Best for: whole-class fluency work and non-native English readers who need low-pressure speaking practice.
Not for: a polished production with blocking and lighting.
Full play
Best for: a performance night with an audience.
Not for: a normal reading lesson with 30 minutes of prep.
The workflow below works for both. It only forks in two places: the drafting step (light rewrite vs. heavy rewrite) and the rehearsal step (how much per-actor prep you need). I'll flag both when we get there.
Part 2. The Page-to-Stage Workflow at a Glance
Here's the whole process and where each piece of it happens. If you only need one part, jump to it.
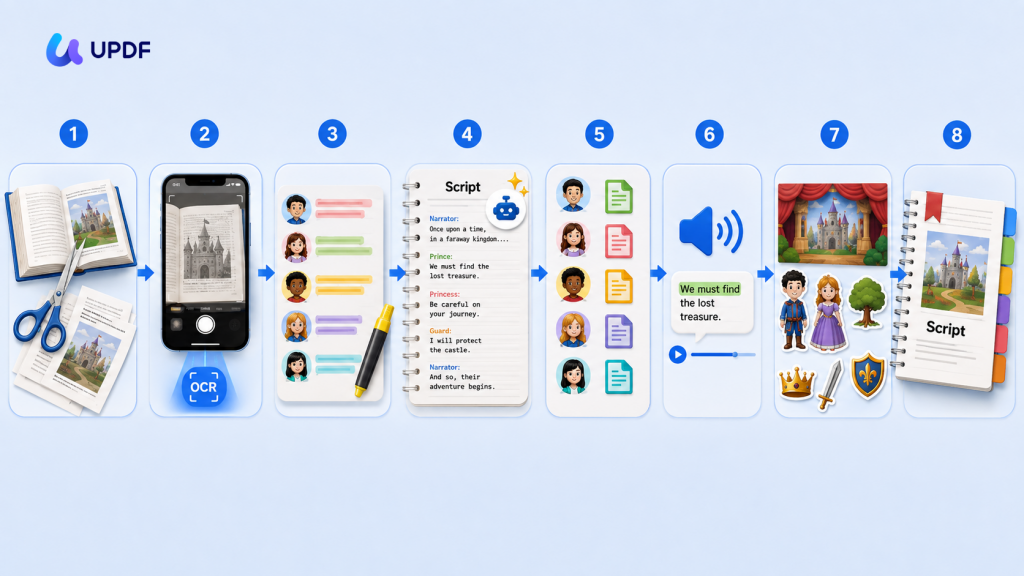
| I need to… | Do this |
|---|---|
| Cut the chapters and exercises I don't need | Step 1 — Organize Pages, then Extract |
| Get text out of a scanned or copy-locked textbook | Step 1 — OCR the trimmed pages |
| Figure out who says what | Step 2 — color-code speakers with Highlight |
| Draft the actual script | Step 3 — insert blank pages, draft with UPDF AI, polish by hand |
| Give each actor just their own lines | Step 4 — export highlights by speaker |
| Hear how a foreign-language line is pronounced | Step 4 — Read Aloud |
| Add character and scene visuals | Step 5 — AI Sticker Maker, AI Background Generator |
| Ship a bookmarked final to the whole class | Step 5 — add bookmarks and export |
I did all of this in UPDF, which runs on Windows, Mac, iOS, and Android — so the same workflow holds whether you're at a desk or marking up a script on an iPad between classes.
Windows • macOS • iOS • Android 100% secure
Part 3. Step 1: Get the Story Out of the PDF
Most classroom source texts are image-based scans or copy-protected e-textbooks. The professional adaptation advice — assign each character a color, highlight every time they appear — quietly assumes you can already select the text. Often you can't. That's the real first wall, and it comes before any of the "how to write a play" steps.
Here's how I got past it:
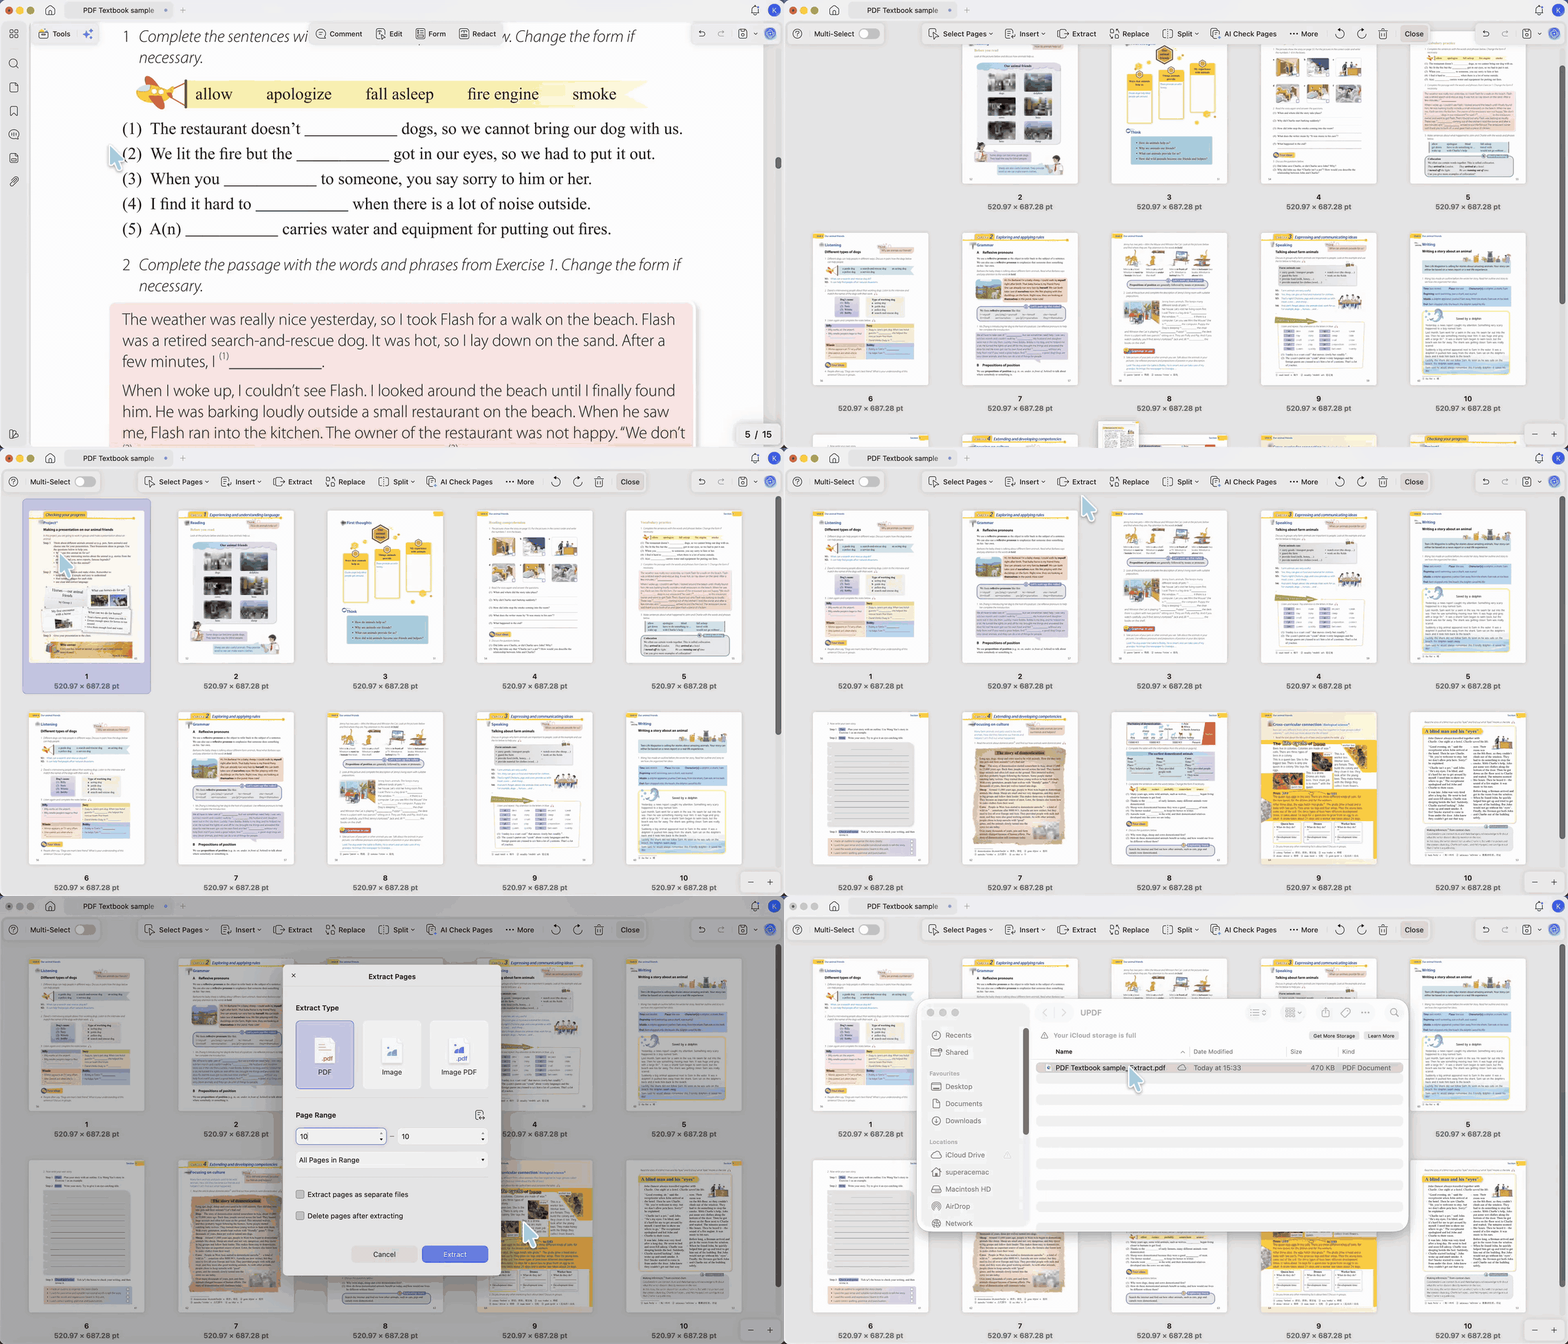
- Open the source PDF in UPDF. You can drag the file straight onto the app window to open it.
- Trim to just the pages you're adapting first. Open Organize Pages in the left sidebar and delete the thumbnails you don't need, or select the one-to-few pages you want and use Extract to pull them into a fresh working file. Reorder the scenes here too if the story doesn't run in stage order — just drag the page thumbnails into the sequence you want. Now you're working on a lean file of only the pages that matter.
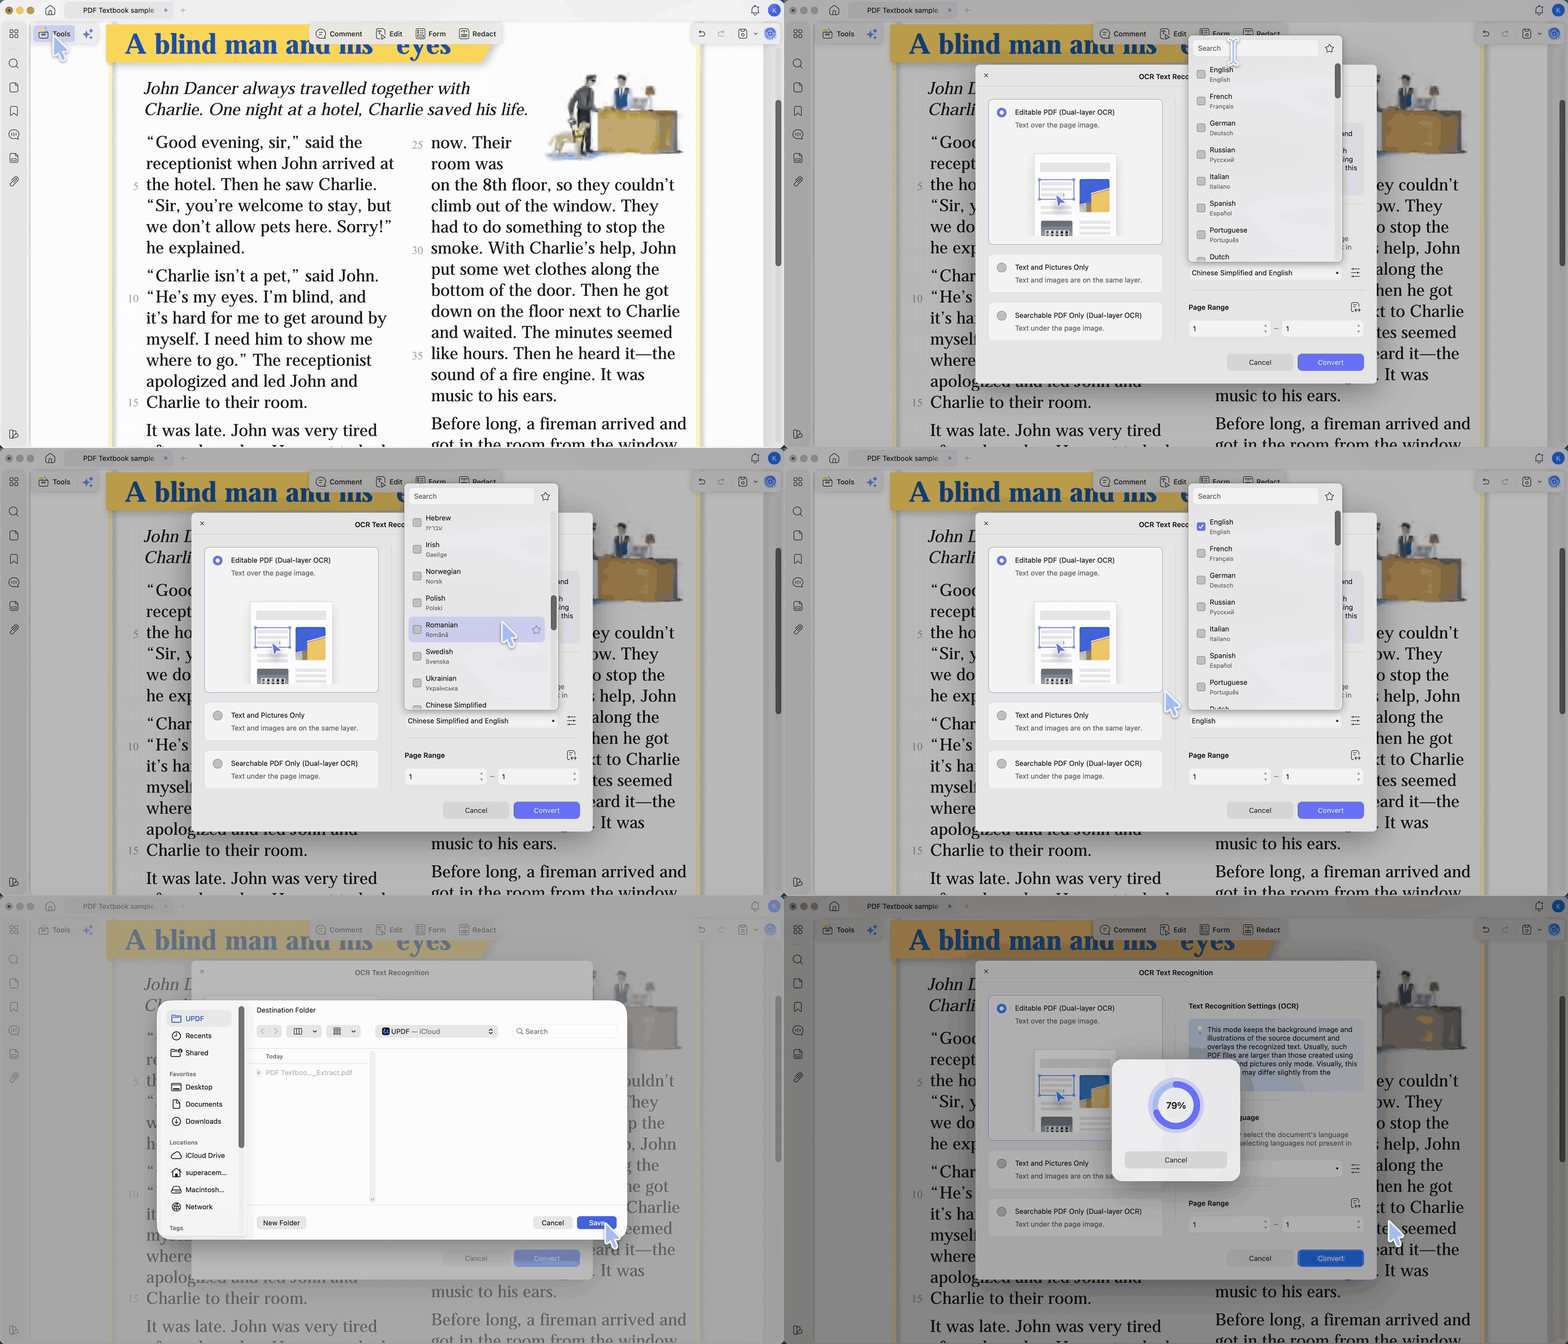
- Then OCR, if the pages are scans or won't let you select text. Go to Tools and choose OCR under the Edit PDF group. In the OCR Text Recognition panel, pick Editable PDF (Dual-layer OCR) — it lays selectable text over the original page image, so the file becomes copyable while still looking like the original. Set the source text's language under Document Language (it's multi-select, so for a bilingual reader you can tick more than one language for a single pass), then click Convert. Because you trimmed first, OCR only runs on the handful of pages you actually kept. UPDF's OCR covers 38+ languages and holds the original layout, which matters when your source has illustrations you want to keep.
The free tier includes 5 OCR uses — enough to try this on a chapter and see whether it fits your workflow. Free export works too; it just carries a trial watermark, which is perfectly fine for a "Draft v1" rehearsal copy. Pro removes both the OCR cap and the watermark when you're ready to distribute a clean copy.
Because OCR, extraction, and highlighting all run on iOS and Android, you can even do this stage on an iPad during a prep period.
To try this on your own file: download UPDF for free to OCR and extract your textbook page — installation is free, and Pro features are available when you need unlimited OCR or watermark-free export.
Windows • macOS • iOS • Android 100% secure
Part 4. Step 2: Map the Story — Color-Code the Speakers
Before writing a single line, you need to see the shape of the story: which sentences are narration, which are already dialogue, and who speaks how much. On paper, that's a printed copy, a fistful of highlighters, and a lot of flipping back and forth. Doing it inside the PDF is faster, and — this is the part that pays off later — it makes your color map machine-usable.
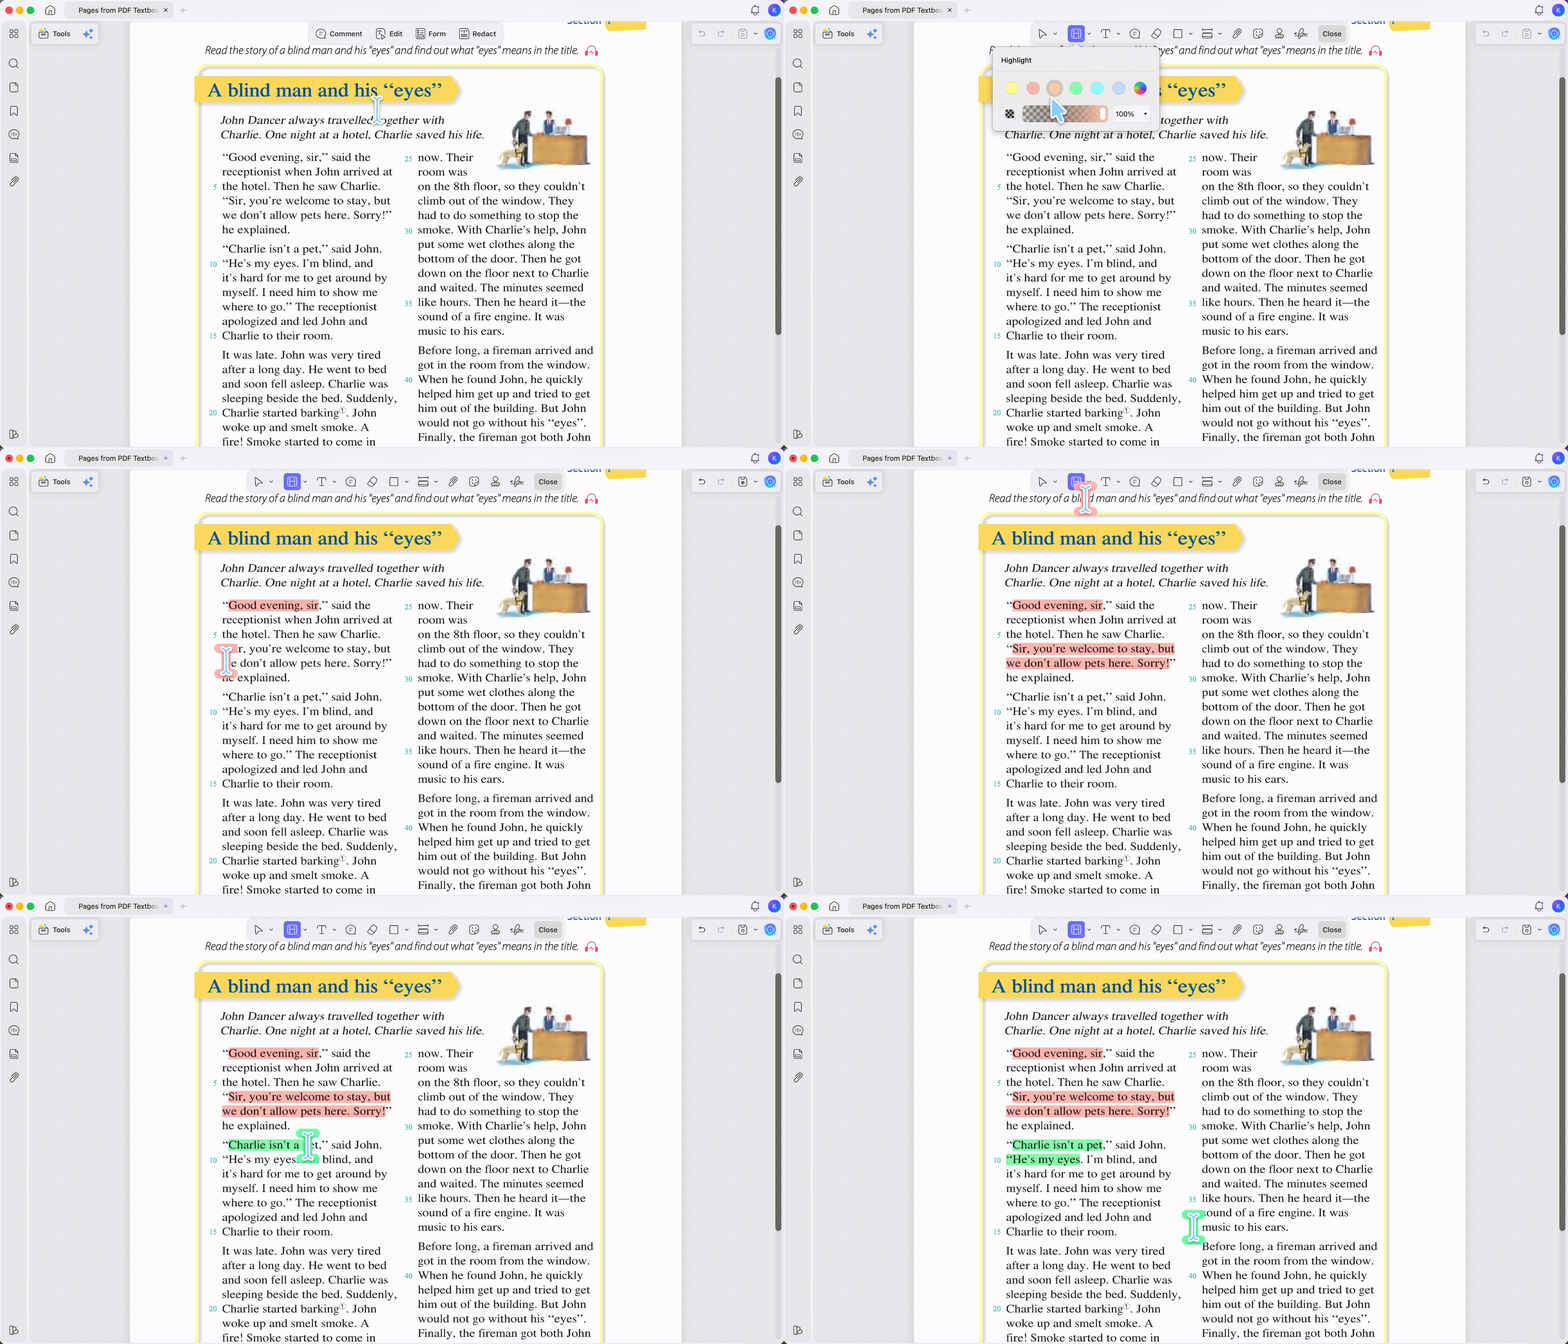
The system I use: click Comment in the top toolbar, pick the Highlight tool, choose a color, and drag across the lines you want to mark. Then:
- One highlight color per speaker. Yellow for the Narrator, green for Character A, pink for Character B, and so on — switch the highlight color between speakers. This mirrors the standard adaptation method, just done natively in the file.
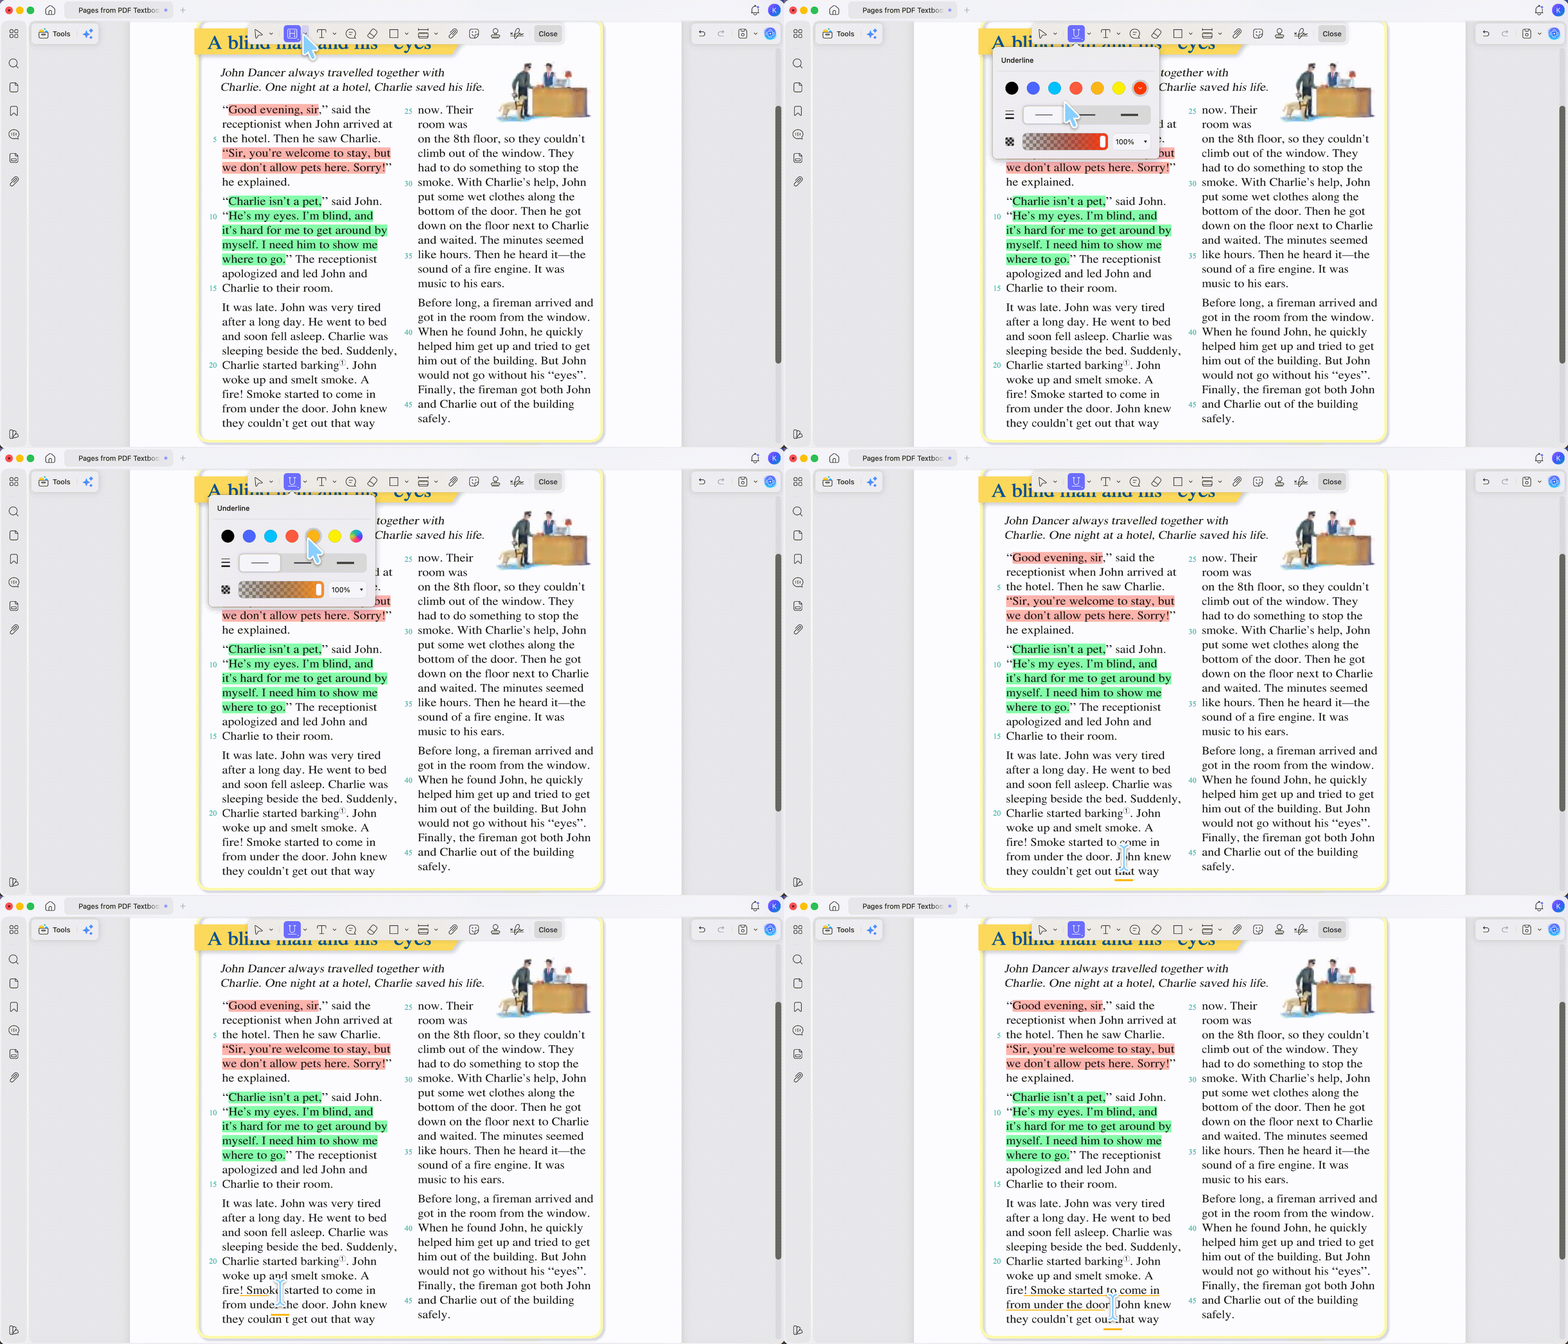
- Underline the action beats — using the Underline tool next to Highlight — for the sentences that will become stage directions rather than spoken lines.
The reason to highlight in the PDF instead of on paper is that UPDF keeps every highlight in a filterable Comment list, tagged by color and page. In Step 4, that lets you export each color separately — one character's lines at a time. Highlighting on paper gives you a pretty page; highlighting in the file gives you a database.
As you work through a longer story, you'll want to jump between scenes to compare them. Double-clicking a page thumbnail in Organize Pages drops you straight to that page in reading view — a fast way to hop to the scene you're looking for.
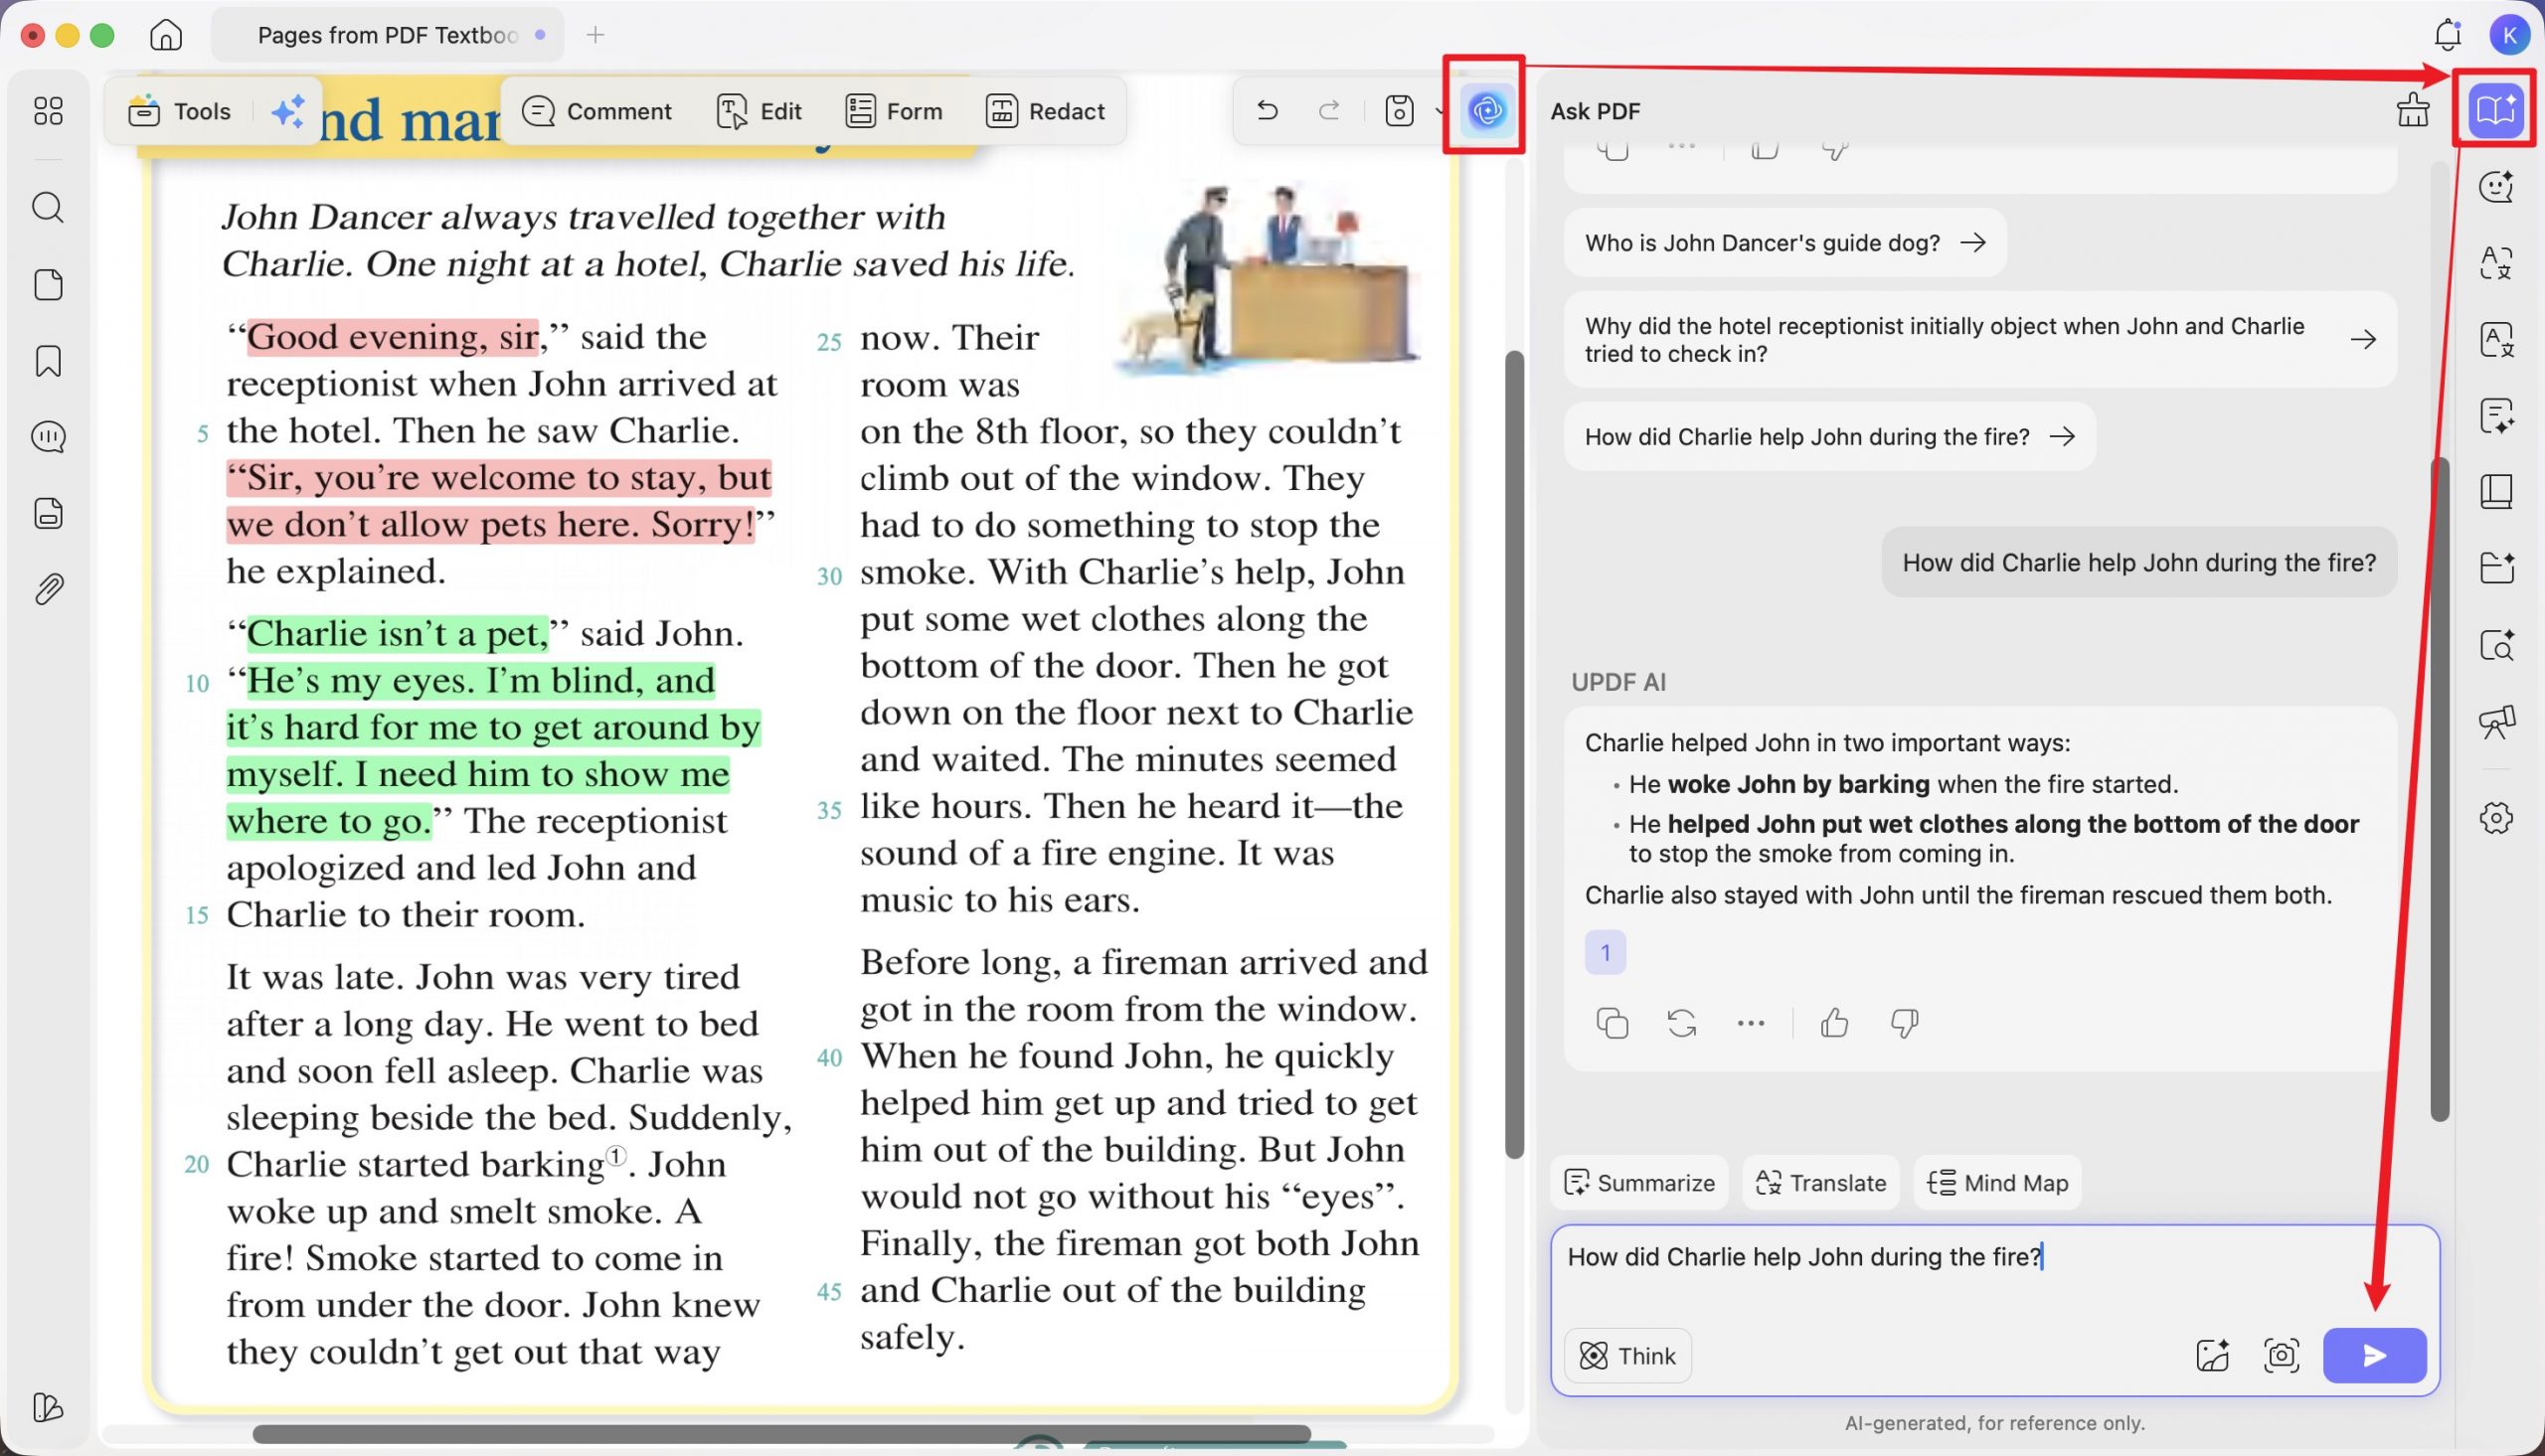
If you don't know the text well yet, click the UPDF AI button in the top-right corner, and on the Ask PDF tab ask it to read the file and answer questions about the story — the main conflict, the character list, which sections are dialogue-heavy. It's a quick way to scope the adaptation before you commit to a structure.
Narration vs. dialogue vs. stage direction — the distinction that drives your color code:
- Narration is what a narrator reads aloud to move the story along. In reader's theater it stays largely intact; give it its own color (I use yellow).
- Dialogue is the words a character actually speaks — one color per character.
- Stage direction is an instruction — an action, a tone, a sound effect — that's never spoken aloud. Underline these rather than highlighting them, so you don't confuse them with lines.
Part 5. Step 3: Draft the Script on Blank Pages
Now you've got a mapped source and a blank script, and you want to draft next to the original so you can keep glancing at the source as you go. In the page thumbnails on the left, right-click where you want a draft page and choose Insert Pages → Blank Page, so each draft page sits right beside the passage it adapts. No toggling between two files.
The fastest way to draft is to let AI produce a full first pass, then refine it line by line:
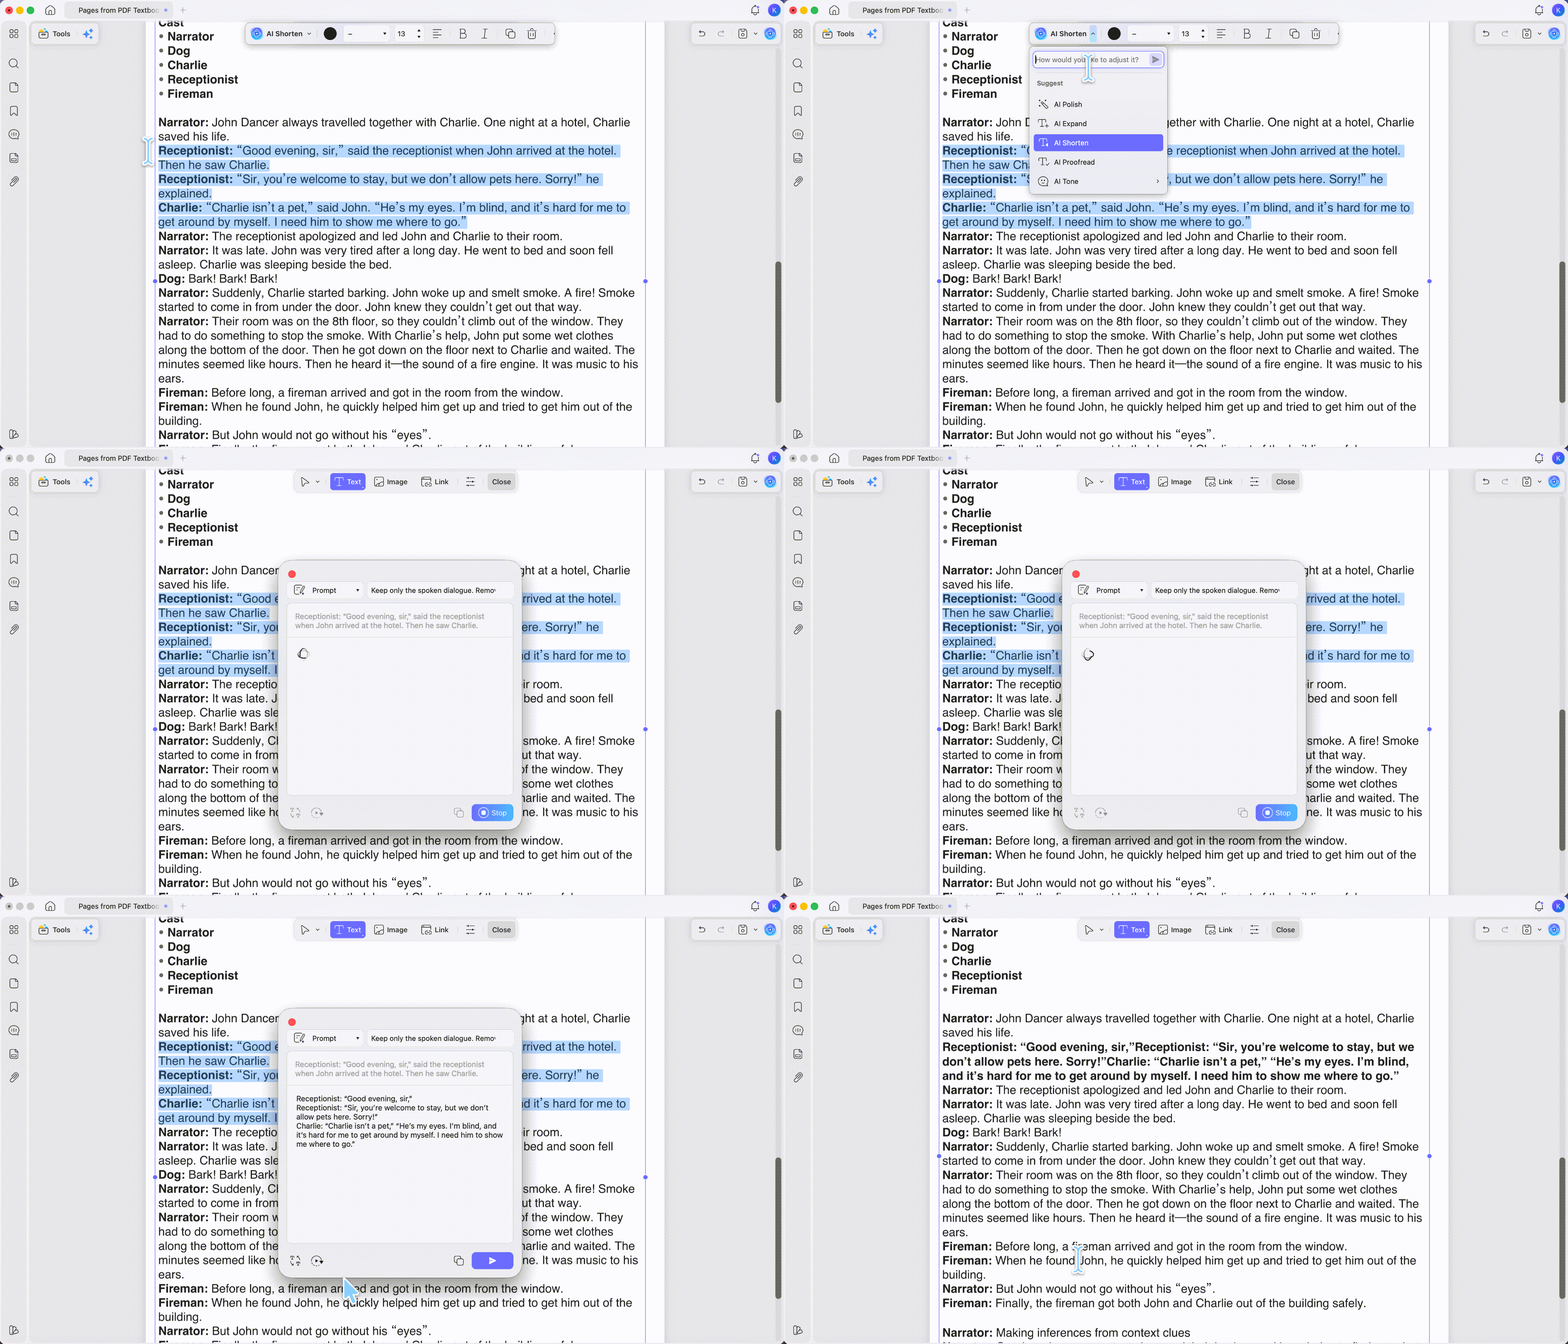
- Generate the whole first draft at once with UPDF AI. Click the UPDF AI button in the top-right corner and, on the Ask PDF tab, ask it to read the whole file and turn it into a script — for example, "Read this entire PDF and rewrite the story as a reader's-theater script for four speakers plus a narrator, with each line labeled by character." Because Ask PDF works from the full document, it drafts the complete script in one go. Treat what comes back as a rough skeleton, not a final draft. To place it on your blank page, go to Edit in the toolbar and use Text to paste the whole draft in.
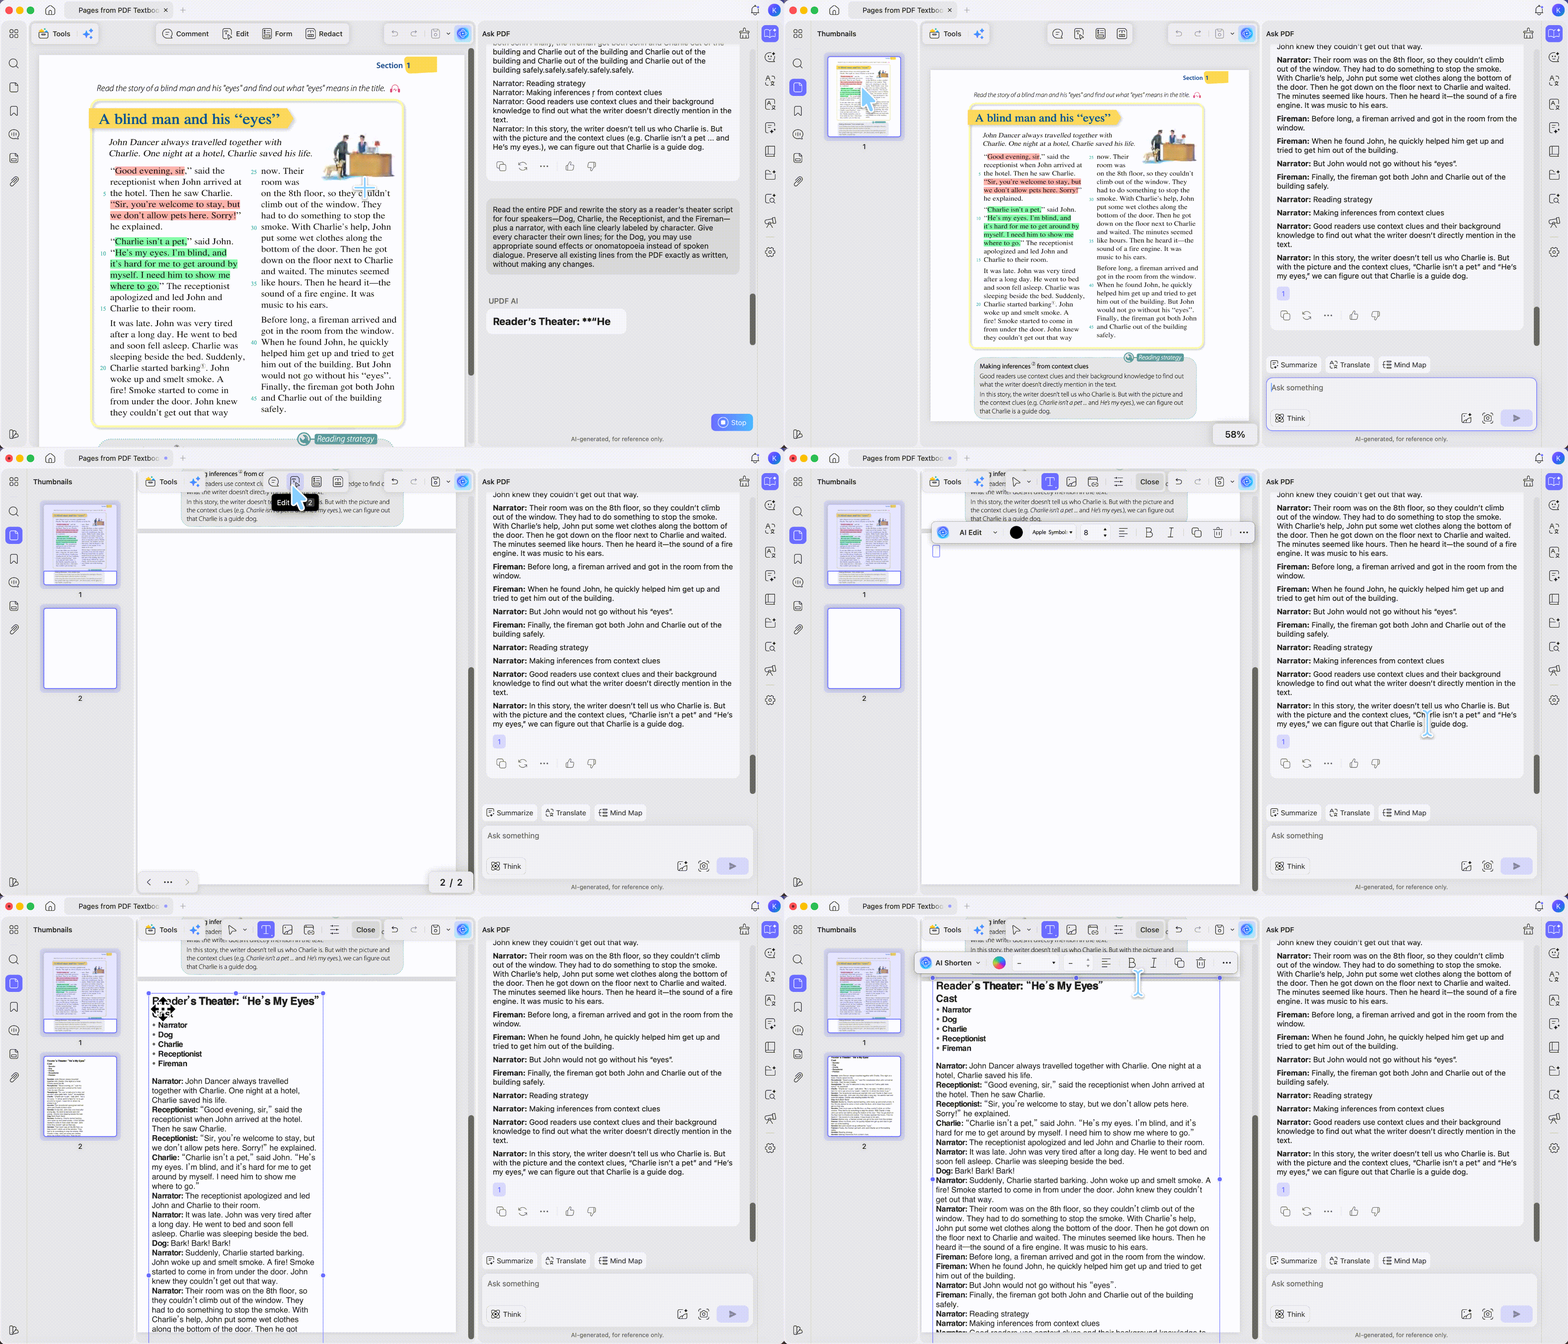
- Refine with the AI Editing Suite. With the draft on the page, click Edit in the top toolbar and select the line or paragraph you want to rework — the AI Edit floating toolbar appears above it. Open its dropdown and either pick a preset (AI Polish, AI Expand, AI Shorten, AI Proofread, AI Tone) or type a custom instruction like "make this line sound more urgent," then review the result and click Replace to drop it straight into the script. It works on the document's body text, so it's ideal for tightening lines, fixing a character name, or adjusting the reading level.
Windows • macOS • iOS • Android 100% secure
This is the fork from earlier. For a reader's theater script, this step is light — you're mostly keeping the original wording and splitting it across speakers. For a full play, it's heavier — you're converting narration into dialogue and writing stage directions from scratch.
Once the lines are drafted, format them to read like a real script.
Part 6. Step 4: Prep for Rehearsal — Per-Actor Lines and Pronunciation
This is the step the entire internet skips, and it's the one that saved me the most time. Pulling highlighted text back out of a PDF is something most tools make surprisingly hard — and it's exactly the wall teachers hit when they try to hand each student just their own lines.
Per-actor rehearsal sheets. Because each speaker already has a distinct highlight color from Step 2, you can pull one character's lines out cleanly:
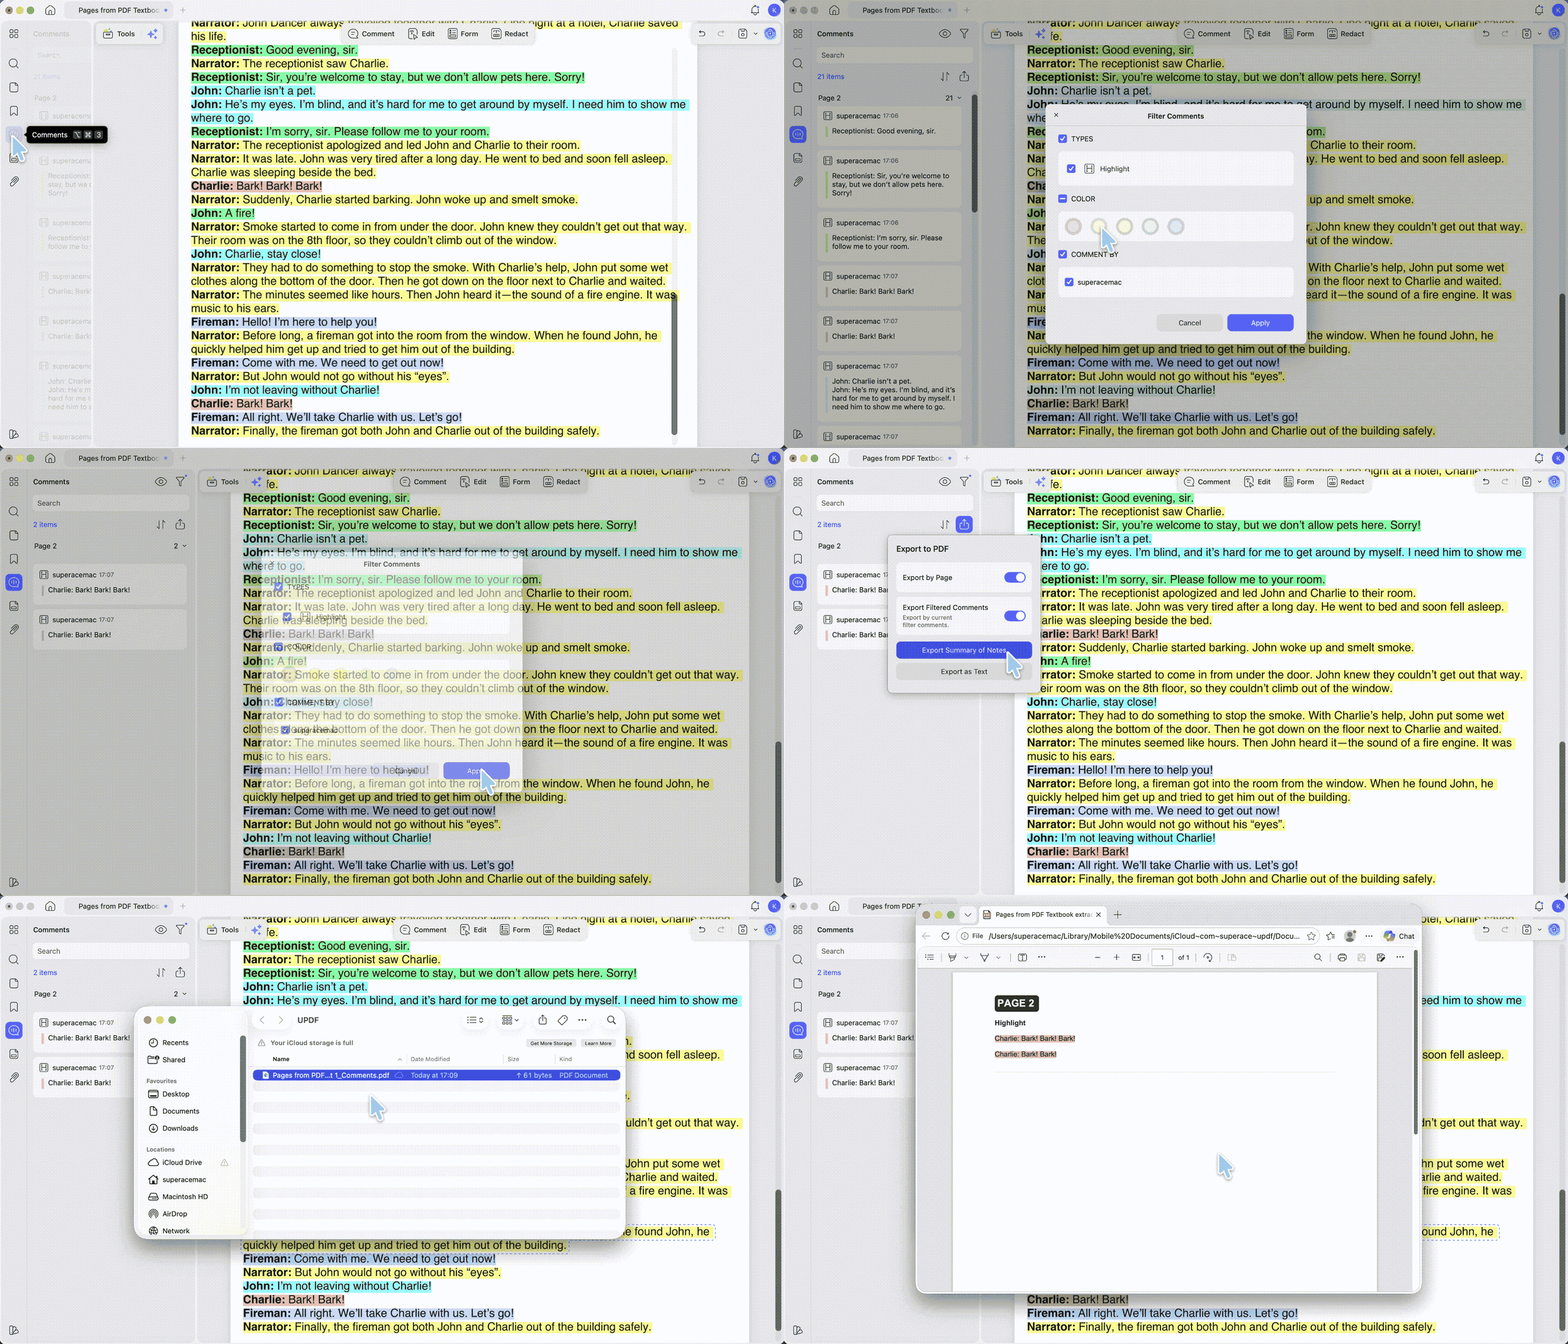
- Click Comment in the top toolbar to open the Comment list on the left. Every highlight appears there, tagged with its page number.
- Click the Filter icon and, under Color, select just one speaker's color (or filter by Type → Highlight to grab everything). Apply.
- Click the Export PDF icon. Turn on Export Filtered Comments to export only what the filter is showing, and Export by Page to keep page numbers attached.
- Choose Export Summary of Notes for a clean PDF that even keeps the original highlight color, or Export as Text for a plain list you can drop into a document.
Run it once per color and you've got a separate sheet for every student — Little Red gets only Little Red's lines, instead of hunting for her three lines across a six-page script. (For the full walkthrough, see how to extract highlighted text from a PDF.)
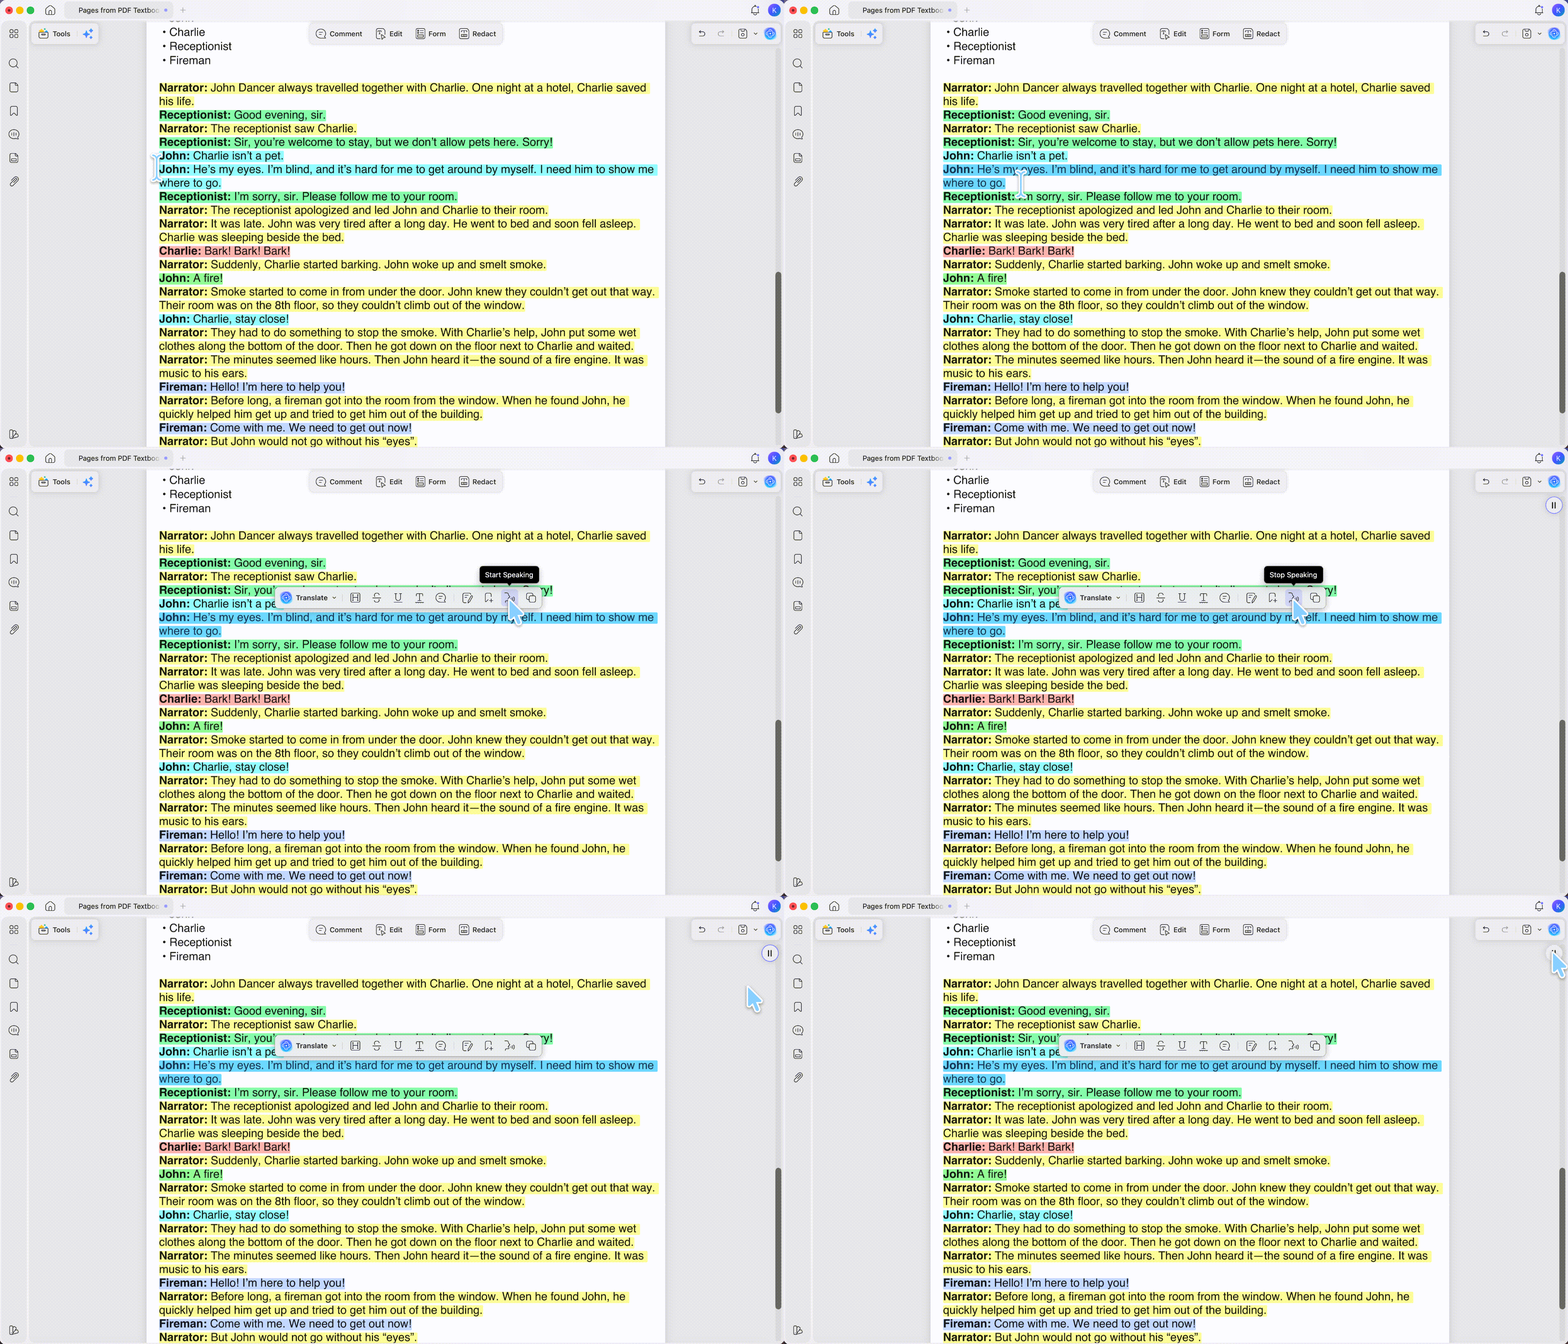
Pronunciation help for non-native English texts. If you're adapting a story in an ESL or EFL classroom, students can hear how a line is meant to sound before they perform it. UPDF's Read Aloud feature reads the script in a range of voices and accents and highlights each word as it goes, so a student can follow along. On Mac, select the text, right-click, and choose Start Speaking; on iPhone or iPad, long-press the text and tap Listen Here. UPDF positions this as a pronunciation aid for exactly this kind of language-learning use — it's a listening tool, not a coaching one, but for a child sounding out an unfamiliar line it does the job.
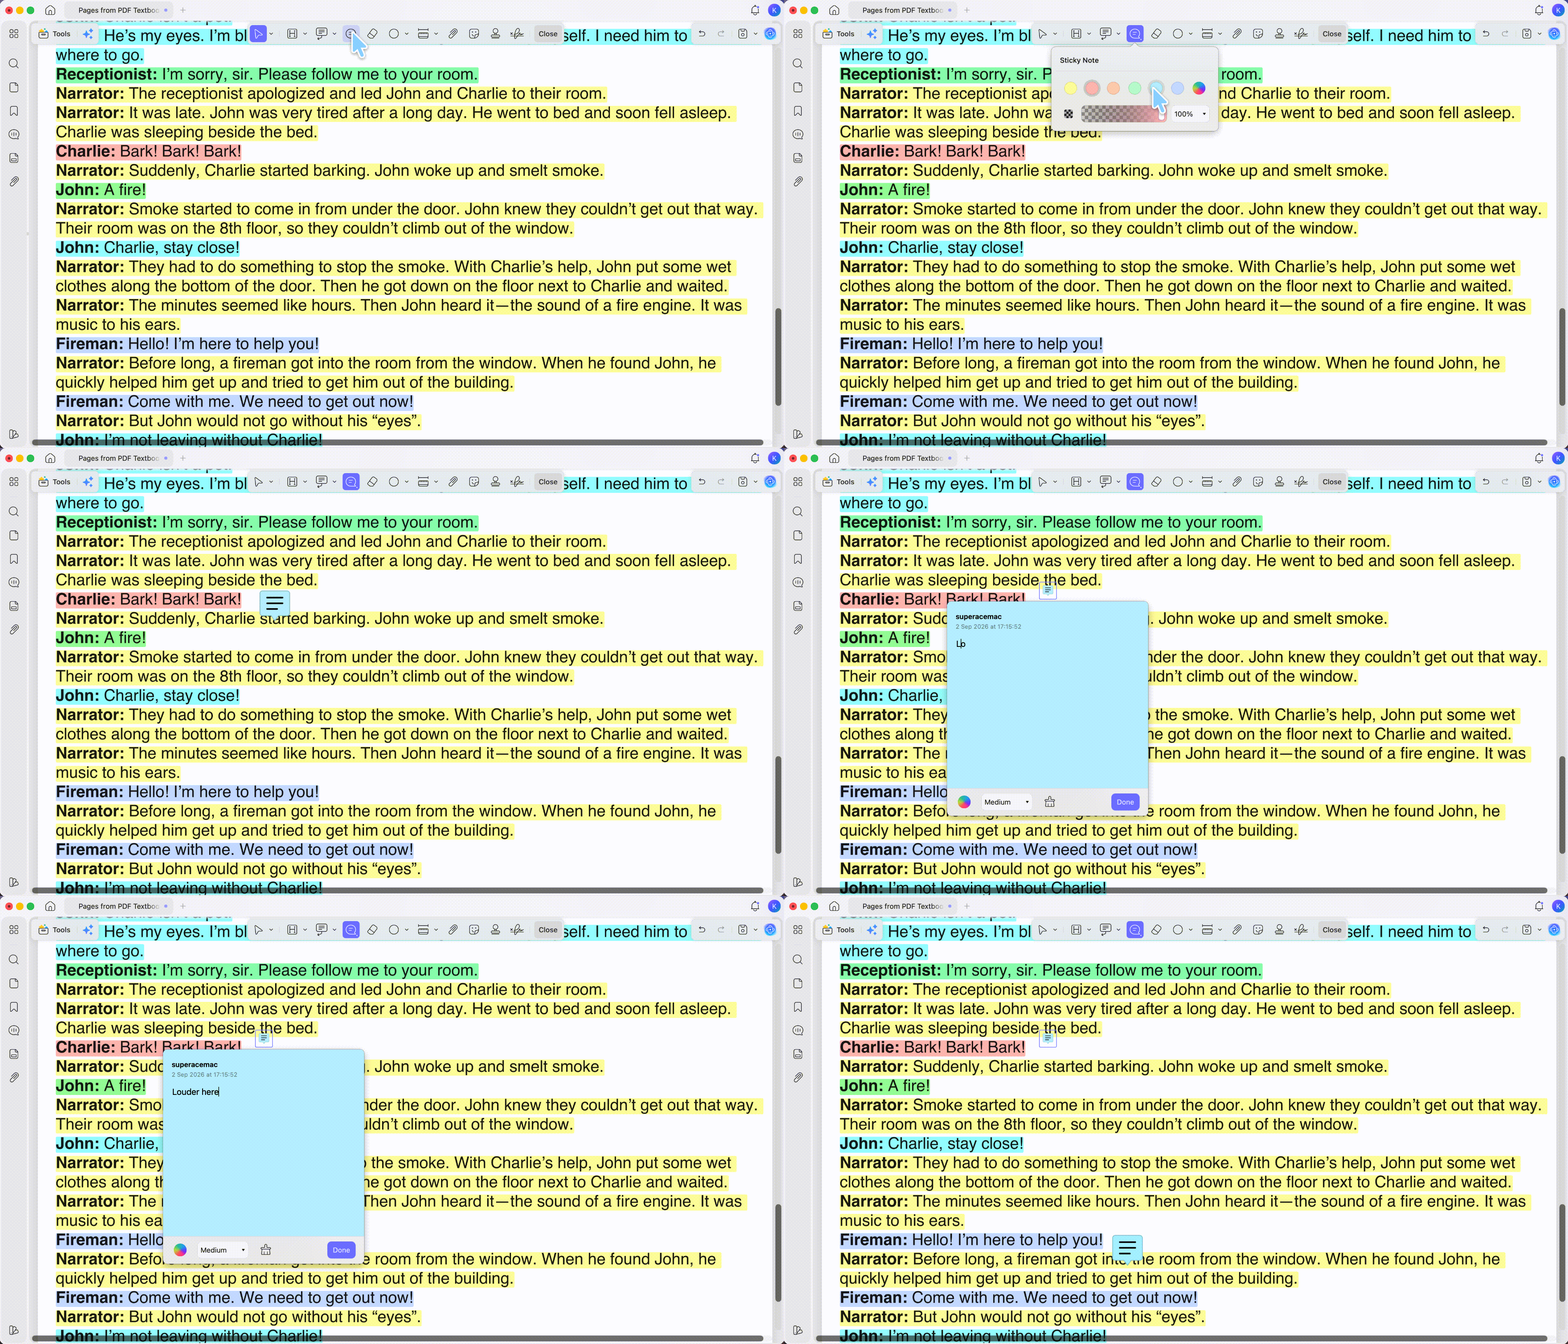
Live markup during table reads. During the table read, annotate the script in real time — circle a line to cut, type "louder here," add a sticky note — with every revision staying visible so nothing gets lost between rehearsals.
Windows • macOS • iOS • Android 100% secure
Part 7. Step 5: Finalize and Distribute
The script's written; now the whole cast and crew need a copy they can navigate, and it should look like a real script rather than a Word file.
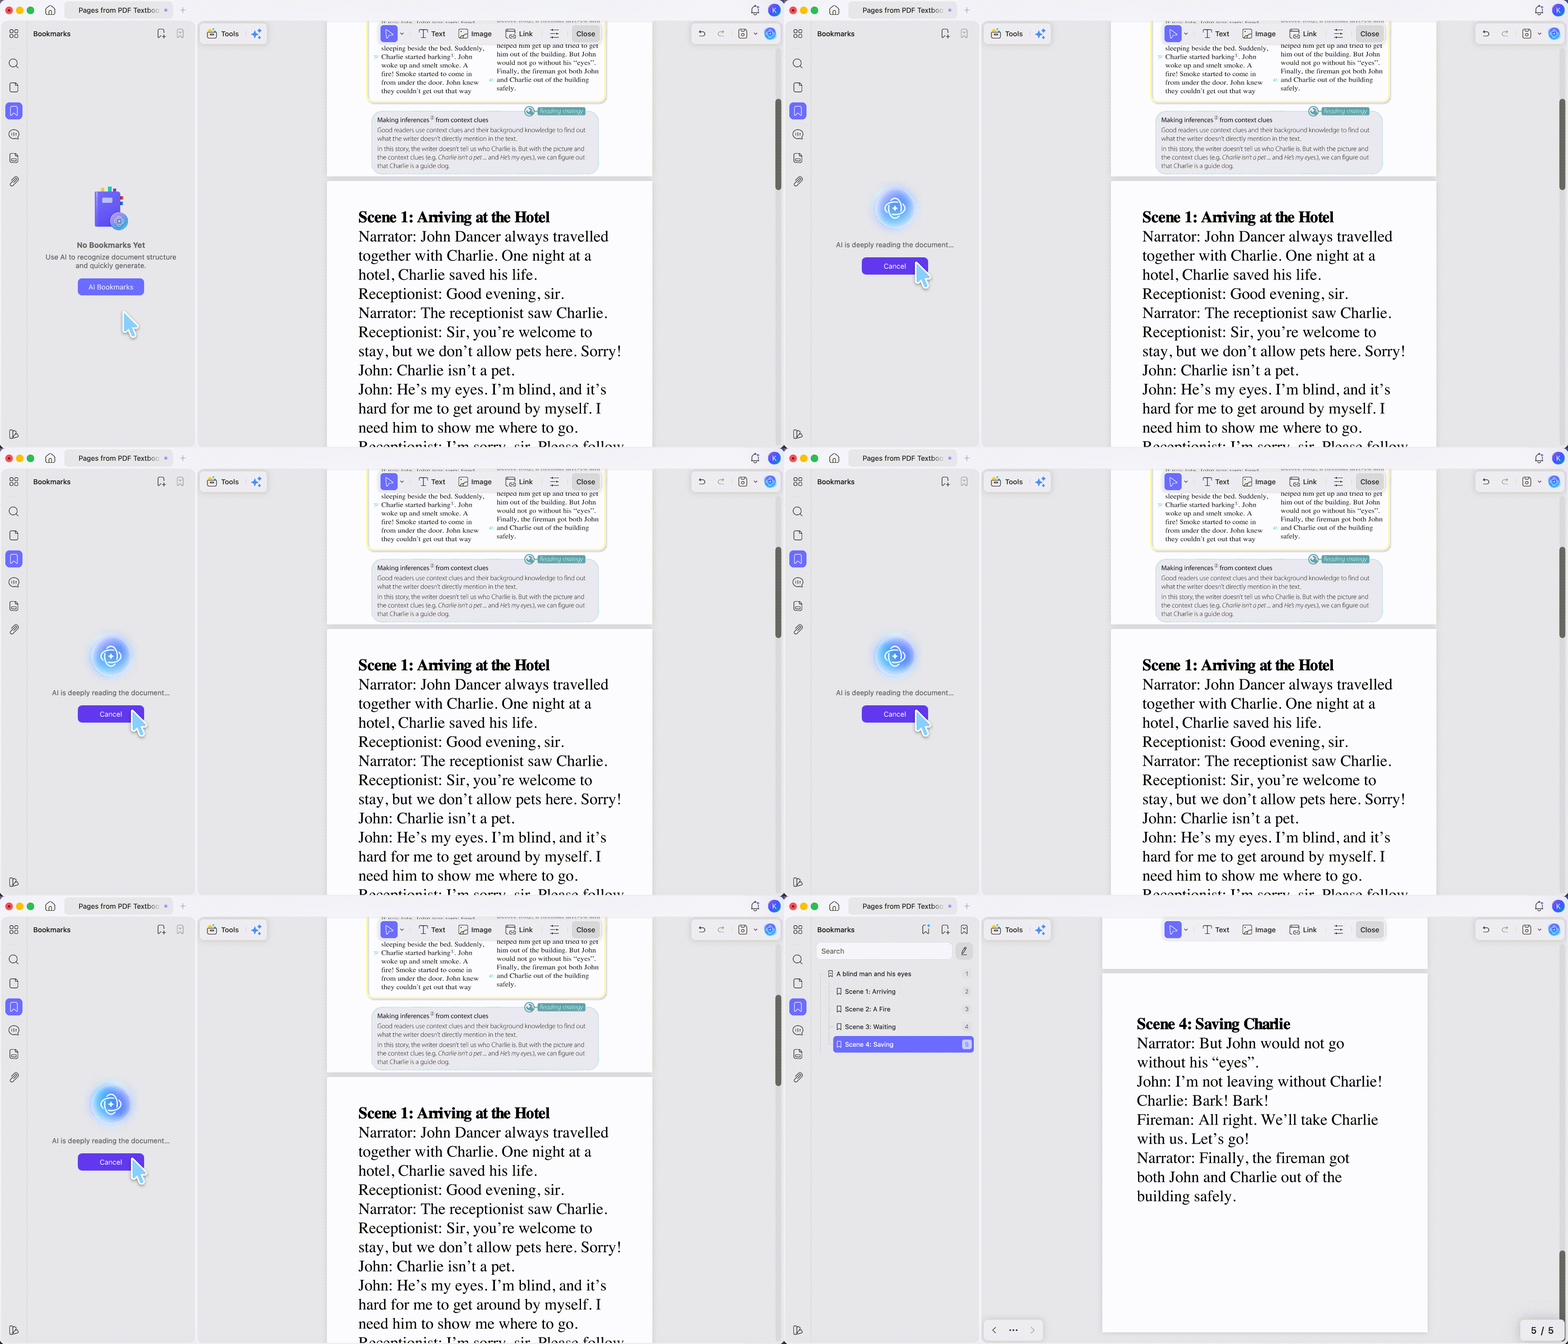
Bookmarks for scene navigation. In the Bookmarks panel on the left sidebar, add an entry for each act or scene so anyone can click straight to "Scene 1 (Forest)." For a long script, you can use the AI Bookmark Generator to draft the outline for you instead of building it entry by entry, then use + to rename or adjust the entries so they match your scenes. For a short script, adding them by hand takes a minute.
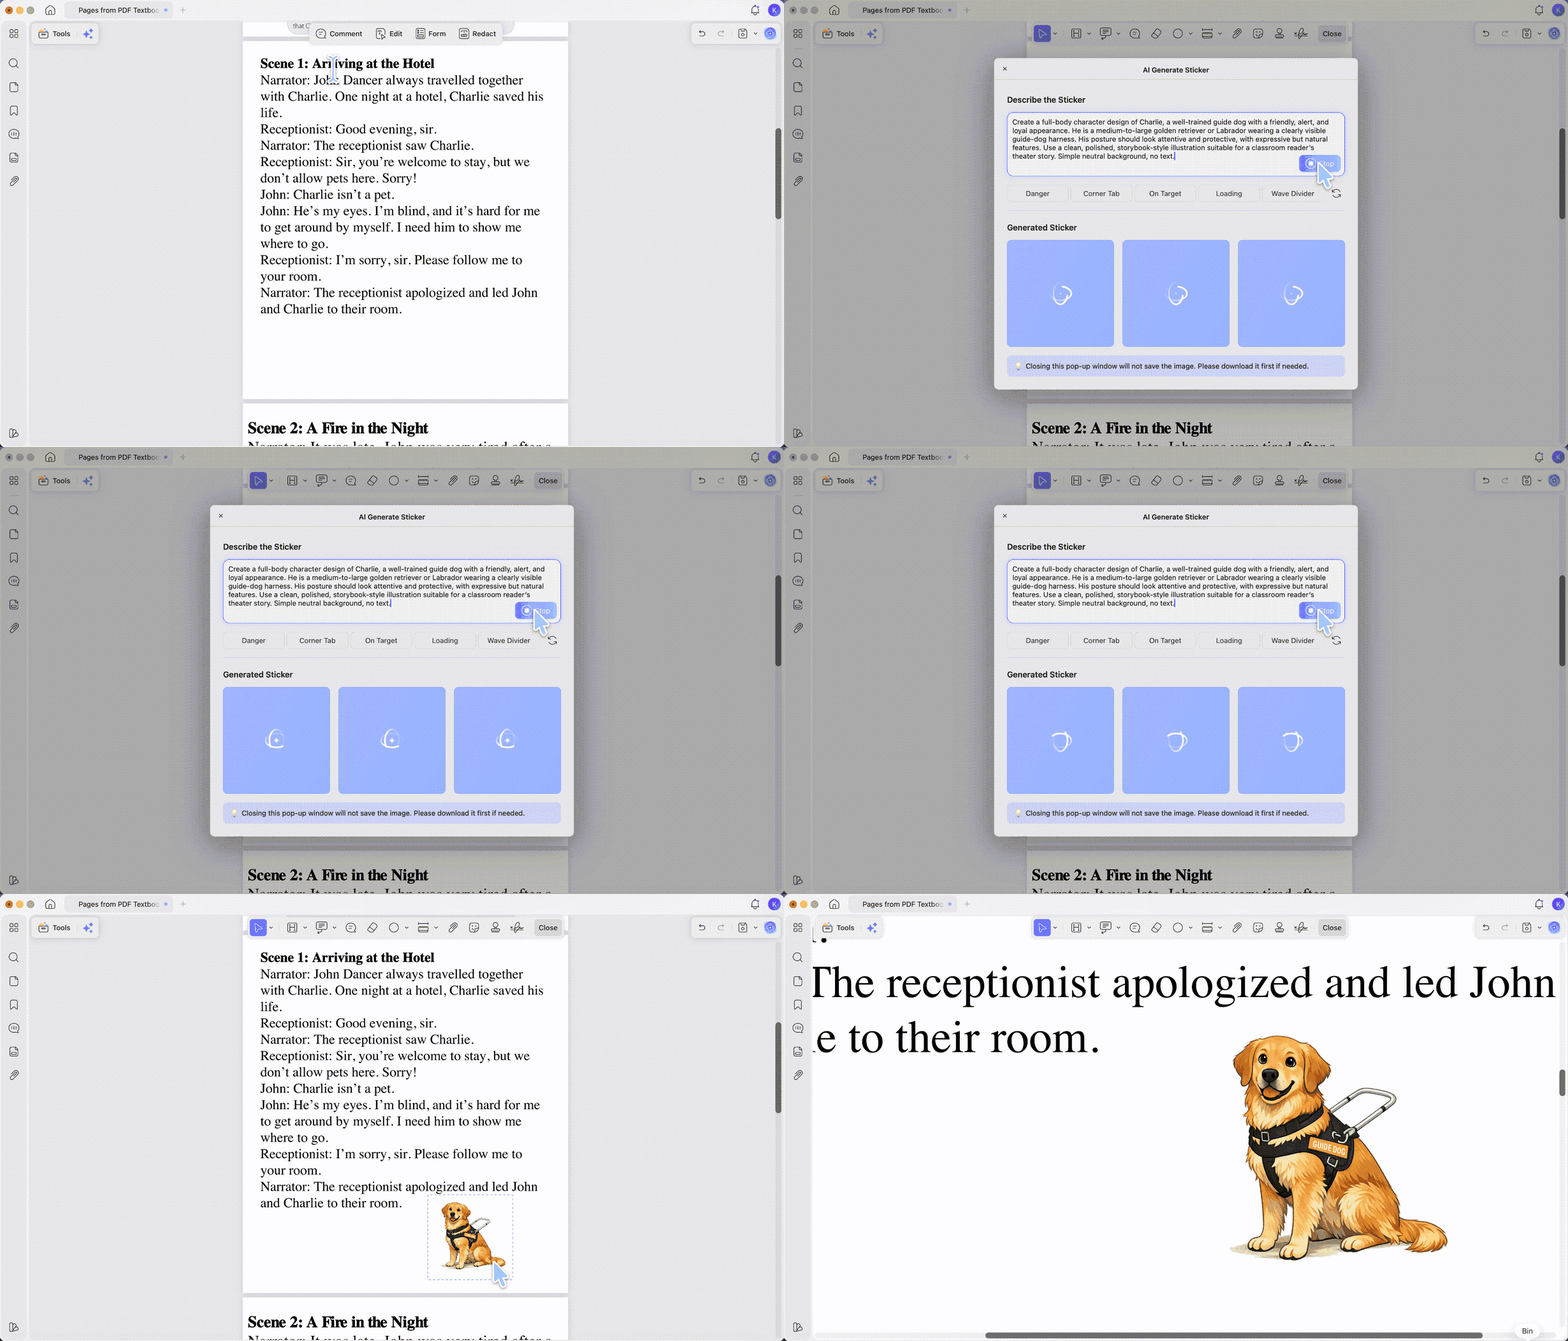
Personalize the script. Since you're producing a creative document, a couple of the AI visual tools earn their place here. Both are reached from the AI Agents area — open the agent, type a text prompt describing what you want, generate, and add the result to your page with the Edit tool:
- AI Sticker Maker — generate character-design or costume references to sit beside the Cast of Characters page, so students can picture who they're playing. Instead of hunting for clip art, I typed prompts and had options in seconds. (AI Sticker Maker.)
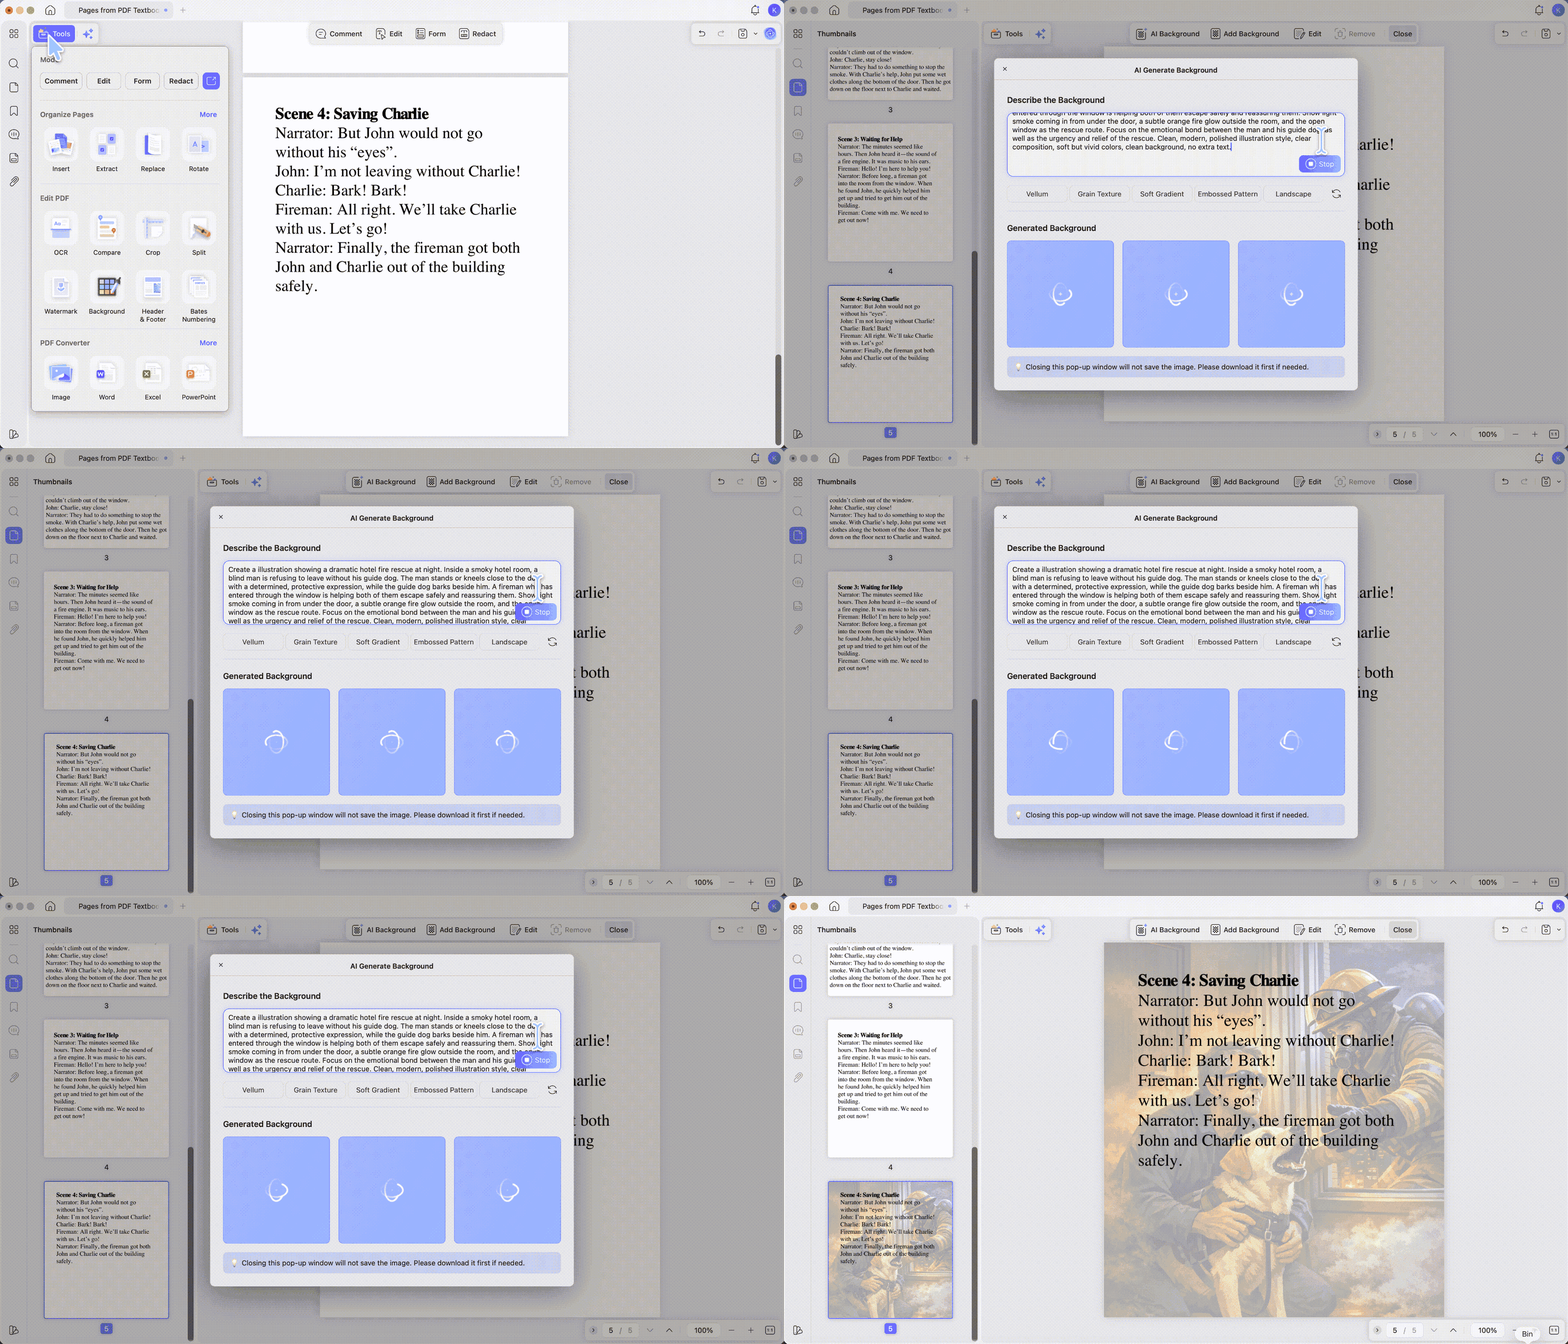
- AI Background Generator — type a prompt like "a dark forest at dusk" to generate a set or scene backdrop reference, then drop it onto the title page or a scene divider. (AI Background Generator.)
Both are for reference and decoration on the script itself, not for producing an actual stage set.
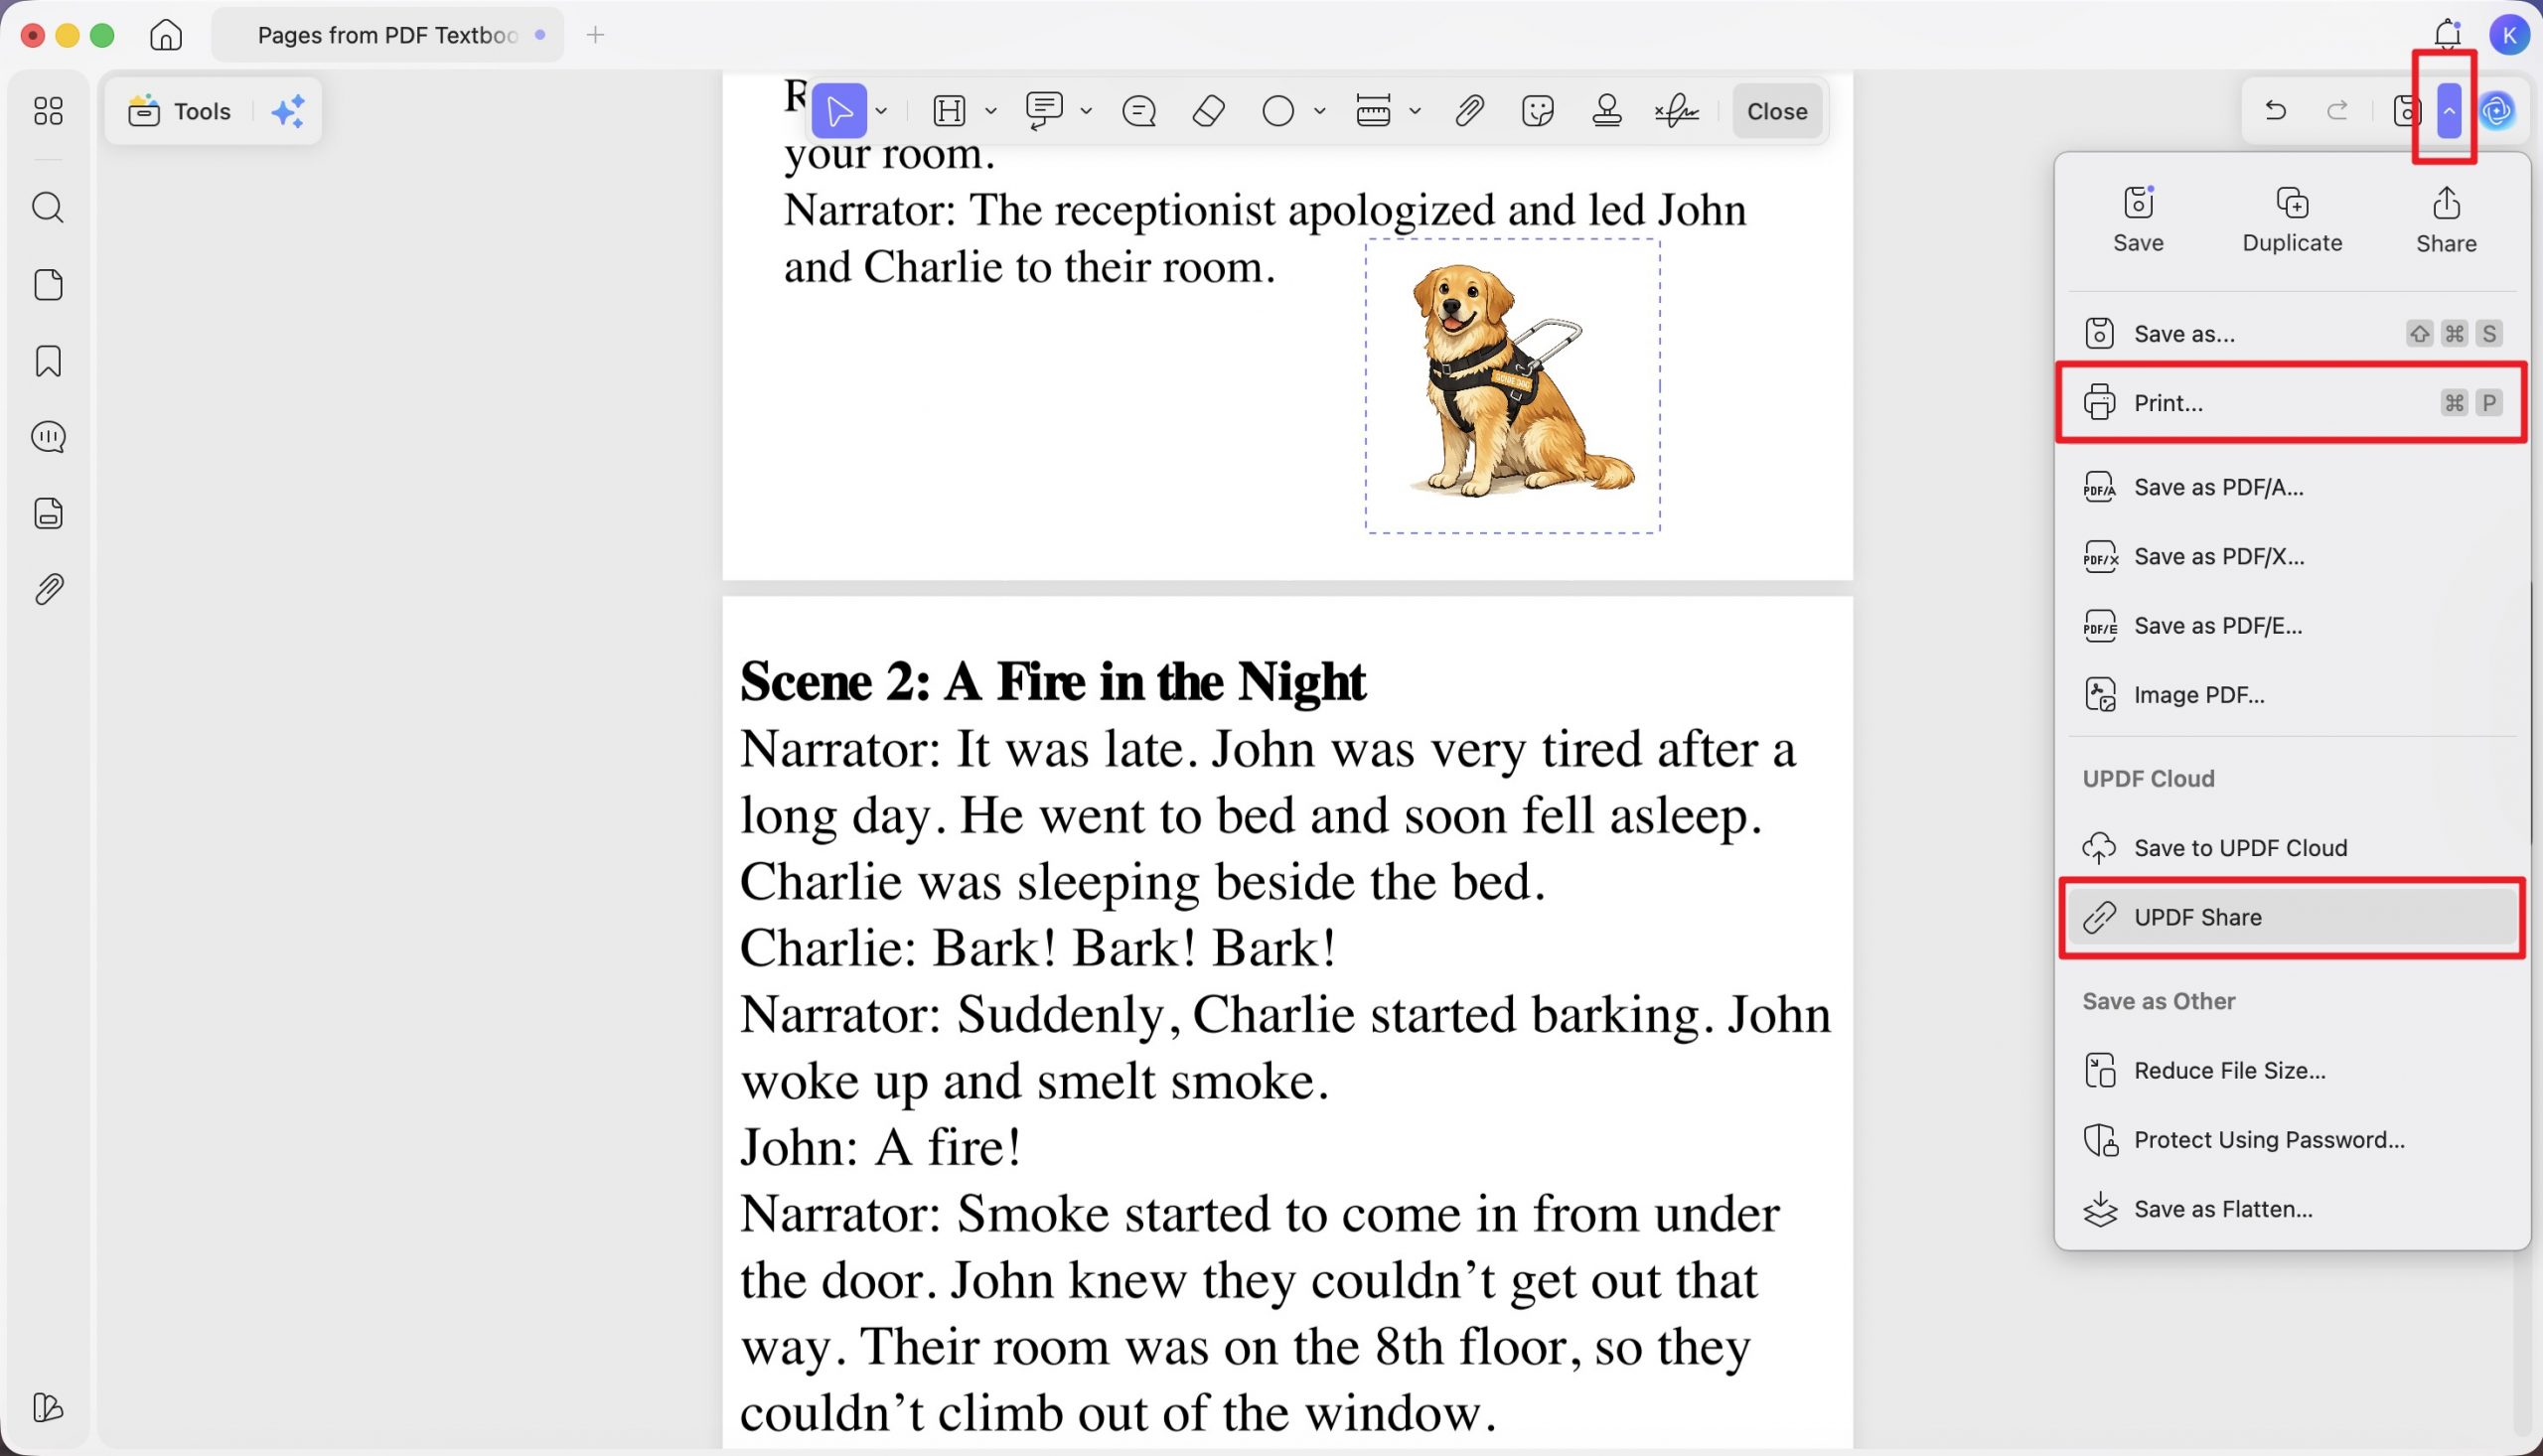
Export and hand it out. Export a fixed, print-ready PDF. Free export adds a trial watermark, which is fine for a "Draft v1" rehearsal copy; Pro removes it for the clean performance copy. If you want to fold in a Word or PowerPoint resource — a warm-up handout, say — drag that file directly onto the UPDF desktop app and it converts to PDF automatically, no menu needed. Then share the final via a link (which uploads to UPDF Cloud) or print it for the class.
Windows • macOS • iOS • Android 100% secure
Part 8. Edge Cases: When the Standard Steps Break
"OCR turned my scanned poem into gibberish." Low-contrast scans and decorative fonts trip up OCR. Rescan cleaner, or make sure you set the right language(s) under Document Language before you run it. For a short passage, retyping a few broken lines by hand can be faster than fighting the recognition.
"My chapter is longer than 300 pages." UPDF caps single-file OCR at 300 pages. If a source runs past that, split it into parts, OCR each part, then merge them back together. (For anything shorter, trimming to just the pages you need in Step 1 already keeps you well under the cap.)
"UPDF won't export the highlights I made." Highlight export only works on highlights added in a PDF editor. A photo of a page you marked with a real highlighter has no annotation layer to pull from — re-highlight the passage in UPDF.
"Read Aloud won't start." A restricted or password-protected PDF can block reading aloud, and Read Aloud needs a real text layer — so OCR a scanned file first. Only use this on files you have the right to open and edit.
Part 9. FAQs
1. What's the easiest kind of story to turn into a script for beginners?
Folk tales and fables. They come with heavy dialogue, a small cast, and a plot students already know — The Three Billy Goats Gruff, Little Red Riding Hood, The Little Red Hen. That combination adapts cleanly with the least rewriting, which is why experienced teachers reach for them first.
2. How many speaking parts should a classroom script have?
Enough for every student. The practical trick is to lean on shared narration — split the narrator role across several readers — and to break up any long speech so no one is left reading paragraphs while everyone else waits. Balanced parts keep the whole class engaged and the rehearsal fair.
3. Do I need permission to adapt a published story into a script?
For classroom-only use it's often allowed, but check first. Classroom performance and public or ticketed performance are treated differently, and the rules vary by country and publisher. Public-domain texts — old folk tales and classics — are the safest, and openly licensed educational texts usually spell out what's permitted. For an in-copyright book, look at the publisher's classroom-use terms before you perform it beyond your own room.
Conclusion
A script for a story isn't written from a blank page — it's built out of the source text, and the document work is most of the job. Get the words out of the PDF, color-code who says what, draft on blank pages beside the original, split the lines out for each actor, and ship a bookmarked final the whole class can navigate. Decide up front whether you're making a reader's theater script or a full play, and the rest of the workflow falls into place.
Ready to build your first one? Download UPDF for free to turn a story into a script on your own file — it's free to install, and Pro unlocks unlimited OCR and watermark-free export when you're ready for the class.
Windows • macOS • iOS • Android 100% secure





 Enid Brown
