 UPDF
 UPDF for Windows
 UPDF for Mac
 UPDF for iPhone/iPad
 UPDF for Android
 Nomostar
 UPDF AI Online
 UPDF Sign
 IvyCraft
 Edit PDF
 Annotate PDF
 Create PDF
 PDF Form
 Edit links
 Convert PDF
 OCR
 PDF to Word
 PDF to Image
 PDF to Excel
 Organize PDF
 Merge PDF
 Split PDF
 Crop PDF
 Rotate PDF
 Protect PDF
 Sign PDF
 Redact PDF
 Sanitize PDF
 Remove Security
 Read PDF
 UPDF Cloud
 Compress PDF
 Print PDF
 Batch Process

 About UPDF AI
 UPDF AI Solutions
 AI User Guide
 FAQ about UPDF AI
 Summarize PDF
 Translate PDF
 Chat with PDF
 Chat with AI
 Chat with image
 PDF to Mind Map
 Explain PDF
 PDF AI Tools
 Image AI Tools
 AI Chat Tools
 AI Writing Tools
 AI Study Tools
 AI Working Tools
 Other AI Tools
 AI Bookmark Generation
 AI Bookmark Summary
 AI Watermark Generation
 AI Background Generation
 AI Sticker Generation
 AI Stamp Generation
 AI Editing Suite
 UPDF Copilot
 AI Page Management
 AI Semantic Search
 PDF to Word
 PDF to Excel
 PDF to PowerPoint
 Enterprise Solution
 Enterprise Sign
 Enterprise AI
 Enterprise Plan
 Enterprise User Guide
 Enterprise Webinar
 IT
 Education
 Construction
 Financial Service
 Healthcare
 Insurance
 Legal
 Manufacturing
 Government
 Researchers & PhDs
 Solopreneurs & Freelancers
 Lawyers & Legal Professionals
 Real Estate Agents & Brokers
 Education Solution
 Customer Stories
 User Guide
 UPDF Tricks
 FAQs
 UPDF Reviews
 Download Center
 Blog
 Newsroom
 Tech Spec
 Updates
 UPDF vs. Adobe Acrobat
 UPDF vs. Foxit
 UPDF vs. PDF Expert


Quick Answer:
Creating a PDF can mean starting with an empty page, exporting a document you have already written, or collecting several files into one deliverable. These tasks need different starting points.
macOS includes PDF-saving tools. UPDF is useful when you need blank-page editing or repeated batch creation. Start with the source you have and the output you need.
Part 1. Choose How to Create Your PDF
| What you have | Recommended route | Intended result |
|---|---|---|
| No source file | UPDF blank PDF | A new PDF you can add content to |
| A document open in an app with Print | macOS Print to PDF | The printable document layout |
| Supported images or PDFs in Finder | Quick Actions > Create PDF | One combined PDF |
| A Word, Excel, or PowerPoint file | Source-app PDF export or UPDF creation | A PDF copy of the document |
| Several supported source files | UPDF Batch Create | Separate PDFs or one combined PDF |
Choose the route first; check layout, page order, and file count afterward. The following instructions cover Mac desktop workflows.
Part 2. Create a Blank PDF with UPDF

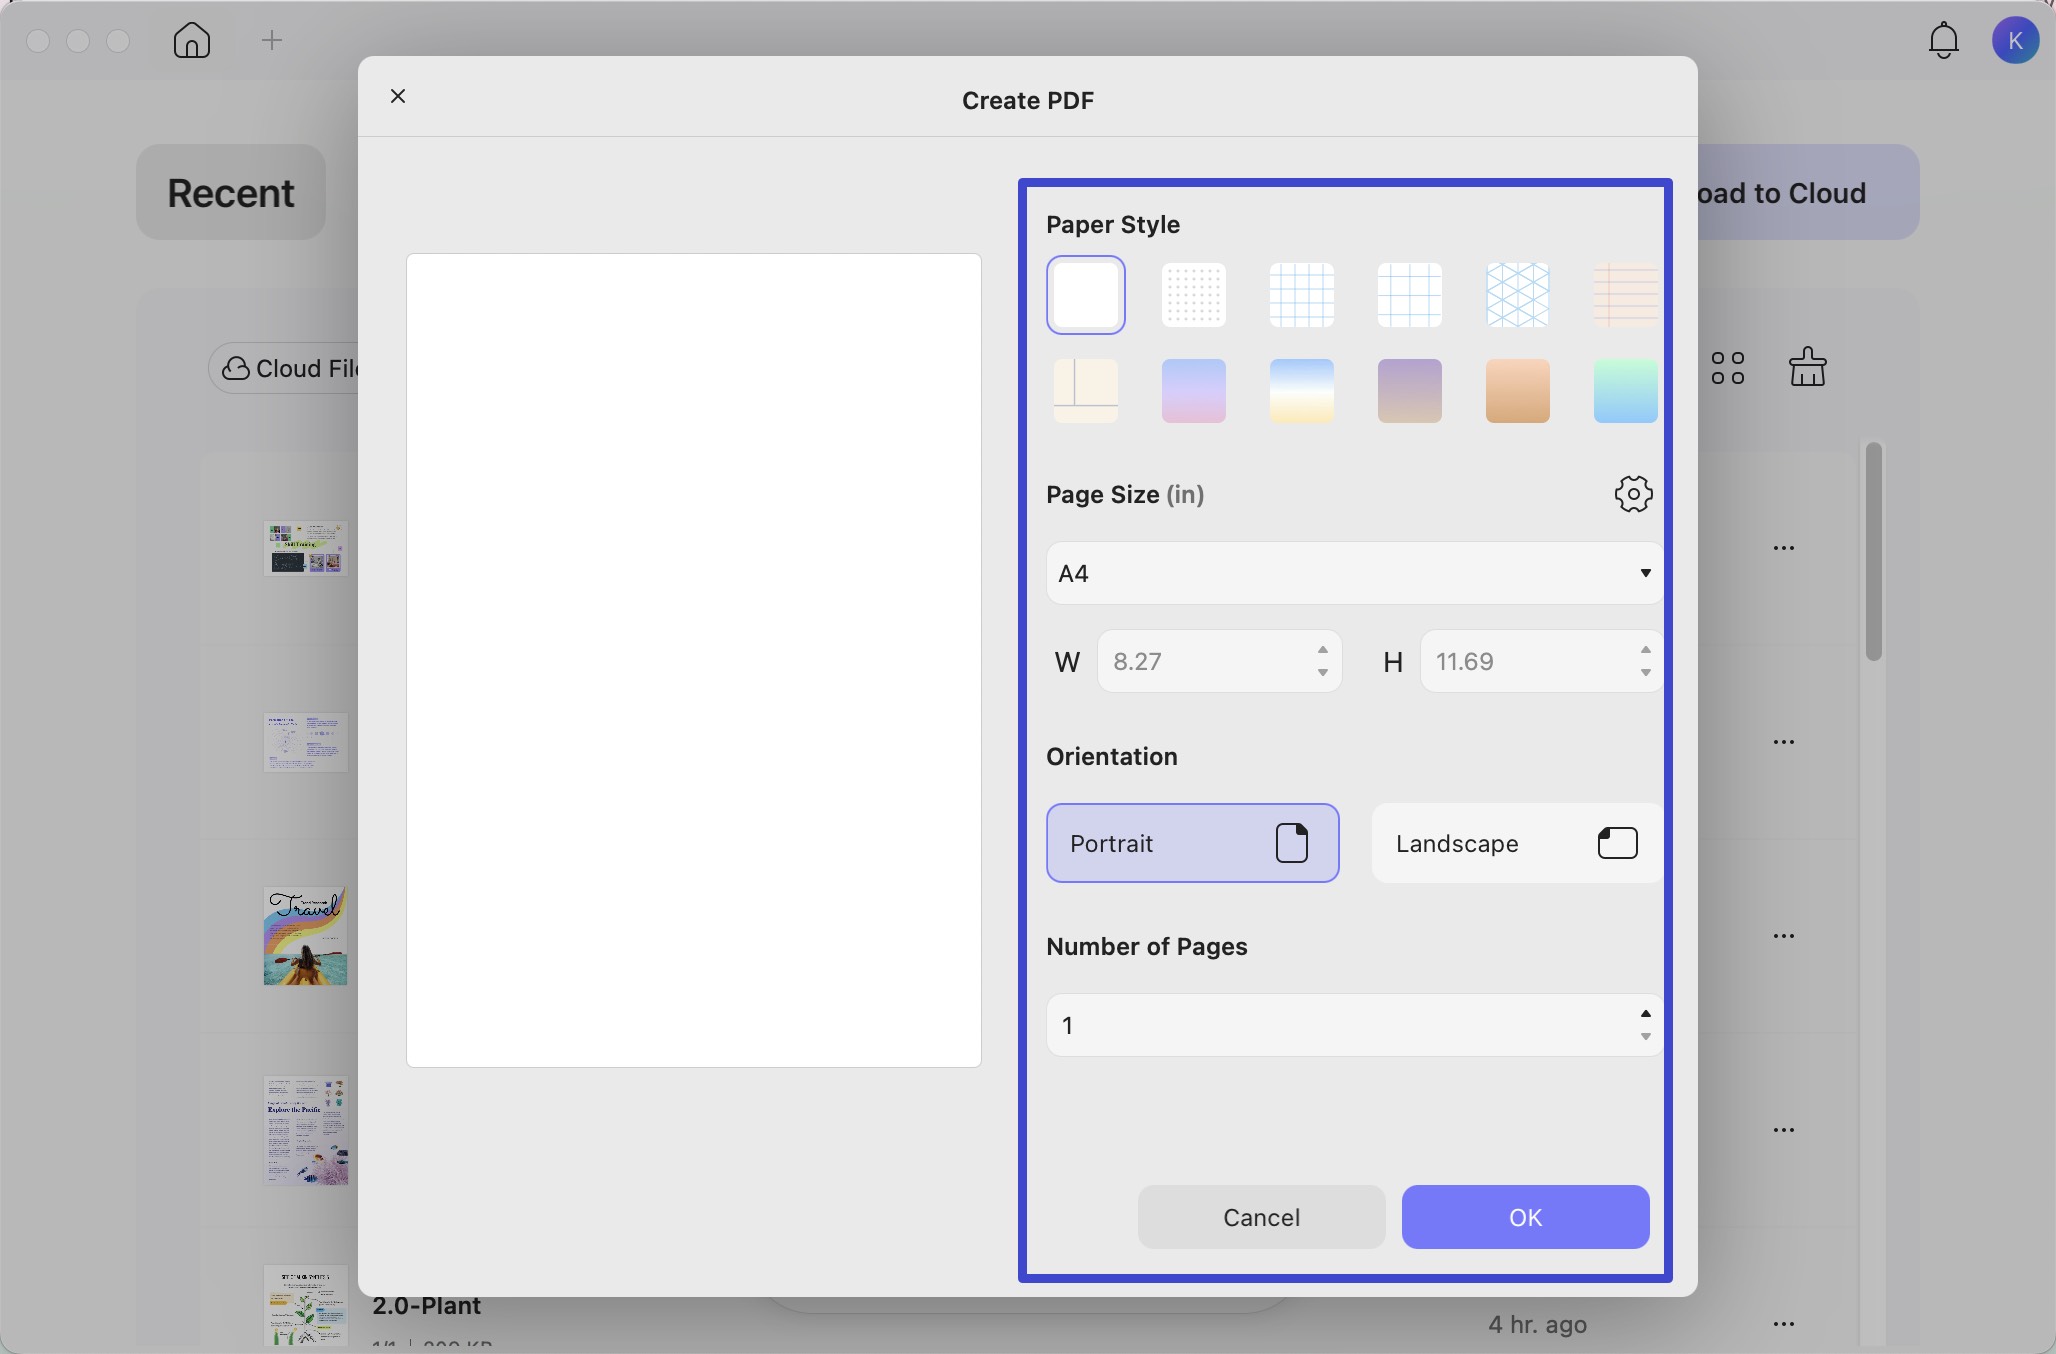
- Open UPDF and choose Tools > Blank.
- Set the page count, size, orientation, and paper style, then confirm.
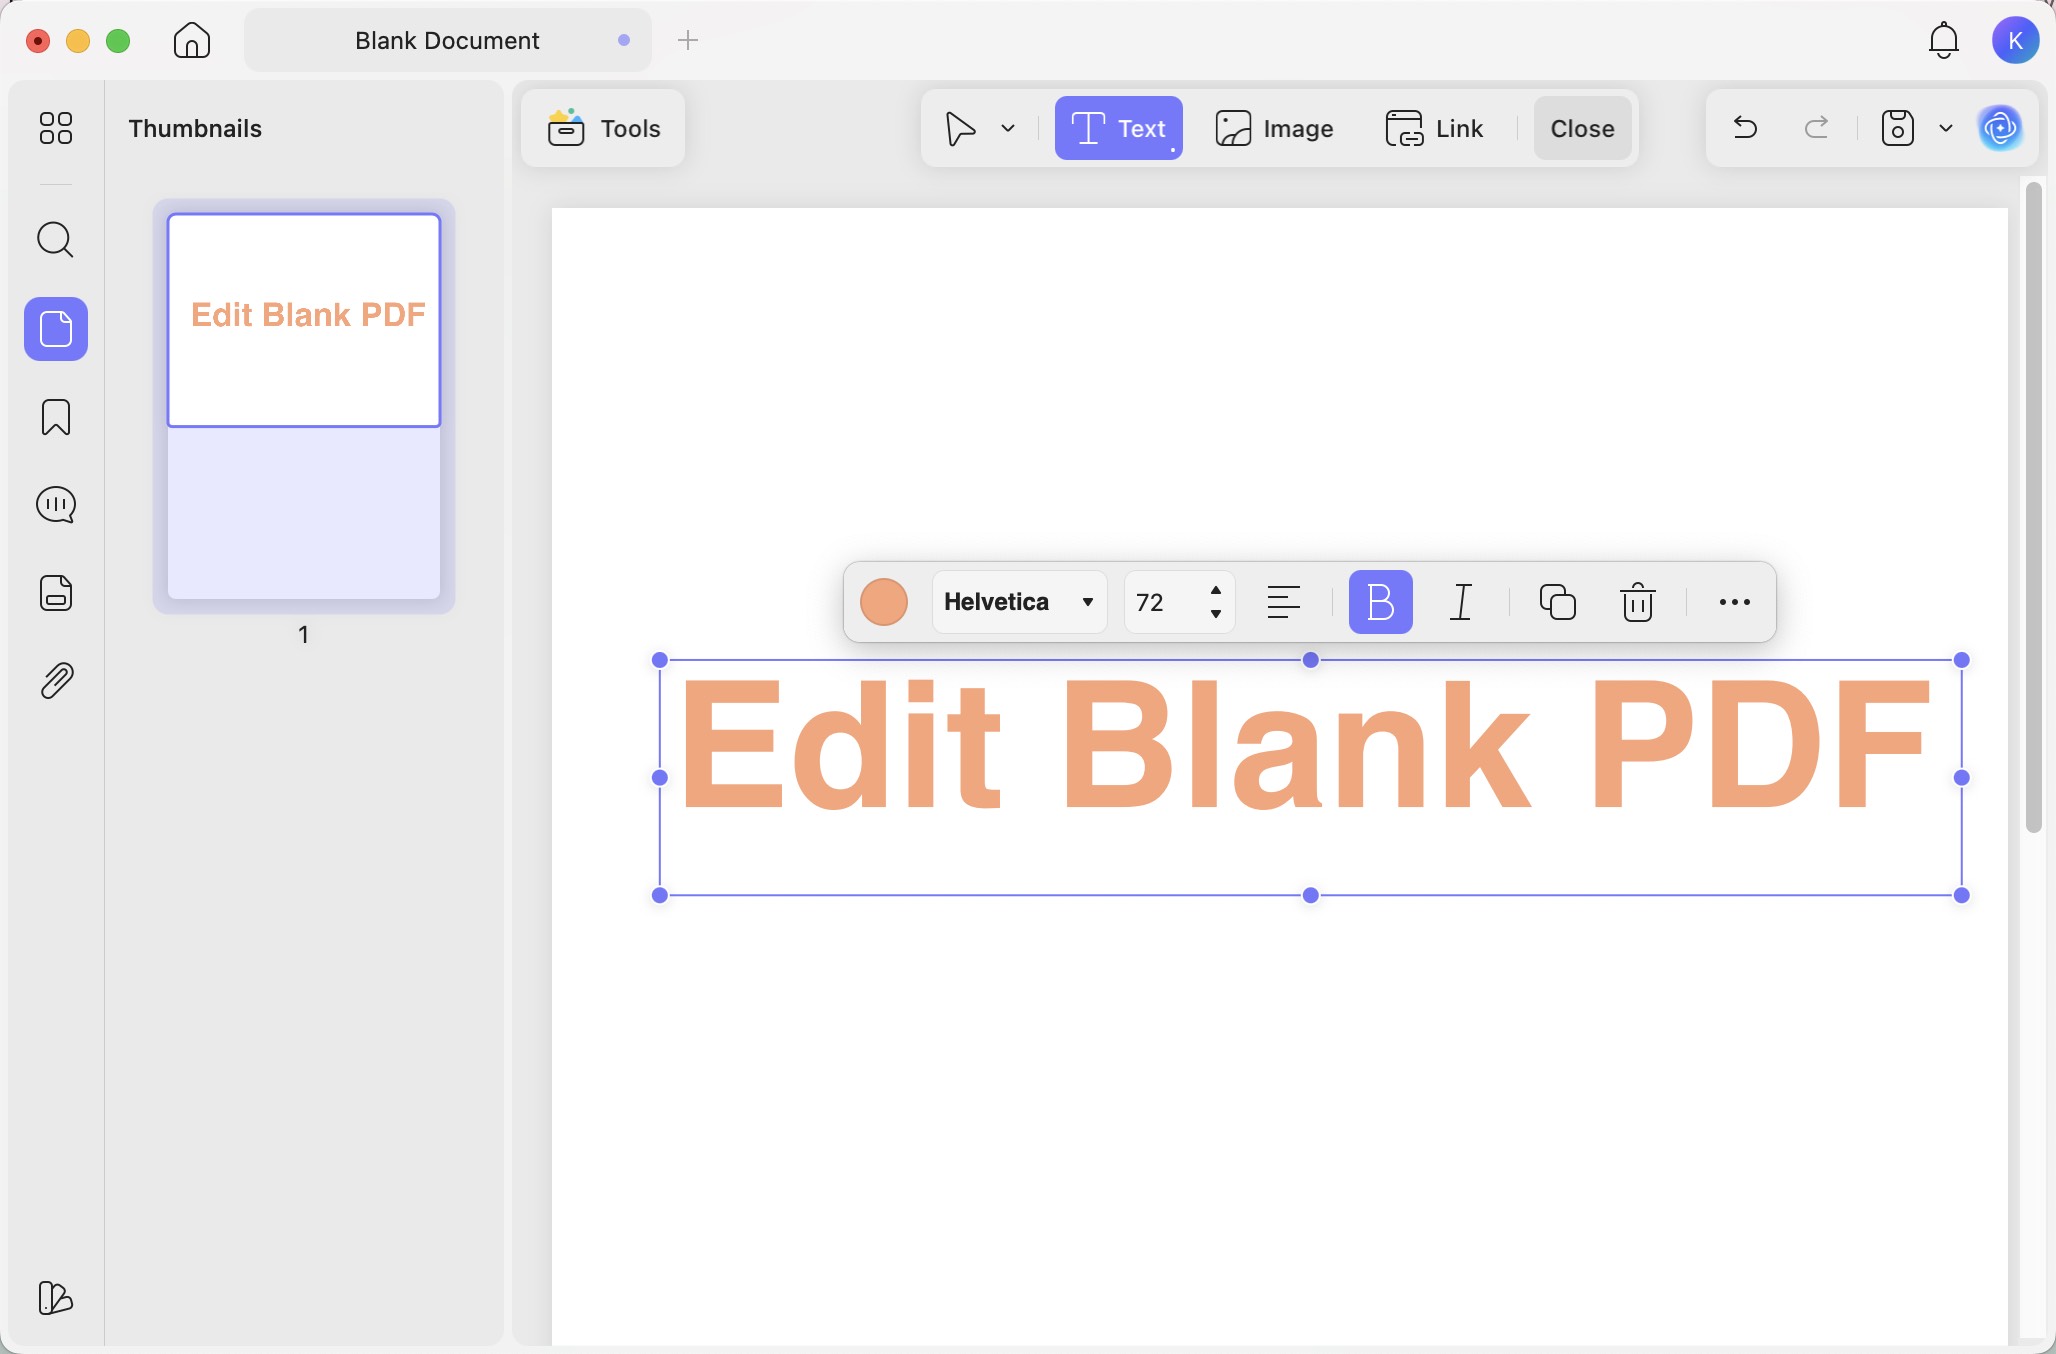
- Use the editing tools to add text or images. Choose Save.
Example: Build a one-page cover sheet with a title and an image. Reopen the saved file to check its layout.
Download UPDF for free to try creating and editing a blank PDF. Pro removes the trial watermark from exported files.
Windows • macOS • iOS • Android 100% secure
Part 3. Save an Open Document as a PDF with macOS
For a document already open in an app (e.g. Preview) that supports printing:
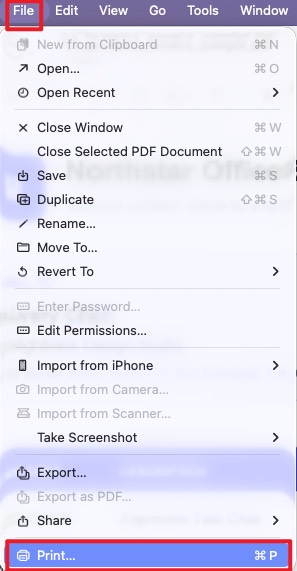
- Choose File > Print.
- Review the preview and print settings.
- Open the PDF menu and choose Save as PDF.
- Name the file, choose a location, and save.
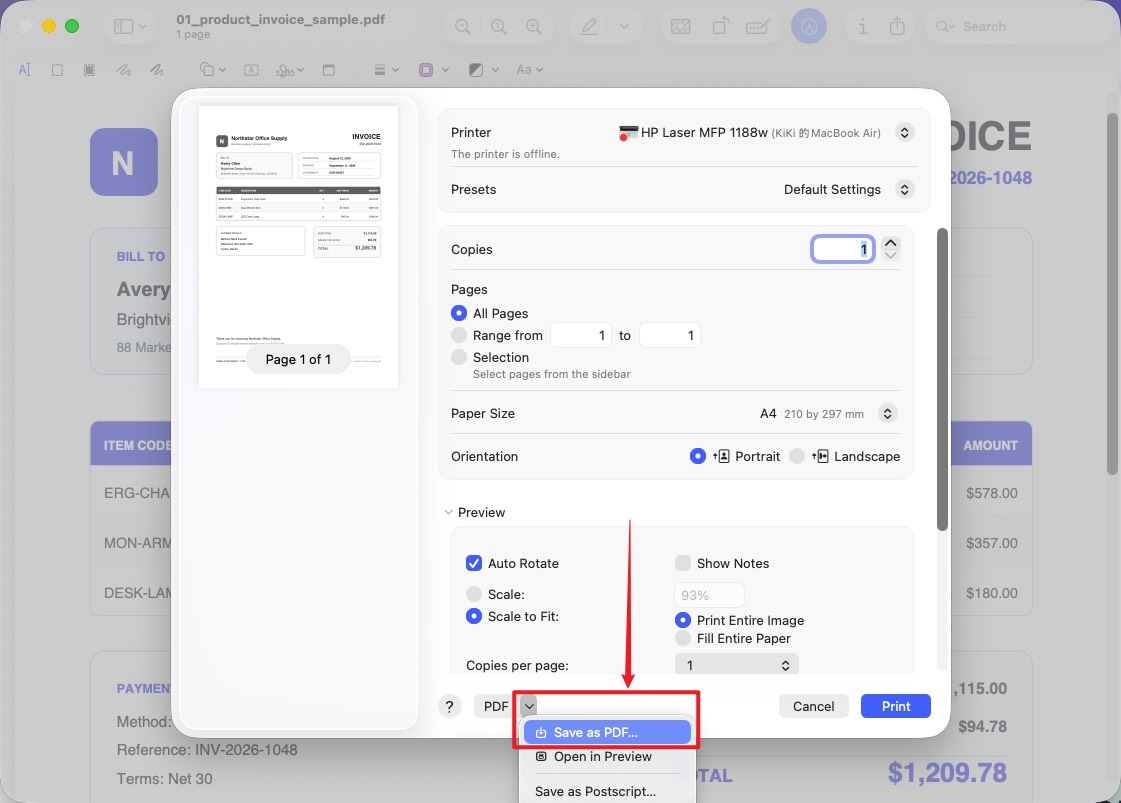
Reopen the PDF to check page breaks, margins, and missing content. This saves the printable layout; it does not create an empty document.
Part 4. Create a PDF from Images or PDFs in Finder
- Select the supported images or PDFs in Finder.
- Control-click the selection.
- Choose Quick Actions > Create PDF.
- Open the result and verify its page order.
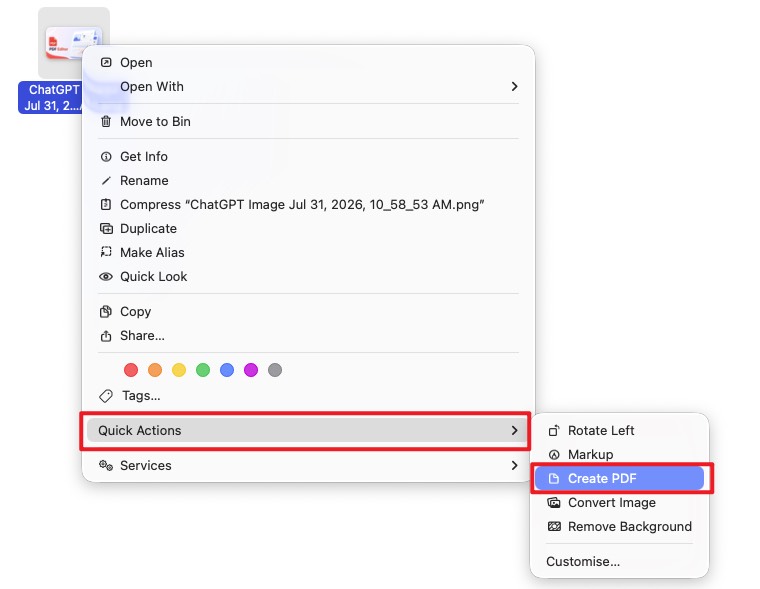
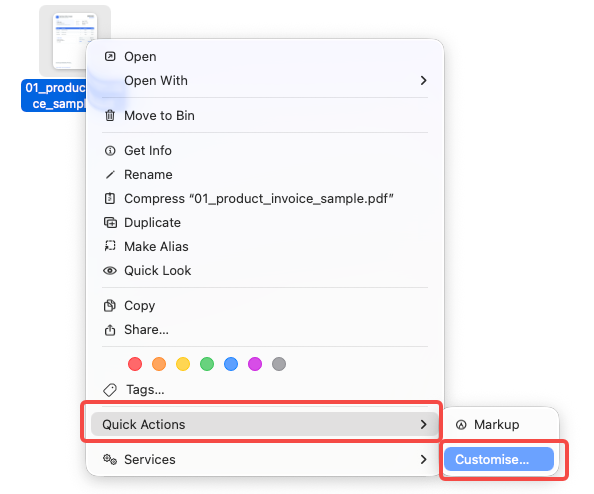
Don’t see Create PDF? Check the selected file type first. This Finder shortcut is intended for supported images and PDFs, not Word, Excel, or PowerPoint files. For Office documents, use the source app’s PDF export or UPDF. If the action is missing for an image or PDF, choose Customise… and check whether Create PDF is enabled.
Part 5. Create a PDF from a Source File with UPDF
Drag a supported source file into UPDF, or choose Tools > Other and select it. Save the generated PDF. Supported sources include Word, Excel, PowerPoint, TXT, RTF, HTML, Markdown, CAJ, and images.
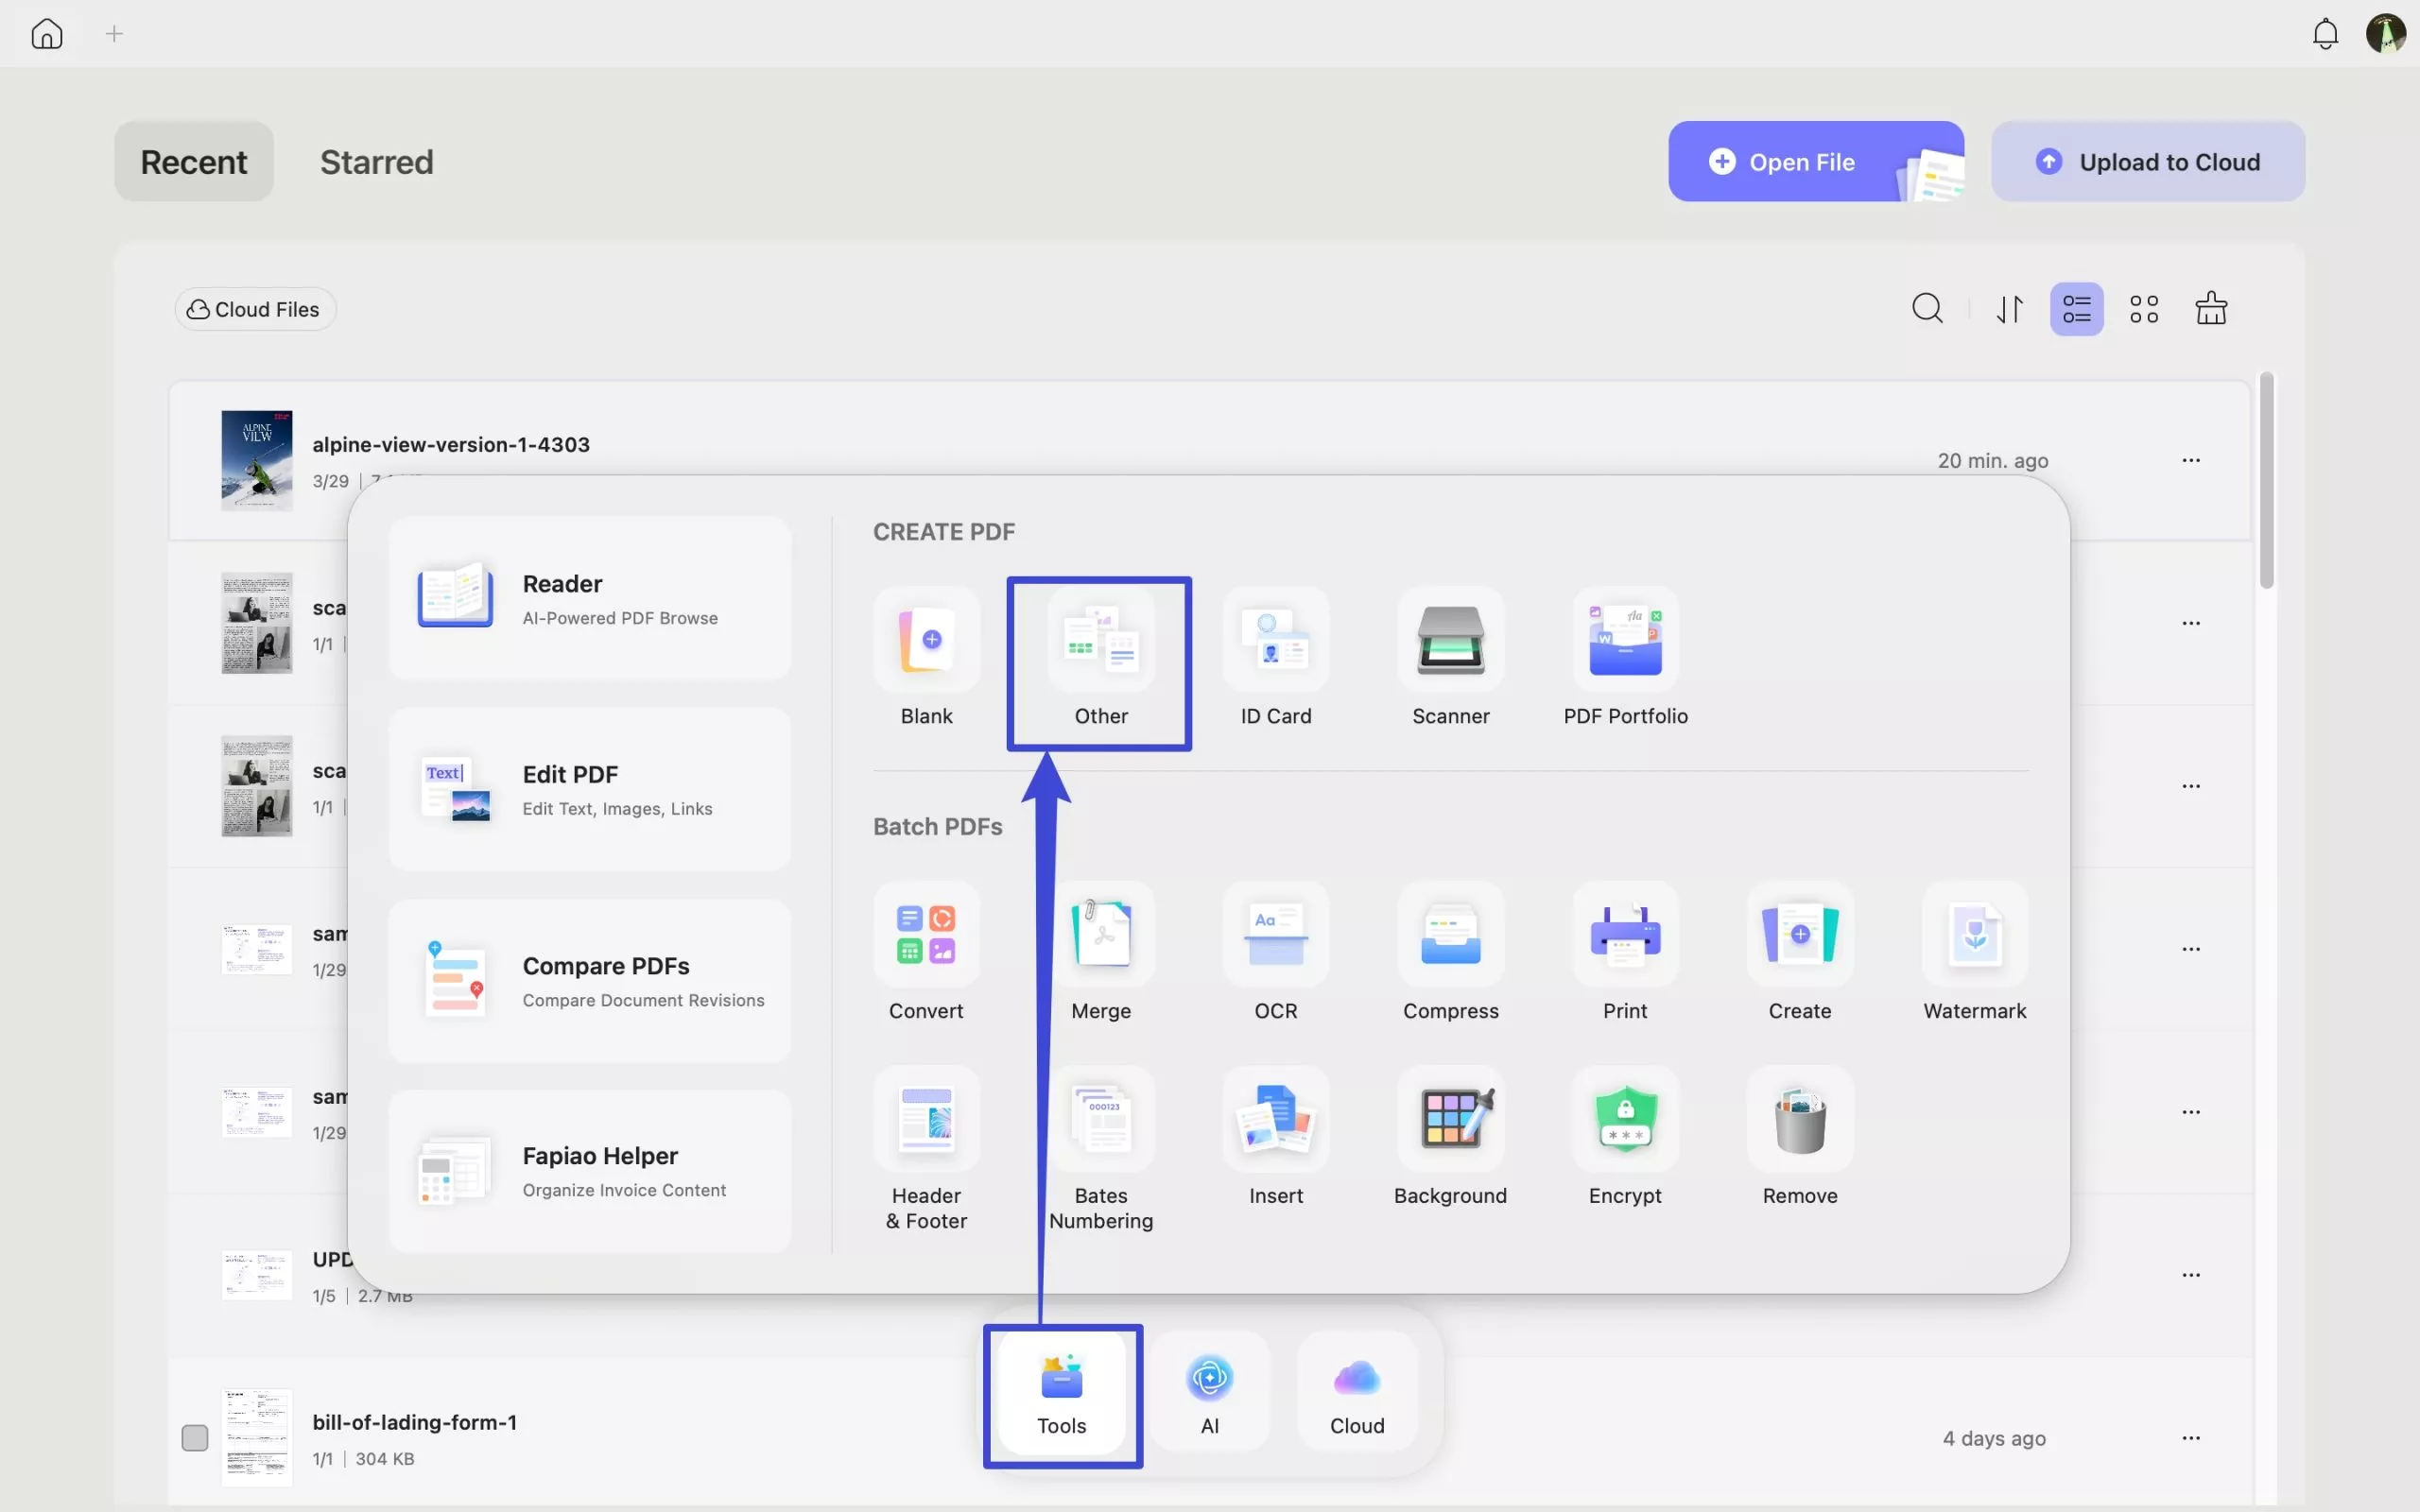
Check pagination and content before sharing. For a detailed workflow, see creating PDFs from images on Mac.
The retained video introduces UPDF PDF creation across desktop and mobile. Use the Mac-specific written paths above for the current menus.
Part 6. Create Separate PDFs or One Combined PDF in a Batch

- Open Tools on the home screen and select Create under Batch PDFs.
- Add the supported source files.
- Choose Create separately or Combine into one.
- Review the order, click Apply, and choose the output location.
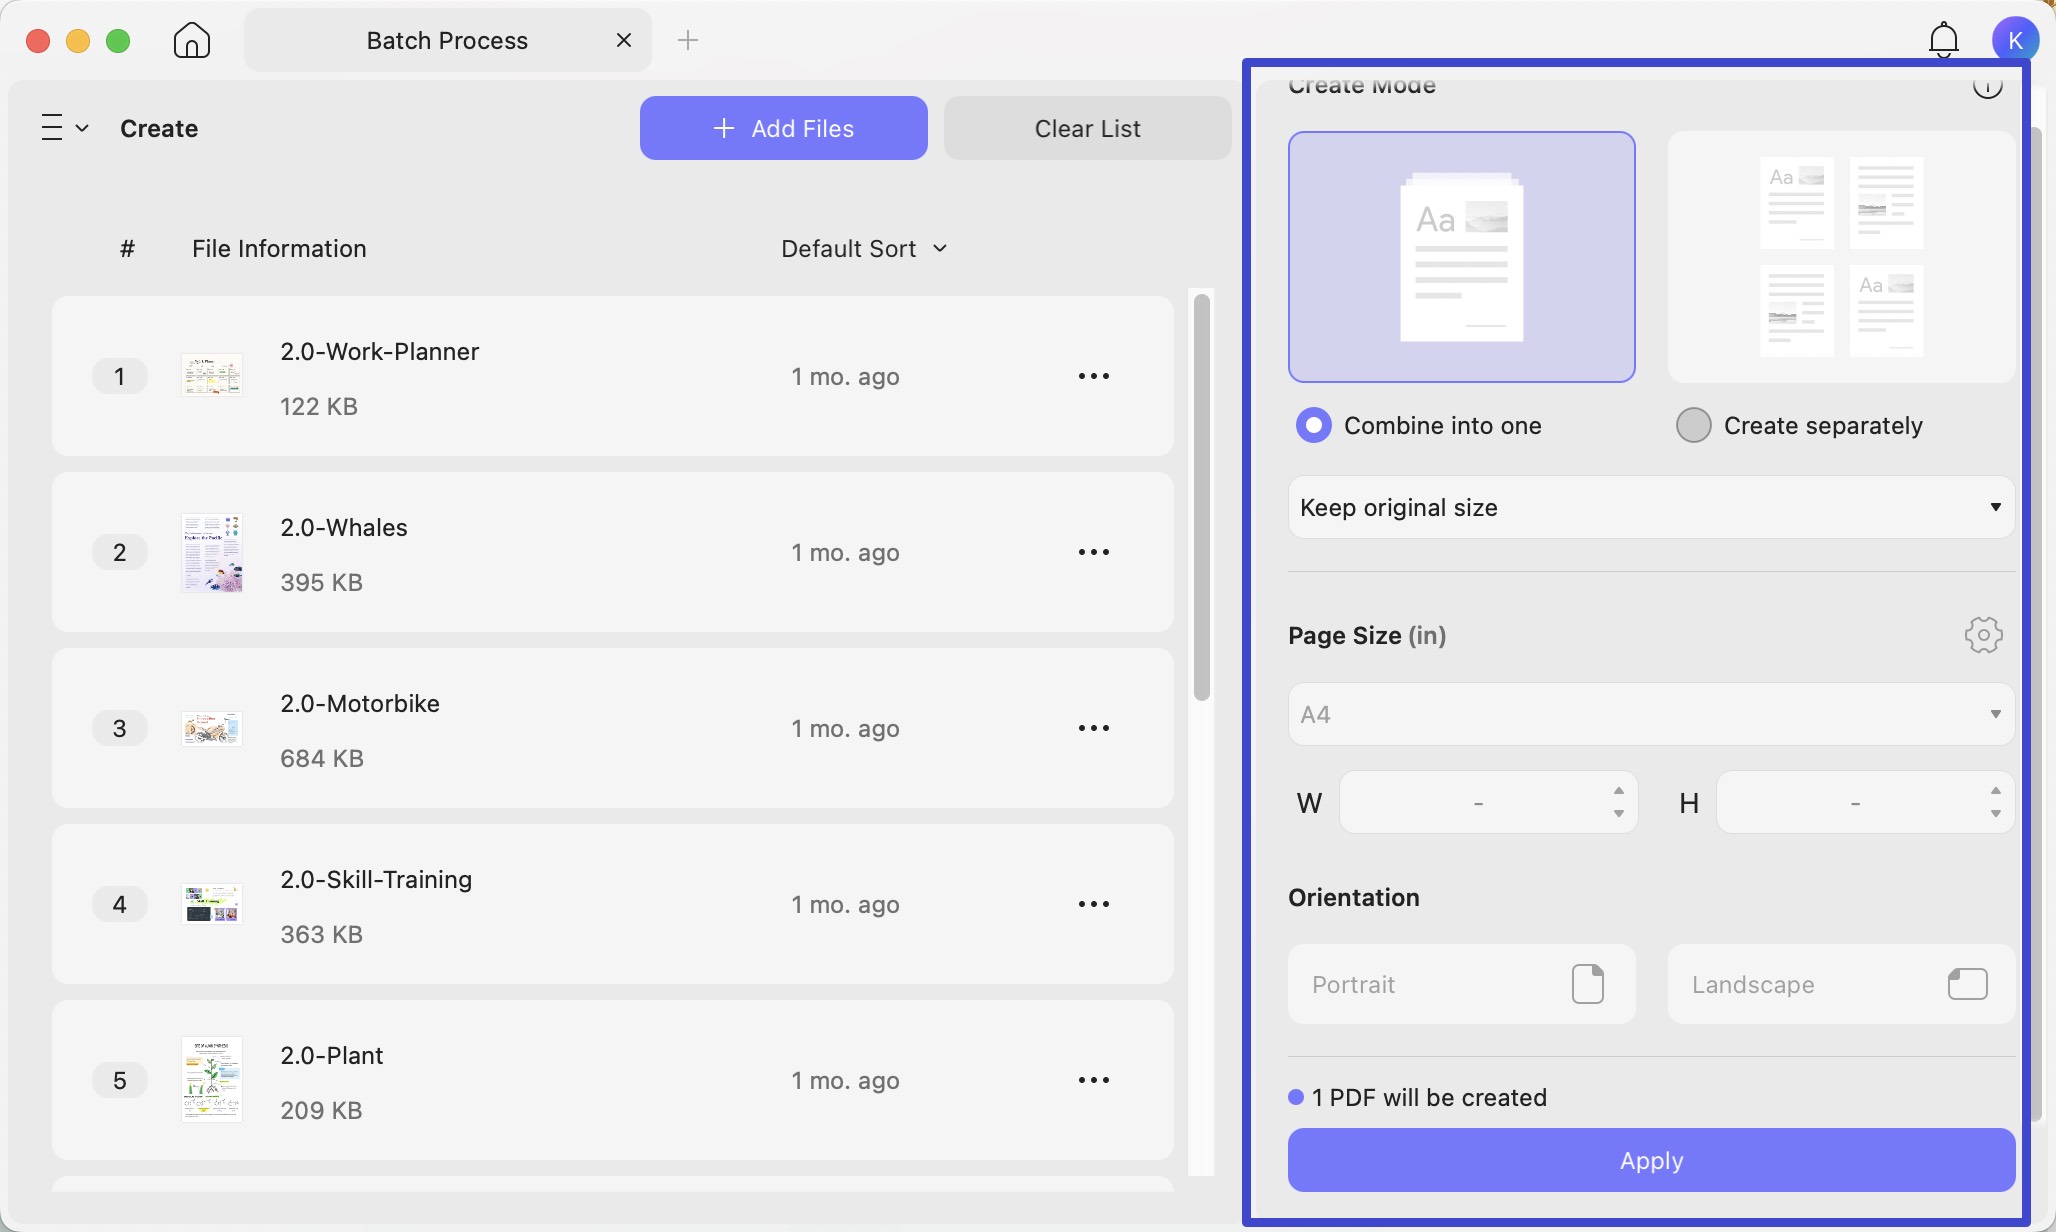
Example: Three inputs should produce three PDFs in separate mode, or one PDF containing all three in combined mode. Check file count and contents. Batch Create generates PDFs from source files; Batch Convert exports existing PDFs to other formats.
Download UPDF for free to test representative files before processing the full collection. Check current free limits and plan terms first.
Windows • macOS • iOS • Android 100% secure
Part 7. Check the PDF Before Sharing
Reopen the saved PDF and check page count, orientation, content, and reading order. Complete any editing or protection before sharing. Password protection is a finishing step, not another way to generate the document.
For other creation sources, follow the Mac PDF creation guide for scanner, capture, and clipboard options. For broader output formats, explore PDF conversion tools.
Part 8. FAQs
1. Does creating a PDF from a photo make its text searchable?
Not automatically. Placing a photo inside a PDF preserves it as an image. OCR is a separate process for recognizing the text.
2. Does typing text on a blank PDF create a fillable form?
No. Ordinary page text is different from an interactive form field. A fillable form requires fields such as text boxes, checkboxes, or dropdowns.
3. Can I rename a document’s extension to .pdf instead of converting it?
No. Renaming changes the filename, not the file format. Use PDF creation, export, or Save as PDF to generate a valid PDF.
Conclusion
Use UPDF for a blank PDF, macOS Print to PDF for an open document, Finder for supported file combinations, and Batch Create for several source files. Check layout, page order, and output file count before sharing.
Download UPDF for free if you need blank-page editing or batch creation, then continue working on the generated document.
Windows • macOS • iOS • Android 100% secure



 Enrica Taylor

 Lizzy Lozano