 UPDF for Windows
 UPDF for Mac
 UPDF for iPhone/iPad
 UPDF for Android
 Nomostar
 UPDF AI Online
 UPDF Sign
 IvyCraft
 Edit PDF
 Annotate PDF
 Create PDF
 PDF Form
 Edit links
 Convert PDF
 OCR
OCR PDF to Word
 PDF to Image
 PDF to Excel
 Organize PDF
 Merge PDF
 Split PDF
 Crop PDF
 Rotate PDF
 Protect PDF
 Sign PDF
 Redact PDF
 Sanitize PDF
 Remove Security
 Read PDF
 UPDF Cloud
 Compress PDF
 Print PDF
 Batch Process
 About UPDF AI
 UPDF AI Solutions
 AI User Guide
 FAQ about UPDF AI
 Summarize PDF
 Translate PDF
 Chat with PDF
 Chat with AI
 Chat with image
 PDF to Mind Map
 Explain PDF
 PDF AI Tools
 Image AI Tools
 AI Chat Tools
 AI Writing Tools
 AI Study Tools
 AI Working Tools
 Other AI Tools
 AI Bookmark Generation
 AI Bookmark Summary
 AI Watermark Generation
 AI Background Generation
 AI Sticker Generation
 AI Stamp Generation
 AI Editing Suite
 UPDF Copilot
 AI Page Management
 AI Semantic Search
 PDF to Word
 PDF to Excel
 PDF to PowerPoint
 User Guide
 UPDF Tricks
 FAQs
FAQs UPDF Reviews
 Download Center
 Blog
Blog Newsroom
 Tech Spec
 Updates
 UPDF vs. Adobe Acrobat
 UPDF vs. Foxit
 UPDF vs. PDF Expert
Are you looking for a way to fit two or more images on a single-page PDF? You might be creating a neat photo collage or showcasing multiple product shots in a catalog. In any case, arranging the images in your desired layout on the same PDF page can be tricky. Not many tools provide a straightforward way to do this.
But don't worry. You don’t need to waste hours or go through complex, lengthy steps to make this possible. In this guide, I will share the easiest ways to put, combine, or print 2 images in one page PDF. You will also learn easy steps to combine multiple images into a single-page PDF.
Let’s get started.
Part 1. Combine 2 Images on One Page PDF
If you want to put, combine, or print two images in one page PDF, the easiest way is to use a tool called UPDF. It simplifies the process and gives you full control over the page’s layout, size, and orientation. There are two effective methods to achieve this. You can create from an ID card template or start with a blank PDF.
To get started, download UPDF on your computer. Then, go through the following methods to combine 2 images in one page PDF.
Windows • macOS • iOS • Android 100% secure
Way 1. Create from ID Card
This method lets you quickly merge your selected images into a PDF with a fixed layout. It removes the need to rearrange images manually. This works well for combining the front and back of an ID card or certificates. However, you can use it to merge any two images.
Here are the steps to combine images into one page PDF.
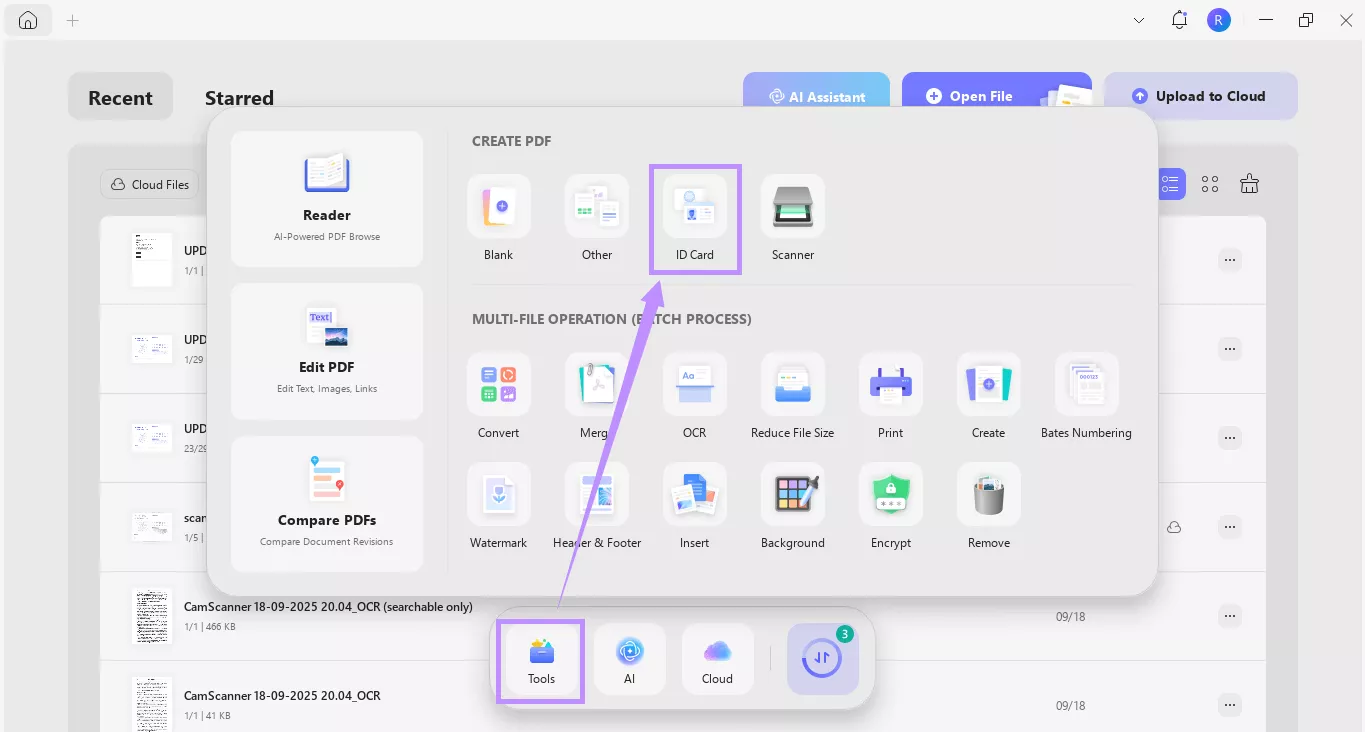
Step 1. Open UPDF on your computer. Click “Tools” from the bottom. Then, select “ID Card” located under the Create PDF section.
Step 2. A new window will show up with two file upload options. Click each “Choose File” button and select the images you want to combine on a single page.
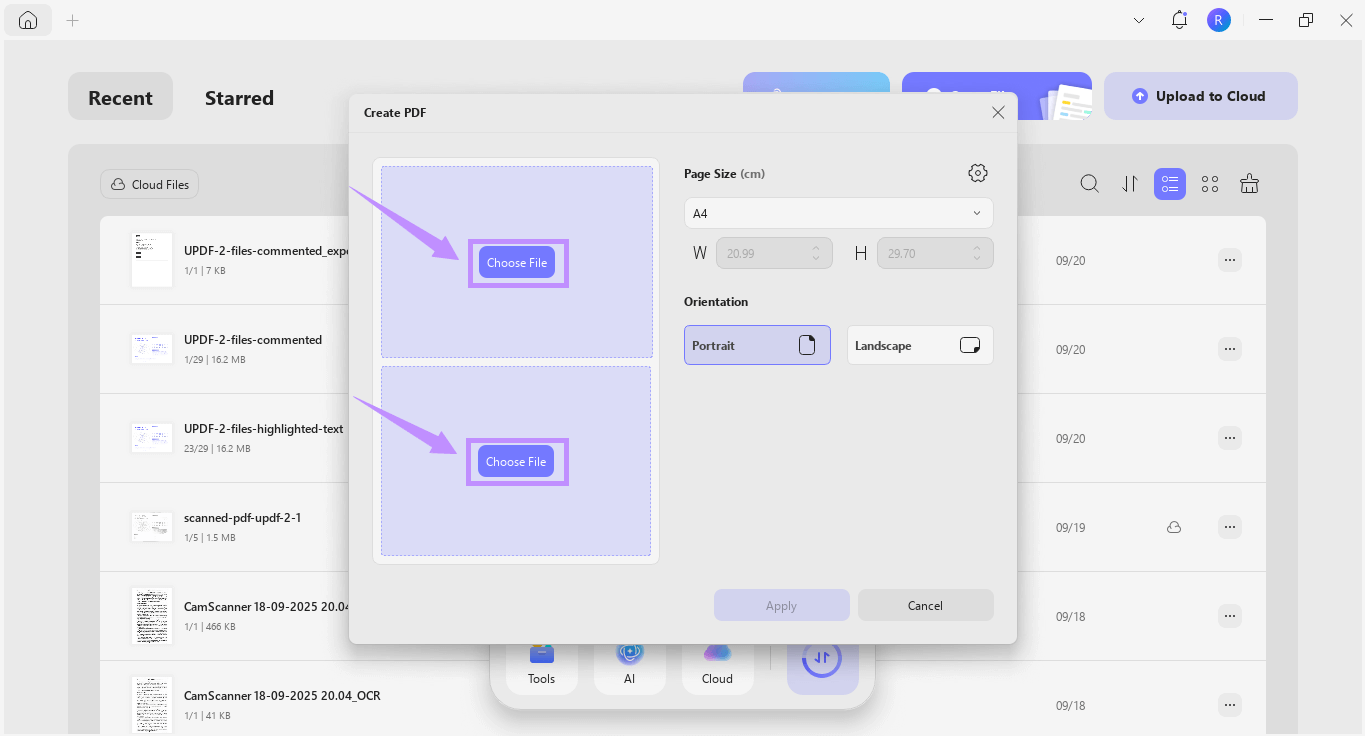
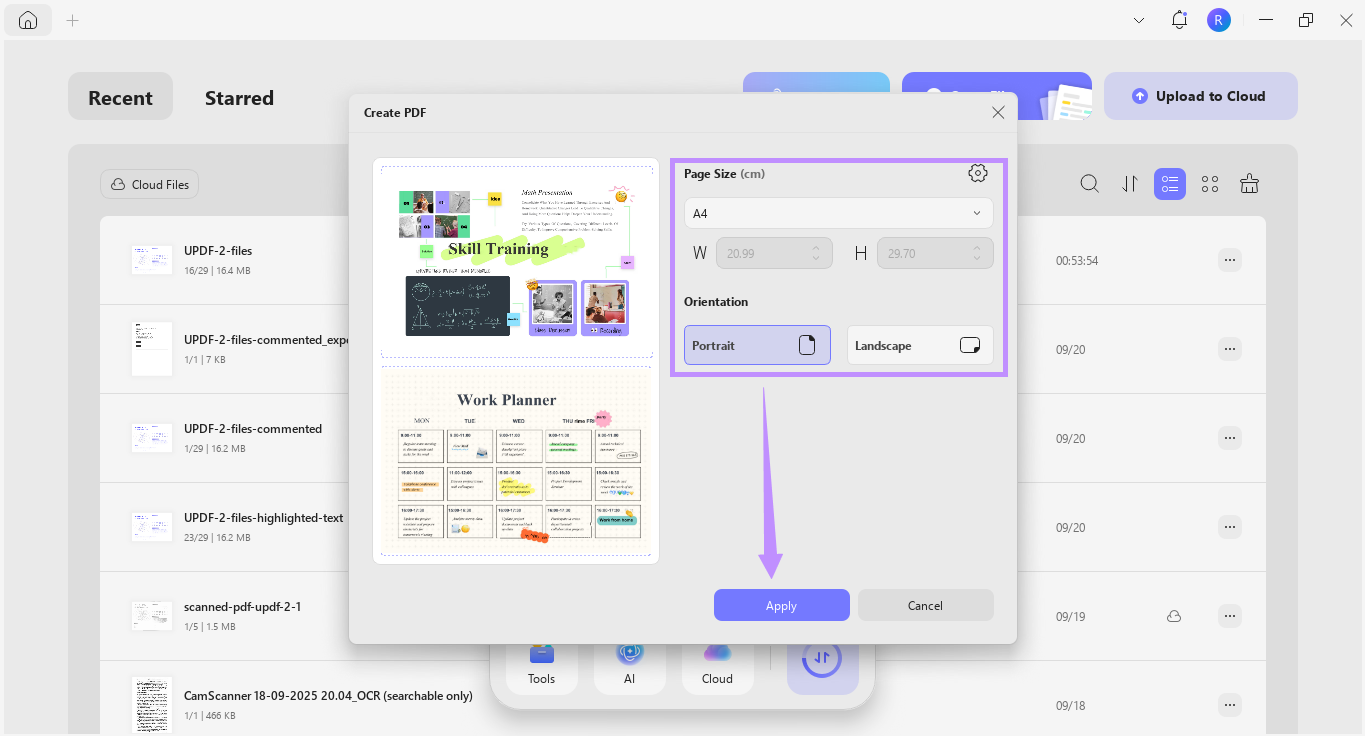
Step 3. Once both images are added, click the Page Size dropdown and choose your desired size. Then, select a page orientation such as Portrait or Landscape. After that, click “Apply.”
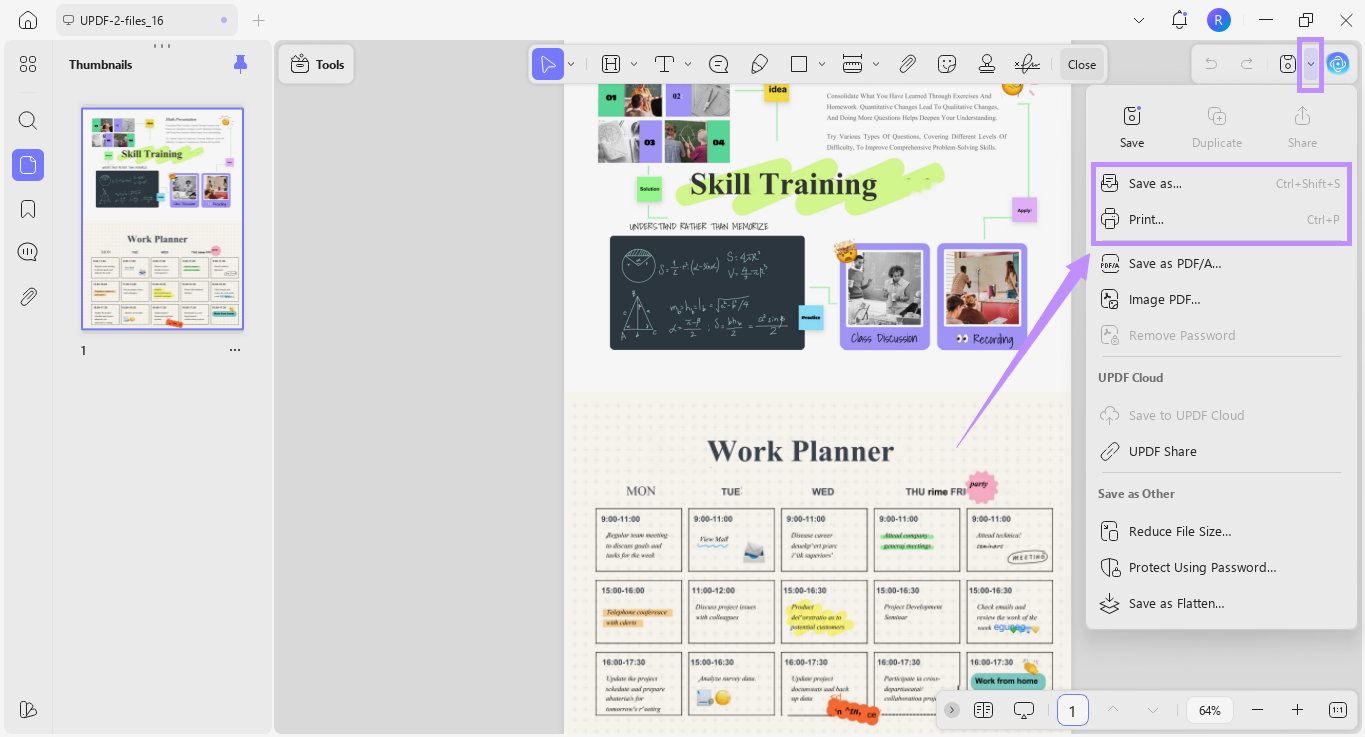
Step 4. UPDF will combine both images into a single page and open it for viewing. From here, click the down arrow in the top right and choose “Save as” or “Print” as needed.
Way 2. Create a Blank PDF Plus Adding Images
This method gives you more control over combining 2 images on one page PDF in your desired layout. It works best for creating custom arrangements. You can freely place images anywhere on the page.
Here’s how it works.
Step 1. Open UPDF and click “Tools” from the Home screen. Then, click “Blank” under Create PDF.
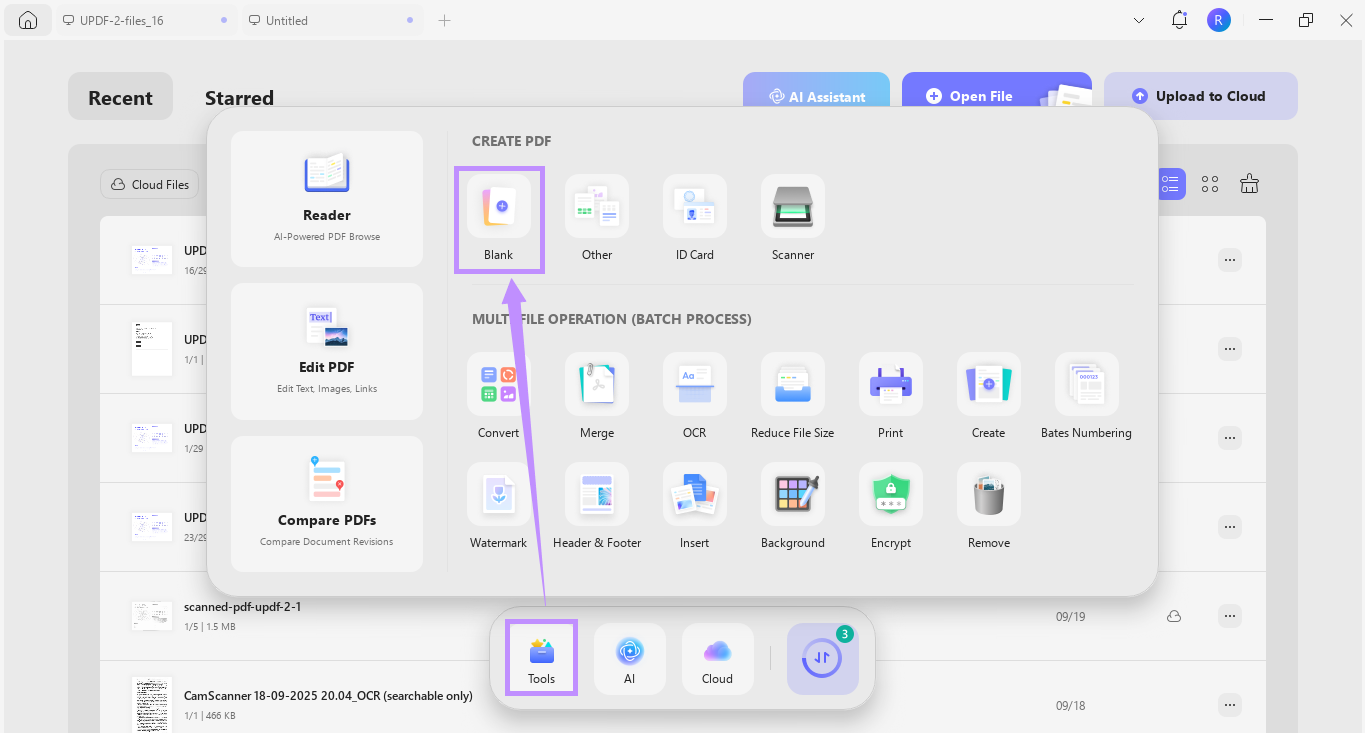
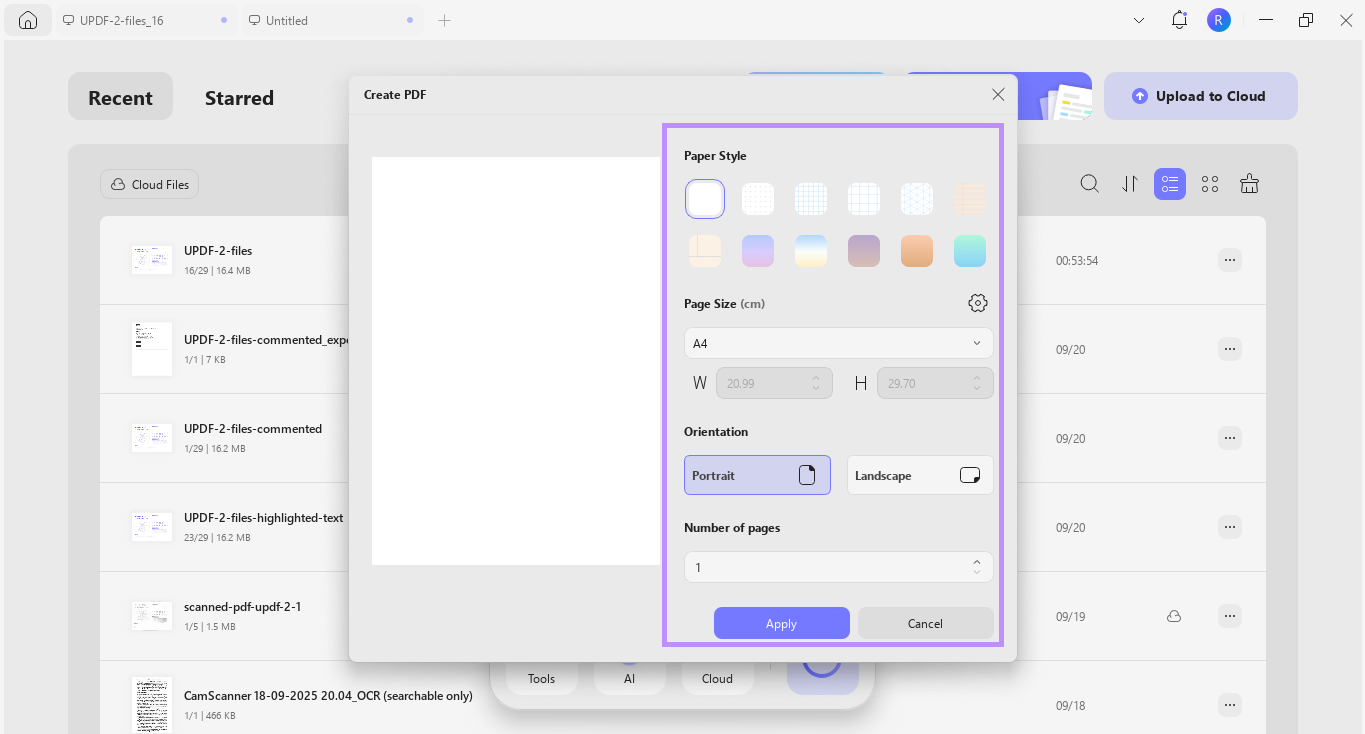
Step 2. From the new window, customize the page appearance. You can select your desired page style, size, orientation, and number of pages. Once done, click “Apply.”
Step 3. UPDF will create and open a blank PDF. From here, click “Tools” at the top and select “Edit.”
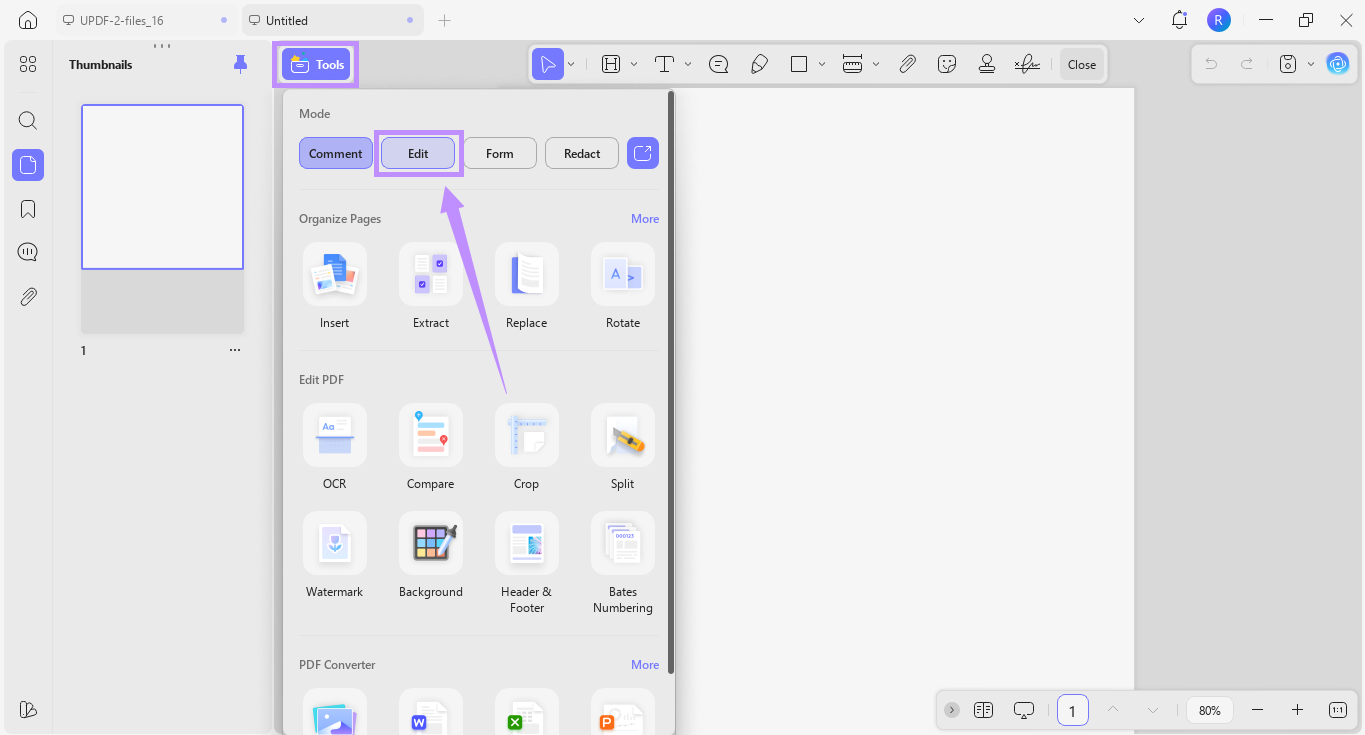
Step 4. You will see a toolbar at the top with several options. Click the image icon for “Insert & Edit Image” from here.
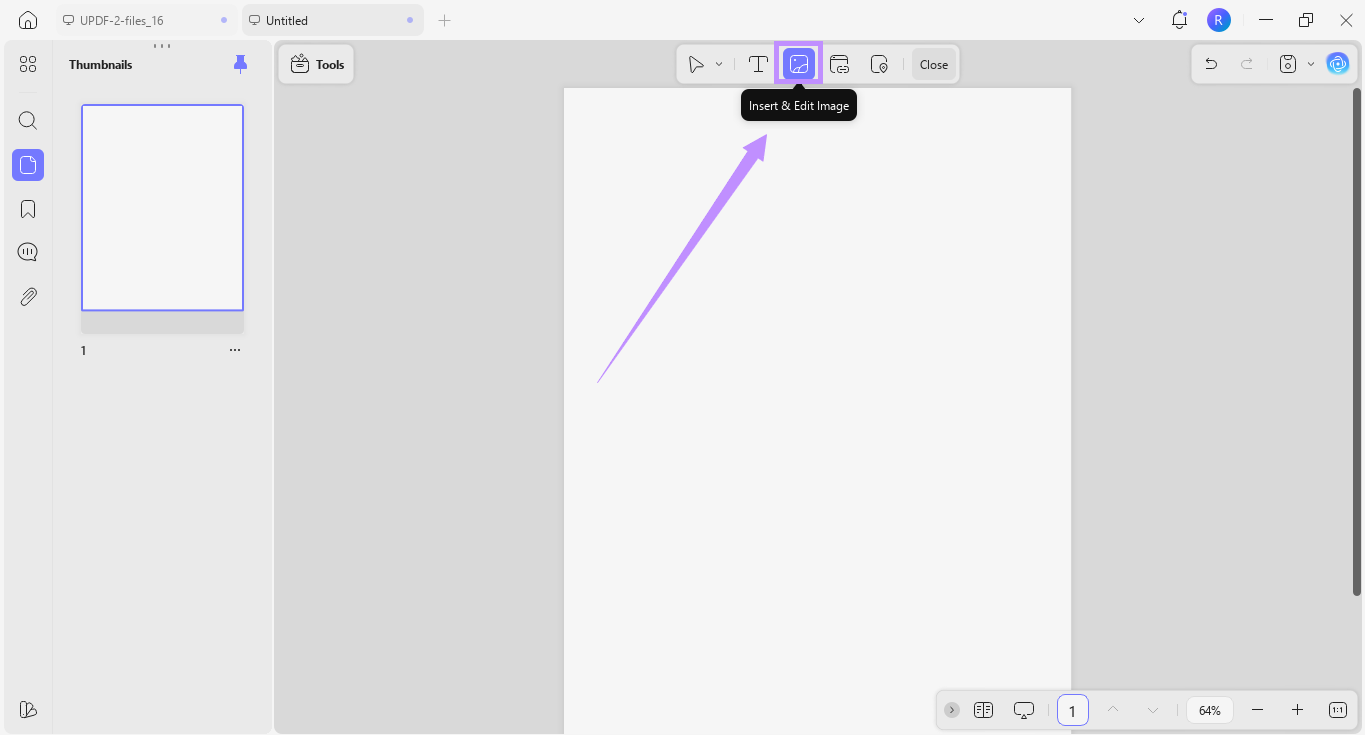
Step 5. Click the area on the page where you want to insert the first image. From the new window, select the image to insert. Repeat the process to add the second image.
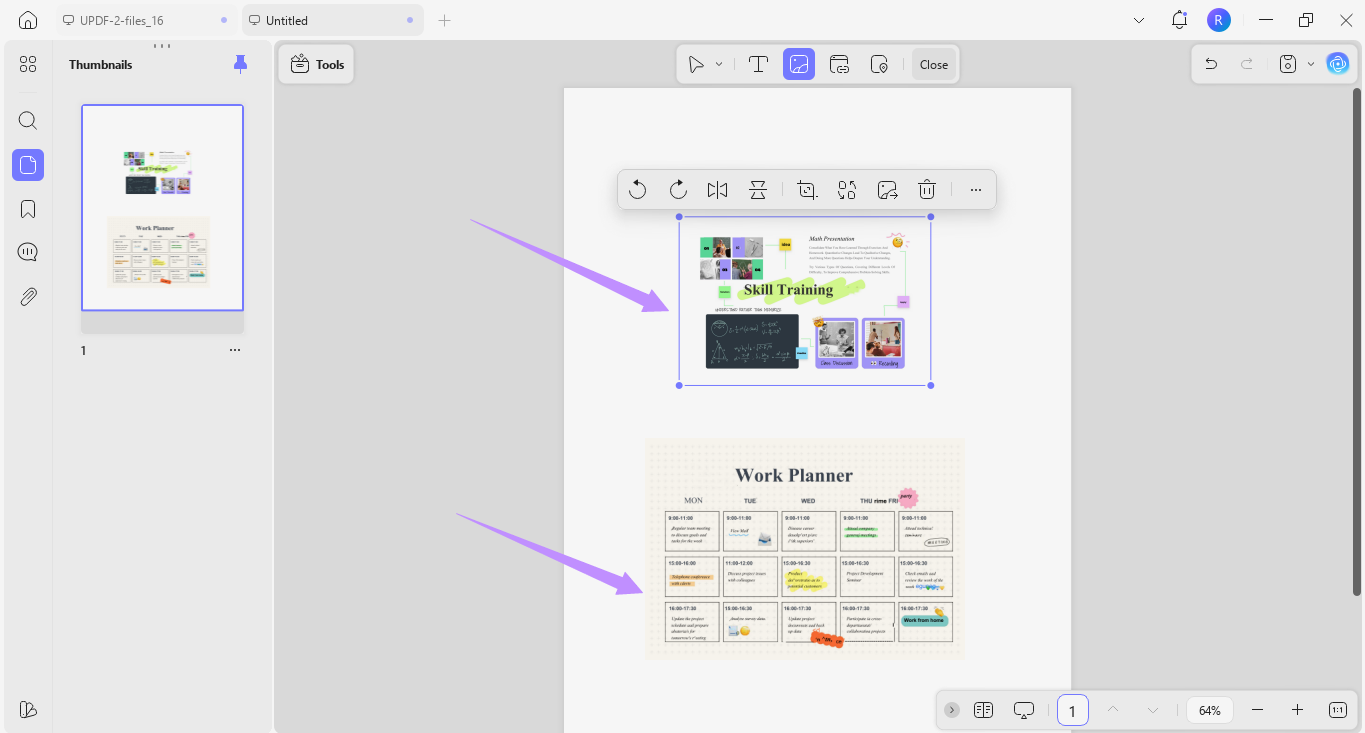
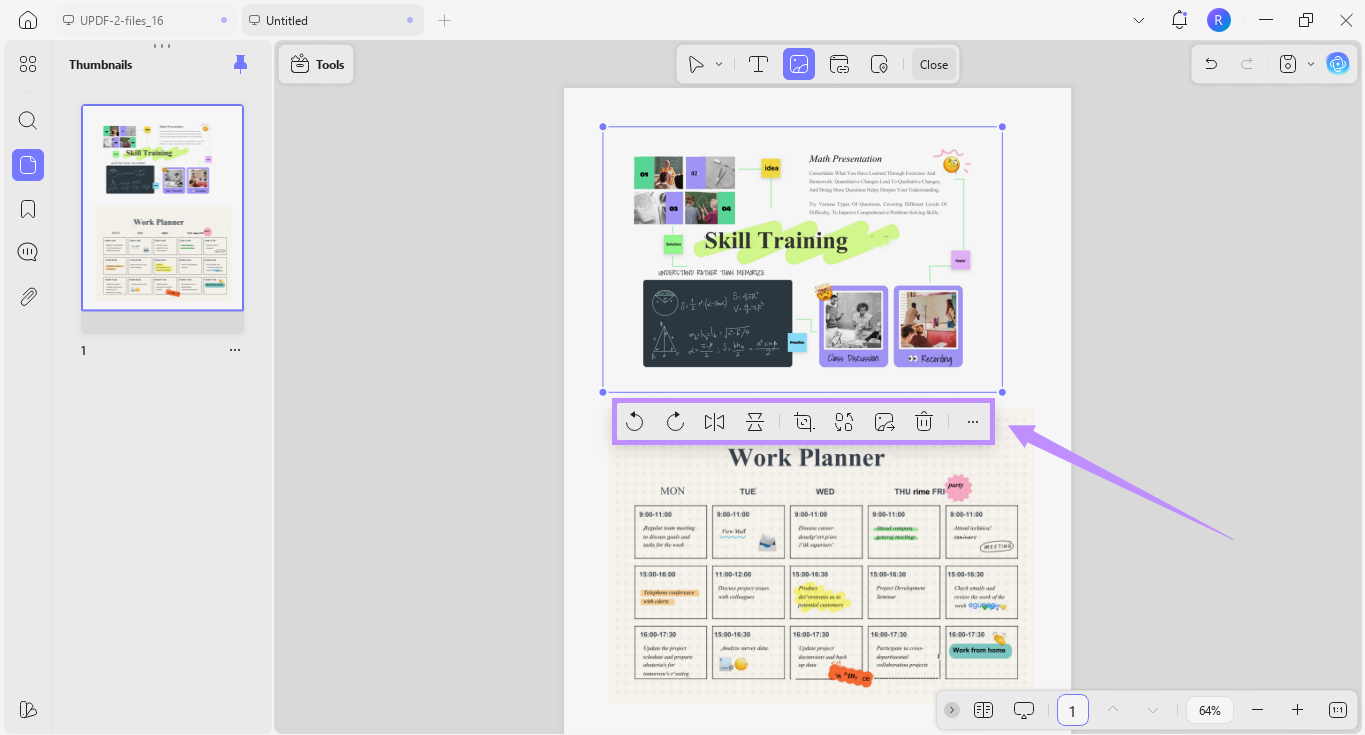
Step 6. Once you’ve added both pictures, click and drag their borders to adjust their size. To reposition them, select and move the images freely on the page. You can also use the floating toolbar to rotate, flip, crop, replace, or delete them as needed.
Step 7. When finished, click the down arrow in the top right corner. Then select “Save as” to store the PDF or choose “Print” to send it directly to a printer.
Part 2. Combine or Print Multiple Images on One Page PDF
Sometimes, you may want to combine or print multiple images on one page of a PDF. This can be useful for creating photo albums, presentations, or catalogues. With UPDF, the process is quick and straightforward. You can use the merge and image tools to put multiple images into a single-page PDF.
So, don’t wait. Download UPDF on your device. Then follow the steps below to learn how to print multiple images on one page PDF.
Windows • macOS • iOS • Android 100% secure
Step 1. With UPDF open, click “Tools” from the Home screen. Then, select “Merge” under Multi-File Operation (Batch Process).
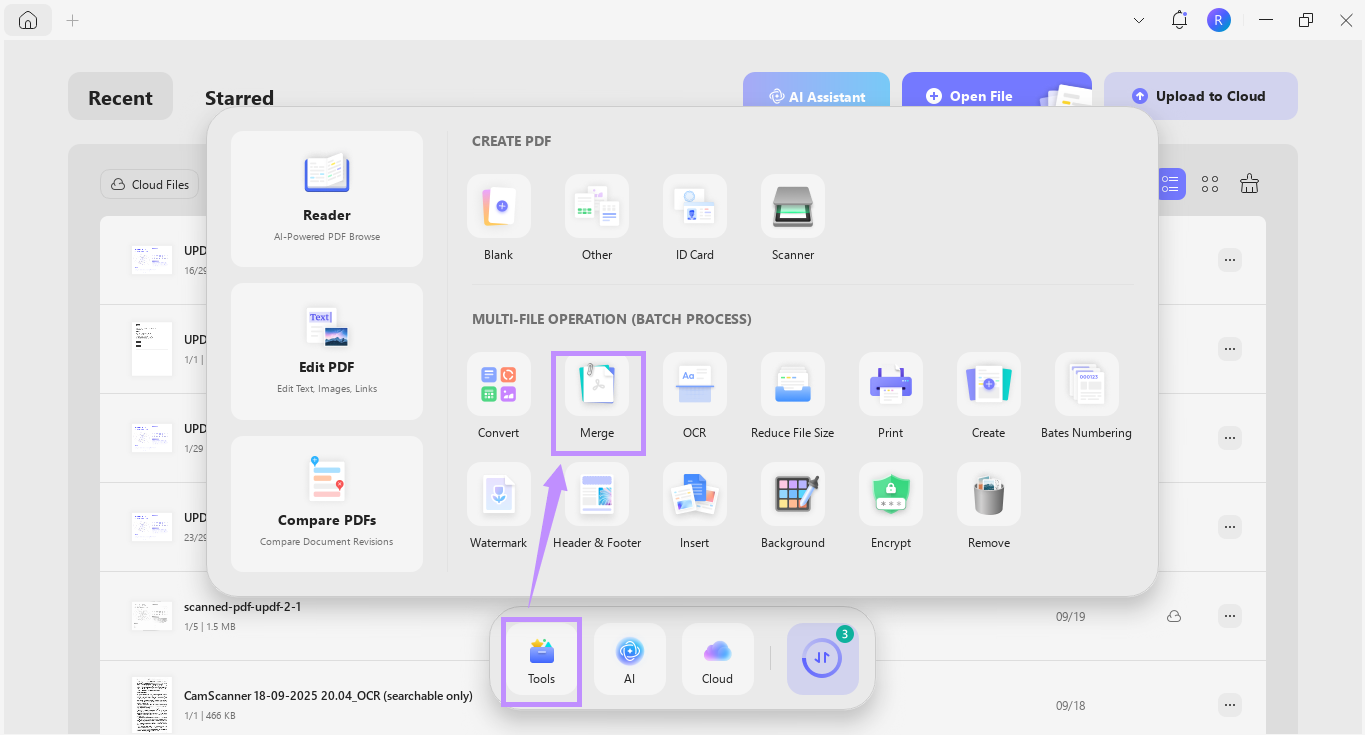
Step 2. Click “Add Files” and import the pictures you want to combine.
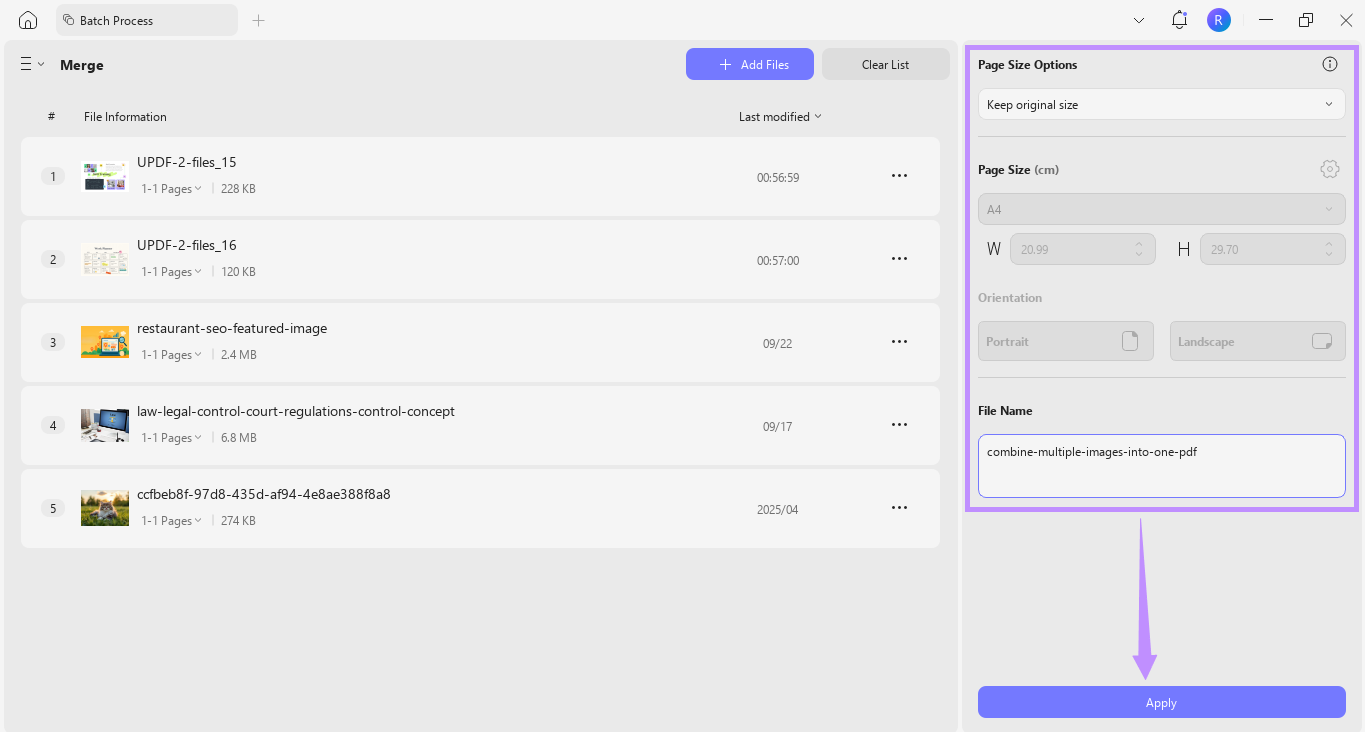
Step 3. Once the images are uploaded, go to the right-hand panel. Click the Page Size Options dropdown and choose either “Keep original size” or “Standardize page size.”
Step 4. If needed, select a page size and orientation. Enter a file name, then click “Apply.” Choose the folder where you want to save the merged file.
Step 5. UPDF will direct you to the folder where your file is located. Double-click the file to open it in UPDF. Then click “Tools” from the top menu and select “Image” under PDF Converter at the bottom.
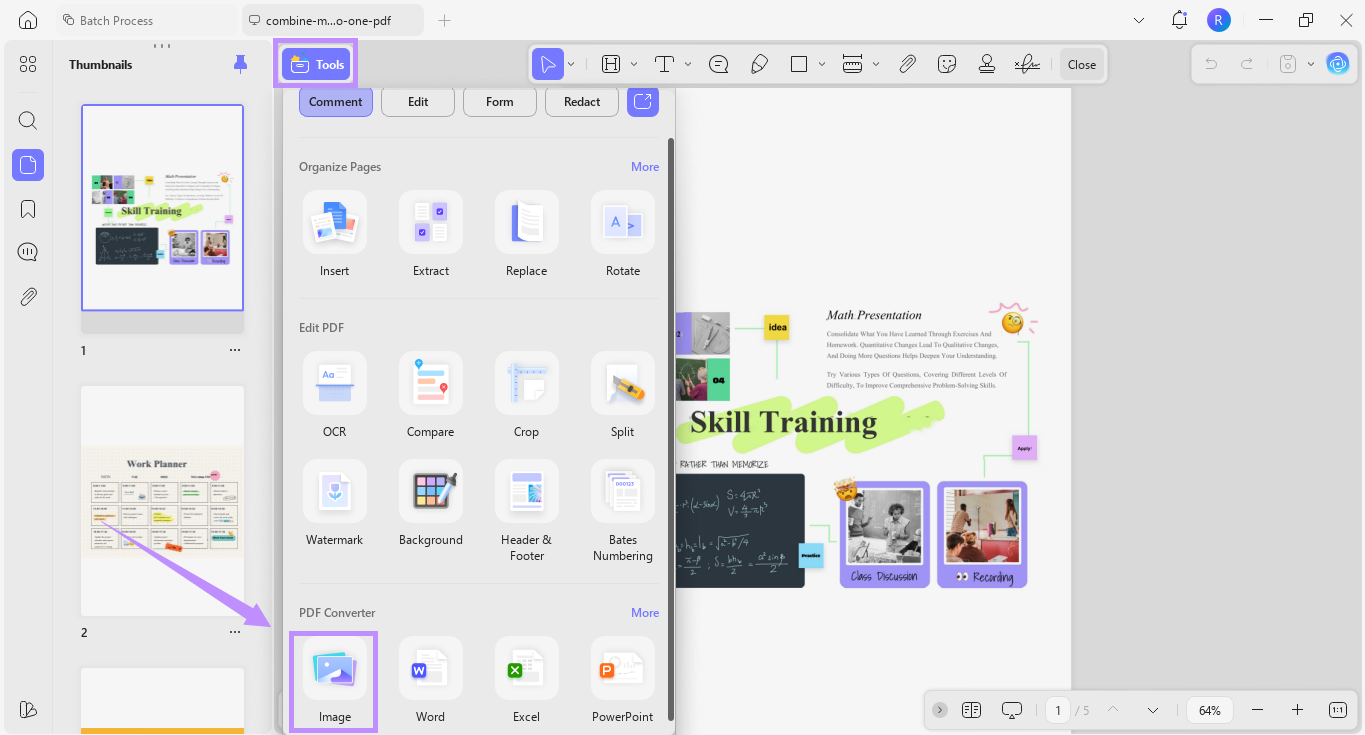
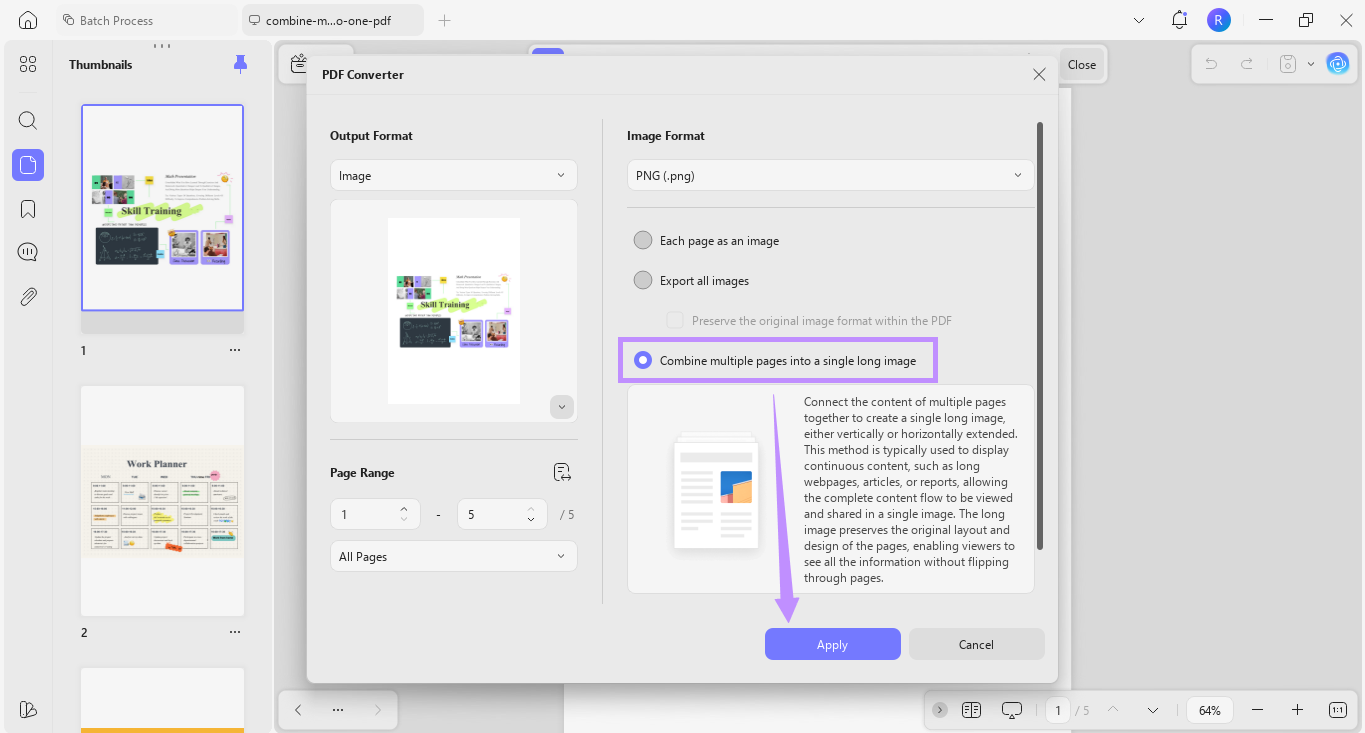
Step 6. In the new window, check “Combine multiple pages into a single long image.” Click “Apply” and save your file.
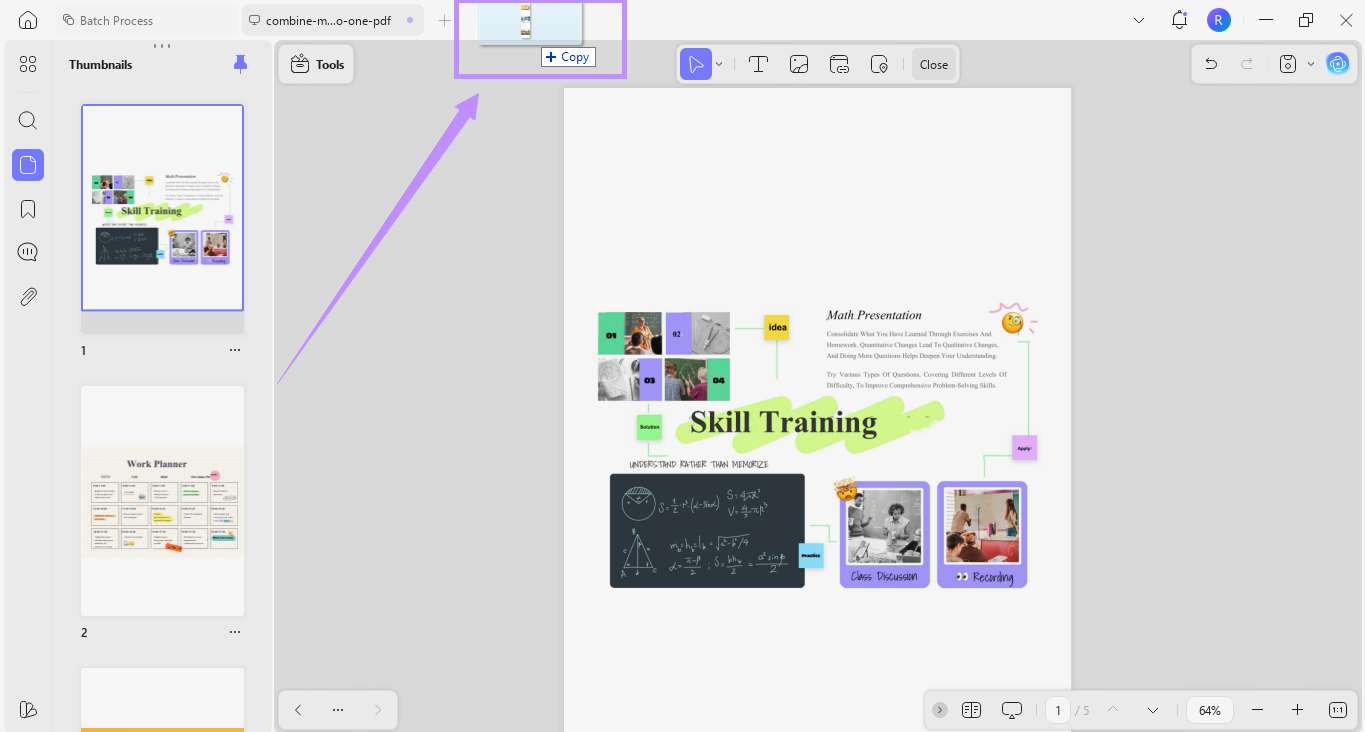
Step 7. After saving, you’ll be directed to the destination folder. Drag and drop the single long image back into UPDF. Make sure to place it on the tab bar to open in a new tab.
Step 8. Finally, click the down arrow in the top right and click “Save as” or “Print” as needed.
Apart from creating a single-page PDF, UPDF is packed with tools to make your PDF management effortless. If you want to get more familiar with it, read this review of UPDF or watch the video below.
Conclusion
That’s all about how to put, combine, or print 2 images in one page PDF. UPDF gives you an all-in-one solution to do everything you need. You can choose an ID card template or create a blank PDF to customize your layout fully. Placing multiple images on one page is just as fast and simple. Besides this, UPDF can help you manage your PDF tasks more productively. You can also get started for free. So, click below to download UPDF and try it today!
Windows • macOS • iOS • Android 100% secure


 Enid Brown
 Enola Davis
 Lizzy Lozano