Google Docs is the Microsoft Word alternative from Google, and it provides all the document editing and processing features. Converting photos to text is one of the special features offered by Google Docs. There are really two ways to go about it. Thus, we will go over the two practical methods as well as the detailed instructions to convert image to text with Google Docs in this article.
In case that you do not like the result of Google Docs, we also recommend UPDF to you. You can download UPDF via the button below to convert image to text and get better experience directly.
Windows • macOS • iOS • Android 100% secure
Part 1. How to Convert an Image to Text in Google Docs? (Official Method)
The first method for converting images to text with Google Docs is known as the official method because we don’t need to use any third-party application or add-on in this method. However, you must note that it requires the use of Google Drive in the process. With these two Google tools combined, you can easily convert images to text with the following steps:
1. Open Google Drive and upload your image to it.
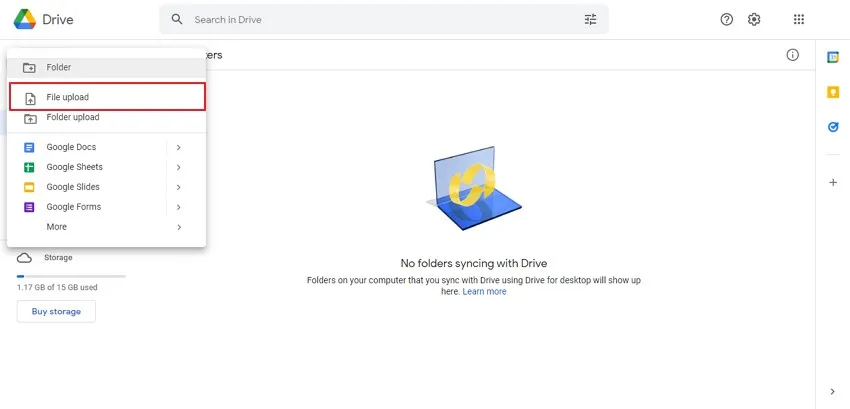
Open the Google Drive website on your browser and click the "+ NEW" button from the left top. Then you need to select "File Upload". Clicking this button will open the browse window where you need to pick the image from your computer to convert it to text. Once you select and click "Open," you must wait for the upload to complete before moving to the next steps.
2. Right-click on the image and open it with Google Docs.
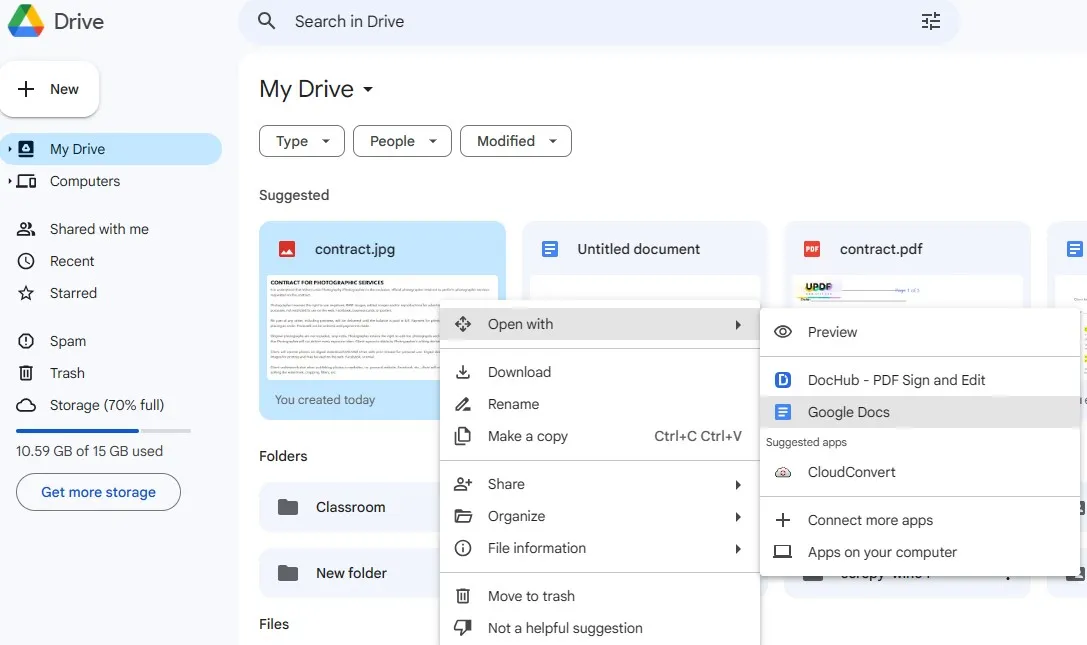
After your upload is finished, you need to reload the Google Drive website to get that image on the top. If it does not, you may click the "Recent" tab from the left side and find your image. Upon finding the image, you need to right-click it and then click "Open With" > "Google Docs."
3. Wait as Google Docs processes the image, and you will see both the image and its text under it.
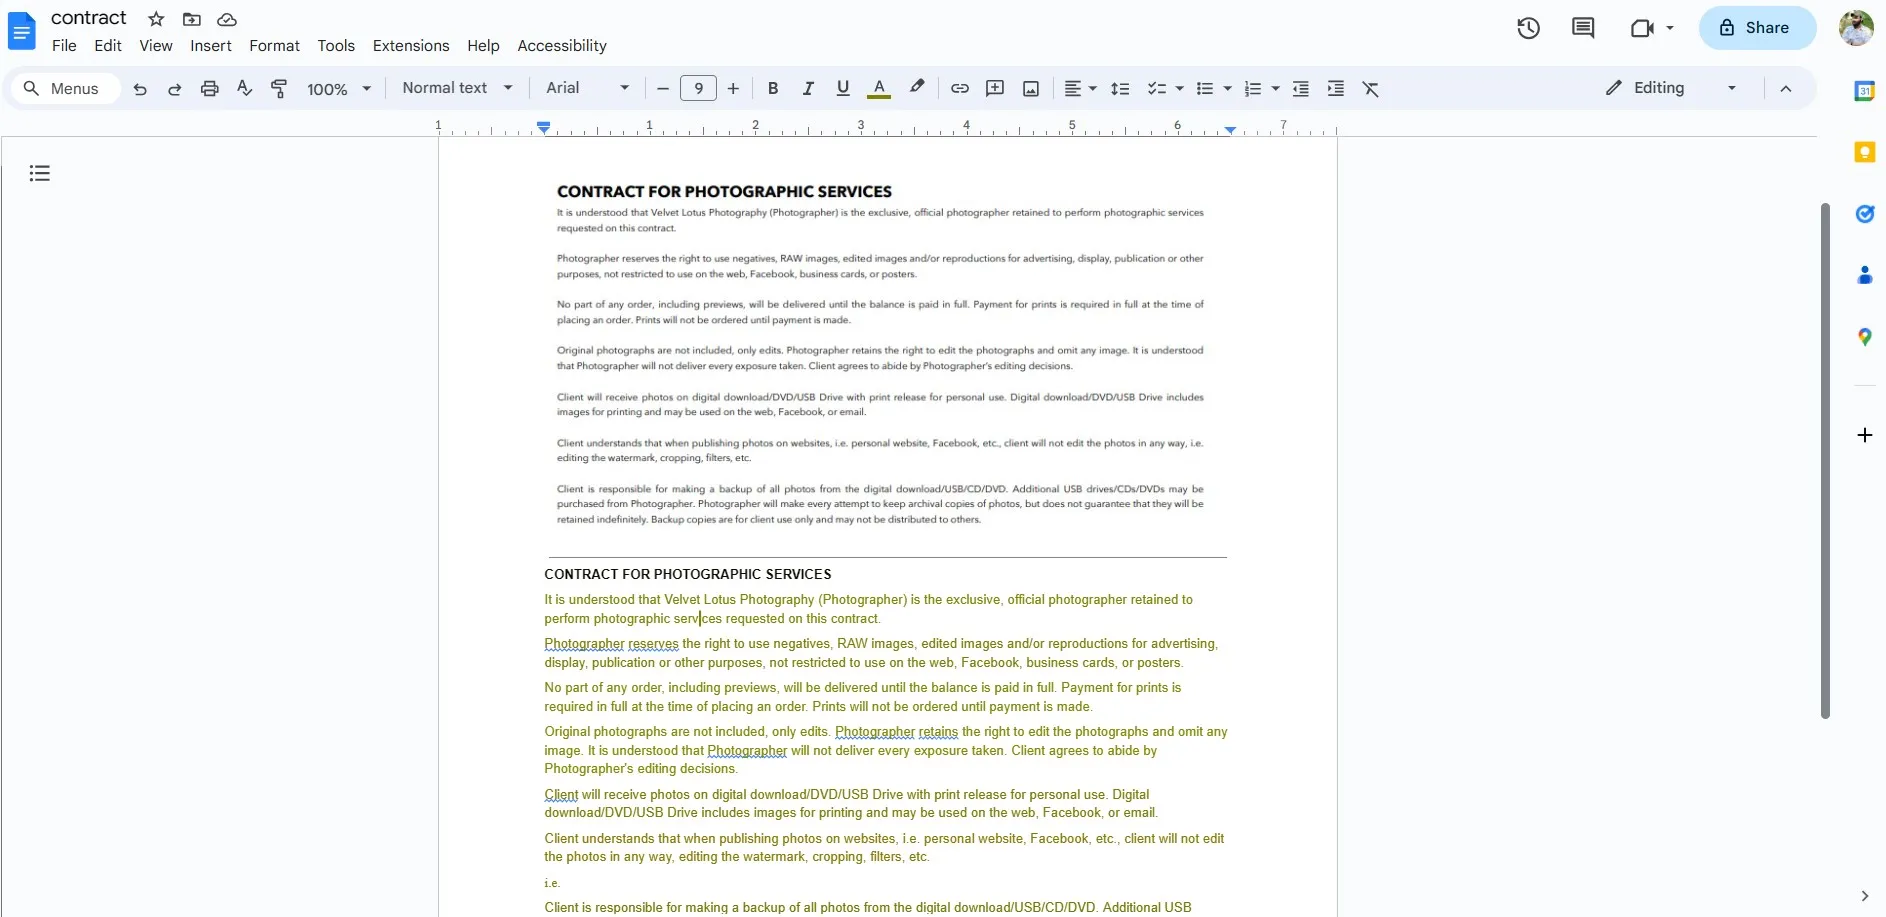
Google Drive will now open a new tab for Google Docs, and this will take some time to load as the image is being processed for converting it to text. As the document loads, you will see the image pasted on the top and all the text in it present at the bottom. Google Docs also tries to somewhat maintain the formatting in the original image, which makes the process convenient.
Part 2. How to Convert an Image to Text in Google Docs Using Add-on
The second method we will discuss here is about using a Google Docs add-on. Add-ons are the tools that you can optionally add to Google Docs for unlocking additional features. Different parties provide them and are usually considered as a third-party utility. However, with this method, you don’t need to access Google Drive and upload the image there since everything can be done with the Google Docs window, as elaborated in the steps below:
1. Open Google Docs and open a blank document.
Start by opening a Google Docs tab in the browser and open the blank document by using the options present on the top. As you click "Blank," Google Docs will process for some time and create an untitled document for you.

2. Add an Add-on in the extensions.
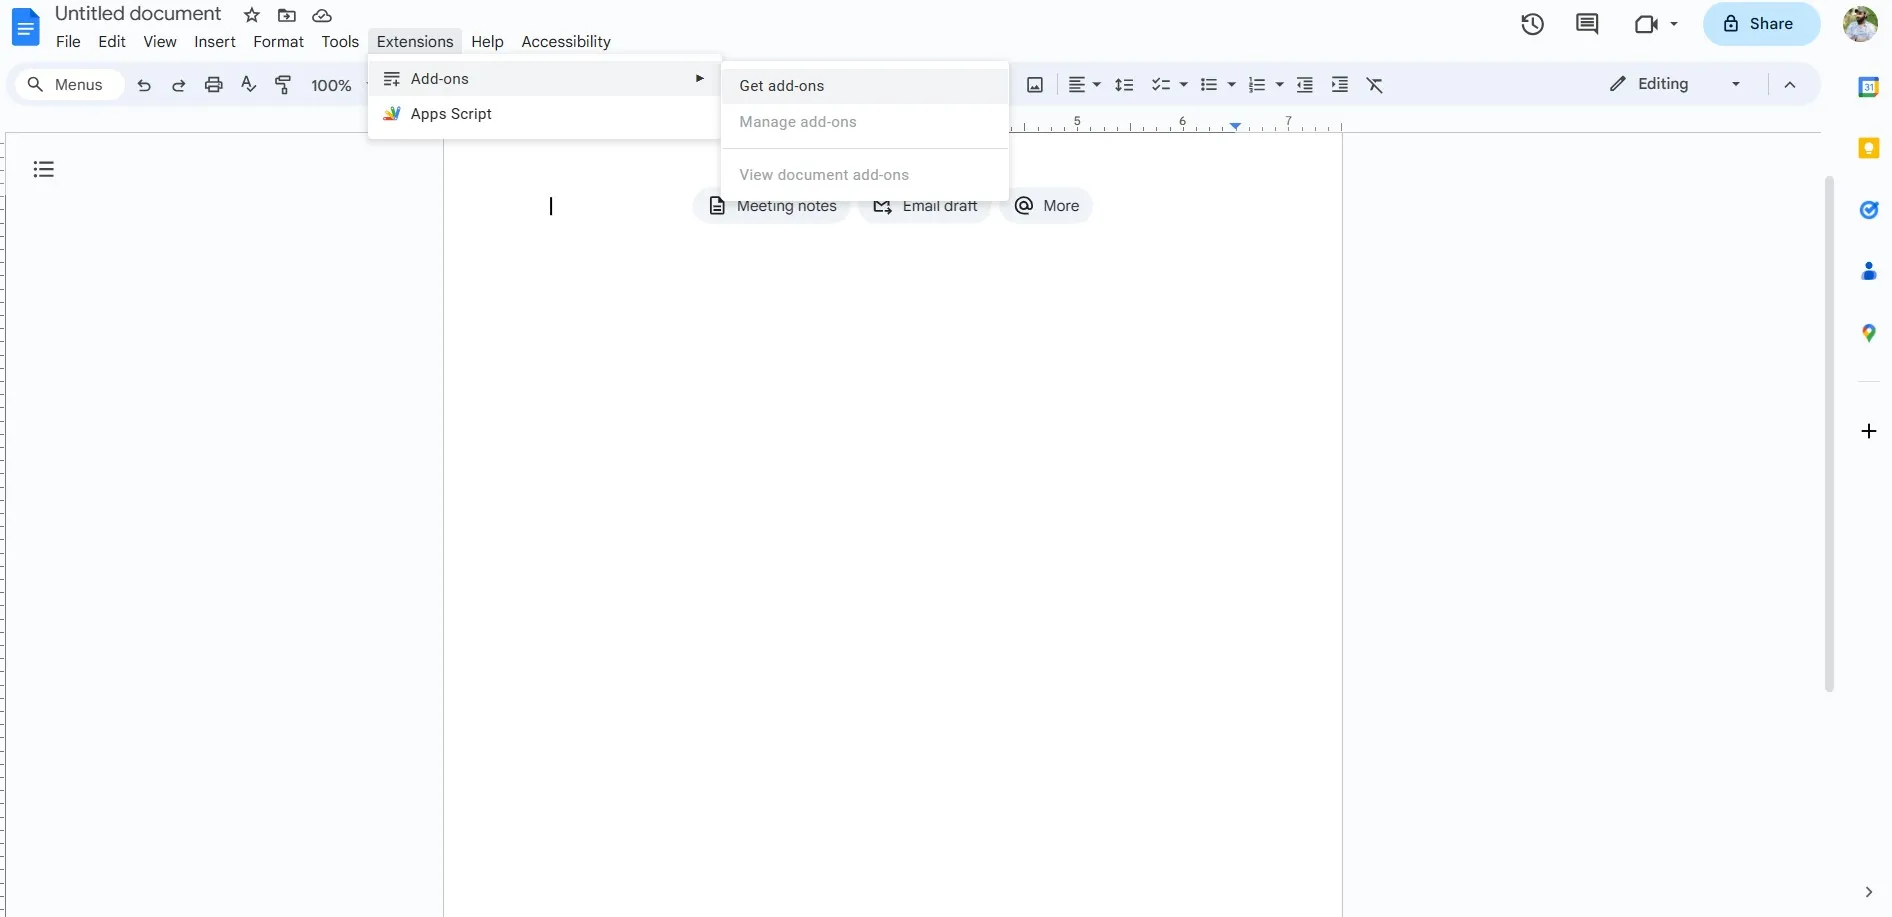
Now, you need to go to the menu on top and click "Extensions." It will give you the "Add-ons” button that will open a dropdown menu containing the "Get add-ons" button that we need to click here.
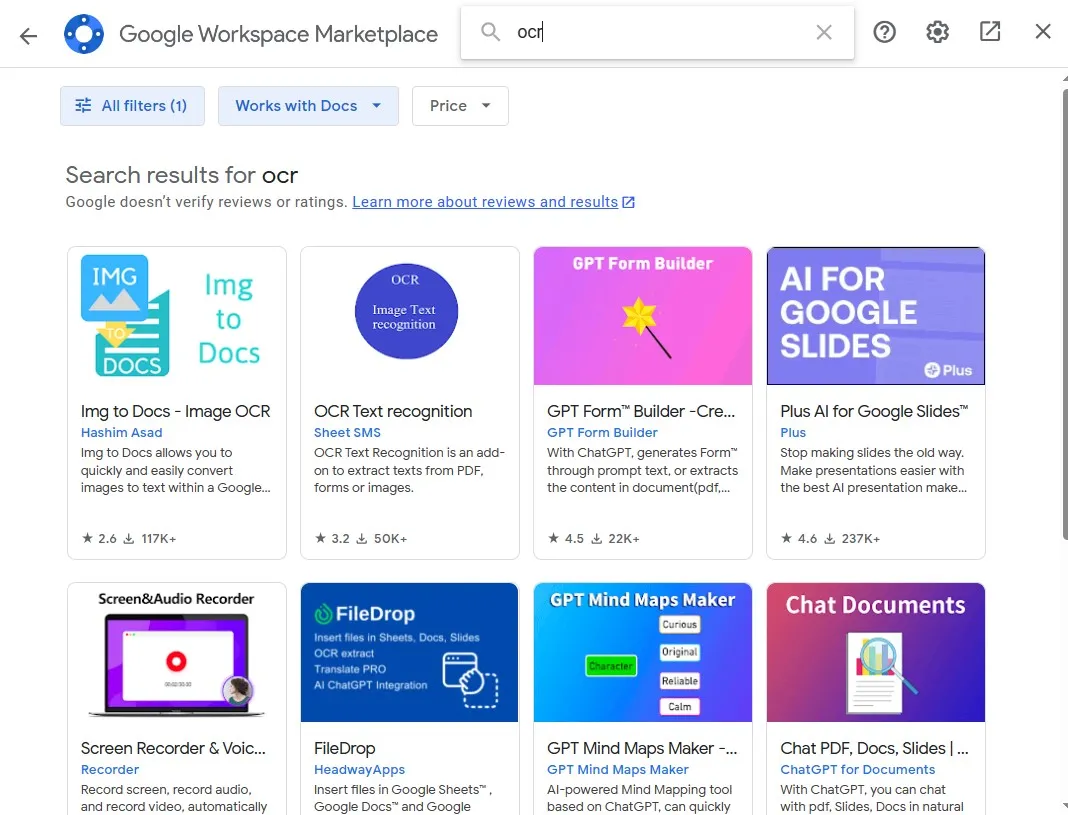
3. Search for OCR and pick the add-on of your choice.
Now, you will see a Google Workspace Marketplace window open in front of you. Here, you need to search "OCR" in the search box and pick any of the add-ons that sound good to you. You may consider the star rating and number of downloads for each one to see which one is better. In this example, we went with the first one.
4. Follow through the installation process.
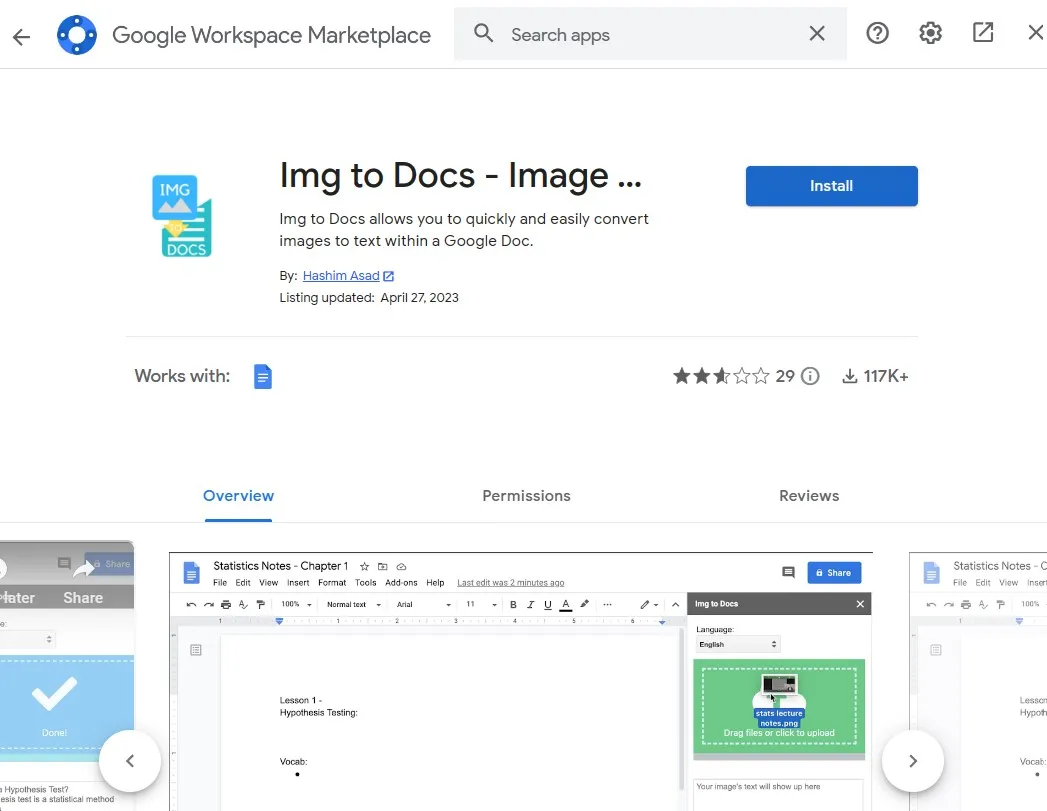
Once you click on the add-on, you will go to its detailed page with the "Install" button. Click it and follow through with the installation process. You may need to allow access to your account, and the rest will be done automatically. Finish the process after the Add-on is added.
5. Click extensions and start your extension.
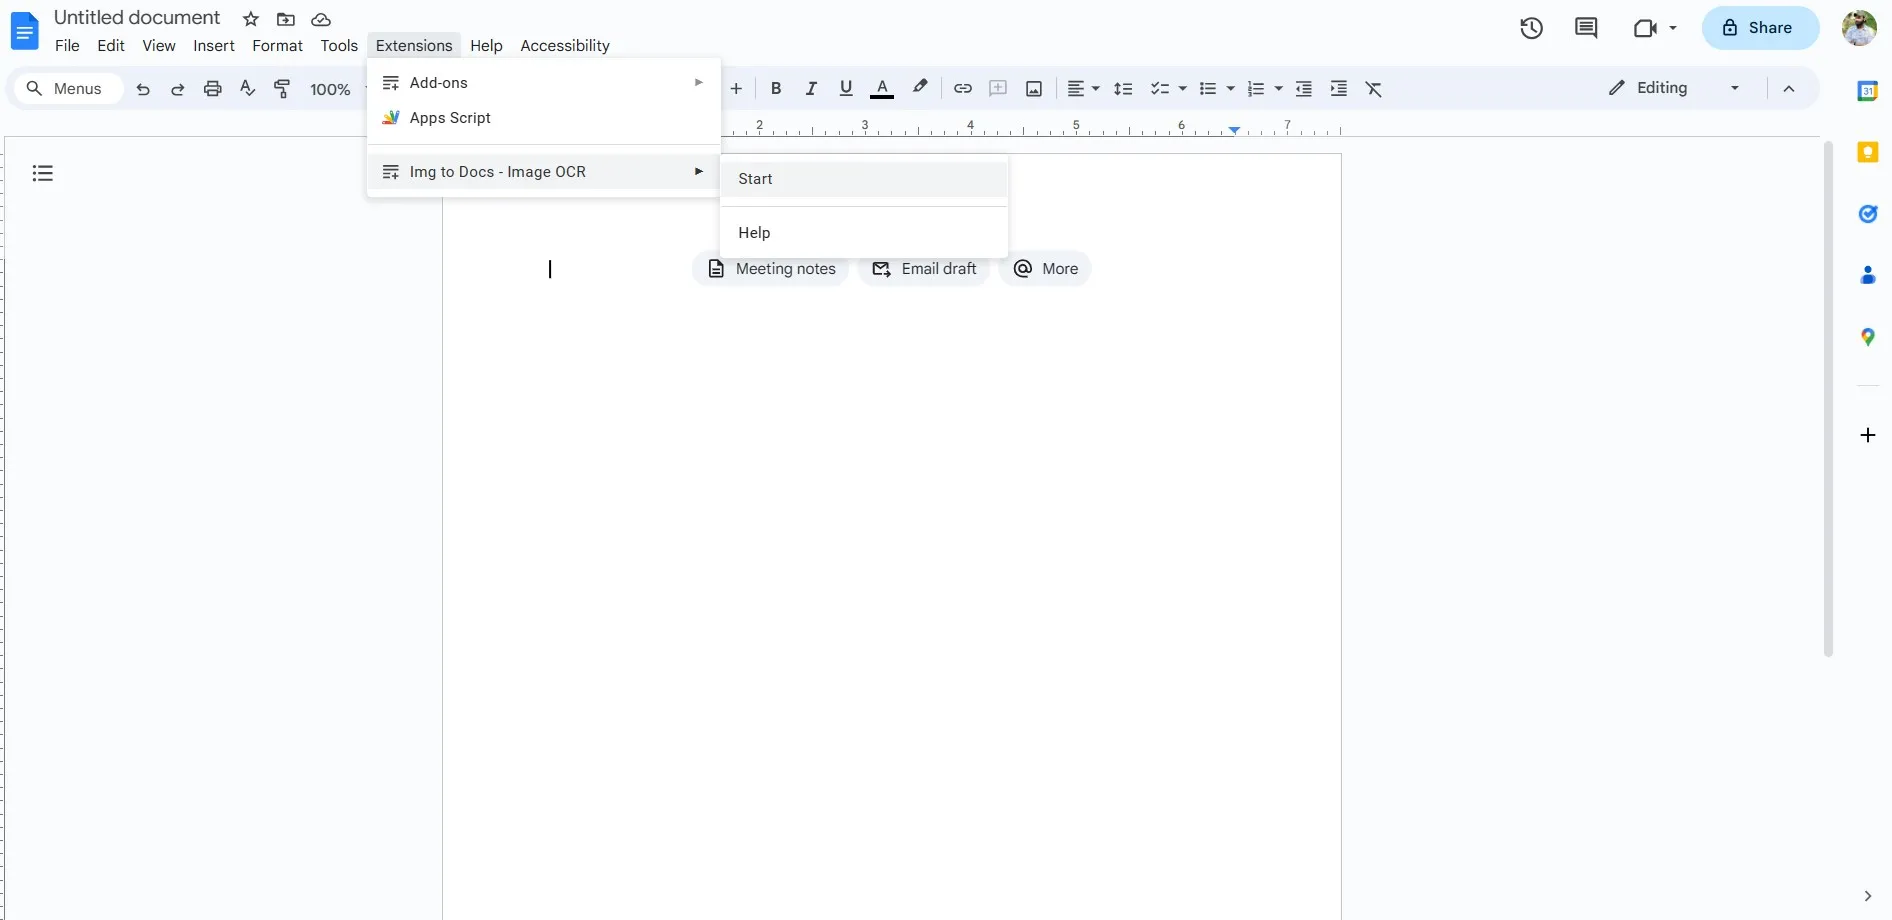
Now, you will go back to the Google Docs tab and click the "Extensions" button. It will show the dropdown menu with the newly added add-on to it. You need to click that add-on and click "Start" to access the features of that add-on tool in Google Docs.
6. Upload image
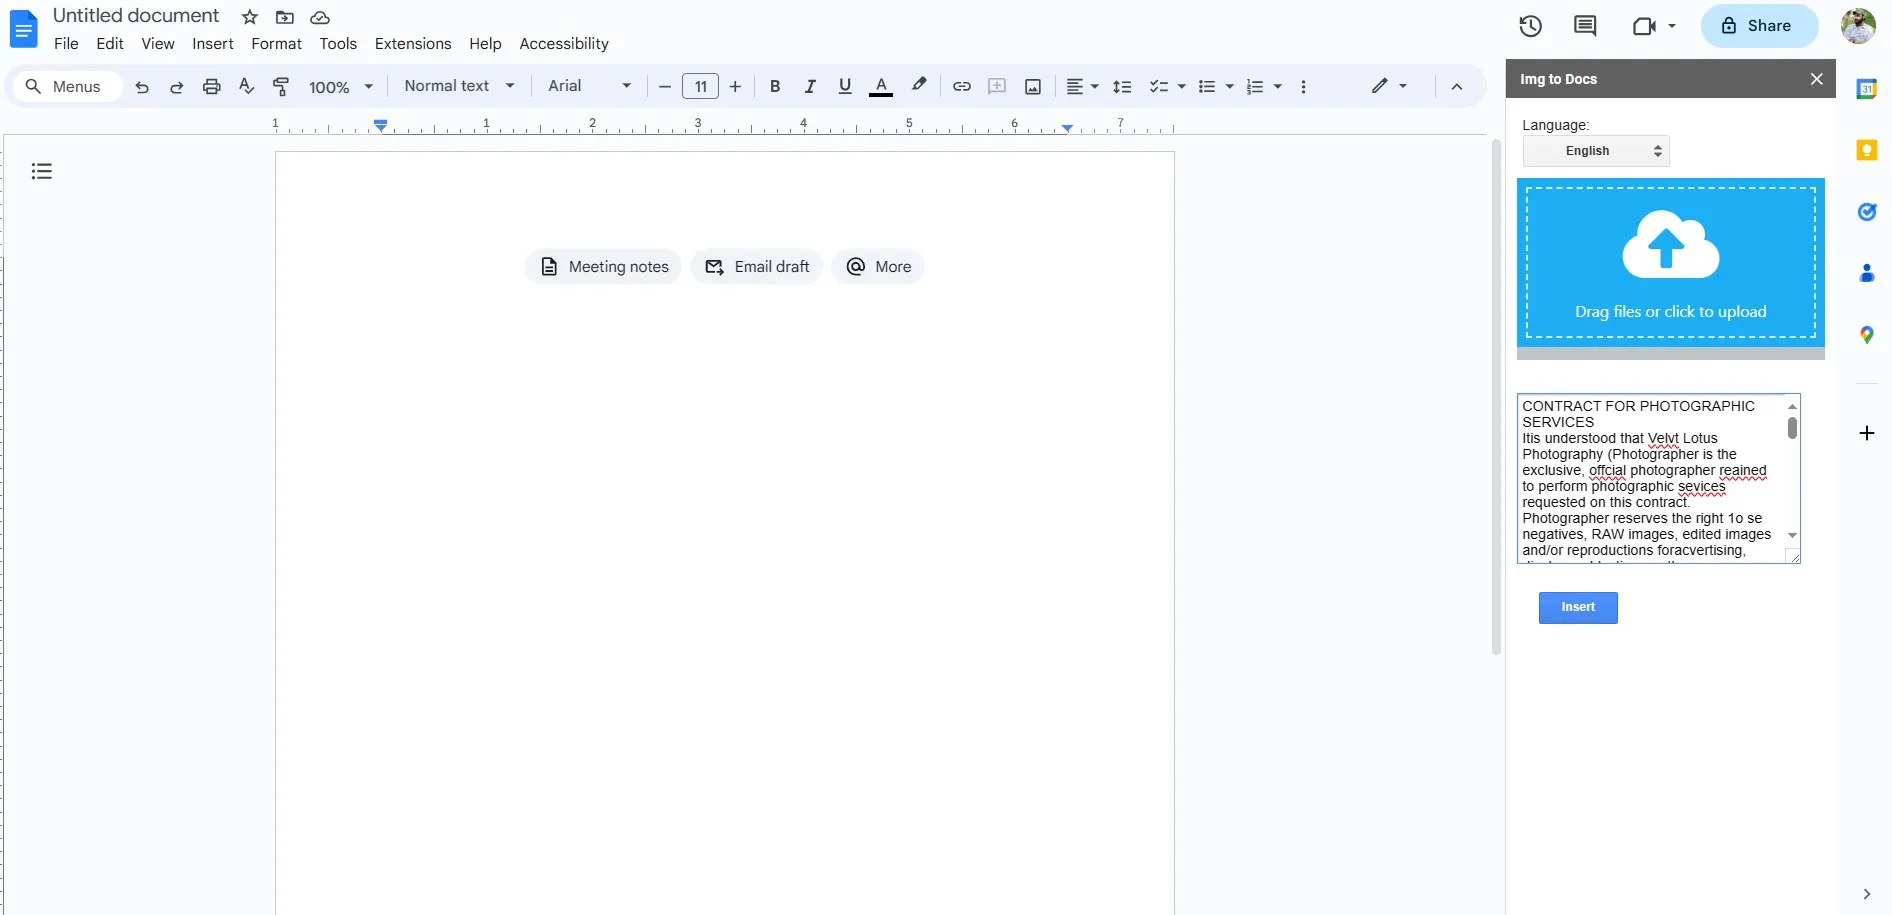
Click "drag files or click to upload" button and upload image. Now wait while it processes the text then, it will display the text from image in the text box below. Now you can manually copy that text or click "Insert" to insert the whole text extracted from that image to the Google Docs document.
Part 3. How to Convert Image to Text Without Google Docs?
Google Docs OCR may work, but you won't get the best experience. There are some problems like formatting issues and content integrity problems, and the biggest one is that you rely completely on the internet. The solution to all these problems is using UPDF since it comes with one of the most accurate OCR features that you can use. The powerful OCR feature of UPDF supports the conversion from image and screenshots to PDF within seconds.
With its AI backend, UPDF ensures to maintain content integrity and formatting after every OCR process, and it also resolves the issue of relying on the internet for offline processing. In addition to these benefits, UPDF supports multiple languages for performing OCR, and you get the same standard experience with high accuracy in every conversion.
While performing OCR, you can customize the OCR settings to ensure that the content is processed as per your needs. Moreover, it allows editing text on the go or converting it to other editable file formats like Word, TXT, HTML, etc., for added convenience.
Moreover, if your purpose for converting image to text is to extract text from the image, you can also use UPDF's AI Assistant to do this task. It works better than OCR as it can recognize any language and handwritten notes.
Download UPDF and see how it changes your experience of converting images to text with the steps below:
Windows • macOS • iOS • Android 100% secure
Way 1. Use OCR
On desktop
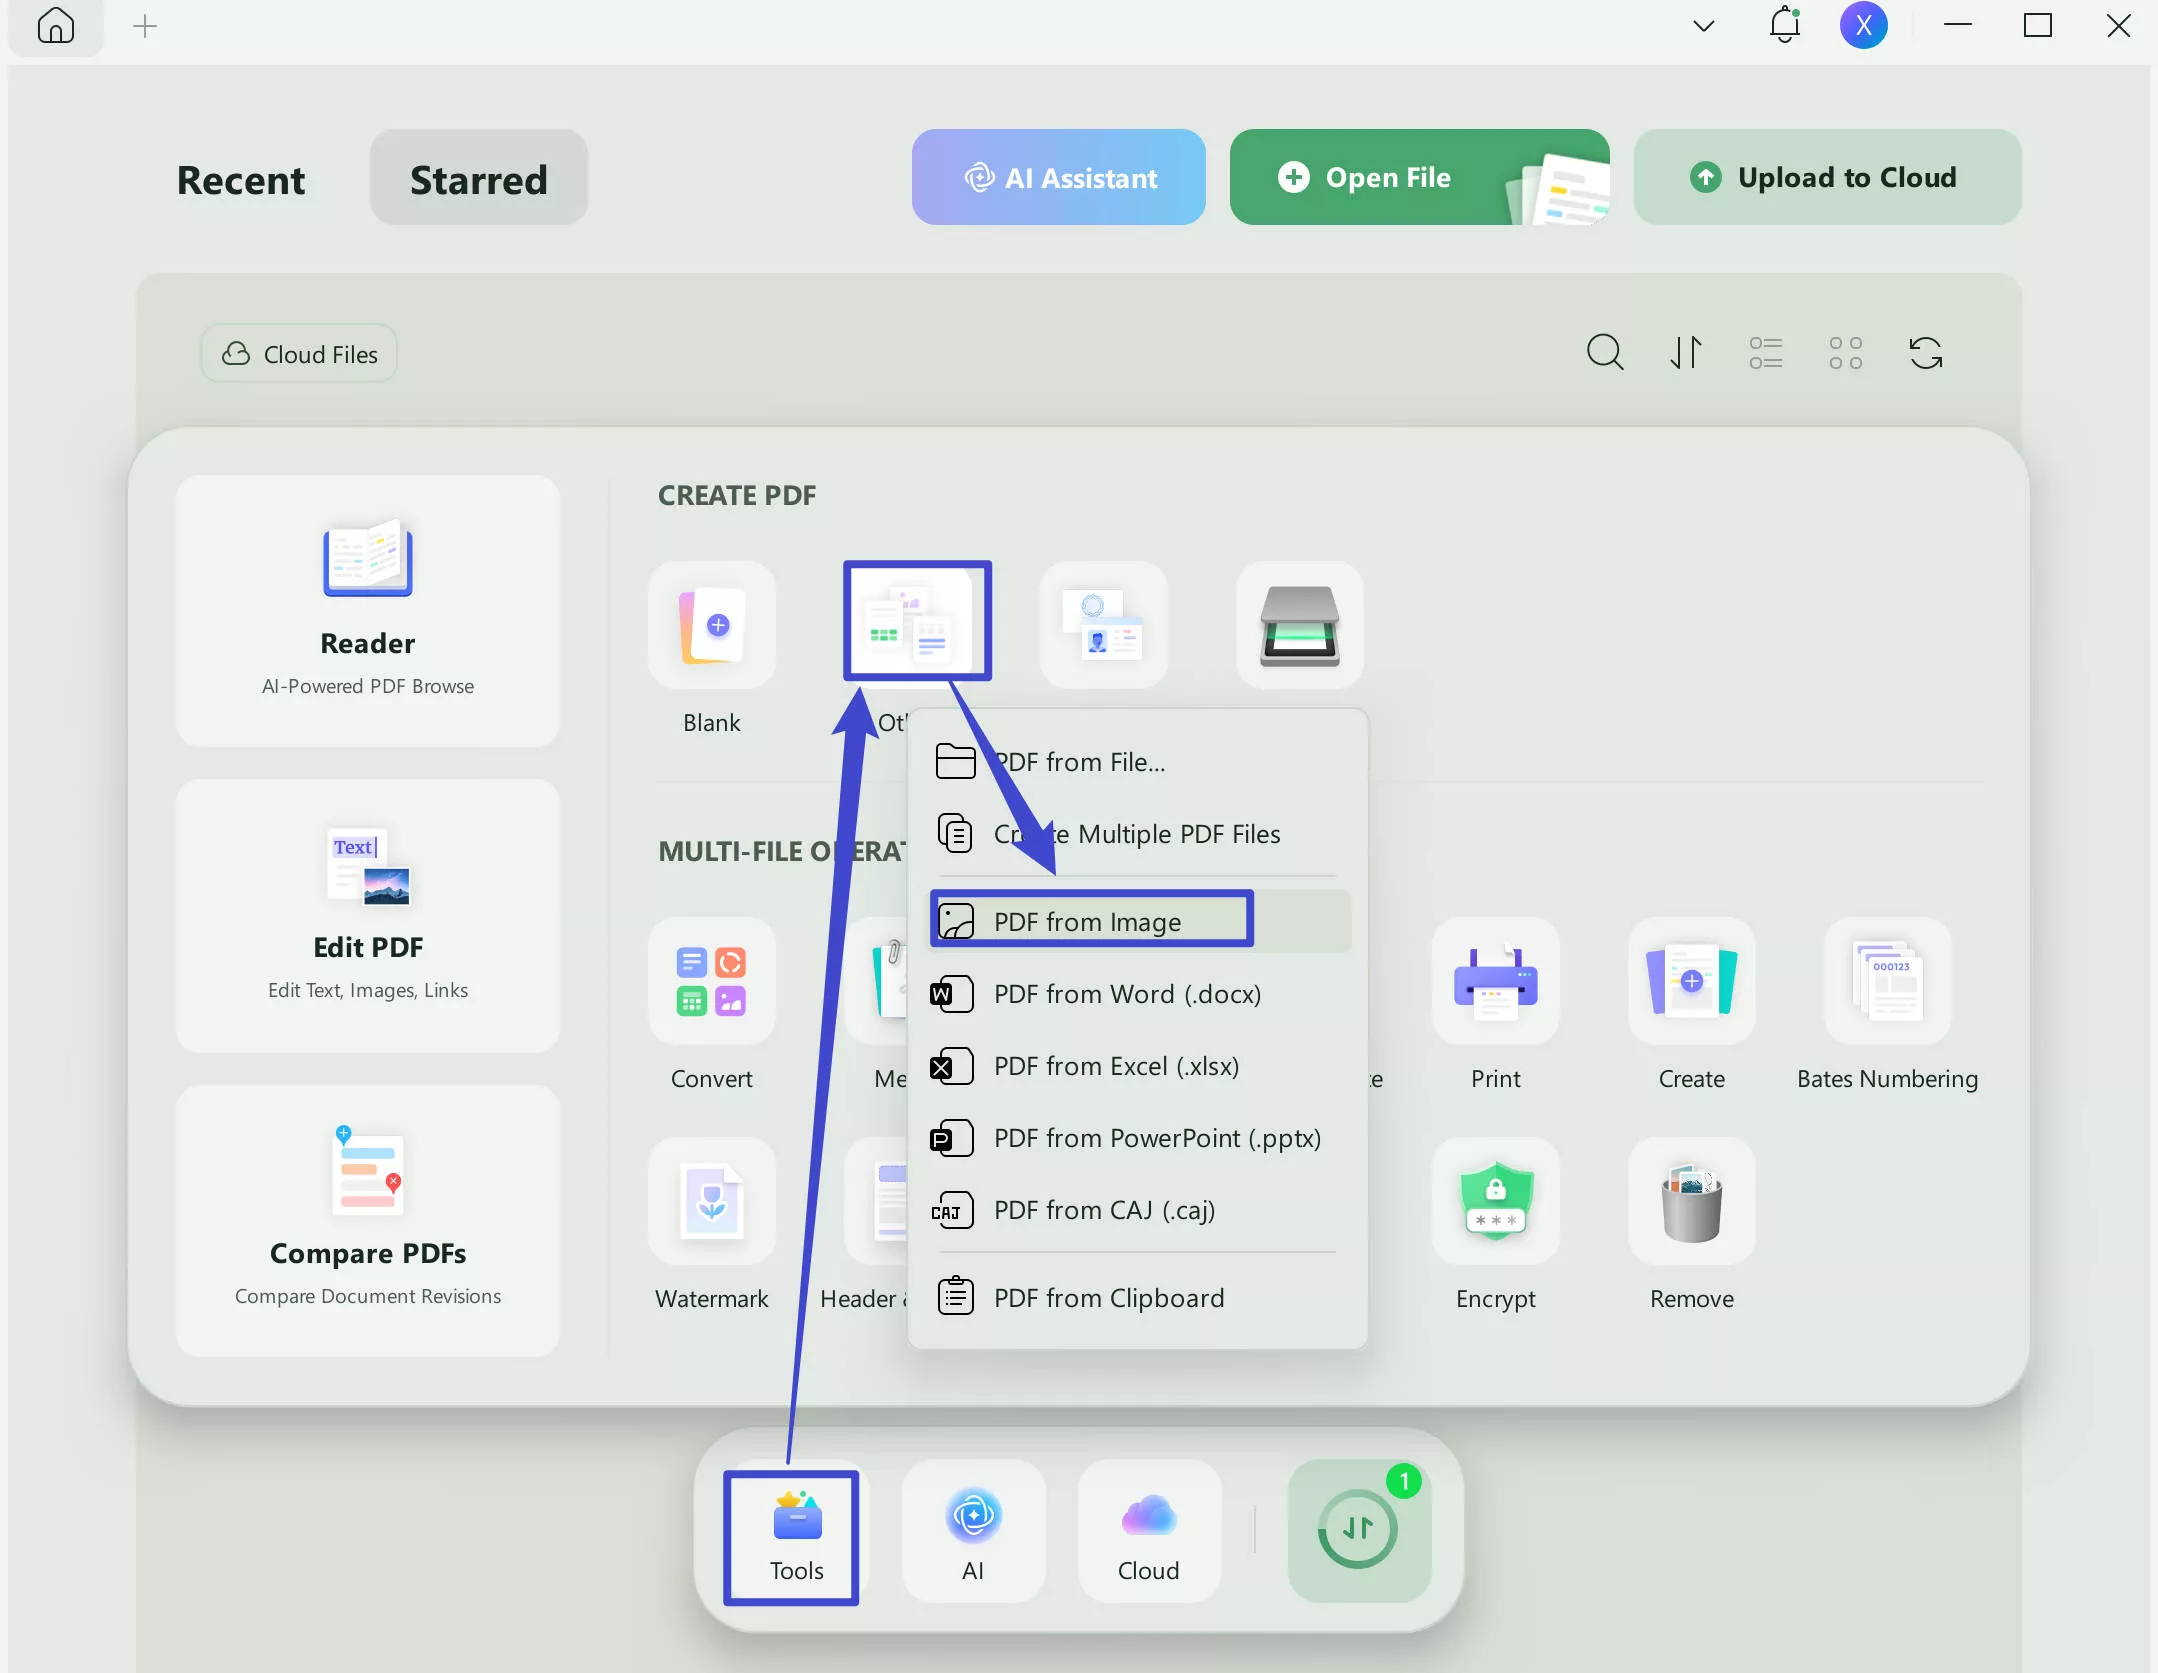
Step 1. Double-click the desktop icon of the UPDF app on your PC. Once you are in the UPDF interface you need to click "Tools" > "Other" > "PDF from image". Now, you will have the browse window where you need to find, select, and open the image in UPDF to make a PDF from it automatically.
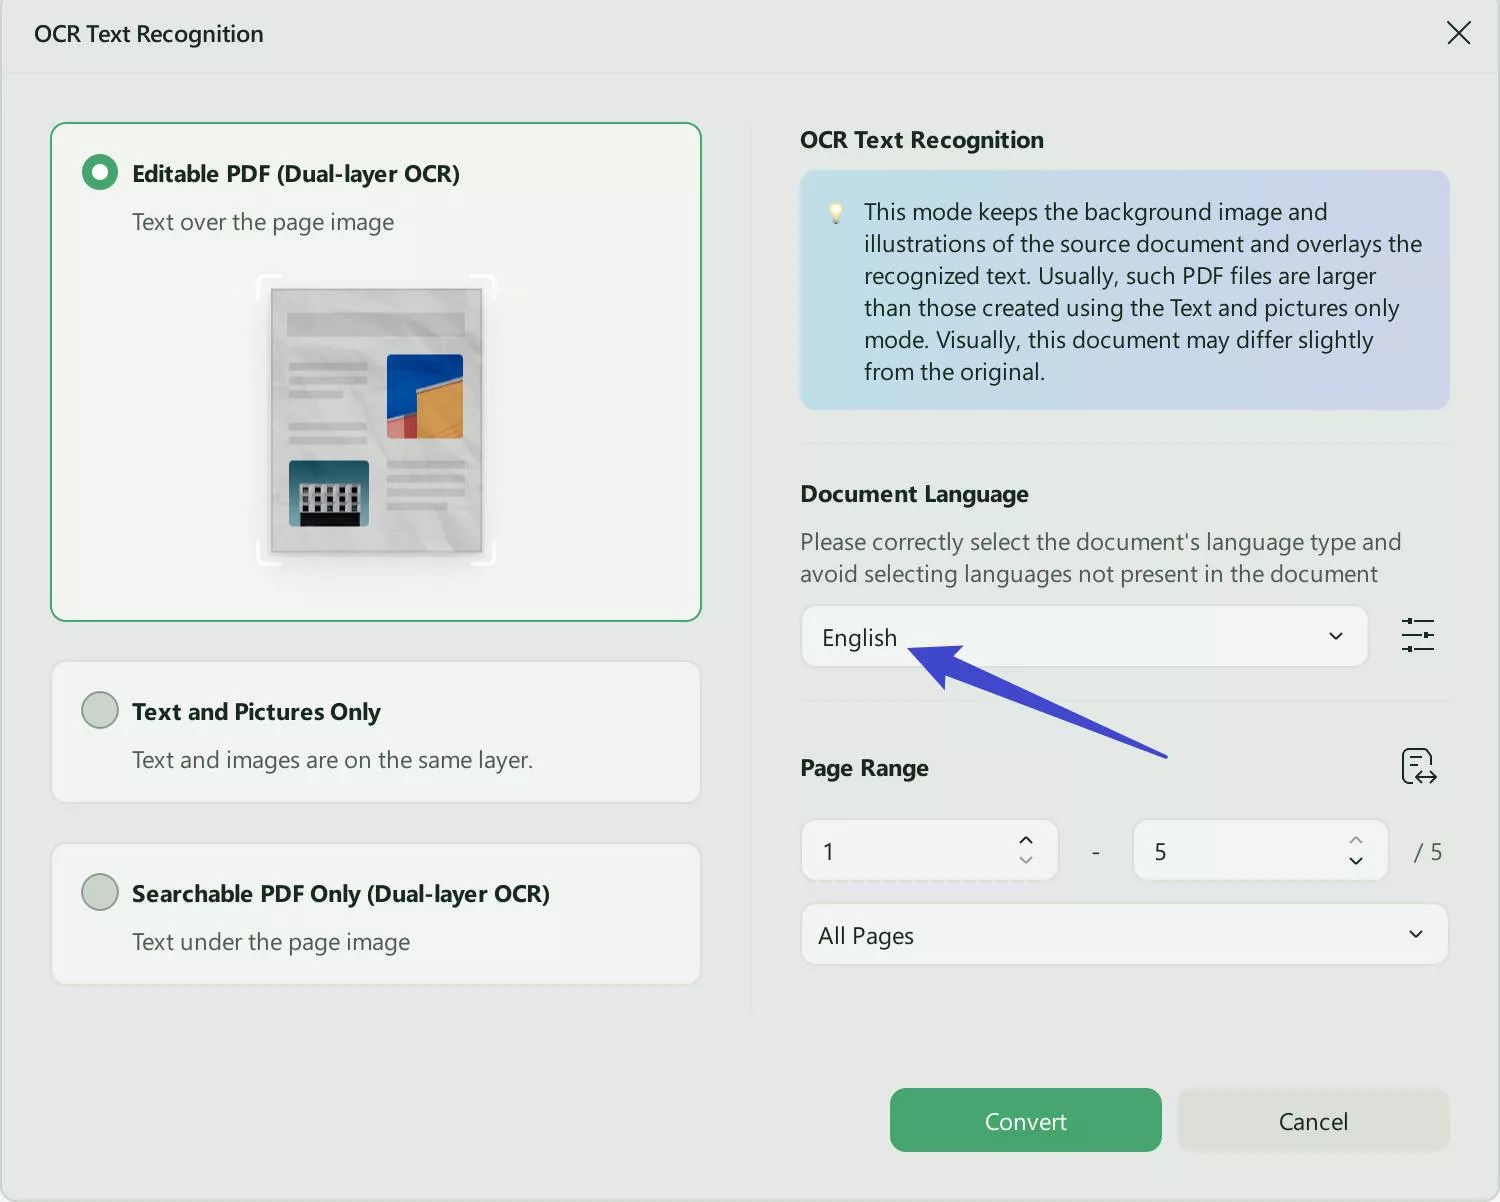
Step 2. When the image opens in UPDF, you need to click "OCR" in "Tools". You may customize the OCR settings, especially, choose the document language before clicking the perform OCR button. Here, I pick up "English", and click on the "Convert". Now follow the file-saving steps on the screen and wait for UPDF to perform your OCR.
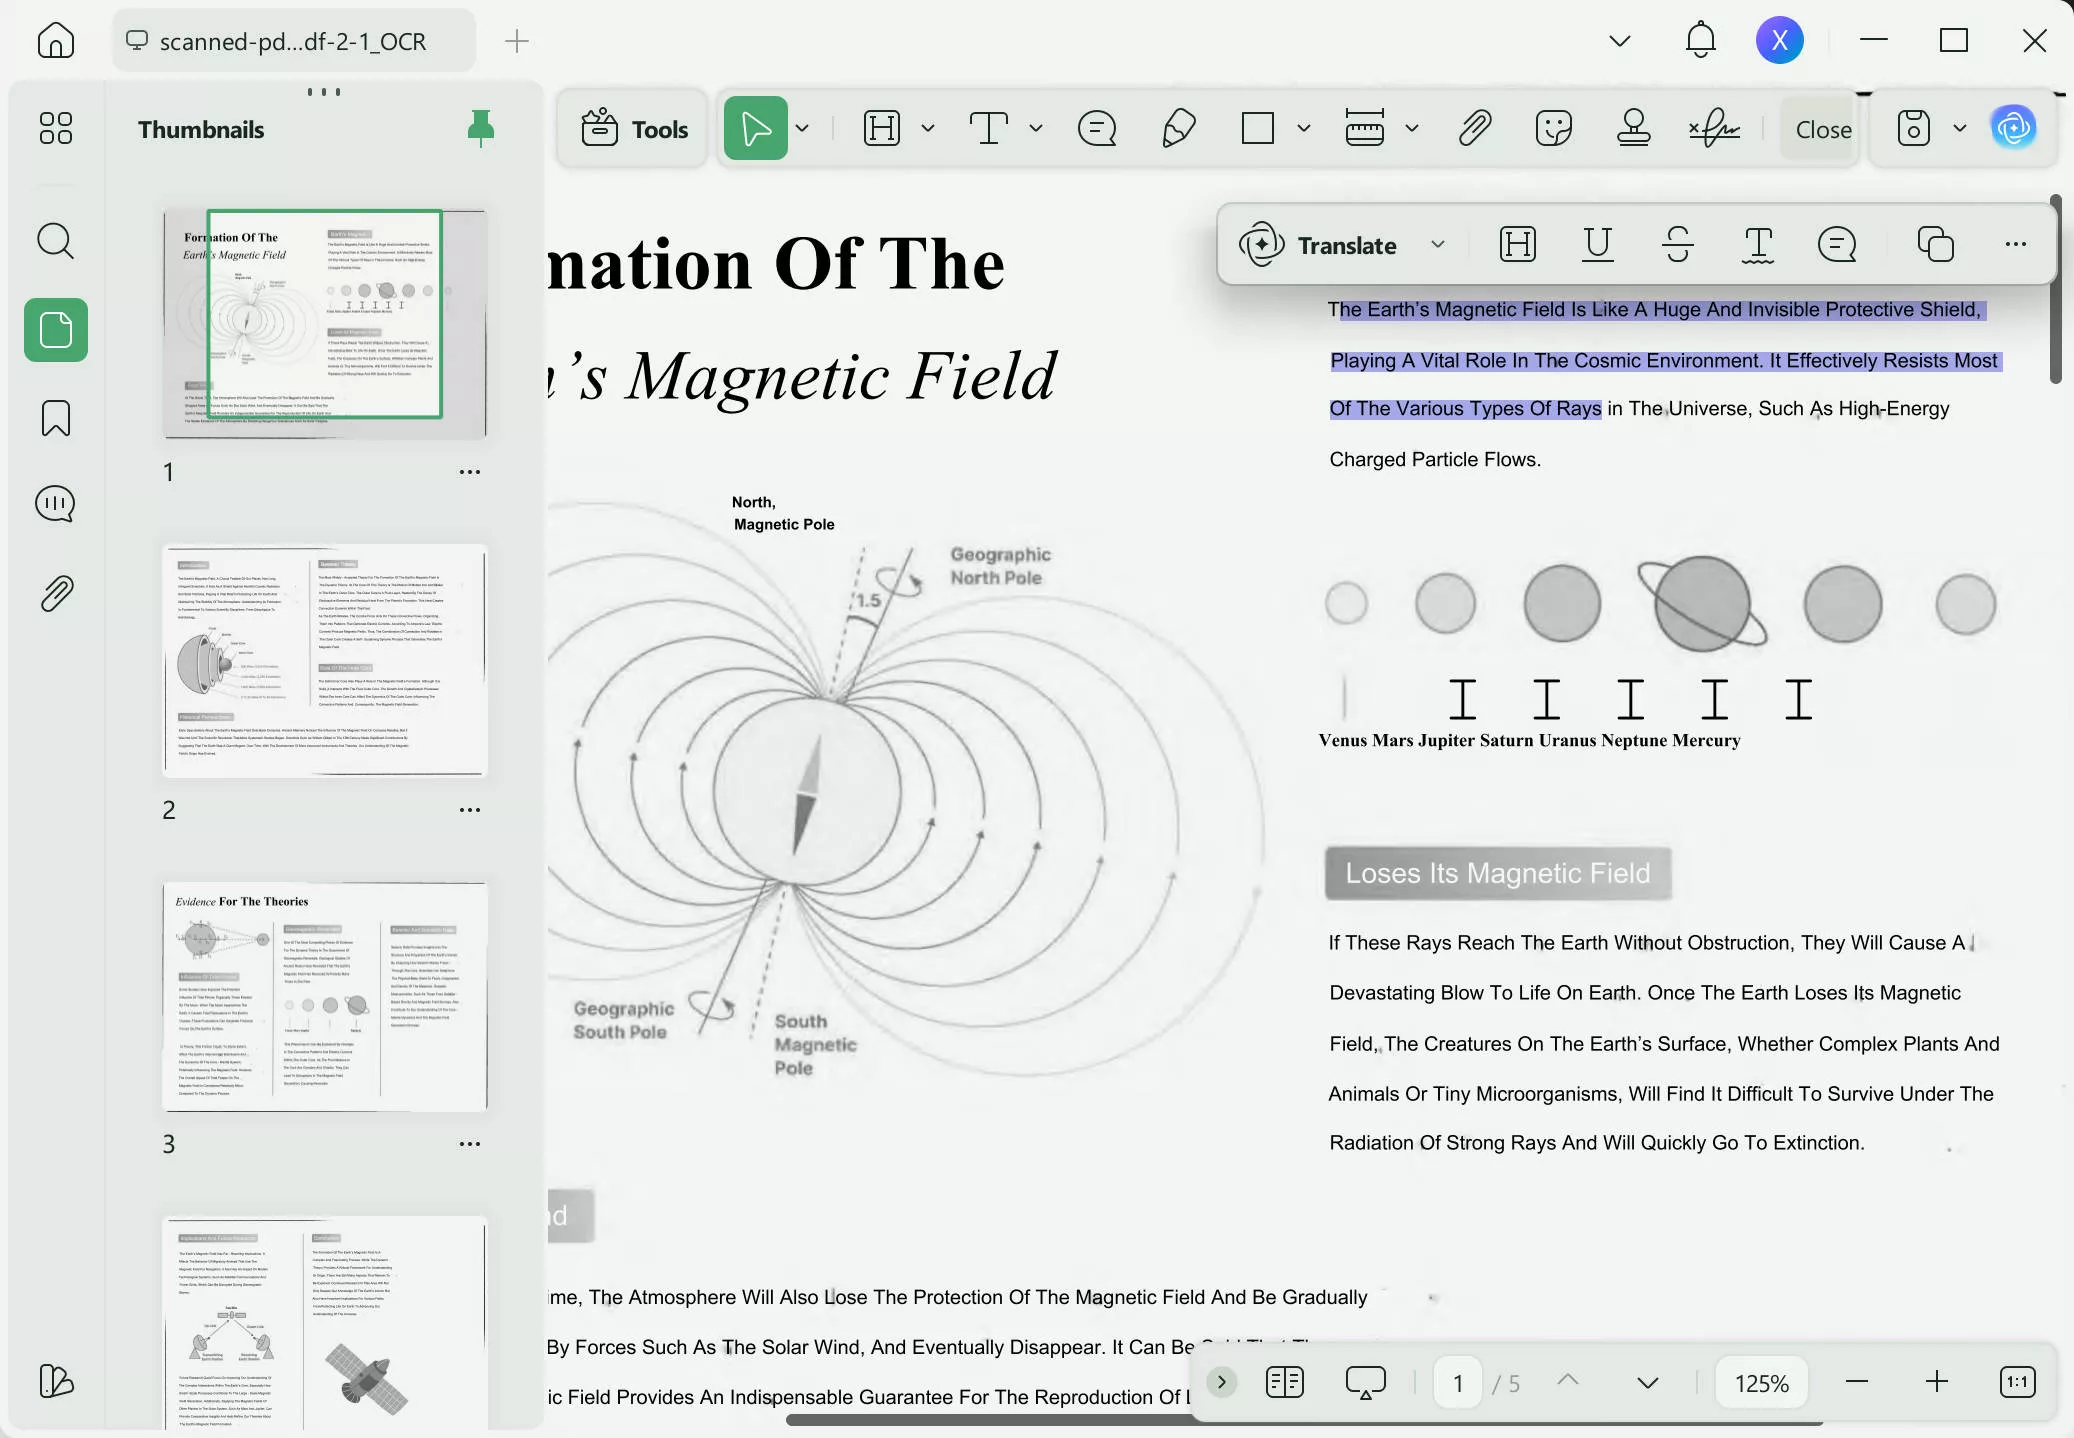
Step 3. Once UPDF has converted your image to text, it will automatically open the OCR PDF file in a new tab. This tab will have the same content with the same formatting and high accuracy. You can select, copy, edit, and convert the text from the image using UPDF. In this way, UPDF brings the most comprehensive OCR experience.
On mobile
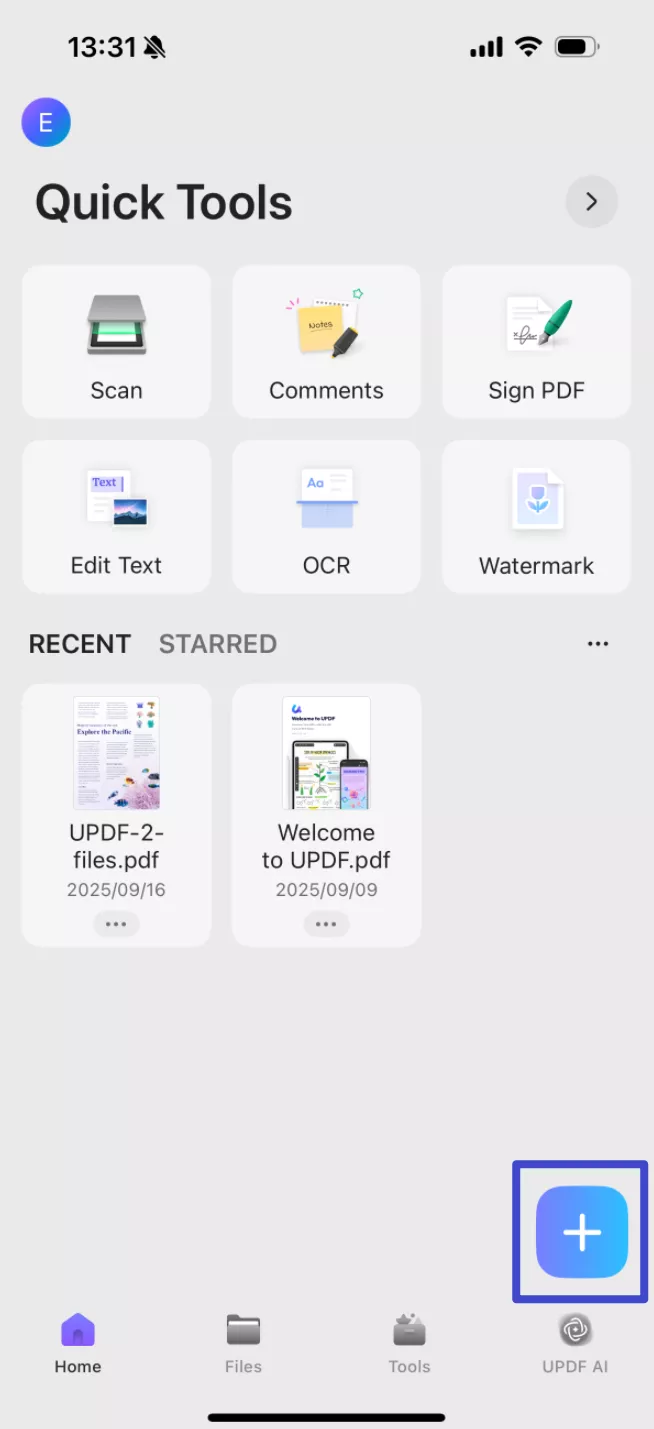
Step 1. Open UPDF, click the "+" icon, choose "From Other Formats" and click "Image to PDF" in the pop-up windows.
Step 2. When the image opens in UPDF, you need to click "OCR" at the bottom. You may customize the OCR settings, especially, choose the document language before clicking the perform OCR button. Here, I pick up "English", and click on the "Continue".
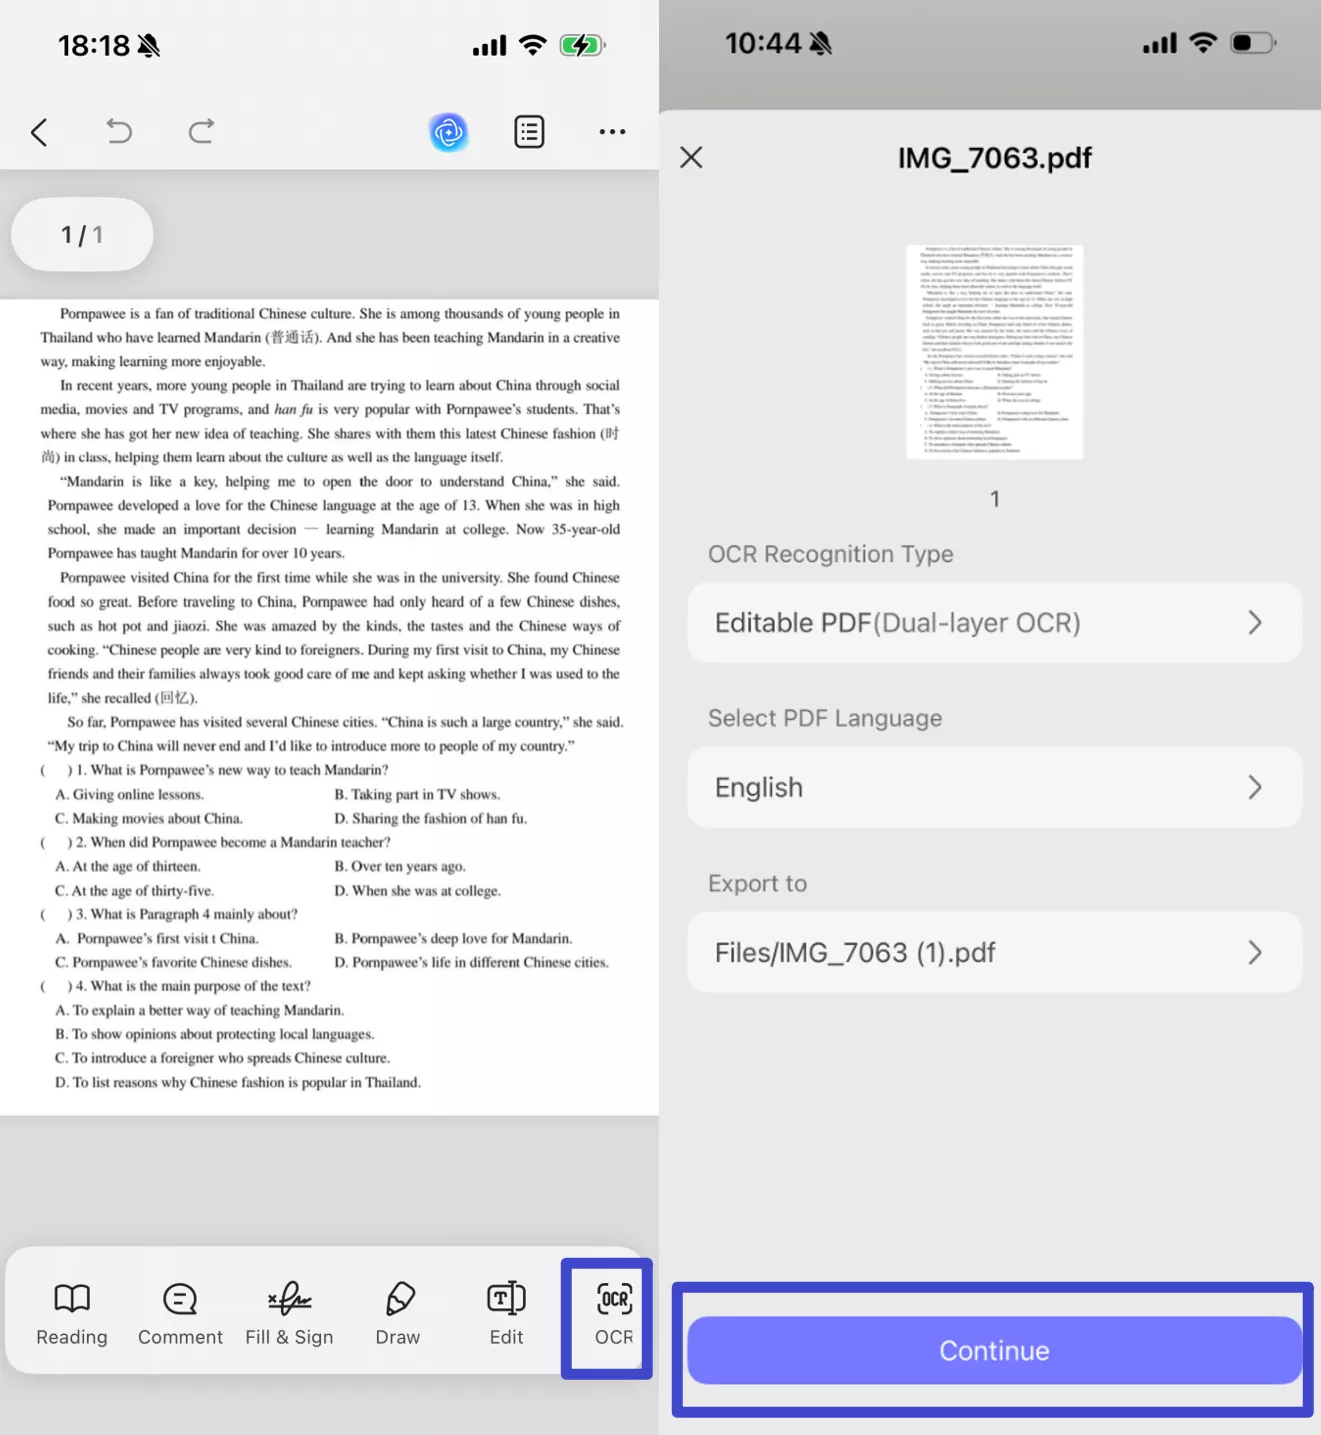
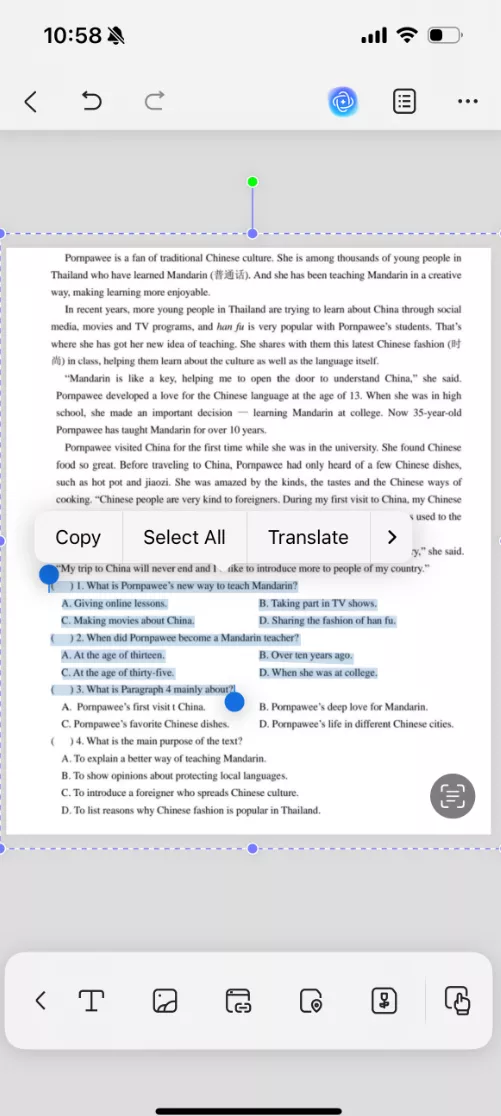
Step 3. Once UPDF has converted your image to text, it will automatically open the OCR PDF file in a new tab. This tab will have the same content with the same formatting and high accuracy. You can select, copy, edit, and convert the text from the image using UPDF.
To learn more about how to use OCR, watch the below video guide.
Way 2. Use AI
If you only want to extract text from the image, you can use UPDF AI's chatting with image feature. Here is the guide.
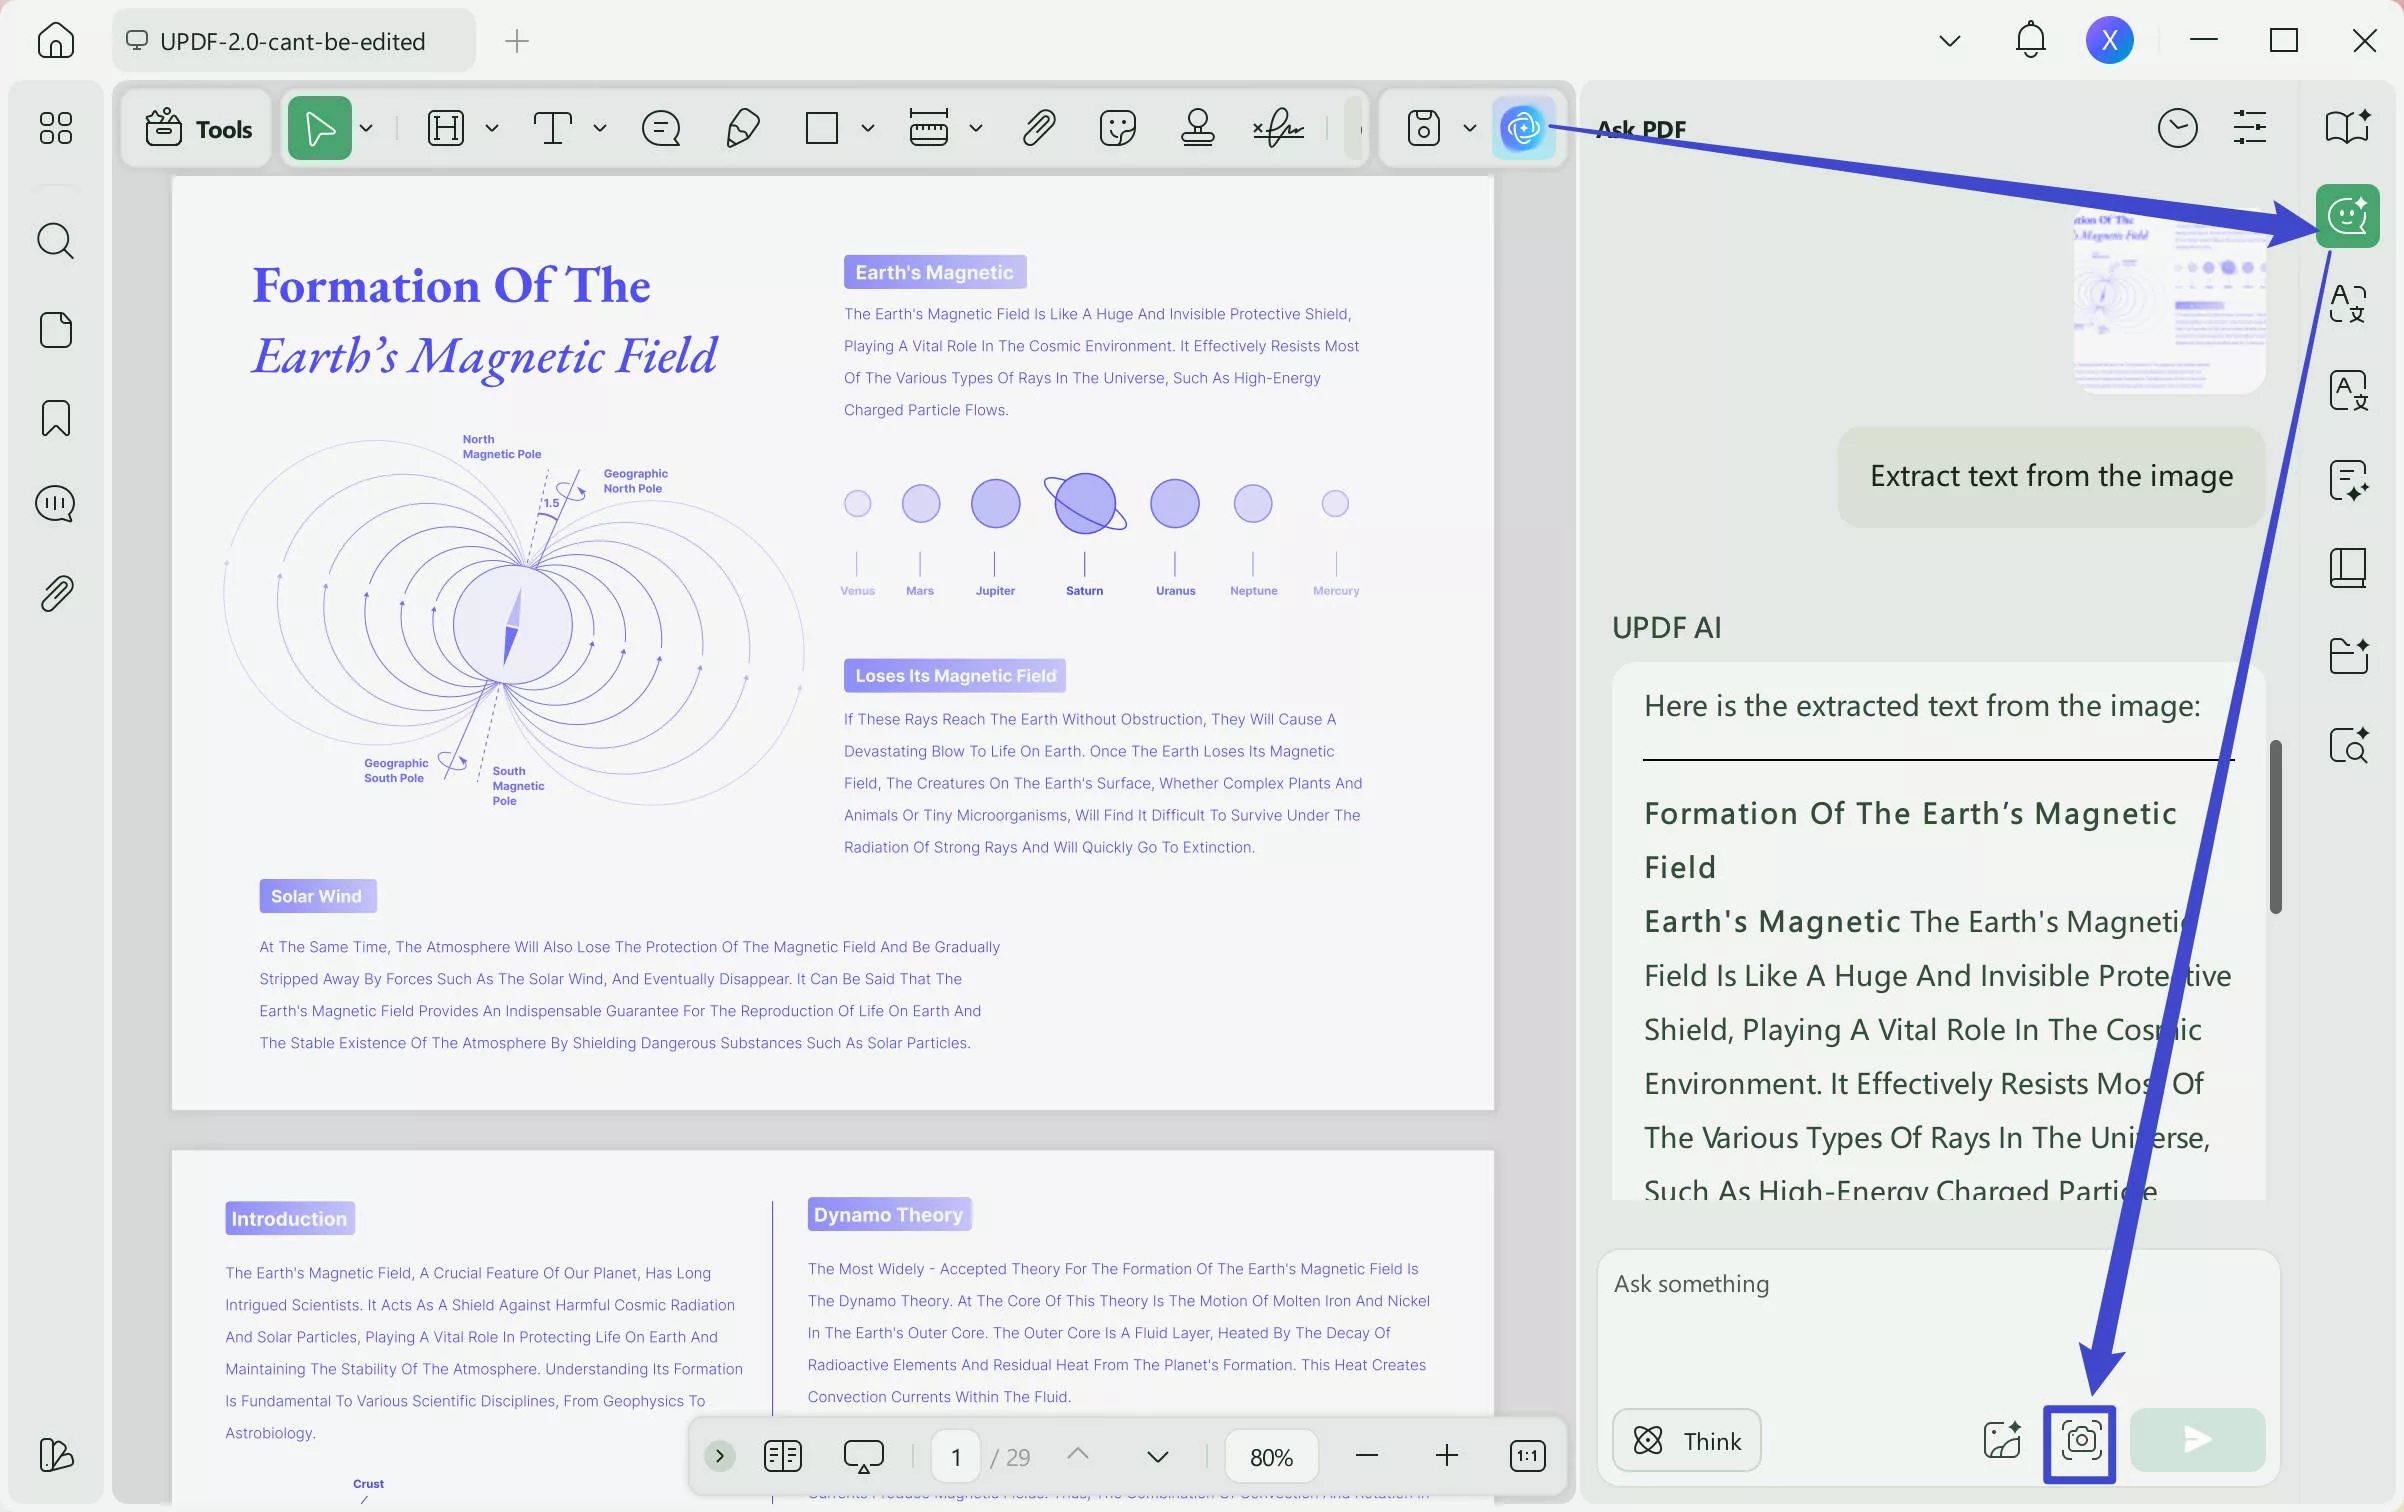
Step 1. Drag the images to UPDF home interface to open them. Then, click on the "UPDF AI" icon, go to "Chat" mode, click on the "Screenshot".
Step 2. Select the area from the image, or you can click on the "Add image" to upload it, and enter the prompt "Extract text from the image", and press enter. Now, you extract the text from the image successfully.
Along with a comprehensive experience of image to text, you can enjoy the following features with UPDF:
- UPDF AI for translating and summarizing content
- UPDF Cloud to organize documents and sync your data across your devices.
- Comprehensive commenting and annotation features
- Ability to edit text, links, and images within the PDF documents
- PDF form creation and editing
- Convert other files to PDF and PDF to other file formats
- Merge, split, and other PDF organization tools
Also, UPDF can work on Windows, Mac, iOS, Android and Al Assistant can work on Web, Windows, Mac, Android and iOS, allowing you to access all these functionalities anytime, anywhere.
Undoubtedly, UPDF meets all your PDF editing, reading, and processing needs. However, for the best experience, we recommend you purchase UPDF PRO, as it will unlock all the premium features at a cheap price.
It is worth noting that with UPDF, you can easily convert screenshots into Word, Excel, HTML and PowerPoint documents.
Final Words
If you get a scanned document or an image that contains text, typing the whole thing again is not efficient. That’s where you need to convert image to text with Google Docs. Hopefully, you can now easily do that with Google Docs using one of the methods that we discussed here.
However, if you are looking for better control and a comprehensive experience, you must use UPDF. Download UPDF to get the best formatting integrity and content accuracy in quick offline conversions on your device.
Windows • macOS • iOS • Android 100% secure
 UPDF
UPDF
 UPDF for Windows
 UPDF for Mac
 UPDF for iPhone/iPad
 UPDF for Android
 UPDF AI Online
 UPDF Sign
 Edit PDF
 Annotate PDF
 Create PDF
 PDF Form
 Edit links
 Convert PDF
 OCR
OCR PDF to Word
 PDF to Image
 PDF to Excel
 Organize PDF
 Merge PDF
 Split PDF
 Crop PDF
 Rotate PDF
 Protect PDF
 Sign PDF
 Redact PDF
 Sanitize PDF
 Remove Security
 Read PDF
 UPDF Cloud
 Compress PDF
 Print PDF
 Batch Process
 About UPDF AI
 UPDF AI Solutions
 AI User Guide
 FAQ about UPDF AI
 Summarize PDF
 Translate PDF
 Chat with PDF
 Chat with AI
 Chat with image
 PDF to Mind Map
 Explain PDF
 Scholar Research
 Paper Search
 AI Proofreader
 AI Writer
 AI Homework Helper
 AI Quiz Generator
 AI Math Solver
 PDF to Word
 PDF to Excel
 PDF to PowerPoint
 User Guide
 UPDF Tricks
 FAQs
FAQs UPDF Reviews
 Download Center
 Blog
Blog Newsroom
 Tech Spec
 Updates
 UPDF vs. Adobe Acrobat
 UPDF vs. Foxit
 UPDF vs. PDF Expert




 Lizzy Lozano
 Enola Davis
 Enid Brown