 UPDF for Windows
 UPDF for Mac
 UPDF for iPhone/iPad
 UPDF for Android
 Nomostar
 UPDF AI Online
 UPDF Sign
 IvyCraft
 Edit PDF
 Annotate PDF
 Create PDF
 PDF Form
 Edit links
 Convert PDF
 OCR
OCR PDF to Word
 PDF to Image
 PDF to Excel
 Organize PDF
 Merge PDF
 Split PDF
 Crop PDF
 Rotate PDF
 Protect PDF
 Sign PDF
 Redact PDF
 Sanitize PDF
 Remove Security
 Read PDF
 UPDF Cloud
 Compress PDF
 Print PDF
 Batch Process
 About UPDF AI
 UPDF AI Solutions
 AI User Guide
 FAQ about UPDF AI
 Summarize PDF
 Translate PDF
 Chat with PDF
 Chat with AI
 Chat with image
 PDF to Mind Map
 Explain PDF
 PDF AI Tools
 Image AI Tools
 AI Chat Tools
 AI Writing Tools
 AI Study Tools
 AI Working Tools
 Other AI Tools
 AI Bookmark Generation
 AI Bookmark Summary
 AI Watermark Generation
 AI Background Generation
 AI Sticker Generation
 AI Stamp Generation
 AI Editing Suite
 UPDF Copilot
 AI Page Management
 AI Semantic Search
 PDF to Word
 PDF to Excel
 PDF to PowerPoint
 User Guide
 UPDF Tricks
 FAQs
FAQs UPDF Reviews
 Download Center
 Blog
Blog Newsroom
 Tech Spec
 Updates
 UPDF vs. Adobe Acrobat
 UPDF vs. Foxit
 UPDF vs. PDF Expert
Photos preserve beautiful memories, exciting moments, and precious history. To keep these memories accessible, it’s important to organize them properly. One of the best ways to do this is by combining your images into a single PDF. This way, you only need to open one file to scroll through your photos, with their original quality fully retained.
While there are many tools available to merge photos into a PDF, some are overpriced, and others compromise image quality. In this article, we’ll introduce the best solution to help you merge Images to PDF with ease.
Method 1: How to Combine Images into PDF using the Batch Combine Feature
The best tool that can be used is UPDF. This universal tool lets you merge images into a PDF in just seconds. There’s no need to worry about file formats—it supports PNG, GIF, JPG, JPEG, TIFF, BMP, and more. On Mac, it even works with nearly all image formats. Best of all, you don’t need any technical skills to use it. With just a few clicks, you can effortlessly combine multiple images into one high-quality PDF.
Step 1: Download UPDF
First of all, download UPDF from the button below. After downloading, follow the underneath steps:
Windows • macOS • iOS • Android 100% secure
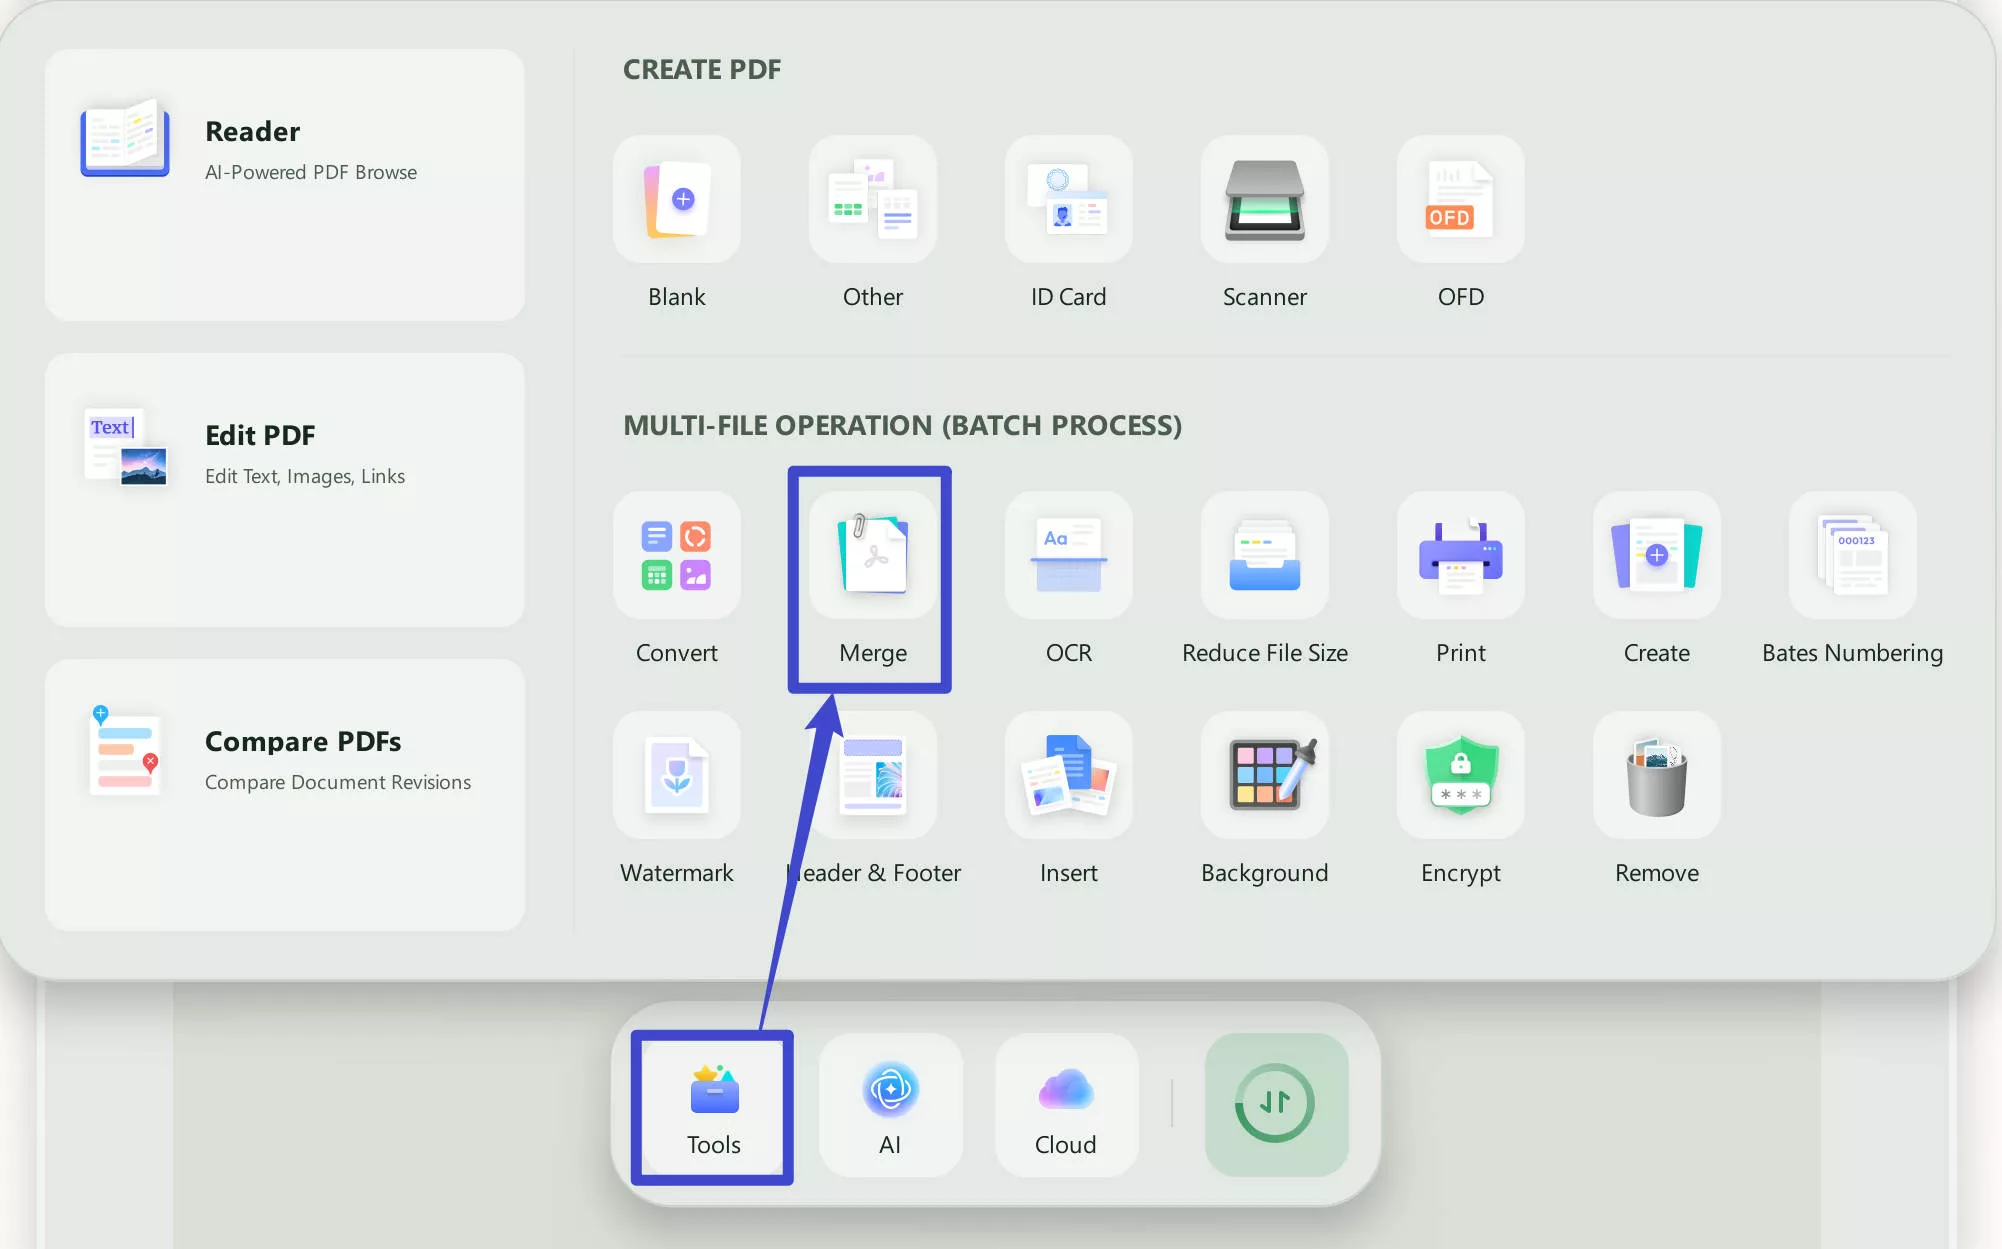
Step 2: Launch and Click "Tools > Merge"
Launch the UPDF on your device. Click on the "Tools". Now, select the "Merge" option.
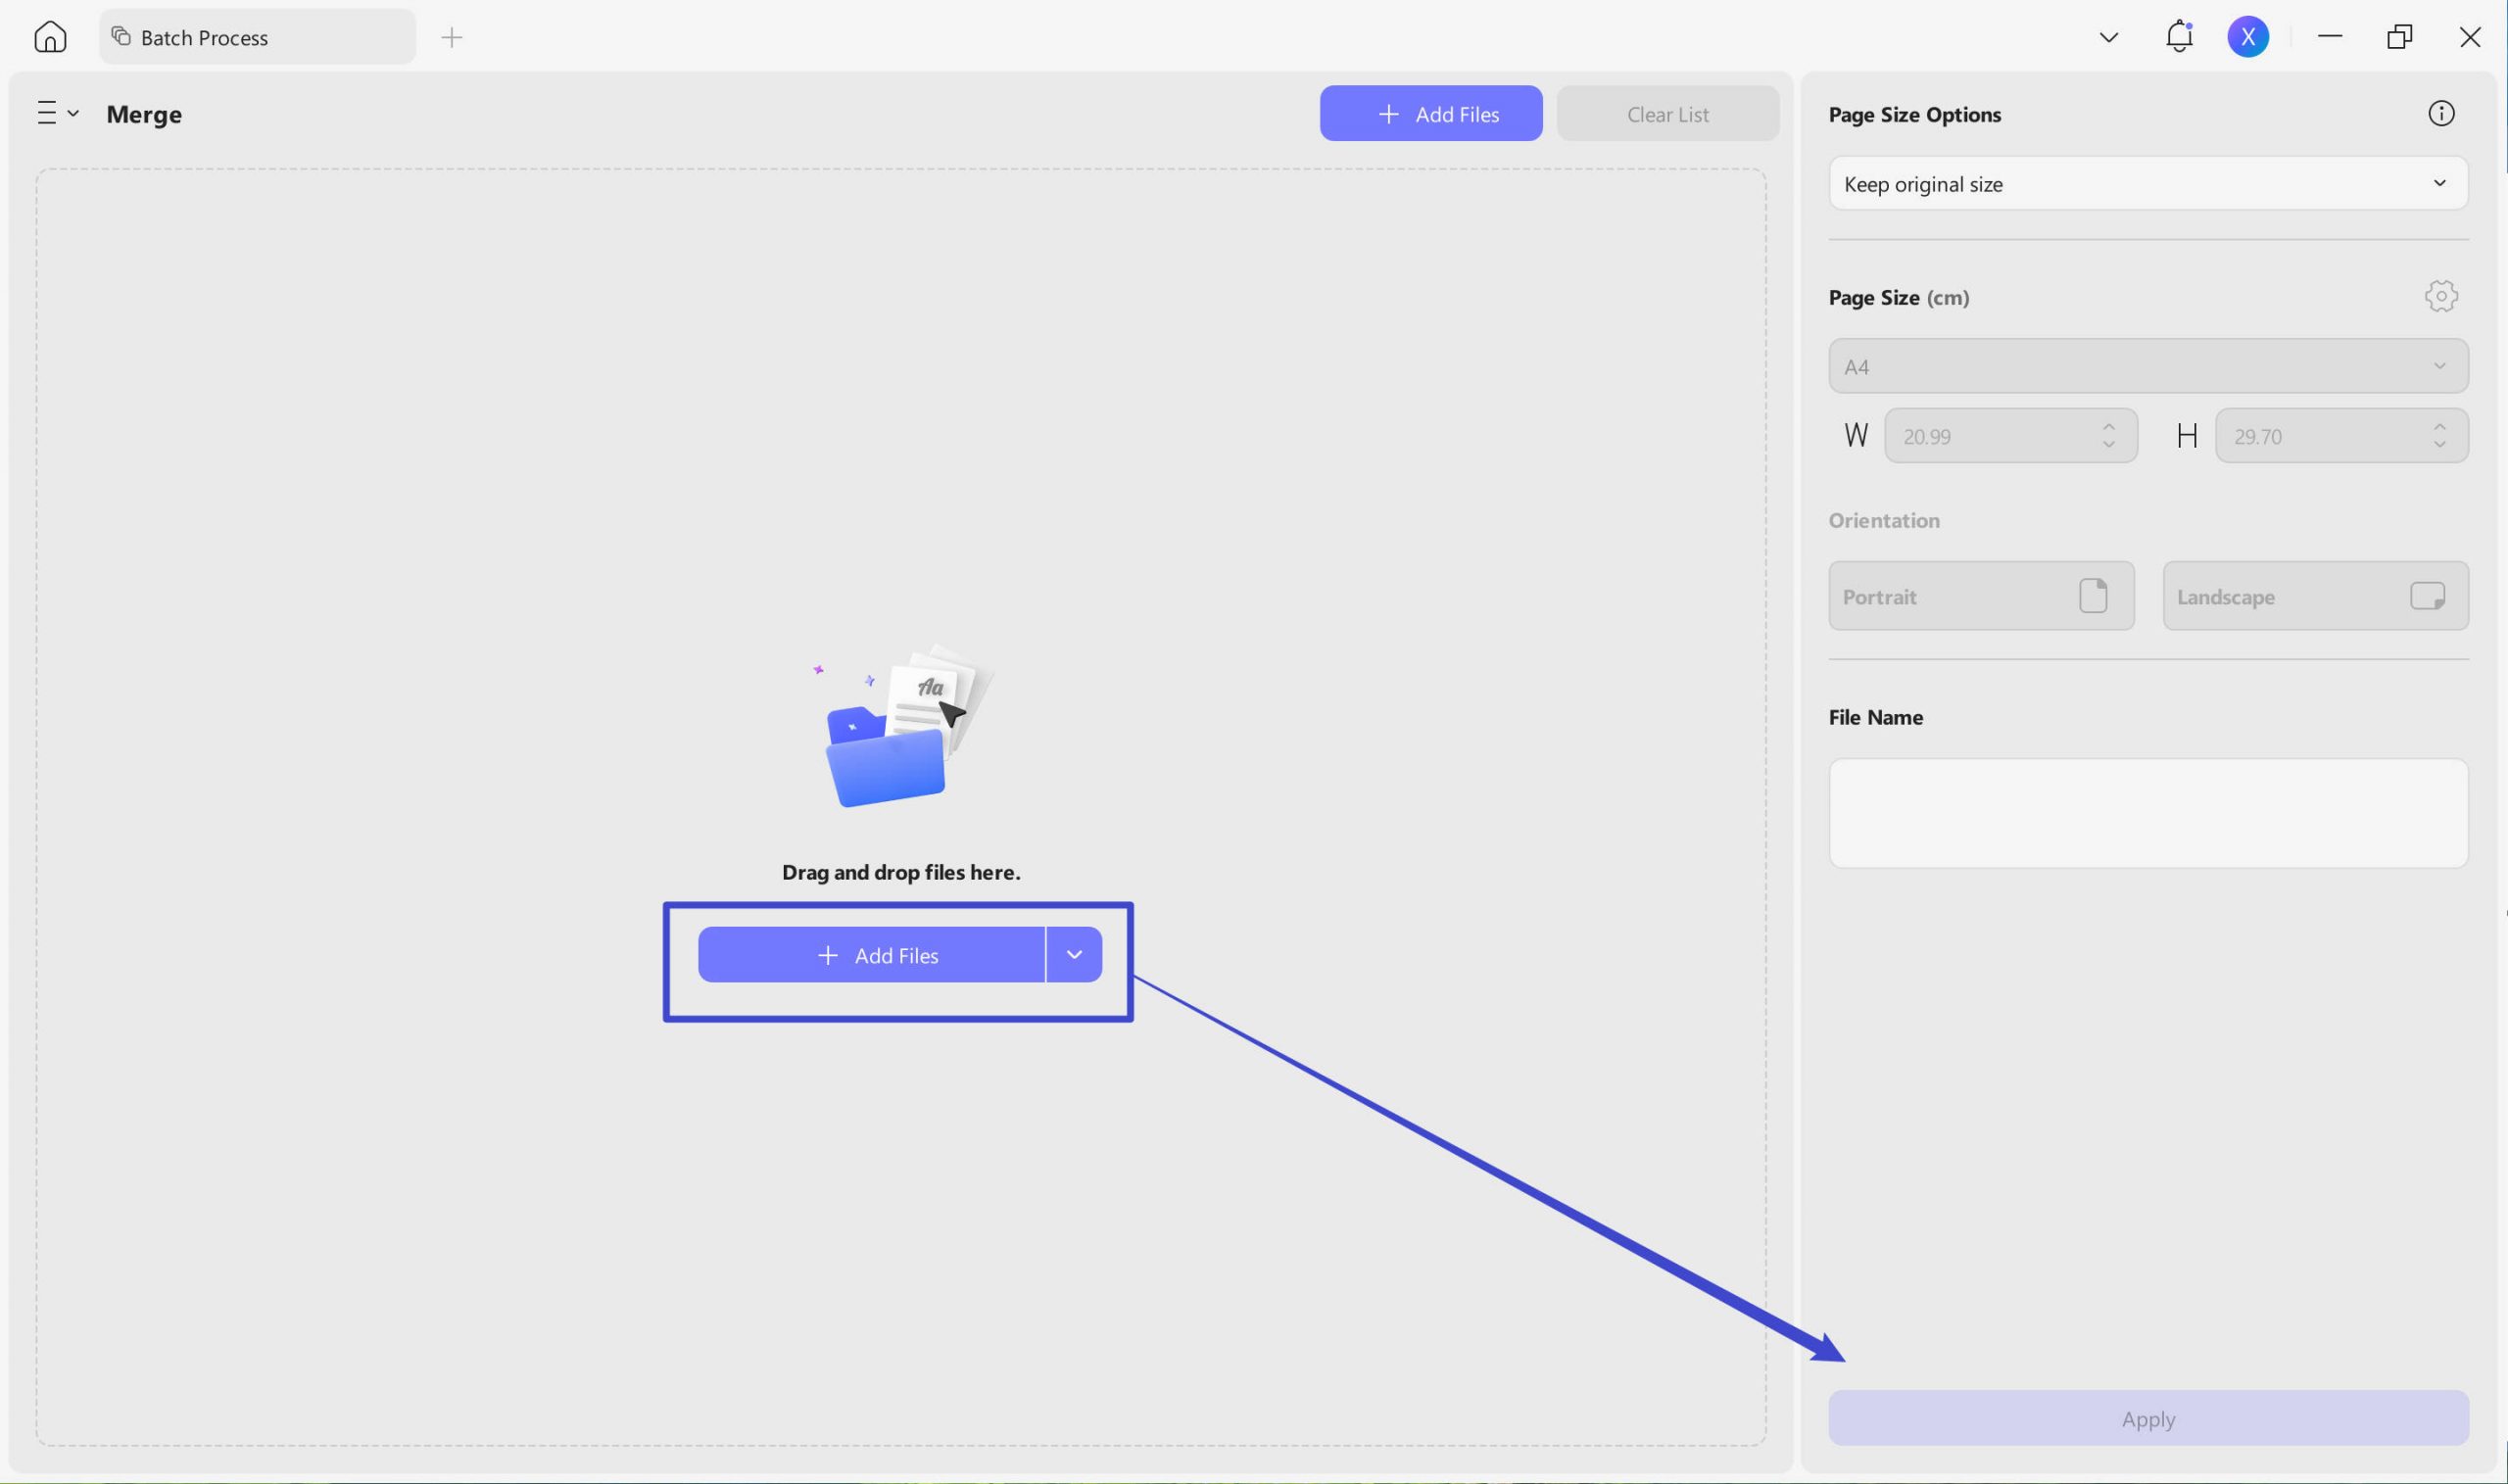
Step 3: Combine Photos to a PDF
Select the "+ Add Files" button and hit "Add Files" to add all the images you want to merge into a PDF file.
After adding the images, you can remove the unnecessary or mistakenly added pictures from the list by clicking on the "Three Dots" menu and choosing the "Remove File" option. You can also reorder them by dragging and dropping them.
Once the image list is ready, click on the "Apply" button. Save the PDF file anywhere you want on your device with a suitable title.
Method 2. How to Combine Photos Into a PDF using the Create Feature
Simply follow the steps below to combine all your images into a single PDF using the Create from Image feature. Click the button below to download UPDF and get started right away.
Windows • macOS • iOS • Android 100% secure
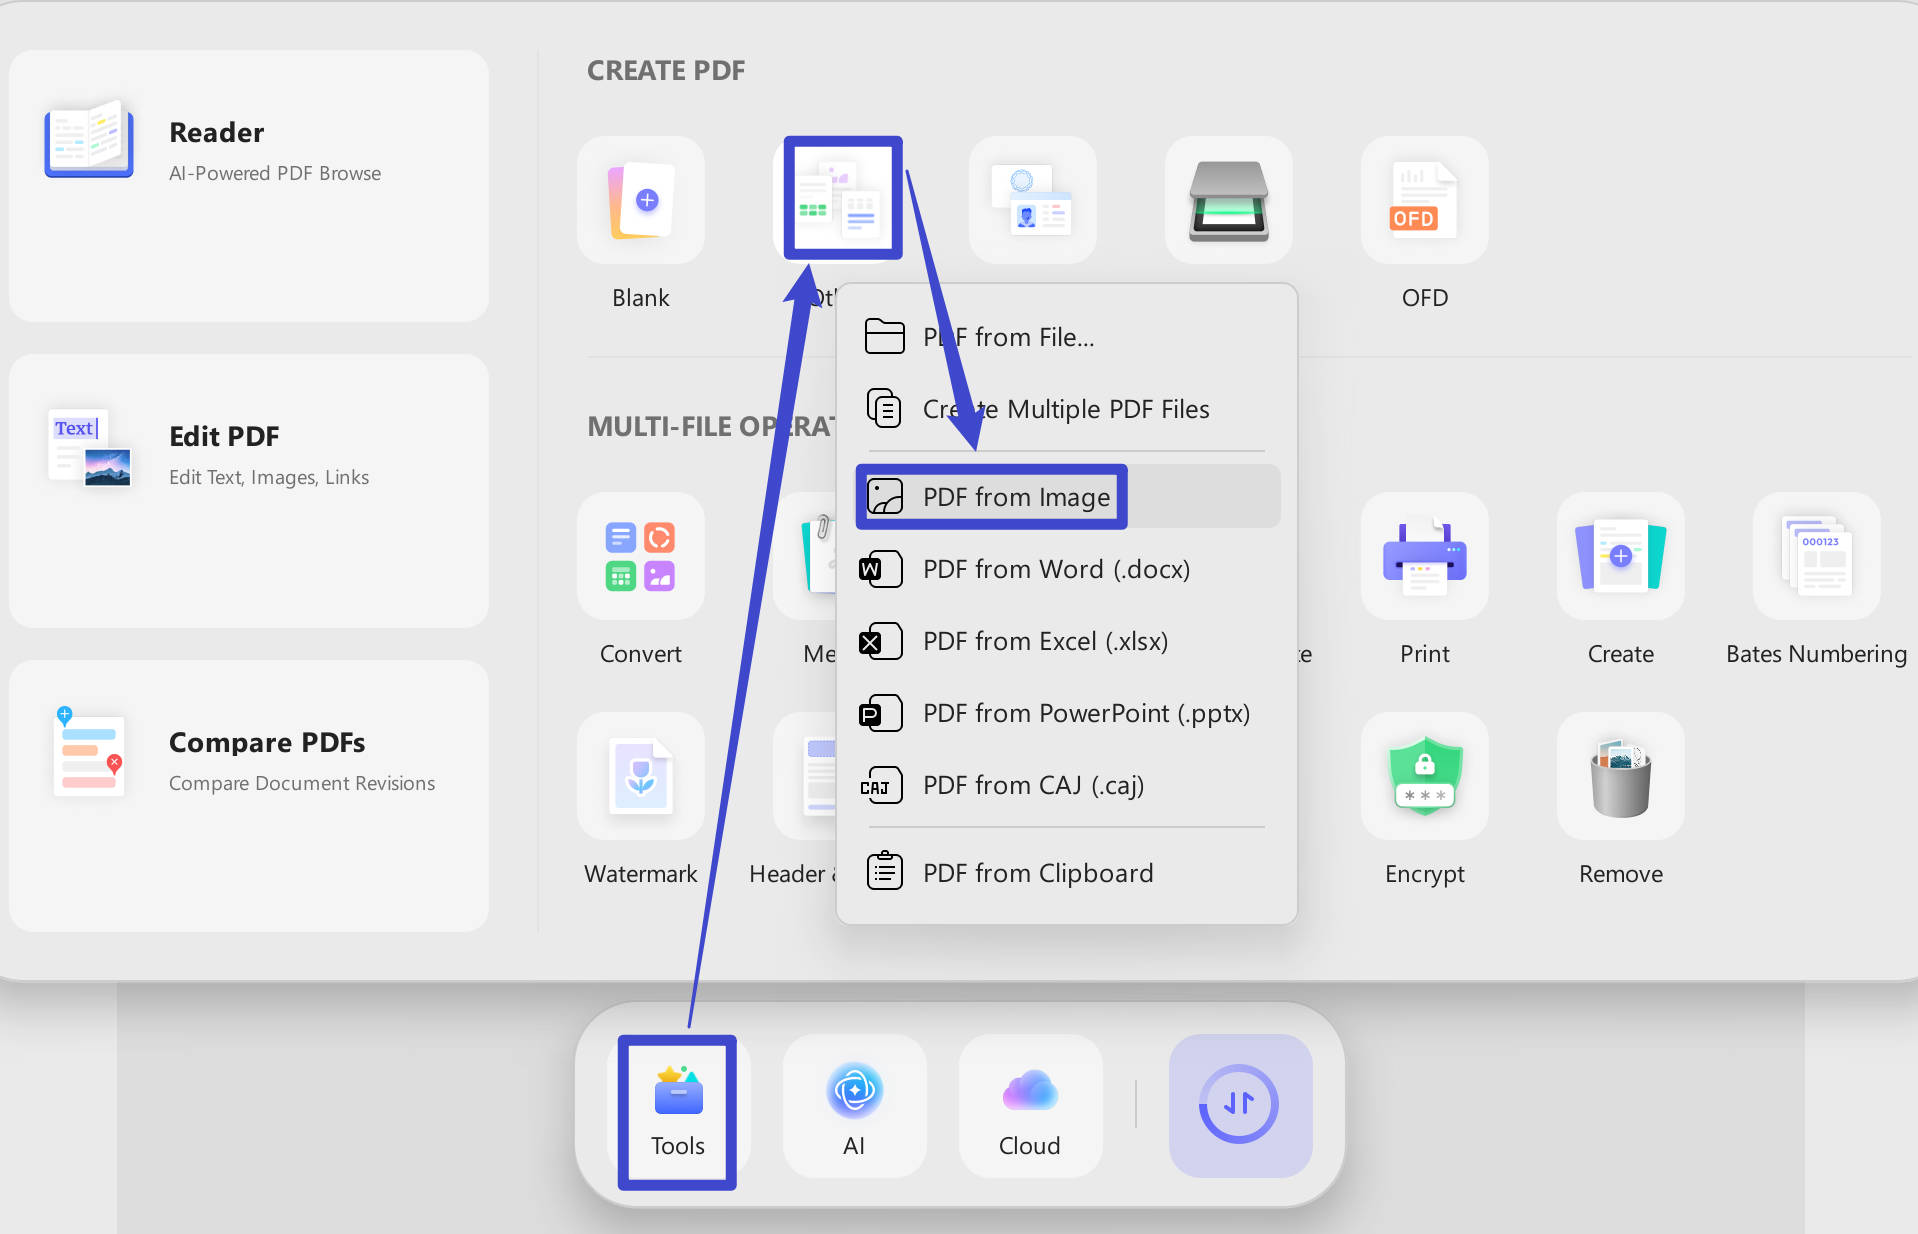
Step 1: Create a New PDF from Images
Open the UPDF tool on your device. Choose the "Tools" option to use the "PDF from Image" feature for combining images into a PDF.
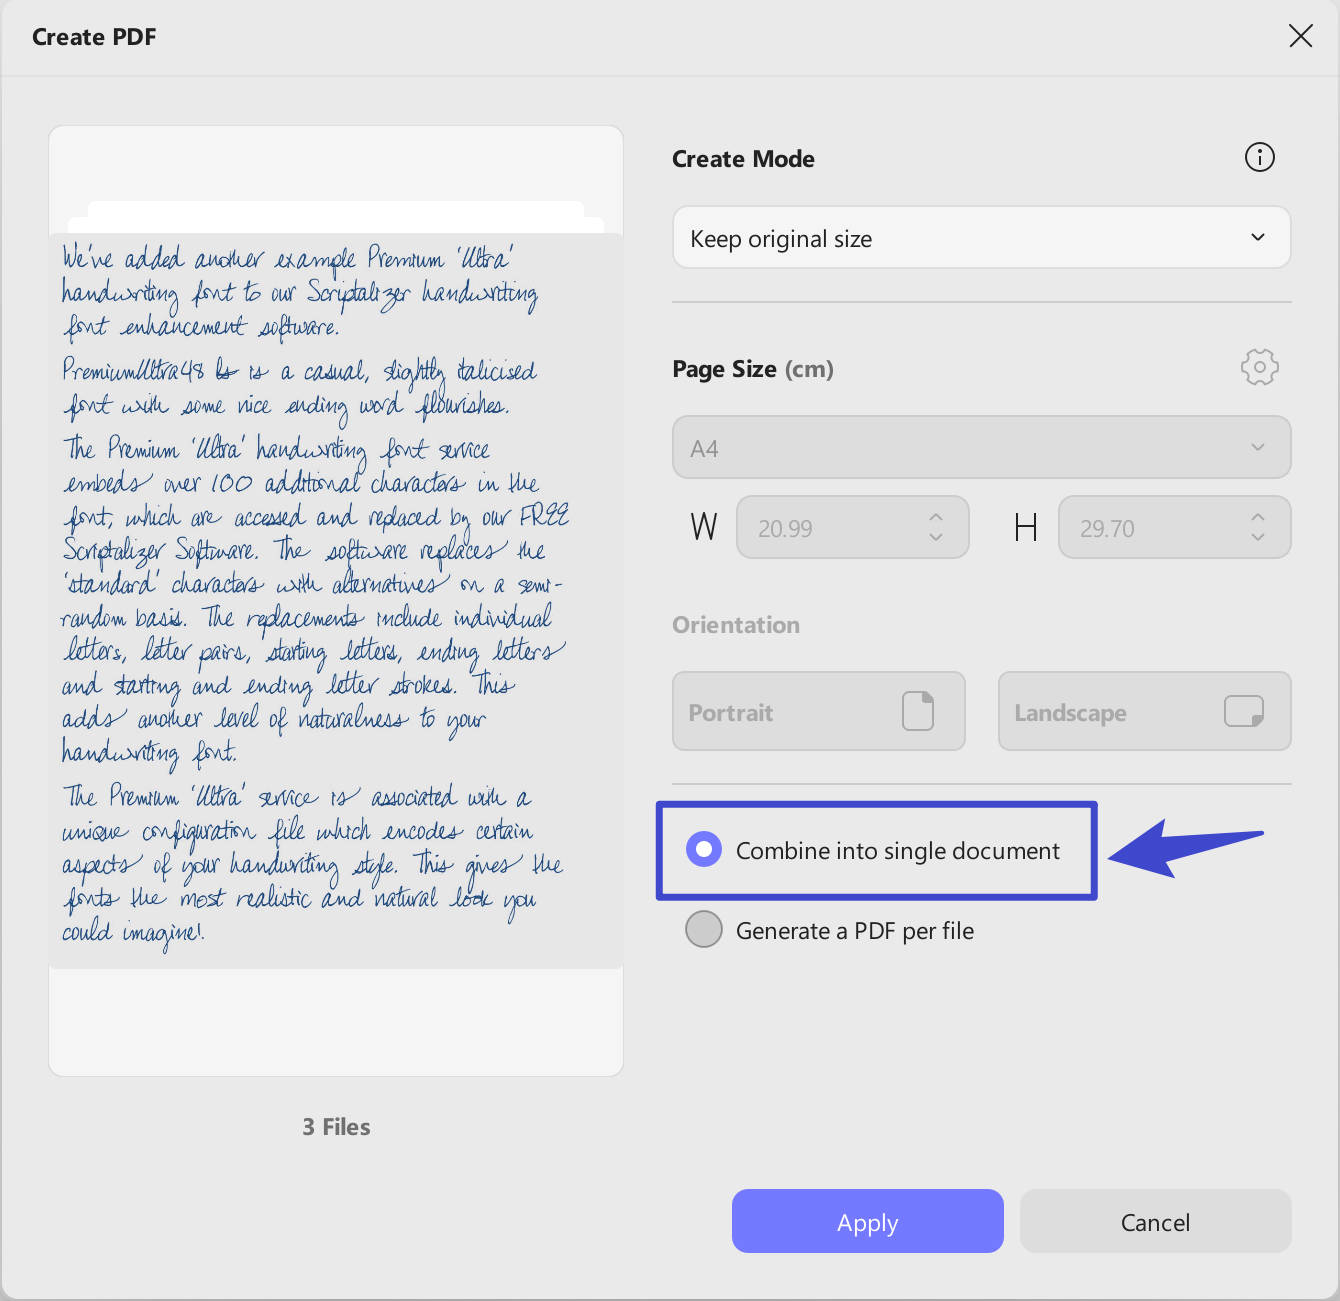
Step 2: Add and Combine Images to the Blank PDF
Now click on "Combine into single document" option. If you want all the images to be created into separate PDF files, click the "Generate a PDF per file" option. Then click "Apply" to finish the process.
Step 3: Save the PDF Document
Next, save the PDF on your device. Select the location and save it successfully.
Method 3. How to Insert an Image into an Existing PDF as a Page
If you’d like to merge images into an existing PDF as new pages, you can easily do so with UPDF. Here’s a quick guide to help you through the process.
Step 1. Click on the button below to download UPDF. Double-click on the UPDF to launch it. Open the PDF you want to have the images inserted.
Windows • macOS • iOS • Android 100% secure
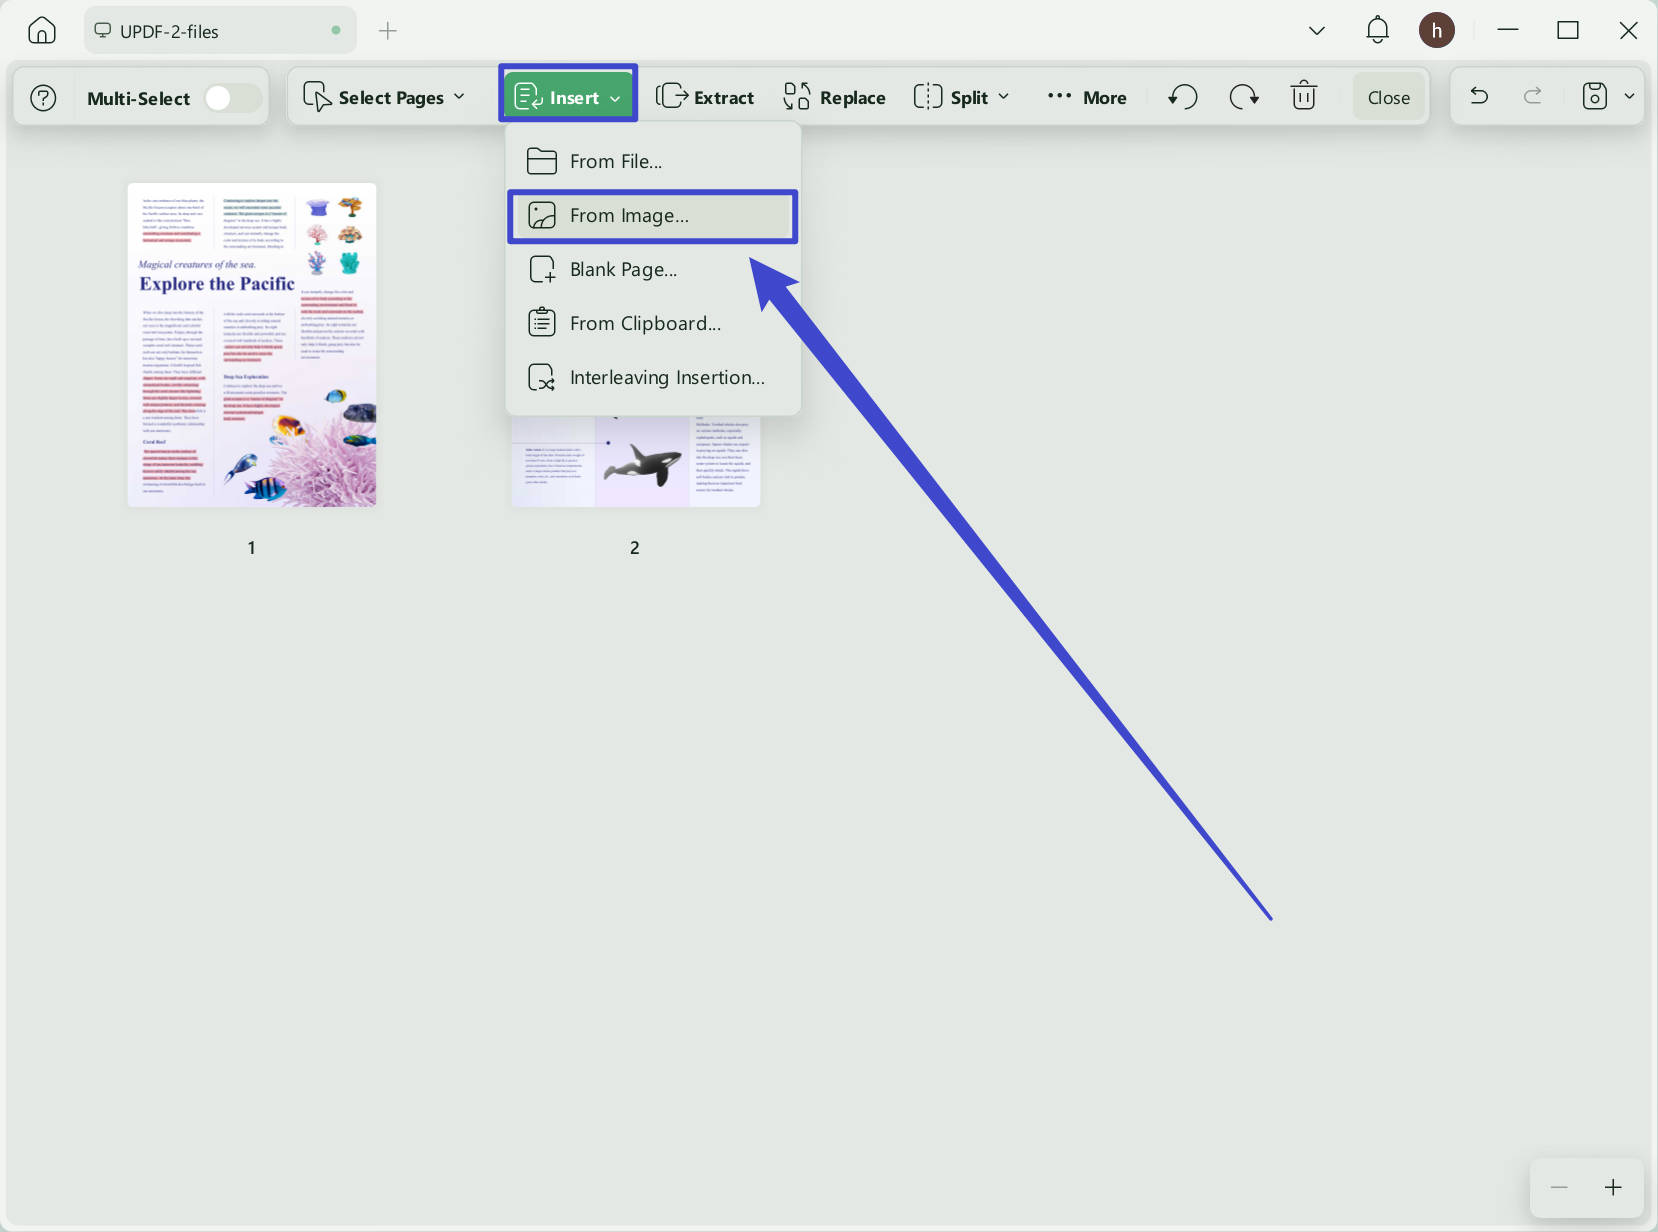
Step 2. Click on the "Organize Pages" icon to get the panel for organizing pages.

Step 3. Click on the "Insert" button and choose the "From Image" icon.
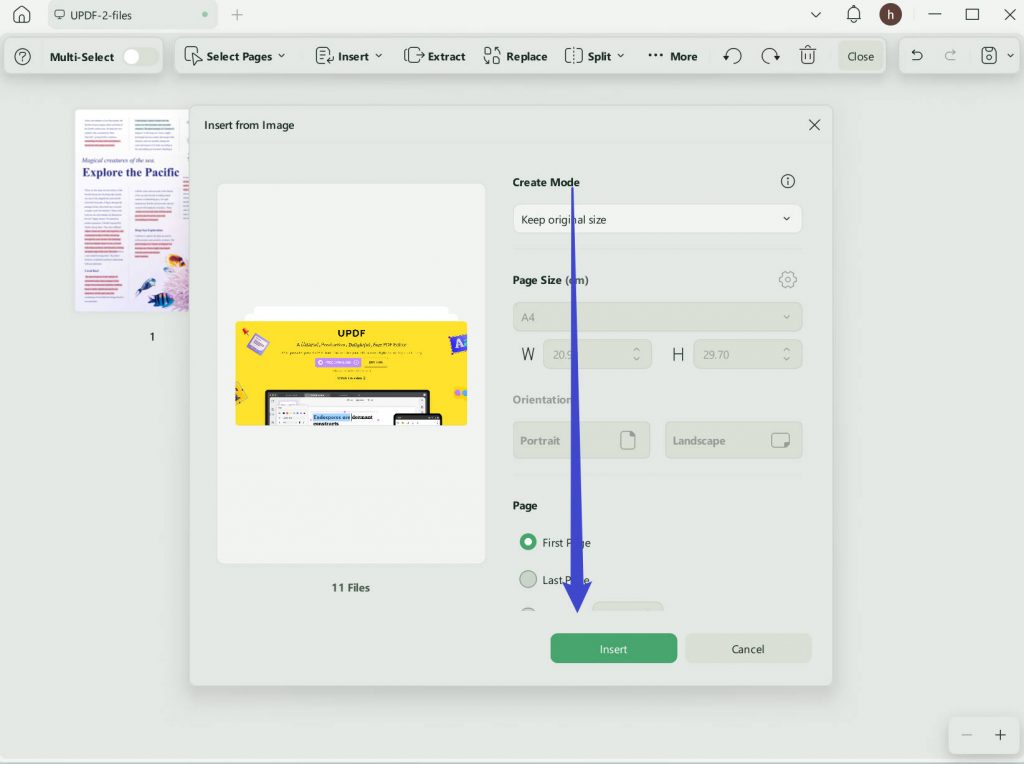
Step 4. Click on the "Select Files", hold the "Ctrl" to select multiple images, and click on the "Insert" to insert all the images as pages into the existing PDF file.
Method 4. How to Merge an Image Into an Existing PDF File?
If you are thinking of making your PDF more distinguishable from your classmates, you can add informative images to it to help you prepare for your exam. By following the simple steps, merge the image into an existing PDF file now:
Step 1: Open the PDF
Launch UPDF on your system and press the "Open File" option to select the PDF to which you want to add the images. Next, select the document and press the "Open" button present in the bottom right corner.
Step 2: Insert Images into the PDF
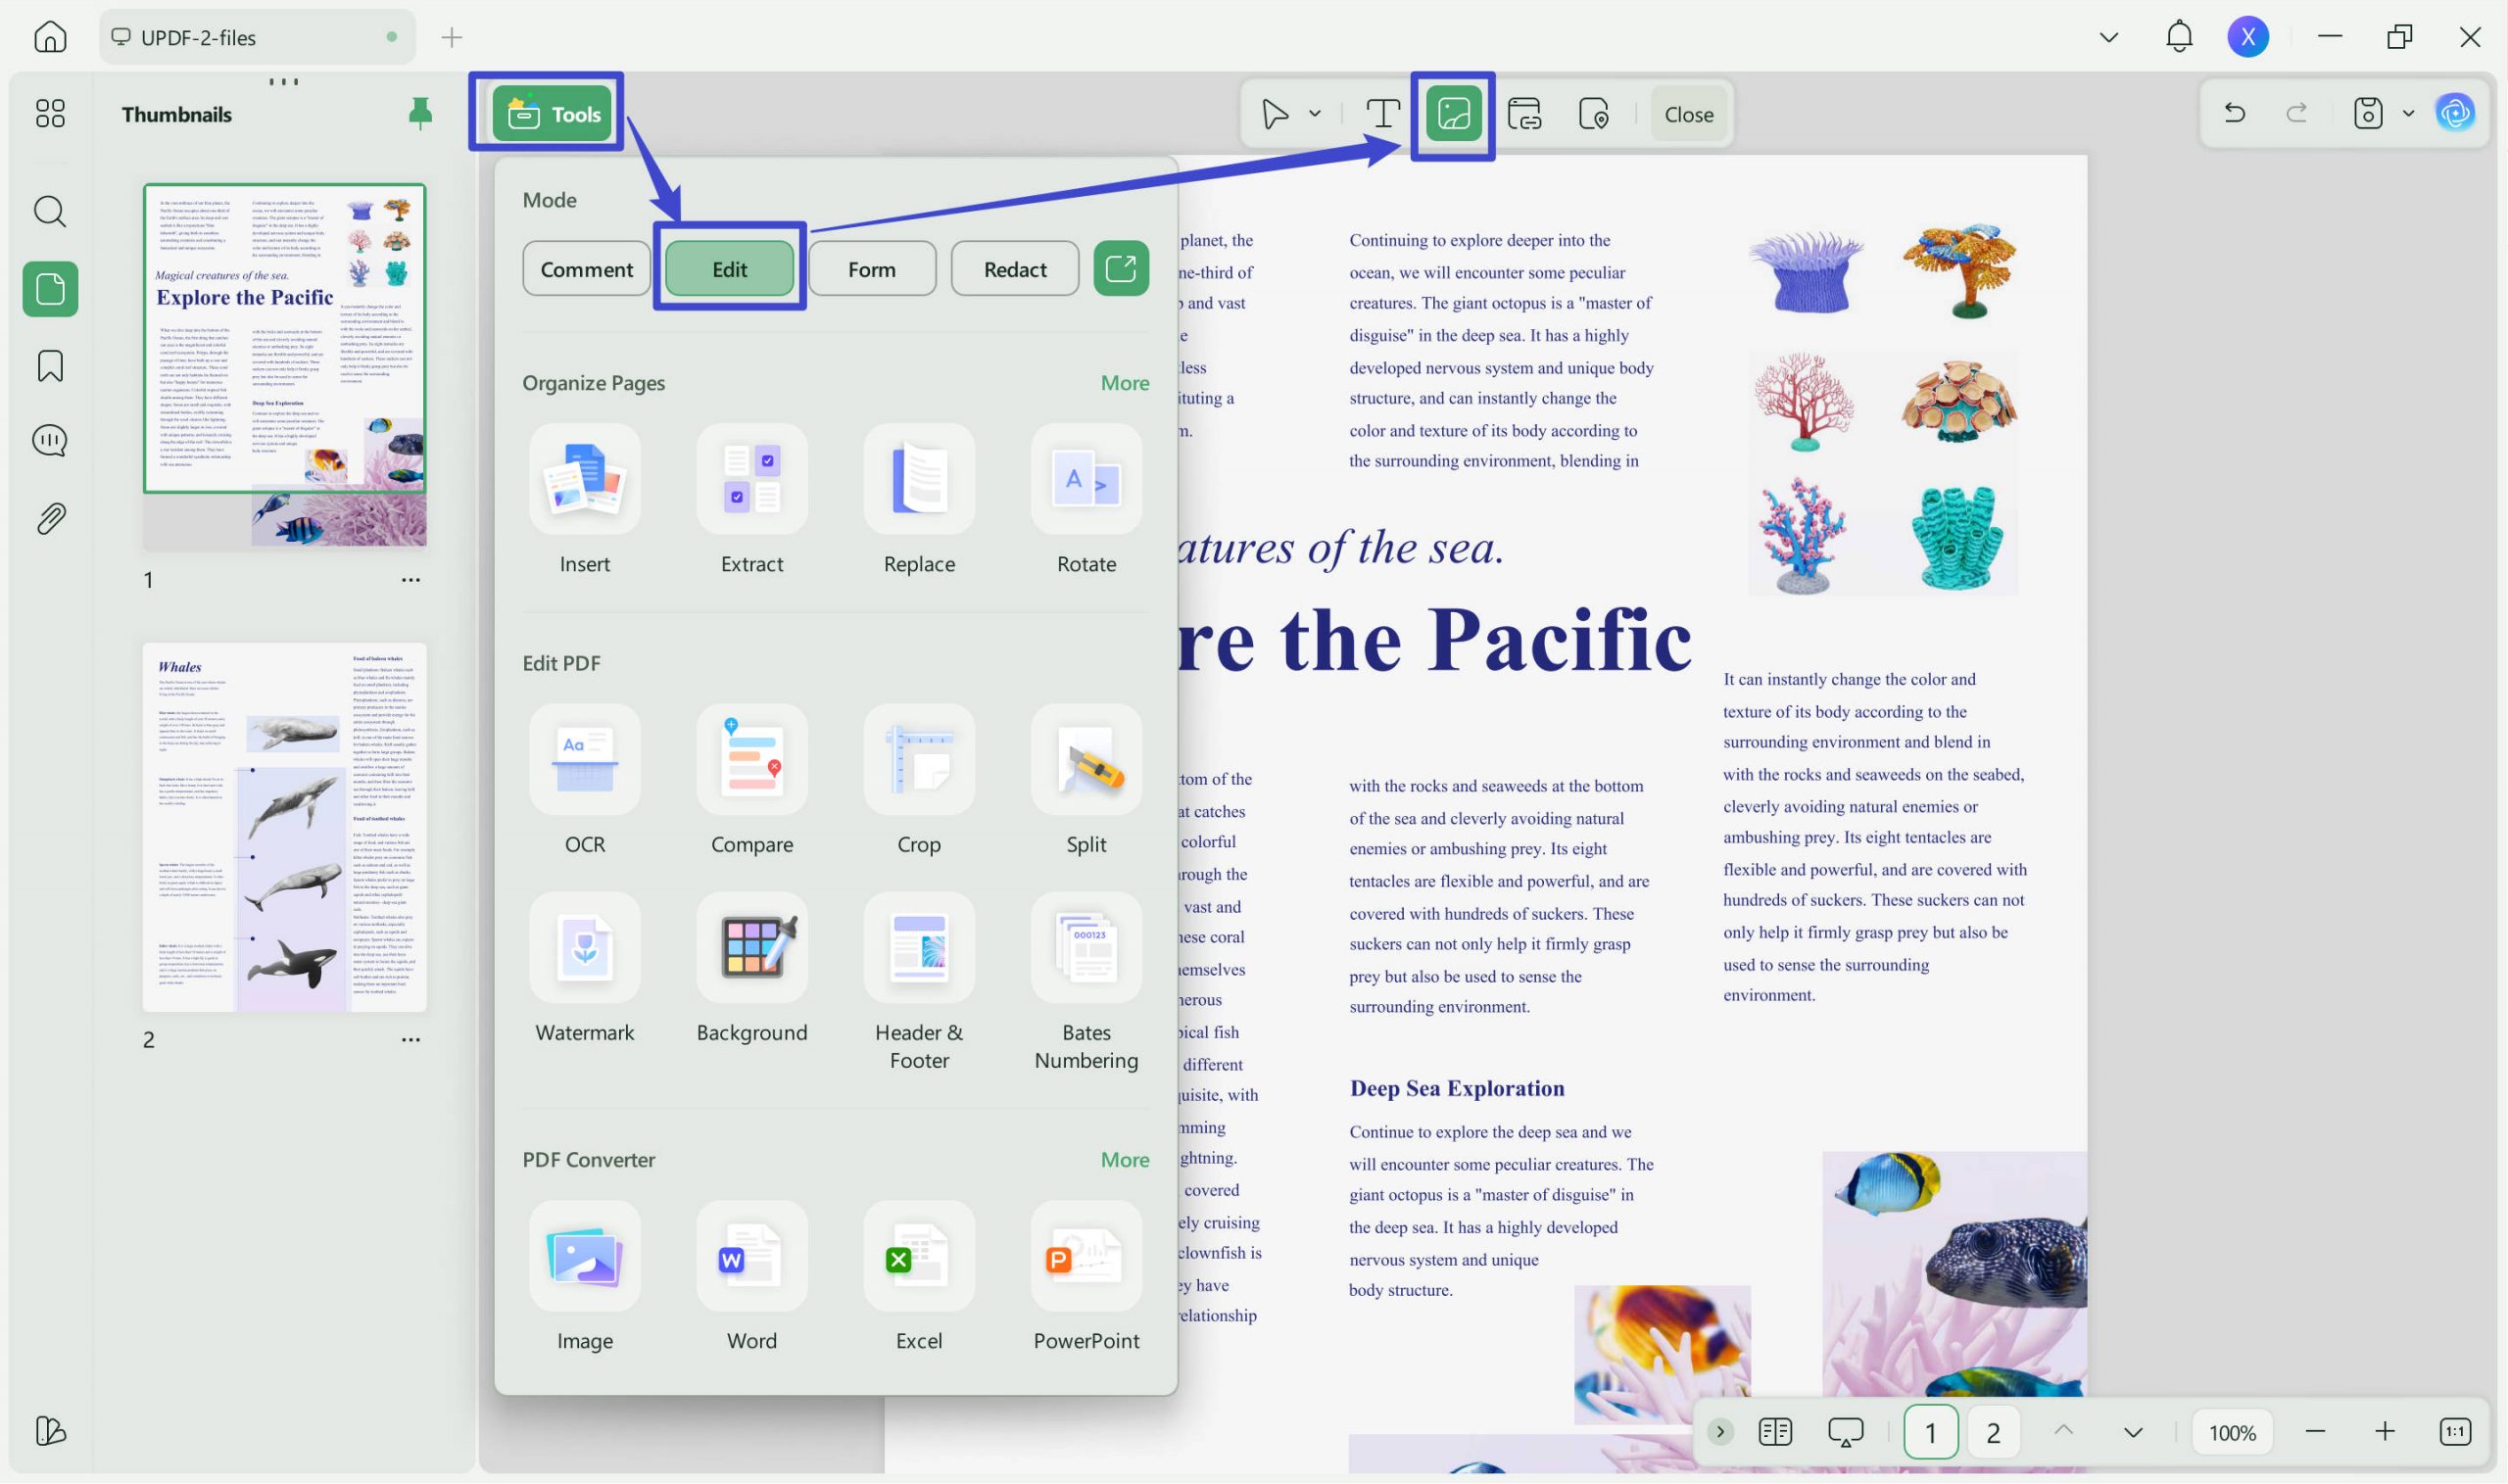
When the PDF opens, tap on the "Edit" in Tools and select the "Image" option at the screen's top toolbar. Next, select the document position where you want to add the image to the PDF, and the system will ask for the picture that needs to be incorporated. Following this, select the image and press the "Open" button.
Step 3: Adjust the Image and Save the PDF
Adjust the size and position of the added image in your PDF file as per requirement. After this, press the "Save" button. Your PDF file will be saved successfully with the already allotted name. If you want to give a new name to PDF, click the narrow next to "Save" and choose "Save as..." and give the file a desired title.
Why Choose UPDF to Combine Photos into PDF
The use of UPDF is increasing rapidly, but do you know the reason behind such popularity? To know in detail, read the following reasons, which will highlight the distinguishable features of UPDF:
- Easily Merge Images into a PDF: You can quickly merge hundreds of images into a single PDF file using UPDF. Whether you are a photographer who wants to create an extraordinary album to attract more clients or a housewife who wants to save beautiful family moments on her computer, everyone can use this magical tool.
- Perform Tasks at a Rapid Speed: Professionals do not have useless time that they can spend waiting for a tool to process their commands. The tool should be fast enough to perform multiple tasks in seconds without lagging or hanging. In contrast to Adobe Acrobat, UPDF never wastes user time because they can work on various PDFs simultaneously at an ultra-fast speed. See the detailed comparison between Adobe Acrobat and UPDF.
- Beginner-friendly Interface: Whenever we hear about an advanced tool, the thing that comes to our minds is that it will be complicated. The users of UPDF face no such complications while operating its different features compared to Adobe Acrobat. Its user-friendly interface allows beginners to use any feature very easily. You do not have to do multiple clicks to apply an edit to the PDF or make any desired changes.
- Offer Versatile Features: This PDF tool is known for its unique features, which make the lives of students, bankers, professors, and many more, a bit easy. If you want to view, edit, crop, annotate, and share PDFs with just a few smart clicks, your file will be ready. You can extract any information from scanned text images or screenshots by applying its OCR technology. To make the document attractive, use a long list of stamps, stickers, or shapes provided by this delightful tool.
- Buy Once, Use on Different Platforms: Students already have tight budgets, and they have to manage different study expenses. That's why they prefer to download that tool which is not only affordable but also a single tool that can run on different platforms. UPDF again stands out in that regard because it is cost e-efficient, and you can use a single purchase on multiple systems like Android, Windows, iOS, and macOS. Upgrade to UPDF Pro or try it through the button below now!
Windows • macOS • iOS • Android 100% secure
Advantages of Merging Images to PDF
It is good to take pictures of people, places, or moments to create long-lasting memories. But sometimes, these unlimited pictures cause stress when they are not sorted properly. You could not find a particular picture in the messy image folder. That's why it is important to merge images into a PDF. To know more advantages of combing images into PDF, check the following information:
- Highly Secure: When images are saved in PDF format, their security increases because you can add a password to a PDF file. Thus, combine all your private pictures in a PDF file and give a password to it.
- Easy to Share: Sometimes, while investigating a crime scene, the investigator takes hundreds of pictures of different sites of crime. It can become difficult for him to share each picture one by one with his team. Once these pictures get merged into a single PDF file, it becomes easy to send.
- Compact File Size: Multiple pictures can be added to the PDF, and the size of the PDF can be compressed to the desired point without harming the pixels of the images. It helps to free up storage space for new things.
- Secure Resolution: Although images can be compressed greatly, their resolution also gets compromised. While in the case of PDF, the resolution of images present inside it remains high, even if the PDF is compressed maximum.
FAQs on Merging Images to PDF
1. How do I make 3 pictures into a PDF?
You can make 3 pictures in a PDF by either using the combine feature of UPDF or by creating a new PDF on it and adding 3 pictures into that document.
2. How do I convert 100 images to PDF?
You can convert 100 images to PDF by using UPDF's "Merge" feature. Here, you can select multiple photos at once and convert them to a single PDF file in a few seconds.
3. How to combine images into a PDF online?
Different online tools can be used to combine images into a single PDF. However, you cannot rely on them entirely due to their drawbacks like image count limitation, size restriction, and lengthy operating process. It is better to use stable desktop software like UPDF, which provides you with a faster speed and better quality.
Conclusion
Different tools are available that can assist you in merging images to PDF, but these tools are either of high price or have certain limitations. It is better to choose UPDF to merge pictures into a PDF because it is affordable, versatile, and user-friendly. With the three different methods discussed in this article, you can merge multiple copies of images into a single PDF file and give a password to that file to increase its security. From the "Free Download" button below, you can try the amazing combine feature instantly.
Windows • macOS • iOS • Android 100% secure


 Enid Brown
 Enrica Taylor
 Enola Davis