Looking for an efficient way on how to combine screenshots into one PDF? Whether you are operating on a Mac or a PC, various methods are available to achieve this desired outcome. To streamline this process and make it even more effortless, we recommend utilizing UPDF.
It is the ultimate tool for merging screenshots into a cohesive PDF file. With UPDF, you will experience unparalleled convenience and efficiency in creating and managing PDF documents.
Part 1. How to Combine Multiple Screenshots into One PDF on Windows? (2 Ways)
UPDF is feature-rich software that provides an innovative solution for combining multiple screenshots into a single PDF on Windows and Mac computers. With its top-notch design, even users without technical expertise can easily navigate and utilize its functionalities. With that, one of the standout features of UPDF is its blazing-fast performance. The software ensures quick processing and conversion of screenshots into PDF format. Enjoy the feature by downloading UPDF now!
Windows • macOS • iOS • Android 100% secure
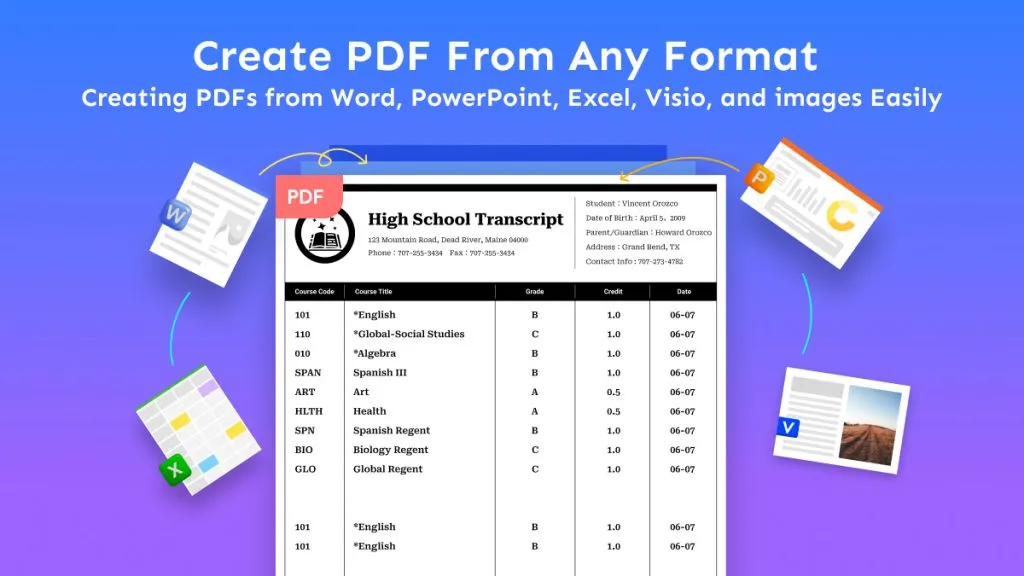
Moreover, UPDF supports a wide range of image formats. Once you have imported the screenshots into UPDF, the software provides various customization options. You can arrange the order of the images, add page numbers, and even adjust the size of the screenshots within the PDF document.
In addition, you can utilize its OCR feature to convert the PDF into an editable format, allowing you to edit the text or links later on.
Let's look at two of the most preferred ways to combine multiple screenshots into one PDF.
1. Via Dragging
The best and easiest way to combine screenshots is via drag and drop. This feature is eventually helpful for starters. Users can drag multiple screenshots without any limits. Have a look at the instructions below to combine screenshots effectively:
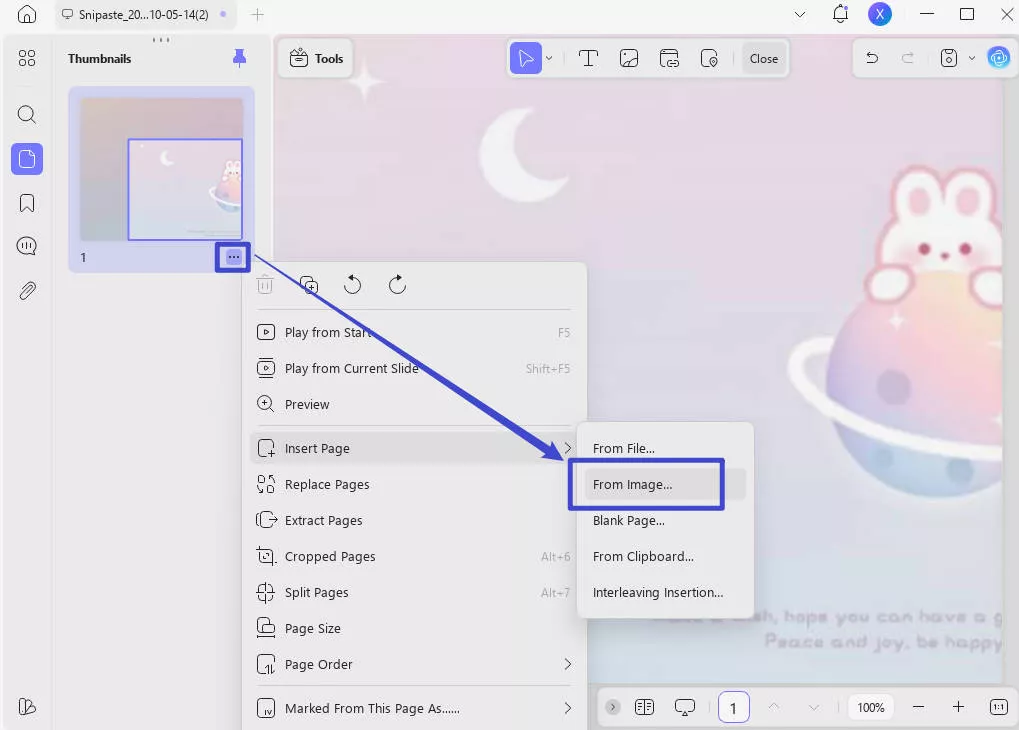
Instruction: On your Windows, locate UPDF and double-click to open it. Afterward, drag a screenshot into UPDF and click three dots to find "Insert Page" and select "From Image". Then add all the screenshots that you want to combine into a PDF. So all the screenshots will be combined as a PDF.
2. Via Batch Combine
With the batch combine feature in UPDF, users can easily combine multiple screenshots or an entire folder containing screenshots into a single PDF document. Follow the given steps to explore and apply combined features efficiently:
Step 1: Open UPDF on Your Windows
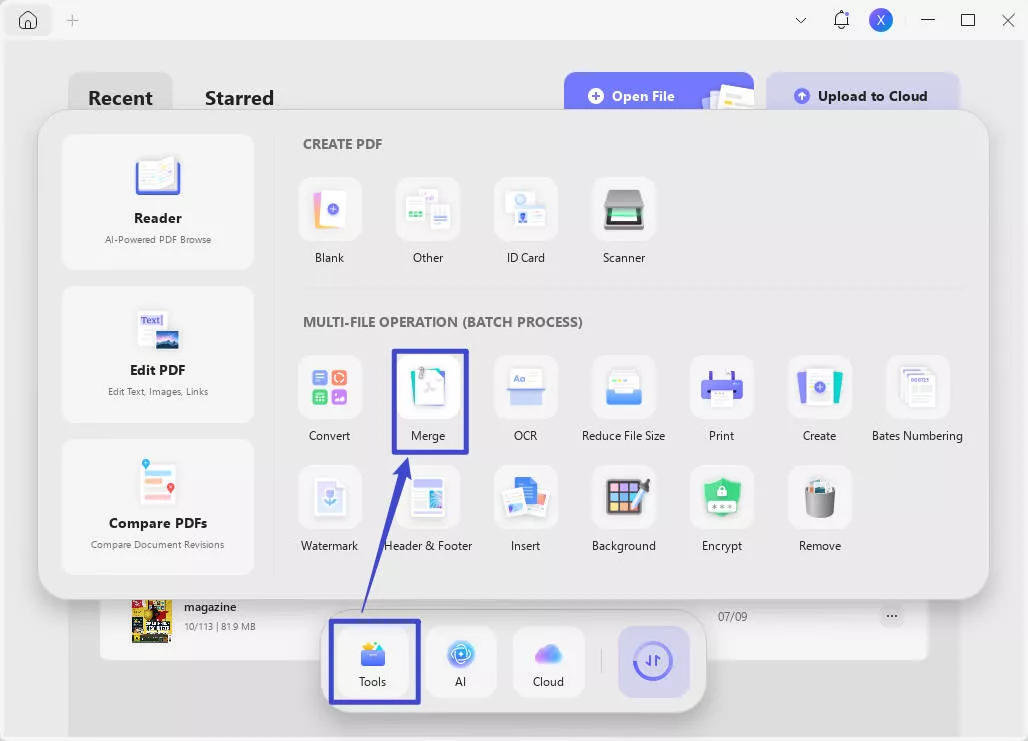
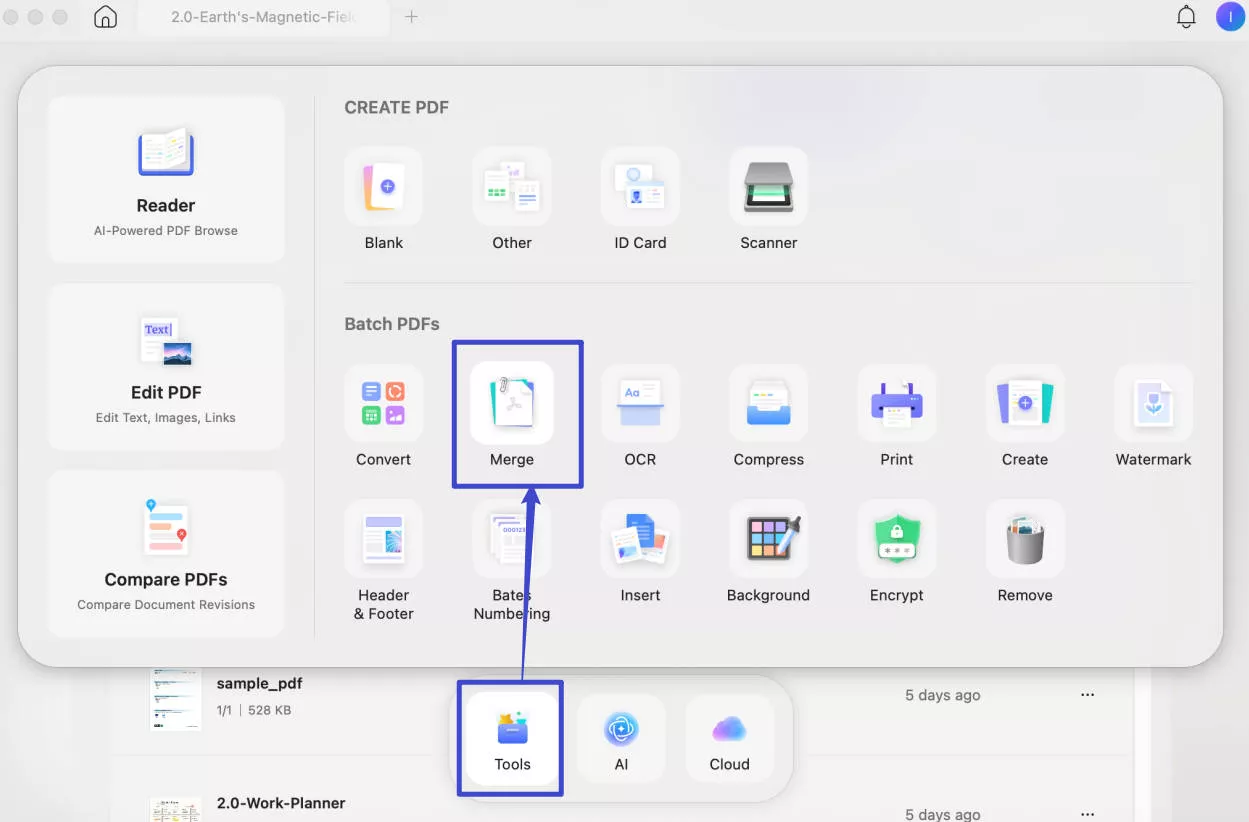
Double-click the UPDF tool after navigating it on your Windows. Now, locate the "Merge" option in "Tools".
Step 2: Add All the Required Screenshots
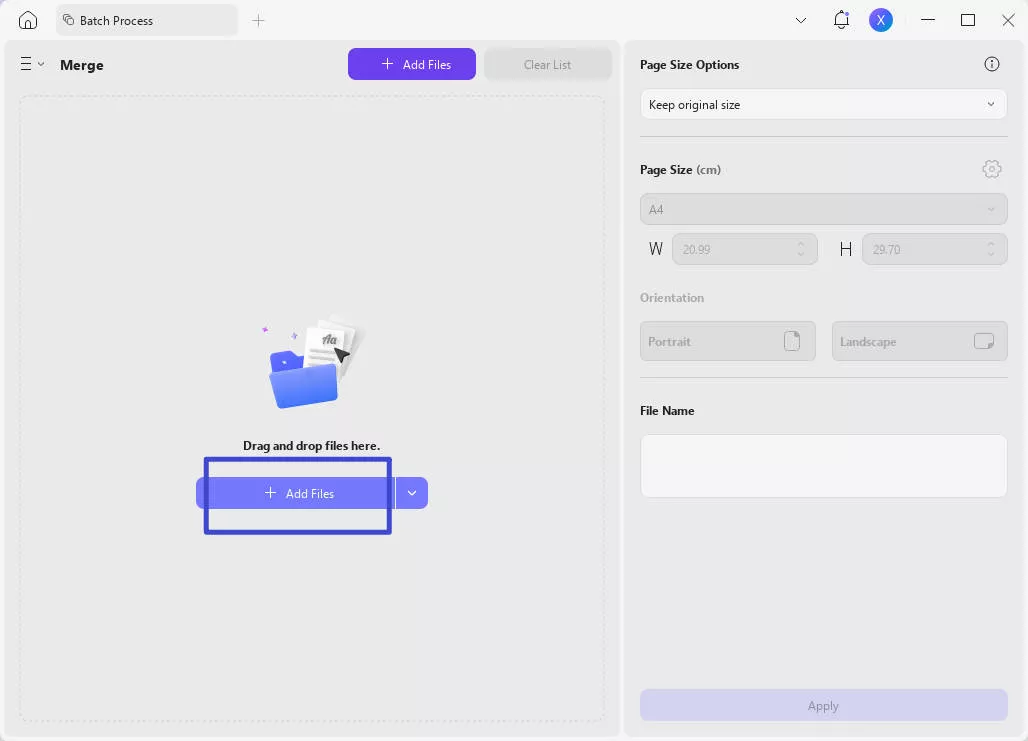
After that, tap the "Add Files" button to add the screenshots. Now all your files will be combined in one PDF. Moreover, you can also tap on the little "Downward Arrow" sign and select the "Add Folders" if needed.
Step 3: Customize the Files Arrangement
Once you have imported the screenshots, you can drag them and arrange them as needed. You can clear the list using the "Clear List" option at the top right. Afterward, click the "Apply" button at the bottom right corner, select the destination folder, and save your new PDF file.
Combining screenshots into one PDF is a simple process with UPDF. Why not download and try it yourself?
Windows • macOS • iOS • Android 100% secure
Part 2. How to Make Multiple Screenshots into One PDF on Mac?
If you are thinking of combining multiple screenshots into a single PDF on a Mac, there are various methods you can apply. However, a dedicated PDF editor like UPDF offers a seamless solution for merging multiple screenshots into a single PDF file. Explore the steps below to learn about how to make multiple screenshots into one PDF:
Option 1. Via the Batch Function
Step 1: Add the Screenshots to UPDF
To add screenshots, open UPDF and access the "Merge" option in "Tools". Now, there are several methods available for adding files. You can select the "Add Files" button on the screen, presenting multiple options. From the drop-down menu, choose "Add Files," or "Add Folders" option to browse your Mac and add any desired screenshot image to UPDF.
Step 2: Rearrange the Position of Screenshots
After successfully adding the files, you can rearrange their positions according to your requirements. You can adjust their order to your preference by simply dragging and dropping the files.
Step 3: Combine the Screenshots and Save Them on Your Device
Once all the necessary files have been added, click the "Apply" button to start the combination process. UPDF will then merge the selected files into a single PDF. After completing the combination, you can choose a suitable location on your Mac to save the newly created file by browsing through your directories.
Option 2. Via the PDF from Image Creation Feature
UPDF for Mac also supports converting multiple images into one PDF using its creation feature. The steps are similar to the Windows version. Simply follow the steps below:
- Drag and drop the images into UPDF.
- Confirm the combination into one PDF by clicking "Yes" in the pop-up screen.
- UPDF will automatically generate a PDF for you. Save the converted PDF to your local storage.
Download and install UPDF on your computer and follow the instructions above, you will do the task perfectly.
Windows • macOS • iOS • Android 100% secure
Part 3. How to Merge Screenshots into One PDF on iPhone and iPad?
UPDF provides an effective solution for how to merge screenshots into one PDF for all iOS users. You can transform your screenshots into a neatly organized PDF file in just a few simple steps. Moreover, users can also share or save the file on their devices. Head to the steps below to effortlessly merge the screenshots:
Step 1: Open UPDF and Enter Selection Mode
Open the UPDF app on your iOS device. To begin combining your screenshots and other files, tap on the "Checkbox" icon at the top right corner of your screen. This will activate the selection mode, allowing you to choose the files you want to merge.
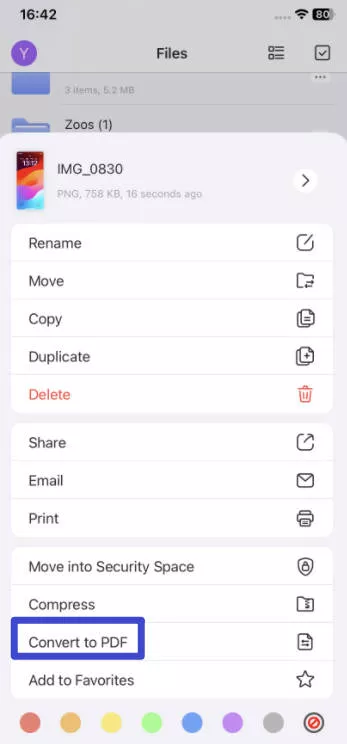
Step 3: Choose the Convert to PDF Option From the List
Look for and select the "Convert to PDF" option first to convert all screenshots to PDFs.
Step 2: Select All the Required Screenshots
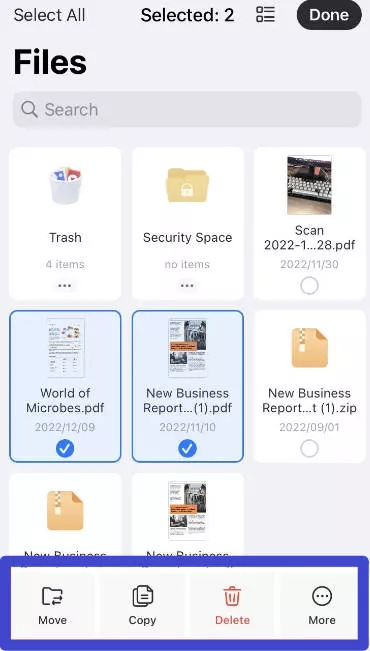
Once in selection mode, choose the screenshots you wish to merge. You can do this by tapping on each screenshot you want to include. After selecting the desired screenshots, look for the "More" menu option on your screen's bottom. Tap on it to open a menu with additional choices.
Step 4. Merge into One PDF
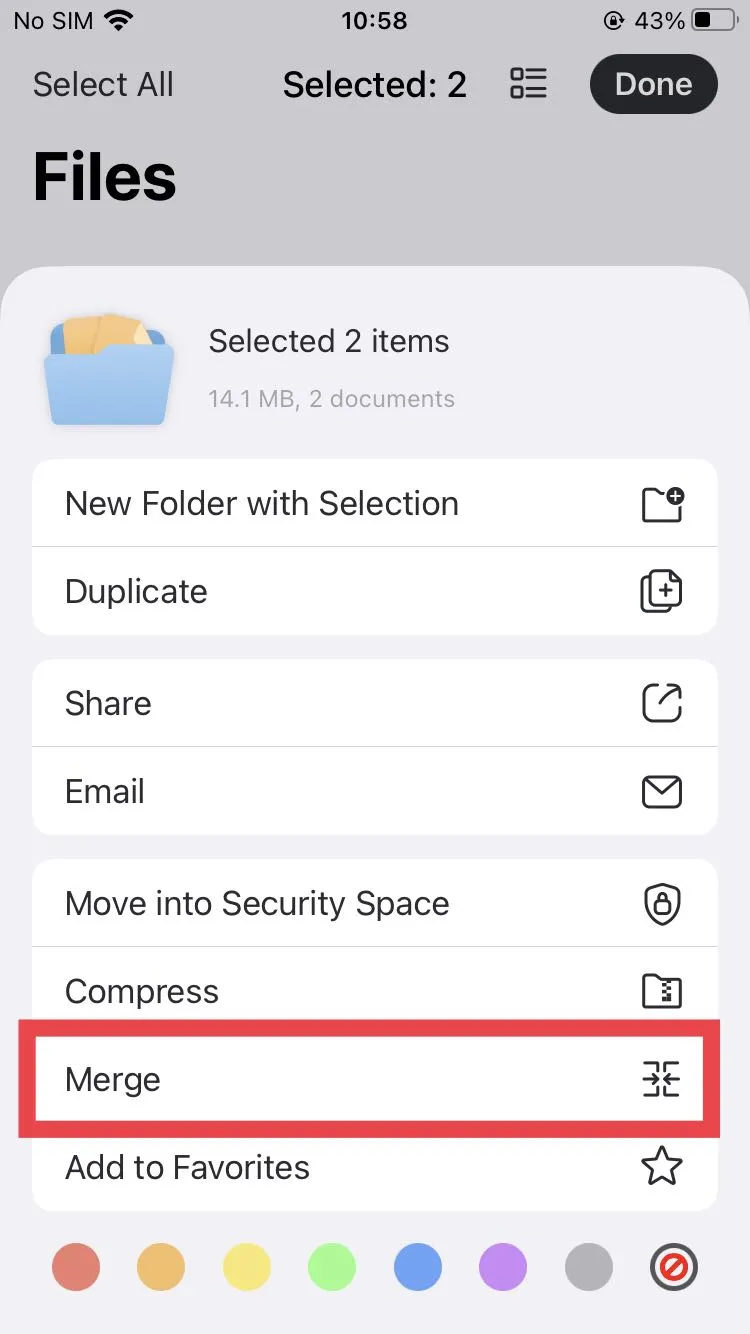
Now, you need to select all converted PDFs, and select "Merge" to combine them into one PDF. The merged PDF file will be saved in the same location as the original files. You can locate it there and, if desired, move it to a different folder or location.
Part 4. What can we do after combining?
After merging the screenshots, you will surely want to personalize them. This is when we have to introduce the powerful capabilities of UPDF as an all-in-one PDF editor.
- PDF Annotation: You can highlight content, drop a comment or draw a shape in your screenshots as you like.
- Batch Processing: You can batch convert, compress screenshots, OCR and so on to save your time.
- UPDF AI: If your screenshots are academic papers, this ChatGPT-powered AI assistance can assist in reading and consuming PDF content by providing summaries, translations, explanations, or chat-based questions.
- UPDF Cloud: This feature stores your screenshot PDF files and allows you to access them across all your connected devices.
In addition, UPDF offers many advanced features waiting for you to explore. If you’re interested, why not watch the following video? You will gain a deeper understanding of UPDF.
The good news is that one single premium account of UPDF can be used on Windows, Mac, iOS, and Android. If you upgrade now, you can even enjoy an exclusive discount! Don't miss it!
Ending Note
All in all, combining screenshots into one PDF can be simple and efficient. This allows users to organize and share multiple images easily. Users can create a unified PDF document that captures all screenshots effortlessly by following a few easy steps mentioned in this guide. One of the best ways to combine screenshots into a PDF is by utilizing a reliable and user-friendly tool like UPDF.
Its comprehensive features give users an exceptional experience for merging multiple screenshots. Moreover, its efficiency and versatility make it ideal for users looking to streamline their screenshot management process. Get it now!
Windows • macOS • iOS • Android 100% secure
 UPDF
UPDF
 UPDF for Windows
 UPDF for Mac
 UPDF for iPhone/iPad
 UPDF for Android
 UPDF AI Online
 UPDF Sign
 Edit PDF
 Annotate PDF
 Create PDF
 PDF Form
 Edit links
 Convert PDF
 OCR
OCR PDF to Word
 PDF to Image
 PDF to Excel
 Organize PDF
 Merge PDF
 Split PDF
 Crop PDF
 Rotate PDF
 Protect PDF
 Sign PDF
 Redact PDF
 Sanitize PDF
 Remove Security
 Read PDF
 UPDF Cloud
 Compress PDF
 Print PDF
 Batch Process
 About UPDF AI
 UPDF AI Solutions
 AI User Guide
 FAQ about UPDF AI
 Summarize PDF
 Translate PDF
 Chat with PDF
 Chat with AI
 Chat with image
 PDF to Mind Map
 Explain PDF
 Scholar Research
 Paper Search
 AI Proofreader
 AI Writer
 AI Homework Helper
 AI Quiz Generator
 AI Math Solver
 PDF to Word
 PDF to Excel
 PDF to PowerPoint
 User Guide
 UPDF Tricks
 FAQs
FAQs UPDF Reviews
 Download Center
 Blog
Blog Newsroom
 Tech Spec
 Updates
 UPDF vs. Adobe Acrobat
 UPDF vs. Foxit
 UPDF vs. PDF Expert





 Enola Miller
 Lizzy Lozano
  Delia Meyer