 UPDF
UPDF
 UPDF for Windows
 UPDF for Mac
 UPDF for iPhone/iPad
 UPDF for Android
 Nomostar
 UPDF AI Online
 UPDF Sign
 IvyCraft
 Edit PDF
 Annotate PDF
 Create PDF
 PDF Form
 Edit links
 Convert PDF
 OCR
OCR PDF to Word
 PDF to Image
 PDF to Excel
 Organize PDF
 Merge PDF
 Split PDF
 Crop PDF
 Rotate PDF
 Protect PDF
 Sign PDF
 Redact PDF
 Sanitize PDF
 Remove Security
 Read PDF
 UPDF Cloud
 Compress PDF
 Print PDF
 Batch Process
 About UPDF AI
 UPDF AI Solutions
 AI User Guide
 FAQ about UPDF AI
 Summarize PDF
 Translate PDF
 Chat with PDF
 Chat with AI
 Chat with image
 PDF to Mind Map
 Explain PDF
 PDF AI Tools
 Image AI Tools
 AI Chat Tools
 AI Writing Tools
 AI Study Tools
 AI Working Tools
 Other AI Tools
 AI Bookmark Generation
 AI Bookmark Summary
 AI Watermark Generation
 AI Background Generation
 AI Sticker Generation
 AI Stamp Generation
 AI Editing Suite
 UPDF Copilot
 AI Page Management
 AI Semantic Search
 PDF to Word
 PDF to Excel
 PDF to PowerPoint
 Enterprise Solution
 Enterprise Sign
 Enterprise AI
 Enterprise Plan
 Enterprise User Guide
 Enterprise Webinar
 IT
IT Education
 Construction
 Financial Service
 Healthcare
 Insurance
 Legal
Legal Manufacturing
 Government
 Researchers & PhDs
 Solopreneurs & Freelancers
 Lawyers & Legal Professionals
 Real Estate Agents & Brokers
 Education Solution
 Customer Stories
 User Guide
 UPDF Tricks
 FAQs
FAQs UPDF Reviews
 Download Center
 Blog
Blog Newsroom
 Tech Spec
 Updates
 UPDF vs. Adobe Acrobat
 UPDF vs. Foxit
 UPDF vs. PDF Expert

You just spent twenty minutes completing a job application, a tax form, or a client contract. Every field is filled, the signature is in place, and the calculated totals look correct. Now the recipient emails back: "Please send a non-editable copy."
If you send the fillable file as-is, anyone with a PDF reader can change the numbers, move the signature, or alter dates after submission. You need to convert the fillable PDF to a regular, locked document—but most people learn the hard way that not all "conversion" methods produce the same result.
Print to PDF can erase your data. Browser-based tools can strip signatures. And some methods turn your crisp text into blurry images that fail professional review.
This guide covers four reliable ways to convert a fillable PDF to a regular PDF after filling—how to choose the right one for contracts versus bulk submissions, and what to do when the output looks wrong.
What Does "Regular PDF" Actually Mean?
There are three ways to turn a fillable form into a "regular" non-editable PDF, and they produce very different results. Before you pick a tool, decide which outcome you actually need.
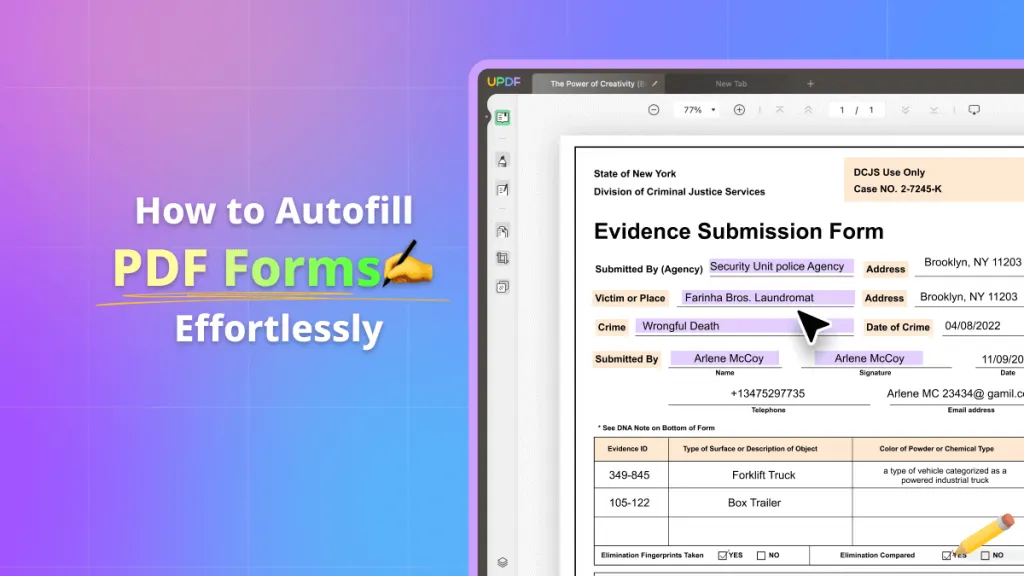
The person completing the form should be able to tell where each answer belongs. You can start with the video below for an introduction to working with PDF forms in UPDF.
Type 1: Flattened PDF (Recommended for Most Users) Form fields become static text and images baked onto the page. The text remains selectable and searchable. File size stays reasonable. This is the professional standard for final contracts, applications, and invoices.
Type 2: Printed / Rasterized PDF (Quick but Lossy) The PDF is re-rendered through a print driver. Text may be converted to images, losing searchability. Fonts may substitute if the print driver does not embed them. Best for quick one-off submissions where exact fidelity does not matter.
Type 3: Image-Only PDF (Maximum Lockdown) Every page becomes a photograph of itself. Completely uneditable, but also unsearchable. File size often increases significantly. Use this only when a government agency or legal body explicitly requires "image-only" or "scanned" format.
Which tool should you use for each method? All four methods below work with any PDF reader, but the results vary significantly. Browser viewers often drop form data. Preview on Mac can corrupt signatures. For reliable, professional output — especially for legal documents, contracts, and government forms — use a dedicated PDF editor like UPDF. It supports flattening, batch printing, and OCR image‑only conversion in one interface.
Windows • macOS • iOS • Android 100% secure
Quick Method Selector: Which Approach Fits Your Situation?
Check below chart to decide which approach fits your situation in 30 seconds, and the step-by-step guide can help you finsh the fillable PDF to regular PDF conversion process.
| Your Situation | Best Method | Result |
|---|---|---|
| Single form, need to submit today, quality not critical | Print to PDF | Flattened, may have slight font changes |
| 50+ forms to process, all same template | Batch Print | Fast, but verify the first output |
| Legal contract with signatures, must preserve exact appearance | Flatten (Comment & Forms) | Professional quality, fields locked, text sharp |
| Government form requiring "image-only" submission | OCR Image-Only | Completely non-editable, but text is not searchable |
| Need to keep text searchable AND lock fields | Flatten without OCR | Best balance of utility and security |
The four methods below work with any filled PDF, regardless of how you completed it. Whether you used Adobe Reader, your browser’s built-in viewer, or a dedicated PDF form filler, the conversion steps are the same. The only requirement is that your filled data is visible when you open the file in a desktop PDF application—not in a browser tab.
Method 1: Print to PDF (Single File)
Use this when you need a quick, one-off conversion and do not have access to premium flattening features.
Step 1: Open your filled PDF in a desktop PDF reader such as UPDF; Verify on screen that all fields show your entered data. Do not use a browser—browser PDF viewers often fail to render filled form data correctly in print output.
Windows • macOS • iOS • Android 100% secure
Step 2: Press Ctrl+P (Windows) or Cmd+P (Mac) to open the Print dialog.
Step 3: Choose your output approach:
- Option A — Print as Image: Produces a rasterized PDF where every page becomes an image. Guarantees the recipient sees exactly what you see, but text is no longer selectable or searchable. File size increases.
- Option B — Preserve Document Structure: Ensure the boxes for Document, Comments, and Form Fields are checked in the print settings. This creates a PDF that retains text searchability but quality depends on the print driver.
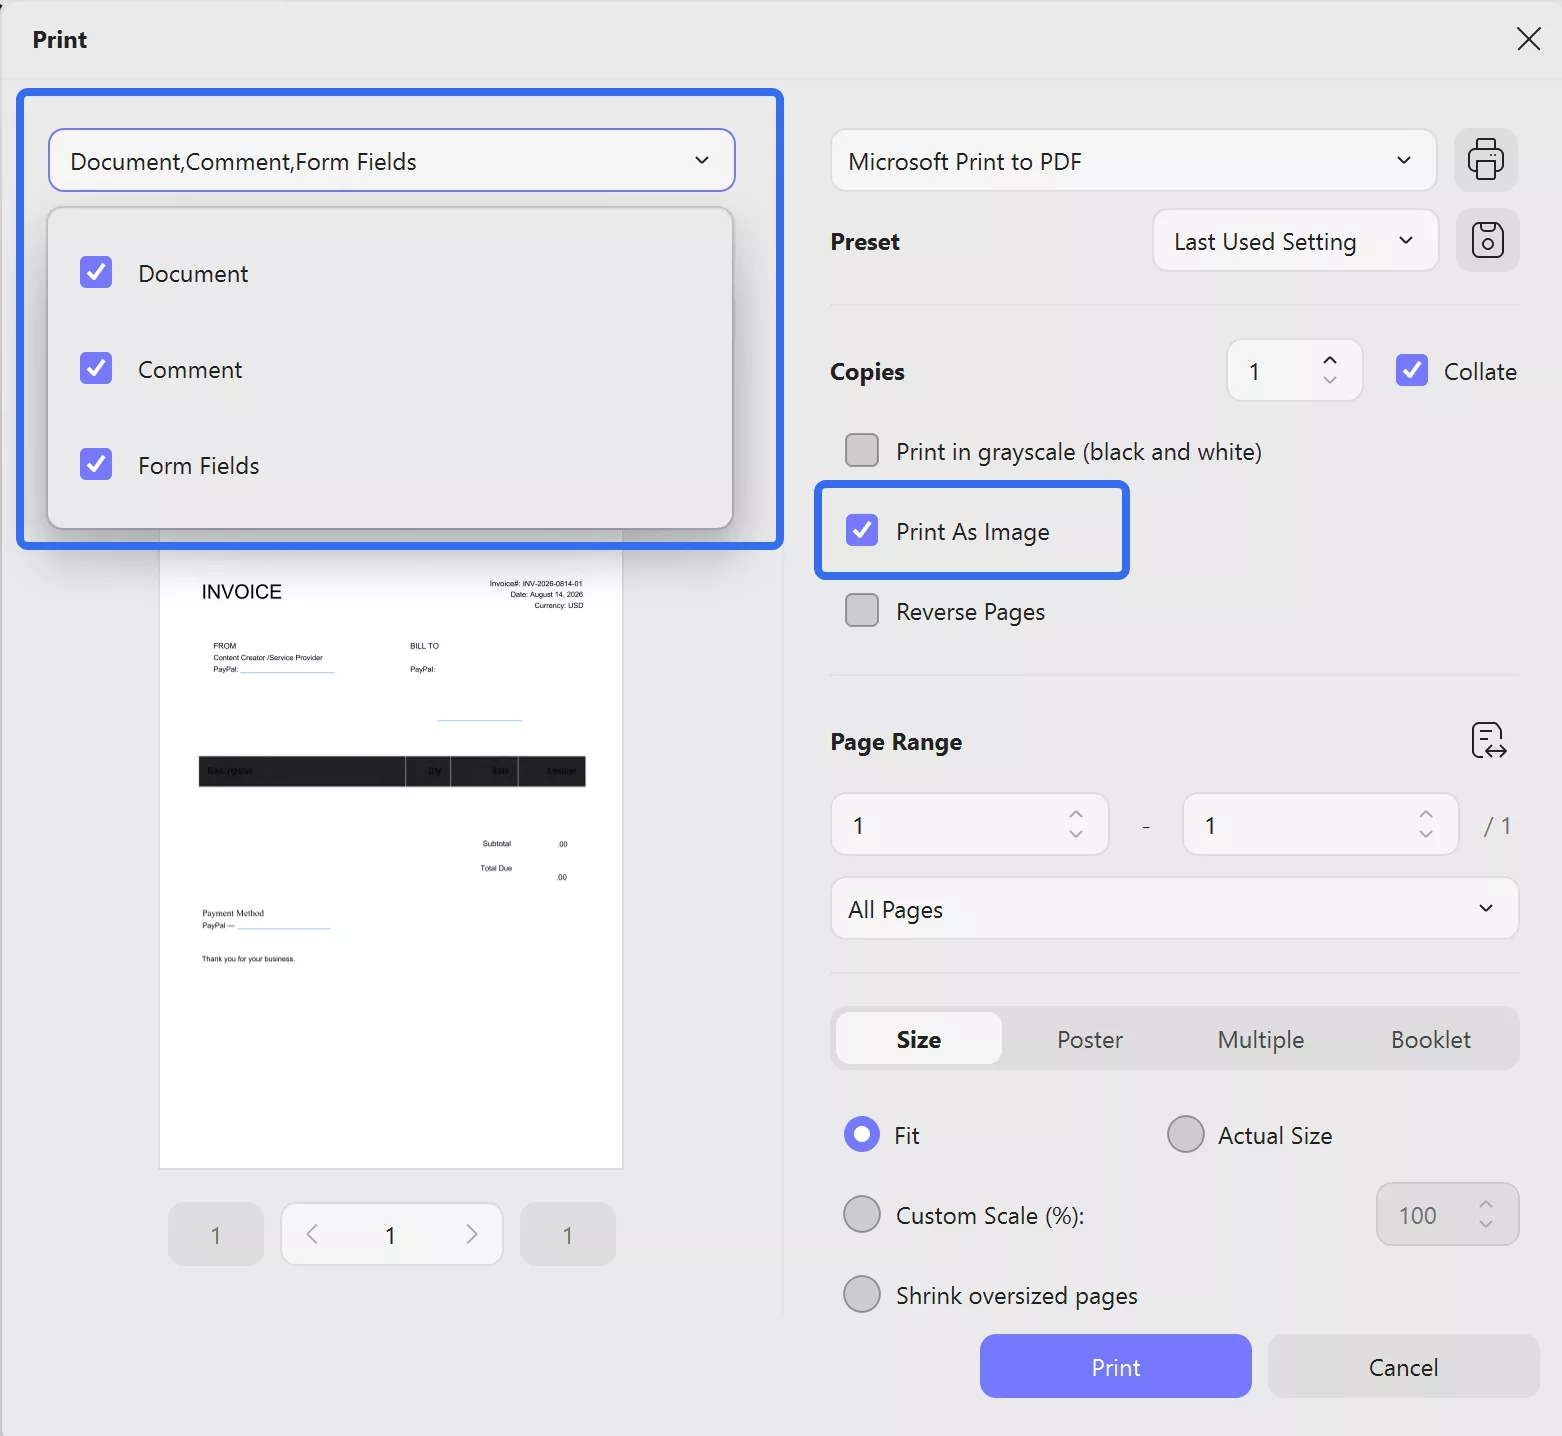
Step 4: Choose Microsoft Print to PDF (Windows) or Save as PDF (Mac) as the destination. Click Print and save the new file.
Critical Warning:
Method 2: Batch Print to PDF (Multiple Files)
Use this when you have dozens or hundreds of completed forms that all need locking at once.
Step 1: Open UPDF. On the home screen, click the Batch icon.
Windows • macOS • iOS • Android 100% secure
Step 2: Select Print from the batch tools menu.
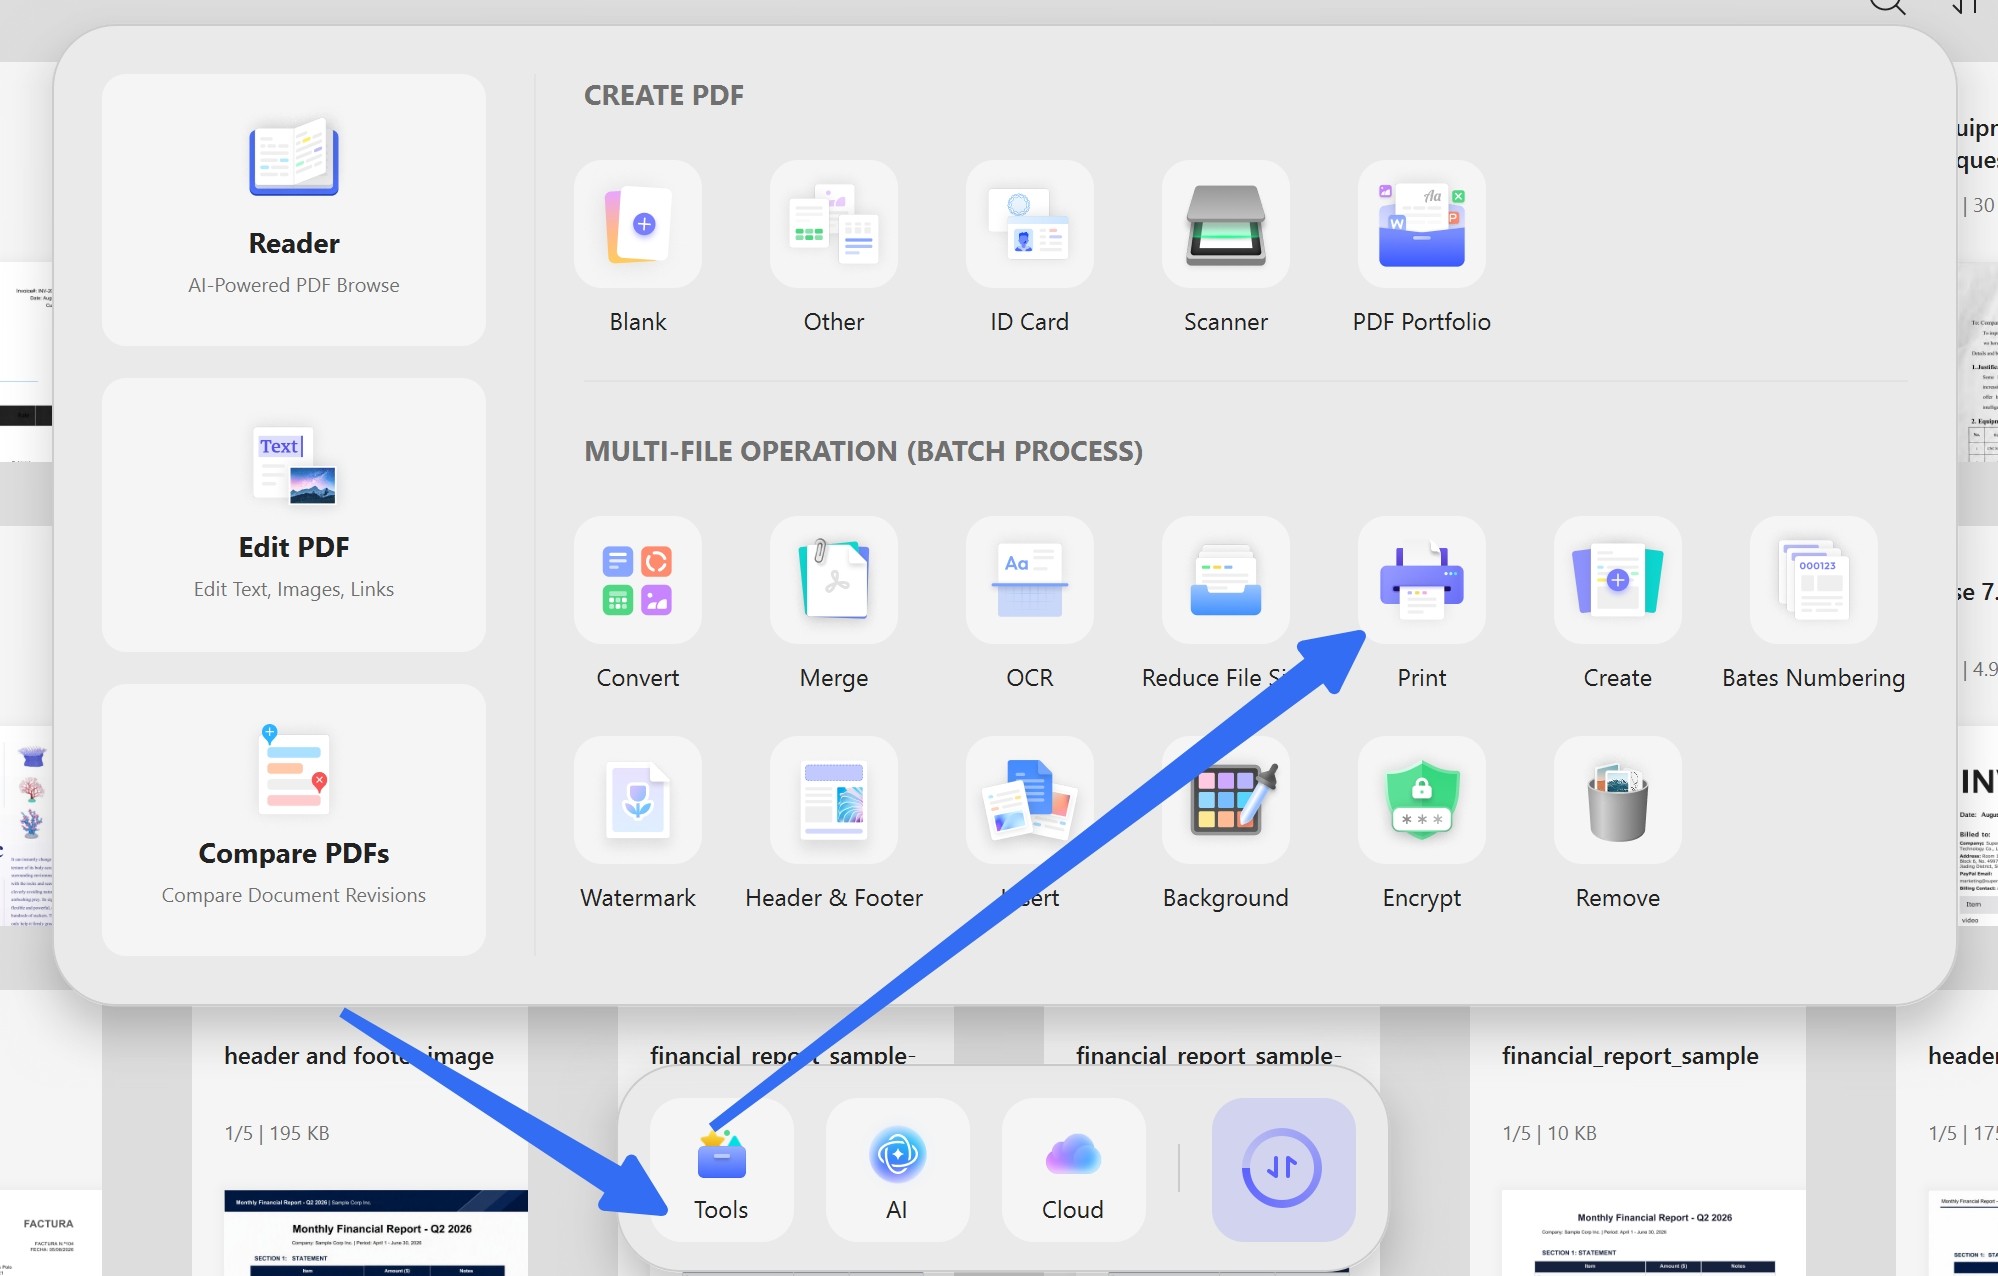
Step 3: Click Add Files and select all the filled PDFs from your local folder. You can also drag and drop an entire folder.
Step 4: On the right-side print settings panel, choose Microsoft Print to PDF as the printing mode.
Step 5: Decide whether to check Print as Image:
- Check it if you need absolute visual fidelity and do not care about searchability.
- Leave it unchecked if you want smaller files and selectable text.
Step 6: Ensure the boxes for Document, Comments, and Form Fields are checked. Choose page size and orientation, then click Print.
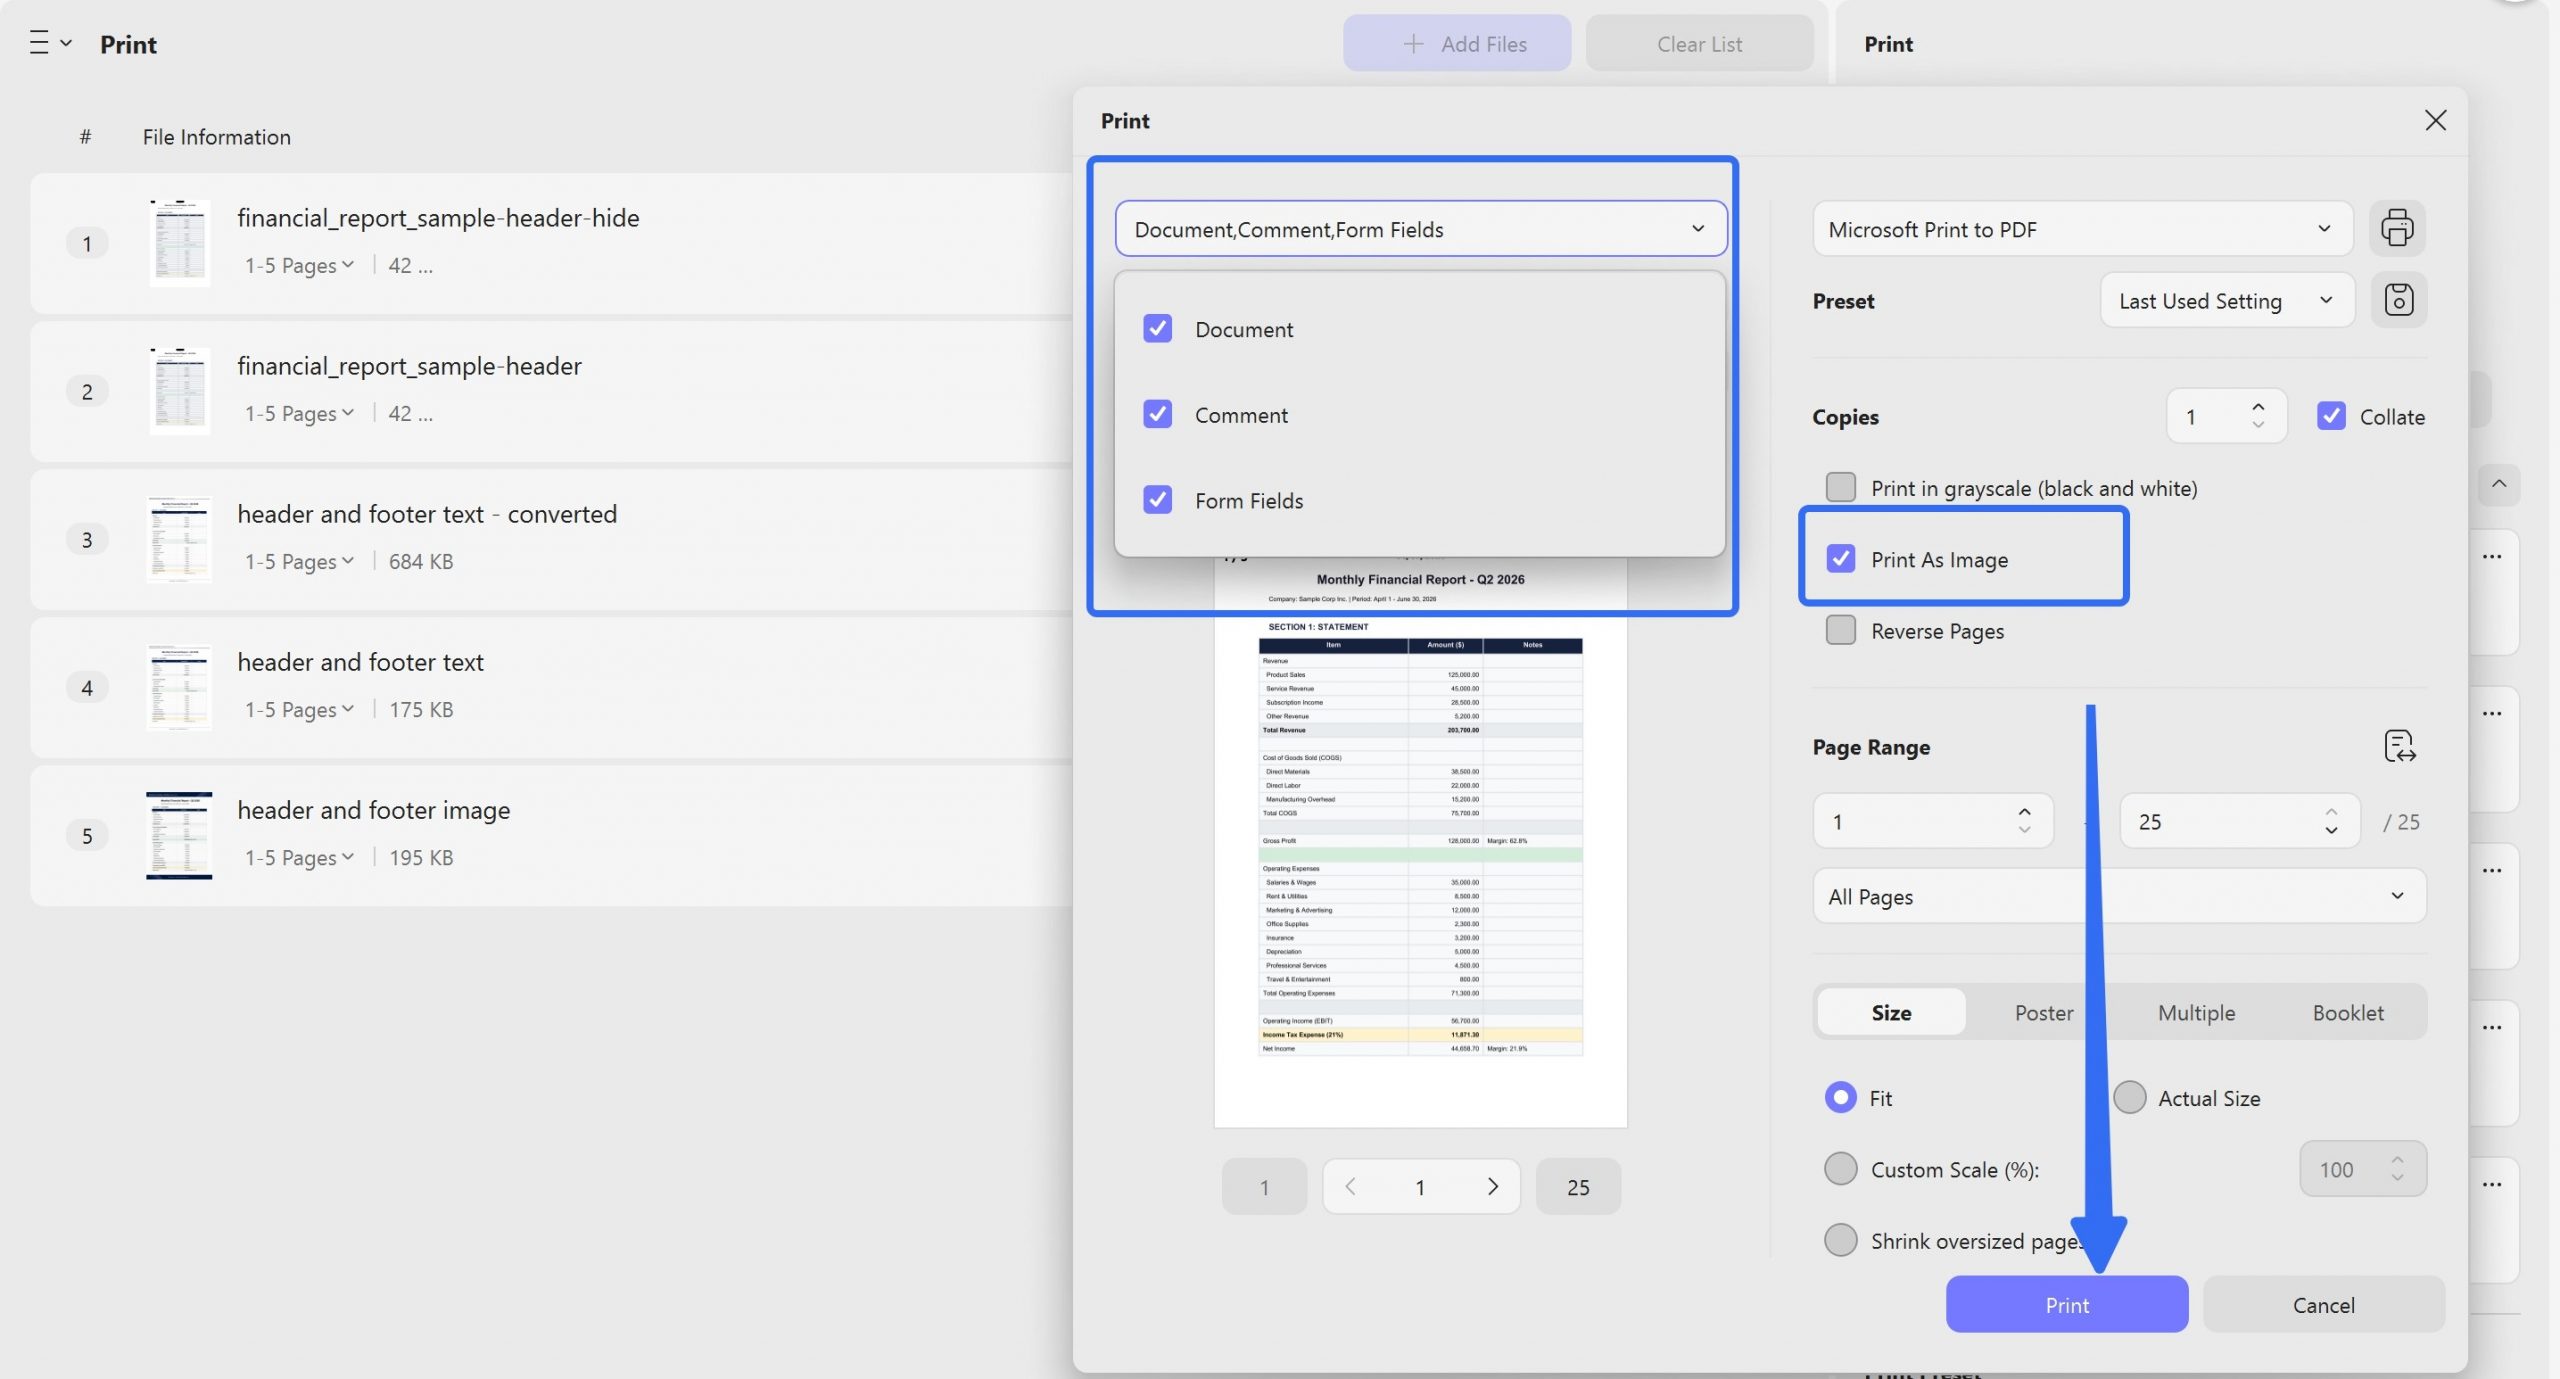
Step 7: Choose a destination folder and save. UPDF will process all files sequentially.
Batch Tip:
Method 3: Flatten Form Fields (Recommended)
Flattening is the professional standard for finalizing forms. It converts interactive fields into static page content while preserving text sharpness and searchability. Unlike printing, flattening does not re-render the page through a print driver—it simply bakes the field values into the document.
Why flatten instead of print?
- Text remains sharp and searchable
- File size does not bloat
- Digital signatures become tamper-evident
- Form calculations (totals, dates) are locked to their final values
- Metadata shows the document was finalized, not merely saved
Step 1: Open your completed form in UPDF. Double-check every field—once flattened, you cannot undo this.
Windows • macOS • iOS • Android 100% secure
Step 2: Click the arrow next to Save and choose Save as Flatten.
Step 3: In the dialog, select Comment and Forms. This ensures both your form data and any annotations or signatures are baked into the page.
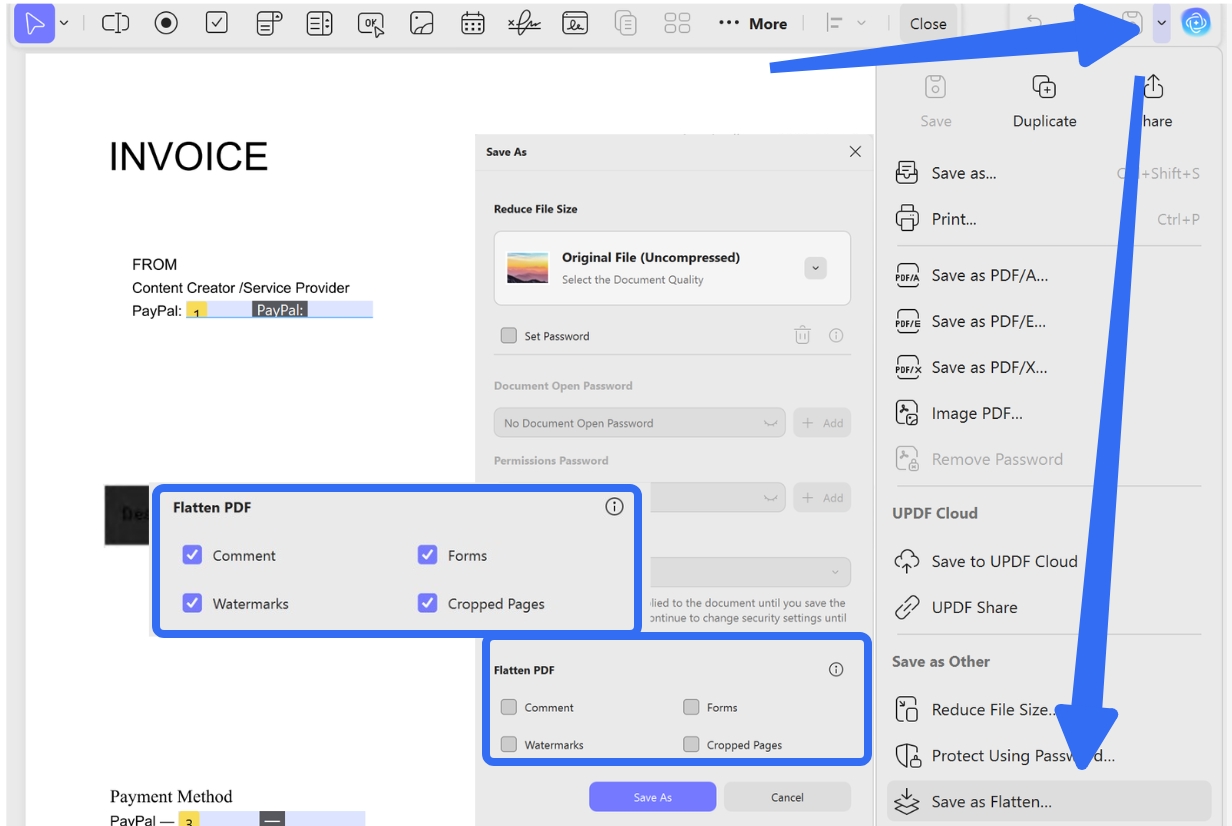
Step 4: Click Save As and choose your destination.
Before You Flatten: Save a separate copy of the original fillable PDF. The flattened version should be clearly named. For example:
- Original:
Contract_v1_FILLABLE.pdf - Final:
Contract_v1_FLAT.pdf
You cannot recover editable fields from a flattened file. Keep the fillable master in a separate backup folder.
Method 4: OCR to Image-Only PDF (Maximum Lockdown)
Use this only when your submission requirements explicitly state "image-only," "scanned format," or when you need absolute certainty that no hidden text or metadata can be extracted.
Trade-offs:
- Completely uneditable—even with advanced PDF editors
- Visual appearance is preserved exactly
- Text is not searchable (Ctrl+F returns nothing)
- File size typically increases three to five times
- Screen readers cannot access the text (accessibility loss)
Step 1: Open your filled form in UPDF.
Windows • macOS • iOS • Android 100% secure
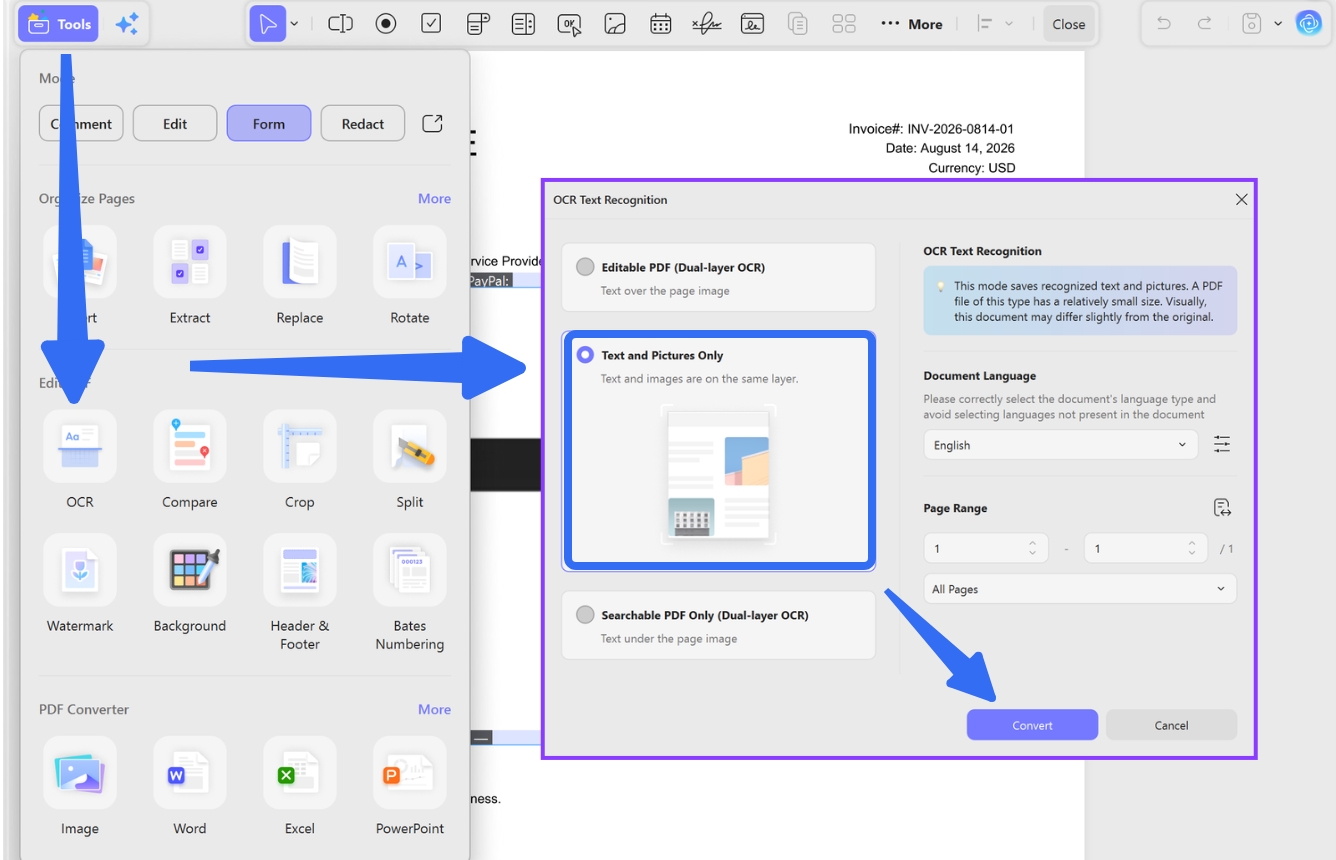
Step 2: Go to Tools > OCR.
Step 3: Select Image-only PDF (or Text and Pictures Only if you need a mixed approach). For most users, Method 3 (Flatten) is superior to OCR. Only choose OCR if explicitly required.
Step 4: Save the new file.
Platform Differences: Windows, Mac, iOS, Android
Windows
Best apps: UPDF, Adobe Acrobat Reader DC.
- File paths: Forms saved to
Downloadsmay be blocked by Windows Defender or marked as read-only. Move toDocumentsbefore flattening. - Email attachments: Outlook sometimes opens PDFs in a protected view that prevents saving or flattening. Click Enable Editing first.
- Batch processing: UPDF on Windows supports true batch flattening and batch printing with consistent output.
Mac
- Avoid Preview for flattening. Preview can display filled forms, but its flattening and print-to-PDF output sometimes drops form data or creates files that Windows users cannot read correctly. This is the number-one cause of cross-platform form failure.
- Best apps: UPDF for Mac or Adobe Acrobat Reader DC for Mac.
- iCloud behavior: If you save a flattened form to iCloud and open it on another Mac, ensure both machines use the same PDF engine. Preview and Adobe Reader handle form data layers differently.
iOS / iPad
- UPDF iOS offers a flattening feature: open the file, tap the arrow next to save, and select Save as Flatten. Choose Comment and Forms, name the file, and tap Save to Files.
- Do not use the iOS Share Sheet > Print > Save as PDF. iOS print drivers often fail to embed filled form data, resulting in blank output. Always flatten within a dedicated PDF app.
- Limitation: Batch processing is limited to ten files at a time due to iOS memory constraints.
Android
- UPDF Android supports flattening and printing to PDF.
- File manager integration: You can flatten directly from Google Drive or local storage without importing first.
- Camera-scanned forms: If the form was originally a photo converted to PDF, flattening works the same way, but verify that OCR was applied first if you need searchability.
Browser (All Platforms)
- Never flatten or print a filled form from a browser. Chrome, Edge, Firefox, and Safari built-in PDF viewers cannot reliably render filled form data in print output. Always download the file and open it in a desktop PDF editor first.
Best Practices for Legal and Bulk Submission
Naming Convention Use a clear suffix system so you never confuse editable masters with final submissions:
Contract_v1_FILLABLE.pdf— the original templateContract_v1_FILLED.pdf— the completed version with dataContract_v1_FLAT.pdf— the locked, non-editable final
Folder Structure Keep three separate folders:
/templates/— original blank forms/filled/— completed but still editable versions/final/— flattened or printed submissions
Never overwrite the original template. Once flattened, you cannot "un-flatten" to recover editable fields.
Legal and Compliance Notes In legal and financial workflows, a fillable PDF is considered a "draft" because fields can be modified after signing. Flattening creates a "final executed version" where:
- Dates cannot be changed retroactively
- Signature fields cannot be moved or copied to another document
- Calculated totals (invoice amounts, tax figures) are locked to their final values
- Metadata shows the document was finalized, not merely saved
Some courts and government agencies explicitly require flattened or image-only submissions to prevent post-submission tampering. When in doubt, ask the recipient whether they require "flattened PDF," "image-only PDF," or simply "non-editable PDF."
FAQs
How to Convert Fillable PDF to Regular PDF Online?
To convert a fillable PDF to regular PDF online, use the browser's printing feature, available on Google Chrome, Mozilla Firefox, and Microsoft Edge. Right-click on your file and select Open With > Chrome. Click the 'printer' icon on the top right corner to open print settings. Choose the destination as Microsoft Print to PDF and select 'Pages' and 'Color' settings as desired. Click Print and save the file on your PC.
How to Convert Fillable PDF to Regular PDF on iPhone/iPad?
UPDF on iOS offers a flattening feature to save the document as a readable file. Open the file on the UPDF app. From the menu drop-down, click on the narrow next to save and select Save as Flatten. On the next screen, add a name for the new file, select a folder on the phone, and tap 'Save to Files.'
How to Convert Fillable PDF to Regular PDF With Adobe?
Open the document with the Adobe application. Click on File and choose Print. Select your desired printing options in the printing settings like 'Page Size,' 'Orientation,' and 'Number of Copies'. Click Print and save the file to your PC.
Will flattening a PDF make my digital signature invalid?
No—flattening typically locks the signature in place and makes it tamper-evident. However, some signature validation systems require the PDF to remain unflattened to verify the certificate chain cryptographically. If your recipient needs to verify the signature through automated software (not just visual inspection), test one file before batch processing.
Why did my converted PDF file size increase so much?
You likely used Print as Image or OCR instead of true flattening. True flattening adds minimal size because it only embeds text values. If file size matters, avoid rasterization methods.
Final Words
Converting a filled form to a non-editable PDF is not just about clicking Print—it is about choosing the right level of finality for your situation. Quick print methods work for casual submissions, but professional flattening preserves quality, searchability, and legal integrity. Image-only OCR is overkill for most users unless a government body explicitly demands it.
Whatever method you choose, always keep the original fillable file as a backup. Flattening is permanent.
Ready to lock your forms with professional quality? Download UPDF and try the Save as Flatten feature on your next completed document.
Windows • macOS • iOS • Android 100% secure
Related guides:
- If you have not yet filled the form and need to save your progress first, read our complete guide: [How to Save a Fillable PDF Without Losing Data]
- If your digital signature is not showing after saving or flattening, see: [Digital Signature Not Showing in Saved PDF?]
- If you need to create the fillable form from scratch: [How to Create a Fillable PDF]





 Lizzy Lozano
 Enya Moore
 Enrica Taylor