QuickBooks is a leading financial management tool trusted by businesses of all sizes to streamline accounts and generate detailed reports. However, many users often need to share or archive their extracted data from the tool in a more suitable format. Exporting QuickBooks reports and invoices to PDF ensures compatibility, professional presentation, and secure document sharing. This makes using this financial tracking tool an essential skill for business owners or accountants.
Understanding how to convert QuickBooks to PDF can help you enhance your workflow and document management. This walkthrough will guide you through the download process, highlighting its simplicity and benefits. Additionally, we will also introduce an AI PDF editor/annotator with powerful compatibility for you - UPDF, you can also click the button below to get a free trial. Stay with us until the end to master the QuickBooks to PDF conversion and optimize the financial report management.
Windows • macOS • iOS • Android 100% secure
Part 1. How to Download/Save Documents in QuickBooks as PDF
Sometimes, a manager may need to save a document from QuickBooks to PDF to streamline the workflow. Other than that, the retail business manager uses QuickBooks to generate monthly sales statements for their records and share updates with the team. Exporting these QuickBooks sales statements to PDF can benefit the manager as they can organize them on their desktops for future reference.
This process ensures data integrity while providing a consistent format that is compatible across various devices and platforms. While using QuickBooks, you get the ability to convert old invoices and new bank statements to simple PDFs with a simple tap. Here are the steps to convert QuickBooks to PDF files using this platform.
Step 1. Get access to the QuickBooks Online tool and click the "+New" button.
Step 2. Then, select the "Statement" tab and choose the "Statement Type" field. As you hit the "Downward" arrow icon, pick any statements you want to export as a PDF.
Step 3. Move to the "Statement Date" field and enter the date you want to view the documents. Next, shift to the "Customer Balance Status" field and choose the status according to your requirements.
Step 4. Moving on, ensure that your "Start Date" and "End Date" fields are accurate, and hit the "Apply" button.
Step 5. Lastly, click the "Download" icon to pick the file destination and hit the "Save" button.
Upon using the QBO to PDF converter, you will need an efficient PDF editor to analyze the content effectively. For this purpose, we recommend you utilize UPDF, as it provides features to edit or annotate the downloaded invoices.
Part 2. How to Send QuickBooks Invoice as PDF
Apart from saving documents into PDFs, let us look into a scenario of sending an invoice as a PDF. Suppose a small business owner is managing their invoicing through QuickBooks and has completed an order for a client. The client requests the invoice in an accessible PDF format so that they can view it on any device without facing any complications. In such scenarios, the best option is to use QuickBooks to PDF converter to export the invoice.
After exporting the invoice as a PDF, the business owner can easily email it to the client. Below is a guide you can follow to better understand how to send QuickBooks invoices in PDF documents to your clients:
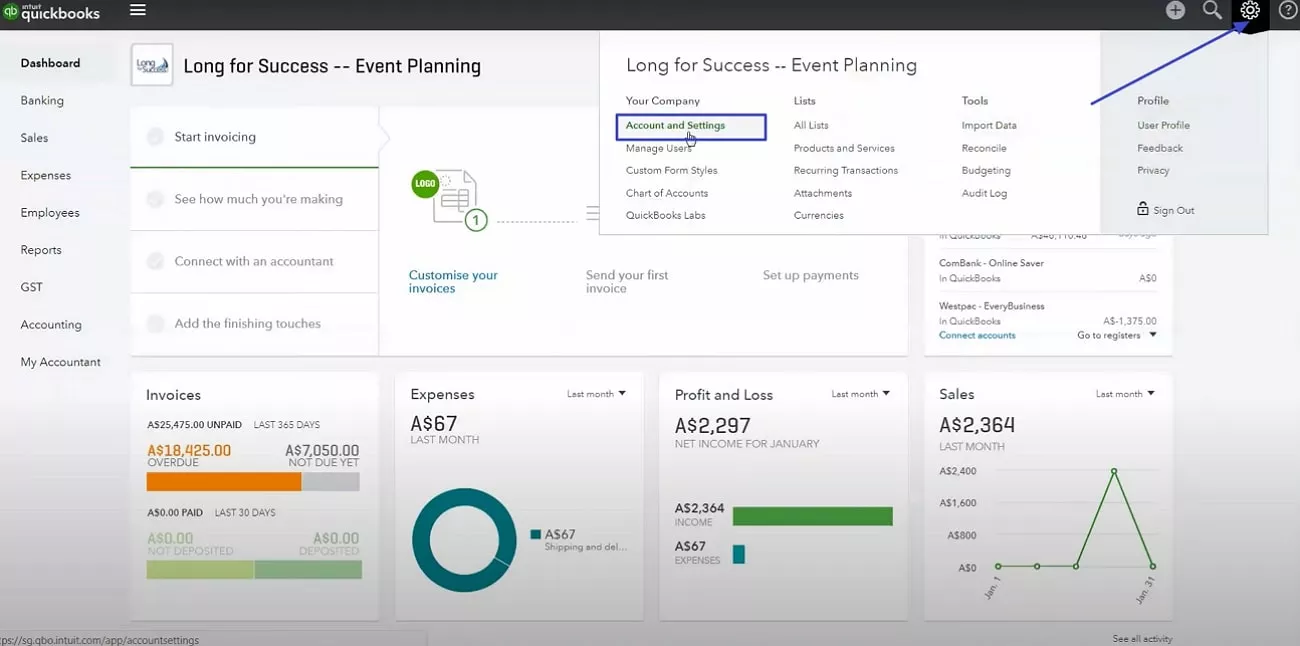
Step 1. As you access the online QuickBooks account, log in with your credentials. Then, at the main interface, click the "Settings" icon, represented by a gear at the top right corner of the screen. Now, pick the "Account and Settings" option from the menu that drops down.
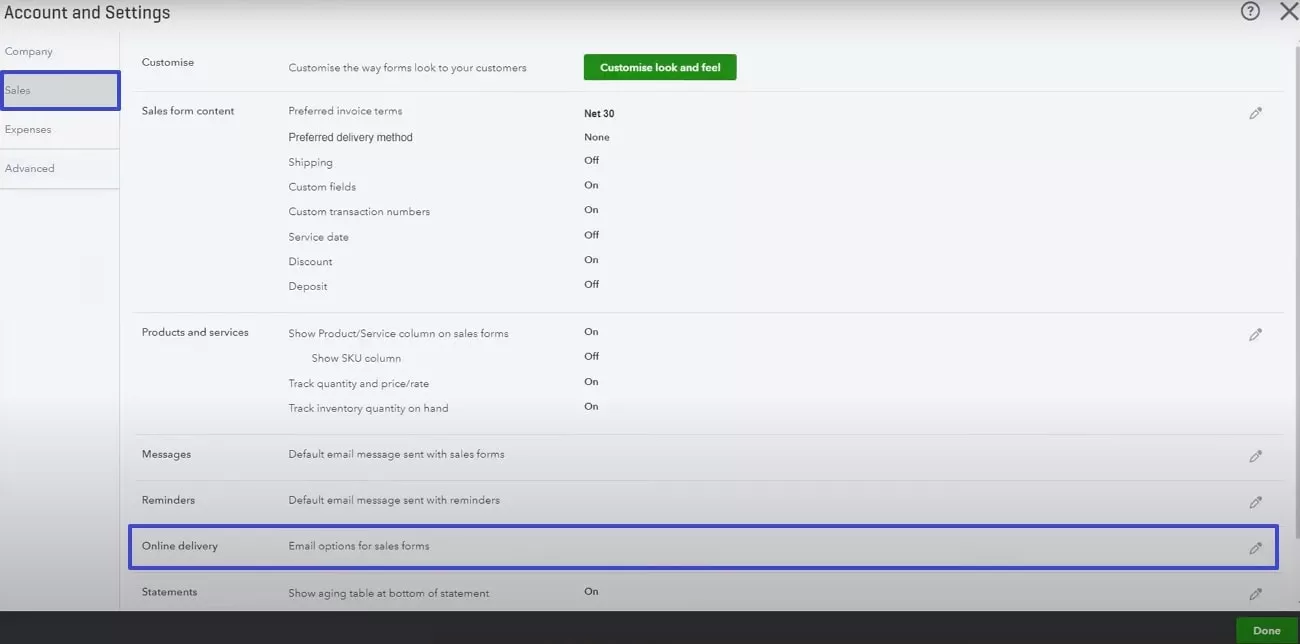
Step 2. Once you are in the Account and Setting panel, select the "Sales" tab from the left menu bar and pick the "Online Delivery" option.
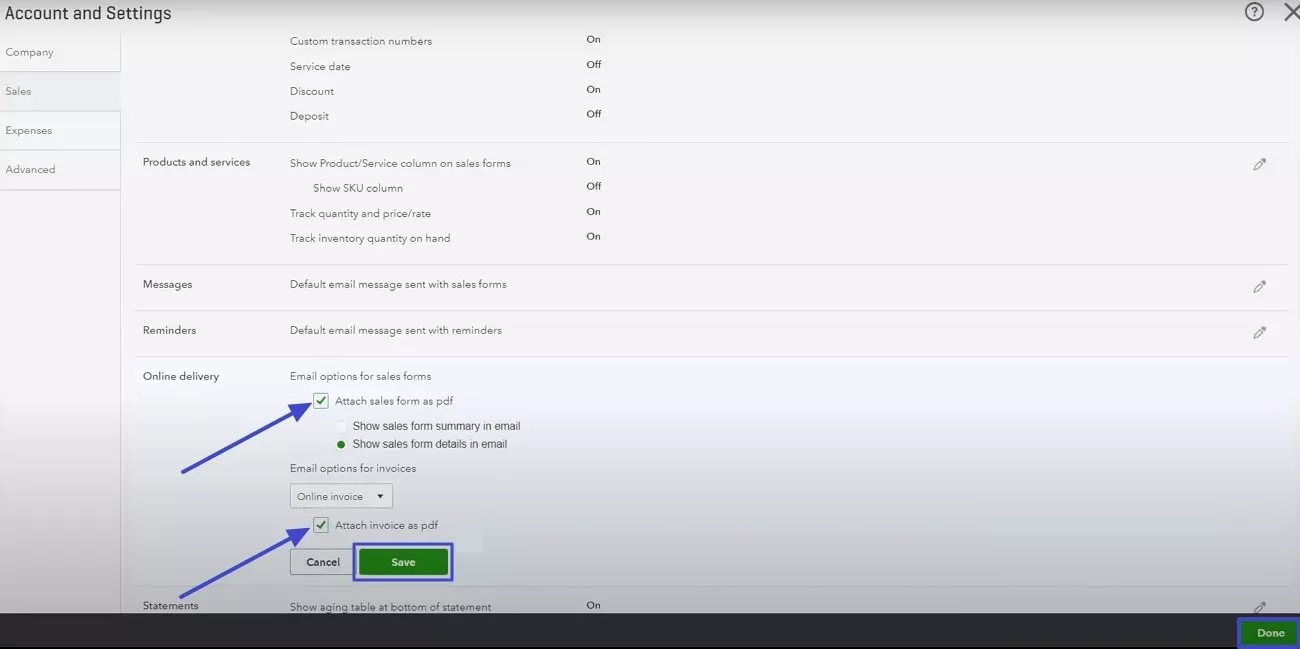
Step 3. After you click the Online Delivery option, tick the "Attach Sales Form as PDF" and the "Attach Invoice as PDF" checkboxes. Then, hit the "Save" button and use the "Done" button at the bottom right corner. After saving these settings, you can now email your clients the QuickBooks invoices in PDF format.
Part 3. Extra Tips About QuickBooks PDF
Now that you are clear on the steps to save QuickBooks to PDF files, here are some extra tips to keep in mind.
1. What do you do if you can't print, email, or save as a PDF from QuickBooks?
If you are not able to print, email, or save documents, use the QuickBooks PDF & Print Repair tool to fix the program problems. Another method could be restarting your desktop device and then resetting the temp folder permissions. Alternatively, update templates or forms or set the Print Spooler service to Automatic and restart it.
2. How can I edit/demonstrate/organize the PDFs printed from QuickBooks?
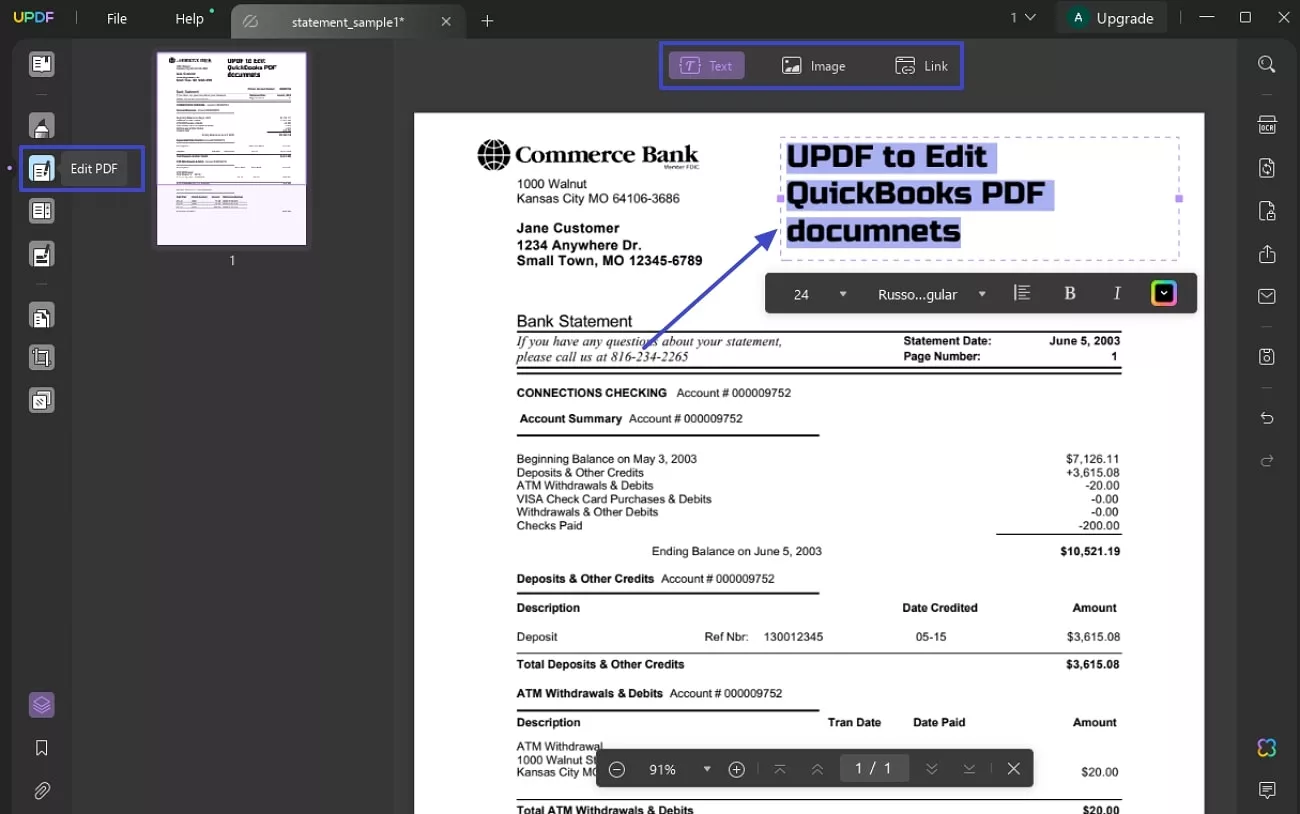
Once you've printed or exported documents from QuickBooks as PDFs, you might need to edit, annotate, or organize them for professional or personal use. UPDF, a user-friendly PDF editor, is an excellent tool for managing your QuickBooks PDFs effectively. Adhere to the steps below to figure out how UPDF can help you edit the QuickBooks to PDF files you converted:
Step 1. To edit your financial PDF document, navigate to the "Edit PDF" tab on the editing interface. Here, you can either add text, images, or links to the PDF as per your requirements.
Step 2. Moving on, to demonstrate the PDF, use the "Export" tab on the right toolbar and tap "PPT" format so that you can professionally present your company's financial health. Other than that, users get the option to utilize its built-in presentation tool.
Step 3. Next, UPDF allows you to organize the document through its "Organize Pages" feature at the left toolbar. You can insert, replace, extract, split, rotate, or delete the pages based on your preferences.
Conclusion
To summarize, we have looked into the steps you need to carry out in order to save your financial documents from QuickBooks to PDF formats. QuickBooks allows users to save, print, and send PDFs of statements extracted from the platform. We have also discussed ways you can utilize enhanced PDF editors like UPDF to edit, demonstrate, or organize the statements as per your preferences.
Windows • macOS • iOS • Android 100% secure
 UPDF
UPDF
 UPDF for Windows
 UPDF for Mac
 UPDF for iPhone/iPad
 UPDF for Android
 UPDF AI Online
 UPDF Sign
 Edit PDF
 Annotate PDF
 Create PDF
 PDF Form
 Edit links
 Convert PDF
 OCR
OCR PDF to Word
 PDF to Image
 PDF to Excel
 Organize PDF
 Merge PDF
 Split PDF
 Crop PDF
 Rotate PDF
 Protect PDF
 Sign PDF
 Redact PDF
 Sanitize PDF
 Remove Security
 Read PDF
 UPDF Cloud
 Compress PDF
 Print PDF
 Batch Process
 About UPDF AI
 UPDF AI Solutions
 AI User Guide
 FAQ about UPDF AI
 Summarize PDF
 Translate PDF
 Chat with PDF
 Chat with AI
 Chat with image
 PDF to Mind Map
 Explain PDF
 Scholar Research
 Paper Search
 AI Proofreader
 AI Writer
 AI Homework Helper
 AI Quiz Generator
 AI Math Solver
 PDF to Word
 PDF to Excel
 PDF to PowerPoint
 User Guide
 UPDF Tricks
 FAQs
FAQs UPDF Reviews
 Download Center
 Blog
Blog Newsroom
 Tech Spec
 Updates
 UPDF vs. Adobe Acrobat
 UPDF vs. Foxit
 UPDF vs. PDF Expert








 Enya Moore


