 UPDF for Windows
 UPDF for Mac
 UPDF for iPhone/iPad
 UPDF for Android
 UPDF AI Online
 UPDF Sign
 Read PDF
 Annotate PDF
 Edit PDF
 Convert PDF
 Create PDF
 Compress PDF
 Organize PDF
 Merge PDF
 Split PDF
 Crop PDF
 Delete PDF pages
 Rotate PDF
 Sign PDF
 PDF Form
 Compare PDFs
 Protect PDF
 Print PDF
 Batch Process
 OCR
OCR UPDF Cloud
 About UPDF AI
 UPDF AI Solutions
 AI User Guide
 FAQ about UPDF AI
 Summarize PDF
 Translate PDF
 Explain PDF
 Chat with PDF
 Chat with image
 PDF to Mind Map
 Chat with AI
 User Guide
 Tech Spec
 Updates
 FAQs
FAQs UPDF Tricks
 Blog
Blog Newsroom
 UPDF Reviews
 Download Center
 Contact Us

How to Create a PDF on Android with UPDF?
UPDF 2.0 for Android offers three easy ways to create PDFs right on your smartphone. You can start fresh with a blank document or convert files from Word, Excel, PowerPoint, or images. And if you have physical documents, you can scan them directly into a PDF.
This guide will explain each method step by step. To get started, click the button below to download UPDF 2.0 or get it from the Play Store here. Then, follow along to create PDFs on your Android.
Windows • macOS • iOS • Android 100% secure
1. Create a Blank PDF
UPDF for Android allows you to create a blank PDF from scratch with complete customization options. You can adjust the page layout, size, number of pages, and more.
Here are the steps.
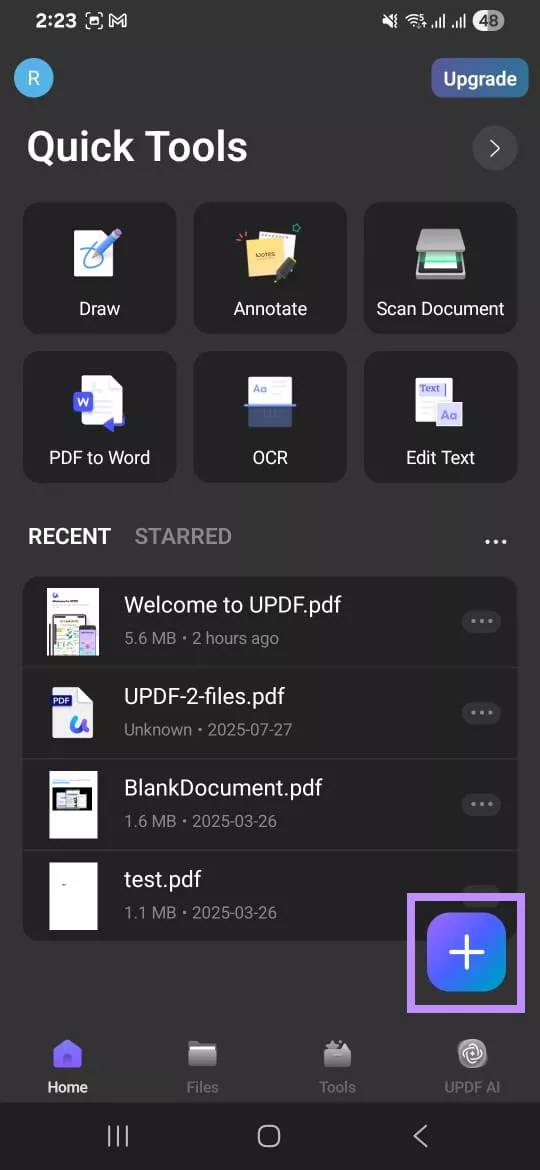
Step 1. Launch UPDF 2.0 on your Android device. Then, tap the “+” button in the bottom right of your screen.
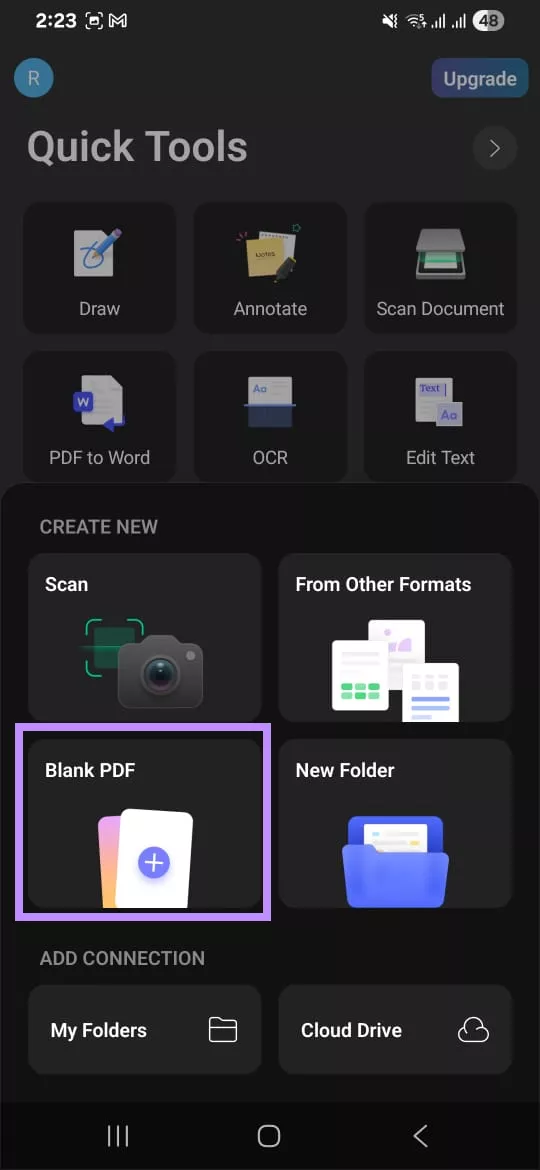
Step 2. A menu will appear on your screen. From here, tap the “Blank PDF” option and proceed.
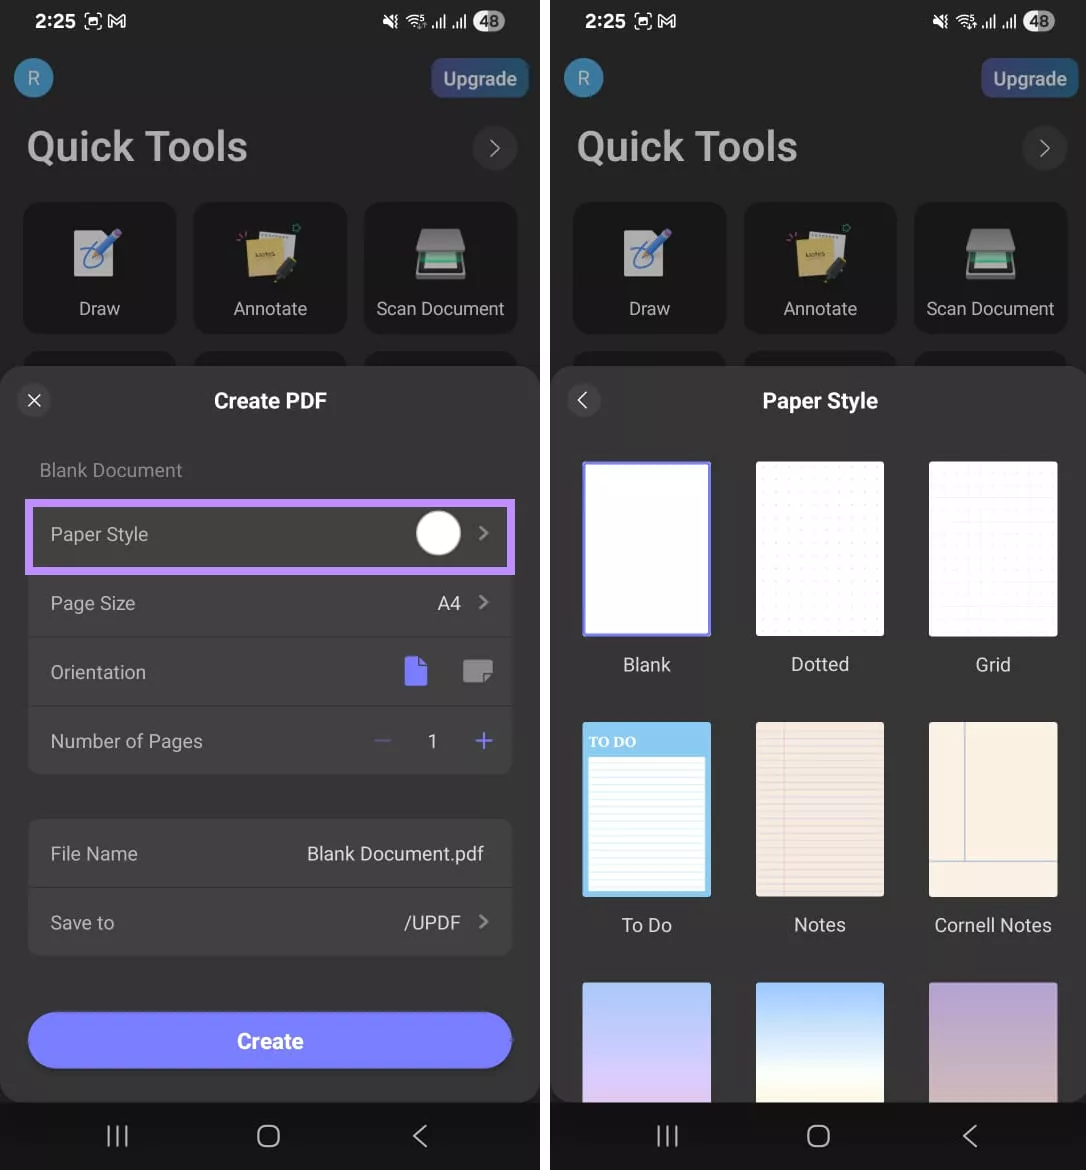
Step 3. From the new window, you will see several options to customize the blank PDF. Tap “Paper Style” to choose a template for your PDF pages. You can select from 12 unique styles, including:
- Blank
- Dotted
- Grid
- To Do
- Notes
- Cronell Notes
- Sunset
- Seaside
- Dusk
- Desert
- Grass
- Night Sky
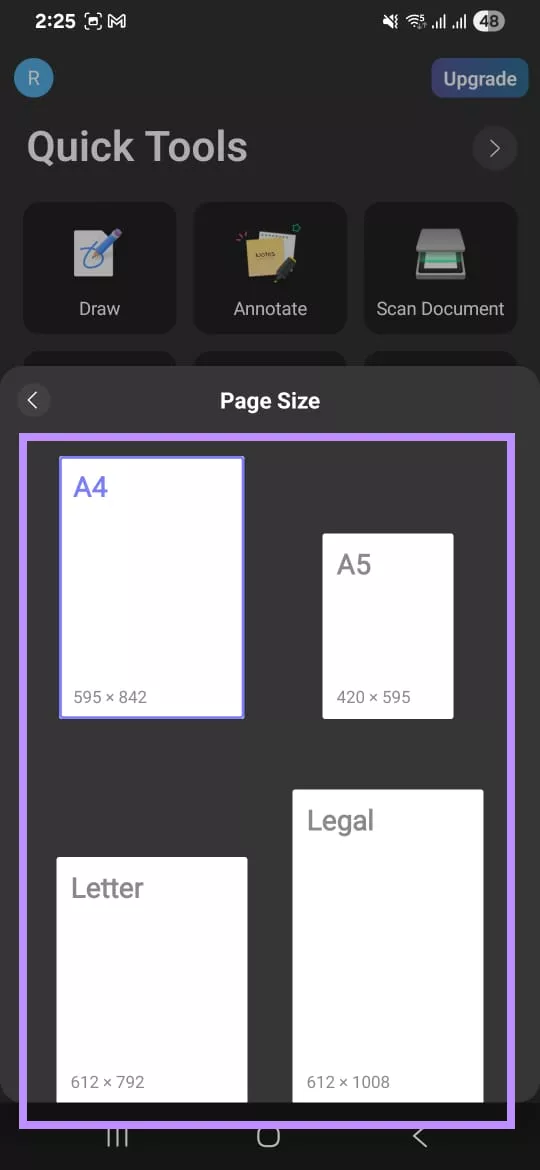
Step 4. Next, tap the “Page Size” option. Then, select a standard size for the type of PDF you’re creating. You can choose from 4 options:
- A4: 595 x 842 dimensions
- A5: 420 x 595 dimensions
- Letter: 612 x 792 dimensions
- Legal: 612 x 1008 dimensions
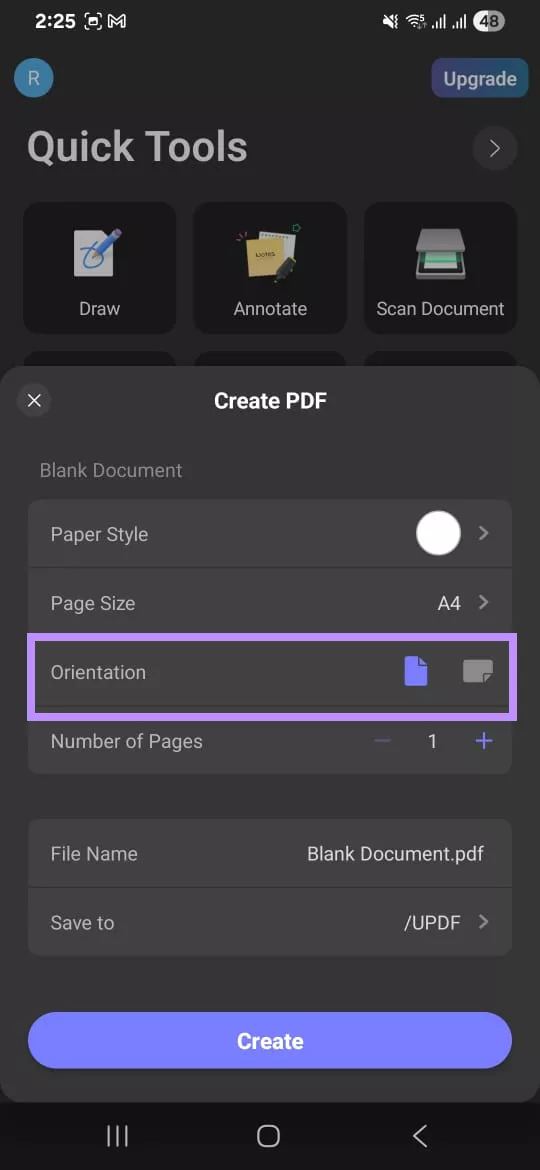
Step 5. Once you’ve chosen a page size, navigate to the Orientation option to define the page layout. You can choose from two options:
- Tap the vertical page icon to select a Portrait Orientation.
- Tap the horizontal page icon to choose a Landscape Orientation.
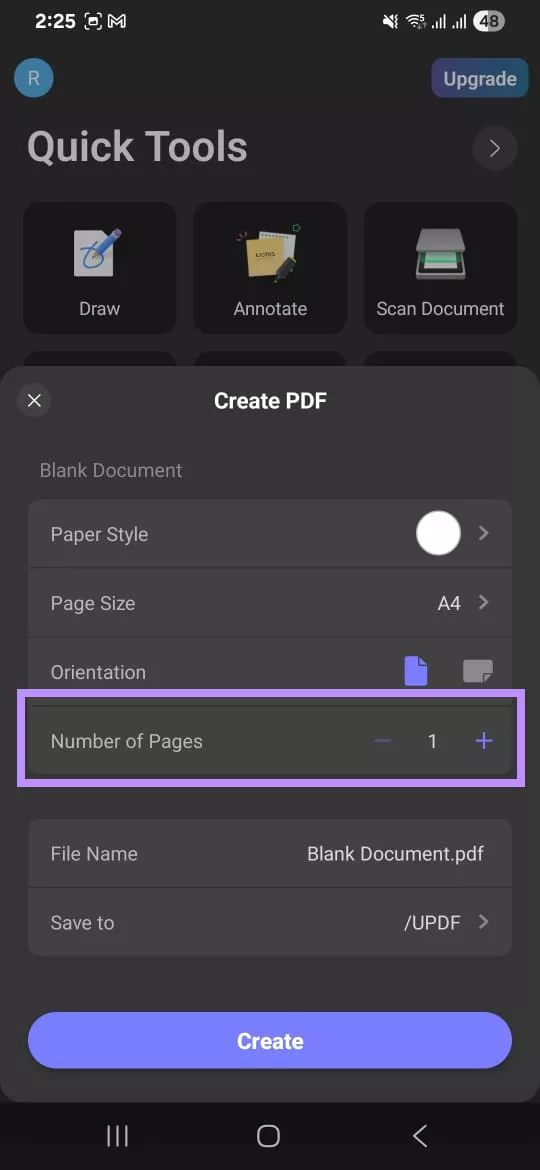
Step 6. Next, you can select the number of pages you want in your PDF. To add more pages, tap the “+” icon next to Number of Pages. If you want to reduce the number of pages, tap the “-” icon.
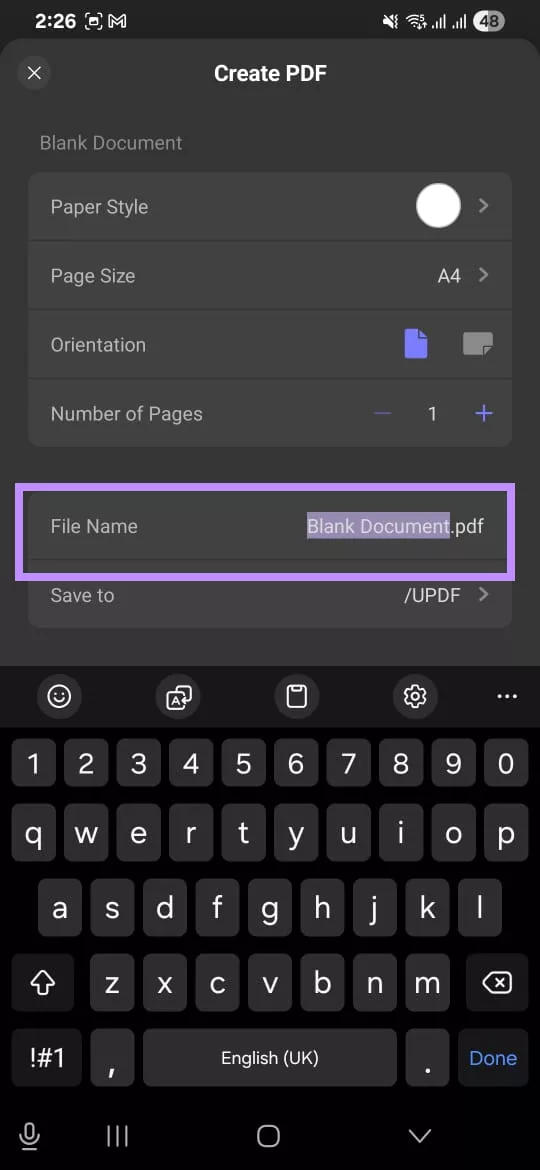
Step 7. After adjusting your settings, name your new PDF file. To do this, tap on Blank Document.pdf next to the File Name option, then type in the desired name.
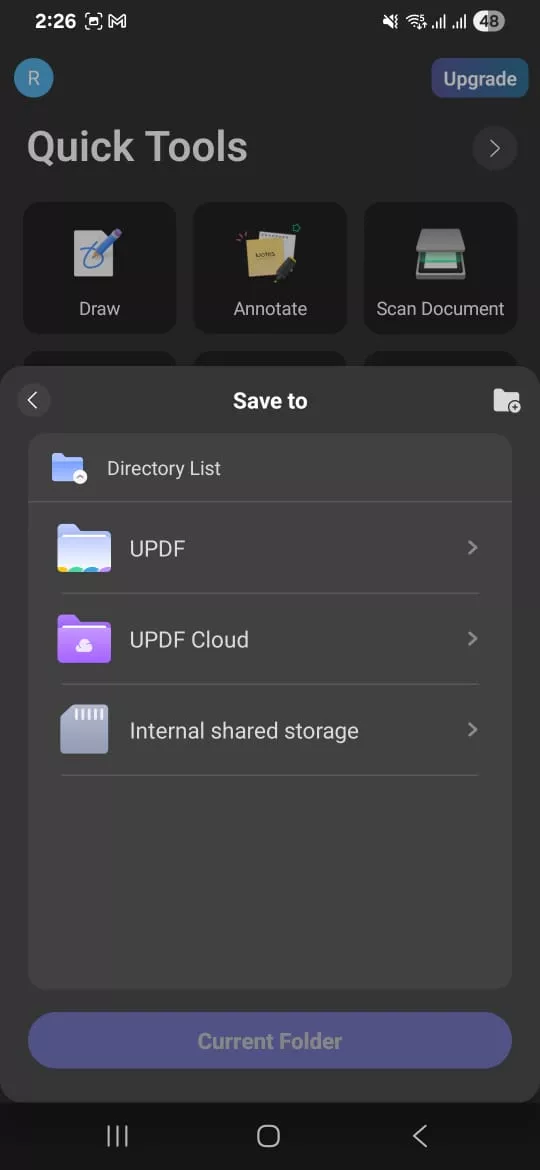
Step 8. Next, tap “Save to” and choose a location to save your new PDF. You can select:
- UPDF: saves documents within the UPDF app.
- UPDF Cloud: Built-in cloud storage.
- Internal shared storage: Your phone’s internal memory.
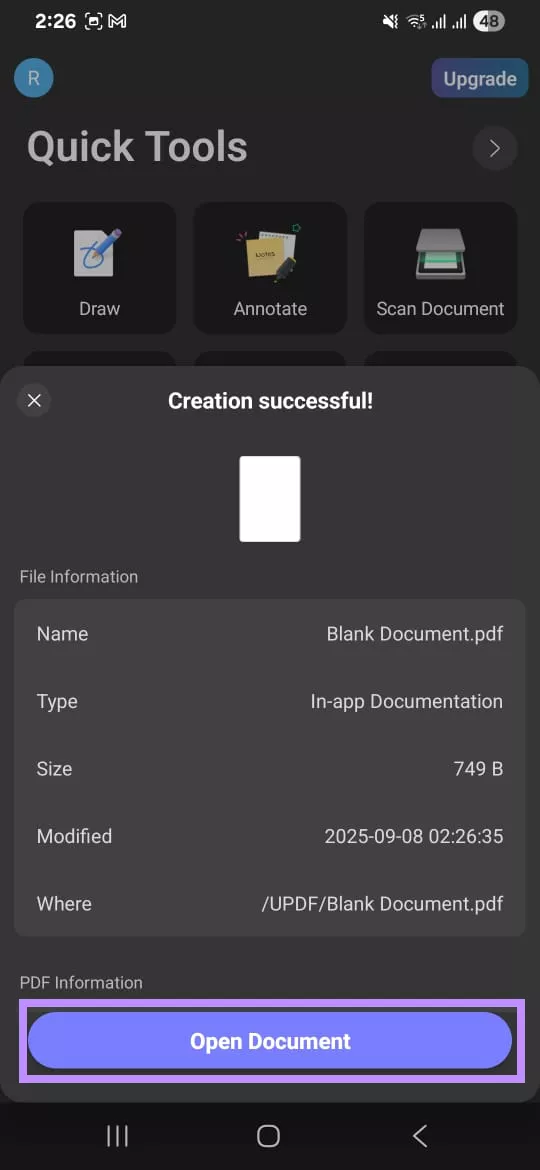
Step 9. Finally, tap the “Current Folder” button to create the blank PDF. This will open a new window on your screen displaying file information, PDF information, and security. From here, tap “Open Document” to view and edit the PDF.
Once your file is open, you can use the edit and annotation tools from the top to add text, images, and markups to your document.
2. Create PDF from Other Formats (Word, Excel, PPT, and Image)
Apart from a blank PDF, you can also create PDFs from other file types. These can be in Word, Excel, PowerPoint, or image formats.
Here are the steps to do this.
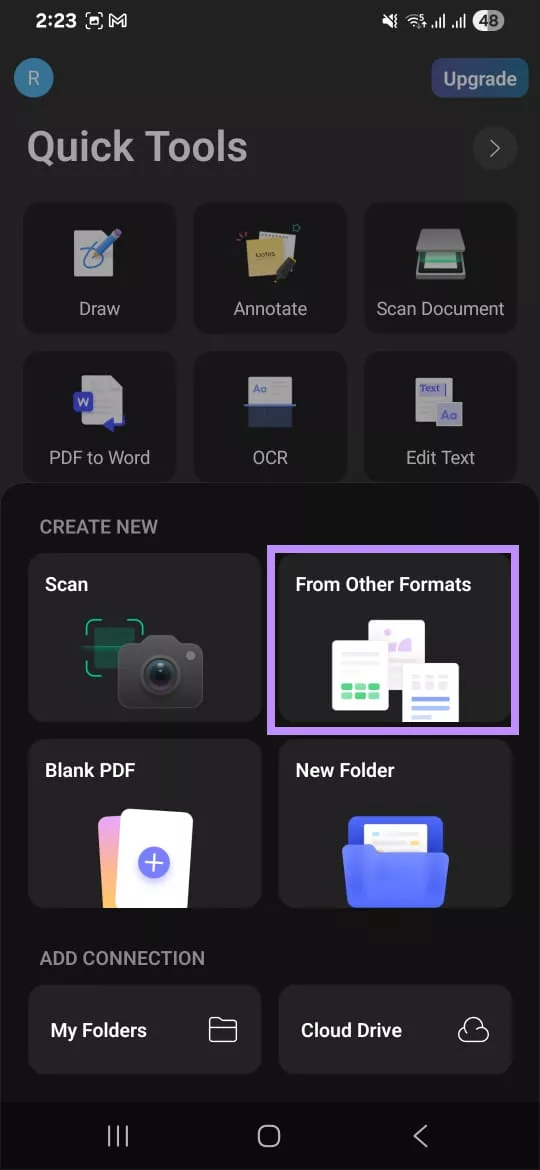
Step 1. With UPDF open on your phone, tap the “+” button in the bottom right corner.
Step 2. A menu will pull up on your screen. From here, select “From Other Formats.”
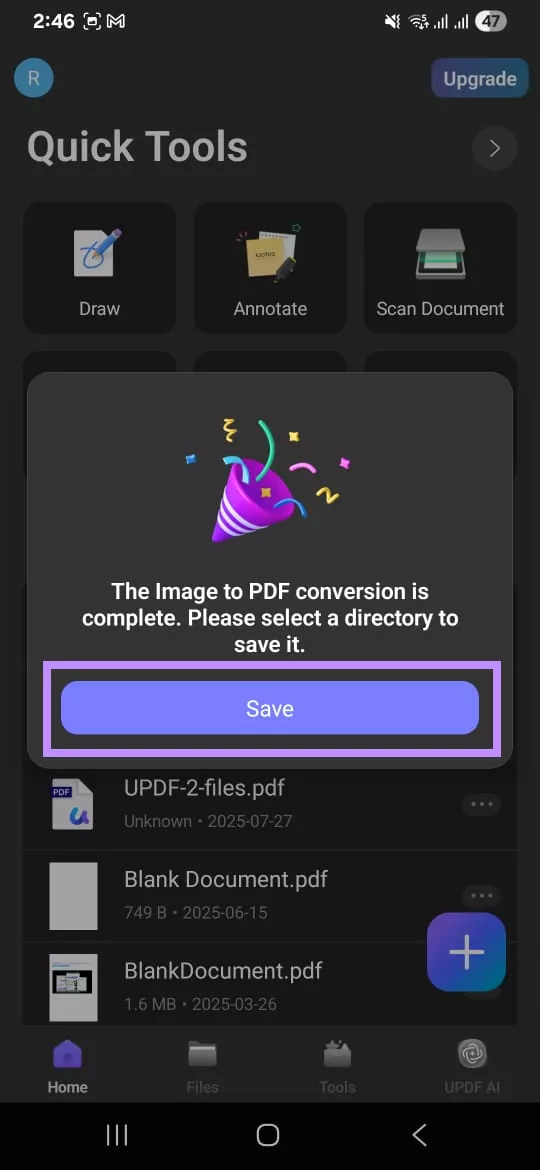
Step 3. Now, select the files you want to convert to a PDF. Simply tap on your desired file, and a dialogue box will appear on your screen. Press “Save” from here.
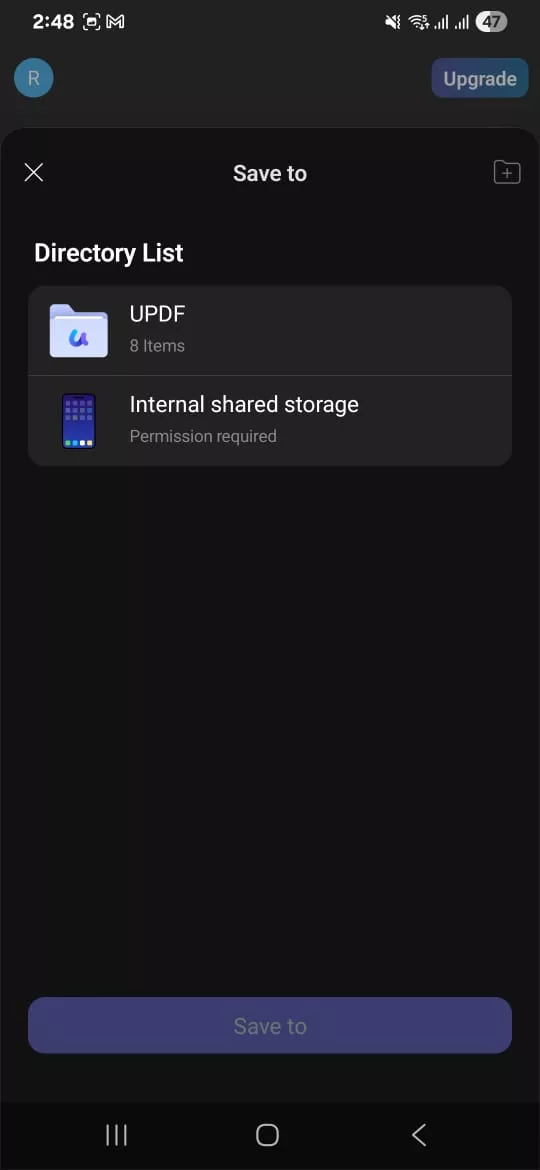
Step 4: You will be taken to the Directory List, where you can store your PDF. The available options are “UPDF” and “Internal shared storage.” Select the location to save your document.
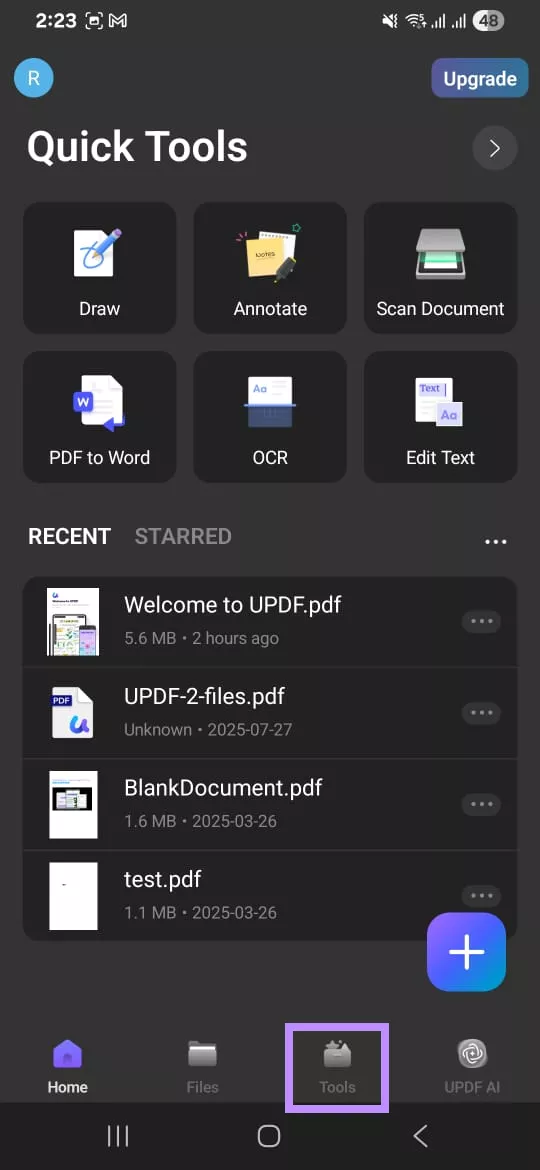
Step 5. You can also use the toolbox to create PDFs from other file formats. To do this, navigate to the Home screen. Then, tap the “Tools” option located at the bottom.
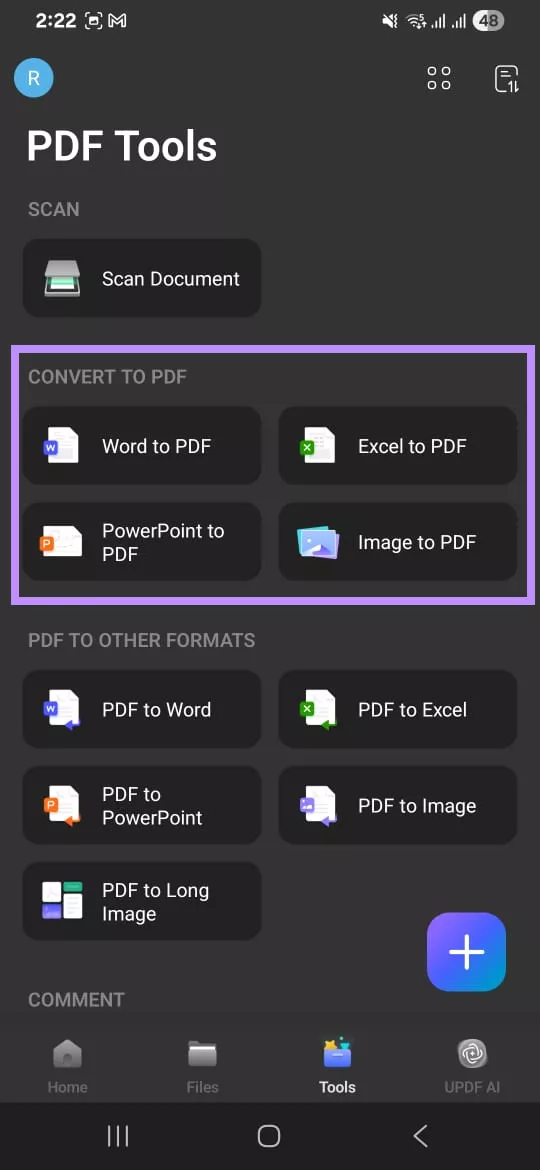
Step 6. In the new window, you can view all the tools UPDF offers. Navigate to the CONVERT TO PDF section. Here, you can select one of the 4 options based on the type of file you want to convert to PDF. These include:
- Word to PDF: Lets you create a PDF from any Word document.
- Excel to PDF: Allows you to create a PDF from any Excel sheet.
- PowerPoint to PDF: Creates a PDF from a PowerPoint presentation.
- Image to PDF: Converts any image files to a PDF.
Step 7. Select your desired option. Then select the file you want to convert and tap the “Save” button from the pop-up. After that, decide where to save the file from the Directory List.
3. Scan to PDF
Another way to create a PDF is by using the built-in document scanner. This tool can be helpful when you need to convert paper documents into an organized PDF.
Follow the steps below to scan to a PDF.
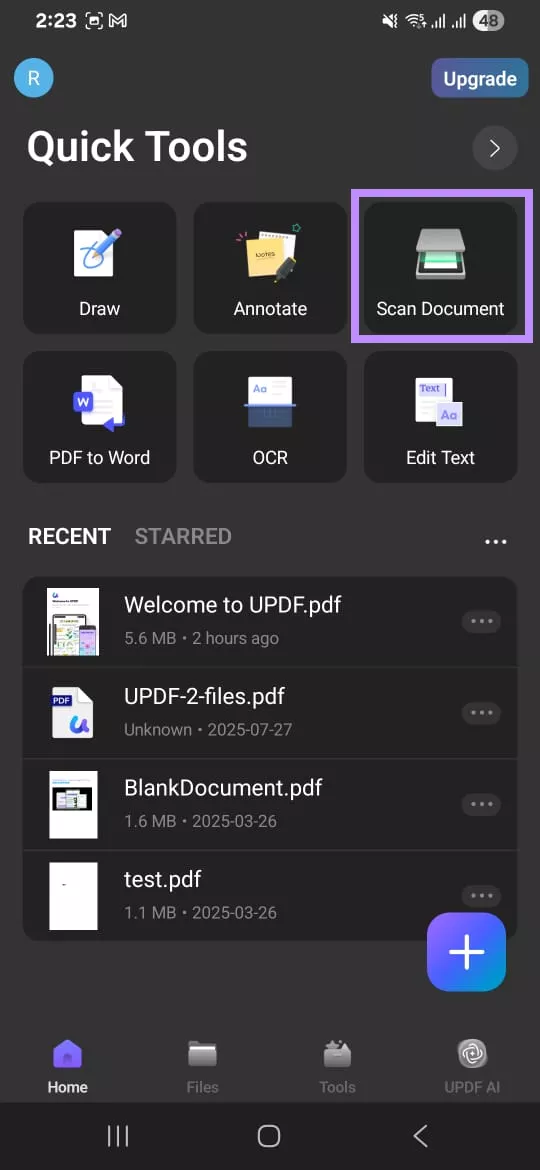
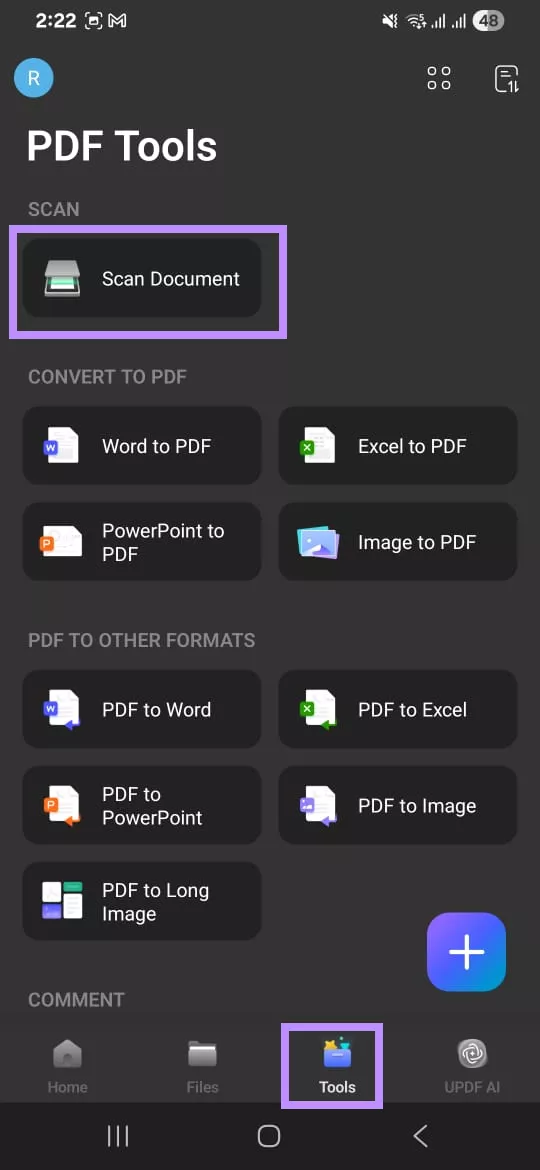
Step 1. Start by selecting the Scan tool in UPDF. You can access it in three ways:
- Tap “Scan Document” right from the Home screen under the Quick Tools menu.
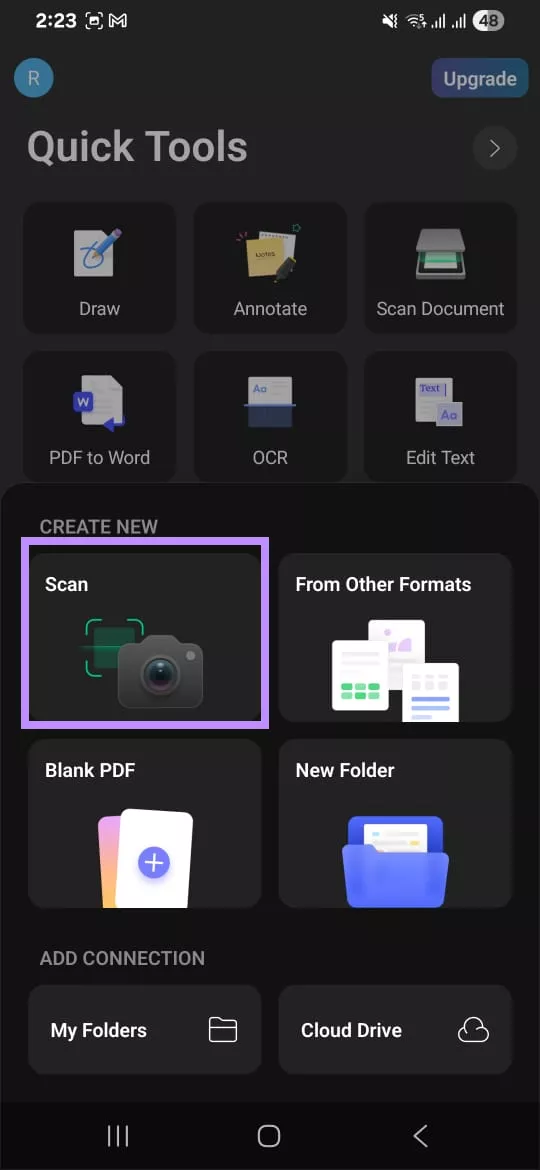
- Tap the “+” button in the bottom right of the Home screen. Then, select “Scan” from the pull-up menu.
- From the Home screen, select the “Tools” option located at the bottom. Then, select “Scan Document” at the top.
Step 2. After selecting the Scan tool in UPDF, take a picture of your desired document using your phone’s camera. Then, click “OK” to confirm it. Alternatively, tap “Retry” for another attempt.
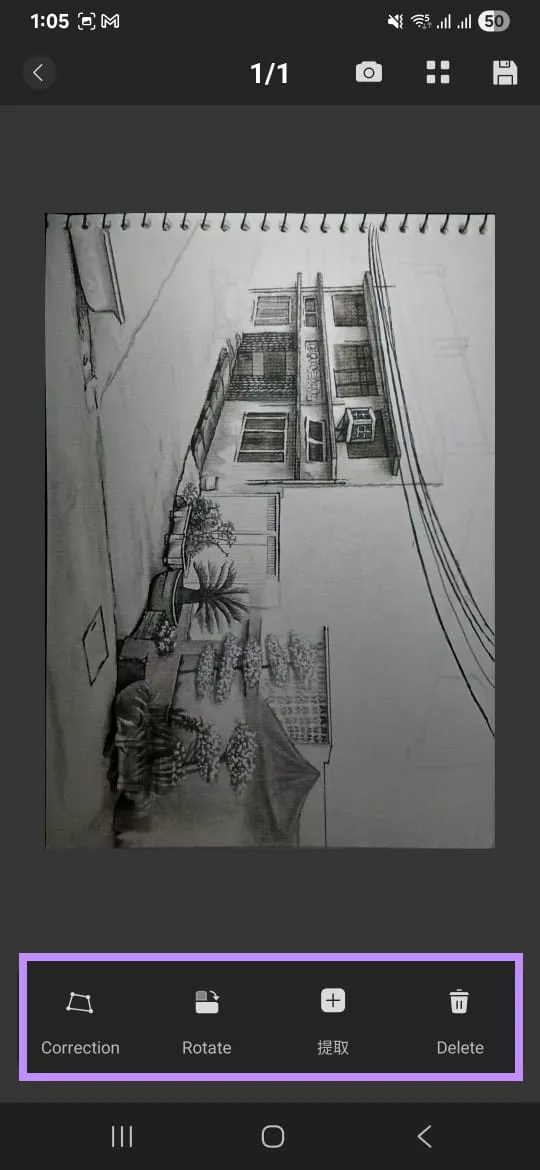
Step 3. Once you’ve selected the scan, UPDF will automatically detect the file and crop extra margins for a polished result. Afterward, you can use the tools at the bottom to adjust it manually. These tools include “Correction,” “Rotate,” “Extract,” and “Delete.”
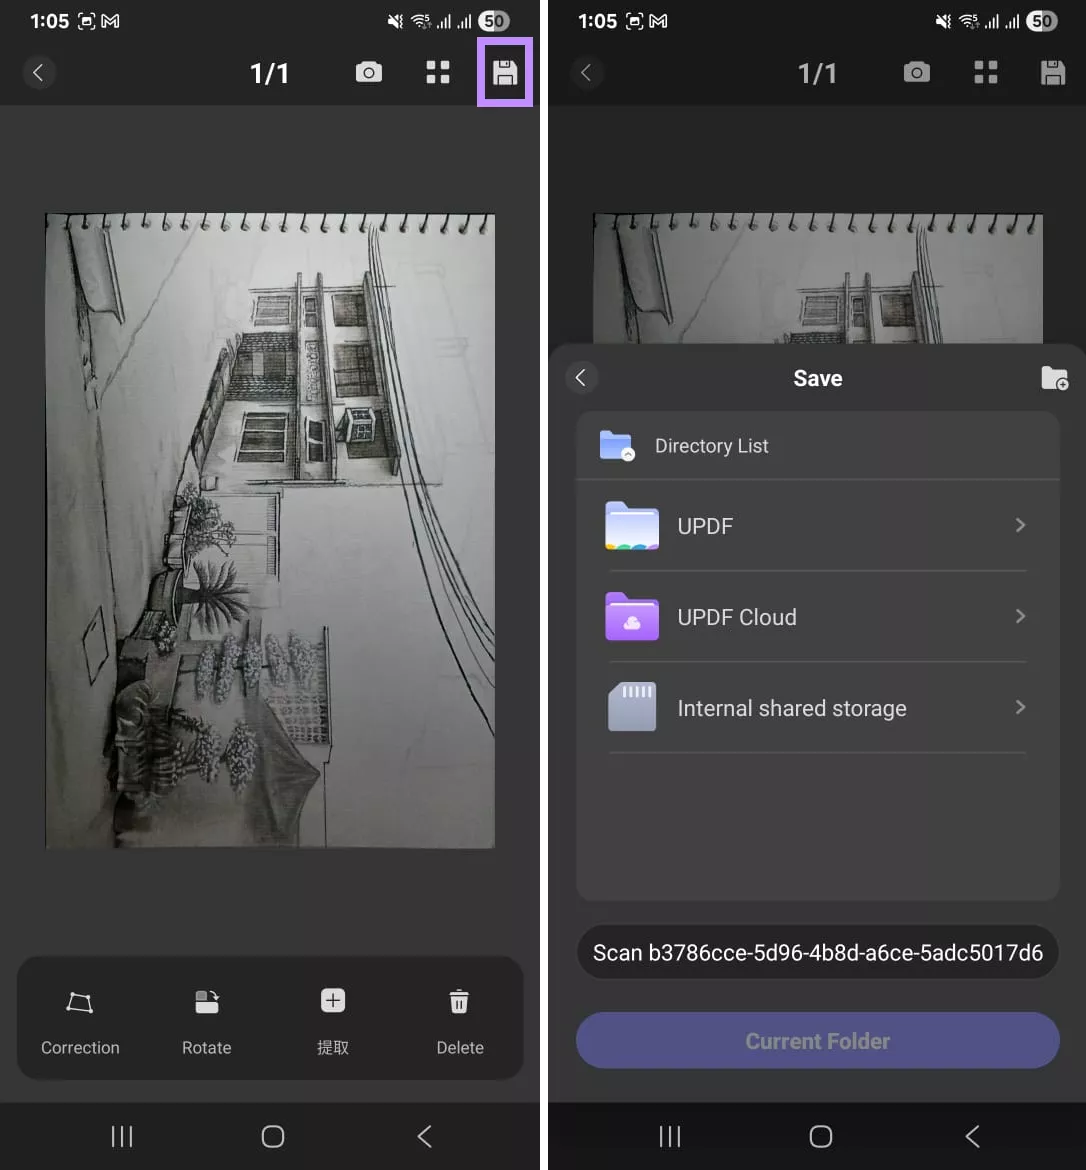
Step 4. Once you’re done, tap the “Save” icon at the top right. Then select a location to save the PDF from the Directory List.
That’s all about creating a PDF using UPDF for Android. If you want to use UPDF without restrictions across all platforms, you can purchase a license from the official website here. A single license can be used on Android, iOS, Windows, and Mac. To get started, download UPDF for Android today!
Windows • macOS • iOS • Android 100% secure