Imagine a shipment of high-value goods is on its way to a distant buyer, but there is confusion about the contents or delivery terms halfway through. In such a scenario, the absence of a bill of lading form can lead to delayed deliveries, financial losses, and even legal disputes. Therefore, this essential document is the cornerstone of accountability and smooth logistics operations.
With it as the backbone, you can prevent misunderstandings, ensure compliance with legal requirements, and streamline the entire supply chain process. Thus, take control of your logistics by reviewing the article below, which portrays a complete guide on the form and how to create it efficiently.
Part 1. What Is a Bill of Lading Form?
The bill of lading form PDF details every critical aspect of the shipment, ensuring a transparent and accountable shipping process. Furthermore, it is more than paperwork as it protects the rights of everyone involved, from the sender to the receiver. Whether your goods travel by road or air, this form ensures that every step of the journey is well-documented, including where they're headed and what's being transported.
Main Elements of the Bill of Lading
- Shipper and Consignee Information: This section includes the sender's and receiver's names, addresses, or contact details.
- Carrier Details: The following section requires information about the transportation provider, including their names and contact information.
- Description of Goods: It needs detailed information about the items being shipped, such as type, quantity, dimensions, and any special handling requirements.
- Terms of Carriage: Another critical element that portrays the conditions under which the goods are transported, including liability and payment terms.
- Special Instructions: Pick-up and delivery locations with dates and any specific instructions for the carrier are written here.
- Signature and Authentication: Once all the details are filled out, signatures from both the shipper and carrier are required to confirm agreements or transfer responsibilities.
- Bill of Lading Number: Additionally, a unique reference number for tracking and identifying the shipment is needed.
Part 2. Free Downloadable Bill of Lading Form Template
After understanding the importance of this form, if you want to simplify your shipping process, download these free bill of lading form templates.
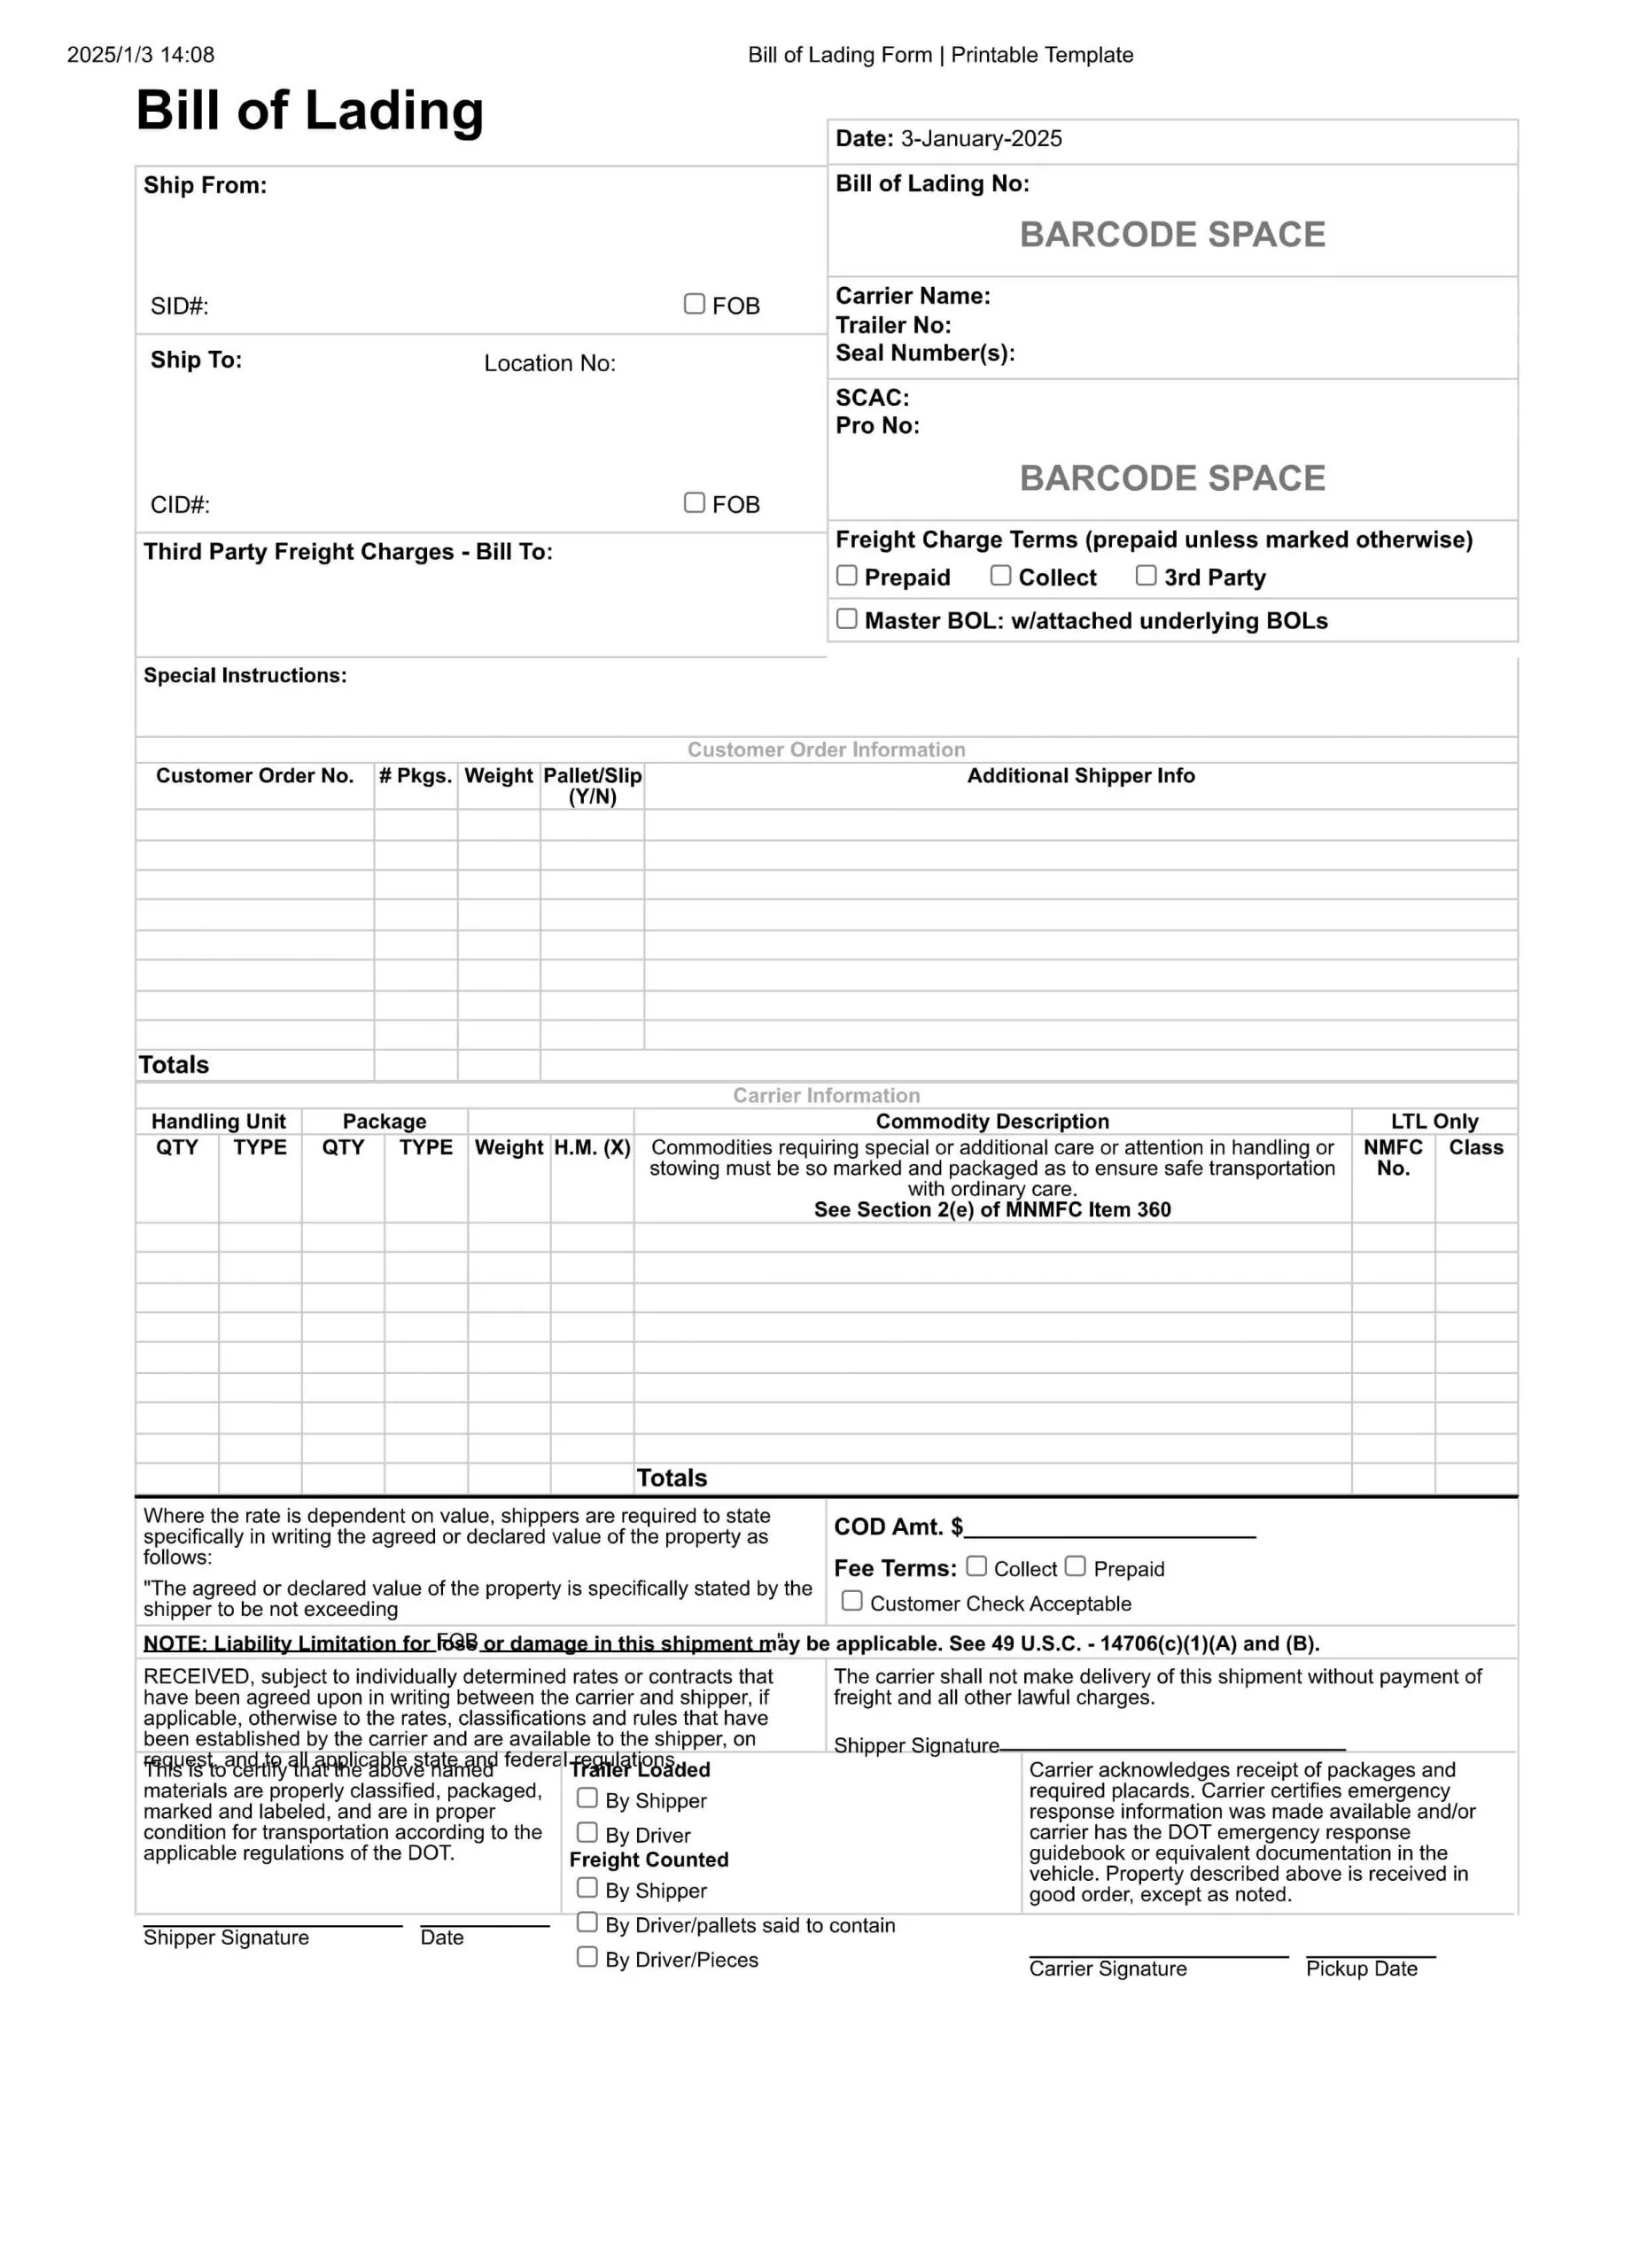
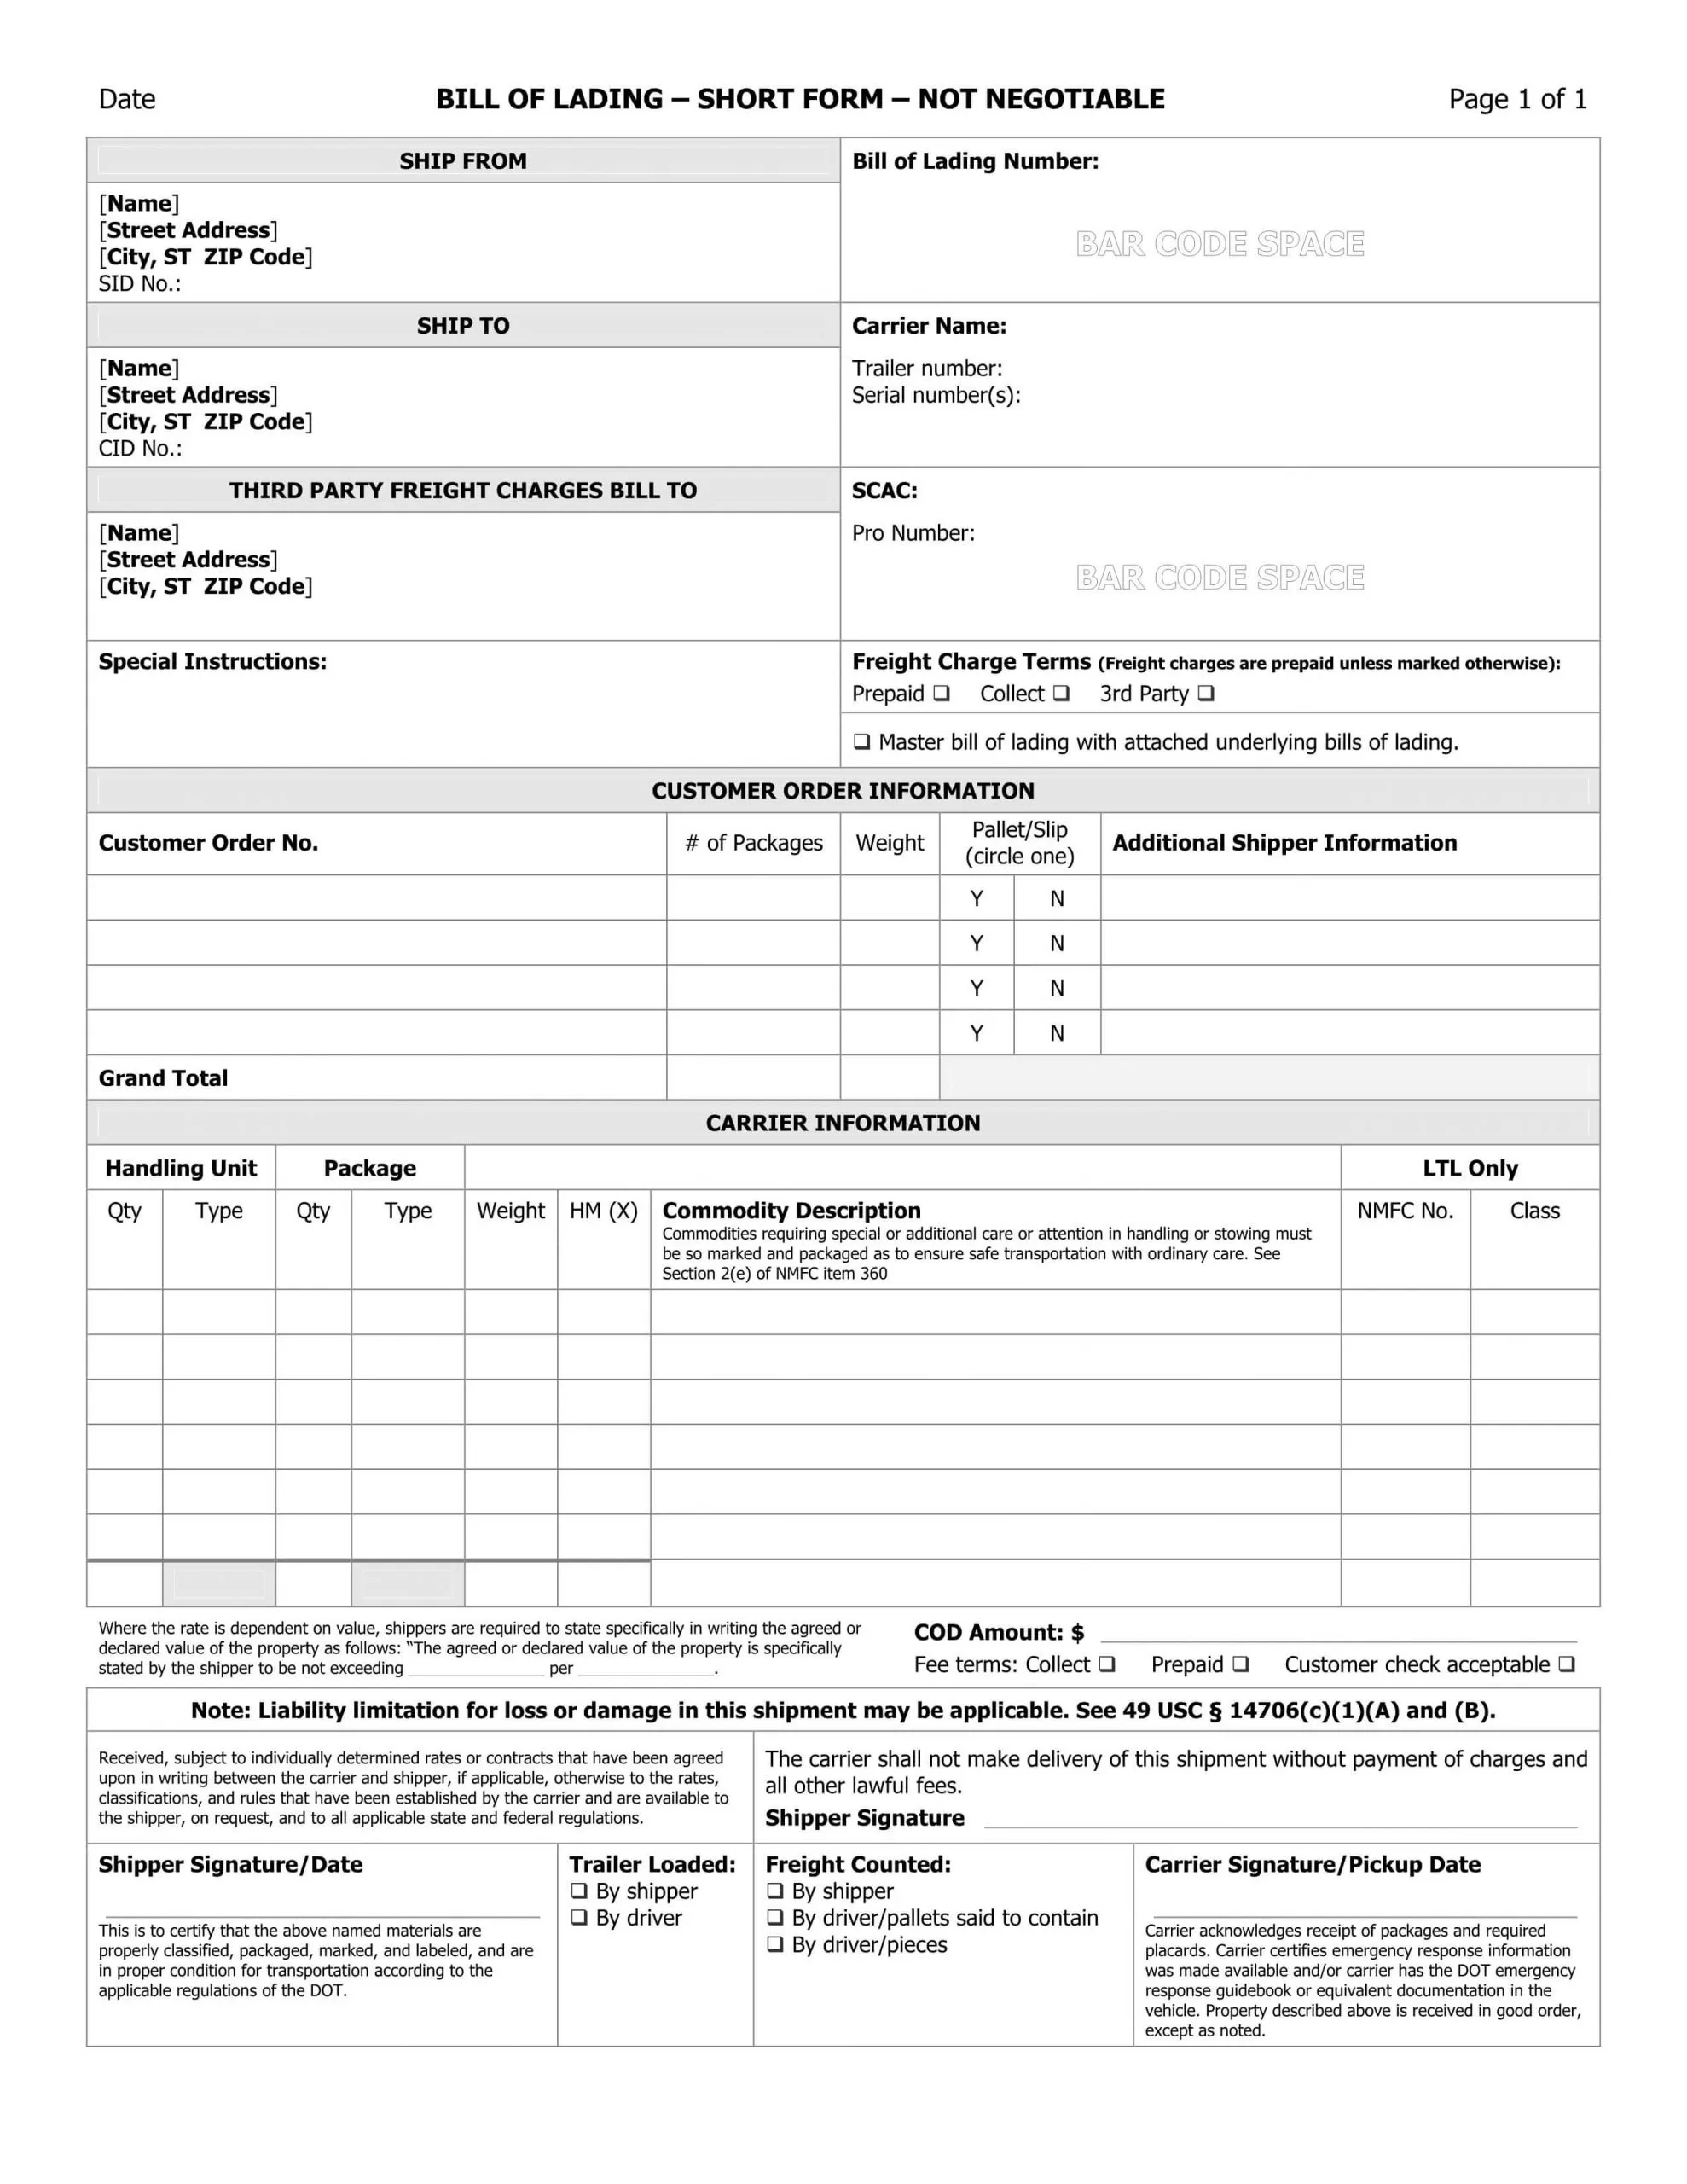
These printable templates help you meet industry standards while ensuring accuracy and efficiency in your logistics operations. In addition, you can use thess templates to document and maintain records, providing smooth and secure shipments.
After downloading the template, we recommend using UPDF as a versatile PDF editor to edit this template. This tool allows you to customize and customize and fill out the form with nine fields, including text, checkboxes, and drop-downs. It also allows users to create or add digital signatures to elevate the authenticity of their legal documents.
Besides this, you can highlight existing fields for a more convenient form-filling experience with seamless data import/export. Thus, get started with customizing or filling out your forms for the shipments by simply downloading UPDF and importing the templates.
Windows • macOS • iOS • Android 100% secure
Guide to Customize and Fill Form Using the Template Downloaded
Once you've downloaded the bill of lading form from the template links above, walk through the steps below and begin the filling process:
Step 1. Launch the Tool on Device and Access Open File
Start the filling and customization process by launching UPDF on your device. Afterward, press the "Open File" button from the main interface and add your downloaded bill of lading form template to the tool.
Step 2. Customize Your Imported Form
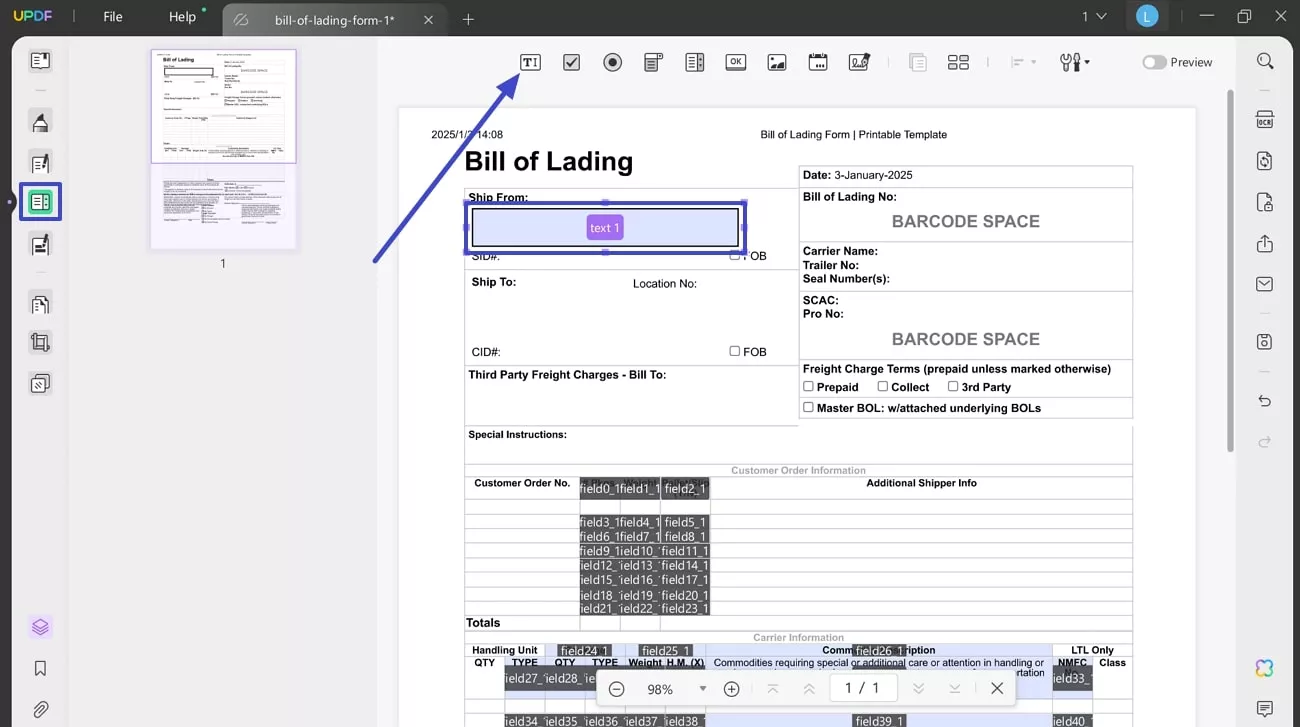
Next, you can customize the form template using the provided fields. Press the "Prepare Form" icon on the left toolbar when your desired form template is successfully imported into the tool. Later, from the toolkit at the top, access the "Text Field" icon and add a field in the space where you prefer.
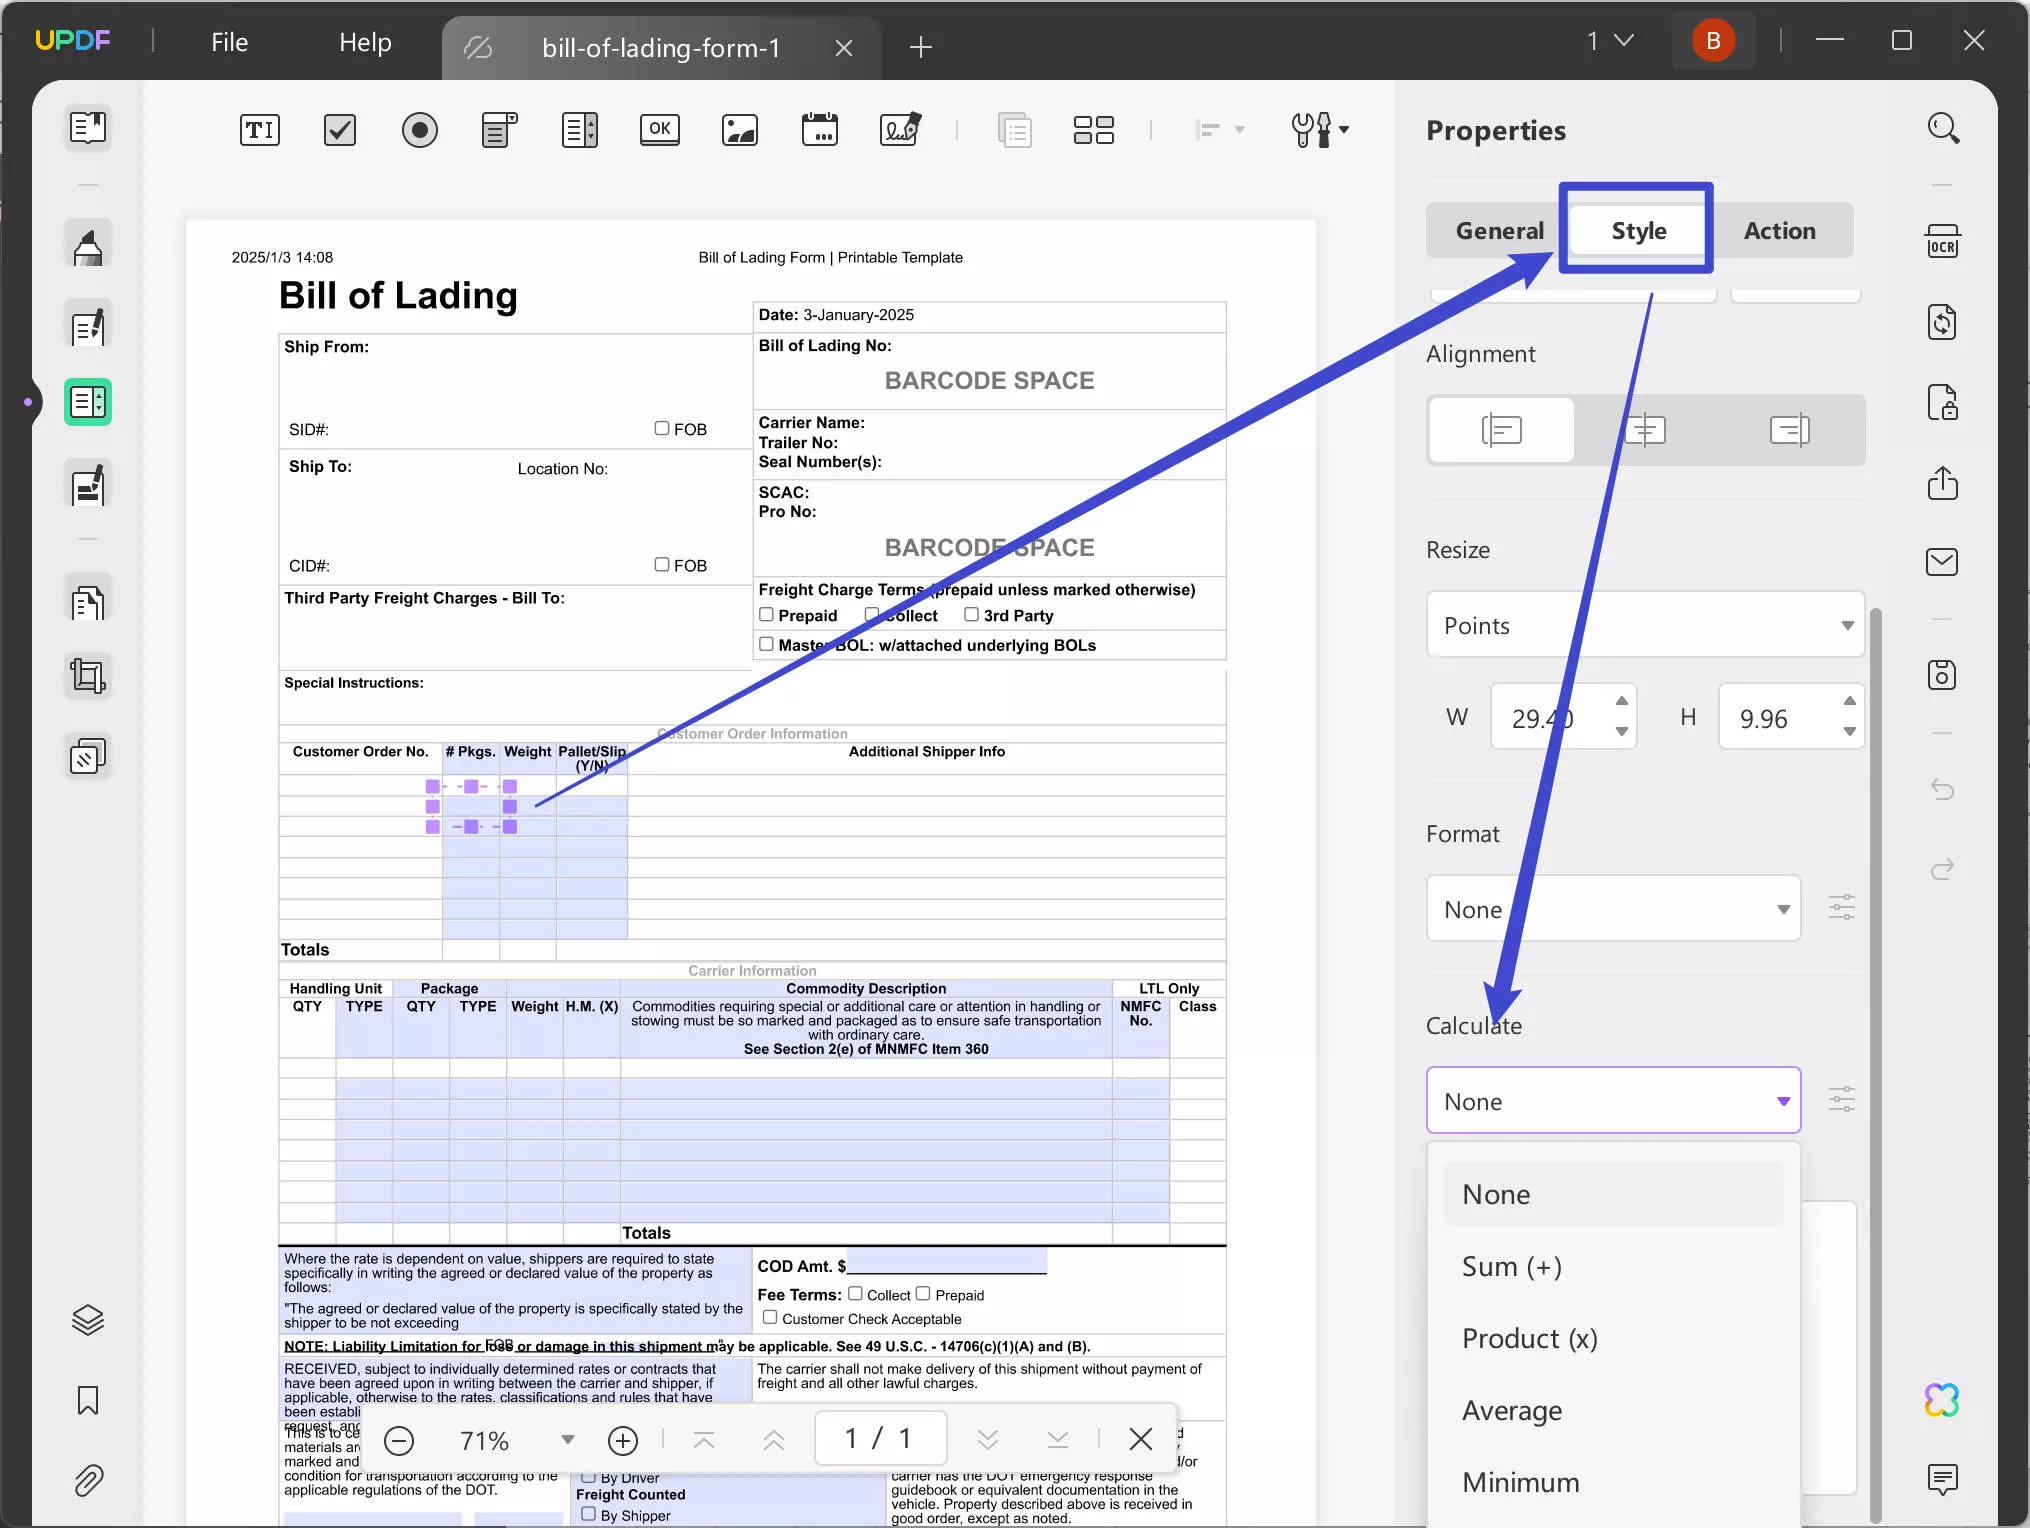
UPDF also provides the formulas to help you automate calculations, such as totals, taxes, or freight charges, ensuring accuracy and saving time when filling out your customized Bill of Lading form.
Step 3. Fill Out the Form
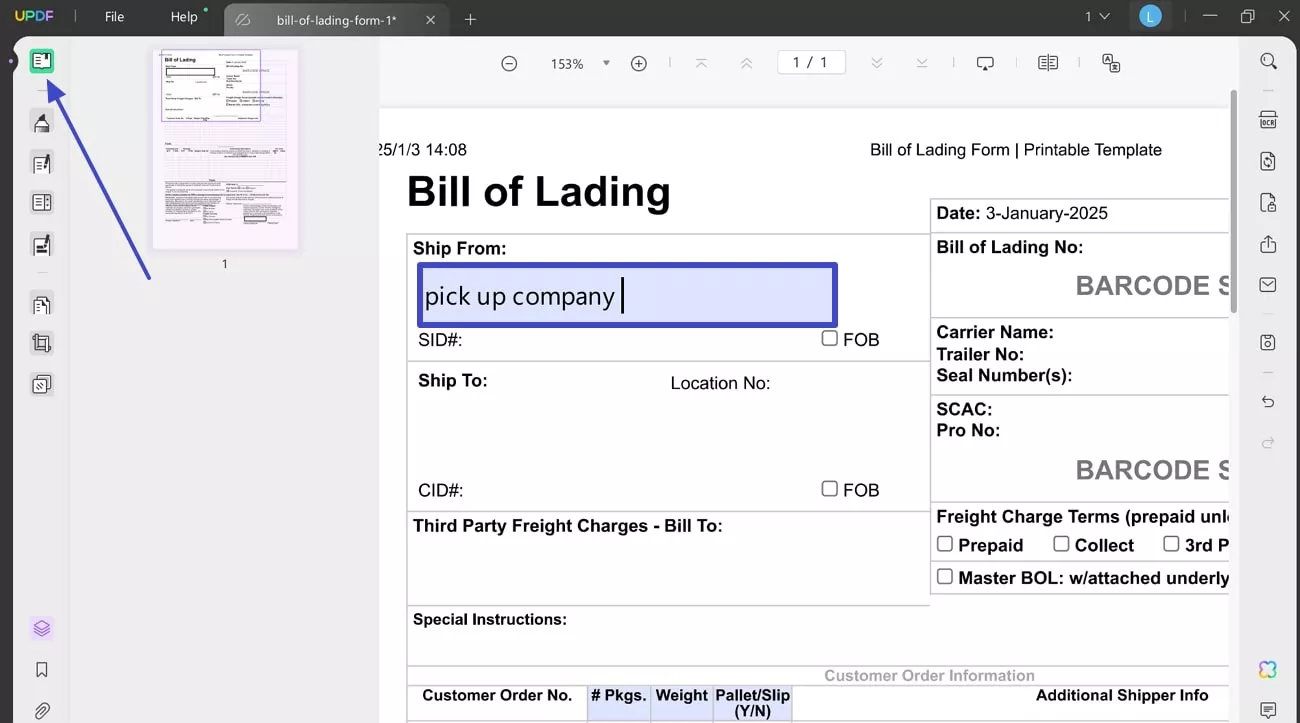
To add text to your added field, press the "Reader" icon from the toolkit on the left side first. Now, click the field you added earlier and start typing the desired text.
Step 4. Sign the Form
In this step, click the "Prepare Form" icon from the left toolbar again and press the "Digital Signature" icon at the top. Next, add a digital signature field in the provided space to digitally sign your bill of lading form.
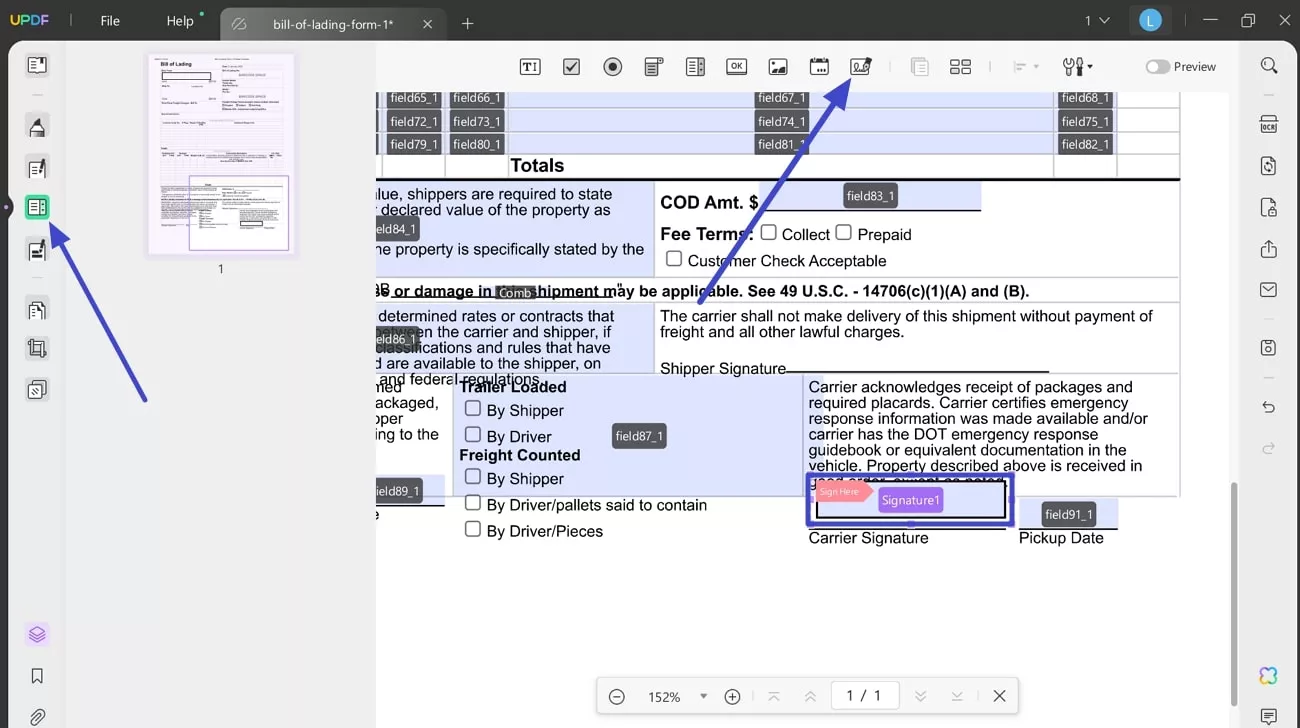
After adding the signature field, click the "Reader" icon and then hit the space for signature to access a new revealing window. Tap the "Create" icon in the window to sign in with a digital ID and later enter the required details. Once completed, press the "Sign" button to add an appropriate signature in your preferred field.
Step 5. Save the Filled Bill of Lading Form for Later Using
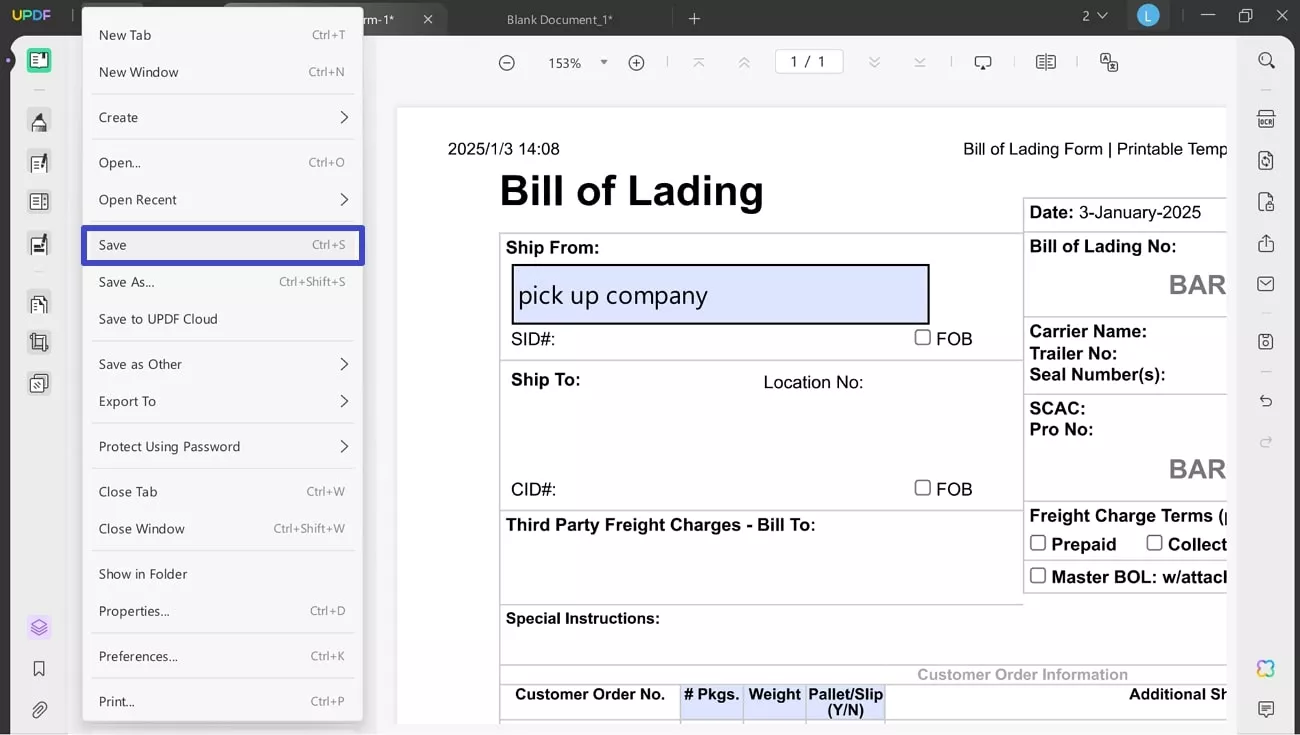
To successfully save your form, press the "File" button from the top toolbar and access the drop-down menu to proceed. From the options provided, click the "Save" button and secure your filled or customized bill of lading form on the tool for later.
Bonus
Also Read: UPDF vs Adobe Acrobat >>
Part 3. How to Create a Bill of Lading Form from Scratch?
In addition to editing existing templates, UPDF supports creating PDF forms from scratch while giving you the complete flexibility to design according to your needs. This tool lets you start with a blank canvas and add fields, text boxes, or other elements required for your bill of lading form PDF. Hence, follow the steps mentioned below to create a new form for a special shipment:
Step 1. Commence the Tool and Create a Blank Page
Initiate the process by downloading and installing the updated version of UPDF.
Windows • macOS • iOS • Android 100% secure
Later, press the "File" icon from the top toolbar and click the "Create" button to access the extended menu. Afterward, choose the "Blank Page" option from the revealing menu to start creating the form from scratch.
Step 2. Customize the Blank Page Accordingly
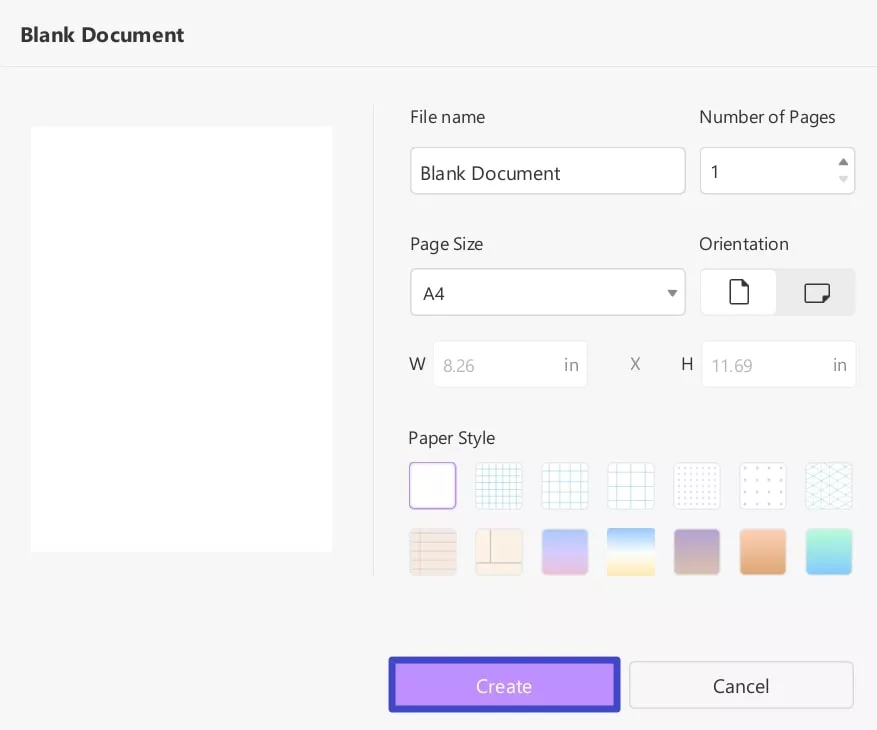
Next, you can customize the blank page according to your requirements by choosing the page size and paper style. Once satisfied with your adjustments, click the "Create" button at the bottom to enter the new interface with a blank page.
Step 3. Edit Form PDF By Adding Text
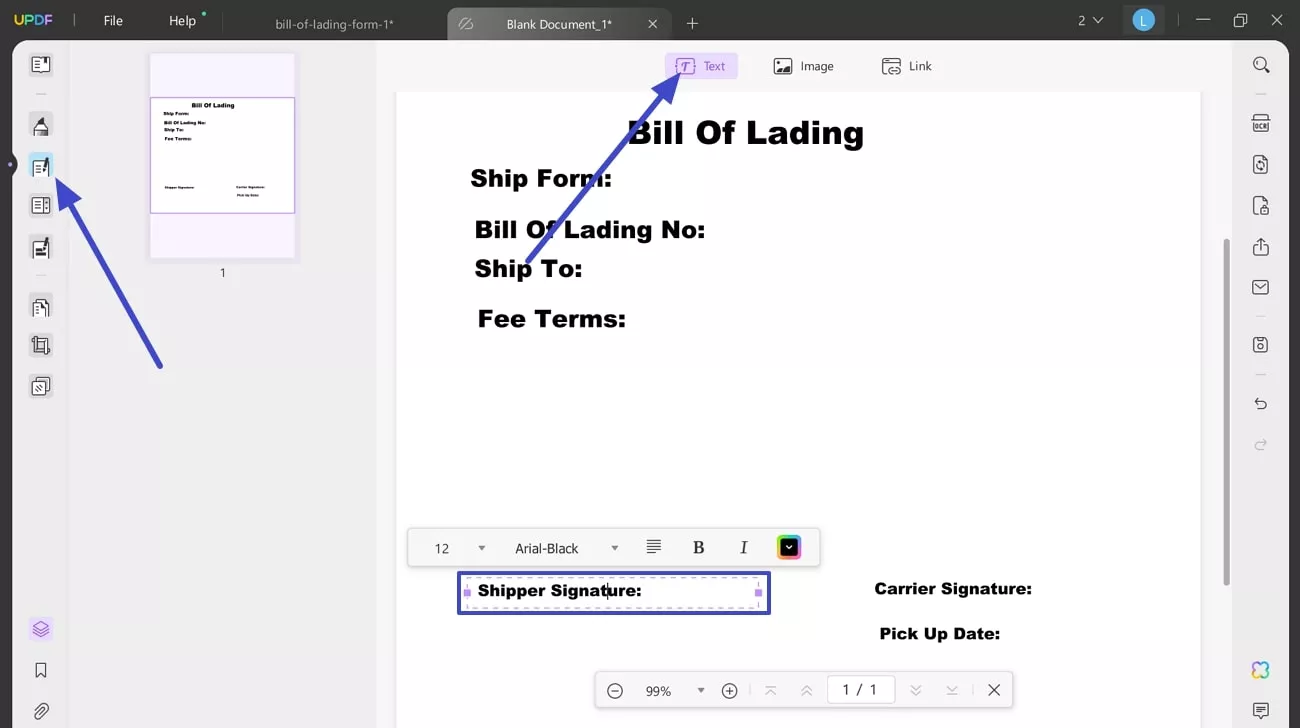
From the toolkit on the left, select the "Edit PDF" option and click the "Text" button in the toolbar at the top. Keep adding the text for your form on the black page provided by the tool for creating your bill lading PDF.
Step 4. Prepare the Form and Add Text Fields
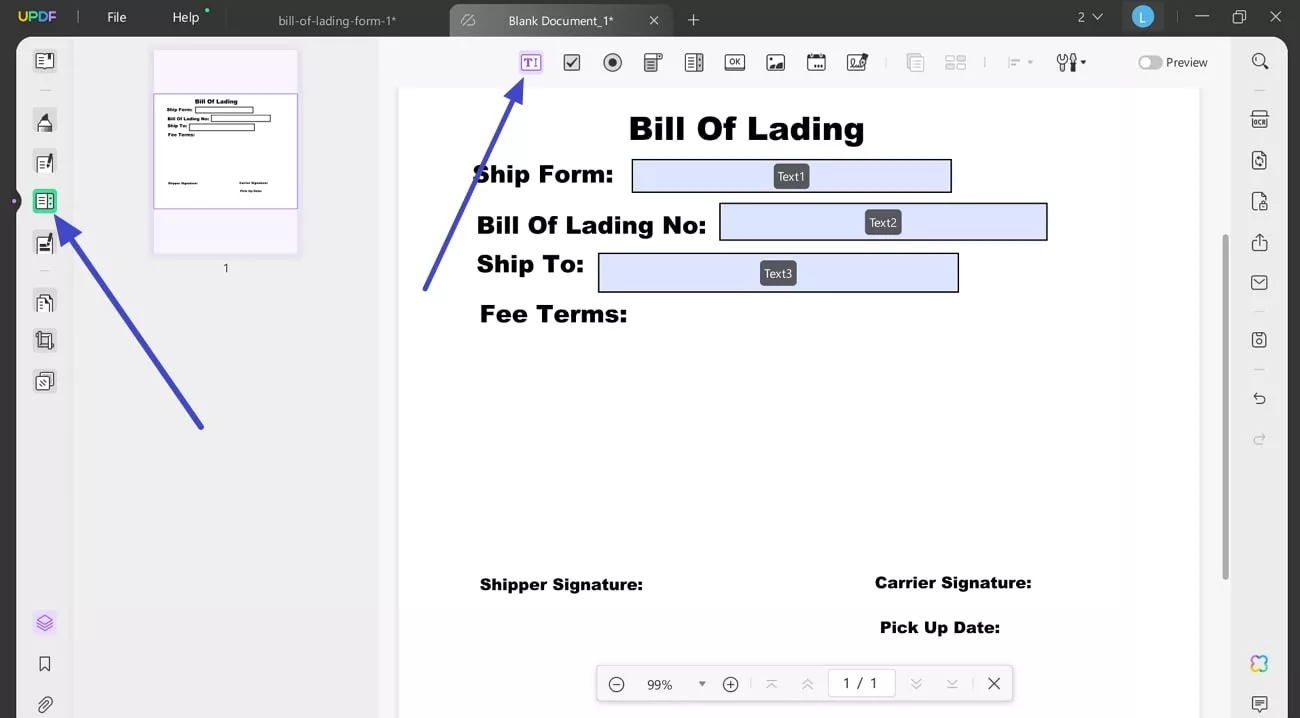
Now, access the "Prepare Form" feature from the panel on the left side, and afterward, choose the "Text Field" icon available in the top toolbar. Later, add text fields on the space provided in the front of the text labeling entered earlier.
Step 5. Type Text in the Text Fields Added
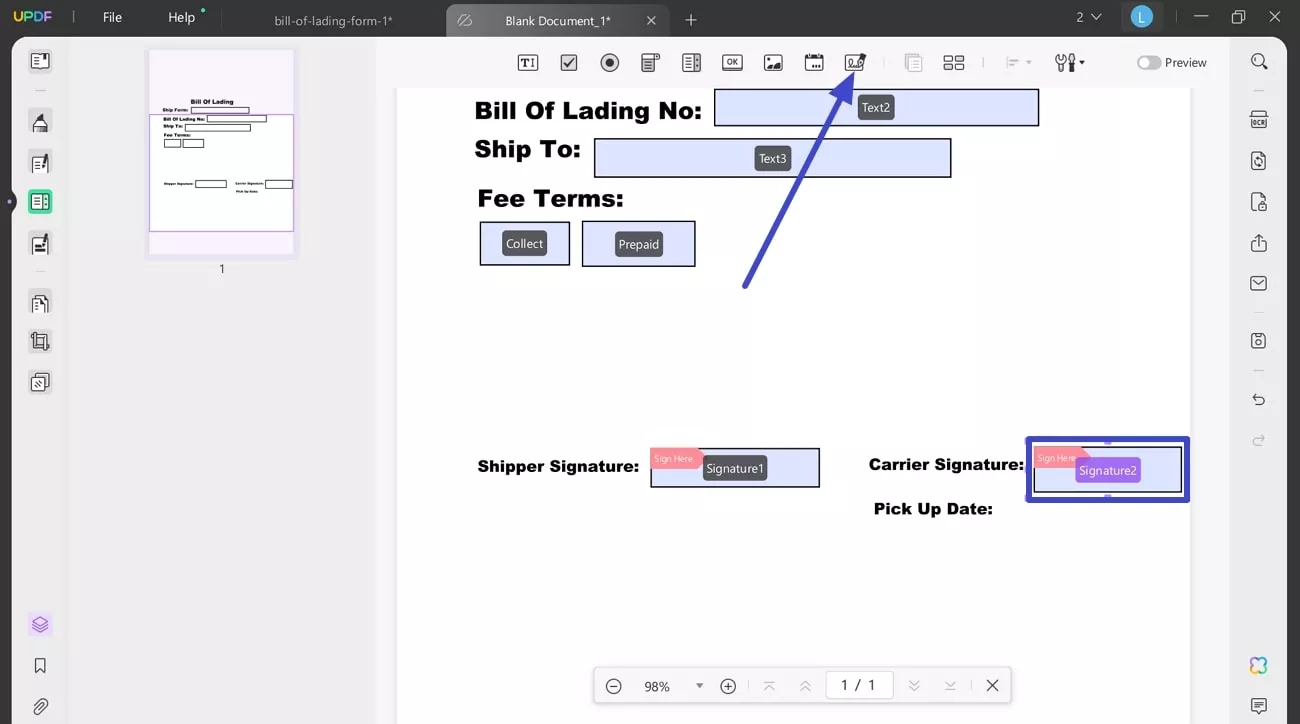
Afterward, add the check box in the designated area and double-click the added field to access further properties. In the "Properties" panel, simply type in the name of the check box you added and later select the font style or color.
Step 6. Insert Digital Signature Field
Move forward and press the "Digital Signature" option from the toolbar available at the top. Once you have access to it, continue inserting the signature fields where required.
Step 7. Add a Date Field for the Pick-Up Date
When dates are being considered, select the "Date Field" option from the same toolbar and insert the field where the dates need to be added.
Step 8. Save the Final Created Bill Lading Form
Once you're done creating a bill of lading form from scratch, head towards the "File" icon and reveal the drop-down menu. After accessing the menu, choose the "Save" option and safeguard your form PDF on the tool for later reference.
Conclusion
While wrapping up the above article, it is clear that the bill of lading form is a crucial document that ensures transparent shipping operations. When customizing is concerned, it is suggested to use UPDF because it allows users to download form templates and fill them out as per choice. Moreover, you can easily create a form from scratch by simply accessing the blank page on the tool.
 UPDF
UPDF
 UPDF for Windows
 UPDF for Mac
 UPDF for iPhone/iPad
 UPDF for Android
 UPDF AI Online
 UPDF Sign
 Edit PDF
 Annotate PDF
 Create PDF
 PDF Form
 Edit links
 Convert PDF
 OCR
OCR PDF to Word
 PDF to Image
 PDF to Excel
 Organize PDF
 Merge PDF
 Split PDF
 Crop PDF
 Rotate PDF
 Protect PDF
 Sign PDF
 Redact PDF
 Sanitize PDF
 Remove Security
 Read PDF
 UPDF Cloud
 Compress PDF
 Print PDF
 Batch Process
 About UPDF AI
 UPDF AI Solutions
 AI User Guide
 FAQ about UPDF AI
 Summarize PDF
 Translate PDF
 Chat with PDF
 Chat with AI
 Chat with image
 PDF to Mind Map
 Explain PDF
 Scholar Research
 Paper Search
 AI Proofreader
 AI Writer
 AI Homework Helper
 AI Quiz Generator
 AI Math Solver
 PDF to Word
 PDF to Excel
 PDF to PowerPoint
 User Guide
 UPDF Tricks
 FAQs
FAQs UPDF Reviews
 Download Center
 Blog
Blog Newsroom
 Tech Spec
 Updates
 UPDF vs. Adobe Acrobat
 UPDF vs. Foxit
 UPDF vs. PDF Expert




 Enola Davis
 Enrica Taylor
 Lizzy Lozano

