 UPDF
UPDF
 UPDF for Windows
 UPDF for Mac
 UPDF for iPhone/iPad
 UPDF for Android
 Nomostar
 UPDF AI Online
 UPDF Sign
 IvyCraft
 Edit PDF
 Annotate PDF
 Create PDF
 PDF Form
 Edit links
 Convert PDF
 OCR
OCR PDF to Word
 PDF to Image
 PDF to Excel
 Organize PDF
 Merge PDF
 Split PDF
 Crop PDF
 Rotate PDF
 Protect PDF
 Sign PDF
 Redact PDF
 Sanitize PDF
 Remove Security
 Read PDF
 UPDF Cloud
 Compress PDF
 Print PDF
 Batch Process
 About UPDF AI
 UPDF AI Solutions
 AI User Guide
 FAQ about UPDF AI
 Summarize PDF
 Translate PDF
 Chat with PDF
 Chat with AI
 Chat with image
 PDF to Mind Map
 Explain PDF
 PDF AI Tools
 Image AI Tools
 AI Chat Tools
 AI Writing Tools
 AI Study Tools
 AI Working Tools
 Other AI Tools
 AI Bookmark Generation
 AI Bookmark Summary
 AI Watermark Generation
 AI Background Generation
 AI Sticker Generation
 AI Stamp Generation
 AI Editing Suite
 UPDF Copilot
 AI Page Management
 AI Semantic Search
 PDF to Word
 PDF to Excel
 PDF to PowerPoint
 Enterprise Solution
 Enterprise Sign
 Enterprise AI
 Enterprise Plan
 Enterprise User Guide
 Enterprise Webinar
 IT
IT Education
 Construction
 Financial Service
 Healthcare
 Insurance
 Legal
Legal Manufacturing
 Government
 Researchers & PhDs
 Solopreneurs & Freelancers
 Lawyers & Legal Professionals
 Real Estate Agents & Brokers
 Education Solution
 Customer Stories
 User Guide
 UPDF Tricks
 FAQs
FAQs UPDF Reviews
 Download Center
 Blog
Blog Newsroom
 Tech Spec
 Updates
 UPDF vs. Adobe Acrobat
 UPDF vs. Foxit
 UPDF vs. PDF Expert

You've spent hours carefully designing a form in Microsoft Word. You added text boxes, checkboxes, dropdown menus—everything looks perfect. You click "Save As" → PDF, attach it to an email, and hit send. Then the reply comes back: "I can't fill this out. The fields aren't working."
Sound familiar?
You're not alone. This is one of the most common frustrations in document management—and it's not your fault. The truth is, Word's built-in "Save As PDF" function does not convert your form controls into fillable PDF fields. It preserves the visual layout but strips away the interactivity. What you get is a static document that looks like a form but functions like a picture.
This guide will show you exactly why this happens and—more importantly—how to fix it. We'll walk through three proven workflows, compare the best tools for the job, and help you choose the right approach for your specific needs and budget.
Use the shortcut that matches your task: if you already have an interactive form and only need to complete it, follow how to fill in a PDF form instead of rebuilding the fields.
🏆A quick heads-up: regardless of the method or workflow, a PDF editor is essential for editing forms. Based on our testing and verification, UPDF stands out as the best tool in terms of features, practicality, and price. Download UPDF and let’s start testing it together.
Windows • macOS • iOS • Android 100% secure
3 Main Workflows for Creating a Fillable PDF from Word
There are three primary ways to convert a Word document into a fillable PDF. Each has its own strengths, weaknesses, and ideal use cases.
Workflow A: Word Content Controls + Dedicated PDF Tool (Recommended)
This is the most reliable and professional approach. You design your form in Word using the Developer tab, then use a dedicated PDF editor to convert those controls into proper PDF form fields.
Step-by-Step:
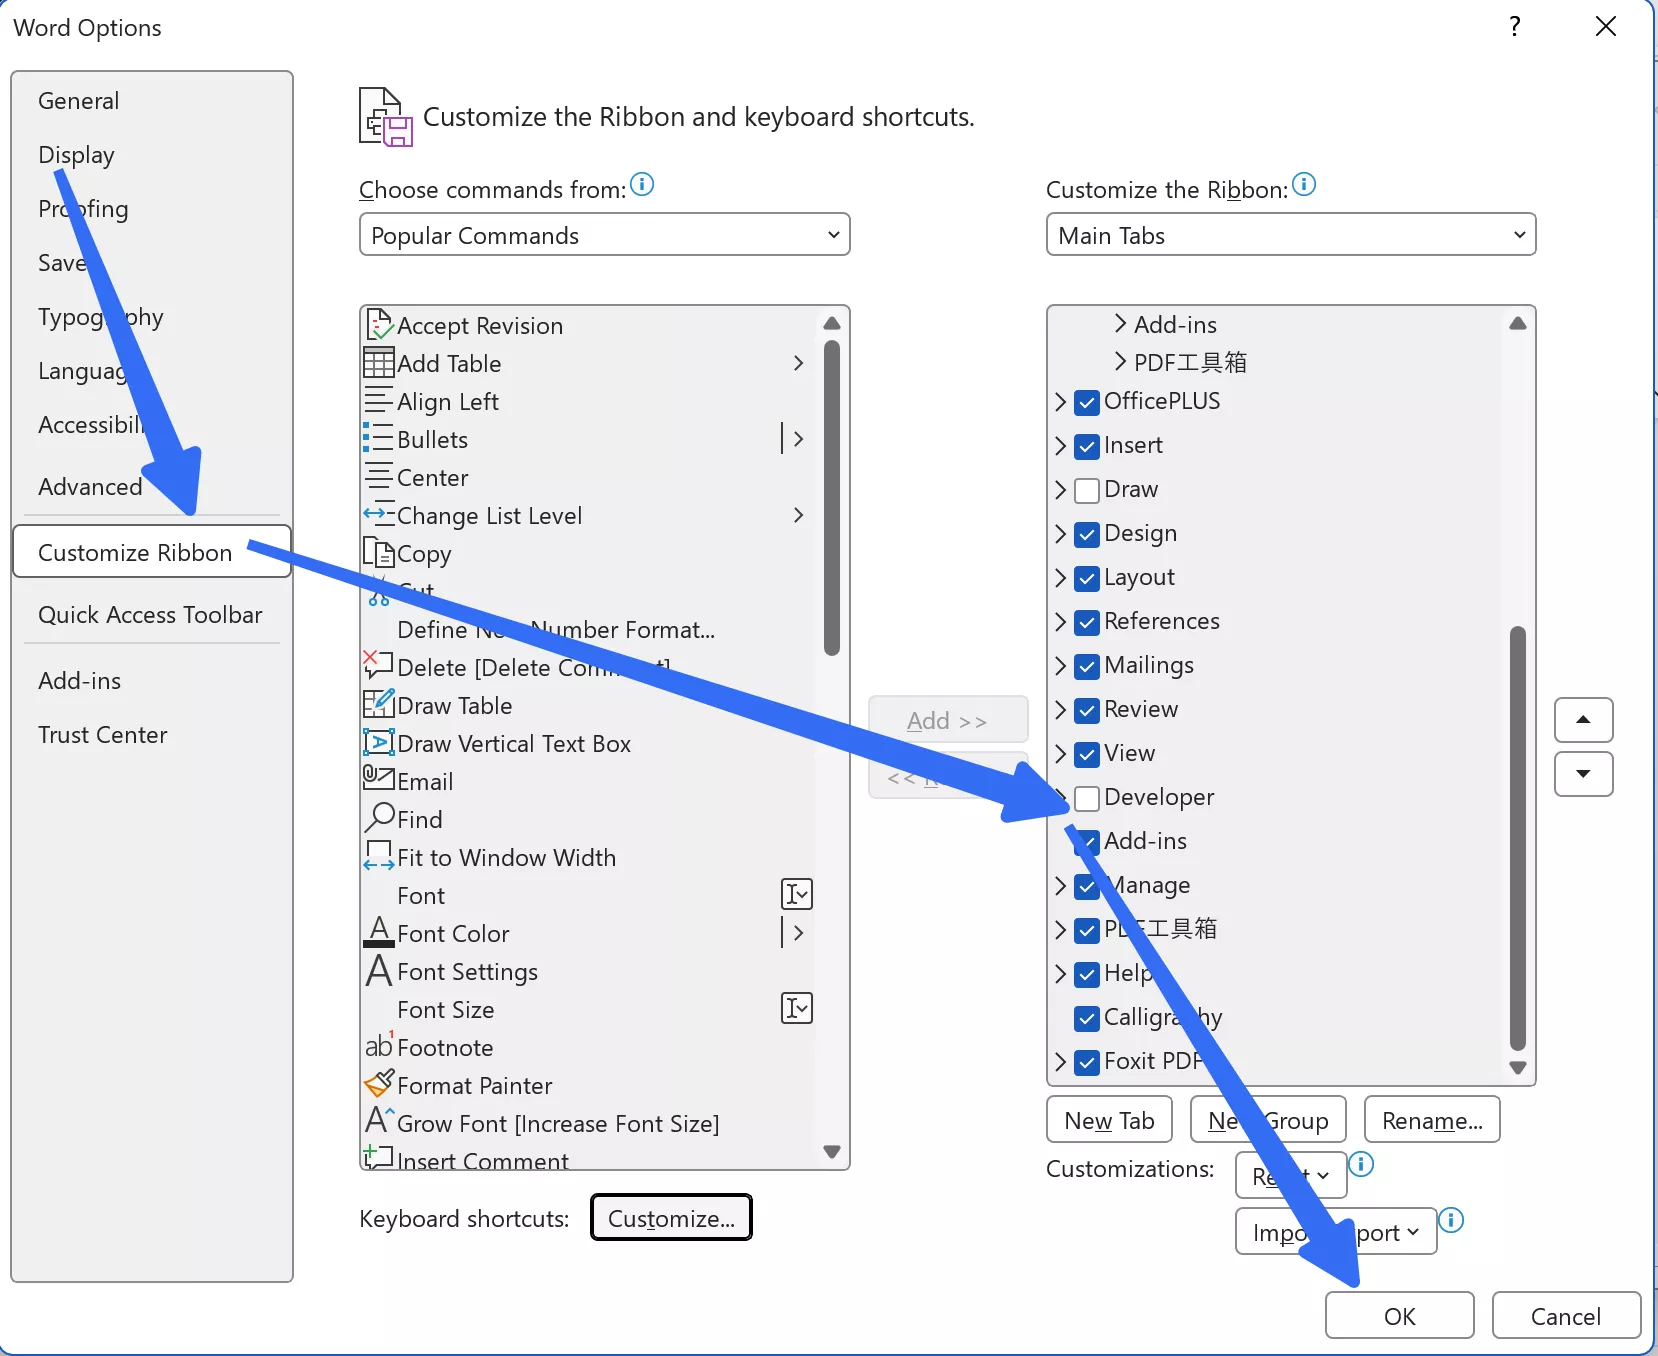
Step 1: Enable the Developer Tab in Word
- Go to File → Options → Customize Ribbon
- Check Developer in the right-hand column
- Click OK
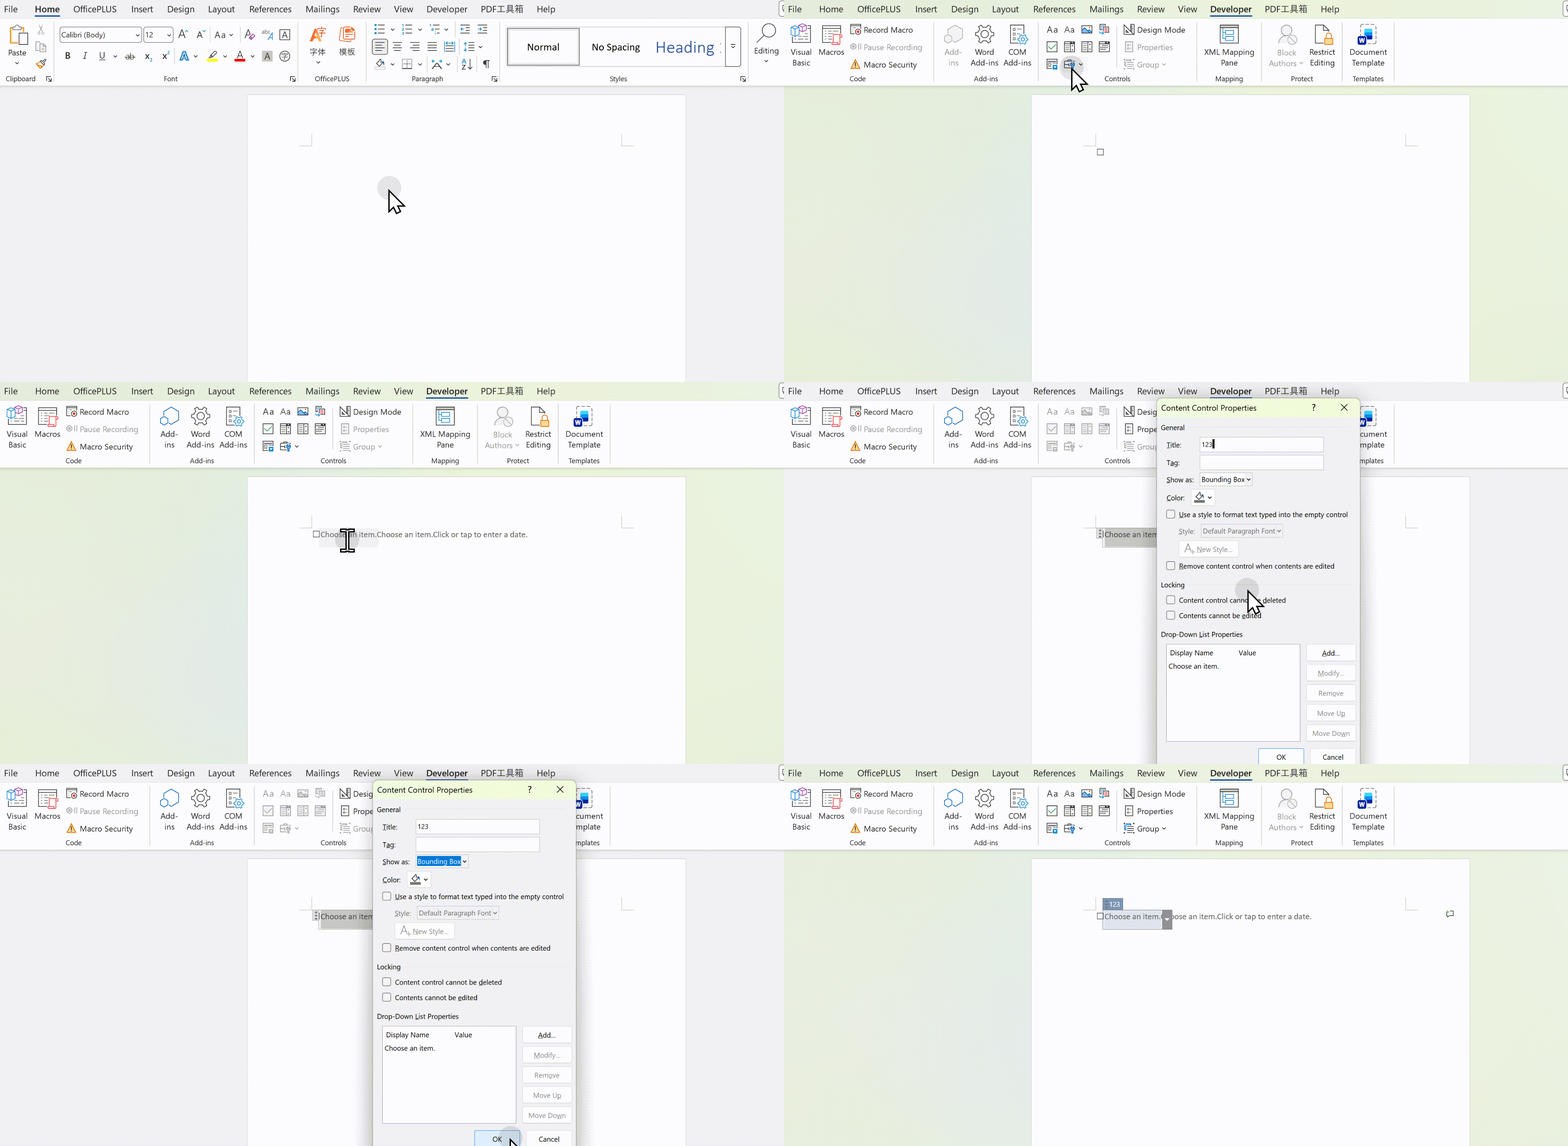
Step 2: Insert Form Controls
- Go to the Developer tab
- Choose from: Text Box, Checkbox, Dropdown List, Date Picker, Combo Box
- Place each control where you want it in your document
- Right-click each control → Properties to configure options (e.g., dropdown choices, default text)
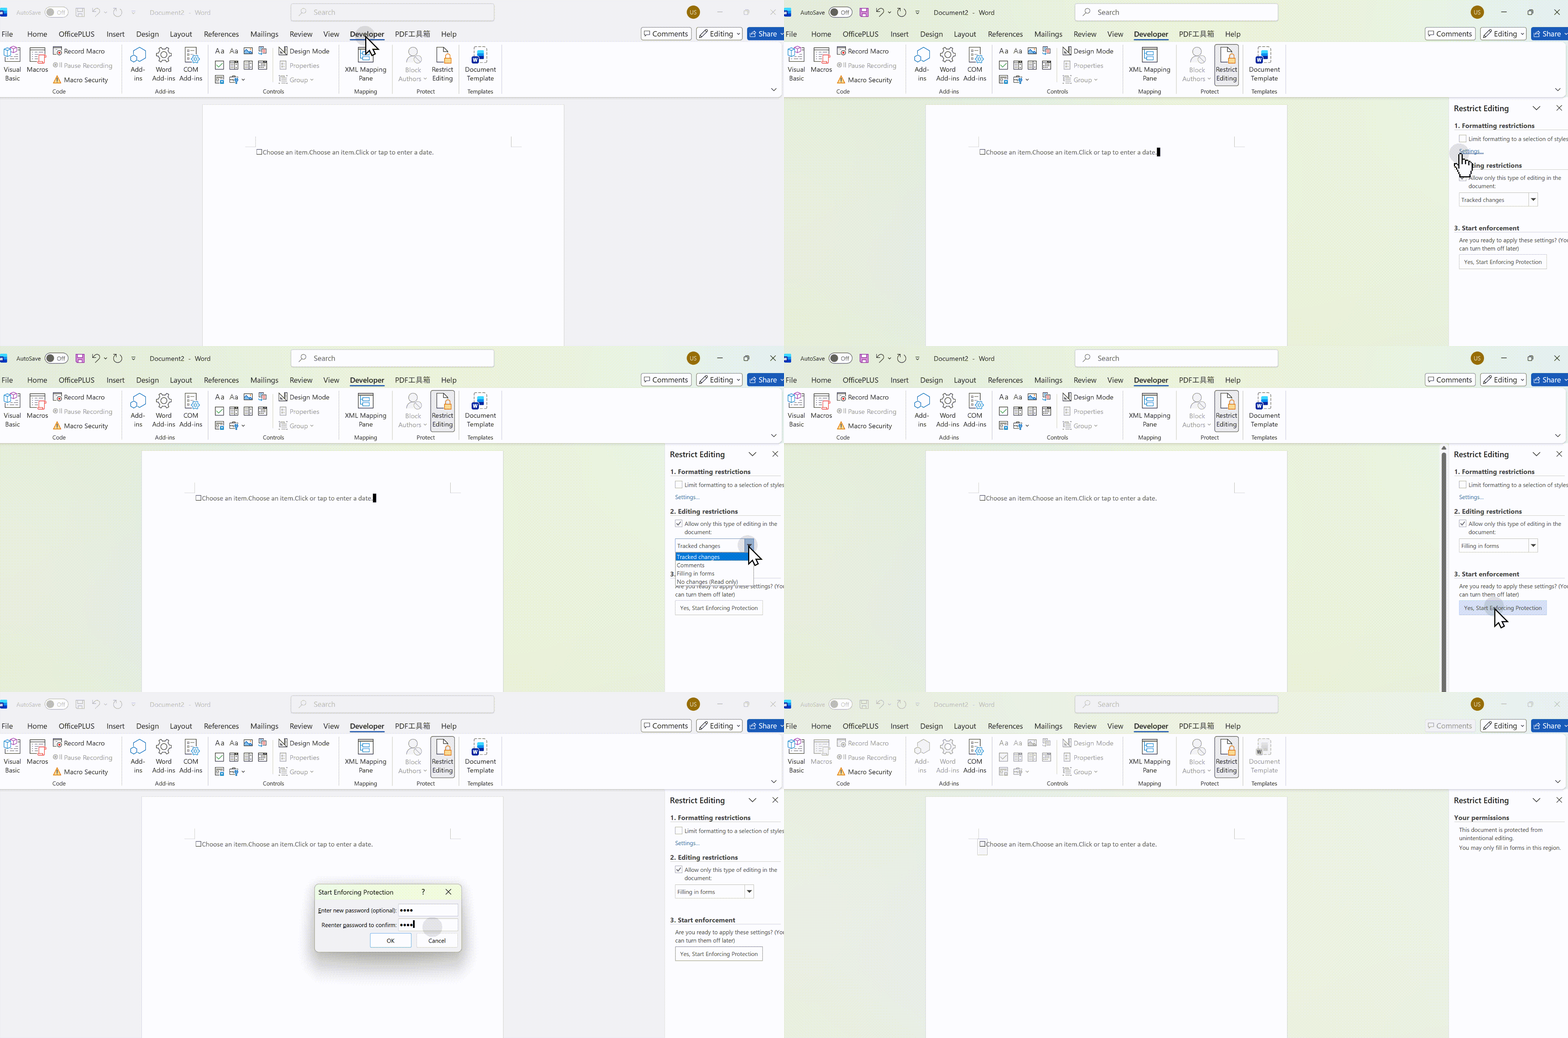
Step 3: Protect the Document (Important!)
- In the Developer tab, click Restrict Editing
- Check Allow only this type of editing in the document
- Select Filling in forms from the dropdown
- Click Yes, Start Enforcing Protection
- Set a password (optional but recommended)
Step 4: Export and Convert with a PDF Tool
- Save your Word document normally (.docx)
- Open your preferred PDF editor (see Part Three for recommendations; highly recommend UPDF)
- Import/open the Word document directly
- The tool will detect your Content Controls and convert them to PDF Form Fields
Pros:
- ✅ Complete control over form design and field types
- ✅ Professional results with proper PDF form functionality
- ✅ Wide compatibility—works across all PDF readers
- ✅ Batch processing available with professional tools
Cons:
- ❌ Requires a dedicated PDF editor (free or paid)
- ❌ Slightly more steps than a one-click solution
- ❌ Learning curve for the Developer tab
Best For:
- Professional forms that will be used frequently
- Documents requiring complex fields (dropdowns, calculations, signatures)
- Users who need reliable, consistent results
Workflow B: Static PDF + Form Field Addition (Adobe's Classic Path)
This is the traditional approach: export a static PDF from Word, then use a PDF editor to add form fields on top of it.
Step-by-Step:
Step 1: Export Word to Static PDF
- Open your Word document
- Go to File → Save As (or Export)
- Choose PDF as the file type
- Click Save

Step 2: Open in a PDF Editor with Form Tools
- Launch your PDF editor (e.g., UPDF or Adobe Acrobat Pro)
- Open the PDF you just created
Step 3: Add Form Fields
- Look for Prepare Form, Add Form Fields, or similar
- The tool may auto-detect where fields should go
- Manually place text boxes, checkboxes, radio buttons, and signature fields
- Configure each field's properties (name, format, validation)

Step 4: Save and Distribute
- Save the PDF with form fields enabled
- Test it yourself before sending
Pros:
- ✅ Works with any PDF editor that has form tools
- ✅ Full control over field placement and properties
- ✅ No special Word setup required
Cons:
- ❌ More manual work—you place every field by hand
- ❌ Most robust tools are paid (Adobe Acrobat Pro is ~$20/month, but with the best value PDF editor - UPDF just costs $49.99 per year, and $79.99 for a one-time purchase)
Best For:
- Users who already have UPDF
- One-off forms where automation isn't worth the setup
- Forms that need very specific field placement
Workflow C: Pure Online Tools (Zero Installation, Simplest)
For quick, simple forms, online tools offer the fastest path from Word to fillable PDF—no software to install, no accounts required.
Step-by-Step:
Step 1: Upload Your Word Document
- Go to an online PDF tool (e.g. iLovePDF, DocFly)
- Upload your Word document
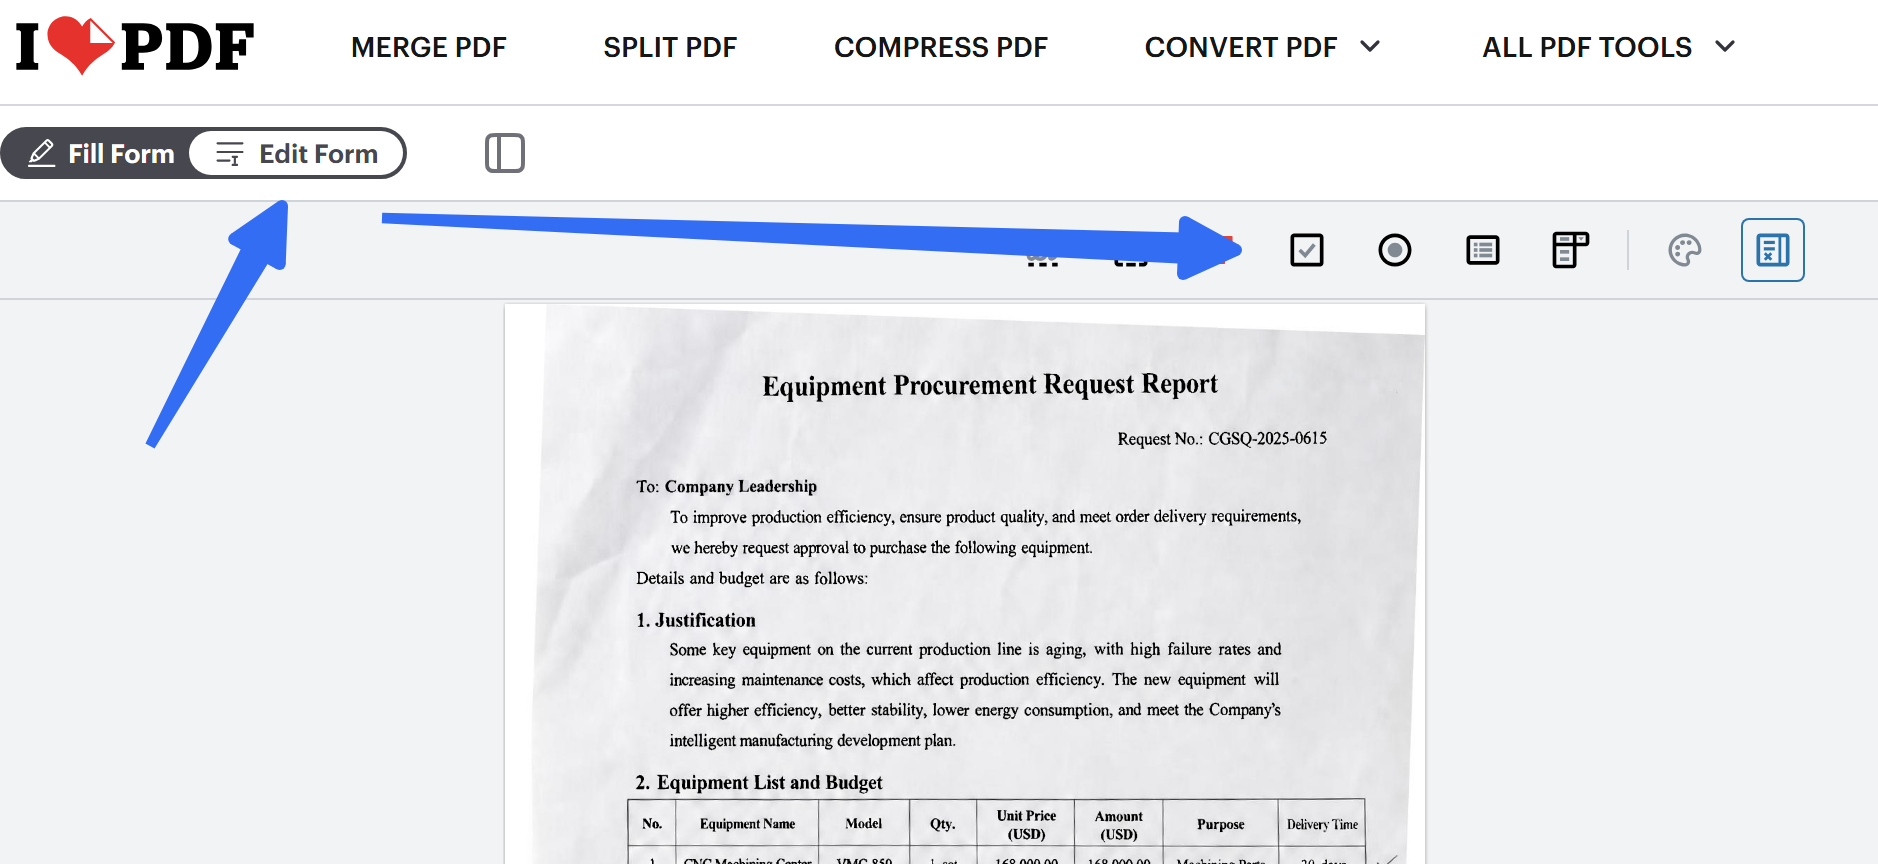
Step 2: Convert and Add Fields
- The tool will convert your Word file to PDF (Smallpdf will convert it automatically, but it doesn't have PDF form options; iLovePDF and DocFly can't support Word format; you need to convert it manually first)
- Use the built-in editor to add text fields, checkboxes, and other form elements
- Some tools offer auto-detection of form areas
Step 3: Download and Share
- Download your fillable PDF
- Share it with recipients
Pros:
- ✅ No installation required
- ✅ Works from any device with a browser
- ✅ Usually has a free tier for basic use
- ✅ Extremely fast for simple forms
Cons:
- ❌ Limited functionality for complex forms
- ❌ File size and privacy concerns—your documents go to third-party servers
- ❌ Watermarks on free versions (in many cases)
- ❌ No batch processing in most free tiers
Best For:
- Quick, simple forms (under 5 fields)
- Users who rarely create fillable forms
- Situations where installing software isn't possible
Regardless of your specific scenario or which of the aforementioned methods you use, you will need a PDF editor—whether it is an online tool or professional software like Adobe. With so many options available on the market, let’s look at how to choose the right tool for your needs.
Choose Your PDF Editor for Fillable Forms Created from Word
Not all PDF tools are created equal. Here's how the major options stack up for creating fillable PDFs from Word.
| Tool | Price Model | Form Creation | Word Import | OCR | Batch Processing | Platform |
|---|---|---|---|---|---|---|
| Adobe Acrobat Pro | ~$20/month subscription | ✅ Full | ✅ Direct | ✅ | ✅ | Windows, Mac |
| UPDF | $49.99 per year or $79.99 for lifetime use | ✅ Full | ✅ Direct | ✅ | ✅ | Windows, Mac, iOS, Android |
| PDF-XChange Editor | Free + Pro upgrade start from $62 per year | ✅ Plus version only | ⚠️ Manual import | ✅ | ✅ | Windows |
| Smallpdf | Free + ~$12/month | ✅ Basic | ✅ Upload | ⚠️ Limited | ❌ | Web |
| iLovePDF | Free + ~$10/month | ✅ Basic | ⚠️ Manual convert | ⚠️ Limited | ❌ | Web |
| DocFly | Free+ ~8/month | ✅ | ⚠️ Manual convert | ❌ | ❌ | Web |
On balance, UPDF strikes an excellent equilibrium between functionality, affordability, and ease of use, making it an ideal choice for professionals who need to create forms regularly but are working with a limited budget. Questions about how to fill in a PDF form from Word or Excel are easily fixed with it.
Check the first page before putting the rest of the PDF together. The example below shows the workflow for working with PDF forms in UPDF.
It caters not only to casual users with straightforward form needs but also provides a polished native experience for Mac users. In contrast, while Adobe Acrobat Pro is undeniably powerful, its higher cost makes it more suitable for enterprise environments that demand maximum compatibility and can afford it.
Windows • macOS • iOS • Android 100% secure
How to Create a Fillable PDF Form from Word without Adobe
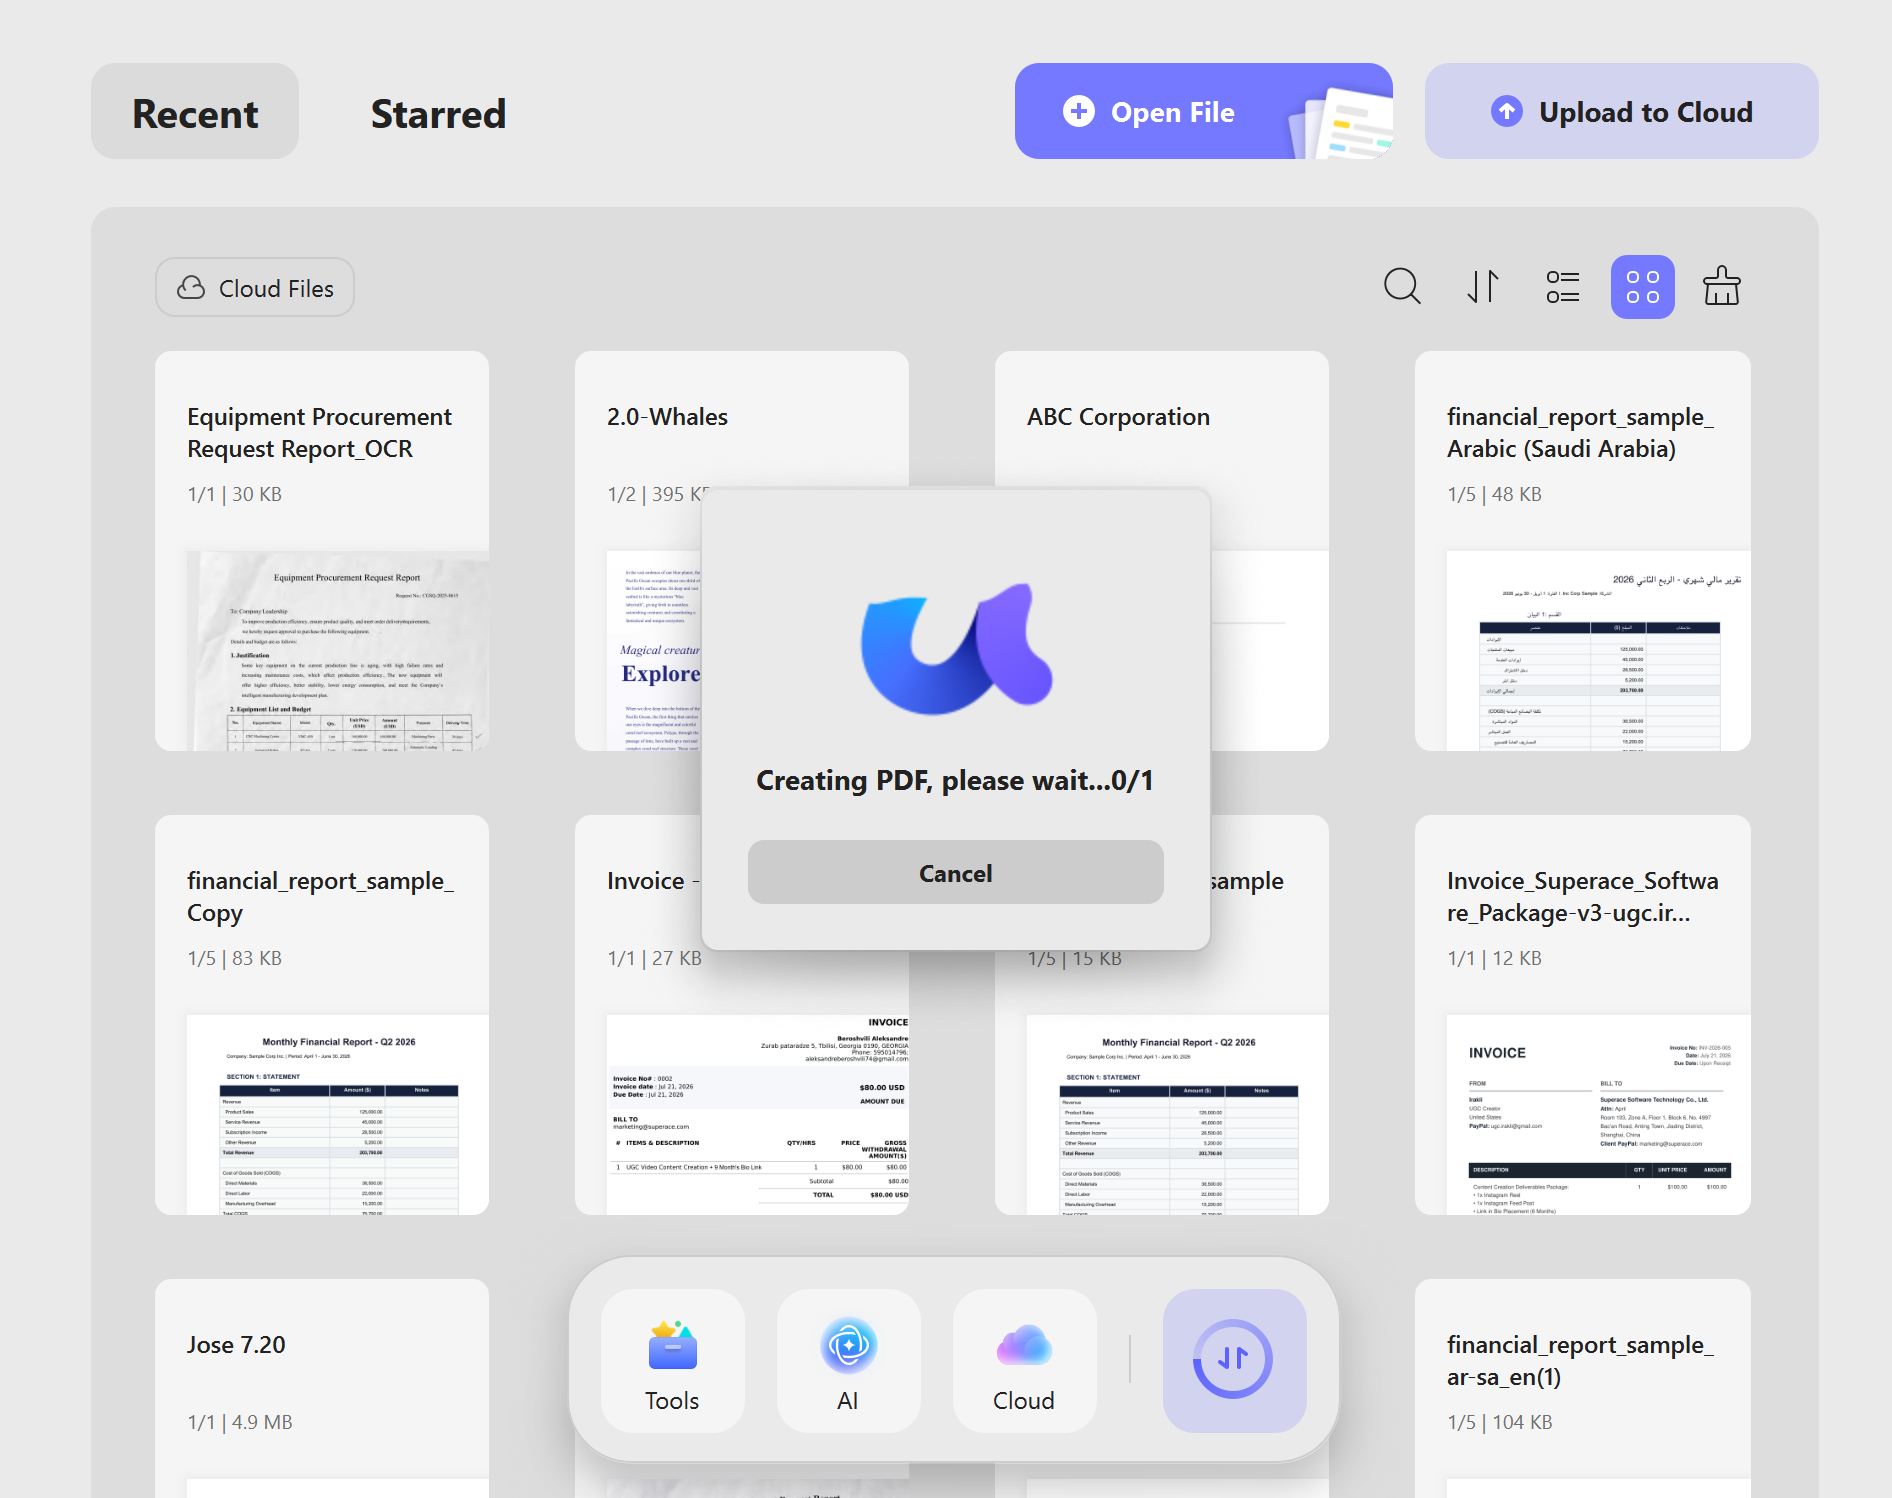
Step 1: Drag your Word file into UPDF to Convert to PDF Automatically
Launch UPDF and drag your Word file into UPDF, and it will be converted into a PDF file at the same time.
Step 2: Add Form Fields
From the top toolbar, click Form to enter the form mode, and select and add the appropriate form elements based on your requirements. UPDF offers a rich set of form tools:
- Text Field – for users to input text, such as name, address, etc.
- Checkbox – allows users to select one or more options.
- Radio Button – restricts users to selecting only one option from a group.
- Dropdown Menu – provides a list of options for users to choose one; ideal when there are many choices.
- List Box – similar to a dropdown, but allows users to select multiple items.
- Button – can perform actions such as submitting or resetting the form, or navigating to a hyperlink.
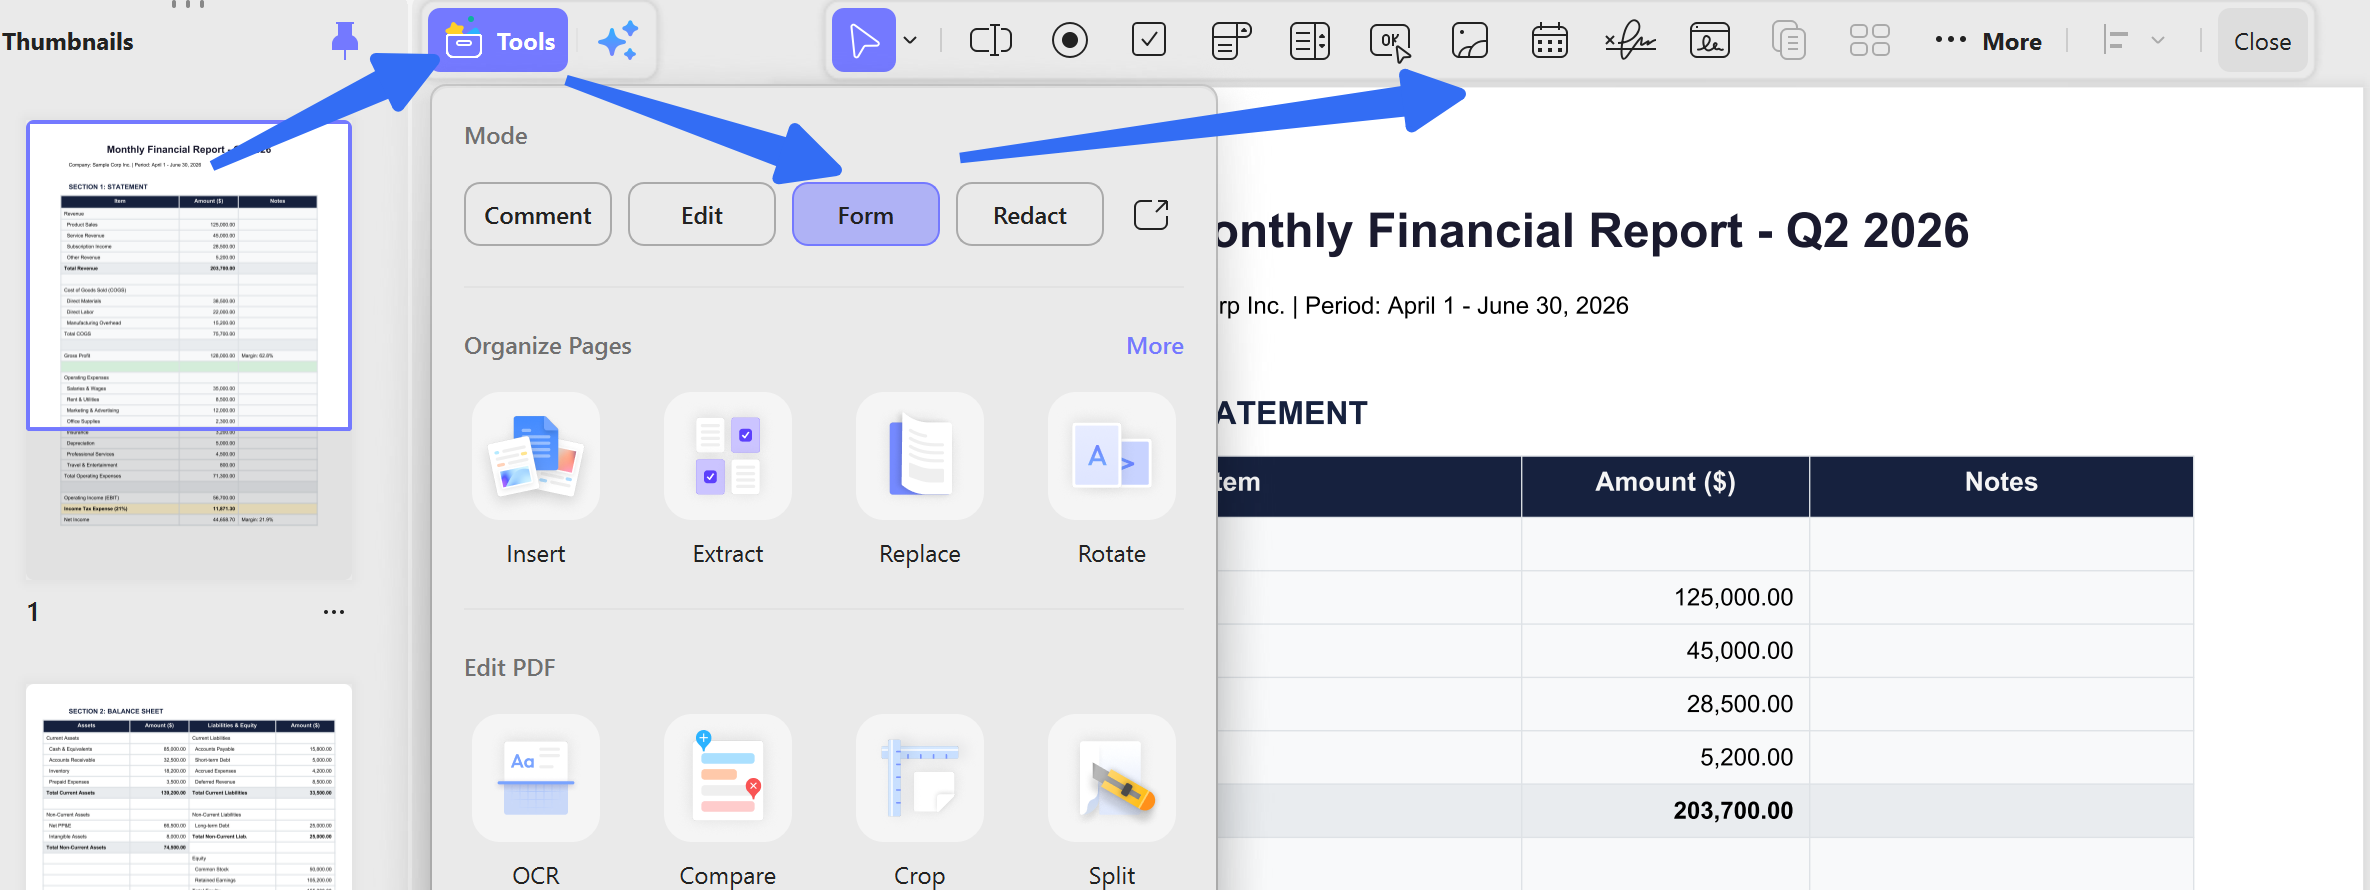
After selecting the desired tool, click or drag on the PDF document at the corresponding location to insert the form field.
Step 3: Edit Field Properties
Double‑click an inserted form field to open the "Form Field Properties" dialog, where you can configure various parameters in detail:
- General – set field name, tooltip (e.g., "Please enter your name"), visibility, and more.
- Style – customise font, size, colour, alignment, background colour, etc.
- Actions – add interactive behaviours for buttons and other fields, such as navigating to a specified webpage upon click.
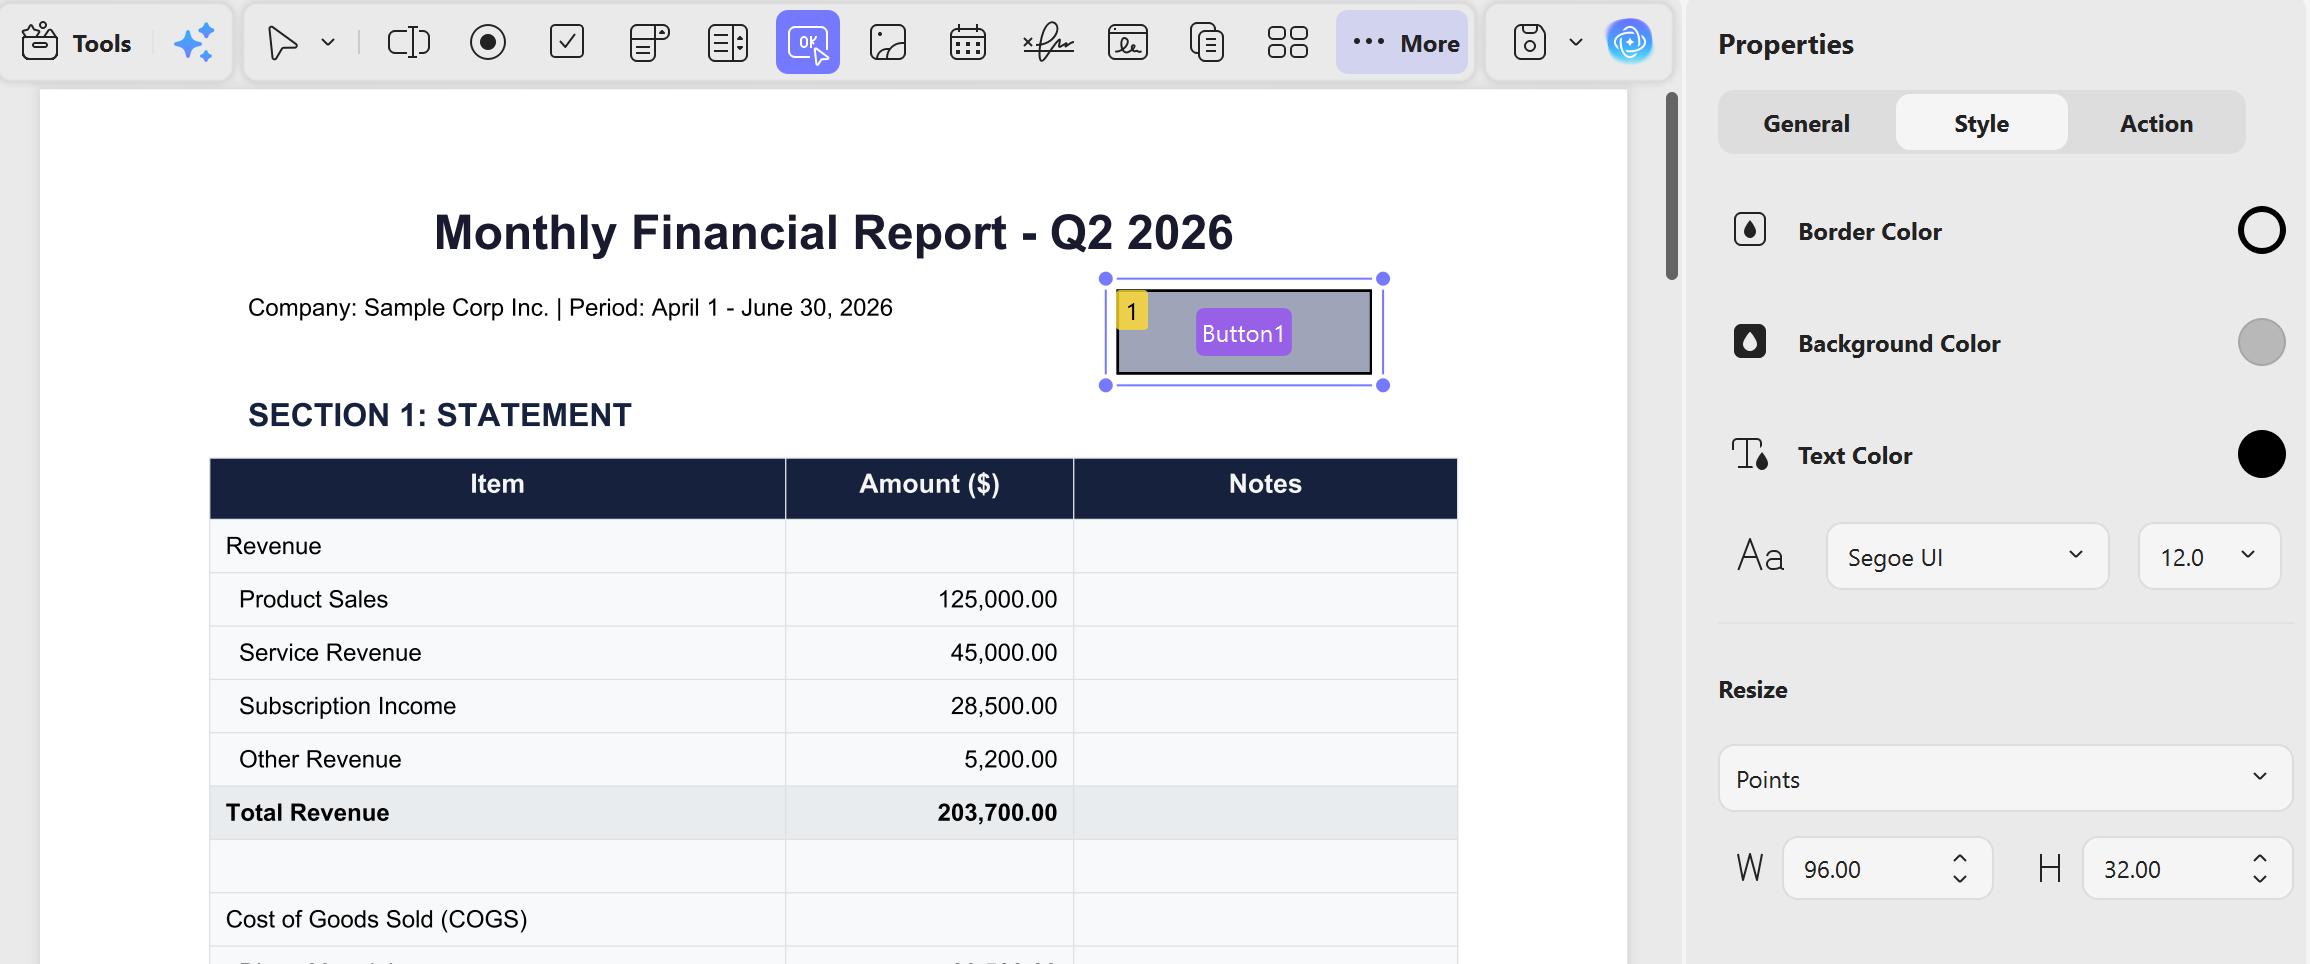
Step 4: Validate the Form Functionality
After completing all edits, click the "Reader" button in the left sidebar to switch to reading mode. Here, you can simulate filling out the form to verify that all fields work as expected. If any issues are found, you can easily return to edit mode to make adjustments.
Windows • macOS • iOS • Android 100% secure
Also Read: How to Create a Fillable Form in Word
How to Create a Fillable PDF from Word Online Free
To create a fillable PDF from Word online for free without any complications, you can use DocFly as your PDF form filler. It provides users with a lot of different form-fillable features like "Paragraph Field," "List Field," "Signature Field," and much more. When utilizing these fields, users can customize their color, font style, size, and even alignment. DocFly also has multiple sharing options, which make it easy for businesses to share the fillable PDF forms with their clients and respective people. With that, let's look at the steps on how to use this tool to fulfill your needs:
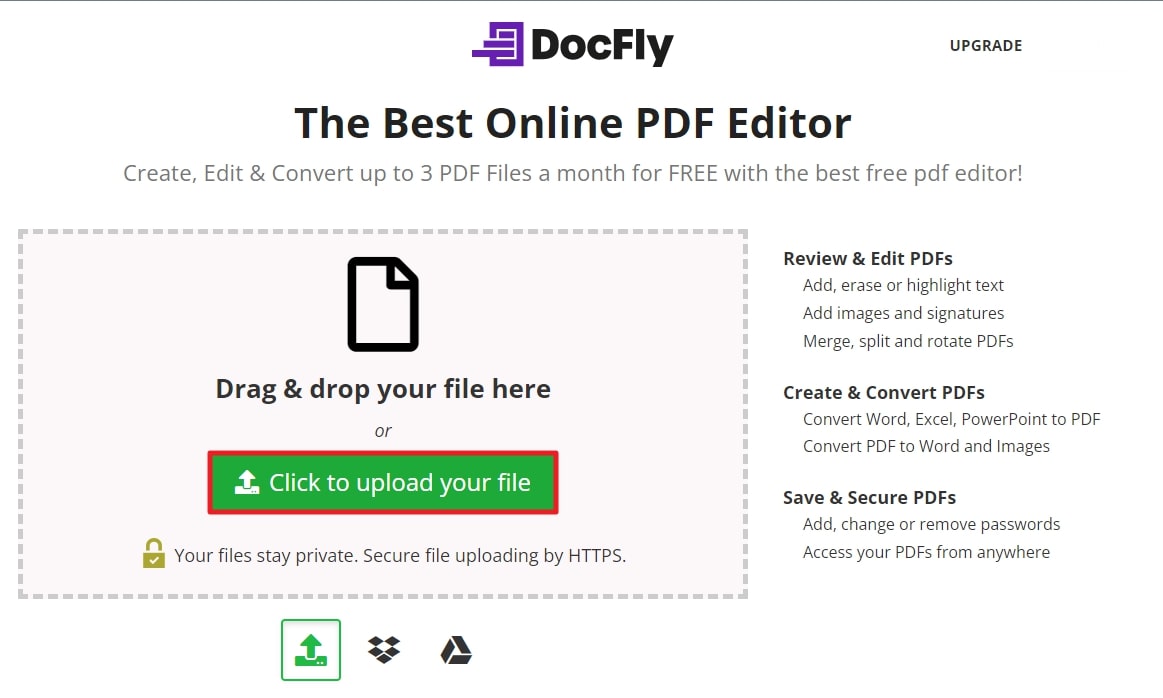
Step 1: Access the official website of DocFly on your computer browser. Tap the "Click to Upload Your File" option on the main homepage. Following this, upload the Word file in DocFly, after which you will be taken to the main dashboard.
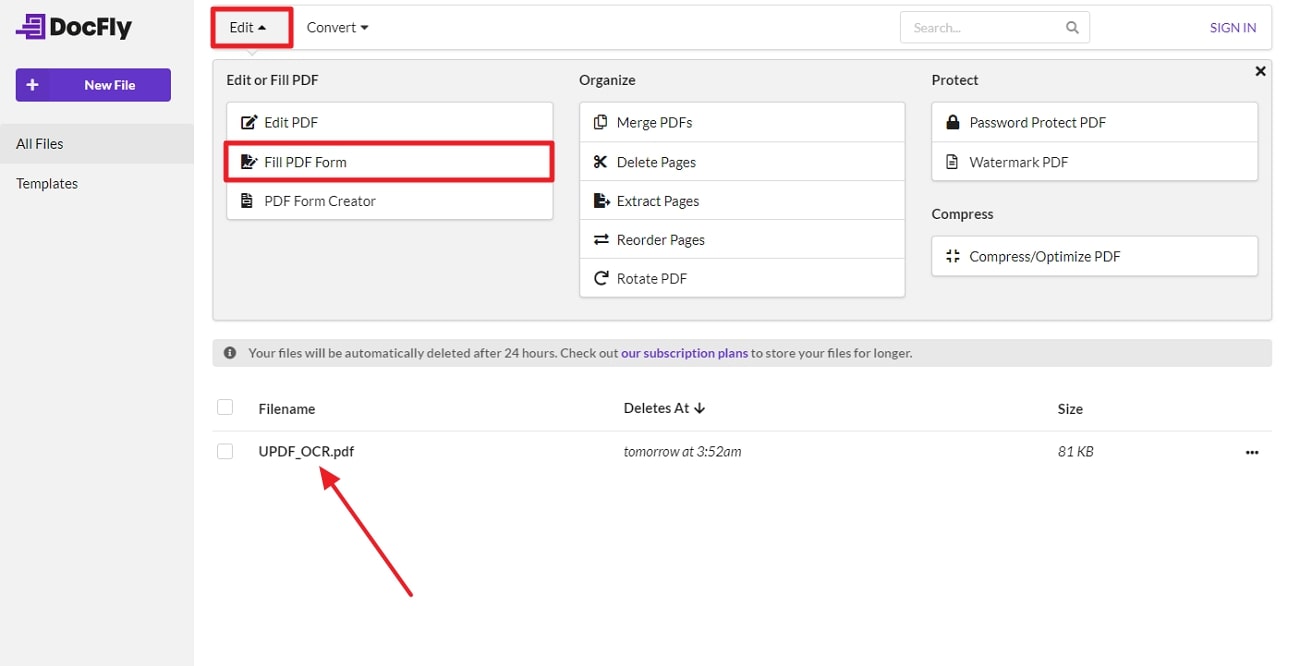
Step 2: Hit the "Edit" option from the top bar and choose the "Fill PDF Form" option. Ensure that you have selected the respective Word file from the "Filename" section, which you have just uploaded. Beforehand, tap on the "Three Dots" next to the file and choose the "Convert to PDF" option to convert this Word file into PDF.
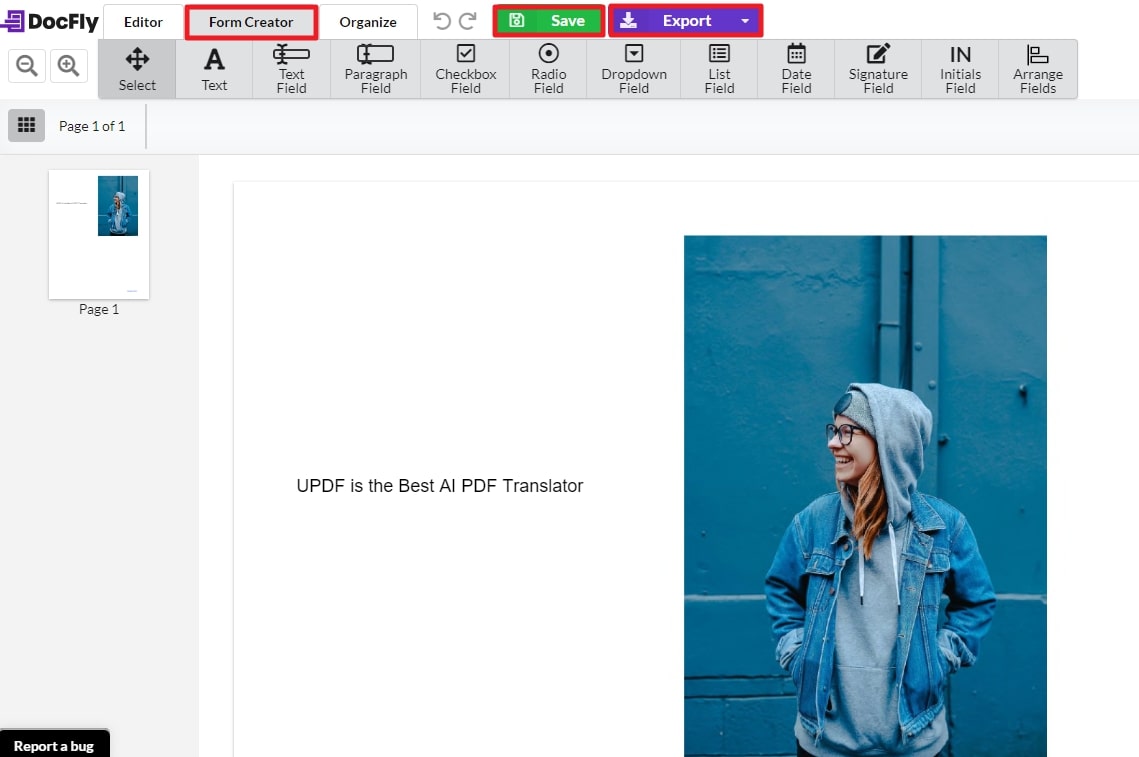
Step 3: Tap on the "Form Creator" option to access the multiple features. From the list of features like "Arrange Fields," "Signature Field," and more, select the necessary option like "Text Field" and paste it at the specific point. Afterward, when all the required fields are added, tap on the "Save" button. Besides this, click the "Export" option to download the PDF on your device.
After discussing the above two ways to convert Word to a fillable PDF for free, we will now compare them both in detail to learn which of these tools offers the better options. The table provided below will help you assess the form-filling features offered by both tools in a better way:
| Features | UPDF | DocFly |
| Form Field Recognition | ||
| Text Field | ||
| Check Box | ||
| Radio Box | ||
| Dropdown | ||
| List | ||
| Button | ||
| Clear form | ||
| Import Data | ||
| Export Data | ||
| Customize styles and actions. | ||
| Duplicate Fields Across Pages | ||
| Create Multiple Field Copies | ||
| Highlight Existing Fields | ||
| See Preview | ||
| Set Fields Alignment | ||
| Insert Tooltip to Fields | ||
| Lock Form Fields |
The table above clearly indicates that UPDF is the best fillable maker currently available. Having more advanced features than DocFly, this tool is sure to make your forms stand out. With UPDF, how to fill in a PDF form is not an issue anymore, as this tool even recognizes form fields. Plus, it can even lock particular fields or allow you to see the preview after creating the form.
With that, you must download UPDF on your devices and start using this tool. For that, click the "Free Download" button below and buy the UPDF Premium plan to access all the discussed features.
Windows • macOS • iOS • Android 100% secure
Pro Tips for Creating Better Fillable PDFs
1. Always Test Your Form
Before sending your fillable PDF to anyone, test it yourself. Open it in at least two different PDF readers (UPDF or Adobe Acrobat Reader) to ensure all fields work correctly.
2. Use Clear Field Labels
Make sure each form field has a clear label that tells users what to enter. This reduces errors and support requests.
3. Set Field Properties
Take advantage of field properties:
- Required fields: Mark fields as required so users can't skip them
- Format validation: Use number, date, or email formats to validate input
- Default values: Pre-fill common answers to save users time
4. Consider Accessibility
If your form will be used by people with disabilities, ensure it's accessible:
- Use proper tab order
- Add descriptive tooltips to fields
- Test with screen readers
5. Keep File Sizes Manageable
Large PDFs are slow to download and open. Compress images and avoid embedding unnecessary fonts or media.
6. Protect Sensitive Information
If your form collects personal data:
Consider digital signatures for authentication
Use password protection
Enable encryption
FAQs About Creating Fillable PDFs From Word
Can Word’s Save As PDF preserve fillable fields?
No. Word’s Save As PDF usually preserves the visual layout but does not turn Word controls into interactive PDF form fields. Add or recognize the fields in a PDF form editor after conversion.
How do you create a fillable PDF from Word without Acrobat?
Convert the Word file to PDF, open it in a PDF form editor such as UPDF, and use form-field recognition or add text fields, checkboxes, and dropdowns manually.
How should you test a fillable PDF before sharing it?
Open it in at least two PDF readers and check every field, tab order, required-field behavior, dropdown option, and save/reopen behavior before sending it.
Final Words
With the advancement in technology, a lot of tools are made to help users create fillable PDFs from Word. However, many of them claim to have the best features, but in reality, they don't provide the necessary features, such as a variety of form fields.
That is why we recommend you use UPDF as the best PDF form creator tool to ensure that your PDF form has all the required fields. This PDF form creator has all types of features that professionals require to make their documents look attractive and valuable. Download UPDF via the button below to try it now.
Windows • macOS • iOS • Android 100% secure








 Enya Moore
 Enola Miller
 Enola Davis

 Engelbert White