 UPDF
UPDF
 UPDF for Windows
 UPDF for Mac
 UPDF for iPhone/iPad
 UPDF for Android
 Nomostar
 UPDF AI Online
 UPDF Sign
 IvyCraft
 Edit PDF
 Annotate PDF
 Create PDF
 PDF Form
 Edit links
 Convert PDF
 OCR
OCR PDF to Word
 PDF to Image
 PDF to Excel
 Organize PDF
 Merge PDF
 Split PDF
 Crop PDF
 Rotate PDF
 Protect PDF
 Sign PDF
 Redact PDF
 Sanitize PDF
 Remove Security
 Read PDF
 UPDF Cloud
 Compress PDF
 Print PDF
 Batch Process
 About UPDF AI
 UPDF AI Solutions
 AI User Guide
 FAQ about UPDF AI
 Summarize PDF
 Translate PDF
 Chat with PDF
 Chat with AI
 Chat with image
 PDF to Mind Map
 Explain PDF
 PDF AI Tools
 Image AI Tools
 AI Chat Tools
 AI Writing Tools
 AI Study Tools
 AI Working Tools
 Other AI Tools
 AI Bookmark Generation
 AI Bookmark Summary
 AI Watermark Generation
 AI Background Generation
 AI Sticker Generation
 AI Stamp Generation
 AI Editing Suite
 UPDF Copilot
 AI Page Management
 AI Semantic Search
 PDF to Word
 PDF to Excel
 PDF to PowerPoint
 Enterprise Solution
 Enterprise Sign
 Enterprise AI
 Enterprise Plan
 Enterprise User Guide
 Enterprise Webinar
 Banking
 Healthcare
 Insurance
 Legal
Legal Manufacturing
 Government
 Researchers & PhDs
 Solopreneurs & Freelancers
 Lawyers & Legal Professionals
 Real Estate Agents & Brokers
 Education Solution
 Customer Stories
 User Guide
 UPDF Tricks
 FAQs
FAQs UPDF Reviews
 Download Center
 Blog
Blog Newsroom
 Tech Spec
 Updates
 UPDF vs. Adobe Acrobat
 UPDF vs. Foxit
 UPDF vs. PDF Expert

Quick answer:
Before you pick a method: the install step, not the OCR code, is where most people get stuck. pdf2image and OCRmyPDF both depend on external binaries (Poppler, Tesseract, Ghostscript) that pip can't install for you, and those binaries are set up differently on Windows, macOS, and Linux. EasyOCR is the only one of the three that doesn't require a separate OCR engine — but it pulls in PyTorch, which has its own install quirks on some Windows setups. Worth knowing before you commit to a method.
Which Method Do You Need?
| Your situation | Method | Best for |
|---|---|---|
| You want plain text fast, don't mind installing Tesseract | pdf2image + pytesseract | Quick scripts, one-off extraction jobs |
| You want to avoid installing an external OCR engine | PyMuPDF + EasyOCR | Environments where you can't easily add system binaries (e.g., shared servers) |
| You need a searchable PDF that keeps the original layout | OCRmyPDF + pdfplumber | Archiving, batch-processing scanned documents into a proper PDF/A |
| You don't want to write or debug code at all | UPDF | One-off documents, non-developers, anyone on a deadline |
Part 1. 3 Ways to OCR a PDF with Python
All three methods below run on Windows, macOS, and Linux, but the install commands differ by OS — this is the step that trips up most people, so it's called out for each method.
Where to run these commands: every pip install … or brew install … line below goes into a terminal, not a browser or file explorer — this is the same for all three methods. On Windows, open Command Prompt or PowerShell (search for either in the Start menu). On macOS, open Terminal (Spotlight search, or Applications → Utilities → Terminal). On Linux, open your distribution's Terminal app.

You'll also need Python itself installed first — type python --version (or python3 --version on Mac/Linux) to check; if that fails, install Python from python.org before continuing.

pip vs pip3: on macOS and most Linux systems, the command is usually pip3 rather than plain pip. If pip install ... throws command not found, retry the exact same command with pip3 instead
About the filenames in the code below: names like contract_scan.pdf or invoice_scan.pdf are placeholders — swap them for your actual file name. Python looks for that file in whatever folder the terminal is currently pointed at, which usually isn't where your PDF lives, so a plain filename alone will throw a "file not found" error. Two ways around this: either move your PDF into the same folder as your script and cd into that folder in the terminal first (e.g., cd Desktop on Mac/Linux or cd Desktop on Windows), or skip the folder issue entirely and paste the file's full path instead — for example "/Users/yourname/Desktop/contract_scan.pdf" on Mac or "C:\Users\yourname\Desktop\contract_scan.pdf" on Windows.
Method 1: pdf2image + pytesseract
pdf2image converts each PDF page into an image; pytesseract then runs Google's Tesseract OCR engine on each image. Tesseract itself is a separate program, not a Python package, so it has to be installed at the system level before pytesseract can call it.
Step 1. Install the Python packages:
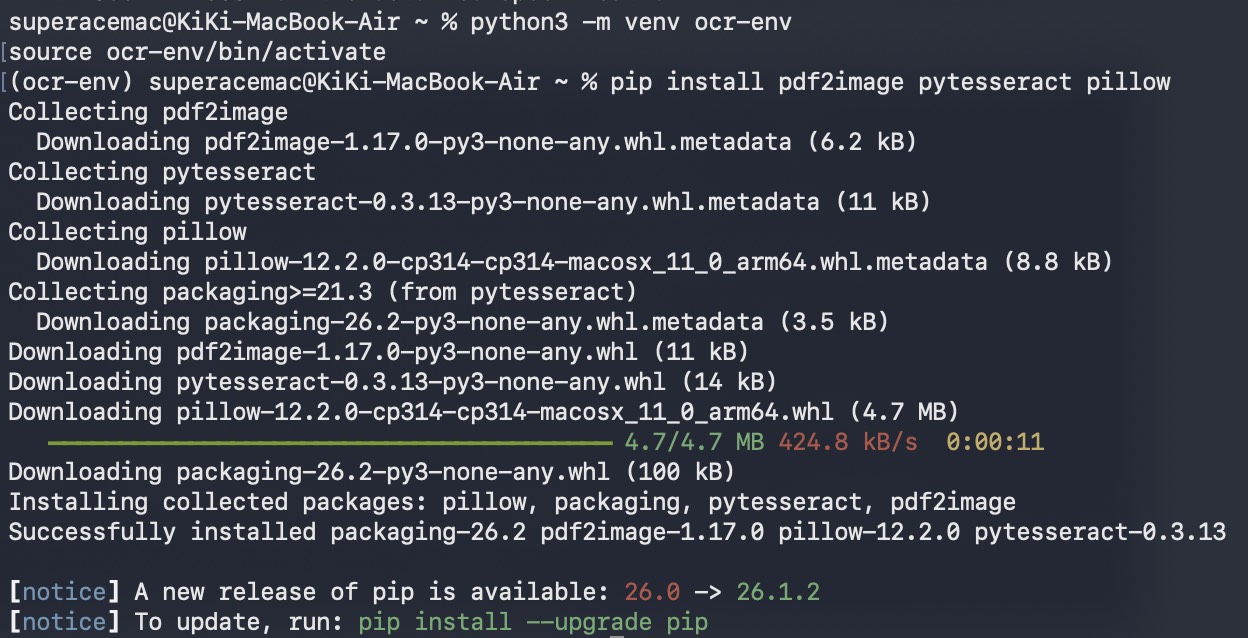
pip install pdf2image pytesseract pillowIf this throws error: externally-managed-environment — common on newer macOS and some Linux installs — use a virtual environment instead of installing system-wide:
python3 -m venv ocr-env
source ocr-env/bin/activate
Once the terminal prompt shows (ocr-env) in front of it, run the pip install ... line again in that same window; it'll work without the error. You'll need to run source ocr-env/bin/activate again each time you open a new terminal to continue working on this.
Step 2. Install the two system dependencies (OS-specific):
- Windows: Download and run the Tesseract installer, then download Poppler for Windows and add both
binfolders to your PATH — or point to them directly in code withpoppler_path=andpytesseract.pytesseract.tesseract_cmd=. - macOS:
brew install tesseract poppler - Linux (Debian/Ubuntu):
sudo apt install tesseract-ocr poppler-utils
Slow brew install that looks stuck? Homebrew auto-updates its package index before every install, which can take a few minutes and shows no progress bar. That's normal — but if you want to skip it and install faster, run:
HOMEBREW_NO_AUTO_UPDATE=1 brew install tesseract popplerStep 3. Run the OCR:
This part is Python code — the terminal can't run it directly. If you paste these lines straight after the % prompt, the terminal tries to treat each line as a shell command and throws errors like command not found: from. You need to get this code into a .py file first, then hand that file to Python to run — the cat trick below does the "write to a file" part without ever executing the code as shell commands, all without leaving the terminal:
cat > ~/Desktop/ocr.py <<'PY'
from pdf2image import convert_from_path
import pytesseract

pages = convert_from_path("contract_scan.pdf", dpi=300)
text = ""
for page in pages:
    text += pytesseract.image_to_string(page)

with open("contract_scan.txt", "w", encoding="utf-8") as f:
    f.write(text)
PY
That command creates the file ocr.py on your Desktop with the code above inside it — remember to swap "contract_scan.pdf" for your own file's name or full path before pasting. Now the file exists but hasn't run yet. This second, separate command actually runs it:
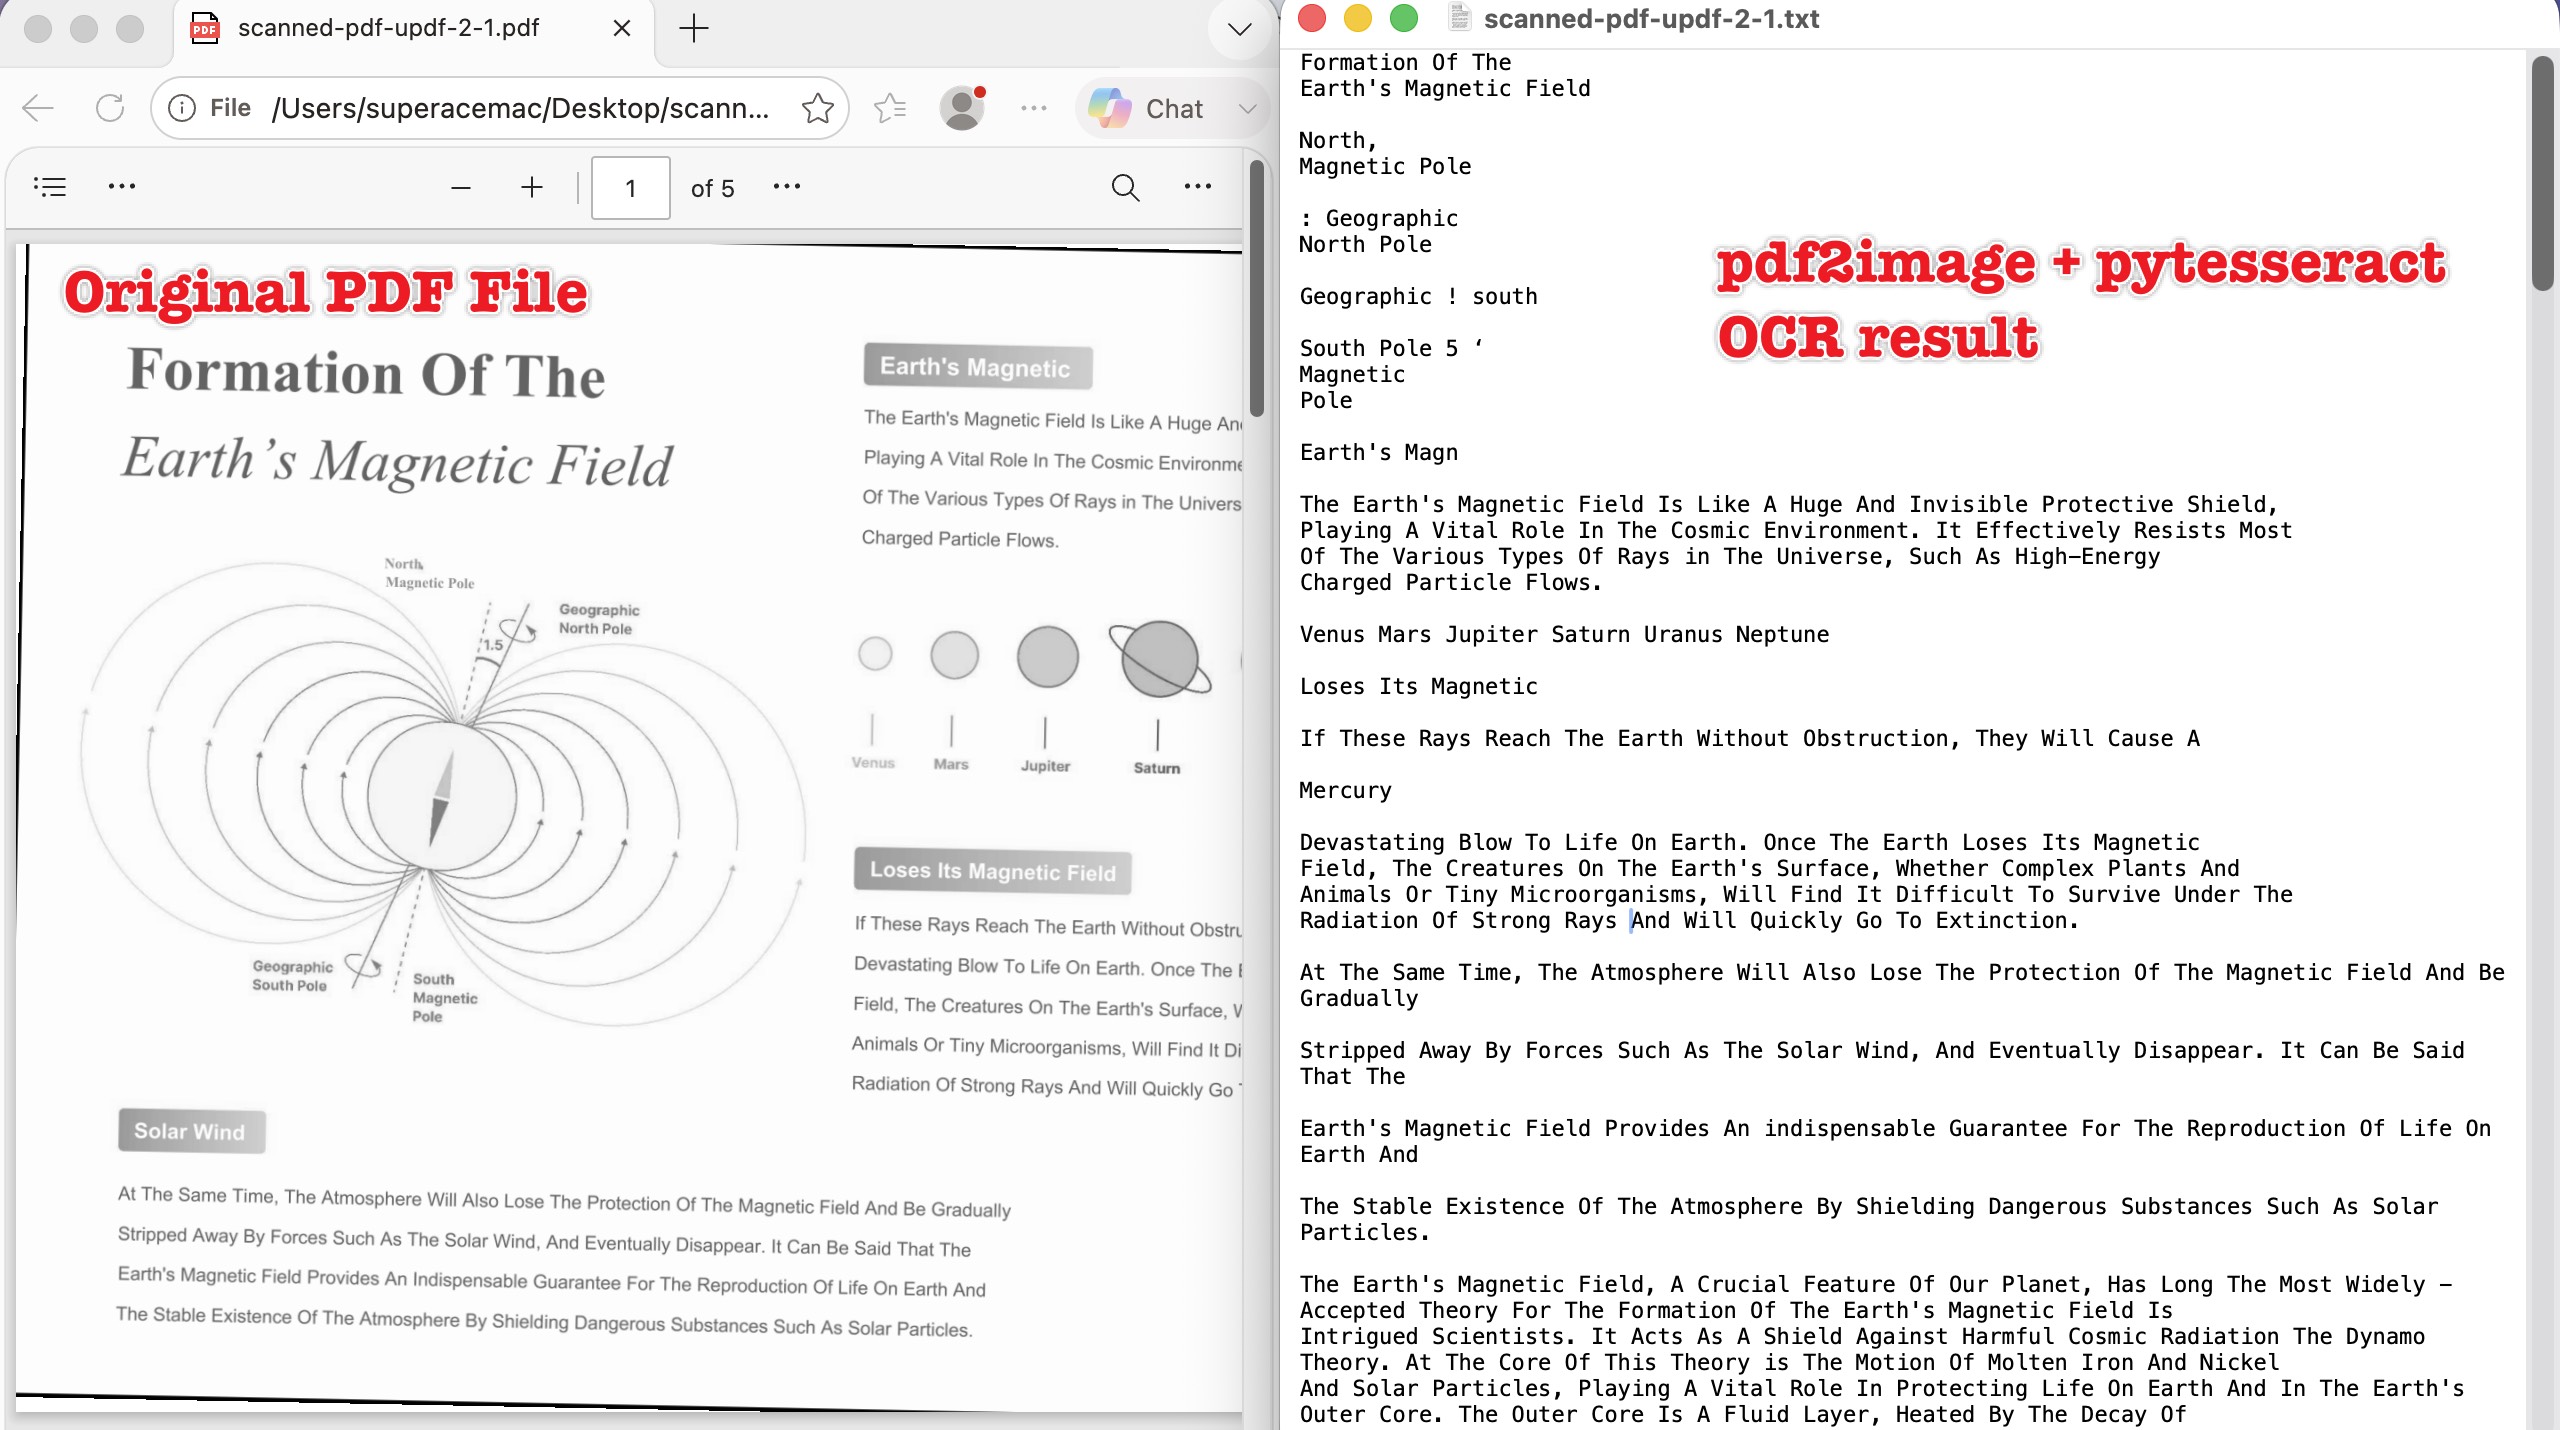
python3 ~/Desktop/ocr.py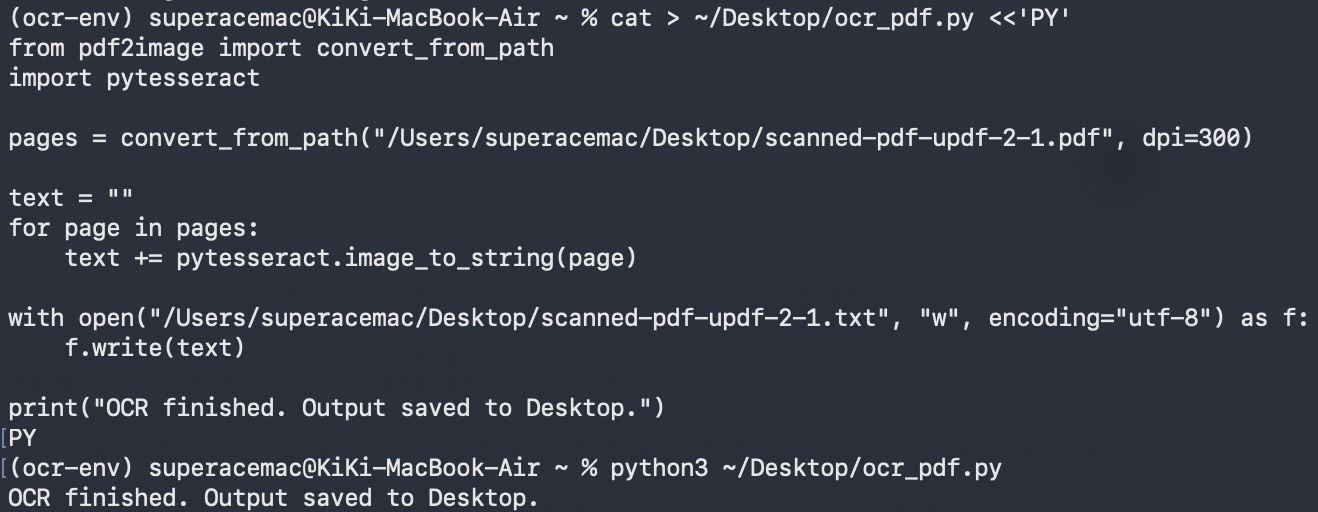
Note
cat <<'PY' trick above only works in Mac/Linux terminals, not Command Prompt or PowerShell: paste the same code into Notepad (Windows) or TextEdit (Mac), on TextEdit use Format → Make Plain Text first — otherwise it saves as .rtf instead of .py — then save as ocr.py and run it the same way, with python ocr.py on Windows or python3 ocr.py on Mac/Linux.Tesseract recognizes 100+ languages — pass lang="fra" (or another language code) to image_to_string() for non-English documents, as long as that language pack is installed.
Best for:
- quick scripts where plain text is all you need.
Not for:
- anyone who can't install system-level binaries (e.g., a restricted work laptop or a minimal cloud container) — see Method 2.
Method 2: PyMuPDF + EasyOCR
PyMuPDF (installed as the pymupdf package, and imported the same way) renders PDF pages to images without any external dependency. EasyOCR is a pure-Python OCR library built on PyTorch — it downloads its own recognition models on first run instead of relying on a separately installed engine, which is the main reason to pick it over Method 1.
Step 1. Install (same command on every OS — no system binaries needed):
pip install pymupdf easyocrIf this throws error: externally-managed-environment, use the virtual environment steps under Method 1's Step 1.

Step 2. Run the OCR:
Same idea as Method 1 — write the code to a file, then run that file, without leaving the terminal:
cat > ~/Desktop/ocr2.py <<'PY'
import pymupdf  # official import name; avoid the unrelated PyPI package "fitz"
import easyocr

doc = pymupdf.open("invoice_scan.pdf")
reader = easyocr.Reader(["en"])

for page in doc:
    pix = page.get_pixmap(dpi=300)
    pix.save("page.png")
    result = reader.readtext("page.png", detail=0)
    print("\n".join(result))
PY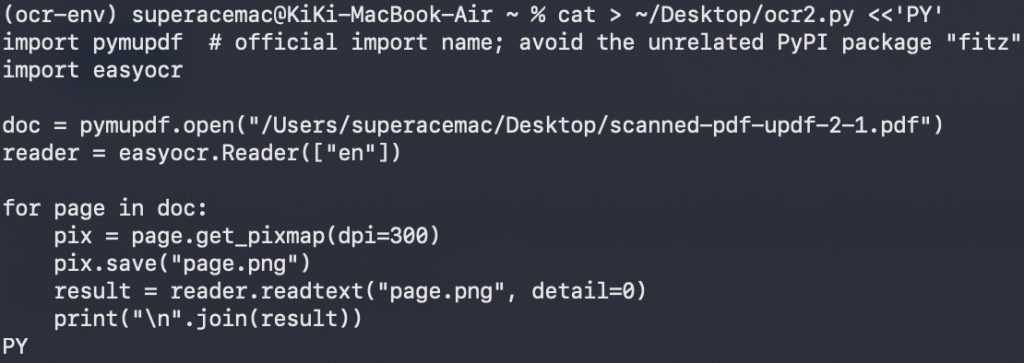
Swap "invoice_scan.pdf" for your own file's name or full path before pasting. Then run it:
python3 ~/Desktop/ocr2.py(On Windows, use Notepad instead — paste the code, save as ocr2.py, then run python ocr2.py.)
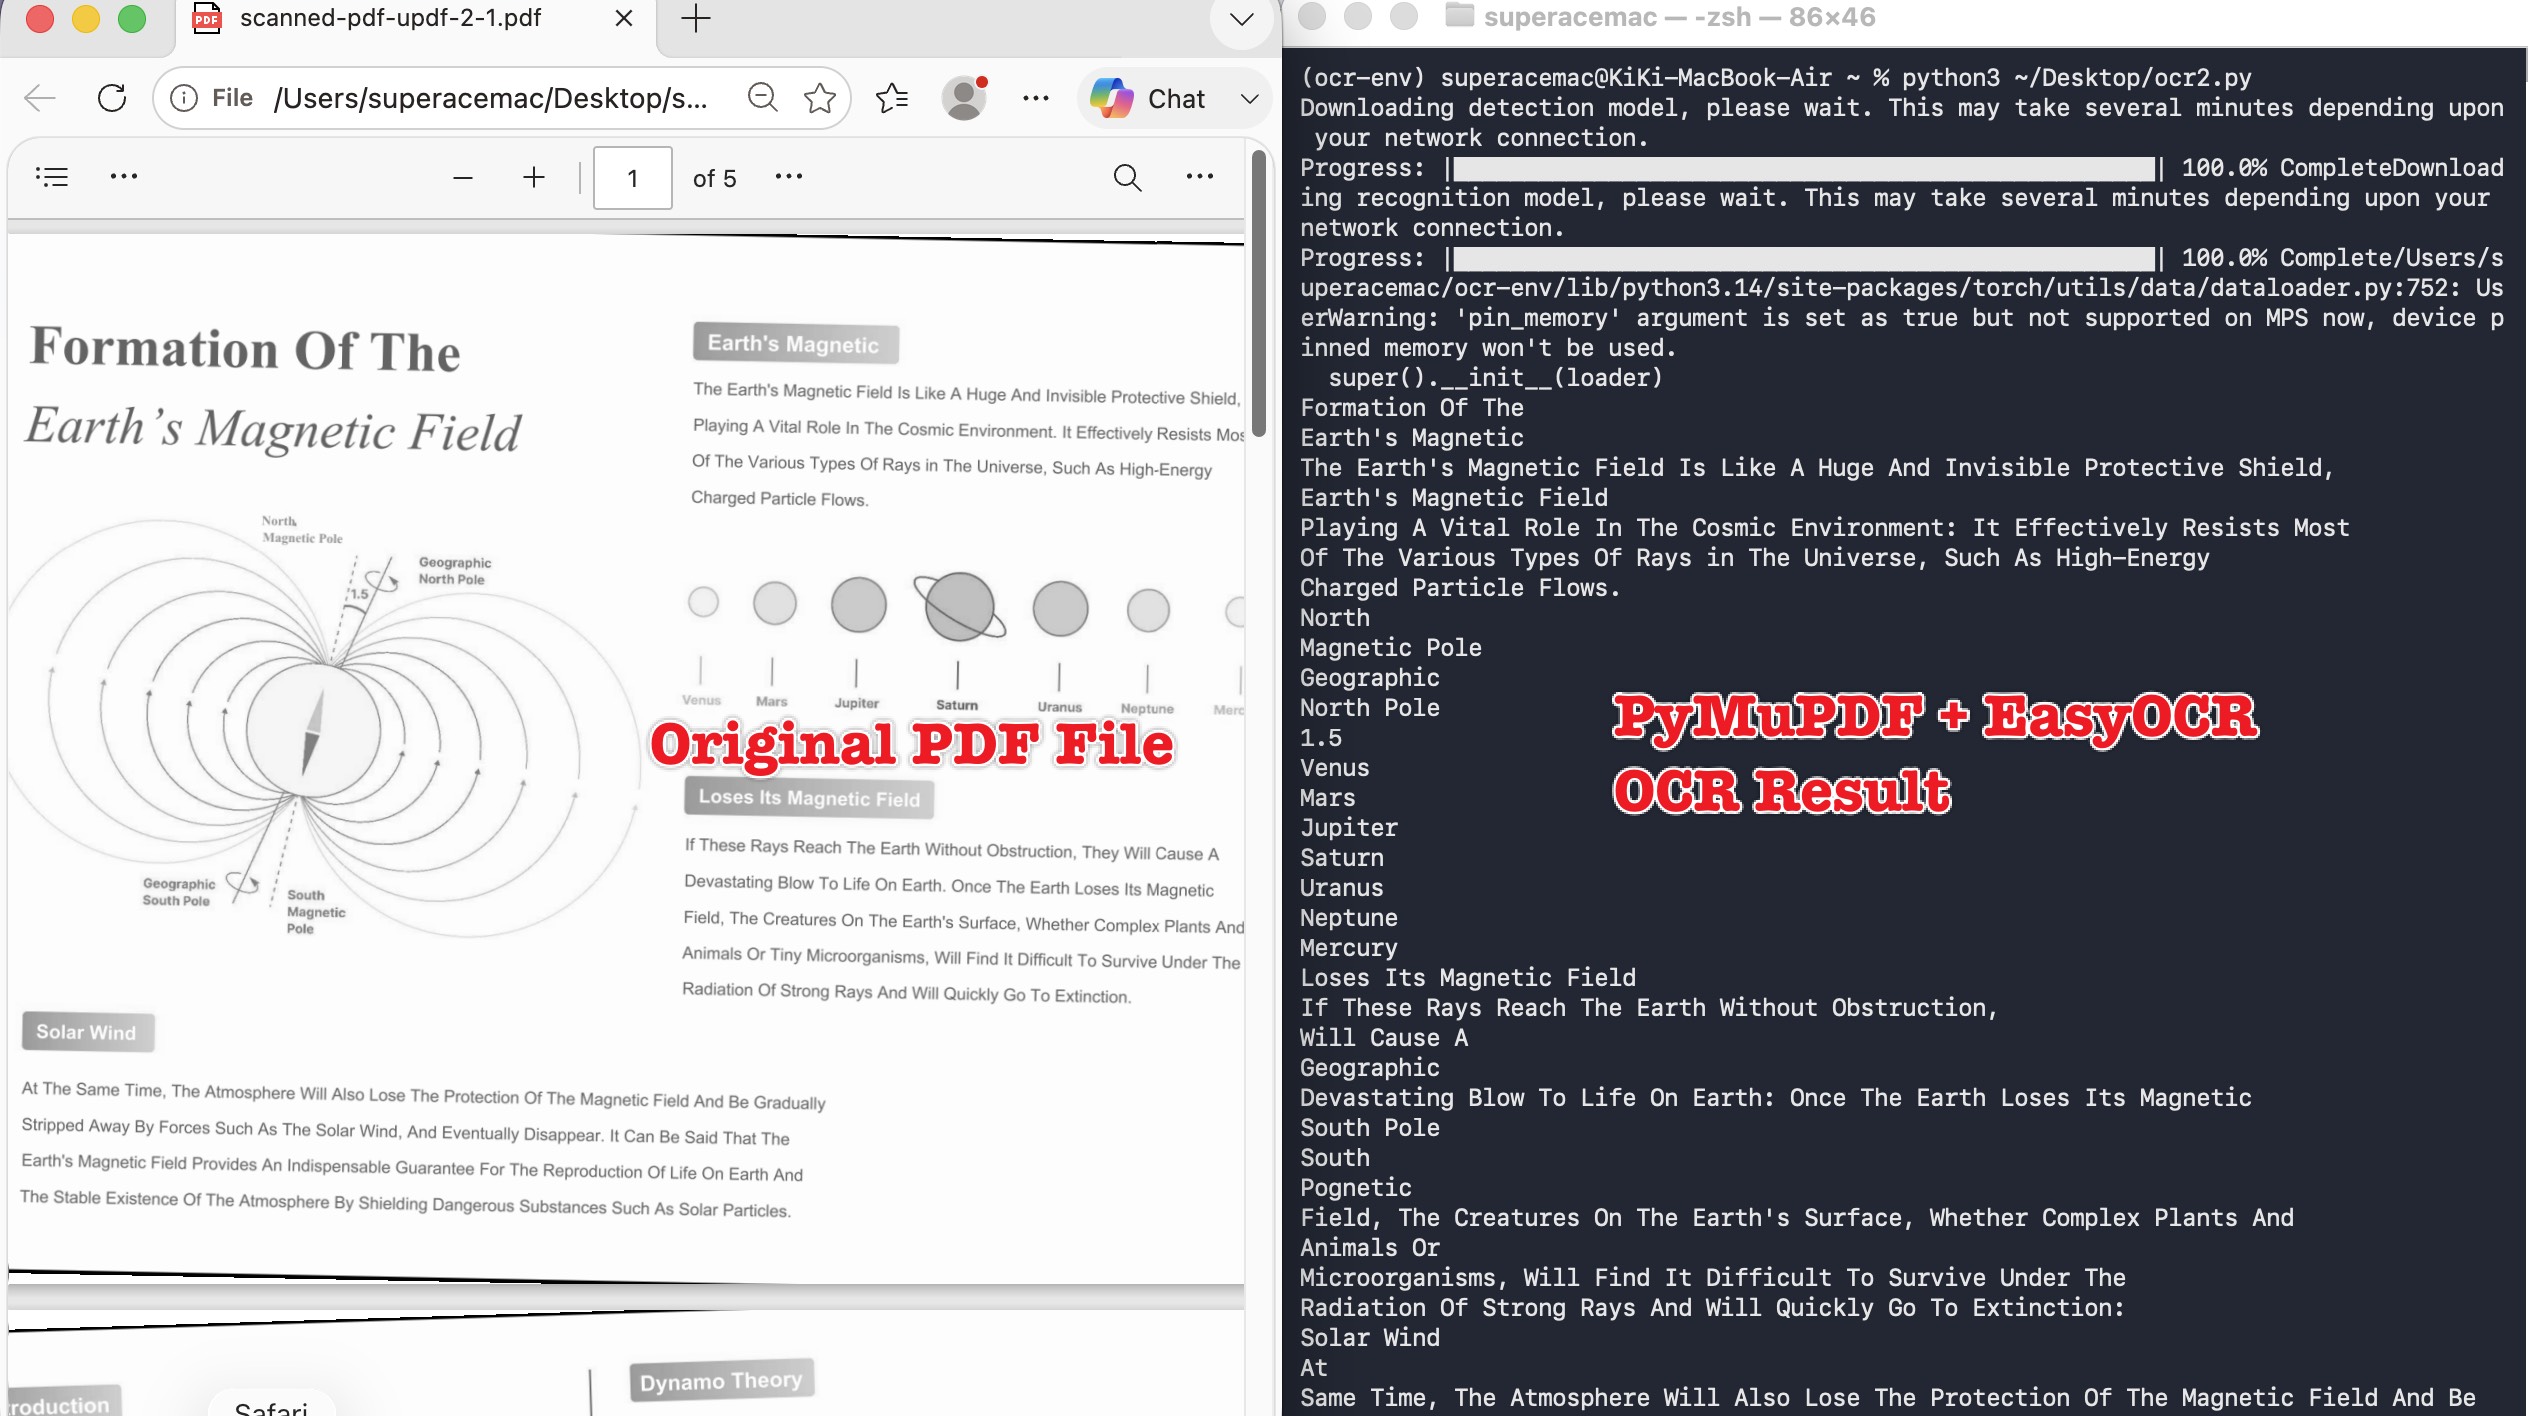
The first run downloads EasyOCR's language models (a few hundred MB), so it's slower to start than Tesseract-based methods — after that, it runs locally. On some Windows machines, pip install easyocr pulls in a CPU-only PyTorch build by default; if you have a GPU and want it used, install torch separately first following PyTorch's own instructions, then install EasyOCR.
["en"] in easyocr.Reader(["en"]) sets the recognition language(s) — swap or add language codes for other documents, e.g. ["en", "ch_sim"] for English plus Simplified Chinese. Not every language can be combined in one call — EasyOCR only allows languages that share a compatible script (most Latin-alphabet languages mix freely; Chinese and Arabic generally can't be paired with each other).
Best for:
- environments where you can't add system packages, or documents in one of EasyOCR's ~80 supported languages.
Not for:
- very large batch jobs — EasyOCR's neural models are noticeably slower per page than Tesseract without a GPU. Also check PyMuPDF's license (AGPL, with a commercial option) before shipping it inside closed-source software.
Method 3: OCRmyPDF + pdfplumber
OCRmyPDF is the only method here that outputs an actual searchable PDF — it lays an invisible text layer over the original scanned image, so the file still looks like the source document but the text is selectable and searchable. pdfplumber then extracts that text if you need it separately.
Step 1. Install the system dependencies first — this is OS-dependent and the least standardized of the three methods:
- macOS:
brew install ocrmypdf(Homebrew pulls in Tesseract and Ghostscript automatically) - Linux (Debian/Ubuntu):
sudo apt install ocrmypdf - Windows: there's no single one-line installer. A native install needs 64-bit Python, Tesseract, and Ghostscript all installed separately (Ghostscript has to be added manually via Chocolatey or its own installer), then
pip install ocrmypdf. Recent OCRmyPDF versions can substitutepypdfium2for some of Ghostscript's rasterization work, but Ghostscript is still the safer default. If that sounds like too much, the maintainers' own docs point to WSL or a Docker image as the more reliable path on Windows.
Step 2. Install the Python packages and run:
pip install pdfplumberIf this throws error: externally-managed-environment, use the virtual environment steps under Method 1's Step 1.
ocrmypdf --deskew --rotate-pages scanned_report.pdf searchable_report.pdf
# scanned_report.pdf = your input file (name or full path); searchable_report.pdf = the output file it creates
The line above runs directly in the terminal — it's the actual OCR step. What follows is optional, only needed if you want to pull the recognized text out into a separate string (rather than just having the searchable PDF). It's Python code, so it goes through the same write-then-run pattern as Method 1 and 2:
cat > ~/Desktop/extract_text.py <<'PY'
import pdfplumber

with pdfplumber.open("searchable_report.pdf") as pdf:
    for page in pdf.pages:
        print(page.extract_text())
PY
Swap "searchable_report.pdf" for your own file's name or full path before pasting. Then run it:
python3 ~/Desktop/extract_text.py(On Windows, use Notepad instead — paste the code, save as extract_text.py, then run python extract_text.py.)
--deskew straightens crooked scans and --rotate-pages auto-corrects sideways pages before OCR runs — both meaningfully improve accuracy on phone-photographed documents, though both also mean the output page image isn't pixel-identical to the source (worth knowing if you need to prove the file wasn't altered).
Best for:
- producing a real searchable/archival PDF, not just a text string.
Not for:
- Windows users without WSL or Docker set up — budget extra setup time for the native install, or use Method 1 instead.
pdf2image vs PyMuPDF vs OCRmyPDF — What's the Difference?
All three read a scanned PDF; they differ in what they hand you back. pdf2image + pytesseract is a pipeline you assemble yourself — fast to write, outputs plain text. PyMuPDF + EasyOCR swaps the external OCR engine for a self-contained Python library — same plain-text output, easier install, slower per page. OCRmyPDF works differently from the other two: instead of pulling text out, it puts a text layer back into the PDF, so the deliverable is a searchable file rather than a string of text.
One way to remember it: pdf2image and PyMuPDF read the scan and hand you the words; OCRmyPDF rebuilds the scan into a document a computer can search.
Part 2. A No-Code Way to OCR a PDF
If the setup steps above are more than you want to deal with for a handful of files, UPDF does OCR recognition through its own built-in engine — no Python environment, Tesseract PATH, or Ghostscript configuration involved. Open the file, click OCR, and the text layer is added directly — no terminal involved.
Windows • macOS • iOS • Android 100% secure
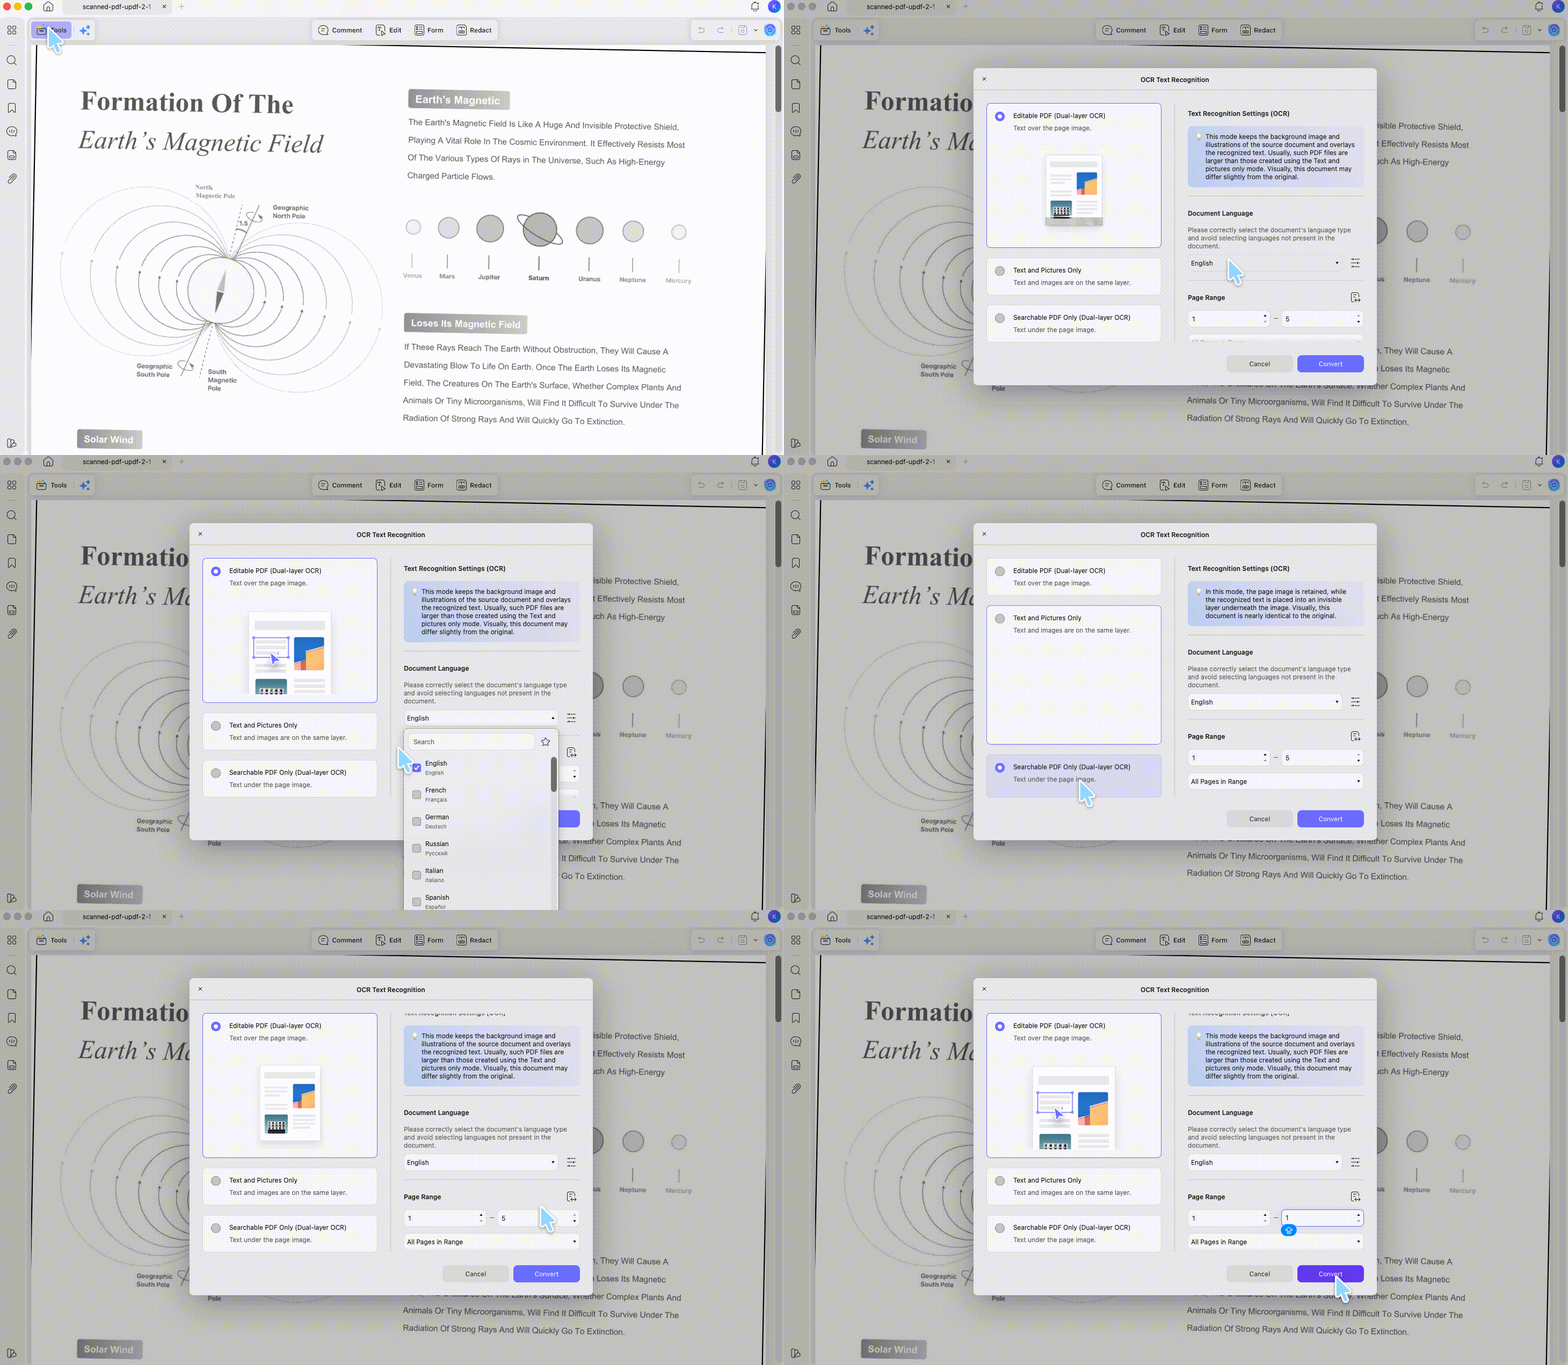
Step 1. Open the scanned PDF in UPDF, then go to Tools → OCR in the side panel.
The next step is to make the content usable beyond simply viewing the page. For an on-screen example, watch the walkthrough of recognizing text in PDFs with UPDF OCR below.
Step 2. Set the language and page range, and choose the output type — Editable PDF, Searchable PDF Only, or Text and Pictures Only — then click Convert.
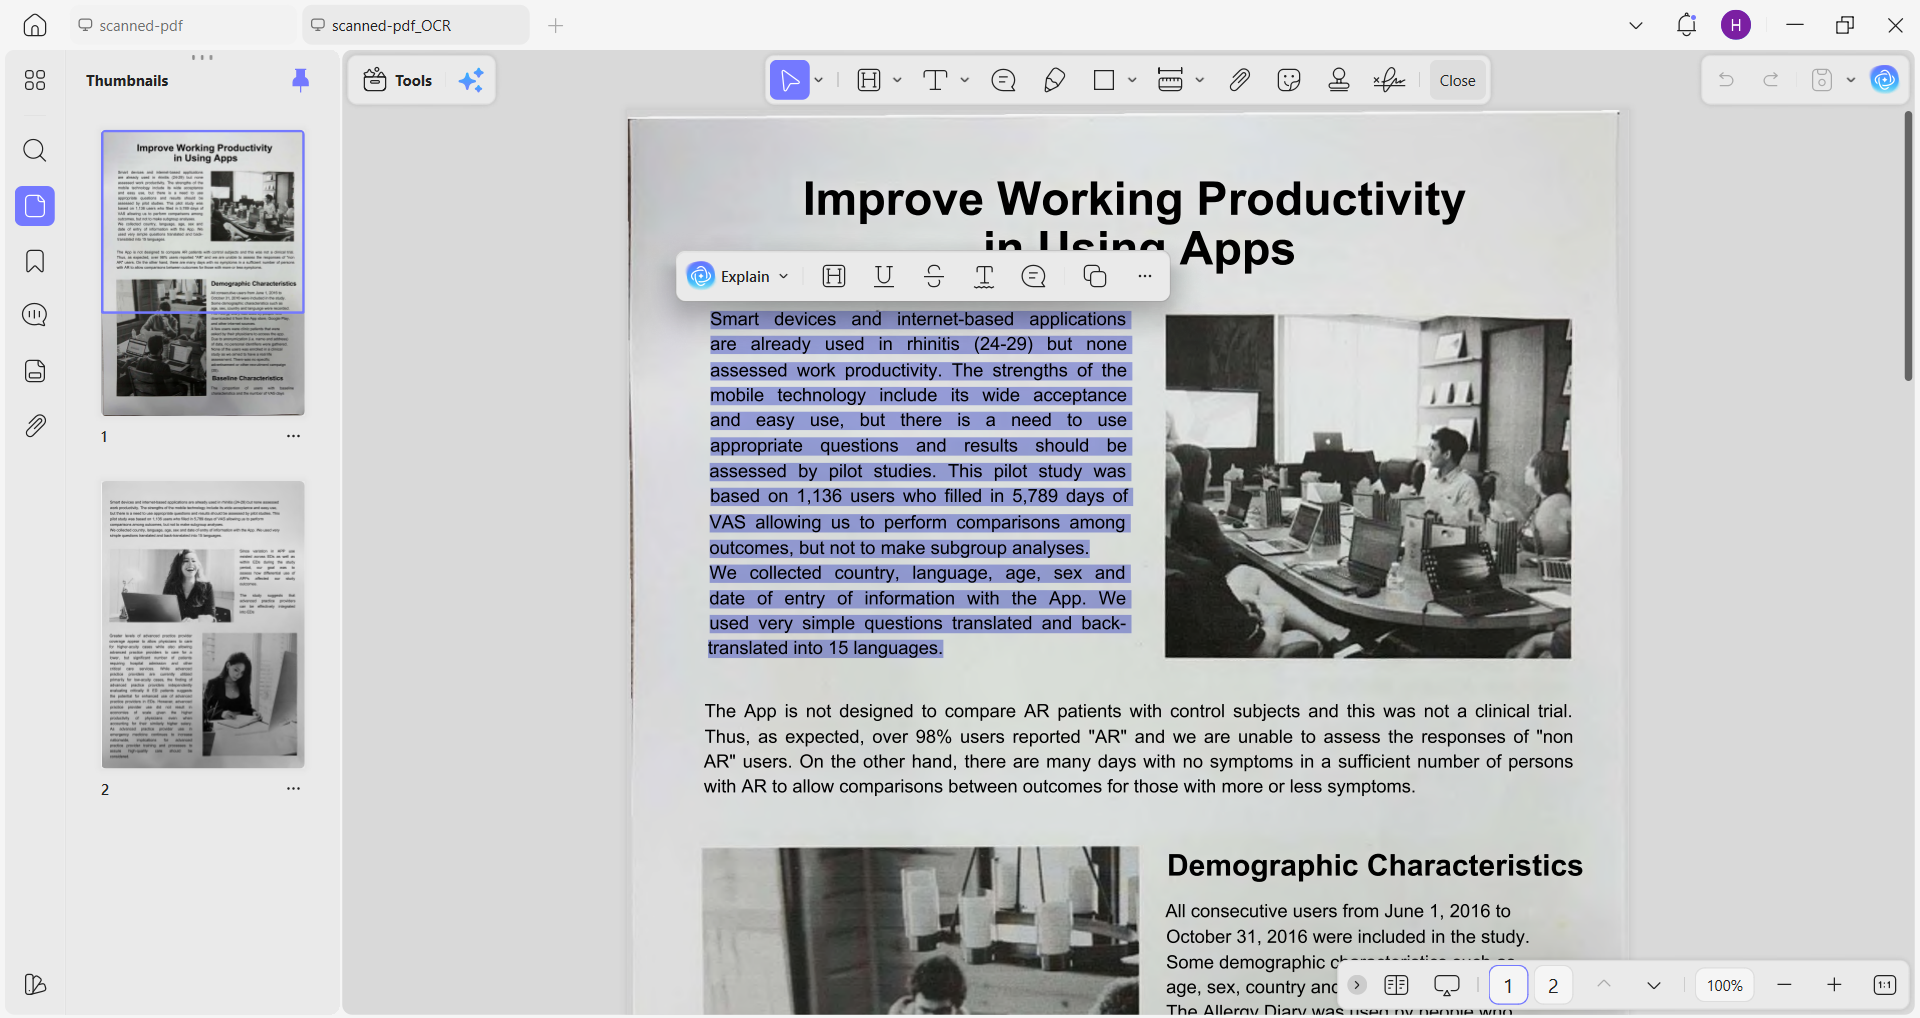
Step 3. Edit or copy the recognized text directly in the same window, without exporting to a separate file first.
UPDF's OCR engine recognizes 38+ languages and preserves the original layout and fonts. On desktop, core OCR is available on Windows and on Mac with an Apple chip — Intel Macs do not support UPDF OCR, even with the website build. If you have an Apple-chip Mac but installed the App Store build, use the website version of UPDF for Mac to access OCR. On iPhone/iPad and Android, UPDF's mobile apps offer the same three OCR modes as desktop — Editable PDF, Text and Pictures Only, and Searchable PDF Only — so a phone photo of a document goes through the identical workflow as a desktop scan.
If you also need to edit the text afterward — not just extract it — the pillar guide on how to make a PDF editable covers both regular and scanned files end to end.
Best for:
- one-off documents, non-developers, or anyone who wants OCR done in under a minute without debugging a PATH error.
Not for:
- developers who need OCR inside an automated pipeline with no UI — the Python methods above fit that case better.
Download UPDF for free to try OCR on your own scanned file — installation is free, and Pro unlocks batch OCR and watermark-free export.
Windows • macOS • iOS • Android 100% secure
Part 3. Python vs UPDF: Which Fits Your Workflow?
| Capability | Python (pdf2image / PyMuPDF / OCRmyPDF) | UPDF |
|---|---|---|
| Setup | System binaries + Python packages, OS-dependent | Single installer, no dependencies |
| Coding required | ✓ | ✗ |
| Output | Plain text, or a searchable PDF (OCRmyPDF only) | Editable PDF and searchable PDF |
| Batch / automation | Fully scriptable, unlimited | Batch OCR available on Pro plan |
| Mobile support | None — desktop/server only | Full OCR on iPhone/iPad and Android (same 3 modes as desktop); desktop OCR needs Windows or an Apple-chip Mac |
| Cost | Free (open-source libraries) | Free to try; 5 OCR uses on the free plan, then Pro ($49.99/yr or $$79.99 one-time) |
Why it matters: if OCR is one step in a larger automated pipeline, the Python route is worth the setup cost because it's scriptable end to end. If you just need one or two documents readable today, the setup time for Tesseract, Poppler, or Ghostscript usually costs more than the task itself.
Part 4. Edge Cases
zsh: command not found: pip(Mac/Linux) right at the install step. Two likely causes: either Python isn't installed yet (python3 --versionwill also fail — install from python.org, then open a new terminal window), or Python is installed but the command ispip3, notpip. Retry withpip3 install pdf2image pytesseract pillow.FileNotFoundErroror "cannot find the file" right away. This means Python is looking for the PDF in the wrong folder — almost always because the filename in the code is still the placeholder (contract_scan.pdf, etc.) or a plain filename typed without checking where the terminal is currently pointed. Replace the placeholder with your real filename, and eithercdinto the folder holding your PDF first or paste the file's full path instead of just its name.PDFInfoNotInstalledError: Unable to get page count(pdf2image). Poppler isn't installed or isn't on your PATH — this hits Windows, Mac, and Linux users alike. Runpdftoppm -hin a terminal to confirm Poppler is actually reachable; if not, reinstall it via the OS-specific command in Method 1 or passpoppler_path=explicitly.TesseractNotFoundError(pytesseract). Tesseract is installed but pytesseract can't find it — most common on Windows. Addpytesseract.pytesseract.tesseract_cmd = r"C:\Program Files\Tesseract-OCR\tesseract.exe"above your OCR call, adjusted to your actual install path.ocrmypdfitself throws a PythonImportErrorwhile running (not during install). This is different from a missing-package error — it means the copy of Python that Homebrew installed alongsideocrmypdfhas an internal problem, unrelated to anything in your own script or virtual environment. It shows up occasionally on brand-new macOS releases, where Homebrew's pre-built package hasn't caught up with the OS yet. Trybrew update && brew upgradefirst — a newer build often fixes it. If it persists, this is a Homebrew packaging bug rather than something to fix in your own setup; it typically resolves within a few weeks as Homebrew republishes the package.- OCR output is garbled or full of misread characters. This is almost always the source image, not the library — a dim or skewed phone photo reads far worse than a flat 300 DPI scan. Re-scan if possible, or add
--deskew(OCRmyPDF) before OCR runs.
Part 5. FAQs
1. Is there a free way to OCR a PDF in Python?
Yes — all three combinations in this guide use free, open-source libraries. There's no purchase cost for pdf2image, pytesseract, PyMuPDF, EasyOCR, OCRmyPDF, Tesseract, or Ghostscript. Check individual license terms (PyMuPDF and Ghostscript are AGPL, with paid commercial licenses available) before bundling any of them into closed-source software you plan to sell.
2. Which Python OCR library is most accurate?
It depends more on your scan quality and language than the library itself. Tesseract and EasyOCR use different recognition models, and either can come out ahead depending on font, contrast, and image resolution — test both against a sample of your actual documents rather than assuming one wins outright.
3. Can I OCR a PDF in Python without installing Tesseract?
Yes — use PyMuPDF with EasyOCR instead. EasyOCR bundles its own recognition models through pip, so it's the only method in this guide that doesn't require a separately installed OCR engine.
4. Does OCRmyPDF change the original scanned image?
By default, no — it only adds a text layer. The visible page keeps looking like the original scan. If you add --deskew, --rotate-pages, or image-optimization flags, those do modify the page image itself (straightening or re-encoding it) even though the text layer addition alone does not.
5. How do I keep page boundaries when extracting OCR text with Python?
Add a separator such as a form-feed character (\f) or a labeled page number after each page in your loop. Otherwise, concatenating page strings can run the last word of one page into the first word of the next. Keep the searchable PDF as well if you need to map text back to its page image.
Conclusion
Which OCR PDF Python method to use comes down to what you need out the other end: pdf2image + pytesseract for a quick text dump, PyMuPDF + EasyOCR when you can't install system binaries, or OCRmyPDF when the deliverable needs to be a real searchable PDF. For everything short of a scripted pipeline, UPDF skips the OS-specific setup entirely — install once on Windows, an Apple-chip Mac, iPhone, or Android, and OCR is a couple of taps away.
Download UPDF for free to OCR your own scanned PDF — installation is free, and Pro is available when you need batch processing or watermark-free export.
Windows • macOS • iOS • Android 100% secure





 Bruna Almeida
 Engelbert White

 Delia Meyer