Every user has their confidential or important data saved in the form of PDFs, Word, Excel, or any kind of format. To preserve the important data, many users prefer to password protect folder on Mac. In this article, we will address how to lock a folder on Mac to ensure the utmost security of your data stored in the folder.
Part 1: What Does it Mean to Lock a Folder on Mac?
A folder on Mac can contain multiple PDF files, photos, business contracts, invoices, or proposals. To ensure the security of your folder containing sensitive information or private data, it’s recommended to password protect folder on Mac. Locking the folder indicates that only those individuals can access your folder to whom you have provided the password.
Without knowing the password that you have created, no one can open the locked folder on your MacBook. It can save your data from copying or getting edited unnecessarily.
Part 2: Why Need to Lock a Folder?
There are multiple benefits of locking a folder on your MacBook. Read the following reasons to know why you should password protect folder on Mac:
- Sensitive information like business projects, invoices, and contracts should be kept secured on your MacBook to avoid any inconvenience in the end. For this, locking the folder is the best option.
- If your kids use your MacBook to play games, but they accidentally edit or delete your files, the only way to protect your data is by locking it in the folder. By doing so, your kids cannot access the locked folder, and all your files will be secured.
- Locking a folder is also necessary on the occasion when you give your MacBook for repairing purposes. In this situation, your confidential data will be secured during the repairing process.
- If you have your personal or family photos saved on your system, it's ideal for securing them through a locked folder. It will protect your personal photos from getting copied or accessed, especially if many people use your laptop on a daily basis.
Part 3: How to Lock a Folder on Mac with Disk Utility?
Mac constantly tries to upgrade its security and privacy to ensure a well-protected environment for its users. Disk Utility is the built-in feature of the Mac that allows the user to lock a folder on the Mac. For this, make sure to gather all your important files in the folder to secure them through Disk Utility. Read the following steps to learn how to put a password on a folder on Mac:
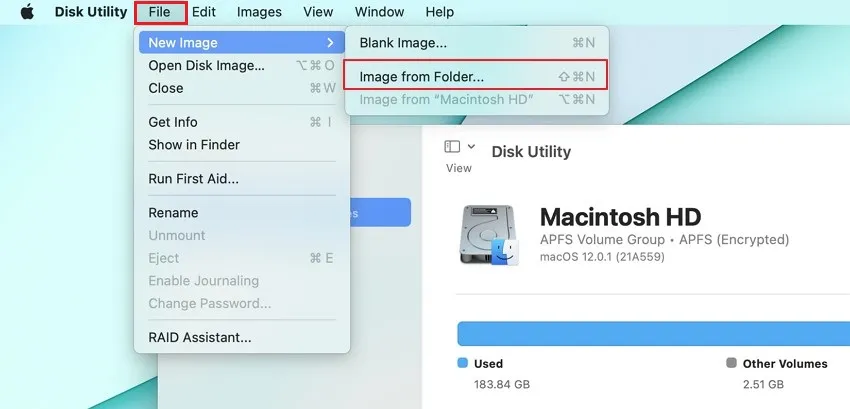
Step 1: Navigate to the feature of "Disk Utility" and open it. Go to its "Menu Bar" and click on the "File" button.
Step 2: Now select "New Image" and then click on "Image from Folder." Once done, choose the folder that you want to lock through a password.
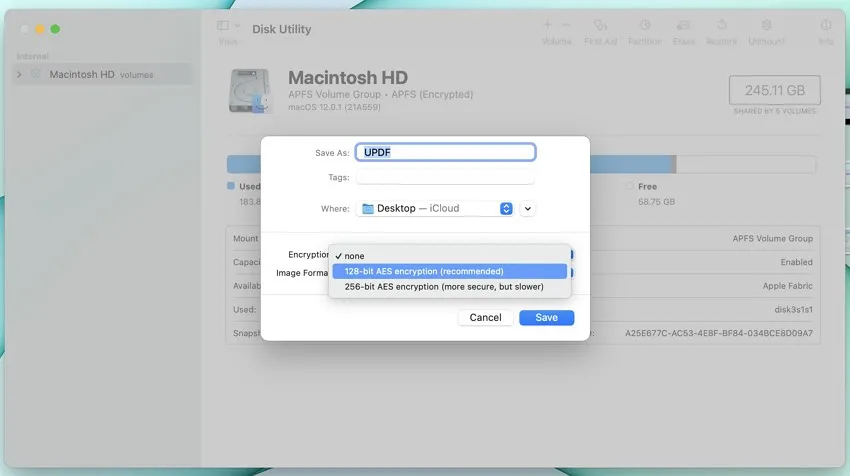
Step 3: Select the encryption level that is either 128-bit or 256-bit. Now enter the password through which you want to lock the folder. After verifying the password, you can also name the folder accordingly.
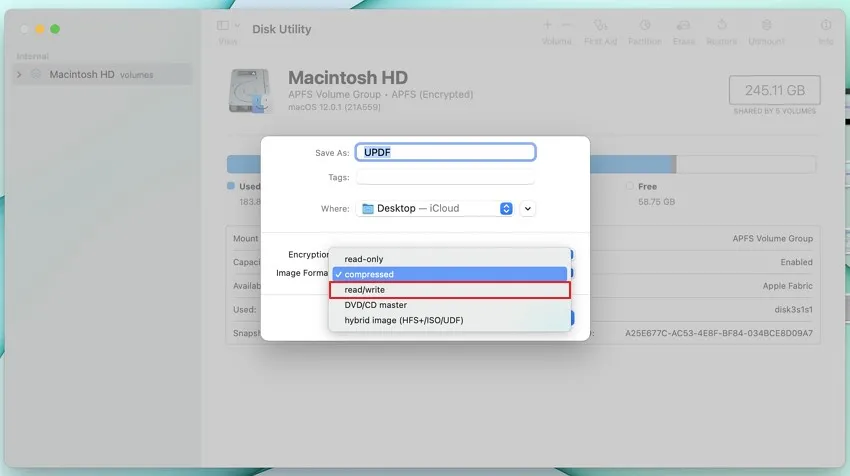
Step 4: In the section "Image Format," choose the "read/write" format from the menu. Once done, click on the "Save" button. The locked folder will be displayed next to the folder you have selected to password protect if you have not selected a different location for it to be saved.
Part 4: How to Password Protect PDF Mac without Disk Utility?
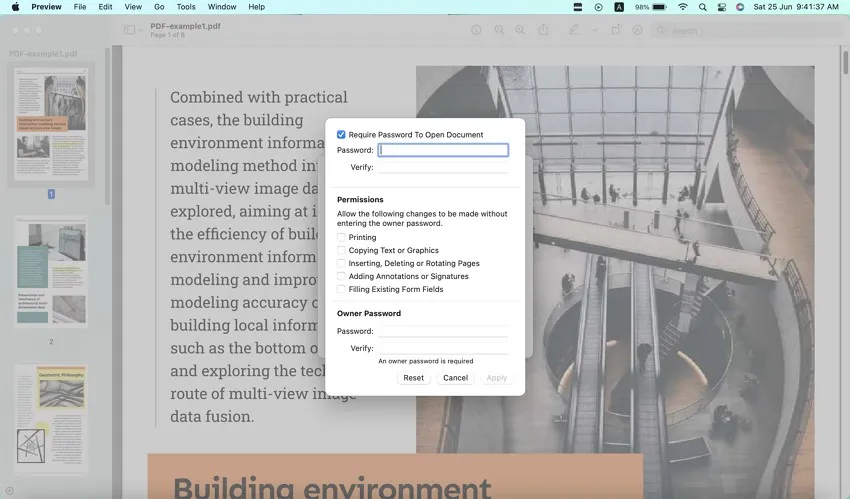
If you don't want to utilize the Disk Utility feature, you can still password protect your PDF file on Mac. You can use the Preview app to secure your data and information flawlessly. However, you can only password protect individual files through the Preview app, not an entire folder. In this section, we will use the Preview app to lock important files efficiently:
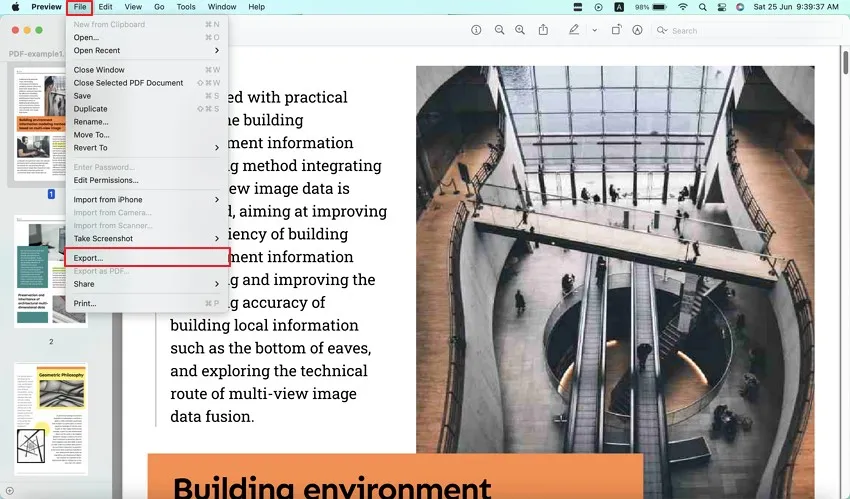
Step 1: Go to the Preview app on your MacBook and open the PDF file that you want to lock. Once done, go to the "File" button and select "Export" from the drop-down menu.
Step 2: At the bottom of the menu, locate the option of "Permissions." Tap on this option to set the file permissions and the password. Now enter a strong password and verify it. Once done, click on the "Apply" button.
Part 5: The Difference Between Locked and Sharing and Permissions of File Settings on Mac
When it comes to locking any folder on your MacBook, there are two options that you can utilize. First, you can lock your folder through an encrypted password. In the second scenario, you can protect your folder from getting unintentionally deleted or modified through a lock. Here, you don't require a password; instead, the system shows a warning notification whenever you try to delete the locked file or folder.
Sharing and permissions of file settings are usually adjusted when there are multiple users of a MacBook. In the sharing and permission settings, you can see three options that are read-only, write-only, and read and write. In the read-only option, you can only read the document and will be restricted from modifying it. Through the write-only setting, the folder becomes a drop box, and the person with this permission can only copy the items to the drop box but can’t access the files in that drop box.
On the other hand, through the read and write option, the user can perform both of the functions without any restriction. By choosing among these options, you can adjust the permissions according to the user.
Part 6: An Easy-to-use PDF Files Management Software for Mac - UPDF
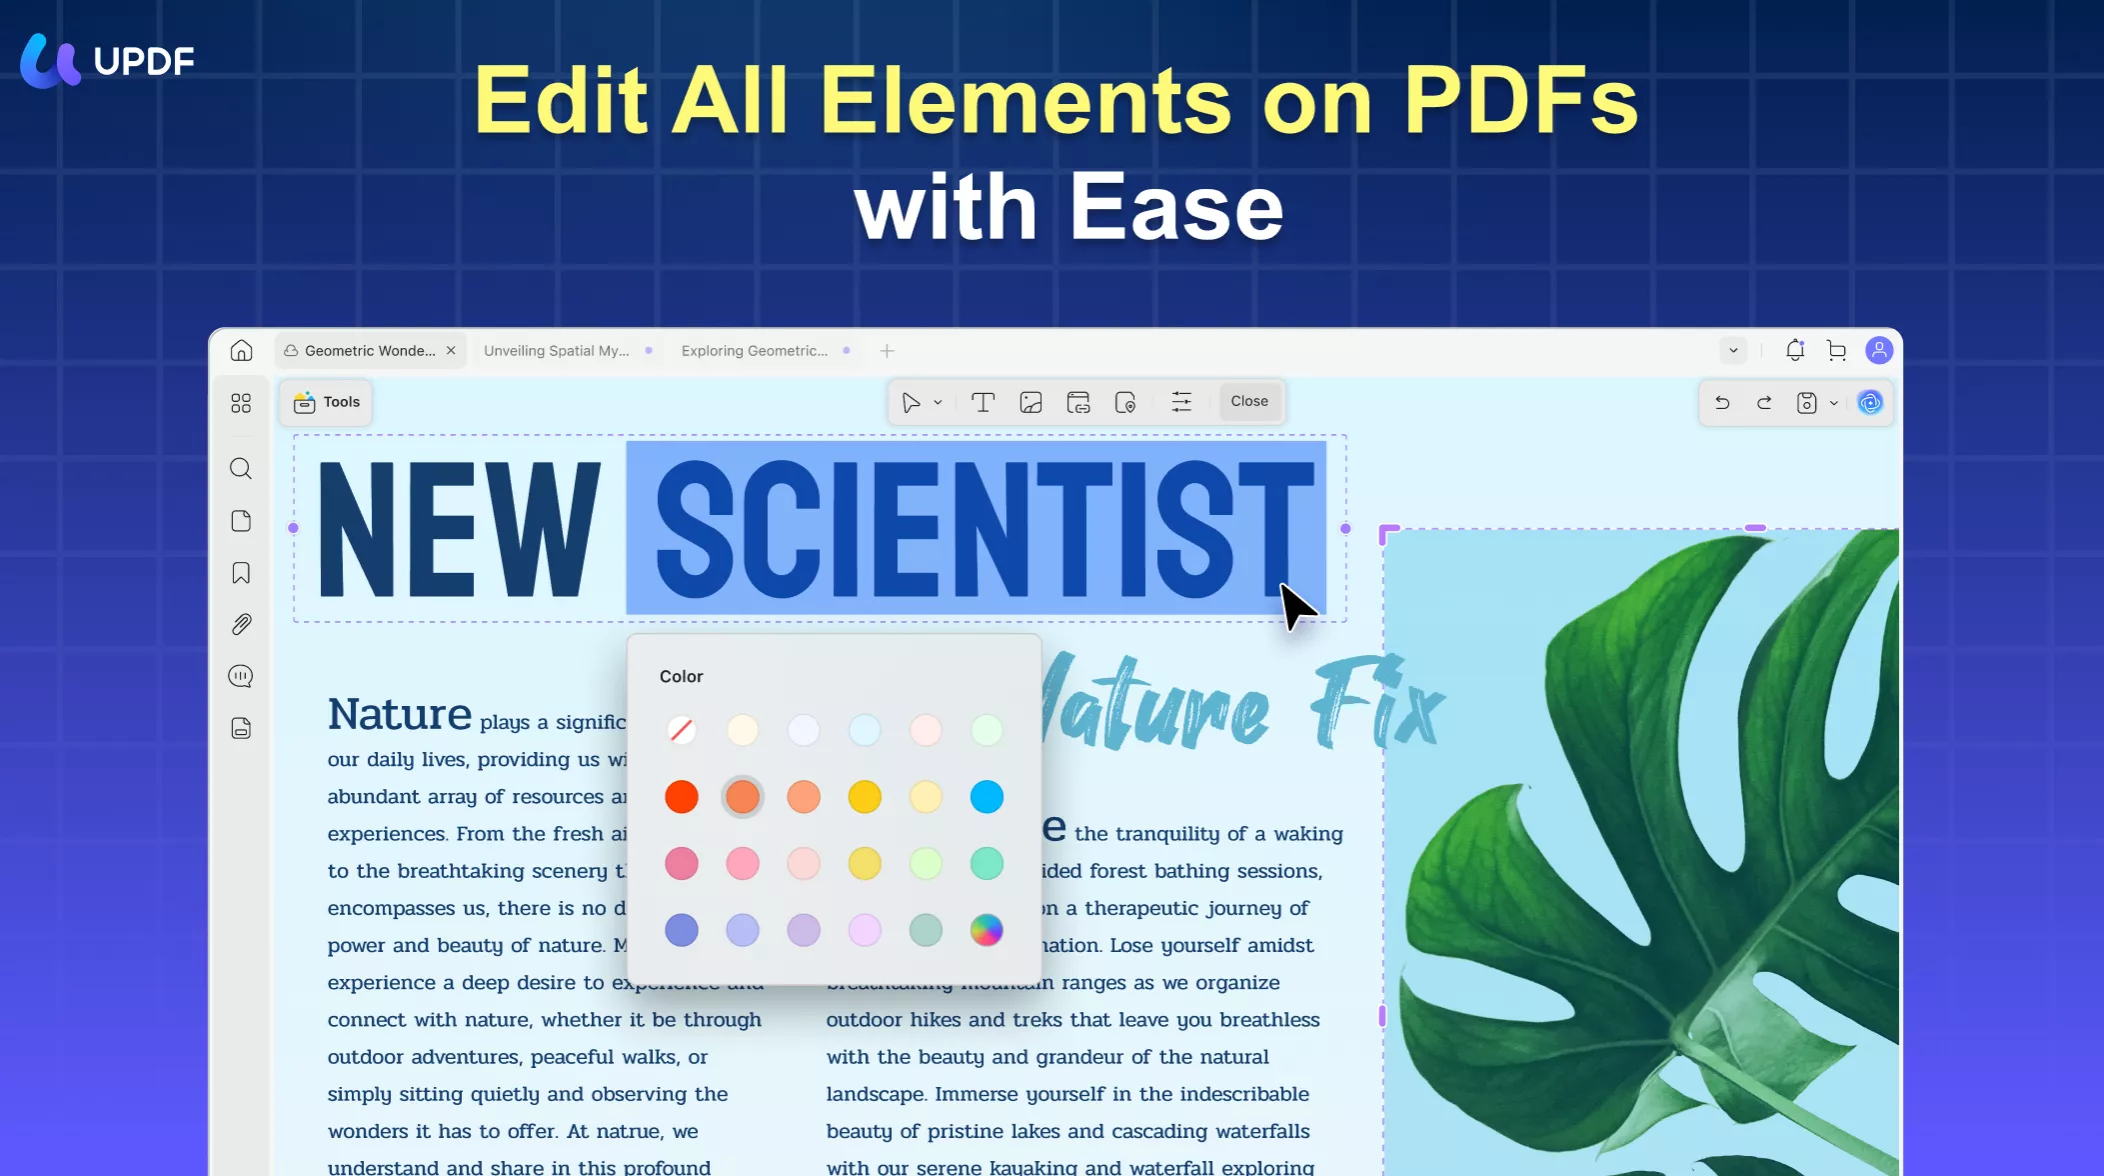
Are you looking forward to an ultimate tool to manage all your PDF files? UPDF for Mac is the complete toolbox for your PDF files as you can conduct several functions on the PDFs flawlessly. This well-trusted platform is famous for its clean and secured interface that offers multiple options to enhance PDF files. Moreover, you can use the UPDF tool to protect your document with a strong password instantly.
Windows • macOS • iOS • Android 100% secure
Main Features
- You can resize, rotate and crop the images in the PDF files effortlessly.
- UPDF gives you an option to add stickers and electronic signatures to the PDF files to make them look unique or customized.
- You can export and share your PDF files with a single click along with utilizing the related options.
- You can add comments and suggestions to your PDF files to include extra information on your document in a structured order.
- You can edit the text in your PDF document by adding, deleting, or modifying its font and size.
- You can convert PDF into 14 different formats, including Excel, Word, PowerPoint, Image(GIF, BMP, JPEG, PNG, TIFF) and etc.
Conclusion
In this age where security has become a major concern for all Mac users, it’s recommended to ensure the complete safety of your data by a password. This article has discussed in length how to password protect a folder on Mac and PDF with different methods. By doing so and choose a secure offline PDF editor - UPDF as double standard, you can ensure the privacy and safety of your sensitive information without getting worried.
Windows • macOS • iOS • Android 100% secure
 UPDF
UPDF
 UPDF for Windows
 UPDF for Mac
 UPDF for iPhone/iPad
 UPDF for Android
 UPDF AI Online
 UPDF Sign
 Edit PDF
 Annotate PDF
 Create PDF
 PDF Form
 Edit links
 Convert PDF
 OCR
OCR PDF to Word
 PDF to Image
 PDF to Excel
 Organize PDF
 Merge PDF
 Split PDF
 Crop PDF
 Rotate PDF
 Protect PDF
 Sign PDF
 Redact PDF
 Sanitize PDF
 Remove Security
 Read PDF
 UPDF Cloud
 Compress PDF
 Print PDF
 Batch Process
 About UPDF AI
 UPDF AI Solutions
 AI User Guide
 FAQ about UPDF AI
 Summarize PDF
 Translate PDF
 Chat with PDF
 Chat with AI
 Chat with image
 PDF to Mind Map
 Explain PDF
 Scholar Research
 Paper Search
 AI Proofreader
 AI Writer
 AI Homework Helper
 AI Quiz Generator
 AI Math Solver
 PDF to Word
 PDF to Excel
 PDF to PowerPoint
 User Guide
 UPDF Tricks
 FAQs
FAQs UPDF Reviews
 Download Center
 Blog
Blog Newsroom
 Tech Spec
 Updates
 UPDF vs. Adobe Acrobat
 UPDF vs. Foxit
 UPDF vs. PDF Expert




 Lizzy Lozano


 Grace Curry

 Enid Brown