Our computers store every kind of information that can be personal and professional. However, with this facility to store various files on the computer, data theft is a common problem that many users face daily. To avoid this, you should implement safety measures to protect all your information and data stored on your computer. Read this article to learn how to lock your MacBook so that all your files, folders, and other important information keeps secured and private in every circumstance.
Part 1: Why Need to Lock MacBook?
There are various causes and reasons why you should lock Mac. In this part, we will discuss a few reasons that will indicate why you need to lock the MacBook.
Prevent Data Theft
There are several cases and incidents of data theft. To prevent yourself from this mishap, the first step you can take is to lock your MacBook with a strong password. By doing so, no one can enter your system without your password.
Privacy Concerns
Privacy in this age is a huge concern for many users. To prevent the access of strangers to your MacBook, it’s important to lock your system. This will help you to easily save your photos and videos on your desktop without worrying about your privacy.
Secures Sensitive Information
Our MacBook consists of sensitive information such as confidential contracts, agreements, and invoices. To preserve your professionalism, you should secure such information by locking your system with a strong password.
Restricts the Data Editing
If your MacBook is not locked with a password, anyone can open your files and documents and can execute the modifications. That is why you should lock your MacBook to prevent this from happening.
Part 2: How to Lock MacBook with a Password?
To lock Mac, the first option is through a password. By creating a password on your MacBook, you can only enter it into your system through the set password. In this section, we will address how to lock MacBook through a password.
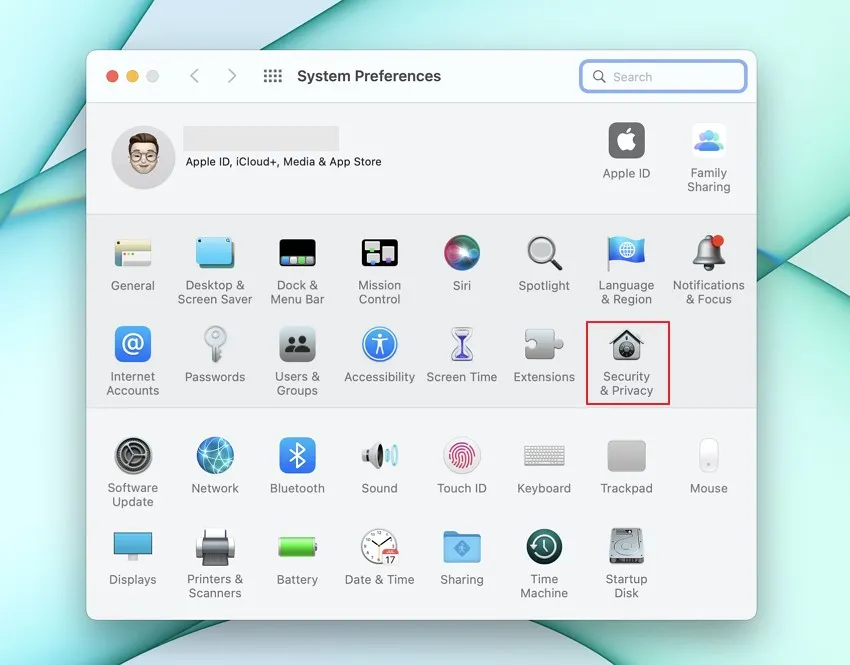
Step 1: Initiate by clicking on the "Apple" icon displayed in the top left corner. From there, open the menu of "System Preferences" by clicking on it. On its window, click on "Security and Privacy."
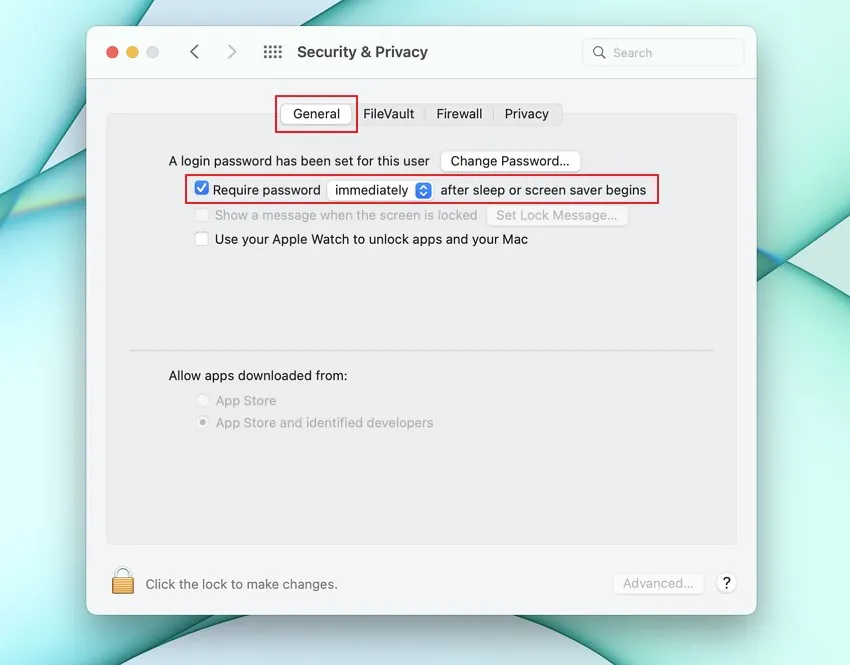
Step 2: Click on the "General" tab and then enable the option of "Require Password." Also, select the time range to require the password for login. You can choose "immediately" to lock your MacBook instantly when it goes to sleep or screen saver mode.
Part 3: How to Lock MacBook with Keyboard Shortcuts?
Another simple and instant way to lock MacBook Air or Pro is with keyboard shortcuts. By using the keyboard shortcuts, you can instantly lock your system within seconds through the combination of keys.
- Use Power Button: You can press the Power button to switch on your Mac or to wake it up from sleep mode. You can also press the power button for 1.5 seconds to put it in sleep mode. Also, to force shut down your Mac, keep holding this button until it gets turned off.
- To Put Mac into Sleep Mode: Press the "Option," "Command," and "Power" buttons simultaneously. Or, press the "Option," "Command," and "Media Eject" keys at the same time.
- To Put Display in Sleep Mode: Press the "Option," "Shift," and "Power" buttons and keys simultaneously. Or, press the "Control," "Shift," and "Media Eject" keys at the same time.
- To Lock Screen Instantly: Press the "Control," "Command," and "Q" keys together.
- To Log Out from macOS Account: Press the "Shift," "Command," and "Q" keys at the same time.
Part 4: How to Lock Mac Using Hot Corners?
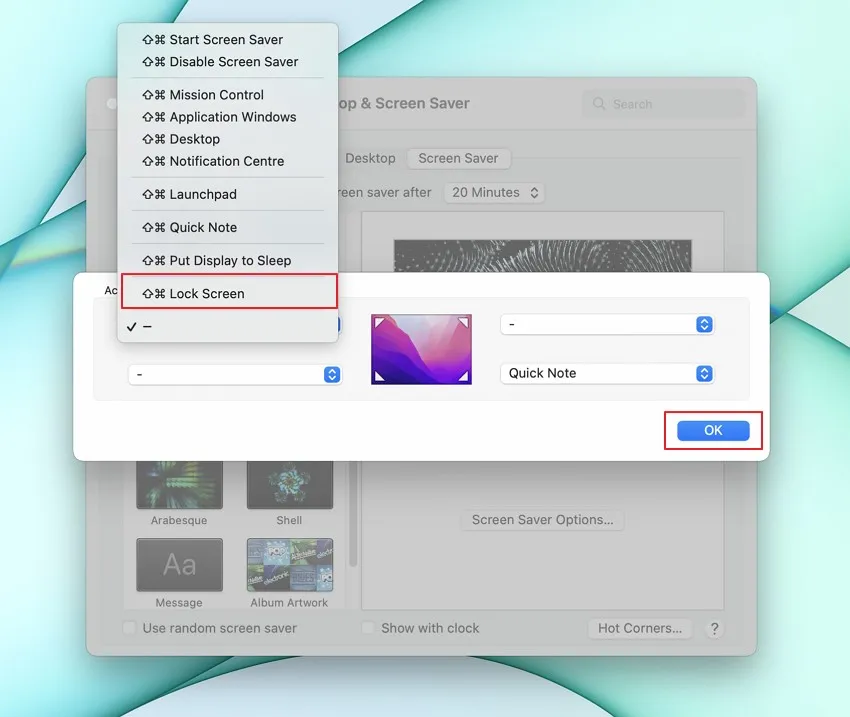
The Hot Corner feature lets you lock your Mac when you move your cursor to any particular corner of the screen. For this, you need to set a lock MacBook shortcut on your screen so that you can instantly lock your system without any difficulty:
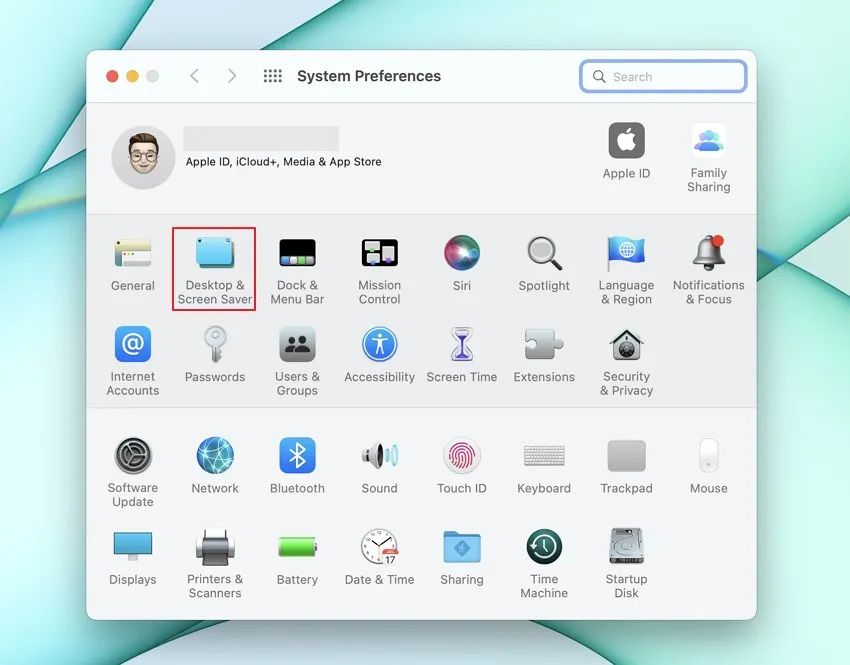
Step 1: Tap on the "Apple" icon displayed in the top left corner. Click on the "System Preferences" that will open its small window. From there, select "Desktop and Screen Saver."
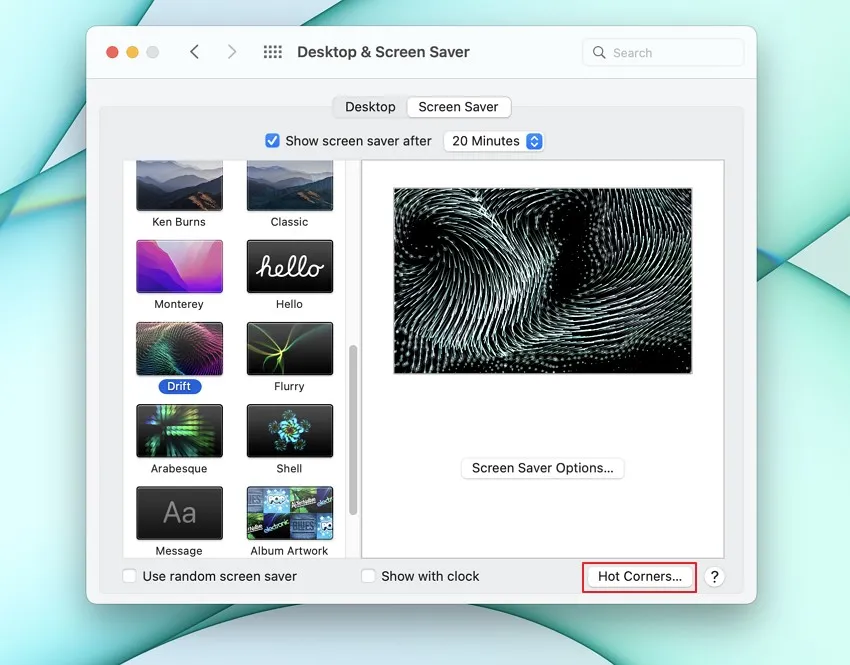
Step 2: Now, you see two tabs that are Desktop and Screen Saver. Go to the tab of "Screen Saver" and then click on "Hot Corners" displayed in the bottom right corner.
Step 3: Now, you can select any corner to lock your screen among four corners. Choose any corner side and then select the "Lock Screen" option from its drop-down menu. Once done, tap on the "OK" button.
Part 5: How to Lock Mac with Touch Bar?
MacBook Pro offers a feature called Touch Bar, through which you can also lock your screen easily. By customization, you can add the option of screen lock on the touch bar efficiently.
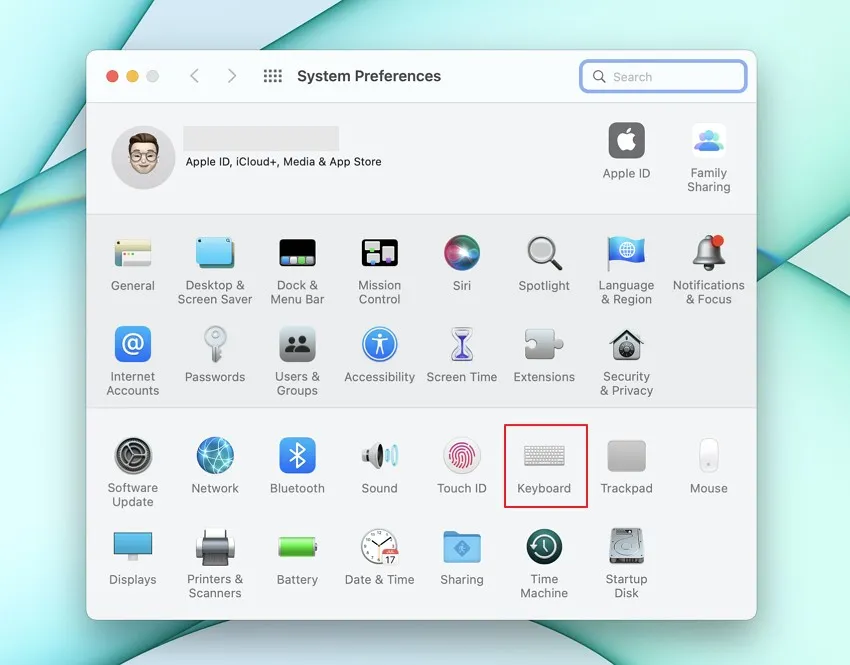
Step 1: Click on the "Apple" icon and choose the "System Preferences" from the drop-down menu. On its window, select the option of "Keyboard."
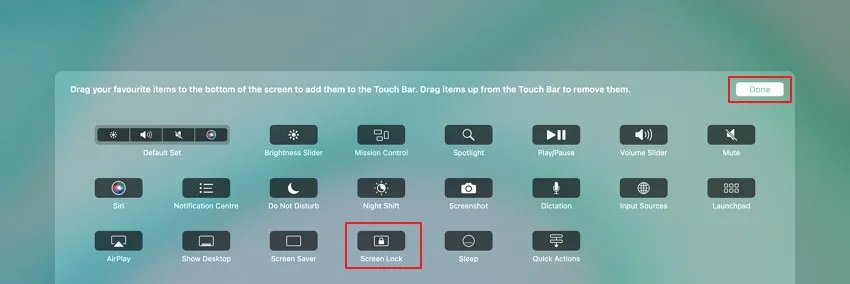
Step 2: A new window will display from which click on "Customize Control Strip" given at the bottom. Here, select the option of "Screen Lock" and drag it to the end of the screen to add it to the touch bar. Now, click on the "Done" button to confirm the process.
Part 6: FAQs about Locking MacBook
1. What is the lock button on Mac?
The lock button is the power button that is available on the top-right side of your keyboard, but it does not lock the Mac. This button can put your Mac to sleep or can be used to wake it up. You can also use this button to switch on or force shut down your MacBook instantly.
2. Does the locking screen put Mac to sleep?
Locking and putting Mac to sleep are two different options. By locking your MacBook, the background apps and activities are still running, and it consumes the energy of your system constantly. However, by outing Mac to sleep, all the background activities automatically stop and consumes relatively less energy from your system.
3. How do I lock my Mac without turning it off?
To lock your Mac without making it turn off, you can use the keyboard shortcuts. Press "Control + Command + Q" keys to lock your system without turning it off.
4. Can I lock apps on Mac?
Use the AppLocker tool to lock your apps on the MacBook easily. This tool can be used to lock your apps through a password so that anyone who is trying to open an app on your MacBook needs your permission.
Part 7: A Stunning and Delightful PDF Reader and Editor on Mac – UPDF
Most Mac users handle PDF files on a daily basis. To manage PDF files on your MacBook with ease, you should try an exceptional PDF tool which is called UPDF for Mac, through which you can perform every little function in an enhanced ecosystem.
Windows • macOS • iOS • Android 100% secure
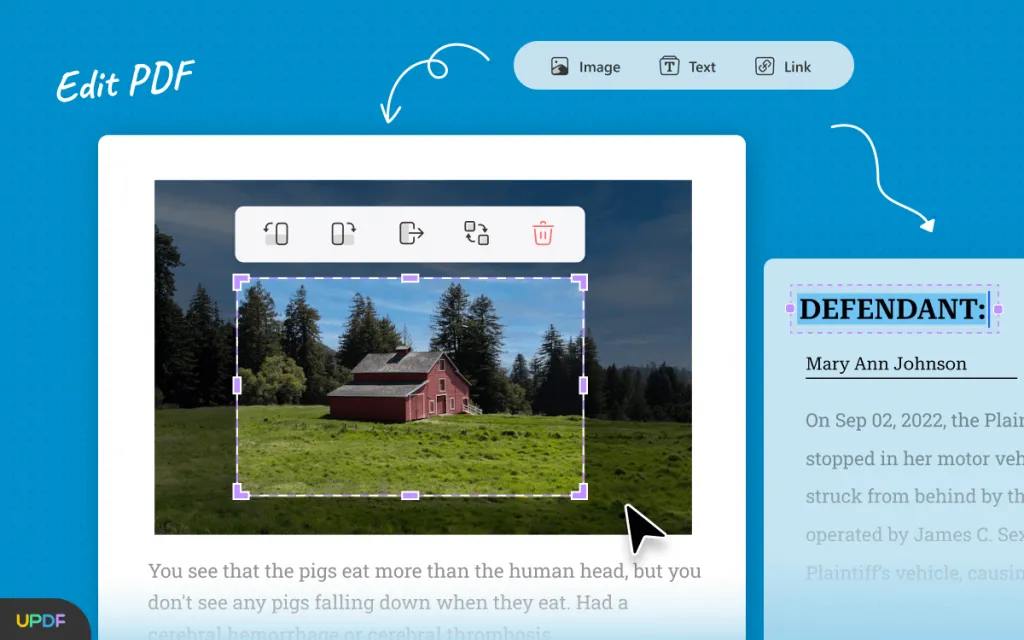
Its key features include a text box, page organizer, annotator, and password protector. By exploring these options, you can flawlessly add extra information to your documents in an appealing manner.
Furthermore, you can add elements to make your PDF document look captivating such as stickers and signatures. You can use its pre-made stickers and can instantly add them to your file. Thus, it’s an excellent tool that offers every feature cost-effectively.
Advantages of UPDF Mac PDF Editor
- It shows compatibility with major platforms like Windows, MacBook, iOS, and Android.
- The user interface is simple yet stunning so that users can enjoy editing PDF files.
- It does not add watermarks on the edited PDF files and offers options to export and share the documents with a single click.
- Edit images on the PDF documents. Rotate, extract, and crop images easily.
- The advanced OCR function allows you to easily edit scanned PDF documents.
Conclusion
Everyone should take necessary measures to enhance the security and privacy levels of their systems. This article can practically help you with how to lock MacBook Pro and Air using multiple methods. By doing so, you can maintain the safety of your system and can keep all your stored data and information protected. Besides of it, choosing the right app will double secure your files also, UPDF - an all-in-one offline PDF editor solves your problems and provides the best users experience.
Windows • macOS • iOS • Android 100% secure
 UPDF
UPDF
 UPDF for Windows
 UPDF for Mac
 UPDF for iPhone/iPad
 UPDF for Android
 UPDF AI Online
 UPDF Sign
 Edit PDF
 Annotate PDF
 Create PDF
 PDF Form
 Edit links
 Convert PDF
 OCR
OCR PDF to Word
 PDF to Image
 PDF to Excel
 Organize PDF
 Merge PDF
 Split PDF
 Crop PDF
 Rotate PDF
 Protect PDF
 Sign PDF
 Redact PDF
 Sanitize PDF
 Remove Security
 Read PDF
 UPDF Cloud
 Compress PDF
 Print PDF
 Batch Process
 About UPDF AI
 UPDF AI Solutions
 AI User Guide
 FAQ about UPDF AI
 Summarize PDF
 Translate PDF
 Chat with PDF
 Chat with AI
 Chat with image
 PDF to Mind Map
 Explain PDF
 Scholar Research
 Paper Search
 AI Proofreader
 AI Writer
 AI Homework Helper
 AI Quiz Generator
 AI Math Solver
 PDF to Word
 PDF to Excel
 PDF to PowerPoint
 User Guide
 UPDF Tricks
 FAQs
FAQs UPDF Reviews
 Download Center
 Blog
Blog Newsroom
 Tech Spec
 Updates
 UPDF vs. Adobe Acrobat
 UPDF vs. Foxit
 UPDF vs. PDF Expert




 Enid Brown
 Delia Meyer