Every so often, you must have come across the need to scan a few pages from a document to save extra space in your office, or you want to keep a few pages with you. But as time passed, now you are required to replace some data or text with new information. For a scanned PDF document, you are unable to make any edits or changes.
This article will explore various authentic and reliable solutions and tools on how to edit a scanned document on Mac without disrupting the original format.
Part 1. How to Edit a Scanned PDF Document on Mac with UPDF
UPDF for Mac is a flexible and innovative PDF editor and can be downloaded on your Mac. With its unmatching user interface and quick processing system, users can read PDF, annotate and merge PDFs without prior experience. It is the best premium PDF editor, which offers advanced features and a one-stop solution for PDF users. You can try it out by clicking the download button below.
Windows • macOS • iOS • Android 100% secure
Key Features of UPDF
Below are some of the best features UPDF offers its customers to experience premium comfort in managing PDF files:
- Protect PDF Files: UPDF provides its user with the feature of password protecting their important PDF files so that their confidential data remains safe and secure while sending it across the internet.
- Crop Pages of PDF Files: While using UPDF, users can crop various PDF pages completely or partially. It allows you to eliminate unnecessary information and keep important data aside.
- Conversion of PDF Files: UPDF supports the conversion of PDF files in different formats such as Word, PowerPoint, CSV, and so on. Instead of copy-pasting the whole file and lost the format, you can convert a PDF into different formats on Mac.
- Edit PDF Files: Users can edit the text, images, links and add watermarks, backgrounds, headers and footers according to the personal needs.
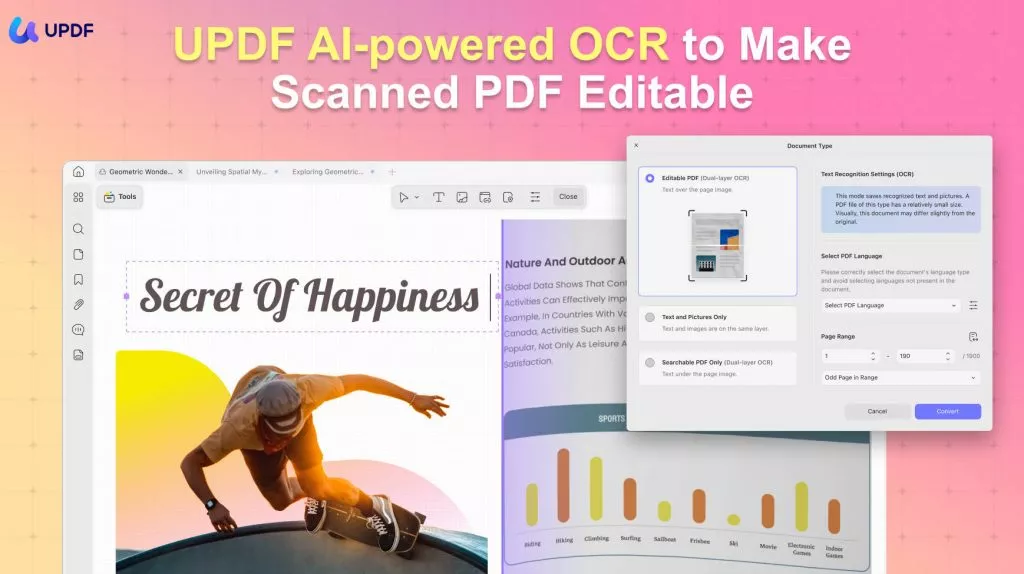
- OCR feature: UPDF supports OCR technology which makes scanned PDFs searchable and editable.
Edit a Scanned PDF on Mac with the OCR Feature
Whenever you have a scanned PDF, you will have to convert it to an editable and searchable PDF document so that you can easily make changes to the document's content. To achieve this feat, UPDF provides a dedicated OCR feature that you can use on your Mac. To understand how it is used, look into the details provided below:
Step 1: Open PDF to Access OCR Tool and Set Layout for OCR PDF
Open the PDF document and click on the "OCR" feature in "Tools" on the left panel.
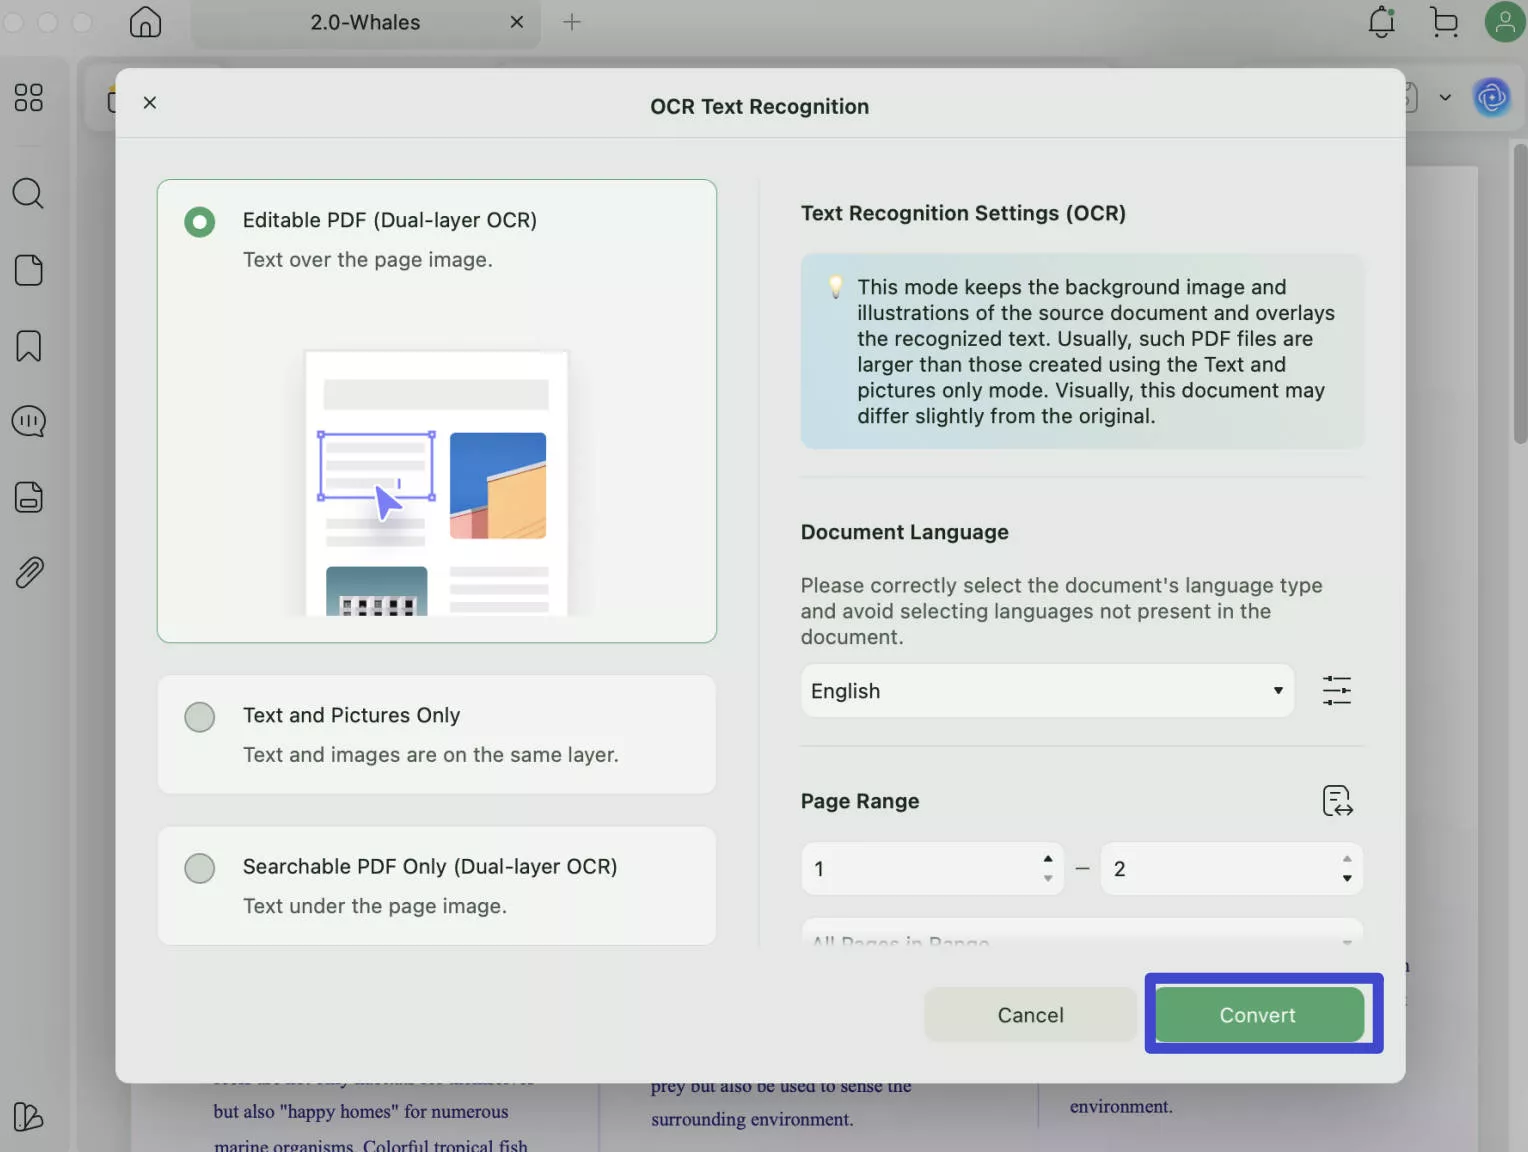
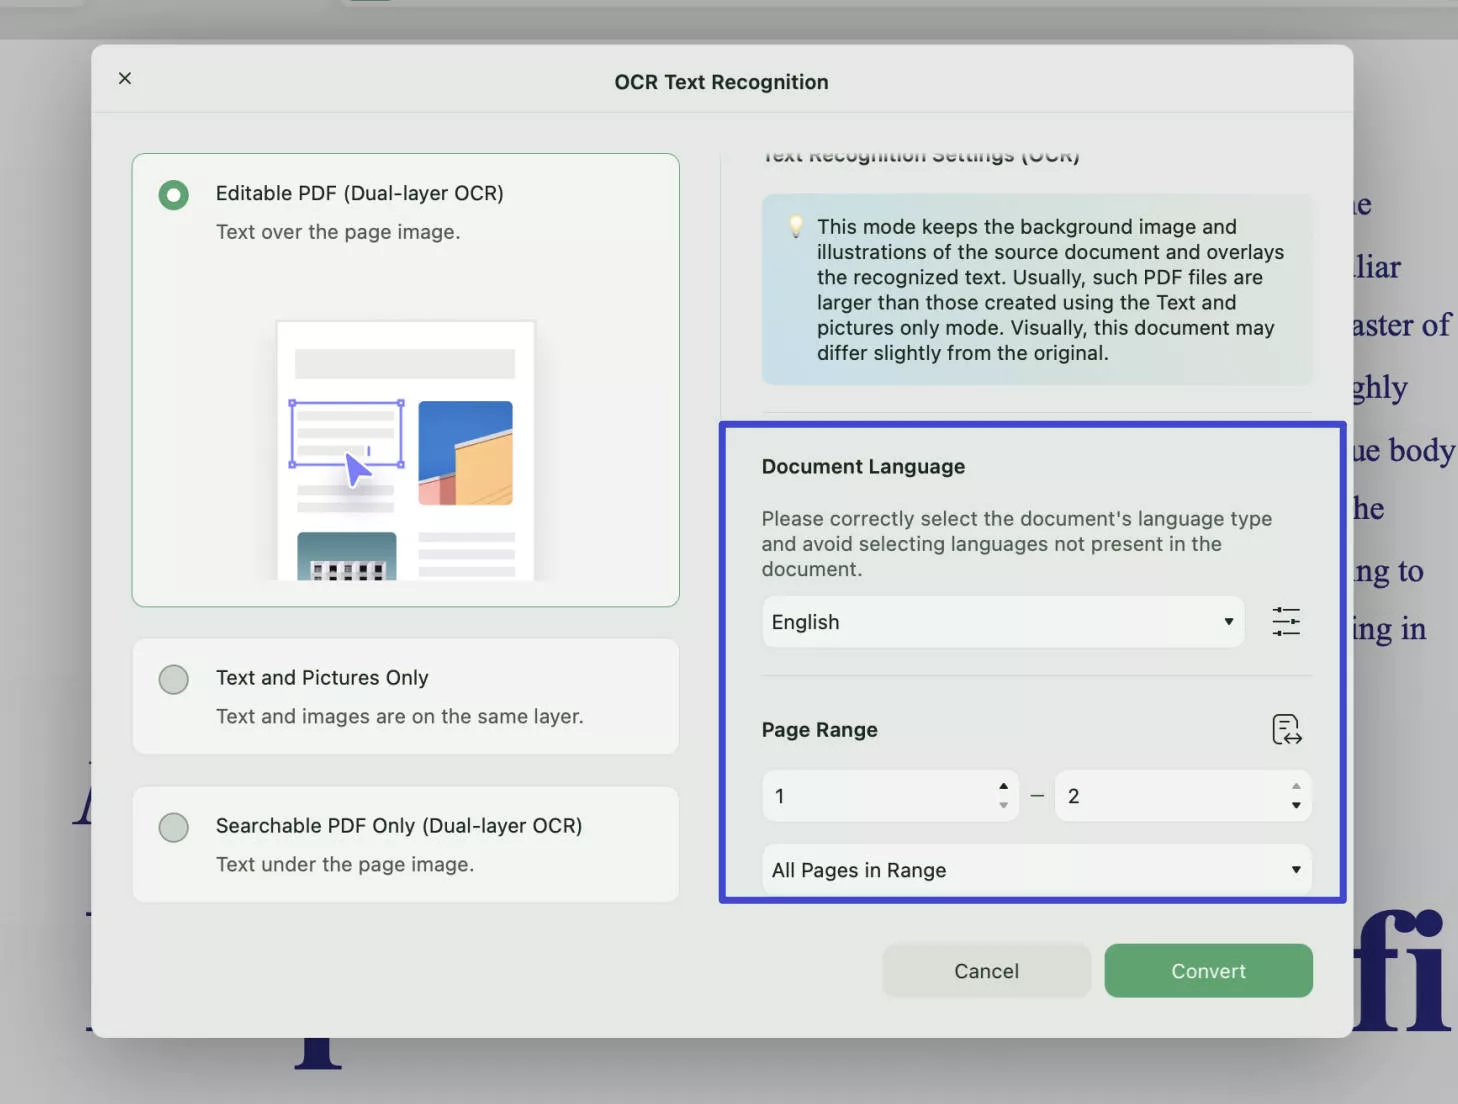
Proceed to set other parameters for performing OCR on the PDF document. Firstly, you need to choose the specific mode for your needs.
- Editable PDF: This option embeds the recognized text and images directly into the document, yielding a compact file. The final look may deviate slightly from the original.
- Text and Picture Only: The source’s background and illustrations are preserved, with the recognized text overlaid on top. Resulting files are typically larger than those from the Editable PDF option, and the visual appearance can differ marginally.
- Searchable PDF Only: A full-page image is retained, while the recognized text is hidden beneath it in an invisible layer. The output remains virtually indistinguishable from the original.
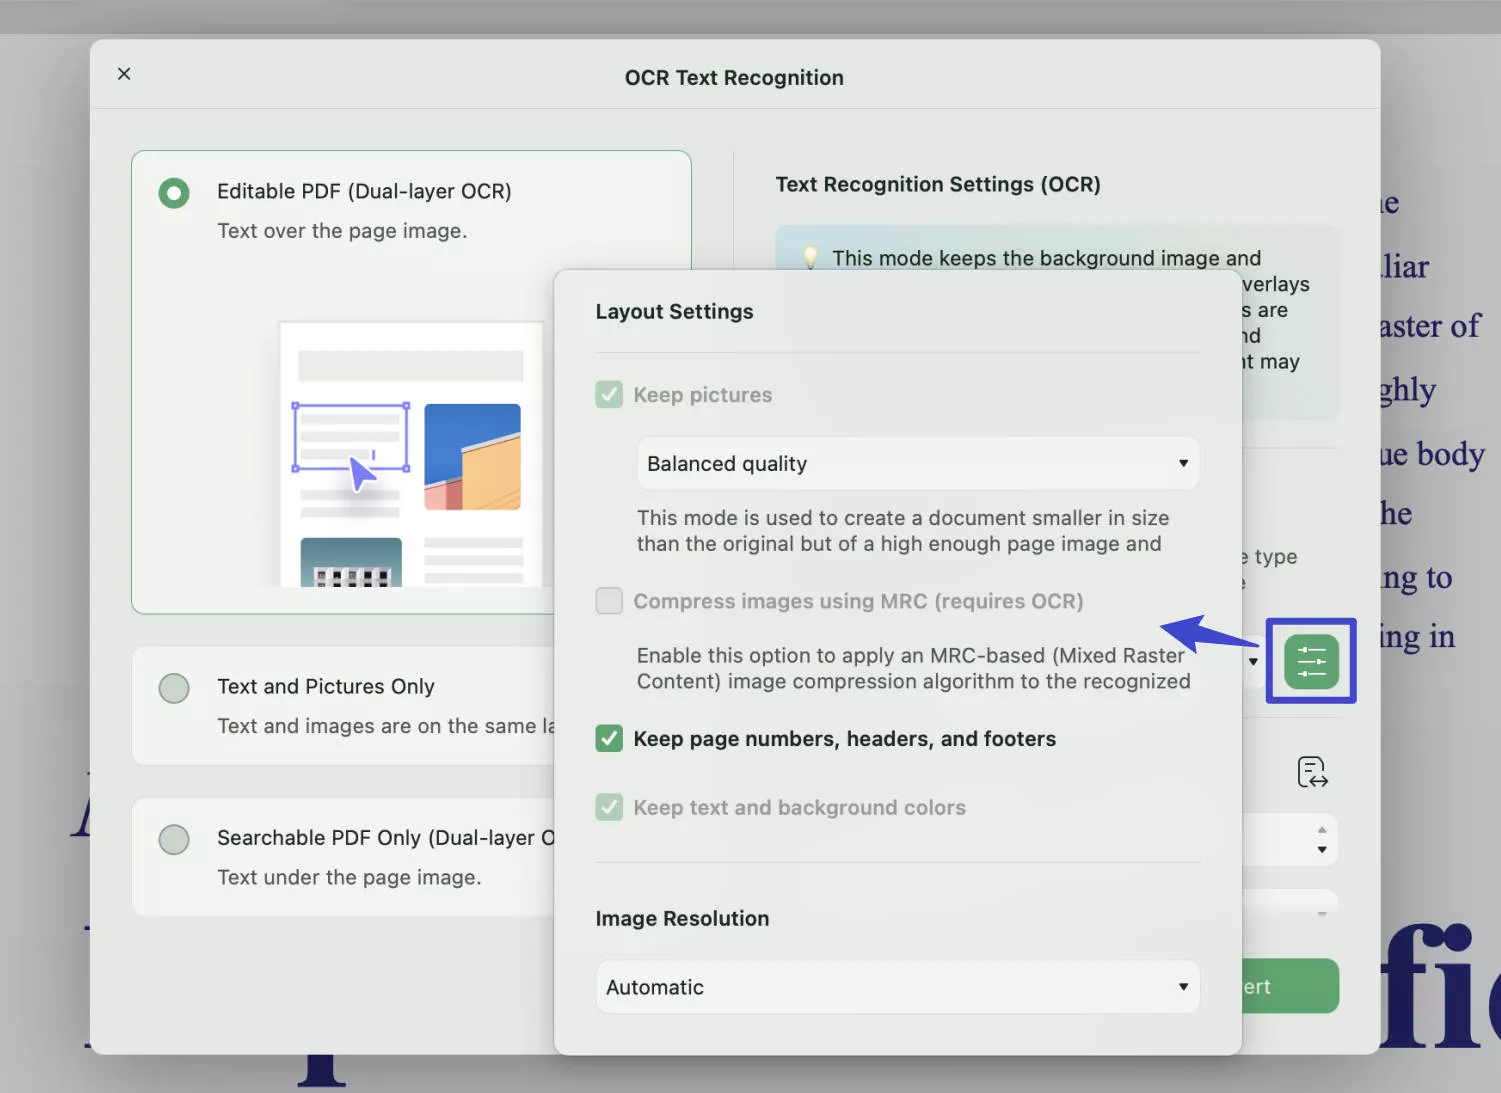
Following this, if you wish to define the Advanced Layout settings, select the "Gear" icon to find the "Layout Settings". Check any option you want to ensure in the layout of your converted PDF.
Step 2: Provide Language and Resolution Details
Next, you can select any of the 38 languages from the list available in the "Document Language" option. You should choose the language that matches the source language. After selecting it, set the "Page Range" where you wish to apply the OCR on Mac.
Step 3: Perform OCR and Edit a Scanned PDF on Mac
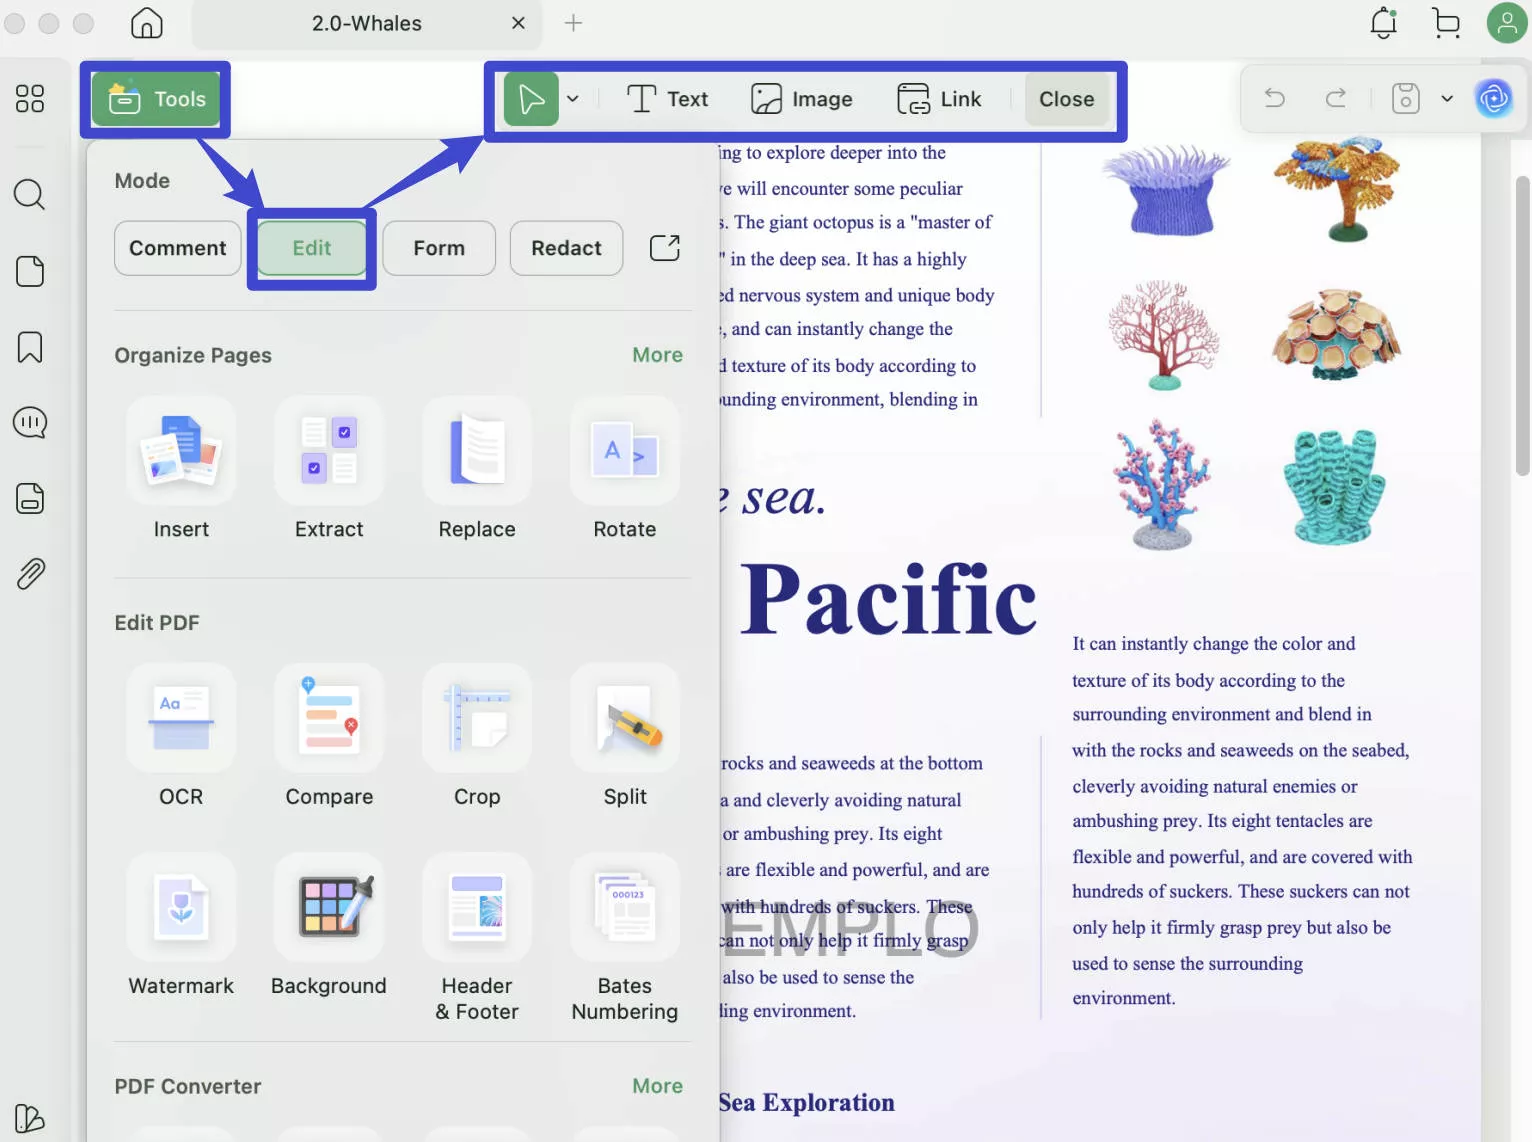
Then, tap "Convert" to execute the conversion process. You can save the converted PDF document in a respective location. As it saves and opens after conversion, you can edit the scanned PDF document with the left editing tools available on UPDF.
Windows • macOS • iOS • Android 100% secure
Also Read: How to Edit a Downloaded PDF on Mac? (Step by Step)
Part 2. How to Edit a Scanned PDF on Mac with Adobe Acrobat
Adobe Acrobat provides a premium experience while working on your PDF documents. Its versatile feature and powerful application allow users to create and edit PDF files quickly. Adobe Acrobat also allows users to edit PDF documents, such as a scanned PDF document on Mac, using the OCR feature available on Adobe Acrobat.
Below are some easy and simple process steps on how to edit a scanned PDF on Mac with the OCR feature:
Step 1: Access the official website of Adobe Acrobat to download the tool on your MacBook. After downloading and installing the tool, launch it on your Mac. Now, tap on the "File" tab and choose the "Open" option to add your scanned PDF file.
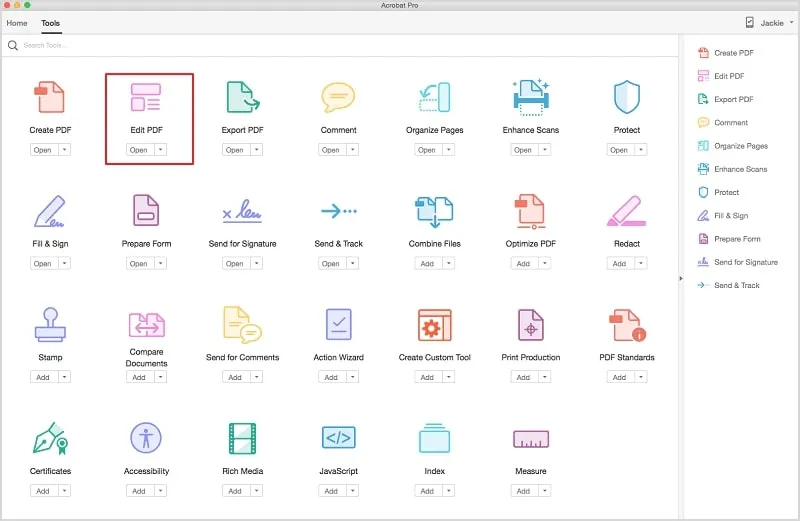
Step 2: Next, access the "Tools" of Adobe Acrobat Mac and choose the "Edit PDF" tool. After selecting this tool, Adobe will automatically apply the OCR feature to your scanned document to make it editable.
Step 3: You can now edit or format the text of your scanned PDF. Along with that, you can apply annotations to your file. After completing all the required edits, tap on the "File" tab again and choose the option of "Save As". Following this, select the destination of your edited PDF file and better to rename it to differentiate it from the original file.
Part 3. How to Edit Scanned PDF on Mac with Online Tool
Online OCR is a free PDF converter that is compatible with macOS. It also offers a wide variety of features, such as it supports different languages as well as it offers different input formats. Online OCR is an online tool, meaning users are not required to download the tool. They can search it up and convert their scanned PDF without any hassle. Follow the steps to know how to edit a scanned PDF document on Mac with the Online OCR tool:
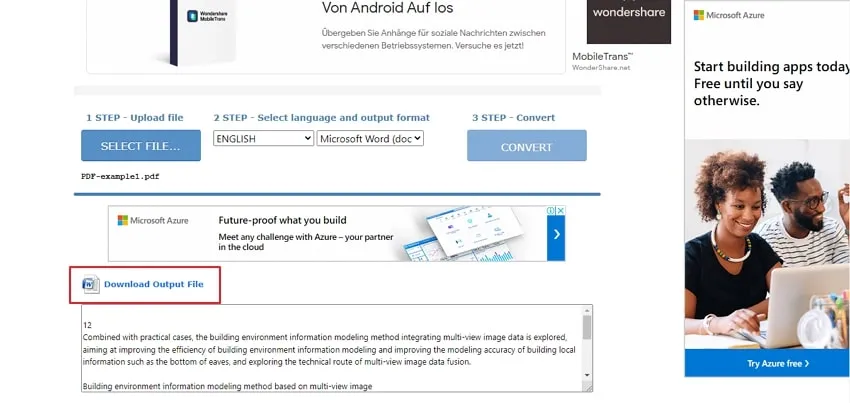
Step 1: Search Online OCR tool on your Mac with Safari or Google Chrome. Next, click the "Select File" button to upload the file to OCR Online. Ensure your PDF file is less than 15 MB, as the tool only supports files up to the range mentioned.
Step 2: Choose the language of the file from the drop-down menu and select the output format of the file as MS Word.
Step 3: Click on the "Convert" button to convert the scanned PDF document into an editable Word file. Next, you can edit the converted file content in the output box provided by the tool. Once done with the edits, you can tap on the "Download Output File" option to export your file.
FAQ: Can I use Preview to edit scanned PDF?
Unfortunately, it can't edit a scanned PDF on Mac with Preview nor ordinary PDF. Mac users are always searching for ways to efficiently edit their PDF files because most of the available software is incompatible with the new macOS. This is why UPDF is one of the best options for editing scanned PDF editor software for Mac users out of all.
Final Words
The popularity of the PDF format due to its security and compatibility makes it one of the most widely used formats in the world. From important business documents to million dollars online receipts are being shared across the internet in PDF format. However, the wide use of PDF also creates a demand for a reliable PDF editor, especially for Mac users.
In that regard, UPDF for Mac is a reliable and convenient solution to edit, annotate, secure and share your PDF files. Download it today to enjoy a hand, one-stop solution for your PDF documents.
Windows • macOS • iOS • Android 100% secure
 UPDF
UPDF
 UPDF for Windows
 UPDF for Mac
 UPDF for iPhone/iPad
 UPDF for Android
 UPDF AI Online
 UPDF Sign
 Edit PDF
 Annotate PDF
 Create PDF
 PDF Form
 Edit links
 Convert PDF
 OCR
OCR PDF to Word
 PDF to Image
 PDF to Excel
 Organize PDF
 Merge PDF
 Split PDF
 Crop PDF
 Rotate PDF
 Protect PDF
 Sign PDF
 Redact PDF
 Sanitize PDF
 Remove Security
 Read PDF
 UPDF Cloud
 Compress PDF
 Print PDF
 Batch Process
 About UPDF AI
 UPDF AI Solutions
 AI User Guide
 FAQ about UPDF AI
 Summarize PDF
 Translate PDF
 Chat with PDF
 Chat with AI
 Chat with image
 PDF to Mind Map
 Explain PDF
 Scholar Research
 Paper Search
 AI Proofreader
 AI Writer
 AI Homework Helper
 AI Quiz Generator
 AI Math Solver
 PDF to Word
 PDF to Excel
 PDF to PowerPoint
 User Guide
 UPDF Tricks
 FAQs
FAQs UPDF Reviews
 Download Center
 Blog
Blog Newsroom
 Tech Spec
 Updates
 UPDF vs. Adobe Acrobat
 UPDF vs. Foxit
 UPDF vs. PDF Expert




 Enola Miller
 Grace Curry
 Enid Brown
