You find UPDF has an enterprise plan, but may have many questions in your mind like what are the differences between individual and enterprise plans, how to purchase the enterprise plan, and how to use it. To help you make sense, we include all you want to know in this article. To those who prefer video guide, you can watch it here.
Before starting, if you still do not have UPDF on your device, you can click the button below to download it and give it a try. We also put the quick steps and links for you to purchase and use the UPDF enterprise plan if you find UPDF is what you need after testing.
Windows • macOS • iOS • Android 100% secure
Step 1. Purchase the UPDF Enterprise Plan by clicking this link or contact sales at [email protected] if you need to order more than 10 licenses.
Step 2. Create a company by this link.
Step 3. Enter UPDF Management Dashboard to manage your licenses.
1. Differences between the Individual Plan and Enterprise Plan
When you compare the plans for the Individual and Enterprise on the UPDF Price page, you will find the plan options are the same for these two plans. Whether Individual plans or Enterprise plans, they both have plans for UPDF only, AI Only, and UPDF plus AI. Moreover, the features for UPDF and AI are the same for these two plans. However, the enterprise plan is more expensive than the individual plan. So you may feel confused about their differences. No worry, you can have a clear understanding of what are their differences and why the UPDF Enterprise Plan is more expensive after checking the below comparison.
For Individual Plan
- Personal Use: If you are using an Individual Plan on UPDF and AI, this exclusively stands appropriate in conditions where you require the tool for personal use.
- User Limit: Individual accounts only allow a single user to utilize the services of UPDF and AI.
- Device Limit: Furthermore, you can log into UPDF and AI with the same account on 4 different devices simultaneously, which includes 2 desktops and 2 mobiles.
Check the price and upgrade now >>
For Enterprise Plan
- Enterprise Management Dashboard: A comprehensive Enterprise Management Dashboard is available for the company that manages all the licenses, members, and the company's virtual assets, etc.
- Flexible License Management: With flexible management of licenses available, controlling the authorization and assigning duties gets much more straightforward.
- User Limit: There are no member limits for inviting to join a company. The package bought from UPDF generally covers the number of authorized and online users. For instance, if you bought 10 licenses, you are allowed to have 10 users online simultaneously. People who turnover from the company can damage your license count. For such cases, turning off their license and authorizing it to a new user is the right way to keep your licenses proficiently.
- Device Limit: Furthermore, users using the Enterprise Plan can use the service on three devices simultaneously, including 1 desktop and 2 mobiles. It clarifies that if the user wishes to activate their enterprise account on Mac, they will have to sign themselves out of the Windows account.
- Avatar: If you are using an enterprise account of UPDF, you will see an enterprise logo on the bottom right side of your logo. This will help you distinguish between a personal and an enterprise account.
Check the price and upgrade now>>
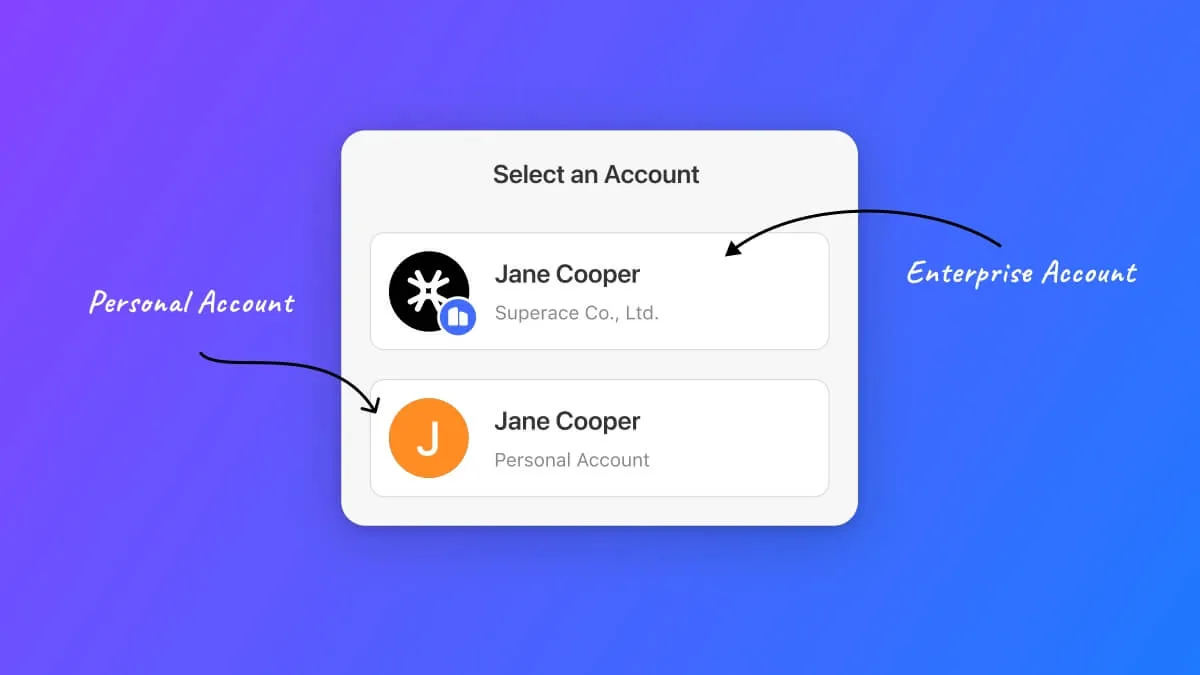
From the above comparison, you can see that the biggest difference between the Individual and Enterprise Plans is that the Enterprise Plan has the ability to manage the licenses by assigning, reassigning, and deactivating the licenses.
2. Purchase, Create a Company, and Redeem
After knowing the differences, you may decide to purchase the Enterprise plan. To ease the process, we will guide you to purchase, create, and redeem to activate the Enterprise Plans. And there are two options for you: One is to purchase the Enterprise Plan first and the other is to create a company first. We will introduce both guides to you.
2.1 Situation One: Purchasing the Enterprise Plan First
You can purchase the Enterprise Plan first and here is the guide.
Step 1: Finish the Purchase Process
While you are present on the Enterprise Plan purchasing page, you need to select the products, There are options: UPDF, AI Assistant, and UPDF Sign. For example, if you want to buy UPDF, you can stay in the "UPDF" section. Now, you can choose UPDF Yearly Plan or UPDF Lifetime Plan.
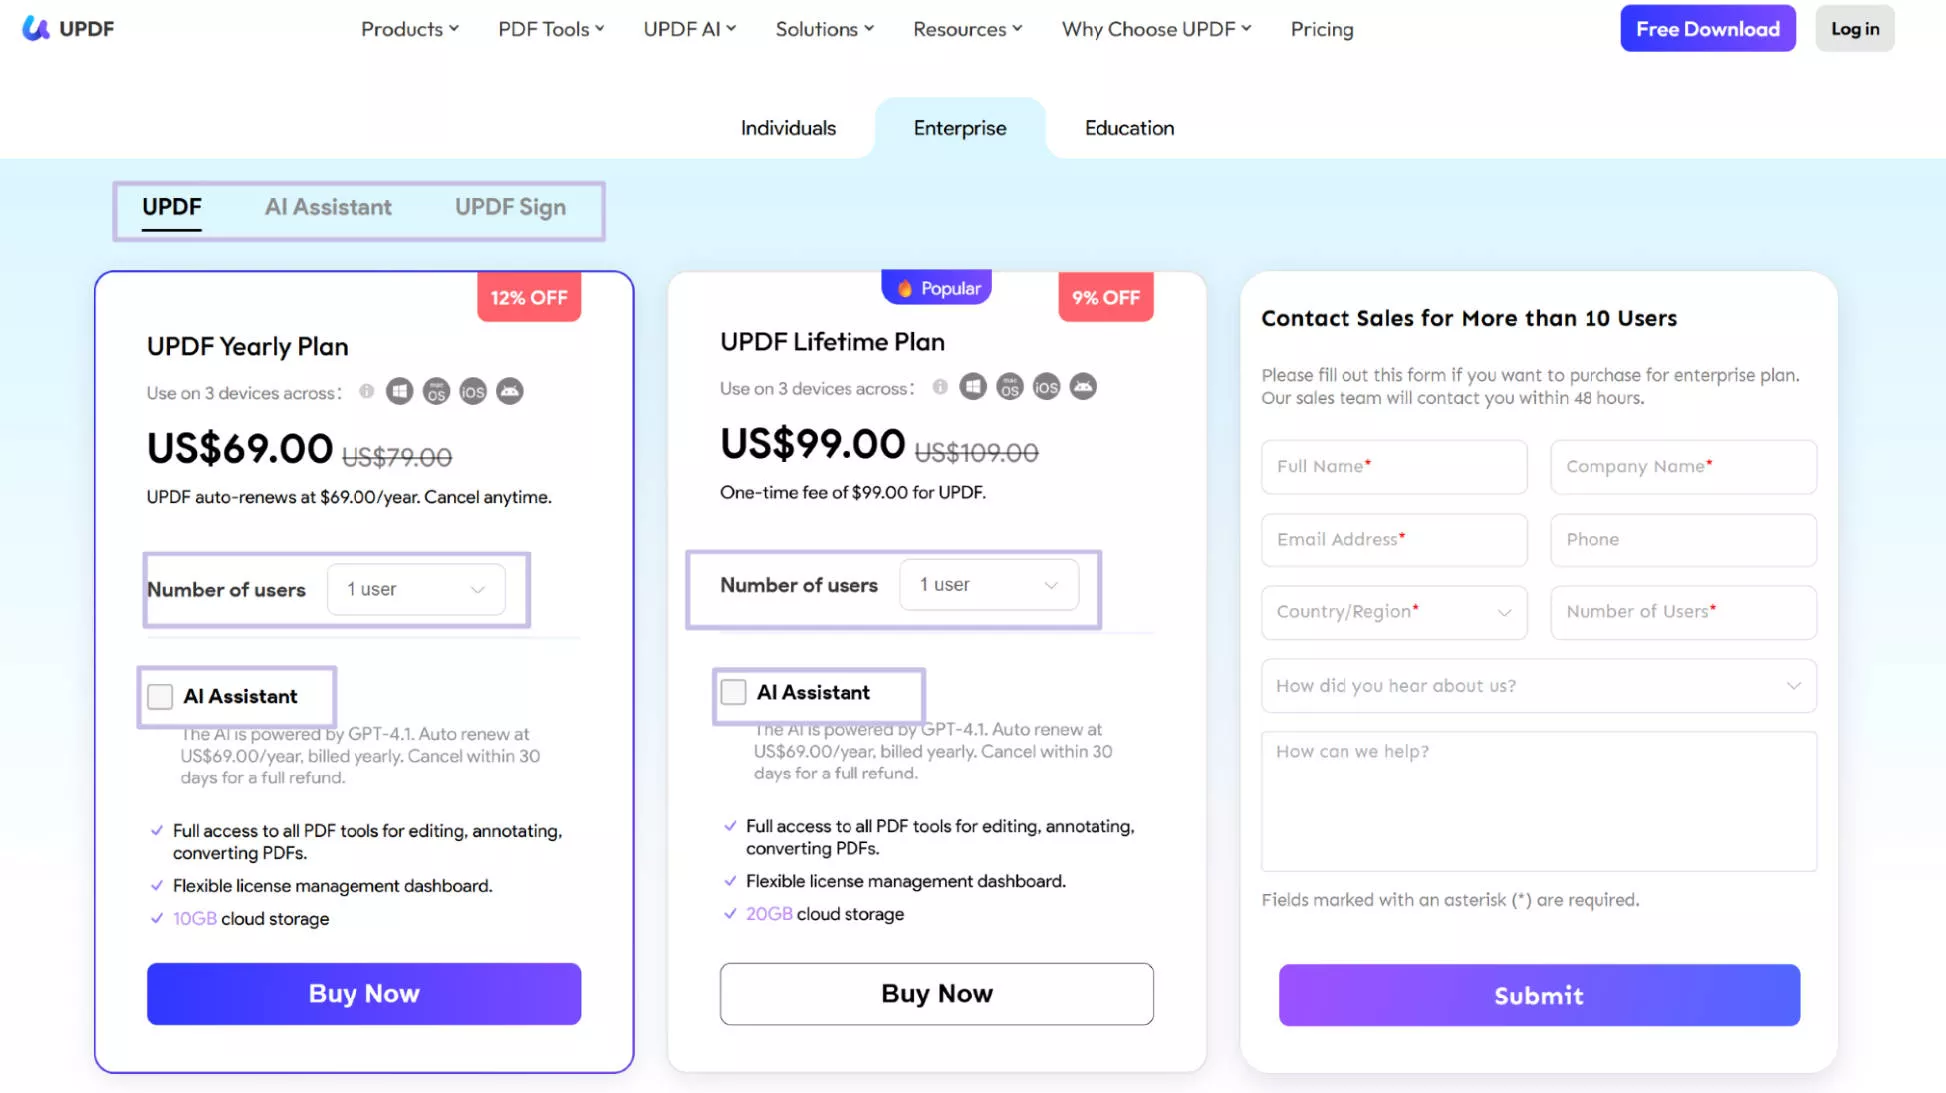
Select one plan, then define the "Number of Users" against the option available on the page. You can also check AI Assistant if you want to AI together.
Note: The plan can be bought directly from the website within the range of 10 users. However, with more than 10 users, contact the sales to purchase the Enterprise Plan with a volume license discount.
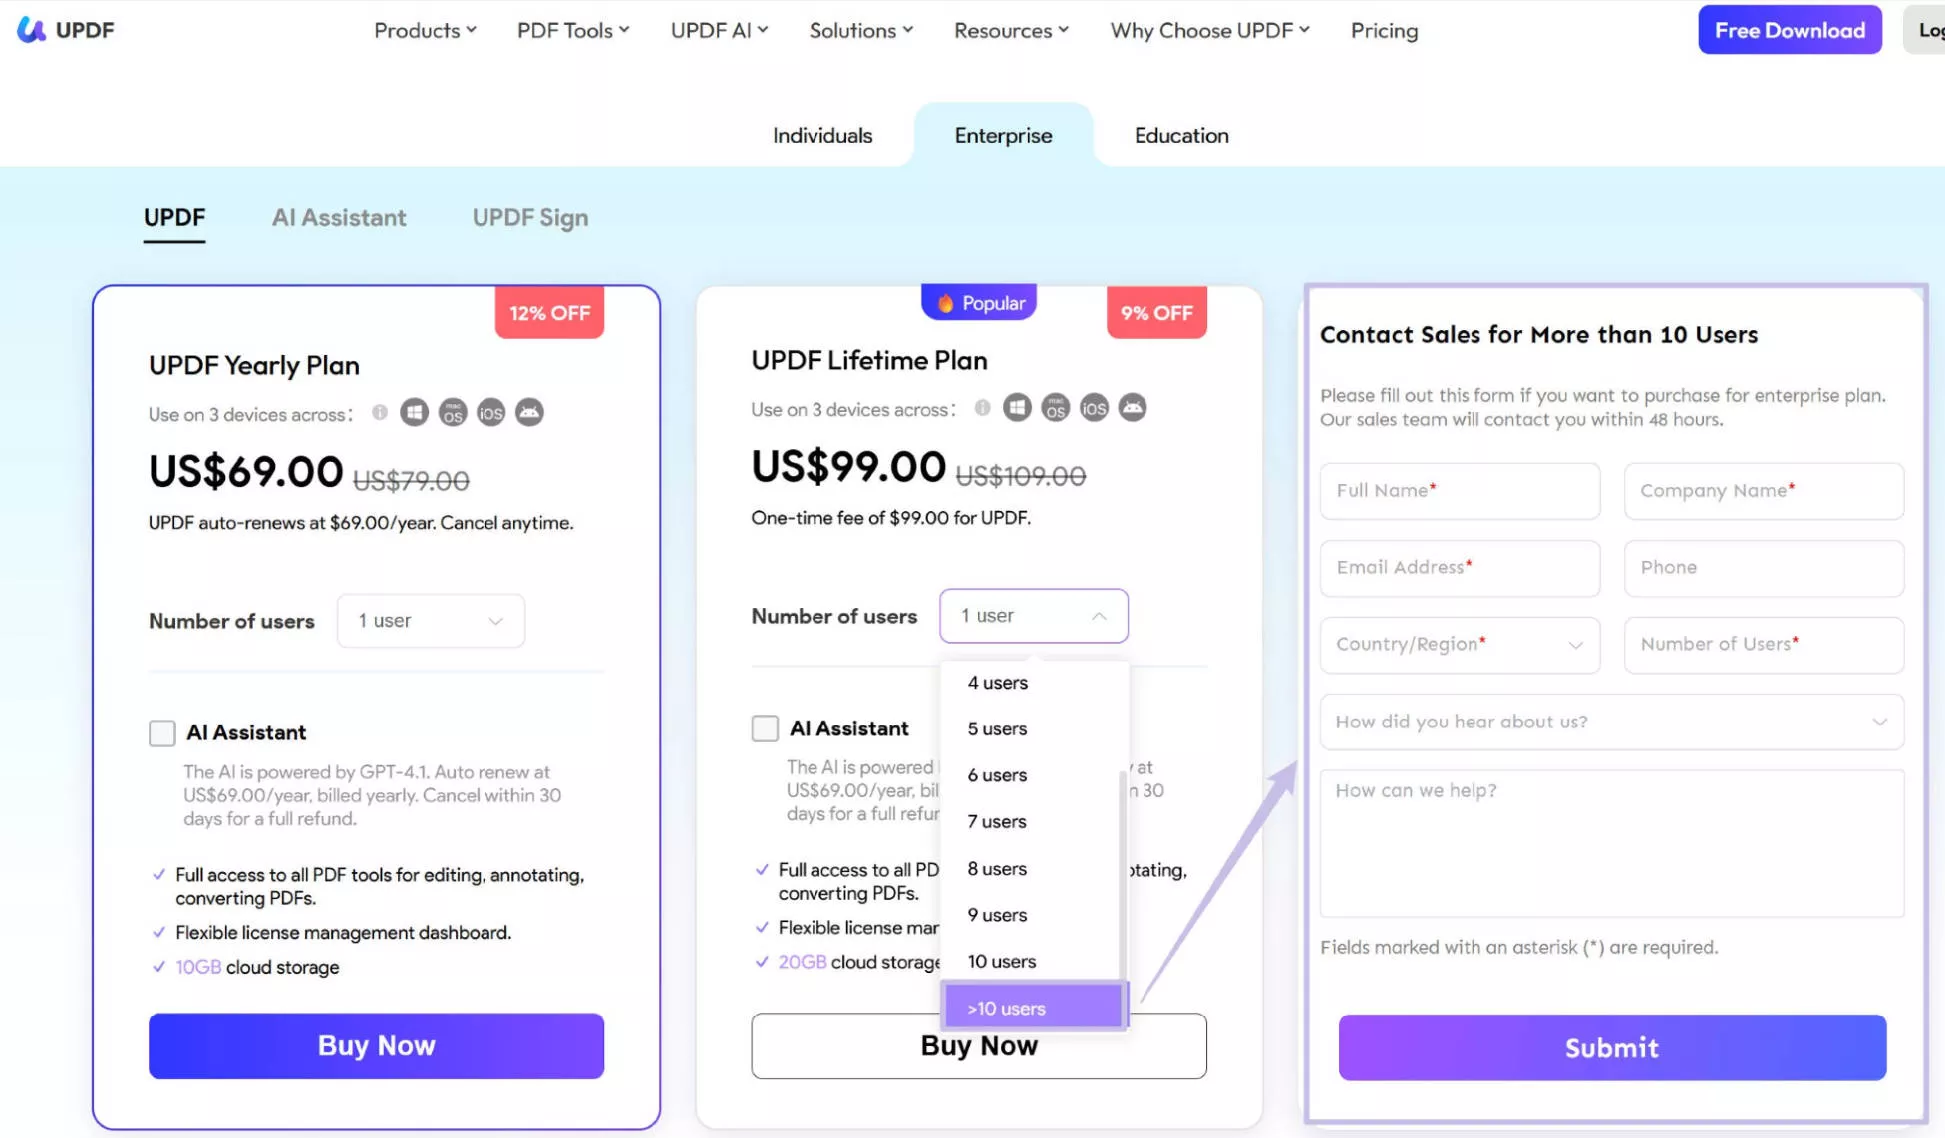
Now, Click on the "Buy Now" icon and you will be brought to a new page, here, you need to enter the email address (Note: It is important to log in or create an account with correct email, as a confirmation mail is received against the address provided for buying the Enterprise Plan, which contains the order information), select the payment method, enter the payment information, and click on the "Pay Securely Now" to finish the payment.
Step 2: Click "Redeem Now" on the Successful Purchase Page
As you have completed all purchases, you will be led to a successful purchase page. On this page, you can copy the redemption code and see the redemption instructions. The best way is to click the "Redeem Now" button to start the "Create a Company" process and this will help you open the auto-redemption prompt in the Enterprise Management Dashboard. With this method, you don't need to copy the code manually.
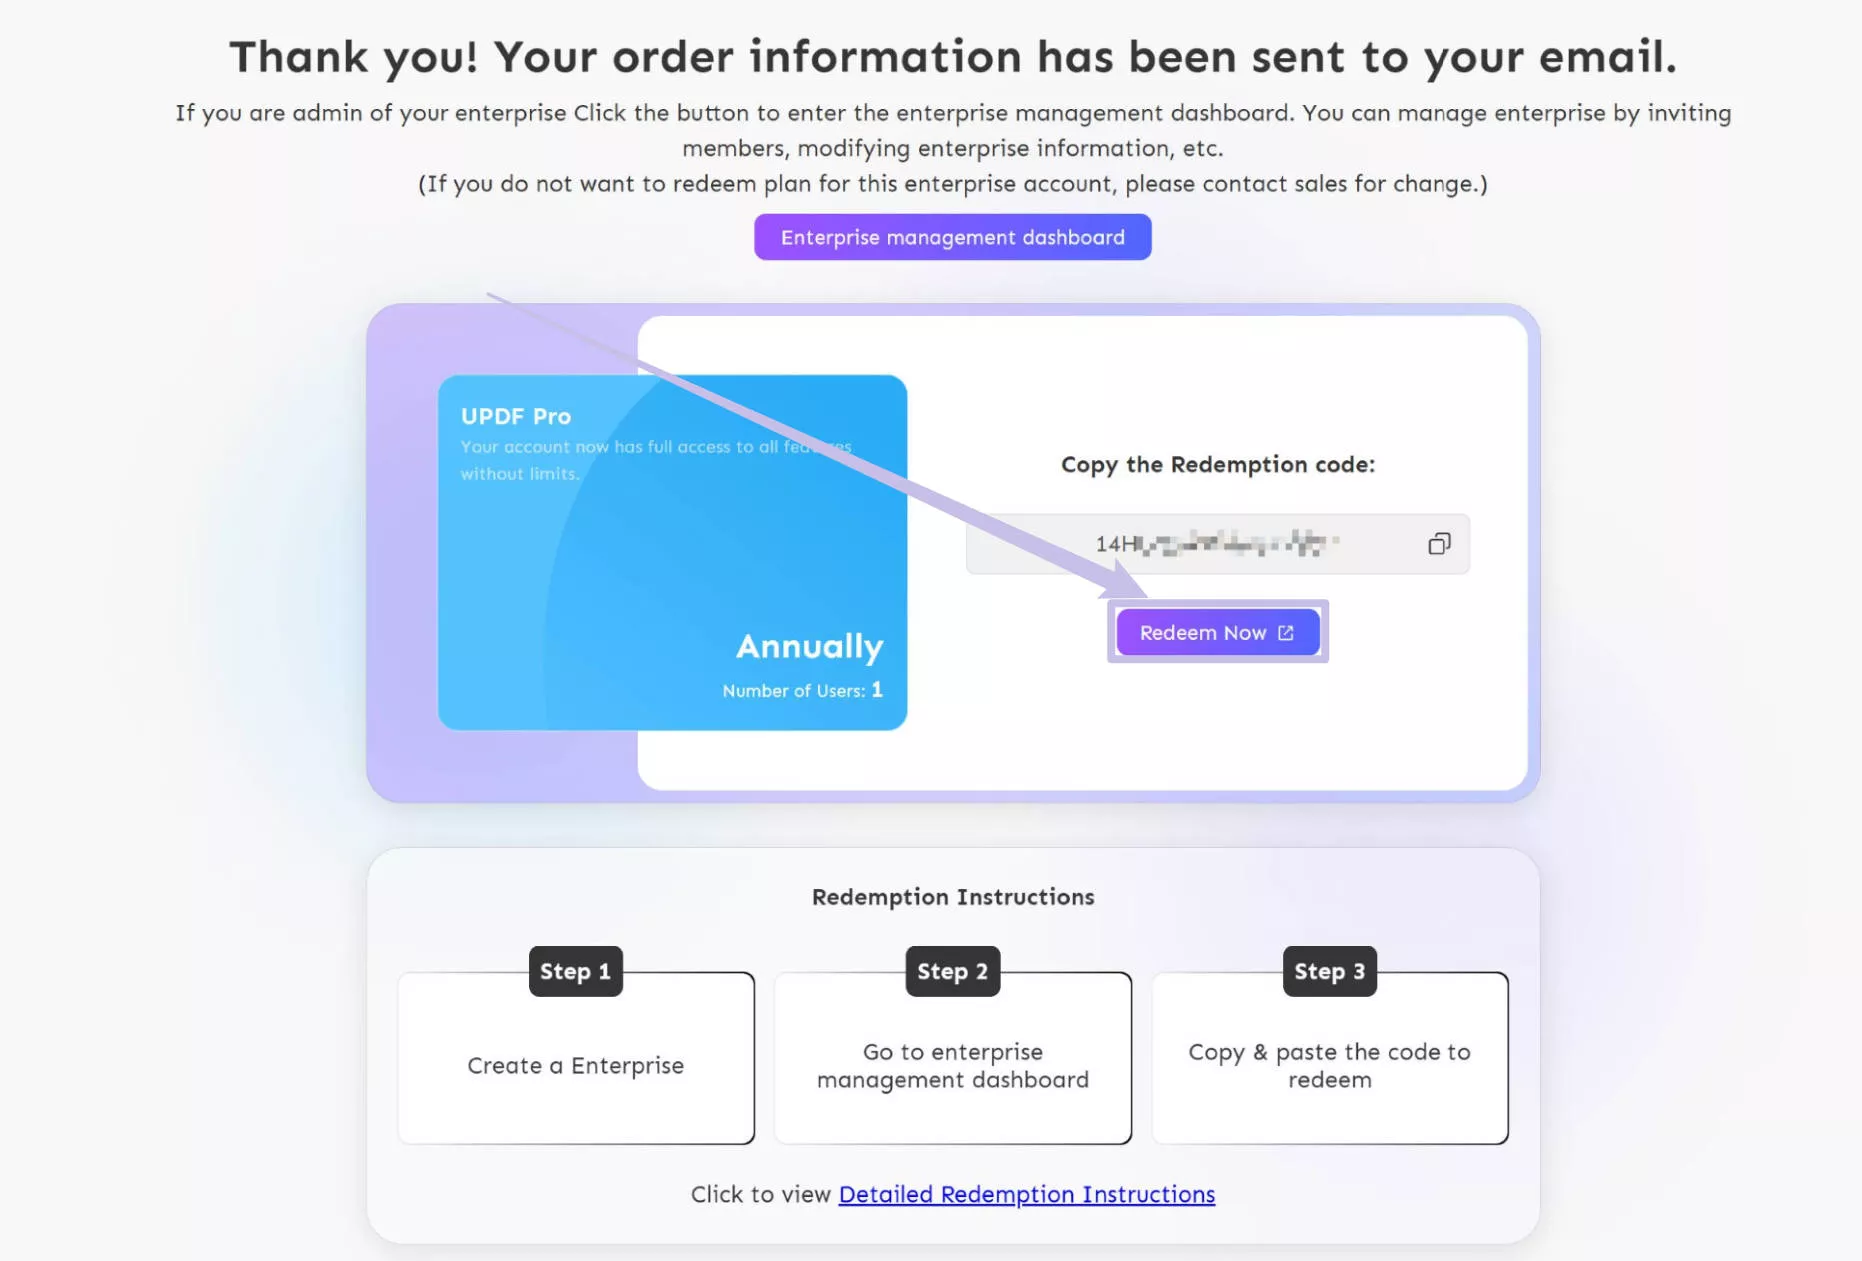
Step 3. Create a Company
By clicking the "Redeem Now" button, you will be redirected to the "Create a Company" process. Provide the "Company Name" in the first spot. Follow through to select the "Industry Type," and continue to choose the "Number of Employees" signing up for the spot in the Enterprise Plan.
Click "Continue" to lead to the next set of pages.

Step 4. Create the Administrator Account
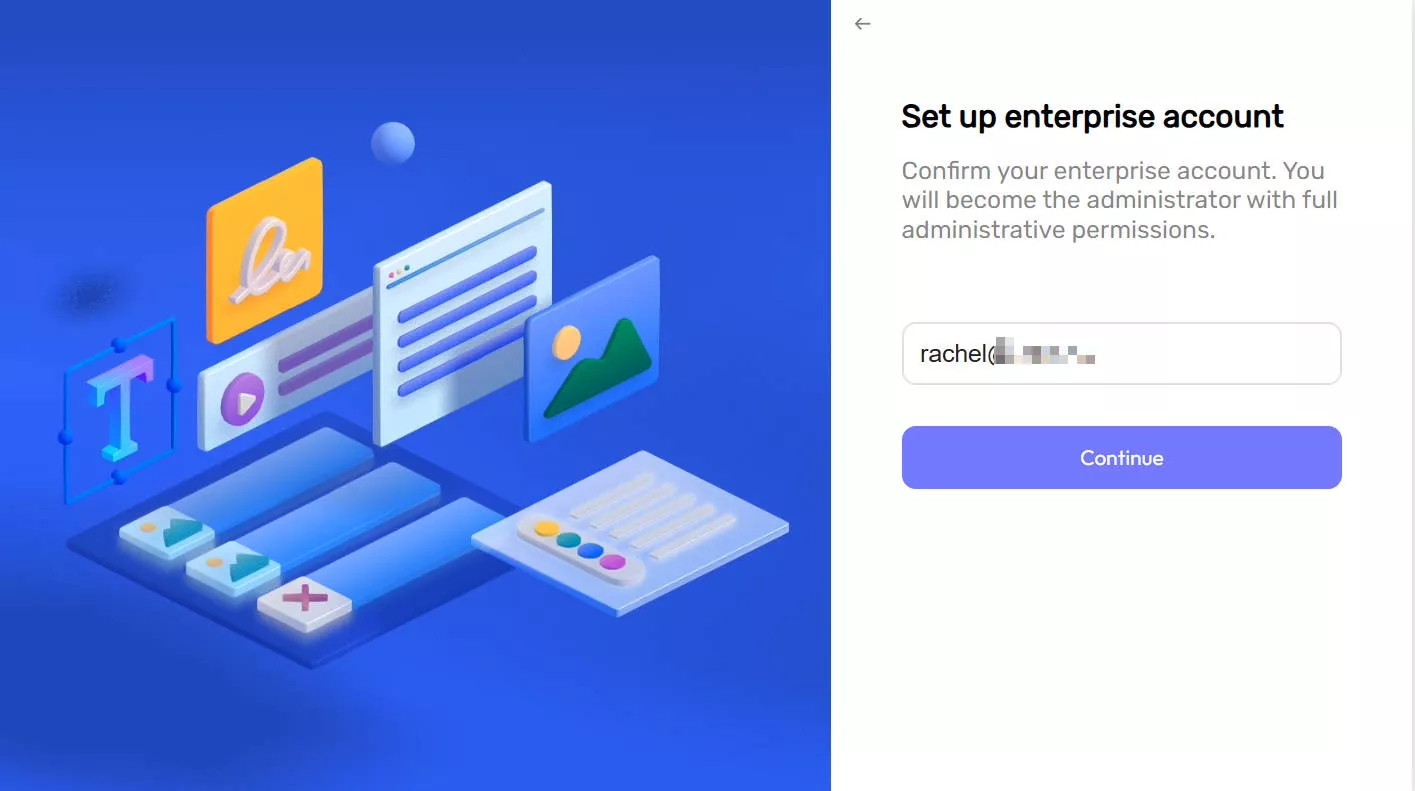
On the next page, provide the email account that would act as the administrator with the exclusive management rights for the Enterprise management system.
Select the "Continue" button after providing the email address. Verify with the code sent to your email and confirm the creation of the company enterprise account at UPDF.
Set up the name and password of the account under creation. Proceed according to the on-screen instructions and conclude the creation of your account successfully.
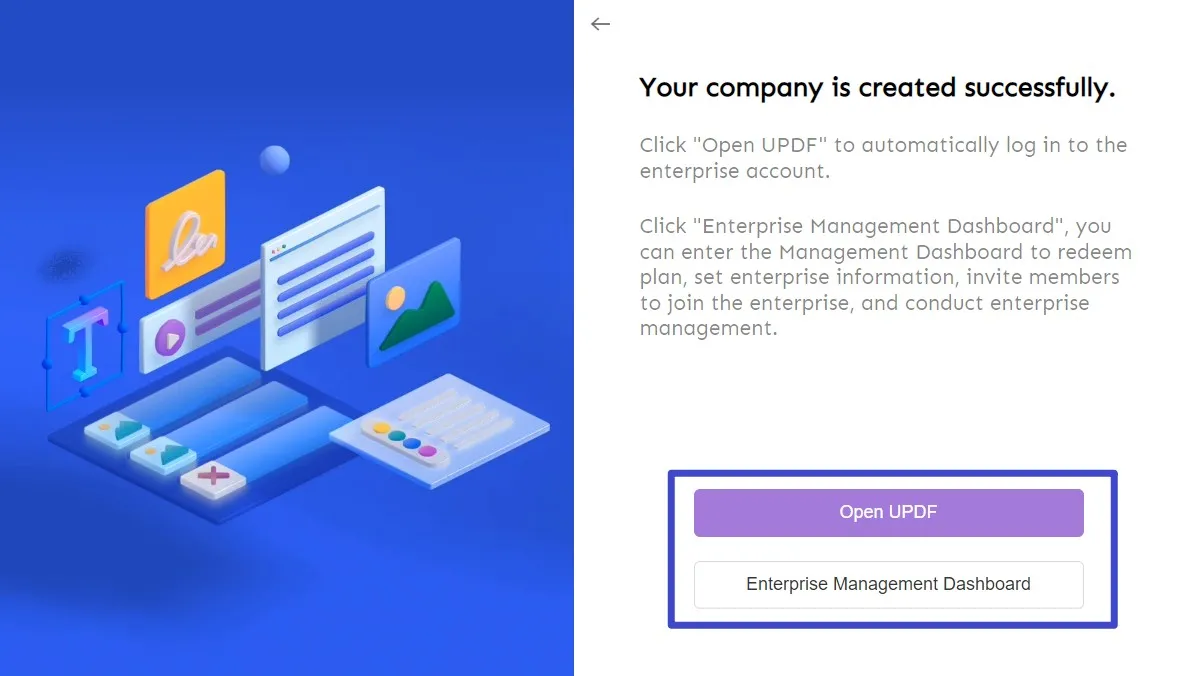
After finishing creating the company and administrator account, you will be provided with two different options to choose from. If you try clicking the "Open UPDF" button, it will launch UPDF and log in with your administrator account automatically.
Step 5. Auto-Redemption on the Dashboard
On clicking the "Enterprise Management Dashboard," you will be redirected to the login window. Enter the email and password to log in. Then, you will be in the Dashboard for the enterprise account. A prompt will appear as soon as you enter the Dashboard. Showing the prompt as "Auto-redemption," click "OK" to automatically redeem the plan.
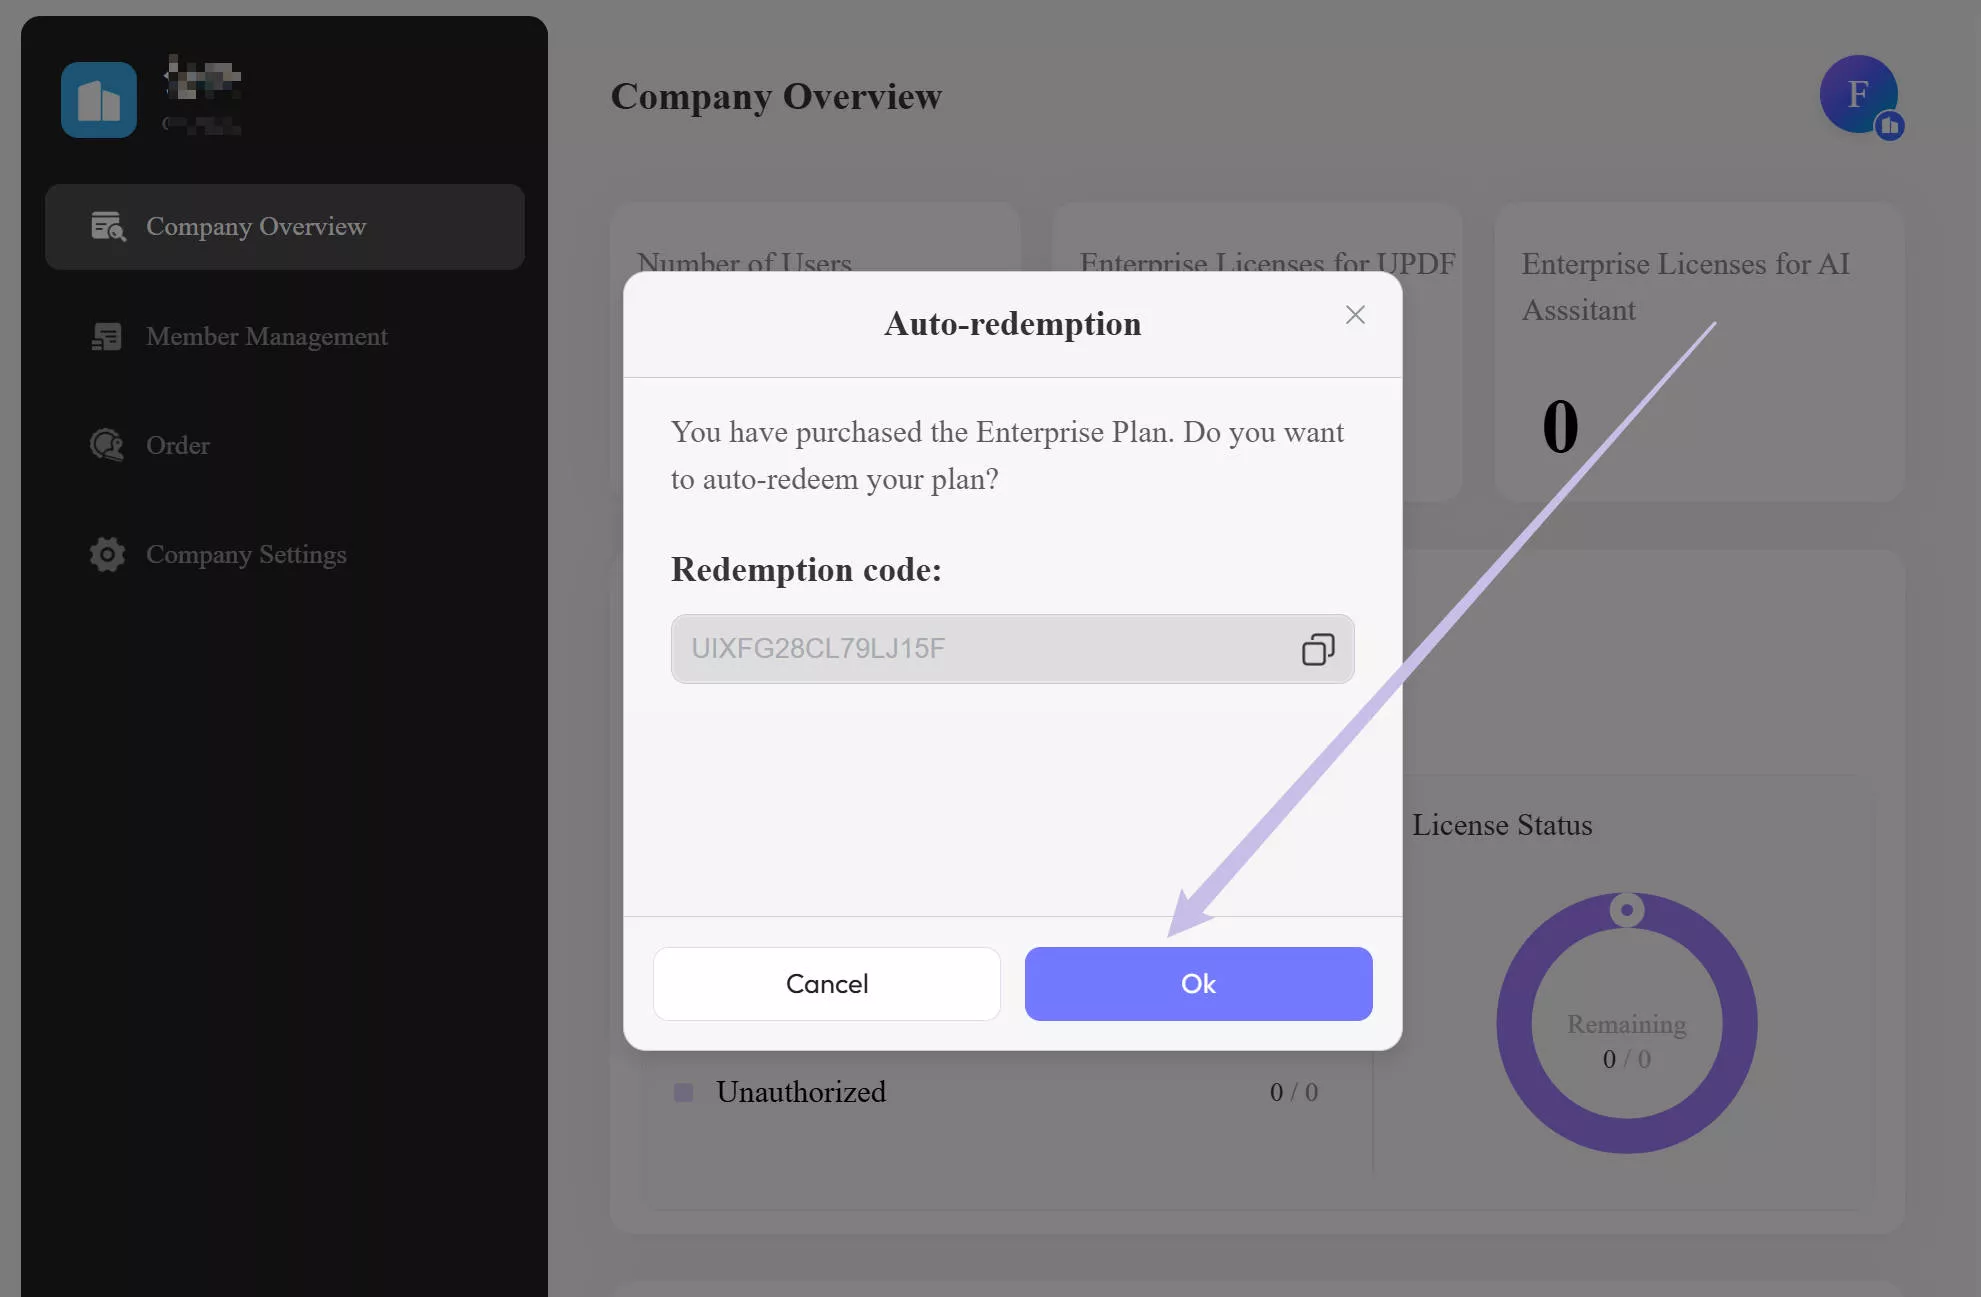
As you continue, the Dashboard shows your license information in the dashboard.

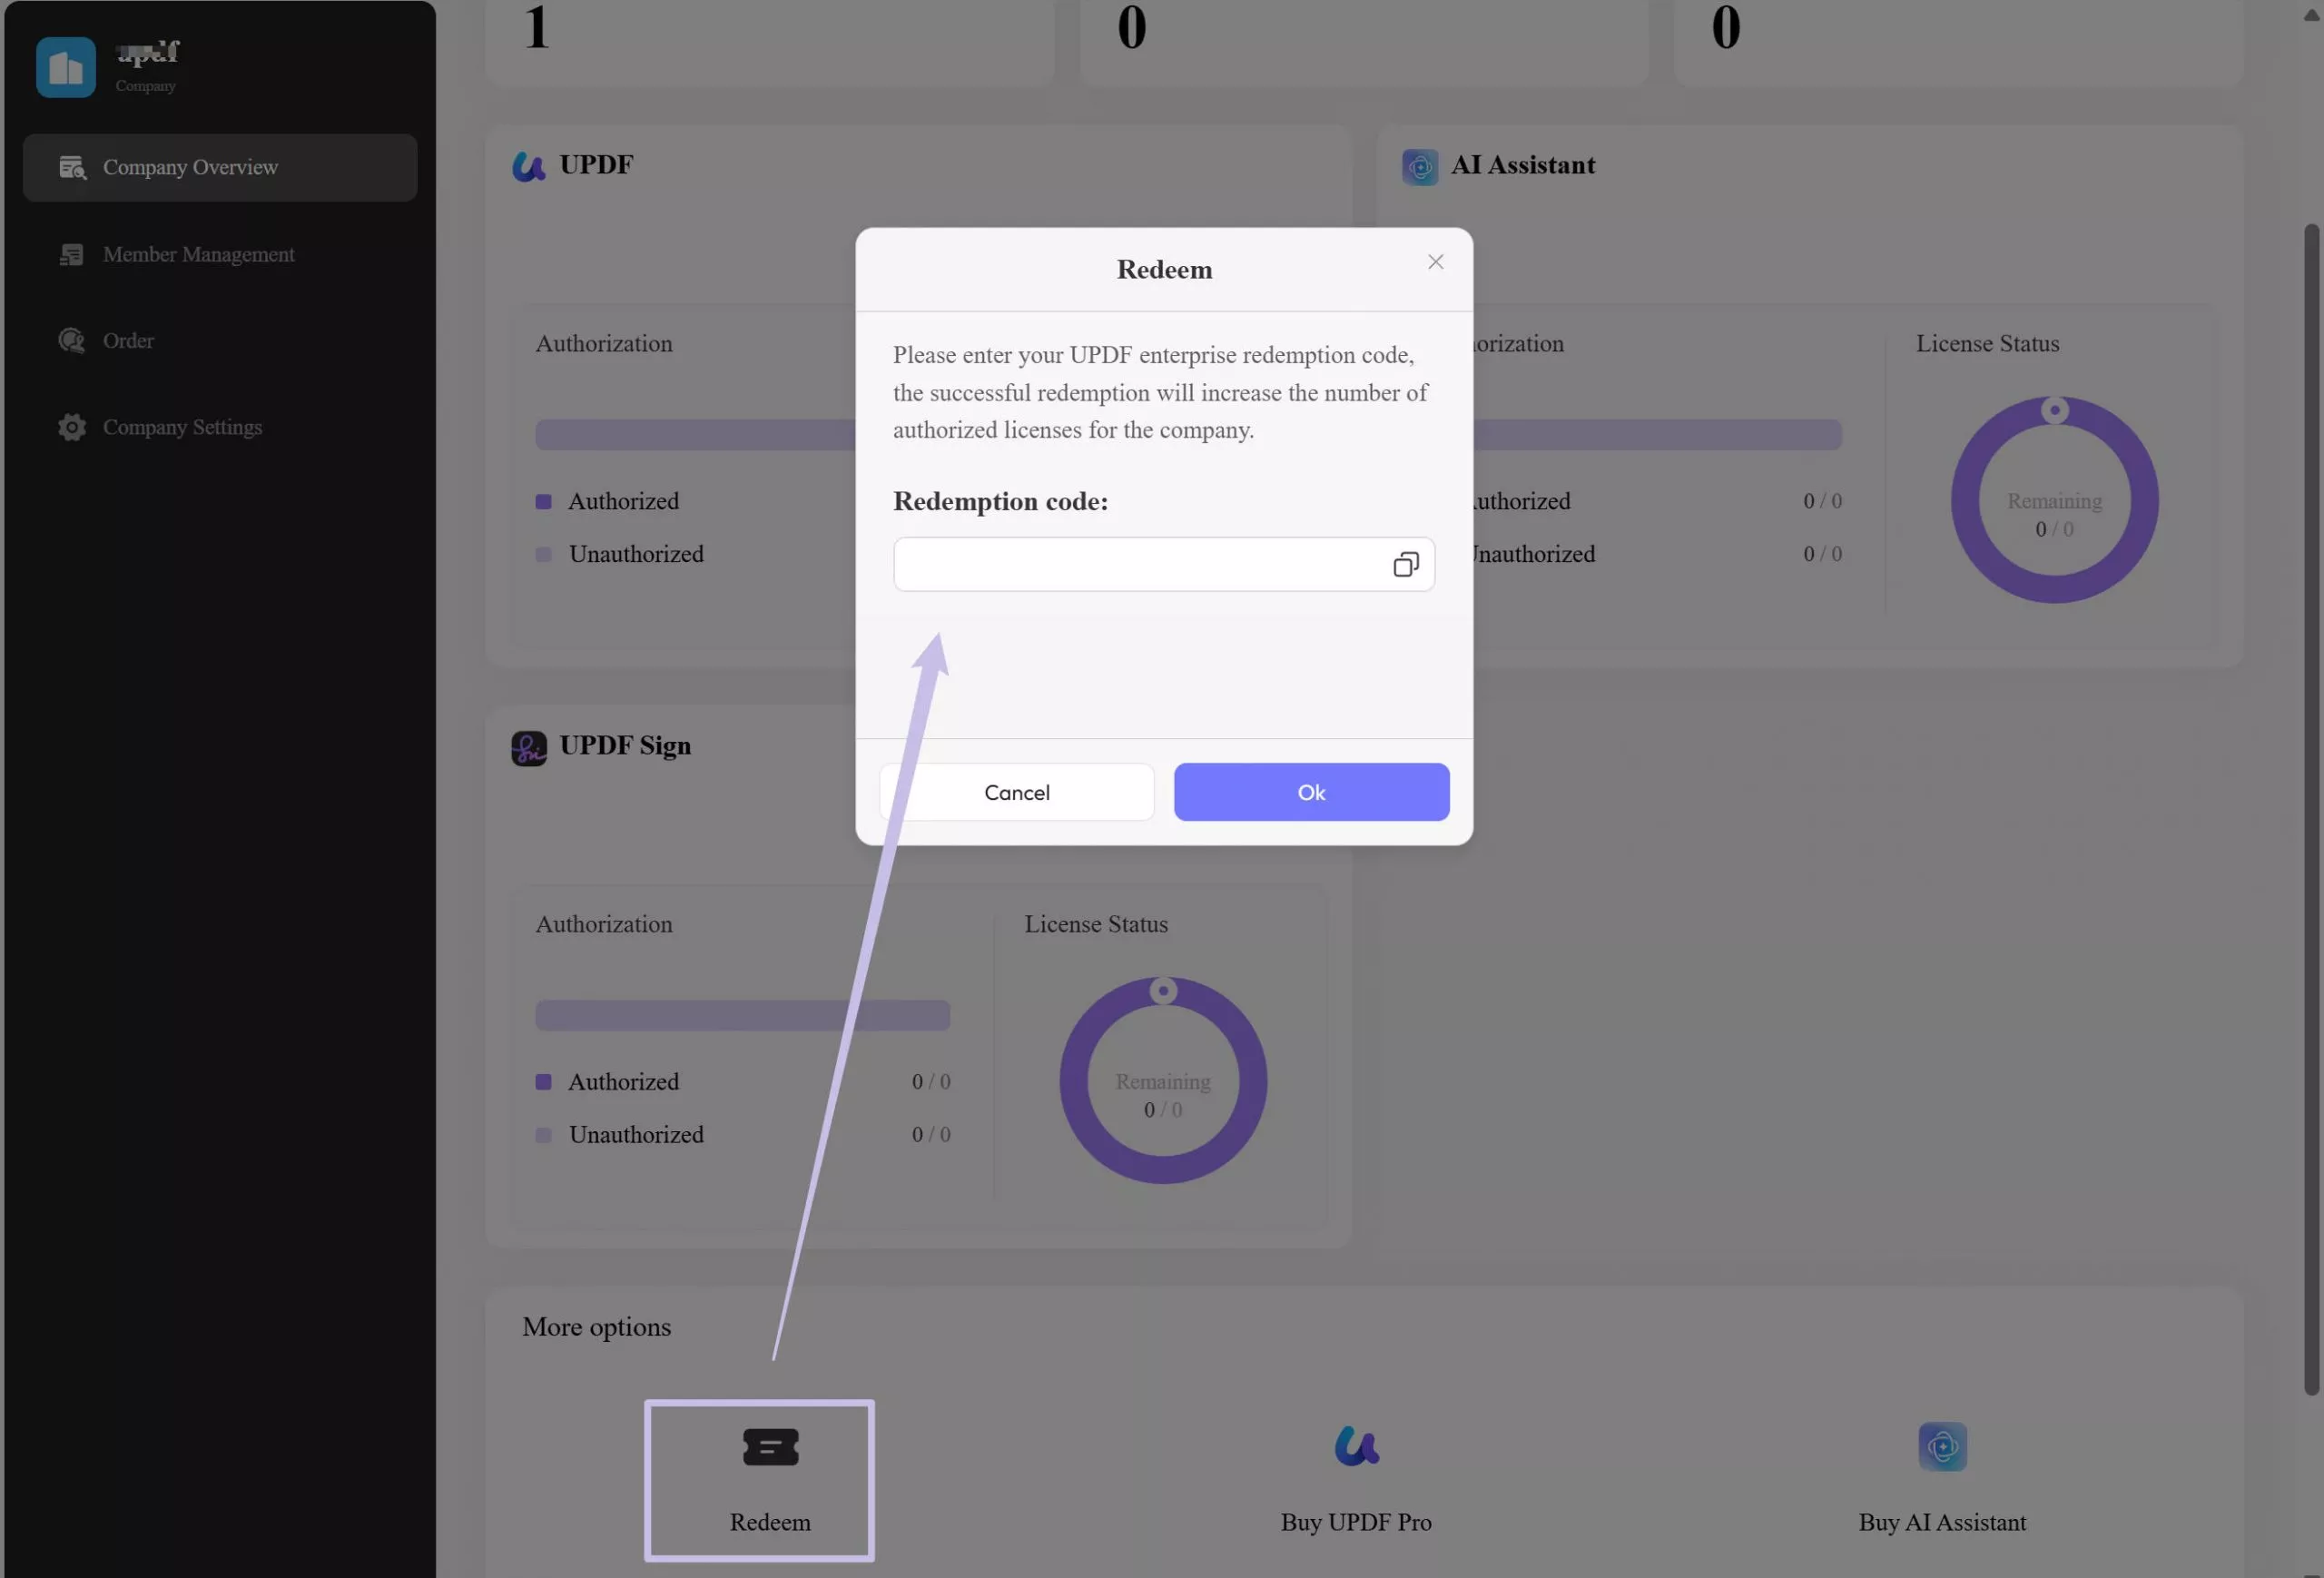
Note: For those users who do not receive the "Auto-redemption" prompt, they can copy the redemption code from the purchase page or email address attached to the process. After pasting the code, click the "Redeem" button present on the Dashboard.
2.2. Situation Two. Creating a Company First
You can also create a company first. Here is the guide you can follow.
Step 1. Create a Company
Follow through the link to initiate the process of creating a company.
Enter the company information to create a company, and then enter your email to create an administrator account for the company. This administrator account can manage team members and control all the authorization.

Step 2. Enter the Enterprise Management Dashboard
As the company is created, you can enter the Enterprise Management Dashboard.
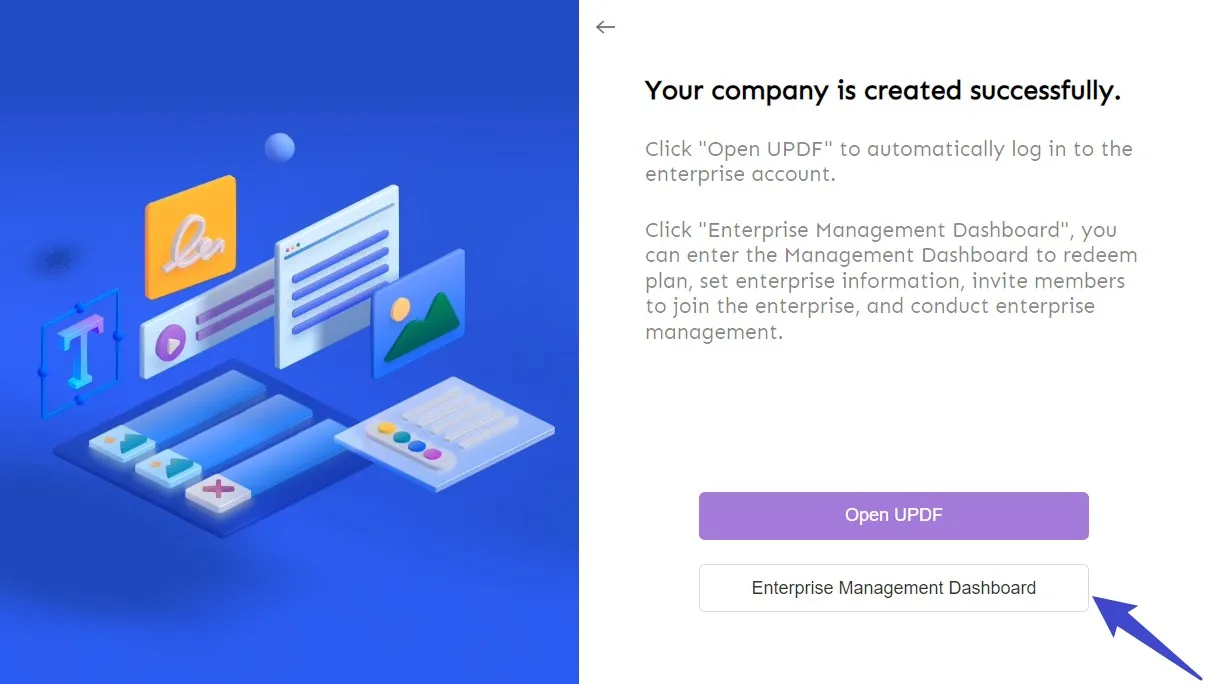
Step 3. Buy License
Now, it will ask you to log in again, and later you can be in the Enterprise Management Dashboard. The next thing that needs to be done is to purchase an Enterprise Plan by clicking the "Buy UPDF Licenses", "Buy AI Licenses", or "Buy UPDF Sign" in the Company Overview Dashboard. This will lead you to the enterprise price page with your admin account logged in automatically.
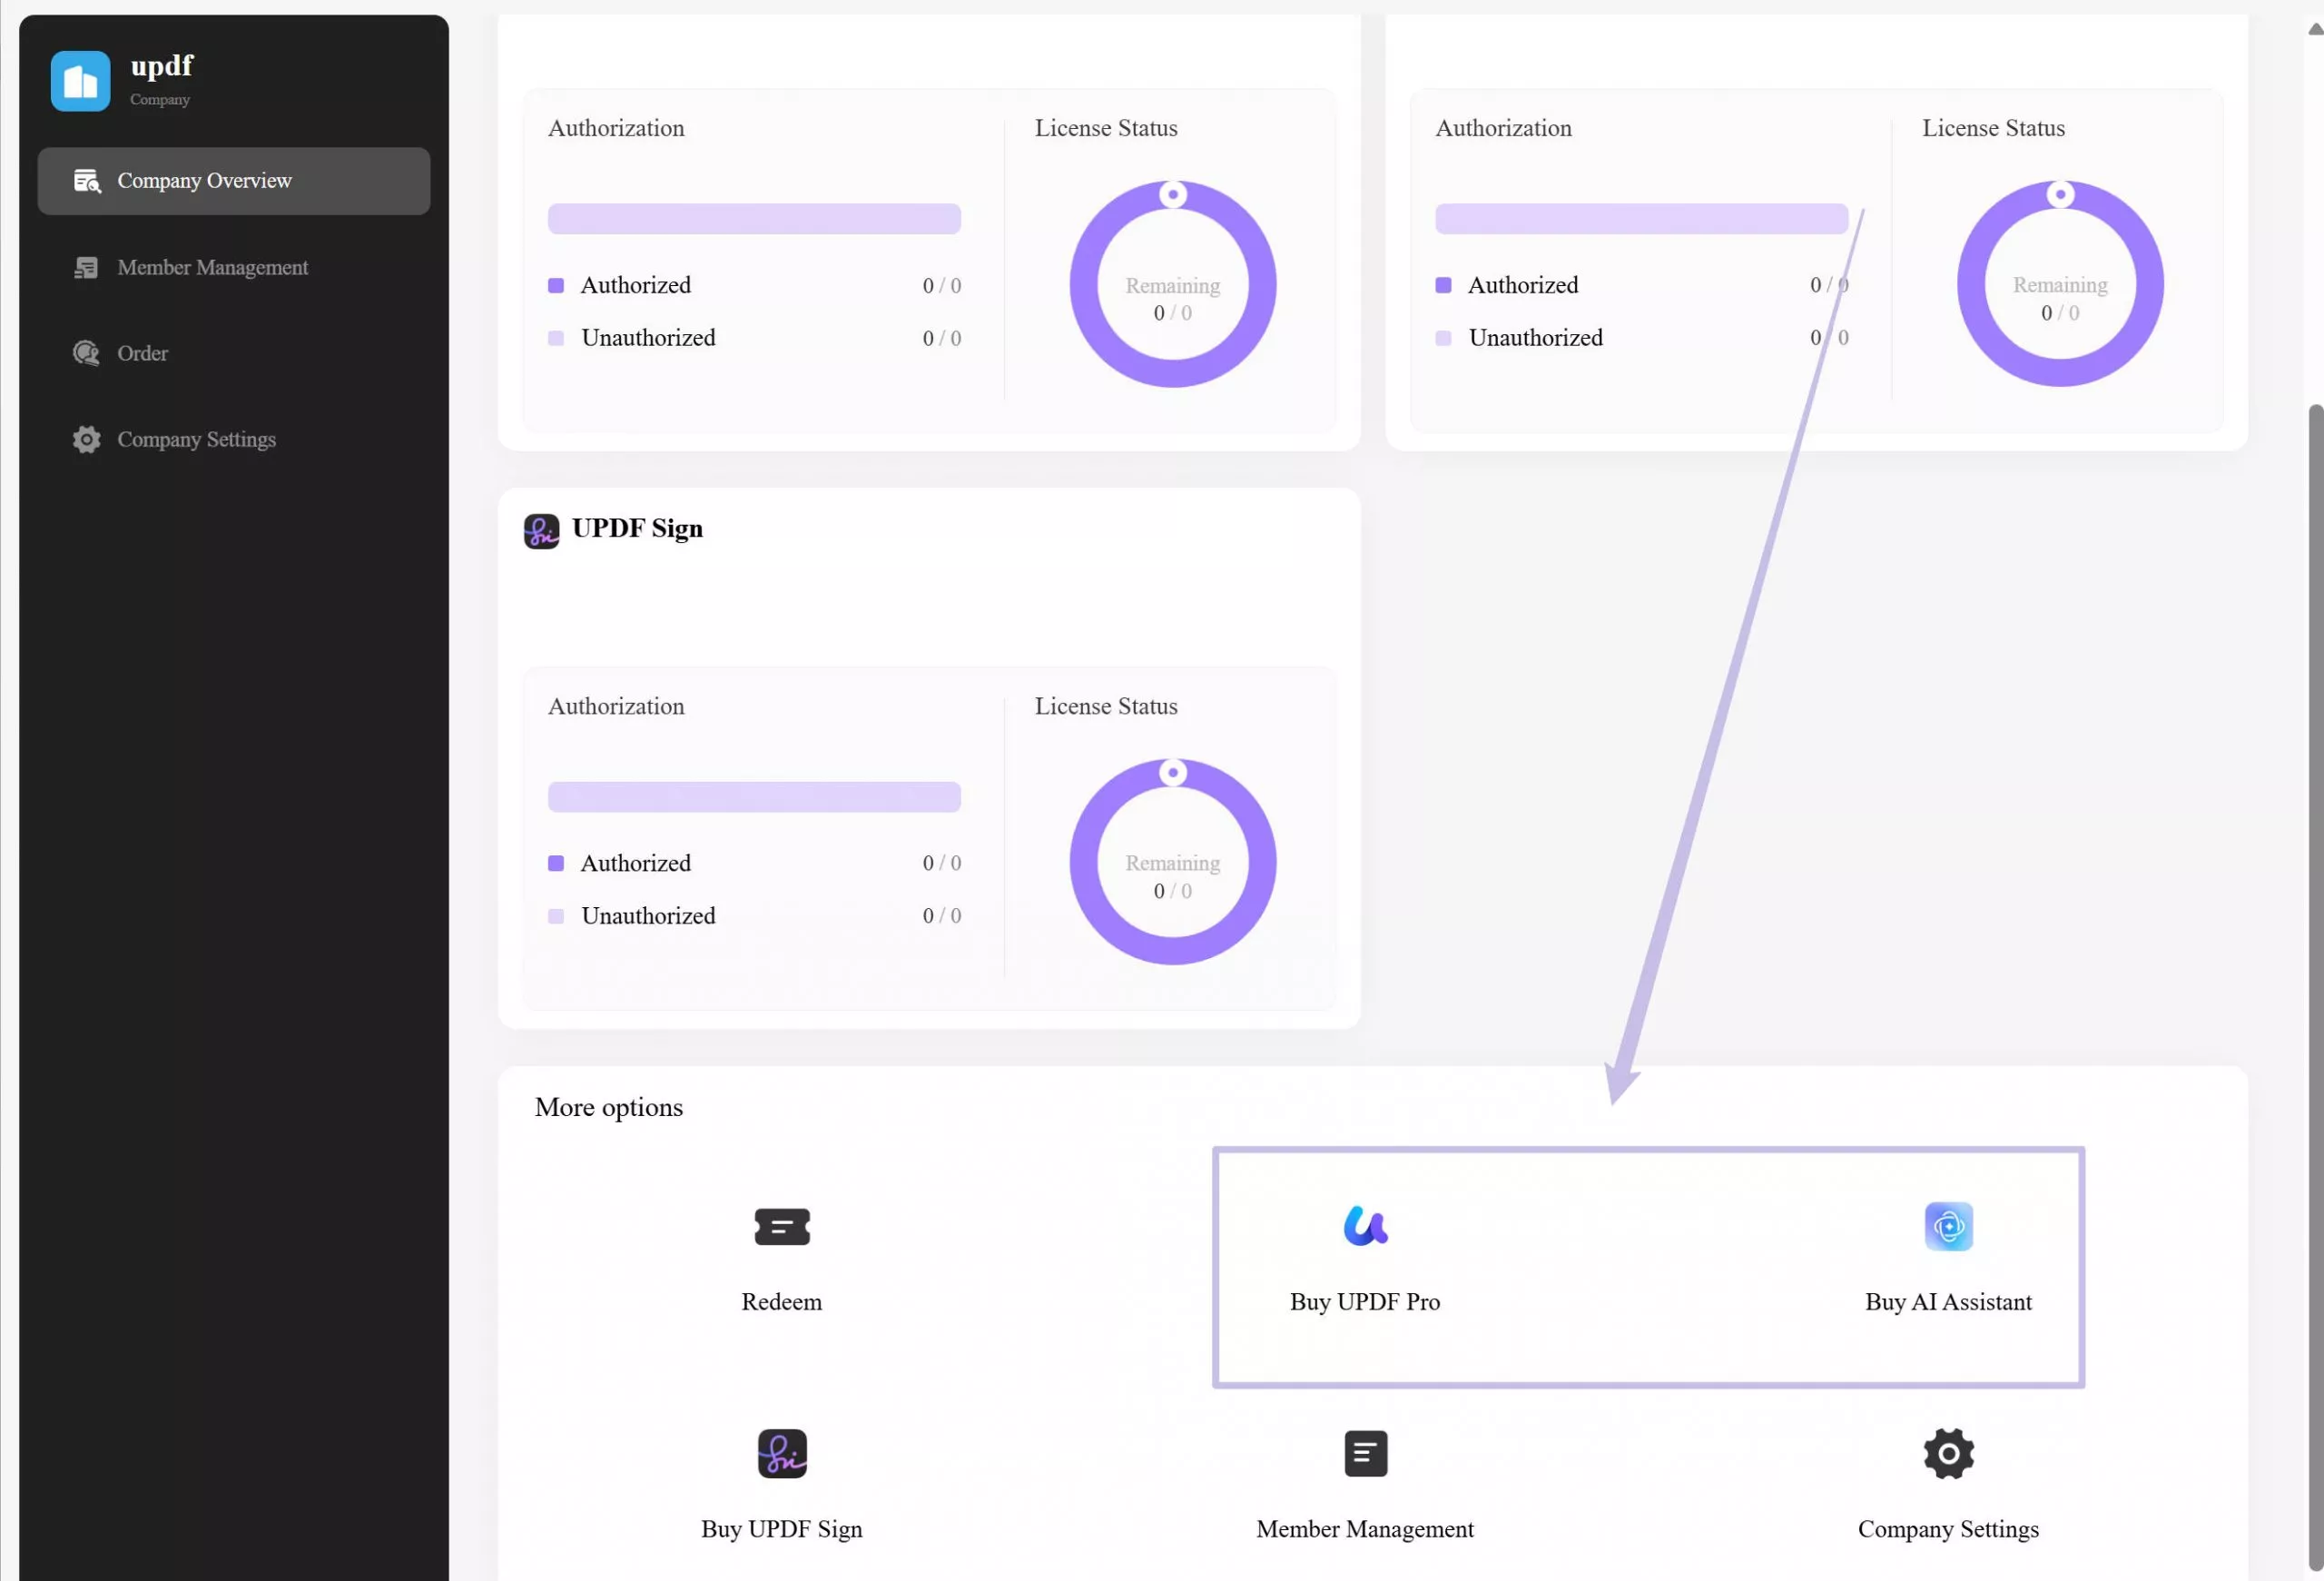
Select the product and number of users and process the payment.
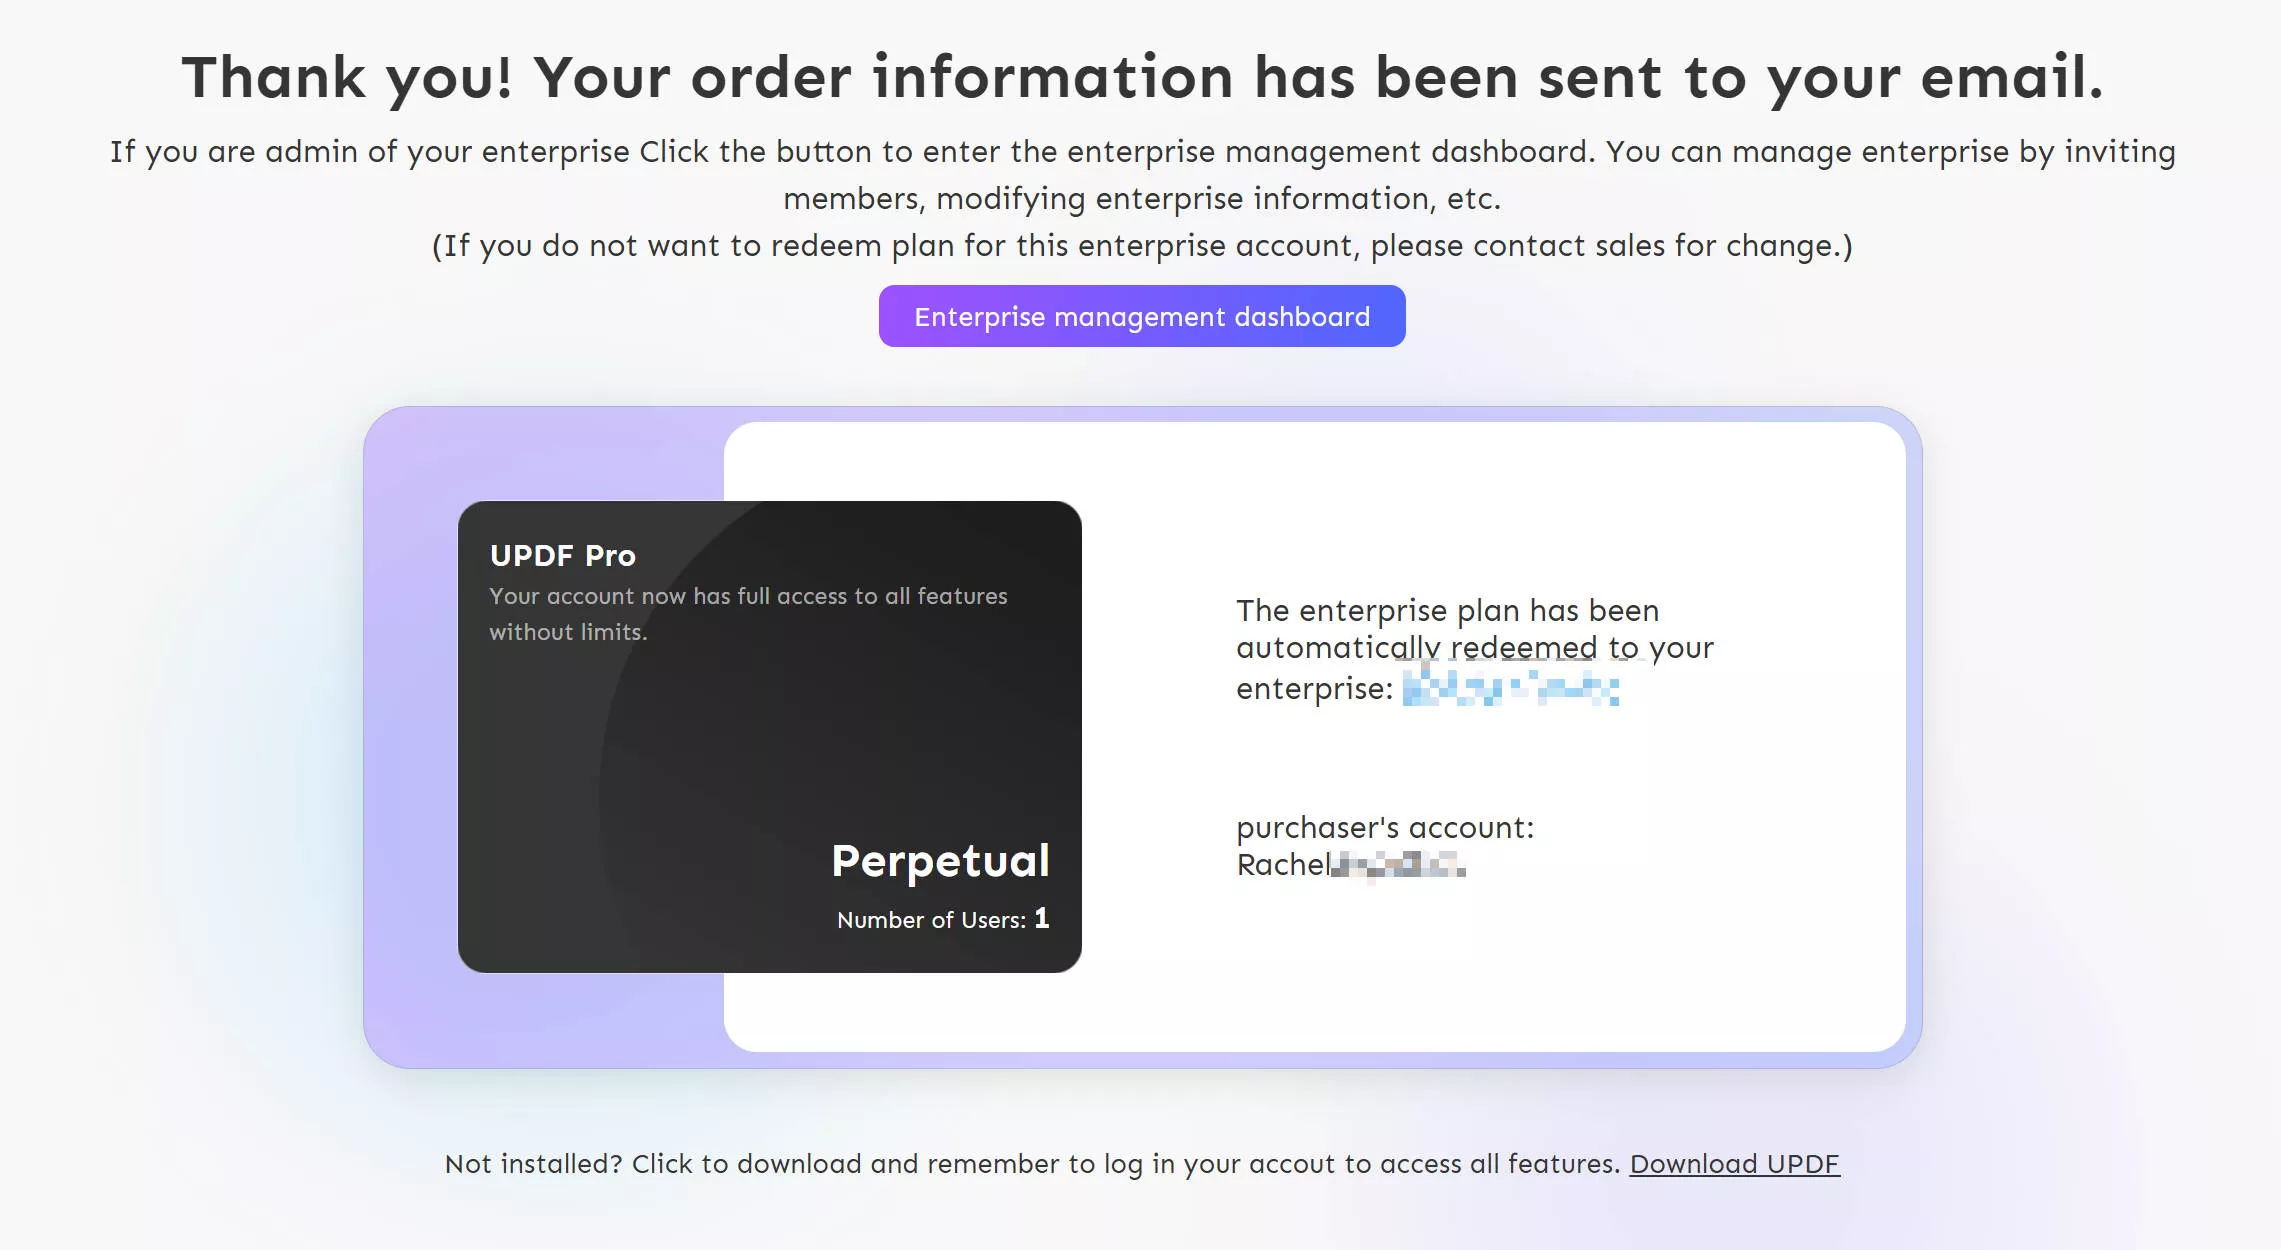
After the payment, you will be directed to the "Successfully Purchased" page. The page displays that the Enterprise Plan has been automatically redeemed to your enterprise.
On clicking the "Enterprise Management Dashboard" button in the center of the page, you will find that the account has been redeemed automatically. This is essential because, since you have already created a company and an admin account, the license automatically redeems if bought using the admin account.
After purchasing, creating, and redeeming, you need to be familiar with the dashboard.
3. What's in the Dashboard
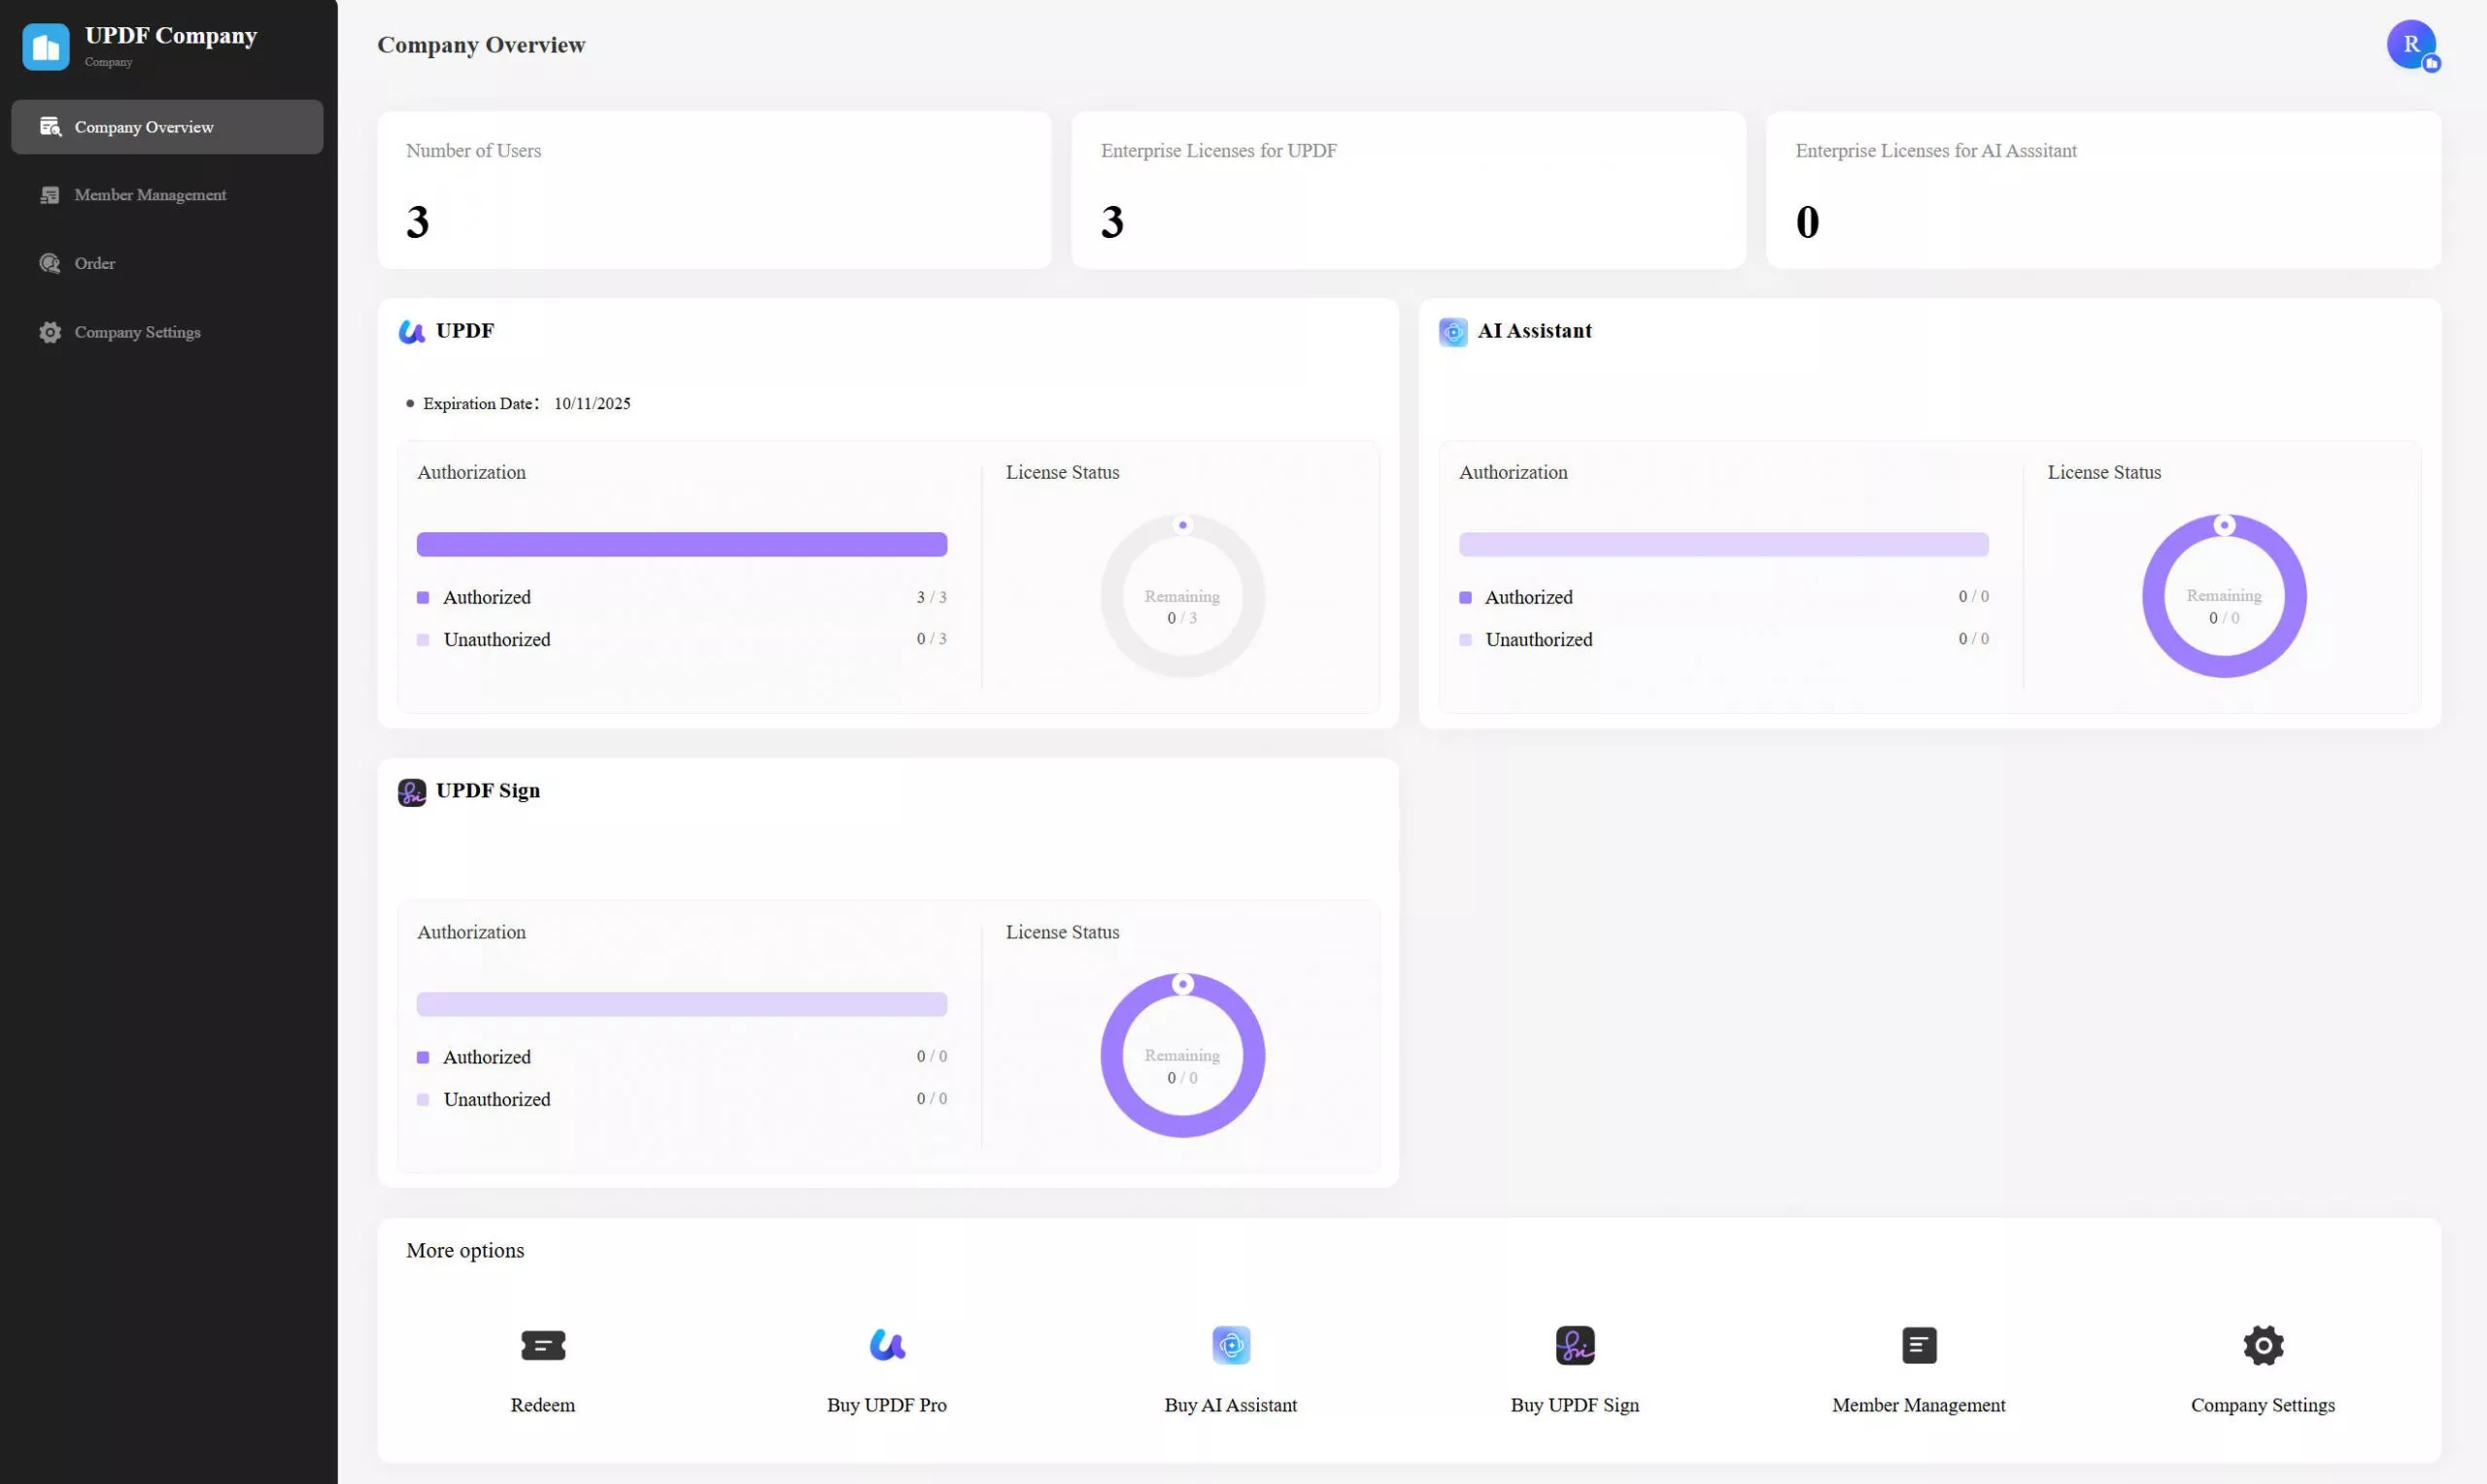
After you enter the Dashboard, you will find that there are three main menus on the left:
3.1 Company Overview
As you find yourselves in the Enterprise Dashboard, you can observe the complete overview of the company in the "Company Overview" tab. You can find the license and the member count. And in " UPDF ", "AI Assistant", and "UPDF Sign" sections, you can have an overview of the license authorization and use states for UPDF, AI, and UPDF Sign. Moreover, you can find the redeem button for you to redeem your license, purchase entrance to buy more licenses, options to manage members, and customize the company information.
3.2 Member Management
Continue to the "Member Management" section from the left panel. You can search for the respective members in the search section provided at the top. If you seek to "Reset" your search settings, click the button available just beneath the search section. You can also add members, remove members, authorize, and deauthorize members.

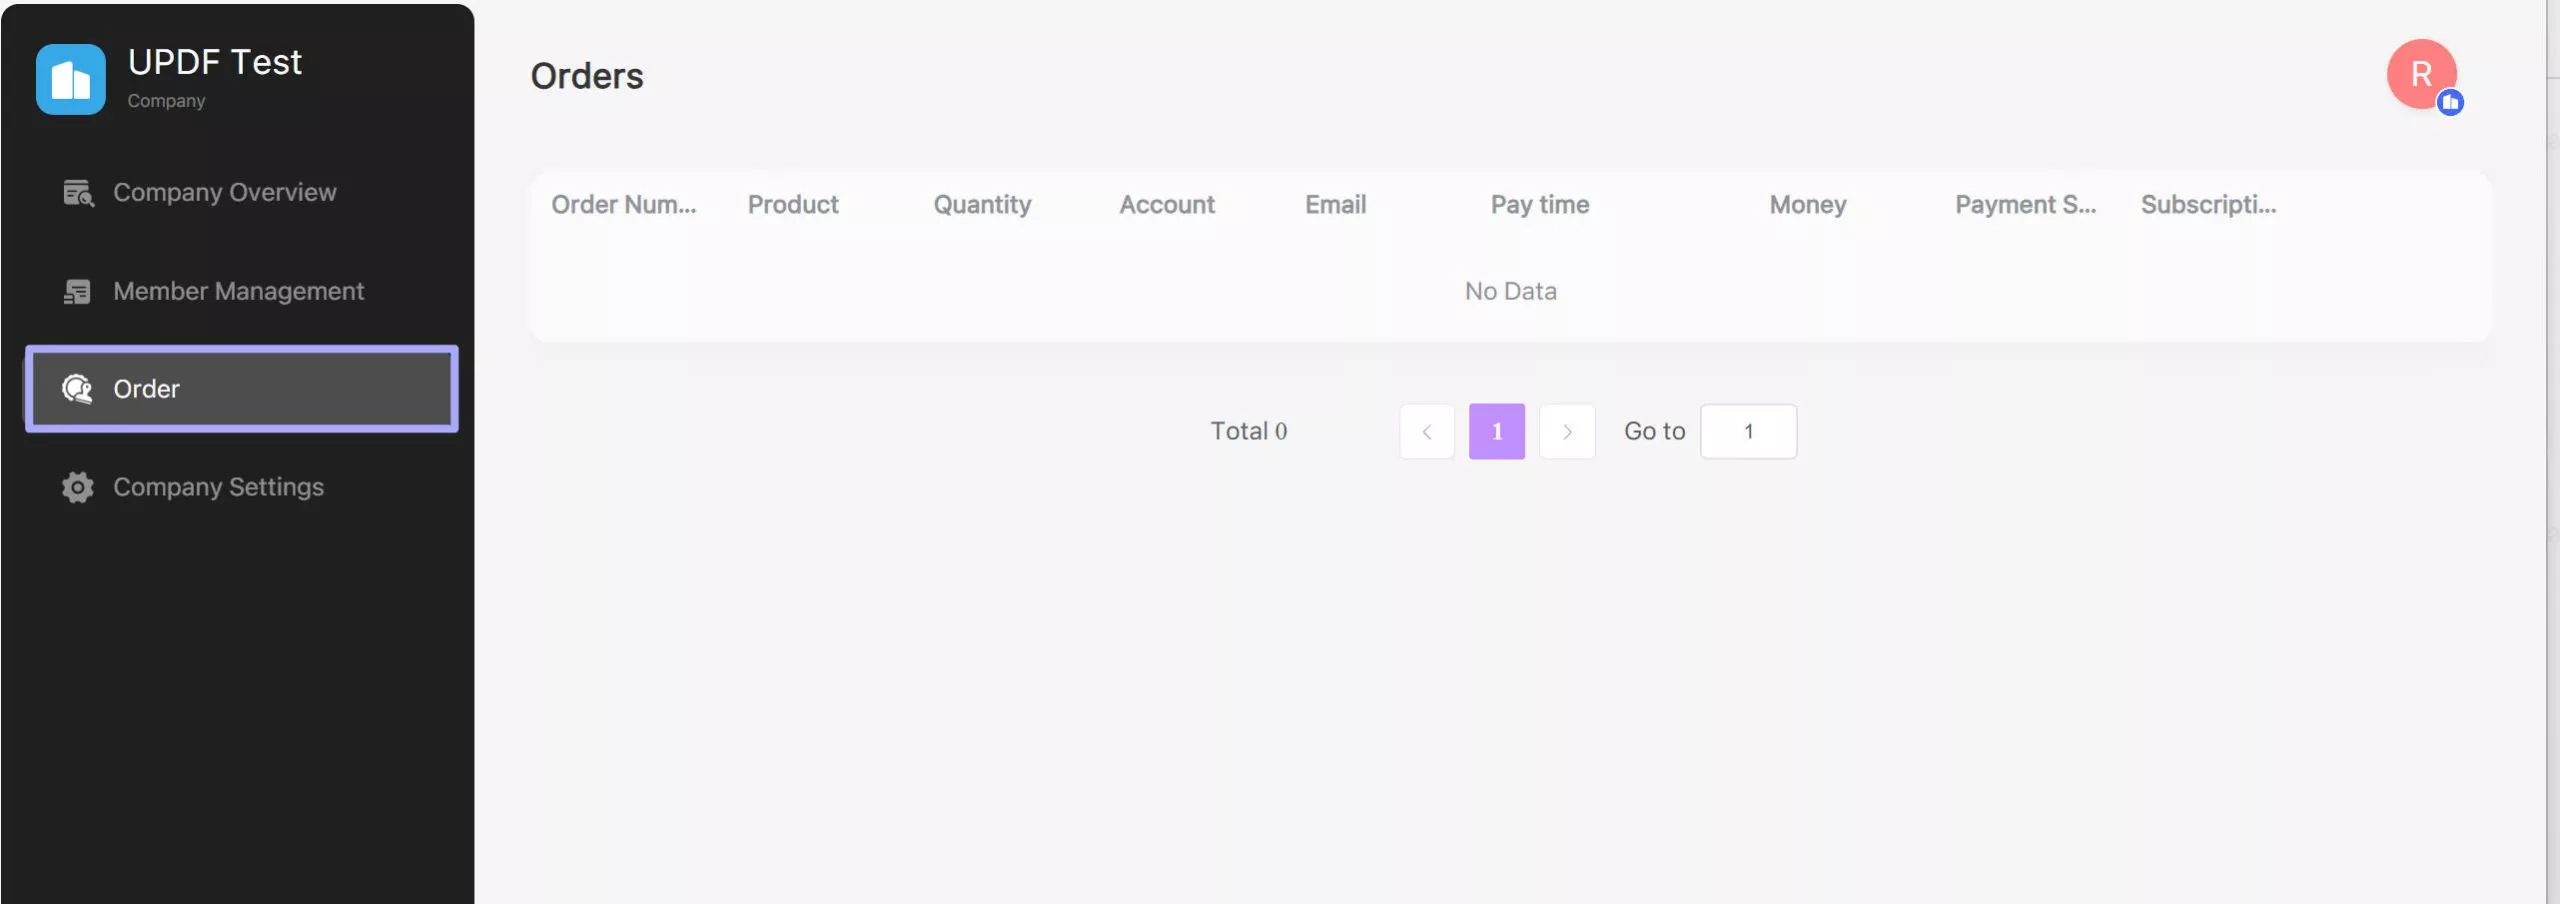
3.3 Order History
The third option is "Order". You can find all your order histories here. It will show the order number, product name, quantity, and more.
3.4 Company Settings
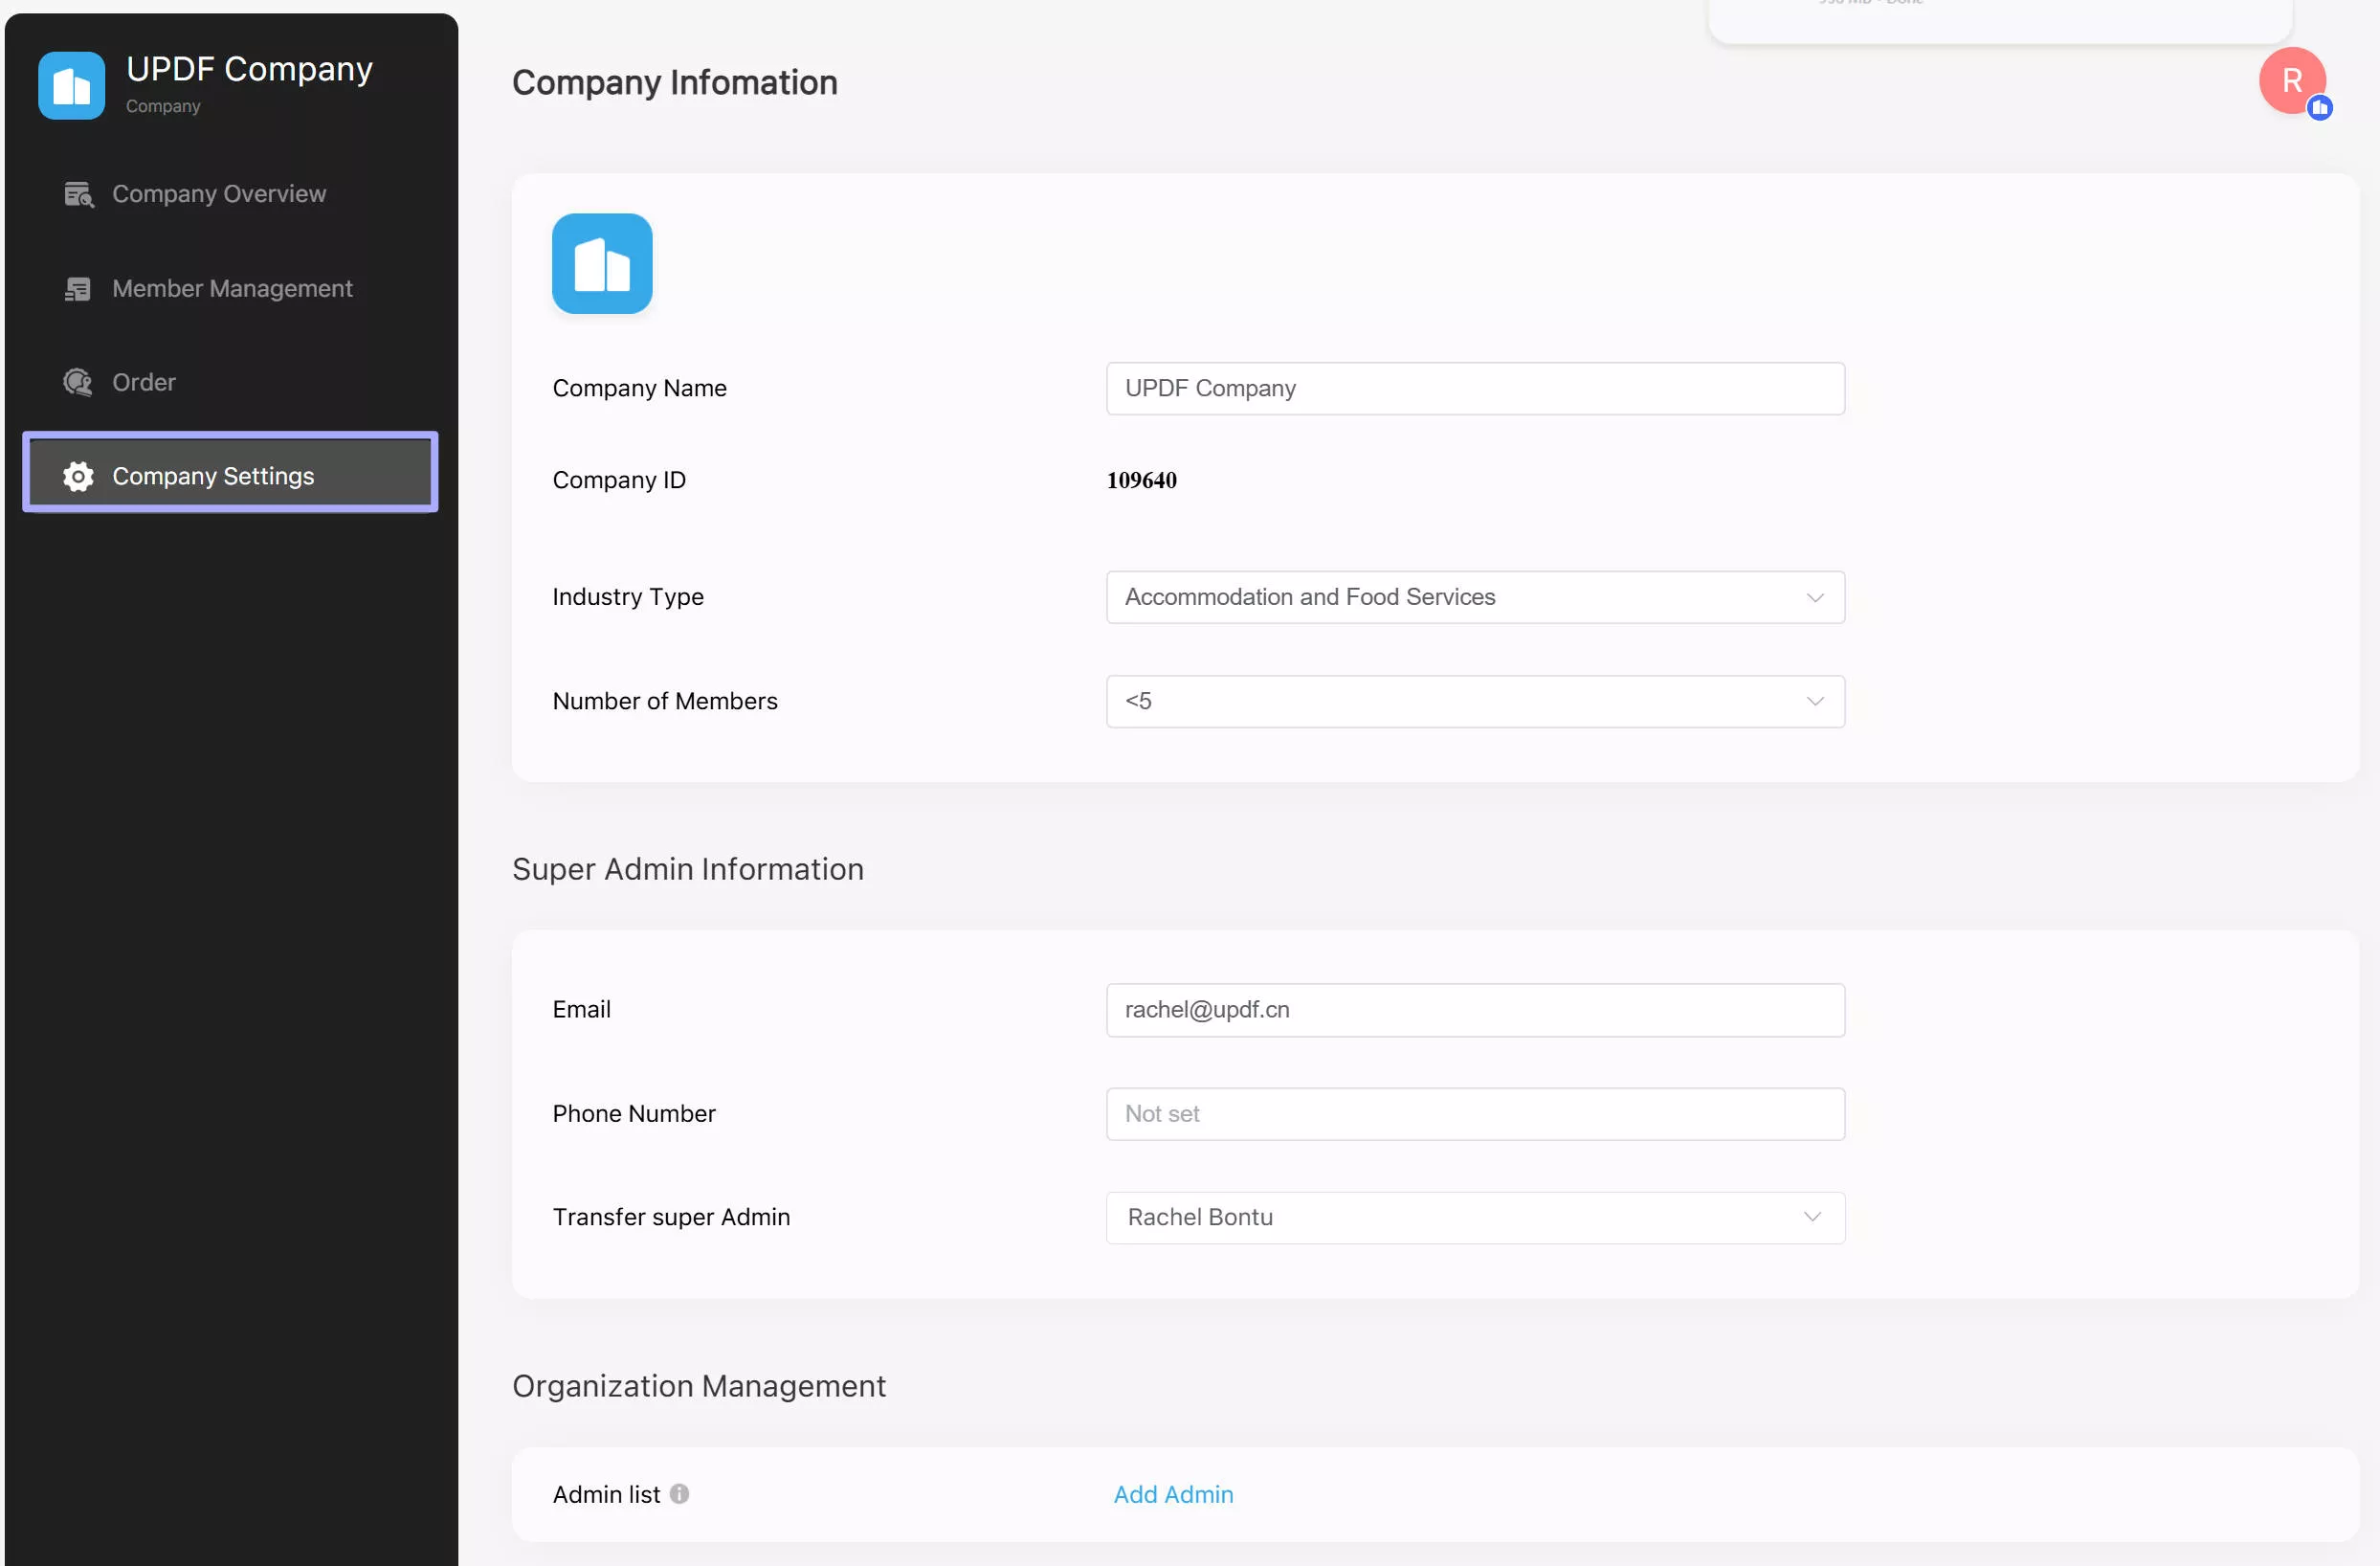
Lead into the "Company Settings" tab from the left panel to open the details of the company provided for the enterprise account.
You can change the name, industry type, and number of employees at any instant. You can also add a new Admin to manage the license, change the dashboard language, and more.
If you want to delete the business information or data, click the "Dissolve Company" button to clear out the enterprise account on UPDF.
4. Invite Members to Join Your Company
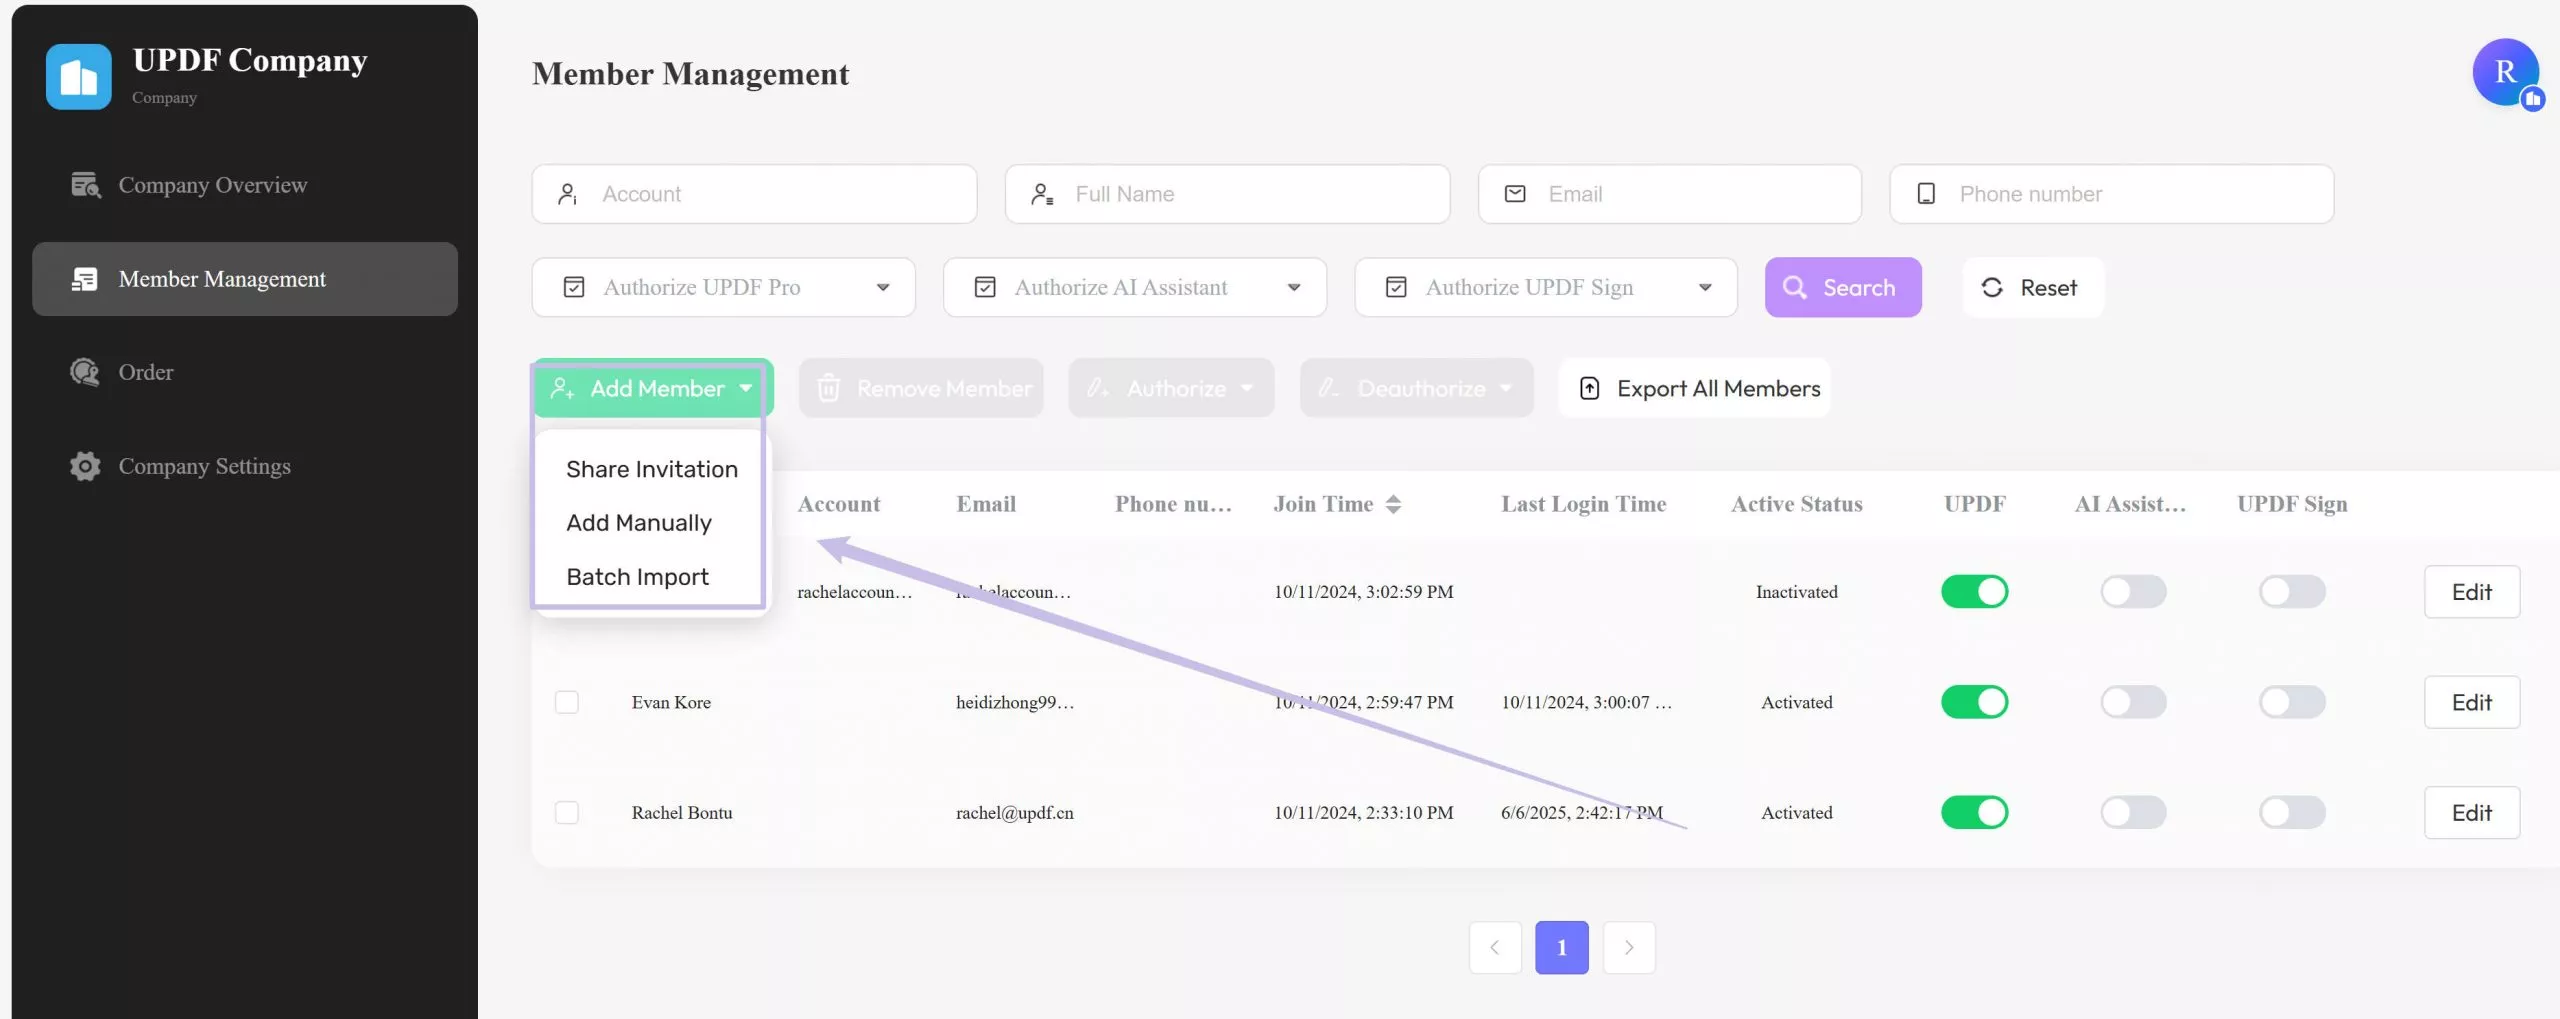
UPDF Enterprise Dashboard allows you to add members in three ways: Share Invitation, Add Manually, and Batch Import. To add a member, press the "Add Member" button and choose the desired option from the drop-down menu.
- Share Invitation: You can add members by copying the link and sharing it with them through communication apps. Moreover, you can add emails of your team members separated by enter and send them an invitation by pressing the "Send Invitation" button.
- Add Manually: To add the team members, fill in the details like Account, Password, First Name, Last Name, Email, and Phone. You can also give authorization by enabling the "UPDF Authorize" or "UPDF AI Authorize" toggle. Next, press the "OK" button to add them successfully.
- Batch Import: You can add hundreds of employees simultaneously by importing the Excel file. UPDF also provides the Employee Table Template that you can download and modify according to your enterprise.
5. How to Accept Invitation
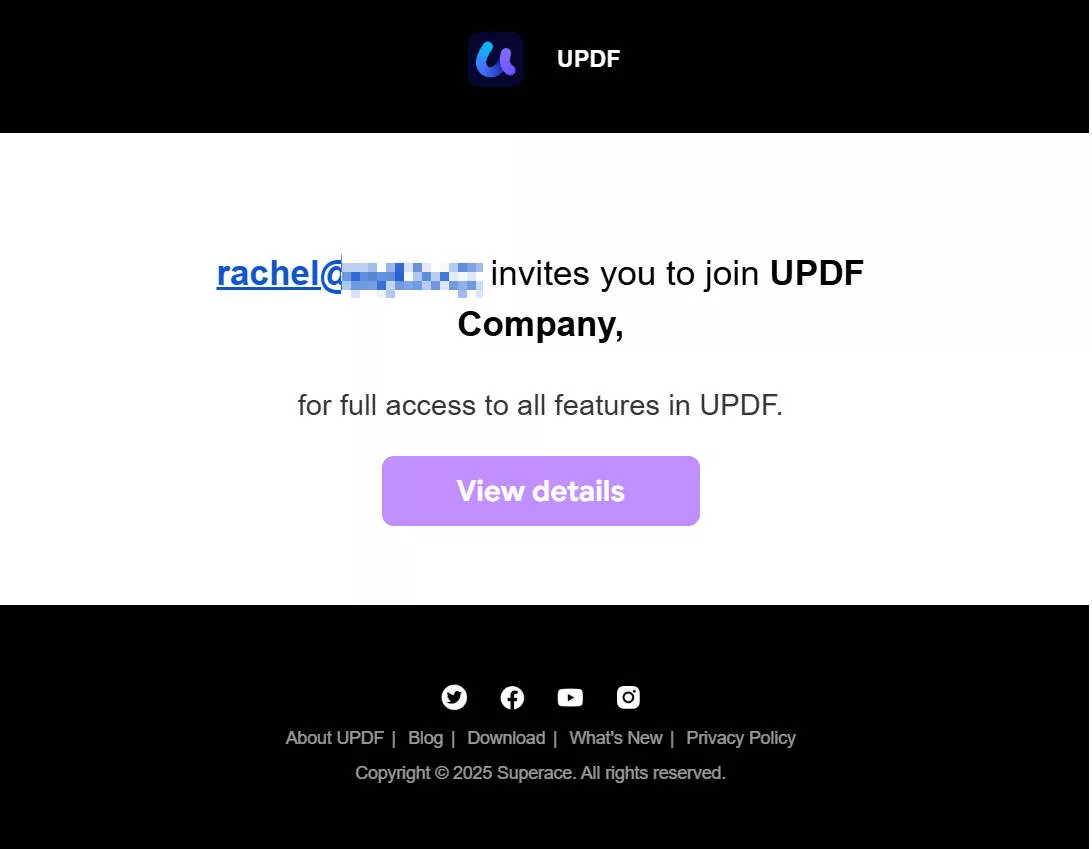
Those who receive an invite to join their company's Enterprise Management System in UPDF will receive an email invitation. As you open the email, click "View Details" to observe the details of the invite.
As you continue to the next screen, you can click the "Accept Invitation" button to accept the invitation, after which you are going to sign up for UPDF. Then, sign up for your enterprise account following the instructions.

If I have a personal account on UPDF, can I still join the company?
Yes, it is entirely possible to join an enterprise account; however, the individual account is entirely separate from the enterprise account. The benefits of these accounts are not mutually shared, as you can log in to any of the accounts to work with UPDF.
6. Member Management and License Authorization
- Add Member
By clicking the "Add Member" button, you can initiate the process to invite or add your employees by three methods (Share Invitation, Add Manually, and Batch Import) as we explained in the "Invite Members to Join Your Company" section above.
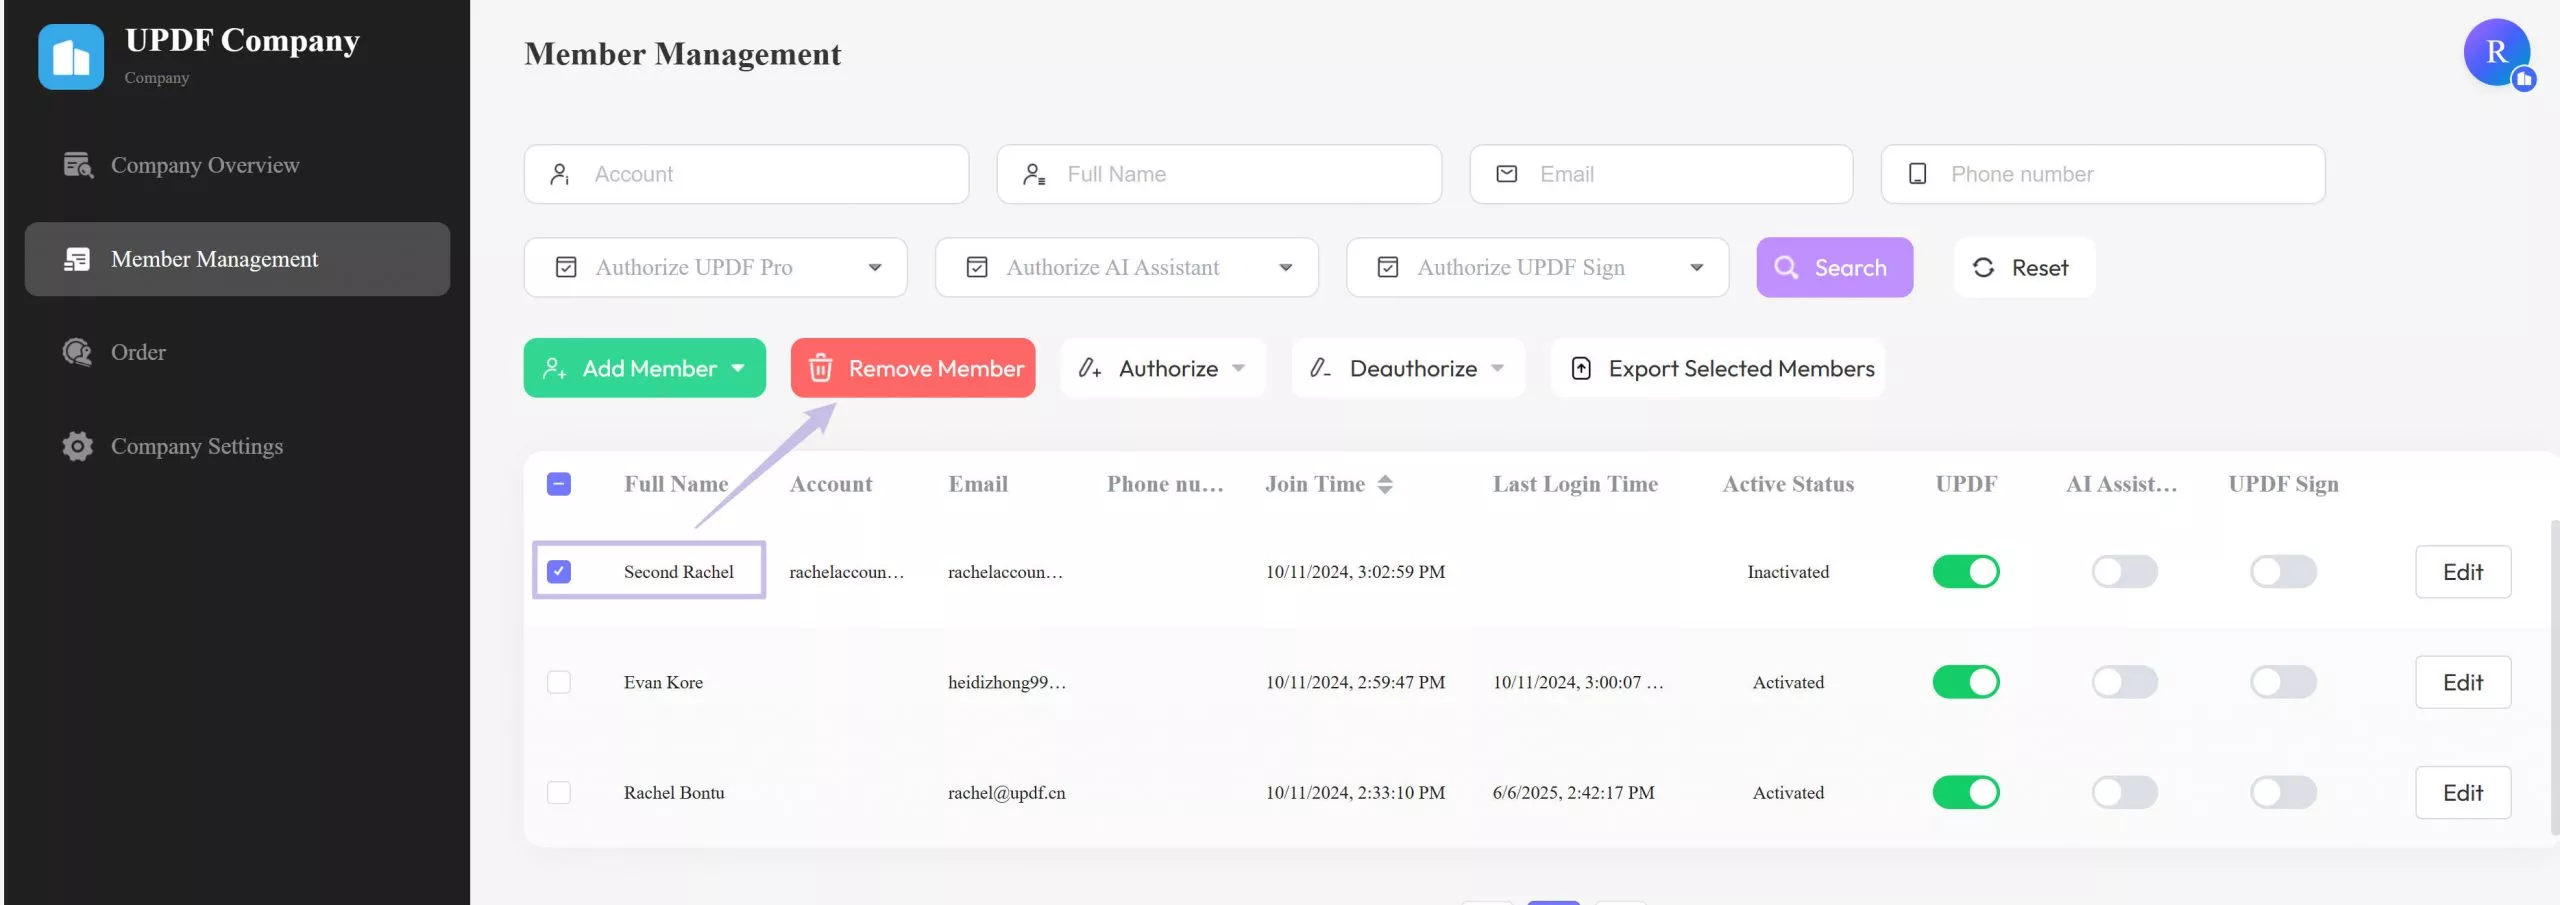
- Remove Member
You can also remove a member by selecting and clicking the "Remove Member" button.
- Authorize and Deauthorize Licenses
Authorize and deauthorize a respective member according to the available options in the Member Management Dashboard.
- You can simply switch to turn on or off the authorization for your members.
- Alternatively, you can select the member and then click the "Authorize" or "Deauthorize" buttons to achieve the same function.
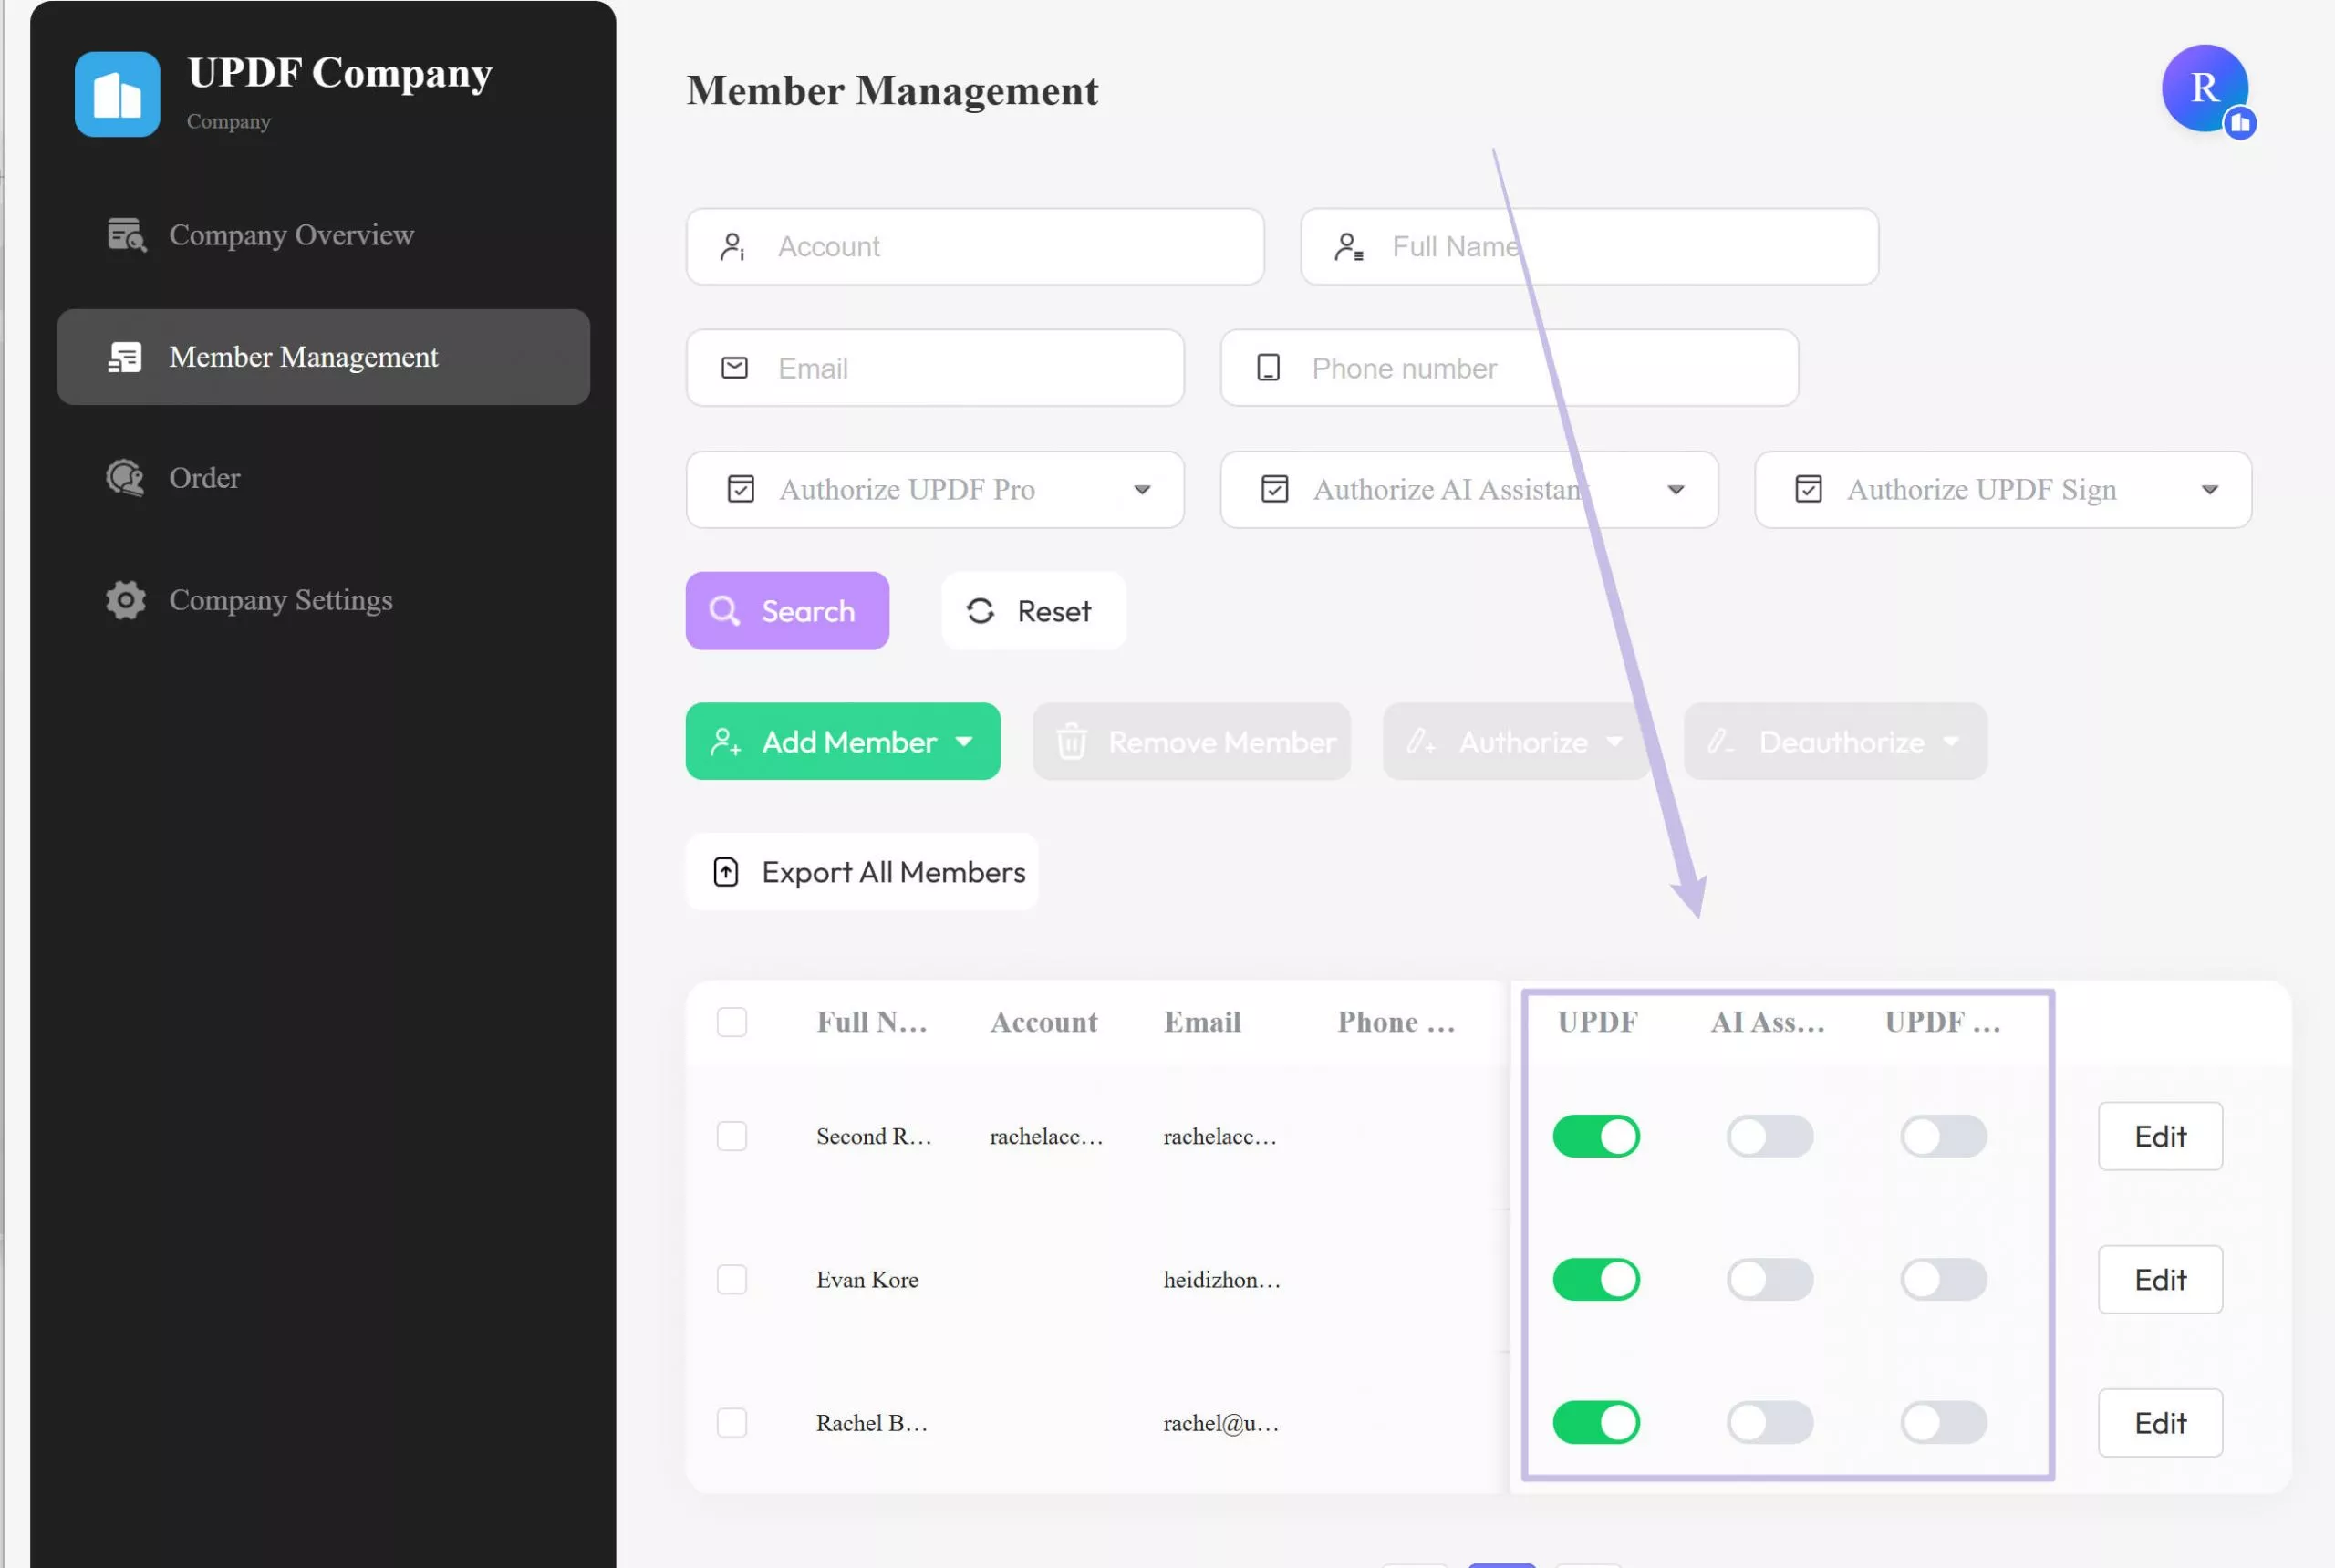
Tip: Considering a user turns over, deauthorizing their license is a single click away. Furthermore, authorizing new users is also a button's work, which turns out to be highly proficient for an enterprise.
7. Download and Use UPDF with Your Enterprise Account
If you are an authorized user of a company having an Enterprise Plan on UPDF, you can have an exclusive experience of all the benefits of this plan. You need to download UPDF on your device and log in with the authorized enterprise account.
Windows • macOS • iOS • Android 100% secure
As you download UPDF successfully, launch and continue to select the "Login" button in the top-right corner of the screen. Continue with the on-screen instructions to log in successfully with the authorized enterprise account.
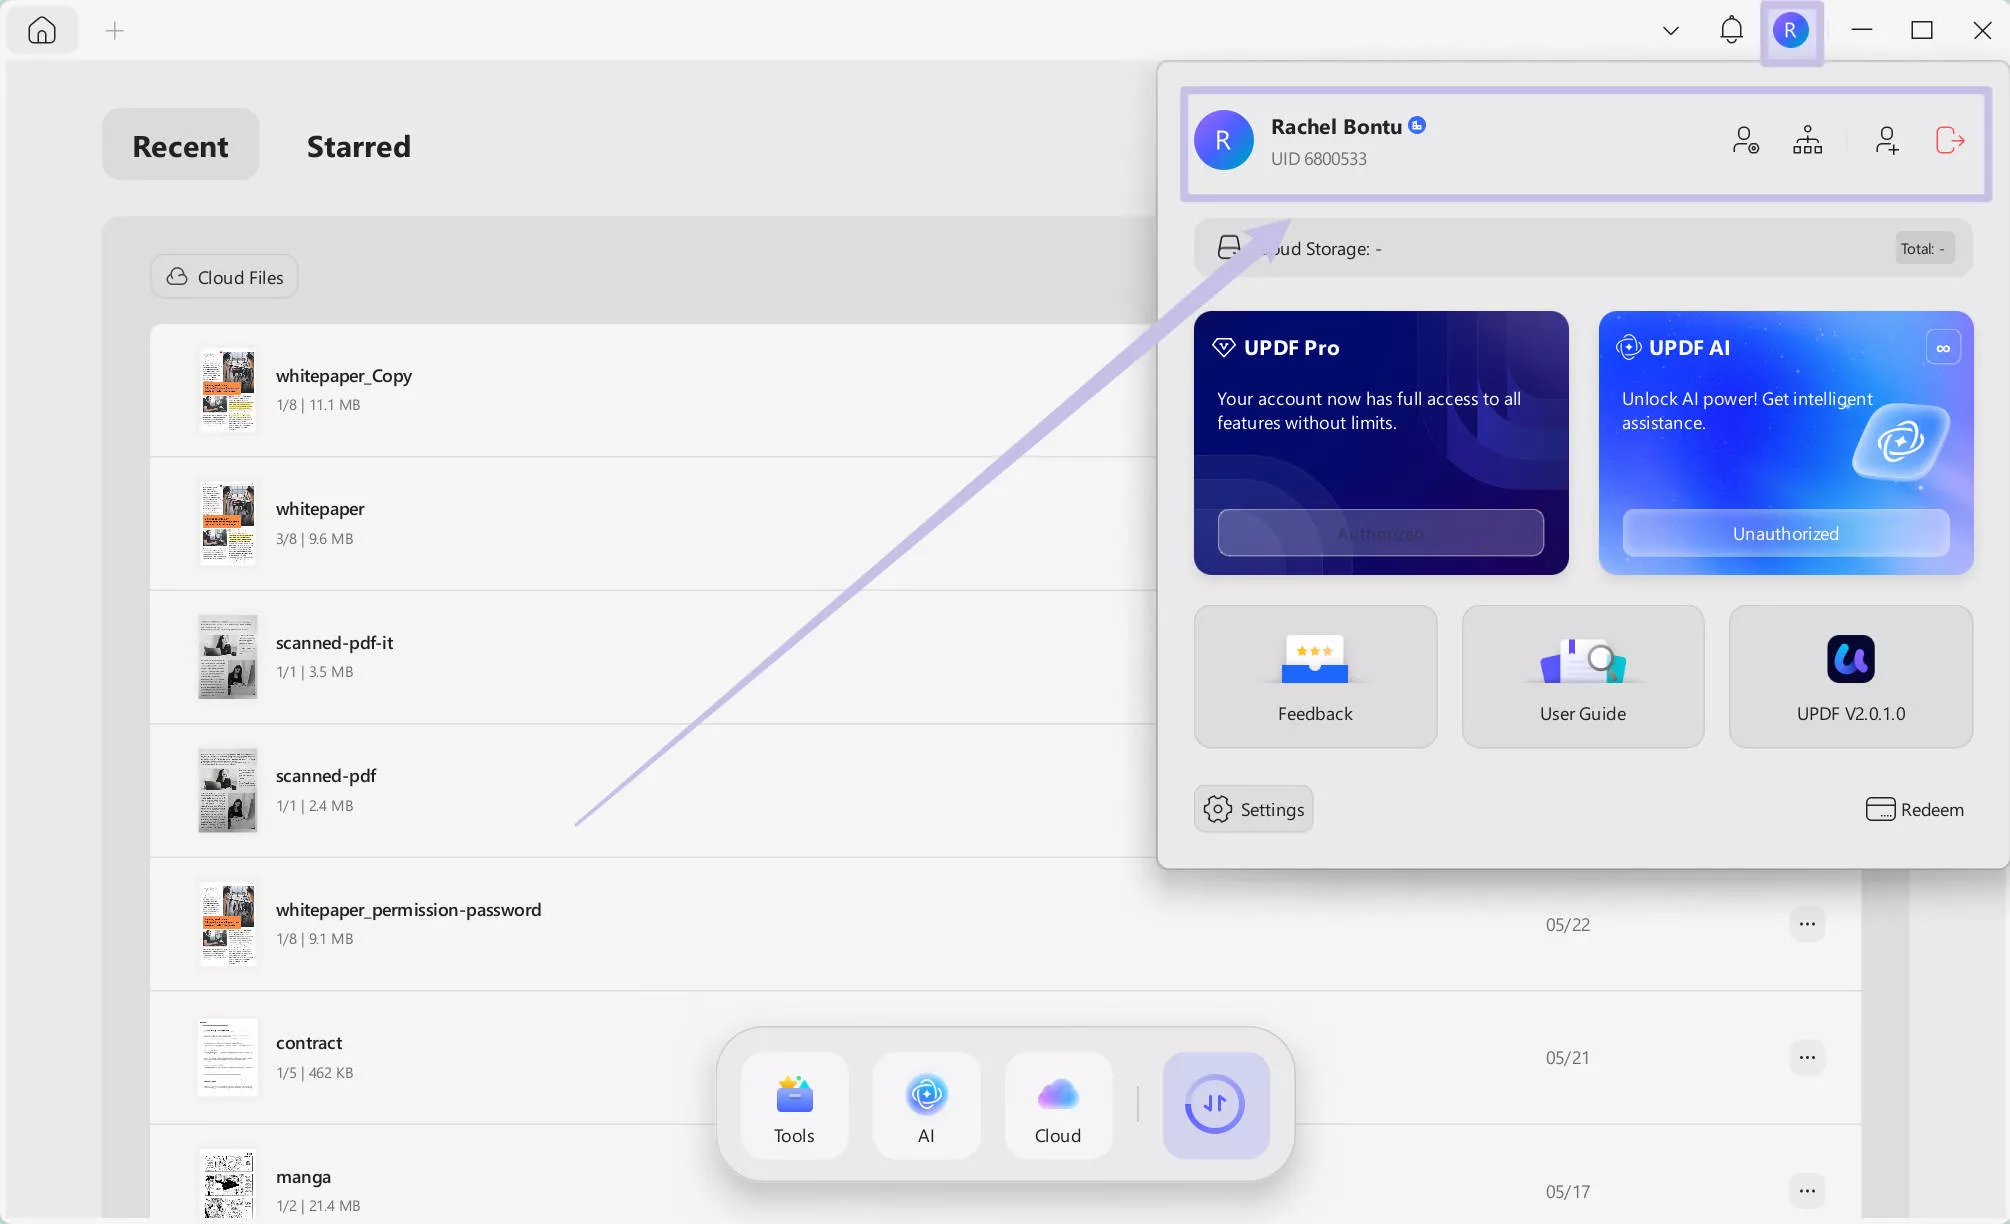
If the administrator has granted authorization for your account, you can find the plan displayed under the "Authorized" label at the same point where you logged into UPDF. You can easily log in to your enterprise account on multiple devices and proceed to enjoy all the benefits associated with the service.
If you still need some help and more details about UPDF Enterprise Plans, please feel free to contact your sales manager or send an email to our customer service at [email protected].
Read this introductory PDF document to learn more about UPDF and its offerings for enterprises.
 UPDF
UPDF
 UPDF for Windows
 UPDF for Mac
 UPDF for iPhone/iPad
 UPDF for Android
 UPDF AI Online
 UPDF Sign
 Edit PDF
 Annotate PDF
 Create PDF
 PDF Form
 Edit links
 Convert PDF
 OCR
OCR PDF to Word
 PDF to Image
 PDF to Excel
 Organize PDF
 Merge PDF
 Split PDF
 Crop PDF
 Rotate PDF
 Protect PDF
 Sign PDF
 Redact PDF
 Sanitize PDF
 Remove Security
 Read PDF
 UPDF Cloud
 Compress PDF
 Print PDF
 Batch Process
 About UPDF AI
 UPDF AI Solutions
 AI User Guide
 FAQ about UPDF AI
 Summarize PDF
 Translate PDF
 Chat with PDF
 Chat with AI
 Chat with image
 PDF to Mind Map
 Explain PDF
 Scholar Research
 Paper Search
 AI Proofreader
 AI Writer
 AI Homework Helper
 AI Quiz Generator
 AI Math Solver
 PDF to Word
 PDF to Excel
 PDF to PowerPoint
 User Guide
 UPDF Tricks
 FAQs
FAQs UPDF Reviews
 Download Center
 Blog
Blog Newsroom
 Tech Spec
 Updates
 UPDF vs. Adobe Acrobat
 UPDF vs. Foxit
 UPDF vs. PDF Expert



 Enya Moore

 Enola Davis
 Engelbert White

 Lizzy Lozano