 UPDF for Windows
 UPDF for Mac
 UPDF for iPhone/iPad
 UPDF for Android
 UPDF AI Online
 UPDF Sign
 Edit PDF
 Annotate PDF
 Create PDF
 PDF Form
 Edit links
 Convert PDF
 OCR
OCR PDF to Word
 PDF to Image
 PDF to Excel
 Organize PDF
 Merge PDF
 Split PDF
 Crop PDF
 Rotate PDF
 Protect PDF
 Sign PDF
 Redact PDF
 Sanitize PDF
 Remove Security
 Read PDF
 UPDF Cloud
 Compress PDF
 Print PDF
 Batch Process
 About UPDF AI
 UPDF AI Solutions
 AI User Guide
 FAQ about UPDF AI
 Summarize PDF
 Translate PDF
 Chat with PDF
 Chat with AI
 Chat with image
 PDF to Mind Map
 Explain PDF
 PDF AI Tools
 Image AI Tools
 AI Chat Tools
 AI Writing Tools
 AI Study Tools
 AI Working Tools
 Other AI Tools
 PDF to Word
 PDF to Excel
 PDF to PowerPoint
 User Guide
 UPDF Tricks
 FAQs
FAQs UPDF Reviews
 Download Center
 Blog
Blog Newsroom
 Tech Spec
 Updates
 UPDF vs. Adobe Acrobat
 UPDF vs. Foxit
 UPDF vs. PDF Expert
Do you want your designs to look professional after printing? Are you looking to add crop marks to your InDesign documents but don't know how it works? We've got you!
This article provides a complete guide on how to add crop marks in InDesign. Whether you need to create crop marks, export them to PDF, or remove them, we will guide you through it step by step.
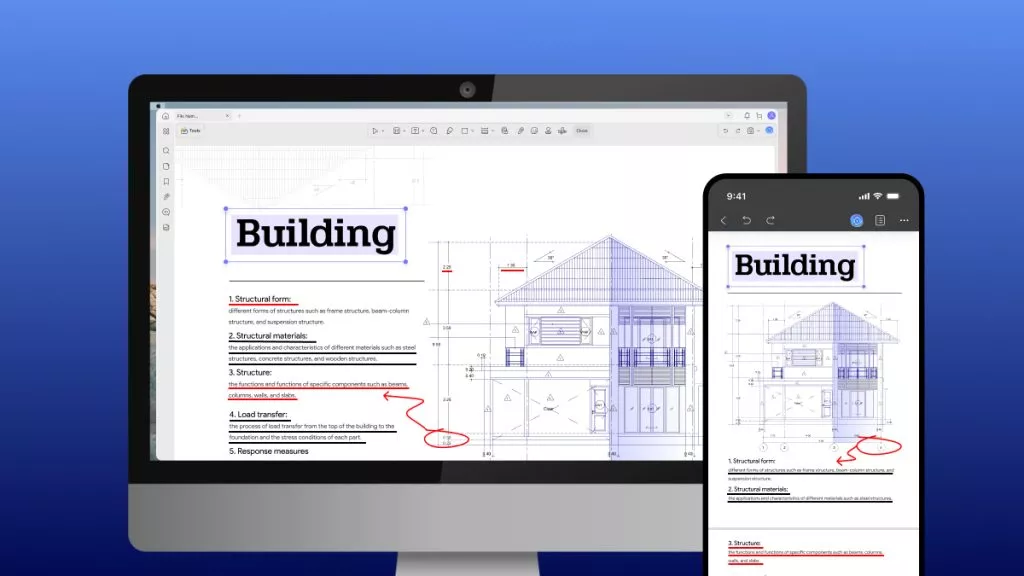
We will also introduce an easier way to crop your PDFs using UPDF. It's an AI-powered PDF editor that lets you organize and crop your PDF pages with a few clicks. Download and try it! Find out how easy it is to handle your digital documents using it!
Windows • macOS • iOS • Android 100% secure
Now, let's explore what crop marks are in InDesign and how to add them.
Part 1. What Are Crop Marks in InDesign?
Crop marks are the small horizontal and vertical lines placed near the corner of the page or the selected design elements. Adding these marks is essential if you want your printed designs to look sleek and professional.
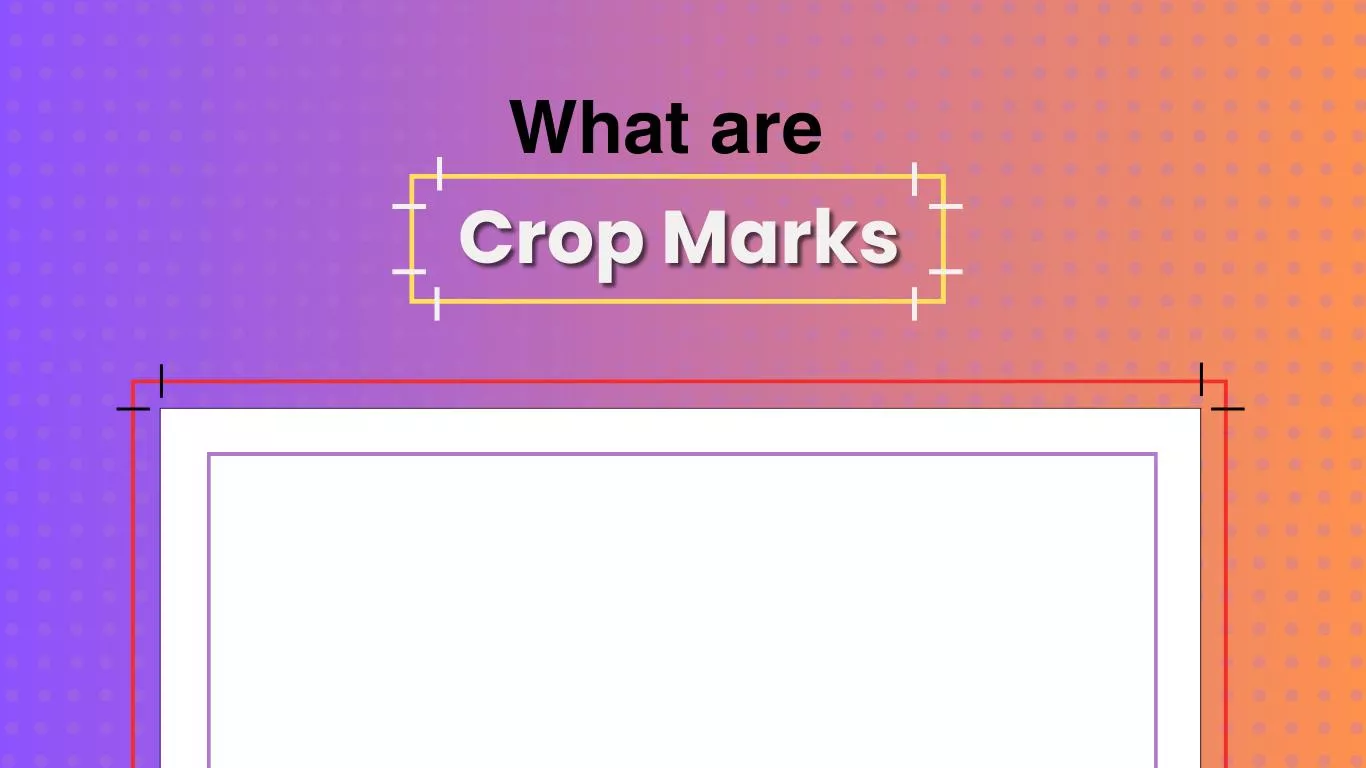
They act as a guideline for precisely cutting the paper after printing. If you don't add crop marks, the pages of your designs will have awkward and unequal margins. Therefore, InDesign lets you create and customize the crop marks and export them with the PDF for printing.
Let's see how to add them in the following section.
Part 2. How to Add and Adjust Crop Marks in InDesign?
InDesign lets you insert crop marks and adjust their dimensions for an entire document or individual design elements.
Let's see how to show crop marks in InDesign using the Scripts.
Step 1: Open or create a new document in InDesign. Select the design elements you want to add crop marks.
Step 2: Click the "Window" menu and choose "Utilities." Then click "Scripts" to enable this option.
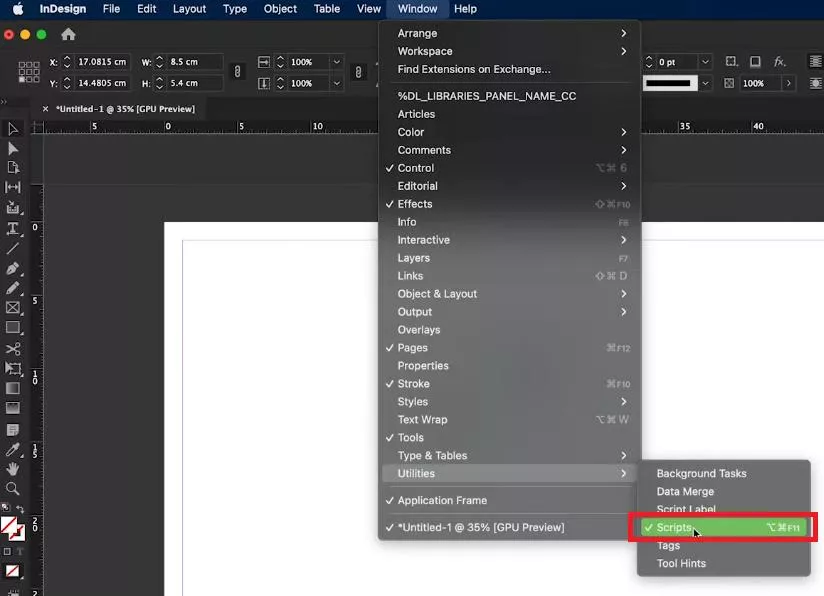
Step 3: Go to the right panel and select "Scripts." Choose the folder where you have InDesign installed. For most people, it is the "Application" folder. Click on it and expand "Samples."
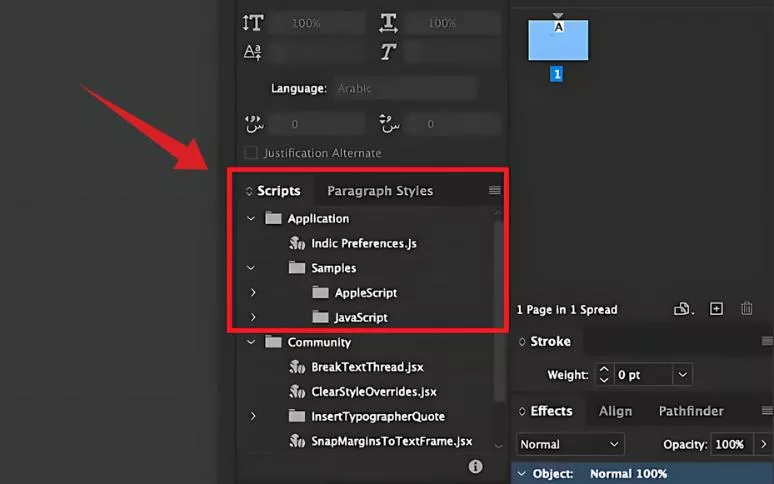
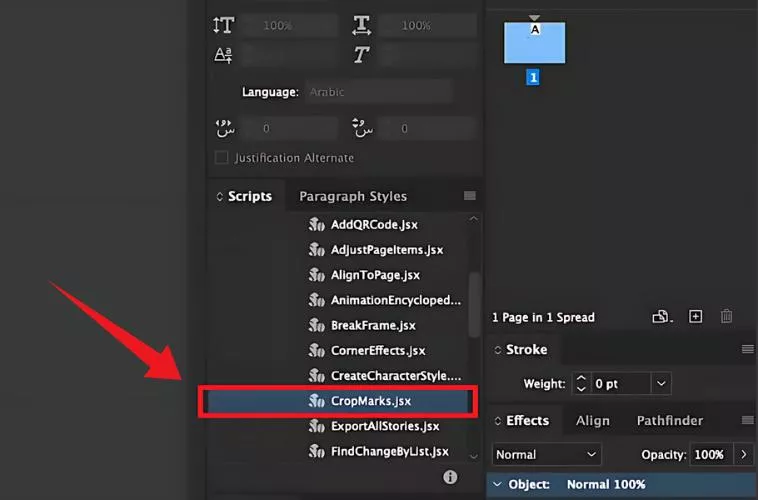
Step 4: Choose the "Javascript" folder and select the "CropMarks.jsx." script from the list.
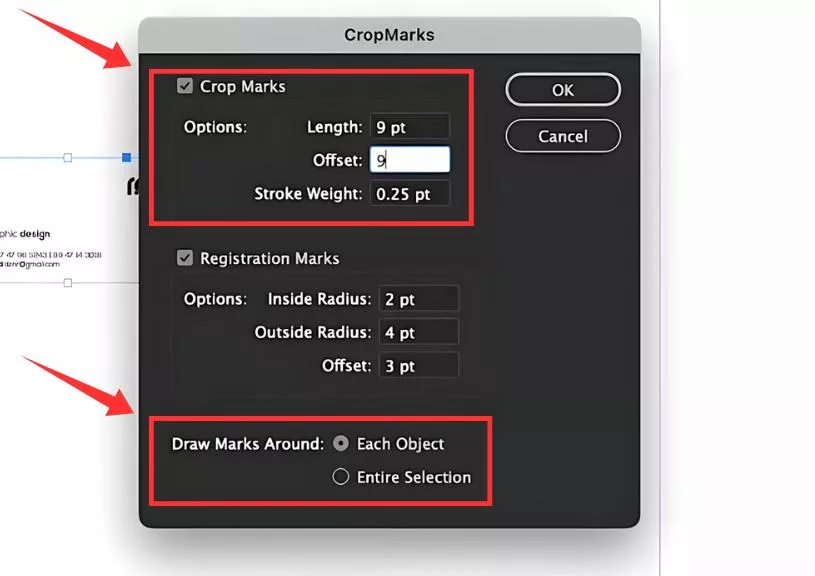
Step 5: A dialogue window will open on your screen. From here, enable "Crop Marks" and adjust the length, offset, and stroke weight.
Step 6: Choose how you want the marks added under "Draw Marks Around." You can choose to add marks to separate objects or the entire selection. Click "OK" once you're done.
Now, you know how to add and adjust crop marks in InDesign. Let's see how you can export your files with crop marks.
Part 3. How to Export with Crop Marks in InDesign?
InDesign also lets you add crop marks to your design documents using its export option. It comes in handy if you need to add crop marks to the entire document at once. Plus, you can export your design as a print-ready PDF file.
Here's how you can use InDesign to export with crop marks.
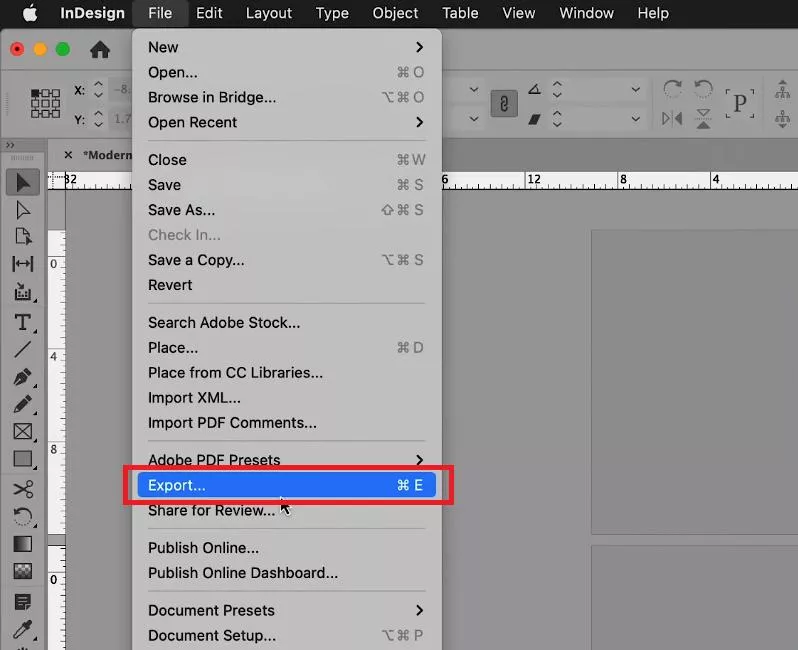
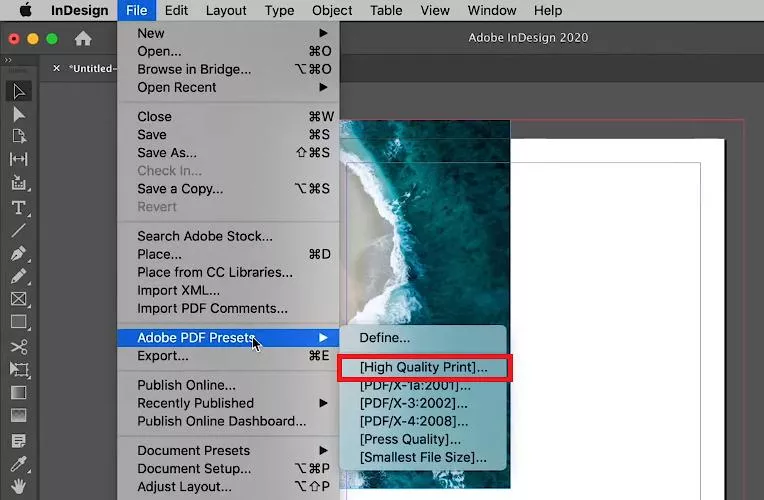
Step 1: Open your document with InDesign and go to the 'File" menu. Click "Export" from the list.
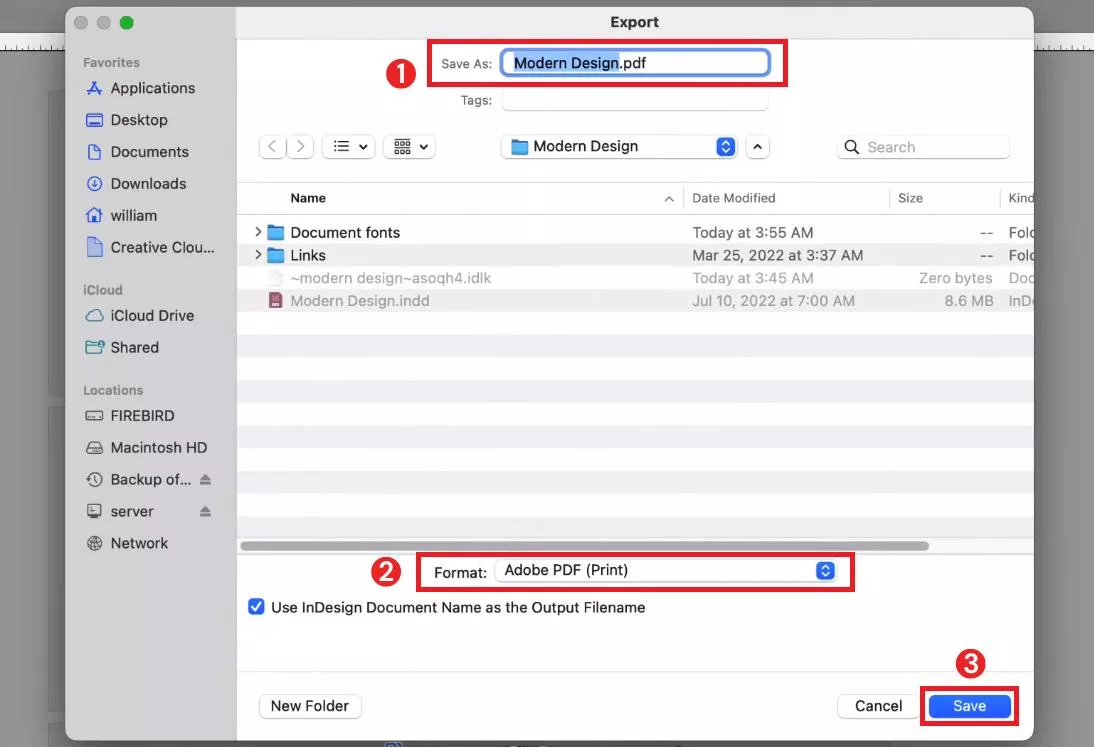
Step 2: A new window will appear. Name your file next to "Save as" and choose "Adobe PDF Print" as the format type. Then click "Save" and continue.
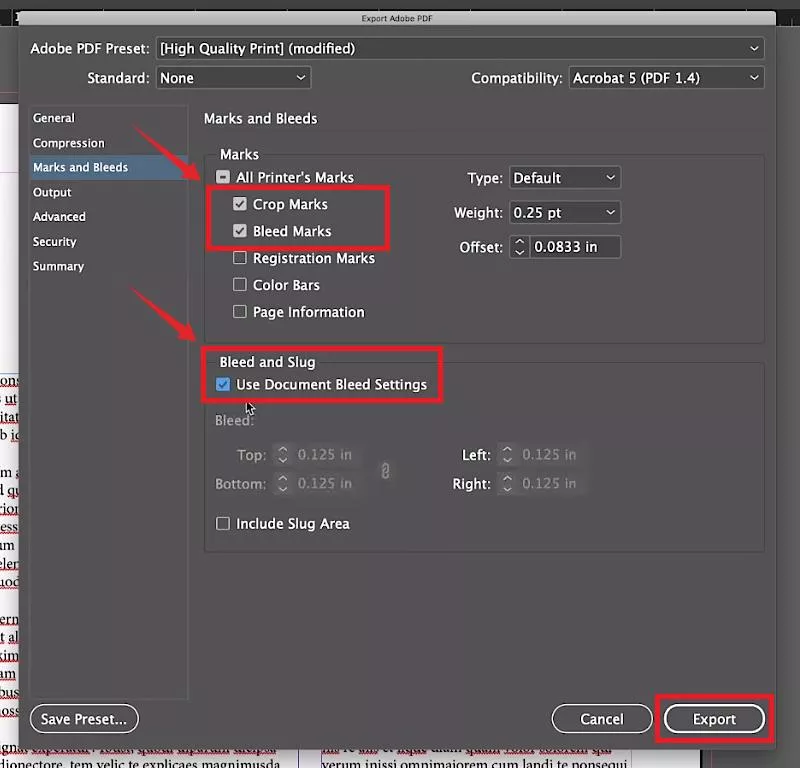
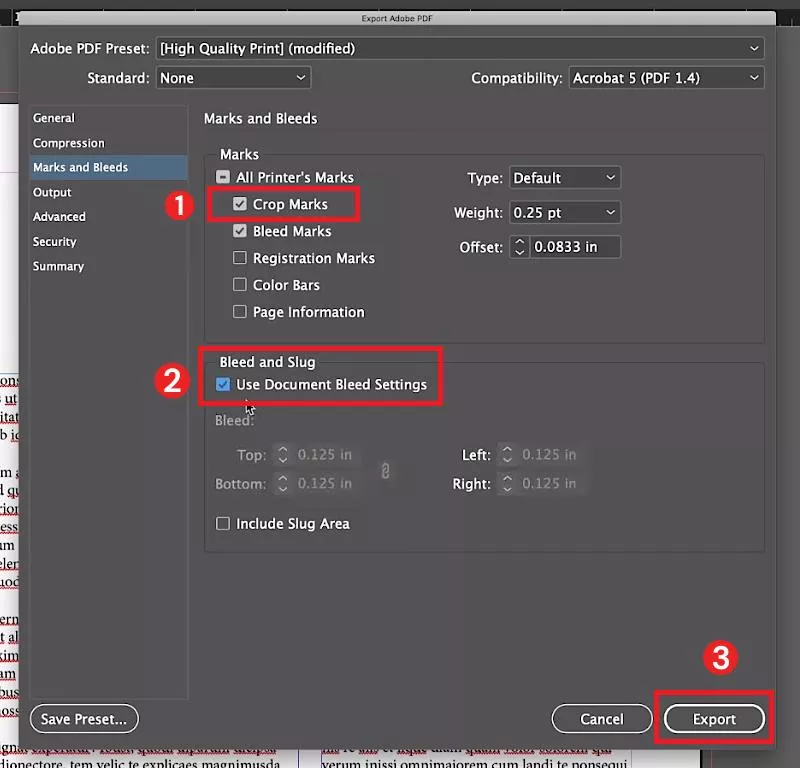
Step 3: Select "Marks and Bleeds" from the left. Go to the "Marks" section and checkmark "Crop Marks" and "Bleed Marks."
Step 4: Enable the "Use Document Bleed Settings" option under "Bleed and Slug." You can customize it by defining the dimensions of all sides.
Step 5: Click "Export" once you are done to save your design as a PDF with crop marks.
And that's how to export with crop marks in InDesign. But did you know that you can also remove these marks if needed? Keep reading to find out how!
Part 4. How to Remove Crop Marks in InDesign?
If you've added crop marks to a document but don't need to print it, then crop marks are pretty unnecessary. You may be planning to distribute the file digitally. For instance, you may need to send it to a client or post it on a website.
In that case, you can remove the crop marks using InDesign. Let's see how!
Step 1: Open the file with crop marks in InDesign and go to "File." Click "Adobe PDF Preset" from the list and select "High Quality Print."
Step 2: A dialogue window will open up. Click "Marks and Bleeds" from here.
Step 3: Uncheck the "Crop Marks" option under the "Marks" section. Then, checkmark "Use Document Bleed Settings" under "Bleed and Slug." Click "Export" once done.
Now you've learned how to remove crop marks in InDesign! But we're not done yet. There is an easier solution to crop your PDFs. Let's learn more about it below!
Part 5. Bonus Tip: How to Crop PDF Without InDesign?
InDesign offers professional-grade tools to design, edit, or crop your documents. However, it's expensive and requires a lot of technical skills. Moreover, it's not compatible with all devices particularly the ones running older systems.
So, is there a reliable and budget-friendly solution for cropping your PDFs?
Let us introduce you to UPDF! It is the ultimate AI-powered solution for editing and cropping your PDF documents without hassle. Whether you need to crop the entire page or specific images within the document, UPDF makes it possible.
Why Choose UPDF?
Let's look at some pros that make UPDF the best InDesign alternative.
- Ease of use: Cropping PDFs with UPDF is effortless. No technical skills are needed. Anyone can use it to edit and handle their documents.
- Broad compatibility: UPDF is compatible with all platforms. These include Windows, Mac, iOS, and Android. This means you can edit PDF wherever you need and crop PDF with Windows and Mac computer!
- Fast and reliable: Unlike Adobe InDesign, UPDF is lightweight. It does not require high-end operating systems, facilitating PDF management for everyone!
- Affordable: UPDF is much cheaper than InDesign, and you can use one license on up to four devices at once.
Steps to Crop PDF Using UPDF
Download and install UPDF on your device. Then, follow the steps below to crop your PDF documents using it.
Windows • macOS • iOS • Android 100% secure
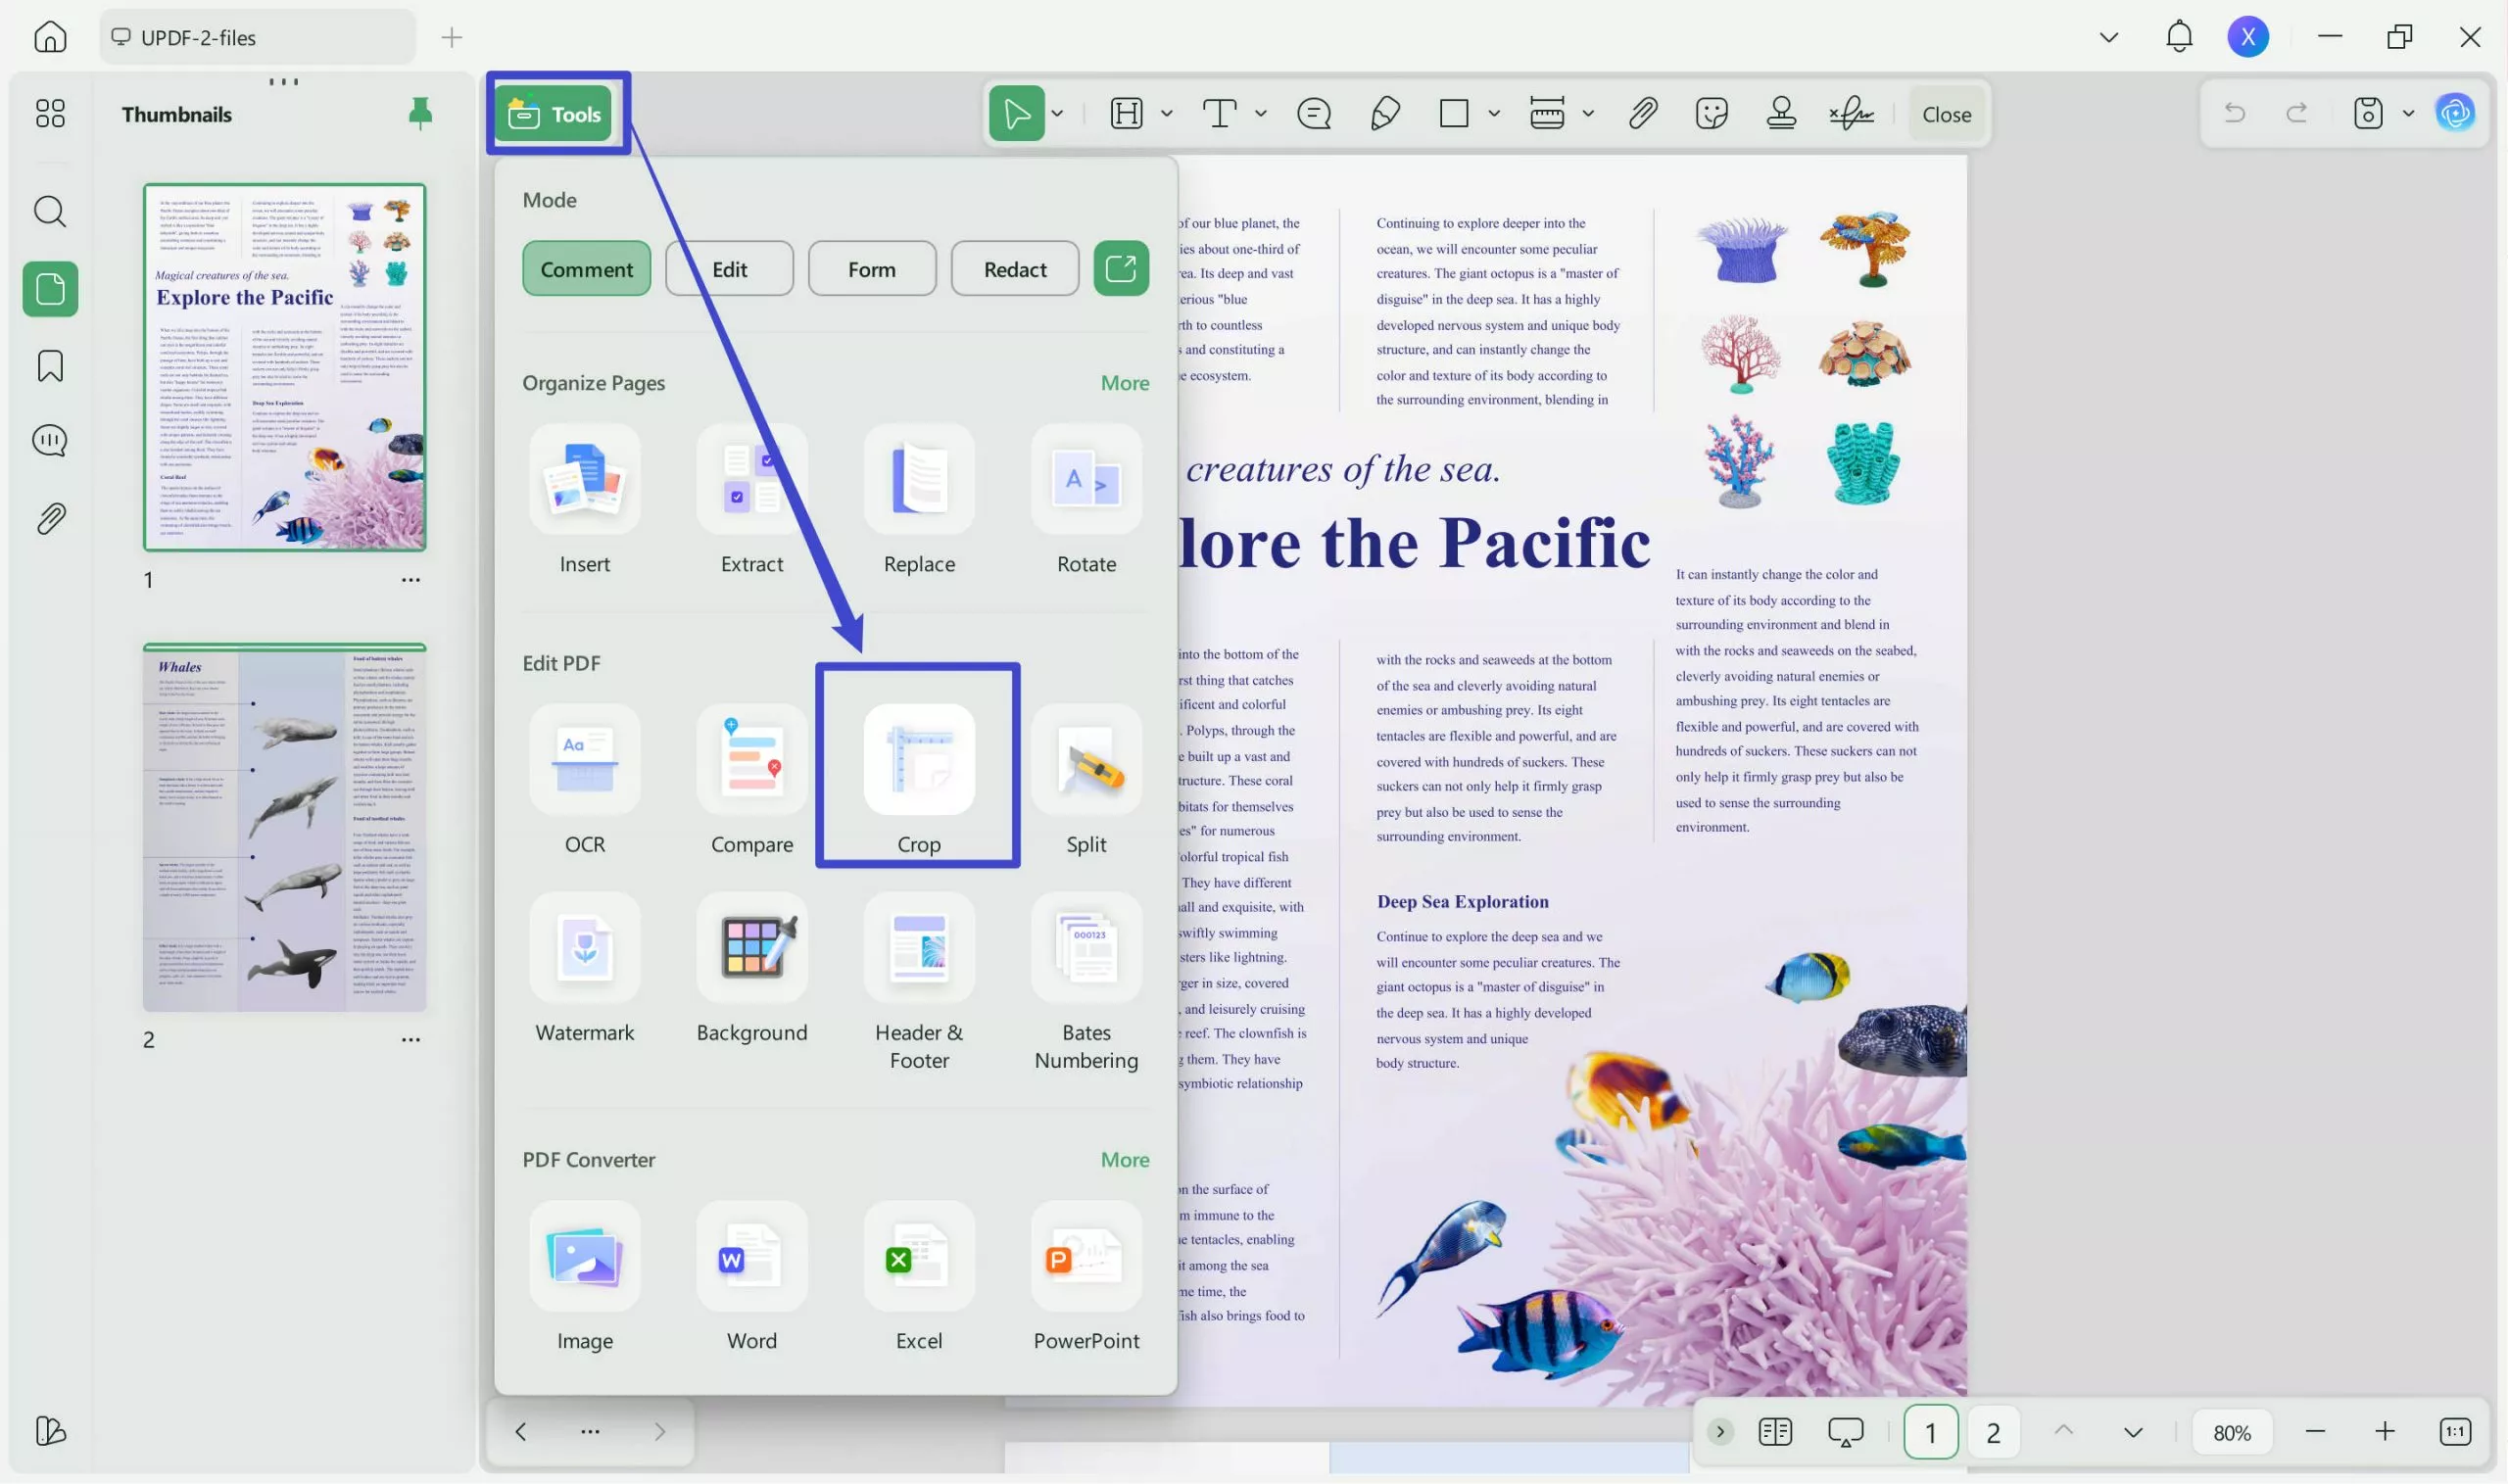
Step 1: Launch UPDF on your PC and click "Open File" to import the PDF you need to crop.
Step 2: Wait for your PDF to open. Then select "Crop" in "Tools" from the left panel.
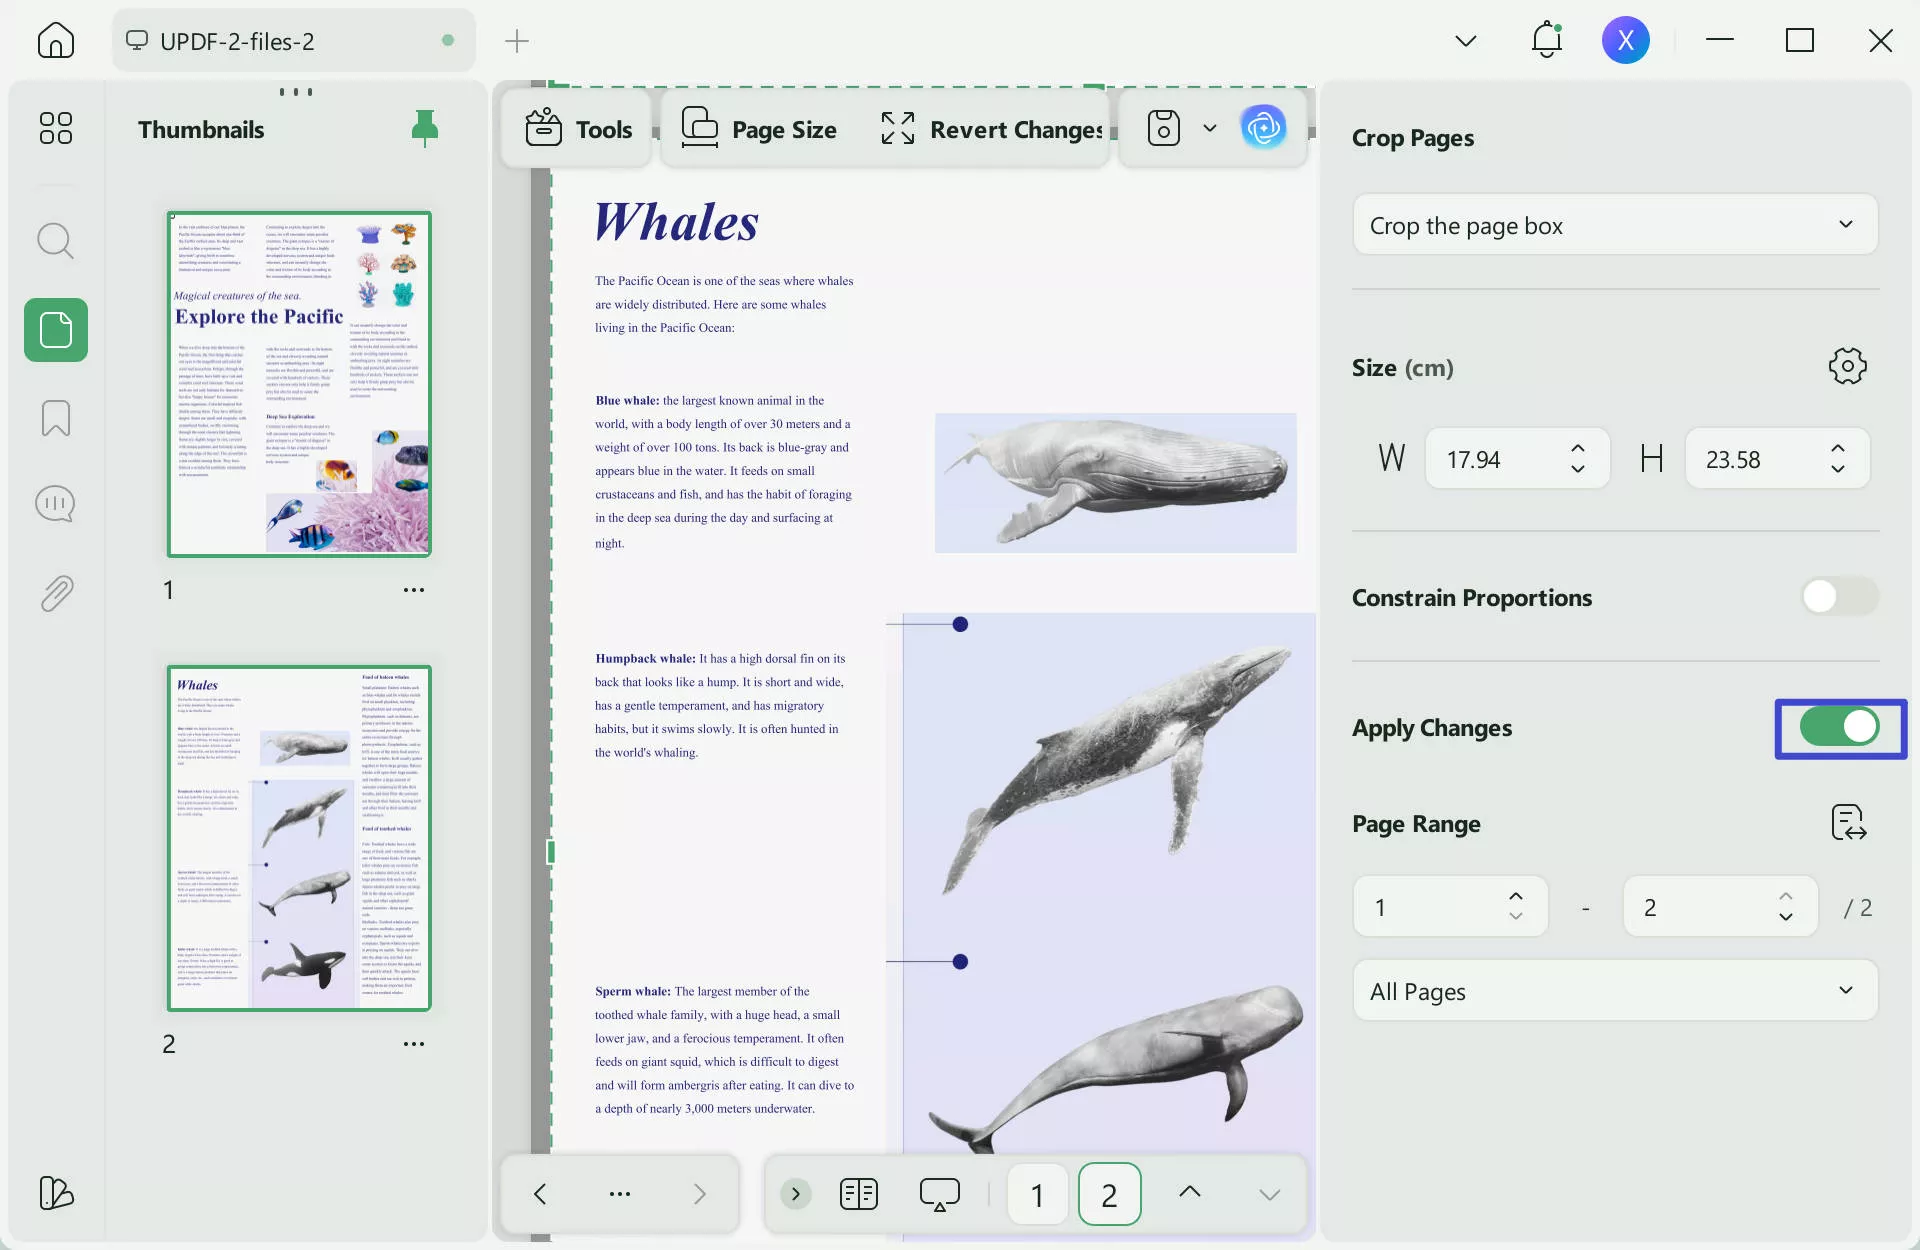
Step 3: Drag the margin of the copping box to your desired dimensions. You can also manually write the dimensions under "Crop the Margin" in the right panel.
Step 4: Turn on the toggle for "Apply Changes" from the right. Select "Page Range" and the cropping method. Then click "Apply".
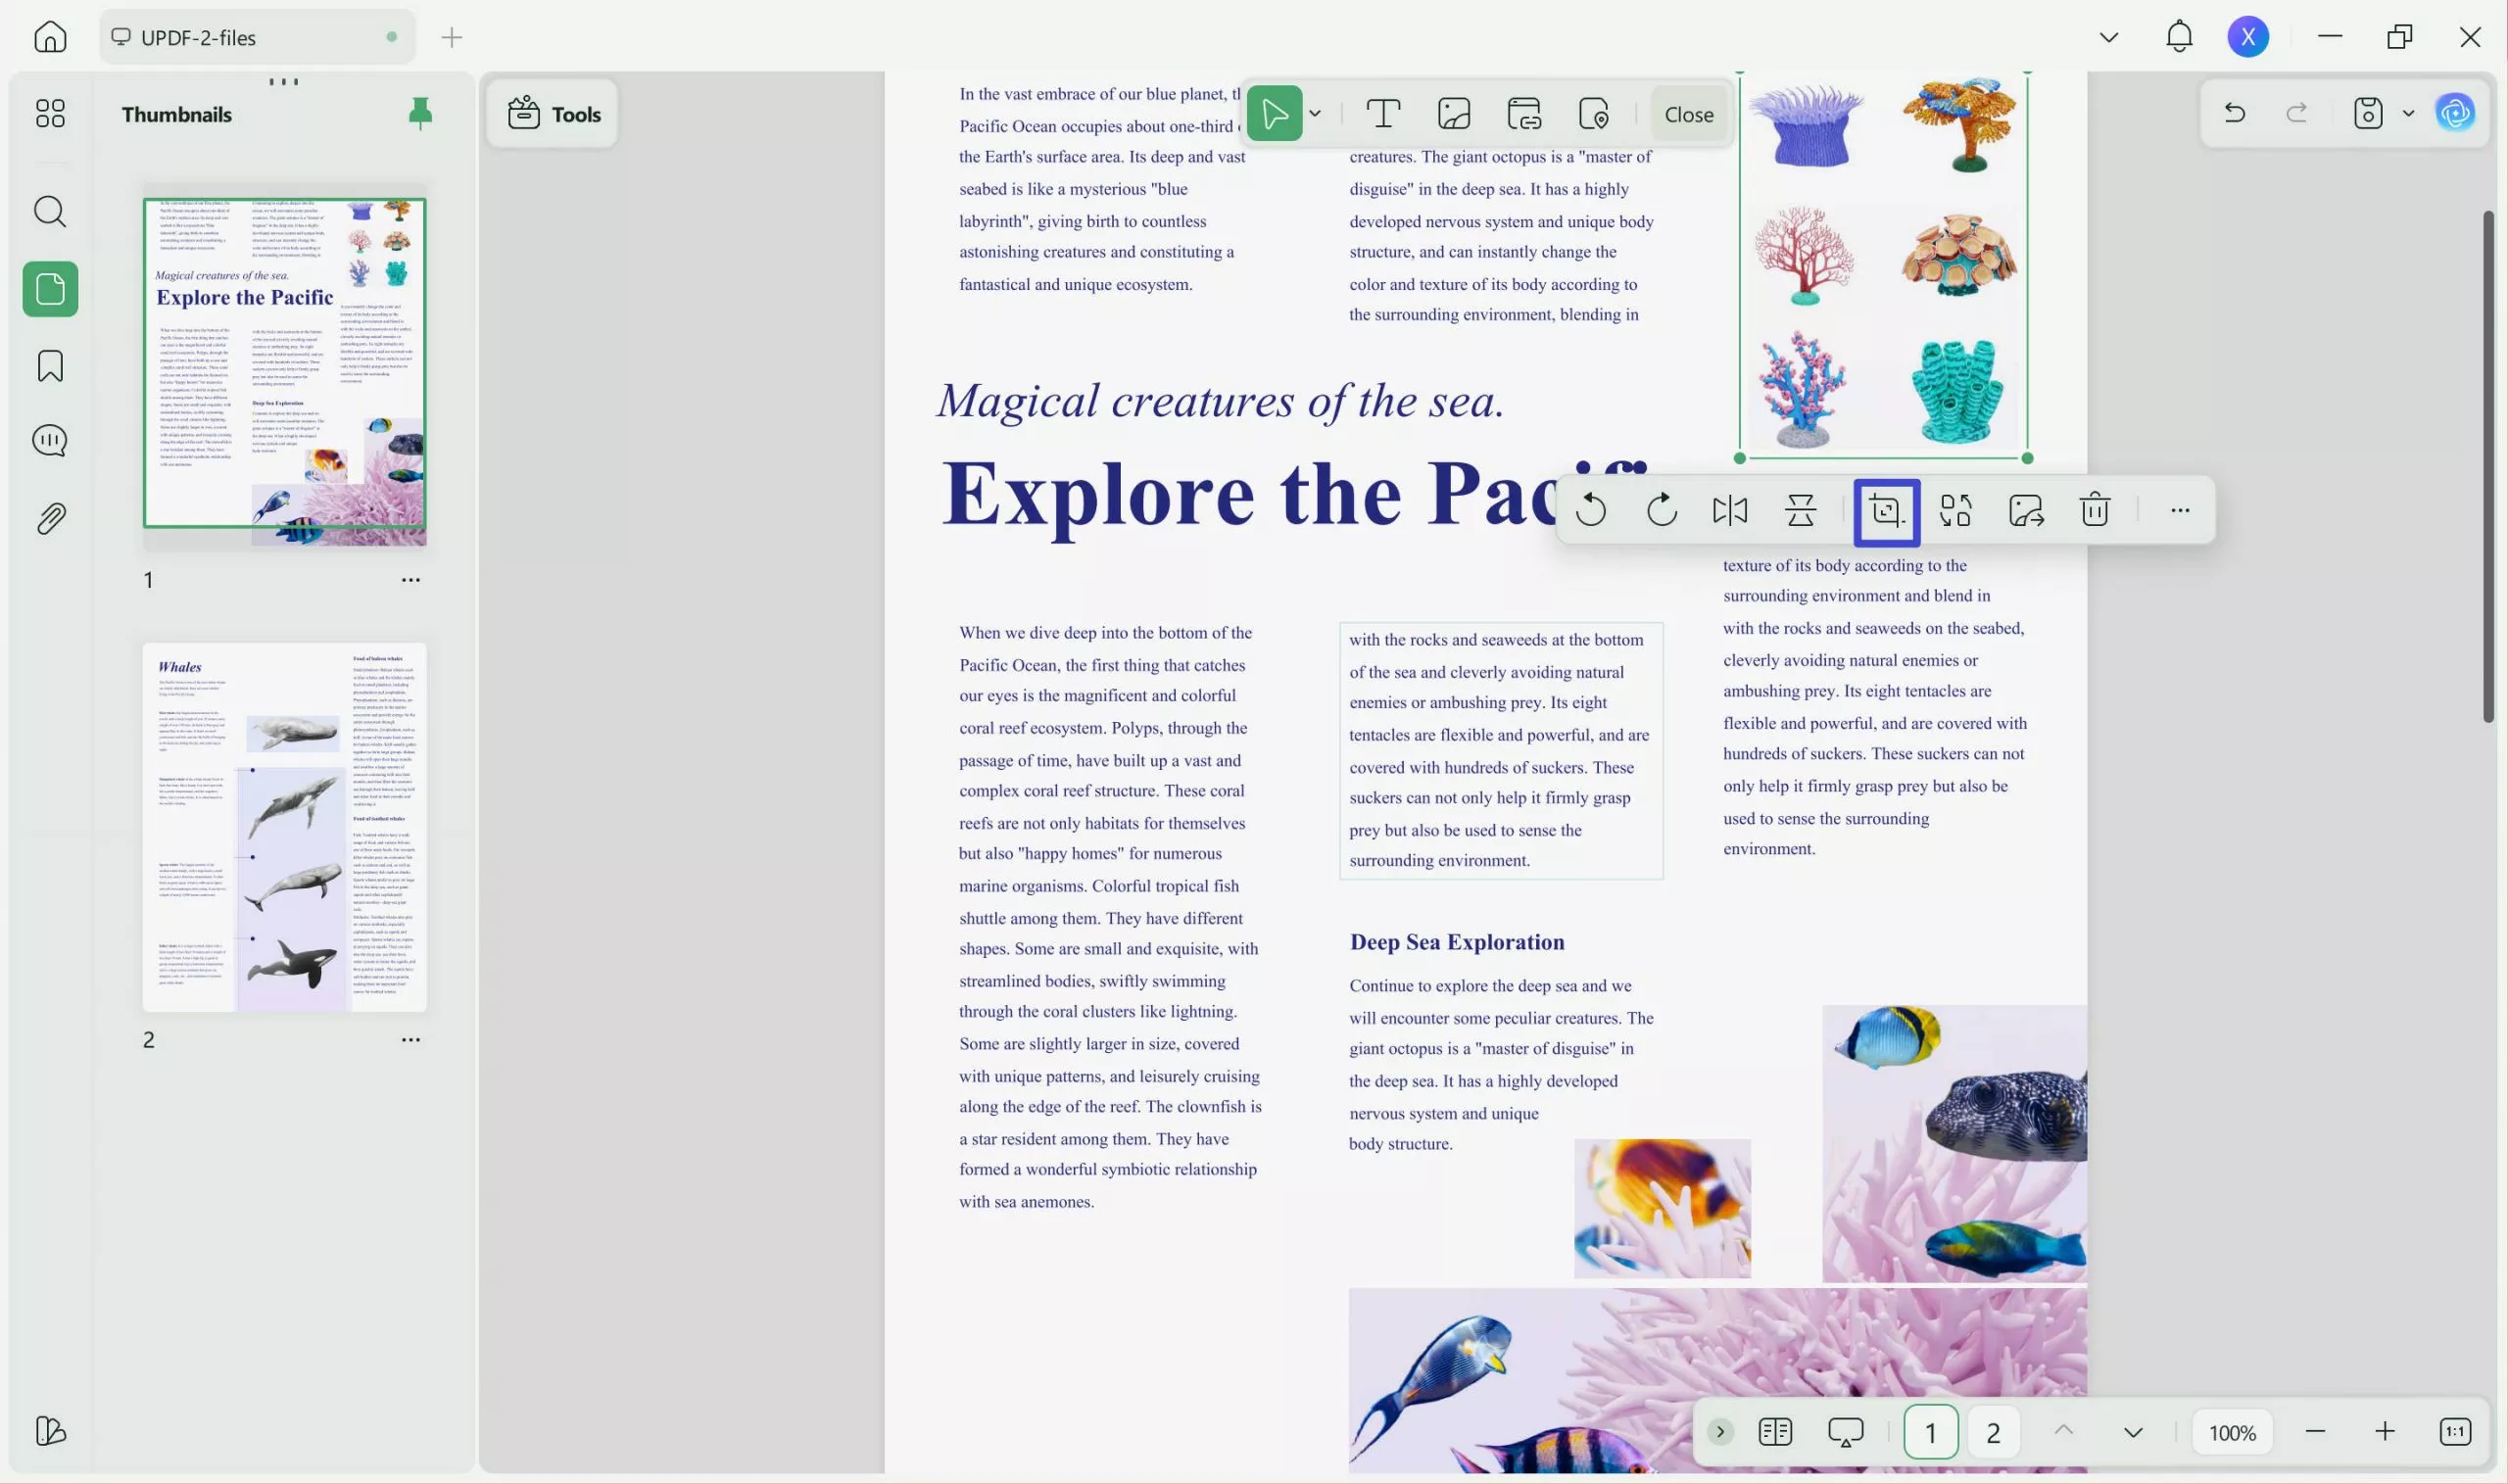
Step 4: If you need to crop an image, select "Edit" in "Tools" and click your desired image to reveal the editing toolbar.
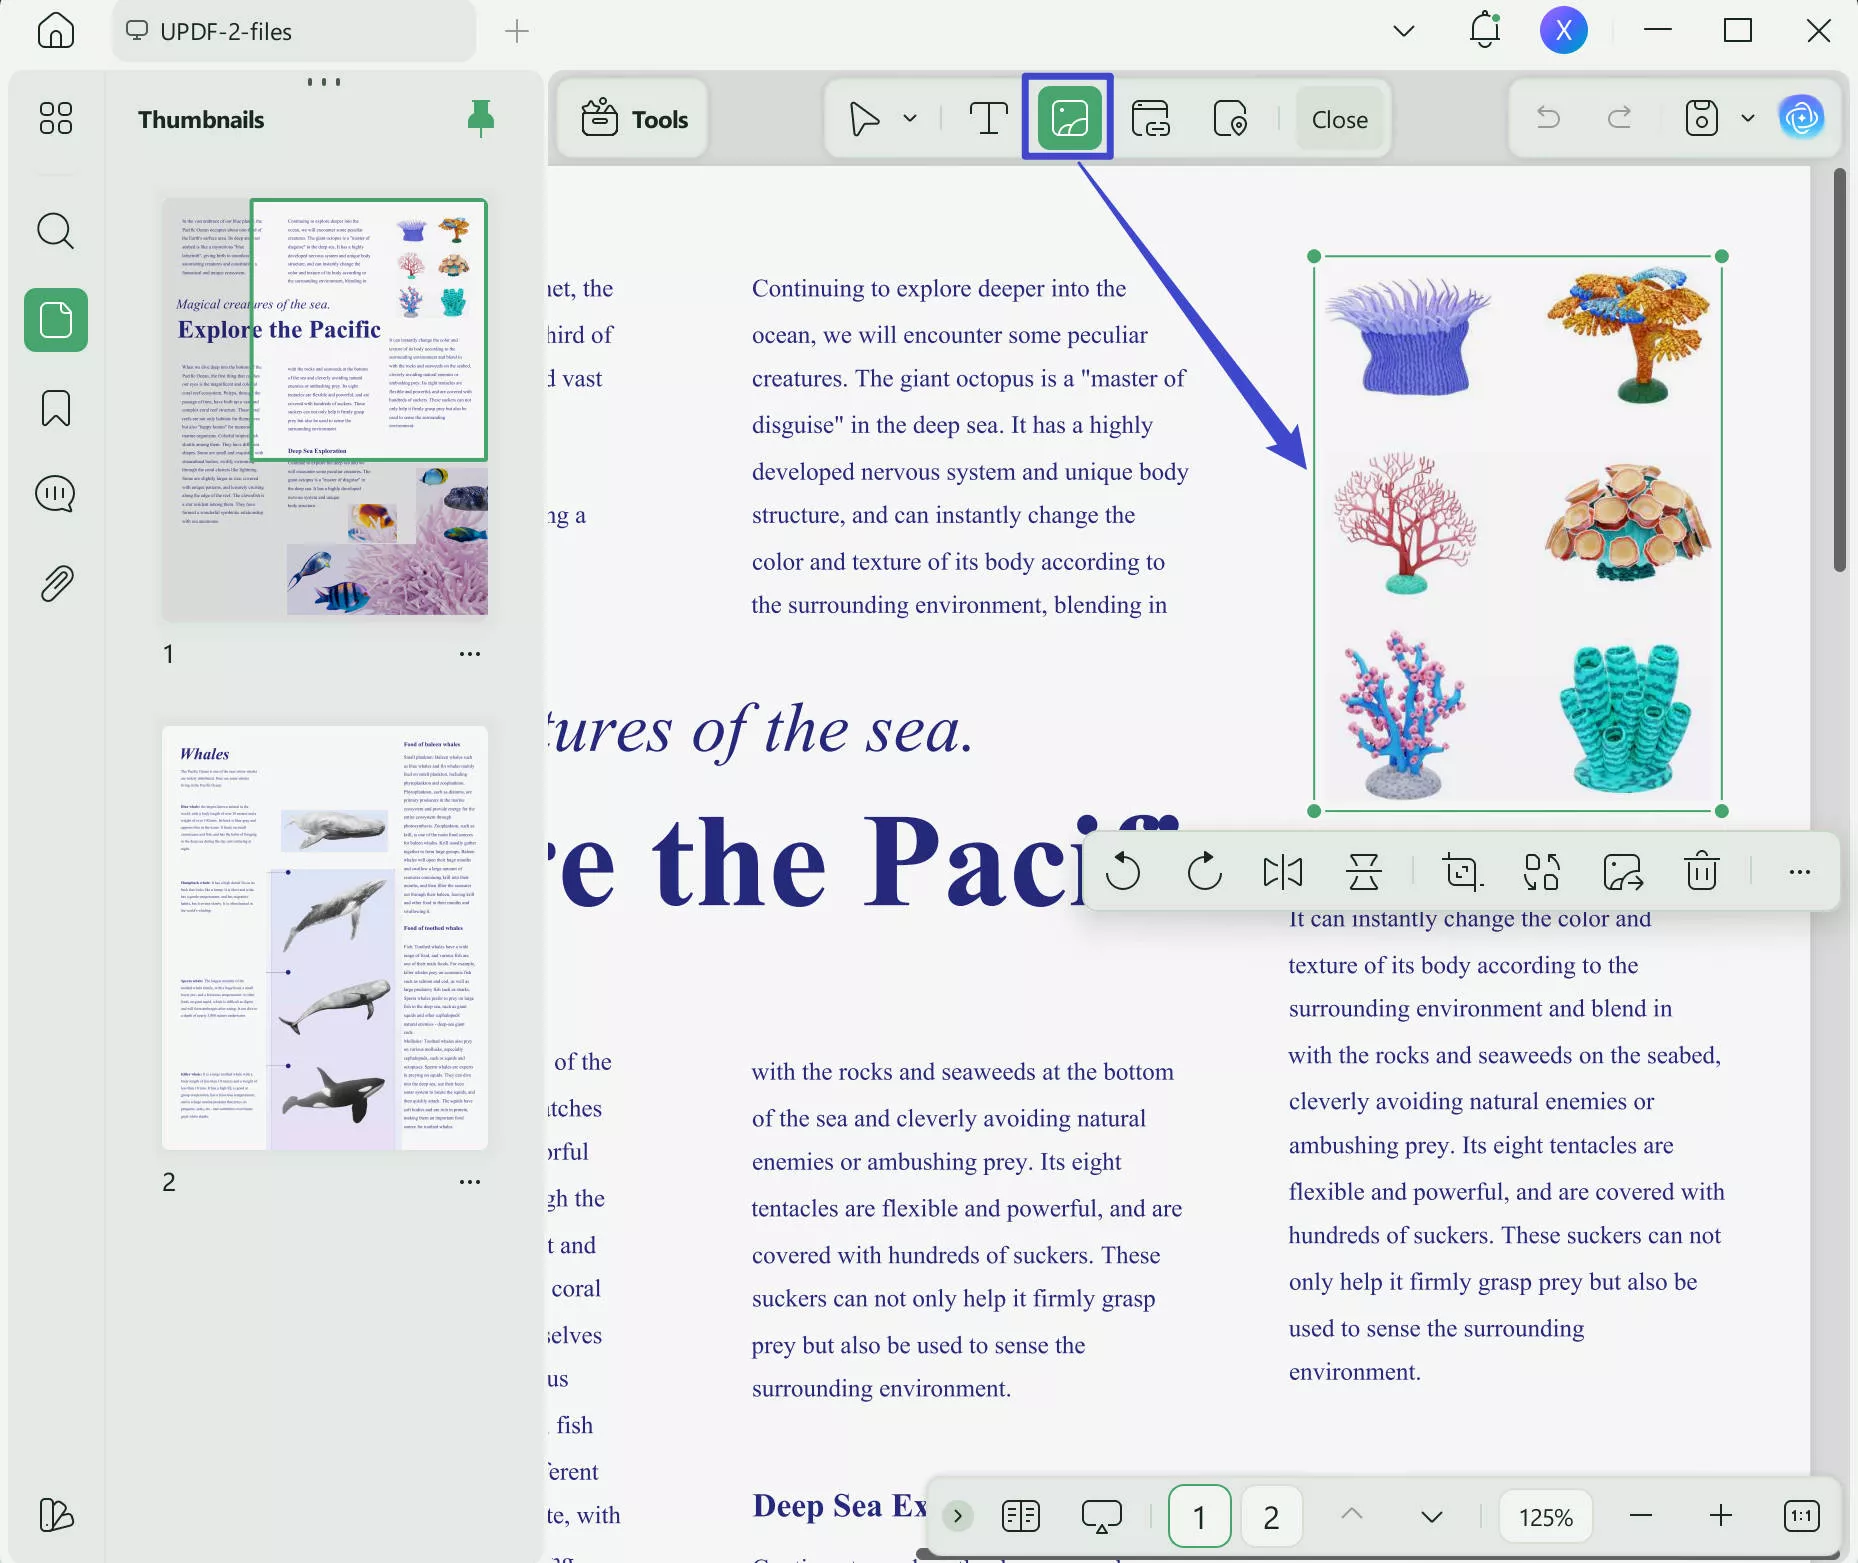
Step 5: Select "Crop Image" from the toolbar and drag the image margins to your desired dimensions. Click "OK" to apply the changes.
That's all! You have successfully cropped your PDF! Compared to InDesign, UPDF offers a user-friendly and quick PDF editing solution. Plus, it is packed with advanced tools to supercharge your document management.
Watch the video below to learn more about its capabilities and how you can benefit from them!
Final Words
That's all about how to add crop marks in InDesign! We have shared three ways to do it. You can insert, customize, export, and even remove the marks when needed.
While InDesign offers advanced options to add crop marks, it is not very accessible due to the complexity of use, large size, and a hefty price tag.
But don't worry! You can use UPDF as an easier alternative that is affordable and packed with features. Don't listen to us. Try it yourself! Download UPDF and handle your PDFs like a pro!
Windows • macOS • iOS • Android 100% secure


 Delia Meyer

 Enya Moore
 Lizzy Lozano
